fdot - asphalt roadway inspection training.pdf
TRANSCRIPT

Focus on QC & VT Technicians documenting the daily activities of the
asphalt roadway pavingPresented by
District 51

• Who are you?
• Where do you work?
• What is your role?
By: Lorie Matthews
2

CPR
onsistent
redictable
epeatable3
http://www.dot.state.fl.us/construction/CPR/CPR_Main.shtm

BII
old
nspirational
nnovative4

5
• Asphalt Roadway QC/VT ActivitiesBy: Tim Carter, Julie Brown Tim McGlone, Jeffrey Hinkle,
& Kermit Ramdial
• Break
• Asphalt in GeneralBy: Robert Parker & Joe Somlitz
• Lunch
• Asphalt Roadway Reporting ExerciseBy: Lori Jones & Karen Madrid
• Break
• Importance of AccuracyBy: John Burnette

Focus on daily activities of the Asphalt Roadway QC & VT Technicians
6
Presented By:Tim Carter, Julie Brown Tim McGlone, Jeffrey Hinkle,& Kermit Ramdial

• Before paving starts, be familiar with the following:Plans
•Plan Sheets•Typicals•Striping
Contract
Asphalt Specifications
Asphalt QC Plan
Pre-Pave Meeting Minutes7

• Have contact number for:
Paving Superintendent/Foreman
Roadway QC/VT
Plant QC/VT
QC Manager
Project Administrator
Resident Asphalt Specialist8

• Onsite Pre-Production Meetingwith QC & VT:
LET’S DISCUSS SAFETY!!
9
Identify possible hazards such as:
• Lane Closures• Taking temperatures• Side streets and driveways• Local activity• Orientation of personnel (clear zone, work zone, location of vehicles, & staff)
• Complacency• Equipment Operations (night time, lighting, and eye contact)
• Plan escape route

• Onsite Pre-Production Meetingwith QC & VT:
Prior to beginning each shift: • Meet to discuss the intended paving operations.
• Discuss any unique or special items that may need to be addressed.
• Check and compare 4 foot smart level.• Compare Thermometers
This information can also be referred to after the shift to make sure nothing was missed.
10

What are we milling for?Cross Slope CorrectionMatch Existing (Depth)
Where do we measure cross slope?Check to ensure cross slope is within Specification toleranceAfter milling machineCPR Website Item #26 Response:
Accumulating errors of milling depth and paving depth can result in cross slope that does not match existing. Physically measuring the milling and paving cross slopes (rather than depths) provides more accurate cross slope readings and better assurance "match existing" occurs.
Where do we measure for depth?Both QC & VT check depth at random locations
Compare results with targets in table 327-1
• Monitor Milling Operation (327):
11

• Review the Typical Section Sheets
12
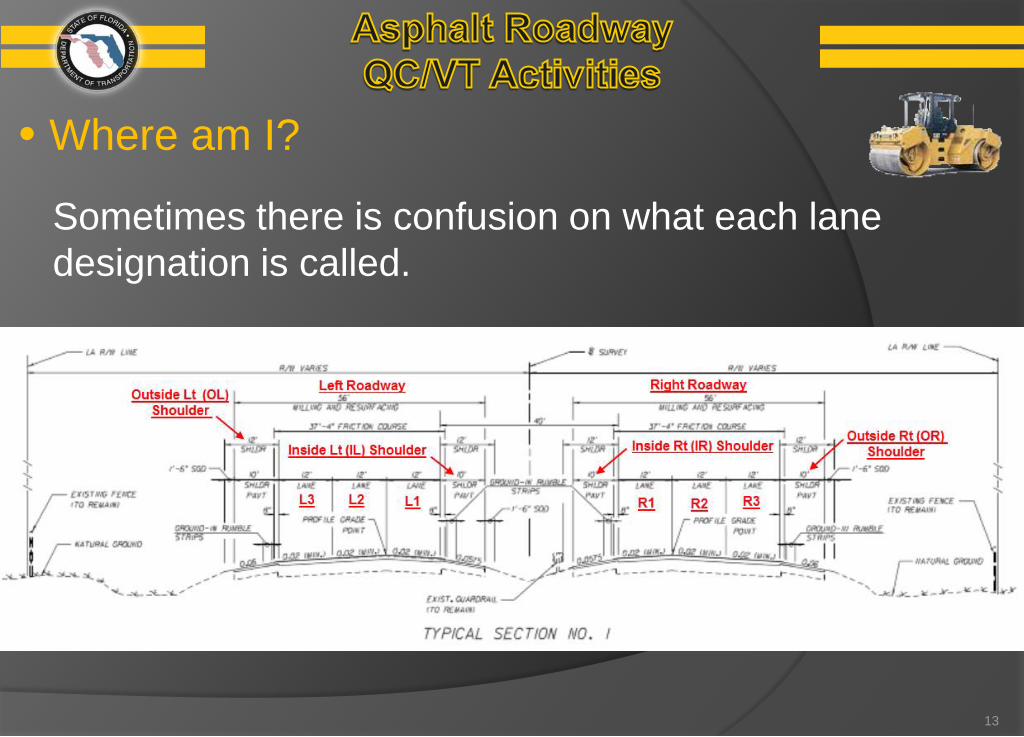
• Where am I?
Sometimes there is confusion on what each lane designation is called.
13

• Where are you on these plans?
1.______________________ 2.________________________
3.______________________ 4.________________________
5.______________________ 6.________________________
7.______________________ 8.________________________ 14
7
3
4
6
5
8
2
1

• What to look for on a Mix Design
15
ContinueXX-XXXX
Structural12.5

• What to look for on a Mix Design
16

• How to Calculate Spread Rate from the Mix Design
17
Continue

• How to Calculate Spread Rate from the Mix Design
18

• QC Roadway Report
Form #675-030-20AAutomated Version
19

• QC Roadway ReportLatest Version Excel 2007
20

• What are the Tabs at the Bottom?
1. This is where the line entries are placed. You will spend most of your time here. This will be covered in detail in just a few moments.
2. Tack spread rate information goes here. How many spread rates are required per day? 300-8.4 Rate of Application
3. If you get lost, there are handy instructions for you. If you have any questions about this form, contact your QC Manager or the Local Resident Asphalt Specialist.
21
1 2 3

• The Basics
12 3 4
5
7 6
1. This is where you place the 11 digit project number (hyphens not required).2. This is where the QC technician would place his TIN # (Driver License). If there is more than
one QC technician working on a project, we will show you later how to designate different QC Technicians.
3. This is your intended lot size. Depending on what type of mix, age of mix 334-5.1.2 is what your lot size will be. There are two options, 2000 or 4000 tons. Remember FC-5 can only have 2000 ton lots 337-6.2.1 paragraph 3.
4. This is where the design mix information goes. When you click on this box, another sub-form appears for you to fill in the appropriate information (Gmm).
5. Is this a static mode lot. You cannot mix a static mode lot/area with a non-static lot.6. This is a drop down box that you can select your lot. Remember each design mix gets a new
lot number7. This is the box that is to be checked when the lot closes. A lot will close for any of the
following reasons:a. Time expired (30 calendar days) d. Change in design mixb. Intended lot size met e. Plant changec. Lot termination due to a failure f. Project over!!!
22

• Asphalt Placement Tracking1
2
3 4 5 6 7 8 9 10
1. Constant Width Area. This is mainline, shoulder, ramps, bike paths, bike lanes. Anywhere the width does not change.
2. Varied Width Areas. This is gore areas, turnouts, radius.3. #. This is where you place a number to put a note for additional information. If there happens to be more
than one QC Technician during a lot of paving, this is where the different TIN numbers will be listed.4. Date Paved. If you have night paving, the date paved will stay the same even if you run past midnight5. Day or Night. If you have 24 hour shifts, it is critical this be filled out so the correct delivery tickets can be
compared with the correct paving shift.6. Sublot. There are 4 sublots per lot. The sublot size is either 500 tons or 1000 tons. See Spec. 334-5.1.2. 7. Truck Load #’s. Record trucks in the order of load placement.8. Intended Use. A drop down box appears. Fill in required information. What is the difference between No
Pay Tonnage and Waste? Waste leaves the job….. No Pay Tonnage stays on the job, i.e., temporary asphalt, corrections.
9. Density. Is Density required in this area? See Spec. 334-5.1.1.210. Lane. Drop Down Box.
23

• Asphalt Placement Tracking (cont.)
11 12 13 14 15 16
11. Description. This is NOT a drop down box. You will need to put some kind of description in here, i.e., Mainline, Street name, radius.
12. Lift # of #. This is where you put what lift you are on and how many lifts are planned for in the plans.13. Start Paving at Station. This is where you place the station number where the spread rate check begins.
Unfortunately all mile post projects need to be converted to station numbers. How many station boards are required on a project? See Spec. 5-7.4
14. End Paving at Station. This is where you place the station number where the spread rate check ends.15. Length. The computer automatically fills this in for you based off your beginning and ending station
numbers.16. Width. The QC Technician fills in the width of the paving pass. Under the “Varied” width section, place the
average width in here.17. Area Paved (SY). The computer automatically fills this in for you.18. Quantity (TN). The QC Technician fills in this field. What is the maximum that can be placed here? See
Spec 330-2.2.
17 18
24

• Asphalt Placement Tracking (cont.)
19 20 21 22 23
19. Individual Lift Thickness. QC Technician fills in this information.20. Actual Spread Rate. The Excel sheet calculates this field for you.21. Target Spread Rate. The Excel sheet calculates this field for you.22. Base Only (Total Thickness). The QC Technician fills this field in.23. Base Only (Prorated Base) The Excel sheet calculates this field for you. Remember to pick the correct
Base type under Intended Use.
Now we have finished the spread rate calculations. But, we have another area to fill in if needed.
25

• Comments Section and Totals
1
1. The Comments Section. This is a sample from another project where comments were placed. In this section the QC Technician would give explanations of anything out of the ordinary, i.e., if a different QC Technician was covering the project, asphalt in lieu of stabilized sub grade, explanation why spread rates are too high or too low, multiple crews, what happened to a missing load or trucks out of order. 26
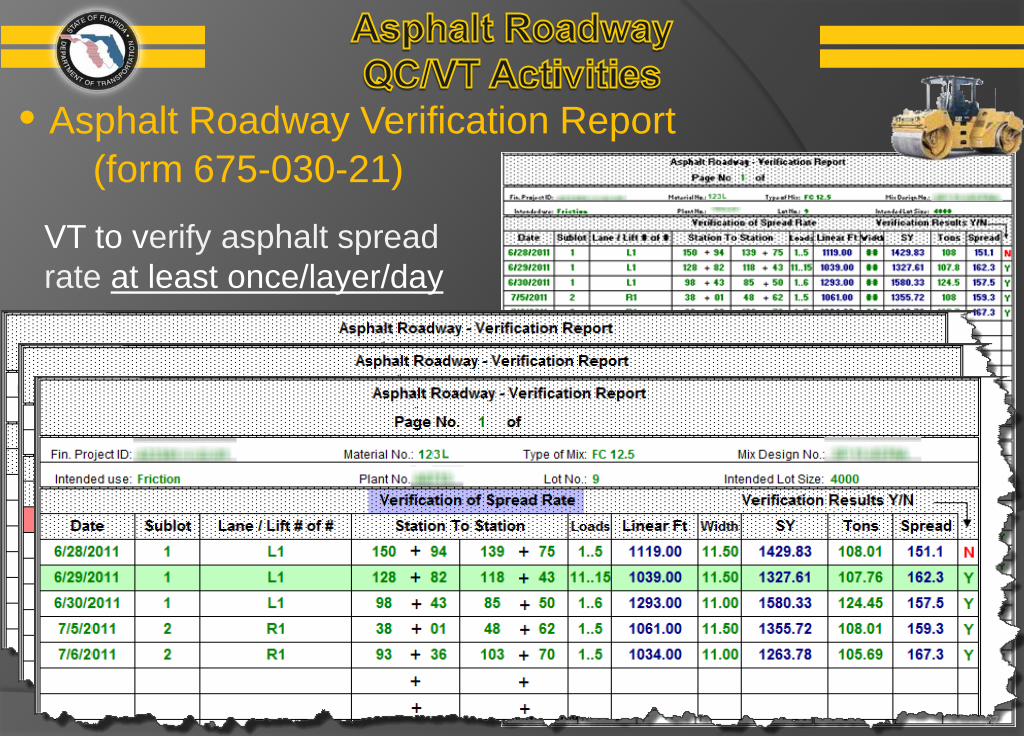
• Asphalt Roadway Verification Report(form 675-030-21)
VT to verify asphalt spread rate at least once/layer/day
27

• Asphalt Roadway Temperature
28
Continue
Roadway QC is to record asphalt temperature for the first five loads and one out of every five loads thereafter onto the delivery ticket (Specification 330)
Company NameAddress
Phone Number
######i5201#####

VT to verify asphalt temperature at least
twice/day(CPAM 5.10)
29
• Asphalt Roadway Temperature

• QC Tack Spread Rate Information
30
QC to check and record the tack spread rate at least twice/day (Specification 300)
Continue

• VT Tack Spread Rate Information
VT to verify tack spread rateat least once/day
(CPAM 5.10)
31

• Why is Tack Important?Too Little
Too Much
32
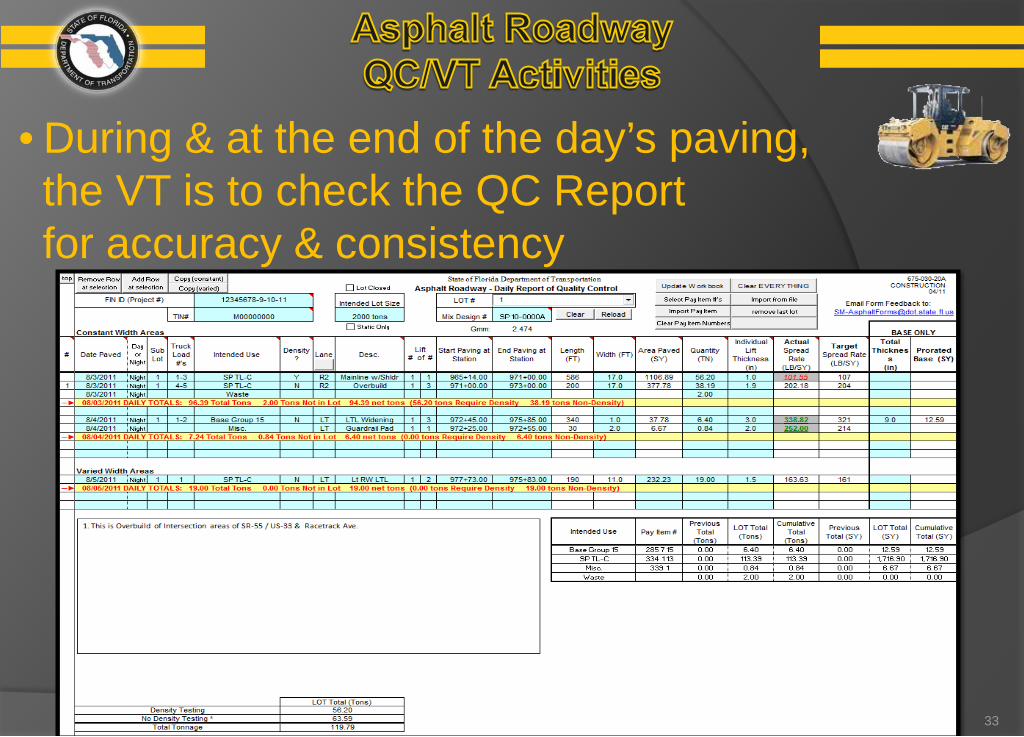
• During & at the end of the day’s paving, the VT is to check the QC Report for accuracy & consistency
33

1. Is the tack uniform, has correct spread rate, and has it broken (turns from brown to black)?
2. When unloading, the trucks should not bump the paver
3. Is the paving operation continuously moving with a sufficient supply of trucks?
4. Is straightedge on jobsite and calibrated daily?
• Observe the following during paving:
Continue34
• Observe the following during paving:
35
5. Are the transverse and longitudinal joints being rolled correctly?
6. Is the proper rolling pattern and procedure being followed?
7. Is safe and efficient traffic control being maintained?
8. Is the spread rate being monitored as required by Specification 330 (QC) and CPAM 5.10 (VT)?
9. Is the cross slope being checked regularly?Continue

Is the paving operations in compliance with the QC Plan?
If non-compliance
If non-compliance not corrected in the same day’s operation
PA has option to pull that portion of QC Plan that is in non-compliance
Notify QC Managerand/or PA
Notify PA
36
• Observe the following during paving:
Continue

Is the paving operations in compliance with the QA/QC Guide List?
37
FDOT-Construction-QA/QC Guide List: http://www.dot.state.fl.us/construction/CONSTADM/guidelist/GuideIndex.shtm
• Observe the following during paving:

1. Straightedge
2. VT to layout cores for the QC and IV immediately after finish roller (use template for laying out core locations).
3. VT to secure random numbers when not being used.
4. Are the cores being cut where marked?
5. Check and verify cross slope
• Observe the following after paving:
38

Questions
39

Focus on the Do’s and Don’ts of paving.
Prepared By:Robert Parker & Joe Somlitz
40

41
• Who is the “Engineer”CPR Website Item #16 Response: Per Specification 1-3 Definitions, the Engineer is, "The Director, Office of Construction, acting directly or through duly authorized representatives; such representatives acting within the scope of duties and authority assigned to them."
In practice, it depends on the issue involved and who has been delegated authority to make the decision. This is done in order to avoid requiring the Director of the Office of Construction make every decision on every project. Decisions are delegated to the appropriate personnel. This allows project decisions to be made at the lowest possible level in an efficient timeframe. However, if agreement cannot be reached at any level, the contractor is afforded the ability to raise the issue up the ladder within the District or State Offices. This system allows more efficient decision making to occur at the project level, and also affords alternatives to address major decisions and disagreements at higher levels within the Department.

• Paving Operations – Do’s
42

43
1. For paving operations, keep a qualified CTQP Asphalt Paving Level II technician on the roadway at all times when placing asphalt mix for the Department, and perform all testing with a CTQP Asphalt Paving Level I technician. As an exception, measurements of cross-slope, temperature and yield (spread rate), as well as the inspection of the placement of miscellaneous asphalt, can be performed by someone under the supervision of a CTQP Paving Level II technician.
Continue
• Paving Operations – Do’s

44
2. Construct a smooth pavement with good surface texture and the proper cross-slope.
3. Look at the plans and plan your work (before you pave) so that everyone knows what you are paving.
4. Place the mix only when the surface has been previously prepared, is intact, firm, properly cured, clean, and dry.
Continue
• Paving Operations – Do’s

45
5. Place the mix only when the air temp is at least 40 degrees F for layers greater than 1 inch and at least 45 degrees for layers 1 inch or less.
6. Minimum temp for leveling courses with a spread rate of 50 lb/sy or less is 50 degrees F.
7. Provide sufficient lighting for night operations.
8. Provide a Level 2 Roadway Verification Technician and Level 2 Roadway Quality Control Technician.
Continue
• Paving Operations – Do’s

46
9. Record truck loads in the order of load placement.
10.Report all sub-lots to even 500 or 1000 ton increments.
11.Record the ending station of the paving operation at the location of the saw cut butt joint for the next night’s starting station. The QC & VT are to agree upon the ending and starting station.
Continue
• Paving Operations – Do’s

47
12.Use the manual straight-edge to locate the flattest section at the end of the paving operation to mark the saw-cut.
13.Show varied width areas (not included in the mainline) on QC Roadway Report on section marked “Varied Width Areas”.
14.Make sure there is a reference line to follow for the paver.
Continue
• Paving Operations – Do’s

48
15.Think about and look ahead where the layer joints are going to fall. They are to be offset 6” to 12” of each other in reference to the lane line.
16.Use electronic screed controls.
17.QC & VT are to agree on the tons when paver picks up from pull.
18.QC & VT should be in communication with each other in regards to Sub-Lots (starting and ending stations) during the paving operation. Continue
• Paving Operations – Do’s

49
19.Check the temperature of the first 5 loads and one out of the next 5 loads minimum.
20.All reports need to be reflective of what was actually placed on the roadway. (Not average out at end of shift)
21.Report placed lift thickness.
22.Maintain a continuous paving operation per Specification Section 330.
• Paving Operations – Do’s

• Paving Operations – Don’ts
50

51
1. Transport mix to the roadway unless all weather conditions are suitable for the laying operations.
2. Place friction course until the adjacent shoulder has been dressed and grassed.
3. Spread the mix when the wind is blowing so proper compaction cannot be maintained or sand and dust on the surface diminish the bond.
Continue
• Paving Operations – Don’ts

52
4. Place the mix while rain is falling or there is water on the surface to be covered.
5. Place mix with a temp that is outside of the master range.
6. Mix up the truck load order on QC Roadway Report (make a note on the report of the actual order but try to keep the truck in order).
7. Get the paver too far ahead of the rollers; this will just cause problems with densities.
Continue
• Paving Operations – Don’ts

53
8. Roll the mix while it’s too hot (in the tender zone).
9. Let trucks dump out in-front of the paver. Have an area for them to clean out.
10.Make entries of pulls over 200 tons on a single line of the Roadway Report.
• Paving Operations – Don’ts

• Overbuild
54
1. Record all overbuild as a separate line item on the QC Roadway Report .
2. Record correct lane number, starting and ending station numbers, width, lift number, and average lift thickness.

• Bike Lanes vs. Bike Paths
55
1. Bike Lanes are adjacent/connected to mainline lanes. These lanes are or could be subjected to traffic, therefore they are eligible for density testing and straightedging.
2. Bike Paths are separate pathways physically separated from mainline pavement. Since they experience very little (if any) vehicular traffic, density testing is not required. Bike paths are exempt straightedge requirements unless a surface irregularity is determined to be objectionable.
3. Report both areas on QC Roadway Report.
Continue

• Bike Lane
56
Continue

• Bike Path
57

• Density Reporting
58
It is very important for the QC to correctly note which areas are density or non-density on QC Roadway Report.

• Density Coring
59
1. Obtain five 6 inch diameter roadway cores within 24 hours of placement at random locations as directed by the Engineer within each sublot. In situations where it is impractical to cut five cores per sublot, obtain a minimum of three cores per sublot at random locations as identified by the Engineer (VT to layout and mark core locations).
2. Do not obtain cores any closer than 12 inches from an unsupported edge.
3. Patch the core holes within three days of coring.
Continue

• Density Coring
60
4. Compact the end of the mat with the same effort as the beginning of the mat. (Note: A core location can fall at the end of a day’s production within 12” of the stopping point.)
5. The VT is to layout the IV core locations and they are independent from QC core locations.
6. Cut core at exact location marked on pavement (must be within the paint area).
Continue

• Density Coring Exceptions
61
1. When the total combined quantity of hot mix asphalt for the project, as indicated in the plans for Type SP and Type FC mixtures only, is less than 2000 tons, the Engineer will accept the mix on the basis of visual inspection.
2. Density testing for acceptance will not be performed on widening strips or shoulders with a width of 5 feet or less, open-graded friction courses, variable thickness overbuild courses, leveling courses, any asphalt layer placed on subgrade (regardless of type), miscellaneous asphalt pavement, bike/shared use paths, crossovers, or any course with a specified thickness less than 1 inch or a specified spread rate that converts to less than 1 inch. Continue

• Density Coring Exceptions
62
3. Density testing for acceptance will not be performed on asphalt courses placed on bridge decks or approach slabs; compact these courses in static mode only.
4. Density testing for acceptance will not be performed on the following areas when they are less than 1,000 feet (continuous) in length: turning lanes, acceleration lanes, deceleration lanes, shoulders, parallel parking lanes or ramps.
Continue

• Density Coring Exceptions
63
5. Density testing for acceptance will not be performed in intersections. The limits of the intersection will be from stop bar to stop bar for both the mainline and side streets. A random core location that occurs within the intersection shall be moved forward or backward from the intersection at the direction of the Engineer (Specification 334-5).
Continue

• Density Cores Intersection Exception Areas
64
Continue

65
• Density Cores

• Misc Asphalt
66

• Cross Slope Checks
67

• Straightedge
68
1. Final Type SP structural and friction course layers, pavement lanes, and ramps with constant width to 3/16 inch.
2. Exceptions (Spec. 330-9): a. Shoulders, intersections, tapers, crossovers, parking
lots and similar areas. b. Areas less than 250 LF as in turn lanes, acceleration &
deceleration lanes and side-streets. c. Any area in the exceptions that is objectionable in
excess of 3/8 inch.Continue
• Straightedge
69
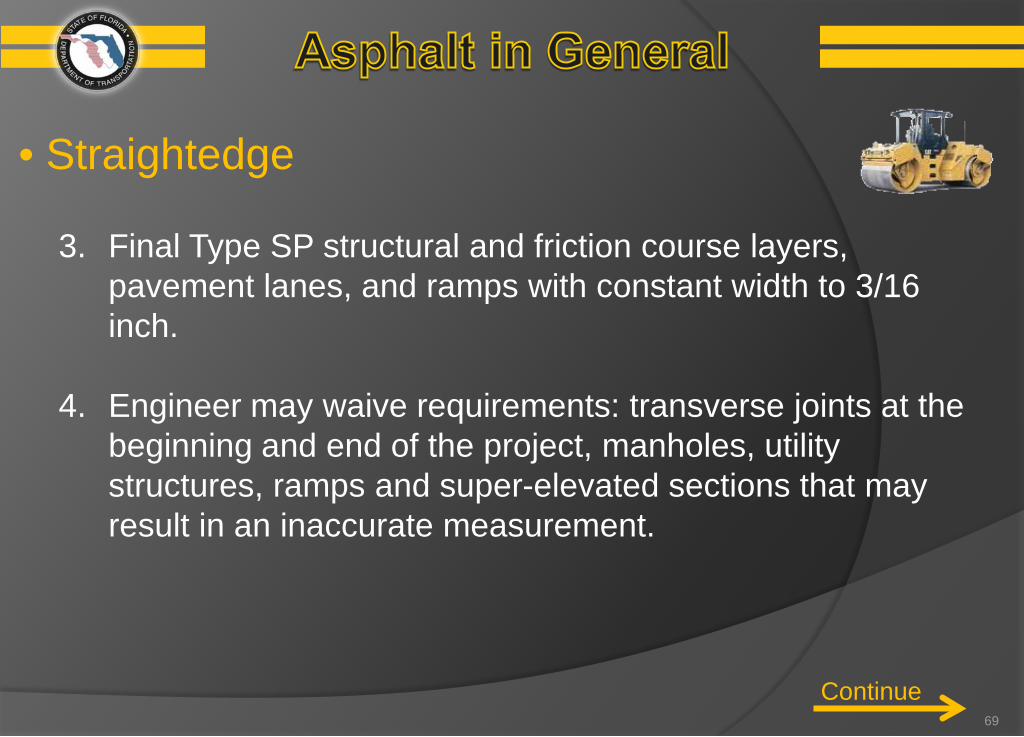
3. Final Type SP structural and friction course layers, pavement lanes, and ramps with constant width to 3/16 inch.
4. Engineer may waive requirements: transverse joints at the beginning and end of the project, manholes, utility structures, ramps and super-elevated sections that may result in an inaccurate measurement.
Continue
• Straightedge
70
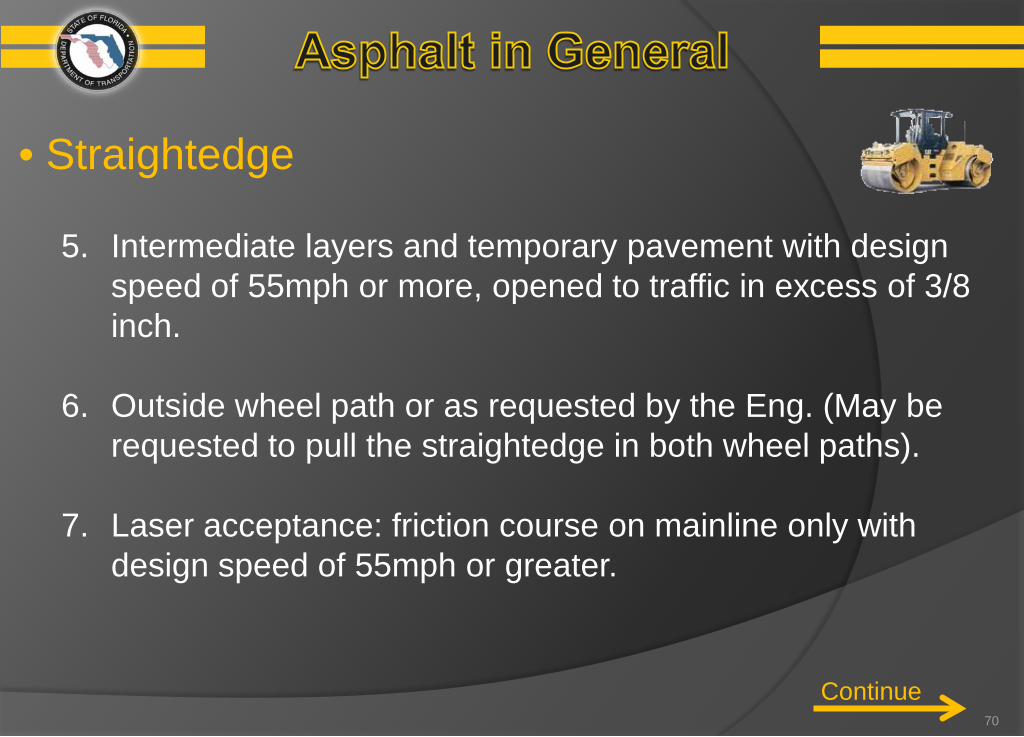
5. Intermediate layers and temporary pavement with design speed of 55mph or more, opened to traffic in excess of 3/8 inch.
6. Outside wheel path or as requested by the Eng. (May be requested to pull the straightedge in both wheel paths).
7. Laser acceptance: friction course on mainline only with design speed of 55mph or greater.
Continue

• StraightedgeException Areas
71
Continue

72
• StraightedgeException Areas
Continue

• Straightedge
73
Continue
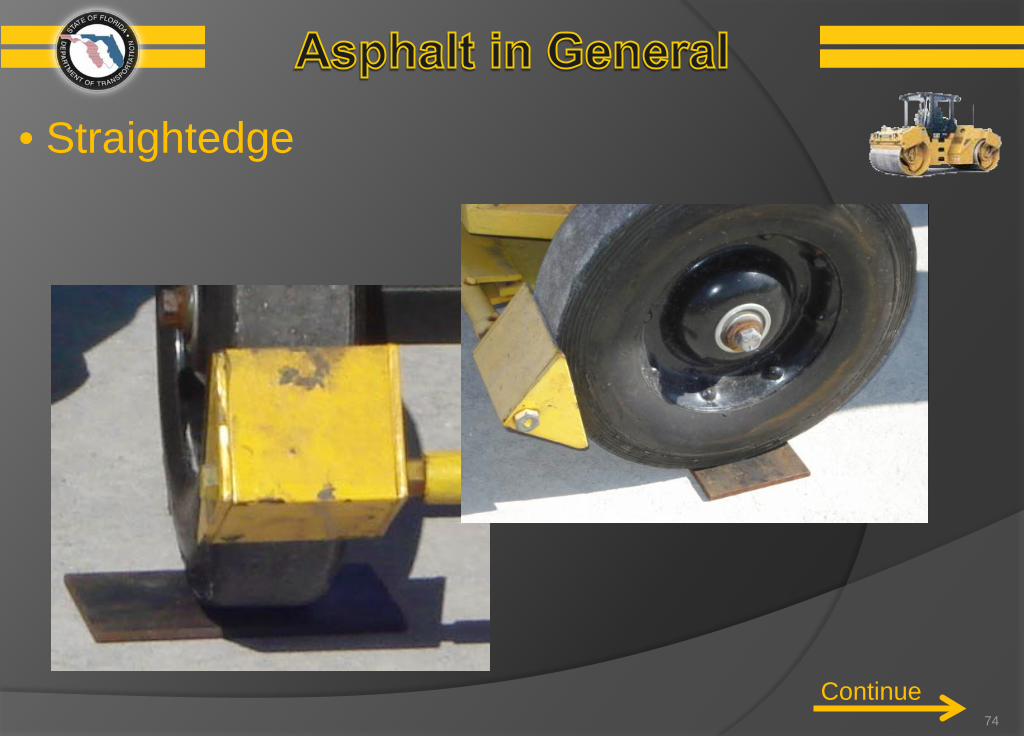
• Straightedge
74
Continue

• Straightedge
75

Questions
76

Focus on completing a QC Road Report
Prepared By:Lori Jones & Karen Madrid
77

78
• QC Roadway Report

CPR
onsistent
redictable
epeatable
• Objectives:
79

• Goals for Exercise:
Truck Load #’s Density? Lane / Description Lifts Stations Widths Overbuild
80

Typical Section
Plan Sheets
Striping Sheets
81
• Tools:

• Paving Operations: 9-6-2011 (Day 1): Lift 1 / 2 widening only
1. Outside Left Roadway at Sta. 1330+00 paving west continuing to Sta. 1324+402. Outside Right Roadway at Sta. 1324+40 paving east continuing to Sta. 1332+39
• Do not include the side street radius3. Inside Left Roadway at Sta. 1330+00 paving west continuing to Sta. 1324+40
• Do not include the crossovers4. Inside Right Roadway at Sta. 1324+40 paving east continuing to Sta. 1328+71
• Include the crossovers
9-7-2011 (Day 2): Lift 1 / 2 and 2 / 2 widening only and overbuild
1. Inside Right Roadway from 9-6-2011 end of day, paving east to Sta. 1332+28
2. Inside Right Roadway at Sta. 1330+00 paving east continuing to Sta. 1332+28
3. Outside Right Roadway at Sta. 1330+00 paving east continuing to 1332+39
4. Place overbuild between Sta. 1330+00 paving east continuing to 1332+3982

• Check List for Future Paving
Truck Load #’s Density? Lane / Description Lifts Stations Widths Overbuild GMM
83
CPR
onsistent
redictable
epeatable84
• Objectives:

Questions
85

Focus on the importance of reporting asphalt activities accurately
Prepared By:John Burnette
86

• Why Is Accuracy Important For Final Estimates?
CPF
DDM Remove/Replace specify in road report
Square Yards
Pay Item/Lump Sum Stacking
Importance of Accuracy (penalties, As-Builts)87

CPF’s and the Affect of How the Road Report is Filled Out.
88

• Non-Density Tonnage Affect on CPF
89
Continue

90
• Non-Density Tonnage Affect on CPF
Continue

91
• Non-Density Tonnage Affect on CPF
Continue

92
• Non-Density Tonnage Affect on CPF
Continue

93
• Non-Density Tonnage Affect on CPF
Continue

94
• Non-Density Tonnage Affect on CPF
Continue

95
• Non-Density Tonnage Affect on CPF
Continue
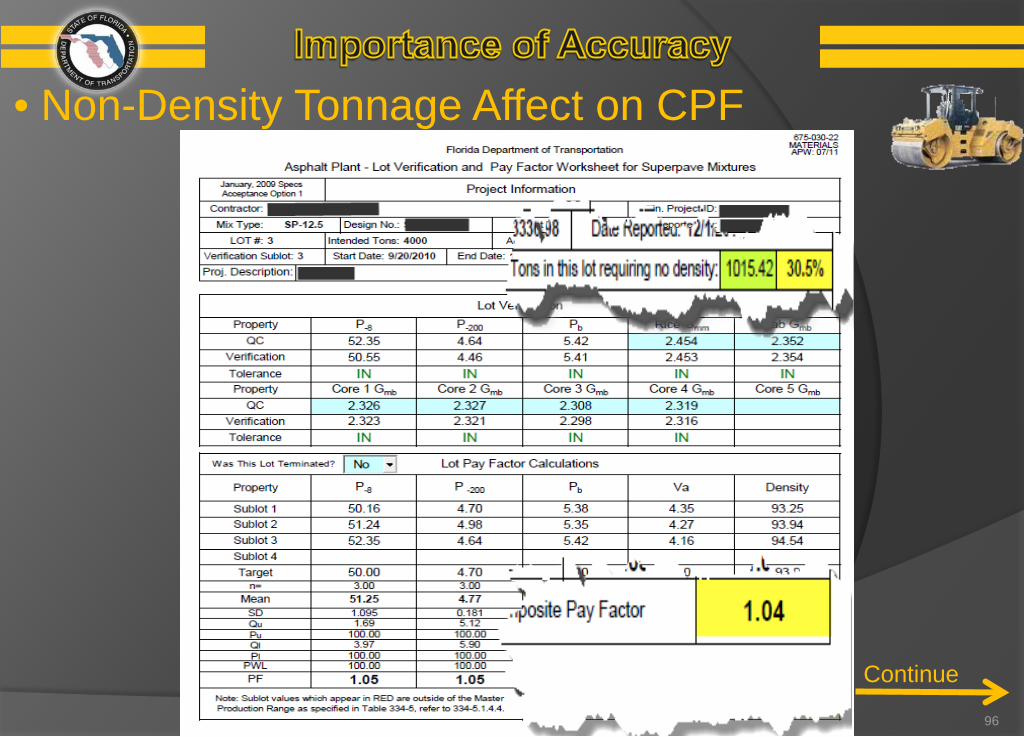
96
• Non-Density Tonnage Affect on CPF
Continue

97
• Non-Density Tonnage Affect on CPF
3330.98 Tons x 1.05 = 3497.50 Tons3497.50 – 3330.98 = 166.52 Tons166.5 Tons x $73.75 = $12,279.38
3330.98 Tons x 1.04 = 3464.22 Tons3464.22 – 3330.98 = 133.24 Tons133.2 Tons x $73.75 = $9,823.50
$12,279.38 - $9,823.50 =

98
• Non-Density Tonnage Affect on CPF
Continue

99
• Non-Density Tonnage Affect on CPF
Continue

100
• Non-Density Tonnage Affect on CPF
Continue

101
• Non-Density Tonnage Affect on CPF
Continue

102
• Non-Density Tonnage Affect on CPF
Continue

103
• Non-Density Tonnage Affect on CPF
Continue

104
• Non-Density Tonnage Affect on CPF
$90.00 x 0.05 = -$4.501,351.7 Tons x -$4.50 = -$6,082.65
$90.00 x 0.04 = -$3.601,351.7 Tons x -$3.60 = -$4,866.12
$6,082.65 - $4,866.12 =

105
DDM Remove and Replace

106
• DDM Remove and Replace
Continue

• DDM Remove and Replace
107
Continue

108
• DDM Remove and Replace
Continue

• DDM Remove and Replace
109
Continue

110
• DDM Remove and Replace
Continue

• DDM Remove and Replace
111
Continue

112
• DDM Remove and Replace
Stations on the Replacement Asphalt Need to Match the Stations on the DDM.
Tonnage that Replaced the Asphalt that was Removed, Needs to be Taken Away from the Original Lot that the DDM was Assessed Against.

113
Square Yards

114
• Why is it so Important to have Good Square Yards on the Road Report? Asphalt Base is a Square Yard Pay Item, and the Square Yards
from the Road Report’s are used for each Lot’s CPF.
The Maximum Deficiency for Asphalt Base of 2 ½ “ or More is 50 Lbs./SY., so your Square Yards being incorrect could require Removal and Replacement or Coring for Thickness.
Good Square Yards are needed to make sure the spread rate for base stays within 5% of Target. Per Specs it is not allowed to pay for any tonnage over 5% of the Target Spread Rate.
On Lump Sum Projects, Good Square Yards are needed to make sure the spread rate stays within 5% of Target. Per Specs, if the Spread for the Sub-Lot is Shy by more than 5%, the layers of Asphalt will have to be stacked in the Area that is Shy to determine if a Penalty is to be assessed.

115
Lump Sum/Stacking

116
• Lump Sum/Stacking
Continue

117
• Lump Sum/Stacking
Continue

118
• Lump Sum - Target Spread Rate Example Sta. 125 +00 – STA. 200+00 = 7,500 Ft. (7,500 Ft X 12 Ft) ÷9 = 10,000 SY Deficient Area deficient = 495 – 465 = 30 #/SY (10,000 SY X 30 #/SY) ÷ 2000 #/Ton = 150 Tons Per Specifications: reduction in pay will be determined per sublot by
applying a proportional reduction in payment based on a ratio of the avg. spread rate to the design spread rate, and the ratio will be applied to the unit price shown in Table-9-1.
465 / 495 = 0.94 0.94 X $ 46.59 = $ 43.79 $43.79 X 150 Tons = This will be
entered as a negative line item adjustmentContinue

119
• Penalties & As-Builts
Accuracy of Stations for Begin, End, Equations & Exceptions on the Road Reports are Important because the Department can not pay for Quantities off of the Project.
Widths need to be Documented Correctly so that any Straightedge Penalty can be Assessed Correctly.
Lanes and Lifts Need to be Accurate in Case of Shy Areas or DDM’s for Remove and Replacement or Leave in Place at No Pay.
Continue

120
• As-Builts

Questions
121

Exercise Answers
122

• Tools: Typical Section
Widening Areas Outside Lanes 11’ (R3/L3 = 7’ and Bike Lane = *4’) Inside Lanes 5’
Plan Sheets Shows where the widening is
Striping Sheets Lane designation Bike Lane = *5’ (at Sta. 1328+50 to 1332+00+/-)
123

• ANSWERS: Day 1 – 1
124

• ANSWERS: Day 1 – 2a
125

• ANSWERS: Day 1 – 2b
126

• ANSWERS: Day 1 – 2c
127

• ANSWERS: Day 1 – 3a
128

• ANSWERS: Day 1 – 3b
129

• ANSWERS: Day 1 – 4a
130

• ANSWERS: Day 1 – 4b
131

• ANSWERS: Day 1 – 4c
132

• ANSWERS: Day 2 – 1
133

• ANSWERS: Day 2 – 2
134

• ANSWERS: Day 2 – 3
135

• ANSWERS: Day 2 – 4
136