federated authentication in a windows azure web … · web viewhow to externalize authentication...
TRANSCRIPT

Hands-On LabFederated Authentication in a Windows Azure Web Role Application Lab version: 2.0.0
Last updated: 5/9/2023
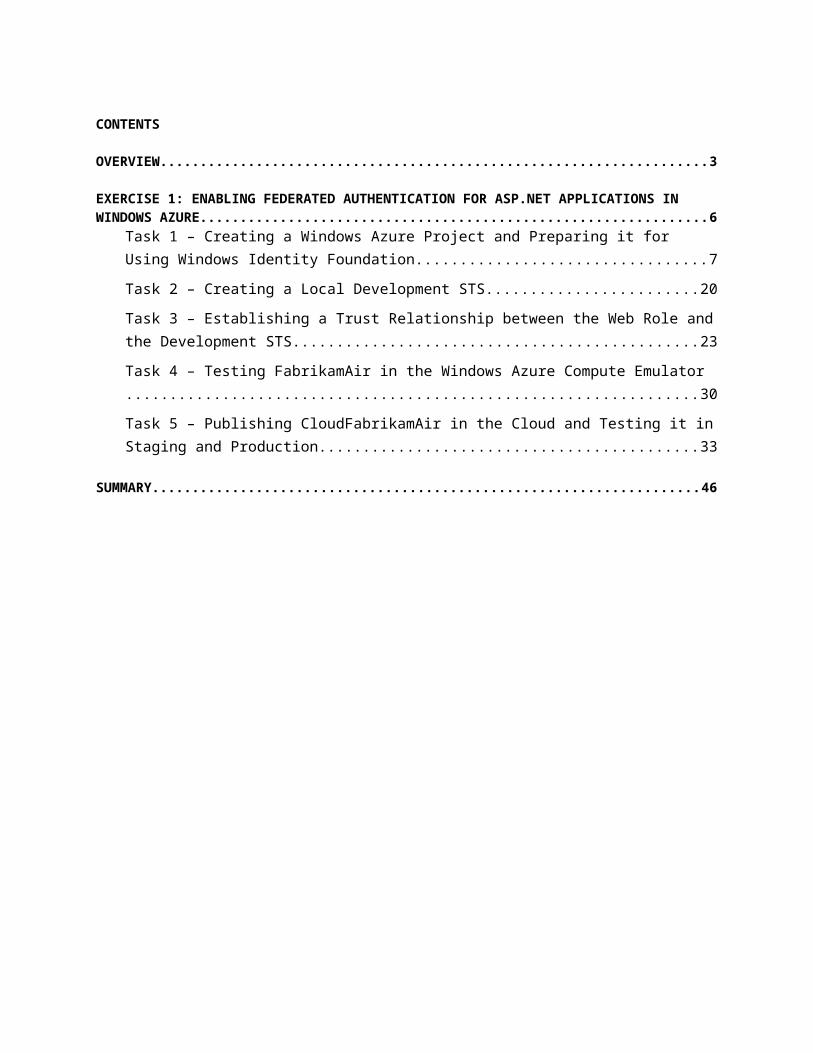
CONTENTS
OVERVIEW................................................................................................................................................. 3
EXERCISE 1: ENABLING FEDERATED AUTHENTICATION FOR ASP.NET APPLICATIONS IN WINDOWS AZURE..................................................................................................................................... 6
Task 1 – Creating a Windows Azure Project and Preparing it for Using Windows Identity Foundation.............................................................................................................................................................7
Task 2 – Creating a Local Development STS.......................................................................................20
Task 3 – Establishing a Trust Relationship between the Web Role and the Development STS..........23
Task 4 – Testing FabrikamAir in the Windows Azure Compute Emulator..........................................30
Task 5 – Publishing CloudFabrikamAir in the Cloud and Testing it in Staging and Production...........33
SUMMARY................................................................................................................................................ 46
Overview
This hands-on lab provides step-by-step guides for hosting in Windows Azure (WAZ) a Web application accepting identities from an external identity provider: with the authentication functions being performed by an external identity provider, you are now free to focus on the business function of your application instead of worrying of low level details. As you will learn while you go through the lab, this is easily accomplished by taking advantage of Windows Identity Foundation (WIF), formerly known as Geneva, for enhancing your web site or web service.
The text gives very concrete indications, and it is optimized for minimizing the number of steps that are necessary for getting up and running with the minimal scenario. We will occasionally add notes in the text to explain choices rationales and indicate alternatives for the reader who is interested in understanding how the solution works or wants to explore more advanced scenarios: if all you are interested in is getting the basic scenario up and running, you can safely skip those notes as you follow the lab instructions.
Essential Introduction to Windows Identity Foundation for Windows Azure developers
Windows® Identity Foundation (WIF) is a developer framework which enhances the .NET Framework with advanced identity capabilities. Based on the concept of Claims Based access, WIF offers a series of classes that, while integrating seamlessly with the traditional .NET identity object model, gives developers control over every aspect of authentication, authorization and identity-driven application behavior. WIF point & click tooling and tight Visual Studio integration make very easy to externalize authentication to a federated partner, so that a developer can configure an ASP.NET application or a WCF service to rely on external entities for identity management. WIF allows application access using open protocols and standards, while hiding the complexity of the security plumbing behind a handy programming model. WIF will work with applications written with the .NET Framework 3.5 SP2 or higher.
You can find further information at http://www.microsoft.com/wif.
Essential Introduction to Windows Azure for Windows Identity Foundation developers
Windows® Azure is a cloud services operating system that serves as the development, service hosting and service management environment of either consumer Web or enterprise scenarios. Windows Azure provides developers with on-demand compute and storage to host, scale, and manages Web applications on the Internet through Microsoft® data centers.
Windows Azure offers a set of Visual Studio templates that can be used to develop ASP.NET applications or worker services destined to be deployed in the cloud. The Windows Azure Tool for Visual Studio includes the Windows Azure compute emulator, a hosting environment that can be used for local simulation of execution in the fabric. The Windows Azure compute emulator gives you the chance to experiment with multiple concurrent instances and other cloud features without the need to be online, while still being able to use your familiar debugging and development tools.
Windows Azure applications can be packaged via Visual Studio or command-line tooling, and then deployed in the cloud via the Windows Azure management portal.
You can find further information at http://www.microsoft.com/azure/windowsazure.mspx in order to able to deploy your project.
Objectives
In this hands-on lab, you will learn how to:
Create a simple ASP.NET web site in a Windows Azure Web Role project, and configure it to rely on an external federated entity for authentication. The federated partner will be simulated by a local development security token service (STS).
Test the Windows Azure Web role project in the local Windows Azure compute emulator.
[optional] Deploy the Windows Azure project in the cloud and test it with the local development STS both from staging and production environment.
System Requirements
The following is required to complete this hands-on lab:
Microsoft® Windows® Vista SP2 (32-bits or 64-bits) , Microsoft® Windows Server 2008 SP2 (32-bit or 64-bit), Microsoft® Windows Server 2008 R2, Microsoft® Windows® 7 RTM (32-bits or 64-bits)
Microsoft® Internet Information Services (IIS) 7.0 with IIS Metabase and IIS 6 configuration compatibility
Microsoft® .NET Framework 4
Microsoft® Visual Studio 2010
Microsoft® Windows Identity Foundation Runtime
Microsoft® Windows Identity Foundation SDK 4.0
Windows Azure Tools for Microsoft Visual Studio 1.6
Setup
In order to execute the exercises in this hands-on lab you need to set up your environment.
1. Open a Windows Explorer window and browse to the lab’s Source folder.
2. Double-click the Setup.cmd file in this folder to launch the setup process that will configure your environment and install the Visual Studio code snippets for this lab. This will also install the localhost certificate used by the local STS.
3. If the User Account Control dialog is shown, confirm the action to proceed.
Note: Make sure you have checked all the dependencies for this lab before running the setup.
Note: The procedure installs a self-signed certificate to enable the SSL binding. If you already have a certificate with subject name CN=localhost, you must back up the certificate and restore after completing the steps in this guide.
Using the Code Snippets
Throughout the lab document, you will be instructed to insert code blocks. For your convenience, most of that code is provided as Visual Studio Code Snippets, which you can use from within Visual Studio 2010 to avoid having to add it manually.
If you are not familiar with the Visual Studio Code Snippets, and want to learn how to use them, you can refer to the Assets\Setup.docx document in the Assets folder of the training kit, which contains a section describing how to use them.
Exercises
This hands-on lab includes the following exercise:
1. Enabling Federated Authentication in Windows Azure
Estimated time to complete this lab: 60 minutes.
Note: When you first start Visual Studio, you must select one of the predefined settings collections. Every predefined collection is designed to match a particular development style and determines window layouts, editor behavior, IntelliSense code snippets, and dialog box options. The procedures in this lab describe the actions necessary to accomplish a given task in Visual Studio when using the
General Development Settings collection. If you choose a different settings collection for your development environment, there may be differences in these procedures that you need to take into account.
Exercise 1: Enabling Federated Authentication for ASP.NET applications in Windows Azure
Securing an ASP.NET web site with WIF is very simple. Within Visual Studio you right-click the project, run an easy wizard in which you indicate from which federated partner you want to accept identities, and you are done. You even have the option to generate on the fly a local development STS which can be used if you do not have federated partners available at development time.
That simple procedure remains largely unchanged even when you are targeting Windows Azure as the deployment environment for your application: the few adjustments you need to apply are mainly related to the structural features of Windows Azure, such as the way in which X509 certificates are stored or how application URIs are handled across the different environments (Windows Azure compute emulator, Staging, Production).
In the following tasks, you will see how to create a Windows Azure WebRole, configure it to use a local development STS and modify the Windows Azure project in order to work in the Windows Azure compute emulator by still referencing the local development STS. Finally, you will publish the project in the cloud and see how the application still works with the local development STS when running in the staging and production environments.
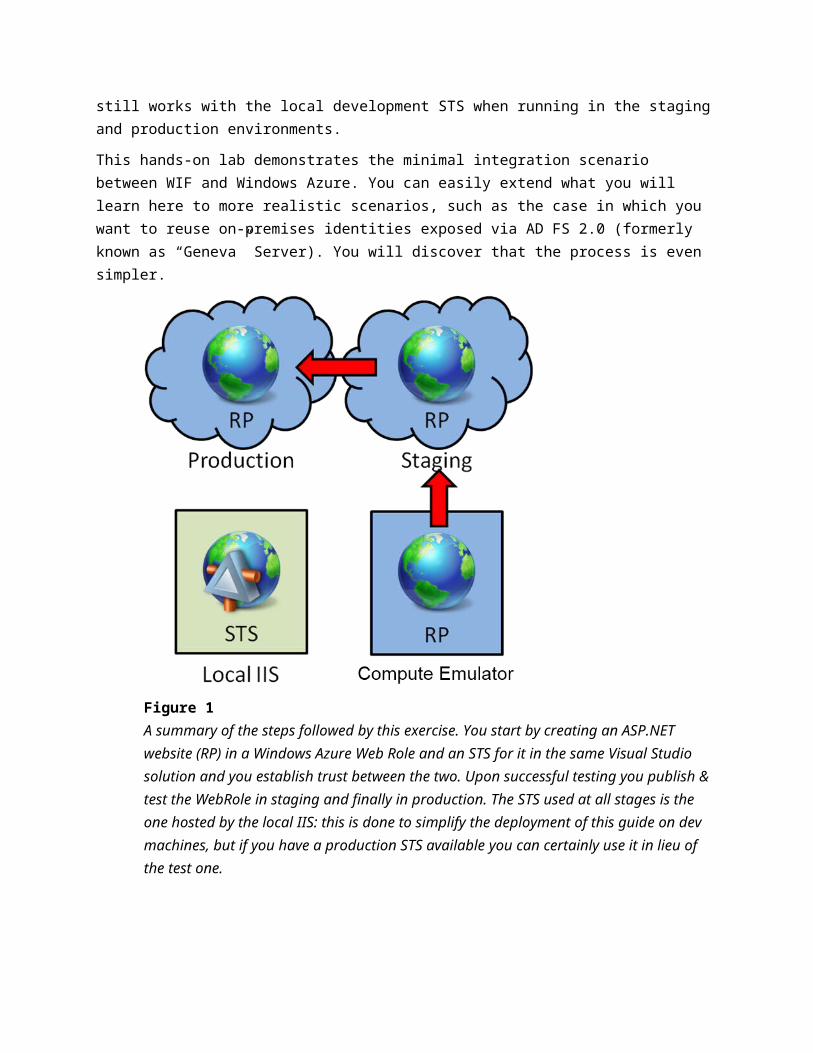
This hands-on lab demonstrates the minimal integration scenario between WIF and Windows Azure. You can easily extend what you will learn here to more realistic scenarios, such as the case in which you want to reuse on-premises identities exposed via AD FS 2.0 (formerly known as “Geneva” Server). You will discover that the process is even simpler.
Figure 1A summary of the steps followed by this exercise. You start by creating an ASP.NET website (RP) in a Windows Azure Web Role and an STS for it in the same Visual Studio solution and you establish trust between the two. Upon successful testing you publish & test the WebRole in staging and finally in production. The STS used at all stages is the one hosted by the local IIS: this is done to simplify the deployment of this guide on dev machines, but if you have a production STS available you can certainly use it in lieu of the test one.
Task 1 – Creating a Windows Azure Project and Preparing it for Using Windows Identity Foundation
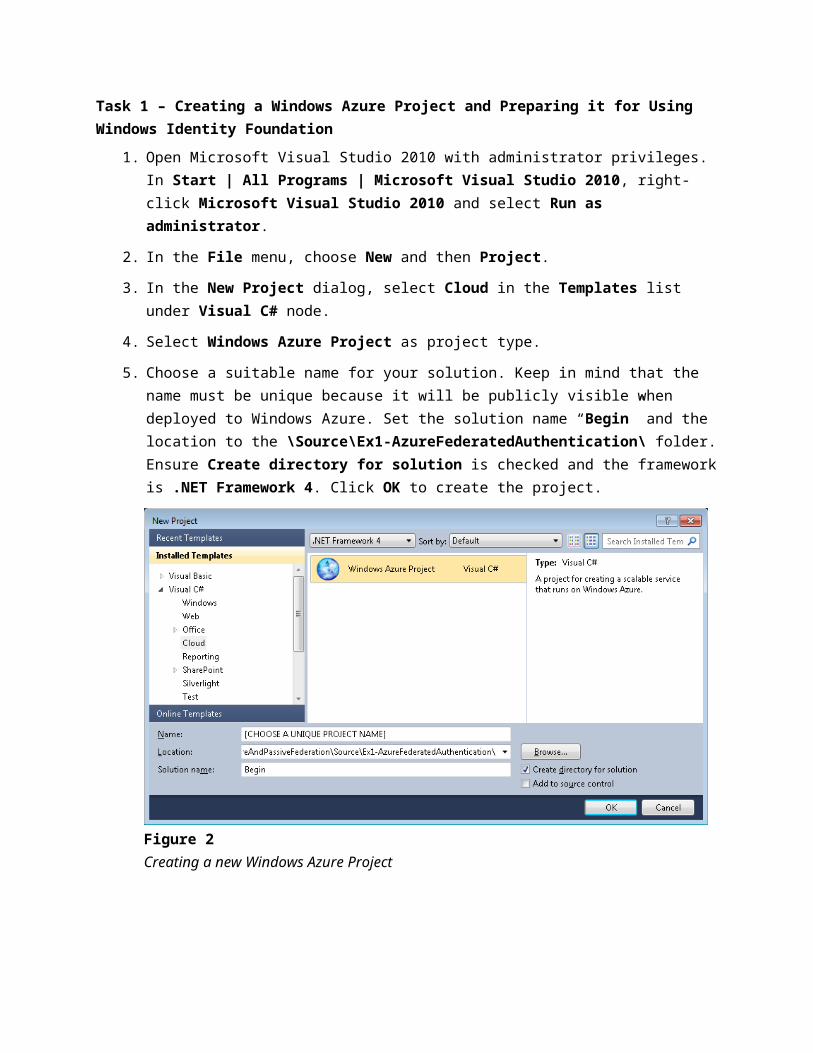
1. Open Microsoft Visual Studio 2010 with administrator privileges. In Start | All Programs | Microsoft Visual Studio 2010, right-click Microsoft Visual Studio 2010 and select Run as administrator.
2. In the File menu, choose New and then Project.
3. In the New Project dialog, select Cloud in the Templates list under Visual C# node.
4. Select Windows Azure Project as project type.
5. Choose a suitable name for your solution. Keep in mind that the name must be unique because it will be publicly visible when deployed to Windows Azure. Set the solution name “Begin” and the location to the \Source\Ex1-AzureFederatedAuthentication\ folder. Ensure Create
directory for solution is checked and the framework is .NET Framework 4. Click OK to create the project.
Figure 2Creating a new Windows Azure Project
Note: Why do we require you to choose your own project name, instead of providing a sample solution?
Every Windows Azure service is published on an URI of the form <projectname>.cloudapp.net.
The string <projectname> must be unique, since it has to be resolvable on the public internet.
For the first steps of this hand-on lab, you could technically use any project name you’d like, since all addresses will be resolved locally. You are forced to pick a unique name (and adjust the configurations accordingly) only at the moment in which you deploy your application in production.
Note: The steps in this guide are more easily understood if the naming convention is coherent, hence we suggest you adhere to it at least the first time you go through it. If you want to adapt the instructions to the name you will choose, simply apply a Find & Replace against fabrikamair on the docx version of this document. When referring to the project name in procedure steps and figures, the hands-on uses the name fabrikamair. Substitute your own project name when following a procedure.
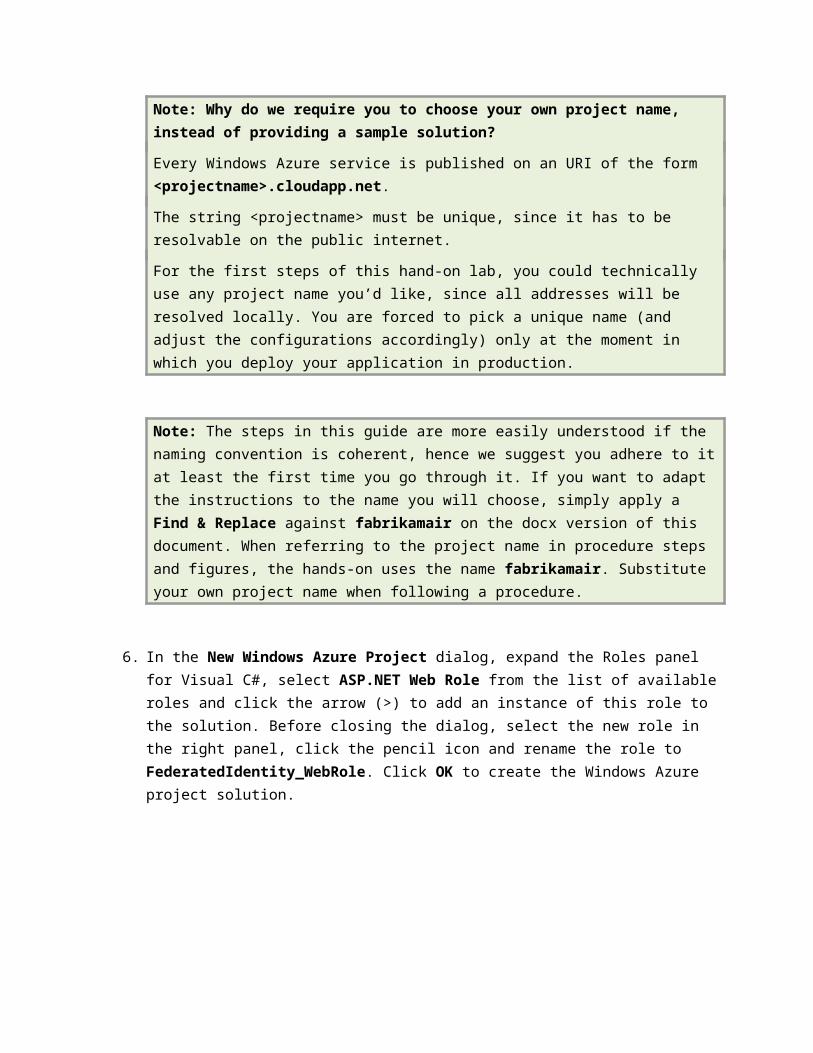
6. In the New Windows Azure Project dialog, expand the Roles panel for Visual C#, select ASP.NET Web Role from the list of available roles and click the arrow (>) to add an instance of this role to the solution. Before closing the dialog, select the new role in the right panel, click the pencil icon and rename the role to FederatedIdentity_WebRole. Click OK to create the Windows Azure project solution.
Figure 3Assigning roles to the Windows Azure project
7. Generate a self-signed certificate for the application to use SSL. For your convenience, the lab material includes a script that performs the necessary actions. It creates the certificate using the subject you specify, installs it to the LocalMachine/Personal certificate store and adds the certificate to the LocalMachine/Trusted Root Certification Authorities store (to avoid the certificate error warning when browsing the site with IE). Open a Visual Studio command prompt as an administrator. To do this, open Start | All Programs | Microsoft Visual Studio 2010 | Visual Studio Tools, right-click Visual Studio Command Prompt (2010) and choose Run as administrator.
8. Change the current directory to the \Source\Assets folder, and execute the CreateCert.cmd script specifying the name of your project as a parameter.
Note: VERY IMPORTANT! make sure to use lower casing for the certificate name.
For example:
Visual Studio Command Prompt
CreateCert.cmd yourprojectname
While running the script you will be asked to enter a password to secure your private key, type abc!123 and press OK.
Figure 4Specifying a password to secure your private key
Figure 5Specifying a password to secure your private key
When you add the certificate to the Trusted Root Certification Authorities store, you are presented with a warning. Click Yes to install the certificate.
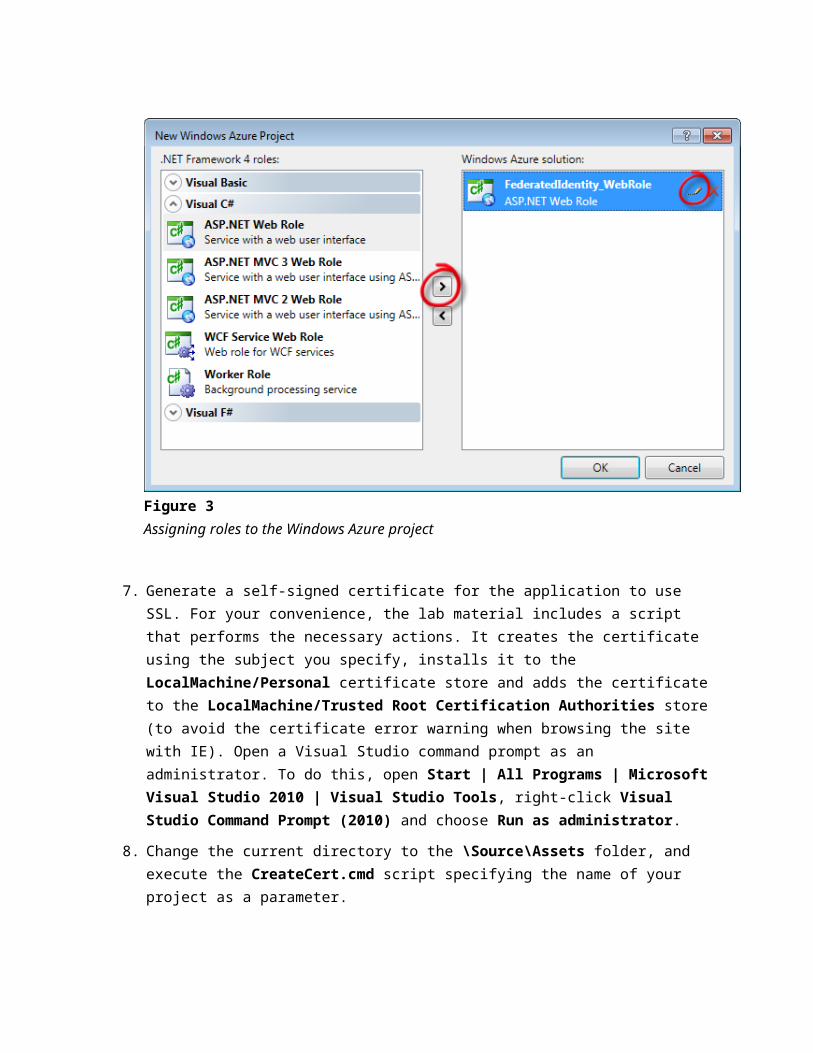
Figure 6Adding a certificate as a trusted root
9. Go to the Solution Explorer; navigate to <yourproject>/Roles/FederatedIdentity_WebRole. Right-click on it and choose Properties.
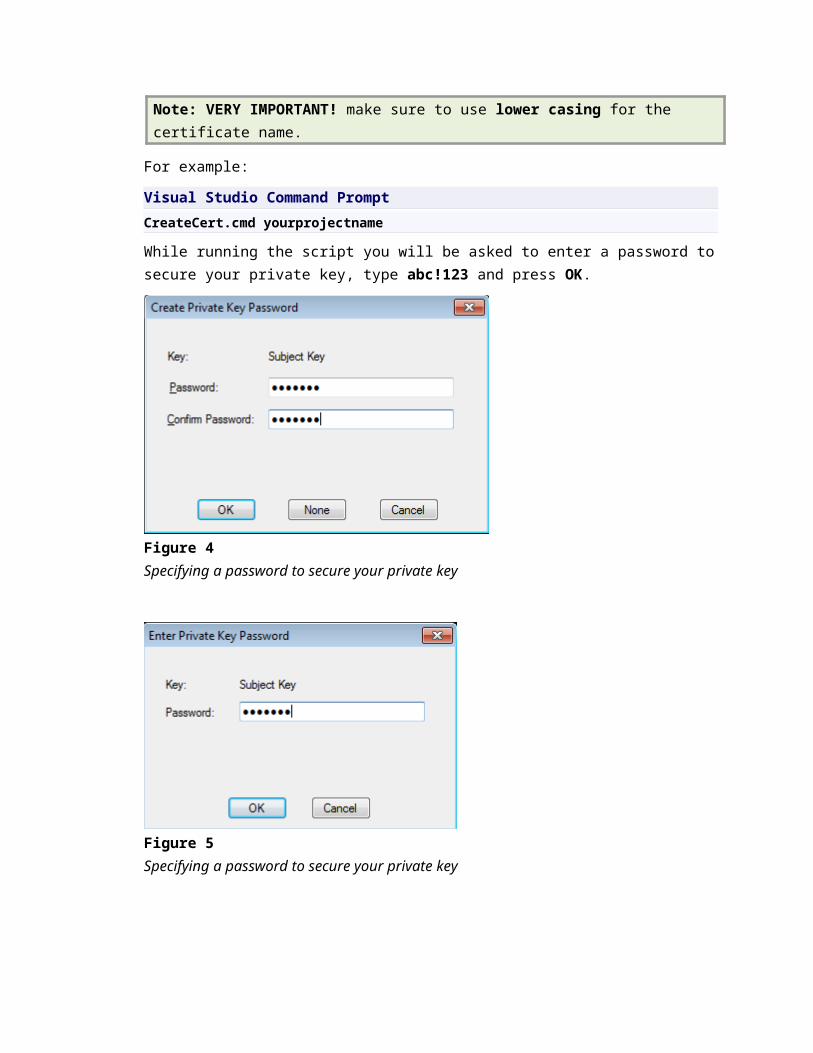
Figure 7Modifying FederatedIdentity_Webrole properties
10. Go to the Configuration Tab and ensure that the Full Trust option is set.
Figure 8FederatedIdentity_WebRole is set to full trust so WIF work as expected
Note: Why do you need to set .NET trust level to Full Trust?
Windows Identity Foundation relies on Windows Communication Foundation (WCF) for handling various cryptography and protocol related operations. Today those parts of WCF require full trust to execute correctly, hence the Enable Full Trust requirement.
Furthermore, the Windows Identity Foundation assemblies are not available in the Global Assembly Cache seen by Windows Azure projects (see below); hence partial trust execution would not be possible in any case.
11. Go to the Certificates Tab and click on Add Certificate.
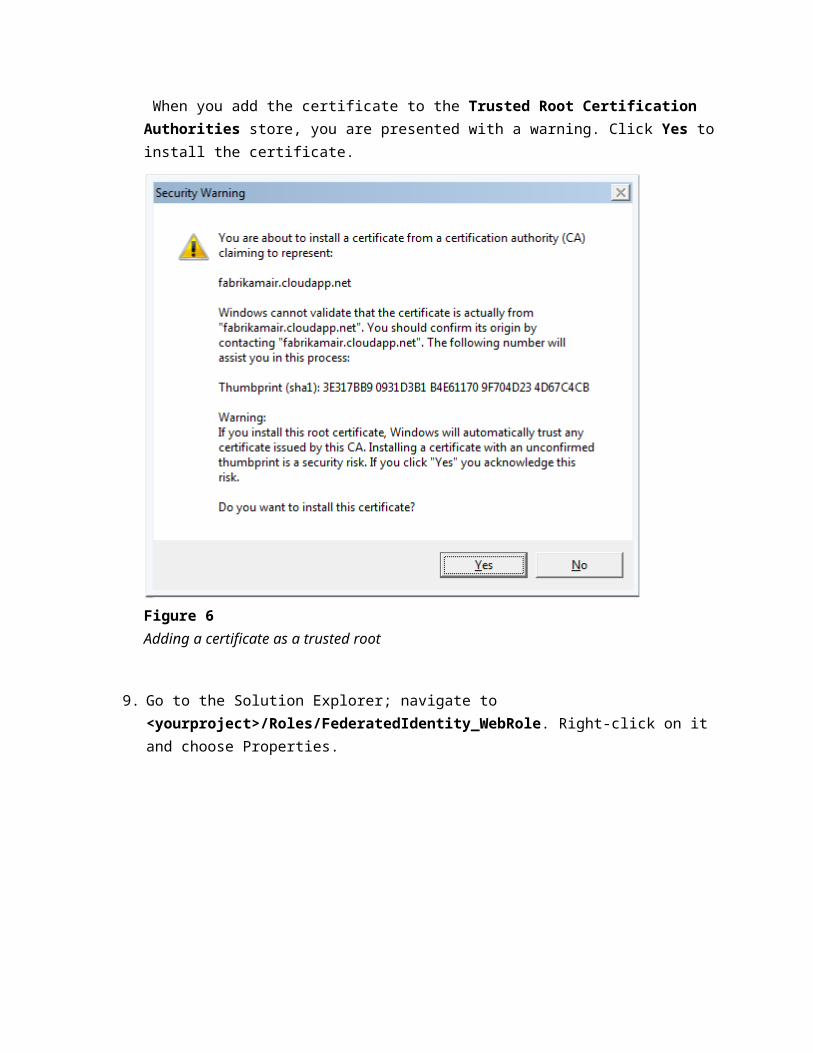
Figure 9Selecting Add Certificate
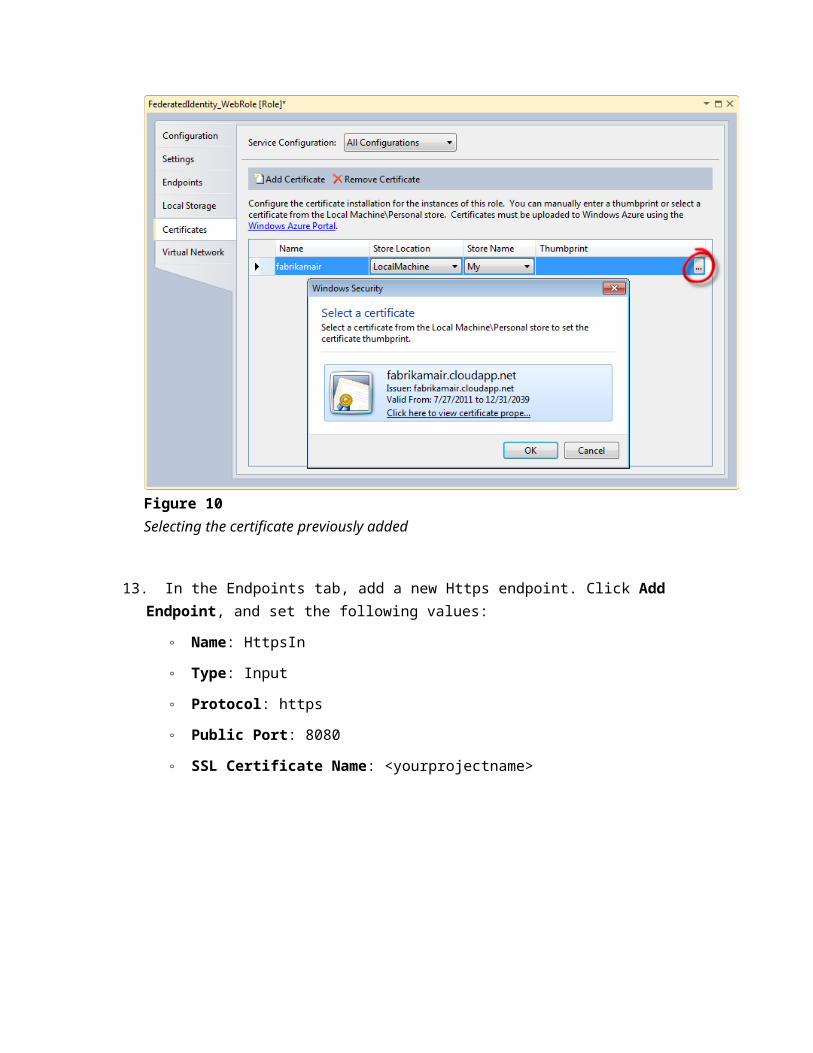
12. Type your <projectName> in the Name field and click on the Thumbprint column to select the cert you generated previously.
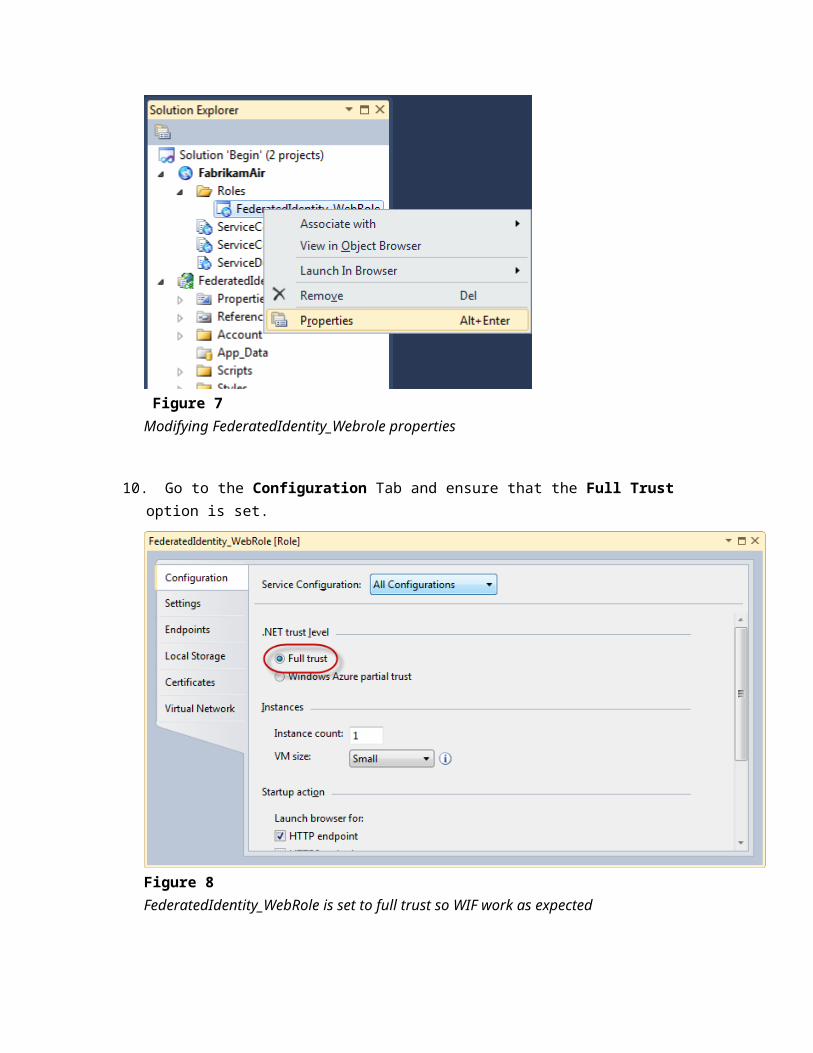
Figure 10Selecting the certificate previously added
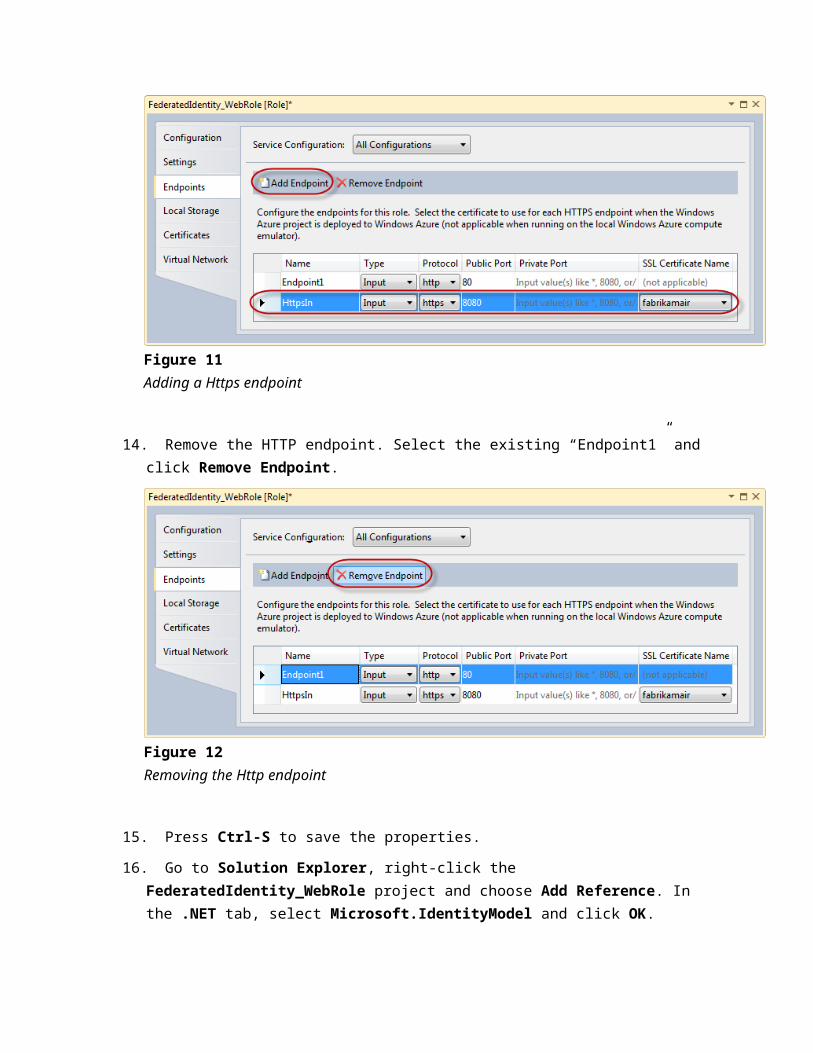
13. In the Endpoints tab, add a new Https endpoint. Click Add Endpoint, and set the following values:
◦ Name: HttpsIn
◦ Type: Input
◦ Protocol: https
◦ Public Port: 8080
◦ SSL Certificate Name: <yourprojectname>
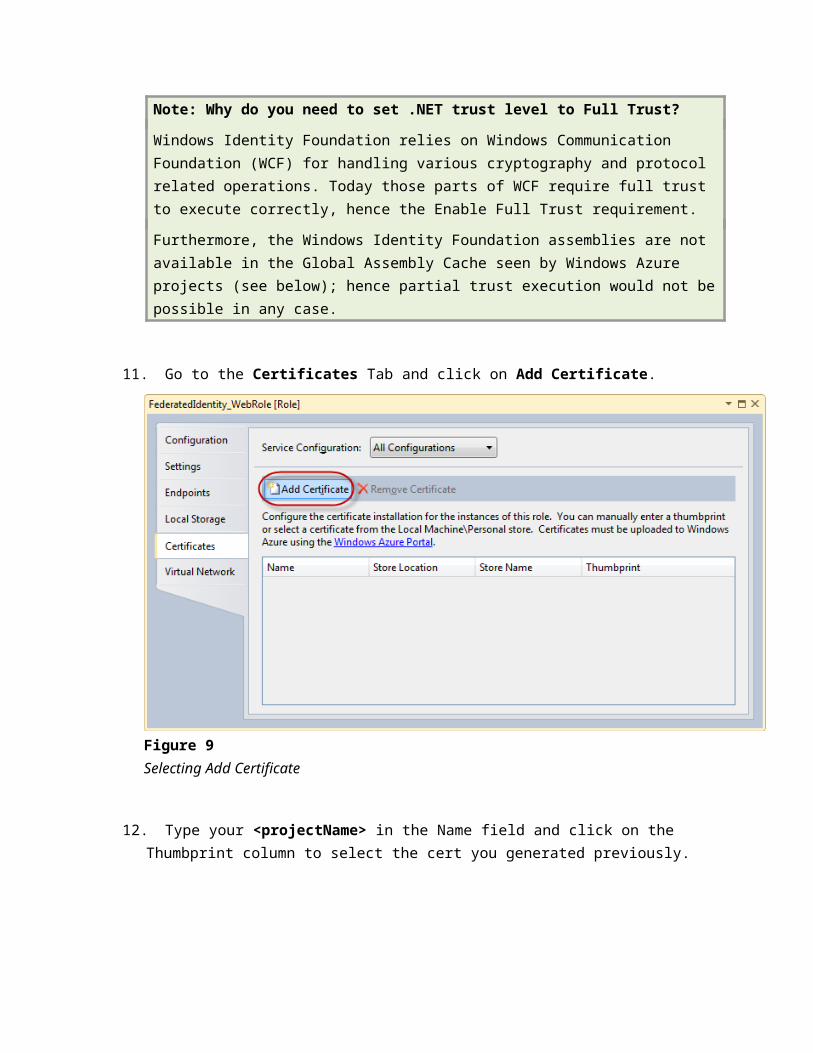
Figure 11Adding a Https endpoint
14. Remove the HTTP endpoint. Select the existing “Endpoint1” and click Remove Endpoint.
Figure 12Removing the Http endpoint
15. Press Ctrl-S to save the properties.
16. Go to Solution Explorer, right-click the FederatedIdentity_WebRole project and choose Add Reference. In the .NET tab, select Microsoft.IdentityModel and click OK.
17. Go to the References folder for the FederatedIdentity_WebRole project, select Microsoft.IdentityModel. Press F4 to open the Properties window and set Copy Local to True and Specific Version to False.
Note: Why do you need to set Copy Local to True for the reference to Microsoft.IdentityModel?Microsoft.IdentityModel is the main Windows Identity Foundation assembly. As mentioned above, such assembly is not available in the Global Assembly Cache that is visible to Windows Azure applications. By setting its Copy Local property to True, you ensure that the bits of the assembly will be included in the project package. Therefore, once you deploy it in the cloud, this will ensure that the WIF is deployed too and available to your application.
18. Update the using statements into Default.aspx.cs in FederatedIdentity_WebRole.
(Code Snippet – Federated Authentication for WebRole Guide – RP Usings)
C#
using System;using System.Collections.Generic;using System.Linq;using System.Web;using System.Web.UI;using System.Web.UI.WebControls;using Microsoft.IdentityModel.Claims;using System.Threading;
19. Insert the following code into the body of the Page_Load handler Default.aspx.cs in FederatedIdentity_WebRole.
(Code Snippet – Federated Authentication for WebRole Guide – RP Page_Load Body)
C#
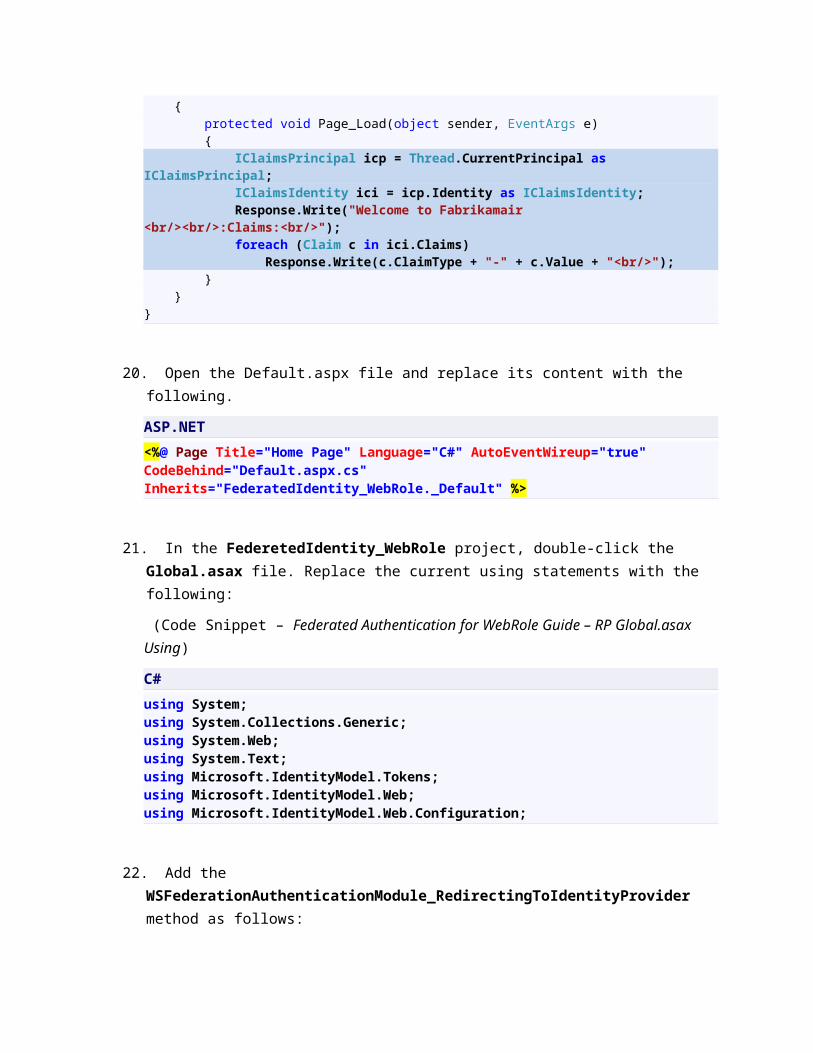
namespace FederatedIdentity_WebRole{ public partial class _Default : System.Web.UI.Page { protected void Page_Load(object sender, EventArgs e) { IClaimsPrincipal icp = Thread.CurrentPrincipal as IClaimsPrincipal; IClaimsIdentity ici = icp.Identity as IClaimsIdentity; Response.Write("Welcome to Fabrikamair <br/><br/>:Claims:<br/>"); foreach (Claim c in ici.Claims) Response.Write(c.ClaimType + "-" + c.Value + "<br/>"); } }}
20. Open the Default.aspx file and replace its content with the following.
ASP.NET
<%@ Page Title="Home Page" Language="C#" AutoEventWireup="true" CodeBehind="Default.aspx.cs" Inherits="FederatedIdentity_WebRole._Default" %>
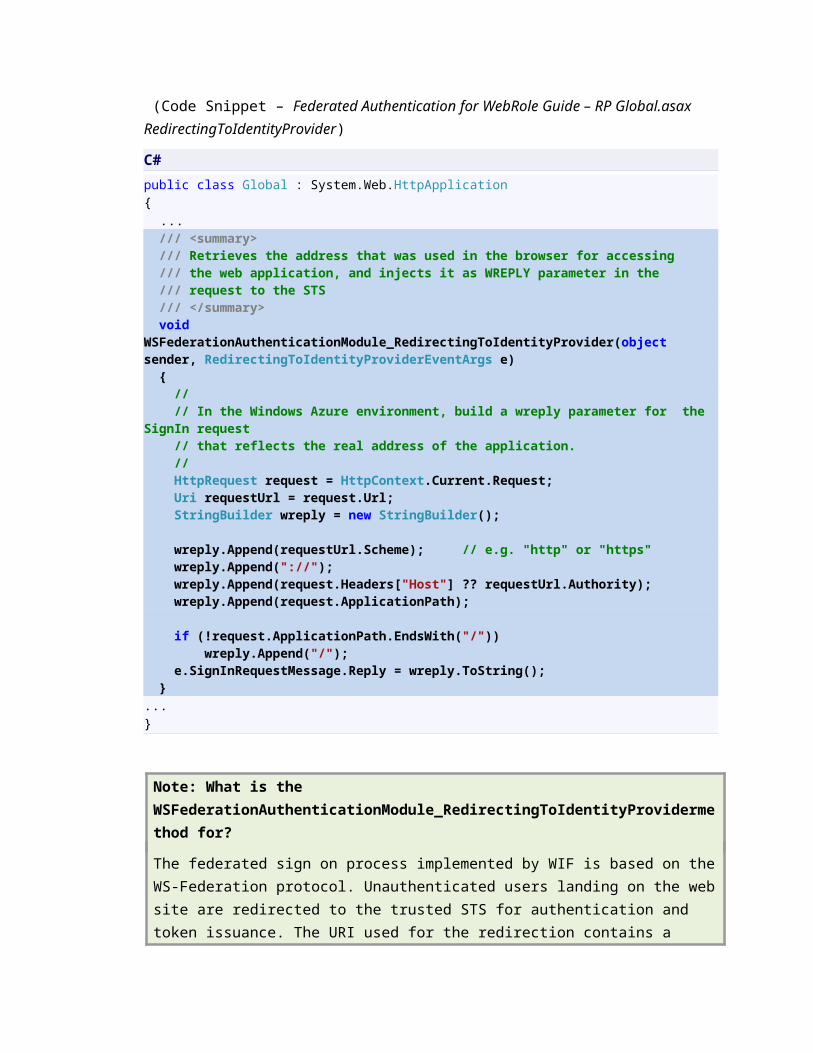
21. In the FederetedIdentity_WebRole project, double-click the Global.asax file. Replace the current using statements with the following:
(Code Snippet – Federated Authentication for WebRole Guide – RP Global.asax Using)
C#
using System;using System.Collections.Generic;using System.Web;using System.Text;using Microsoft.IdentityModel.Tokens;using Microsoft.IdentityModel.Web;using Microsoft.IdentityModel.Web.Configuration;
22. Add the WSFederationAuthenticationModule_RedirectingToIdentityProvider method as follows:
(Code Snippet – Federated Authentication for WebRole Guide – RP Global.asax RedirectingToIdentityProvider)
C#
public class Global : System.Web.HttpApplication{ ... /// <summary> /// Retrieves the address that was used in the browser for accessing /// the web application, and injects it as WREPLY parameter in the /// request to the STS /// </summary> void WSFederationAuthenticationModule_RedirectingToIdentityProvider(object sender, RedirectingToIdentityProviderEventArgs e) { // // In the Windows Azure environment, build a wreply parameter for the SignIn request // that reflects the real address of the application. // HttpRequest request = HttpContext.Current.Request; Uri requestUrl = request.Url;

StringBuilder wreply = new StringBuilder();
wreply.Append(requestUrl.Scheme); // e.g. "http" or "https" wreply.Append("://"); wreply.Append(request.Headers["Host"] ?? requestUrl.Authority); wreply.Append(request.ApplicationPath);
if (!request.ApplicationPath.EndsWith("/")) wreply.Append("/"); e.SignInRequestMessage.Reply = wreply.ToString(); }...}
Note: What is the WSFederationAuthenticationModule_RedirectingToIdentityProvidermethod for?
The federated sign on process implemented by WIF is based on the WS-Federation protocol. Unauthenticated users landing on the web site are redirected to the trusted STS for authentication and token issuance. The URI used for the redirection contains a number of parameters, mainly retrieved from the website Web.config: among those, there is the address to which the STS will have to redirect the user’s browser once successfully authenticated. In the default case, WIF retrieves that return address from the configuration settings generated by the Federation Utility wizard.
In Windows Azure this approach would not work as is: an application hosted in Windows Azure will have a different URI depending on the environment in which it is hosted (Windows Azure compute emulator, staging, production) hence one would have to continuously change the values in the Web.config before deploying. In fact, even that strategy would not work in all cases since in the staging environment you learn what URI has been assigned to your app only AFTER you deployed the project.
The current solution to this is finding out at runtime what the address of the app is, and injecting it in the request to the STS as wreply parameter. An STS receiving a wreply would use its value as the return address, hence decoupling your application from its address at deploy time.
Of course, there are many security considerations to be made about this solution. To name one, this will often lead to a red address bar in Internet Explorer, since the subject of the certificate used to secure the website will match the URI only when the project is deployed in the production environment. Furthermore, this opens the door to redirect attacks that will have to be mitigated at the STS side.
Why do you use the Host header instead of just getting the Uri from HttpContext.Current.Request.Url?
Windows Azure uses various network artifacts in its infrastructure: as a result, the Url property of the current http request would contain ports that are not really meaningful outside Windows Azure internals and that would cause problems, for example mess up with session cookies. The code provided ensures that the URI in the browser address bar will be used.
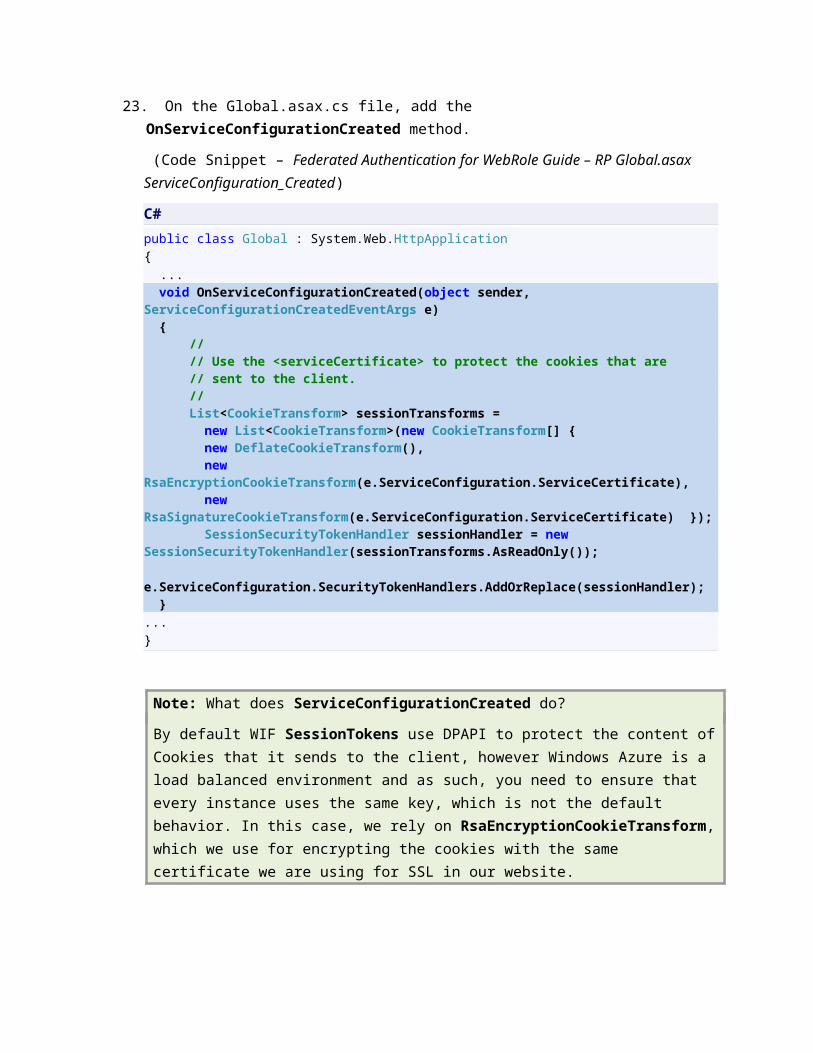
23. On the Global.asax.cs file, add the OnServiceConfigurationCreated method.
(Code Snippet – Federated Authentication for WebRole Guide – RP Global.asax ServiceConfiguration_Created)
C#
public class Global : System.Web.HttpApplication{ ... void OnServiceConfigurationCreated(object sender, ServiceConfigurationCreatedEventArgs e) { // // Use the <serviceCertificate> to protect the cookies that are // sent to the client. // List<CookieTransform> sessionTransforms = new List<CookieTransform>(new CookieTransform[] { new DeflateCookieTransform(), new RsaEncryptionCookieTransform(e.ServiceConfiguration.ServiceCertificate), new RsaSignatureCookieTransform(e.ServiceConfiguration.ServiceCertificate) }); SessionSecurityTokenHandler sessionHandler = new SessionSecurityTokenHandler(sessionTransforms.AsReadOnly()); e.ServiceConfiguration.SecurityTokenHandlers.AddOrReplace(sessionHandler); }...}
Note: What does ServiceConfigurationCreated do?
By default WIF SessionTokens use DPAPI to protect the content of Cookies that it sends to the client, however Windows Azure is a load balanced environment and as such, you need to ensure that every instance uses the same key, which is not the default behavior. In this case, we rely on RsaEncryptionCookieTransform, which we use for encrypting the cookies with the same certificate we are using for SSL in our website.
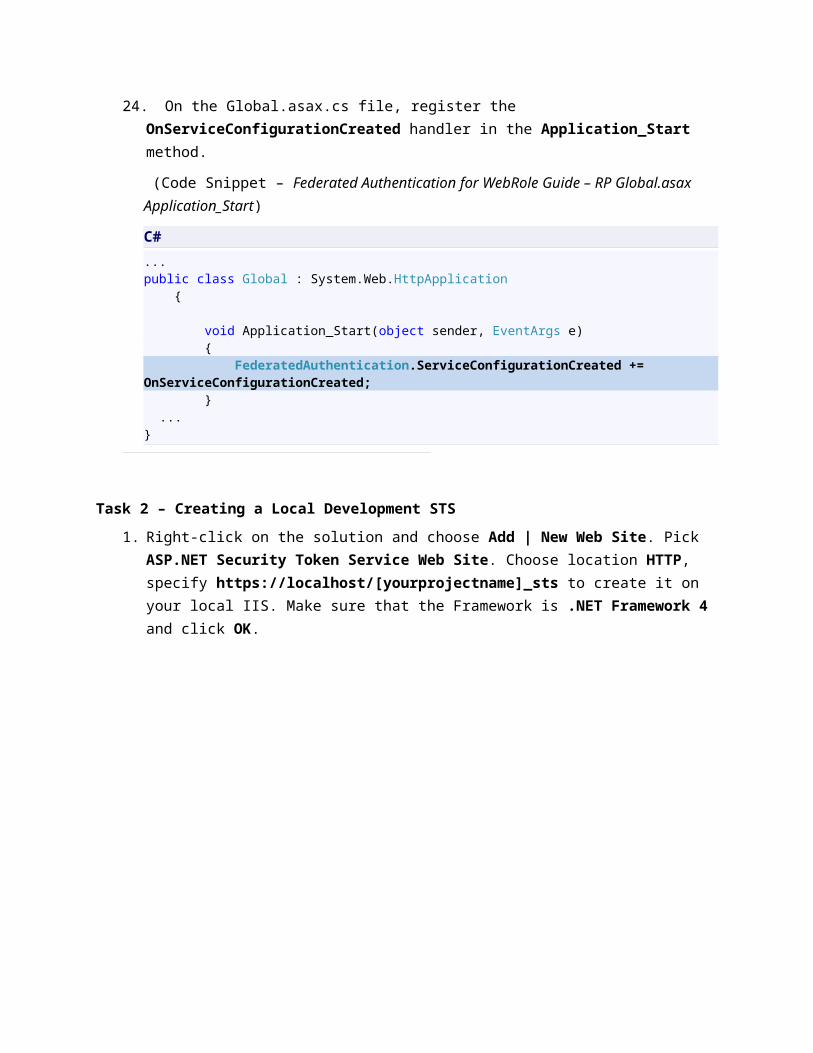
24. On the Global.asax.cs file, register the OnServiceConfigurationCreated handler in the Application_Start method.
(Code Snippet – Federated Authentication for WebRole Guide – RP Global.asax Application_Start)
C#
...public class Global : System.Web.HttpApplication {
void Application_Start(object sender, EventArgs e) { FederatedAuthentication.ServiceConfigurationCreated += OnServiceConfigurationCreated; } ...}
Task 2 – Creating a Local Development STS
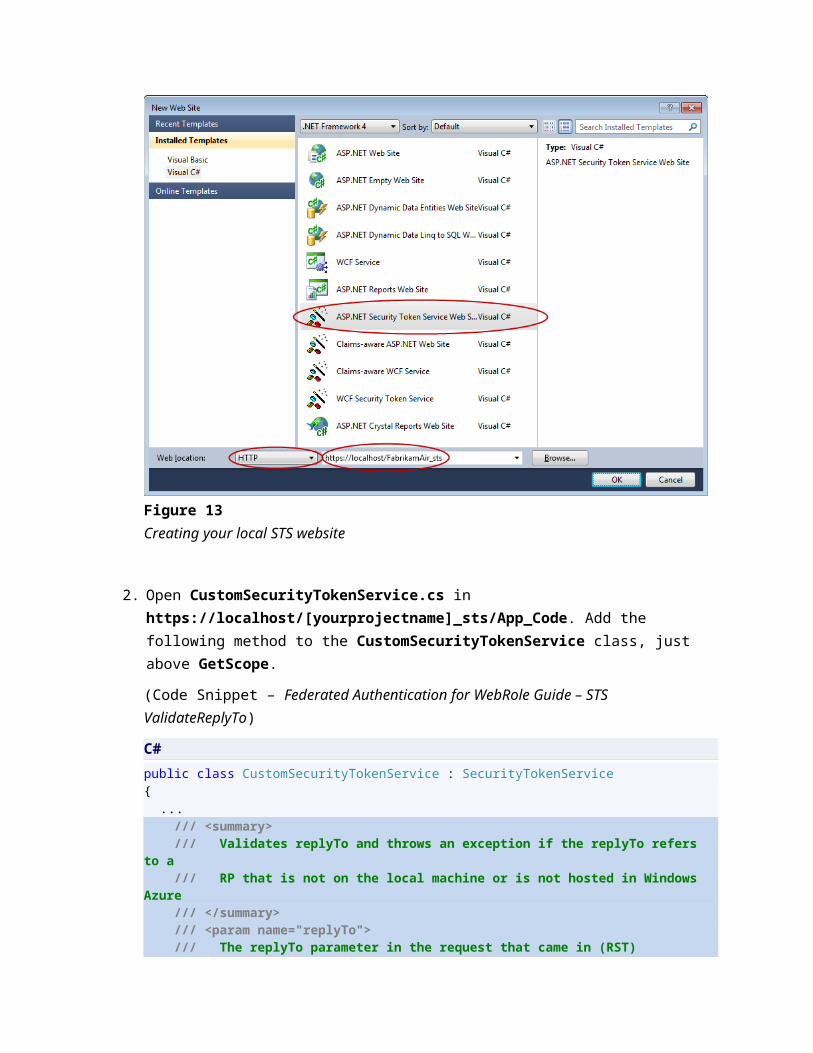
1. Right-click on the solution and choose Add | New Web Site. Pick ASP.NET Security Token Service Web Site. Choose location HTTP, specify https://localhost/[yourprojectname]_sts to create it on your local IIS. Make sure that the Framework is .NET Framework 4 and click OK.
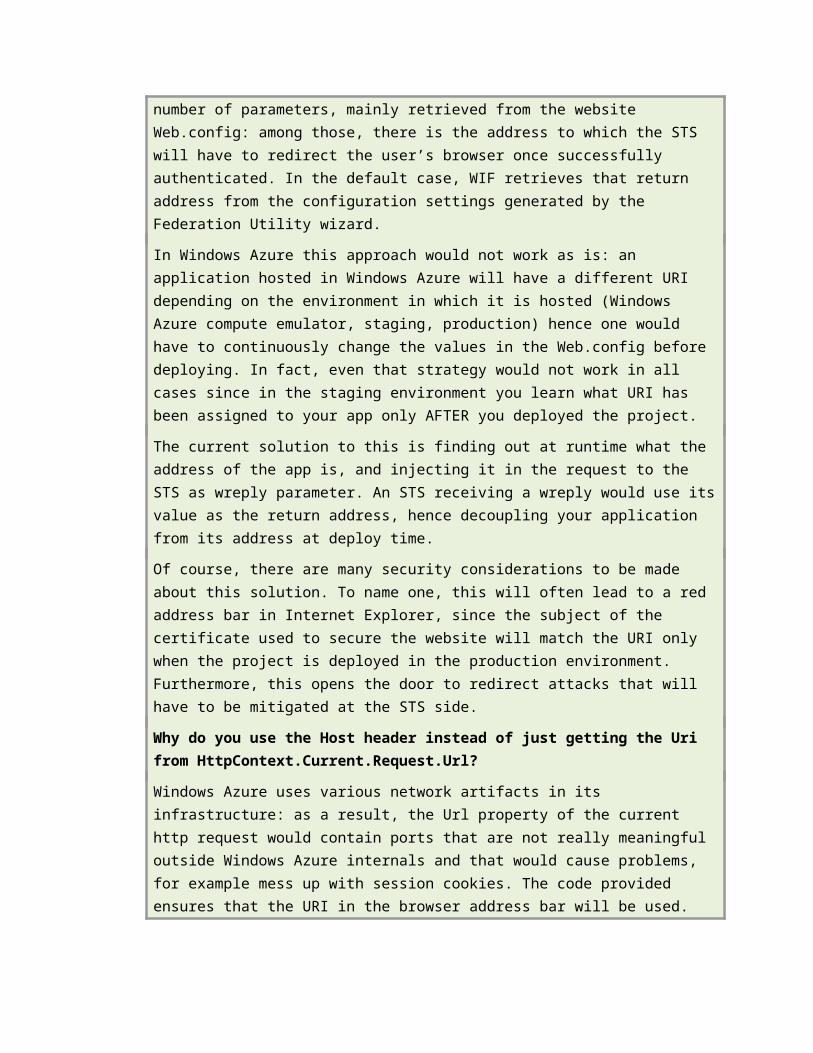
Figure 13Creating your local STS website
2. Open CustomSecurityTokenService.cs in https://localhost/[yourprojectname]_sts/App_Code. Add the following method to the CustomSecurityTokenService class, just above GetScope.
(Code Snippet – Federated Authentication for WebRole Guide – STS ValidateReplyTo)
C#
public class CustomSecurityTokenService : SecurityTokenService{ ... /// <summary> /// Validates replyTo and throws an exception if the replyTo refers to a /// RP that is not on the local machine or is not hosted in Windows Azure /// </summary> /// <param name="replyTo"> /// The replyTo parameter in the request that came in (RST) /// </param> void ValidateReplyTo(string replyTo) { // if ReplyTo is empty, we have nothing to validate. We will default
// to AppliesTo, which is harder to compromise via redirect attack if (!String.IsNullOrEmpty(replyTo)) { string host = (new Uri(replyTo)).Host.ToLower(); if (!((host == "127.0.0.1") || (host == "localhost") || host.EndsWith(".cloudapp.net"))) { throw new InvalidRequestException( String.Format( "The host in the ReplyTo address {0} is not valid.", host)); } } }
/// <summary> /// This method returns the configuration for the token issuance request. The configuration /// is represented by the Scope class. In our case, we are only capable of issuing a token for a /// single RP identity represented by the EncryptingCertificateName. /// </summary> /// <param name="principal">The caller's principal.</param> /// <param name="request">The incoming RST.</param> /// <returns>The scope information to be used for the token issuance.</returns> protected override Scope GetScope( IClaimsPrincipal principal, RequestSecurityToken request ) { ValidateAppliesTo( request.AppliesTo ); ...}
3. At the beginning of GetScope, add a call to ValidateReplyTo that was added in the previous step.
(Code Snippet – Federated Authentication for WebRole Guide – ValidateReplyTo Call)
C#
... protected override Scope GetScope( IClaimsPrincipal principal, RequestSecurityToken request ) { ValidateAppliesTo( request.AppliesTo ); ValidateReplyTo(request.ReplyTo);
//
// Note: The signing certificate used by default has a Distinguished name of "CN=STSTestCert", // and is located in the Personal certificate store of the Local Computer. Before going into production, // ensure that you change this certificate to a valid CA-issued certificate as appropriate. // Scope scope = new Scope( request.AppliesTo.Uri.OriginalString, SecurityTokenServiceConfiguration.SigningCredentials );
...
4. At the end of GetScope, replace the current scope.ReplyToAddress assignment with the following code.
(Code Snippet – Federated Authentication for WebRole Guide – STS Redirect to ReplyTo)
C#
protected override Scope GetScope( IClaimsPrincipal principal, RequestSecurityToken request ){ ... // Set the ReplyTo address for the WS-Federation passive protocol (wreply). This is the address to which responses will be directed. // In this template, we have chosen to set this to the AppliesToAddress.
scope.ReplyToAddress = String.IsNullOrEmpty(request.ReplyTo) ? scope.AppliesToAddress : request.ReplyTo;
return scope;}
Note: Why do we make those changes to the default local STS auto-generated by the Federation Utility wizard?
In Task 1, you modified the Global.asax of your application to ensure that it would send its actual URI to the STS, by storing it in the wreply parameter.
The ValidateReplyTo ensures that the address in the wreply refers to an application on your local machine (as in the Windows Azure compute emulator case) or from a host ending with “.cloudapp.net” (as in the Windows Azure staging or production environments case). This mitigates redirection attacks, as it limits the accepted ReplyTo values to addresses of Windows Azure applications. Note that this check would prevent you from using a domain name not matching the Windows Azure schema; hence, if you plan to map Windows Azure applications through a custom domain, you will have to adjust the code accordingly.
The assignment of scope.ReplyToAddress is modified to take the value of wreply, if present. If no wreply parameter is available in the request, the assignment will fold back to the default behavior (using the AppliesTo uri).
Task 3 – Establishing a Trust Relationship between the Web Role and the Development STS
1. Go to Solution Explorer, right-click the FederatedIdentity_WebRole project and choose Add STS reference. Accept the proposed location for the application configuration file, set the Application URI to https://<yourProjectName>.cloudapp.net, where <yourProjectName> is the name chosen for your cloud project (e.g. https://fabrikamair.cloudapp.net/) and click Next.
Figure 14The first screen of the Federation Utility wizard
2. Select the option Use an existing STS, browse to your inetpub folder (generally located in C:\inetpub). Select the file FederationMetadata.xml located in wwwroot\<yourProjectName>_sts\FederationMetadata\2007-06\ and click Next.
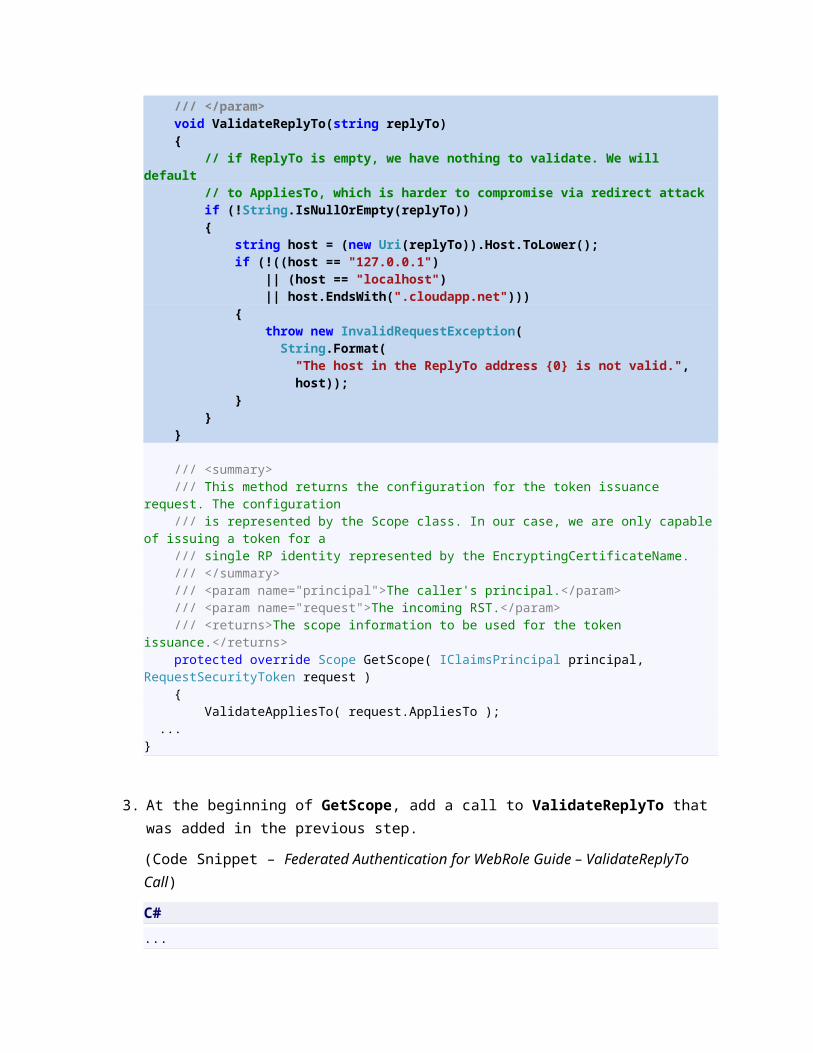
Figure 15The second screen of the Federation Utility wizard
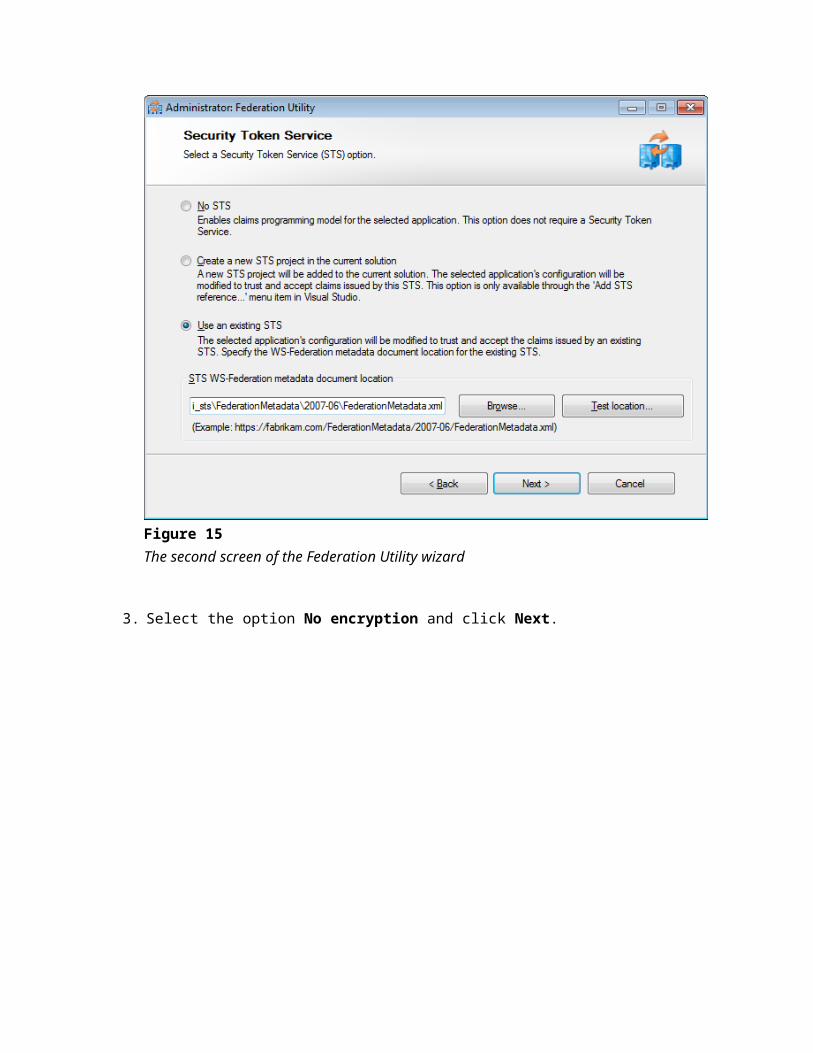
3. Select the option No encryption and click Next.
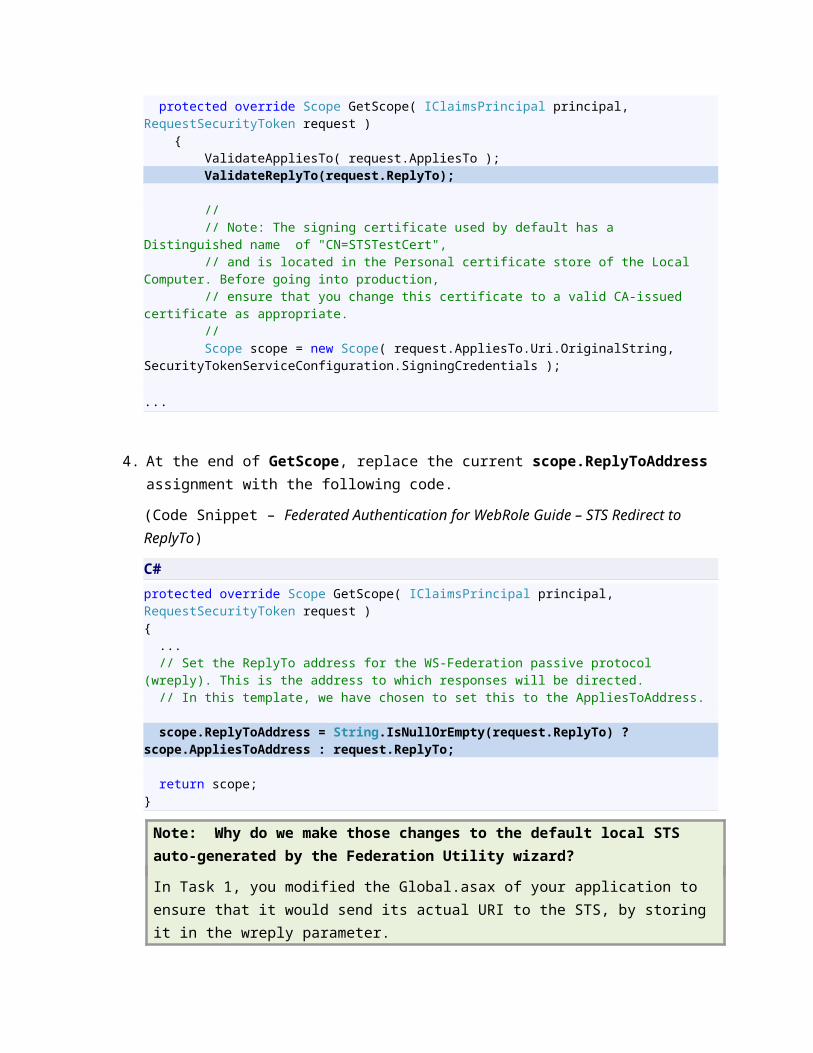
Figure 16Federation encryption setup screen
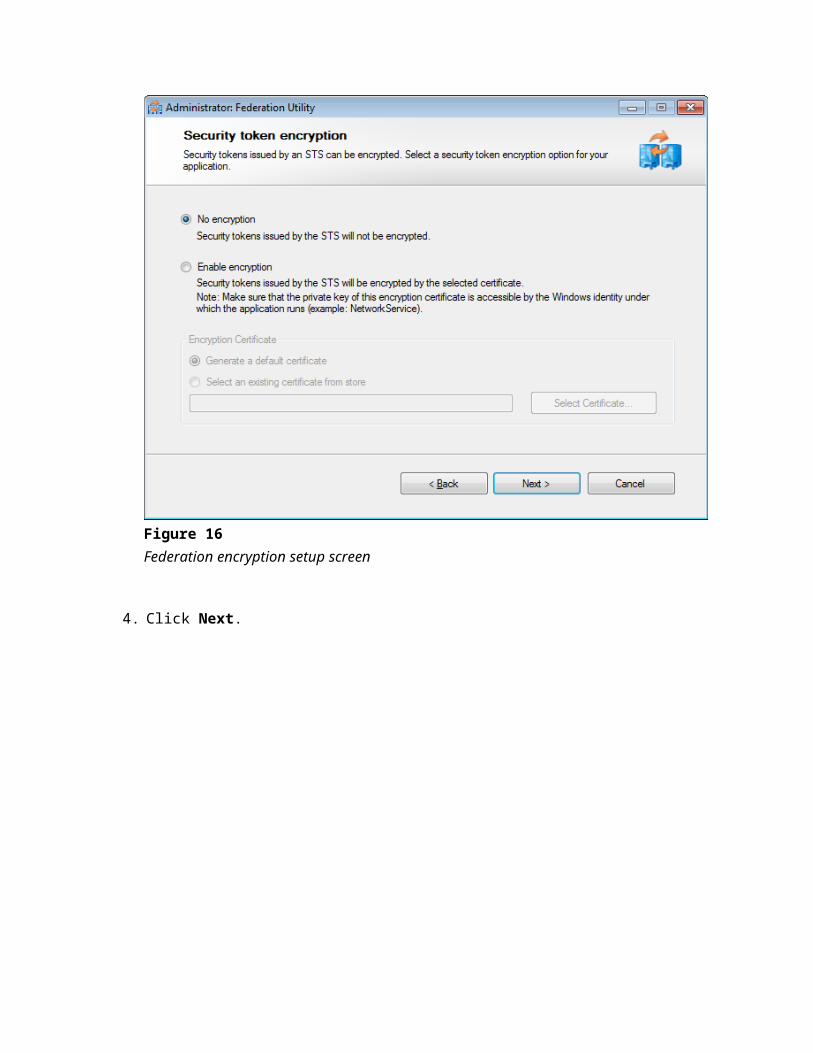
4. Click Next.
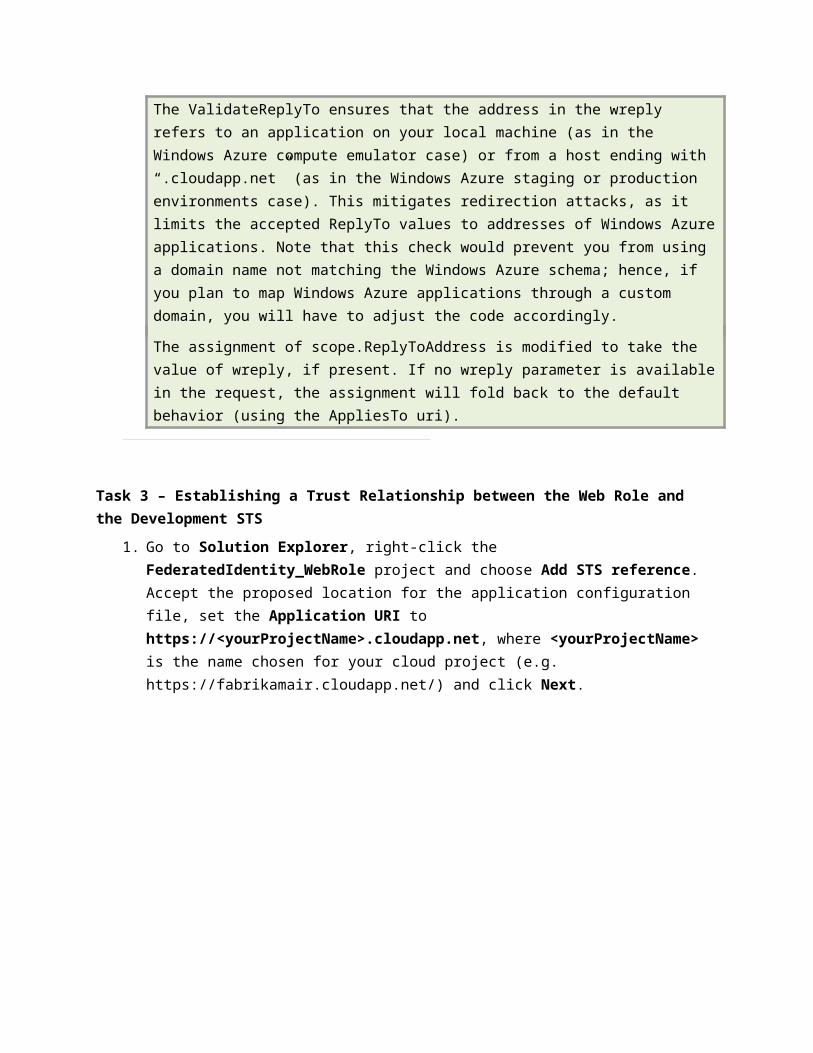
Figure 17Claim offered by the STS.
5. On the summary page review the changes that will be made, and click Finish.
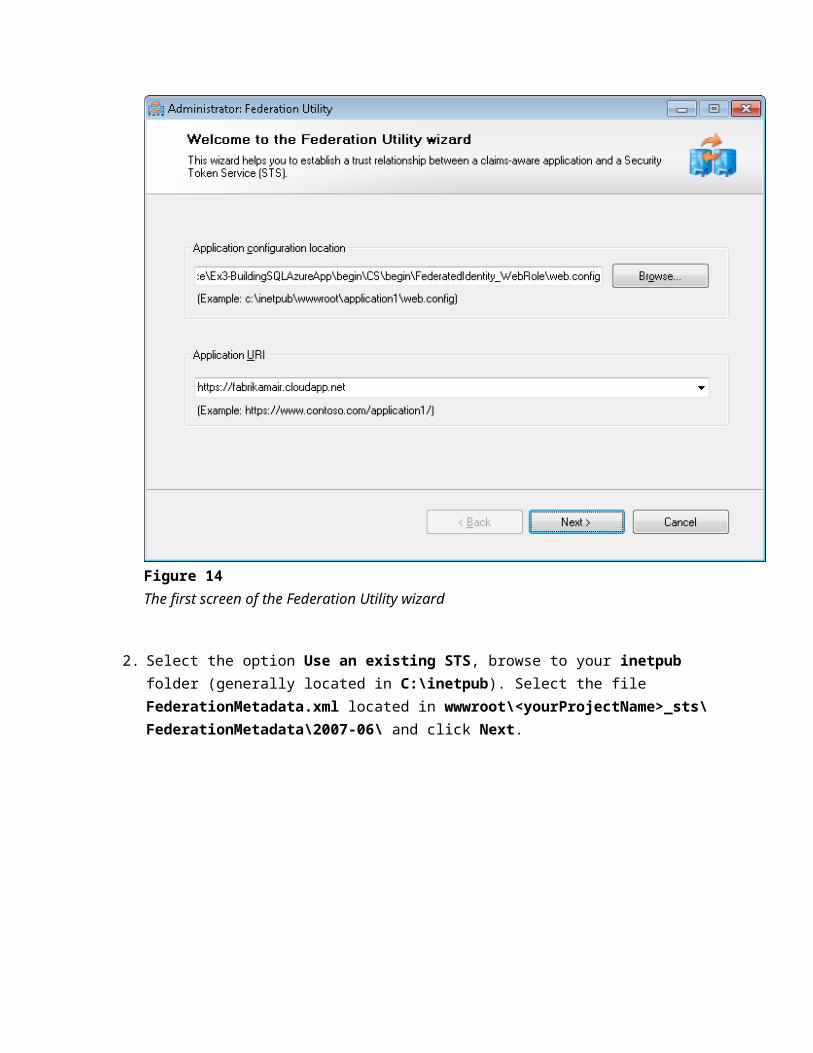
Figure 18Summary
6. Add the serviceCertificate element in the Web.config of the FederatedIdentity_WebRole project under microsoft.identityModel\service. Update the placeholder in the findValue attribute with the corresponding thumbprint from the ServiceConfiguration.Cloud.cscfg file.
(Code Snippet – Federated Authentication for WebRole Guide – ServiceCertificate)
XML
<microsoft.identityModel> <service> ... <serviceCertificate> <certificateReference x509FindType="FindByThumbprint" findValue="[yourCorrespondingThumbprint]"/> </serviceCertificate> </service></microsoft.identityModel>
7. Add the certificateValidation element under the microsoft.identityModel\service element and set the certificateValidationMode attribute to None.
(Code Snippet – Federated Authentication for WebRole Guide – CertificateValidation)
XML
<microsoft.identityModel> <service> ... </serviceCertificate> <certificateValidation certificateValidationMode="None"/> </service></microsoft.identityModel>
Note: We expect the token we receive to be signed with the private key of the STS we trust. The Add STS Reference wizard we went through in steps 1 to 5 saved in the element issuerNameRegistry of web.config the thumbprint of the certificate of the STS we trust. Once we receive a token, WIF uses this information for:
- Retrieving the corresponding certificate
- Using the certificate for checking the token signature
- Verifying that the signer was indeed listed in the issuerNameRegistry element, hence trusted
In order to perform those operations, WIF can use the thumbprint for retrieving the bits of the STS certificate from the certificate store. However, certificate handling in Windows Azure requires extra operations, hence here we use an alternative method. Very often the request containing the token will also contain the bits of the certificate corresponding to the signature: this means that our application can use the thumbprint for retrieving the certificate from the request itself rather than relying on having the bits available locally. Setting the certificateValidationMode to None has the purpose of enabling the latter scenario.
Note that the request does not have to contain the bits of the certificate, and for certain platforms this won’t be the default behavior: in those cases you will need to deploy in Windows Azure the public key (that is to say the certificate) of the STS as well, as shown in step 9 of task 5.
ASP.NET by default validates all the POSTs done to the web application. This validation checks that the input is not dangerous. For instance, a piece of XML that is not encoded is considered dangerous for ASP.NET. A token is a piece of XML that is not encoded. To avoid getting an exception when the token is posted, you will add a class that will check if the input is a token. If it is, it will return true and will let the request to continue. If not, it will throw the regular "A potentially dangerous Request.Form value was detected..." exception.
8. Add the SampleRequestValidator.cs file from the assets folder, to the FederatedIdentity_WebRole project.
9. Open the Web.config file from the FederatedIdentity_WebRole project, add the httpRuntime element inside the system.web element and set the requestValidationType attribute to SampleRequestValidator.
Note: Make sure you add the httpRuntime element inside the general system.web element and not the one that is inside the element <location path =”FederationMetadata”>.
XML
... <httpRuntime requestValidationType="SampleRequestValidator" /></system.web>
Task 4 – Testing FabrikamAir in the Windows Azure Compute Emulator
In this task you will run the web application in the Windows Azure compute emulator, while the development STS we created in Task 2 will take care of authenticating users while running in the local IIS.
Figure 19Local Deployment
1. You are finally ready to test the application in the Windows Azure compute emulator. Set the cloud project as the startup project. To do this, in Solution Explorer, right-click the Windows Azure project and choose Set as StartUp Project.
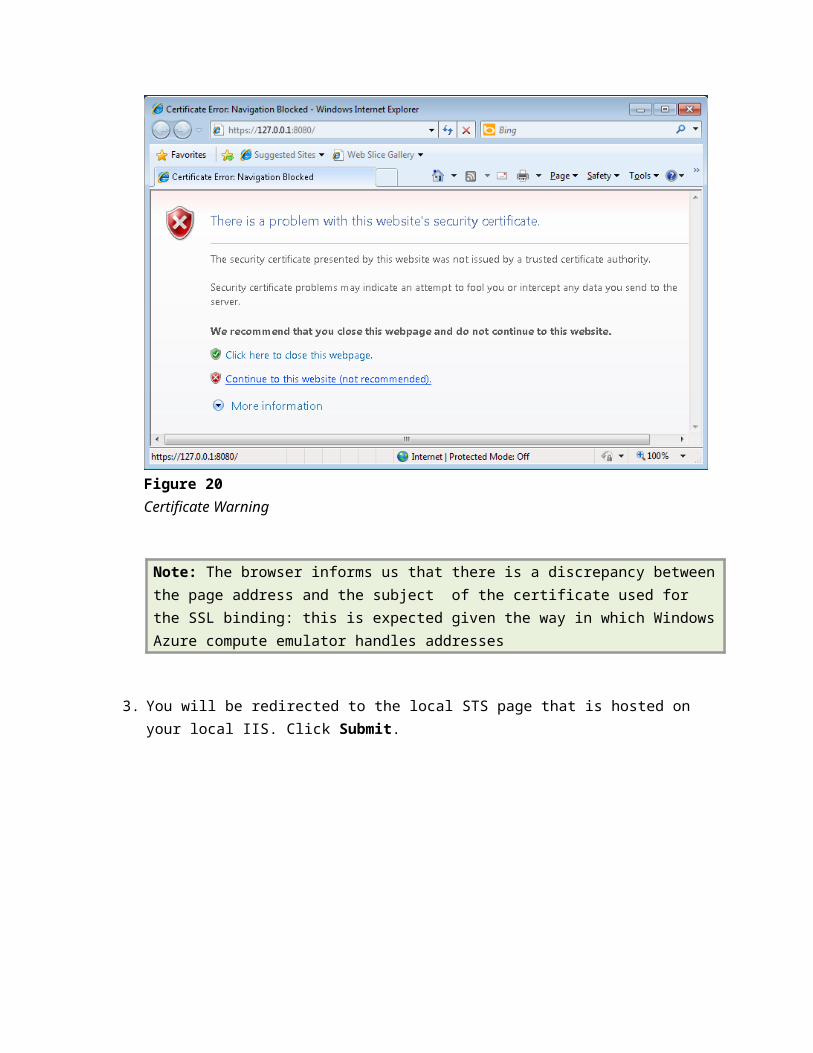
2. Press F5 to build and run the application. A browser page will open, pointing to https://127.0.0.1:8080. In the first screen, you will observe a certificate warning because the Windows Azure compute emulator uses an IP address for navigating to your application, while the certificate you are using refers to the address that the application will have once deployed in production in the cloud. Click Continue to this website.
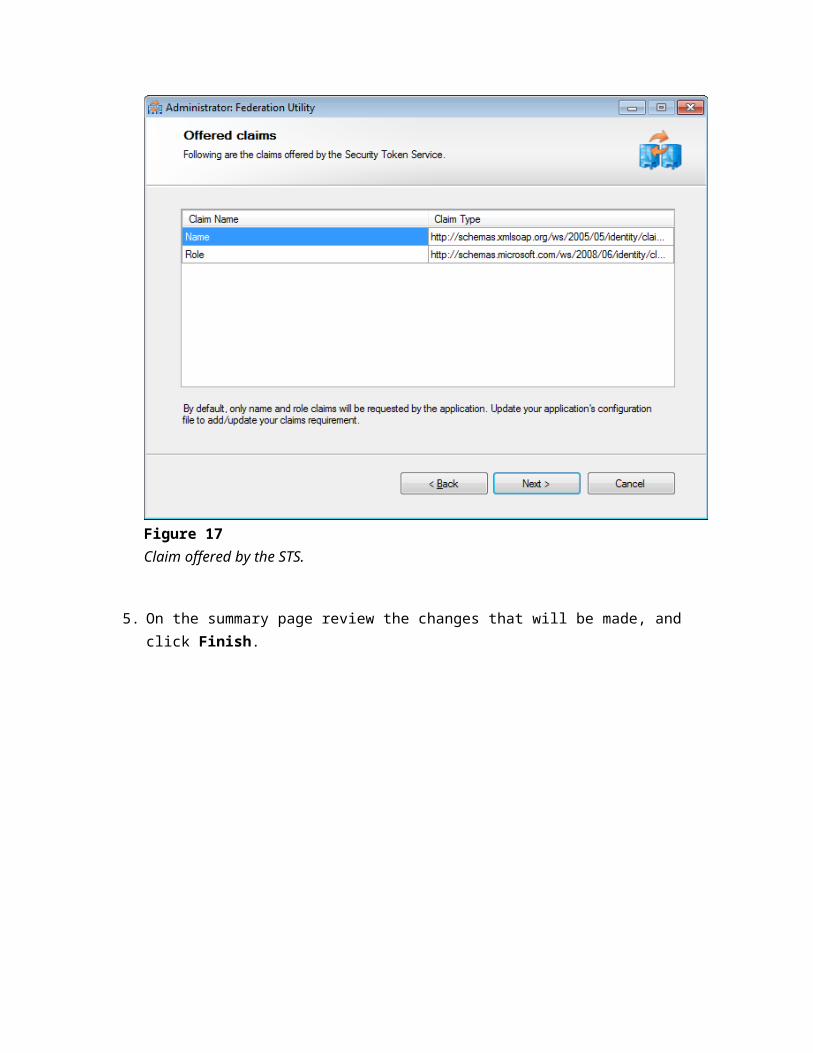
Figure 20Certificate Warning
Note: The browser informs us that there is a discrepancy between the page address and the subject of the certificate used for the SSL binding: this is expected given the way in which Windows Azure compute emulator handles addresses
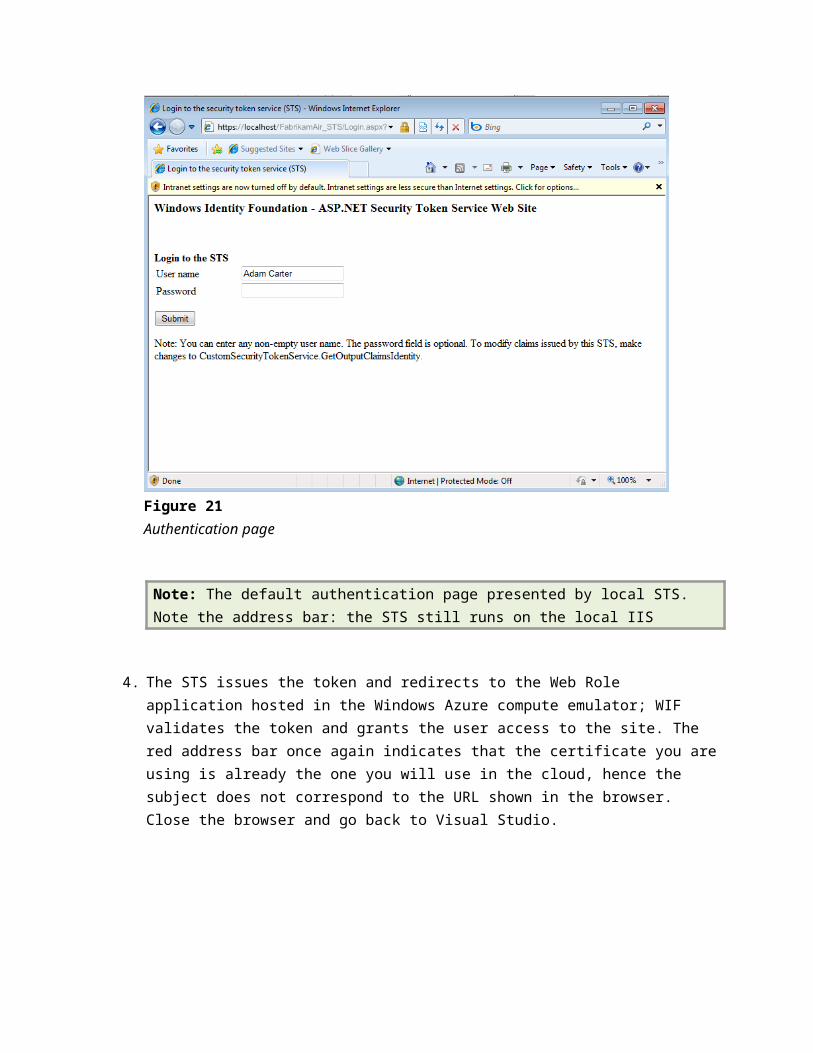
3. You will be redirected to the local STS page that is hosted on your local IIS. Click Submit.
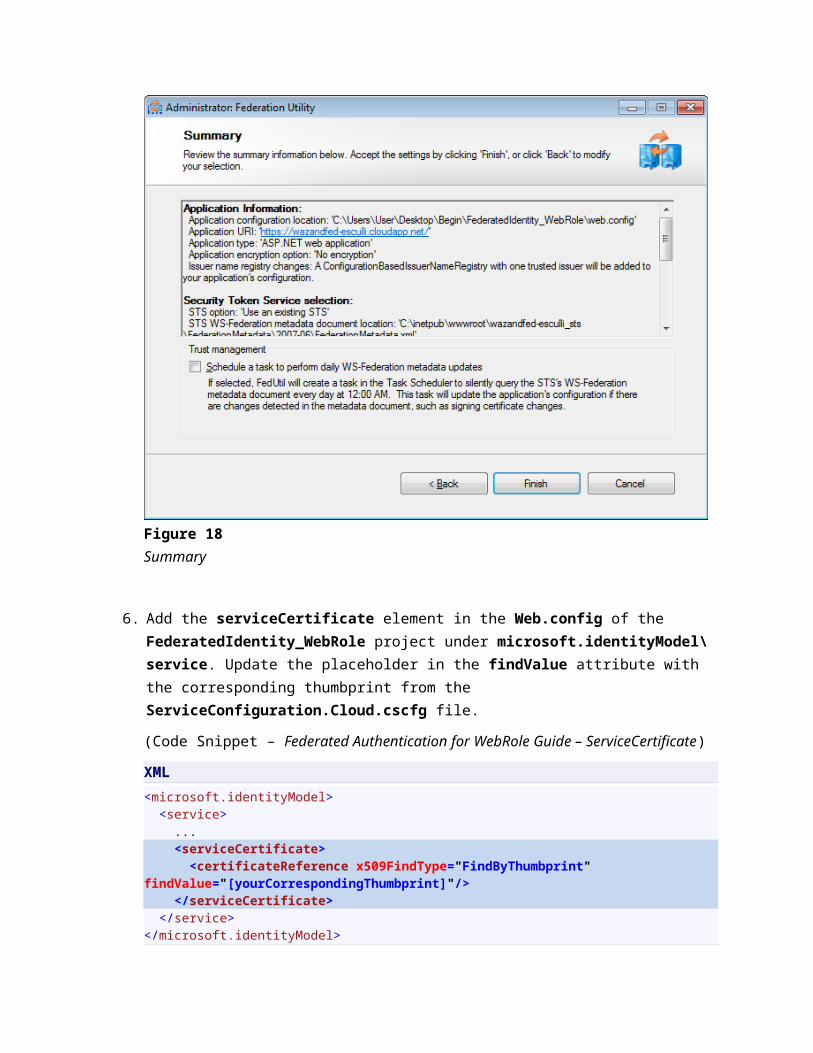
Figure 21Authentication page
Note: The default authentication page presented by local STS. Note the address bar: the STS still runs on the local IIS
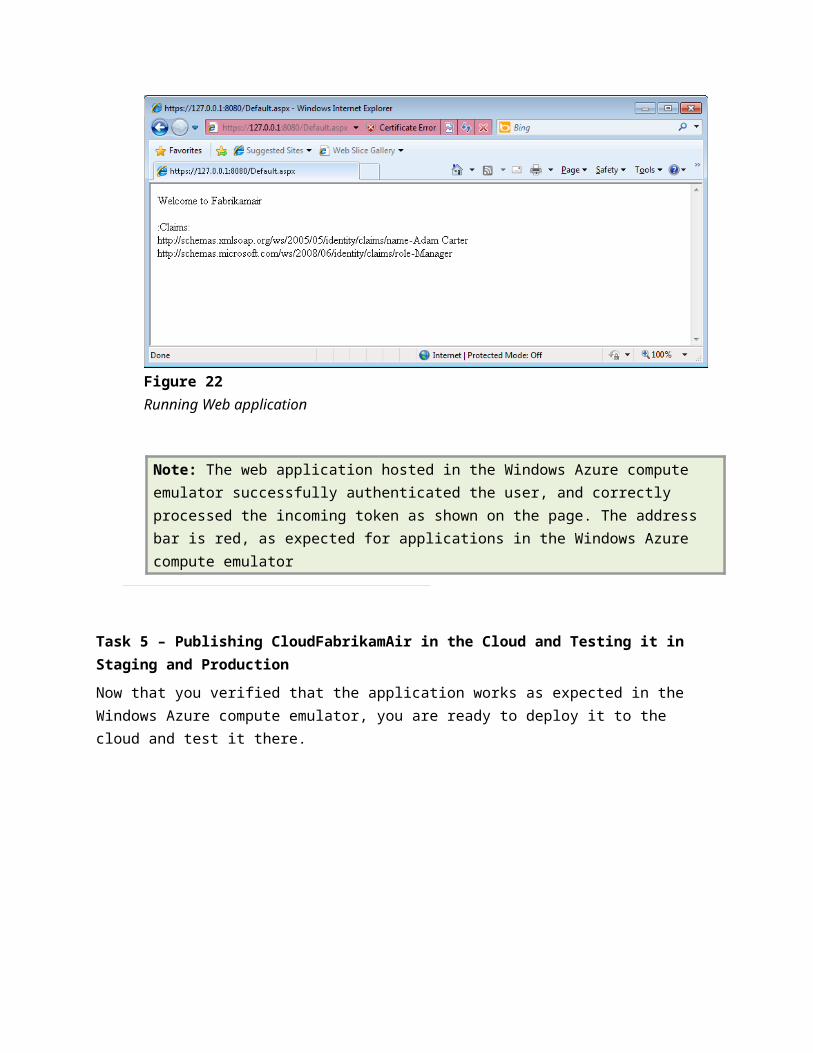
4. The STS issues the token and redirects to the Web Role application hosted in the Windows Azure compute emulator; WIF validates the token and grants the user access to the site. The red address bar once again indicates that the certificate you are using is already the one you will use in the cloud, hence the subject does not correspond to the URL shown in the browser. Close the browser and go back to Visual Studio.
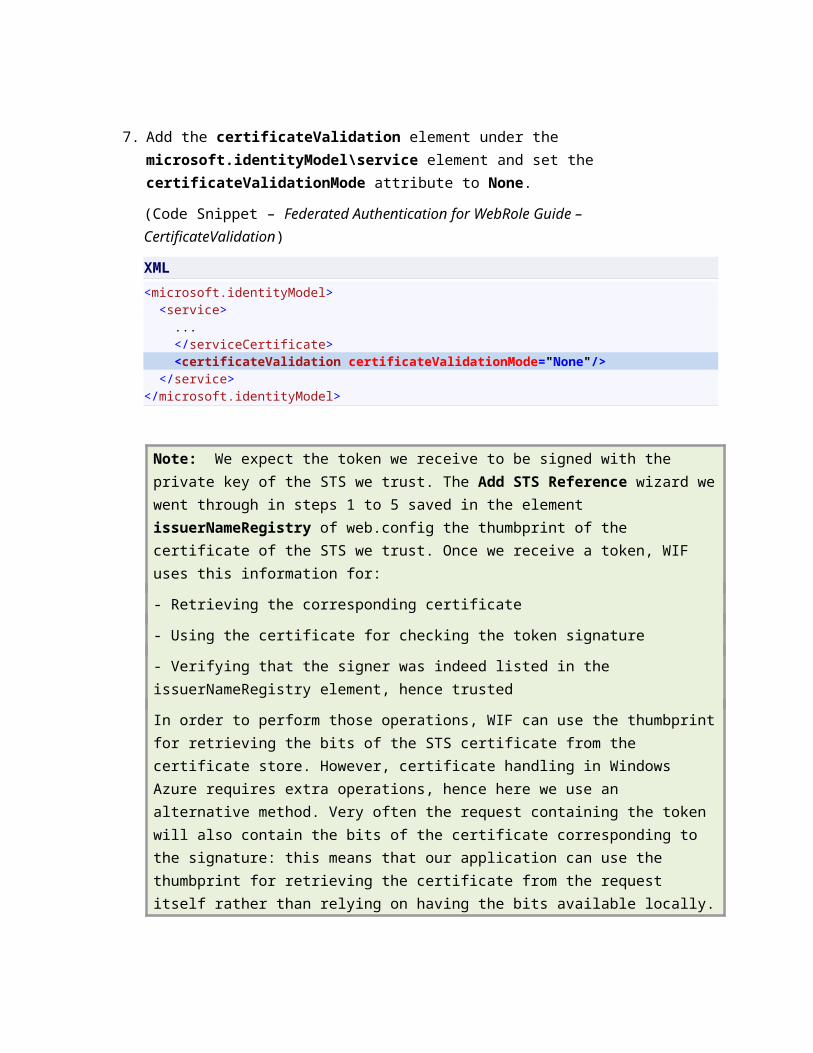
Figure 22Running Web application
Note: The web application hosted in the Windows Azure compute emulator successfully authenticated the user, and correctly processed the incoming token as shown on the page. The address bar is red, as expected for applications in the Windows Azure compute emulator
Task 5 – Publishing CloudFabrikamAir in the Cloud and Testing it in Staging and Production
Now that you verified that the application works as expected in the Windows Azure compute emulator, you are ready to deploy it to the cloud and test it there.
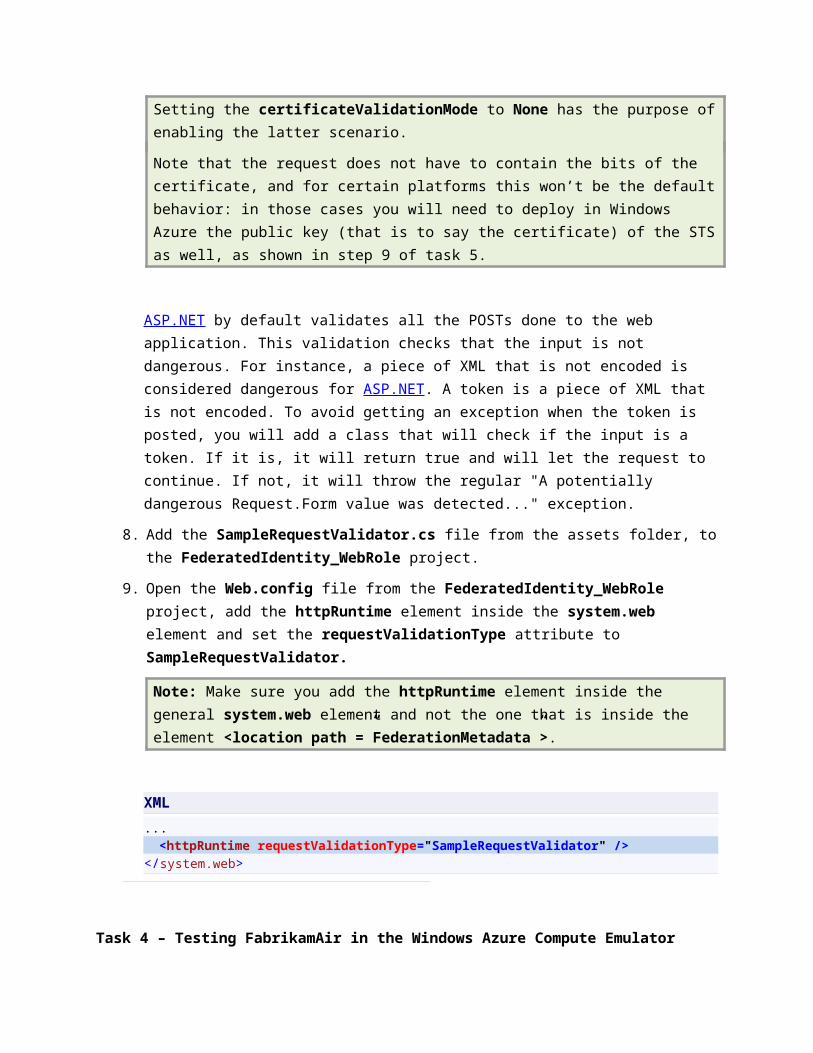
Figure 23Cloud Deployment
In this task you will publish your project to the staging environment, test it, and finally move it to the production environment
Note: Please remember that to be able to deploy in the cloud you need an account on the Management Portal.
Steps of this task assume that you comply with the above requirement, that you have a subscription in place but that you did not create a service for this application yet.
1. Navigate to http://windows.azure.com using a Web browser and sign in using your Windows Live ID.
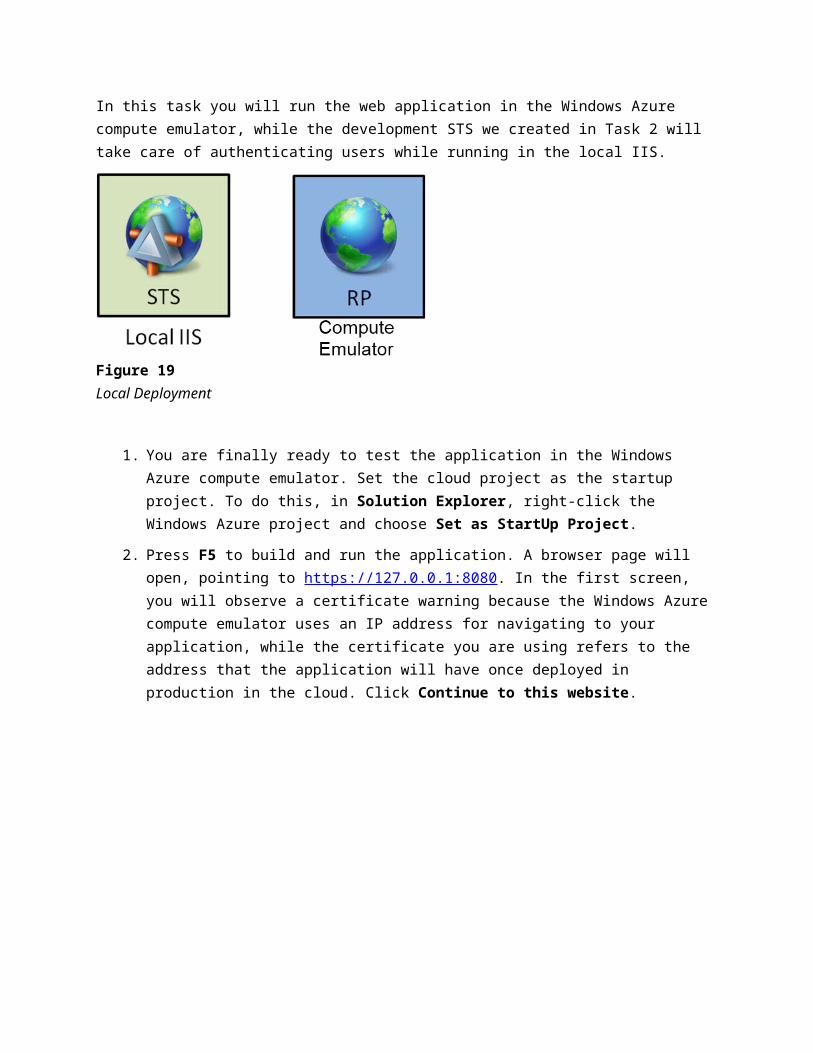
Figure 24Signing in to the Management Portal
2. Create the compute component that executes the application code. Click Hosted Services on the left pane. Click on New Hosted Service button on the ribbon.
Figure 25Creating a new hosted service
3. In the Create a new Hosted Service dialog, select the subscription where you wish to create the service from the drop down list labeled Choose a subscription.
Figure 26Choosing your subscription
4. Enter a service name in the textbox labeled Enter a name for your service and choose its URL by entering a prefix in the textbox labeled Enter a URL prefix for your service, use same project name you used to generate the certificates in task 1.
5. Select the option labeled Choose a region and then pick any of the available regions.
6. Select the option labeled Do not Deploy.
Note: While you can create and deploy your service to Windows Azure in a single operation by completing the Deployment Options section, for this hands-on lab, you will defer the deployment until the next steps.
Figure 27Create a new hosted service dialog fulfilled
7. Click OK to create the hosted service and then wait until the provisioning process completes.
Figure 28Hosted service successfully created
8. Before we can upload our package to the cloud, we need to ensure that our target environment will have all the certificates it needs for allowing our application to function as expected.
Note: In step 11 of task 1 we picked a certificate from the local certificate store to act as the SSL certificate for our application. Now that we are preparing to deploy our application to the cloud, we need to ensure that the certificate and its private key will be available in our target deployment environment. Note that in this lab we do not take advantage of token encryption: if we did, we would have to decide if we want to decrypt tokens with the same certificate we use for SSL (in which case we would already be all set) or if we would want to use another one. In the latter case, we would need to repeat the steps 10 to 13 below for uploading the pfx encrypting certificate and its private key.
Trust management via STS certificates requires some specific considerations: see the note in step 7 of task 3.
9. Expand the project you have just created, select the Certificates folder and click Add Certificate on the Hosted Service Certificates ribbon.

Figure 29Adding a certificate
10. Click Browse to select the SSL certificate created on Task 1, Step 7 and 8.
Figure 30Select the SSL certificate to upload
11. Navigate to the folder where the certificate was created \Source\Assets\certs and select the file called <yourpProjectName>.cloudapp.net.pfx.
Note: Make sure to select the .pfx file extension.
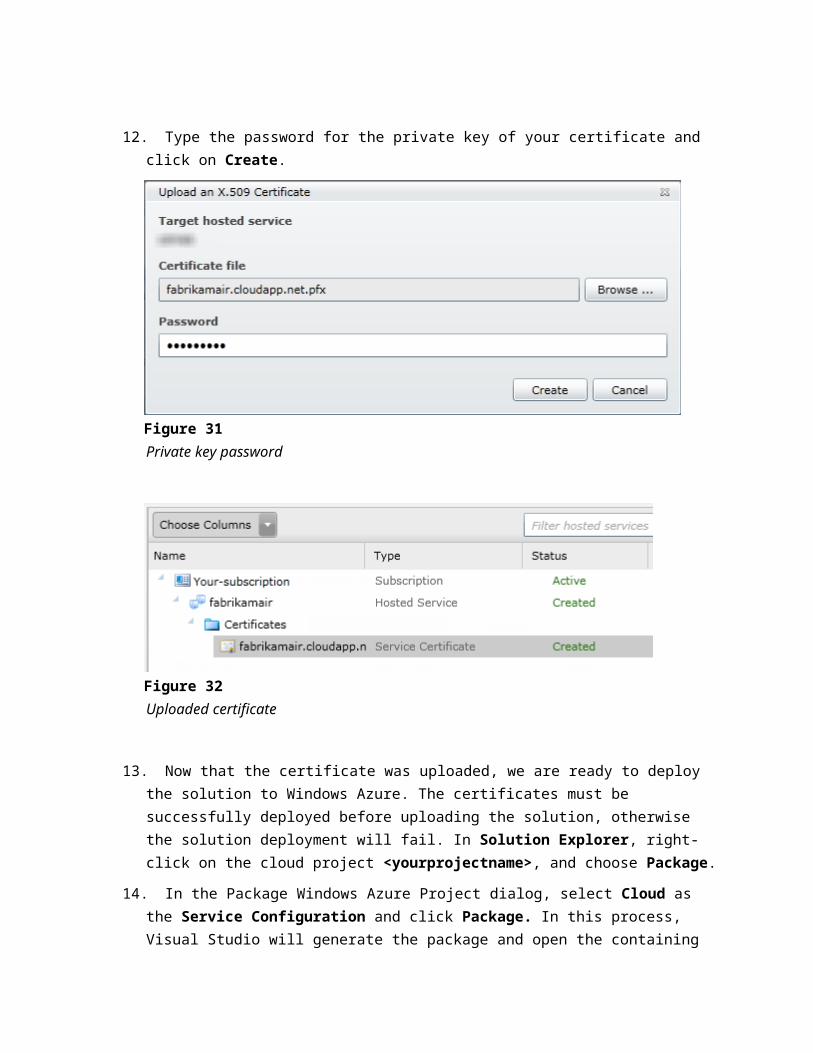
12. Type the password for the private key of your certificate and click on Create.
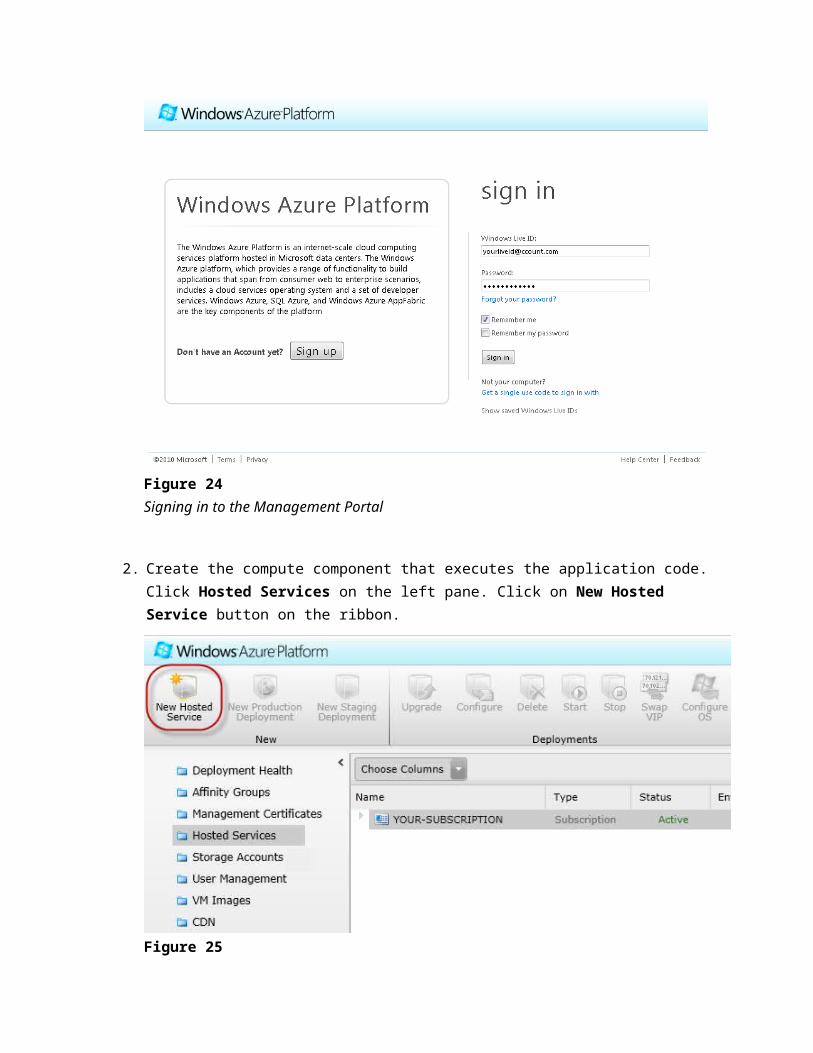
Figure 31Private key password
Figure 32Uploaded certificate
13. Now that the certificate was uploaded, we are ready to deploy the solution to Windows Azure. The certificates must be successfully deployed before uploading the solution, otherwise the solution deployment will fail. In Solution Explorer, right-click on the cloud project <yourprojectname>, and choose Package.
14. In the Package Windows Azure Project dialog, select Cloud as the Service Configuration and click Package. In this process, Visual Studio will generate the package and open the containing folder with the package and configuration file. You will use these files later.
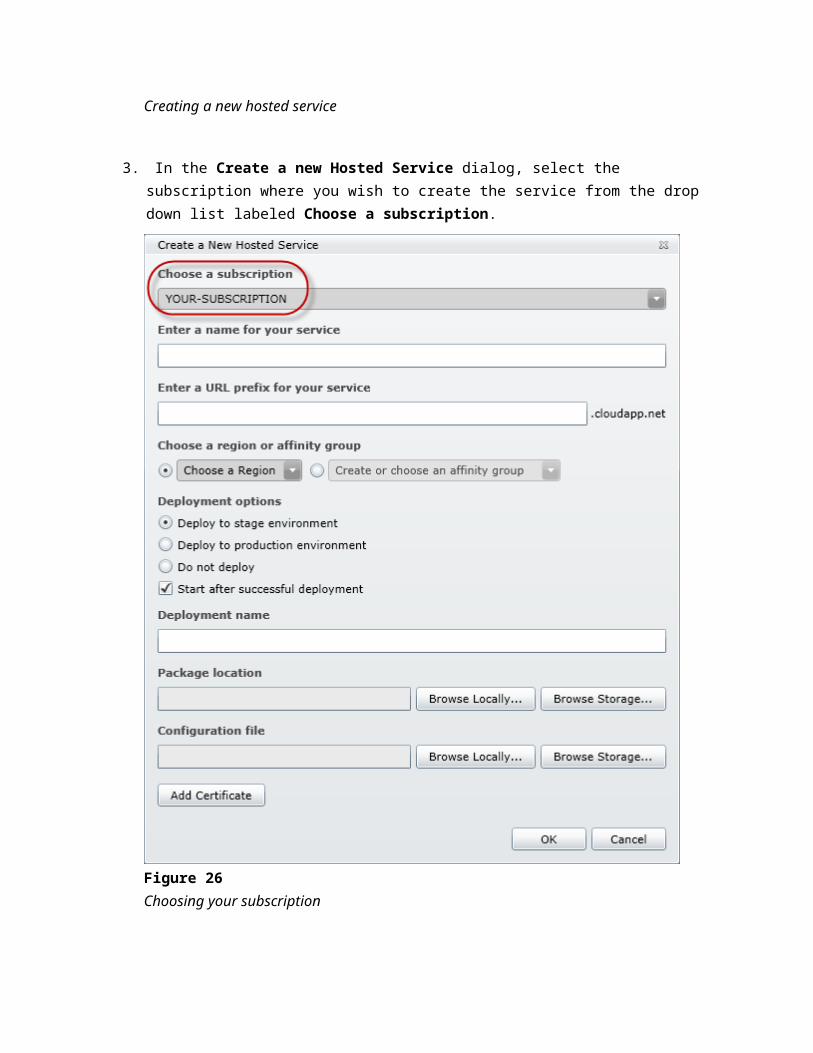
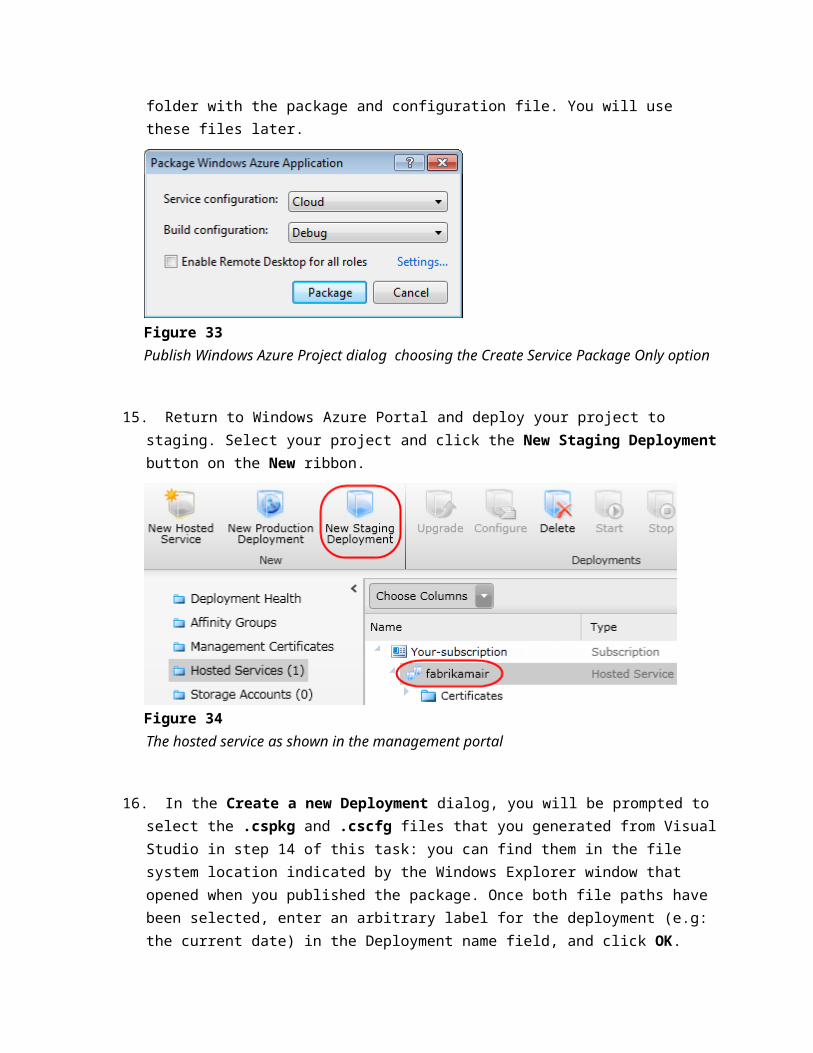
Figure 33Publish Windows Azure Project dialog choosing the Create Service Package Only option
15. Return to Windows Azure Portal and deploy your project to staging. Select your project and click the New Staging Deployment button on the New ribbon.
Figure 34The hosted service as shown in the management portal
16. In the Create a new Deployment dialog, you will be prompted to select the .cspkg and .cscfg files that you generated from Visual Studio in step 14 of this task: you can find them in the file system location indicated by the Windows Explorer window that opened when you published the package. Once both file paths have been selected, enter an arbitrary label for the deployment (e.g: the current date) in the Deployment name field, and click OK.
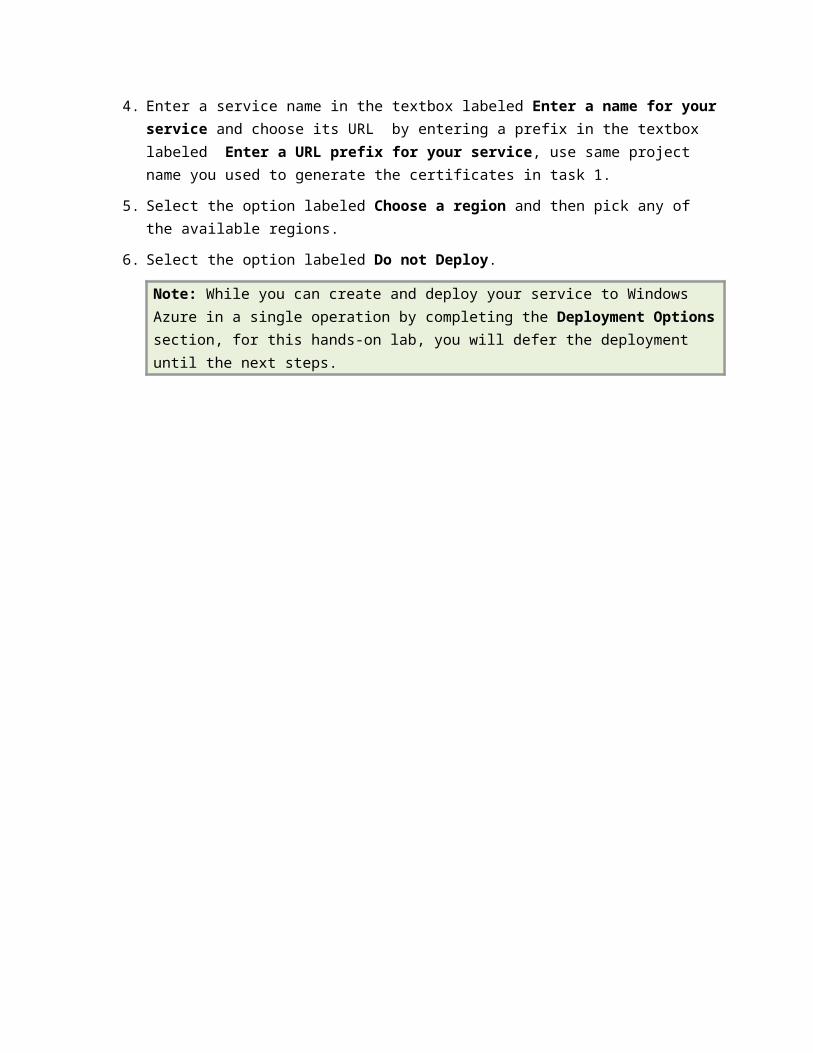
Figure 35Deploying to staging
17. If a warning popup appears, review the warnings and click Yes button to override them.
18. The project has been deployed in the Staging environment and has been assigned an URL of the form <GUID>.cloudapp.net.
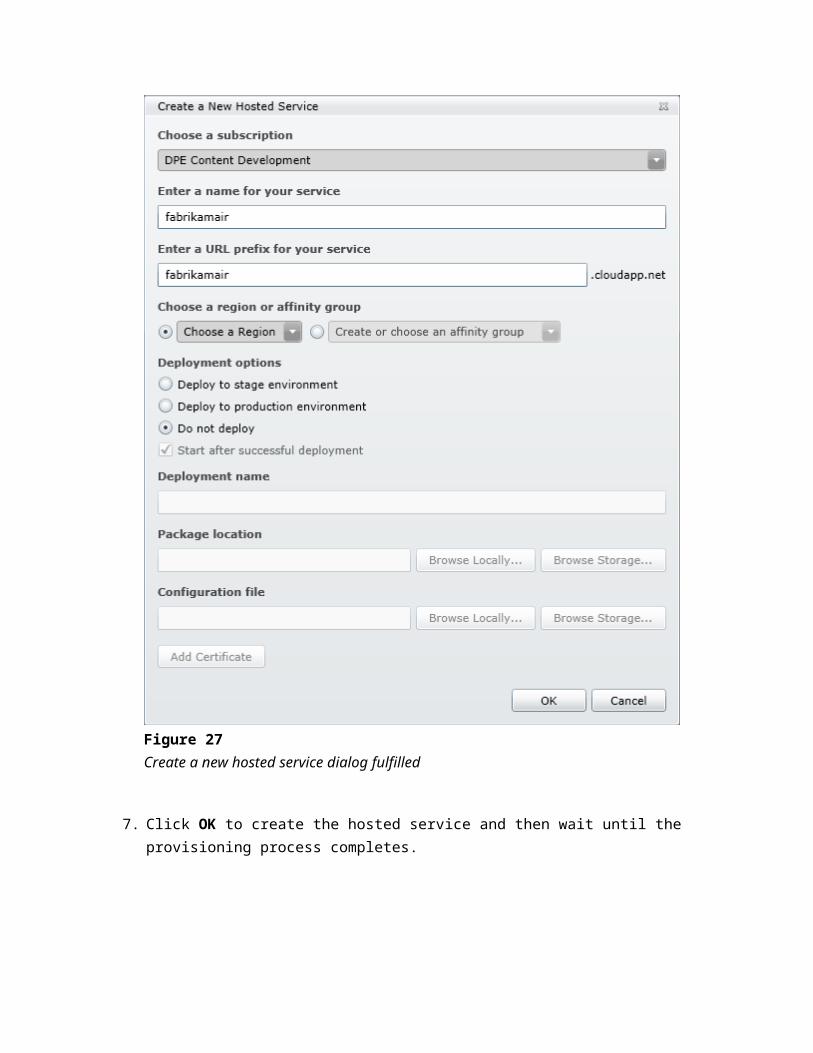
Figure 36Package deployed in Staging and ready to run
19. The application will spend some time Initializing (this might take 10 minutes at most). Once it goes into Ready status, click the DNS name link. A new browser will open, and you will get an error since the link is on http while you exposed only on https. Add the “s” to the protocol and the port number (i.e. https://5a90bc689ebd401c9c1d43b5cd200d7d.cloudapp.net:8080) in the address bar, and press ENTER. A certificate warning will be issued, since the staging URL, that contains a Guid, does not correspond to the certificate fabrikamair.cloudapp.net; you will be redirected to the development STS on your localhost; finally, you will land on the staging application where you will successfully authenticate.

Figure 37The web application running in Staging environment
20. Now you are finally ready to promote the deployment to Production. Ensure the current deployment is selected and click the Swap VIP button from the Deployments ribbon. Click OK on the Swap VIPs dialog.
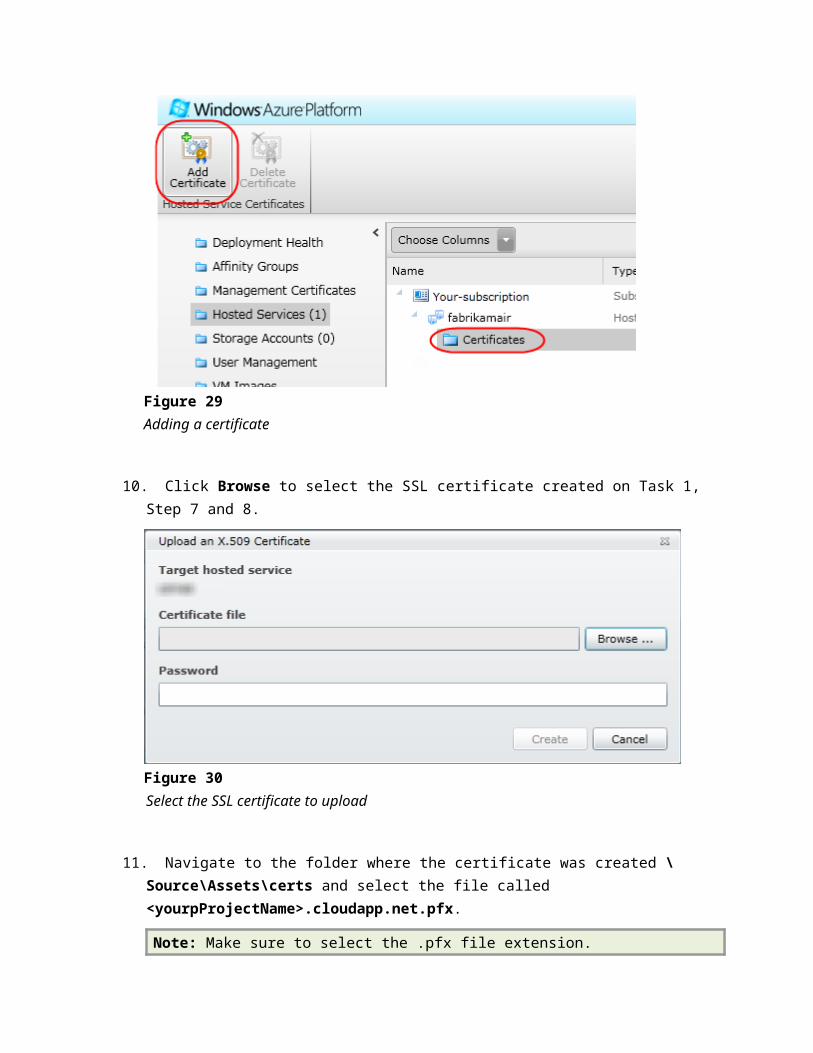
Figure 38Swap from Staging to Production
Figure 39Swap VIPs dialog
21. The project is now deployed and running in production. Click the DNS name link. You will need to manually add the “s” to the protocol and the port number (i.e. https://<yourProjectName>.cloudapp.net:8080) in the address bar, and press ENTER. This time you will not receive any certificate warning because the DNS name matches the certificate you uploaded. The browser will be redirected to the local STS running on your local IIS. Click Submit to authenticate. The home page of the website will show the claims issued by the STS.
Figure 40The web application running in the Production environment with an HTTPS certificate
Summary
Taking advantage of existing identities in new applications is one of the fundamental requirements in today’s distributed systems, and the new wave of cloud based services is no exception.
By completing this hands-on lab you have learned:
How to externalize authentication for a Windows Azure Web Role application, by taking advantage of Windows Identity Foundation for federating with an external authority (here simulated by a development STS).
[Optional] How to deploy such an application in Windows Azure and take care of the operations (such as deploying certificates) that are necessary for making the application work as expected in federated and SSO scenarios.
As you have discovered while going through the lab, the claims-based approach to identity enabled by Windows Identity Foundation can be applied with little or no modification to both on-premises or cloud application.
We hope that the programming skills you learned in this and the other identity labs will enable you to write solutions with the confidence that no matter where your application will end up being deployed, you took care of identity in consistent and effective manner.