felted rosette clutch rosette clutch supply list: ... • felting supplies you will need either a...
TRANSCRIPT

- 1 -
Originally published 2006 ~Revised 2008 Bethany A Dailey~ http://GettinItPegged.com
For non-commercial, private use only~ All rights reserved
� Felted Rosette Clutch �
Supply List:
• Reg-Lrg Gauge Loom with at least 40 pegs. The Yellow & Blue Round Knifty Knitters were used to create sample.
• 100% Wool #4 Worsted Weight yarn. Sample uses Patons Classic Wool Yarn, in Leaf Green and Purple
*note: make sure your yarn is feltable!
• Loom Tool, Yarn needle, & 6 mm Crochet Hook *note: I really like to use a metal wool needle, which has a loop of filament, rather than a needle eye. This makes threading yarn much easier, and makes sewing thru thick felted wool a snap. The crochet hook comes in handy for cast ons, picking up stitches, etc. and should always be on hand. We will also be using it for the assembly
of the clutch strap.
• One sm. piece of Velcro, or a Snap, & Sewing Needle/Thread Make sure the Velcro/snap is the sew-on kind, not adhesive! ☺
• Felting Supplies You will need either a washing machine set on the hot water cycle, or a tub with hot water, 1 tablespoon of laundry soap or baking soda, a mesh laundry bag or pillow
case and an absorbent towel.
- 2 -
Originally published 2006 ~Revised 2008 Bethany A Dailey~ http://GettinItPegged.com
For non-commercial, private use only~ All rights reserved
� The Clutch: ● Using 2 strands held as one, EW CO to your loom using 40 pegs. The sample used one strand of each color…you may choose to do this for a variegated look, or use 2 strands of the same color to for a solid patterned clutch.
● Row 1-40: EW Panel Knit. Do not slip stitch turning pegs throughout pattern.
● BO all pegs using basic BO as detailed in the Key. Weave in all loose ends.
� The Rosette: ● Using 2 strands of your desired rosette color held as one, CO to 24 pegs.
● Rows 1-8: EW PK.
● BO using the Decrease BO method, leaving a
16” tail. � There is a tutorial video demonstrating this BO and the formation of the rosette in detail here: http://gettinitpegged.com/twisted-stitches/
● Thread your tail onto your yarn needle. Begin rolling the side opposite your tail into a rosette shape, following the natural curve of the gathered BO edge. When you’ve completed shaping your rosette, stitch in place permanently with your tail & needle.
� The Leaf: ● Using 2 strands of your desired leaf color held as one, CO to 15 pegs.
● Rows 1-8: EW PK.
� The Strap: ● Using 2 strands of your desired strap color held as one, crochet a simple chain of 26” in length. Knot. (you may instead create a 2 peg I-cord if this is preferable to you.)
� Felting: ●Now it’s time to felt all your pieces! Remember that during the felting process, the wool will shrink significantly. I’ve noticed about a 45% shrinkage in width, and about a 15-20% shrinkage in length in projects knitted with the larger gauge looms, such as the Knifty Knitters.
Pattern & Instructions Key Cast On (add new length of yarn to loom using number of pegs and method stated)
CO
Working Yarn (yarn connected to skein)
WY
E-Wrap Knit (method of knitting by wrapping each peg with WY while keeping connecting lines to the inside of loom.)
EW
Knit Off (lift bottom loop over top loop and off the peg to the inside of the loom)
KO
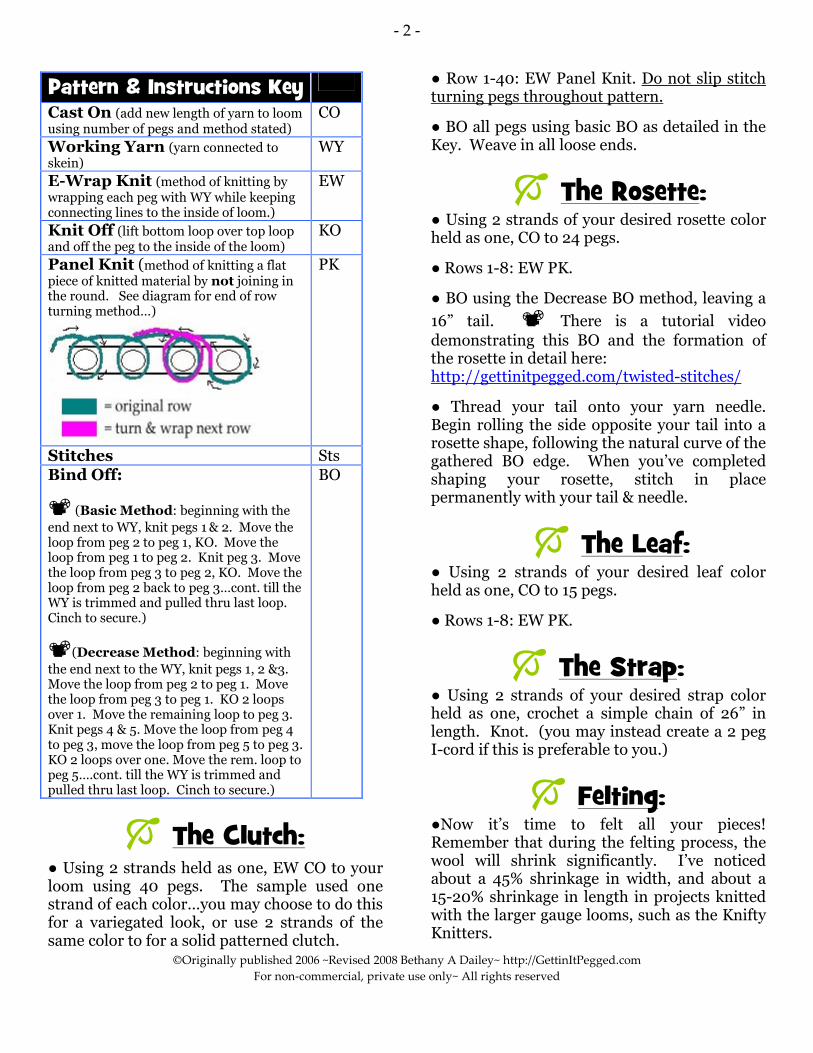
Panel Knit (method of knitting a flat piece of knitted material by not joining in the round. See diagram for end of row turning method…)
PK
Stitches Sts Bind Off:
� (Basic Method: beginning with the
end next to WY, knit pegs 1 & 2. Move the loop from peg 2 to peg 1, KO. Move the loop from peg 1 to peg 2. Knit peg 3. Move the loop from peg 3 to peg 2, KO. Move the loop from peg 2 back to peg 3…cont. till the WY is trimmed and pulled thru last loop. Cinch to secure.)
�(Decrease Method: beginning with
the end next to the WY, knit pegs 1, 2 &3. Move the loop from peg 2 to peg 1. Move the loop from peg 3 to peg 1. KO 2 loops over 1. Move the remaining loop to peg 3. Knit pegs 4 & 5. Move the loop from peg 4 to peg 3, move the loop from peg 5 to peg 3. KO 2 loops over one. Move the rem. loop to peg 5….cont. till the WY is trimmed and pulled thru last loop. Cinch to secure.)
BO

- 3 -
Originally published 2006 ~Revised 2008 Bethany A Dailey~ http://GettinItPegged.com
For non-commercial, private use only~ All rights reserved
● If you’re using your washing machine, it’s a good idea to place your pieces into a laundry mesh bag, or a pillow case knotted at one end before felting. Not only does this protect your project, but it also protects your washing machine! A lot of wool lint can shed off during the felting process, and can clog up your drain spout…not fun!!!
● Add a tablespoon of laundry soap or baking soda to the wash. Throw in an old pair of jeans, or a towel that will not shed lint onto your project. This creates the extra agitation you need for felting. If you’re felting by hand, using hot water in a tub or sink, rub the project together briskly onto each other, and in your fingers, making sure to get every little piece thoroughly agitated. You can use the aid of a clean ice cube tray, or a new ;) plunger as well. ● Let the cycle wash for about 10-15 minutes, checking occasionally to make sure of the size of your finished felted pieces. It’s really easy to leave a project in a tad too long and have your carefully knitted pieces turn out too small, or oddly shaped! So, make sure to keep checking on it… you’ll know it’s complete when your pieces are the desired size, and the knitted stitches are blurred, or even completely blended together. ● Removed your finished felted pieces, and blot them thoroughly with your absorbent towel. Stretch your bag and leaf pieces flat and square, and mold the rosette into the desired shape.
� Assembly: I like to assemble my felted pieces while they’re still damp. Doing it this way makes the pieces dry into the shape I want it to end up in, therefore setting it permanently.
● Fold the large bag piece up two thirds in length and blanket stitch in place using the sharp yarn needle and the rosette colored yarn. ● Continue blanket stitching around the top flap and across the opening of the bag. *Note: Shape the bag as you stitch, so that the piece will dry into the shape that you desire. ● Stitch the Velcro patch or snap in place for your closure, using your needle and thread. ● Cut 2 leaf shapes out of the leaf square. Stitch into place on the left side of the outside flap using a long strand of rosette colored yarn and your sharp yarn needle. Keep your sts small and located where your rosette will cover. ● Using the same length of yarn, stitch your rosette into place over the leaves, using sts to permanently mold your rosette into the shape you desire. ● For the strap, use your crochet hook to pull the 2 ends of your felted chain through the top left corner of your purse, slightly behind the top of the flap. Tie ends together in an overhand knot and trim ends. ● Let your clutch dry completely, stretching and shaping occasionally as it dries.
� Enjoy! ***Make sure to send me a picture or two of your Rosette Clutch to use on the Clique Pics page of my blog! Send them to:
…and of course, feel free to post them in your own photo album at the Loom Knitter’s Chat Clique! ☺