fielding drills - bsbproduction.s3.amazonaws.com to try to get the tag out. coaching tips: • this...
TRANSCRIPT

1
Fielding Drills
DRILL #1 – BALL TO FIRST
DRILL #2 – SCOOP DRILL
DRILL #3 – PAST BALL
DRILL #4 – ALLIGATOR ARMS
DRILL #5 – STOP AND GO
DRILL #6 – ROLLERS
DRILL #7 – STEP AWAY TOSS
DRILL #8 – LEAD RUNNER
DRILL #9 – HIT THE RELAY
DRILL #10 – PICKLE
DRILL #11 – THE STAR DRILL
DRILL #12 – FIRST THEN PLATE DRILL
DRILL #13 – CATCHER’S BLOCK DRILL
DRILL #14 – RICOCHET DRILL
DRILL #15 – LINE THROW RELAY
DRILL #16 – THIRD THROW OUT
DRILL #17 – TAG OUT
DRILL #18 – KNOW WHERE TO GO
DRILL #19 – CATCH & THROW
DRILL #20 – THROW THEM OUT
DRILL #21 – DOUBLE PLAY BALL
DRILL #22 – PEPPER
DRILL #23 – CATCH THE FLIES
DRILL #24 – MAKE THE PLAY

2

3
DRILL #1 – BALL TO FIRST
Skill Level: Beginner
Purpose:
It is important for younger players to understand what happens when the ball is hit and it comes to
them. Most will be focused on actually stopping the ball, but when they do secure it in their gloves,
they need to know where to throw it.
Setup:
The players should have their gloves on and you can send them out to second base. Have one
player play first base to field the throws. You can also have one near you (home plate) to field balls
from first base to home.
Execution:
1. Toss or lightly hit the ball to the players in line at second base.
2. Players work on both fielding the ball and making a good throw to first.
3. The first baseman then throws the ball home.
4. Players can then rotate: the fielder goes to first, the first baseman goes to home plate, and then the ‘catcher’ will go to the back of the fielding line. Once the players get the hang of it, you
might be able to just keep hitting in succession as all the players go through the drill.
Coaching Tips:
• Explain to your players that when they get the ball, one of the first places they are going to throw is first base.
Players work on both fielding and throwing to the appropriate base in this team drill.
4
• So players understand where all of the bases are, you can run this drill from any position on the
infield, and throw to any base. Keep the throw length reasonably short (shortstop to 2nd or
3rd, 1st to 2nd etc.) for the younger players.
DRILL #2 – SCOOP DRILL
Purpose:
This is a great drill to help younger players learn which way to use their glove.
Setup:
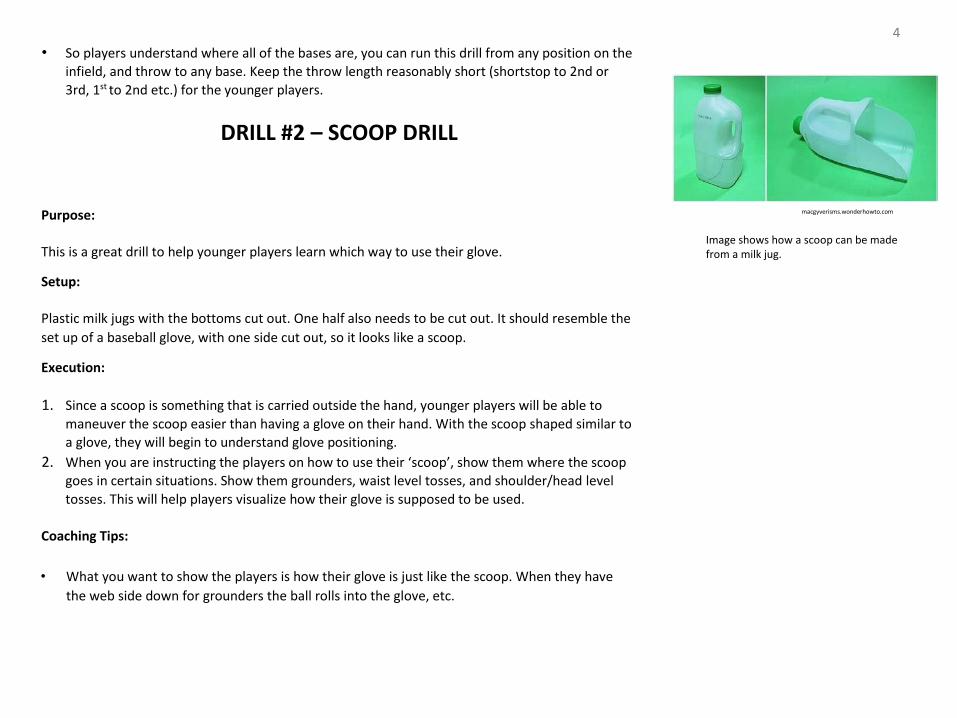
Plastic milk jugs with the bottoms cut out. One half also needs to be cut out. It should resemble the
set up of a baseball glove, with one side cut out, so it looks like a scoop.
Execution:
1. Since a scoop is something that is carried outside the hand, younger players will be able to
maneuver the scoop easier than having a glove on their hand. With the scoop shaped similar to a glove, they will begin to understand glove positioning.
2. When you are instructing the players on how to use their ‘scoop’, show them where the scoop goes in certain situations. Show them grounders, waist level tosses, and shoulder/head level
tosses. This will help players visualize how their glove is supposed to be used.
Coaching Tips:
• What you want to show the players is how their glove is just like the scoop. When they have
the web side down for grounders the ball rolls into the glove, etc.
Image shows how a scoop can be made from a milk jug.
macgyverisms.wonderhowto.com

DRILL #3 – PAST BALL
Purpose : Teaches younger players how to field properly by getting
them in front of the ball.
Setup:
Gloves and balls. Two pylons about 10’ apart.
Execution:
1. Explain to the players that they cannot let the ball get past
them and cross the imaginary line between the two pylons.
2. Roll, or bounce ,the ball towards the player in an attempt
to get the ball past them.
3. Instruct them on how to shuffle from side to side with their
glove in front of them to get their entire body in front of the ball.
Coaching Tips: You will probably have a few players who don’t want
to get in front of the ball because they fear it will hurt them. This is completely normal for players

at a younger age. If you want, try the drill with soft baseballs (for T-ball level) or with tennis balls –
just to get the players used to getting hit.
DRILL #4 – ALLIGATOR ARMS
Purpose: Using two hands to catch the ball is important for younger players to learn. If you use something like Alligator arms (kids like
alligators), it will give them a better understanding of what is expected of them when they field a ball.
Setup:
Gloves and balls.

Execution:
1. Have the players stand in a single file line in the fielding ready position.
2. When you roll the ball, have them place their glove down in front of the ball, and explain
to them that when the ball reaches their glove, the other hand should clamp down to secure the
ball – just like alligator jaws – but only with their arms.
3. You can do this with waist high throws and shoulder height throws as well.
Coaching Tips:
• Prior to the drill starting, explain to the young ball players the idea of how an alligator jaw works. Then show them
how catching the ball and fielding grounders works the same way. The ball is just like an alligator’s food, and they need to
capture it with both hands.

DRILL #5 – STOP AND GO
Purpose:
This drill focuses on the proper technique needed to field a ground ball. Players also working on balance and mechanics.
Setup:
Can be performed anywhere on the field. Players should form a single-file line facing the coach.
Execution:
1. Coach says “Creep” and first player takes a few steps forward and assumes a defensive ready position with knees bent, glove out in front, with a slight forward lean.
2. The coach rolls a ground ball to the player.
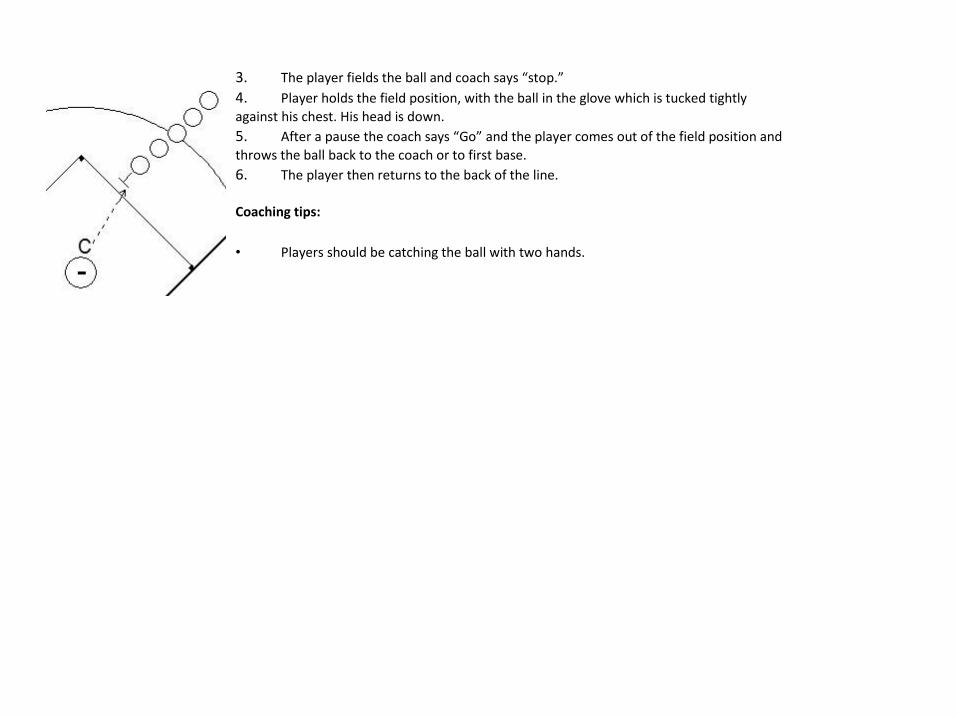
3. The player fields the ball and coach says “stop.”
4. Player holds the field position, with the ball in the glove which is tucked tightly
against his chest. His head is down.
5. After a pause the coach says “Go” and the player comes out of the field position and
throws the ball back to the coach or to first base.
6. The player then returns to the back of the line.
Coaching tips:
• Players should be catching the ball with two hands.

DRILL #6 – ROLLERS
Purpose:
Defensive players work on fielding ground balls and develop their hand-eye coordination.
Setup:
Players get on knees about 10 feet from each other anywhere on the infield.
Execution:
1. Players roll the ball to each other. First directly to each other and then off to either side.
2. Players catch the ball directly or with their forehand or backhand.
Coaching Tips:
• Players should be fielding the ball with two hands and watching the ball into their mitts.

DRILL #7 – STEP AWAY TOSS
Purpose:
Learning to throw and catch are two of the most basic elements of baseball. This drill teaches your
players to do both while also conditioning them to throw both longer and
shorter distances.
Setup:
Balls, gloves and an even number of players. You will set the players up facing each
other about one stride apart to begin.
Execution:
1. With the players facing each other about 3’ apart, they should be instructed to place the ball in the other player opposite’s glove to start.
2. The catching player needs to use the ‘alligator arms’ approach to collecting the ball in their glove.
3. Once both players successfully execute this part, they take one giant step back from one another and
toss the ball to each other.
4. They continue taking a step back and tossing the ball to each other until the coach says “stop.”
Coaching Tips:
• Make sure that each time the players take a step back that they are adjusting their throwing and
catching appropriately to the new distance. It’s important that players learn when to throw
softer and when to throw harder.

DRILL #8 – LEAD RUNNER
Purpose:
Players learn to field the ball and make the correct play in different runner-on-base situations.
Setup:
Set up a regular infield with all positions on the field. Have a runner on first base.
Execution:
1. With the runner of first base, you can hit to all of the positions and have them throw the ball to
where the lead runner is headed (second base).
2. Go through all of the positions and force them to not only field the ball, but to make the
decision to throw it to second base rather than immediately to first.
Coaching Tips:
• To make this drill even more interesting, you can either put a player on first and second, or just
on second. The first option makes the player throw it to either first, second or third, depending
on the lead runner, and if they can make the throw on time. The second option can be done
with the player on second base making a decision to run or not to run, making the fielding
player decide to play the runner on second, or make the throw to first.
Players work on fielding and throwing out the lead runner in this drill.
DRILL #9 – HIT THE RELAY
Purpose:
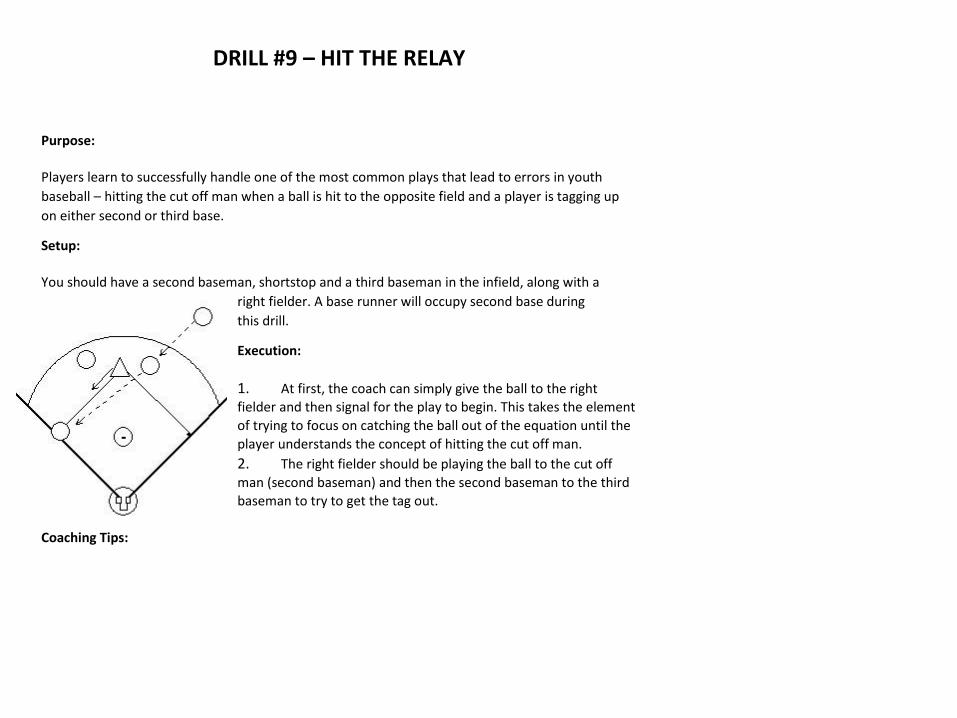
Players learn to successfully handle one of the most common plays that lead to errors in youth
baseball – hitting the cut off man when a ball is hit to the opposite field and a player is tagging up
on either second or third base.
Setup:
You should have a second baseman, shortstop and a third baseman in the infield, along with a
right fielder. A base runner will occupy second base during
this drill.
Execution:
1. At first, the coach can simply give the ball to the right fielder and then signal for the play to begin. This takes the element
of trying to focus on catching the ball out of the equation until the
player understands the concept of hitting the cut off man.
2. The right fielder should be playing the ball to the cut off
man (second baseman) and then the second baseman to the third
baseman to try to get the tag out.
Coaching Tips:

• This drill can also be run with a left fielder and a base runner on third base. Then the drill would
be from the left field to the shortstop and then to home plate. Further, you can add the extra
element of catching the ball once the players understand the importance of hitting the cut off
man.

DRILL #10 – PICKLE
Purpose:
Both the runners and the fielders learn what they need to do when they a runner is caught in-between two bases, which is a common
occurrence in youth baseball.
Setup:
Set up 4 stations. You will need three people per station (2 fielders, 1 runner). The bases should be 30 feet apart.
Execution:
1. The fielders need to work the ball back and forth in an attempt to get the runner out.
2. The runner needs to try to advance to third base or get back safely to second.
3. You can award the fielders two points if they get the runner out. One point if they get the runner back to second, zero points if the runner gets to third base.
4. Play the game until the fielders get 5 points. Rotate the players at this point.
Coaching Tips:
• Once the players have mastered this aspect of the drill, then you should advance it to the standard tactic where players are backing each other up and rotating as the rundown advances.

DRILL #11 – THE STAR DRILL
Purpose:
Reinforces the need for quality throws in the infield.
Setup:
Put an entire infield together, along with an outfield. The outfield will be more for support rather than
being completely involved in the star. You will also need a base runner.
Execution:
1. The coach will hit the ball to the second baseman, who will then throw it to the third baseman,
then the first baseman, then the shortstop, who then throws it home.
2. There is a runner that starts at first base and runs when the ball is first hit by the coach. The runner
continues to run while this star drill is going on.
3. The ball must get to all positions in the star before the runner gets to home plate.
Coaching Tips:
• This drill stresses the importance of good quality throws to each position, under the pressure of beating the runner. The outfielders will
come into play when a ball is overthrown or missed by the infielder.
Players must complete the star pattern before the runner reaches home.

DRILL #12 – FIRST THEN PLATE DRILL
Purpose:
This is a good workout for the infielders to help build throwing accuracy.
Setup:
You need to field an entire infield for this drill. The coach will bat grounders to each position.
Execution:
1. Each time it is the same thing for each player when they get the ball hit to them.
2. First, the coach will hit to the player and they will field the ball and throw to first, then the coach will
dribble a ball that the fielder must charge, scoop and then throw to the catcher. Then they are done.
3. Coach will cycle through all of the positions on the field, and each one of them will do the same thing
– go to first and then to the catcher.
Coaching Tips:
• The key is to watch for good fielding and throwing skills.
• This is a drill that you can incorporate into your pre-game routine just to get your players warmed up with a little infield practice. It helps get them into the action and develops good skills.
First Then Plate Drill for the third baseman.

DRILL #13 – CATCHER’S BLOCK DRILL
Purpose:
Catchers learn to effectively knock down errant pitches.
Setup:
If you have more than one catcher that regularly plays for your team, you can work with each one of them. They
should each have a pitcher to work with.
Execution:
1. Pitchers (or a coach) will take turns throwing good pitches and then throwing
the odd hard one into the dirt.
2. The catcher is going to have to try and react accordingly and knock the ball
down. It is important for the catcher to get his body in front of the ball instead of just
trying to knock it down with the glove.
Coaching Tips:
• You can make this drill more effective, and more game-like, if you include a batter who is going
to take a few cuts at the bad balls. This adds a little distraction to the catcher.
Catchers practice blocking wild pitches.

DRILL #14 – RICOCHET DRILL
Purpose:
This drill is used to teach catchers to trust their protective equipment and to concentrate on the ball.
Setup:
Two players will stand in front of the catcher, each with a ball in his hand.
Execution:

One player will flick a ball at the catcher’s mask and the other will toss a pop up somewhere within the catcher’s range.
1. The catcher must shake off the ball in the mask to find the pop up
and to make the catch.
Coaching Tips:
• Make sure catchers are maintaining focus on the ball and using good
fundamentals despite the distractions.
.

DRILL #15 – LINE THROW RELAY DRILL
Purpose:
This drill is going to work on the accuracy of your players’ throws.
Setup:
You need to separate your team into groups of four. Line up the players from the first base line out into
left field. Put the infielders in the middle two spots, because it allows them to work on their relay
throws.
Execution:
1. With the first person on the first base foul line, they throw it to player number two. Then player
number two throws it back to number one. Then one to three, back to one again. This goes on to
the fourth player and then back to three, back to the third player, and then the second player, etc.
2. If, at any point there is a dropped ball, overthrow, etc., then the drill starts again from the very
beginning.
Coaching Tips:
• This drill can mean a lot of throws for the player in the one position. Once you have gone through the drill once, you can switch the
players up in order, and they can rotate who starts at the number one position.
Players work on the accuracy of their relay throws.

DRILL #16 – THIRD THROW OUT
Purpose:
Focuses on one of the most common throw out plays – right field to third base. A runner on first base will
try to beat the tag.
Setup:
You will need a full infield, along with a right fielder, a runner and the coach will be hitting.
Execution:
1. The coach will start off by hitting the ball to the right fielder. Once the ball is hit, the runner will take
off and try to make it to third.
2. The right fielder will hit the cut off man (second baseman) and then the second baseman will throw to
third.
3. For this drill, pit the runners against the fielders. Each side gets a point if they are successful. The
runners get one point if safe, and the fielders get one if they get the person out.
Coaching Tips:
• Accurate throws are important, and the tag made on third base is also important – so be sure to watch both of those aspects of the
play. On the throw, the ball should come in low and in front of the bag.
The defense tries to throw out the runner at third.

DRILL #17 – TAG OUT
Purpose:
Young players often understand how to get players out at first base and they may have also learned
the basics of a force out play. But, they must also learn about tagging players out at bases. This drill
teaches players the difference between a force out and a tag out.
Setup:
You will need players to fill the infield. Put a runner on second base to start.
Execution:
1. 1. Hit grounders to the infield with the runner on second base. The players must understand that
the player can stay at second or run. If the player runs, then they can go to third and make a tag
out. If the runner doesn’t go, then the infielder can look the runner off and then throw to first.
Coaching Tips:
• There are several different variations of this drill that your team can use. You can hit shallow fly balls into the outfield and then try and
tag out the tagged up runner. You can hit line drives through the infield and if the players catch it, they have to throw to the base with
the runner to try to get them out.
Players learn when to apply the tag in this
drill which can also be run with balls hit to the outfield.

DRILL #18 – KNOW WHERE TO GO
Purpose:
Sometimes when the ball is hit, players just don’t know where they are supposed to go. Often times, they will just sit around and watch the
play develop and not go to where they really should be. This is a great drill to help them understand their responsibilities on the field.
Setup:
You need an entire infield to start, and you can add the outfielders later, and also you can
switch up the situation by adding runners in different situations for the players on the field to
see.
Execution:
1. As the players are in the field, you can call out situations (assuming the situations have been taught). For example, what happens when a player hits a dribbler up the first base line?
2. First base runs after the ball, then second base (or pitch) covers first, short covers
second, etc.
3. You can go through several situations to get the players used to realizing that they
have a responsibility on the field. They aren’t supposed to be just standing around watching
what everyone else is doing.
Coaching Tips:
• Make a game of it by rewarding the players who get to their positions first, after a scenario is called out.
• Further, to make the drill more interesting, you can add batting into the mix. You can run two drills at once: this one, and batters trying
to hit a ground ball through the infield. This will help both sides.

DRILL #19 – CATCH & THROW
Purpose: Outfielders learn the appropriate way to approach a fly ball – especially if there is a
threatening runner on base.
Setup:
Set up three lines of players to indicate left, center and right fields. The coach should have a bat to
hit fly balls to the players. One player may be used to snag balls for the coach.
Execution:
1. At first, you might want to start with the lines close, and just hit soft, low flies so the players can work on their footwork.
2. The footwork for this drill should be taught beforehand. It should be: back up a couple of steps behind where the ball is anticipated
to drop, and keep one foot behind the other, ready to take a step forward to catch the ball with momentum.
3. Once they are ready to receive the ball, they should be stepping forward with their gloves prepared, and their throwing hand ready
to get the ball. Just prior to catching the ball, the player should take a couple of steps into the ball to build momentum and then throw
with the momentum.
Coaching Tips:
• It will take the players a little while to catch on, so at first you should only do the drill from about 25 feet away, and do short pop ups for them. As they gain confidence in preparing to throw right after the catch, you can move back and the fly balls can go higher.
• Also, you can actually add the runner that they have to throw out at second base.
Players learn to catch the ball with momentum and make good throws in this drill.

DRILL #20 – THROW THEM OUT
Purpose:
This drill focuses on fielding the ball and making a good throw while there is a runner running to
different bases.
Setup:
Field an entire infield to start this drill, along with a line of runners at home plate for when the
coach hits the ball to the players.
Execution:
1. This is your standard throwing drill – except this one has a runner headed to first base. Now the
pressure is on. The runners try to outrun the throw. The coach will go through each position
and hit a grounder to them to field and throw to first base.
Coaching Tips:
• Award one point for the fielders if they can complete the out, or award a point for the runners
that outrun the ball or make it to first base. Make it a competition between runners and
fielders.
• What should be stressed is collecting the grounders, making solid and accurate throws, and
then the ball needs to be caught.
This drill teaches players composure and reduces the chances they’ll make game- losing errors in actual competition.

DRILL #21 – DOUBLE PLAY BALL
Purpose:
The double play is one of the most exciting and effective plays in baseball. It gets a team out of a
jam when they need it the most. Here players learn to develop the excellent timing and seamless
fielding that are needed to execute it effectively.
Setup:
An entire infield is needed for this drill, along with a runner at first base (to start) and at home
plate.
Execution:
1. The coach should hit balls to the different positions, and the players need to make the throw to
second base and then turn it to first base for the double play. The runners will try to disrupt the
play, and/or outrun the ball being thrown to their base.
Coaching Tips:
• You can add a little variation to the drill by having men on first and second (and home plate) and when the ball is hit, the players have to make the decision of whether they will take the
lead runner (and double play) or if they take the easier double play and leave the lead runner.
• Further variations would also include having line drives hit and caught and then throwing to the bag where a runner was. For example, you can have a man on second and when the line drive is hit, the fielder attempts to catch the ball and then make the double play at second base.
Defense turns the 6-4-3 double play.

DRILL #22 – PEPPER
Purpose:
This is a great drill to build hand-eye coordination, quick reaction and to teach players the value of
knocking the ball down at all costs.
Setup:
Have one or two groups set up with 5 or 7 players in a line facing the coach. Gloves on and players
are spread out about 10 to 15 feet apart. One player should be snagging balls for the coach.
Execution:
1. The coach will be about 15 feet away from the player and will begin by hitting grounders and
line drives to the players. 2. He does this in random order – the players do not know where the ball is going to be hit. They
need to react quickly and then throw the ball to the player fielding balls for the coach.
3. The coach will hit the ball as quickly as he can to the different players.
4. Players are eliminated from pepper for missing balls or making errant throws.
Coaching Tips:
• Players must communicate with one another so there is no problem with collisions on the field. This happens in baseball and can be eliminated if players talk to each other while on the field.
• The focus should be on: reading, reacting, and making a good throw to person collecting balls
for the coach.
Players work on developing quick reaction times in this fast-paced drill.

DRILL #23 – CATCH THE FLIES
Purpose:
In this drill, players learn the proper footwork and improve their range to catch fly balls that are not
hit directly at them.
Setup:
Line up the fielders in all three of the fields. Coach will hit the balls to the players.
Execution:
1. Prior to doing the drill the players should understand the fundamentals of catching high fly balls that are not hit directly to them. They should understand the proper ‘stalking’ of a fly ball. The
coach should stress that the player take the first step with their glove side foot, and move
quickly to anticipate the direction of the ball, and then get under it.
2. During the drill, coach will hit fly balls to the players.
Coaching Tips:
• Dropped balls are usually caused by improper approach to the ball and then a lack of
concentration. Emphasize those areas and help your players learn by repetition. • You can
also use this drill to help players adjust to high fly balls. Many times players can misjudge these
balls. Constant repetition is important in gaining an understanding of how the ball is going to
travel.
Players work on taking the proper route to catch fly balls.

DRILL #24 – MAKE THE PLAY
Purpose:
Baseball has many different defensive combinations, and in this drill players gain an understanding
of their responsibilities in different situations and how to make the right play when they are called
upon.
Setup:
You need to field an entire defensive team for this drill. Along with that, you need one or two
runners for this drill. The coach will be setting up different scenarios with the runners.
Execution:
1. This is your standard fielding drill, but with a twist. It isn’t just a throw to first, although it could
be. The coach can set up any number of different plays to cover. It could be a player stealing
bases, a fly ball with a runner tagged up on third, or a potential double play ball, etc.
Coaching Tips:
• Don’t let the fielders know what is going to happen next. That way they need to read and react
to the play that is going on.
Defensive players must read the situation and make the right play.
