figure-1 parts of the smartx rotary actuator
TRANSCRIPT

Schneider Electric 1-888-444-1311 www.schneider-electric.com Product Support Services F-26736-3 April 2014
MF41-6043 SeriesMS41-6043 Series
SmartX ActuatorsNon-Spring Return
Direct CoupledGeneral Instructions
Figure-1 Parts of the SmartX Rotary Actuator
Product Description These installation instructions describe the steps for direct coupled mounting of the following SmartX Actuators: 35 lb-in MF41-6043 Series and MS41-6043 Series non-spring return rotary electronic damper models.
Product Numbers3-position control: MF41-6043, MF41-6043-502, and MF41-6043-510
Modulating control: MS41-6043, MS41-6043-502, MS41-6043-520, and MS41-6043-522
Required Tools• 3 mm hex wrench
• 4 mm (5/32-inch) drill bit and drill
• Phillips small flat-blade screwdrivers
• Marker or pencil
Warning/Caution Notations
Warning: Personal injury/loss of life may occur if a procedure is not performed as specified.
Caution: Equipment damage or loss of data may occur if the user does not follow a procedure as specified.
Estimated Installation Time30 minutes
Instructions
Warning: Do not open the actuator.
Note: Place the actuator on the damper shaft so that the front of the actuator is accessible. The label is on the front side.
1. Determine whether the damper blades will rotate clockwise or counterclockwise to open. See Figure 7.
2. If the blades will rotate counterclockwise, slide the manual override switch to manual, and move the adjustment lever to the right. Return the switch to automatic. See Figure 10.
Note: To wire an MF41-6043 Series actuator (three-position) for counterclockwise rotation, follow the Counterclockwise Damper Rotation instructions located in the Wiring Diagrams section when wiring the actuator to the controller.
3. If the actuator model has any switches or adjustments, set them with the following instructions.

2
Schneider Electric 1-888-444-1311 www.schneider-electric.com Product Support Services F-26736-3 April 2014
DIP Switch Settings
For MS41-6043 Series only
1. To access the Dual In-line Package (DIP) switches, raise the tab on the lower left side of the actuator. See Figure 7.
Self-Adapt Switch (Factory setting = 0 or OFF)
Figure-2 Self-Adapt Switch.
When using the mechanical range stop screw to limit the angle of damper blade rotation (see the Mechanical Range Adjustment section for details), turn the self-adapt switch ON so that the adjusted range will become the new 0 to 100% for the actuator logic. In this case, 0 to 100% is not equal to 1.
The position output signal U is not influenced by the self-adapt function. The 0 to 10V feedback signal U is always proportional to 0 to 1 (or 1 to 0).
Direction of Rotation Switch (Factory setting = Clock wise)
Figure-3 Direction of Rotation Switch.
The direction of rotation switch should match the damper rotation movement.
Output Signal Switch (Factory setting = Direct Acting)
Figure-4 Output Signal Switch.
As the clockwise angle of rotation increases, the output voltage increases.
If the direction of rotation is counterclockwise, the output signal switch should be set at reverse acting to match the direction of the rotation switch.
2. Close the tab over the DIP switches.
Span (slope) and Start Point (offset) Adjustment
For MS41-6043-520 and MS41-6043-522 only
Factory setting:Span (slope) DU ≈10Start Point (offset) Uo = 0
Use a flat-blade screwdriver to make adjustments. The long arm of the X points to the setting.
Figure-5 Span and Start Point Adjustments.
Dual Auxiliary Switch Setting
For MF41-6043-502, MS41-6043-502, and MS41-6043-522 only
Factory setting:A = .05B = .95
Use a flat-blade screwdriver to adjust the A switch. The long arm of the X points to the setting. Manually turn the red ring of the B switch. The narrower tab on the ring points to the setting.
The auxiliary switch setting shafts rotate with the actuator. The scale is valid only when the actuator is in the “0” position on clockwise motion.
Figure-6 Auxiliary Switches.
Figure-2 Self-Adapt Switch.

3
Schneider Electric 1-888-444-1311 www.schneider-electric.com Product Support Services F-26736-3 April 2014
Figure-7 Setting the Direction Rotation.
Figure-8 Mounting the Actuator to the Damper Shaft.
Mounting

4
Schneider Electric 1-888-444-1311 www.schneider-electric.com Product Support Services F-26736-3 April 2014
Manual OverrideTo move the damper blades and lock the position with no power present, do the following:
1. Slide the red manual override knob toward the back of the actuator.
2. Make adjustments to the damper position.
3. Slide the red manual override knob toward the front of the actuator.
Once power is restored, the actuator returns to automated control.
Figure-9 Attaching the Mounting Bracket.
Figure-10 Manual Override.
5
Schneider Electric 1-888-444-1311 www.schneider-electric.com Product Support Services F-26736-3 April 2014
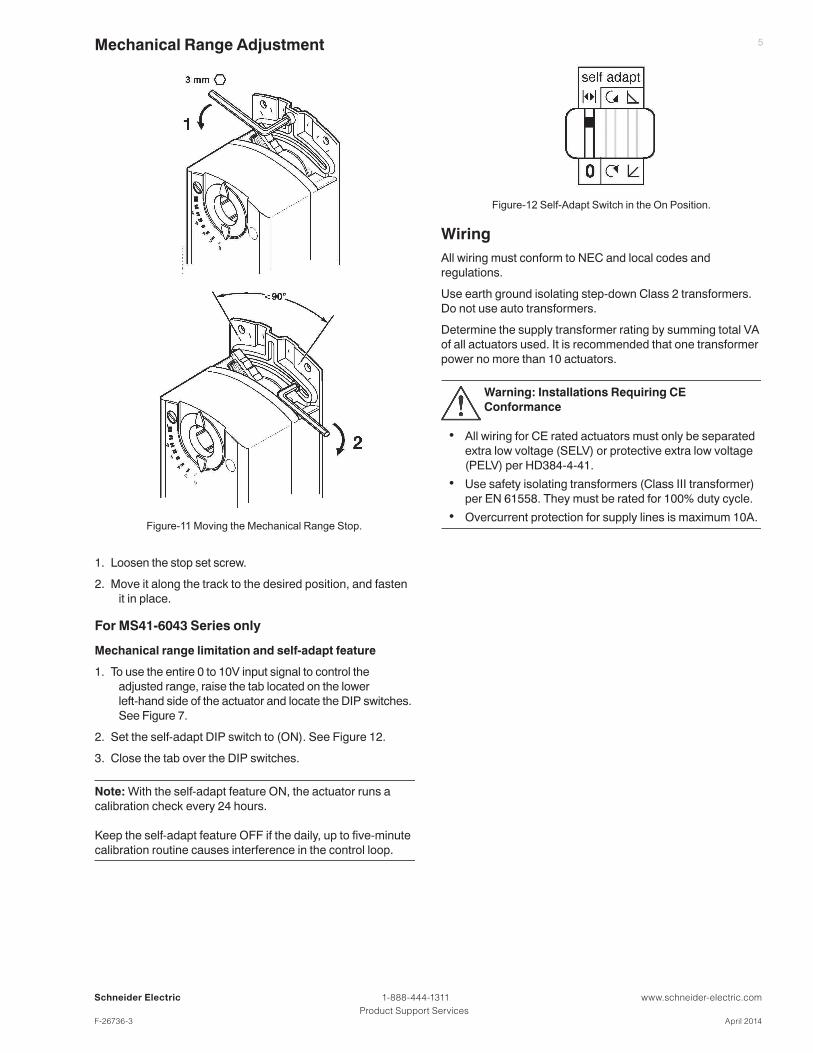
Mechanical Range Adjustment
Figure-11 Moving the Mechanical Range Stop.
1. Loosen the stop set screw.
2. Move it along the track to the desired position, and fasten it in place.
For MS41-6043 Series only
Mechanical range limitation and self-adapt feature
1. To use the entire 0 to 10V input signal to control the adjusted range, raise the tab located on the lower left-hand side of the actuator and locate the DIP switches. See Figure 7.
2. Set the self-adapt DIP switch to (ON). See Figure 12.
3. Close the tab over the DIP switches.
Note: With the self-adapt feature ON, the actuator runs a calibration check every 24 hours. Keep the self-adapt feature OFF if the daily, up to five-minute calibration routine causes interference in the control loop.
Figure-12 Self-Adapt Switch in the On Position.
WiringAll wiring must conform to NEC and local codes and regulations.
Use earth ground isolating step-down Class 2 transformers. Do not use auto transformers.
Determine the supply transformer rating by summing total VA of all actuators used. It is recommended that one transformer power no more than 10 actuators.
Warning: Installations Requiring CE Conformance
• All wiring for CE rated actuators must only be separated extra low voltage (SELV) or protective extra low voltage (PELV) per HD384-4-41.
• Use safety isolating transformers (Class III transformer) per EN 61558. They must be rated for 100% duty cycle.
• Overcurrent protection for supply lines is maximum 10A.

6
Schneider Electric 1-888-444-1311 www.schneider-electric.com Product Support Services F-26736-3 April 2014
Wiring Diagrams
MF41-6043 Series
24 Vac power supply
Three-position control 24 Vac
Each wire has the standard symbol printed on it. See Table 1.
Table-1 Three-Position Control 24 Vac.
Standard Symbol
FunctionColor
Plenum
1 Supply (SP) Red
6 Control signal clockwise Violet
7 Control signal counterclockwise Orange
S1 Switch A Common Black
S2 Switch A N.C. Black
S3 Switch A N.O. Black
S4 Switch B Common Black
S5 Switch B N.C. Black
S6 Switch B N.O. Black
P1Feedback Potentiometer 0 to 100% P1 - P2
Black
P2 Feedback Potentiometer Common Black
P3Feedback Potentiometer 100 to 0% P3 - P2
Black
Counterclockwise Damper Rotation
If the damper blades turn counterclockwise to open (CCW), reverse the 6 (violet) and 7 (orange) wires at the controller.
Figure-13 Typical Three-Position Control.
MS41-6043 Series24 Vac power supply
0 to 10V modulating control
Each wire has the standard symbol printed on it. See Table 2.
Table-2 Modulating Control.
Standard Symbol
FunctionColor
Plenum
1 Supply (SP) Red
2 Neutral (SN) Black
8 0 to 10V input signal Gray
9Output for 0 to 10 Vdc position indication
Pink
S1 Switch A Common Black
S2 Switch A N.C. Black
S3 Switch A N.O. Black
S4 Switch B Common Black
S5 Switch B N.C. Black
S6 Switch B N.O. Black

7
Schneider Electric 1-888-444-1311 www.schneider-electric.com Product Support Services F-26736-3 April 2014
Dimensions
Figure 14 Dimensions of the SmartX Actuator and Mounting Bracket. Dimensions in inches (mm).

Schneider Electric 1-888-444-1311 www.schneider-electric.com Product Support Services F-26736-3 April 2014
© 2
014
Sch
neid
er E
lect
ric. A
ll rig
hts
rese
rved
.