finances part i: beginning values this presentation will provide instruction on how to enter...
TRANSCRIPT

Finances Part I: Beginning Values
This presentation will provide instructionon how to enter beginning values on a student’s
first day in Ag. Class

To enter the financial tab, click on “Finances”

This is the home page of the financial tab. If you have an unpaid placement project, you will never enter anything in this tab. Any
projects that involve money will have records to enter here.

Let’s begin by entering information about your project when you started in Ag. Education. To do this, click on “Beginning Values.”
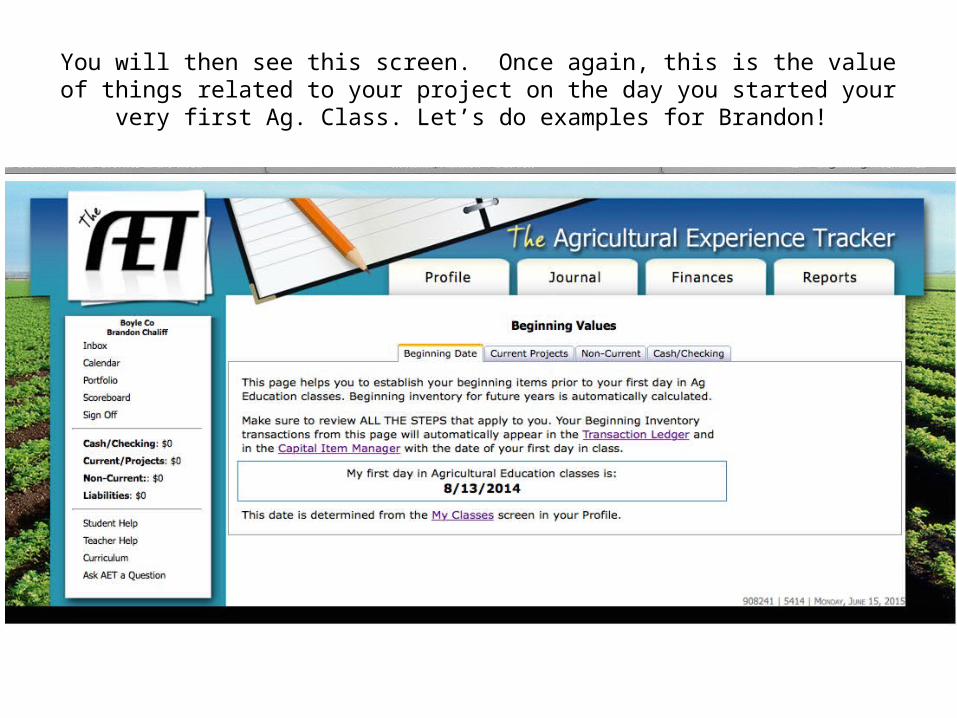
You will then see this screen. Once again, this is the value of things related to your project on the day you started your very
first Ag. Class. Let’s do examples for Brandon!

On the day Brandon started Ag, he owned $100 worth of hay, $15 in leftover banana pepper seed, a heifer which was born on his farm
valued at $800 and 4 cows he purchased at the stockyard valued at $5000. He also had $750
cash.

To start entering Brandon’s records, click on “Current Projects”.

This is the “Current Projects” tab. Here, we will enter the information about Brandon’s hay and seed, because
those are current items.

Side Note: Current items are those you plan to use within the next year. Examples include feed, seed, vet supplies, fertilizer, inventory purchased for re-sale, etc.
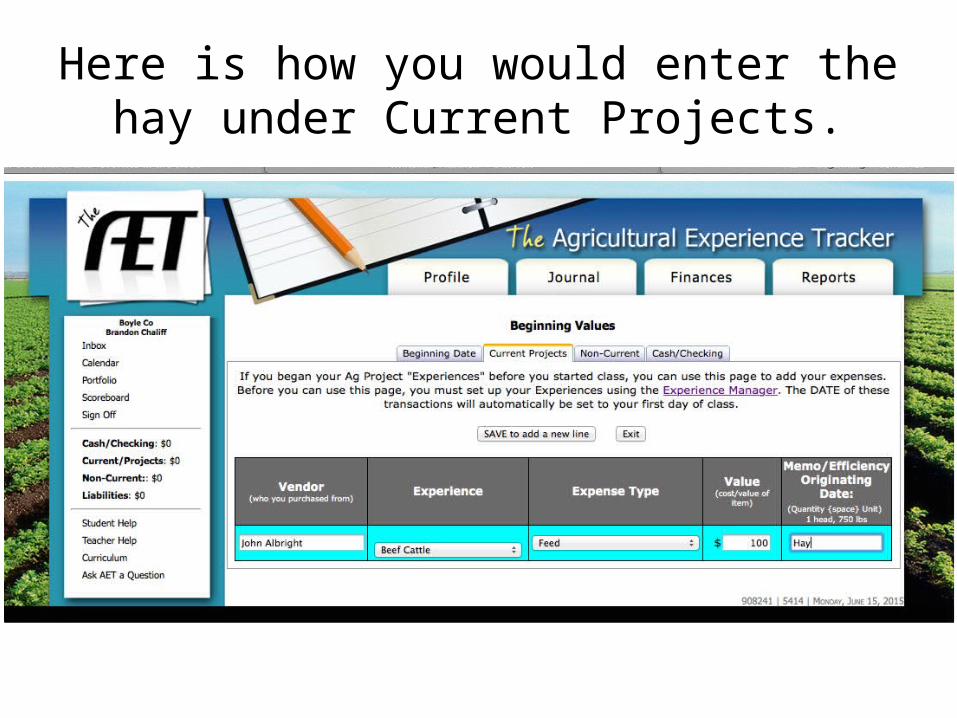
Here is how you would enter the hay under Current Projects.

The Vendor is simply who you purchased the inventory from.

“Experience” is which SAE this inventory relates to. You will see a drop down box which will allow you to select from all your
entrepreneurship SAEs. In this case, we would select “Beef Cattle”.

“Expense Type” is the category under which this inventory would fall. The drop down box will give you several options. In this
case, we would select “Feed”.

Under “Value”, you simply enter how much the item(s) are worth.

And finally, the Memo is a place to enter the information about what the item is or how much of it you have. Next, you will need
to click “SAVE to add a new line”

Next, we would enter all the information for our banana pepper seeds, just like we did with our hay.
After entering click “SAVE to add a new line” and then go to the “Non-Current” tab.

On the “Non-Current” tab, you will enter the heifer and cows Brandon started with.

Side Note: Non-Current items are those which you plan to keep for more than one year.
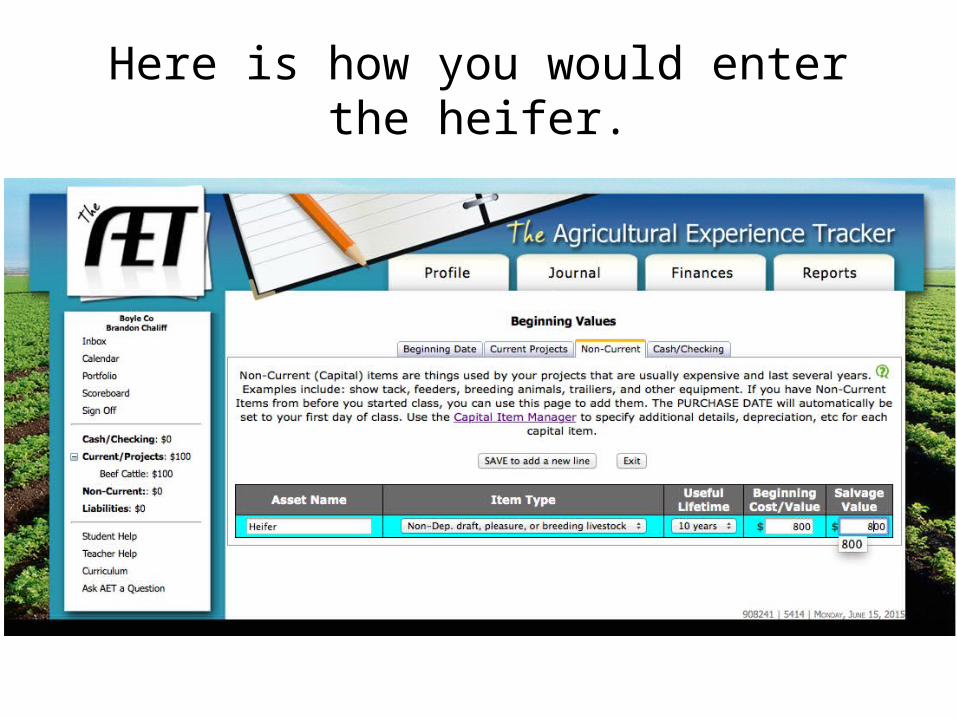
Here is how you would enter the heifer.

The asset name is what inventory you are entering information about.

“Item Type” gives you a drop down box to select which type of non-current item you are entering.

Side Note: Here we would select “Non-Depreciable draft, pleasure or breeding livestock” because the heifer was born on Brandon’s farm. Therefore, it cannot be depreciated because
he did not pay anything for it.

The “Useful Lifetime” allows you to select between 3, 5, 8, 10 or 20 years. This is an estimate of how long you think the item will be
useful. If you aren’t sure, ask your Ag. Teacher.

The beginning cost/value is how much the item was worth when you bought it. In this case, since we are doing beginning inventory,
we would put the value on the date we started Ag. Class.

Finally, the Salvage Value is how much you think the animal/item will be worth at the end of its useful life. This is an estimate, but if you aren’t sure, ask your
teacher. Click on “SAVE to add a new line” to enter our cows.
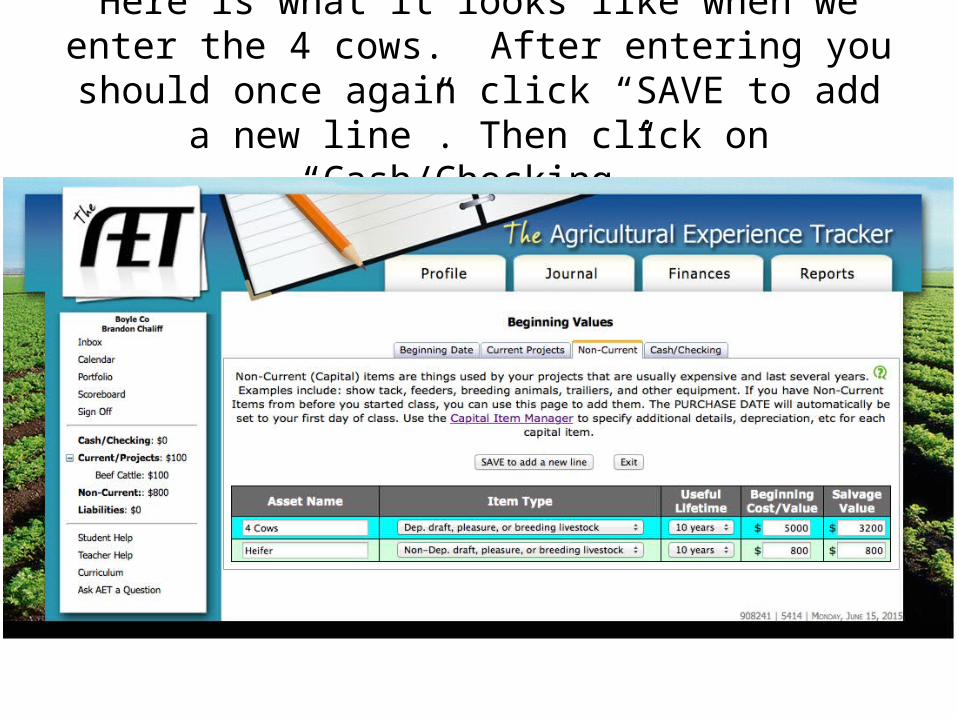
Here is what it looks like when we enter the 4 cows. After entering you should once again click “SAVE to add
a new line”. Then click on “Cash/Checking”.

Side Note: This time, we selected “Depreciable draft, pleasure or breeding livestock” because we had purchased the animals from the stockyard and they will be worth less at the end of their lives
than they were when we bought them.

Author’s Note: This example shows us entering all 4 of the cows on one line. While this is certainly an option, it is much more effective to enter each cow on its own separate line. This will make using the Livestock Manager feature of the
AET much easier. For more information, see the power-point which covers Livestock Management.

This is the “Cash/Checking” Tab. This is where we will enter the $750 in cash which Brandon
had when he started Ag Class.

The two numbers in bold represent the total values of current and non-current items we just
entered.

In the box, you type in the value of cash Brandon had. Then click “Save”. This will take you back to the Finance
Homepage and completes the Beginning Values.