financial management system (fms) lender reporting application · the purpose of the lender user...
TRANSCRIPT
Release 8.0
Financial Management System (FMS) Lender Reporting Application
External User Guide
LaRS External User Guide – Release 8 FSA FMS
i
Table of Contents 1 Introduction ....................................................................................................................................... 3
1.1 Purpose ........................................................................................................................................ 3 1.2 Overview of the Lender Payment Process ............................................................................. 3 1.3 Responsibilities ........................................................................................................................... 3
2 Sign on Procedures ............................................................................................................................ 4 3 Navigating in FMS ............................................................................................................................ 8 4 Update Profile (as a Lender) .......................................................................................................... 10
4.1 Payment Information (View Only!) ....................................................................................... 17 4.2 Guaranty Agency Information ............................................................................................... 19 4.3 Servicer Information ................................................................................................................ 24 4.4 Additional LID(s) Information ............................................................................................... 29
5 Update Profile (as a Servicer) ........................................................................................................ 33 5.1 Contact Information ................................................................................................................. 35 5.2 Lender Information .................................................................................................................. 39
6 FSA LaRS Form ................................................................................................................................ 41 6.1 Complete FSA LaRS Form Online ......................................................................................... 41
6.1.1 Selection of Billing Period (Lender) ....................................................................... 43 6.1.2 Selection of Billing Period (Servicer) ..................................................................... 47 6.1.3 Part I – Loan Origination & Lender Fees ............................................................... 51 6.1.4 Part II – Interest Benefits ........................................................................................ 54 6.1.5 Part III – Special Allowance ................................................................................... 57 6.1.6 Part IV – Loan Activity........................................................................................... 61 6.1.7 Part V – Loan Portfolio Status ................................................................................ 65 6.1.8 Save FSA LaRS Form ............................................................................................. 68 6.1.9 Exit LaRS ................................................................................................................ 69
6.2 Submit FSA LaRS Form ........................................................................................................... 70 6.3 Query on Existing FSA LaRS Forms ...................................................................................... 79
6.3.1 Search for a Specific FSA LaRS Form ................................................................... 83 7 File Transfer Process ....................................................................................................................... 88
7.1 Overview ................................................................................................................................... 88 7.1.1 Description .............................................................................................................. 88 7.1.2 Process Flow ........................................................................................................... 89 7.1.3 Rejection/Re-submission ........................................................................................ 89 7.1.4 File Level Error Checks .......................................................................................... 90 7.1.5 Invoice Level Error Checks .................................................................................... 90 7.1.6 File Extension ......................................................................................................... 90
7.2 Enrollment ................................................................................................................................. 90 7.3 Overview Funds Remittance Process .................................................................................... 91
LaRS External User Guide – Release 8 FSA FMS
ii
8 Appendix .......................................................................................................................................... 92 8.1 Appendix A – Frequently Asked Questions ........................................................................ 92 Appendix B– Fee Code Definitions NOTE – with the transition to 100% Direct Lending, this section is provided as information only. .......................................................................................... 93 8.2 Appendix E – Loan Origination and Lender Fee Percent Information NOTE – with the transition to 100% Direct Lending, this section is provided as information only....................... 94 8.3 Appendix F – Loan Interest Rate Information ..................................................................... 95 8.4 Appendix G – Billing Code Definitions ................................................................................ 96 8.5 Appendix H – Special Allowance Category Definitions (Part III) .................................... 97
LaRS External User Guide – Release 8 FSA FMS
3
1 Introduction
1.1 Purpose The purpose of the Lender User Guide is to introduce lenders and servicers to the Lender’s Reporting Applicaton (LaRS), its primary functions, screen layout, and general process flow. Users will also learn how to setup and configure their computer to gain access to LaRS via the Internet.
1.2 Overview of the Lender Payment Process The on-line LaRS replaces the previous paper ED Form 799. The goal of the LaRS program is to streamline the business processes associated with exchanging financial information with Lenders and Servicers. This involves developing new business activities that integrate Lender and Servicer reporting with the Financial Management System (FMS). These business activities include: allowing Lenders and Servicers to electronically complete and submit their reports, developing digital approval and ad hoc query functionality, complying with current legislative mandates, providing timely notification of errors following submission, and integrating all activities with concurrent Federal Student Aid (FSA) enterprise-wide initiatives.
1.3 Responsibilities Every system user is granted a role based on LAP/LaRS responsibilities to which they are assigned. The system administrator links the role to each user’s system logon ID in FMS. The following are descriptions of the roles in FMS: FSA LaRS Lender/Servicer This role has three different levels of security: View, Maintain and Submit. The Lender/Servicer will be assigned a level of access to FSA LaRS Form that coincides with the security level assigned to them. Each security level is explained in detail below:
View This role allows the user to have “read only” access to their LaRS data. This access means that the user is able to view the data, but is unable to make any changes to this data. Users will not have access to any data besides their own. Maintain This role allows the user to view, update, and query their LaRS data, but will not be able to submit data. Users will not have access to any data besides their own. This role will also be able to update their Lender/Servicer profile data. Submit This role allows the user to view, update, submit and query their LaRS data. Users will not have access to any data besides their own. This role will also be able to update their Lender/Servicer profile data.

LaRS External User Guide – Release 8 FSA FMS
4
2 Sign on Procedures Steps to access the LaRS application: Open Internet Explorer, or another Internet browser. Type the following address: http://www.fp.ed.gov, and press the Enter Key. After a few moments, the ”Financial Partners Portal ” page appears.
1. Click on FMS under ‘FSA Links’ on the left side of the page or click on “GO”
LaRS External User Guide – Release 8 FSA FMS
5
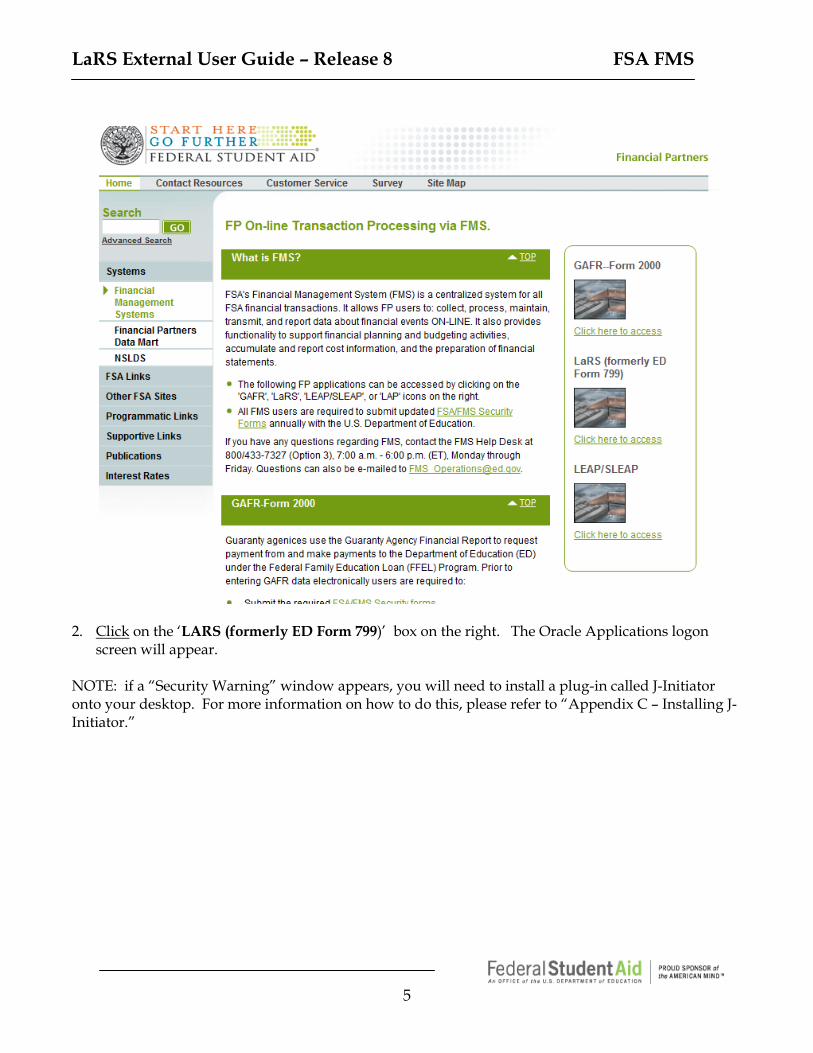
2. Click on the ‘LARS (formerly ED Form 799)’ box on the right. The Oracle Applications logon
screen will appear. NOTE: if a “Security Warning” window appears, you will need to install a plug-in called J-Initiator onto your desktop. For more information on how to do this, please refer to “Appendix C – Installing J-Initiator.”
LaRS External User Guide – Release 8 FSA FMS
6
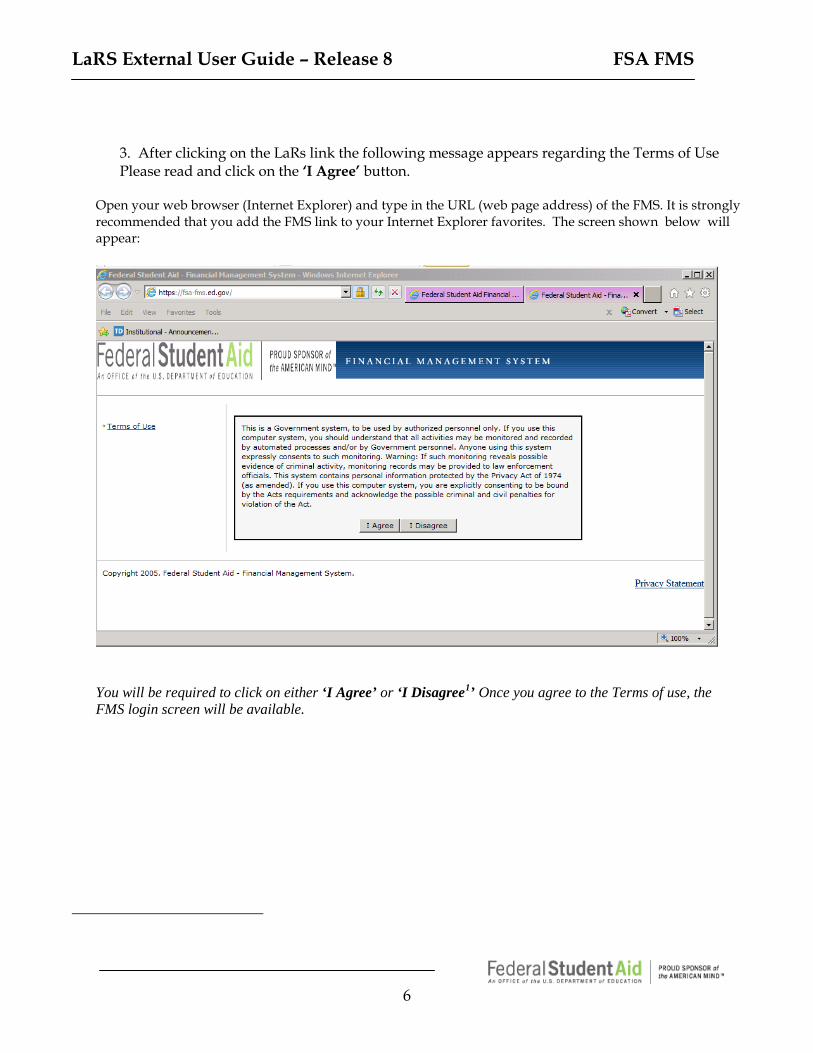
3. After clicking on the LaRs link the following message appears regarding the Terms of Use Please read and click on the ‘I Agree’ button.
Open your web browser (Internet Explorer) and type in the URL (web page address) of the FMS. It is strongly recommended that you add the FMS link to your Internet Explorer favorites. The screen shown below will appear:
You will be required to click on either ‘I Agree’ or ‘I Disagree1’ Once you agree to the Terms of use, the FMS login screen will be available.
LaRS External User Guide – Release 8 FSA FMS
7
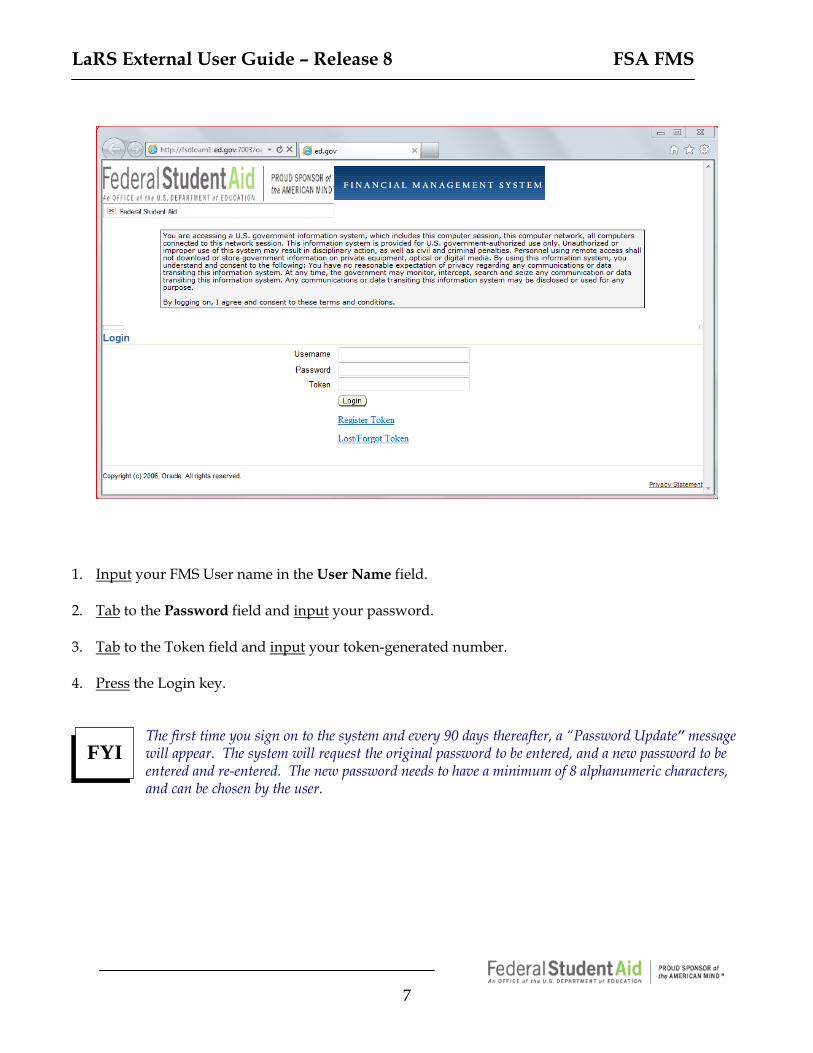
1. Input your FMS User name in the User Name field. 2. Tab to the Password field and input your password.
3. Tab to the Token field and input your token-generated number. 4. Press the Login key.
The first time you sign on to the system and every 90 days thereafter, a “Password Update” message will appear. The system will request the original password to be entered, and a new password to be entered and re-entered. The new password needs to have a minimum of 8 alphanumeric characters, and can be chosen by the user.
FYI
LaRS External User Guide – Release 8 FSA FMS
8
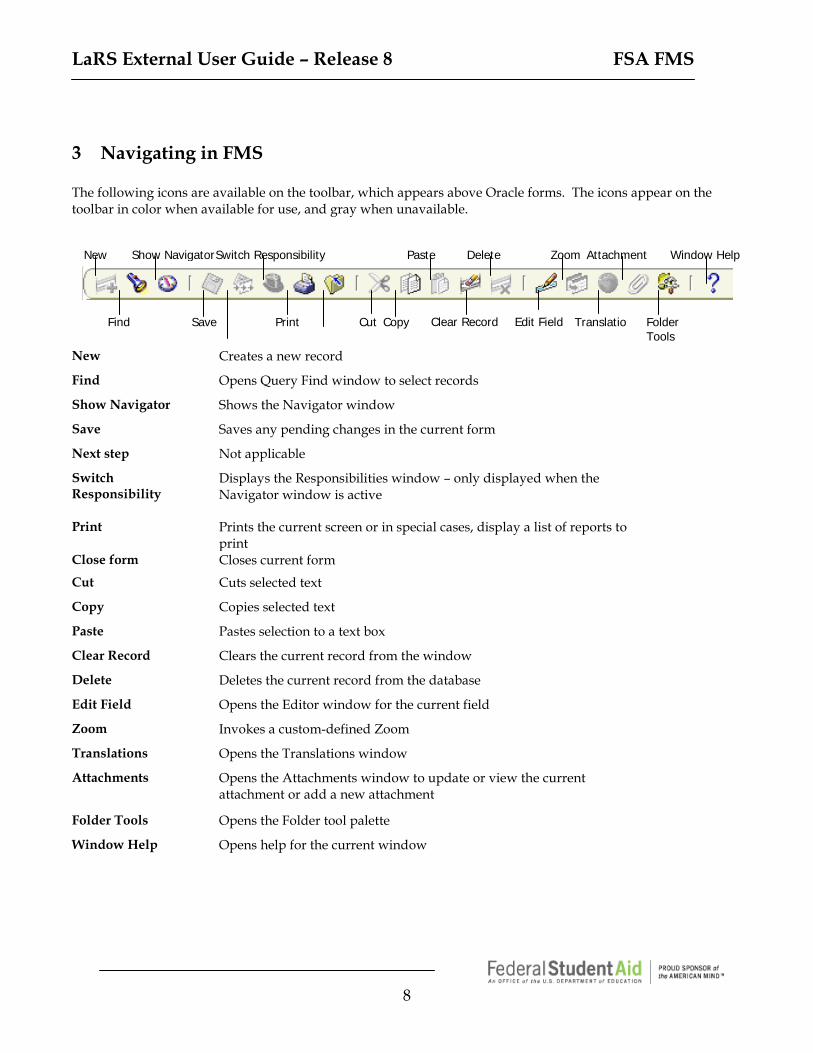
3 Navigating in FMS The following icons are available on the toolbar, which appears above Oracle forms. The icons appear on the toolbar in color when available for use, and gray when unavailable.
New Creates a new record
Find Opens Query Find window to select records
Show Navigator Shows the Navigator window
Save Saves any pending changes in the current form
Next step Not applicable
Switch Responsibility
Displays the Responsibilities window – only displayed when the Navigator window is active
Print Prints the current screen or in special cases, display a list of reports to print
Close form Closes current form Cut Cuts selected text
Copy Copies selected text
Paste Pastes selection to a text box
Clear Record Clears the current record from the window
Delete Deletes the current record from the database
Edit Field Opens the Editor window for the current field
Zoom Invokes a custom-defined Zoom
Translations Opens the Translations window
Attachments Opens the Attachments window to update or view the current attachment or add a new attachment
Folder Tools Opens the Folder tool palette
Window Help Opens help for the current window
New
Find Save
Show Navigator
Switch Responsibility
Cut
Paste
Clear Record Copy Edit Field
Delete Attachment
Folder Tools
Zoom
Translatio
Window Help
LaRS External User Guide – Release 8 FSA FMS
9
You may find it helpful to print the FMS Toolbar Icon Glossary and use it as a desk reference as you process your LaRS. To navigate forward through the fields on any LaRS screen, simply press on the tab key. To navigate backwards, hold the shift key down while pressing the tab key. This will move you backwards sequentially through the fields.
-OR-
Use your mouse to put the cursor in a desired field at any time.
FYI
FYI
LaRS External User Guide – Release 8 FSA FMS
10
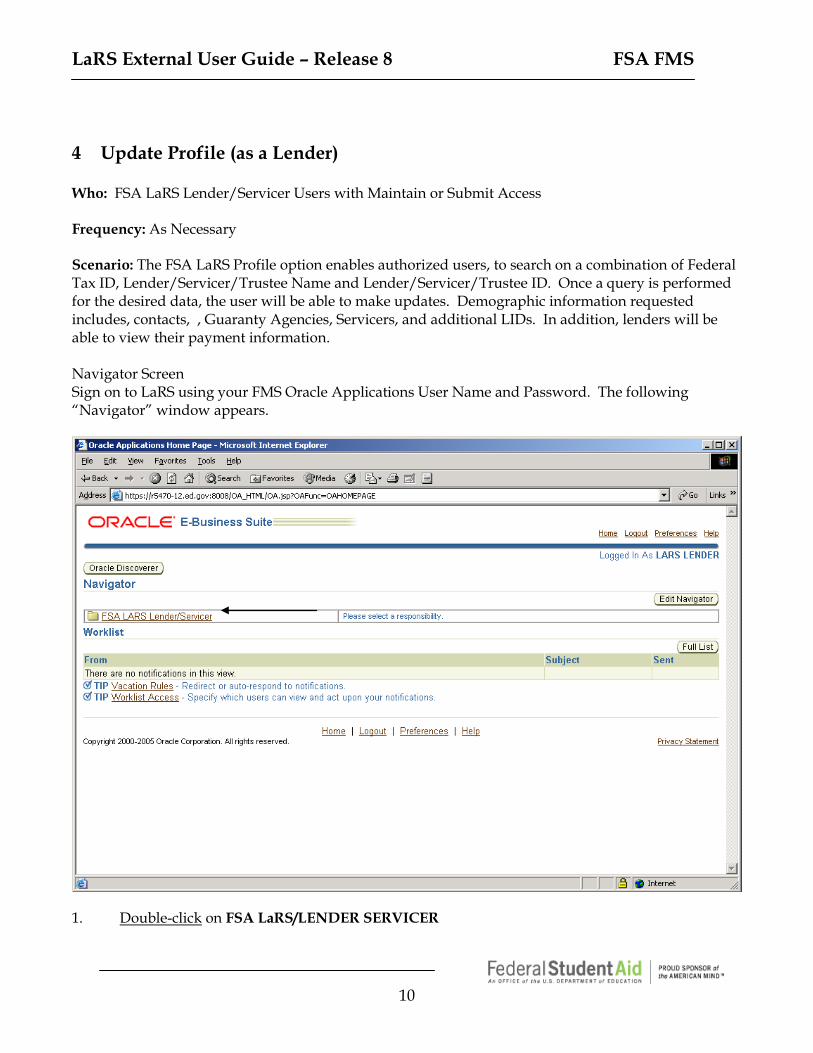
4 Update Profile (as a Lender) Who: FSA LaRS Lender/Servicer Users with Maintain or Submit Access Frequency: As Necessary Scenario: The FSA LaRS Profile option enables authorized users, to search on a combination of Federal Tax ID, Lender/Servicer/Trustee Name and Lender/Servicer/Trustee ID. Once a query is performed for the desired data, the user will be able to make updates. Demographic information requested includes, contacts, , Guaranty Agencies, Servicers, and additional LIDs. In addition, lenders will be able to view their payment information. Navigator Screen Sign on to LaRS using your FMS Oracle Applications User Name and Password. The following “Navigator” window appears.
1. Double-click on FSA LaRS/LENDER SERVICER
LaRS External User Guide – Release 8 FSA FMS
11
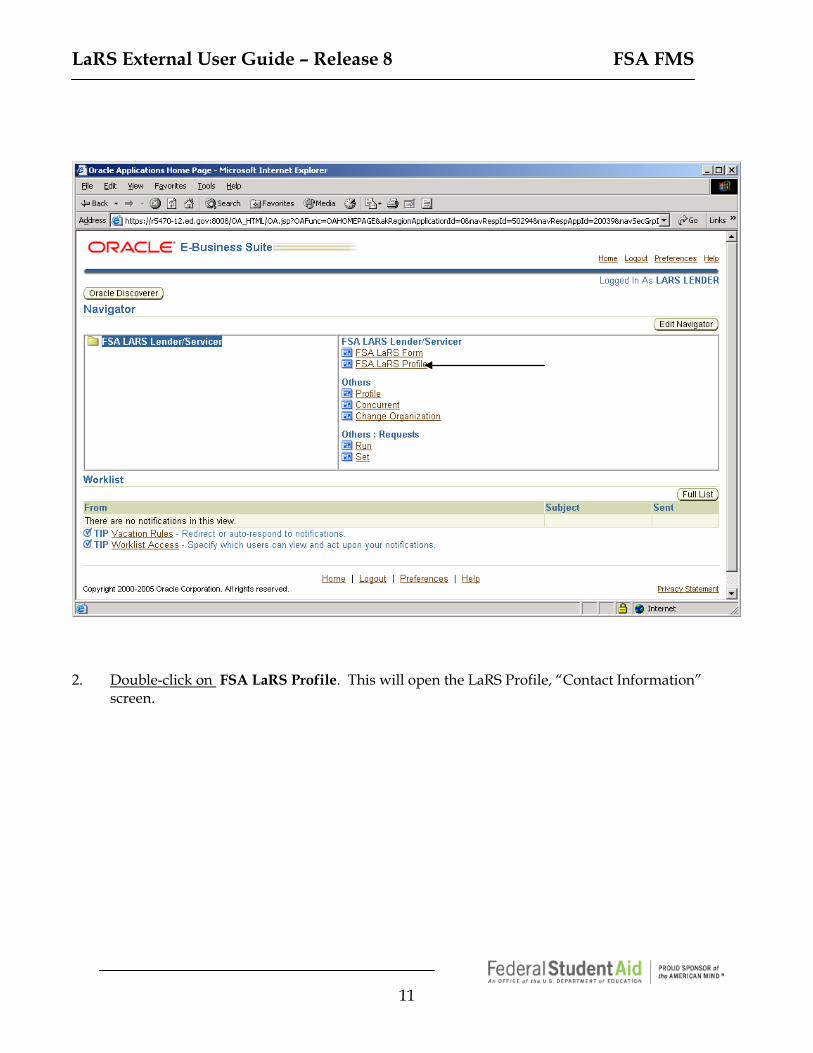
2. Double-click on FSA LaRS Profile. This will open the LaRS Profile, “Contact Information”
screen.

LaRS External User Guide – Release 8 FSA FMS
12
LaRS External User Guide – Release 8 FSA FMS
13
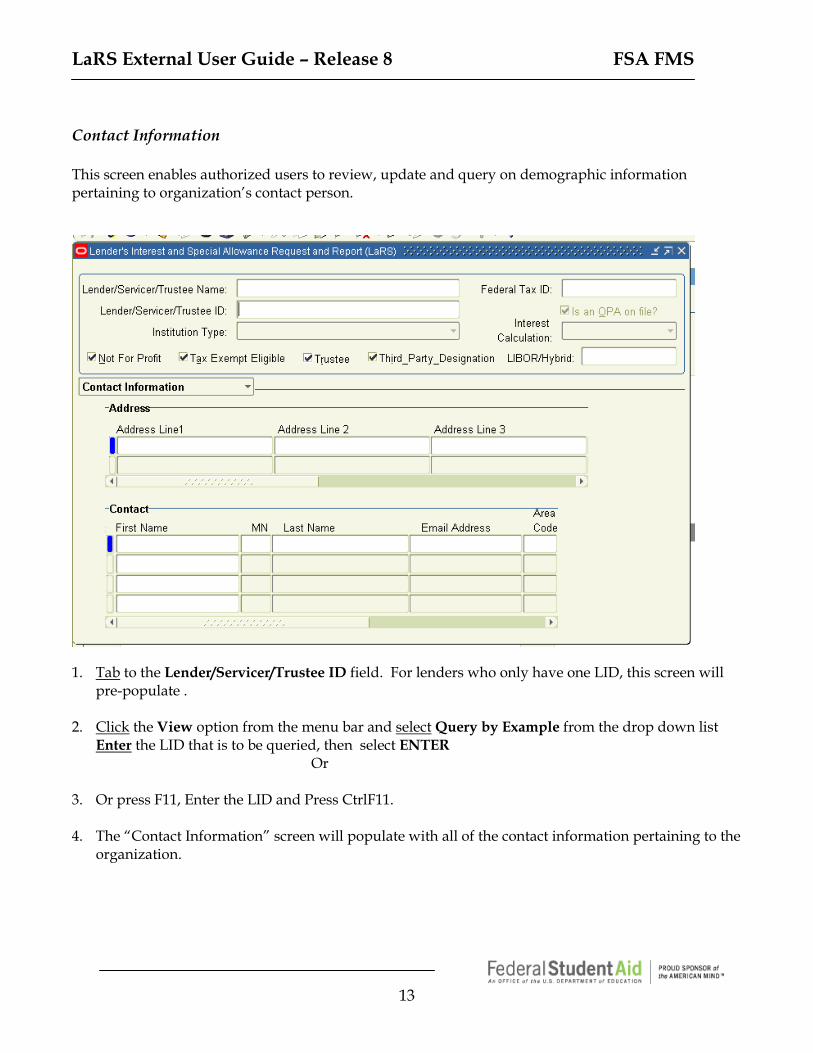
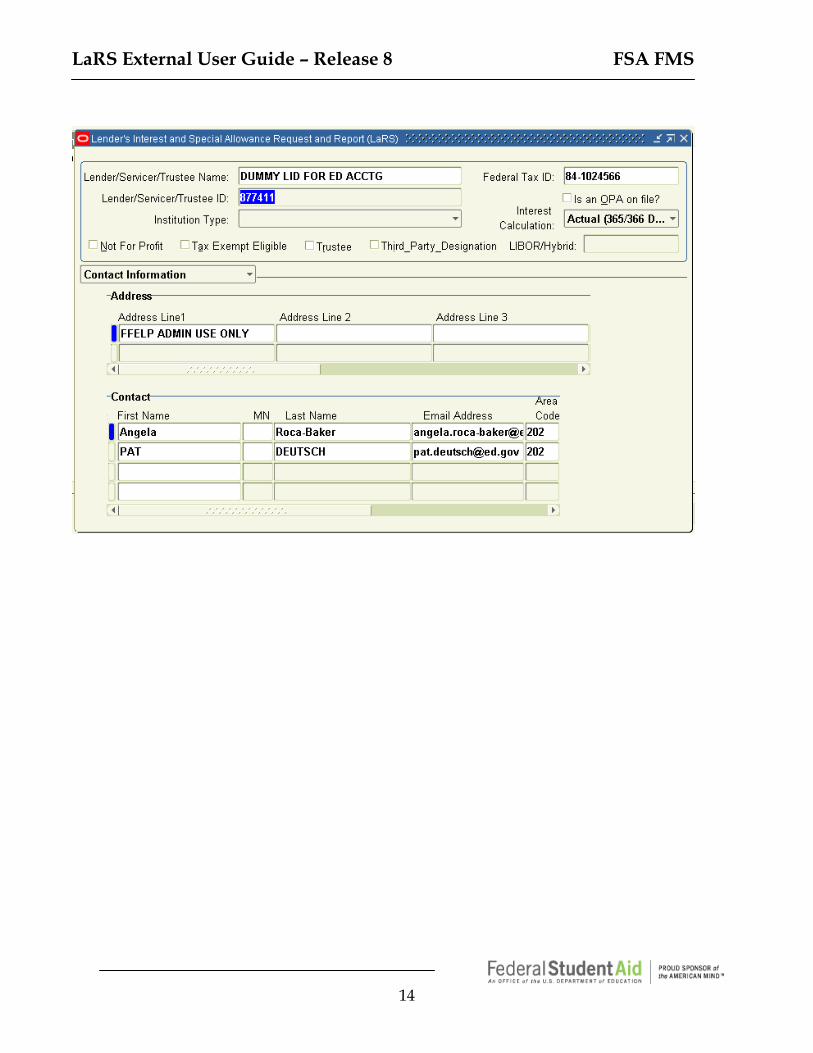
Contact Information This screen enables authorized users to review, update and query on demographic information pertaining to organization’s contact person.
1. Tab to the Lender/Servicer/Trustee ID field. For lenders who only have one LID, this screen will
pre-populate . 2. Click the View option from the menu bar and select Query by Example from the drop down list
Enter the LID that is to be queried, then select ENTER Or
3. Or press F11, Enter the LID and Press CtrlF11. 4. The “Contact Information” screen will populate with all of the contact information pertaining to the
organization.
LaRS External User Guide – Release 8 FSA FMS
14
LaRS External User Guide – Release 8 FSA FMS
15
1. Note the status of the Is an OPA on file? checkbox. If an OPA (Organization Participation Agreement) has been received from the organization , the box will be checked. If an OPA has not been received, the box will be unchecked. This is a “read only” field.
An OPA is an agreement that the user agrees to submit/receive data electronically on LaRS to/from the Department of Education. It is renewed every 2 years.
2. Note the Interest Calculation field. If the interest calculation method shown is not accurate, click on the drop-down arrow. Highlight and click on the interest calculation method that the organization currently uses. This is a required field.
3. Note the Institution Type field. If the institution type shown does not accurately describe the
organization, click on the drop-down arrow. Highlight and click on the institution type that best represents the organization. This is a required field.
4. Note the LIBOR/Hybrid/For Profit/Tax-exempt/Trustee/Third Party Statuses: These fields are
view only. Please contact FSA to make any changes. 5. Note the Address fields. If the address shown in the address lines is not current, update them with
the appropriate information. The Address Line 1 field is a required field. All other Address Line fields are optional.
When information is queried for a Lender or Servicer, the user will see only one record in the address block. When information is queried for a Trustee, there will be a second record in the Address block. The second record is the Entity information for the Trustee. If the user moves the cursor to this second record, the contact information displayed will be for the Entity record.
6. Scroll to the right using the scroll bar arrows. The following fields will appear:
• City • State • ZIP Code • Area Code • Phone • Fax Area Code • Fax Number If the information in any of these fields is not current, update them with the appropriate information.
FYI
FYI
LaRS External User Guide – Release 8 FSA FMS
16
7. Note the First Name field. If the contact person for the organization has changed, update this field
with the first name of the appropriate contact person. The contact person should be authorized to address inquiries concerning information about the student loan program. This is a required field.
8. Note the Middle Name field. If the contact person for the organization has changed, update this
field with the middle initial of the appropriate contact person. This is not a required field. 9. Note the Last Name field. If the contact person for the organization has changed, update this field
with the last name of the appropriate contact person. This is a required field. 10. Note the Email Address field. If the email address shown for the contact person is not current,
update it with the appropriate information. This is a required field. 11. Scroll to the right using the scroll bar arrows. The following fields will appear:
• Area Code • Phone
If the information in any of these fields is not current, update them with the appropriate information.
12. Once the appropriate fields have been updated, click on the Save icon to save the changes. Note that only FSA LaRS Lender/Servicer users with Submit access will be able to save changes.
13. Once the “Contact Information” screen has been updated and saved, click on the menu drop down
arrow and select the next screen.
–OR- 14. If no further profile updates need to be made, click File from the menu bar and select Close Form
from the drop down list. This will bring the user back to the “Navigator “window.
LaRS External User Guide – Release 8 FSA FMS
17
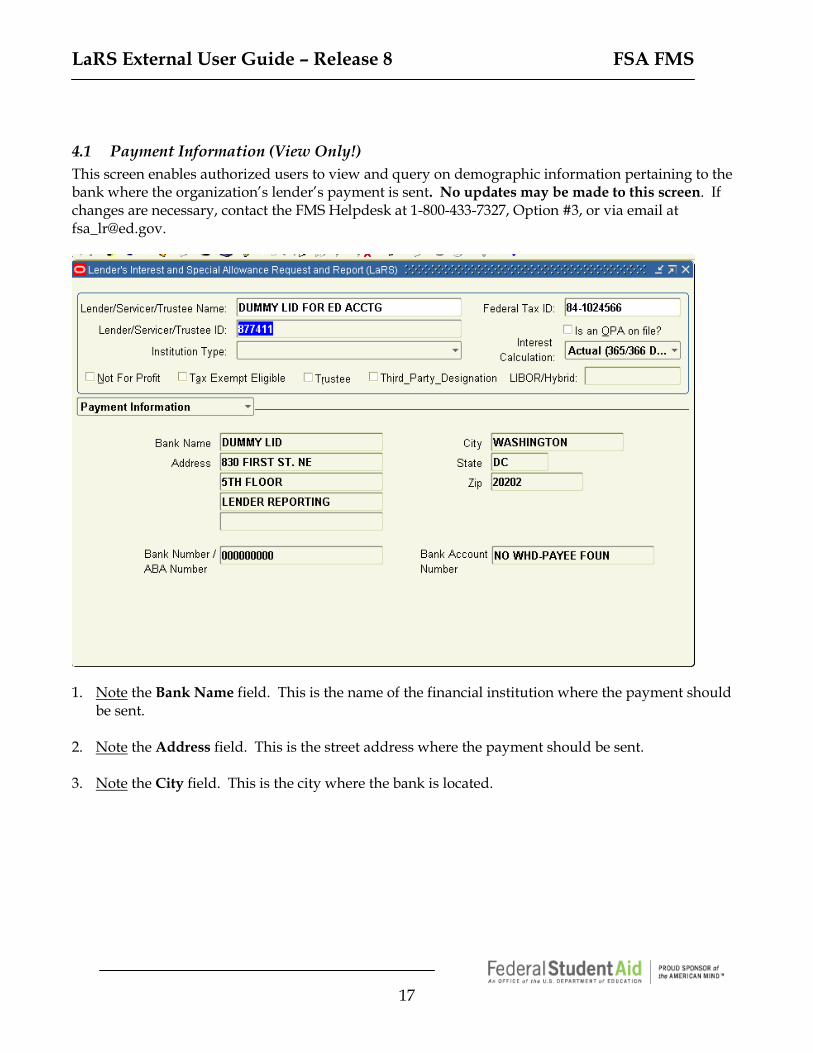
4.1 Payment Information (View Only!) This screen enables authorized users to view and query on demographic information pertaining to the bank where the organization’s lender’s payment is sent. No updates may be made to this screen. If changes are necessary, contact the FMS Helpdesk at 1-800-433-7327, Option #3, or via email at [email protected].
1. Note the Bank Name field. This is the name of the financial institution where the payment should
be sent. 2. Note the Address field. This is the street address where the payment should be sent. 3. Note the City field. This is the city where the bank is located.

LaRS External User Guide – Release 8 FSA FMS
18
4. Note the State field. This is the state where the bank is located. 5. Note the ZIP field. This is the ZIP code where the bank is located. 6. Note the Number/ABA Number field. This is routing number for the bank. 7. Note the Bank Account Number field. This is the account number to which deposits are made. 8. Once the “Payment Information” screen has been reviewed, click on the menu drop down arrow
and select the next screen that needs to be updated.
–OR- 9. If no further profile updates need to be made, click the File option from the menu bar and select
Close Form from the drop down list. This will bring the user back to the “Navigator” window.
LaRS External User Guide – Release 8 FSA FMS
19
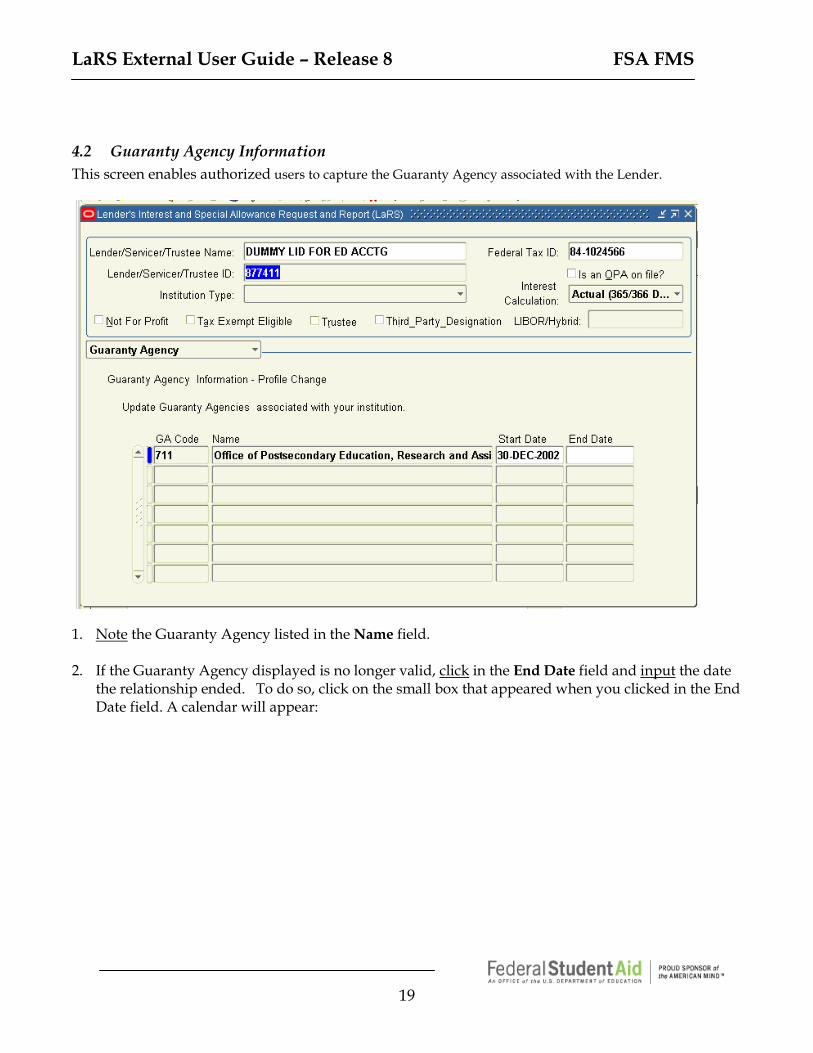
4.2 Guaranty Agency Information This screen enables authorized users to capture the Guaranty Agency associated with the Lender.
1. Note the Guaranty Agency listed in the Name field. 2. If the Guaranty Agency displayed is no longer valid, click in the End Date field and input the date
the relationship ended. To do so, click on the small box that appeared when you clicked in the End Date field. A calendar will appear:
LaRS External User Guide – Release 8 FSA FMS
20
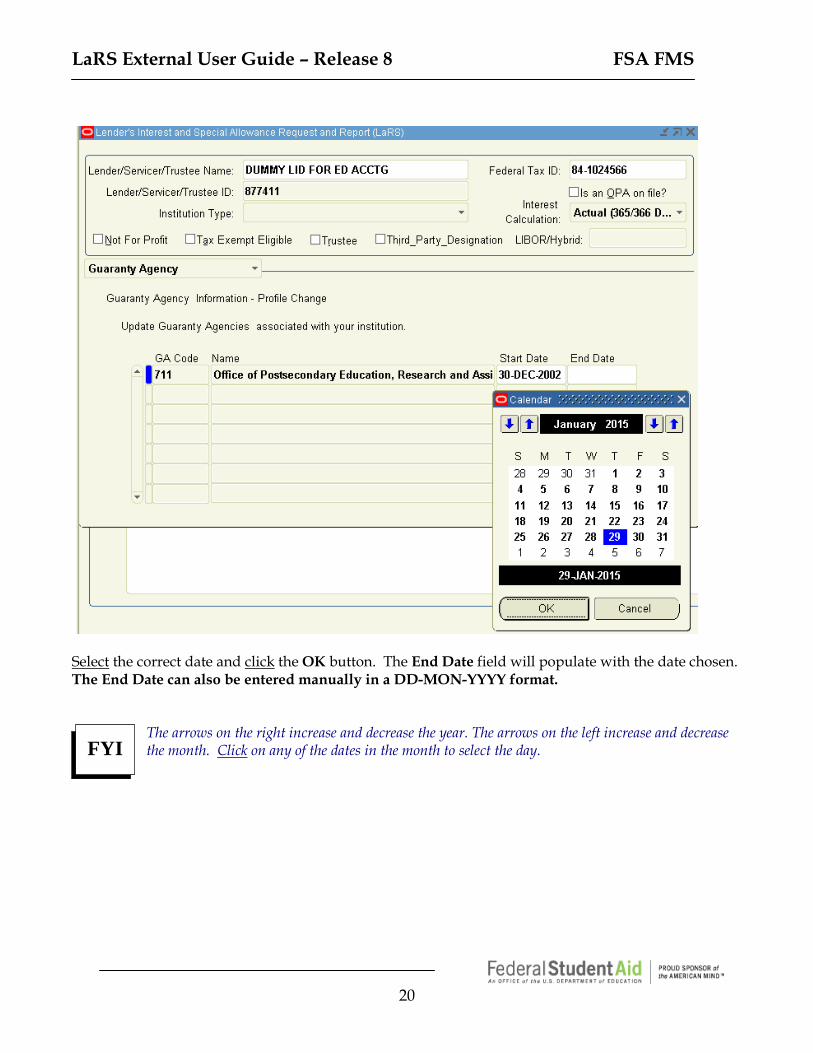
Select the correct date and click the OK button. The End Date field will populate with the date chosen. The End Date can also be entered manually in a DD-MON-YYYY format.
The arrows on the right increase and decrease the year. The arrows on the left increase and decrease the month. Click on any of the dates in the month to select the day.
FYI
LaRS External User Guide – Release 8 FSA FMS
21
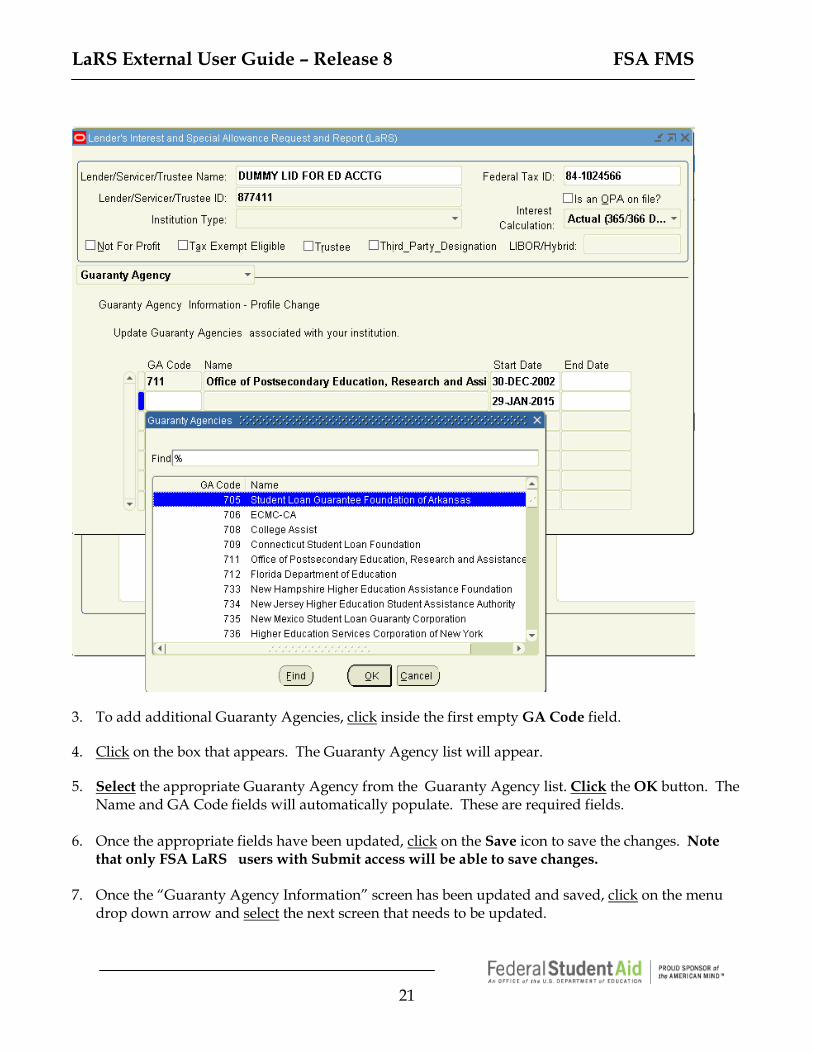
3. To add additional Guaranty Agencies, click inside the first empty GA Code field. 4. Click on the box that appears. The Guaranty Agency list will appear. 5. Select the appropriate Guaranty Agency from the Guaranty Agency list. Click the OK button. The
Name and GA Code fields will automatically populate. These are required fields. 6. Once the appropriate fields have been updated, click on the Save icon to save the changes. Note
that only FSA LaRS users with Submit access will be able to save changes. 7. Once the “Guaranty Agency Information” screen has been updated and saved, click on the menu
drop down arrow and select the next screen that needs to be updated.
LaRS External User Guide – Release 8 FSA FMS
22
–OR-
8. If no further profile updates need to be made, click the File option from the menu bar and select
Close Form from the drop down list. This will bring the user back to the “Navigator” window.
LaRS External User Guide – Release 8 FSA FMS
23
If more than seven Guaranty Agencies are associated with this LID, then press the down arrow on your keyboard. A new line will be provided. Continue adding new lines until all of the associated Guaranty Agencies are listed. To delete a Guaranty Agency from the Guaranty Agency screen, click inside the field that contains the name of the Guaranty Agency to be deleted. Click on the Delete Record icon and the record will be permanently deleted.
FYI
FYI
LaRS External User Guide – Release 8 FSA FMS
24
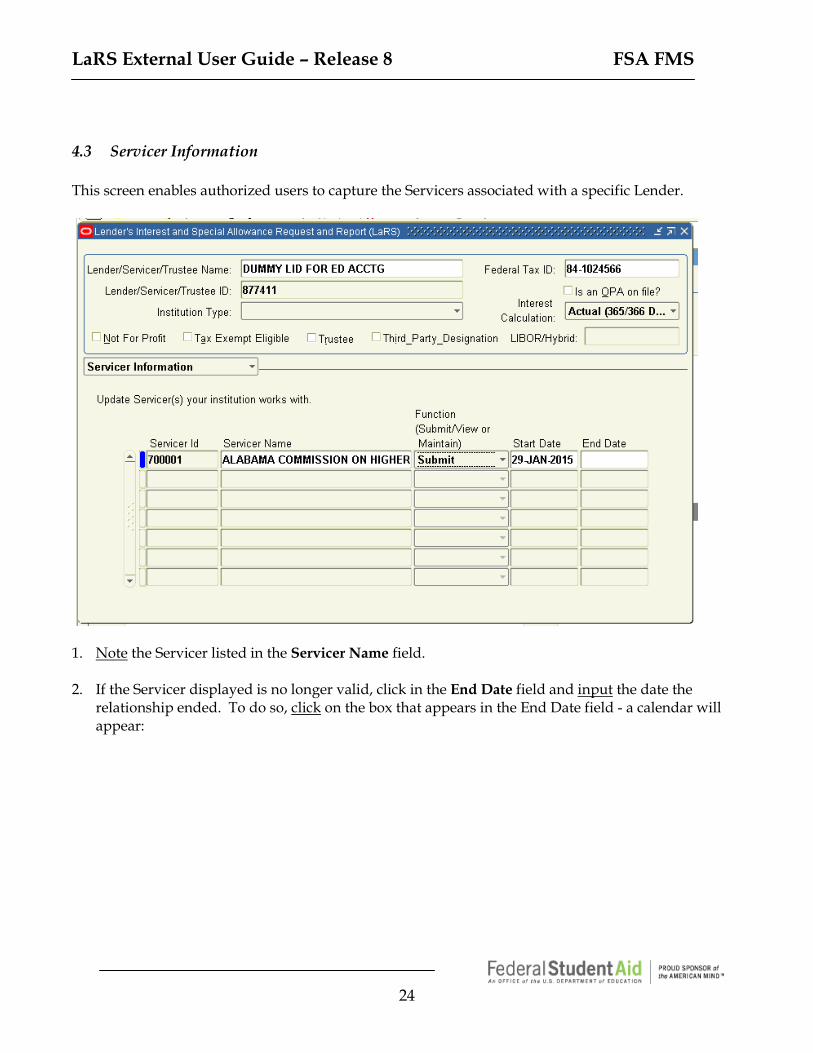
4.3 Servicer Information This screen enables authorized users to capture the Servicers associated with a specific Lender.
1. Note the Servicer listed in the Servicer Name field. 2. If the Servicer displayed is no longer valid, click in the End Date field and input the date the
relationship ended. To do so, click on the box that appears in the End Date field - a calendar will appear:
LaRS External User Guide – Release 8 FSA FMS
25
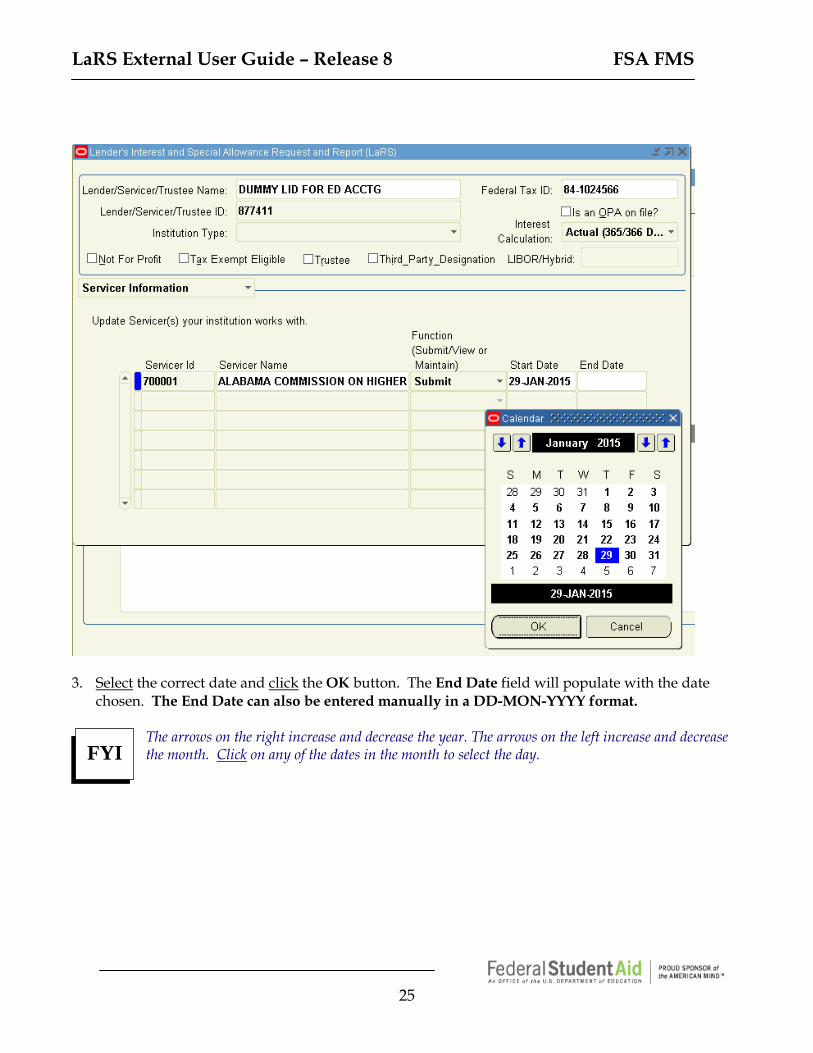
3. Select the correct date and click the OK button. The End Date field will populate with the date
chosen. The End Date can also be entered manually in a DD-MON-YYYY format.
The arrows on the right increase and decrease the year. The arrows on the left increase and decrease the month. Click on any of the dates in the month to select the day.
FYI
LaRS External User Guide – Release 8 FSA FMS
26
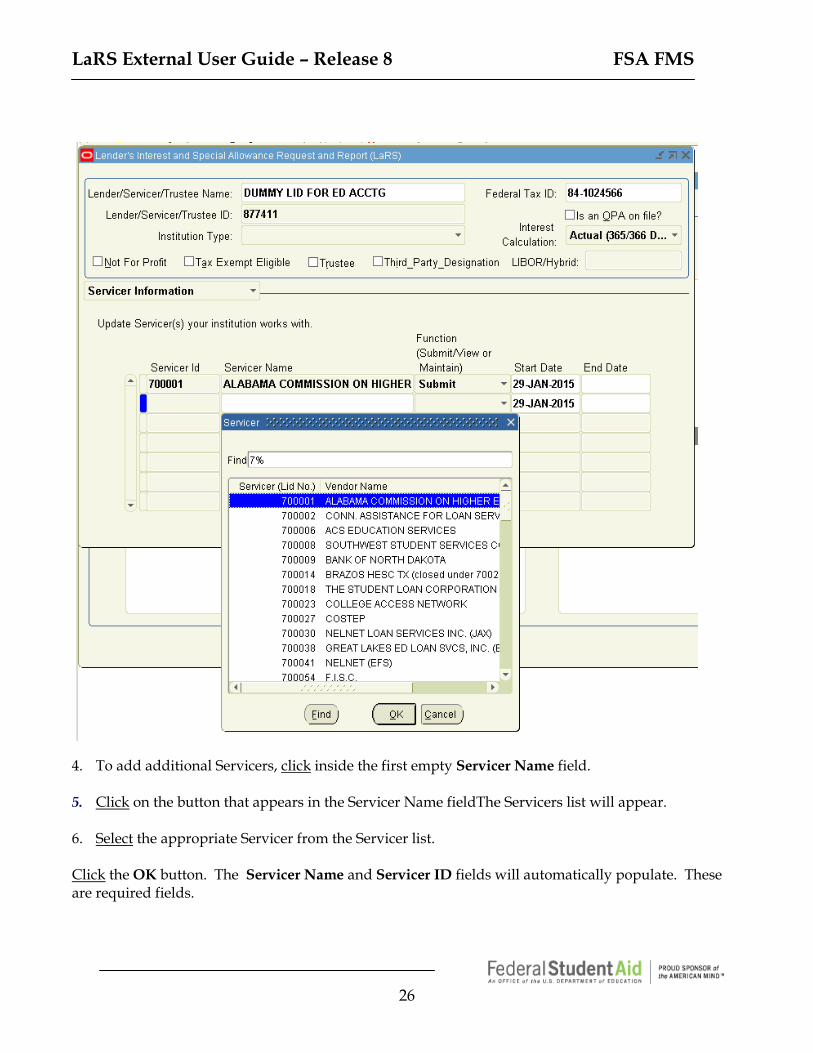
4. To add additional Servicers, click inside the first empty Servicer Name field. 5. Click on the button that appears in the Servicer Name fieldThe Servicers list will appear. 6. Select the appropriate Servicer from the Servicer list. Click the OK button. The Servicer Name and Servicer ID fields will automatically populate. These are required fields.

LaRS External User Guide – Release 8 FSA FMS
27
7. Click on the drop down arrow beside the Function field. Choose the appropriate function for the
Servicer.
Note: Select ‘Submit’ if the Servicer fills out AND submits quarterly billings for the institution. Select “Maintain” if the Servicer completes but WILL NOT submit quarterly billings for the institution.
8. Click inside the Start Date field. This is a required field. The Start Date field will pre-populate
with the current date. The Start Date can also be entered manually in a DD-MON-YYYY format or by selecting the calendar.
9. If desired, an End Date for the servicer relationship can be entered, but it is not required. To enter
an End Date, repeat steps 2 and 3. The End Date can also be entered manually in an XX-MON-YYYY format.
10. Once the appropriate fields have been updated, click on the Save icon to save the changes. Note
that only FSA LaRS Lender/Servicer users with Submit access will be able to save changes.
LaRS External User Guide – Release 8 FSA FMS
28
11. Once the “Servicer Information” screen has been updated and saved, click on the menu drop down arrow and select the next screen that needs to be updated.
–OR-
12. If no further profile updates need to be made, click the Action option from the menu bar and select
Close Window from the drop down list. This will bring the user back to the “Navigator” window.
If more than seven Servicers are associated with this LID, then press the down arrow on your keyboard. A new line will be provided. Continue adding new lines until all of the associated Servicers are listed. To delete a Servicer from the “Servicer Information” screen, click inside the field that contains the name of the Servicer to be deleted. Click on the Delete Record icon and the record will be permanently deleted.
FYI
FYI
LaRS External User Guide – Release 8 FSA FMS
29
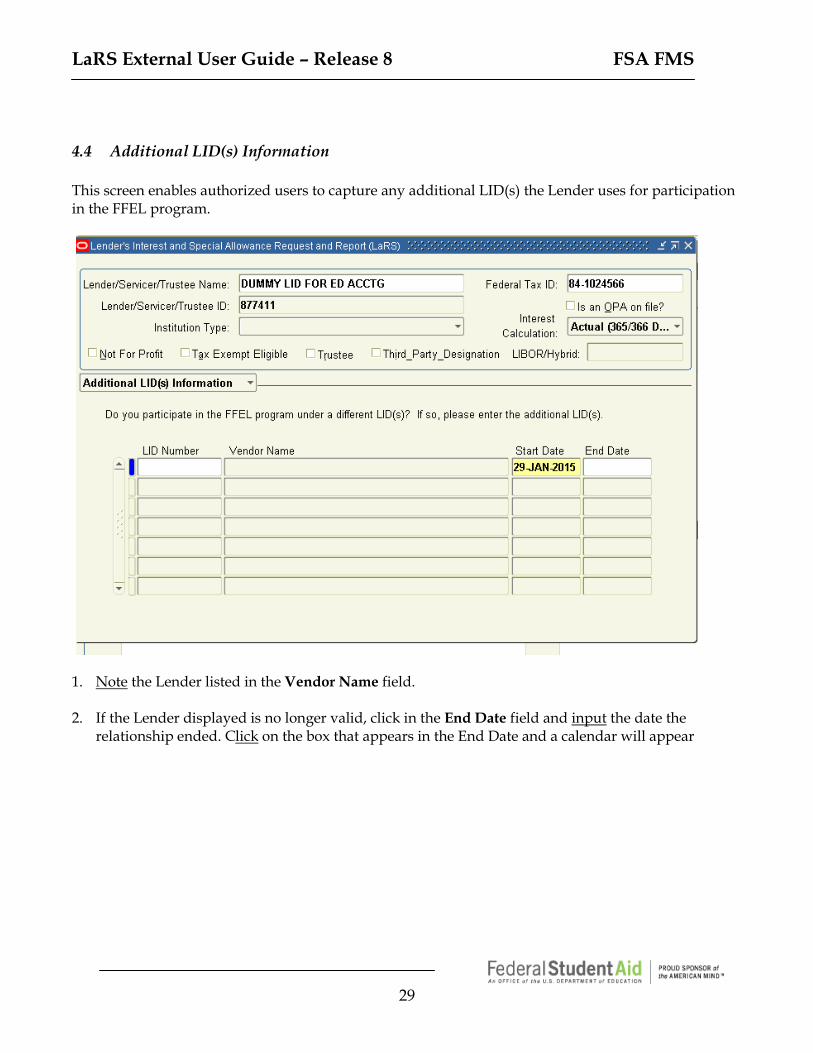
4.4 Additional LID(s) Information This screen enables authorized users to capture any additional LID(s) the Lender uses for participation in the FFEL program.
1. Note the Lender listed in the Vendor Name field. 2. If the Lender displayed is no longer valid, click in the End Date field and input the date the
relationship ended. Click on the box that appears in the End Date and a calendar will appear
LaRS External User Guide – Release 8 FSA FMS
30
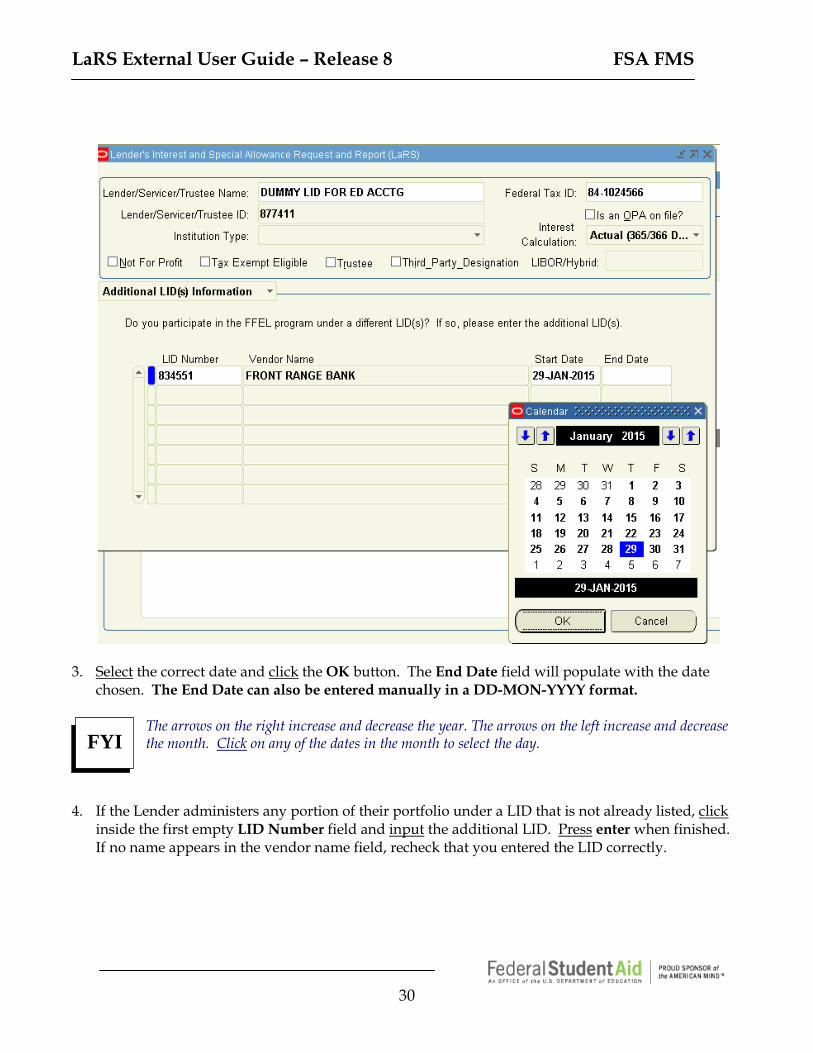
3. Select the correct date and click the OK button. The End Date field will populate with the date
chosen. The End Date can also be entered manually in a DD-MON-YYYY format.
The arrows on the right increase and decrease the year. The arrows on the left increase and decrease the month. Click on any of the dates in the month to select the day.
4. If the Lender administers any portion of their portfolio under a LID that is not already listed, click
inside the first empty LID Number field and input the additional LID. Press enter when finished. If no name appears in the vendor name field, recheck that you entered the LID correctly.
FYI
LaRS External User Guide – Release 8 FSA FMS
31
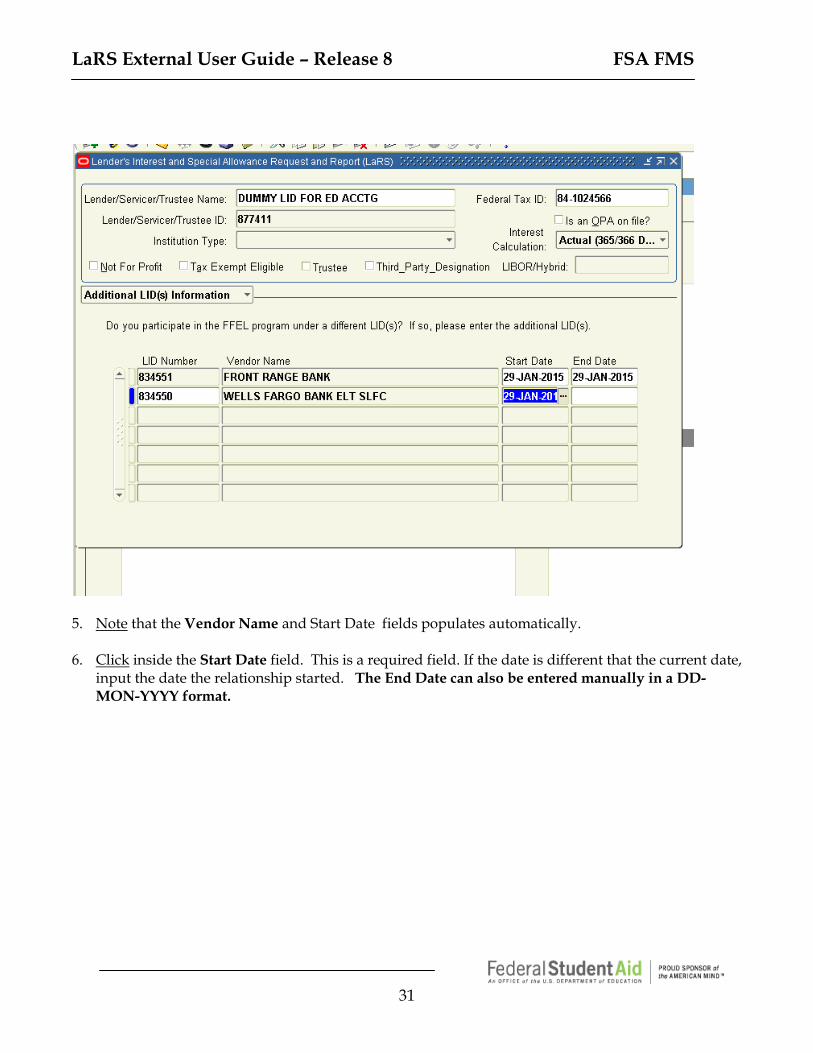
5. Note that the Vendor Name and Start Date fields populates automatically. 6. Click inside the Start Date field. This is a required field. If the date is different that the current date,
input the date the relationship started. The End Date can also be entered manually in a DD-MON-YYYY format.
LaRS External User Guide – Release 8 FSA FMS
32
7. If desired, an End Date for the additional LID can be entered, but it is not required. To enter an
End Date, repeat steps 2 and 3. The End Date can also be entered manually in a XX-MON_YYYY format.
8. Once the appropriate fields have been updated, click on the Save icon to save the changes. Note that only FSA LaRS users with Submit access will be able to save changes.
9. Once the “Additional LID Information” screen has been updated and saved, click on the menu
drop down arrow and select the next screen that needs to be updated. 10. If no further profile updates need to be made, click the File option from the menu bar and select
Close Form from the drop down list. This will bring the user back to the “Navigator” window.
–OR- 11. To close the LaRS application, select “Exit Oracle Applications” from the Action option on the
menu bar. If more than seven LIDs are associated with this organization, then press the down arrow on your keyboard. A new line will be provided. Continue adding new lines until all of the associated LIDs are listed. To delete a LID from the “Additional LIDs Information” screen, click inside the field that contains the name of the LID to be deleted. Click on the Delete Record icon and the record will be permanently deleted.
FYI
FYI
LaRS External User Guide – Release 8 FSA FMS
33
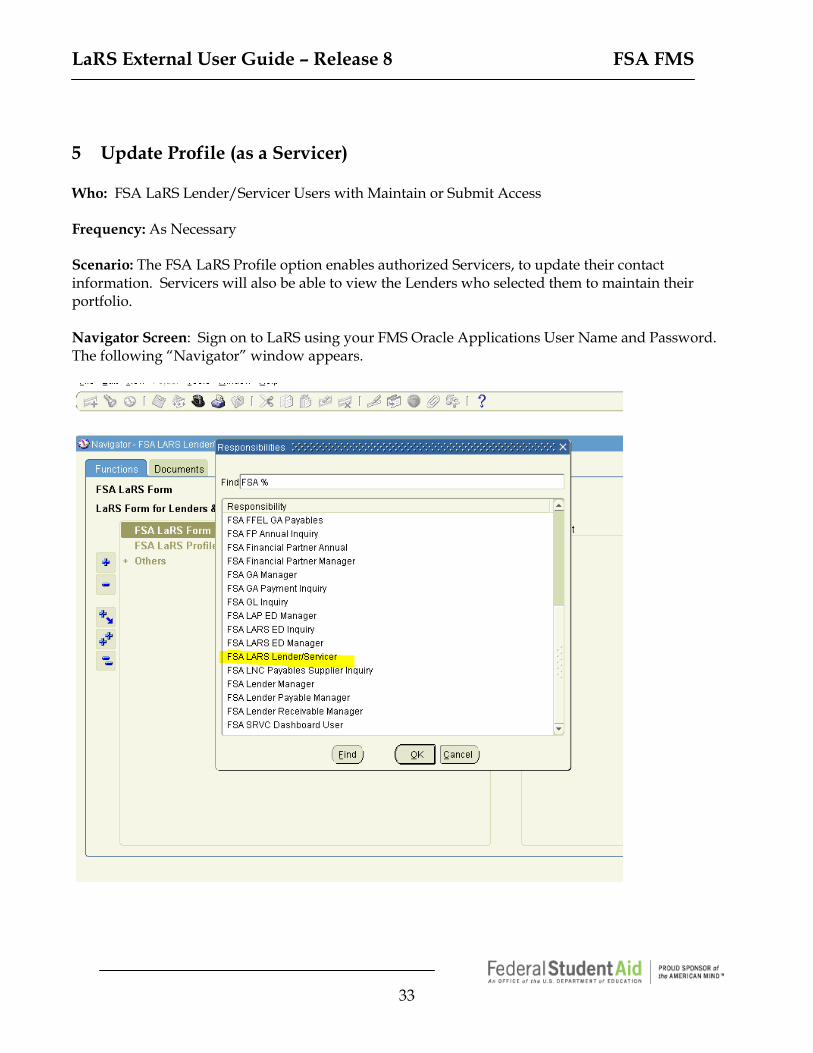
5 Update Profile (as a Servicer) Who: FSA LaRS Lender/Servicer Users with Maintain or Submit Access Frequency: As Necessary Scenario: The FSA LaRS Profile option enables authorized Servicers, to update their contact information. Servicers will also be able to view the Lenders who selected them to maintain their portfolio. Navigator Screen: Sign on to LaRS using your FMS Oracle Applications User Name and Password. The following “Navigator” window appears.

LaRS External User Guide – Release 8 FSA FMS
34
1. Double-click on FSA LaRS Profiles. This will open the LaRS Profile, “Contact Information” screen.
Profile functionality is for update purposes only. Users may not insert new records through the Profile screens.
FYI
LaRS External User Guide – Release 8 FSA FMS
35
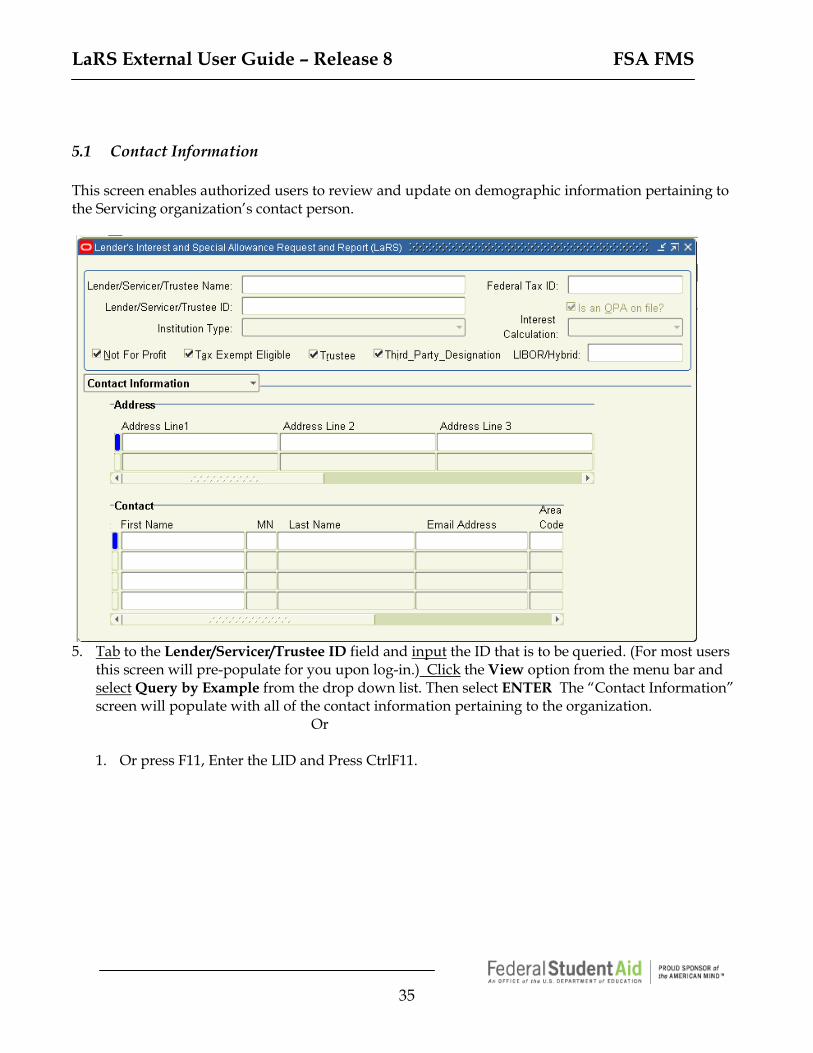
5.1 Contact Information This screen enables authorized users to review and update on demographic information pertaining to the Servicing organization’s contact person.
5. Tab to the Lender/Servicer/Trustee ID field and input the ID that is to be queried. (For most users
this screen will pre-populate for you upon log-in.) Click the View option from the menu bar and select Query by Example from the drop down list. Then select ENTER The “Contact Information” screen will populate with all of the contact information pertaining to the organization.
Or
1. Or press F11, Enter the LID and Press CtrlF11.
LaRS External User Guide – Release 8 FSA FMS
36
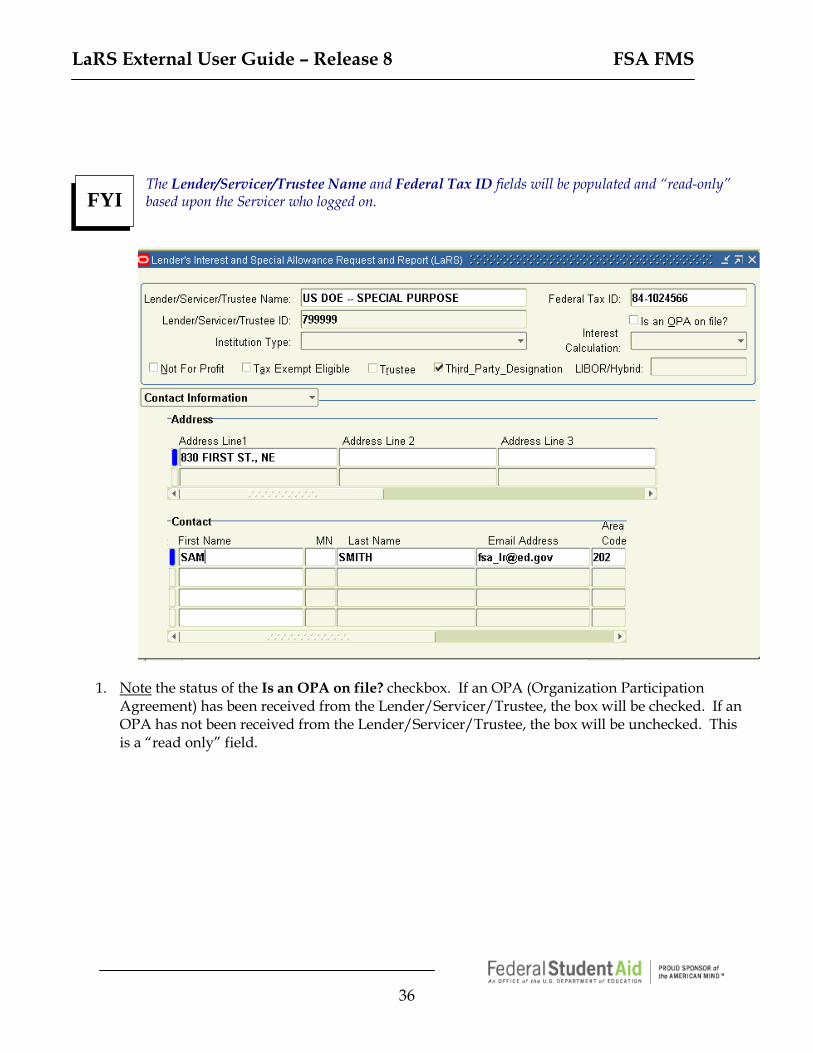
The Lender/Servicer/Trustee Name and Federal Tax ID fields will be populated and “read-only” based upon the Servicer who logged on.
1. Note the status of the Is an OPA on file? checkbox. If an OPA (Organization Participation Agreement) has been received from the Lender/Servicer/Trustee, the box will be checked. If an OPA has not been received from the Lender/Servicer/Trustee, the box will be unchecked. This is a “read only” field.
FYI
LaRS External User Guide – Release 8 FSA FMS
37
2. Note the Address fields. If the address shown in the address lines is not current, update them
with the appropriate information. The Address Line 1 field is a required field. All other Address Line fields are optional.
3. Scroll to the right using the scroll bar arrows. The following fields will appear:
• City • State • ZIP Code • Area Code • Phone • Fax Area Code • Fax Number • Lender ID
If the information in any of these fields is not current, update them with the appropriate information.
4. Note the Third-Party Designation field – This box is checked to designate the entity as a approved third party servicer.
5. Note the First Name field. If the contact person for the Servicing organization has changed,
update this field with the first name of the appropriate contact person. The contact person should be knowledgable about the student loan program. This is a required field.
6. Note the Middle Name field. If the contact person for organization has changed, update this
field with the middle initial of the appropriate contact person. This is not a required field.
LaRS External User Guide – Release 8 FSA FMS
38
7. Note the Last Name field. If the contact person for the organization has changed, update this field with the last name of the appropriate contact person. This is a required field.
8. Note the Email Address field. If the email address shown for the contact person is not current,
update it with the appropriate information. This is a required field.
9. Scroll to the right using the scroll bar arrows. The following fields will appear:
• Area Code • Phone
If the information in any of these fields is not current, update them with the appropriate information.
10. Once the appropriate fields have been updated, click on the Save icon to save the changes. Note that only FSA LaRS Lender/Servicer users with Submit access will be able to save changes.
11. Once the “Contact Information” screen has been updated and saved, click on the menu drop
down arrow and select the next screen.
–OR-
12. If no further profile updates need to be made, click the File option from the menu bar and select Close Form from the drop down list. This will bring the user back to the “Navigator” window.

LaRS External User Guide – Release 8 FSA FMS
39
5.2 Lender Information This screen allows Servicers to view all Lenders that have identified them as a valid Servicer.
1. Note the Lender ID field. This field contains the LID that corresponds to the organization listed in
the Lender Name field. This is a “read only” field. 2. Note the Lender/Trustee listed in the Lender Name field. The organization listed selected this
Servicer to manage their portfolio. This is a “read only” field. 3. Note the Function field. If the “Submit/View” option is selected, this Servicer fills out AND
submits quarterly billings for the Lender/Trustee financial institution. If “Maintain” is selected, this Servicer fills out but DOES NOT submit quarterly billings for the organization. This is a “read only” field.
4. Note the Start Date field. The relationship between the Servicer and Lender/Trustee began on this
date. This is a “read only” field.
LaRS External User Guide – Release 8 FSA FMS
40
5. Note the End Date field. This field may or may not be populated. The relationship between the Servicer and Lender/Trustee is set to end on this date. This is a “read only” field.
6. Once the “Lender Information” screen has been reviewed, click on the menu drop down arrow and
select the next screen that needs to be updated.
-OR- 7. If no further profile updates need to be made, click the File option from the menu bar and select
Close Form from the drop down list. This will bring the user back to the “Navigator” window.
-OR-
To close the LaRS application, select “Exit Oracle Applications” from the File option on the menu bar.
LaRS External User Guide – Release 8 FSA FMS
41
6 FSA LaRS Form
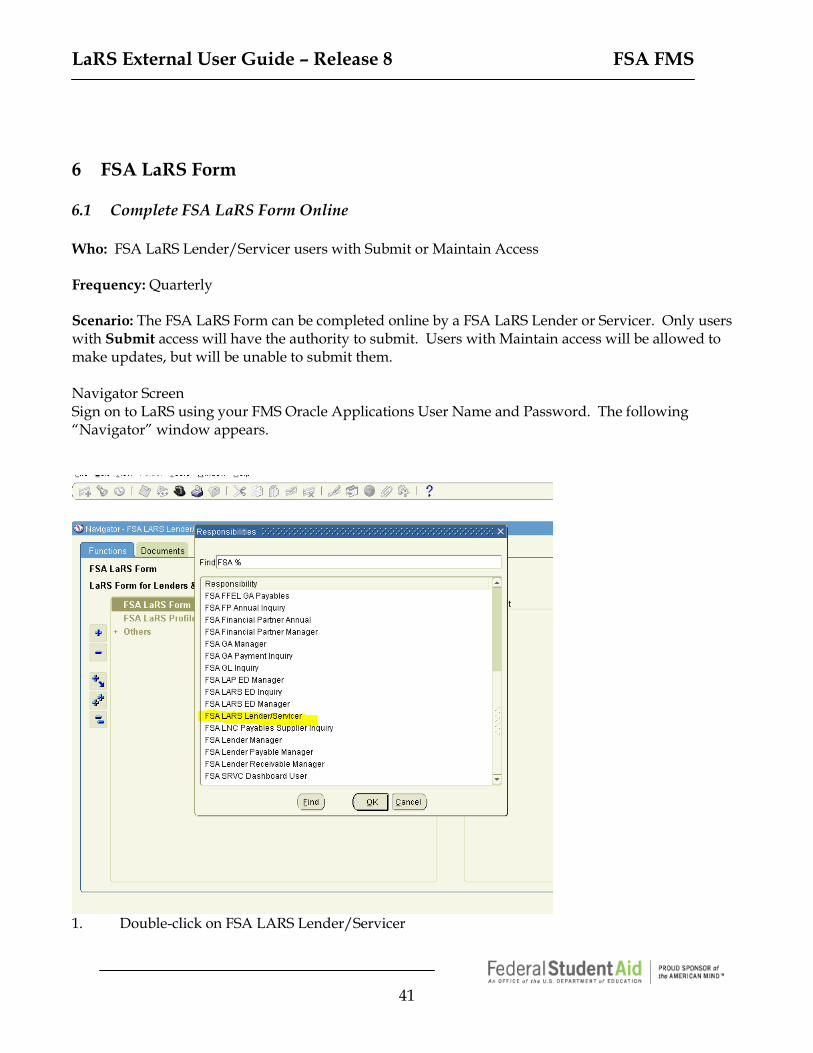
6.1 Complete FSA LaRS Form Online Who: FSA LaRS Lender/Servicer users with Submit or Maintain Access Frequency: Quarterly Scenario: The FSA LaRS Form can be completed online by a FSA LaRS Lender or Servicer. Only users with Submit access will have the authority to submit. Users with Maintain access will be allowed to make updates, but will be unable to submit them. Navigator Screen Sign on to LaRS using your FMS Oracle Applications User Name and Password. The following “Navigator” window appears.
1. Double-click on FSA LARS Lender/Servicer
LaRS External User Guide – Release 8 FSA FMS
42
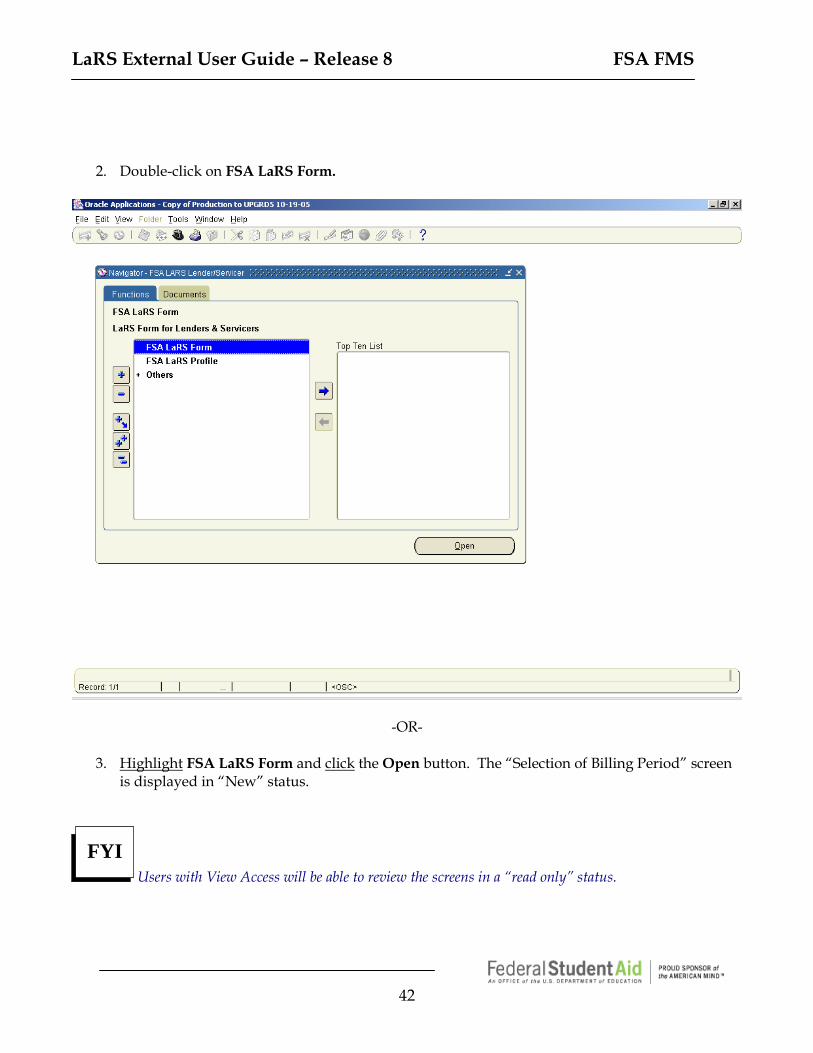
2. Double-click on FSA LaRS Form.
-OR-
3. Highlight FSA LaRS Form and click the Open button. The “Selection of Billing Period” screen is displayed in “New” status.
FYI Users with View Access will be able to review the screens in a “read only” status.
LaRS External User Guide – Release 8 FSA FMS
43
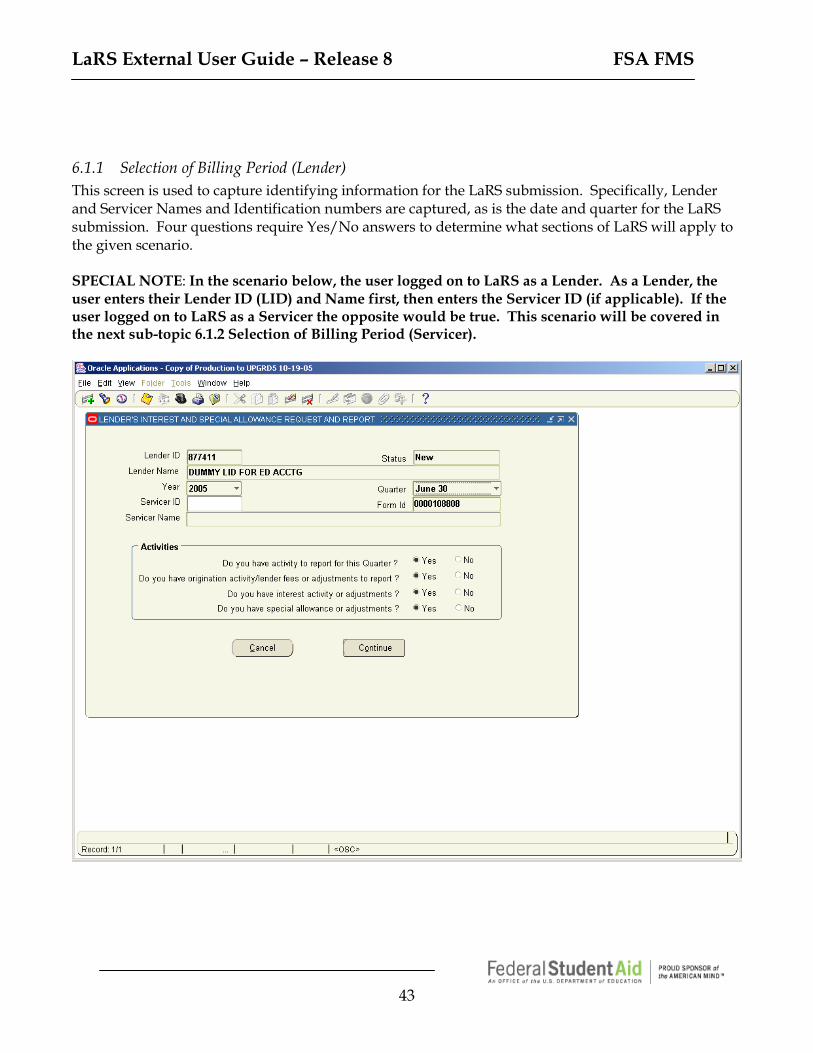
6.1.1 Selection of Billing Period (Lender) This screen is used to capture identifying information for the LaRS submission. Specifically, Lender and Servicer Names and Identification numbers are captured, as is the date and quarter for the LaRS submission. Four questions require Yes/No answers to determine what sections of LaRS will apply to the given scenario. SPECIAL NOTE: In the scenario below, the user logged on to LaRS as a Lender. As a Lender, the user enters their Lender ID (LID) and Name first, then enters the Servicer ID (if applicable). If the user logged on to LaRS as a Servicer the opposite would be true. This scenario will be covered in the next sub-topic 6.1.2 Selection of Billing Period (Servicer).
LaRS External User Guide – Release 8 FSA FMS
44
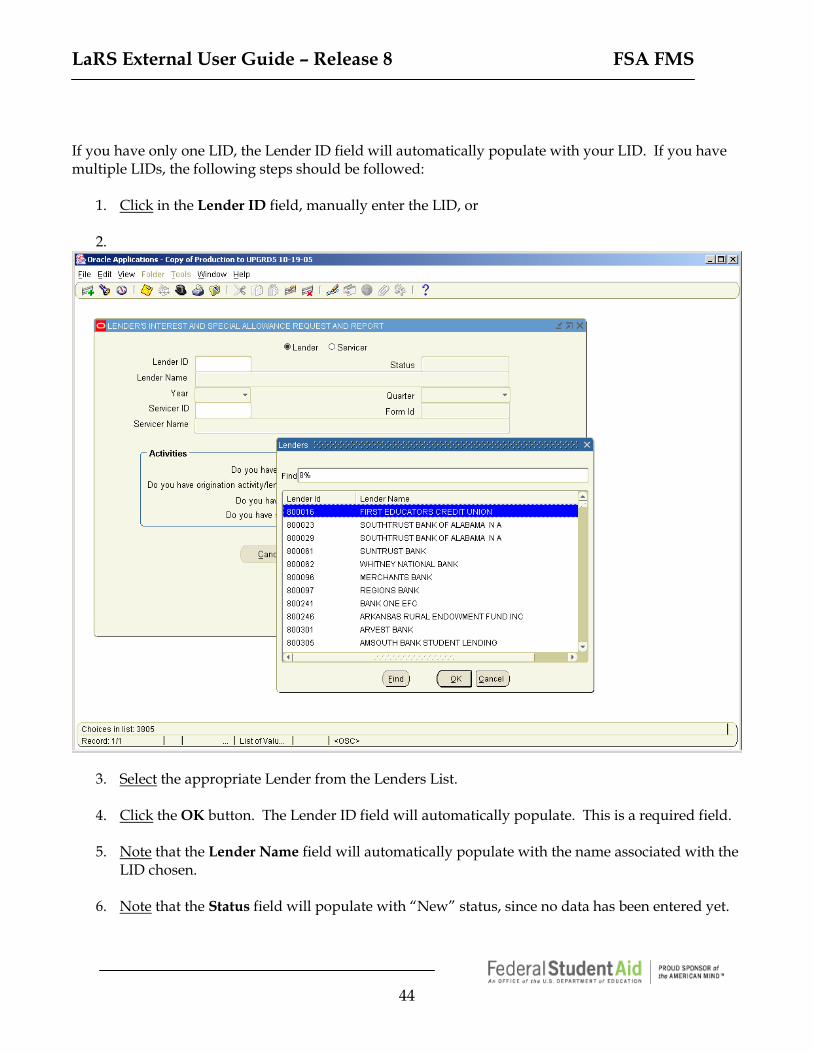
If you have only one LID, the Lender ID field will automatically populate with your LID. If you have multiple LIDs, the following steps should be followed:
1. Click in the Lender ID field, manually enter the LID, or
2.
3. Select the appropriate Lender from the Lenders List.
4. Click the OK button. The Lender ID field will automatically populate. This is a required field.
5. Note that the Lender Name field will automatically populate with the name associated with the
LID chosen.
6. Note that the Status field will populate with “New” status, since no data has been entered yet.
LaRS External User Guide – Release 8 FSA FMS
45
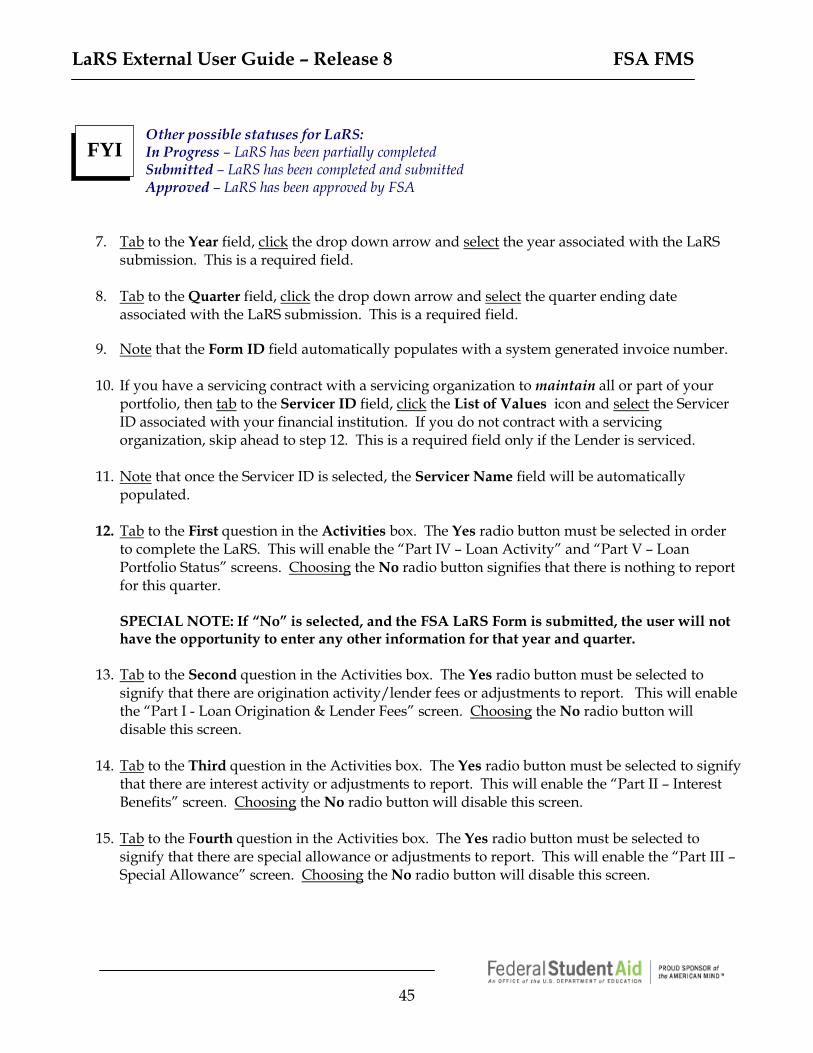
Other possible statuses for LaRS: In Progress – LaRS has been partially completed Submitted – LaRS has been completed and submitted Approved – LaRS has been approved by FSA
7. Tab to the Year field, click the drop down arrow and select the year associated with the LaRS
submission. This is a required field.
8. Tab to the Quarter field, click the drop down arrow and select the quarter ending date associated with the LaRS submission. This is a required field.
9. Note that the Form ID field automatically populates with a system generated invoice number.
10. If you have a servicing contract with a servicing organization to maintain all or part of your
portfolio, then tab to the Servicer ID field, click the List of Values icon and select the Servicer ID associated with your financial institution. If you do not contract with a servicing organization, skip ahead to step 12. This is a required field only if the Lender is serviced.
11. Note that once the Servicer ID is selected, the Servicer Name field will be automatically
populated.
12. Tab to the First question in the Activities box. The Yes radio button must be selected in order to complete the LaRS. This will enable the “Part IV – Loan Activity” and “Part V – Loan Portfolio Status” screens. Choosing the No radio button signifies that there is nothing to report for this quarter.
SPECIAL NOTE: If “No” is selected, and the FSA LaRS Form is submitted, the user will not have the opportunity to enter any other information for that year and quarter.
13. Tab to the Second question in the Activities box. The Yes radio button must be selected to
signify that there are origination activity/lender fees or adjustments to report. This will enable the “Part I - Loan Origination & Lender Fees” screen. Choosing the No radio button will disable this screen.
14. Tab to the Third question in the Activities box. The Yes radio button must be selected to signify
that there are interest activity or adjustments to report. This will enable the “Part II – Interest Benefits” screen. Choosing the No radio button will disable this screen.
15. Tab to the Fourth question in the Activities box. The Yes radio button must be selected to
signify that there are special allowance or adjustments to report. This will enable the “Part III – Special Allowance” screen. Choosing the No radio button will disable this screen.
FYI
LaRS External User Guide – Release 8 FSA FMS
46
SPECIAL NOTE: for training purposes this user guide assumes that the user selected the Yes radio button for all four Activities box questions. This will enable the user to see instructions for all possible screens.
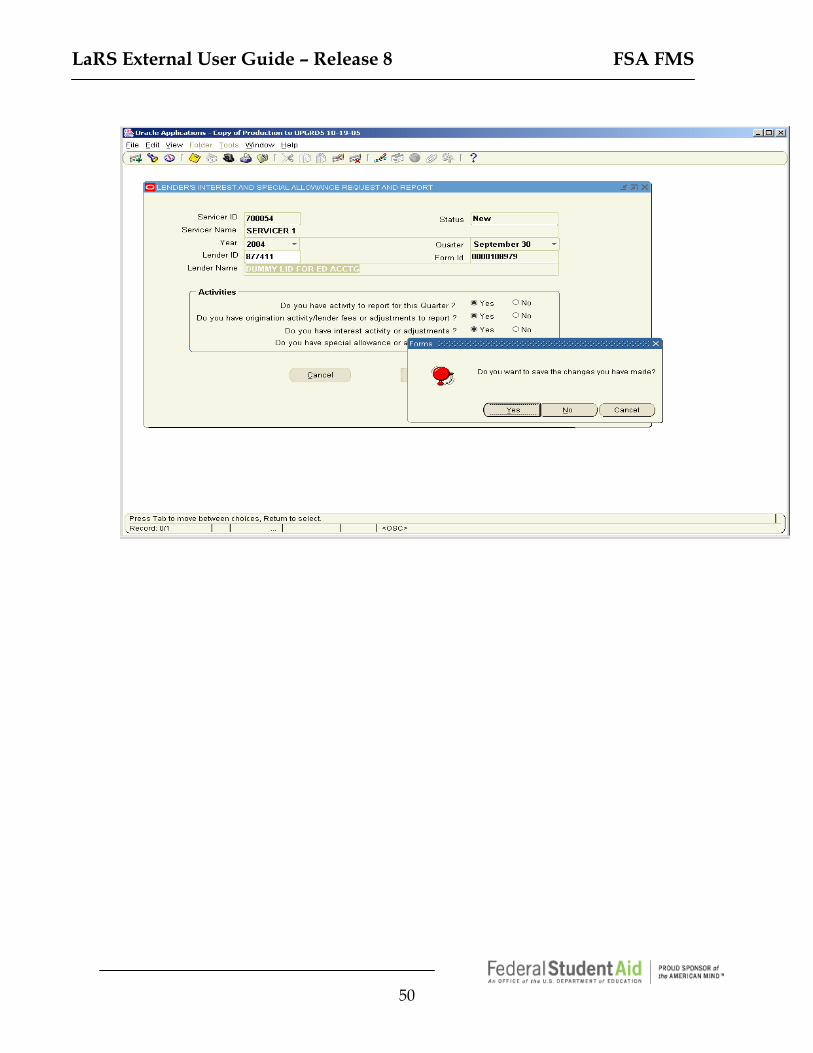
16. Once you have completed all fields on the “Selection of Billing Period” screen, click the
continue button. The Status will change from “New” to “In Progress”, and the “Part I – Loan Origination & Lender Fees” screen will open.
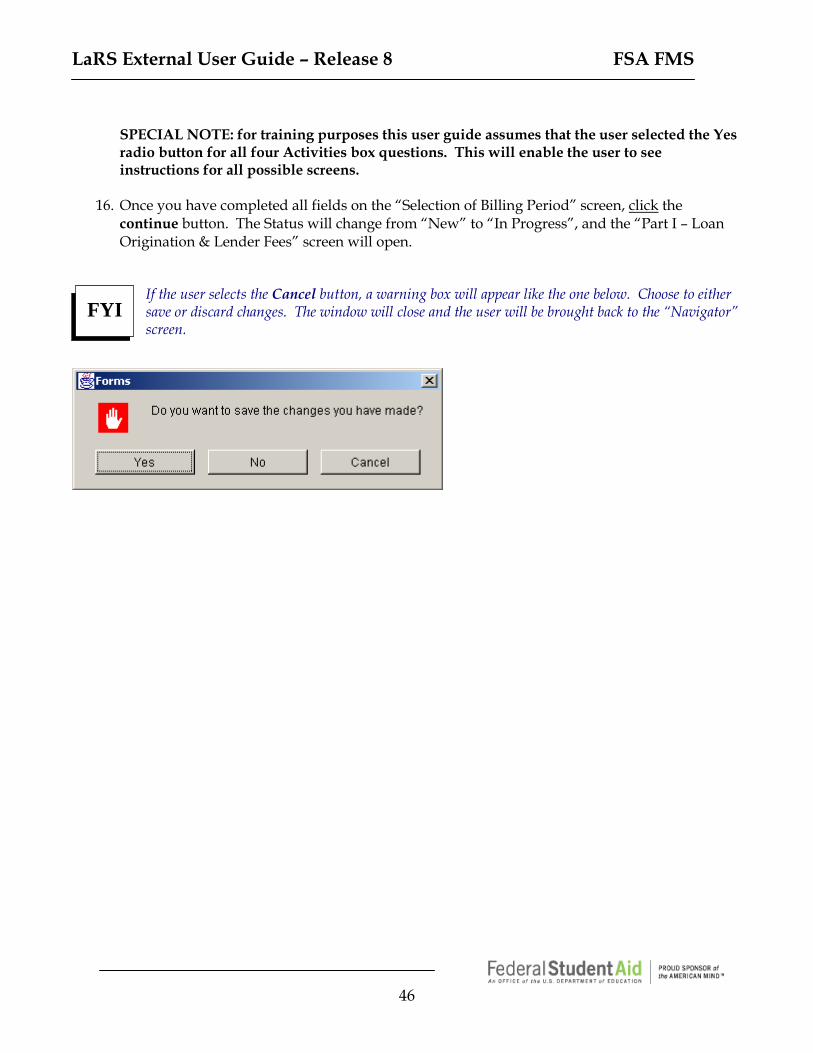
If the user selects the Cancel button, a warning box will appear like the one below. Choose to either save or discard changes. The window will close and the user will be brought back to the “Navigator” screen.
FYI
LaRS External User Guide – Release 8 FSA FMS
47
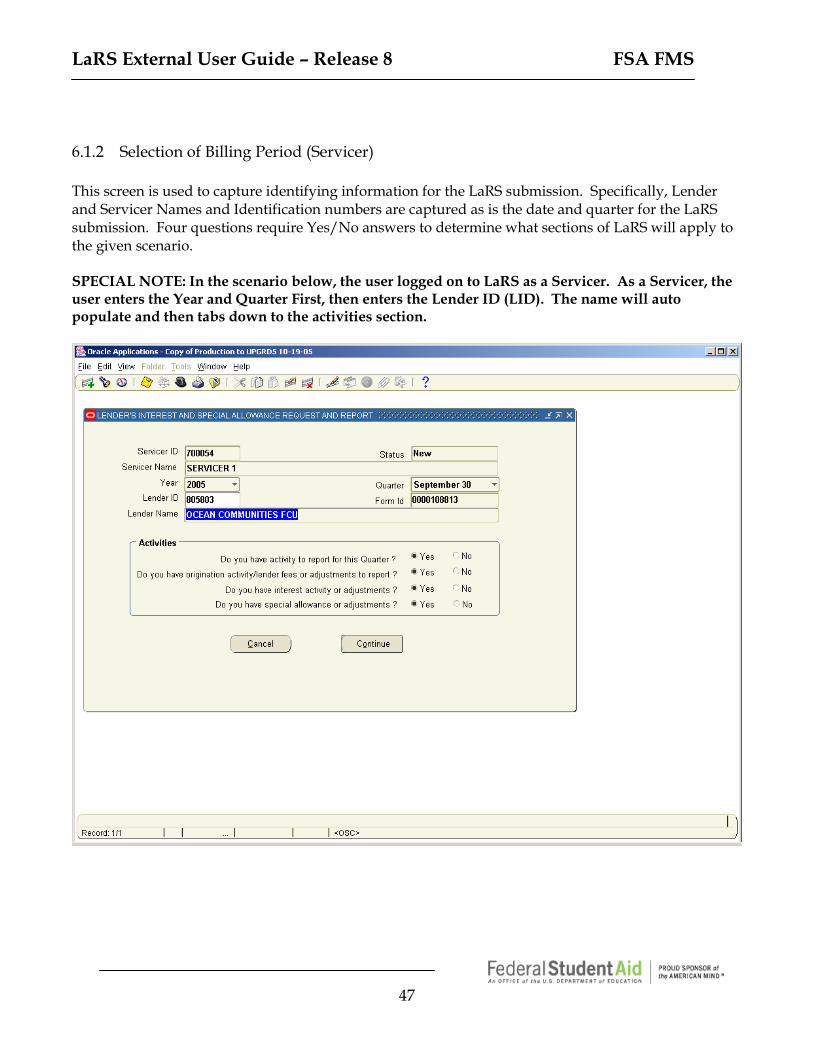
6.1.2 Selection of Billing Period (Servicer) This screen is used to capture identifying information for the LaRS submission. Specifically, Lender and Servicer Names and Identification numbers are captured as is the date and quarter for the LaRS submission. Four questions require Yes/No answers to determine what sections of LaRS will apply to the given scenario. SPECIAL NOTE: In the scenario below, the user logged on to LaRS as a Servicer. As a Servicer, the user enters the Year and Quarter First, then enters the Lender ID (LID). The name will auto populate and then tabs down to the activities section.
LaRS External User Guide – Release 8 FSA FMS
48
1. Note that the Servicer ID field is pre-populated with the ID for the Servicer.
2. Note that the Servicer Name field is pre-populated with the name associated with the Servicer
ID.
3. Note that the Status field populates with “New” status, since no data has been entered yet.
Other possible statuses for LaRS: In Progress – LaRS has been partially completed Submitted – LaRS has been completed and submitted Approved – LaRS has been approved by FSA
4. Tab to the Year field, click the drop down arrow and select the year associated with the LaRS
submission. This is a required field.
5. Tab to the Quarter field, click the drop down arrow and select the quarter ending date associated with the LaRS submission. This is a required field.
6. Note that the Form ID field automatically populates with a system generated invoice number.
7. Tab to the Lender ID field, click the List of Values icon and select the Lender for whom you are
submitting the LaRS or enter the LID .
8. Note that once the Lender ID is selected, the Lender Name field will be automatically populated.
9. Tab to the First question in the Activities box. The Yes radio button must be selected in order
to complete the LaRS. This will enable the “Part IV – Loan Activity” and “Part V – Loan Portfolio Status” screens. Choosing the No radio button signifies that there is nothing to report for this quarter.
SPECIAL NOTE: If “No” is selected, and the FSA LaRS Form is submitted, the user will not have the opportunity to enter any other information for that year and quarter.
10. Tab to the Second question in the Activities box. The Yes radio button must be selected to
signify that there are origination activity/lender fees or adjustments to report. This will enable the “Part I - Loan Origination & Lender Fees” screen. Choosing the No radio button will disable this screen.
FYI
LaRS External User Guide – Release 8 FSA FMS
49
11. Tab to the Third question in the Activities box. The Yes radio button must be selected to signify that there are interest activity or adjustments to report. This will enable the “Part II – Interest Benefits” screen. Choosing the No radio button will disable this screen.
12. Tab to the Fourth question in the Activities box. The Yes radio button must be selected to
signify that there are special allowance or adjustments to report. This will enable the “Part III – Special Allowance” screen. Choosing the No radio button will disable this screen.
SPECIAL NOTE: for training purposes this user guide assumes that the user selected the Yes radio button for all four Activities box questions. This will enable the user to see instructions for all possible screens.
13. Once you have completed all fields on the “Selection of Billing Period” screen, click the
Continue button. The Status will change from “New” to “In Progress”, and the “Part I – Loan Origination & Lender Fees” screen will open.
If the user selects the Cancel button, a warning box will appear like the one below. Choose to either save or discard changes. The window will close and the user will be brought back to the “Navigator” screen.
FYI
LaRS External User Guide – Release 8 FSA FMS
50
LaRS External User Guide – Release 8 FSA FMS
51
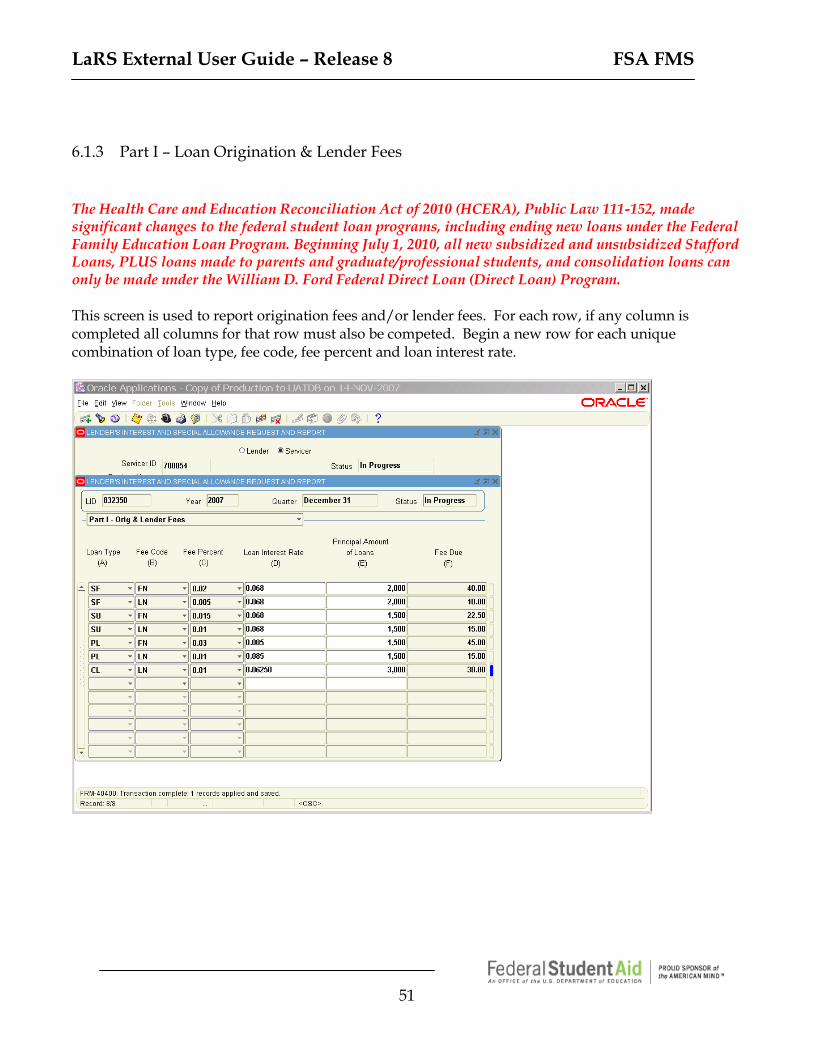
6.1.3 Part I – Loan Origination & Lender Fees The Health Care and Education Reconciliation Act of 2010 (HCERA), Public Law 111-152, made significant changes to the federal student loan programs, including ending new loans under the Federal Family Education Loan Program. Beginning July 1, 2010, all new subsidized and unsubsidized Stafford Loans, PLUS loans made to parents and graduate/professional students, and consolidation loans can only be made under the William D. Ford Federal Direct Loan (Direct Loan) Program. This screen is used to report origination fees and/or lender fees. For each row, if any column is completed all columns for that row must also be competed. Begin a new row for each unique combination of loan type, fee code, fee percent and loan interest rate.
LaRS External User Guide – Release 8 FSA FMS
52
• LID, Year and Quarter fields will automatically populate based upon information supplied on the “Selection of Billing Period” screen.
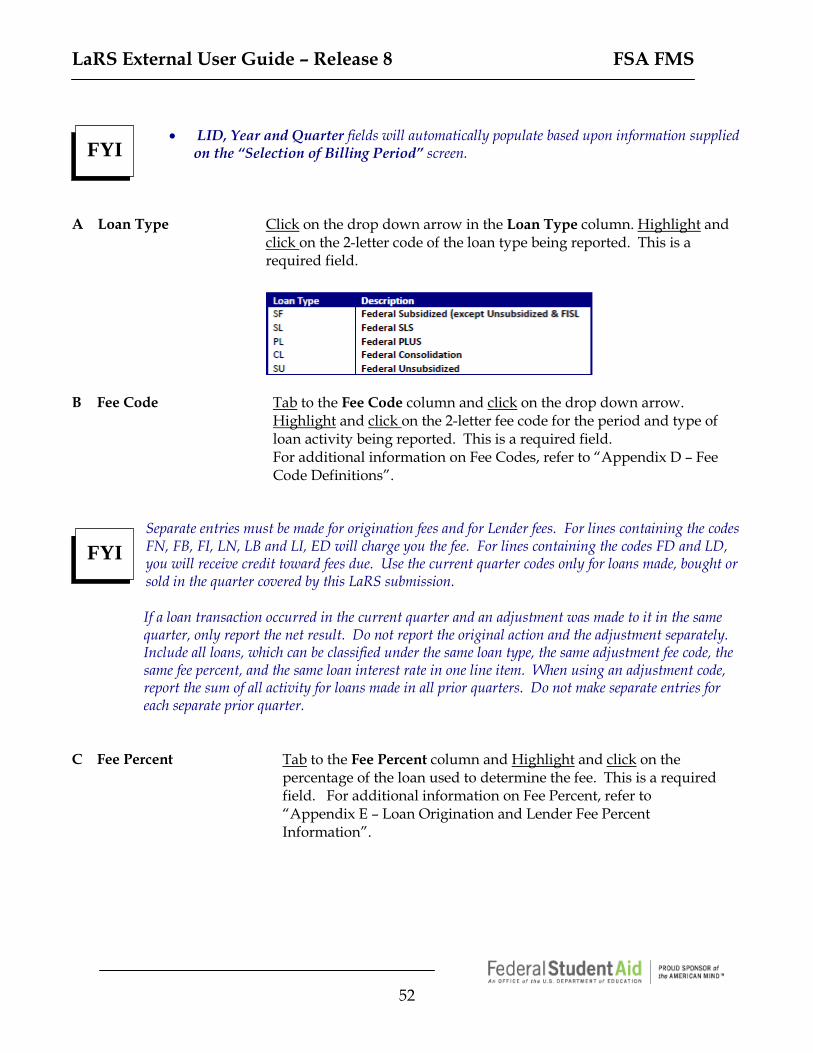
A Loan Type Click on the drop down arrow in the Loan Type column. Highlight and
click on the 2-letter code of the loan type being reported. This is a required field.
B Fee Code Tab to the Fee Code column and click on the drop down arrow. Highlight and click on the 2-letter fee code for the period and type of loan activity being reported. This is a required field. For additional information on Fee Codes, refer to “Appendix D – Fee Code Definitions”.
Separate entries must be made for origination fees and for Lender fees. For lines containing the codes FN, FB, FI, LN, LB and LI, ED will charge you the fee. For lines containing the codes FD and LD, you will receive credit toward fees due. Use the current quarter codes only for loans made, bought or sold in the quarter covered by this LaRS submission.
If a loan transaction occurred in the current quarter and an adjustment was made to it in the same quarter, only report the net result. Do not report the original action and the adjustment separately. Include all loans, which can be classified under the same loan type, the same adjustment fee code, the same fee percent, and the same loan interest rate in one line item. When using an adjustment code, report the sum of all activity for loans made in all prior quarters. Do not make separate entries for each separate prior quarter.
C Fee Percent Tab to the Fee Percent column and Highlight and click on the percentage of the loan used to determine the fee. This is a required field. For additional information on Fee Percent, refer to “Appendix E – Loan Origination and Lender Fee Percent Information”.
FYI
FYI
LaRS External User Guide – Release 8 FSA FMS
53
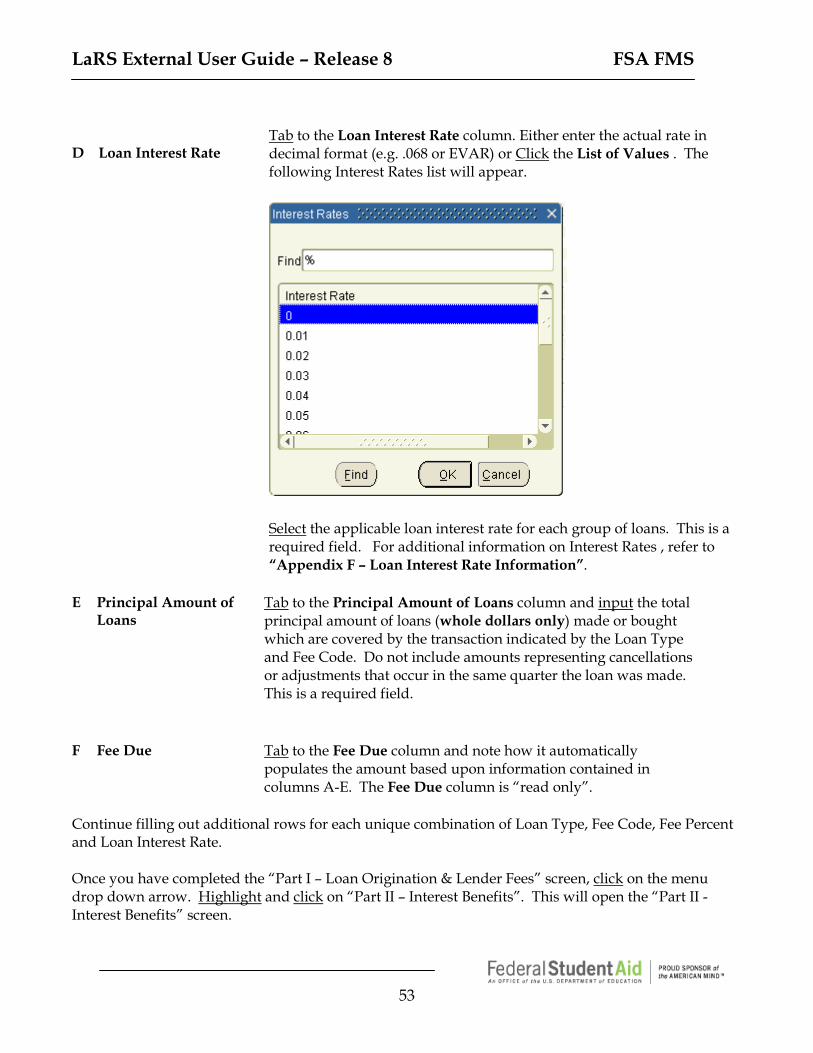
D
Loan Interest Rate
Tab to the Loan Interest Rate column. Either enter the actual rate in decimal format (e.g. .068 or EVAR) or Click the List of Values . The following Interest Rates list will appear.
Select the applicable loan interest rate for each group of loans. This is a required field. For additional information on Interest Rates , refer to “Appendix F – Loan Interest Rate Information”.
E Principal Amount of
Loans Tab to the Principal Amount of Loans column and input the total principal amount of loans (whole dollars only) made or bought which are covered by the transaction indicated by the Loan Type and Fee Code. Do not include amounts representing cancellations or adjustments that occur in the same quarter the loan was made. This is a required field.
F Fee Due Tab to the Fee Due column and note how it automatically
populates the amount based upon information contained in columns A-E. The Fee Due column is “read only”.
Continue filling out additional rows for each unique combination of Loan Type, Fee Code, Fee Percent and Loan Interest Rate. Once you have completed the “Part I – Loan Origination & Lender Fees” screen, click on the menu drop down arrow. Highlight and click on “Part II – Interest Benefits”. This will open the “Part II - Interest Benefits” screen.
LaRS External User Guide – Release 8 FSA FMS
54
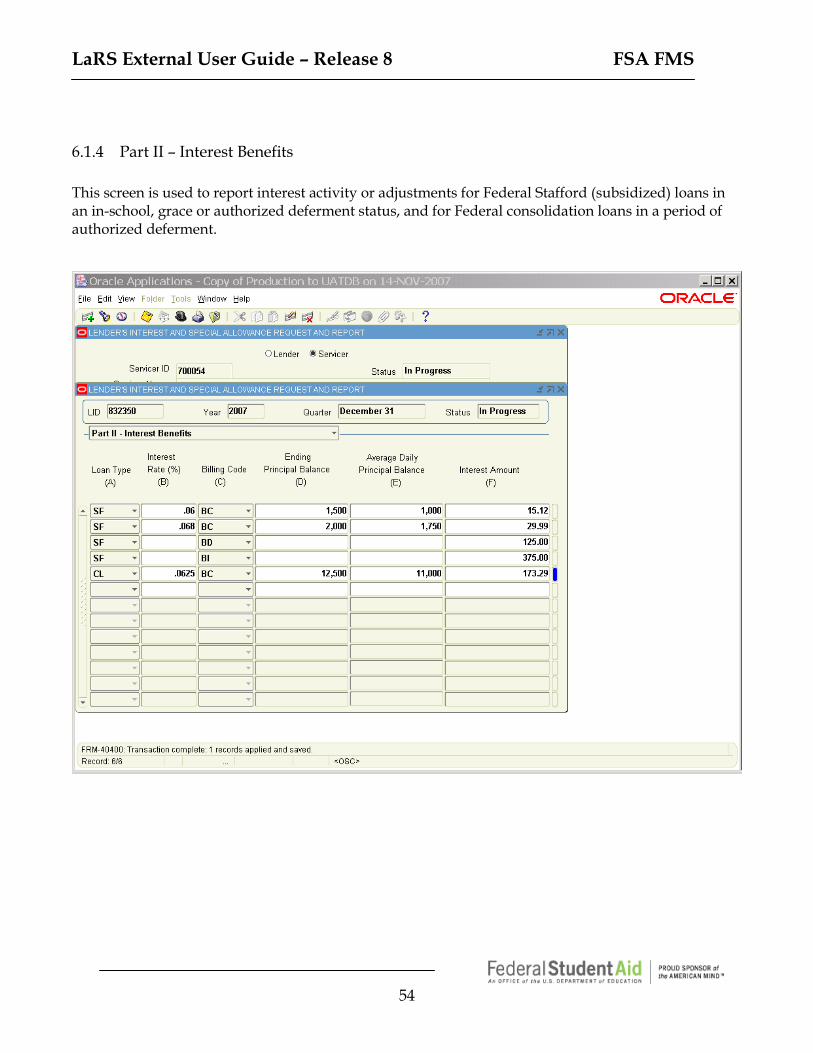
6.1.4 Part II – Interest Benefits This screen is used to report interest activity or adjustments for Federal Stafford (subsidized) loans in an in-school, grace or authorized deferment status, and for Federal consolidation loans in a period of authorized deferment.

LaRS External User Guide – Release 8 FSA FMS
55
LID, Year and Quarter fields will automatically populate based upon information supplied on the “Selection of Billing Period” screen. Status field will automatically populate based upon the status of your LaRS.
A
Loan Type
Click on the drop down arrow in the Loan Type column. Highlight and click on the applicable the 2-letter code for the loan type being reported. This is a required field. SF - Federal Stafford (Subsidized) CL - Federal Consolidation
B Interest Rate Tab to the Interest Rate column. Either enter the actual rate in
decimal forma (e.g. .0470 or EVAR) or Click the List of Values. The following Interest Rates list will appear.
Select the applicable interest rate for loans or portions of loans on which you are billing interest for the quarter covered by this LaRS submission. This is a required field. The user may also manually enter an interest rate.
C Billing Code Tab to the Billing Code column and click on the drop down arrow.
Highlight and click on the code for the period and type of loan activity being reported. This is a required field. For additional information on Billing Codes (including Income-Based Reporting) please refer to “Appendix G – Billing Code Definitions”.
FYI
LaRS External User Guide – Release 8 FSA FMS
56
• For lines containing the codes BC or BI, you will receive an interest payment from ED. For
lines containing the code BD, you will be charged for the amount owed to ED.
• If an interest transaction occurred in the current quarter and an adjustment was made to it in the same quarter, report only the net result. Do not report the original action and the adjustment separately.
• Use codes BI and BD to report adjustments to interest activity for all prior quarters
combined, regardless of the loans' individual interest rates.
D Ending Principal Balance Tab to the Ending Principal Balance column and input the total unpaid principal balance outstanding on all loans or portions of loans eligible for interest benefits (whole dollars only) for the stated Loan Type, Interest Rate and Billing Code combination, as of the last day of the quarter covered by this LaRS submission. This is a required field.
E Average Daily Principal
Balance Tab to the Average Daily Principal Balance column. For each combination of Loan Type, Interest Rate and Billing Code, input the average (whole dollars only) of the daily principal balances of all eligible loans or portions of loans for the quarter covered by this LaRS submission. This is accomplished by adding the outstanding principal balance of all eligible loans or portions of loans for each day in the quarter and dividing by the number of days in the quarter. This is a required field.
F Interest Amount Tab to the Interest Amount column.
If Billing Code is BI or BD, input (to the nearest penny) the amount of interest due you or owed to ED. Enter a positive number only. This is a required field. If Billing Code is BC is, the Interest Due will automatically populate in Column F and will be read only.
Continue filling out additional rows for each unique combination of Loan Type and Interest Rate and Billing Code. Once you have completed the “Part II – Interest Benefits” screen, click on the menu drop down arrow. Highlight and click on “Part III – Special Allowance”. This will open the “Part III – Special Allowance” screen.
FYI
LaRS External User Guide – Release 8 FSA FMS
57
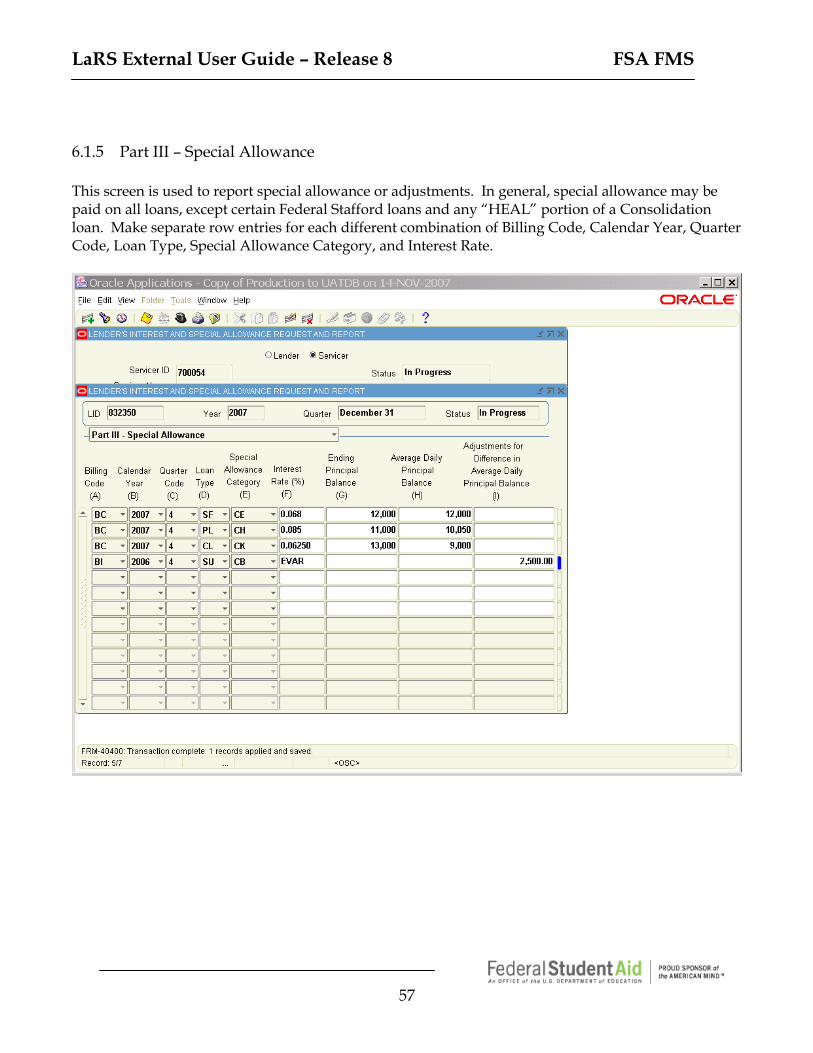
6.1.5 Part III – Special Allowance This screen is used to report special allowance or adjustments. In general, special allowance may be paid on all loans, except certain Federal Stafford loans and any “HEAL” portion of a Consolidation loan. Make separate row entries for each different combination of Billing Code, Calendar Year, Quarter Code, Loan Type, Special Allowance Category, and Interest Rate.
LaRS External User Guide – Release 8 FSA FMS
58
LID, Year and Quarter fields will automatically populate based upon information supplied on the “Selection of Billing Period” screen.
A Billing Code Click on the drop down arrow in the Billing Code column. Highlight and
click on the code for the period and type of loan activity being reported. This is a required field. For additional information on Billing Codes, refer to “Appendix G – Billing Code Definitions”.
For lines containing the codes BC and BI, YOU will receive a payment from ED. For a line containing the code BD, YOU will be charged for the amount owed to ED. If a transaction occurred in the current quarter and an adjustment was made in the same quarter, only report the net result.
B Calendar Year Tab to the Calendar Year column and click on the drop down arrow. Highlight
and click on the year being reported. This is a required field. C Quarter Code Tab to the Quarter Code column and click on the drop down arrow. Highlight
and click on the digit for the quarter being reported. This is a required field. 1- March 31 2 - June 30 3 - September 30 4 - December 31
D Loan Type Tab to the Loan Type column and click on the drop down arrow. Highlight and
click on the 2-letter code for the loans being reported. This is a required field. SF - Federal Stafford (Subsidized) SL - Federal SLS PL - Federal PLUS (Includes PLUS for grad/professional students) CL - Federal Consolidation SU - Unsubsidized Stafford
E Special
Allowance Category
Tab to the Special Allowance Category column and click on the drop down arrow. Highlight and click on the code for the loans being reported. This is a required field. Acceptable codes are CA/LA, CB/LB, CC/LC, CD/LD, CE/LE, CF/LF, CG/LG, CH/LH, CI/LI, CJ/LJ, CK/LK, CM/LM, SA, SB, SC, SD, SE, SG, SH, SJ, SK, SL, XA, XB, XE, XG, XH, XJ, XK, XL, XM, XN, XO and XP. For additional information on Special Allowance Categories, refer to “Appendix H – Special Allowance Category Definitions”.
FYI
FYI
LaRS External User Guide – Release 8 FSA FMS
59
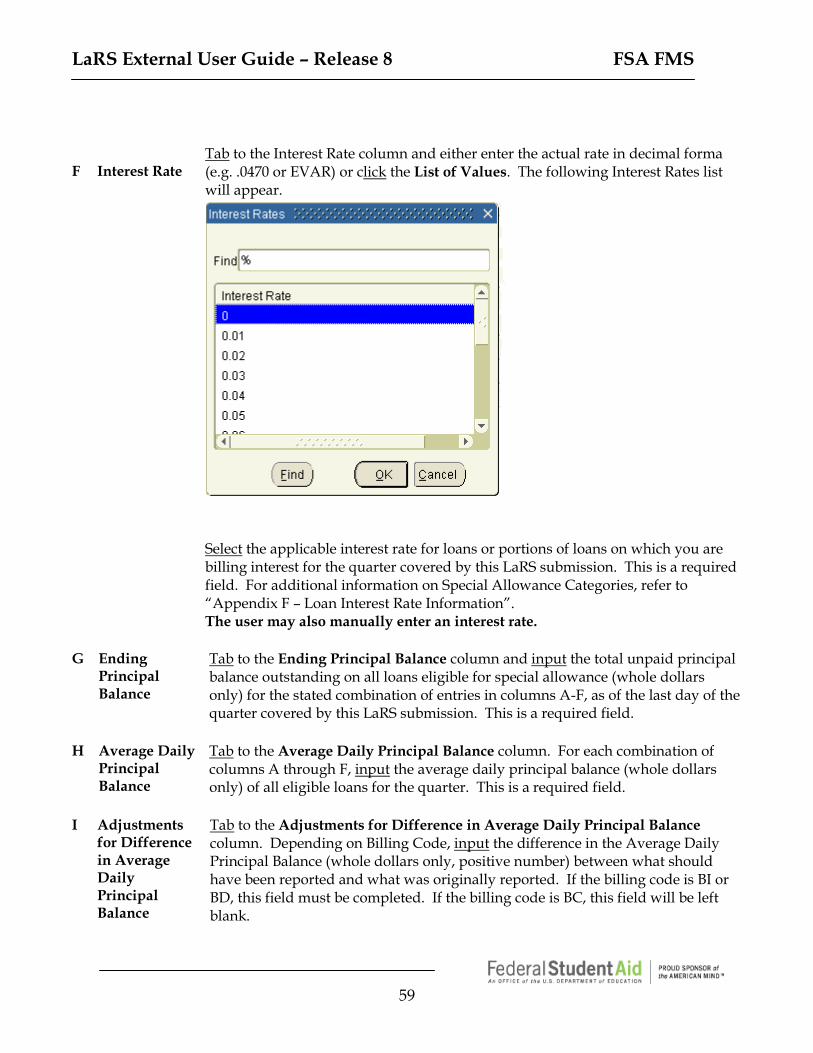
F
Interest Rate
Tab to the Interest Rate column and either enter the actual rate in decimal forma (e.g. .0470 or EVAR) or click the List of Values. The following Interest Rates list will appear.
Select the applicable interest rate for loans or portions of loans on which you are billing interest for the quarter covered by this LaRS submission. This is a required field. For additional information on Special Allowance Categories, refer to “Appendix F – Loan Interest Rate Information”. The user may also manually enter an interest rate.
G Ending
Principal Balance
Tab to the Ending Principal Balance column and input the total unpaid principal balance outstanding on all loans eligible for special allowance (whole dollars only) for the stated combination of entries in columns A-F, as of the last day of the quarter covered by this LaRS submission. This is a required field.
H Average Daily
Principal Balance
Tab to the Average Daily Principal Balance column. For each combination of columns A through F, input the average daily principal balance (whole dollars only) of all eligible loans for the quarter. This is a required field.
I Adjustments
for Difference in Average Daily Principal Balance
Tab to the Adjustments for Difference in Average Daily Principal Balance column. Depending on Billing Code, input the difference in the Average Daily Principal Balance (whole dollars only, positive number) between what should have been reported and what was originally reported. If the billing code is BI or BD, this field must be completed. If the billing code is BC, this field will be left blank.
LaRS External User Guide – Release 8 FSA FMS
60
Continue filling out additional rows for each unique combination of Billing Code, Calendar Year, Quarter Code, Loan Type, Special Allowance Category, and Interest Rate. Once you have completed the “Part III – Special Allowance” screen, click on the menu drop down arrow. Highlight and click on “Part IV – Loan Activity”. This will open the “Part IV – Loan Activity” screen.
LaRS External User Guide – Release 8 FSA FMS
61
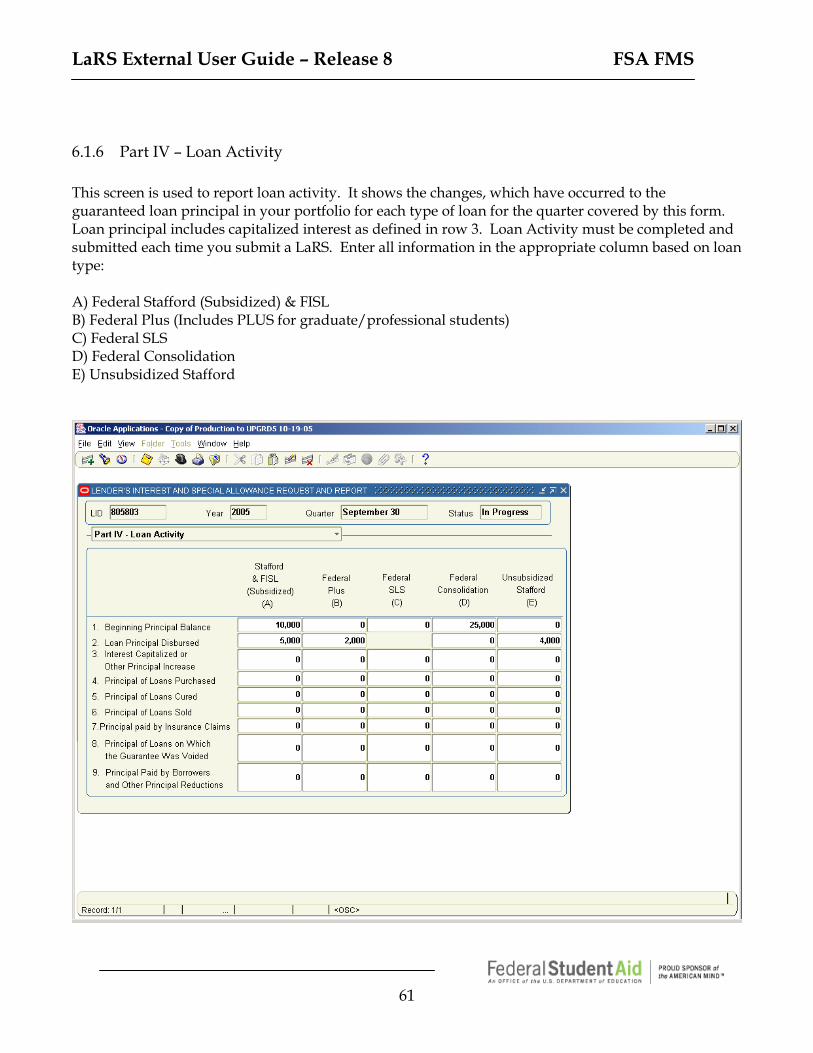
6.1.6 Part IV – Loan Activity This screen is used to report loan activity. It shows the changes, which have occurred to the guaranteed loan principal in your portfolio for each type of loan for the quarter covered by this form. Loan principal includes capitalized interest as defined in row 3. Loan Activity must be completed and submitted each time you submit a LaRS. Enter all information in the appropriate column based on loan type: A) Federal Stafford (Subsidized) & FISL B) Federal Plus (Includes PLUS for graduate/professional students) C) Federal SLS D) Federal Consolidation E) Unsubsidized Stafford
LaRS External User Guide – Release 8 FSA FMS
62
LID, Year and Quarter fields will automatically populate based upon information supplied on the “Selection of Billing Period” screen.
1 Beginning Principal
Balance Tab to the appropriate loan type column in the Beginning Principal Balance row. Input the outstanding principal balance (including the sum of capitalized interest outstanding) of loans at the start of business on the first day of the quarter. Unless an adjustment has been made, this amount must be the same as the Ending Principal Balance from the previous quarter's submission.
2 Loan Principal Disbursed Tab to the appropriate loan type column in the Loan Principal Disbursed row. Input the principal amount of loans disbursed during the quarter. This may be new loans or additional disbursements for loans initially disbursed in a prior quarter. Report the gross amount; that is, the amount prior to any deductions for insurance premiums or origination fees. Do not report amounts disbursed and then cancelled (e.g., checks returned uncashed) in the same quarter.
3 Interest Capitalized or
Other Principal Increase Tab to the appropriate loan type column in the Interest Capitalized or Other Principal Increase row. Input the amount of interest and unpaid insurance premiums that were added to principal during the quarter in accordance with program regulations, principal transferred from other LIDs assigned to your institution, and any other increases in your portfolio not shown elsewhere.
FYI
LaRS External User Guide – Release 8 FSA FMS
63
4 Principal of Loans
Purchased Tab to the appropriate loan type column in the Principal of Loans Purchased row. Input the principal amount of loans purchased (including interest capitalized prior to purchase) from other Lenders. DO NOT include amounts disbursed to consolidate a loan. If the Fee Code is FS, this field will populate automatically in Column A. If the fee code is FB in Part I, the sum of the principal amount of the different loan types will populate the corresponding Principal of Loans Purchased fields.
5 Principal of Loans Cured Tab to the appropriate loan type column in the Principal of Loans
Cured row. Input the principal amount of loans (including the sum of interest capitalized prior to the reinstatement of the loan's insurance) on which insurance coverage was reinstated (cured) in accordance with program regulations.
6 Principal of Loans Sold Tab to the appropriate loan type column in the Principal of Loans
Sold row. Input the principal amount of loans sold (including interest capitalized prior to sale) to other Lenders or the Department of Education. DO NOT include loans paid in full through consolidation. Also, do not include Federal PLUS and SLS loans paid in full as part of a refinancing of those loans. If the Fee Code is FS in Part I, the sum of the principal amount of different loan types will populate the corresponding Principal of Loans Sold fields.
7 Principal Paid by
Insurance Claims Tab to the appropriate loan type column in the Principal Paid by Insurance Claims row. Input the amount received from the guarantor for principal (including interest capitalized prior to claim filing) for default, death, disability, bankruptcy and other claims authorized by statute, regulations, and policy.
8 Principal of Loans on
Which the Guarantee Was Voided
Tab to the appropriate loan type column in the Principal of Loans on Which the Guarantee Was Voided row. Input the principal amount of loans (including interest capitalized prior to the loss of guarantee) on which the insurance guarantee was voided due to a due diligence, timely filing, or other violation.
LaRS External User Guide – Release 8 FSA FMS
64
9 Principal Paid by
Borrowers and other Principal Reductions
Tab to the appropriate loan type column in the Principal paid by Borrowers and Other Principal Reductions row. Input the amount of payment received to reduce outstanding principal and capitalized interest, including payments from borrowers, refunds received from schools, checks returned uncashed for loans reported disbursed in prior quarters, and amounts received to pay off loans included in Federal Consolidation and refinanced Federal PLUS and SLS loans. DO NOT include claim payments from guarantors.
Continue filling out additional columns until each type of loan for the quarter covered by this submission is represented. Once you have completed the “Part IV – Loan Activity” screen, click on the menu drop down arrow. Highlight and click on “Part V – Loan Portfolio Status”. This will open the “Part V – Loan Portfolio Status” screen.
LaRS External User Guide – Release 8 FSA FMS
65
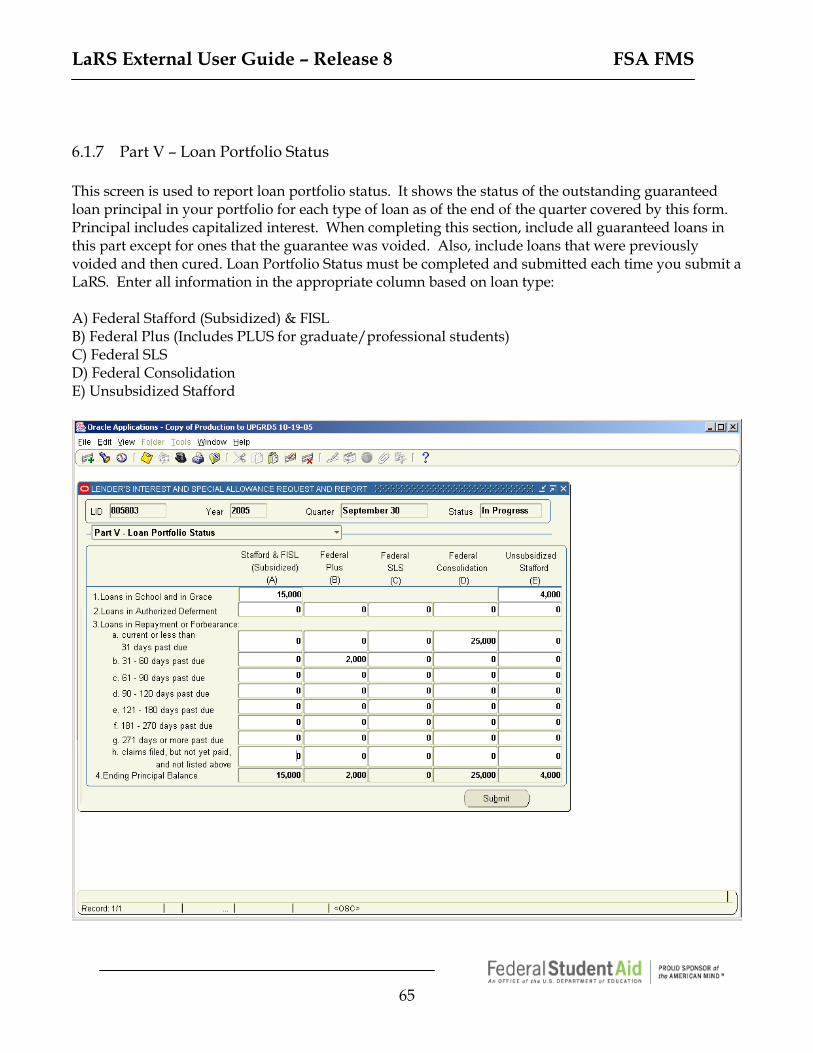
6.1.7 Part V – Loan Portfolio Status This screen is used to report loan portfolio status. It shows the status of the outstanding guaranteed loan principal in your portfolio for each type of loan as of the end of the quarter covered by this form. Principal includes capitalized interest. When completing this section, include all guaranteed loans in this part except for ones that the guarantee was voided. Also, include loans that were previously voided and then cured. Loan Portfolio Status must be completed and submitted each time you submit a LaRS. Enter all information in the appropriate column based on loan type: A) Federal Stafford (Subsidized) & FISL B) Federal Plus (Includes PLUS for graduate/professional students) C) Federal SLS D) Federal Consolidation E) Unsubsidized Stafford
LaRS External User Guide – Release 8 FSA FMS
66
LID, Year and Quarter fields will automatically populate based upon information supplied on the “Selection of Billing Period” screen. Note that the Submit button is grayed out. In this case, the user is not able to submit because the user is signed on as a FSA LaRS Lender/Servicer User with Maintain status. The user must be signed on as a FSA LaRS Lender/Servicer. Users with Submit status in order to submit the LaRS. Submit functionality will be shown in the next section, “6.2 Submit FSA LaRS Form”.
1 Loans in School and in
Grace Tab to the appropriate loan type column in the Loans in School and in Grace row. Input in the principal amount of all Stafford, FISL and Unsubsidized Stafford loans in an "in school or grace period" status. Do not include loans for which the borrower has a deferment due to returning to school after expiration of the grace period. These loans are to be included in row 2. Also, note that this status does not apply to Federal PLUS, Federal SLS or Federal Consolidation loans.
2 Loans in Authorized
Deferment Tab to the appropriate loan type column in the Loans in Authorized Deferment row. Input the principal amount of all loans in a period of authorized deferment.
3 Loans in Repayment or
Forbearance Tab to the appropriate loan type column under the Loans in Repayment or Forbearance heading. In the appropriate category (rows 3a through 3h), input the principal amount of all loans in a repayment for forbearance status. Include loans on which the grace period has ended and no deferment has been authorized, whether or not the borrower has made repayment arrangements or has made a payment. Do not include loans on which a claim has been filed with a guarantor in lines 3a through 3g. These loans are reported in line 3h.
4 Ending Principal Balance Note that the Ending Principal Balance row automatically
calculates the principal balance of outstanding loans at the end of business on the last day of the quarter. Allowing for rounding, this equals the sum of lines 1, 2, and 3a through 3h. (4) = (1) + (2) + (3a) + (3b) + (3c) + (3d) + (3e) + (3f) + (3g) + (3h)
Continue filling out additional columns until each type of loan for the quarter covered by this submission is represented. Once you have completed “Part V – Loan Portfolio Status” screen, you will either submit the form or save it. If you have logged on as a FSA LaRS Lender/Servicer user with Maintain access, notice that
FYI
LaRS External User Guide – Release 8 FSA FMS
67
the Submit button is grayed out. If this is the case, save (subtopic 6.1.8) the FSA LaRS Form and ask a FSA LaRS Lender/Servicer user with submit access to review it and submit it for you. If you have logged on as a FSA LaRS Lender/Servicer user with submit access, notice that the Submit button is enabled. If this is the case, move on to the Section 6.2, Step 8 to learn how to submit the FSA LaRS Form.
LaRS External User Guide – Release 8 FSA FMS
68
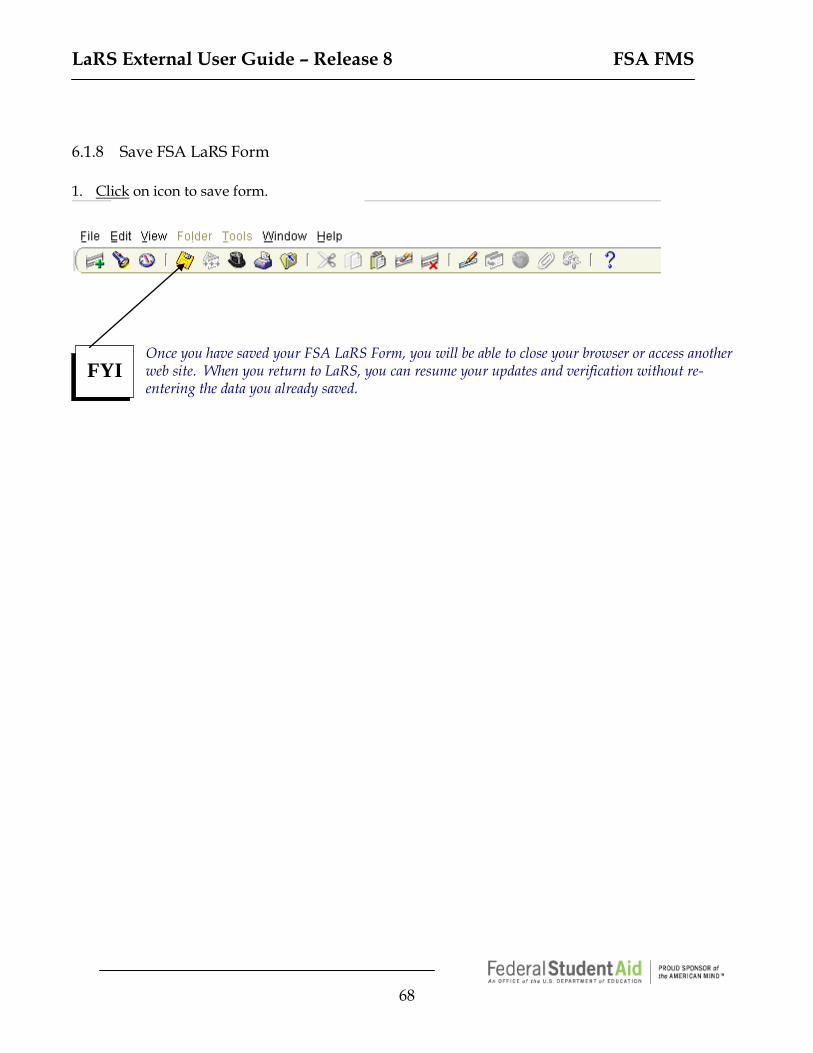
6.1.8 Save FSA LaRS Form 1. Click on icon to save form.
Once you have saved your FSA LaRS Form, you will be able to close your browser or access another web site. When you return to LaRS, you can resume your updates and verification without re-entering the data you already saved.
FYI
LaRS External User Guide – Release 8 FSA FMS
69
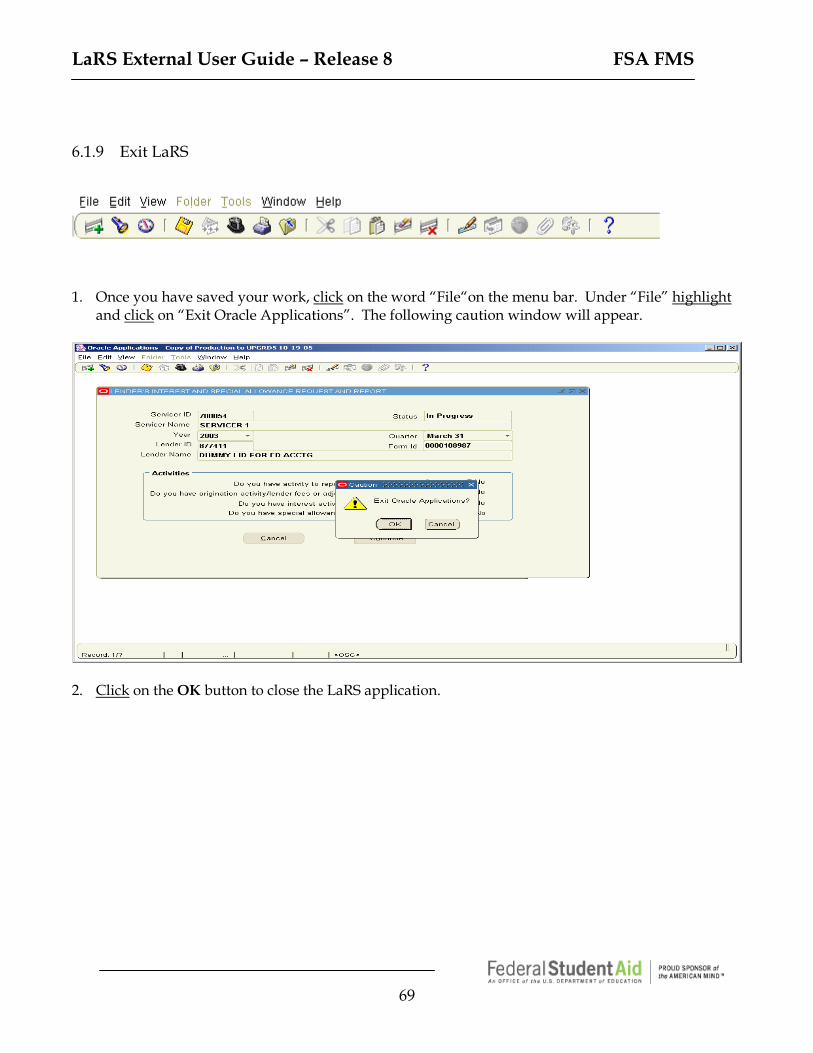
6.1.9 Exit LaRS
1. Once you have saved your work, click on the word “File“on the menu bar. Under “File” highlight
and click on “Exit Oracle Applications”. The following caution window will appear.
2. Click on the OK button to close the LaRS application.
LaRS External User Guide – Release 8 FSA FMS
70
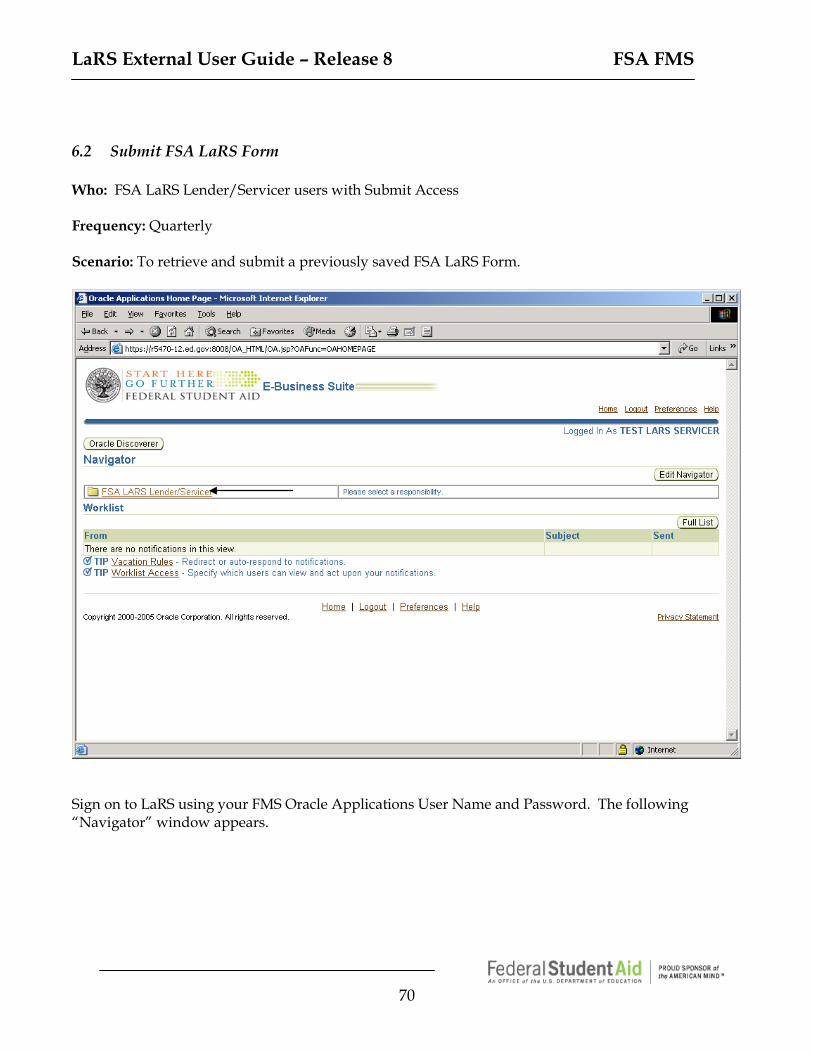
6.2 Submit FSA LaRS Form Who: FSA LaRS Lender/Servicer users with Submit Access Frequency: Quarterly Scenario: To retrieve and submit a previously saved FSA LaRS Form.
Sign on to LaRS using your FMS Oracle Applications User Name and Password. The following “Navigator” window appears.
LaRS External User Guide – Release 8 FSA FMS
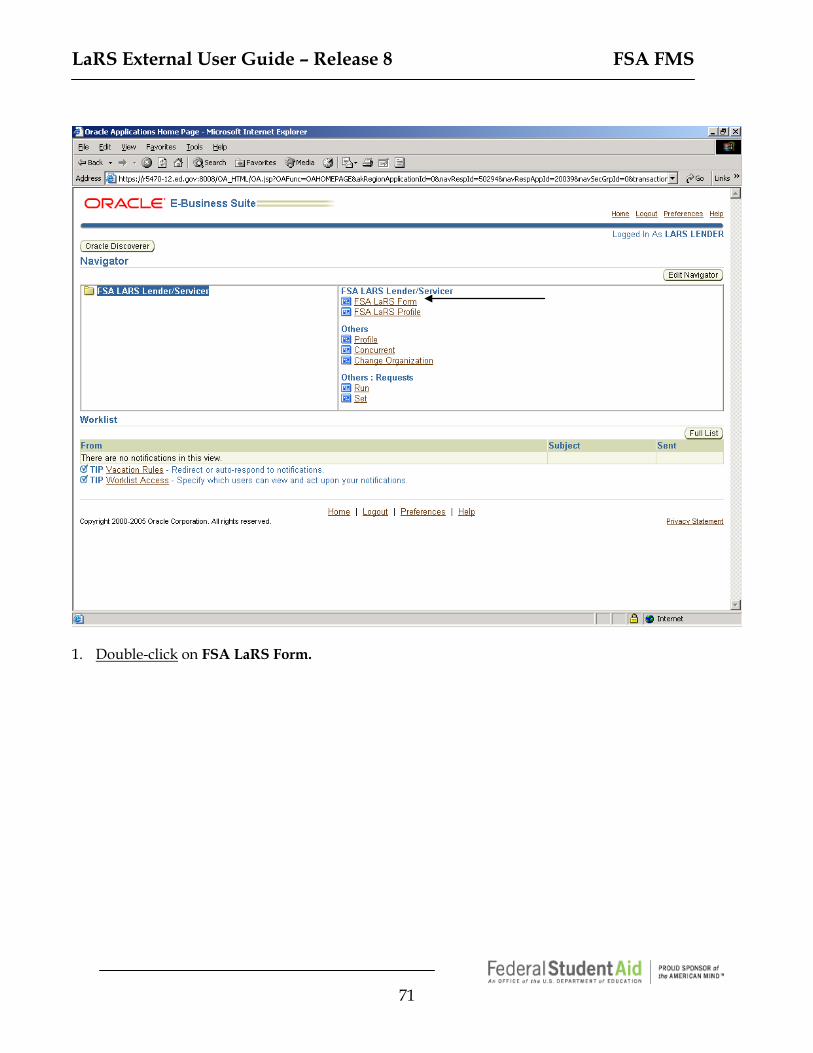
71
1. Double-click on FSA LaRS Form.
LaRS External User Guide – Release 8 FSA FMS
72
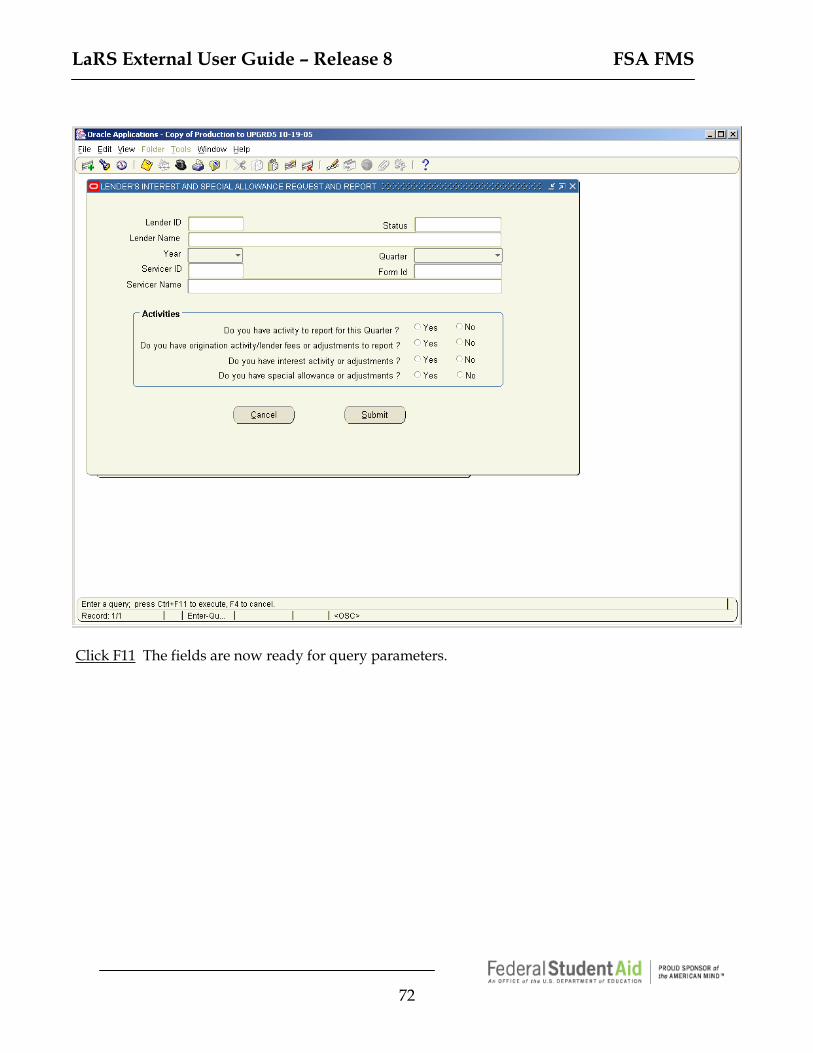
Click F11 The fields are now ready for query parameters.
LaRS External User Guide – Release 8 FSA FMS
73
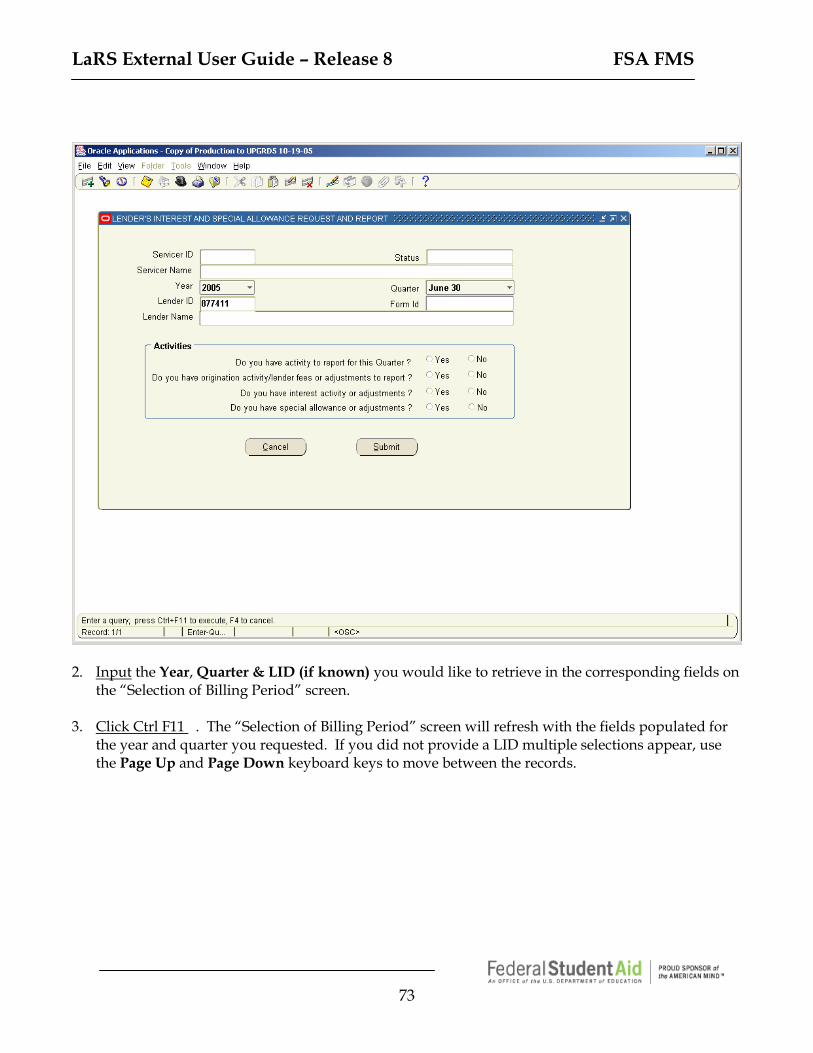
2. Input the Year, Quarter & LID (if known) you would like to retrieve in the corresponding fields on
the “Selection of Billing Period” screen. 3. Click Ctrl F11 . The “Selection of Billing Period” screen will refresh with the fields populated for
the year and quarter you requested. If you did not provide a LID multiple selections appear, use the Page Up and Page Down keyboard keys to move between the records.
LaRS External User Guide – Release 8 FSA FMS
74
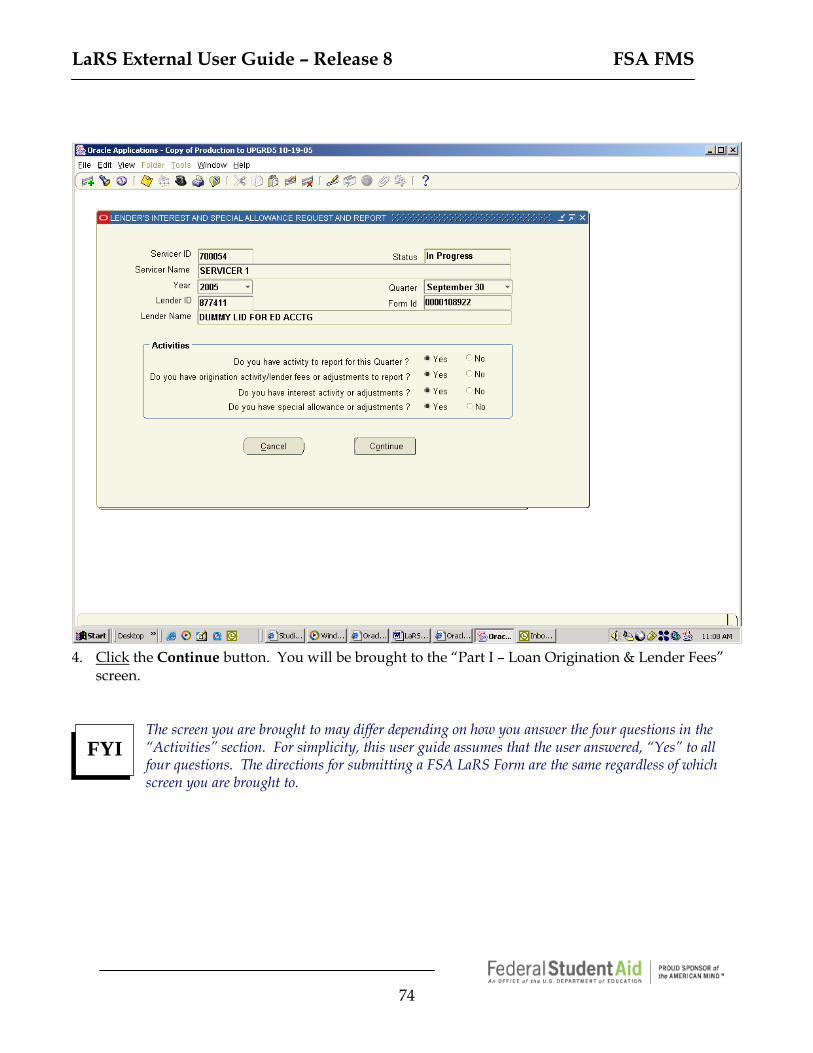
4. Click the Continue button. You will be brought to the “Part I – Loan Origination & Lender Fees”
screen.
The screen you are brought to may differ depending on how you answer the four questions in the “Activities” section. For simplicity, this user guide assumes that the user answered, “Yes” to all four questions. The directions for submitting a FSA LaRS Form are the same regardless of which screen you are brought to.
FYI
LaRS External User Guide – Release 8 FSA FMS
75
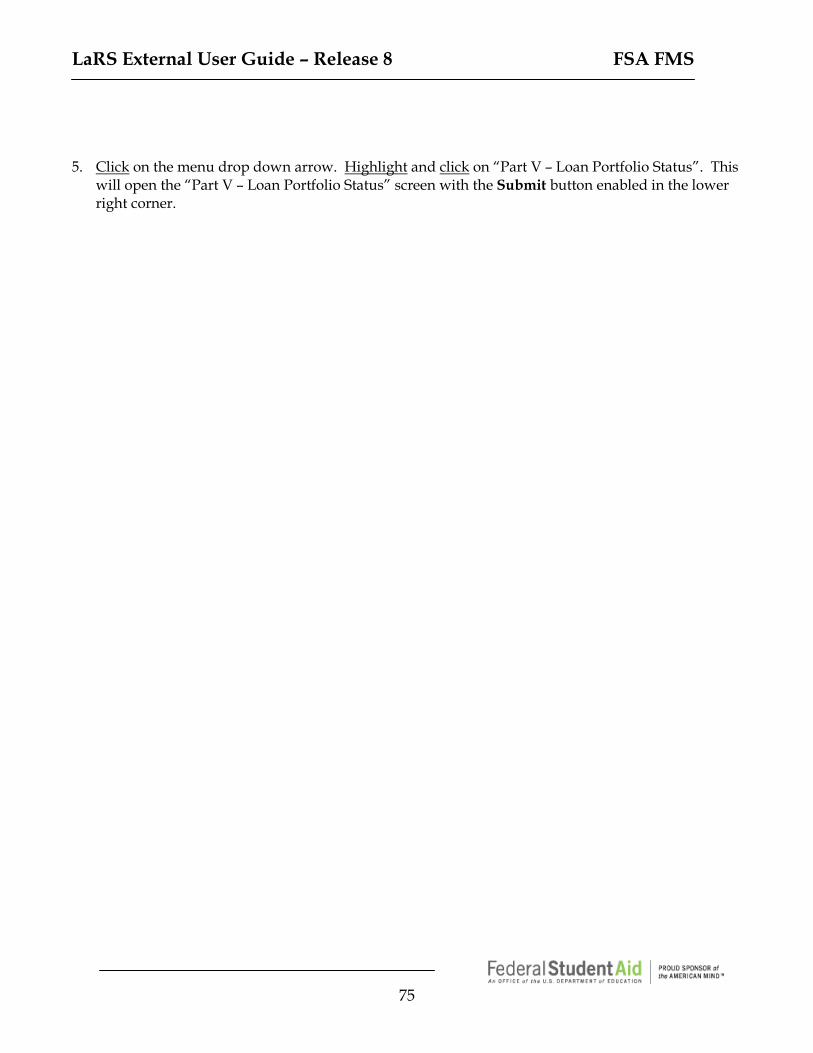
5. Click on the menu drop down arrow. Highlight and click on “Part V – Loan Portfolio Status”. This will open the “Part V – Loan Portfolio Status” screen with the Submit button enabled in the lower right corner.
LaRS External User Guide – Release 8 FSA FMS
76
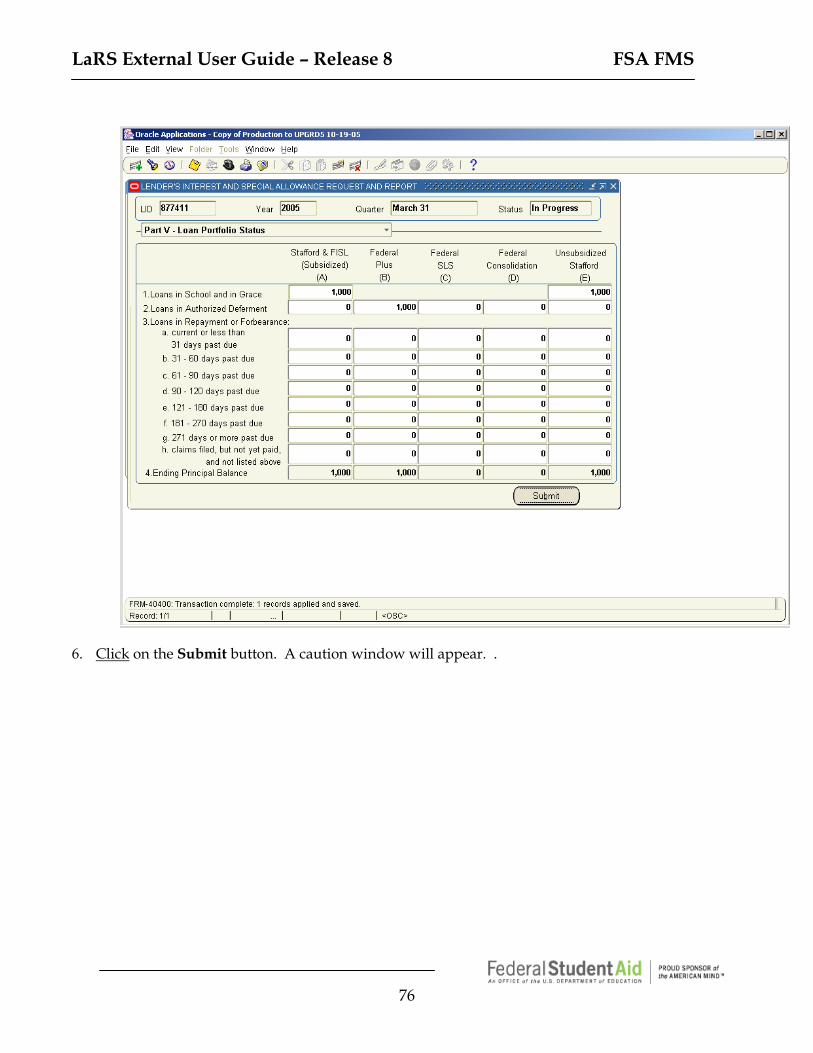
6. Click on the Submit button. A caution window will appear. .
LaRS External User Guide – Release 8 FSA FMS
77
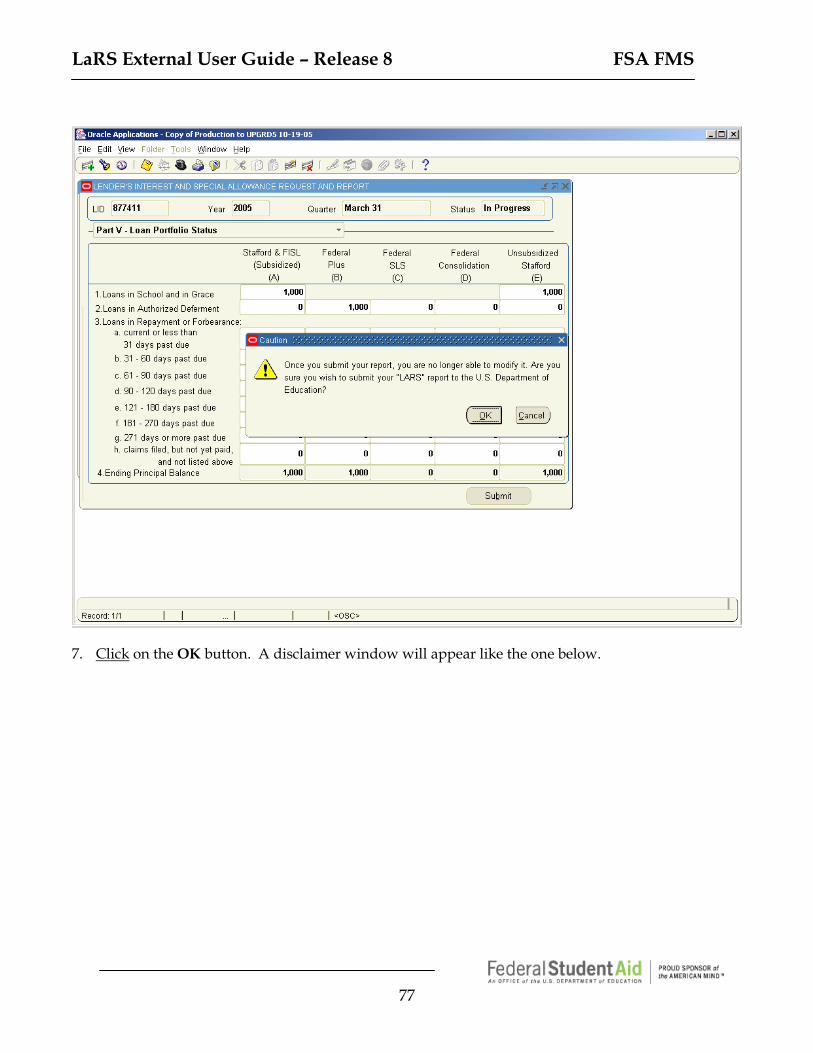
7. Click on the OK button. A disclaimer window will appear like the one below.
LaRS External User Guide – Release 8 FSA FMS
78
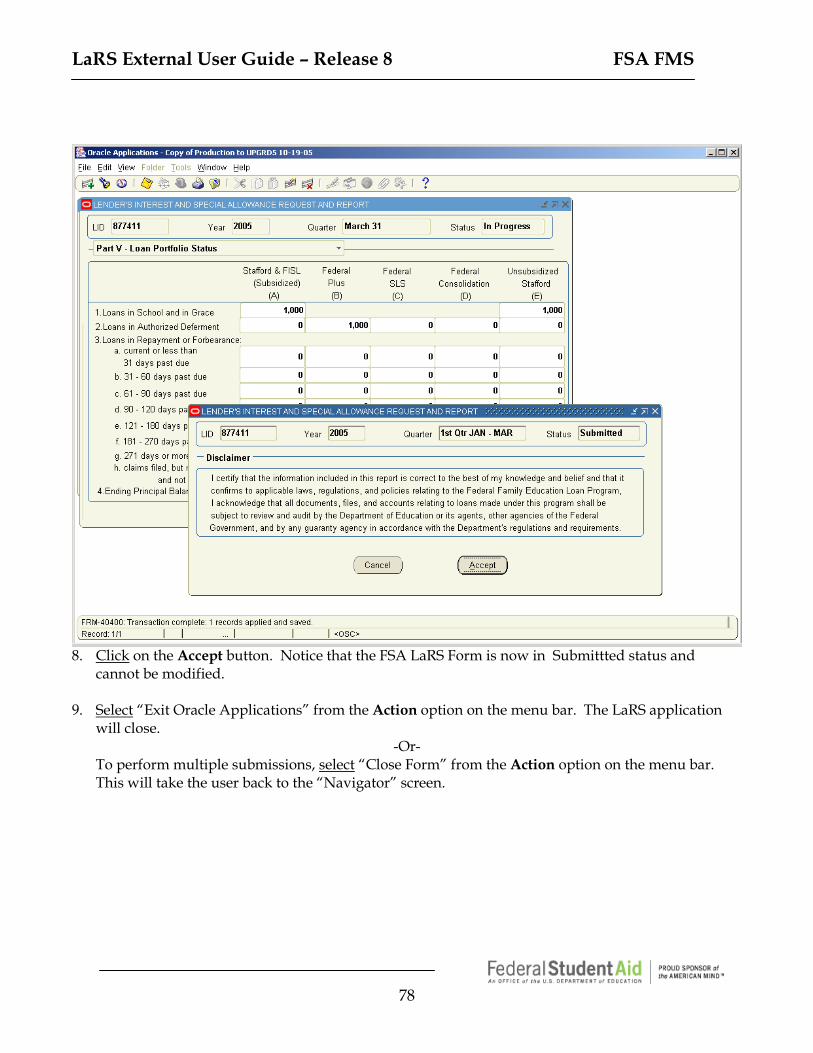
8. Click on the Accept button. Notice that the FSA LaRS Form is now in Submittted status and
cannot be modified. 9. Select “Exit Oracle Applications” from the Action option on the menu bar. The LaRS application
will close. -Or-
To perform multiple submissions, select “Close Form” from the Action option on the menu bar. This will take the user back to the “Navigator” screen.

LaRS External User Guide – Release 8 FSA FMS
79
6.3 Query on Existing FSA LaRS Forms Who: FSA LaRS Lender/Servicer users with Submit, Maintain or View Access Frequency: As Necessary Scenario: Users will attempt to query FSA LaRS Form data online. Sign on to LaRS using your FMS Oracle Applications User Name and Password. The following “Navigator” window appears.
LaRS External User Guide – Release 8 FSA FMS
80
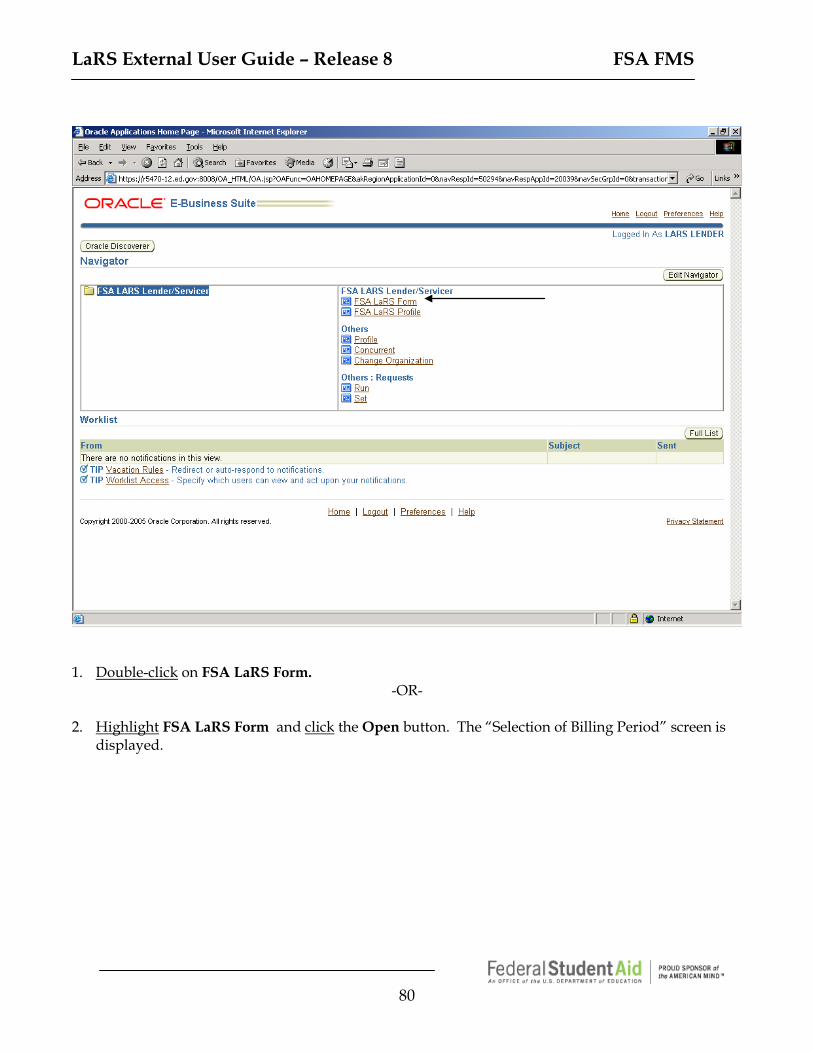
1. Double-click on FSA LaRS Form.
-OR-
2. Highlight FSA LaRS Form and click the Open button. The “Selection of Billing Period” screen is displayed.
LaRS External User Guide – Release 8 FSA FMS
81
LaRS External User Guide – Release 8 FSA FMS
82
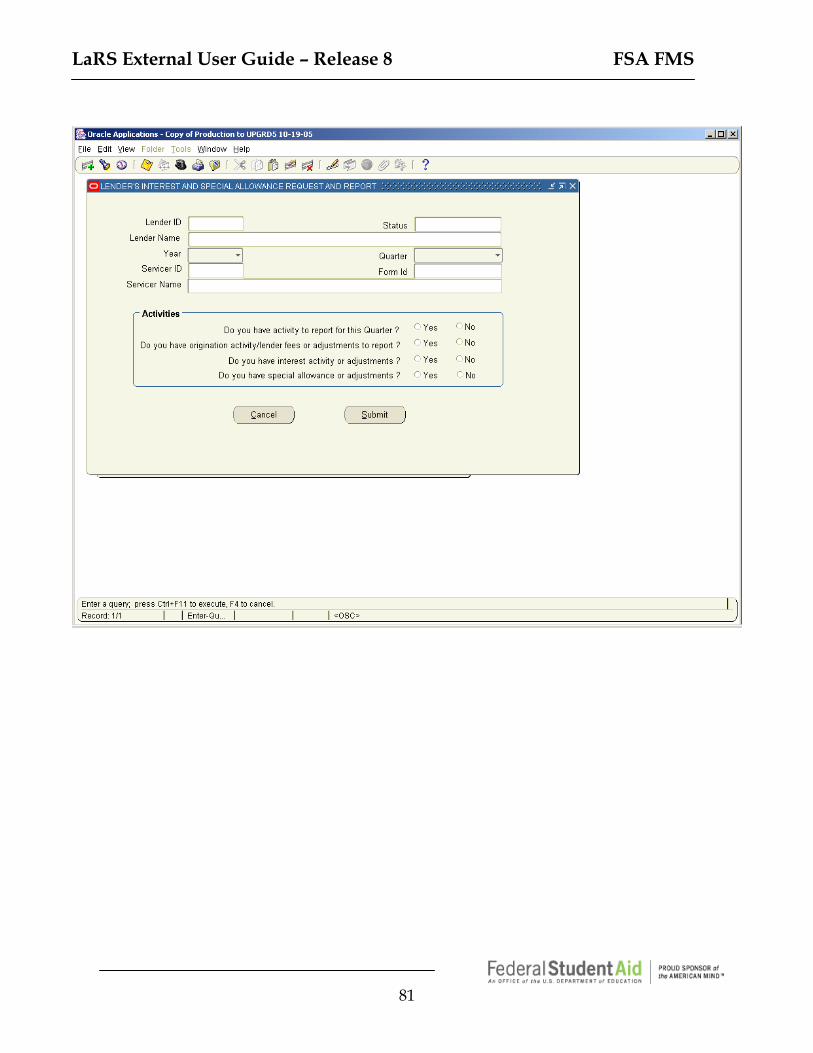
6.3.1 Search for all FSA LaRS Forms 1. Click F11 . The fields in FSA LaRS Form are ready for query parameters. 2. If you wish to retrieve all records, do not enter any value on the report. 3. Click Ctrl F11 to execute query. The “Selection of Billing Period” screen is displayed with all FSA
LaRS Forms listed in chronological order by Year and Quarter. -OR-
4. Use the Page Up and Page Down keyboard keys to move between the records. 5. Click the button in the upper right corner of the screen to close the “Selection of Billing Period”
screen. The “Navigator” window returns. If you wish to retrieve specific FSA LaRS Forms, proceed to the next sub-section, entitled “6.3.2 Search for a Specific FSA LaRS Form”.
FYI
LaRS External User Guide – Release 8 FSA FMS
83
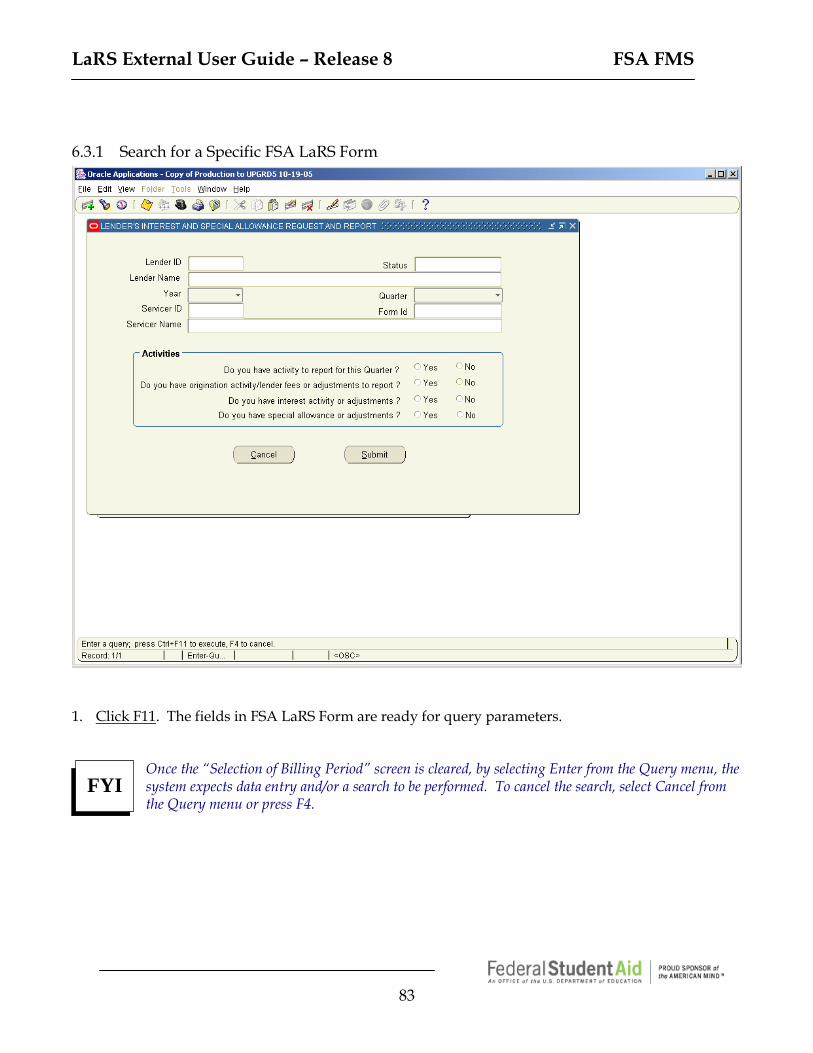
6.3.1 Search for a Specific FSA LaRS Form
1. Click F11. The fields in FSA LaRS Form are ready for query parameters.
Once the “Selection of Billing Period” screen is cleared, by selecting Enter from the Query menu, the system expects data entry and/or a search to be performed. To cancel the search, select Cancel from the Query menu or press F4.
FYI
LaRS External User Guide – Release 8 FSA FMS
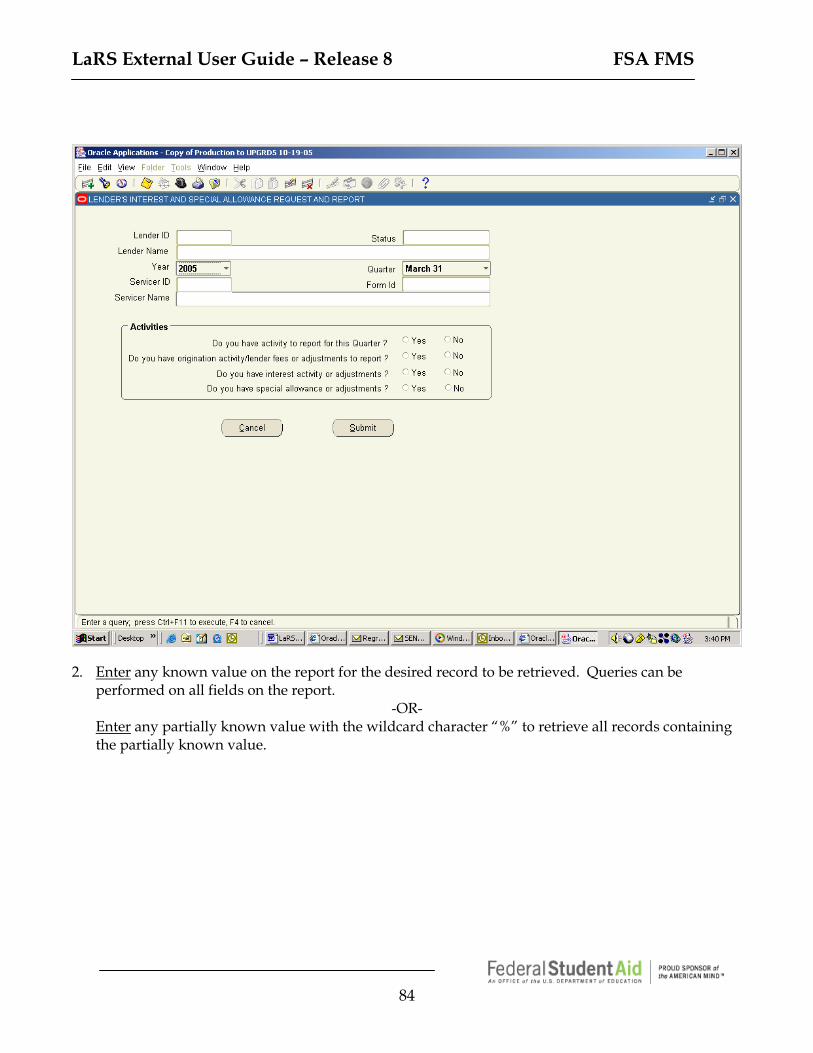
84
2. Enter any known value on the report for the desired record to be retrieved. Queries can be
performed on all fields on the report. -OR-
Enter any partially known value with the wildcard character “%” to retrieve all records containing the partially known value.

LaRS External User Guide – Release 8 FSA FMS
85
The “%” symbol can be used as a wildcard character in any field on the report. Wherever the wildcard is placed in a search string, the system will look for records that contain any character value in its place. The wildcard can be used at any place in a search string. • For example: If the user types “S%” in the status field, the system will search for all records with a
status that begins with “S”. In this case, the system will return only those records with a status of Submitted, since submitted is the only possible status that begins with “S”.
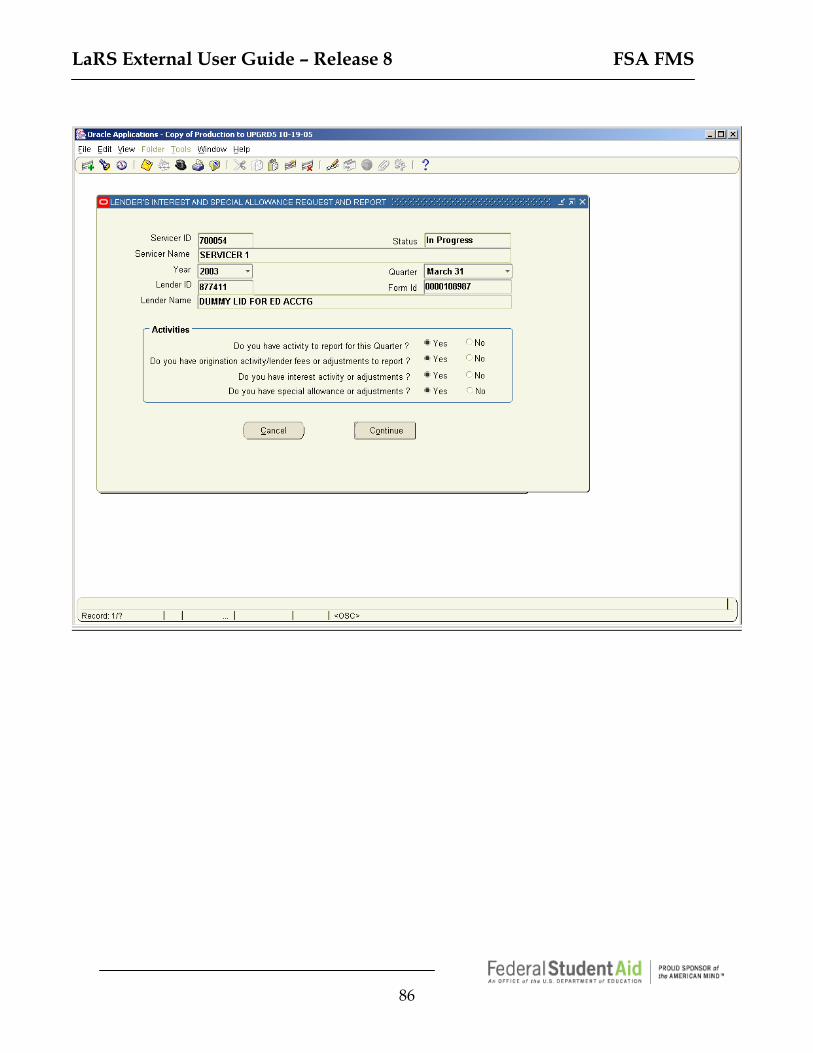
3. Click Ctrl F11 to execute the query The “Selection of Billing Period” screen is displayed with the
records that match your search.
FYI
LaRS External User Guide – Release 8 FSA FMS
86
LaRS External User Guide – Release 8 FSA FMS
87
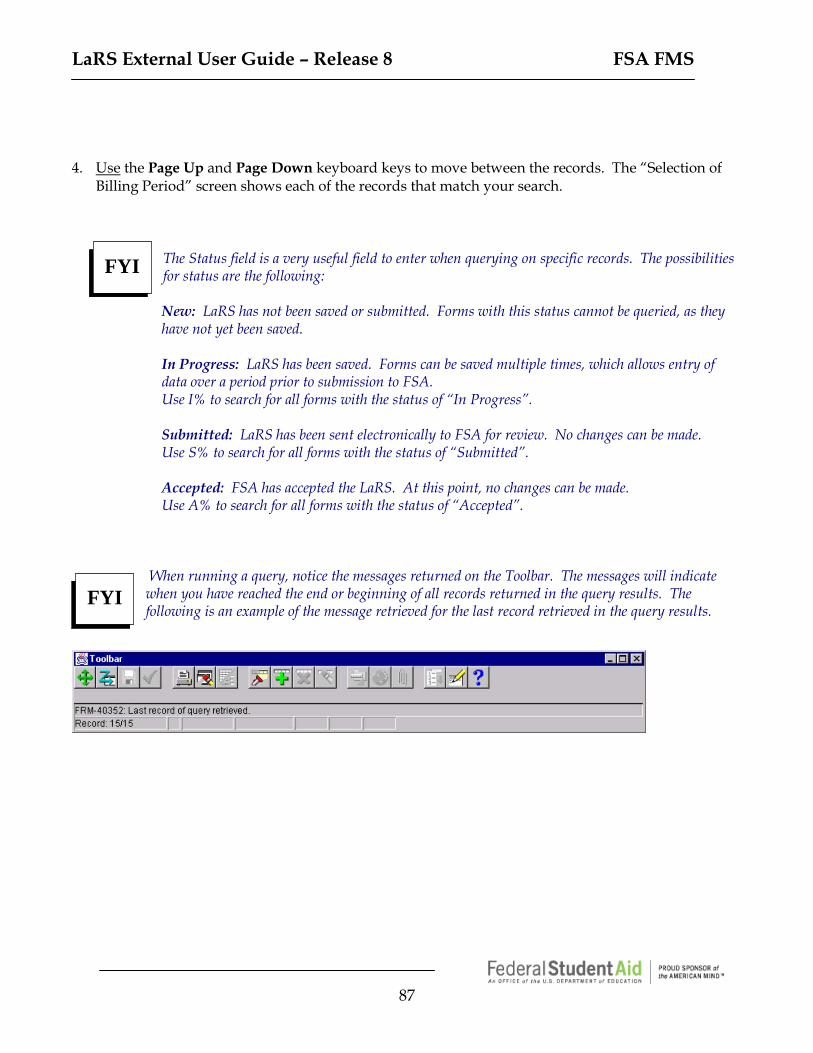
4. Use the Page Up and Page Down keyboard keys to move between the records. The “Selection of
Billing Period” screen shows each of the records that match your search.
The Status field is a very useful field to enter when querying on specific records. The possibilities for status are the following:
New: LaRS has not been saved or submitted. Forms with this status cannot be queried, as they have not yet been saved. In Progress: LaRS has been saved. Forms can be saved multiple times, which allows entry of data over a period prior to submission to FSA. Use I% to search for all forms with the status of “In Progress”. Submitted: LaRS has been sent electronically to FSA for review. No changes can be made. Use S% to search for all forms with the status of “Submitted”. Accepted: FSA has accepted the LaRS. At this point, no changes can be made. Use A% to search for all forms with the status of “Accepted”.
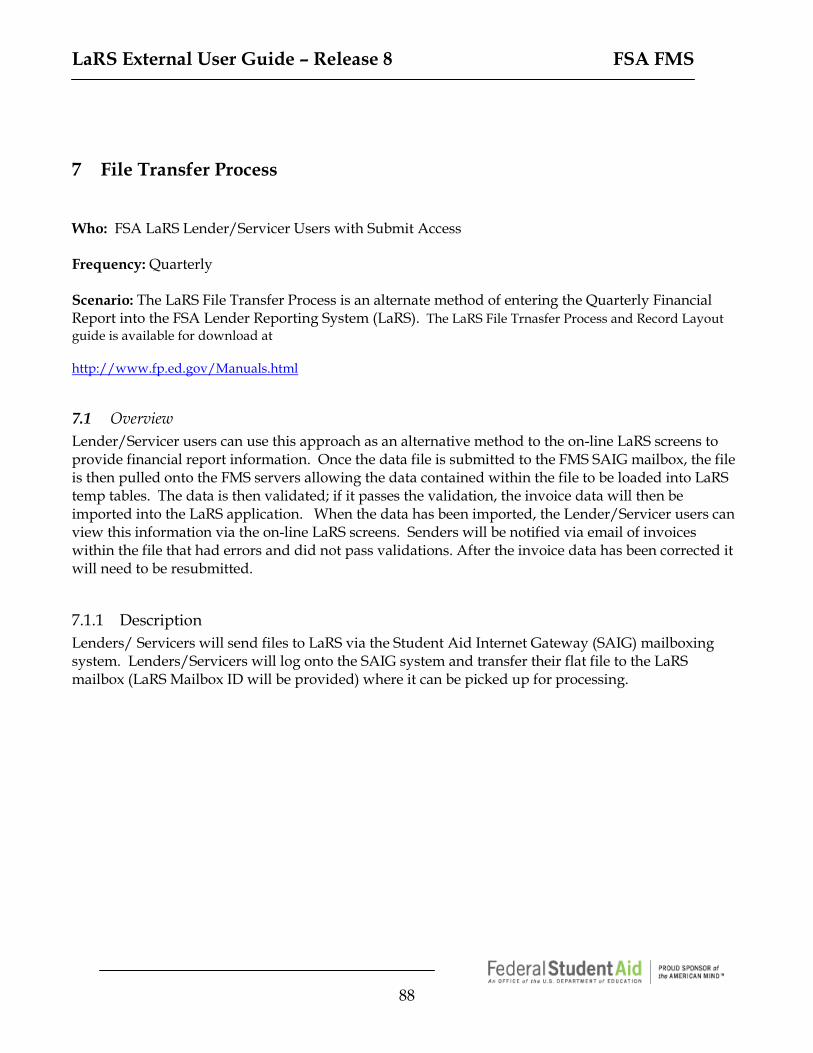
When running a query, notice the messages returned on the Toolbar. The messages will indicate when you have reached the end or beginning of all records returned in the query results. The following is an example of the message retrieved for the last record retrieved in the query results.
FYI
FYI
LaRS External User Guide – Release 8 FSA FMS
88
7 File Transfer Process Who: FSA LaRS Lender/Servicer Users with Submit Access Frequency: Quarterly Scenario: The LaRS File Transfer Process is an alternate method of entering the Quarterly Financial Report into the FSA Lender Reporting System (LaRS). The LaRS File Trnasfer Process and Record Layout guide is available for download at http://www.fp.ed.gov/Manuals.html
7.1 Overview Lender/Servicer users can use this approach as an alternative method to the on-line LaRS screens to provide financial report information. Once the data file is submitted to the FMS SAIG mailbox, the file is then pulled onto the FMS servers allowing the data contained within the file to be loaded into LaRS temp tables. The data is then validated; if it passes the validation, the invoice data will then be imported into the LaRS application. When the data has been imported, the Lender/Servicer users can view this information via the on-line LaRS screens. Senders will be notified via email of invoices within the file that had errors and did not pass validations. After the invoice data has been corrected it will need to be resubmitted.
7.1.1 Description Lenders/ Servicers will send files to LaRS via the Student Aid Internet Gateway (SAIG) mailboxing system. Lenders/Servicers will log onto the SAIG system and transfer their flat file to the LaRS mailbox (LaRS Mailbox ID will be provided) where it can be picked up for processing.

LaRS External User Guide – Release 8 FSA FMS
89
7.1.2 Process Flow Below is a graphical depiction of the process:
If the data is valid, calculations are performed, the data is imported into the LaRS application extension, and the invoice is automatically submitted to ED (the Status is set to “Submitted”). An email is sent to the Lender/ Servicer user notifying them of a successful submission. Note: Lender/ Servicer will be allowed to submit only one invoice per quarter. Invoice duplication will be prevented based on a unique key combination of LID/Servicer ID/Year/Quarter. Once the data is loaded, the Lender/ Servicer users may view the information using the respective LaRS screen.
7.1.3 Rejection/Re-submission If a file level error was detected (the error checks are further described below), the invoices with the errors will not be loaded into the LaRS Oracle application extension . If file level errors are detected, a notice will be sent to the “Sender” of the file via email. The email address(es) will be taken from the Profile information within the LARS system based on the “Sender’s” LID. The email notification will include the LID/Quarter/Year combination that had errors and the errors themselves. Only invoices that had errors need to be fixed and resubmitted. To resubmit a file, the Lender/ Servicer will follow the same process that they originally used for submitting the file.
Lender/ Servicer System
File Transer
Import and Validate Invoice
Data
Valid Data?
LARS Extension
Application
No
Yes
Log into SAIG and submit file to FMS mailbox.
Email Notification Sent to Lender/Servicer Point of Contact
Lender Invoice data
Email Notification Sent to Lender/Servicer Point of Contact
LaRS External User Guide – Release 8 FSA FMS
90
7.1.4 File Level Error Checks The Lender/ Servicer is responsible for ensuring that correct information is sent to FSA. A file will be rejected if the file does not contain any invoice data (e.g. the file is a picture, or anything other than invoice lines data). If a file is rejected, the sending organization will receive a notice indicating that an error was encountered with the file. If the file is accepted, it will be retained in the FSA archives.
7.1.5 Invoice Level Error Checks Although the LaRS Data File Load will perform some validation checks, the Lender/ Servicer is responsible for ensuring that correct information is sent to FSA. Any error will cause the invoice to be rejected. All rejected invoices will be reported back to the Lender/ Servicer for correction and will need to be resubmitted. Items to assist the Lender/ Servicer in sending valid invoices include: 1. A single file from a Servicer may contain data for multiple LIDs. 2. Validation to prevent duplicate invoices submitted from a Lender/ Servicer (based on unique key
Lender ID / Servicer ID, quarter, and year) will occur. 3. Do not enter dollar signs. 4. Do not enter commas. 5. The file includes a pipe delimiter between each data field for ease in loading and processing the
files. 6. Enter a carriage return as a separation indicator. 7. Include ACTUAL values for numeric/amount fields, and INCLUDE decimal points where
required.
7.1.6 File Extension As the file will be an ASCII file the preferred extension will be TXT.
7.2 Enrollment Potential File Transfer users may enroll online at the following web address: https://www.fsawebenroll.ed.gov This website enables potential users to: •Enroll online •Check enrollment status •Print enrollment signature documents
LaRS External User Guide – Release 8 FSA FMS
91
Users submitting their Data File using a PC will be required to download EDConnect software in order to use the SAIG. EDConnect software and installation instructions can be obtained at the following website: http://fsadownload.ed.gov/softedconnect.htm Users submitting their Data File using a Mainframe(MVS)/Midrange(UNIX) will be required to download TD Client software in order to use the SAIG. EasyAccess software and installation instructions can be obtained at the following website: http://fsadownload.ed.gov/mainframeguide.htm If your Lender/Servicer organization is interested in learning more about how to enroll in the File Transfer Process, please contact the FMS Help Desk at 1-800-433-7327, Option #3, or email to [email protected]. Expereincing issues with SAIG, please call SAIG technical support at 800-330-5947 or e-mail [email protected].
7.3 Overview Funds Remittance Process Lenders submit remittance data either by check to US Bank or via pay.gov. Users should refer to the Lender Funds Remittance guide for detailed instructions. The guides are available for download at http://www.fp.ed.gov/attachments/activities_whatsnew/FundsRemittanceGuideV9pt6.pdf http://www.fp.ed.gov/attachments/activities_whatsnew/RemittingFundsThroughACH090412.pdf http://www.fp.ed.gov/attachments/activities_whatsnew/PaygovFundsRemittanceLenders090412.pdf
LaRS External User Guide – Release 8 FSA FMS
92
8 Appendix
8.1 Appendix A – Frequently Asked Questions 8.1.1.1 What browsers can I use to access LaRS? Microsoft Internet Explorer (IE) can be used to access LaRS. If you do not have the correct browser version, you can download Internet Explorer://www.microsoft.com/downloads/en/default.aspx. The most current version of IE certified to work with LaRS is Version 8.0 8.1.1.2 What ports do I need to open to access LaRS through my firewall or proxy server? Port 443 needs to be open for Bi-Directional Internet Traffic in order to access LaRS. If you are using the correct browser version and the page is still hanging, there may be a network issue and you will need to verify with your technical staff that the appropriate ports are open. 8.1.1.3 Can I use a Proxy server? You can use a proxy server if you can open Port 443 for Bi-Directional Internet Traffic. 8.1.1.4 What if the “hot link” on the Portals site does not bring me to the LARS application? If this occurs, you should manually type in the LARS URL (https://fsa-fms.ed.gov). If Java Runtime Environment (JRE) does not begin loading the first time that you access LARS, you may download it by going to http://www.java.com/en/download/index.jsp and downloading the Java software. I successfully downloaded JRE but the sign on the screen for LARS does not appear, why is this? This may occur because the browser is still preparing to run JRE. This process may take up to 1 hour. If after 1 hour you still cannot access LARS, please call the Help Desk at 1-800-433-7327, Option #3. Where do I direct my questions to regarding LaRS?
For technical issues related to LaRS access contact the FMS Help Desk at 1-800-433-7327, Option #3, or email at [email protected].
LaRS External User Guide – Release 8 FSA FMS
93
Appendix B– Fee Code Definitions NOTE – with the transition to 100% Direct Lending, this section is provided as information only. Origination fees for current quarter: FN - New Loans you have made (including those then sold) in the quarter covered by this form if you owe the origination fees. FN fee code must always be followed by a LN fee code. FS - Loans you made and sold in the quarter covered by this form if the purchaser owes the origination fees FB - Loans you bought from another Lender in the quarter covered by this form, if you owe the origination fees Origination fee adjustments to previously reported quarters: FI - Net increase in loans you made or bought as reported for a previous quarter, if you owe the origination fees FD - Net decrease in loans you made or bought as reported for a previous quarter, if the fees are to be credited to you Lender Loan fees for current quarter: LN - New loans you have made (including those then sold) in the quarter covered by this form, if you owe the Lender loan fees. LN fee code must always be proceeded by a FN fee code [except for consolidation loans]. LS - Loans you made and sold in the quarter covered by this form, if the purchaser owes the Lender loan fees LB - Loans you bought from another Lender in the quarter covered by this form, if you owe the Lender loan fees Lender fee adjustment to previously reported quarters: LI - Net increase in loans you made or bought as reported for a previous quarter, if you owe the Lender fees LD - Net decrease in loans you made or bought as reported for a previous quarter, if the fees are to be credited to you
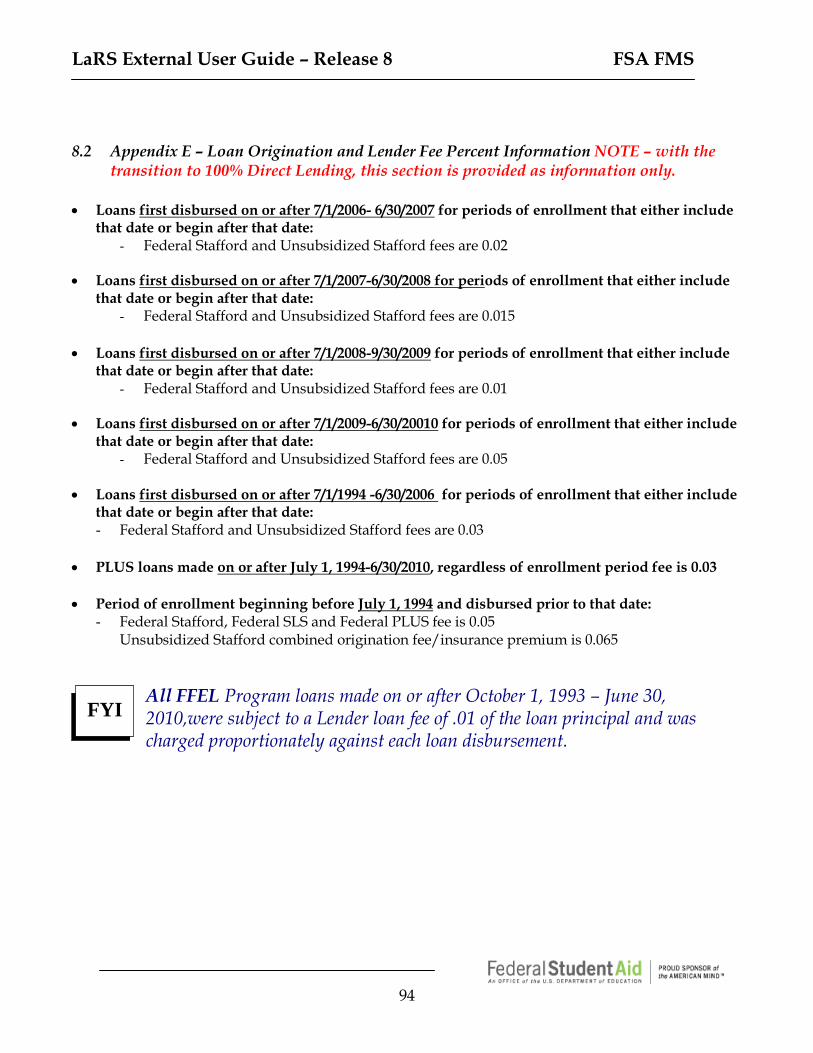
LaRS External User Guide – Release 8 FSA FMS
94
8.2 Appendix E – Loan Origination and Lender Fee Percent Information NOTE – with the transition to 100% Direct Lending, this section is provided as information only.
• Loans first disbursed on or after 7/1/2006- 6/30/2007 for periods of enrollment that either include
that date or begin after that date: - Federal Stafford and Unsubsidized Stafford fees are 0.02
• Loans first disbursed on or after 7/1/2007-6/30/2008 for periods of enrollment that either include
that date or begin after that date: - Federal Stafford and Unsubsidized Stafford fees are 0.015
• Loans first disbursed on or after 7/1/2008-9/30/2009 for periods of enrollment that either include that date or begin after that date:
- Federal Stafford and Unsubsidized Stafford fees are 0.01
• Loans first disbursed on or after 7/1/2009-6/30/20010 for periods of enrollment that either include that date or begin after that date:
- Federal Stafford and Unsubsidized Stafford fees are 0.05 • Loans first disbursed on or after 7/1/1994 -6/30/2006 for periods of enrollment that either include
that date or begin after that date: - Federal Stafford and Unsubsidized Stafford fees are 0.03
• PLUS loans made on or after July 1, 1994-6/30/2010, regardless of enrollment period fee is 0.03 • Period of enrollment beginning before July 1, 1994 and disbursed prior to that date:
- Federal Stafford, Federal SLS and Federal PLUS fee is 0.05 Unsubsidized Stafford combined origination fee/insurance premium is 0.065
All FFEL Program loans made on or after October 1, 1993 – June 30, 2010,were subject to a Lender loan fee of .01 of the loan principal and was charged proportionately against each loan disbursement.
FYI
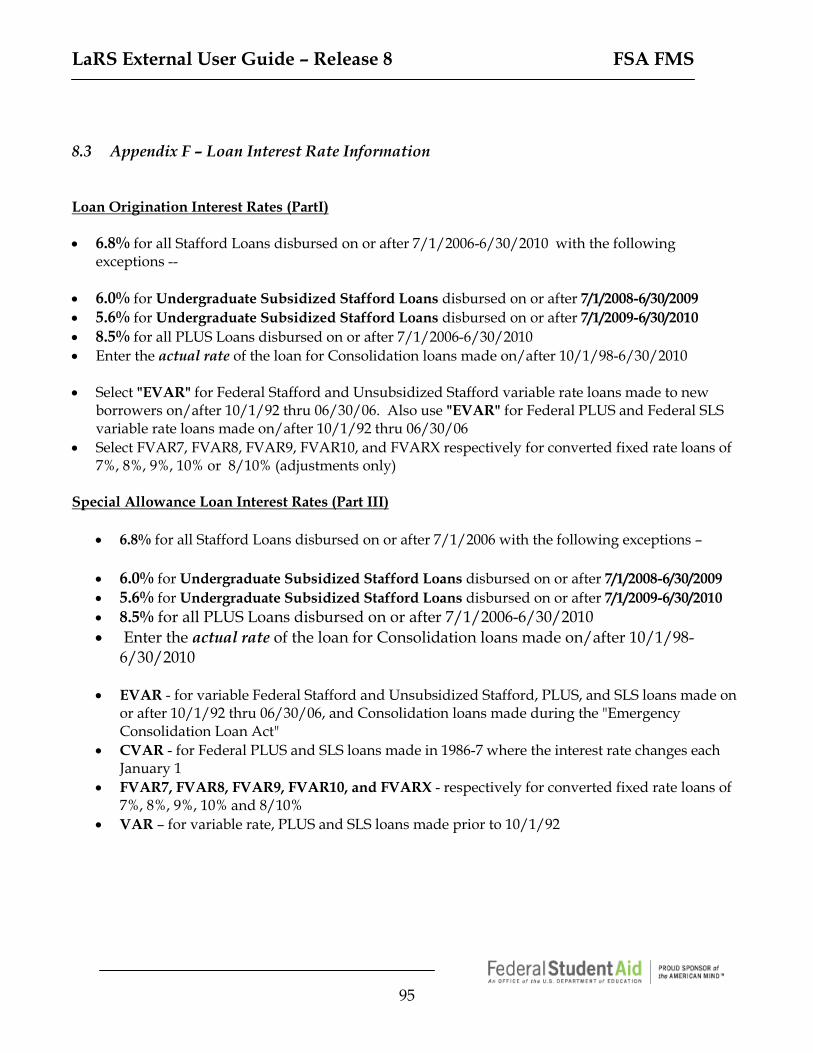
LaRS External User Guide – Release 8 FSA FMS
95
8.3 Appendix F – Loan Interest Rate Information Loan Origination Interest Rates (PartI) • 6.8% for all Stafford Loans disbursed on or after 7/1/2006-6/30/2010 with the following
exceptions -- • 6.0% for Undergraduate Subsidized Stafford Loans disbursed on or after 7/1/2008-6/30/2009 • 5.6% for Undergraduate Subsidized Stafford Loans disbursed on or after 7/1/2009-6/30/2010 • 8.5% for all PLUS Loans disbursed on or after 7/1/2006-6/30/2010 • Enter the actual rate of the loan for Consolidation loans made on/after 10/1/98-6/30/2010 • Select "EVAR" for Federal Stafford and Unsubsidized Stafford variable rate loans made to new
borrowers on/after 10/1/92 thru 06/30/06. Also use "EVAR" for Federal PLUS and Federal SLS variable rate loans made on/after 10/1/92 thru 06/30/06
• Select FVAR7, FVAR8, FVAR9, FVAR10, and FVARX respectively for converted fixed rate loans of 7%, 8%, 9%, 10% or 8/10% (adjustments only)
Special Allowance Loan Interest Rates (Part III)
• 6.8% for all Stafford Loans disbursed on or after 7/1/2006 with the following exceptions – • 6.0% for Undergraduate Subsidized Stafford Loans disbursed on or after 7/1/2008-6/30/2009 • 5.6% for Undergraduate Subsidized Stafford Loans disbursed on or after 7/1/2009-6/30/2010 • 8.5% for all PLUS Loans disbursed on or after 7/1/2006-6/30/2010 • Enter the actual rate of the loan for Consolidation loans made on/after 10/1/98-
6/30/2010 • EVAR - for variable Federal Stafford and Unsubsidized Stafford, PLUS, and SLS loans made on
or after 10/1/92 thru 06/30/06, and Consolidation loans made during the "Emergency Consolidation Loan Act"
• CVAR - for Federal PLUS and SLS loans made in 1986-7 where the interest rate changes each January 1
• FVAR7, FVAR8, FVAR9, FVAR10, and FVARX - respectively for converted fixed rate loans of 7%, 8%, 9%, 10% and 8/10%
• VAR – for variable rate, PLUS and SLS loans made prior to 10/1/92
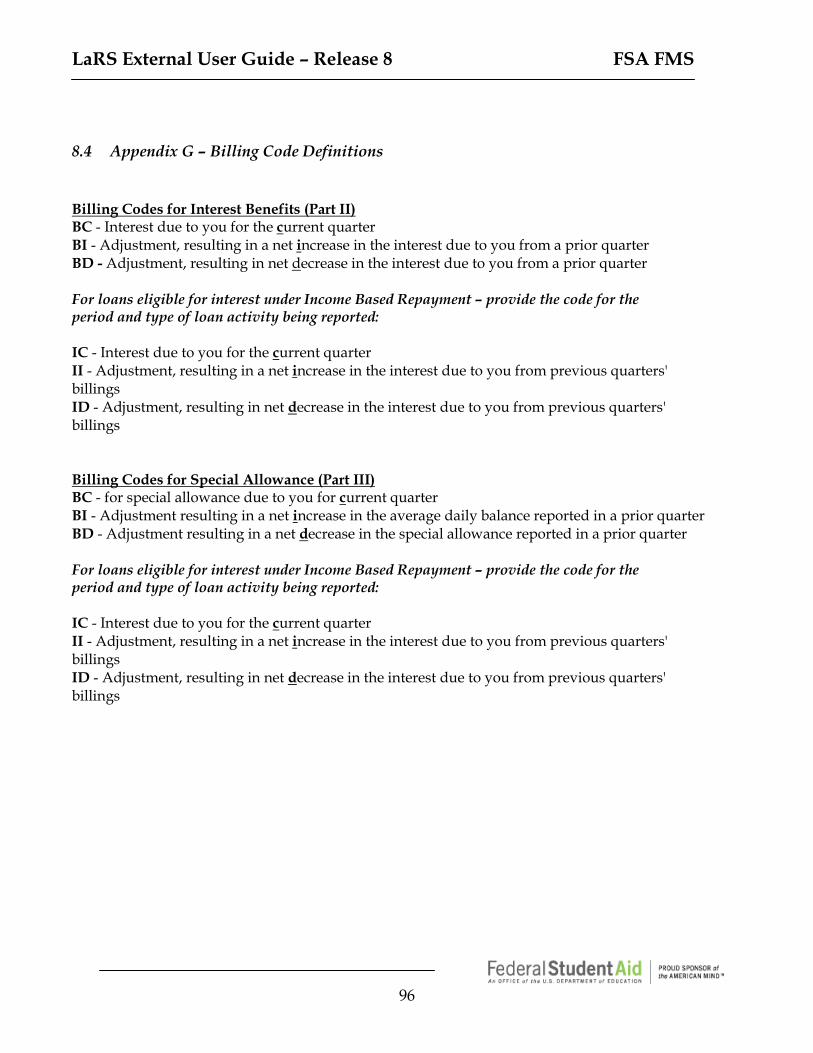
LaRS External User Guide – Release 8 FSA FMS
96
8.4 Appendix G – Billing Code Definitions Billing Codes for Interest Benefits (Part II) BC - Interest due to you for the current quarter BI - Adjustment, resulting in a net increase in the interest due to you from a prior quarter BD - Adjustment, resulting in net decrease in the interest due to you from a prior quarter For loans eligible for interest under Income Based Repayment – provide the code for the period and type of loan activity being reported: IC - Interest due to you for the current quarter II - Adjustment, resulting in a net increase in the interest due to you from previous quarters' billings ID - Adjustment, resulting in net decrease in the interest due to you from previous quarters' billings Billing Codes for Special Allowance (Part III) BC - for special allowance due to you for current quarter BI - Adjustment resulting in a net increase in the average daily balance reported in a prior quarter BD - Adjustment resulting in a net decrease in the special allowance reported in a prior quarter For loans eligible for interest under Income Based Repayment – provide the code for the period and type of loan activity being reported: IC - Interest due to you for the current quarter II - Adjustment, resulting in a net increase in the interest due to you from previous quarters' billings ID - Adjustment, resulting in net decrease in the interest due to you from previous quarters' billings
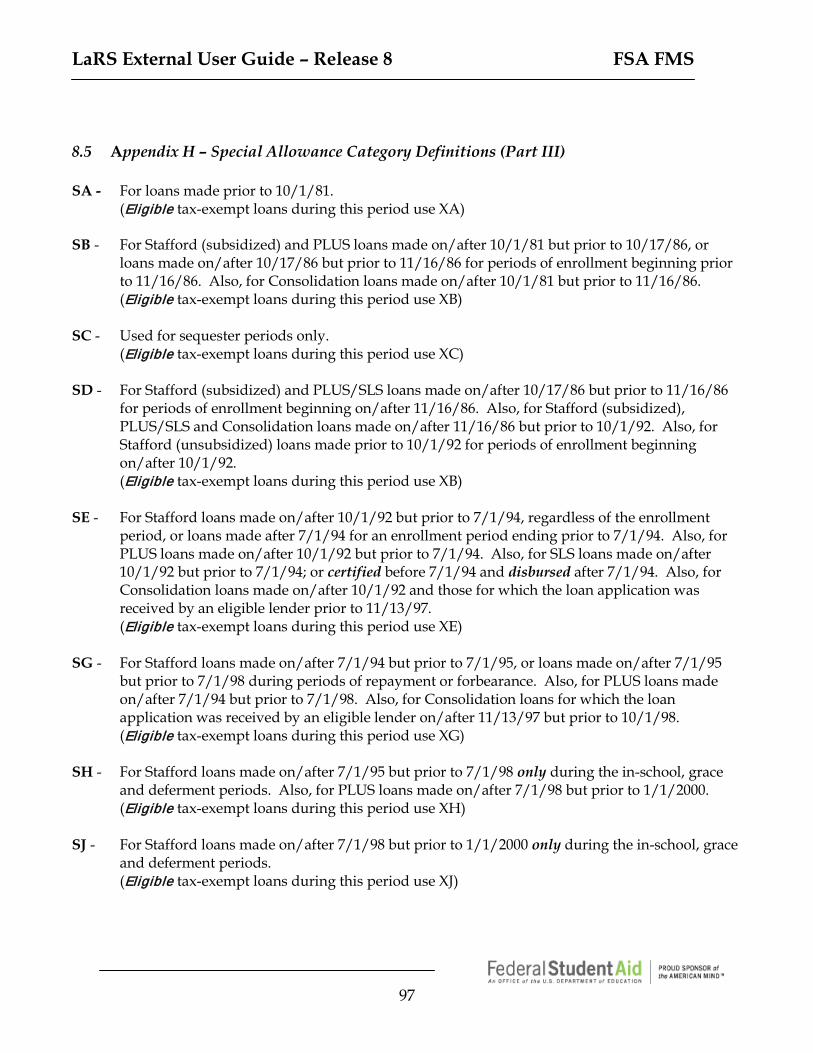
LaRS External User Guide – Release 8 FSA FMS
97
8.5 Appendix H – Special Allowance Category Definitions (Part III) SA - For loans made prior to 10/1/81. (Eligible tax-exempt loans during this period use XA) SB - For Stafford (subsidized) and PLUS loans made on/after 10/1/81 but prior to 10/17/86, or
loans made on/after 10/17/86 but prior to 11/16/86 for periods of enrollment beginning prior to 11/16/86. Also, for Consolidation loans made on/after 10/1/81 but prior to 11/16/86. (Eligible tax-exempt loans during this period use XB)
SC - Used for sequester periods only. (Eligible tax-exempt loans during this period use XC) SD - For Stafford (subsidized) and PLUS/SLS loans made on/after 10/17/86 but prior to 11/16/86
for periods of enrollment beginning on/after 11/16/86. Also, for Stafford (subsidized), PLUS/SLS and Consolidation loans made on/after 11/16/86 but prior to 10/1/92. Also, for Stafford (unsubsidized) loans made prior to 10/1/92 for periods of enrollment beginning on/after 10/1/92. (Eligible tax-exempt loans during this period use XB)
SE - For Stafford loans made on/after 10/1/92 but prior to 7/1/94, regardless of the enrollment period, or loans made after 7/1/94 for an enrollment period ending prior to 7/1/94. Also, for PLUS loans made on/after 10/1/92 but prior to 7/1/94. Also, for SLS loans made on/after 10/1/92 but prior to 7/1/94; or certified before 7/1/94 and disbursed after 7/1/94. Also, for Consolidation loans made on/after 10/1/92 and those for which the loan application was received by an eligible lender prior to 11/13/97. (Eligible tax-exempt loans during this period use XE)
SG - For Stafford loans made on/after 7/1/94 but prior to 7/1/95, or loans made on/after 7/1/95
but prior to 7/1/98 during periods of repayment or forbearance. Also, for PLUS loans made on/after 7/1/94 but prior to 7/1/98. Also, for Consolidation loans for which the loan application was received by an eligible lender on/after 11/13/97 but prior to 10/1/98. (Eligible tax-exempt loans during this period use XG)
SH - For Stafford loans made on/after 7/1/95 but prior to 7/1/98 only during the in-school, grace
and deferment periods. Also, for PLUS loans made on/after 7/1/98 but prior to 1/1/2000. (Eligible tax-exempt loans during this period use XH)
SJ - For Stafford loans made on/after 7/1/98 but prior to 1/1/2000 only during the in-school, grace
and deferment periods. (Eligible tax-exempt loans during this period use XJ)

LaRS External User Guide – Release 8 FSA FMS
98
SK - For Stafford loans disbursed on/after 7/1/98 but prior to 1/1/2000 only during the repayment
and forbearance periods. (Tax-exempt loans during this period use XK) SL - Consolidation loans disbursed on/after 10/1/98 but prior to 1/1/2000. (Tax-exempt loans during this period use XL)
‘C’= Commercial Paper ‘L’= IBOR
CA/LA -Stafford loans disbursed on/after 1/1/2000, only during the in-school, grace and deferment
periods. (Eligible tax-exempt loans during this period use XJ) CB/LB -Stafford loans disbursed on/after 1/1/2000, only during the repayment and forbearance
periods. (Eligible tax-exempt loans during this period use XK) CC/LC -Consolidation loans disbursed on/after 1/1/2000. (Eligible tax-exempt loans during this
period use XL) CD/LD -PLUS loans disbursed on/after 1/1/2000. (Eligible tax-exempt loans during this period use XH) CE/LE- Stafford loans disbursed on/after 4/1/2006, only during the in-school, grace and deferment
periods. (Eligible tax-exempt loans during this period use XM*) CF/LF- Stafford loans disbursed on/after 4/1/2006, only during the repayment and forbearance
periods. (Eligible tax-exempt loans during this period use XN*) CG/LG-Consolidation loans disbursed on/after 4/1/2006. (Eligible tax-exempt loans during this period use XO*) CH/LH-PLUS loans disbursed on/after 4/1/2006. (Eligible tax-exempt loans during this period use XP*) CI/LI - Stafford loans disbursed on/after 10/1/2007, only during the in-school, grace and deferment
periods. CJ/LJ- Stafford loans disbursed on/after 10/1/2007, only during the repayment and forbearance CK/LK-Consolidation loans disbursed on/after 10/1/2007. CM/LM-PLUS loans disbursed on/after 10/1/2007.

LaRS External User Guide – Release 8 FSA FMS
99
*Please refer to Dear Colleague Letters GEN-06-02, FP-06-01, FP-07-06, FP-07-01, FP-06-15 etc. for tax-exempt eligibility requirements.