financials introduction for new users v9.2 the university ... · financials introduction for new...
TRANSCRIPT

Financials Introduction for New Users V9.2 The University of Akron
Ver. 2014.11.25 [email protected] These materials may not be reproduced in whole or in part without the express written permission of
The University of Akron.
Table of Contents COURSE OBJECTIVES .............................................................................................................................................. 1
LESSON 1: PEOPLESOFT FINANCIALS AT THE UNIVERSITY OF AKRON ..................................................................... 2
DATABASE TERMS .......................................................................................................................................................... 2 PEOPLESOFT MODULES .................................................................................................................................................. 3 OBTAINING SECURITY TO ACCESS PEOPLESOFT FINANCIALS RECORDS ...................................................................................... 4
LESSON 2: DEFINITIONS ......................................................................................................................................... 6
SPEEDTYPES.................................................................................................................................................................. 6 CHARTFIELDS ................................................................................................................................................................ 6 ACCOUNTING AND BUDGET PERIODS ................................................................................................................................. 8 LIFE CYCLE OF A REQUISITION ........................................................................................................................................... 9
LESSON 3: SIGN IN AND SIGN OUT ....................................................................................................................... 10
SIGN IN TO PEOPLESOFT................................................................................................................................................ 10 SIGN OUT OF PEOPLESOFT ............................................................................................................................................ 12
LESSON 4: MENU NAVIGATION ............................................................................................................................ 13
DISCUSSION ................................................................................................................................................................ 13 USE THE DROP-DOWN MENU ........................................................................................................................................ 13 USE THE DROP-DOWN MENU WITH A NAVIGATION PAGE ................................................................................................... 17
LESSON 5: SETTING FAVORITES ............................................................................................................................ 18
LESSON 6: USE FAVORITES ................................................................................................................................... 19
LESSON 7: USE A RUN CONTROL ID – REQUISITION PRINT REPORT ...................................................................... 21
RUN CONTROL IDS ....................................................................................................................................................... 21 PRINTING A REQUISITION .............................................................................................................................................. 22
Part A: Use the Menu to Navigate ..................................................................................................................... 22 Part B: Create a New or Use an Existing Run Control ID .................................................................................... 23
Create a New Run Control ID .......................................................................................................................................... 23 Use an Existing Run Control ID ........................................................................................................................................ 25
Part C: Set the Report Criteria ............................................................................................................................ 26 Part D: Use the Process Scheduler ...................................................................................................................... 28 Part E: Use the Report Manager to Print the Report.......................................................................................... 29
LESSON 8: USE MULTIPLE WINDOWS ................................................................................................................... 32
LESSON 9: PRINT A WEB PAGE USING THE BROWSER .......................................................................................... 33
IN THE INTERNET EXPLORER VERSION 9 ............................................................................................................................ 33 IN GOOGLE CHROME: ................................................................................................................................................... 34
LESSON 10: USE AN EXISTING RUN CONTROL ID .................................................................................................. 35
LESSON 11: ONLINE INQUIRY ............................................................................................................................... 37
DISCUSSION ................................................................................................................................................................ 37 REQUISITION INQUIRY PAGE ........................................................................................................................................... 38 INQUIRE ON A PURCHASE ORDER .................................................................................................................................... 45 INQUIRE ON A VOUCHER ............................................................................................................................................... 50 INQUIRE ON A PAYMENT ............................................................................................................................................... 54
Part A: Search by Check Number ........................................................................................................................ 54 Part B: Search by Supplier ID with Payment Date Range ................................................................................... 56

Financials Introduction for New Users V9.2 The University of Akron
Ver. 2014.11.25 [email protected] These materials may not be reproduced in whole or in part without the express written permission of
The University of Akron.
LESSON 12: CLEAR CACHE IN INTERNET EXPLORER 9 ............................................................................................ 60
LESSON 13: LOCATE PEOPLESOFT TRAINING AND DOCUMENTATION ON THE WEB ............................................. 62
APPENDIX A: PERSONALIZE AN INQUIRY GRID ..................................................................................................... 63
APPENDIX B: USE THE DOWNLOAD TOOL ............................................................................................................ 68
APPENDIX C: CHANGE YOUR PASSWORD ............................................................................................................. 70
APPENDIX D: USE MY PERSONALIZATIONS .......................................................................................................... 72
APPENDIX E: POOL ACCOUNTS ............................................................................................................................ 75
APPENDIX F: INCOME AND EXPENSE ACCOUNTS ................................................................................................. 76
APPENDIX G: REPORT LIST ................................................................................................................................... 83

Financials Introduction for New Users V9.2 The University of Akron
Ver. 2014.11.25 [email protected] Page 1 These materials may not be reproduced in whole or in part without the express written permission of
The University of Akron.
Course Objectives
In PeopleSoft Financials version 9.2, the applications are used in an Internet environment. The system requires the use of a web browser, such as the Internet Explorer, on individual user machines. Installation of software on your computer is not required. Using the browser, you sign in to PeopleSoft as you would when opening your favorite website. This course is intended for faculty, staff and student employees who are new users of the PeopleSoft version 9.2 Financials system. Frequently-used procedures will be reviewed. At the end of class, you will be able to:
• Define a relational database • Explain how The University of Akron uses PeopleSoft Financials • Define common terms used in PeopleSoft Financials • Initiate requests for access to PeopleSoft records and for assistance with
PeopleSoft User IDs and passwords • Sign In and Sign Out • Navigate using the menu and navigation bar • Search for and locate a record • Use Run Control IDs, the Process Scheduler and the Report Manager to
complete common reporting tasks • Set and use favorites • Inquire on a Financial document • Print a web page • Locate The University of Akron’s PeopleSoft documentation, instructor-led
courses and web-based courses on the web • Use this documentation to navigate common paths and perform common
tasks

Financials Introduction for New Users V9.2 The University of Akron
Ver. 2014.11.25 [email protected] Page 2 These materials may not be reproduced in whole or in part without the express written permission of
The University of Akron.
Lesson 1: PeopleSoft Financials at The University of Akron
In this lesson, you will review general information about the PeopleSoft Financials system. The topics reviewed include:
◘ Database terms ◘ PeopleSoft modules ◘ Accessing PeopleSoft records
Database Terms
Knowledge of the following terms is important to your use of PeopleSoft. Term Definition Database A collection of data that is organized into a
group, because the data is related to a particular topic or purpose
Table The basic structure that stores related data in rows and columns
Field A category of data which is within one column in a table
Field Value The data itself that is stored in a field. Ex: The field is called Last Name. One of the field values is Brown.
PeopleSoft is a type of software called a Relational Database Management System. The data in the database is stored in hundreds of tables. The records in one table are related to the records in another table or several other tables by a piece of data that is repeated in each of the tables. An example of data that may appear in many tables is UserID or Account. The fields that relate one table to another table are called keys. These relationships allow for the use of information from more than one table at a time, so that on one page of PeopleSoft or in a report, you can see data from many tables. Journal Header Table Business Unit
Journal ID Journal Date
Unpost Seq
AKRON JD04621106 10/21/2003 AKRON AP00313456 10/22/2003 Journal Line Table Business Unit
Journal ID Journal Line
Ledger Account Fund
AKRON JD04621106 1 ACTUALS 5763 10000 AKRON JD04621106 2 ÁCTUALS 5763 36563
If you request information on Journal ID JD04621106, PeopleSoft can display the rows of data (with that Journal ID) from the two tables. PeopleSoft knows which rows are related by the values in the key field,

Financials Introduction for New Users V9.2 The University of Akron
Ver. 2014.11.25 [email protected] Page 3 These materials may not be reproduced in whole or in part without the express written permission of
The University of Akron.
PeopleSoft Modules
PeopleSoft is purchased in modules (parts). The General Ledger, Accounts Payable, Purchasing, Commitment Control, and Grants modules are referred to as PeopleSoft Financials. Unless you work in one of The University’s business and finance administrative offices, your use of PeopleSoft Financials will be restricted to one or more of the following:
◘ Entering requisitions ◘ Inquiring on requisitions, purchase orders, vouchers and payments ◘ Inquiring on budgets ◘ Submitting a request to the Office of Resource Analysis & Budget to transfer
dollars from one budget to another or within a single budget from one pool account to another
◘ Submitting data to the Controller’s office for adjusting journal entries ◘ Printing reports ◘ Downloading financial data to Excel
The University of Akron uses the following modules of PeopleSoft. Module Comment Human Resources Recruitment, compensation system, workforce development. Benefits Administration
Establish and manage benefit programs, such as sick or vacation leave, medical insurance.
Payroll Calculate earnings, taxes and deductions. Direct deposit, payroll checks.
Campus Community Biographic and demographic data of students, faculty, staff, alumni and patrons. This data is shared across all modules.
Admissions Prospect recruitment, application processing and admission. Academic Structure Student careers (undergraduate, graduate and law) and
academic plans (majors and minors). Student Records Courses, registration and grade processing. Advisement Access to academic records and reports. Student Financials Student fee invoice and student account balances. Financial Aid Application processing, student financial aid awards and loans. General Ledger Financial records and financial management. Accounts Payable Suppliers, invoice entry, payment of The University’s bills. Purchasing Requisitions, purchase orders, delivery receipts. Commitment Control Budgets Contributor Relations Manage supporter relationships, alumni information, track
giving. Grants Sponsored programs. Research, externally funded projects. Recruiting Solutions Hiring processes.
Financials Introduction for New Users V9.2 The University of Akron
Ver. 2014.11.25 [email protected] Page 4 These materials may not be reproduced in whole or in part without the express written permission of
The University of Akron.
Obtaining Security to Access PeopleSoft Financials Records
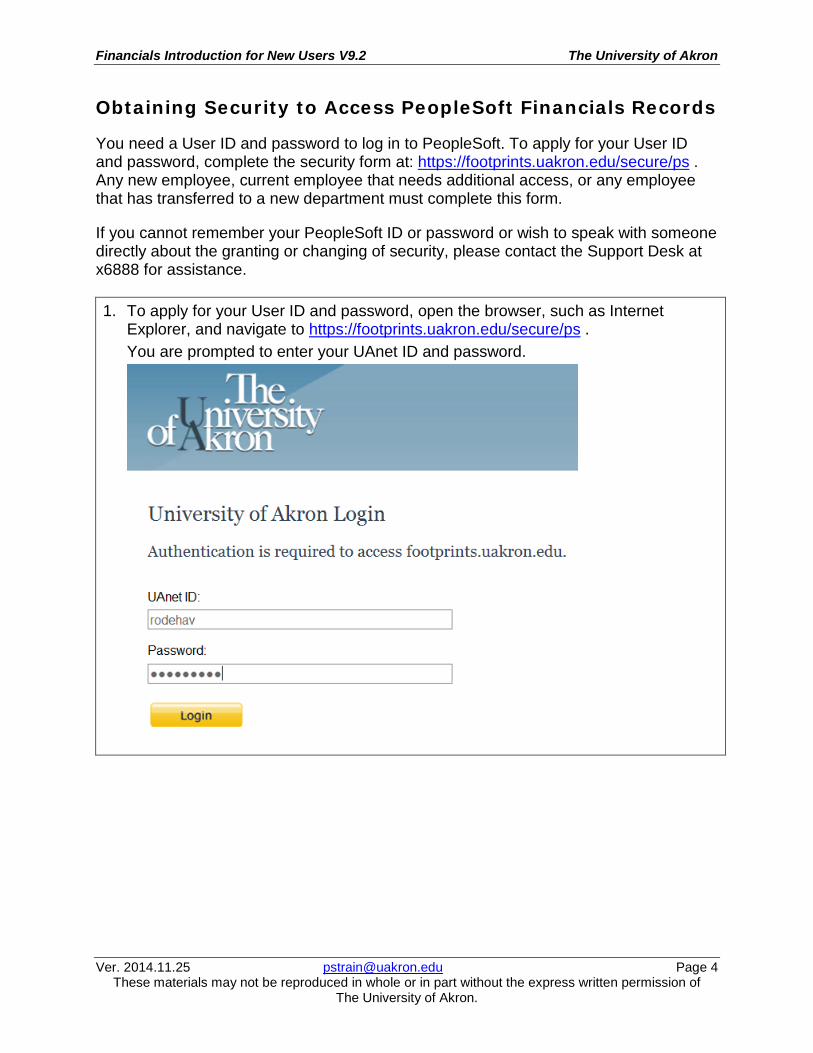
You need a User ID and password to log in to PeopleSoft. To apply for your User ID and password, complete the security form at: https://footprints.uakron.edu/secure/ps . Any new employee, current employee that needs additional access, or any employee that has transferred to a new department must complete this form.
If you cannot remember your PeopleSoft ID or password or wish to speak with someone directly about the granting or changing of security, please contact the Support Desk at x6888 for assistance. 1. To apply for your User ID and password, open the browser, such as Internet
Explorer, and navigate to https://footprints.uakron.edu/secure/ps . You are prompted to enter your UAnet ID and password.
Financials Introduction for New Users V9.2 The University of Akron
Ver. 2014.11.25 [email protected] Page 5 These materials may not be reproduced in whole or in part without the express written permission of
The University of Akron.
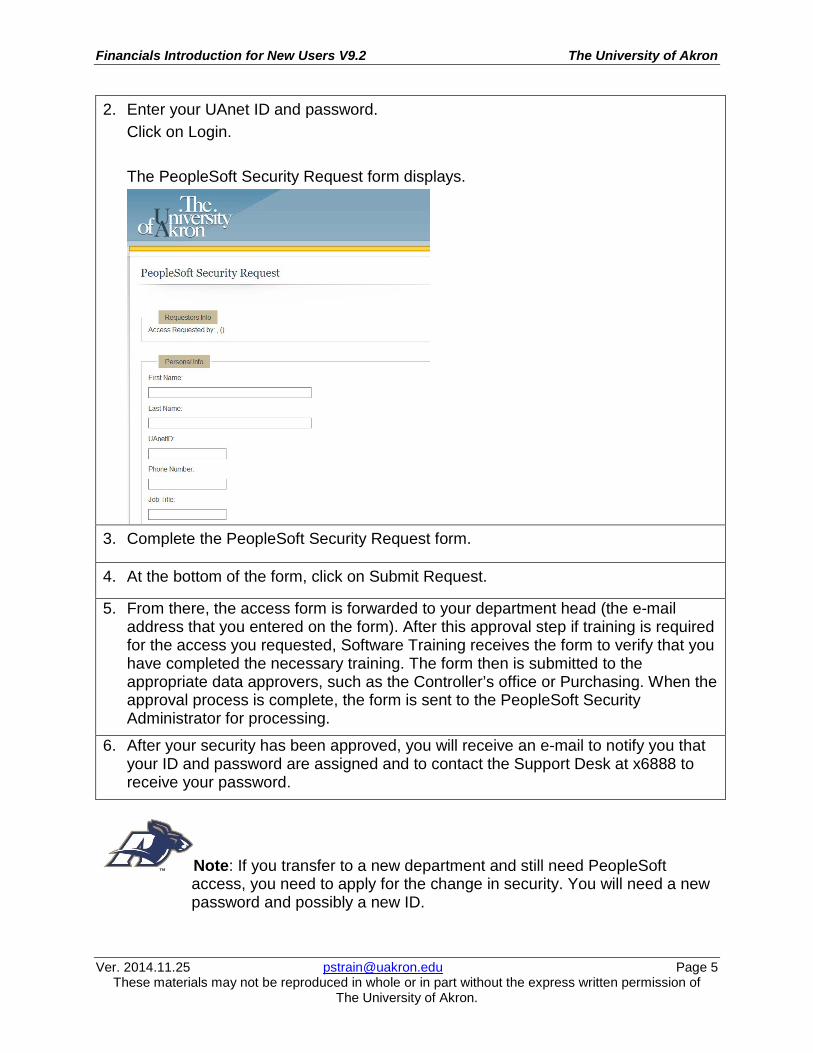
2. Enter your UAnet ID and password. Click on Login. The PeopleSoft Security Request form displays.
3. Complete the PeopleSoft Security Request form.
4. At the bottom of the form, click on Submit Request.
5. From there, the access form is forwarded to your department head (the e-mail address that you entered on the form). After this approval step if training is required for the access you requested, Software Training receives the form to verify that you have completed the necessary training. The form then is submitted to the appropriate data approvers, such as the Controller’s office or Purchasing. When the approval process is complete, the form is sent to the PeopleSoft Security Administrator for processing.
6. After your security has been approved, you will receive an e-mail to notify you that your ID and password are assigned and to contact the Support Desk at x6888 to receive your password.
Note: If you transfer to a new department and still need PeopleSoft access, you need to apply for the change in security. You will need a new password and possibly a new ID.
Financials Introduction for New Users V9.2 The University of Akron
Ver. 2014.11.25 [email protected] Page 6 These materials may not be reproduced in whole or in part without the express written permission of
The University of Akron.
Lesson 2: Definitions
SpeedTypes
This 6-digit code represents a particular budget. In most cases, this 6-digit code is used for data entry, to request information, or to print a report regarding that budget. Examples of SpeedTypes are: 200704 or 537861.
ChartFields
The PeopleSoft system uses the seven ChartFields to categorize and track all financial transactions. Those ChartFields are:
◘ Fund ◘ Dept Unit ◘ Dept ◘ Program ◘ Class ◘ Project ◘ Account
The function of each ChartField can be broadly defined as follows: Fund: This ChartField represents the highest level of University accounting. For
regular departmental SpeedTypes, the fund will be 10000 for the Akron campus and 11000 for the Wayne campus. Departmental Sales funds will start with the digits “108” while Auxiliary funds will start with the digit “2”. All restricted funds will be composed of the last five digits of their related SpeedType.
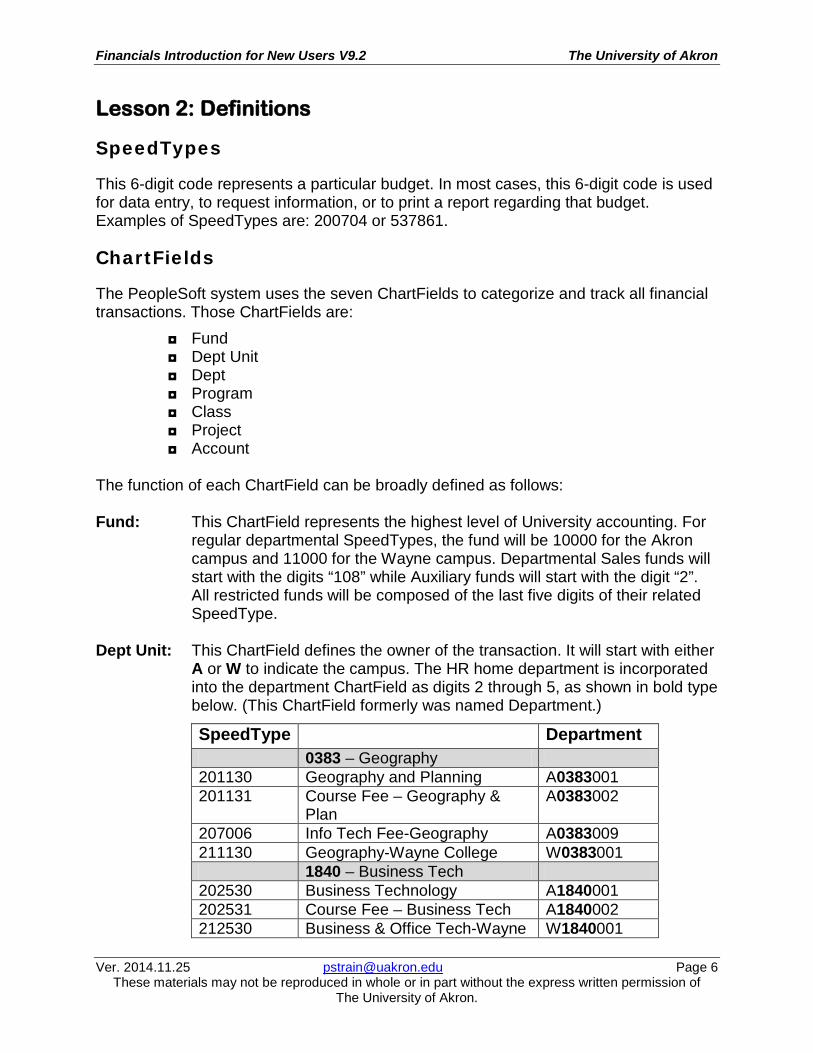
Dept Unit: This ChartField defines the owner of the transaction. It will start with either
A or W to indicate the campus. The HR home department is incorporated into the department ChartField as digits 2 through 5, as shown in bold type below. (This ChartField formerly was named Department.)
SpeedType Department 0383 – Geography 201130 Geography and Planning A0383001 201131 Course Fee – Geography &
Plan A0383002
207006 Info Tech Fee-Geography A0383009 211130 Geography-Wayne College W0383001 1840 – Business Tech 202530 Business Technology A1840001 202531 Course Fee – Business Tech A1840002 212530 Business & Office Tech-Wayne W1840001
Financials Introduction for New Users V9.2 The University of Akron
Ver. 2014.11.25 [email protected] Page 7 These materials may not be reproduced in whole or in part without the express written permission of
The University of Akron.
Dept: This ChartField is six digits in length. It is the HR home department (four digits) with two leading zeroes for the Akron campus and 01 (zero, one) for the Wayne campus. Examples: 000322 for Akron Biology and 010322 for Wayne biology
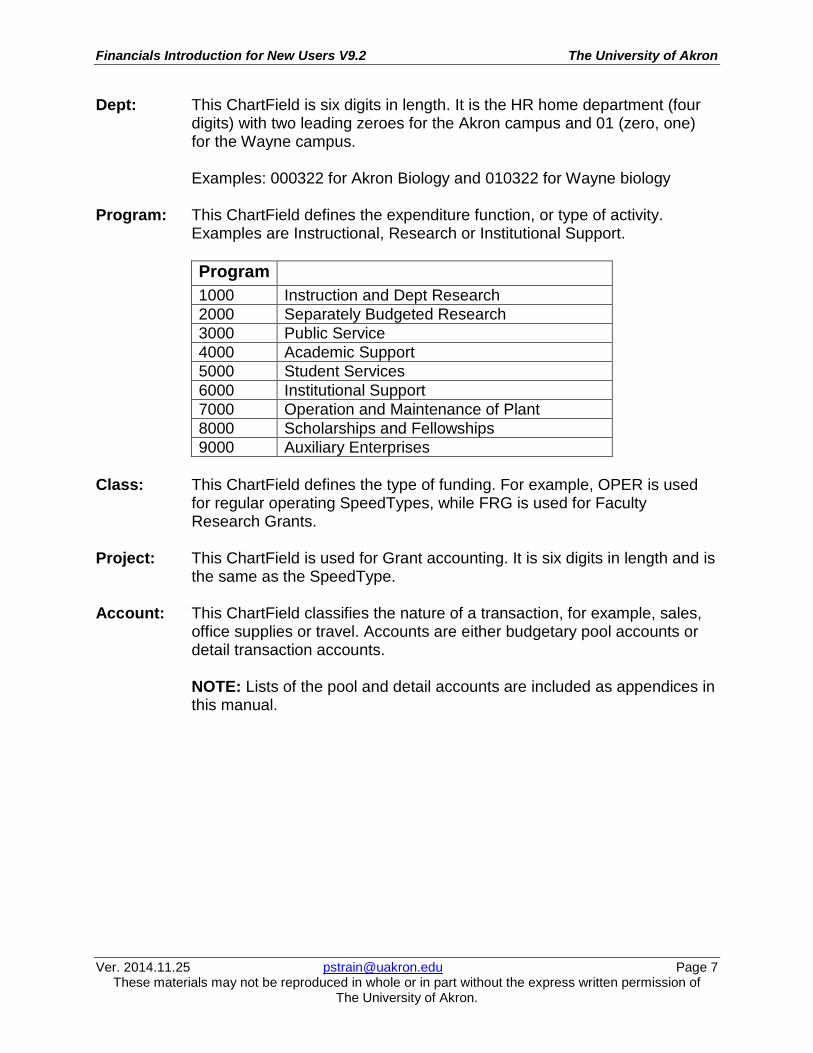
Program: This ChartField defines the expenditure function, or type of activity.
Examples are Instructional, Research or Institutional Support.
Program 1000 Instruction and Dept Research 2000 Separately Budgeted Research 3000 Public Service 4000 Academic Support 5000 Student Services 6000 Institutional Support 7000 Operation and Maintenance of Plant 8000 Scholarships and Fellowships 9000 Auxiliary Enterprises
Class: This ChartField defines the type of funding. For example, OPER is used
for regular operating SpeedTypes, while FRG is used for Faculty Research Grants.
Project: This ChartField is used for Grant accounting. It is six digits in length and is
the same as the SpeedType. Account: This ChartField classifies the nature of a transaction, for example, sales,
office supplies or travel. Accounts are either budgetary pool accounts or detail transaction accounts.
NOTE: Lists of the pool and detail accounts are included as appendices in this manual.

Financials Introduction for New Users V9.2 The University of Akron
Ver. 2014.11.25 [email protected] Page 8 These materials may not be reproduced in whole or in part without the express written permission of
The University of Akron.
Accounting and Budget Periods
At The University of Akron, the accounting year, known as the Fiscal Year, runs from July 1 through June 30. Each fiscal year is named for the year in which it ends. For example, the 12 month period running from July 1, 2011 through June 30, 2012 is referred to as the 2012 Fiscal Year. In many places throughout the financial system, Budget Period is used synonymously with Fiscal Year. The months of the year are called Accounting Periods and are numbered 1 through 12. July, the first month of the fiscal year, is assigned the number 1. August is assigned number 2, and so on.
Budget Period (Fiscal Year) Month Accounting Period July 1 August 2 September 3 October 4 November 5 December 6 January 7 February 8 March 9 April 10 May 11 June 12
Financials Introduction for New Users V9.2 The University of Akron
Ver. 2014.11.25 [email protected] Page 9 These materials may not be reproduced in whole or in part without the express written permission of
The University of Akron.
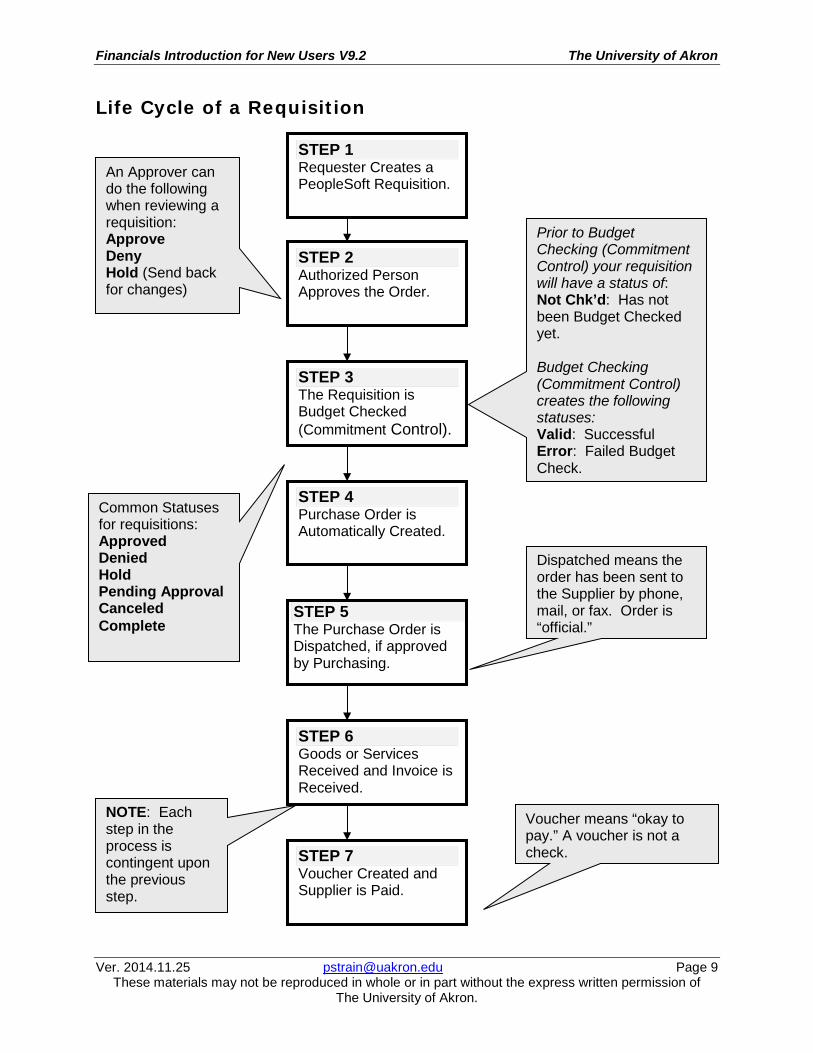
Life Cycle of a Requisition
Prior to Budget Checking (Commitment Control) your requisition will have a status of: Not Chk’d: Has not been Budget Checked yet. Budget Checking (Commitment Control) creates the following statuses: Valid: Successful Error: Failed Budget Check.
An Approver can do the following when reviewing a requisition: Approve Deny Hold (Send back for changes)
Dispatched means the order has been sent to the Supplier by phone, mail, or fax. Order is “official.”
NOTE: Each step in the process is contingent upon the previous step.
STEP 1 Requester Creates a PeopleSoft Requisition.
STEP 2 Authorized Person Approves the Order.
STEP 3 The Requisition is Budget Checked (Commitment Control).
STEP 4 Purchase Order is Automatically Created.
STEP 5 The Purchase Order is Dispatched, if approved by Purchasing.
STEP 6 Goods or Services Received and Invoice is Received.
STEP 7 Voucher Created and Supplier is Paid.
Common Statuses for requisitions: Approved Denied Hold Pending Approval Canceled Complete
Voucher means “okay to pay.” A voucher is not a check.

Financials Introduction for New Users V9.2 The University of Akron
Ver. 2014.11.25 [email protected] Page 10 These materials may not be reproduced in whole or in part without the express written permission of
The University of Akron.
Lesson 3: Sign In and Sign Out
Sign In to PeopleSoft
1. Open the browser.
2. If this is the first time that you are logging in, type the URL given to you by your instructor. Set this as a favorite in the browser. If you have set the PeopleSoft Sign-In page as a favorite, select it from the favorites list.
3. Enter your User ID and password in all capital letters.
4. Click on the button. The Home page displays.

Financials Introduction for New Users V9.2 The University of Akron
Ver. 2014.11.25 [email protected] Page 11 These materials may not be reproduced in whole or in part without the express written permission of
The University of Akron.
5. OPTIONAL: Press F11 to use the Full Screen view. In the Full Screen view, the browser’s title bar, status bar, menu bar and toolbars are hidden, as well as the Windows taskbar. This allows more display area for the PeopleSoft pages. Press F11 again to return to the Normal view in the browser.
Financials Introduction for New Users V9.2 The University of Akron
Ver. 2014.11.25 [email protected] Page 12 These materials may not be reproduced in whole or in part without the express written permission of
The University of Akron.
Sign Out of PeopleSoft
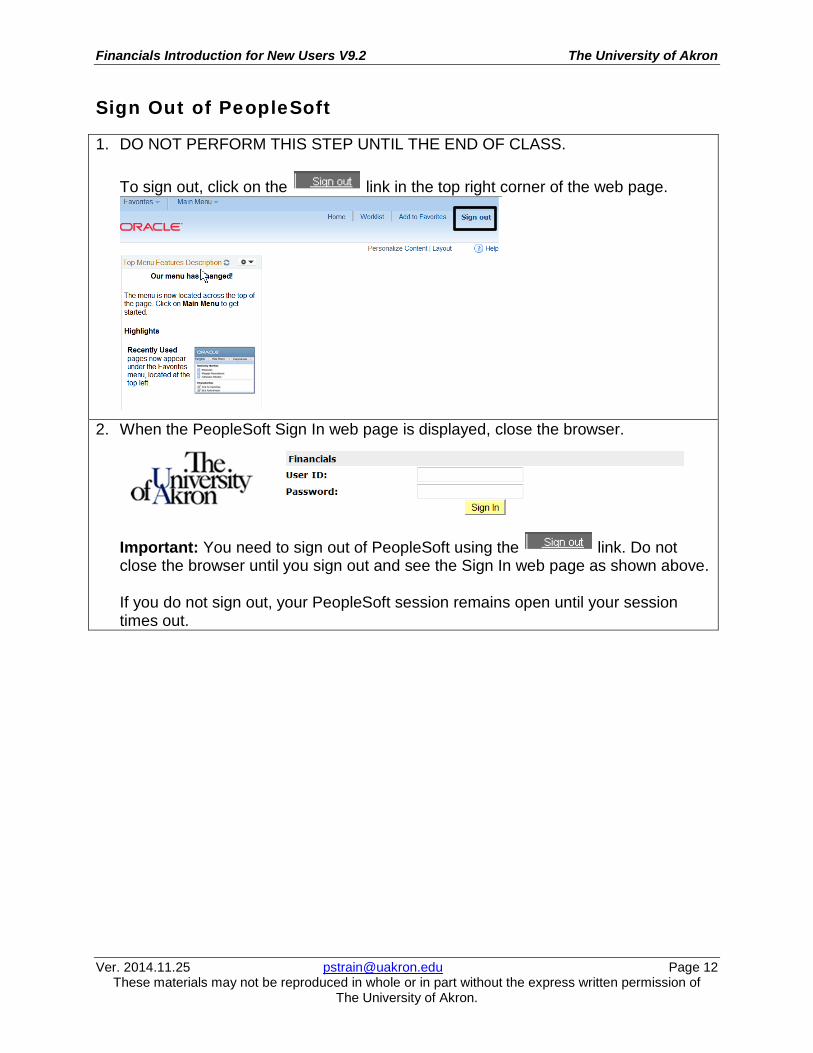
1. DO NOT PERFORM THIS STEP UNTIL THE END OF CLASS. To sign out, click on the link in the top right corner of the web page.
2. When the PeopleSoft Sign In web page is displayed, close the browser.
Important: You need to sign out of PeopleSoft using the link. Do not close the browser until you sign out and see the Sign In web page as shown above. If you do not sign out, your PeopleSoft session remains open until your session times out.
Financials Introduction for New Users V9.2 The University of Akron
Ver. 2014.11.25 [email protected] Page 13 These materials may not be reproduced in whole or in part without the express written permission of
The University of Akron.
Lesson 4: Menu Navigation
Discussion
In PeopleSoft Financials version 9.2, the data and your choices are presented as web pages. By default, the menu displays at the top of the window. As you make selections, the menu expands itself until you make your final selection. To locate the data needed, you make menu selections. The set of menu selections are referred to as a path. In the following exercise, you will follow the path: Process Financial Information > UA Department Inquiries > Reports > Requisition Print Use the Drop-Down Menu
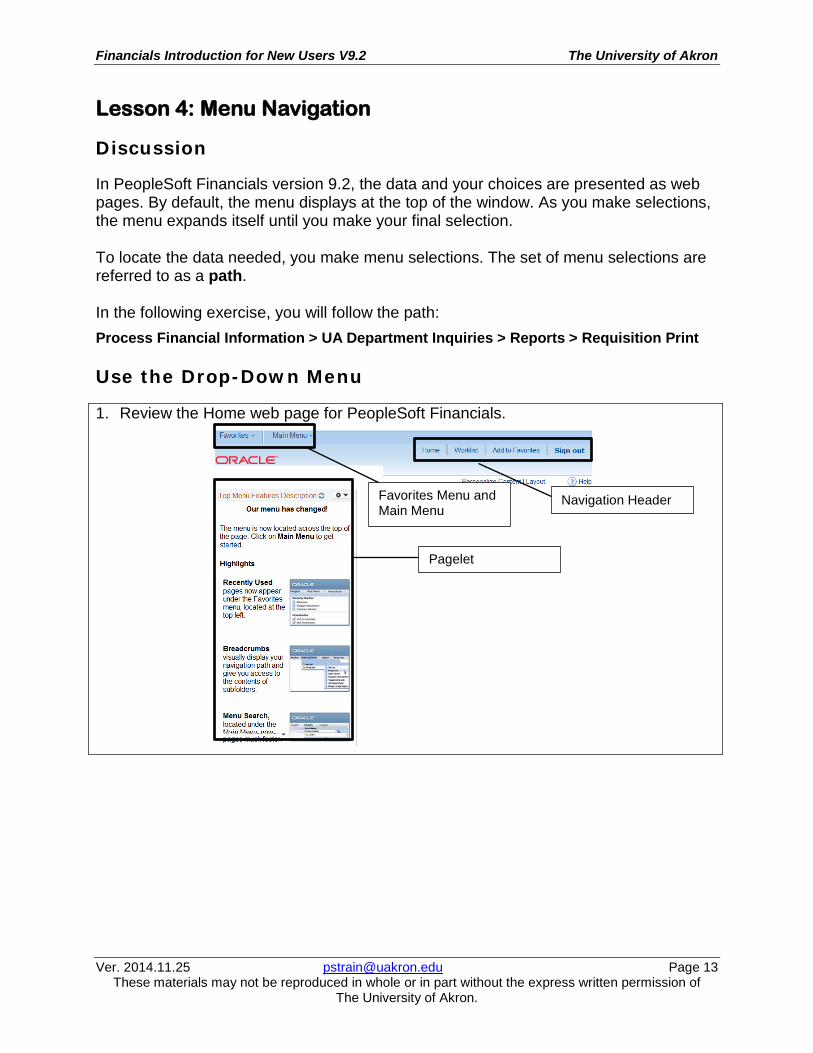
1. Review the Home web page for PeopleSoft Financials.
Navigation Header Favorites Menu and
Main Menu
Pagelet

Financials Introduction for New Users V9.2 The University of Akron
Ver. 2014.11.25 [email protected] Page 14 These materials may not be reproduced in whole or in part without the express written permission of
The University of Akron.
2. Click on . The Main Menu displays. The menus and menu options that are available are determined by your PeopleSoft security.
3. Click on the text for the menu item Process Financial Information.
The menu expands.
Note: If you click on the folder icon for the menu item, a Navigation Page displays.
4. Click on UA Department Inquiries.
5. Click on Report.

Financials Introduction for New Users V9.2 The University of Akron
Ver. 2014.11.25 [email protected] Page 15 These materials may not be reproduced in whole or in part without the express written permission of
The University of Akron.
6. Click on Requisition Print. The Requisition Print – Find an Existing Value page displays.
7. Note that there are two tabs available, a Find an Existing Value tab and
an Add a New Value tab. Click on a tab to access the data or options available on that tab. The use of the tabs is reviewed in Lesson 7 of this manual.
8. Note the Expand/Collapse icon (triangle) for Search Criteria. Click on the icon to collapse and expand the Search Criteria.
9. At the top of the page, each of the menu selections in the selected path has a breadcrumb in the trail.
Financials Introduction for New Users V9.2 The University of Akron
Ver. 2014.11.25 [email protected] Page 16 These materials may not be reproduced in whole or in part without the express written permission of
The University of Akron.
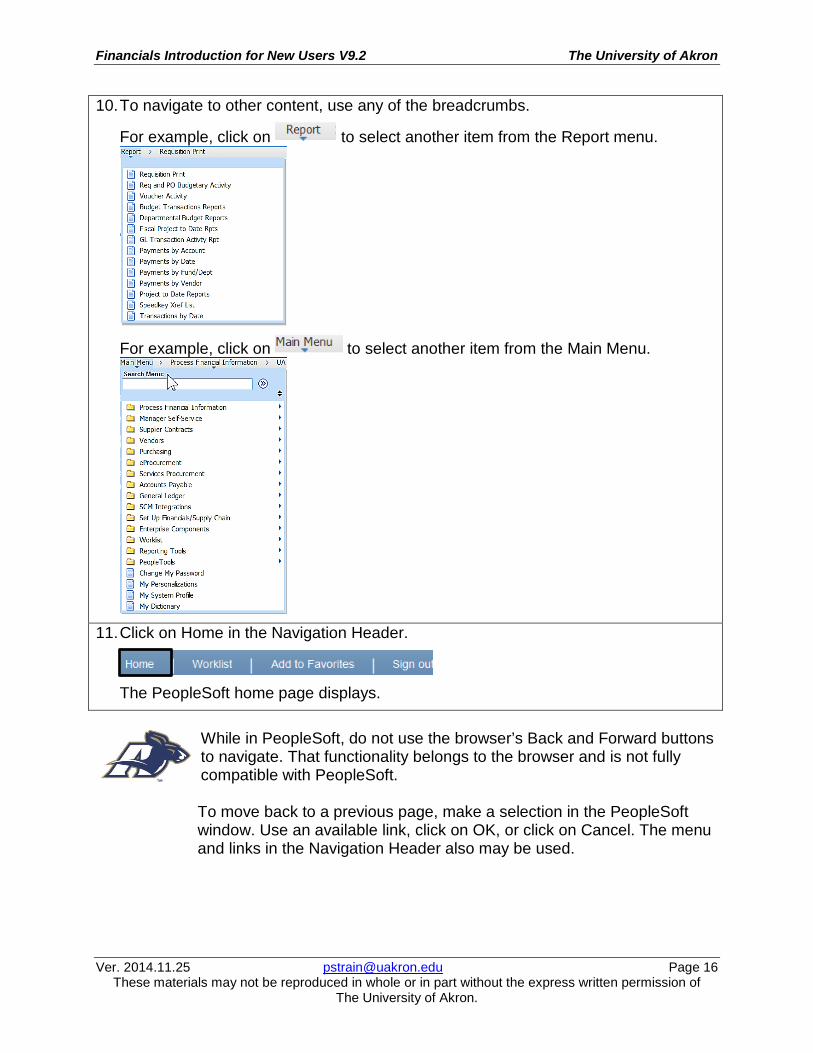
10. To navigate to other content, use any of the breadcrumbs.
For example, click on to select another item from the Report menu.
For example, click on to select another item from the Main Menu.
11. Click on Home in the Navigation Header.
The PeopleSoft home page displays.
While in PeopleSoft, do not use the browser’s Back and Forward buttons to navigate. That functionality belongs to the browser and is not fully compatible with PeopleSoft.
To move back to a previous page, make a selection in the PeopleSoft window. Use an available link, click on OK, or click on Cancel. The menu and links in the Navigation Header also may be used.
Financials Introduction for New Users V9.2 The University of Akron
Ver. 2014.11.25 [email protected] Page 17 These materials may not be reproduced in whole or in part without the express written permission of
The University of Akron.
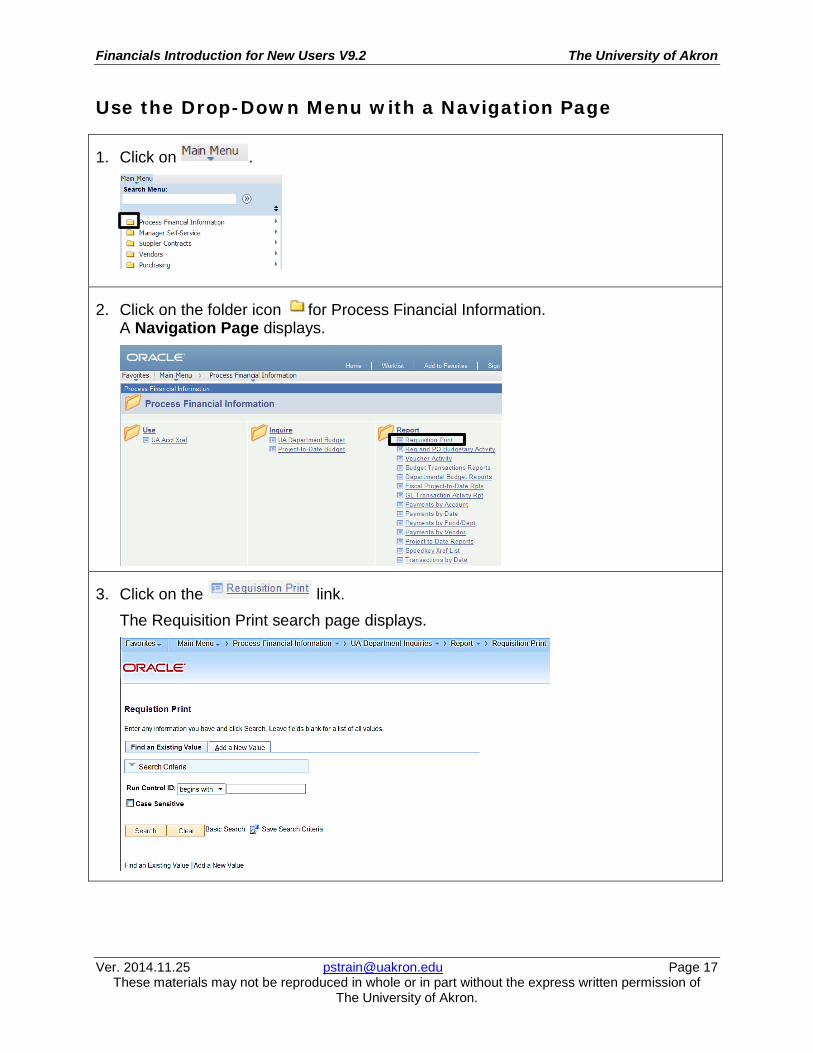
Use the Drop-Down Menu with a Navigation Page
1. Click on .
2. Click on the folder icon for Process Financial Information. A Navigation Page displays.
3. Click on the link. The Requisition Print search page displays.
Financials Introduction for New Users V9.2 The University of Akron
Ver. 2014.11.25 [email protected] Page 18 These materials may not be reproduced in whole or in part without the express written permission of
The University of Akron.
Lesson 5: Setting Favorites
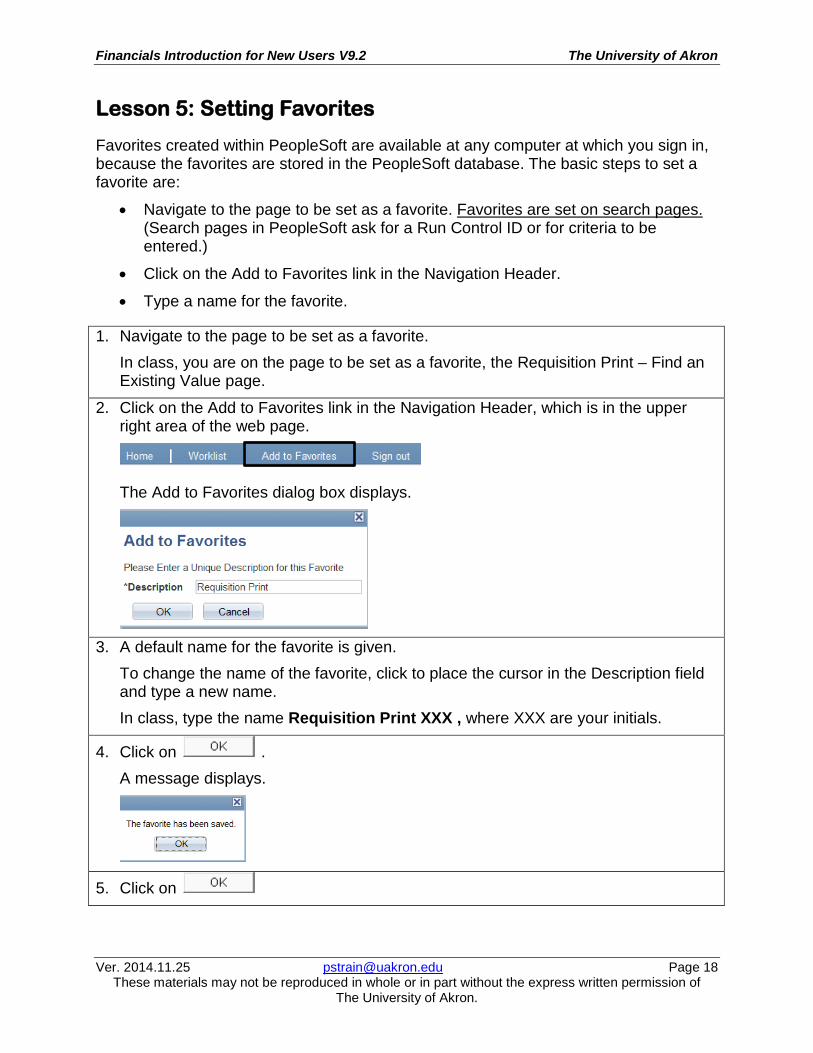
Favorites created within PeopleSoft are available at any computer at which you sign in, because the favorites are stored in the PeopleSoft database. The basic steps to set a favorite are:
• Navigate to the page to be set as a favorite. Favorites are set on search pages. (Search pages in PeopleSoft ask for a Run Control ID or for criteria to be entered.)
• Click on the Add to Favorites link in the Navigation Header.
• Type a name for the favorite.
1. Navigate to the page to be set as a favorite. In class, you are on the page to be set as a favorite, the Requisition Print – Find an Existing Value page.
2. Click on the Add to Favorites link in the Navigation Header, which is in the upper right area of the web page.
The Add to Favorites dialog box displays.
3. A default name for the favorite is given.
To change the name of the favorite, click to place the cursor in the Description field and type a new name. In class, type the name Requisition Print XXX , where XXX are your initials.
4. Click on . A message displays.
5. Click on

Financials Introduction for New Users V9.2 The University of Akron
Ver. 2014.11.25 [email protected] Page 19 These materials may not be reproduced in whole or in part without the express written permission of
The University of Akron.
Lesson 6: Use Favorites
Once a Favorite is set, use the Favorites menu to quickly navigate to the page that is needed. 1. In class, click on in the Navigation Header, so you can test the Favorite that
was set.
2. Click on at the top of the PeopleSoft window. The Favorites menu displays.
3. Review the two sections of the Favorites menu.
• The first section is Recently Used. The PeopleSoft pages that you accessed most recently display. A maximum of five pages can display. Click on a page name to navigate to that page.
• The second section is My Favorites. The Favorites that you created display.
4. In the My Favorites section of the menu, note the following:
• The Add to Favorites menu item has the same function as Add to Favorites in the Navigation Header.
• The Edit Favorites menu item allows you to: - Delete a favorite - Rename a favorite - Place the list of favorites in a different order
Financials Introduction for New Users V9.2 The University of Akron
Ver. 2014.11.25 [email protected] Page 20 These materials may not be reproduced in whole or in part without the express written permission of
The University of Akron.
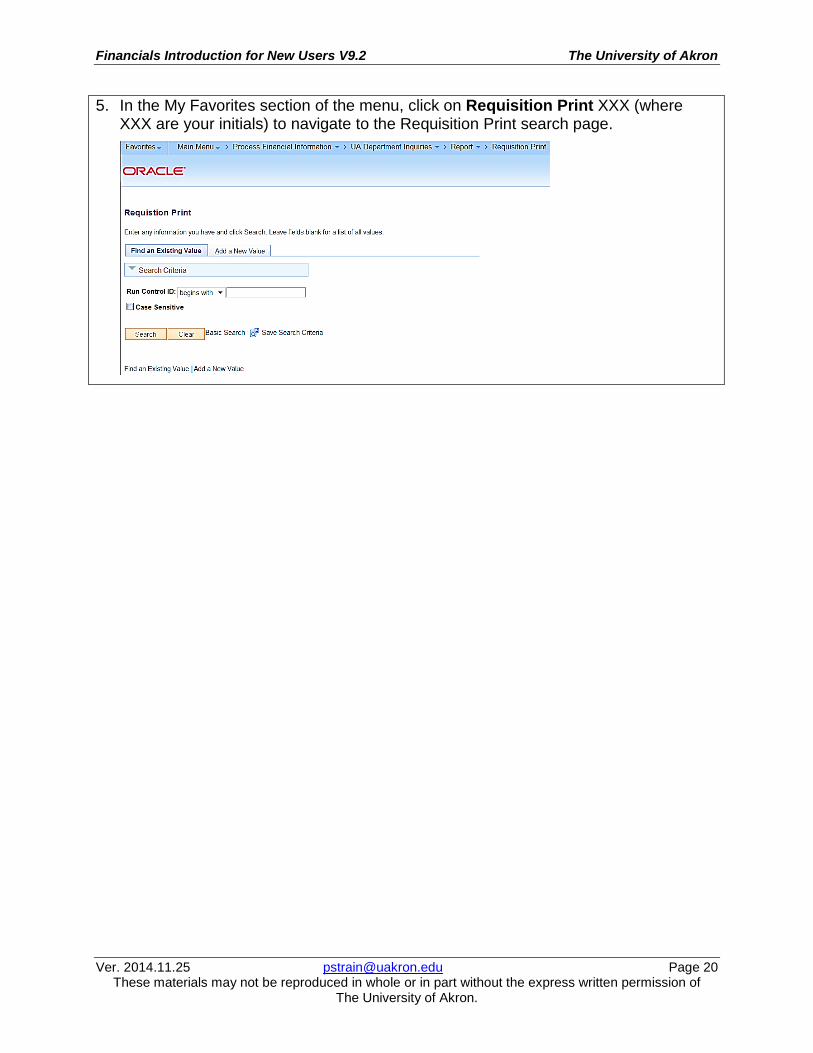
5. In the My Favorites section of the menu, click on Requisition Print XXX (where XXX are your initials) to navigate to the Requisition Print search page.

Financials Introduction for New Users V9.2 The University of Akron
Ver. 2014.11.25 [email protected] Page 21 These materials may not be reproduced in whole or in part without the express written permission of
The University of Akron.
Lesson 7: Use a Run Control ID – Requisition Print Report
Run Control IDs
What is a Run Control ID? A Run Control ID is an identification code that represents:
• Your PeopleSoft ID • The process you are running, such as printing a departmental budget report or
printing a requisition • Your criteria for that process, such as From Date 11/15/2011 Through Date
11/15/2011, Requester AC628PR, for printing a Requisition Each process that you run needs its own unique Run Control ID. If you run Departmental Budget Reports and run Requisition Print reports, you will create one Run Control ID for Departmental Budget Reports and one Run Control ID for Requisition Print reports. Think of a Run Control ID as a report request name. When do you create a Run Control ID? The first time that you run a process, you need to create a Run Control ID for that process. Some examples of processes are gathering the data to print a Departmental Budget Report or gathering the data to print a Requisition. When you run the process in the future, you use the same Run Control ID as the first time that you ran the process. You can change the criteria each time you run the process. What are the characteristics of a Run Control ID? A Run Control ID can be up to 30 characters in length. It cannot contain spaces or the percent sign, %. Some examples of Run Control IDs are BudgetReport or ReqPrint. Run Control IDs are case sensitive, so BudgetReport is a separate ID from budgetreport.

Financials Introduction for New Users V9.2 The University of Akron
Ver. 2014.11.25 [email protected] Page 22 These materials may not be reproduced in whole or in part without the express written permission of
The University of Akron.
Printing a Requisition
Part A: Use the Menu to Navigate
1. Click on .
2. Make menu selections to follow the path: Process Financial Information > UA Department Inquiries > Report > Requisition Print In class, you have done these two steps already.

Financials Introduction for New Users V9.2 The University of Akron
Ver. 2014.11.25 [email protected] Page 23 These materials may not be reproduced in whole or in part without the express written permission of
The University of Akron.
Part B: Create a New or Use an Existing Run Control ID
The first time that you print a requisition, you need to create a Run Control ID. When you print a requisition in the future, use this existing Run Control ID. Create a New Run Control ID
If it is the first time that you are printing a requisition, follow these steps. If you previously have printed a requisition, proceed to “Use an Existing Run Control ID” on page 25.
1. Click on the Add a New Value tab or the link.
The Add a New Value page is displayed.
2. In the Run Control ID field, type a Run Control ID with a maximum number of 30
characters and no spaces. In class, type ReqPrintXXX where XXX are your initials. For example, John Q. Smith would type ReqPrintJQS.
Financials Introduction for New Users V9.2 The University of Akron
Ver. 2014.11.25 [email protected] Page 24 These materials may not be reproduced in whole or in part without the express written permission of
The University of Akron.
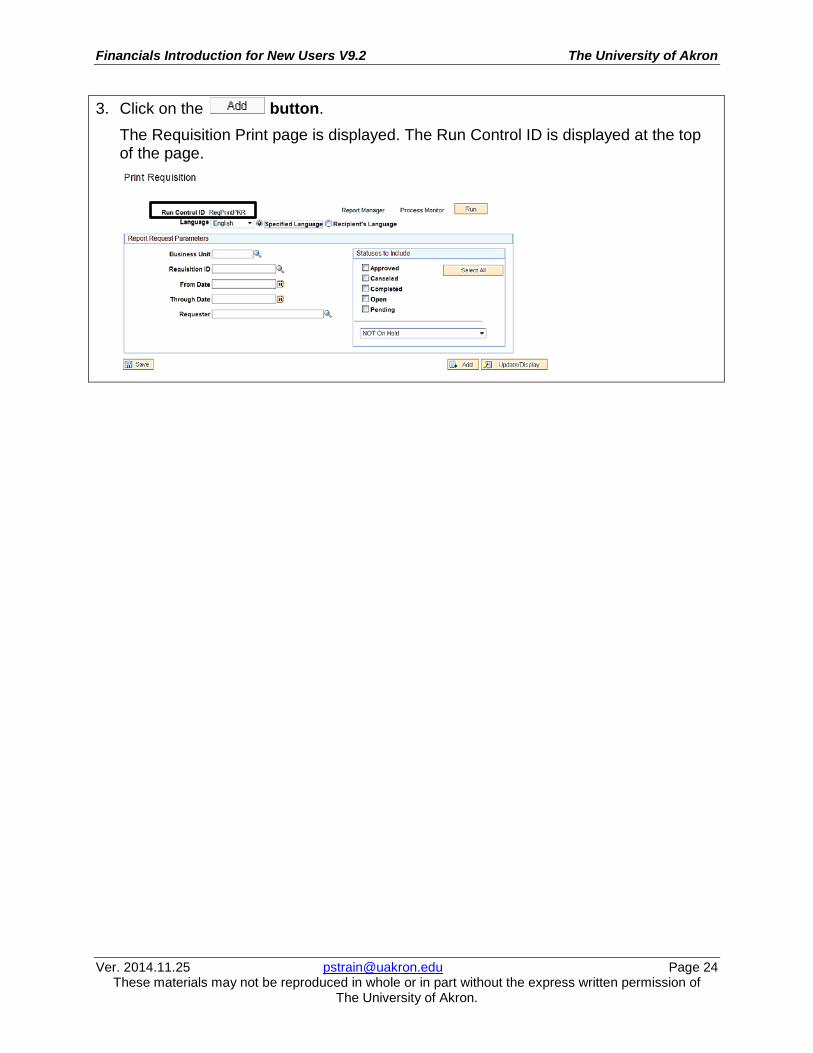
3. Click on the button. The Requisition Print page is displayed. The Run Control ID is displayed at the top of the page.
Financials Introduction for New Users V9.2 The University of Akron
Ver. 2014.11.25 [email protected] Page 25 These materials may not be reproduced in whole or in part without the express written permission of
The University of Akron.
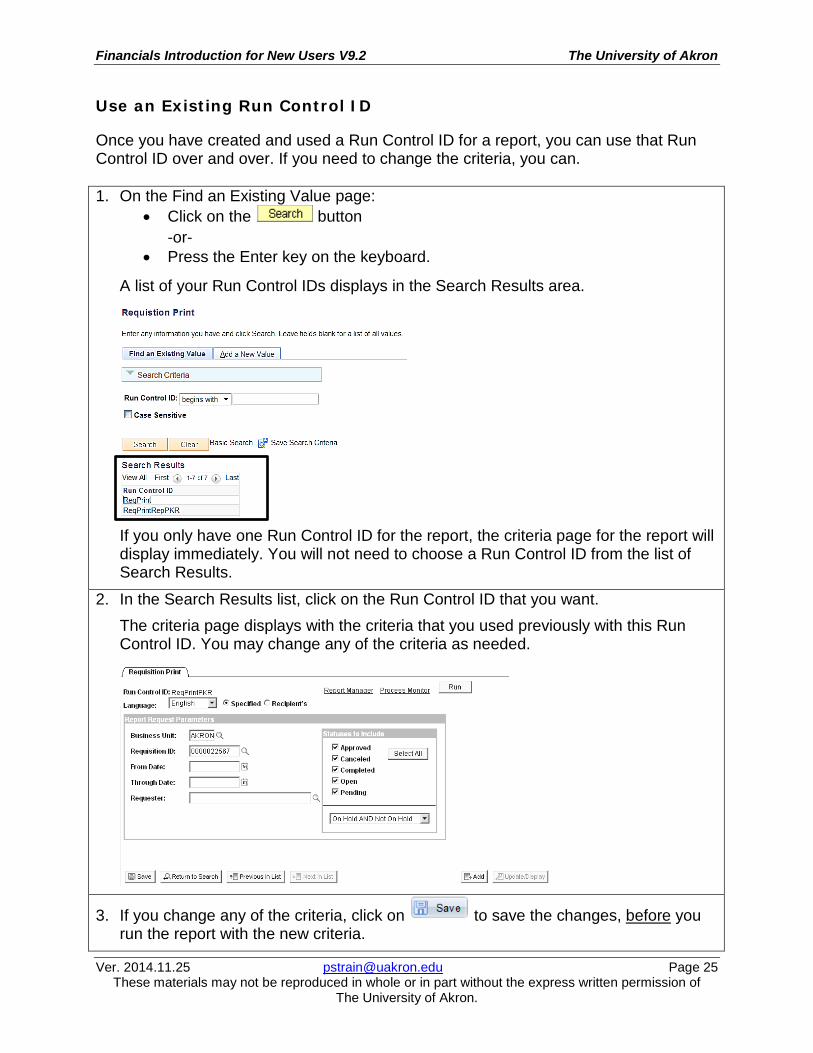
Use an Existing Run Control ID
Once you have created and used a Run Control ID for a report, you can use that Run Control ID over and over. If you need to change the criteria, you can. 1. On the Find an Existing Value page:
• Click on the button -or-
• Press the Enter key on the keyboard.
A list of your Run Control IDs displays in the Search Results area.
If you only have one Run Control ID for the report, the criteria page for the report will display immediately. You will not need to choose a Run Control ID from the list of Search Results.
2. In the Search Results list, click on the Run Control ID that you want. The criteria page displays with the criteria that you used previously with this Run Control ID. You may change any of the criteria as needed.
3. If you change any of the criteria, click on to save the changes, before you run the report with the new criteria.
Financials Introduction for New Users V9.2 The University of Akron
Ver. 2014.11.25 [email protected] Page 26 These materials may not be reproduced in whole or in part without the express written permission of
The University of Akron.
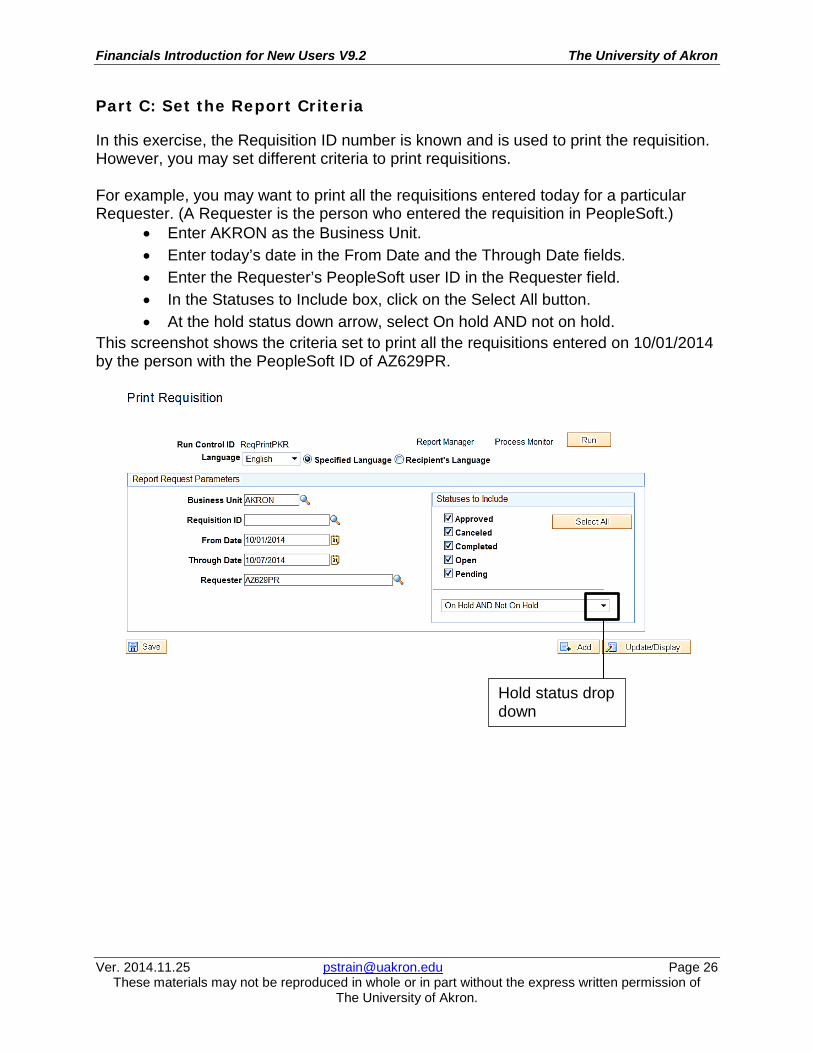
Part C: Set the Report Criteria
In this exercise, the Requisition ID number is known and is used to print the requisition. However, you may set different criteria to print requisitions. For example, you may want to print all the requisitions entered today for a particular Requester. (A Requester is the person who entered the requisition in PeopleSoft.)
• Enter AKRON as the Business Unit. • Enter today’s date in the From Date and the Through Date fields. • Enter the Requester’s PeopleSoft user ID in the Requester field. • In the Statuses to Include box, click on the Select All button. • At the hold status down arrow, select On hold AND not on hold.
This screenshot shows the criteria set to print all the requisitions entered on 10/01/2014 by the person with the PeopleSoft ID of AZ629PR.
Hold status drop down
Financials Introduction for New Users V9.2 The University of Akron
Ver. 2014.11.25 [email protected] Page 27 These materials may not be reproduced in whole or in part without the express written permission of
The University of Akron.
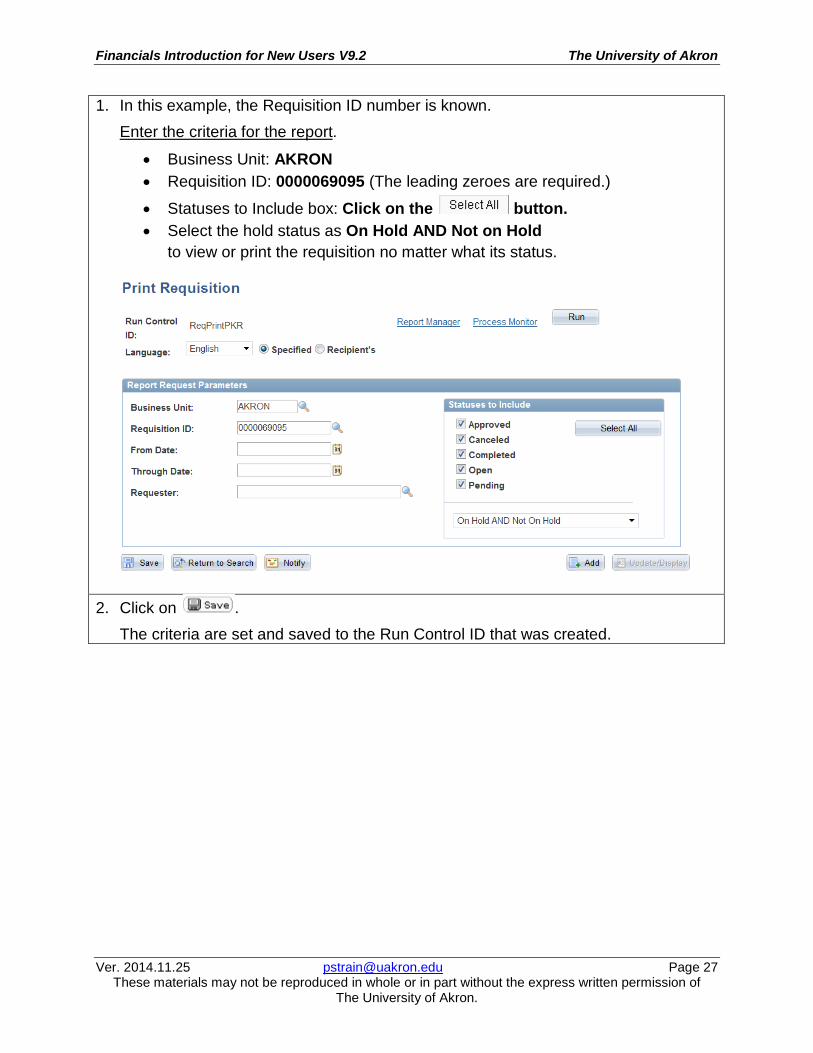
1. In this example, the Requisition ID number is known. Enter the criteria for the report.
• Business Unit: AKRON • Requisition ID: 0000069095 (The leading zeroes are required.)
• Statuses to Include box: Click on the button. • Select the hold status as On Hold AND Not on Hold
to view or print the requisition no matter what its status.
2. Click on . The criteria are set and saved to the Run Control ID that was created.
Financials Introduction for New Users V9.2 The University of Akron
Ver. 2014.11.25 [email protected] Page 28 These materials may not be reproduced in whole or in part without the express written permission of
The University of Akron.
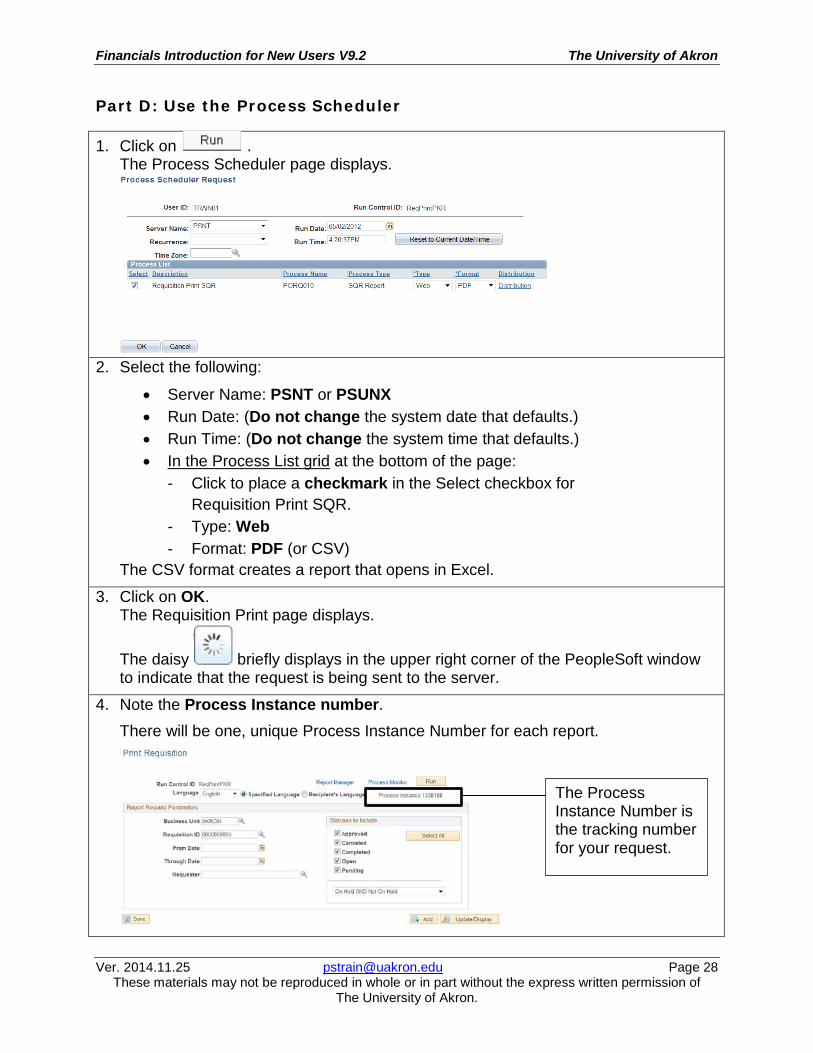
Part D: Use the Process Scheduler
1. Click on . The Process Scheduler page displays.
2. Select the following:
• Server Name: PSNT or PSUNX • Run Date: (Do not change the system date that defaults.) • Run Time: (Do not change the system time that defaults.) • In the Process List grid at the bottom of the page:
- Click to place a checkmark in the Select checkbox for Requisition Print SQR.
- Type: Web - Format: PDF (or CSV)
The CSV format creates a report that opens in Excel.
3. Click on OK. The Requisition Print page displays.
The daisy briefly displays in the upper right corner of the PeopleSoft window to indicate that the request is being sent to the server.
4. Note the Process Instance number. There will be one, unique Process Instance Number for each report.
The Process Instance Number is the tracking number for your request.

Financials Introduction for New Users V9.2 The University of Akron
Ver. 2014.11.25 [email protected] Page 29 These materials may not be reproduced in whole or in part without the express written permission of
The University of Akron.
Part E: Use the Report Manager to Print the Report
1. On the Requisition Print page, click on the link. The Report Manager component displays. The List page is on top.
2. Click on the Administration tab.
The Administration page displays.
Report list grid

Financials Introduction for New Users V9.2 The University of Akron
Ver. 2014.11.25 [email protected] Page 30 These materials may not be reproduced in whole or in part without the express written permission of
The University of Akron.
3. In the Report List grid, look in the Prcs Instance field to locate the Process Instance number for your report. You noted that number on the Requisition Print page. Notes:
• The list of reports shown is for the last 24 hours (1 day). • You may request to see your reports for up to the last 7 calendar days. • You only see the reports that you ran, not the reports of other users. • The list is in order with the most recent report at the top and the “oldest”
report at the bottom.
4. The report is not complete and available for viewing and printing until the Status column reads Posted.
Click on the button to update the display and to see the change in status. The display does not refresh automatically. You may need to click on the Refresh button several times until the Status changes and the column reads Posted. In Report Manager, there are several status levels: N/A The server has not placed your process in the queue, yet.
Scheduled The process was just added to the report requests.
Processing Process Scheduler has initiated the program and is running the process at that time.
Generated The report has finished processing and all files are available for transferring.
Posting The report is in the process of being transferred to the Report Repository.
Posted The report has finished posting and is ready to be viewed.
The Delete button is deactivated. You cannot use it to delete a report. The reports are kept for seven calendar days and automatically deleted on the eighth day.
The Status of your report must be Posted in order for a report link to be available.
Click the report Description link to view the report.
To see reports for up to the last 7 days, change the number of days.
Financials Introduction for New Users V9.2 The University of Akron
Ver. 2014.11.25 [email protected] Page 31 These materials may not be reproduced in whole or in part without the express written permission of
The University of Akron.
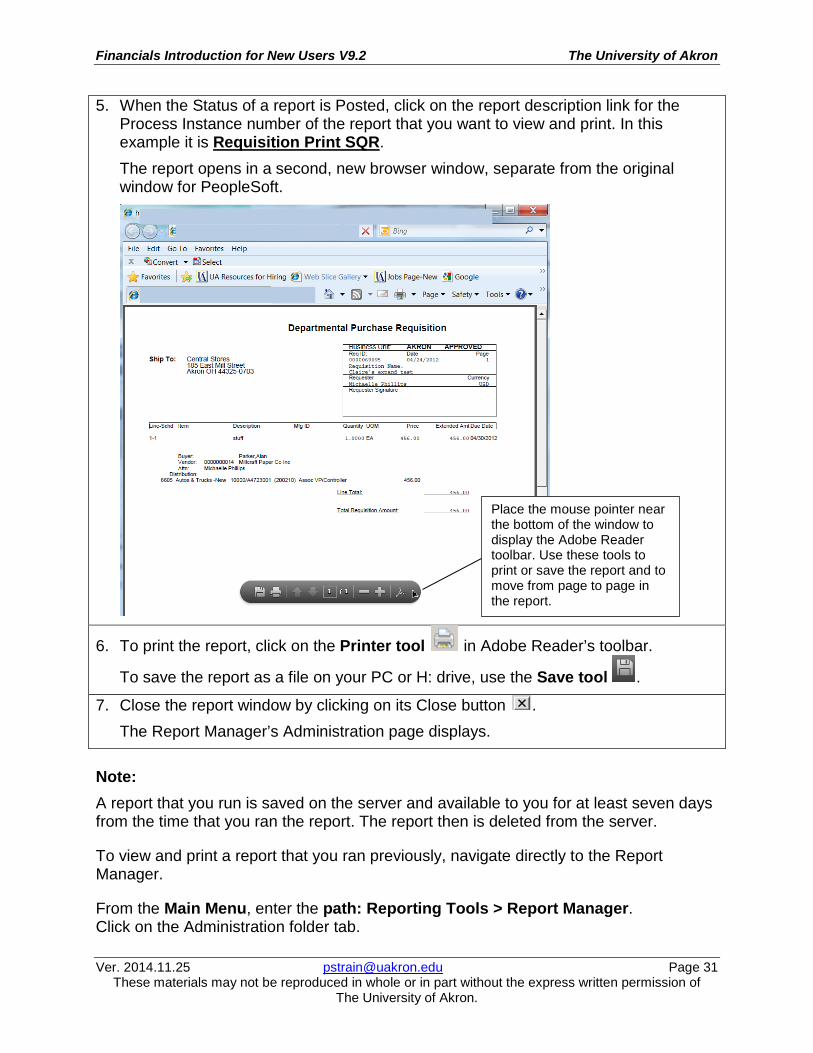
5. When the Status of a report is Posted, click on the report description link for the Process Instance number of the report that you want to view and print. In this example it is Requisition Print SQR. The report opens in a second, new browser window, separate from the original window for PeopleSoft.
6. To print the report, click on the Printer tool in Adobe Reader’s toolbar.
To save the report as a file on your PC or H: drive, use the Save tool .
7. Close the report window by clicking on its Close button . The Report Manager’s Administration page displays.
Note: A report that you run is saved on the server and available to you for at least seven days from the time that you ran the report. The report then is deleted from the server.
To view and print a report that you ran previously, navigate directly to the Report Manager.
From the Main Menu, enter the path: Reporting Tools > Report Manager. Click on the Administration folder tab.
Place the mouse pointer near the bottom of the window to display the Adobe Reader toolbar. Use these tools to print or save the report and to move from page to page in the report.
Financials Introduction for New Users V9.2 The University of Akron
Ver. 2014.11.25 [email protected] Page 32 These materials may not be reproduced in whole or in part without the express written permission of
The University of Akron.
Lesson 8: Use Multiple Windows
The use of more than one PeopleSoft window of the same browser type, such as two Internet Explorer sessions or two tabs in the Internet Explorer, can cause PeopleSoft to function improperly or time out. This occurs because there is not a unique cache or unique cookies for each of the sessions.
If you need to have two PeopleSoft sessions open at the same time, use two different browser types, such as Internet Explorer for the first window and Google Chrome for the second window. This practice results in unique cache/cookies for each PeopleSoft session.

Financials Introduction for New Users V9.2 The University of Akron
Ver. 2014.11.25 [email protected] Page 33 These materials may not be reproduced in whole or in part without the express written permission of
The University of Akron.
Lesson 9: Print a Web Page Using the Browser
To print the PeopleSoft page that is displayed, use the browser’s File > Print Preview command.
If the PeopleSoft web page does not print properly, follow these instructions.
In the Internet Explorer version 9
1. On the PeopleSoft page to be printed, right click with the mouse and choose Select All from the list that displays.
The items on the web page are selected (highlighted).
2. Right click, again, and select Print Preview from the shortcut menu.
The Print Preview window displays.

Financials Introduction for New Users V9.2 The University of Akron
Ver. 2014.11.25 [email protected] Page 34 These materials may not be reproduced in whole or in part without the express written permission of
The University of Akron.
3. In the IE Print Preview toolbar, click on the drop down arrow to choose Only the selected frame (or As selected on screen).
4. To change the page orientation to Landscape, click on the Landscape button. -OR-
Use the Page Setup tool or in the Print Preview toolbar to change the orientation, paper size, margins, printer, or number of copies. Print Preview displays the change.
5. To resize the text on the page(s) to be printed, click on the drop down arrow at
or to select the desired size increase or decrease. Print Preview displays the sizing change.
6. To print, click on the Print button or .
In Google Chrome:
• Right mouse click on the web page. • Select Print. The Print options page displays. • Click on the Print button.
Financials Introduction for New Users V9.2 The University of Akron
Ver. 2014.11.25 [email protected] Page 35 These materials may not be reproduced in whole or in part without the express written permission of
The University of Akron.
Lesson 10: Use an Existing Run Control ID
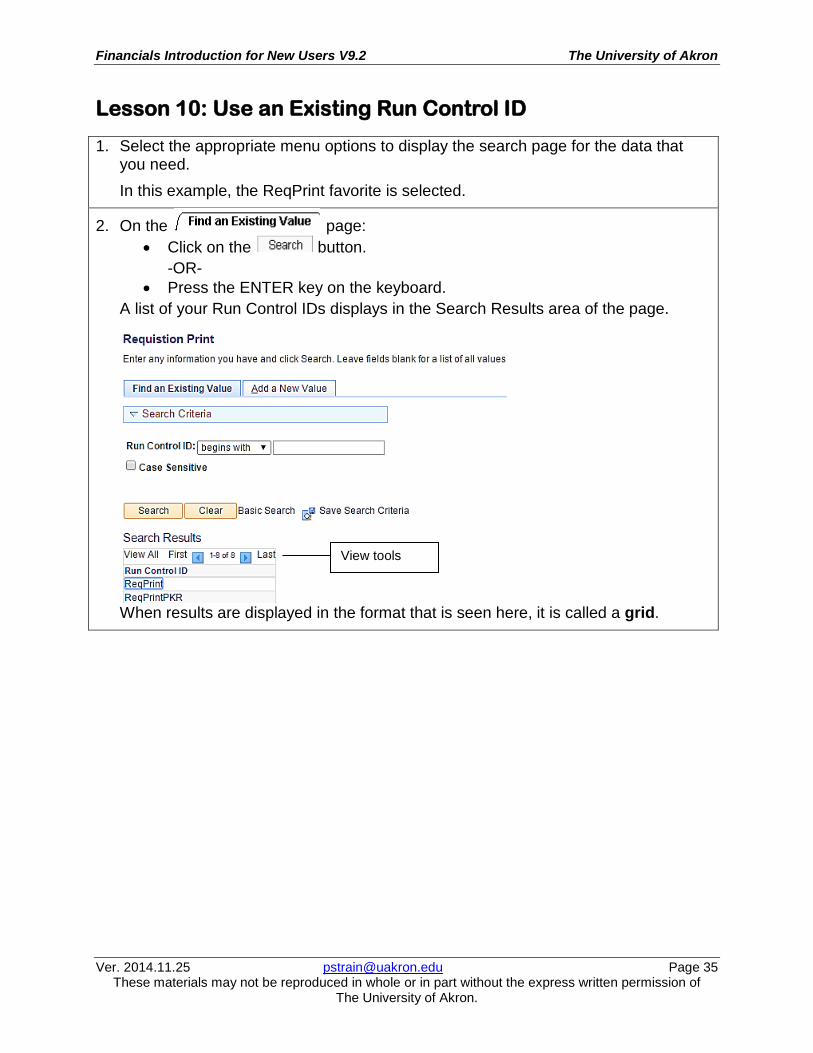
1. Select the appropriate menu options to display the search page for the data that you need. In this example, the ReqPrint favorite is selected.
2. On the page: • Click on the button.
-OR- • Press the ENTER key on the keyboard.
A list of your Run Control IDs displays in the Search Results area of the page.
When results are displayed in the format that is seen here, it is called a grid.
View tools

Financials Introduction for New Users V9.2 The University of Akron
Ver. 2014.11.25 [email protected] Page 36 These materials may not be reproduced in whole or in part without the express written permission of
The University of Akron.
3. Note that the total number of rows retrieved is listed in the header of the grid. In the example shown here, there are 2 rows. Review the navigation that is available in the view tools on the navigation bar of the grid.
The view tools are useful if results are lengthy and are displayed on more than one page. In the example shown here, the results display on a single page, so the view tools are not needed for navigation.
4. In the Search Results grid, click on the link for the Run Control ID that you created earlier in class, ReqPrintXXX (where XXX are your initials). The Requisition Print page is displayed. The criteria is displayed that you used previously for this Run Control ID.
5. You may change any of the criteria.
Save the changes. Run the Requisition Print report.
Select View All to display all the results on one web page. Be prepared to scroll.
Select First to navigate to the first page of results.
Select Last to navigate to the last page of results.
Select the to
navigate to the previous page.
Select the to
navigate to the next page.
Financials Introduction for New Users V9.2 The University of Akron
Ver. 2014.11.25 [email protected] Page 37 These materials may not be reproduced in whole or in part without the express written permission of
The University of Akron.
Lesson 11: Online Inquiry
Discussion
Use the instructions in this lesson to inquire on financial documents, such as requisitions, purchase orders, vouchers, and payments.
When you enter the search criteria to locate the records that you wish to see, be as specific as possible to ensure a shorter wait time for the records to be displayed. If you will use any of the following inquiries on a frequent basis, consider using the Personalize feature available in each inquiry. One advantage to customizing an inquiry screen is that the data that you review most often can appear on the first of the pages to avoid scrolling or clicking on additional folder tabs. Each inquiry has its own customization. Click on the Personalize link in the header of the grid. For a review of customizing an inquiry grid, see Appendix A. To download to Excel the data displayed in the inquiry results grid, CTRL + click on the Download tool in the header of the grid.

Financials Introduction for New Users V9.2 The University of Akron
Ver. 2014.11.25 [email protected] Page 38 These materials may not be reproduced in whole or in part without the express written permission of
The University of Akron.
Requisition Inquiry Page
Use this page to locate the following information: ◘ Status of the requisition ◘ The Date the requisition was created ◘ Total Amount of requisition ◘ Items on a requisition ◘ Approval History ◘ If a Purchase Order has been created ◘ If the items from the requisition have been received ◘ If a Voucher has been created ◘ If payment has been made and the check number
1. From the Main Menu, enter the path: Purchasing > Requisitions > Review Requisition Information > Requisitions The Requisition Inquiry search page displays. Use this page to enter the criteria for the requisitions to review.

Financials Introduction for New Users V9.2 The University of Akron
Ver. 2014.11.25 [email protected] Page 39 These materials may not be reproduced in whole or in part without the express written permission of
The University of Akron.
2. Fill in search criteria. The use of more criteria will return a smaller group of
requisitions. This page may be used to review up to 20 requisitions that match the criteria. The search results from this page are limited to 20 rows. If the search results are greater than 20 rows, the following message displays.
Business Unit AKRON Requisition ID Enter Requisition ID, including any leading zeros.
Example: 0000068609 To select a range of Requisition IDs, enter the beginning Req ID here and the ending Req ID in the To Req field. (Remember that search results are limited to 20 rows.)
Requester This is the PeopleSoft ID for the person who entered the Requisition. This is a case sensitive field. Enter the ID in all capital letters. . You can use the Look Up tool to locate IDs.
For example: Requester Name Search for the Requester by entering his/her name. The format for name is
LastName,FirstName. There is a comma only (NO space) between the last name and first name. This is a case sensitive field. Examples: Doe,Susan or Smith,George You can use the Look Up tool to locate Requesters.
Requisition Date Enter the date on which the Requisition was entered. You can use the Choose a Date tool to display a calendar to select a date. To select a range of dates, enter the beginning date here and the ending date in the To field. (Remember that search results are limited to 20 rows.)
Supplier ID Enter the Supplier (Vendor) ID. To lookup the Supplier ID, click on the Supplier Lookup link.

Financials Introduction for New Users V9.2 The University of Akron
Ver. 2014.11.25 [email protected] Page 40 These materials may not be reproduced in whole or in part without the express written permission of
The University of Akron.
3. In class, the first search is for a specific requisition. At Requisition ID, enter 0000069095.
4. Click on . The Requisitions Inquiry page displays.
5. You can find the following information on the Requisition Details page. ◘ Requisition number ◘ Status (Approved, Denied, Hold, Pending Approval, Canceled, or Complete) ◘ Requester ◘ Requisition Date ◘ Total Amount
6. Click on Return to go back to the Requisition inquiry page. 7. Click on the
Show All Columns tool . All the columns from the two tabs, Details and Status, are displayed on the one page. There are no tabs. Scroll to see all the data.
Use this tool to download the data in the grid to Excel.
The Show All Columns tool
Click on the link for the Requisition ID to display the Requisition Details page. Use the
button to return to the Requisition Inquiry pages.
Case,Test

Financials Introduction for New Users V9.2 The University of Akron
Ver. 2014.11.25 [email protected] Page 41 These materials may not be reproduced in whole or in part without the express written permission of
The University of Akron.
8. Click on the Show tabs tool . The two tabs, Details and Status, are displayed, again.
9. Click on the Status tab to review additional information.
Click on a Y link to obtain additional information.
Click on Search to enter new search criteria.
Financials Introduction for New Users V9.2 The University of Akron
Ver. 2014.11.25 [email protected] Page 42 These materials may not be reproduced in whole or in part without the express written permission of
The University of Akron.
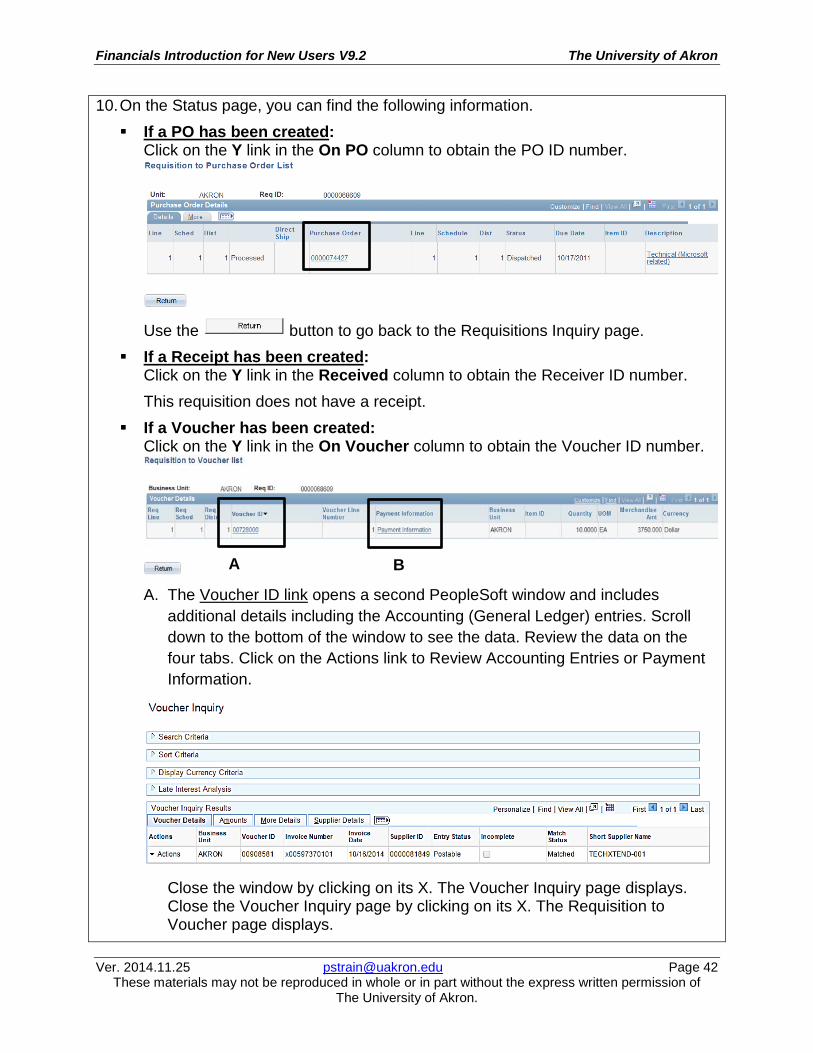
10. On the Status page, you can find the following information. If a PO has been created:
Click on the Y link in the On PO column to obtain the PO ID number.
Use the button to go back to the Requisitions Inquiry page. If a Receipt has been created:
Click on the Y link in the Received column to obtain the Receiver ID number. This requisition does not have a receipt.
If a Voucher has been created: Click on the Y link in the On Voucher column to obtain the Voucher ID number.
A. The Voucher ID link opens a second PeopleSoft window and includes
additional details including the Accounting (General Ledger) entries. Scroll down to the bottom of the window to see the data. Review the data on the four tabs. Click on the Actions link to Review Accounting Entries or Payment Information.
Close the window by clicking on its X. The Voucher Inquiry page displays. Close the Voucher Inquiry page by clicking on its X. The Requisition to Voucher page displays.
A B
Financials Introduction for New Users V9.2 The University of Akron
Ver. 2014.11.25 [email protected] Page 43 These materials may not be reproduced in whole or in part without the express written permission of
The University of Akron.
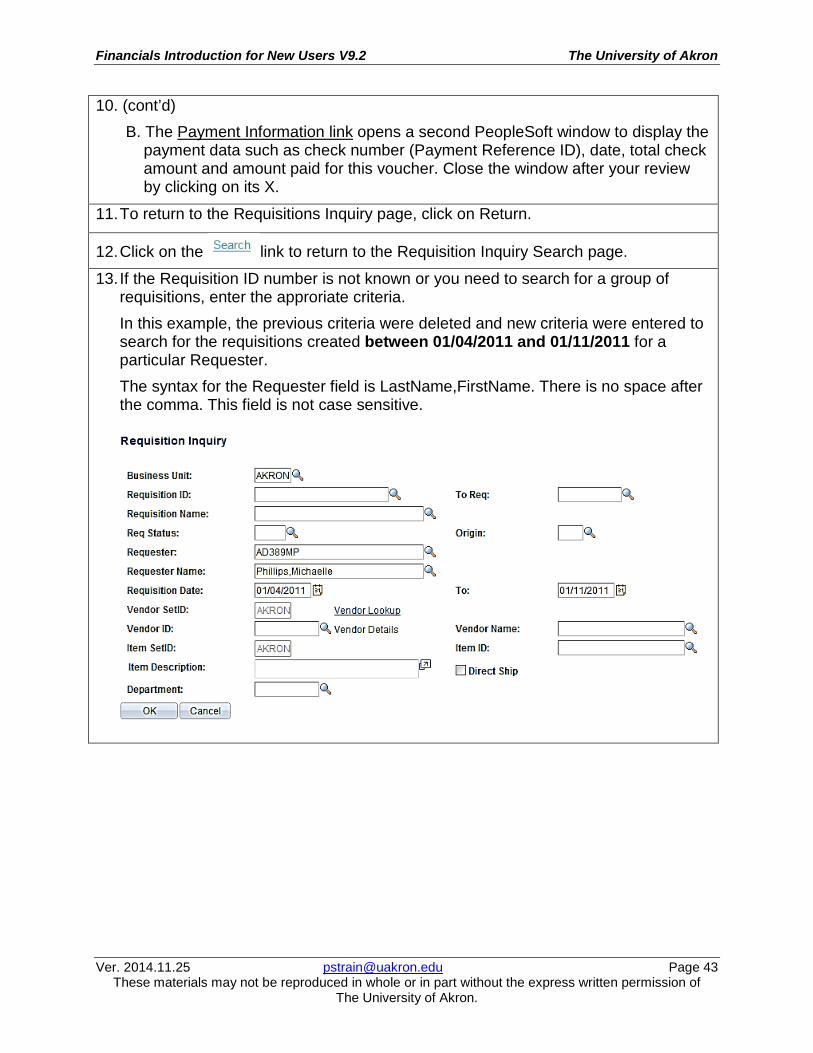
10. (cont’d) B. The Payment Information link opens a second PeopleSoft window to display the
payment data such as check number (Payment Reference ID), date, total check amount and amount paid for this voucher. Close the window after your review by clicking on its X.
11. To return to the Requisitions Inquiry page, click on Return.
12. Click on the link to return to the Requisition Inquiry Search page.
13. If the Requisition ID number is not known or you need to search for a group of requisitions, enter the approriate criteria. In this example, the previous criteria were deleted and new criteria were entered to search for the requisitions created between 01/04/2011 and 01/11/2011 for a particular Requester. The syntax for the Requester field is LastName,FirstName. There is no space after the comma. This field is not case sensitive.
Financials Introduction for New Users V9.2 The University of Akron
Ver. 2014.11.25 [email protected] Page 44 These materials may not be reproduced in whole or in part without the express written permission of
The University of Akron.
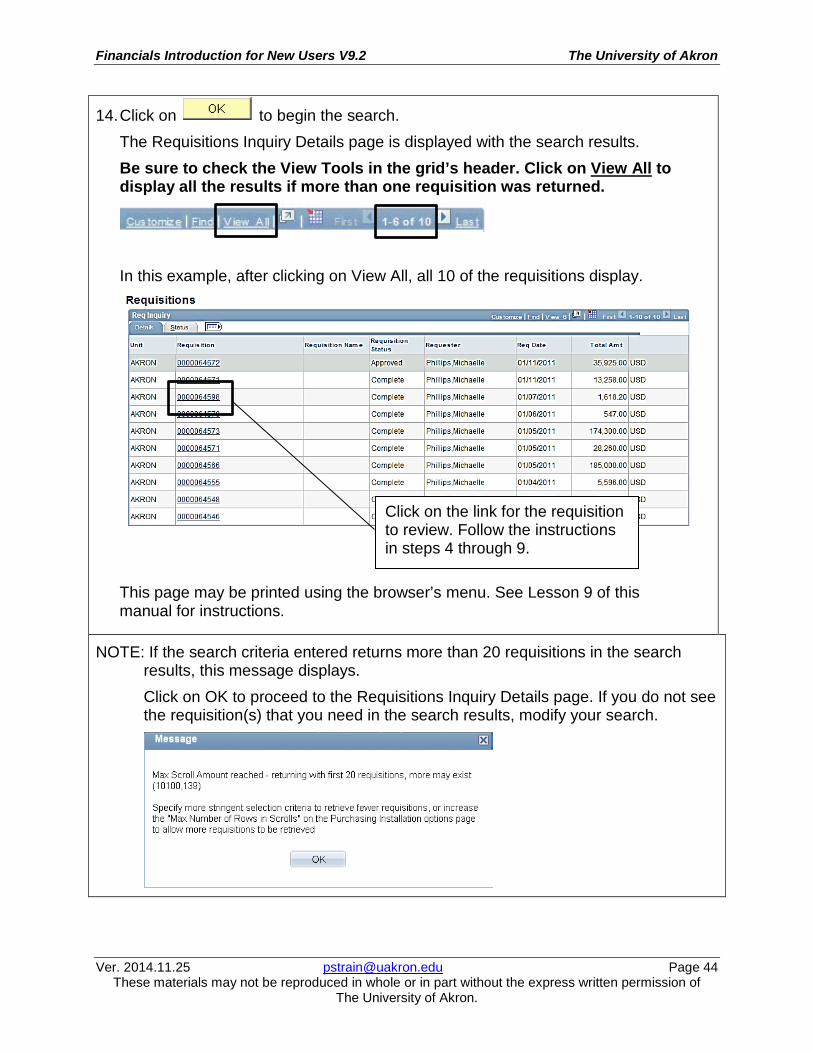
14. Click on to begin the search. The Requisitions Inquiry Details page is displayed with the search results. Be sure to check the View Tools in the grid’s header. Click on View All to display all the results if more than one requisition was returned.
In this example, after clicking on View All, all 10 of the requisitions display.
NOTE: If the search criteria entered returns more than 20 requisitions in the search results, this message displays. Click on OK to proceed to the Requisitions Inquiry Details page. If you do not see the requisition(s) that you need in the search results, modify your search.
Click on the link for the requisition to review. Follow the instructions in steps 4 through 9.
This page may be printed using the browser’s menu. See Lesson 9 of this manual for instructions.

Financials Introduction for New Users V9.2 The University of Akron
Ver. 2014.11.25 [email protected] Page 45 These materials may not be reproduced in whole or in part without the express written permission of
The University of Akron.
Inquire on a Purchase Order
1. From the Main Menu, enter the path: Purchasing > Purchase Orders > Review PO Information > Purchase Orders The Purchase Order Inquiry search page displays.
2. Enter search criteria to locate the Purchase Order(s) that you need.
To search by a Purchase Order ID:
-OR-
3. Click on . Select from the search results at the bottom of the page.
To search by a Purchase Order ID, enter the ID without leading zeroes and select contains at the down arrow. -OR- Enter the ID with leading zeroes and select begins with at the down arrow.
Financials Introduction for New Users V9.2 The University of Akron
Ver. 2014.11.25 [email protected] Page 46 These materials may not be reproduced in whole or in part without the express written permission of
The University of Akron.
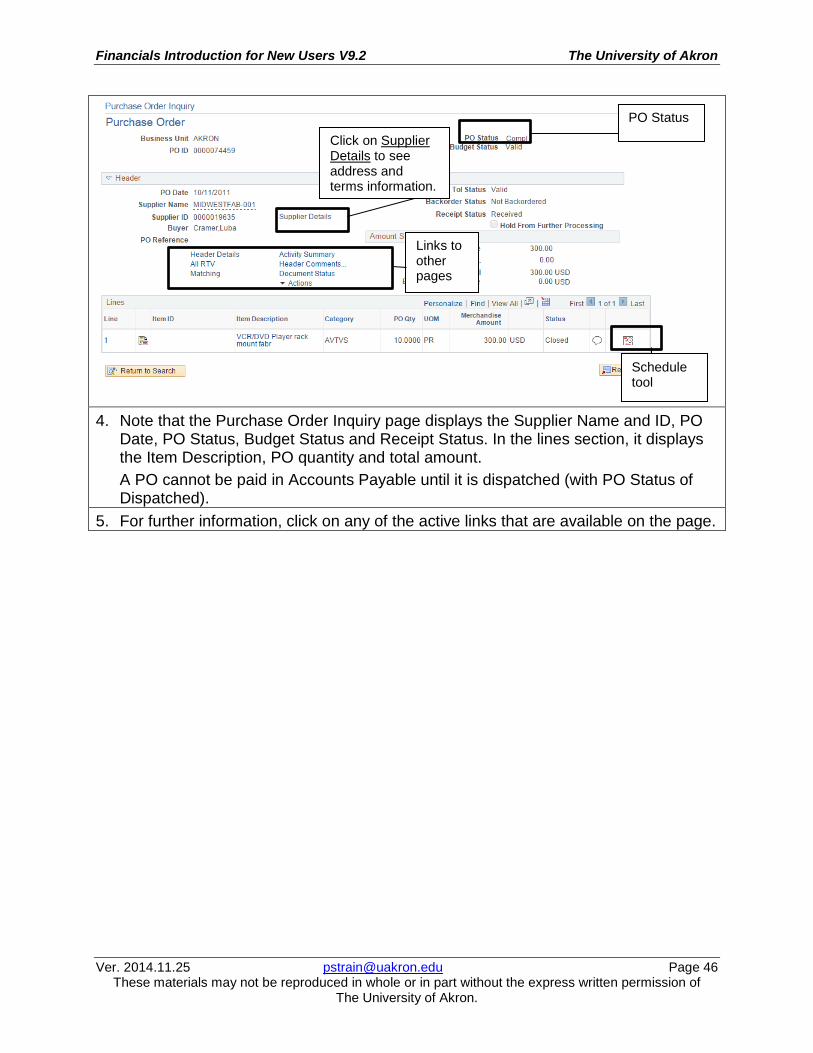
4. Note that the Purchase Order Inquiry page displays the Supplier Name and ID, PO Date, PO Status, Budget Status and Receipt Status. In the lines section, it displays the Item Description, PO quantity and total amount. A PO cannot be paid in Accounts Payable until it is dispatched (with PO Status of Dispatched).
5. For further information, click on any of the active links that are available on the page.
Links to other pages
Click on Supplier Details to see address and terms information.
Schedule tool
PO Status
Financials Introduction for New Users V9.2 The University of Akron
Ver. 2014.11.25 [email protected] Page 47 These materials may not be reproduced in whole or in part without the express written permission of
The University of Akron.
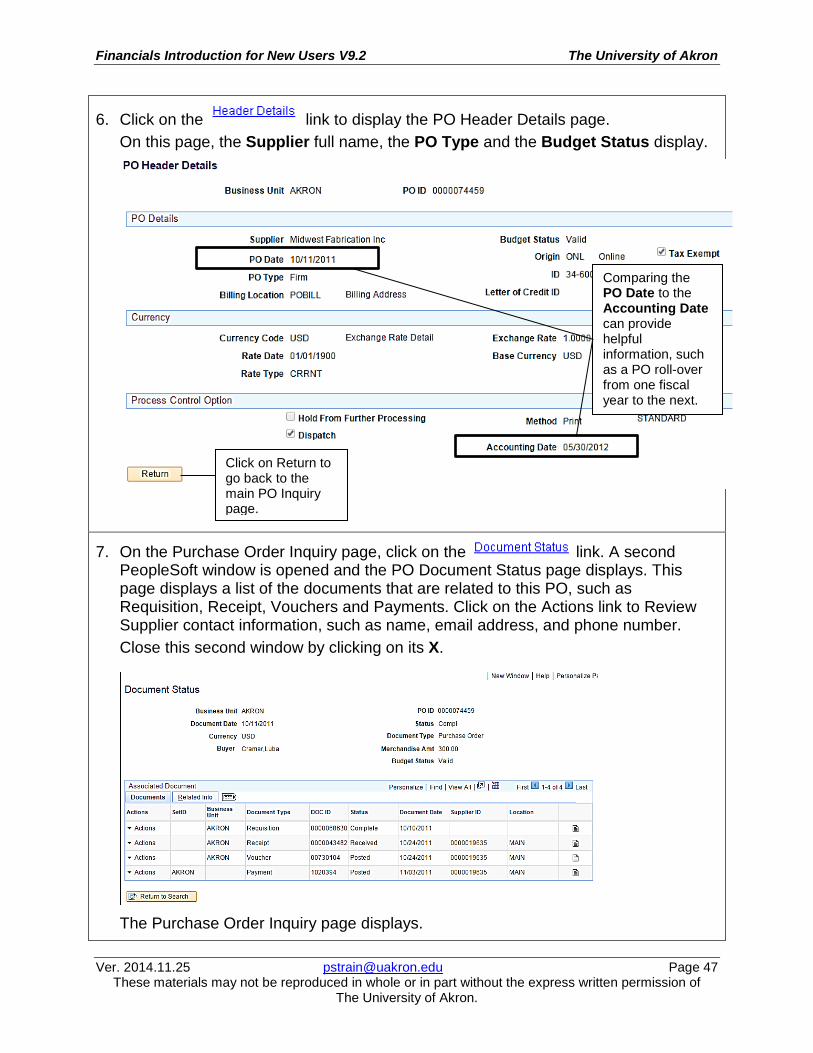
6. Click on the link to display the PO Header Details page. On this page, the Supplier full name, the PO Type and the Budget Status display.
7. On the Purchase Order Inquiry page, click on the link. A second PeopleSoft window is opened and the PO Document Status page displays. This page displays a list of the documents that are related to this PO, such as Requisition, Receipt, Vouchers and Payments. Click on the Actions link to Review Supplier contact information, such as name, email address, and phone number. Close this second window by clicking on its X.
The Purchase Order Inquiry page displays.
Comparing the PO Date to the Accounting Date can provide helpful information, such as a PO roll-over from one fiscal year to the next.
Click on Return to go back to the main PO Inquiry page.

Financials Introduction for New Users V9.2 The University of Akron
Ver. 2014.11.25 [email protected] Page 48 These materials may not be reproduced in whole or in part without the express written permission of
The University of Akron.
8. Click on the Schedule icon . The Schedules page displays with detail information on a PO schedule line, such as Due Date, PO Qty (Quantity), Price, Amount and Status.
9. Click on the Distributions/ChartFields tool . The Distributions for Schedule page for this PO Schedule displays.
The page shown here indicates that the PO is distributed to a single budget.
10. Click on the tab. The Req ID and Requester ID display.
11. Click on . The Schedules page display.
12. On the Schedules page, click on the link near the top of the page. The Purchase Order Inquiry main page displays.
Click on this link to return to the Purchase Order Inquiry main page.
Click on the Distributions/ChartFields icon to review ChartField data.

Financials Introduction for New Users V9.2 The University of Akron
Ver. 2014.11.25 [email protected] Page 49 These materials may not be reproduced in whole or in part without the express written permission of
The University of Akron.
13. When your review of this Purchase Order is complete, click on the button at the bottom of the page to search for another Purchase Order.
Financials Introduction for New Users V9.2 The University of Akron
Ver. 2014.11.25 [email protected] Page 50 These materials may not be reproduced in whole or in part without the express written permission of
The University of Akron.
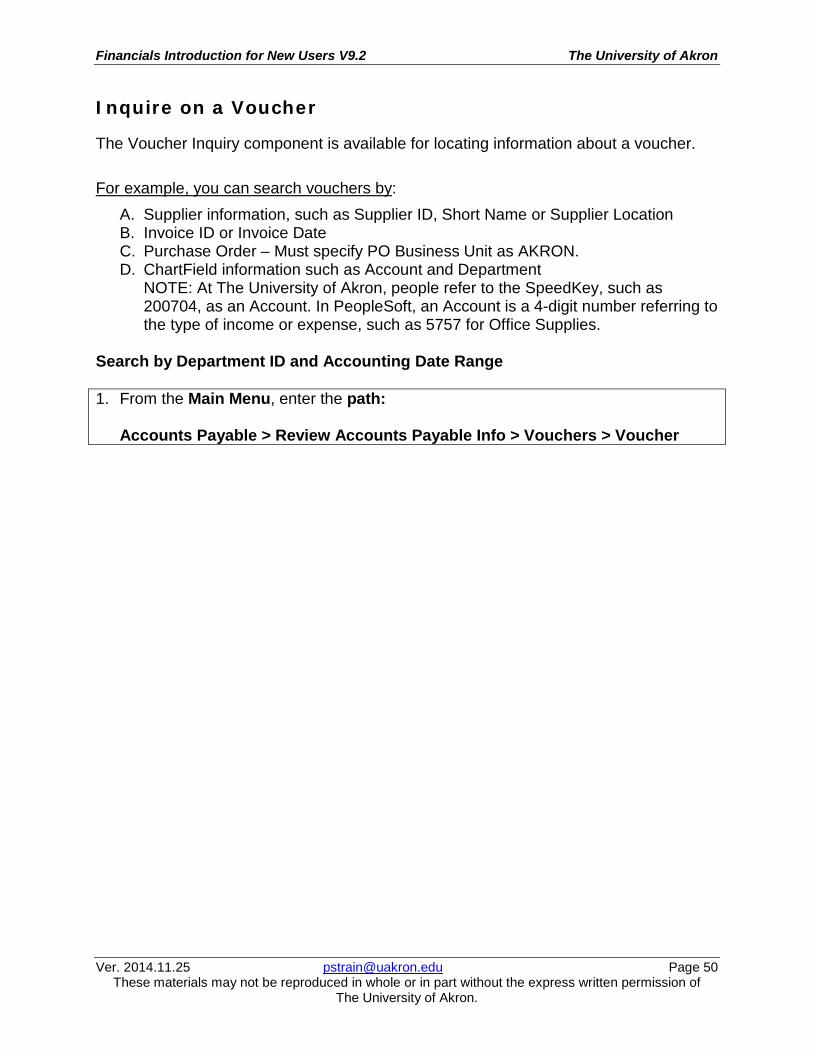
Inquire on a Voucher
The Voucher Inquiry component is available for locating information about a voucher. For example, you can search vouchers by:
A. Supplier information, such as Supplier ID, Short Name or Supplier Location B. Invoice ID or Invoice Date C. Purchase Order – Must specify PO Business Unit as AKRON. D. ChartField information such as Account and Department
NOTE: At The University of Akron, people refer to the SpeedKey, such as 200704, as an Account. In PeopleSoft, an Account is a 4-digit number referring to the type of income or expense, such as 5757 for Office Supplies.
Search by Department ID and Accounting Date Range 1. From the Main Menu, enter the path:
Accounts Payable > Review Accounts Payable Info > Vouchers > Voucher

Financials Introduction for New Users V9.2 The University of Akron
Ver. 2014.11.25 [email protected] Page 51 These materials may not be reproduced in whole or in part without the express written permission of
The University of Akron.
2. In this example, the search criteria are entered for:
Department 000660 Entered Date 02/01/2014 (through) 06/28/2014
3. Click on the tool. The Voucher Inquiry Results are displayed at the bottom of the page. Scroll down to view the Results.
Accounting Dt is the Accounts Payable entry date.
Department is the Dept ChartField value. It is the HR home department (four digits) with two leading zeroes for the Akron campus or a leading 01 (zero, one) for the Wayne campus.
Financials Introduction for New Users V9.2 The University of Akron
Ver. 2014.11.25 [email protected] Page 52 These materials may not be reproduced in whole or in part without the express written permission of
The University of Akron.
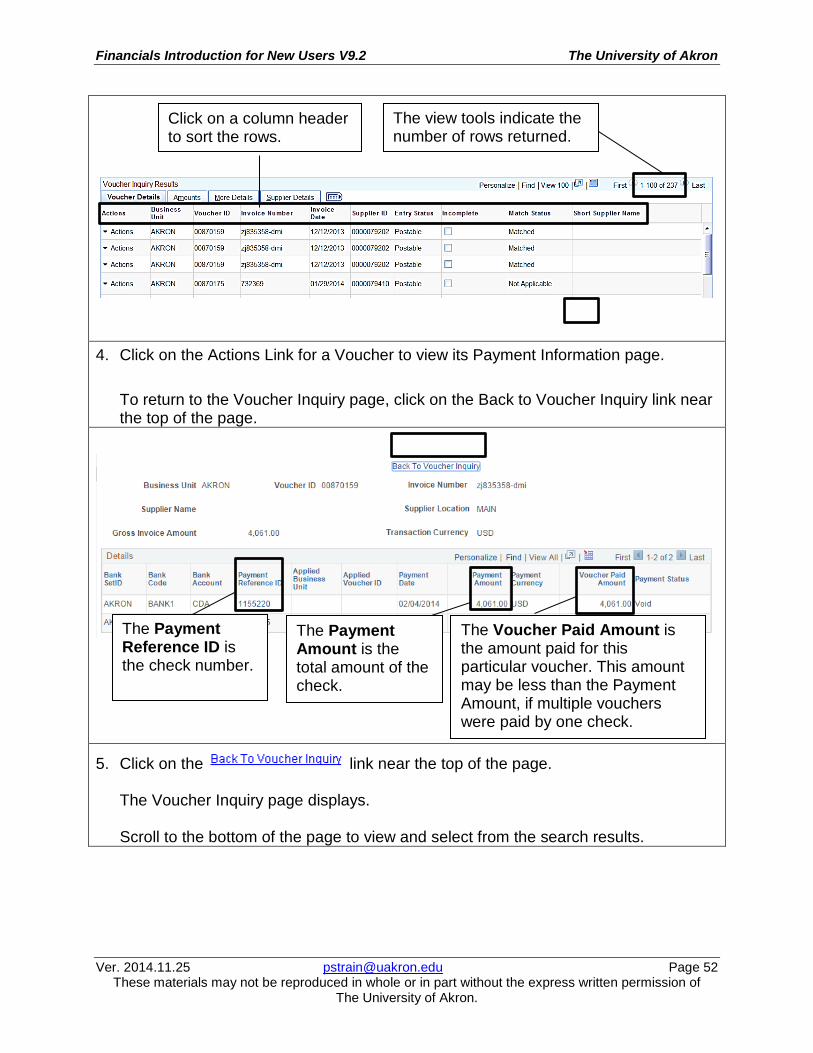
4. Click on the Actions Link for a Voucher to view its Payment Information page. To return to the Voucher Inquiry page, click on the Back to Voucher Inquiry link near the top of the page.
5. Click on the link near the top of the page. The Voucher Inquiry page displays. Scroll to the bottom of the page to view and select from the search results.
The Payment Amount is the total amount of the check.
The Voucher Paid Amount is the amount paid for this particular voucher. This amount may be less than the Payment Amount, if multiple vouchers were paid by one check.
The view tools indicate the number of rows returned.
The Payment Reference ID is the check number.
Click on a column header to sort the rows.

Financials Introduction for New Users V9.2 The University of Akron
Ver. 2014.11.25 [email protected] Page 53 These materials may not be reproduced in whole or in part without the express written permission of
The University of Akron.
6. Click on the Actions link, then, Review Accounting Entries. The Voucher Accounting Entries page displays.
7. Click on the Main Information, Chartfields, or Journal tab to review the accounting
entries and ChartField information for this voucher. The Chartfields tab:

Financials Introduction for New Users V9.2 The University of Akron
Ver. 2014.11.25 [email protected] Page 54 These materials may not be reproduced in whole or in part without the express written permission of
The University of Akron.
Inquire on a Payment
The Payment Inquiry page is reviewed in this lesson. Examples of two searches are given: Part A: Search by Check Number Part B: Search by Supplier ID with Payment Date Range
Part A: Search by Check Number In PeopleSoft, the check number is referred to as the Payment Reference ID.
1. From the Main Menu, enter the path: Accounts Payable > Review Accounts Payable Info > Payments > Payment The Payment Inquiry search page displays.
Searches are available by Supplier Name, supplier ID (Remit Supplier), check number (Reference), Payment Date, Amount (with Amount Rule), and other criteria.
2. Leave the Amount Rule at the default of Any. (If an option other than “Any” is selected at the down arrow, complete the amount field.)
3. Leave the Bank SetID at the default of AKRON.
To search by a check number, enter the number in the Reference field.
Financials Introduction for New Users V9.2 The University of Akron
Ver. 2014.11.25 [email protected] Page 55 These materials may not be reproduced in whole or in part without the express written permission of
The University of Akron.
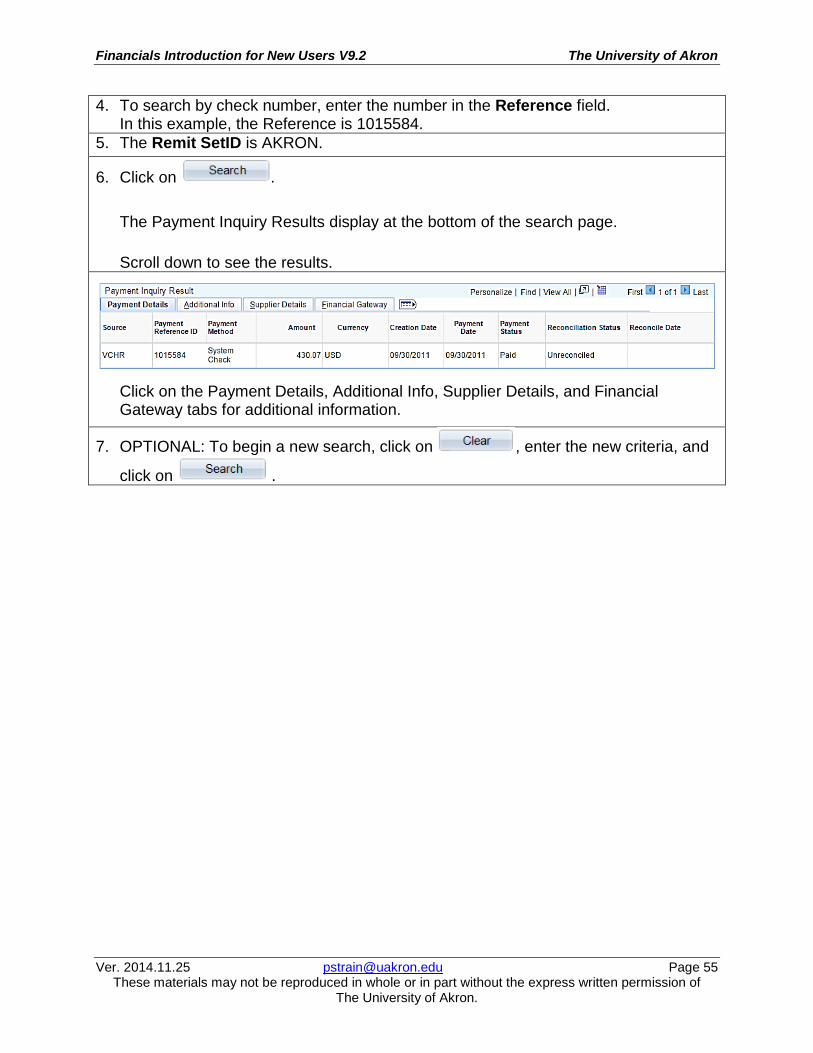
4. To search by check number, enter the number in the Reference field. In this example, the Reference is 1015584.
5. The Remit SetID is AKRON.
6. Click on . The Payment Inquiry Results display at the bottom of the search page. Scroll down to see the results.
Click on the Payment Details, Additional Info, Supplier Details, and Financial Gateway tabs for additional information.
7. OPTIONAL: To begin a new search, click on , enter the new criteria, and
click on .
Financials Introduction for New Users V9.2 The University of Akron
Ver. 2014.11.25 [email protected] Page 56 These materials may not be reproduced in whole or in part without the express written permission of
The University of Akron.
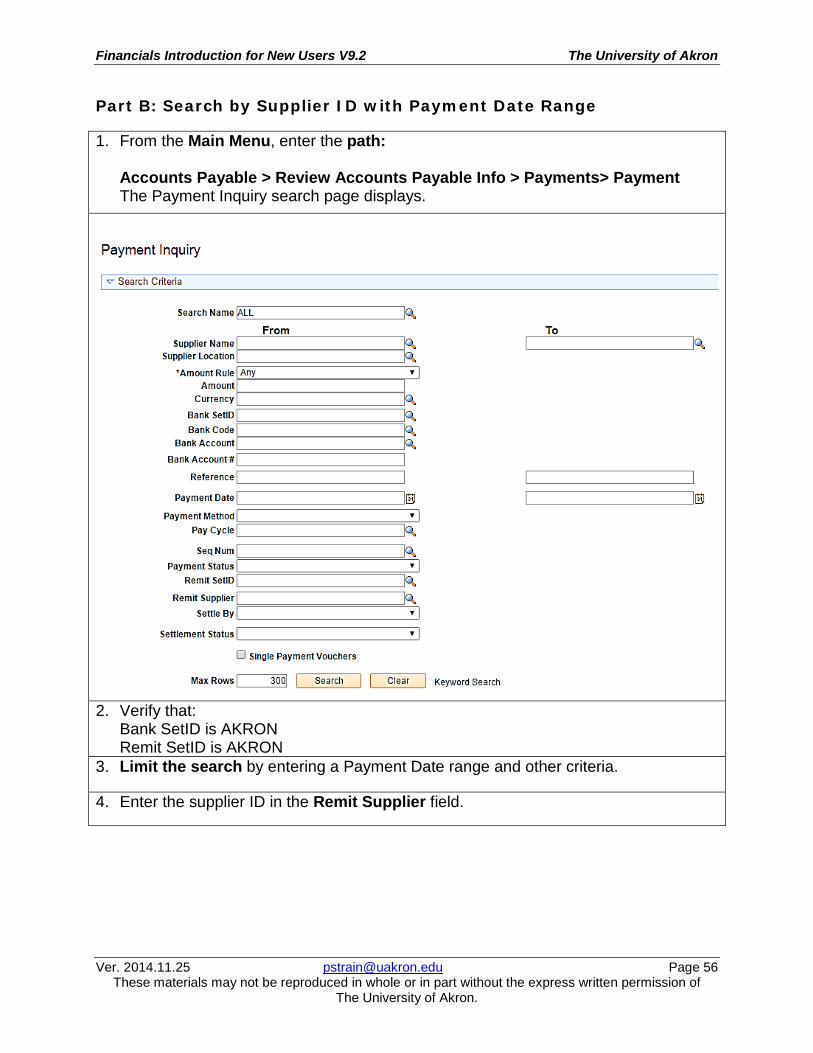
Part B: Search by Supplier ID with Payment Date Range
1. From the Main Menu, enter the path: Accounts Payable > Review Accounts Payable Info > Payments> Payment The Payment Inquiry search page displays.
2. Verify that:
Bank SetID is AKRON Remit SetID is AKRON
3. Limit the search by entering a Payment Date range and other criteria.
4. Enter the supplier ID in the Remit Supplier field.

Financials Introduction for New Users V9.2 The University of Akron
Ver. 2014.11.25 [email protected] Page 57 These materials may not be reproduced in whole or in part without the express written permission of
The University of Akron.
The search shown here is for: Amount Rule of Any Bank SetID of AKRON Payment made between 07/01/2014 and 07/30/2014 Remit SetID of AKRON Remit Supplier 0000000039 (FedEx)
To limit the search by a Payment Date range, enter a beginning date and ending date.
Financials Introduction for New Users V9.2 The University of Akron
Ver. 2014.11.25 [email protected] Page 58 These materials may not be reproduced in whole or in part without the express written permission of
The University of Akron.
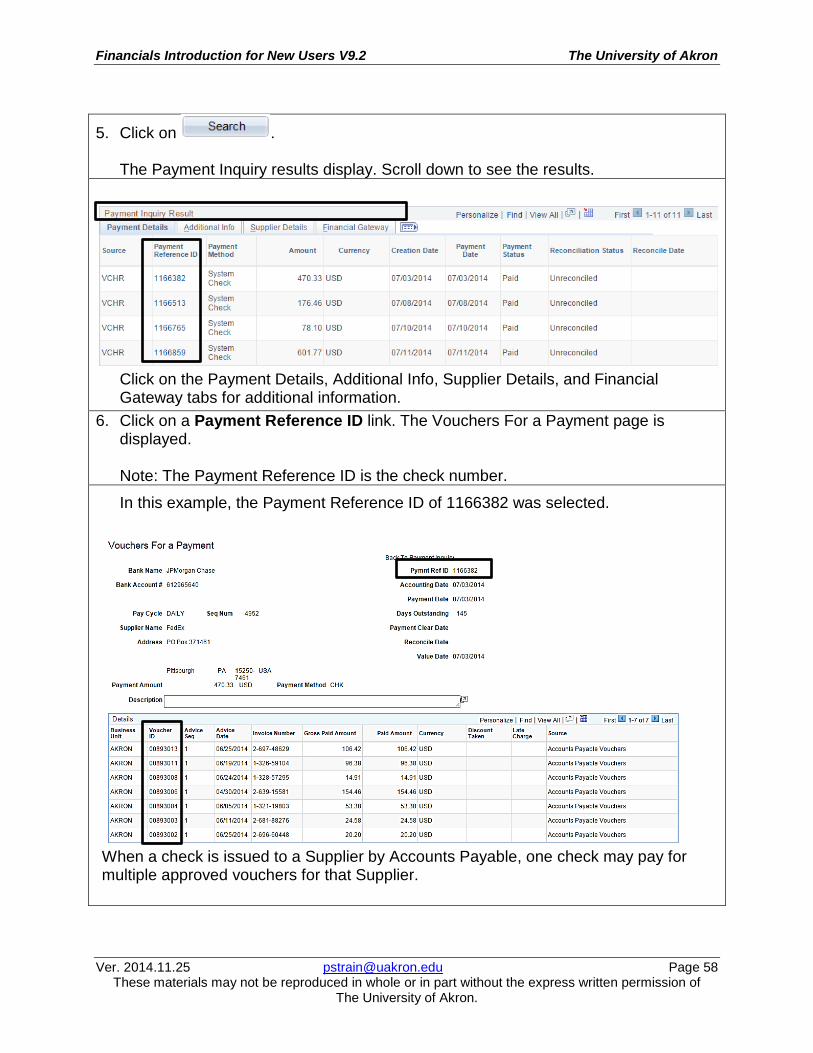
5. Click on . The Payment Inquiry results display. Scroll down to see the results.
Click on the Payment Details, Additional Info, Supplier Details, and Financial Gateway tabs for additional information.
6. Click on a Payment Reference ID link. The Vouchers For a Payment page is displayed. Note: The Payment Reference ID is the check number.
In this example, the Payment Reference ID of 1166382 was selected.
When a check is issued to a Supplier by Accounts Payable, one check may pay for multiple approved vouchers for that Supplier.
Financials Introduction for New Users V9.2 The University of Akron
Ver. 2014.11.25 [email protected] Page 59 These materials may not be reproduced in whole or in part without the express written permission of
The University of Akron.
7. Click on the link to return to the Payment Inquiry page. -OR- Click on a Voucher ID link to go to the Voucher Inquiry page. The page requested displays.
Financials Introduction for New Users V9.2 The University of Akron
Ver. 2014.11.25 [email protected] Page 60 These materials may not be reproduced in whole or in part without the express written permission of
The University of Akron.
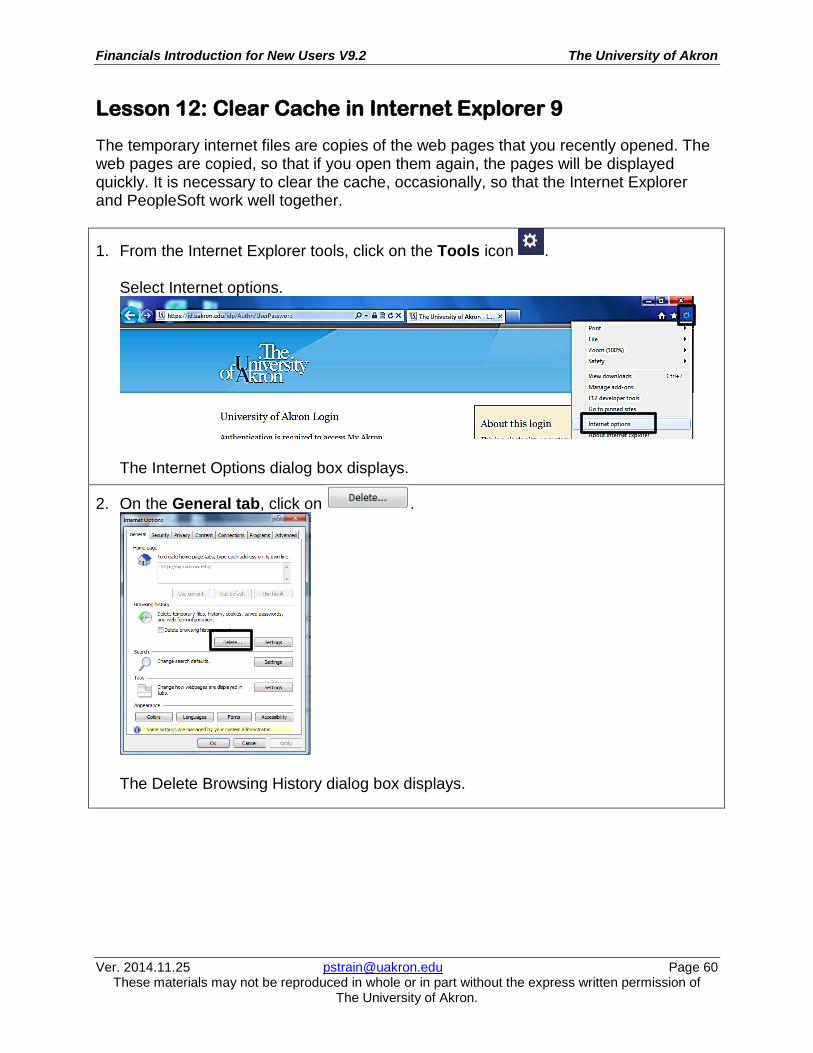
Lesson 12: Clear Cache in Internet Explorer 9
The temporary internet files are copies of the web pages that you recently opened. The web pages are copied, so that if you open them again, the pages will be displayed quickly. It is necessary to clear the cache, occasionally, so that the Internet Explorer and PeopleSoft work well together.
1. From the Internet Explorer tools, click on the Tools icon . Select Internet options.
The Internet Options dialog box displays.
2. On the General tab, click on .
The Delete Browsing History dialog box displays.

Financials Introduction for New Users V9.2 The University of Akron
Ver. 2014.11.25 [email protected] Page 61 These materials may not be reproduced in whole or in part without the express written permission of
The University of Akron.
3. Mark the three checkboxes as shown here.
4. Click on A message will display while the files are being deleted. If you have not cleared cache recently, this may take a minute or several minutes.
When cache is cleared, the message is no longer seen. The Internet Options box is displayed, as shown in step 2.
5. In the Internet Options dialog box,
click on . 6. Close the Internet Explorer.
This checkmark retains your browser favorites, so they are not deleted.
Financials Introduction for New Users V9.2 The University of Akron
Ver. 2014.11.25 [email protected] Page 62 These materials may not be reproduced in whole or in part without the express written permission of
The University of Akron.
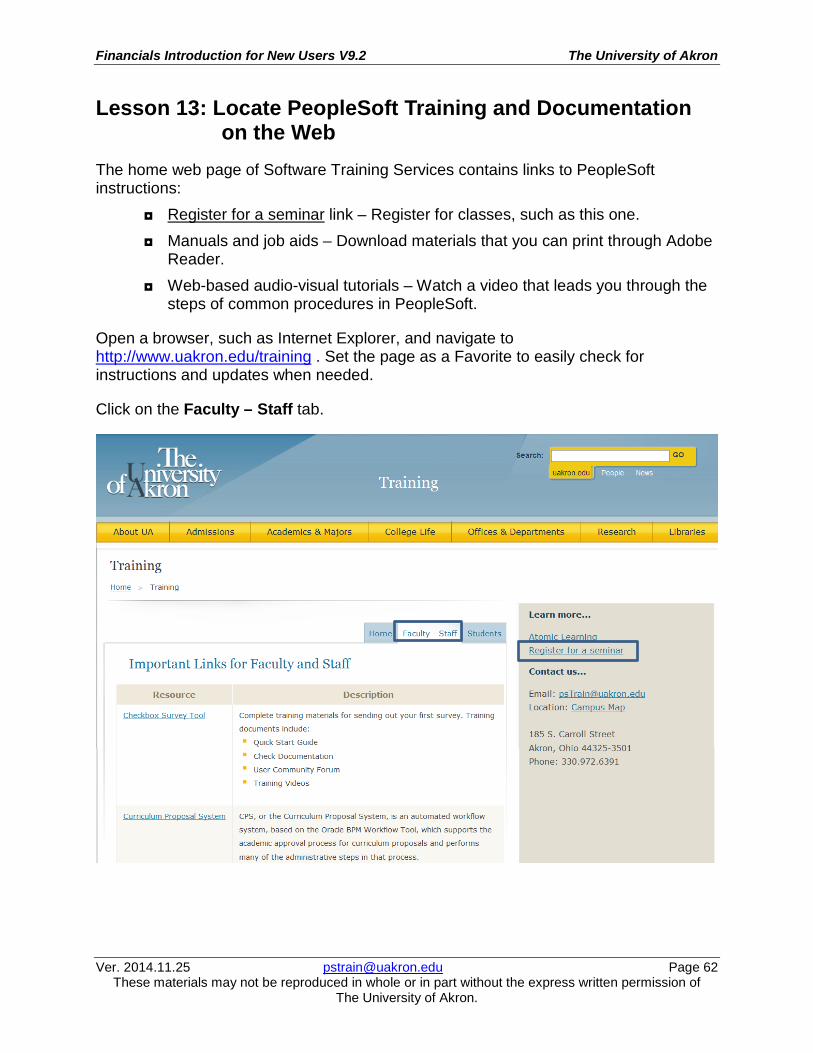
Lesson 13: Locate PeopleSoft Training and Documentation on the Web
The home web page of Software Training Services contains links to PeopleSoft instructions:
◘ Register for a seminar link – Register for classes, such as this one. ◘ Manuals and job aids – Download materials that you can print through Adobe
Reader. ◘ Web-based audio-visual tutorials – Watch a video that leads you through the
steps of common procedures in PeopleSoft.
Open a browser, such as Internet Explorer, and navigate to http://www.uakron.edu/training . Set the page as a Favorite to easily check for instructions and updates when needed.
Click on the Faculty – Staff tab.
Financials Introduction for New Users V9.2 The University of Akron
Ver. 2014.11.25 [email protected] Page 63 These materials may not be reproduced in whole or in part without the express written permission of
The University of Akron.
Appendix A: Personalize an Inquiry Grid
On many of the inquiry pages, there are grids that contain more than one tab of data. Use the Personalize link to reorganize the presentation of the fields on the tabs, so that:
◘ The data needed most frequently appears on one tab, or ◘ The data is in an order that is more logical, or ◘ To reduce or eliminate the need to scroll to locate data
The Personalize link allows you to: ◘ Change the order of the columns (fields) ◘ Change the sort order ◘ Hide columns from view ◘ Freeze columns so that the column appears on every tab (This would be an
identifying field such as the ID number.) ◘ Move columns from one tab to another
In this example, the Voucher Inquiry page is used. The path is:
Main Menu > Accounts Payable > Review Accounts Payable Info > Vouchers > Voucher
The inquiry search results on this page display in a grid with three folder tabs. You will customize the results area.
To personalize a grid, search results first must be displayed.

Financials Introduction for New Users V9.2 The University of Akron
Ver. 2014.11.25 [email protected] Page 64 These materials may not be reproduced in whole or in part without the express written permission of
The University of Akron.
1. From the Main Menu, enter the path:
Accounts Payable > Review Accounts Payable Info > Vouchers > Voucher 2. Enter criteria for the search, as outlined in Lesson 11 of this manual.
The items that match the criteria display in the search results area.
Folder tabs
Personalize link
In this example, the search is for all vouchers with:
• Business Unit of AKRON, and • Supplier SetID of AKRON, and • Accounting Dt from 06/01/2014 through
06/30/2014, and • Department 000660

Financials Introduction for New Users V9.2 The University of Akron
Ver. 2014.11.25 [email protected] Page 65 These materials may not be reproduced in whole or in part without the express written permission of
The University of Akron.
3. Click on . To personalize a grid, search results first must be displayed.
4. Click on the Personalize link. The Personalize Column and Sort Order page displays.
Financials Introduction for New Users V9.2 The University of Akron
Ver. 2014.11.25 [email protected] Page 66 These materials may not be reproduced in whole or in part without the express written permission of
The University of Akron.
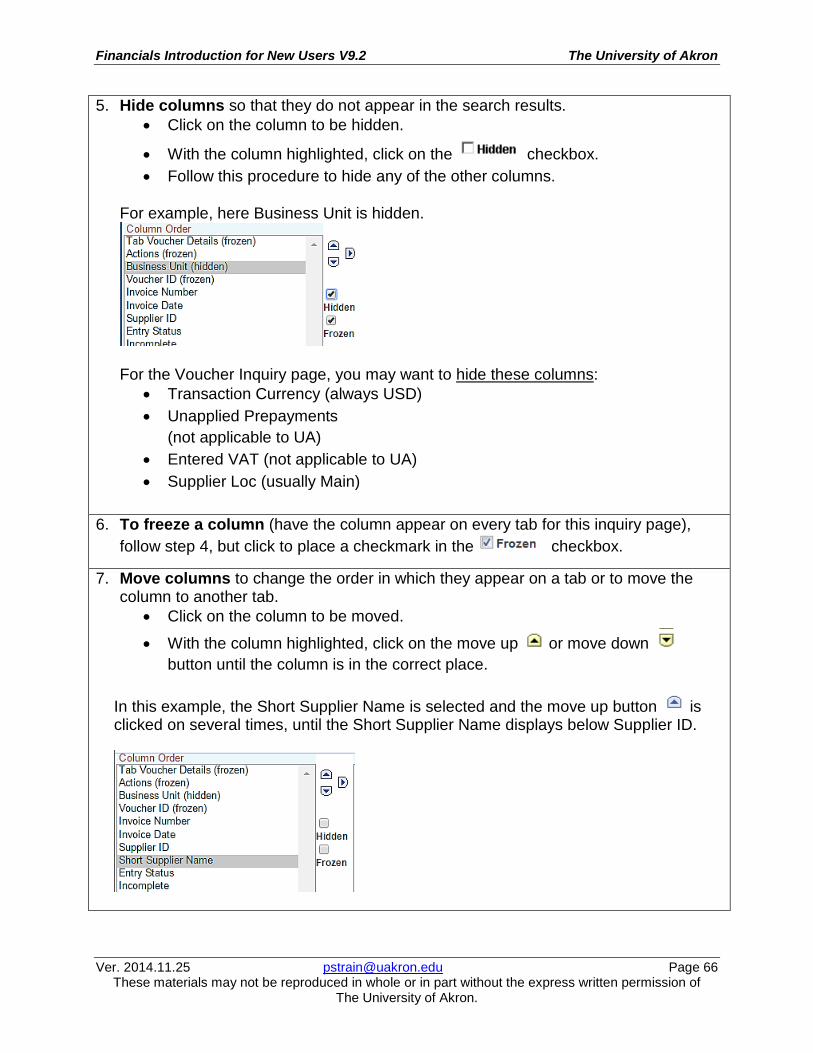
5. Hide columns so that they do not appear in the search results. • Click on the column to be hidden.
• With the column highlighted, click on the checkbox. • Follow this procedure to hide any of the other columns.
For example, here Business Unit is hidden.
For the Voucher Inquiry page, you may want to hide these columns:
• Transaction Currency (always USD) • Unapplied Prepayments
(not applicable to UA) • Entered VAT (not applicable to UA) • Supplier Loc (usually Main)
6. To freeze a column (have the column appear on every tab for this inquiry page), follow step 4, but click to place a checkmark in the checkbox.
7. Move columns to change the order in which they appear on a tab or to move the column to another tab.
• Click on the column to be moved.
• With the column highlighted, click on the move up or move down button until the column is in the correct place.
In this example, the Short Supplier Name is selected and the move up button is clicked on several times, until the Short Supplier Name displays below Supplier ID.
Financials Introduction for New Users V9.2 The University of Akron
Ver. 2014.11.25 [email protected] Page 67 These materials may not be reproduced in whole or in part without the express written permission of
The University of Akron.
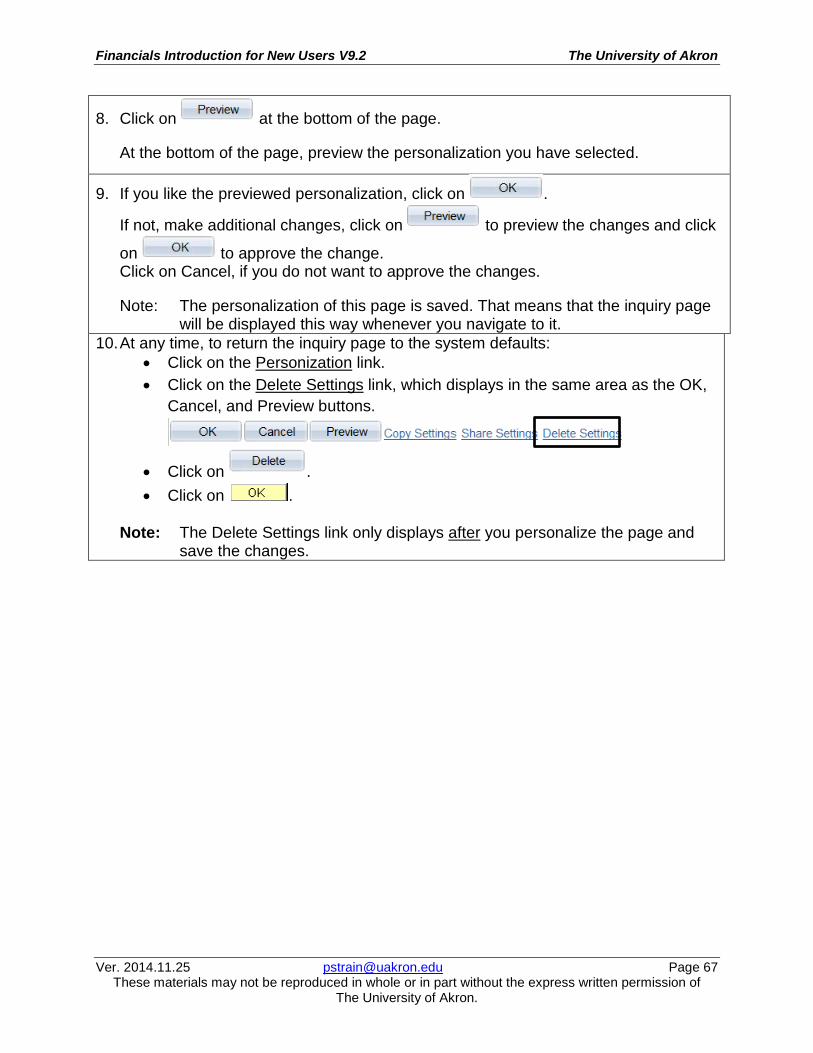
8. Click on at the bottom of the page.
At the bottom of the page, preview the personalization you have selected.
9. If you like the previewed personalization, click on .
If not, make additional changes, click on to preview the changes and click
on to approve the change. Click on Cancel, if you do not want to approve the changes.
Note: The personalization of this page is saved. That means that the inquiry page will be displayed this way whenever you navigate to it.
10. At any time, to return the inquiry page to the system defaults: • Click on the Personization link. • Click on the Delete Settings link, which displays in the same area as the OK,
Cancel, and Preview buttons.
• Click on . • Click on .
Note: The Delete Settings link only displays after you personalize the page and save the changes.
Financials Introduction for New Users V9.2 The University of Akron
Ver. 2014.11.25 [email protected] Page 68 These materials may not be reproduced in whole or in part without the express written permission of
The University of Akron.
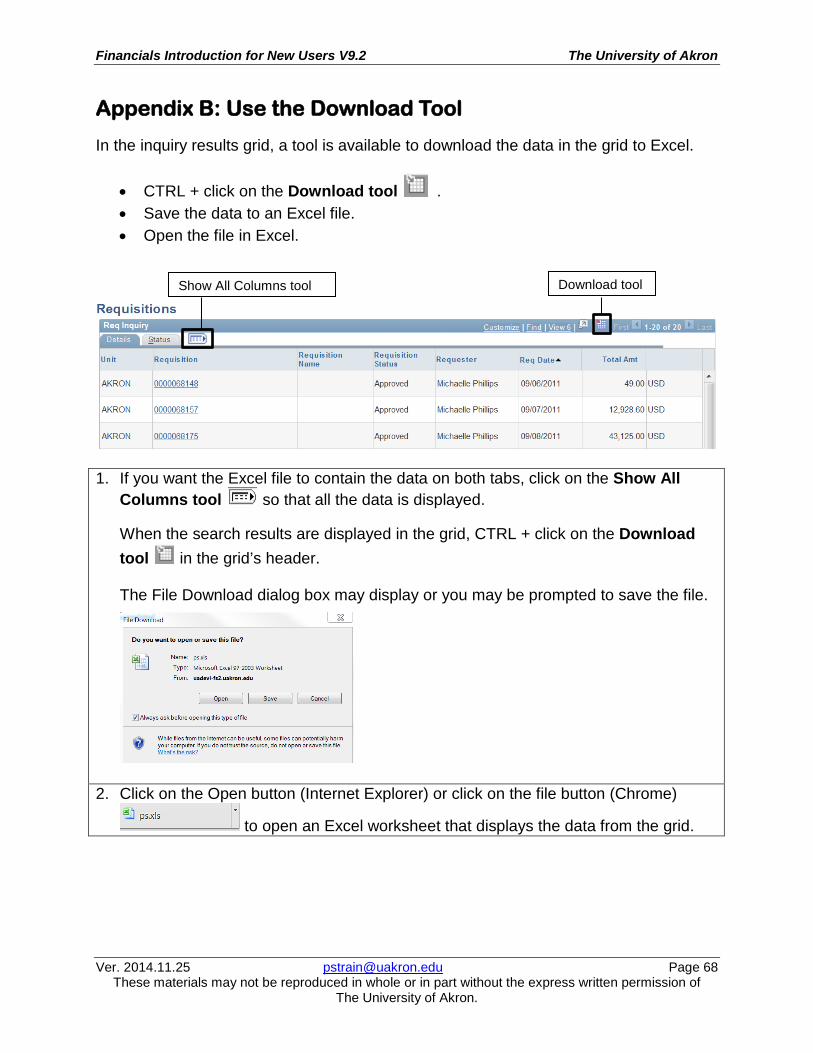
Appendix B: Use the Download Tool
In the inquiry results grid, a tool is available to download the data in the grid to Excel.
• CTRL + click on the Download tool . • Save the data to an Excel file. • Open the file in Excel.
1. If you want the Excel file to contain the data on both tabs, click on the Show All
Columns tool so that all the data is displayed.
When the search results are displayed in the grid, CTRL + click on the Download tool in the grid’s header. The File Download dialog box may display or you may be prompted to save the file.
2. Click on the Open button (Internet Explorer) or click on the file button (Chrome)
to open an Excel worksheet that displays the data from the grid.
Download tool Show All Columns tool

Financials Introduction for New Users V9.2 The University of Akron
Ver. 2014.11.25 [email protected] Page 69 These materials may not be reproduced in whole or in part without the express written permission of
The University of Akron.
3. If this window displays, it may remain on top, so that you cannot see the other messages. Either move the window to the left or right or minimize it. Do not close the window at this time.
4. If this message displays, click on Yes.
5. Excel opens and the data from the grid displays in the worksheet.
6. OPTIONAL: The Excel workbook may open as a read only file, which does not allow
editing. Review the title bar for the words “read-only.” Use the File > Save As command to save the workbook for editing.

Financials Introduction for New Users V9.2 The University of Akron
Ver. 2014.11.25 [email protected] Page 70 These materials may not be reproduced in whole or in part without the express written permission of
The University of Akron.
Appendix C: Change Your Password
The University of Akron’s security administrator recommends that you change your password every 30 days. You are required to change it every 180 days. You will be prompted to do so.
When you create a password, it should be at least 8 characters and contain at least one number and one letter. Special characters, such as !, @ and #, are allowed. One method for choosing a good password is to pick a phrase that you easily can remember and take the first letter of each word in the phrase. Then, randomly insert numbers and special characters between the letters. For example, the phrase Would you like fries with that? could be WUL8FWT?
If you have any questions or concerns about your PeopleSoft ID and password, contact the Support Desk at x6888. 1. From the Main Menu, menu, click on the menu item .
The Change Password page displays.
2. Type your current password in the Current Password field.
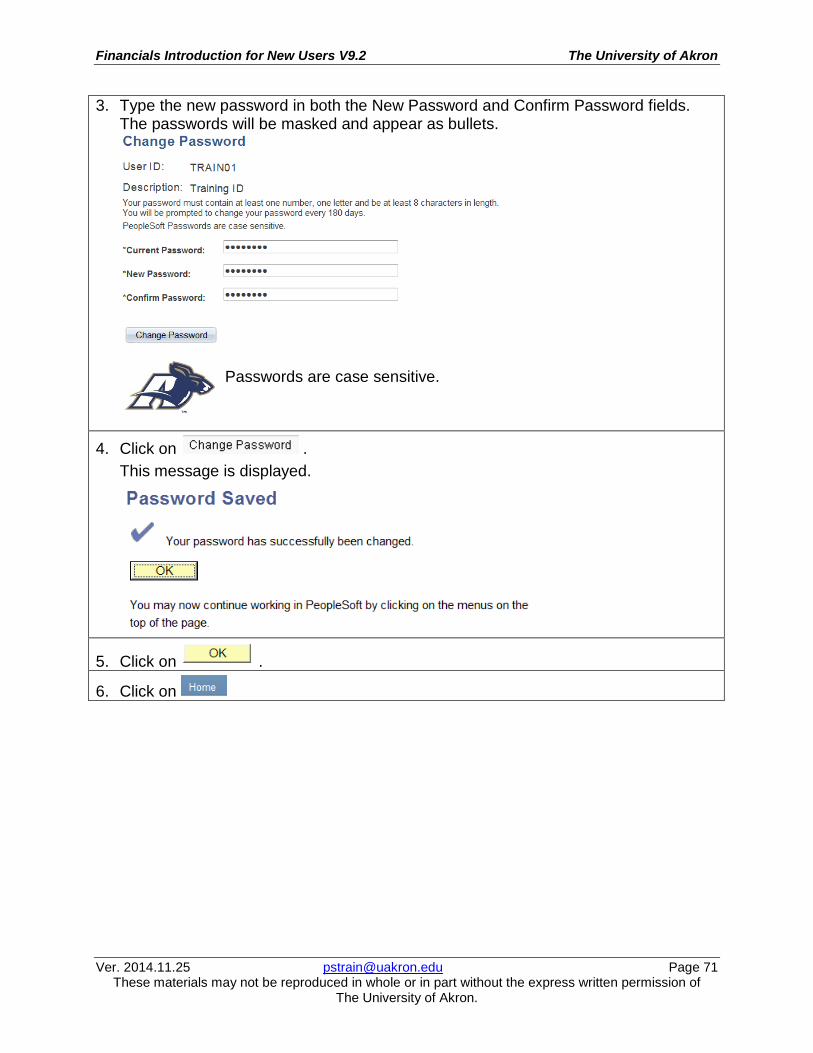
Financials Introduction for New Users V9.2 The University of Akron
Ver. 2014.11.25 [email protected] Page 71 These materials may not be reproduced in whole or in part without the express written permission of
The University of Akron.
3. Type the new password in both the New Password and Confirm Password fields. The passwords will be masked and appear as bullets.
Passwords are case sensitive.
4. Click on . This message is displayed.
5. Click on .
6. Click on
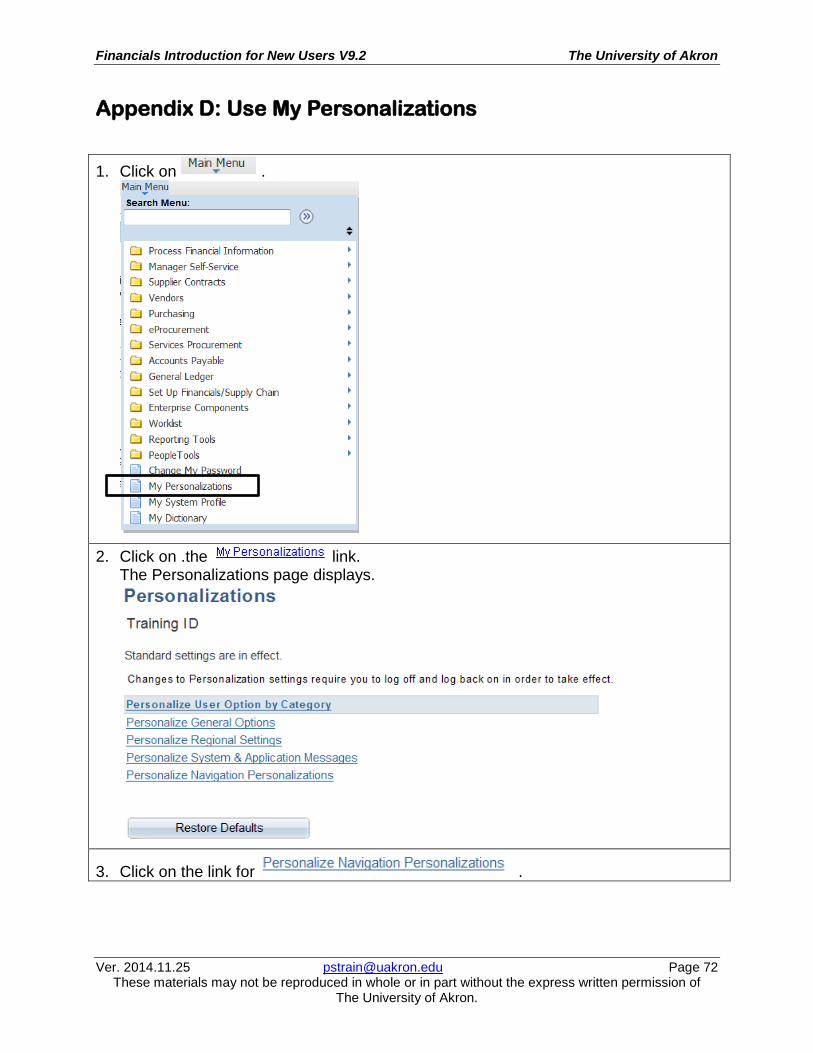
Financials Introduction for New Users V9.2 The University of Akron
Ver. 2014.11.25 [email protected] Page 72 These materials may not be reproduced in whole or in part without the express written permission of
The University of Akron.
Appendix D: Use My Personalizations
1. Click on .
2. Click on .the link. The Personalizations page displays.
3. Click on the link for .
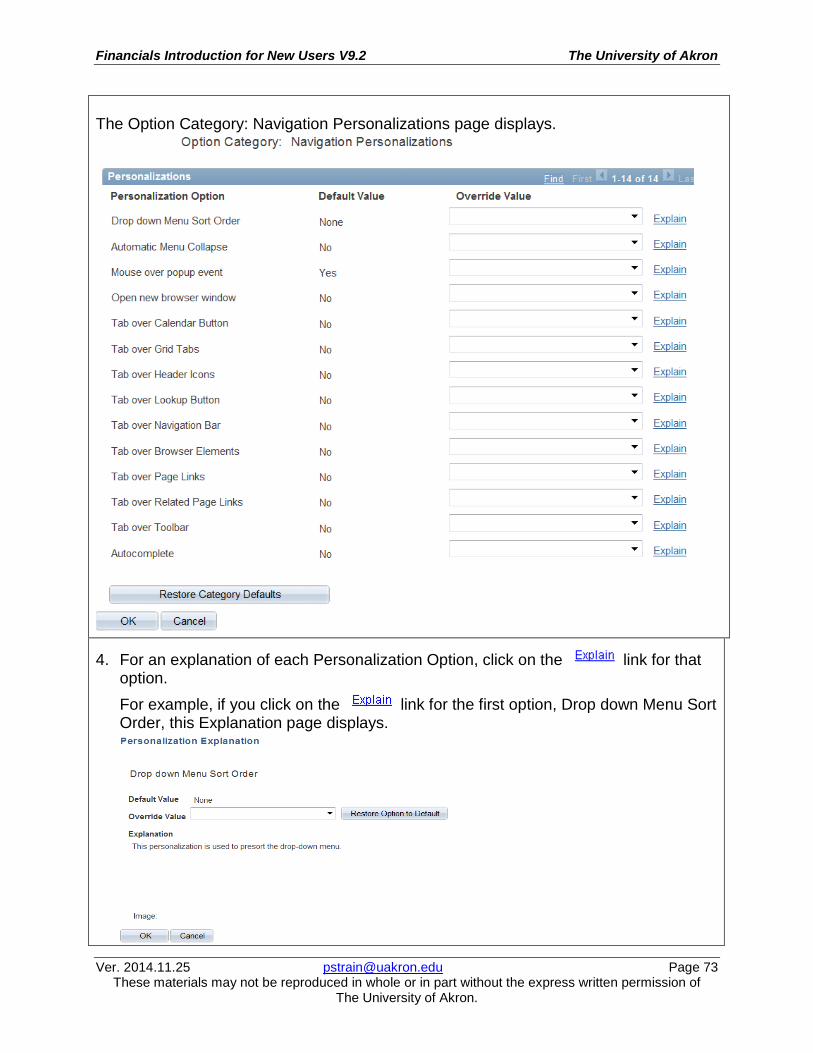
Financials Introduction for New Users V9.2 The University of Akron
Ver. 2014.11.25 [email protected] Page 73 These materials may not be reproduced in whole or in part without the express written permission of
The University of Akron.
The Option Category: Navigation Personalizations page displays.
4. For an explanation of each Personalization Option, click on the link for that option. For example, if you click on the link for the first option, Drop down Menu Sort Order, this Explanation page displays.
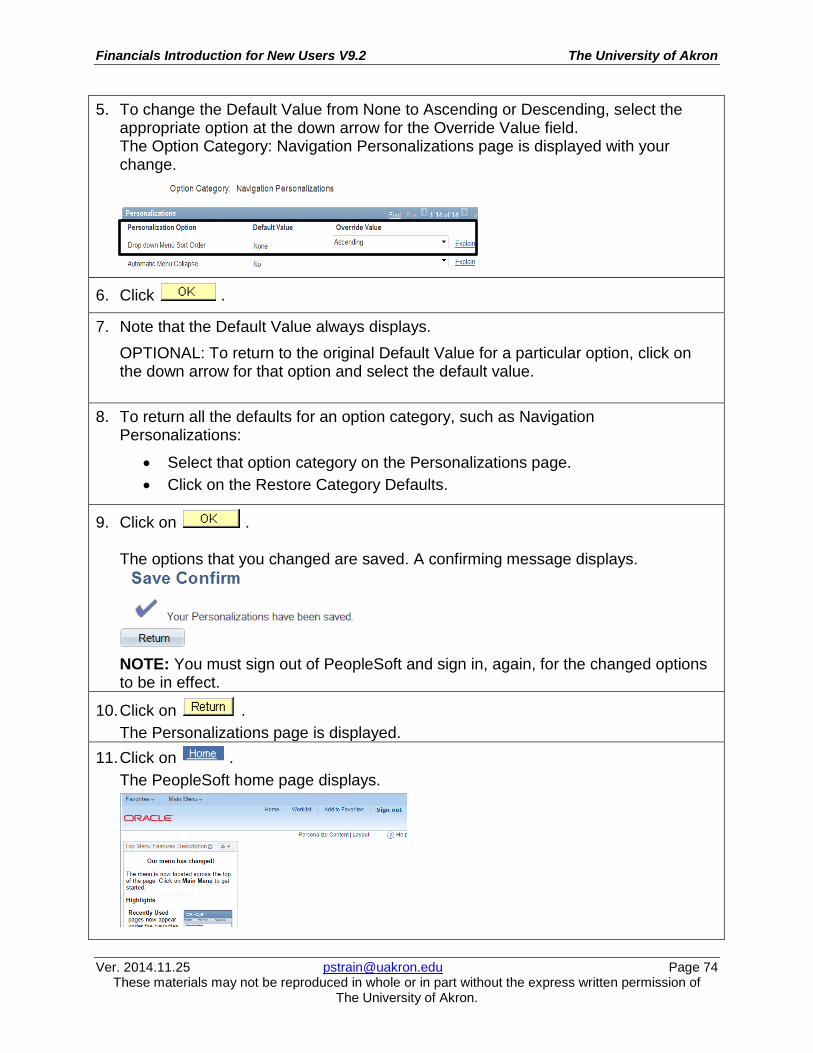
Financials Introduction for New Users V9.2 The University of Akron
Ver. 2014.11.25 [email protected] Page 74 These materials may not be reproduced in whole or in part without the express written permission of
The University of Akron.
5. To change the Default Value from None to Ascending or Descending, select the appropriate option at the down arrow for the Override Value field. The Option Category: Navigation Personalizations page is displayed with your change.
6. Click .
7. Note that the Default Value always displays. OPTIONAL: To return to the original Default Value for a particular option, click on the down arrow for that option and select the default value.
8. To return all the defaults for an option category, such as Navigation Personalizations:
• Select that option category on the Personalizations page. • Click on the Restore Category Defaults.
9. Click on .
The options that you changed are saved. A confirming message displays.
NOTE: You must sign out of PeopleSoft and sign in, again, for the changed options to be in effect.
10. Click on . The Personalizations page is displayed.
11. Click on . The PeopleSoft home page displays.

Financials Introduction for New Users V9.2 The University of Akron
Ver. 2014.11.25 [email protected] Page 75 These materials may not be reproduced in whole or in part without the express written permission of
The University of Akron.
Appendix E: Pool Accounts
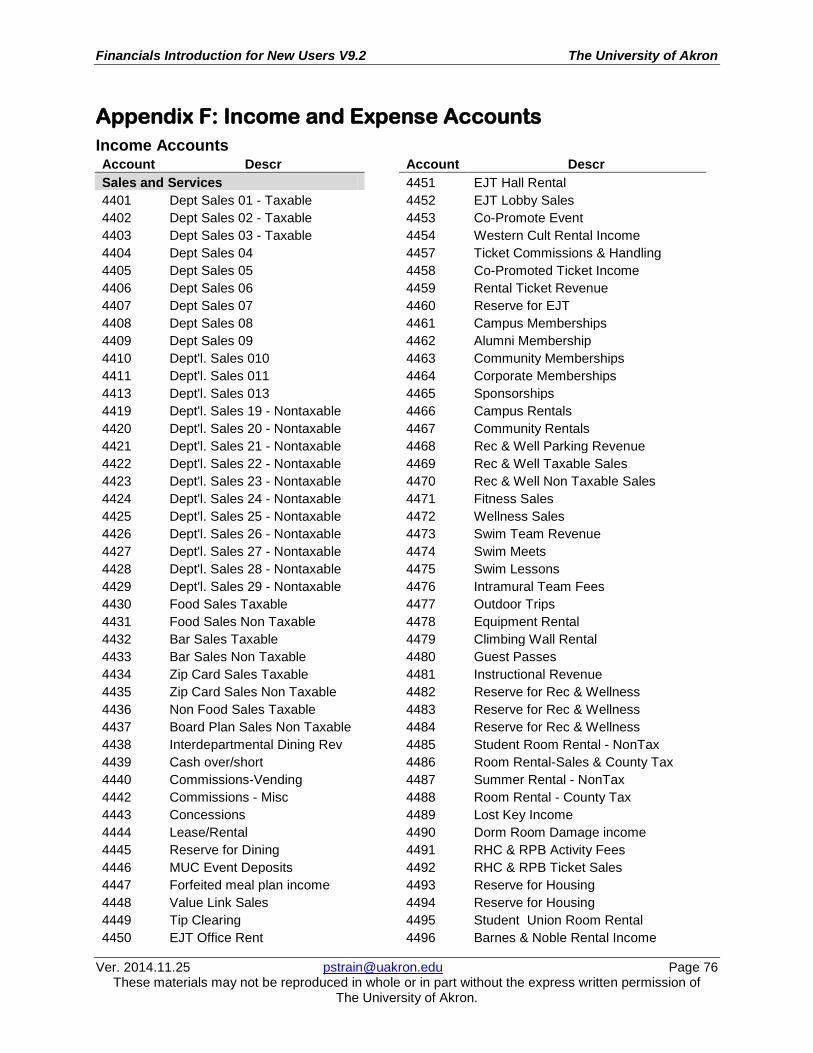
Financials Introduction for New Users V9.2 The University of Akron
Ver. 2014.11.25 [email protected] Page 76 These materials may not be reproduced in whole or in part without the express written permission of
The University of Akron.
Appendix F: Income and Expense Accounts Income Accounts Account Descr
Account Descr
Sales and Services
4451 EJT Hall Rental 4401 Dept Sales 01 - Taxable
4452 EJT Lobby Sales
4402 Dept Sales 02 - Taxable
4453 Co-Promote Event 4403 Dept Sales 03 - Taxable
4454 Western Cult Rental Income
4404 Dept Sales 04
4457 Ticket Commissions & Handling 4405 Dept Sales 05
4458 Co-Promoted Ticket Income
4406 Dept Sales 06
4459 Rental Ticket Revenue 4407 Dept Sales 07
4460 Reserve for EJT
4408 Dept Sales 08
4461 Campus Memberships 4409 Dept Sales 09
4462 Alumni Membership
4410 Dept'l. Sales 010
4463 Community Memberships 4411 Dept'l. Sales 011
4464 Corporate Memberships
4413 Dept'l. Sales 013
4465 Sponsorships 4419 Dept'l. Sales 19 - Nontaxable
4466 Campus Rentals
4420 Dept'l. Sales 20 - Nontaxable
4467 Community Rentals 4421 Dept'l. Sales 21 - Nontaxable
4468 Rec & Well Parking Revenue
4422 Dept'l. Sales 22 - Nontaxable
4469 Rec & Well Taxable Sales 4423 Dept'l. Sales 23 - Nontaxable
4470 Rec & Well Non Taxable Sales
4424 Dept'l. Sales 24 - Nontaxable
4471 Fitness Sales 4425 Dept'l. Sales 25 - Nontaxable
4472 Wellness Sales
4426 Dept'l. Sales 26 - Nontaxable
4473 Swim Team Revenue 4427 Dept'l. Sales 27 - Nontaxable
4474 Swim Meets
4428 Dept'l. Sales 28 - Nontaxable
4475 Swim Lessons 4429 Dept'l. Sales 29 - Nontaxable
4476 Intramural Team Fees
4430 Food Sales Taxable
4477 Outdoor Trips 4431 Food Sales Non Taxable
4478 Equipment Rental
4432 Bar Sales Taxable
4479 Climbing Wall Rental 4433 Bar Sales Non Taxable
4480 Guest Passes
4434 Zip Card Sales Taxable
4481 Instructional Revenue 4435 Zip Card Sales Non Taxable
4482 Reserve for Rec & Wellness
4436 Non Food Sales Taxable
4483 Reserve for Rec & Wellness 4437 Board Plan Sales Non Taxable
4484 Reserve for Rec & Wellness
4438 Interdepartmental Dining Rev
4485 Student Room Rental - NonTax 4439 Cash over/short
4486 Room Rental-Sales & County Tax
4440 Commissions-Vending
4487 Summer Rental - NonTax 4442 Commissions - Misc
4488 Room Rental - County Tax
4443 Concessions
4489 Lost Key Income 4444 Lease/Rental
4490 Dorm Room Damage income
4445 Reserve for Dining
4491 RHC & RPB Activity Fees 4446 MUC Event Deposits
4492 RHC & RPB Ticket Sales
4447 Forfeited meal plan income
4493 Reserve for Housing 4448 Value Link Sales
4494 Reserve for Housing
4449 Tip Clearing
4495 Student Union Room Rental 4450 EJT Office Rent
4496 Barnes & Noble Rental Income
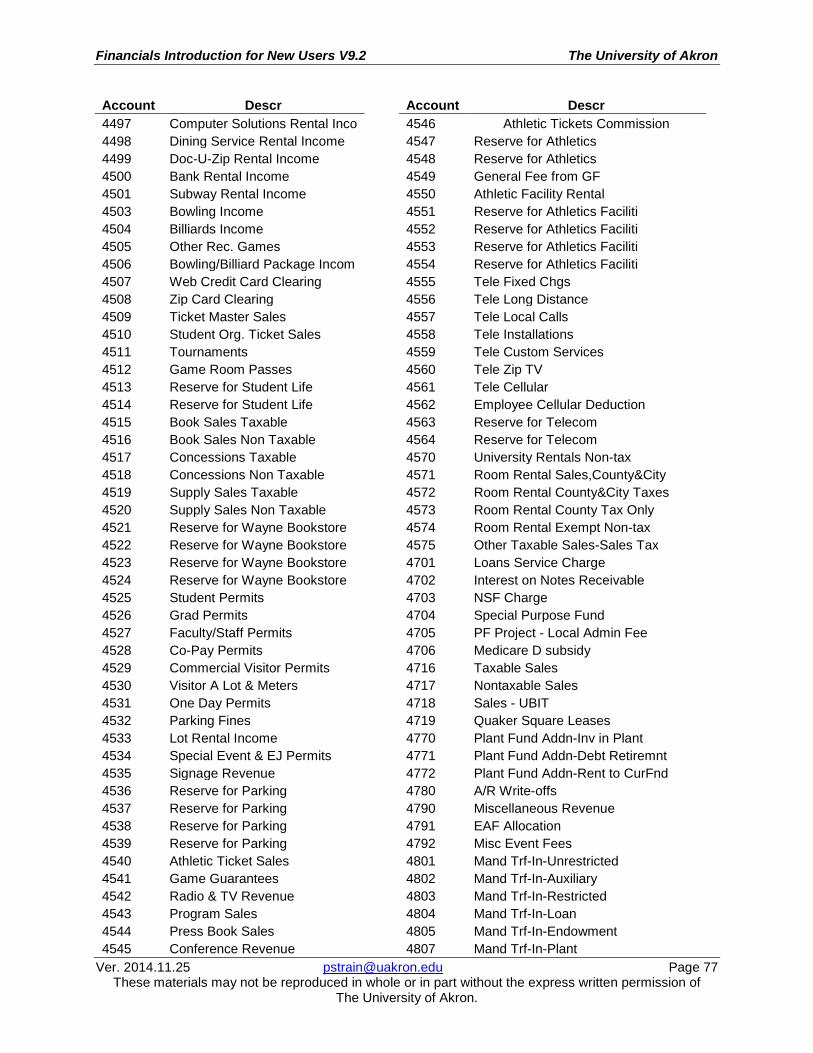
Financials Introduction for New Users V9.2 The University of Akron
Ver. 2014.11.25 [email protected] Page 77 These materials may not be reproduced in whole or in part without the express written permission of
The University of Akron.
Account Descr
Account Descr 4497 Computer Solutions Rental Inco
4546 Athletic Tickets Commission
4498 Dining Service Rental Income
4547 Reserve for Athletics 4499 Doc-U-Zip Rental Income
4548 Reserve for Athletics
4500 Bank Rental Income
4549 General Fee from GF 4501 Subway Rental Income
4550 Athletic Facility Rental
4503 Bowling Income
4551 Reserve for Athletics Faciliti 4504 Billiards Income
4552 Reserve for Athletics Faciliti
4505 Other Rec. Games
4553 Reserve for Athletics Faciliti 4506 Bowling/Billiard Package Incom
4554 Reserve for Athletics Faciliti
4507 Web Credit Card Clearing
4555 Tele Fixed Chgs 4508 Zip Card Clearing
4556 Tele Long Distance
4509 Ticket Master Sales
4557 Tele Local Calls 4510 Student Org. Ticket Sales
4558 Tele Installations
4511 Tournaments
4559 Tele Custom Services 4512 Game Room Passes
4560 Tele Zip TV
4513 Reserve for Student Life
4561 Tele Cellular 4514 Reserve for Student Life
4562 Employee Cellular Deduction
4515 Book Sales Taxable
4563 Reserve for Telecom 4516 Book Sales Non Taxable
4564 Reserve for Telecom
4517 Concessions Taxable
4570 University Rentals Non-tax 4518 Concessions Non Taxable
4571 Room Rental Sales,County&City
4519 Supply Sales Taxable
4572 Room Rental County&City Taxes 4520 Supply Sales Non Taxable
4573 Room Rental County Tax Only
4521 Reserve for Wayne Bookstore
4574 Room Rental Exempt Non-tax 4522 Reserve for Wayne Bookstore
4575 Other Taxable Sales-Sales Tax
4523 Reserve for Wayne Bookstore
4701 Loans Service Charge 4524 Reserve for Wayne Bookstore
4702 Interest on Notes Receivable
4525 Student Permits
4703 NSF Charge 4526 Grad Permits
4704 Special Purpose Fund
4527 Faculty/Staff Permits
4705 PF Project - Local Admin Fee 4528 Co-Pay Permits
4706 Medicare D subsidy
4529 Commercial Visitor Permits
4716 Taxable Sales 4530 Visitor A Lot & Meters
4717 Nontaxable Sales
4531 One Day Permits
4718 Sales - UBIT 4532 Parking Fines
4719 Quaker Square Leases
4533 Lot Rental Income
4770 Plant Fund Addn-Inv in Plant 4534 Special Event & EJ Permits
4771 Plant Fund Addn-Debt Retiremnt
4535 Signage Revenue
4772 Plant Fund Addn-Rent to CurFnd 4536 Reserve for Parking
4780 A/R Write-offs
4537 Reserve for Parking
4790 Miscellaneous Revenue 4538 Reserve for Parking
4791 EAF Allocation
4539 Reserve for Parking
4792 Misc Event Fees 4540 Athletic Ticket Sales
4801 Mand Trf-In-Unrestricted
4541 Game Guarantees
4802 Mand Trf-In-Auxiliary 4542 Radio & TV Revenue
4803 Mand Trf-In-Restricted
4543 Program Sales
4804 Mand Trf-In-Loan 4544 Press Book Sales
4805 Mand Trf-In-Endowment
4545 Conference Revenue
4807 Mand Trf-In-Plant
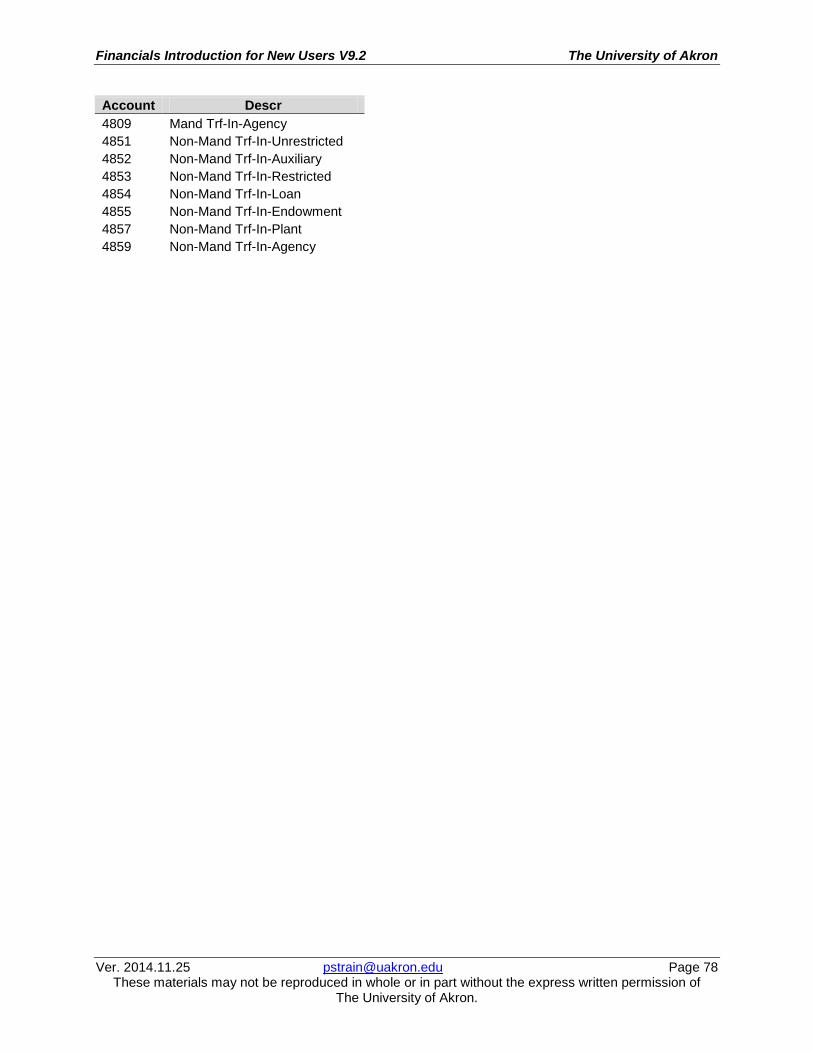
Financials Introduction for New Users V9.2 The University of Akron
Ver. 2014.11.25 [email protected] Page 78 These materials may not be reproduced in whole or in part without the express written permission of
The University of Akron.
Account Descr 4809 Mand Trf-In-Agency 4851 Non-Mand Trf-In-Unrestricted 4852 Non-Mand Trf-In-Auxiliary 4853 Non-Mand Trf-In-Restricted 4854 Non-Mand Trf-In-Loan 4855 Non-Mand Trf-In-Endowment 4857 Non-Mand Trf-In-Plant 4859 Non-Mand Trf-In-Agency

Financials Introduction for New Users V9.2 The University of Akron
Ver. 2014.11.25 [email protected] Page 79 These materials may not be reproduced in whole or in part without the express written permission of
The University of Akron.
Expense Accounts
Account Descr
Account Descr Faculty
Staff cont’d
5001 Ft Fac Admin 12 Mo
5209 Staff Cost Share Mandatory 5002 Ft Fac Admin 9/10 Mo
5210 FT Staff Suppl/Other
5003 Ft Fac Teach 12 Mo
5211 FT Staff Temp 5004 Ft Fac Teach 9/10 Mo
5212 Staff Sick Leave Accrual
5005 Ft Fac Prof Leave (FIPL)
5221 PT Staff Hourly & Salary 5006 Fac Sick Leave Payoff
5222 PT Staff Temp
5007 Fac Vacation Payoff
5223 PT Staff Temp Pay Differential 5008 Ft Fac Cost Share Voluntary
5241 Staff Overtime
5009 Ft Fac Cost Share Mandatory
5242 Shift Differential Overtime 5010 Vacation Accrual-Faculty
5243 Comp Time Paid
5011 Housing Allowance
Graduate Assistants 5012 FT Fac Acad Yr Suppl Non-Teach
5301 Grad Assts Teaching
5013 FT Fac Temp
5302 Grad Assts Non-Teach 5014 Fac Sick Leave Accrual
5308 Grad Assts - Cost Sharing Vol
5031 PT Fac Fall & Spring
5309 Grad Assts - Cost Sharing Mand 5032 PT Fac Acad Yr Suppl Non-Teach
Student Assistants
5041 Ft Fac Summer Teach
5401 Student Assts - Regular 5042 Pt Fac Summer Teach
5402 Student Assts - Overtime
5043 FT Fac Summer Admin
5403 Student Assts - Night 5044 PT Fac Summer Admin
5404 Stu Asst Shift Differential
5045 FT Fac Summer Research
5405 Cwsp-Federal 5046 PT Fac Summer Research
5406 Cwsp-Institutional
5047 FT Fac Summer Other
5407 Student Commissions 5048 PT Fac Summer Other
5408 CWSP 100%
5051 Ft Fac Teach Overload
5409 CWSP 100% - Shift Differential Administration
Fringe Benefits
5101 Ft Contr Prof 12 Mo
5601 STRS 5102 Ft Contr Prof 9/10 Mo
5602 SERS
5103 Admin Cost Share Voluntary
5603 PERS-LE 5104 Admin Cost Share Mandatory
5604 Alternative Retire Plan -STRS
5106 Contr Prof Sick Leave Payoff
5605 Alternative Retire Plan - SERS 5107 Contr Prof Vacation Payoff
5607 SERS Surcharge
5108 Vacation Accrual-Admin
5610 Medical/Life 5109 FT Contr Prof Suppl/Other
5620 Workers Comp
5110 FT Contr Prof Temp
5621 Unemployment Comp 5111 Contr Prof Sick Leave Accrual
5622 Medicare Tax
5151 Part-time Contr Prof
5630 Remiss Fee-Fac 5152 Part-time Contr Prof Temp
5631 Remiss Fee-Fac Dep
Staff
5632 Remiss Fee-Staff 5201 FT Staff Salary
5633 Remiss Fee-Staff Dep
5202 FT Staff Hourly
5634 Remiss Fee-Grad Asst 5203 Staff Post Doc Fellowships
5635 Remiss Fee-Music
5204 Shift Differential
5636 Remiss Fee-Sr Citiz 5205 Staff Sick Leave Payoff
5637 Remiss Fee-Other
5206 Vacation Accrual-Staff
5640 Parking Permits 5207 Staff Vacation Payoff 5641 Residence Meal Allowance 5208 Staff Cost Share Voluntary
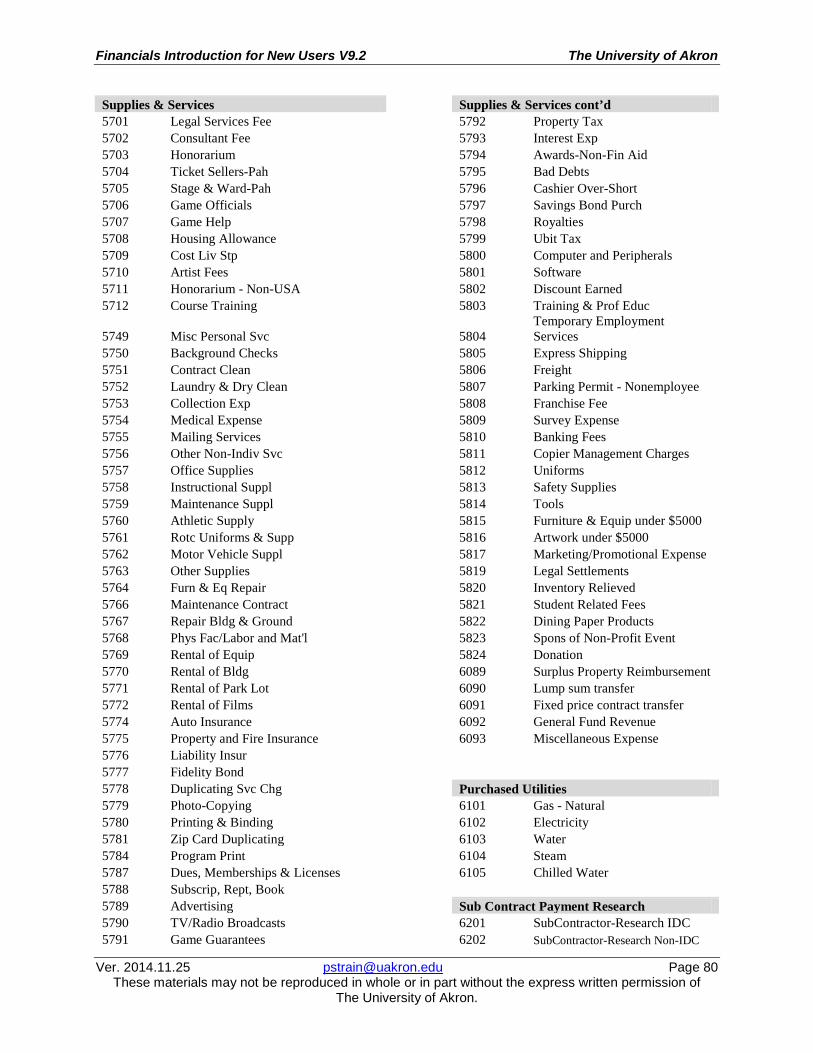
Financials Introduction for New Users V9.2 The University of Akron
Ver. 2014.11.25 [email protected] Page 80 These materials may not be reproduced in whole or in part without the express written permission of
The University of Akron.
Supplies & Services
Supplies & Services cont’d 5701 Legal Services Fee
5792 Property Tax
5702 Consultant Fee
5793 Interest Exp 5703 Honorarium
5794 Awards-Non-Fin Aid
5704 Ticket Sellers-Pah
5795 Bad Debts 5705 Stage & Ward-Pah
5796 Cashier Over-Short
5706 Game Officials
5797 Savings Bond Purch 5707 Game Help
5798 Royalties
5708 Housing Allowance
5799 Ubit Tax 5709 Cost Liv Stp
5800 Computer and Peripherals
5710 Artist Fees
5801 Software 5711 Honorarium - Non-USA
5802 Discount Earned
5712 Course Training
5803 Training & Prof Educ
5749 Misc Personal Svc
5804 Temporary Employment Services
5750 Background Checks
5805 Express Shipping 5751 Contract Clean
5806 Freight
5752 Laundry & Dry Clean
5807 Parking Permit - Nonemployee 5753 Collection Exp
5808 Franchise Fee
5754 Medical Expense
5809 Survey Expense 5755 Mailing Services
5810 Banking Fees
5756 Other Non-Indiv Svc
5811 Copier Management Charges 5757 Office Supplies
5812 Uniforms
5758 Instructional Suppl
5813 Safety Supplies 5759 Maintenance Suppl
5814 Tools
5760 Athletic Supply
5815 Furniture & Equip under $5000 5761 Rotc Uniforms & Supp
5816 Artwork under $5000
5762 Motor Vehicle Suppl
5817 Marketing/Promotional Expense 5763 Other Supplies
5819 Legal Settlements
5764 Furn & Eq Repair
5820 Inventory Relieved 5766 Maintenance Contract
5821 Student Related Fees
5767 Repair Bldg & Ground
5822 Dining Paper Products 5768 Phys Fac/Labor and Mat'l
5823 Spons of Non-Profit Event
5769 Rental of Equip
5824 Donation 5770 Rental of Bldg
6089 Surplus Property Reimbursement
5771 Rental of Park Lot
6090 Lump sum transfer 5772 Rental of Films
6091 Fixed price contract transfer
5774 Auto Insurance
6092 General Fund Revenue 5775 Property and Fire Insurance
6093 Miscellaneous Expense
5776 Liability Insur
5777 Fidelity Bond
5778 Duplicating Svc Chg
Purchased Utilities 5779 Photo-Copying
6101 Gas - Natural
5780 Printing & Binding
6102 Electricity 5781 Zip Card Duplicating
6103 Water
5784 Program Print
6104 Steam 5787 Dues, Memberships & Licenses
6105 Chilled Water
5788 Subscrip, Rept, Book 5789 Advertising
Sub Contract Payment Research 5790 TV/Radio Broadcasts
6201 SubContractor-Research IDC
5791 Game Guarantees
6202 SubContractor-Research Non-IDC

Financials Introduction for New Users V9.2 The University of Akron
Ver. 2014.11.25 [email protected] Page 81 These materials may not be reproduced in whole or in part without the express written permission of
The University of Akron.
Communications
Library Books & Materials 6211 Participant Supp - Stipend
6701 Books & Per-Gen'l
6212 Participant Supp - Travel
6702 Lost Book Repurchase 6213 Participant Supp - Subsistence
6703 Electronic Library Materials
6214 Participant Supp - Other
6710 Law Books-Gen'l 6301 Tele Long Distance
6711 Law Books-Cont(Perm)
6302 Tele Cellular
6712 Law Books-Cont(Temp) 6303 Tele Local Calls
6713 Law Books-Periodical
6305 Tele Monthly Fixed Chg.
6714 Law Books-Repl 6306 Tele Installation
6715 Law Books-Binding
6307 Tele Materials
6716 Law Electronic Library Matls 6308 Tele Vendor Labor
Plant Fund Expense
6309 Tele Custom Services
6801 Land 6310 Tele Zip TV
6802 Land Improvement
6311 Postage
6803 Buildings Chargeback
6804 Building Alteration
6401 Gen. Svc's. Ch-Back
6805 Architect Fee 6402 Duplicating
6806 Copper/Fiber Cable & Hardware
6403 Master-Maker-Gen
6807 Copper/Fiber Installation 6404 Master-Maker 4250
6808 Fiber Cable/Hdw Purchase
6405 Comp. Ctr-Internal
6809 Fiber Cable/Hdw Installation 6406 Comp. Ctr-External
6810 Artwork,Archives&Collections
6407 Utilities Distr
6811 Landscaping 6408 Taxable Dept Service
6901 Depreciation
6409 Taxable Inventory - Cost
Travel & Hospitality 6410 Non-Tax Inventory - Cost
7005 Travel - Non-Univ Personnel
6411 Taxable Inventory
7010 Athletic Recruiting In-State 6412 Non-Tax Inventory
7011 Athletic Recruiting Out-State
6413 Service Contr
7020 Athletic Team - Airfare 6415 Gas - Natural
7021 Athletic Team - Bus
6416 Electricity
7022 Athletic Team - Meals 6417 Water
7023 Athletic Team - Car Rental
6418 Hi Temp Hot Water
7024 Athletic Team - Other Trans 6419 Chilled Water - Chg Bck
7025 Athletic Team - Mileage
Equipment Lease/Purchase
7026 Athletic Team - Lodging 6501 Equip Lease/Purchase
7027 Athletic Team - Shuttle/Taxi
6502 Land Installment Purchase
7028 Athletic Team - Other Moveable Equipment
7029 Athletic Team - Gasoline
6601 Office Equip - New
7030 Res. Asst. Meals 6602 Class & Lab Equip - New
7031 Personnel Interview
6603 Computers - Servers
7032 Moving Expense 6604 Gen'l Movable Equip - New
7033 Outdoor Adventure Trips
6605 Autos & Trucks -New
7040 Hospitality-Tickets 6606 Computers - PC's
7041 Hospitality-Gen'l
6607 Work in Progress
7042 Hospitality-Events 6610 Equip $1500-$4999 Grants Only
7044 Zip Card Hospitality
6611 Equipment held in trust
7045 Business Meals 6612 UA Built Equipment
7046 Flowers/Gifts
7061 Airfare
7062 Commercial Bus
7063 Car Rental

Financials Introduction for New Users V9.2 The University of Akron
Ver. 2014.11.25 [email protected] Page 82 These materials may not be reproduced in whole or in part without the express written permission of
The University of Akron.
Travel & Hospitality cont’d
Cost Sharing 7064 Other Commercial Transport
7401 Matching Funds-Research
7065 Mileage
7402 Matching Funds-College 7066 Lodging
7403 Matching Funds-Department
7067 Meals/Per Diem 7068 Conference Fees/Prof Devel
Mandatory Trf-Out
7069 Shuttle/Taxi
7701 Mand Trf-Out-Unrestricted 7070 Other Misc. Travel Expenses
7702 Mand Trf-Out-Auxiliary
7071 Gasoline
7703 Mand Trf-Out-Restricted 7081 Foreign Airfare
7704 Mand Trf-Out-Loan
7082 Foreign Commercial Bus
7705 Mand Trf-Out-Endow & Sim 7083 Foreign Car Rental
7707 Mand Trf-Out-Plant
7084 Foreign Other Comm Transport
7709 Mand Trf-Out-Agency 7085 Foreign Mileage
7086 Foreign Lodging 7087 Foreign Meals/Per Diem 7088 Foreign Conference Fees 7089 Foreign Shuttle/Taxi 7090 Foreign Other Misc Travel Exp 7091 Foreign Travel Non-Univ Persnl 7092 Foreign Gasoline Cost of Goods Sold 7101 Pur-Resale-Food 7102 Pur-Resale-Alcohol 7103 Pur-Resale-Books 7104 Pur-Resale-Sundry 7105 Pur-Resale-AV/Film 7106 Pur-Resale-Misc 7120 Bookstore-Textbooks 7122 Bookstore-Gen. Supplies 7123 Bookstore-Art & Engr. Supp 7124 Bookstore-Clothing 7125 Bookstore-Gift Items 7140 Comp Store-Depart'l 7141 Comp Store-External 7199 Mo Cost of Sale Jv Student Aid 7201 Scholarships 7202 Grad Asst Fellowships 7203 Athletic Scholarships 7204 Grad Asst Scholarship 7205 Grad Asst Schol-C/S 7206 Awards 7207 Grad Asst Schol-No Cost Share 7208 Departmental Fee Payment Indirect Costs 7301 Indirect Cost 7302 Indirect Cost-Other Distributi

Financials Introduction for New Users V9.2 The University of Akron
Ver. 2014.11.25 [email protected] Page 83 These materials may not be reproduced in whole or in part without the express written permission of
The University of Akron.
Appendix G: Report List
PeopleSoft Financials Report List Path: Process Financial Information > UA Department Inquiries > Report
5/21/2012
Title Description Menu Option APS8001J Voucher Activity Voucher Activity PORQ010 Requisition Print Requisition Print POS8001 Procurement and Budgetary Activity Req and PO Budgetary Activity POS8002 Requisition Budgetary Activity Req and PO Budgetary Activity UAPS0001 Payments by Vendor Payments by Vendor UAPS0002 Payments by Fund/Dept Payments by Fund/Dept UAPS0003 Payments by Account Payments by Account UAPS0004 Payments by Date Payments by Date UBDS0001 Departmental Budget Summary Departmental Budget Reports UBDS0002 Departmental Budget Detail Departmental Budget Reports UBDS0004 Departmental Budget Summary - One-Line Departmental Budget Reports UBDS0005 Budget Transactions - Landscape Budget Transactions Reports UBDS0008 Budget Transactions - Portrait Budget Transactions Reports UBDS0011 Project Budget Summary Project-to-Date Reports UBDS0012 Project Budget Detail Project-to-Date Reports UBDS0020 Fiscal Project-to-Date Summary Fiscal Project-to-Date Rpts UBDS0021 Ficscal Project-to-Date Detail Fiscal Project-to-Date Rpts UBDS0022 Project-to-Date One-Line Summary Project-to-Date Reports UBDS0023 Fiscal Project-to-Date Summary - One-Line Fiscal Project-to-Date Rpts UBLS0003 SpeedKey Xref List SpeedKey Xref List UGLS0002 GL Transaction Activity GL Transaction Activity Rpt