find out how this book will
TRANSCRIPT
Gear Up!
Copyright becker&mayer!, 11010 Northup Way, Bellevue, Washington. Published 2006.
Published by SmartLab®, an imprint of becker&mayer!All rights reserved. SmartLab® is a registered trademark of becker&mayer!, 11010 Northup Way, Bellevue, Washington.Creative development by Jim Becker and Anna Johnson
No part of this book may be reproduced, stored in a retrieval system, or transmitted in any form or by any means, electronic, mechanical, photocopy-ing, recording, or otherwise, without the prior permission of SmartLab®. Requests for such permissions should be addressed to SmartLab® Permissions, becker&mayer!, 11010 Northup Way, Bellevue, WA 98004.
If you have any questions or comments about this product, send e-mail to [email protected] or visit www.smartlabtoys.com.
Edited by Ben GrossblattWritten by Paul BeckArt direction, packaging design, and illustrations by Eddee HelmsAssembly illustrations by Ryan Hobson and John LaidlawProduct photography by Keith MegaySmartLab® character photography by Craig HarroldProduct development by Mark ByrnesProduction management by Katie StephensProject management by Beth Lenz
Image credits: Page 17: Electromagnet courtesy of hometrainingtools.com; Page 22: Bevel gears © Ufuk Zivana; Rack and pinion © Steven Ruzin; Planetary gears courtesy of robotmarketplace.com; Page 23: Gear © Jim Jurica; Page 28: Car with winch courtesy of Warn Industries, Inc.; Page 29: Winch © Jeremy Voisey; Page 31: Airport conveyor belt © Alfred Molon; Page 32: Australian canopy crane courtesy of Rainforest CRC; Page 33: Crane © Mikael Cronham; Page 36: Bulldozer © Keith Syvinski; Page 38: Bulldozer © Kenn Kiser; Page 39: PackBot courtesy of iRobot.
Every effort has been made to correctly attribute all the material reproduced in this book. We will be happy to correct any errors in future editions.
Printed, manufactured, and assembled in China.
Gear Up! is part of the SmartLab® You Build It Motor Mania kit. Not to be sold separately.
10 9 8 7 6 5 4 3 2 11-932855-34-305099
GEARSMAGNETS
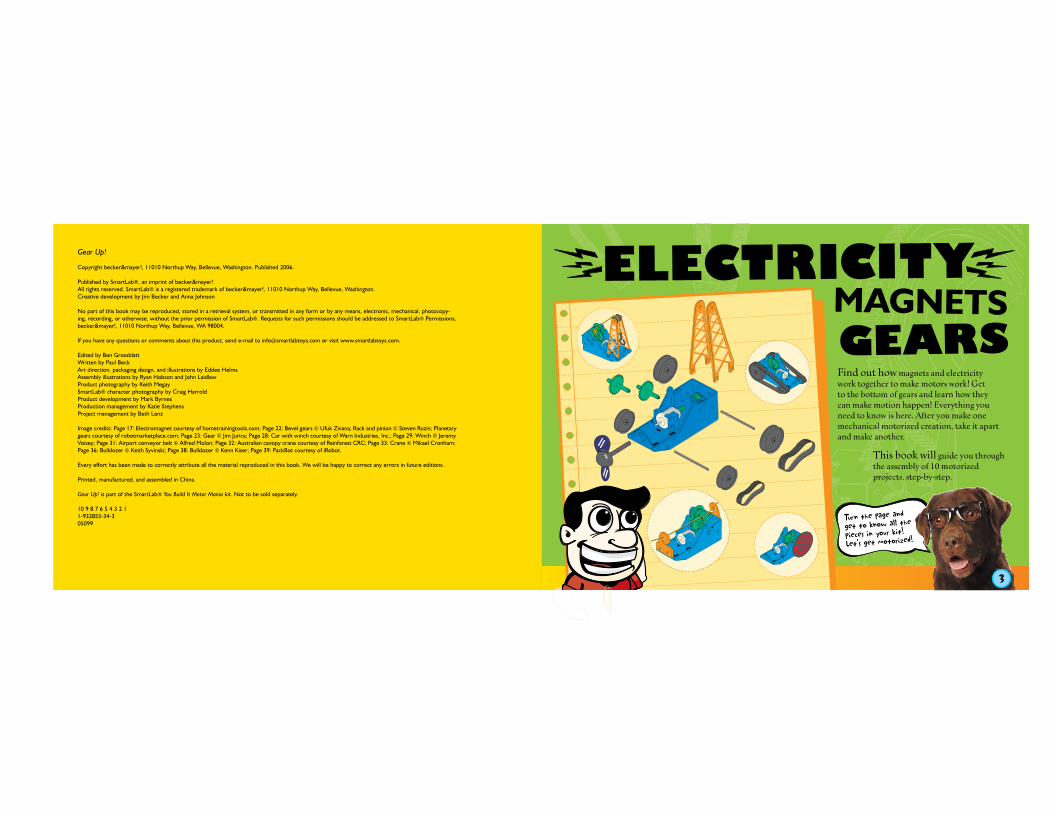
This book will guide you through the assembly of 10 motorized projects, step-by-step.
Find out how magnets and electricity work together to make motors work! Get to the bottom of gears and learn how they can make motion happen! Everything you need to know is here. After you make one mechanical motorized creation, take it apart and make another.
ELECTRICITY

MOTORPARTS
MANIA SPINNER WINCH
DRUM
LARGE GEAR
MEDIUMGEAR
SPOOLS (4)
PINS (6)
AXLES (3)
CHASSIS
SPIRAL DISK
GAME DISKS
FAN BLADE
REARGUIDE
WHEELS
SHORT STRING & HOOK
LONG STRING
RETAINERS (3)
COLLAR POSTS (2)
SMALL TREADS (2)
LARGETREADS (2)
STIRRER
GANTRY (2)PIECES
MEDIUM TREADS (2)
(2, DOUBLE-SIDED)
(2 LARGE,2 SMALL)
DOWEL
FRONTGUIDE

First, make sure the switch on the back of the chassis is in the OFF (center) position. Then, turn the chassis over and look at the underside. Unscrew the screw in the battery compartment door. (To unscrew, turn the screwdriver counterclockwise.)
Remove the door to expose the battery compartment.
Replace the battery compartment door by inserting the tab on the door into the slot in the chassis.
Screw the screw all the way back into the battery compartment door. (To screw it in, turn the screwdriver clockwise.)
PLACEMENTBATTERY To ensure proper safety and operation, the battery replacement must always be done by an adult.Never let a child use this product unless the battery door is secure.Keep all batteries away from small children, and immediately dispose of any batteries safely.Batteries are small objects and could be ingested.Nonrechargeable batteries are not to be recharged.Rechargeable batteries are not recommended for use with this toy.Rechargeable batteries are to be removed from the toy before being charged.Rechargeable batteries are only to be charged under adult supervision.Different types of batteries or new and used batteries are not to be mixed.Only batteries of the same or equivalent types as recommended are to be used.Do not mix alkaline, standard (carbon-zinc), or rechargeable (nickel-cadmium) batteries.Batteries are to be inserted with the correct polarity.Exhausted batteries are to be removed from the toy.The supply terminals are not to be short-circuited.
BATTERY
TWOSTEP
THREESTEP
COUNTER-CLOCKWISE
CLOCKWISE
DOOR
NOTE POSITIONS
FOURSTEP FIVE
STEP
CAUTIONS
Insert two AAA batteries as shown. Make sure you insert them the right way. (Match them up with the markings inside the battery compartment.)TIP The screw will stay in the
battery compartment door.
STEP ONE

Remove the covering from the drive gear. (Make sure the drive gear doesn’t fall out.) Insert the long arm of the large gear into hole A in the left side of the chassis. Insert the short arm of the large gear into hole B in the right side of the chassis. Once you’ve done this, the large gear should mesh with the drive gear in the rear of the chassis. Spin the large gear with your finger to make sure it’s engaging the drive gear.
Insert the left post (marked LEFT on the side that faces inward) into the slot on the left side of the chassis. Insert the right post (marked RIGHT on the side that faces inward) into the slot on the right side of the chas-sis.
Insert the long arm of the medium gear into hole C in the right side of the chassis. Insert the arm with the spring into hole D in the left side of the chassis. Once you’ve done this, the medium gear should mesh with the large gear and the worm gear. Gently turn the motor shaft to make sure the medium gear is engaging the other gears.
TWOSTEP
ONESTEP
THREESTEP
Insert a pin into hole G in the left side of the chassis and another into hole G on the right side of the chassis.
LARGE GEAR SHORT
ARMLONG ARM
DRIVE GEAR
LEFT SIDE OF CHASSIS
ARM WITH
SPRING
LONG ARM
WORM GEAR
YOU NOW HAVE A COMPLETED CHASSIS FOR ALL OF YOUR MOTOR MANIA PROJECTS.
GOOD
CHASSIS
LEFT POST
PIN
ASSEMBLY
JOB!
Whenever you switch the motor
on, be careful of the exposed, spinning gears!MOTOR
SHAFT
RIGHTPOST
NOTE:
MEDIUM GEAR

A magnet made from a coil of wire is called an electromagnet. Electromagnets are useful because they can be turned on and off. When there’s current flowing in the wire, it’s a magnet. When the current stops, it’s not a magnet anymore.
Wash the stirrer thoroughly before use. Push the rod of the stirrer through the center hole in the chassis.
ONE
PROJECT 1
STEP
THREESTEPDRINK Electricity and magnetism are related. (In fact, they’re
really two parts of the same thing, called electromagnetism.) Whenever electric current flows through a wire, it creates a magnetic field. Making a loop out of the wire makes the magnetic field stronger. Winding the wire around and around in a coil of many, many loops makes the field even stronger.
THE
NOTE:
Keep pushing the stirrer toward the chassis until the hole in the rod fits over the motor shaft. Push the rod onto the motor shaft as far as it will go. (But don’t force it!)
TWOSTEP
When you’re ready to stir up a drink, hold the chassis and dip the paddles into the glass. Move the switch to FOR (forward) or REV (reverse) and start stirring. As you use the Drink Stirrer, you may notice the motor slow down. This is a result of friction as parts rub together.
PADDLES
ROD CENTER HOLE MOTOR
SHAFT
MAIN
ELECTROMAGNET
KEEP PUSHING
STIRRER
Use the Drink Stirrer for drinks only. Trying to stir thicker stuff could damage the motor or other parts!
ATTRACTION

HYPNOTICONPROJECT 2
STEP TWOInsert the other end of the axle into hole A in the left side of the chassis. Push the axle all the way through the center of
the large gear’s arms and out through hole B in
the right side of the chassis.
STEP THREE
STEP FOUR
Gently pull on the spiral disk until
the retainer lies flat against the right side of the chassis. Find some
willing hypnosis subjects, move the switch to FOR (forward) or REV (reverse), and have your subjects watch the spiral disk as it spins around. Will they cluck like chickens or bark like dogs?
LEFT SIDE OF CHASSIS
RETAINER
If you have trouble sliding axles through the chassis,
make sure the flat sides of the axles are lined up
with the six-sided holes.
TIP
STEP ONEFit one end of an axle into the hole in the back of the spiral disk.
AXLE
SPIRAL DISK
Unlike what you see in movies or on TV, people can’t be hypnotized against their will. You have to want to be hypnotized for hypnosis to work.
DEAL
Place a retainer onto the end of the axle that sticks out of hole B in the right side of the chassis.
THEREAL
CRAWLINGHere’s a trick you can try on yourself. Turn on your hypnoticon and stare at the spinning spiral for 60 seconds. Now look at the wall. What do you see?
THE
WALL

An electromagnet has a north and south pole, too. The amazing thing about electromagnets is that the magnet’s poles depend on the direction the current is flowing. If you switch the direction of the current, the electromagnet’s poles flip.
Every magnet has two poles, called north (N) and south (S). If you line two magnets up with their opposite poles together, the magnets attract each other. If you line them up with the same poles together (north to north or south to south), they repel, or push away from, each other.
PROJECT3
A
Push the rod of the fan blade through the center hole in the chassis.
ONESTEP
TWOSTEP MAGNETS
MORE ON
Push the rod onto the motor shaft as far as it will go. (But don’t force it!)
Keep pushing the fan blade toward the chassis until the hole in the rod fits over the motor shaft.
s poles depend on towing. If you switch the direction of , the electromagnet’s
Move the switch to REV (reverse) and cool down. Don’t touch the fan blades to your skin (or anyone else’s) when the fan is turned on!
THREESTEP POLES
SWITCH THE
ELECTROMAGNET
MAGNETS REPEL
POLES
FAN BLADE
ROD
CENTER HOLE
MOTOR SHAFT
KEEP PUSHING
NF MAGNETS ATTRACT

Use your Game Spinner when you play games. Set it on a tabletop, making sure that the spinner is well over the edge. Move the switch to FOR (forward) or REV (reverse) to start the arrow spinning. Move the switch to OFF to make it stop.
THREE
YOUR MOTOR MANIA KIT COMES WITH
TWO DOUBLE-SIDED GAME DISKS.
PROJECT 4
Let the device decide for you!
Why flip a coin when you can
flick a switch?
Ask a question—your mystical
machine will give you an answer.
Randomly "roll" a number from
1 to 6.
GAMES
FOR
TUNE TELLER
A DIE ROLL
H
EADS OR TAILS
TRUTH OR DAR
E
As you use the Game Spinner, you may notice the motor slow down. This is a result of friction as parts rub together.
STEP
RONE
STEP
TWOSTEP
Place the holes in a game disk over the pegs on the front of the chassis. Gently press the game disk on until it’s firmly attached.
NNGAME
SPI
PEGS
GAME DISK ARROW
ROD
SPINNER
Insert the rod of the spinner through the hole in the center of the game disk. Keep pushing the rod toward the chassis until the hole in the rod fits over the motor shaft. Push the rod onto the motor shaft as far as it will go. (But don’t force it!)
E
5PROJECT
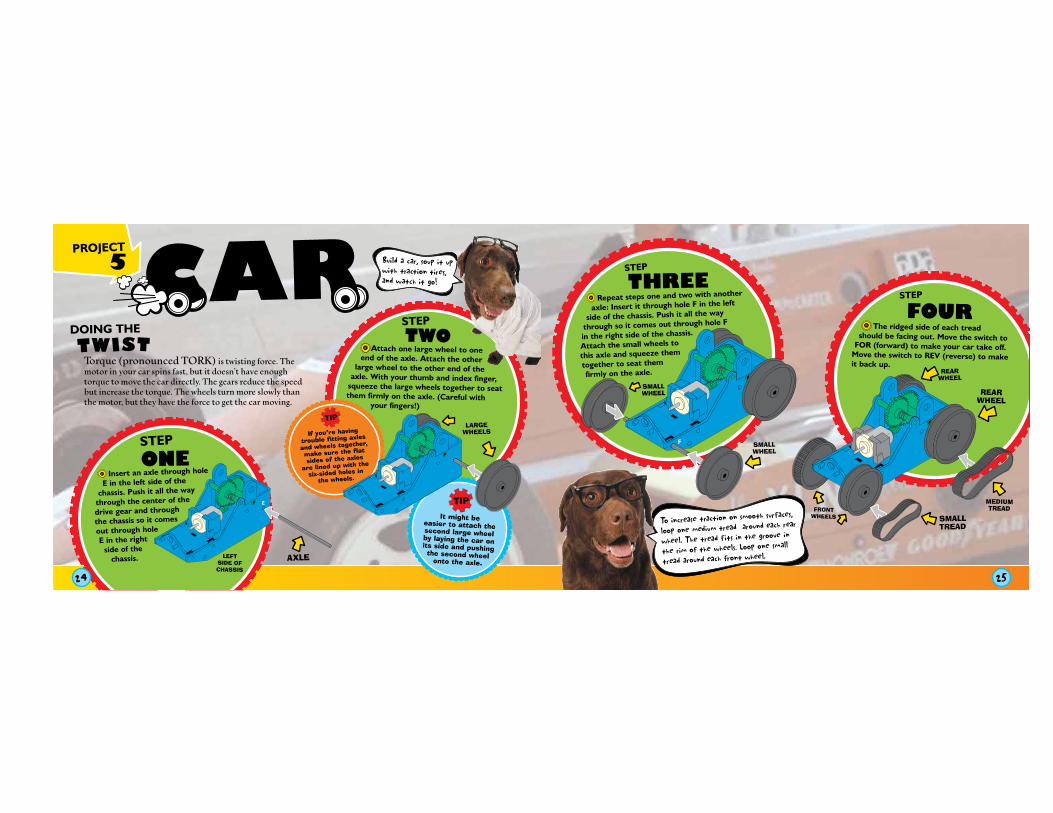
Repeat steps one and two with another
axle: Insert it through hole F in the left
side of the chassis. Push it all the way
through so it comes out through hole F
in the right side of the chassis.
Attach the small wheels to
this axle and squeeze them
together to seat them
firmly on the axle.
Attach one large wheel to one end of the axle. Attach the other
large wheel to the other end of the axle. With your thumb and index finger,
squeeze the large wheels together to seat them firmly on the axle. (Careful with your fingers!)
Insert an axle through hole
E in the left side of the
chassis. Push it all the way
through the center of the
drive gear and through
the chassis so it comes
out through hole E in the right
side of the chassis.
ONE
It might be easier to attach the second large wheel by laying the car on its side and pushing the second wheel
onto the axle.
TIP
TIP
TWOSTEP
THREESTEP
If you’re having
trouble fitting axles
and wheels together,
make sure the flat
sides of the axles
are lined up with the
six-sided holes in
the wheels.
CAR
AXLELEFT SIDE OF CHASSIS
LARGE WHEELS
SMALL WHEEL
STEP
The ridged side of each tread should be facing out. Move the switch to
FOR (forward) to make your car take off. Move the switch to REV (reverse) to make it back up.
FOUR
SMALL TREAD
REAR WHEEL
MEDIUM TREAD
REAR WHEEL
STEP
FRONT WHEELS
DOING THE
Torque (pronounced TORK) is twisting force. The motor in your car spins fast, but it doesn’t have enough torque to move the car directly. The gears reduce the speed but increase the torque. The wheels turn more slowly than the motor, but they have the force to get the car moving.
TWIST
SMALL WHEEL

SKI TRAINS
FOUR
Wind the long string (the string without the hook attached) onto the shaft of the winch drum. The string should wrap around the shaft—from the back of the winch drum, over the top, down, under, and up. The string will hang off the drum in the front and back.
Attach the rear guide to the back of the chassis by pressing the pegs in the guide into the holes in the chassis. Attach the front guide to the front of the chassis by fitting the holes in the guide over the pegs on the front of the chassis.
STEP
RAM Carefully insert the winch drum into the holes in the posts. The side of the winch drum nearest the shaft fits into the hole in the left post. The side of the winch drum nearest the cogs fits into the hole in the right post.
THREESTEP
PROJECT6
T
Aerial trams don’t need roads or rails, so they’re a good way to get skiers or sightseers up a mountain. The tram cars hang from wheels that roll along a cable or pair of cables, a bit like suspended, flexible railroad tracks. A smaller haul cable pulls the cars along.
ONESTEP REAR
GUIDE
PEGS
FRONT GUIDE
DIAGONAL EDGE
LEFT SIDE OF CHASSIS
BACK OF WINCH DRUM
SHAFT[UP & OVER
ONCE]
TWO
Make sure the front guide is mounted correctly—the diagonal edge should point down to the left side of the chassis.
TIP
COGS
RIGHTPOST
LEFT POST
STEP
Thread the string through the eyes in the front and rear guides. Now tie one end of the string to a doorknob or railing—or whatever! Hold the other end or attach it to something else. (Make sure the chassis is not resting on a sur-face.) Move the switch to FOR (forward) or REV (reverse) and watch the tram go!
EYE
EYE

Jeeps and other off-road vehicles often have winches mounted on the front. If the vehicle gets stuck, the driver can hook the cable to a rock or tree and use the winch to pull the vehicle out.
You’re ready to haul! Move the switch to FOR (forward) to lower the hook. Move the switch to REV (reverse) to haul it back in. (Don’t try to raise heavy objects. You could damage the motor or other parts!)
Find the short string (the one with the hook attached). Insert the end of the short string without the hook into the hole in the winch drum shaft. (Notice that the hole is bigger in one side of the shaft. It’s easier to work the string through this large hole.) Pull the string through and tie a knot to secure it to the shaft.
Insert the winch drum into the holes in the posts. The side of the winch drum nearest the shaft fits into the hole in the left post. The side of the winch drum nearest the cogs fits into the hole in the right post.
Wind the string around the winch drum shaft: from the back of the winch drum, over the top, under, up, and over the top again, a few times.
PROJECT7
WINCH DRUM
SHAFT
LARGE HOLE
HOOK
STRING
SHAFT
BACK OF WINCH DRUM
[UP & OVER A FEW TIMES]
STRING
STEP ONE
TWOSTEP
THREESTEP
FOURSTEP
WHICH WINCH
A winch is basically a giant spool of thread. Only, instead a wooden spool, a winch has a big metal drum. And instead of thread, it has a rope, cable, or chain. Finally, to turn the drum, a winch needs a motor or a crank.
COGS
POST
LEFT SIDE OF CHASSIS
WINCH
STUCK IN THE MUD

Insert an axle through hole E in the left side of the chassis. Push it all the way through the center of the drive gear and through the chassis so it comes out through hole E in the right side of the chassis. Attach a retainer to the end of the axle on the right side of the chassis.
Insert another axle through hole F in the left side of the chassis. Push it all the way through so it comes out through hole F in the right side of the chassis. Attach a retainer to the end of this axle on the right side of the chassis. Fit one spool onto the free end of this axle and press it toward the chassis. Fit another spool onto the axle next to the first.
Fit a large wheel onto the free end of the axle and press it toward the chassis. Fit the other large wheel onto the axle next to the first.
143
The baggage handling system at Denver International Airport in Colorado has six miles of conveyor belts.
BELTS
CONVEYORPROJECT
8
It might be easier to attach the second large wheel by laying the car on its side and pushing the second wheel onto the axle.
TIP
If you’re having trouble fitting axles and wheels together, make sure the flat sides of the axles are lined up with the six-sided holes in the wheels.
TIP
AXLE
LEFT SIDE OF CHASSIS
RETAINER
2
FREE END
LARGE WHEELS [2]
AXLE
RETAINER
SPOOLS [2] Loop one large tread around the inner spool and inner large wheel. Loop the other large tread around the outer spool and outer large wheel. The ridged side of each tread should be facing out. Place small, light objects on the tread conveyor belt. Hold the Conveyor in your hand (or position the left side over the edge of a table.) Move the switch to REV (reverse) to make the conveyor belt move the objects to the rear. Move the switch to FOR (forward) to make the conveyor belt move them to the front.
TIP If you have trouble sliding axles through the chassis, make sure the flat sides of the axles are lined up with the six-sided holes.
MILESOF
WHEEL TREADS

CRANEScientists use tower cranes, like the ones you see at building construction sites, to study the plant and animal life in the rainforest treetops.
Find the short string (the one with the hook attached). Insert the end of the string without the hook into the hole in the winch drum shaft. (Notice that the hole is bigger in one side of the shaft. It’s easier to work the string through this large hole.) Pull the string through and tie a knot to secure it to the shaft.
Wind the string around the winch drum shaft: from the back of the winch drum, over the top, under, up, and over the top again, a few times.
Insert the winch drum into the holes in the posts. The side of the winch drum nearest the shaft fits into the hole in the left post. The side of the winch drum nearest the cogs fits into the hole in the right post.
HEAVYTower cranes are often found at construction sites. That’s because it takes a mighty crane to lift those massive loads. (A crane like this can lift 20 tons of equipment and supplies!) Heavy counterweights keep the crane from tipping over when it raises a heavy load.
CANOPY
WINCH DRUM
SHAFT
STRING
LARGE HOLE
HOOK
STEP
ONE
PROJECT
9 SHAFT
[UP & OVER A FEW TIMES]
STRING
BACK OF WINCH DRUM
COGS
RIGHT POST
LEFT POST
LIFTING
CRANES
THREESTEP
TURN THE PAGE FOR THE REST OF THE CRANE-
BUILDING STEPS!
STEP
TWO

Lift up the hook on the string, and lay it over the spool at the top of the gantry pieces. Wrap the string under the spool and back over the top. Move the switch to FOR (forward) to lower the hook. Move the switch to REV (reverse) to raise it back up.Hold a spool between the tops of the two gantry pieces. Line up the hole in the center of the spool with the holes at the tops of the gantry pieces. Insert the dowel through the holes in the tops of the gantry pieces and the spool. Secure the dowel by fitting the collar around it.
Insert pins in holes F
and H (on the left side of the
chassis) and holes F and H (on the right side
of the chassis) to secure the gantry pieces.
Install the left gantry piece (marked LEFT) by inserting the tabs at the bottom into the slots in the left side of the chassis. Install the right gantry piece (marked RIGHT) by inserting the tabs into the slots in the right side of the chassis.
FOURSTEP
Make sure the gantry pieces lean forward and in toward each other.
TIP
PIN
FIVESTEP
DOWEL
SPOOL
COLLAR
SIXSTEP
SEVENSTEP
SLOTS
RIGHT GANTRY PIECE
LEFT GANTRY
PIECE

TRACTIONACTION
Tank-style treads are great for traction on all kinds of surfaces. Bulldozers have them for going across piles of dirt and rubble. Snowmobiles have them for going across snow. The one place where they’re not all that great is on roads. Insert one axle into
hole E in the left side of the chassis. Push it all the way
through the center of the drive gear and through the chassis so it comes out through hole E in the right side of the chassis.
STEP ONE
Attach one large wheel to
one end of this axle. Attach the other large wheel to the other end of the axle. With your thumb and index finger, squeeze the large wheels together to seat them firmly on the axle.
TIPIt might be easier to attach the second large wheel by laying the car on its side and pushing the second wheel onto the axle.
TIPIf you’re having trouble fitting axles and wheels together, make sure the flat sides of the axles are lined up with the six-sided holes in the wheels.If you have trouble
sliding axles through the chassis, make sure the flat sides of the axles are lined up with the six-sided holes.
TIP
AXLE
LEFT SIDE OF CHASSIS
LARGE WHEEL
PROJECT10
TRANKTOR Insert another axle into hole I in the left side of the
chassis. Push it all the way through the chassis so it comes out through hole I in the right side of the chassis.
STEP THREE
AXLE
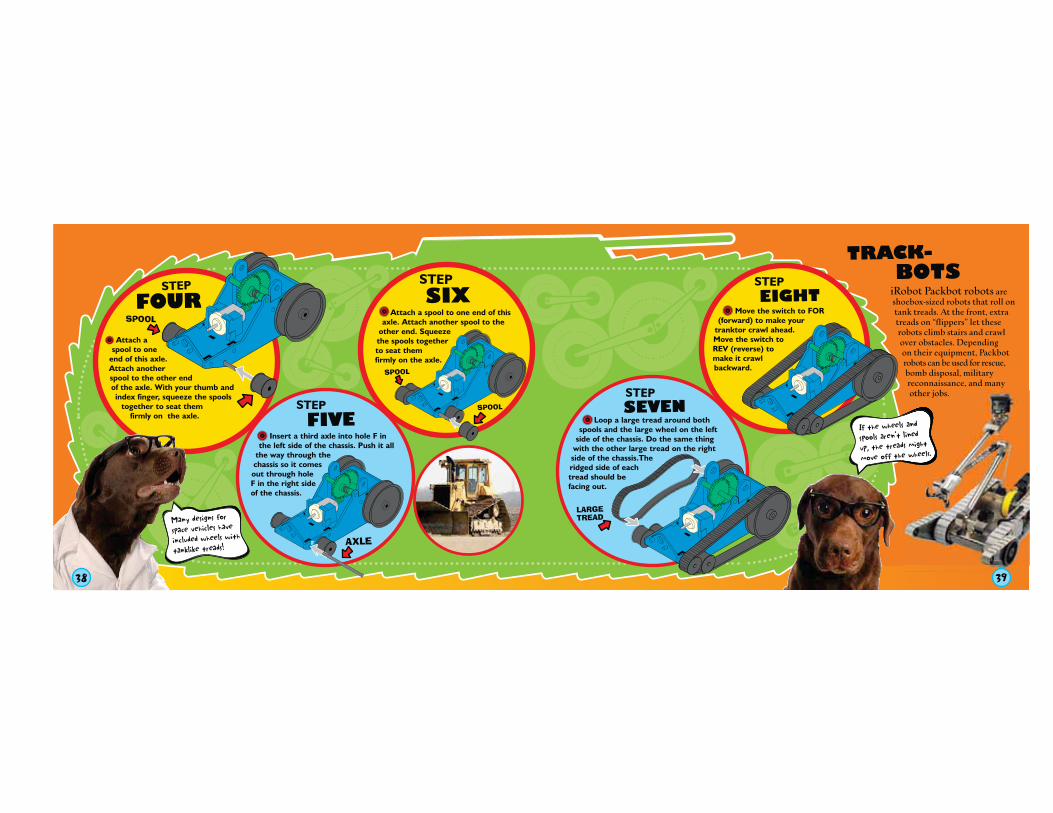
Move the switch to FOR (forward) to make your
tranktor crawl ahead. Move the switch to REV (reverse) to make it crawl backward.
Insert a third axle into hole F in the left side of the chassis. Push it all
the way through the chassis so it comes out through hole F in the right side of the chassis.
AXLE
STEP FIVE
Attach a spool to one
end of this axle. Attach another spool to the other end of the axle. With your thumb and index finger, squeeze the spools
together to seat them firmly on the axle.
STEP
FOURSPOOL
STEP SIX
Loop a large tread around both spools and the large wheel on the left
side of the chassis. Do the same thing with the other large tread on the right side of the chassis.The ridged side of each tread should be facing out.
TRACK-BOTS
iRobot Packbot robots are shoebox-sized robots that roll on tank treads. At the front, extra treads on “flippers” let these robots climb stairs and crawl over obstacles. Depending on their equipment, Packbot robots can be used for rescue, bomb disposal, military reconnaissance, and many other jobs.
Attach a spool to one end of this axle. Attach another spool to the
other end. Squeeze the spools together to seat them firmly on the axle.
STEP EIGHT
STEP SEVEN
LARGE TREAD
SPOOL
SPOOL
other jobs.

EXPERIMENTS
CLIMB IT!Build the car or tranktor and place it on a flat board or other hard, smooth surface. Move the switch to FOR (forward) and raise the end of the driving surface so the machine has to climb. How steep does the incline have to be before the machine slips and can’t keep climbing? Can the car roll on a steep surface without treads on the wheels? Can the tranktor go up a steeper incline than the car?
What happens when one of your wheeled machines tries to drive up an inclined surface?
PULL IT!Move the switch to FOR (forward) to reel out out the string all the way. Now attach different objects to the hook: a paperclip chain, a model car, a shoe (hook a shoelace). Move the switch to REV (reverse) and watch the winch work. How heavy a load can it pull? What happens when you try to pull a load that weighs too much?
How much weight can the winch pull?
“Roll” your die roller and keep track of how many times each number comes up. Do you find that the numbers even out the more times you “roll”?
TRACK IT!If you roll a six-sided die, the chances of rolling any given number are the same. In other words, if you roll the die 60 times, you could expect to roll a 1 ten times, a 2 ten times, a 3 ten times, and so on. Well, that’s what the odds look like.
TRY IT YOURSELF!
If you try this experiment with the string hanging over the edge of a table—or anything else—your winch could be damaged trying to raise something that’s too heavy.
TIP
MAKE UP YOUR OWN EXPERIMENTS AND PUT YOUR MACHINES
TO THE TEST!