fingercard system (biofinger+) fileelsys corp. 2013 . 2 content 1. ... usb port 1 free usb ports...
TRANSCRIPT
FINGERCARD
System
(BioFinger+) Inet version
User’s Guide
ELSYS Corp. 2013
2
Content
1. General information ___________________________________________________________________ 3
2. Package contents ______________________________________________________________________ 3
3. System requirements ___________________________________________________________________ 3
4. Software specification __________________________________________________________________ 4
5. Hardware technical specification _________________________________________________________ 5
6. Getting started ________________________________________________________________________ 6
6.1. DC-21U drivers installation: ___________________________________________________________ 6
6.2. ZK-4500 drivers installation: ___________________________________________________________ 8
6.3. FingerCard program installation _______________________________________________________ 9
6.4 FingerCard installation from internet ___________________________________________________ 10
6.5 FingerCard activation ________________________________________________________________ 11
7. FingerCard. User guide _______________________________________________________________ 12
7.1. Main module (FingerCard.exe) ________________________________________________________ 12
7.2 Main menu ________________________________________________________________________ 14
7.3. Toolbar ___________________________________________________________________________ 18
7.4. Fingerprint scanning ________________________________________________________________ 19
7.5. Fingerprint analyze _________________________________________________________________ 28
7.6. Testing results _____________________________________________________________________ 32
8. Maintenance ________________________________________________________________________ 37
8.1. FingerCard (Inet version) reinstallation to other PC ____________________________________ 37
8.2. Safety Instructions __________________________________________________________________ 37
3
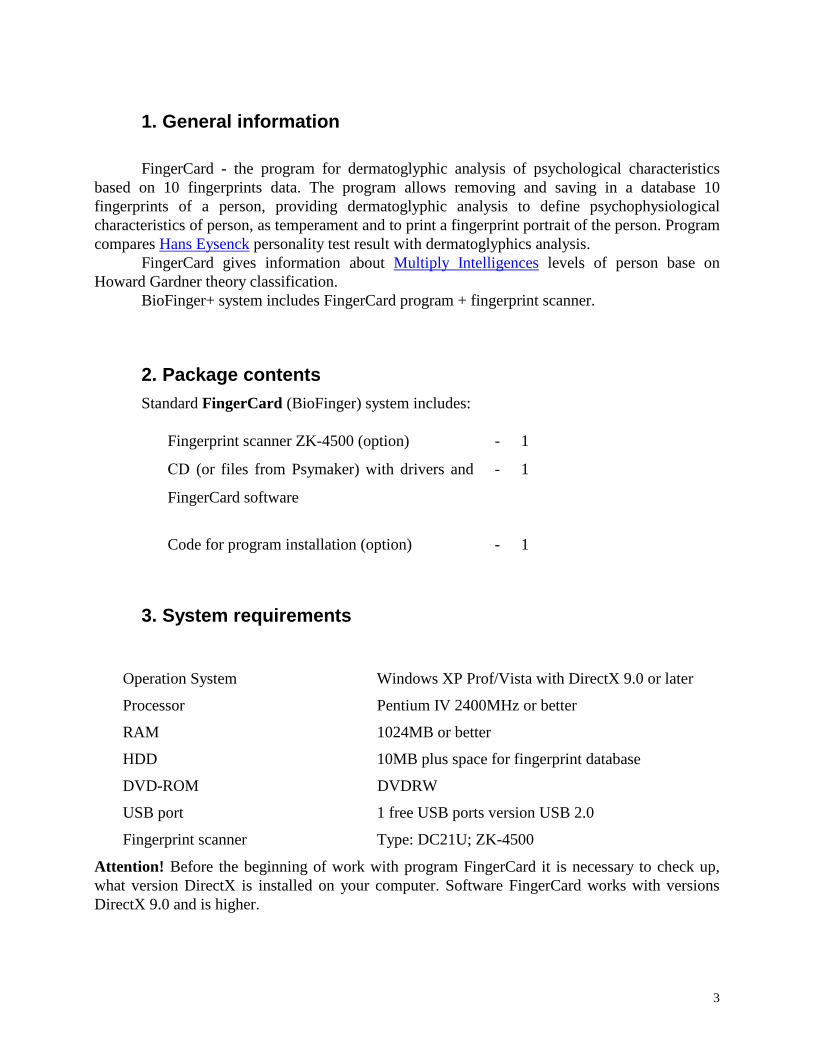
1. General information
FingerCard - the program for dermatoglyphic analysis of psychological characteristics
based on 10 fingerprints data. The program allows removing and saving in a database 10
fingerprints of a person, providing dermatoglyphic analysis to define psychophysiological
characteristics of person, as temperament and to print a fingerprint portrait of the person. Program
compares Hans Eysenck personality test result with dermatoglyphics analysis.
FingerCard gives information about Multiply Intelligences levels of person base on
Howard Gardner theory classification.
BioFinger+ system includes FingerCard program + fingerprint scanner.
2. Package contents
Standard FingerCard (BioFinger) system includes:
Fingerprint scanner ZK-4500 (option) - 1
СD (or files from Psymaker) with drivers and
FingerCard software
- 1
Code for program installation (option)
-
1
3. System requirements
Operation System Windows XP Prof/Vista with DirectX 9.0 or later
Processor Pentium IV 2400MHz or better
RAM 1024MB or better
HDD 10MB plus space for fingerprint database
DVD-ROM DVDRW
USB port 1 free USB ports version USB 2.0
Fingerprint scanner Type: DC21U; ZK-4500
Attention! Before the beginning of work with program FingerCard it is necessary to check up,
what version DirectX is installed on your computer. Software FingerCard works with versions
DirectX 9.0 and is higher.

4
4. Software specification
FingerCard software is a part of BioFinger + system for scanning and analysis of person
fingerprints. Results of personal dermatoglyphics analysis are used for definition character,
personality, Multiple Intelligence and for printing of fingerprint (dactyloscopic) portrait of a
person. FingerCard application for various scientific, psychological and medical purposes is
possible.
FingerCard solves the following tasks:
Scanning 10 fingerprints of the person and saving it in archive in format BMP
Input and saving of the demographic data in a file in format TXT
Definition of the basic type of a fingerprint pattern
Calculation dermatoglyphics parameters of fingerprints
Calculation of fingerprint portrait of person including the following characteristics:
Extravert-introvert
Right – left hemisphere
Leadership level
Stability level
Multiply Intelligences Levels and its variability
Calculation psycho-physiological parameters of the person is made on the basis of the
analysis:
basic type of a pattern of a fingerprint
Orientations of the basic pattern
Mutual site of concrete patterns on concrete fingers
Width between fingerprint lines
Quantity of bifurcations and ends of lines
In the folder \FingerCardUSB\ the complete set of files of the FingerCard program is
located.
The basic operating modes of the software are described in section «FingerCard. User's
guide».
5
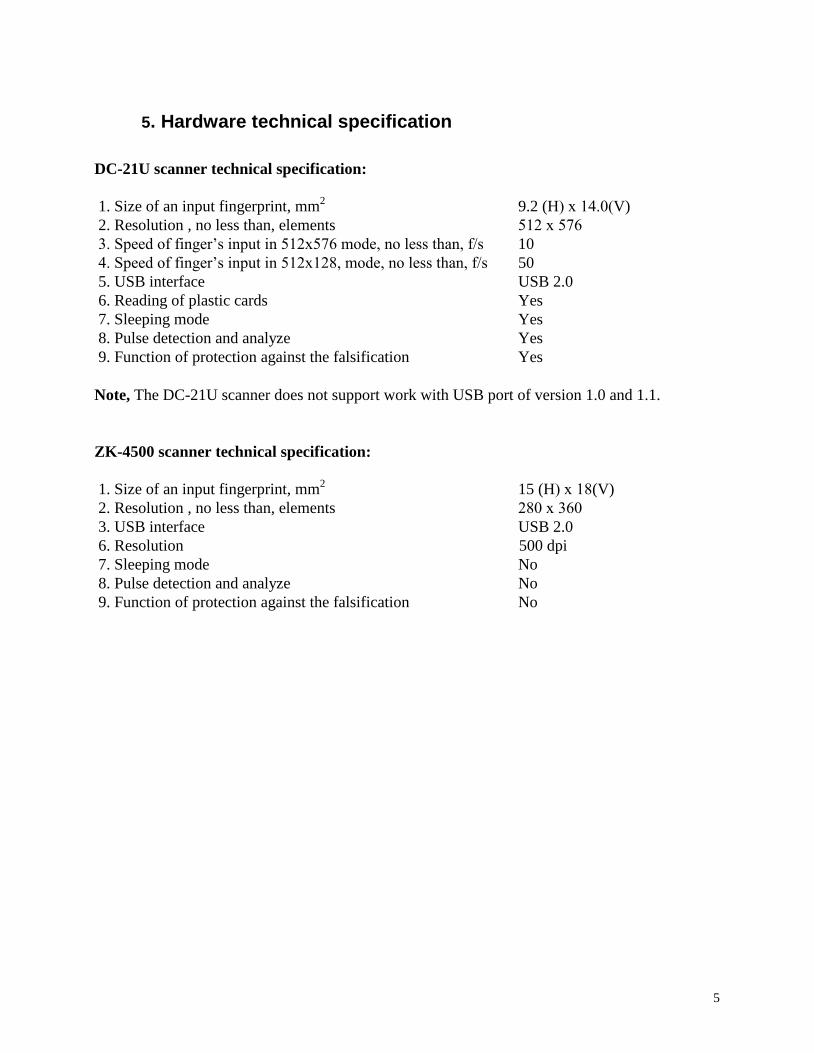
5. Hardware technical specification
DC-21U scanner technical specification:
1. Size of an input fingerprint, mm2
9.2 (H) х 14.0(V)
2. Resolution , no less than, elements 512 х 576
3. Speed of finger’s input in 512x576 mode, no less than, f/s 10
4. Speed of finger’s input in 512x128, mode, no less than, f/s 50
5. USB interface USB 2.0
6. Reading of plastic cards Yes
7. Sleeping mode Yes
8. Pulse detection and analyze Yes
9. Function of protection against the falsification Yes
Note, The DC-21U scanner does not support work with USB port of version 1.0 and 1.1.
ZK-4500 scanner technical specification:
1. Size of an input fingerprint, mm2
15 (H) х 18(V)
2. Resolution , no less than, elements 280 х 360
3. USB interface USB 2.0
6. Resolution 500 dpi
7. Sleeping mode No
8. Pulse detection and analyze No
9. Function of protection against the falsification No

6
6. Getting started
It is necessary to execute the following actions for installation of FingerCard
program on your computer:
1. To check up conformity of technical parameters of your computer to the system
requirements resulted in section «System requirements». Note to the version, software DirectX
installed by your computer;
2. Close all other applications to avoid file sharing errors;
3. To lead installation of drivers of the DC-21U scanner according to the
recommendations specified in section «DC-21U drivers installation» (see below);
4. Connected scanner to PC. Note, DC-21U scanner work only with USB2.0 ports;
5. To lead installation of FingerCard software on your computer according to the
recommendations specified in section «FingerCard Installation» (see below);
6. Attentively read the basic operating modes of a complex which are specified in section
«FingerCard. User's guide»;
7. To run FingerCard.exe programs and to check up serviceability of the scanner and
FingerCard system.
8. In FingerCard program to make a choice of folder for record dactocard and results of
the analysis (see item 7.6 of the present description)
6.1. DC-21U drivers installation:
1. Installation of drivers and the software is necessary for making before the first connection
of the device to a computer
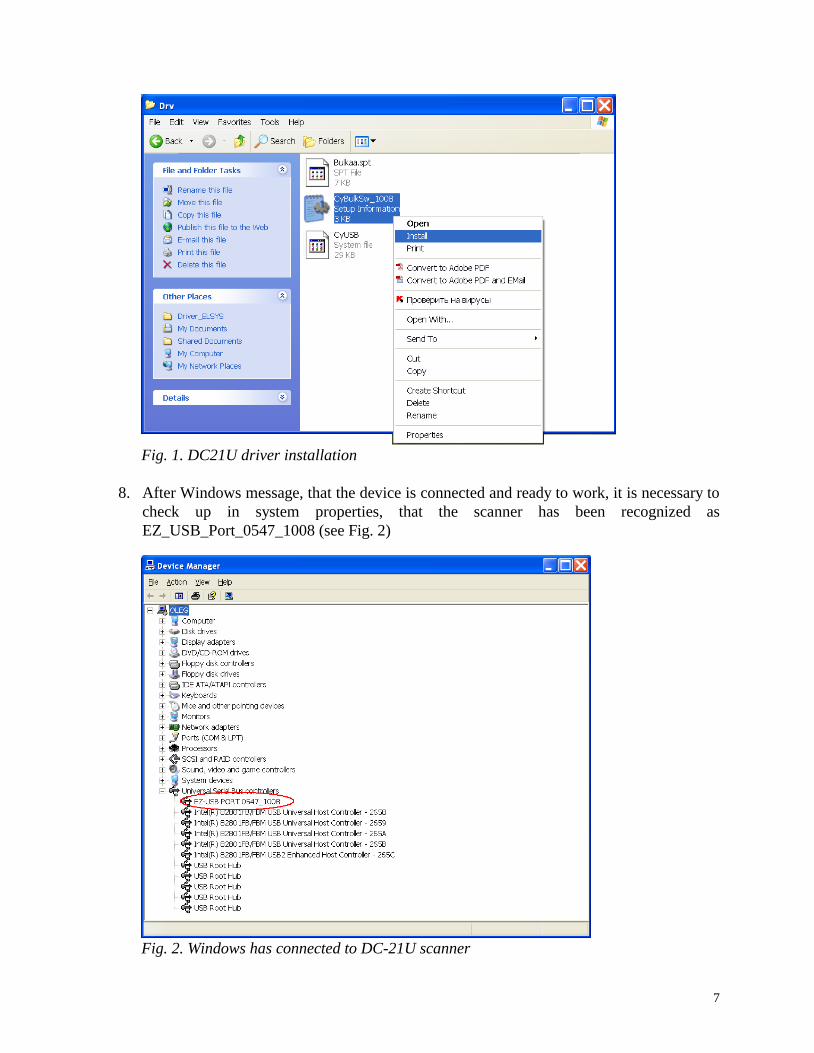
2. From folder CD:\BioFinger\Drivers\Drv install file CyBulkSw_1008.inf For this
purpose click of the right button of the mouse to cause the options menu and to choose the
item «Install» (see Fig. 3)
3. From folder CD:\BioFinger\Drivers install updating Windows FrameWork 1.1., having
started file «dotnetfx11.exe»
4. From folder CD:\ BioFinger\Drivers install drivers «DC USB CP.msi»
5. The software of ELSYS Corp. located on a CD disk, allows to work and with old versions
of fingerprint scanners. If old scanners DC-21 or DC-21_Corona will be used, it is
necessary to install in addition the driver for these devices
6. Connected scanner to PC. Note, scanner DC-21U work only with USB2.0 ports.
7. To connect the scanner, when Windows will find out the new device, to specify the same
driver which has been installed in item 2.
7
Fig. 1. DC21U driver installation
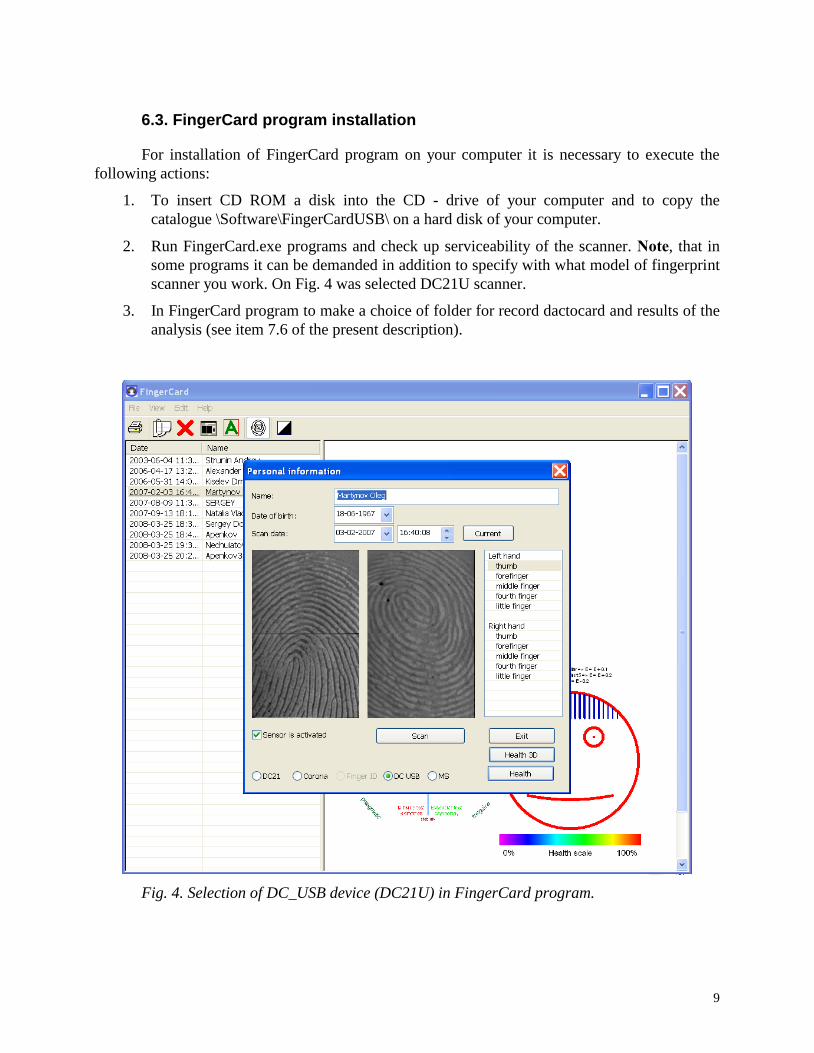
8. After Windows message, that the device is connected and ready to work, it is necessary to
check up in system properties, that the scanner has been recognized as
EZ_USB_Port_0547_1008 (see Fig. 2)
Fig. 2. Windows has connected to DC-21U scanner

8
9. Using «Control panel» run the program «DC USB Devices» and check serviceability of
the device (see Fig. 3).
Fig. 3.DC USB Devices pictogram location in the control panel
10. Install the driver of DC-21U device FOR ALL USB PORTS of a computer!!!! Connecting
to them the scanner by turns.
Attention! After finishing of scanner drivers installation is necessary to restart your
computer.
6.2. ZK-4500 drivers installation:
Run Setup.exe file from CD from the package of ZK-4500 scanner and go on
corresponding instructions.
9
6.3. FingerCard program installation
For installation of FingerCard program on your computer it is necessary to execute the
following actions:
1. To insert CD ROM a disk into the CD - drive of your computer and to copy the
catalogue \Software\FingerCardUSB\ on a hard disk of your computer.
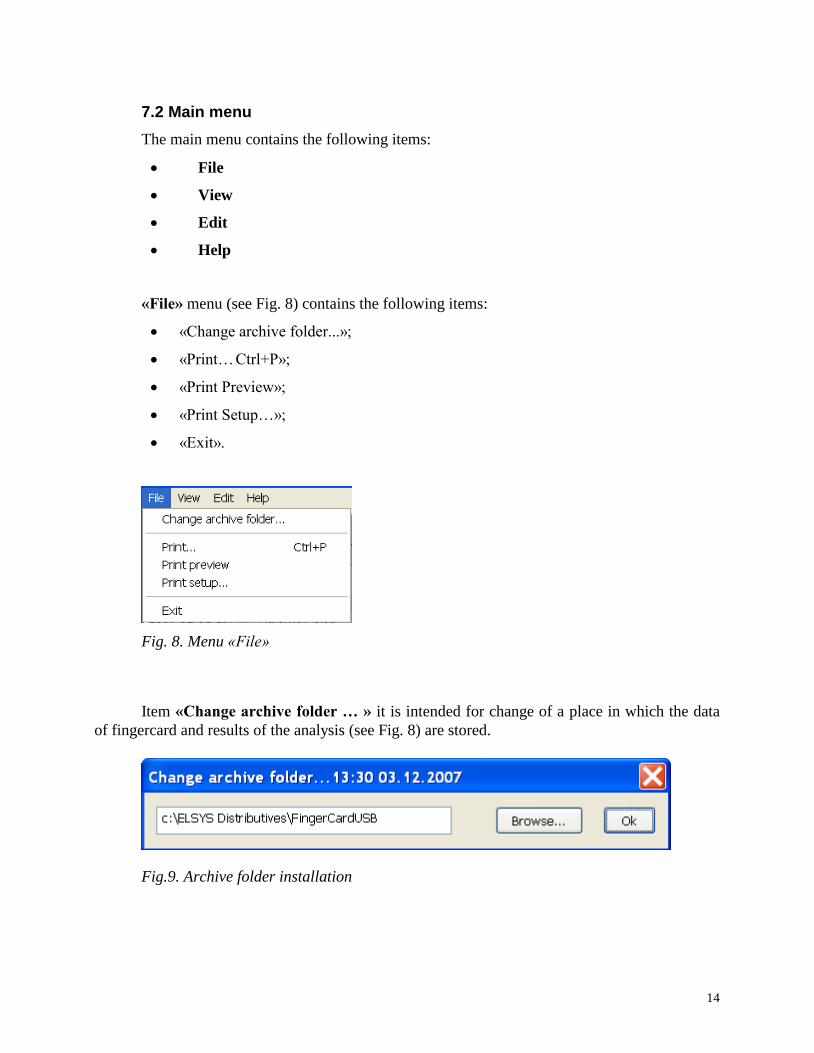
2. Run FingerCard.exe programs and check up serviceability of the scanner. Note, that in
some programs it can be demanded in addition to specify with what model of fingerprint
scanner you work. On Fig. 4 was selected DC21U scanner.
3. In FingerCard program to make a choice of folder for record dactocard and results of the
analysis (see item 7.6 of the present description).
Fig. 4. Selection of DC_USB device (DC21U) in FingerCard program.

10
6.4 FingerCard installation from internet
Note
1. Activation procedure is needed to do only one time during the first program start.
2. One activation code allows FingerCard program activation only on one PC.
3. Program activation is possible only for PC connected to the internet.
Activation method
1. Run FingerCardSetup.msi file (downloaded from internet) and goes for Windows
instructions.
2. In the installation window press button Next.
3. Accept license agreement and press button Next.
4. In the shown window write the way to catalog with FingerCard program operation and
press button Next.
5. In the appeared window press button Next for installation program on your PC.
6. For finishing installation process press button Close on the window.
7. After installation you will see the FingerCard mark on PC screen.
8. Restart your PC

11
6.5 FingerCard activation
Activation procedure
1. Start FingerCard.exe program from the screen of your PC.
2. You see activation window shown on the Fig.5
Fig. 5. First start of activation window.
3. Put activation code received from the e-mail into area Request. After putting code in
Request Area press button Get Answer code using HTTP.
4. Activation code would be tested by internet testing and after successful confirmation you
receive confirmation code (see Fig 6)
Fig. 6. Received confirmation code from internet
5. Press button OK and FingerCard program starts automatically
6. Start operation with FingerCard program.
12
7. FingerCard. User guide
7.1. Main module (FingerCard.exe)
The program FingerCard allows removing and saving in a database 10 fingerprints of a
person, to provide processing, and dermatoglyphics analysis, to define psycho-physiological
parameters of the person, temperament, Multiply Intelligences Levels and printing a fingerprint
portrait of the person (see Fig.9 ).
7.1.1. Main window
Main window (see Fig. 8) consists of the following parts:
main menu;
list of person;
area of print;
toolbar;
The list of persons (see Fig. 7) is intended for display of the list of records of fingerprint
archive and a choice of record for viewing and a print.
At a choice the current record is allocated with the cursor, corresponding to it fingerprints,
results of the analysis and the demographic information are displayed in the area of print.
Area of print (see Fig. 7) it is intended for display fingerprints, results of the analysis and
the demographic information, corresponding to the current record of the list of person.

13
Fig. 7. Main window of FingerCard.exe
14
7.2 Main menu
The main menu contains the following items:
File
View
Edit
Help
«File» menu (see Fig. 8) contains the following items:
«Change archive folder...»;
«Print… Ctrl+P»;
«Print Preview»;
«Print Setup…»;
«Exit».
Fig. 8. Menu «File»
Item «Change archive folder … » it is intended for change of a place in which the data
of fingercard and results of the analysis (see Fig. 8) are stored.
Fig.9. Archive folder installation
15
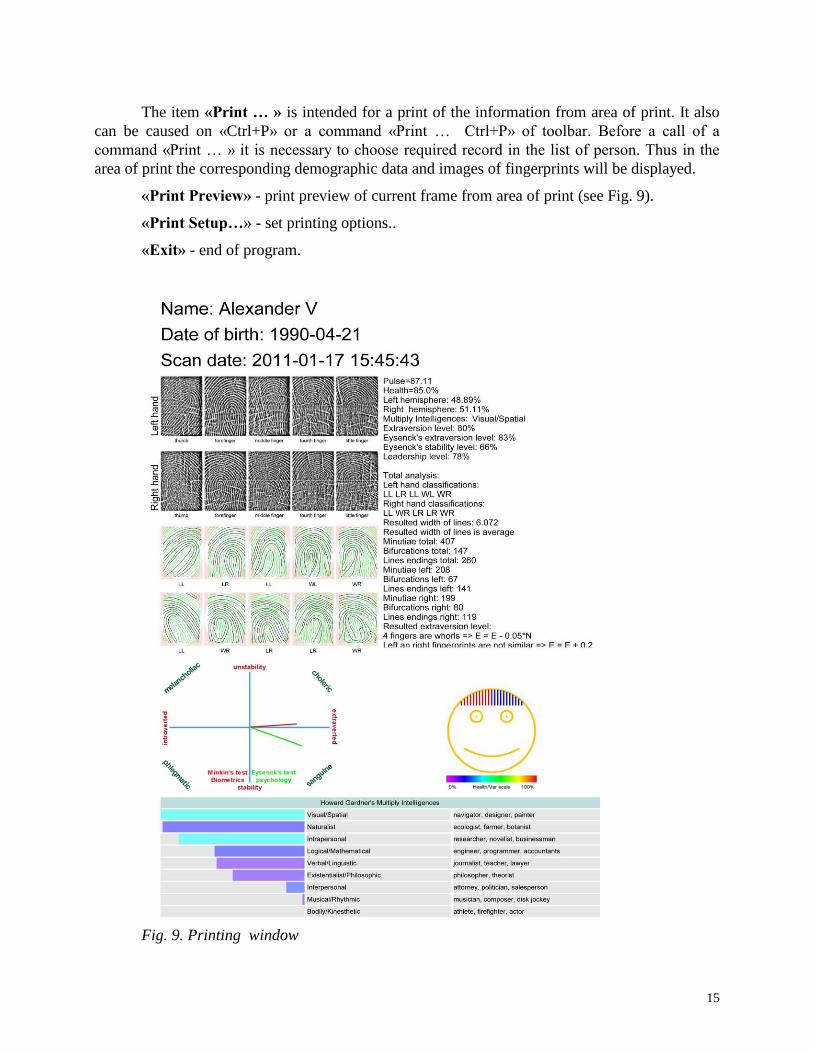
The item «Print … » is intended for a print of the information from area of print. It also
can be caused on «Ctrl+P» or a command «Print … Ctrl+P» of toolbar. Before a call of a
command «Print … » it is necessary to choose required record in the list of person. Thus in the
area of print the corresponding demographic data and images of fingerprints will be displayed.
«Print Preview» - print preview of current frame from area of print (see Fig. 9).
«Print Setup…» - set printing options..
«Exit» - end of program.
Fig. 9. Printing window
16
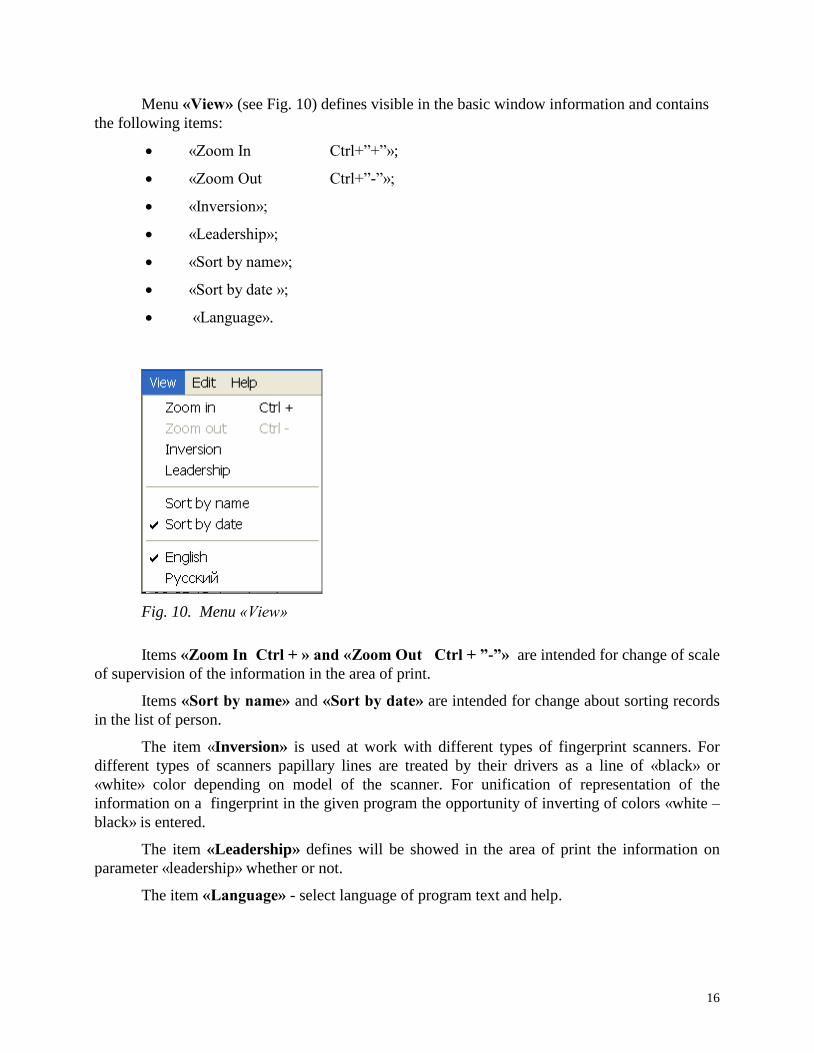
Menu «View» (see Fig. 10) defines visible in the basic window information and contains
the following items:
«Zoom In Ctrl+”+”»;
«Zoom Out Ctrl+”-”»;
«Inversion»;
«Leadership»;
«Sort by name»;
«Sort by date »;
«Language».
Fig. 10. Menu «View»
Items «Zoom In Ctrl + » and «Zoom Out Ctrl + ”-”» are intended for change of scale
of supervision of the information in the area of print.
Items «Sort by name» and «Sort by date» are intended for change about sorting records
in the list of person.
The item «Inversion» is used at work with different types of fingerprint scanners. For
different types of scanners papillary lines are treated by their drivers as a line of «black» or
«white» color depending on model of the scanner. For unification of representation of the
information on a fingerprint in the given program the opportunity of inverting of colors «white –
black» is entered.
The item «Leadership» defines will be showed in the area of print the information on
parameter «leadership» whether or not.
The item «Language» - select language of program text and help.
17
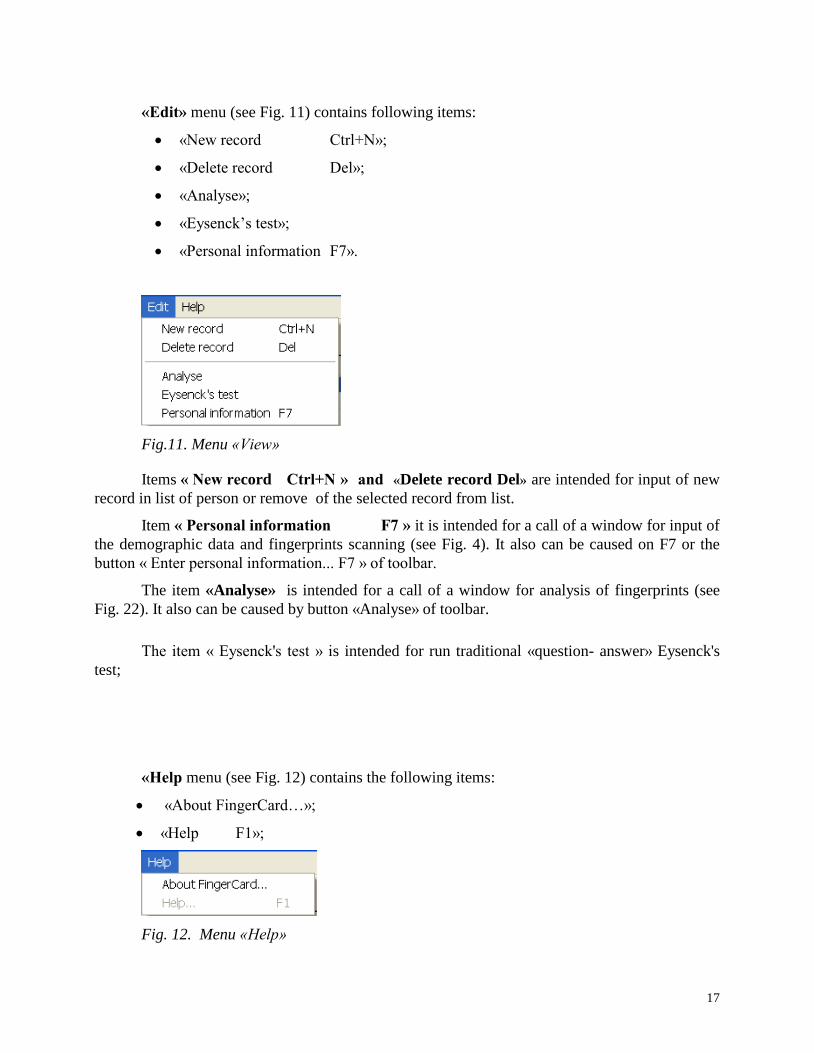
«Edit» menu (see Fig. 11) contains following items:
«New record Ctrl+N»;
«Delete record Del»;
«Analyse»;
«Eysenck’s test»;
«Personal information F7».
Fig.11. Menu «View»
Items « New record Ctrl+N » and «Delete record Del» are intended for input of new
record in list of person or remove of the selected record from list.
Item « Personal information F7 » it is intended for a call of a window for input of
the demographic data and fingerprints scanning (see Fig. 4). It also can be caused on F7 or the
button « Enter personal information... F7 » of toolbar.
The item «Analyse» is intended for a call of a window for analysis of fingerprints (see
Fig. 22). It also can be caused by button «Analyse» of toolbar.
The item « Eysenck's test » is intended for run traditional «question- answer» Eysenck's
test;
«Help menu (see Fig. 12) contains the following items:
«About FingerCard…»;
«Help F1»;
Fig. 12. Menu «Help»
18
Use «About FingerCard…» …» command to view the information about software
version.
Use «Help» command to call the help system.
Fig. 13. Information about program version
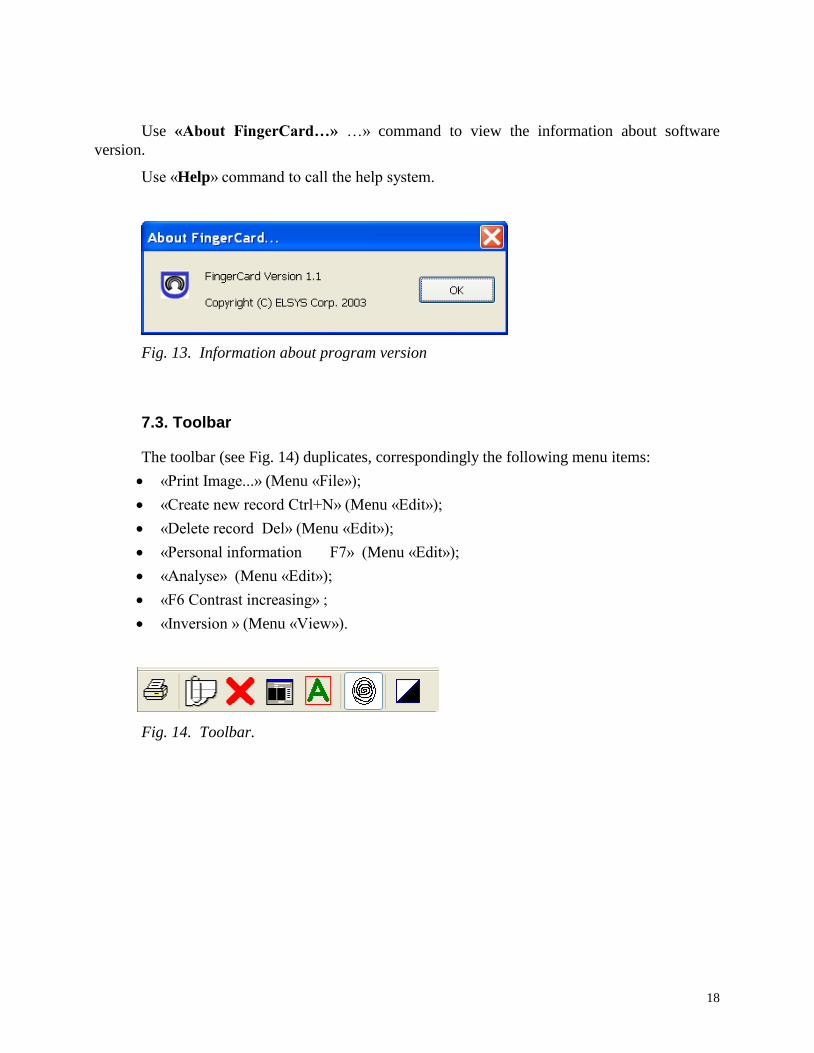
7.3. Toolbar
The toolbar (see Fig. 14) duplicates, correspondingly the following menu items:
«Print Image...» (Menu «File»);
«Create new record Ctrl+N» (Menu «Edit»);
«Delete record Del» (Menu «Edit»);
«Personal information F7» (Menu «Edit»);
«Analyse» (Menu «Edit»);
«F6 Contrast increasing» ;
«Inversion » (Menu «View»).
Fig. 14. Toolbar.
19
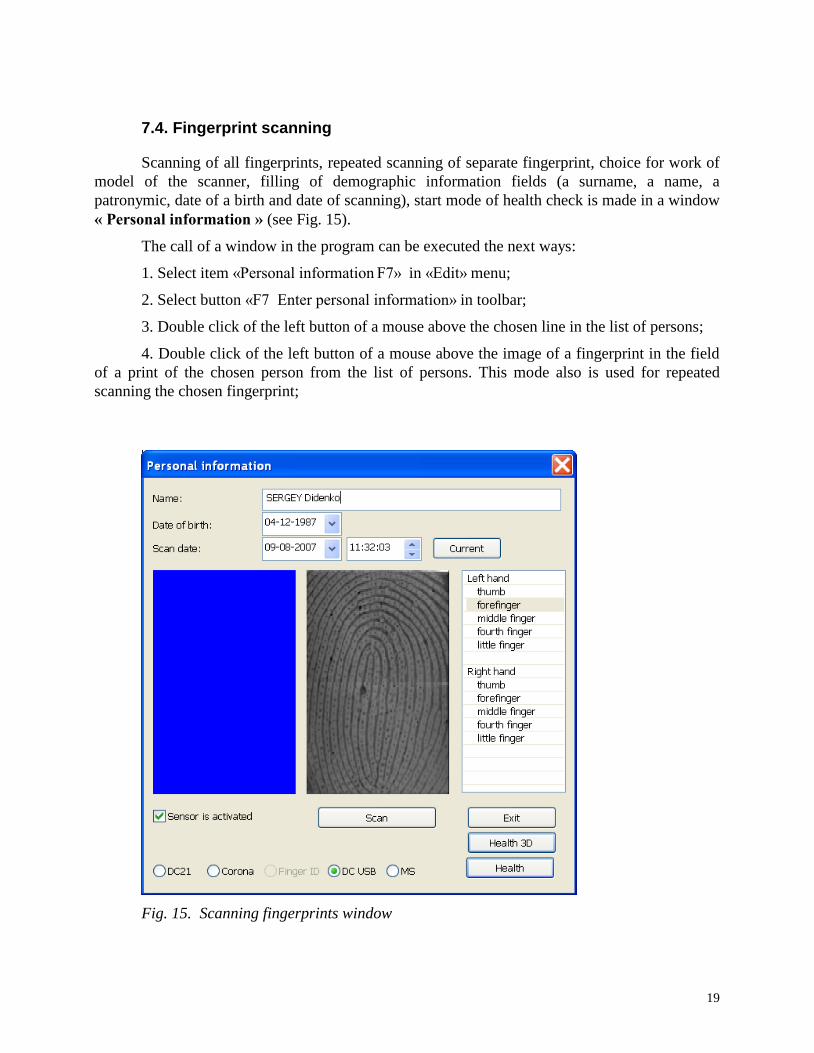
7.4. Fingerprint scanning
Scanning of all fingerprints, repeated scanning of separate fingerprint, choice for work of
model of the scanner, filling of demographic information fields (a surname, a name, a
patronymic, date of a birth and date of scanning), start mode of health check is made in a window
« Personal information » (see Fig. 15).
The call of a window in the program can be executed the next ways:
1. Select item «Personal information F7» in «Edit» menu;
2. Select button «F7 Enter personal information» in toolbar;
3. Double click of the left button of a mouse above the chosen line in the list of persons;
4. Double click of the left button of a mouse above the image of a fingerprint in the field
of a print of the chosen person from the list of persons. This mode also is used for repeated
scanning the chosen fingerprint;
Fig. 15. Scanning fingerprints window

20
For scanning fingerprints it is necessary to execute the following actions:
1. To choose type of the scanner of fingerprints which is connected to a computer;
2. input demographic data of person;
3. Having pressed button «Current» to install date of scanning. Note, that the data in
archive for each person are stored in separate folders, as a name of a folder date of
scanning is used. For example, the folder «20070624190941» has been created 24-06-
2007 years at 19 o'clock 09 minutes and 41 second;
4. To choose from what finger to begin scanning. Note, after pressing button «Scan» the
pointer of «the current finger» automatically will pass on the following under the list a
finger in 5 seconds. To look the scanned print, it is necessary to choose the mouse
pointer the name of a required finger;
5. To put on a finger in the scanner. In the left window the image of a fingerprint
received from the scanner will appear.
Fig. 16. Scanning of an index finger of the left hand has passed successfully. The
finger is correctly located in scanner.
21
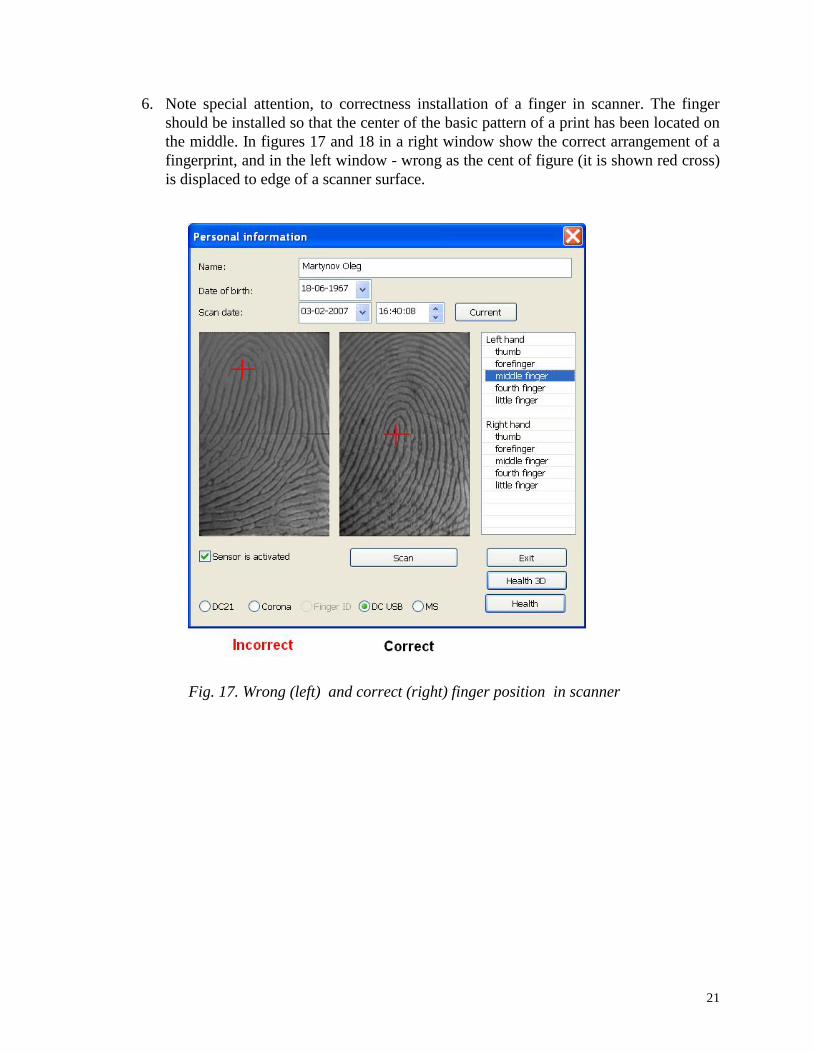
6. Note special attention, to correctness installation of a finger in scanner. The finger
should be installed so that the center of the basic pattern of a print has been located on
the middle. In figures 17 and 18 in a right window show the correct arrangement of a
fingerprint, and in the left window - wrong as the cent of figure (it is shown red cross)
is displaced to edge of a scanner surface.
Fig. 17. Wrong (left) and correct (right) finger position in scanner
22
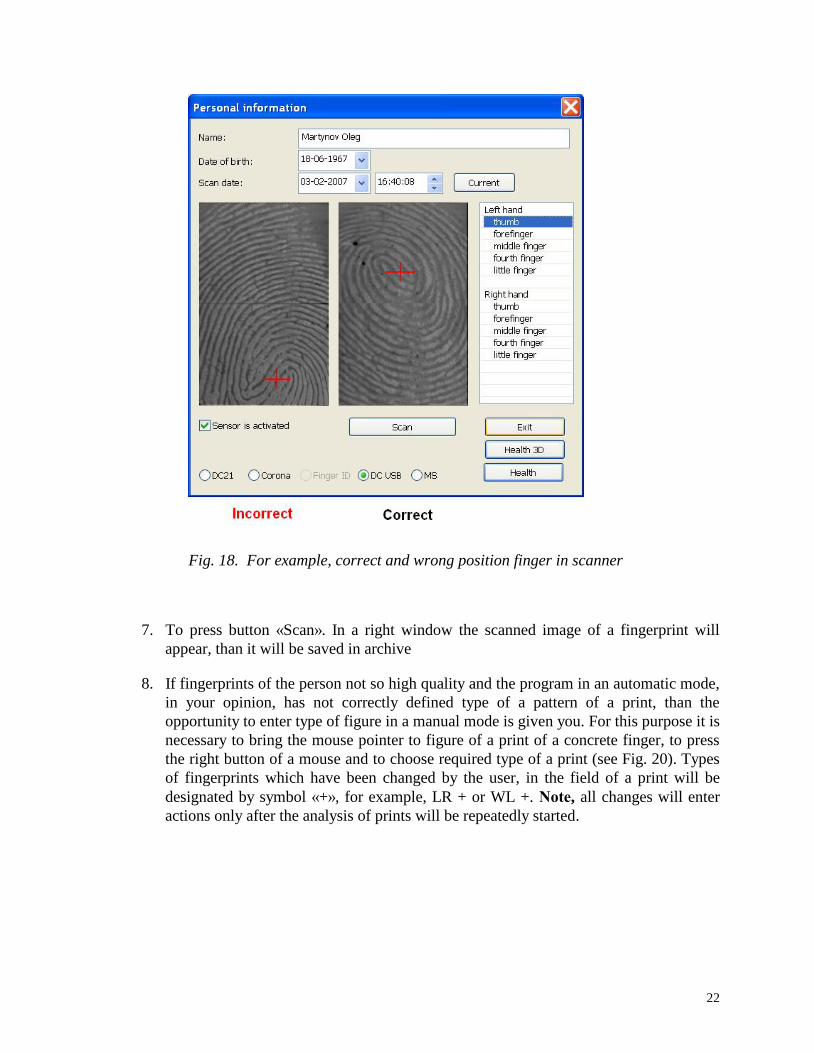
Fig. 18. For example, correct and wrong position finger in scanner
7. To press button «Scan». In a right window the scanned image of a fingerprint will
appear, than it will be saved in archive
8. If fingerprints of the person not so high quality and the program in an automatic mode,
in your opinion, has not correctly defined type of a pattern of a print, than the
opportunity to enter type of figure in a manual mode is given you. For this purpose it is
necessary to bring the mouse pointer to figure of a print of a concrete finger, to press
the right button of a mouse and to choose required type of a print (see Fig. 20). Types
of fingerprints which have been changed by the user, in the field of a print will be
designated by symbol «+», for example, LR + or WL +. Note, all changes will enter
actions only after the analysis of prints will be repeatedly started.
23
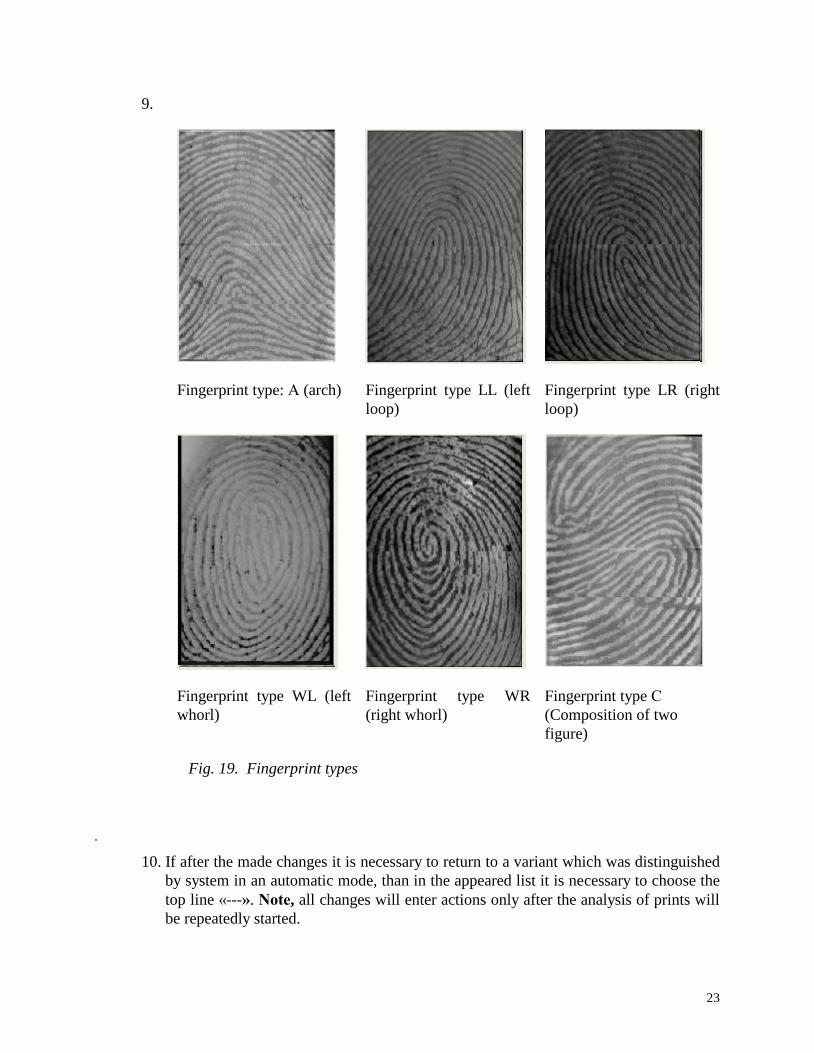
9.
Fingerprint type: А (arch) Fingerprint type LL (left
loop)
Fingerprint type LR (right
loop)
Fingerprint type WL (left
whorl)
Fingerprint type WR
(right whorl)
Fingerprint type С
(Composition of two
figure)
Fig. 19. Fingerprint types
.
10. If after the made changes it is necessary to return to a variant which was distinguished
by system in an automatic mode, than in the appeared list it is necessary to choose the
top line «---». Note, all changes will enter actions only after the analysis of prints will
be repeatedly started.

24
Fig. 20. Input of fingerprint image type in a manual mode
25
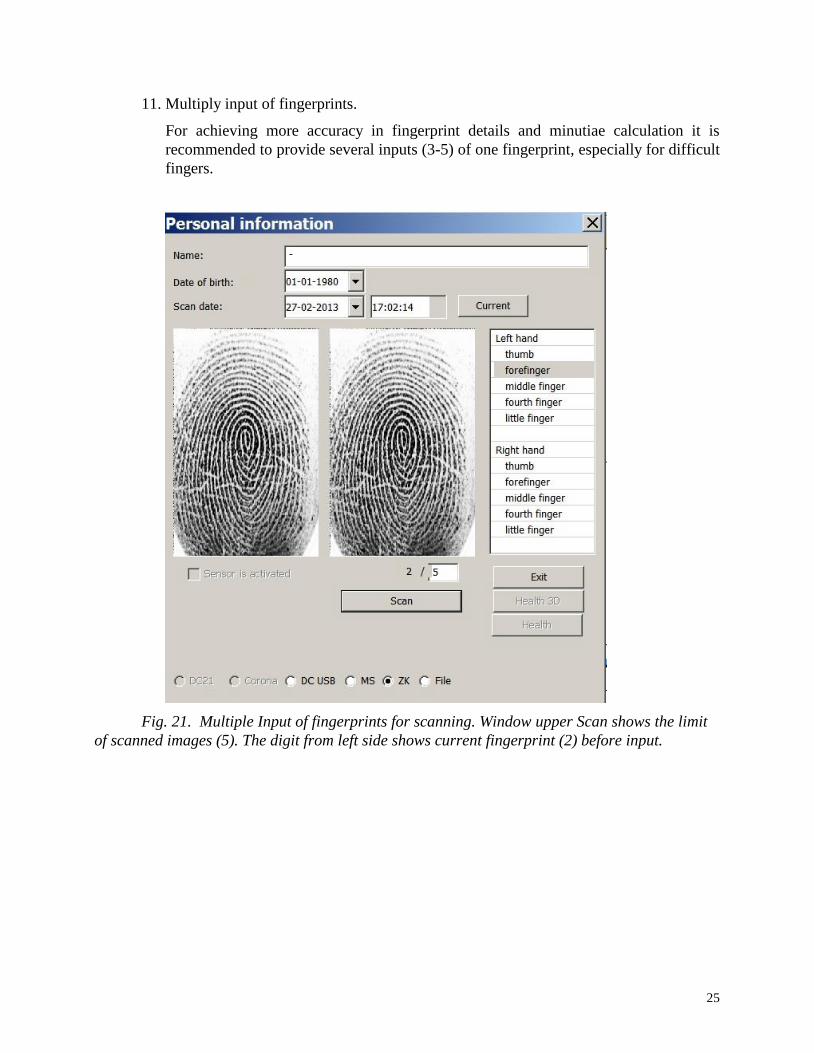
11. Multiply input of fingerprints.
For achieving more accuracy in fingerprint details and minutiae calculation it is
recommended to provide several inputs (3-5) of one fingerprint, especially for difficult
fingers.
Fig. 21. Multiple Input of fingerprints for scanning. Window upper Scan shows the limit
of scanned images (5). The digit from left side shows current fingerprint (2) before input.

26
12. Fingerprint input from file
Biofinger system allows input fingerprints scanned on any scanner and even inked
printed on paper and scanned by usual scanner. In this case fingerprint images usually
stored as bmp files. You can stand mark for downloading fingerprints from file
(Fig.22) and stand corresponding resolution of fingerprint scanning. So you can input
any finger or 10 fingerprints into Biofinger system and conclude remote
dermatoglyphic analysis for any person distantly sent to you fingerprints,
Fig. 22. Fingerprint input from file. Resolution 500 dpi
During the input of fingerprint file you need to move image and select central area of
fingerprint (red area) as it shown on the Fig 23.b instead of original scan shown on the
Fig. 23a.
Fig. 23a. Original scan Fig. 23b. Selected area of scan
27
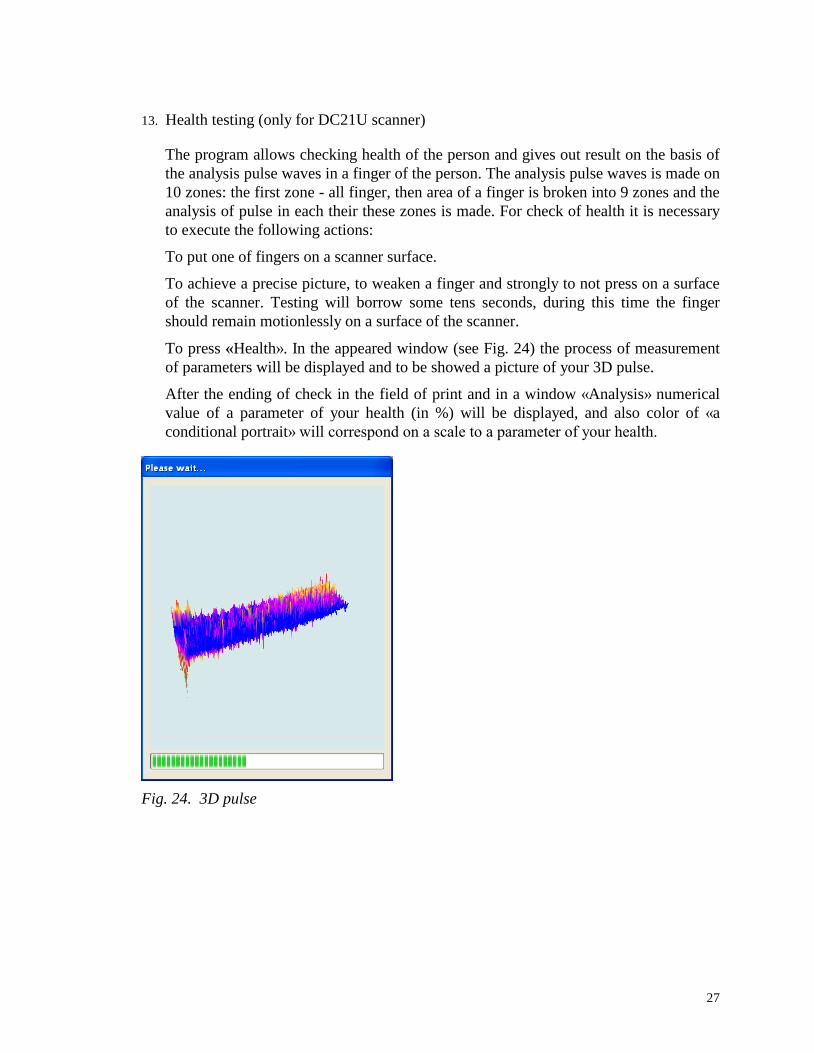
13. Health testing (only for DC21U scanner)
The program allows checking health of the person and gives out result on the basis of
the analysis pulse waves in a finger of the person. The analysis pulse waves is made on
10 zones: the first zone - all finger, then area of a finger is broken into 9 zones and the
analysis of pulse in each their these zones is made. For check of health it is necessary
to execute the following actions:
To put one of fingers on a scanner surface.
To achieve a precise picture, to weaken a finger and strongly to not press on a surface
of the scanner. Testing will borrow some tens seconds, during this time the finger
should remain motionlessly on a surface of the scanner.
To press «Health». In the appeared window (see Fig. 24) the process of measurement
of parameters will be displayed and to be showed a picture of your 3D pulse.
After the ending of check in the field of print and in a window «Analysis» numerical
value of a parameter of your health (in %) will be displayed, and also color of «a
conditional portrait» will correspond on a scale to a parameter of your health.
Fig. 24. 3D pulse

28
7.5. Fingerprint analyze
The analysis of the scanned fingerprints is made in a window «Analysis» (see Fig. 25).
The call of «Analyse» window in the program can be executed the next ways:
1. Select item «Analyse» in «Edit» menu;
2. Select button «Analyse » in toolbar;
Fig.25. Window for analyze of fingerprints
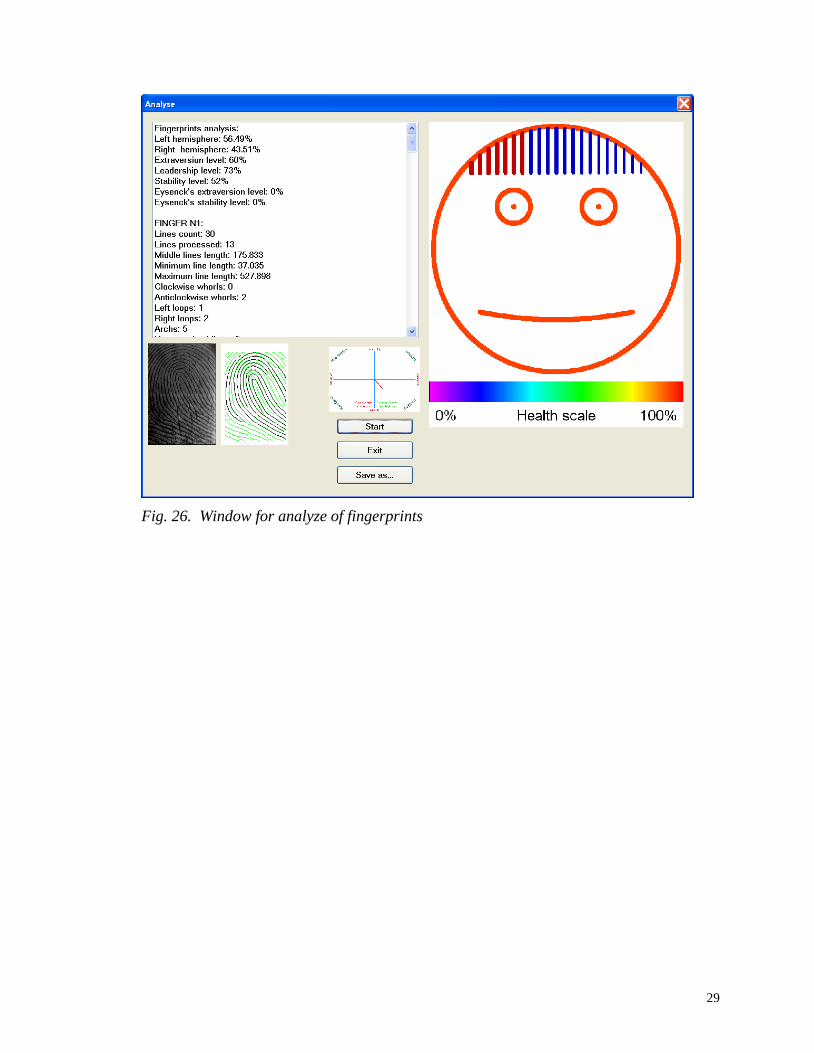
After pressing buttons «Start» the analysis of your fingerprints will be started. Results of
the analysis will be given at once on the screen as the text data and color changes of «a
conditional portrait» (see Fig. 25, 26) and also results will be automatically saved in a folder of
archive in corresponding files.
If necessary results of the analysis of fingerprints can be saved in any place which can be
specified, having pressed «Save As …».
29
Fig. 26. Window for analyze of fingerprints

30
As a result of the analysis the following information will be given:
1. For each finger calculation of pattern parameters (see Fig. 27) will be made. Results
will be save in a corresponding folder of archive in a file named Analyse.txt
Fingerprints analysis:
FINGER N1:
Lines count: 43
Lines processed: 14
Middle lines length: 141.392
Minimum line length: 91.870
Maximum line length: 365.248
Clockwise whorls: 0
Anticlockwise whorls: 0
Left loops: 3
Right loops: 1
Archs: 10
Unrecognized lines: 0
Unprocessed lines: 0
Bifurcations: 6
Lines endings: 20
Middle lines width: 5.970
Fingerprint class: LL
. . . .
Fig. 27. File analyse.txt. Analyze results for finger №1
2. In a file Analyse.txt and on the working screen as total results of patterns parameters
for all fingerprints will be displayed (see Fig. 28).
Total analysis:
Left hand classifications:
WL LL LL WL WL
Right hand classifications:
WL LL LR WL LR
Resulted width of lines: 6.165
Resulted width of lines is average
Minutiae total: 262
Bifurcations total: 96
Lines endings total: 166
Minutiae left: 114
Bifurcations left: 43
Lines endings left: 71
Minutiae right: 148
Bifurcations right: 53
Lines endings right: 95
Fig. 28. File analyse.txt. Ten finger analyze results

31
3. As in a file Analyse.txt the calculation results of the analysis of your psychological
portrait (see Fig. 29) will be displayed on the working screen, also as show what
specified features of your fingerprints patterns are taken into account at the analysis.
Fingerprints analysis:
Left hemisphere: 56.49%
Right hemisphere: 43.51%
Extraversion level: 60%
Leadership level: 73%
Stability level: 52%
Eysenck's extraversion level: 0%
Eysenck's stability level: 0%
. . . . .
Resulted extraversion level:
Left an right fingerprints are not
similar => E = E + 0.1
There are 5 similar fingerprints
against 5 => E = E + 0.2
One reverse loop in right hand =>
E = E - 0.2
Fig. 29. File analyse.txt. Results of the analysis of a psychological portrait
4. For presentation results of the analysis of a psychological portrait are displayed in the
graphic form as a fingerprint portrait (see Fig. 35). Left(right)-hemisphere it is
displayed as vertical lines red (right-hemisphere) and blue color (left- hemisphere).
Color of a contour of «a conditional portrait » characterizes parameter «Health». And a
smile – extraversion and introversion. At introverts the smile is directed downwards «a
sad conditional portrait», and at extroverts - upwards «a cheerful conditional portrait ».
32
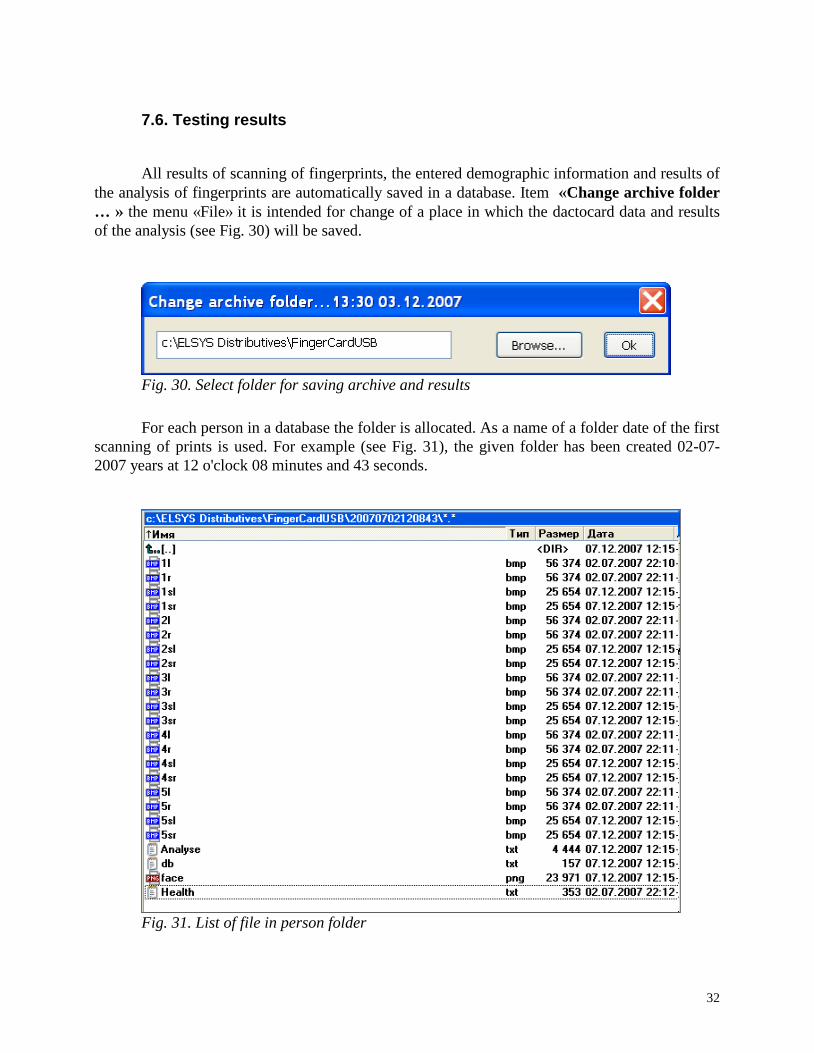
7.6. Testing results
All results of scanning of fingerprints, the entered demographic information and results of
the analysis of fingerprints are automatically saved in a database. Item «Change archive folder
… » the menu «File» it is intended for change of a place in which the dactocard data and results
of the analysis (see Fig. 30) will be saved.
Fig. 30. Select folder for saving archive and results
For each person in a database the folder is allocated. As a name of a folder date of the first
scanning of prints is used. For example (see Fig. 31), the given folder has been created 02-07-
2007 years at 12 o'clock 08 minutes and 43 seconds.
Fig. 31. List of file in person folder
33
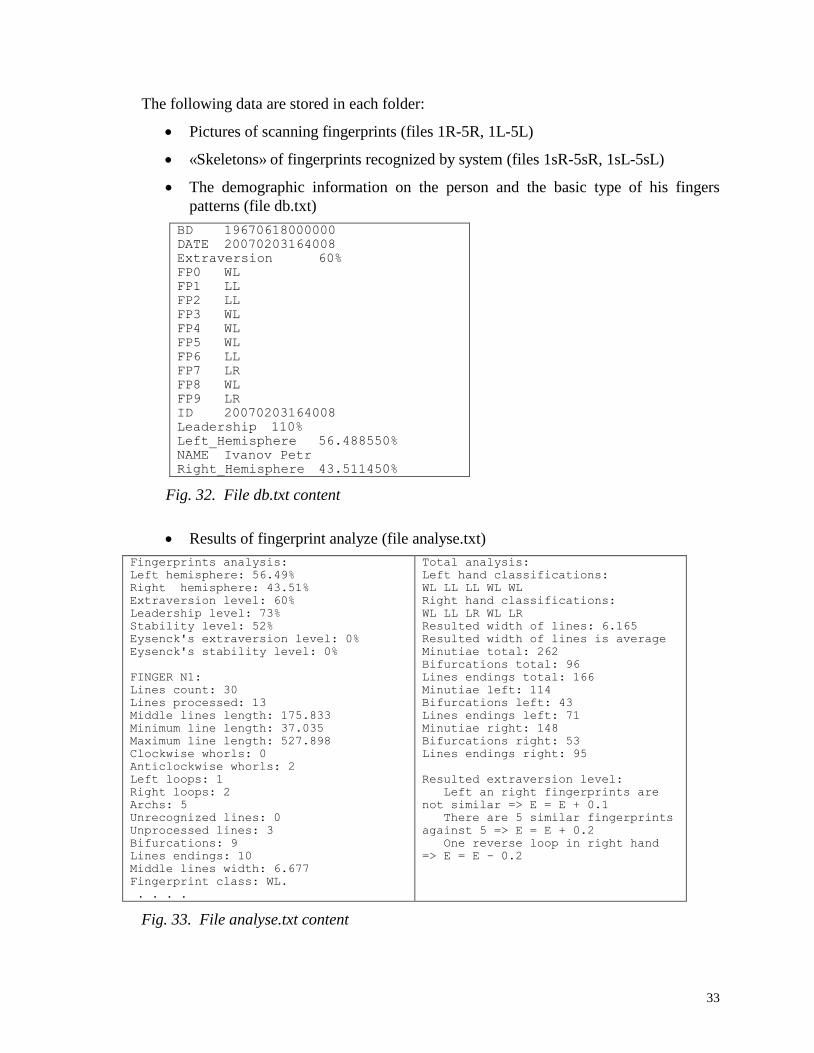
The following data are stored in each folder:
Pictures of scanning fingerprints (files 1R-5R, 1L-5L)
«Skeletons» of fingerprints recognized by system (files 1sR-5sR, 1sL-5sL)
The demographic information on the person and the basic type of his fingers
patterns (file db.txt)
BD 19670618000000
DATE 20070203164008
Extraversion 60%
FP0 WL
FP1 LL
FP2 LL
FP3 WL
FP4 WL
FP5 WL
FP6 LL
FP7 LR
FP8 WL
FP9 LR
ID 20070203164008
Leadership 110%
Left_Hemisphere 56.488550%
NAME Ivanov Petr
Right_Hemisphere 43.511450%
Fig. 32. File db.txt content
Results of fingerprint analyze (file analyse.txt)
Fingerprints analysis:
Left hemisphere: 56.49%
Right hemisphere: 43.51%
Extraversion level: 60%
Leadership level: 73%
Stability level: 52%
Eysenck's extraversion level: 0%
Eysenck's stability level: 0%
FINGER N1:
Lines count: 30
Lines processed: 13
Middle lines length: 175.833
Minimum line length: 37.035
Maximum line length: 527.898
Clockwise whorls: 0
Anticlockwise whorls: 2
Left loops: 1
Right loops: 2
Archs: 5
Unrecognized lines: 0
Unprocessed lines: 3
Bifurcations: 9
Lines endings: 10
Middle lines width: 6.677
Fingerprint class: WL.
. . . .
Total analysis:
Left hand classifications:
WL LL LL WL WL
Right hand classifications:
WL LL LR WL LR
Resulted width of lines: 6.165
Resulted width of lines is average
Minutiae total: 262
Bifurcations total: 96
Lines endings total: 166
Minutiae left: 114
Bifurcations left: 43
Lines endings left: 71
Minutiae right: 148
Bifurcations right: 53
Lines endings right: 95
Resulted extraversion level:
Left an right fingerprints are
not similar => E = E + 0.1
There are 5 similar fingerprints
against 5 => E = E + 0.2
One reverse loop in right hand
=> E = E - 0.2
Fig. 33. File analyse.txt content
34
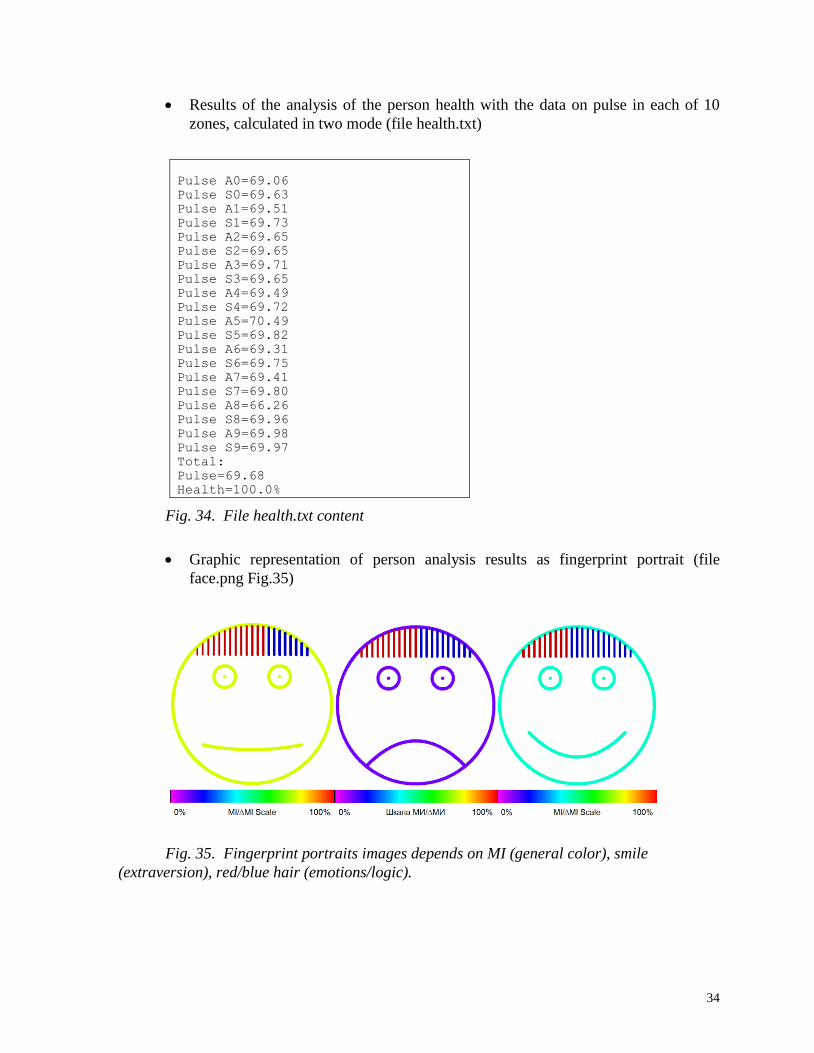
Results of the analysis of the person health with the data on pulse in each of 10
zones, calculated in two mode (file health.txt)
Pulse A0=69.06
Pulse S0=69.63
Pulse A1=69.51
Pulse S1=69.73
Pulse A2=69.65
Pulse S2=69.65
Pulse A3=69.71
Pulse S3=69.65
Pulse A4=69.49
Pulse S4=69.72
Pulse A5=70.49
Pulse S5=69.82
Pulse A6=69.31
Pulse S6=69.75
Pulse A7=69.41
Pulse S7=69.80
Pulse A8=66.26
Pulse S8=69.96
Pulse A9=69.98
Pulse S9=69.97
Total:
Pulse=69.68
Health=100.0%
Fig. 34. File health.txt content
Graphic representation of person analysis results as fingerprint portrait (file
face.png Fig.35)
Fig. 35. Fingerprint portraits images depends on MI (general color), smile
(extraversion), red/blue hair (emotions/logic).

35
Graphic representation of results of the analysis of the person temperament as « the
conditional schedule». Results are calculated by two mode: on a standard
questionnaire and under the analysis of fingerprints (file ImgA.png Fig.33)
Fig. 36. File face.png content
Multiply Intelligences (MI level) dermatogliphic analysis results coordinated with
Howard Gardner theory are presented as colored histogram on right column of Fig.
33. Maximum levels of Multiply Intelligences are putting in up position. Color of
every MI are fixed and based on color scale MI/∆MI shown on Fig. 35
For Fig. 37 maximum MI level has Logical/Mathematical Intelligence and this
intelligence also has middle variability level, so during the development and
education this intelligence could be greatly more than Naturalist (the second
position in MI classification).
Fig. 37. Multiply Intelligences levels and variability histogram
36
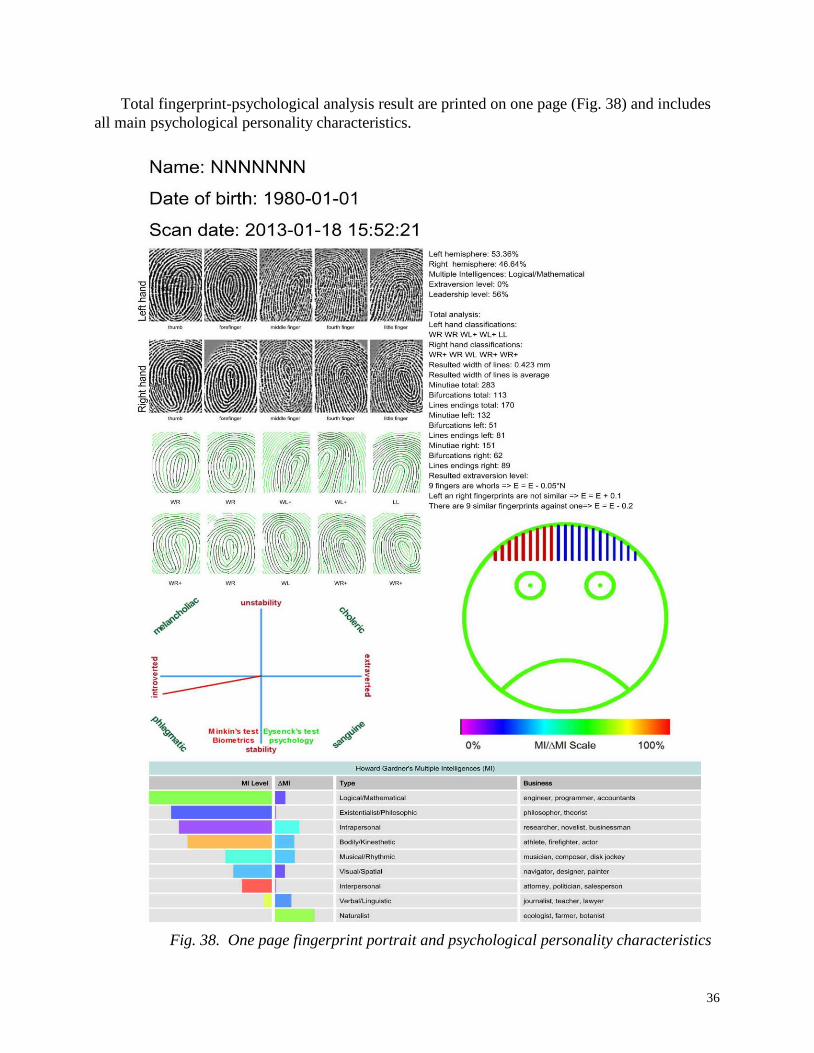
Total fingerprint-psychological analysis result are printed on one page (Fig. 38) and includes
all main psychological personality characteristics.
Fig. 38. One page fingerprint portrait and psychological personality characteristics
37
8. Maintenance
Maintenance service and service regulations of FingerCard system is carried out according
to the given Description and instructions on used hardware (computer, fingerprint scanner, etc.).
8.1. FingerCard (Inet version) reinstallation to other PC
It is possible to uninstall and install FingerCard program on one PC, or reinstall program from
one PC to other PC. User need to do the following operations:
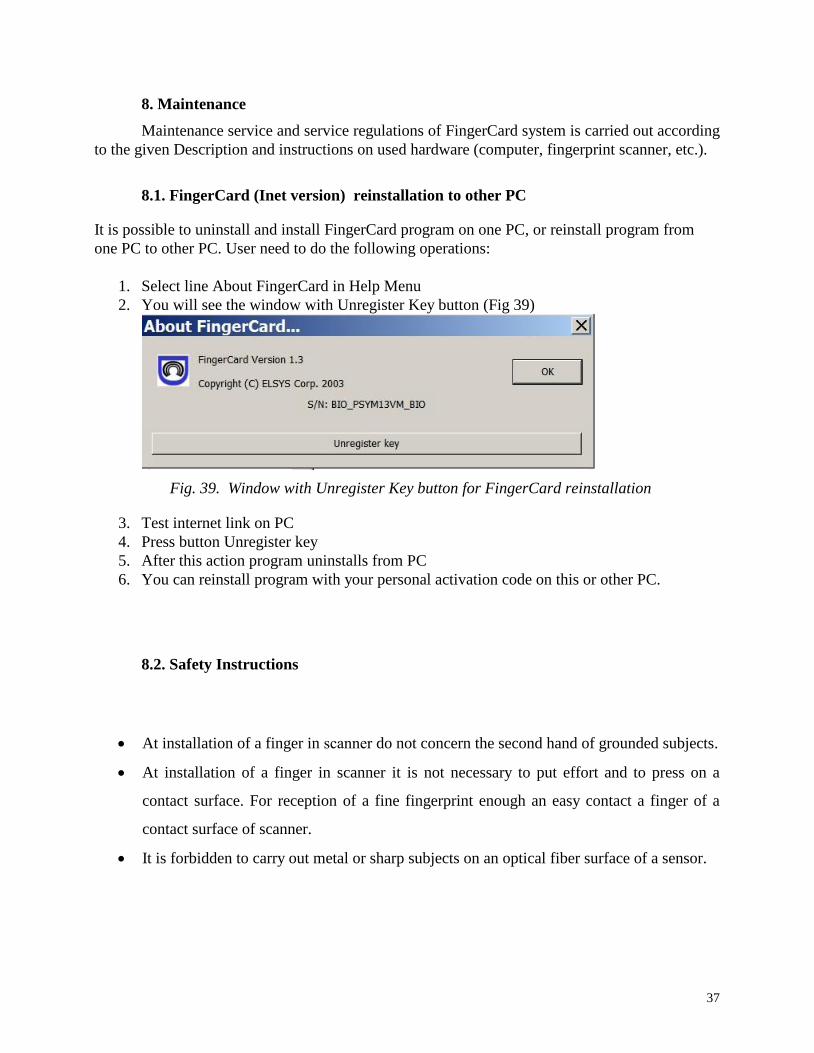
1. Select line About FingerCard in Help Menu
2. You will see the window with Unregister Key button (Fig 39)
Fig. 39. Window with Unregister Key button for FingerCard reinstallation
3. Test internet link on PC
4. Press button Unregister key
5. After this action program uninstalls from PC
6. You can reinstall program with your personal activation code on this or other PC.
8.2. Safety Instructions
At installation of a finger in scanner do not concern the second hand of grounded subjects.
At installation of a finger in scanner it is not necessary to put effort and to press on a
contact surface. For reception of a fine fingerprint enough an easy contact a finger of a
contact surface of scanner.
It is forbidden to carry out metal or sharp subjects on an optical fiber surface of a sensor.

38
NOTE: the Manufacturer reserves rights to make technical changes in operation and
description of dermatoglyphic system FingerCard (Biofinger) without notice.
Developed and produced by Elsys Corp. All rights reserved.
Russia, 194223 St. Petersburg, Toreza, 68.
Ph./fax: +7-812-552 67 19
E-mail: [email protected]
www.elsys.ru
www.psymaker.com