first2cut 6 draft - united states army · “antenna to high power line — electrical injury ”...
TRANSCRIPT


Front Cover Photo Credits
PFC Kyle Hockenberry, who was injured by an improvised explosive device, is treated by flight medic Cpl. Amanda Mosher while being transported by medevac helicopter to the Role 3 hospital at Kandahar Air Field, Afghanistan, June, 15, 2011. His tattoo reads “For Those I Love I Will Sacrifice.” (Photo by Stars and Stripes reporter Laura Rauch.)
Taken by LTC Shawn C. Nessen at Orgun‐e, Afghanistan, during the summer of 2007.
Two tables with five board‐certified general surgeons performing two damage control laparotomies at a CSH. (Photo by MAJ Thomas Repine, 31
st CSH, Bagdad, Iraq, 2004)
Second Edition Published by the U.S. Army Institute of Surgical Research
Fort Sam Houston, Texas March 2012

First to Cut
i
Table of Contents i
Figures ix
Contributors xi
Disclaimer xiii
Dedication xiv
Preface xv
Introduction 1
Fragment Wounds 5
“Bleeding under the drapes” 6
“He had fragments all over his abdomen, and the FAST was negative” 7
“Massive facial frag wounds and bleeding” 8
“Creative wound vacs 101” 9
“Wrong fragment projection” 10
“Explosion frags, blunt trauma, and burn injury” 11
“Frag wounds head to toes – which cavity first?” 12
“How long do I continue the antibiotics?” 13
“Thigh fragments just underneath the skin” 14
“I packed the wound with KERLIX™, but it kept bleeding” 15
“Full‐thickness bowel burn” 16
“Local national – frag wounds everywhere – tetanus prophy?” 17
“Frag wounds – he will never change the dressings” 18
“A 24‐y.o. male injured in an IED blast” 19
“A 43‐y.o. male with a 5‐cm fragment wound in his back from an IED explosion” 20
“A 23‐y.o. patient with IED blast wounds to the abdomen and extremities” 21
“How do I deal with a soldier with multiple amputations?” 22
First to Cut
ii
Damage Control Resuscitation 25
“We gave him FFP but his INR was over 2 in the ICU” 26
“O negative whole blood” 27
“Is there an FFP universal donor?” 28
“Factor VIIa” 29
“Why didn’t you tell me you were giving neo?” 30
“How do I handle unstoppable oozing?” 31
Extremity and Vascular Injuries 33
“Resuscitation and field tourniquets” 34
“Multiple frag wounds up and down the leg and no pulse” 36
“A pulseless leg all by yourself – way out” 37
“We don’t need no stinking proximal control!” 39
“Four hours of tourniquet time” 40
“I do this cool one‐incision fasciotomy” 41
“The popliteal artery and vein were transected” 42
“The femoral artery was transected, and the femur was in two pieces” 43
“GSW transecting the subclavian artery, near death” 44
“Aortic injury – we tried and tried to put in a graft, but then she became coagulopathic” 45
“External iliac artery transection, stool everywhere, and no long grafts” 46
“Damage control laparotomy in extremis and a transected brachial artery” 47
“Exsanguinating axillary artery wound” 48
“Land mine injury to lower leg – and pus” 49
“What is that mold doing there?” 50
First to Cut
iii
Abdominal Injuries 51
“Colon frag wounds – blow it up” 52
“Packed abdomen and no abd wound vacs around” 53
“GSW through the colon and a bullet in the psoas muscle” 54
“IVC injury – we tried to fix it but had to ligate” 55
“The portal vein was transected – I tried to fix it; but the patient became coagulopathic, and I had 3 units of blood left.” 56
“Frag right through the right hepatic artery, cold, coagulopathic” 57
“Massive abdominal wall destruction” 58
“GSW right through the head of the pancreas and the duodenum” 59
“Ah, the packing will stop the bleeding” 60
“The rectum and nec fasc” 61
“Pelvic fracture and hypotensive” 62
“Transpelvic GSW and interventional radiology…NOT!” 63
“Stomach multiple frag wounds – blow it up” 64
“Isolated frag wounds to the RUQ and liver” 65
“The spleen had a small piece hanging off” 66
“A large retroperitoneal hematoma (exposures)” 67
“Colon injury and a red wound” 68
“Hypothermia, frag wounds to abdomen and head” 69
“Massive colon injury – stoma or no stoma?” 70
“The pelvis was packed with two lap pads floating in a pool of blood” 72
“Hole in the stomach and left diaphragm” 73
“Entrance left lower chest – large gaping wound on right” 74
“RPG blast with massive diaphragm loss” 75
“GSW to the duodenum – getting cold” 76
“The pelvis is unstable, and the patient’s blood pressure is dropping” 77

First to Cut
iv
Urologic Injuries 79
“The bladder is blown wide open” 80
“The ureter was cut in half” 81
“The kidney had 50 small frag holes” 82
“Both testicles disrupted” 83
“GSW to the kidney and we tried to fix it, but she became coagulopathic” 84
Chest Injuries 85
“Chest frags, amputation, and 1000 cc from the chest tube” 86
“Frag wounds to ‘the box’” 87
“Hole in the heart and no pledgets” 89
“Post‐op day #5 and a retained hemothorax” 90
“Damage control and esophageal injury” 91
“Diffuse bleeding from the parietal pleural” 92
“It was just a little pneumothorax” 93
“Frag wounds with lung hamburger” 94
“Massive chest wall destruction” 95
“ER thoracotomy in a MASCAL situation” 96
“GSW to the lung” 97
“Two through‐and‐through GSWs in the left chest” 98
“Massive thoracic hemorrhage – where should I cut?” 100
Neck Injuries 101
“Exsanguinating proximal neck wound” 102
“The patient became coagulopathic, and I had to ligate the IJ” 103
“GSW to the neck – normal neuro exam and wide awake” 104
“The ORs are full, and one patient had pulsatile neck bleeding” 105
First to Cut
v
Brain and Spine Injuries 107
“Ventilation, ICP, and the brain injured” 108
“Blunt spinal cord injury and damage control” 109
“Head frag, pus, and all alone” 110
Orthopedic Injuries 111
“He had had a fasciotomy, but we’re not sure why, where, when, or how” 112
“Articular injuries to the knee” 113
“To fix or not to fix? That is the question.” 114
“Forearm fracture: rule out nerve injury” 115
“Man, that’s a big hole!” 116
“The spine was dislocated, and the patient was paraplegic” 118
“How do I get rid of these bugs?” 119
Burn Injuries 121
“Burn resuscitation and the open abdomen” 122
“Smoke inhalation – that tube better not come out” 126
“Burned fingers and the ‘escharotendonotomy’” 128
“I graft small burns, but they keep shearing” 130
“Antenna to high power line — electrical injury” 131
“Did you say, ‘depleted uranium’?” 133
“What does anyone use chlorine gas for anyway?” 134
“Willie Pete” 135
“Mustard gas – be serious – will never happen!” 137
Explosion Injuries 139
“What do I do with a primary blast injury?” 140
“The pelvis is unstable, and the patient’s blood pressure is dropping” 141
First to Cut
vi
Soft‐Tissue Injuries 143
“Large soft‐tissue injury and coagulopathy” 144
“His fevers will not go away” 145
Anesthesia 147
“Large fragment to the face” 148
“First to die was the anesthesia machine” 149
“Which patient are we talking about?” 150
“Out here, the difficult airway algorithm is very simple” 151
“The worthless femoral cordis” 152
“I’ll do that case tomorrow” 153
Triage 155
“They just kept coming, one after another” 156
“Multiple patients with belly frag wounds – all at once” 157
Military‐Unique Injuries 159
“@#%&@&, there’s an RPG round in his chest!” 160
“A local dog bit him and ran off” 161
“Working dog down, GSW to the belly” 162
“Call a surgeon” 164
“Half way around the world, and he wants a mole removed” 165
Intensive Care Unit 167
“After we closed the fascia we could not ventilate, no urine, hypotensive; he was dying” 168
“Post‐op in the ICU, he was hypotensive and getting lots of blood” 170
“Post‐op we got a CXR – classic TB” 171

First to Cut
vii
Post‐Operative Complications 173
“S/P neck exploration with a fever” 174
“Hey, that looks like a lap pad” 175
“Post‐op day #10 and an intraperitoneal abscess” 176
“Post‐op day # 8 and elevated WBC and free air on CXR” 177
“Anastomotic leak” 178
“Fascial dehiscence” 179
“Combined complications” 180
End of Life, Consent, and Ethics 181
“Three patients – one local national and two U.S. soldiers” 182
“The local national refused surgery” 183
“Transferred to a local hospital” 184
“This is futile” 185
En‐Route Care 187
Transferring an intubated patient 189
“The oxygen ran out, and then his heart slowed and then went asystolic; we started CPR” 190
“We could not ventilate him” 191
“His leg stump started to bleed” 192
“He arrived with a head injury, and his initial PCO2 was 17” 193
“She arrived cold at about 92°” 194
“On transport, the cordis shifted position” 195
Field Expediency 197
Acronyms 199

First to Cut
viii

First to Cut
ix
Figures
1. Combat damage control stages of surgical and resuscitative care 2
2. Two tables with five board‐certified general surgeons performing two damage control laparotomies at a combat support hospital (CSH) 2
3. Anatomic distribution of combat injuries 3
4. Guidelines on the use of antibiotics for treating combat injuries 3
5. Multiple full‐body fragment wounds 6
6. Multiple‐fragment wounds over the abdomen 7
7. Whole‐blood transfusion at a CSH 27
8. Double windlass tourniquet placement by a combat medic 34
9. Orthopedic pneumatic tourniquet can be placed in the ER or in the OR 34
10. Reversed interposition vein grafts in femoral arterial and venous position in thigh 36
11. Temporary interposition vascular shunt in place 38
12. Extremity vascular shunt 38
13. Bilateral incision four‐compartment fasciotomy 41
14. Subclavian artery injury 44
15. Abdominal dressing over open abdomen 53
16. Distal IVC ligated with a Prolene™ suture 55
17. STSG to granulation tissue of open abdomen 58
18. Injured spleen 66
19. Large retroperitoneal hematoma 67
20. Pelvic binder with reduced pelvic skeleton 77
21. Pelvis externally fixed 77
22. Shattered kidney 84
23. Clamshell thoracotomy exposes the heart 96
24. A pedicled groin flap covers a dorsal hand defect 116
25. Sagittal MRI demonstrating the displaced spine fracture‐dislocation 118

First to Cut
x
26. The reduced spine was fixed with 16‐hole 4.5‐mm dynamic compression plates and sub‐laminar wires 118
27. Lateral radiograph of reduced spine stabilized with internal fixation 118
28. Continuous paracentesis to remove ascites from a massively resuscitated burn patient 122
29. Lund and Browder chart 123
30. JTS burn flow sheet 124
31. More is not better. 125
32. Bronchoscopic view of mucosal damage with inhalational injury 126
33. Don’t let this tube come out! 126
34. Hand burns are common. Elevate the burned upper extremity above the heart on pillows or blankets to reduce edema 128
35. Large blood loss requiring transfusion that occurred during a short helicopter transfer from a level II to a level III facility in Iraq following an unnecessary fasciotomy in a burn patient 129
36. VAC is a great post‐operative skin graft dressing 130
37. Myoglobinuria following high‐voltage electric injury 131
38. There is no better way to document clearing of pigment from the urine than collecting the urine hourly and looking at it 131
39. Effects of mustard gas exposure 138
40. Large soft‐tissue injury 144
41. Fragment as seen on a CT image 157
42. Medical helo transport 188
43. Hot pocket 194

First to Cut
xi
Contributors
Senior Editor COL Lorne H. Blackbourne, MD
Editors COL Lee Cancio, MD
MAJ André Cap, MD
CDR Ramón Cestero, MD
COL W. Darrin Clouse, MD
COL Bob Craig, DO
Joseph DuBose, MD
COL Brian Eastridge, MD
CDR Eric Elster, MD
COL (Ret) John Holcomb, MD
Peggy Knudson, MD
COL (Ret) John Kragh, MD
LTC Matthew Martin
COL Russell Martin, MD
COL Todd Rasmussen, MD
Anesthesia Editors LTC Paul Barras, CRNA
COL Kurt Grathwohl, MD
LTC Craig McFarland, MD
Infectious Disease Editor LTC Clint Murray, MD
Intensive Care Editor LTC Kevin Chung, MD
Neurosurgical Editor MAJ John Cole, IV, MD
Oral‐Maxillofacial Surgery Editor COL Robert Hale, DDS
Burn Editors COL Dave Barillo, MD
COL Lee Cancio, MD
James Williams, PA‐C
Urologic Surgery Editors COL Doug Soderdahl, MD
COL Greg Thibault, MD
Vascular Surgery Editor COL W. Darrin Clouse, MD
Physician‐Assistant Editor James Williams, PA‐C
Ethics Editor MAJ Thomas Repine, MD

First to Cut
xii
Contributing Editors LTC Romney C. Andersen, MD
CDR Jared Antevil, MD
LTC Martin F. Baechler, MD
MAJ Thomas Boel, MD
LTC Mickey S. Cho, MD
COL Jeffrey N. Davila, MD
LTC John G. DeVine, MD
MAJ Andrew Morgan, MD
LTC (P) Mark P. Pallis, DO
CDR Joseph E. Strauss, DO
Publication Staff
Managing Editor Otilia Sánchez, MA
Graphics, Cover Art, Layout, and Design Glen E. Gueller, CKM

First to Cut
xiii
DISCLAIMER
The information in this book reflects the personal opinions of the authors and does not necessarily reflect the official views of the
U.S. Department of Defense.
The medical vignettes do not identify any individual and are fictitious in the composite.

First to Cut
xiv
DEDICATION
This book is dedicated to the living memory of U.S. Army Orthopedic Surgeon Colonel Brian Allgood, U.S. Army Trauma Surgeon MAJ John Pryor, and U.S. Army
General Surgeon MAJ Mark Taylor.
COL Brian Allgood, MD
MAJ Mark Taylor, MD (second from left)
MAJ John Pryor, MD
First to Cut
xv
PREFACE The goal of this book is simple: to save lives. As all deployed combat surgeons know, combat trauma is not their parents’ civilian trauma. There is no equivalent in the civilian world to a patient with 100 fragment holes, above‐the‐knee amputation, and a 10% burn. Being faced with these unique wounding patterns for the first time, a doctor can often make mistakes; but once doctors experience dealing with these types of injuries, they do not repeat the mistakes. We document these experiences in a rapid format – in a conversational tone – so that combat surgeons can hopefully benefit from our mistakes and pearls of wisdom. To paraphrase Winston Churchill, these lessons can only be “forged in the fires of battle.”
COL Lorne H. Blackbourne, MD U.S. Army

First to Cut
xvi

First to Cut
1
Introduction Damage control has been devised to stop the physiologic derangements of severe hemorrhage seen in trauma patients known as the “lethal triad” or the “vicious bloody cycle” of hypothermia, acidosis, and coagulopathy. Civilian damage control surgery has been well defined. Damage control surgery is the trilogy defined as
1. abbreviated operation, 2. resuscitation in the intensive care unit (ICU), and 3. return to the operating room (OR) for the definitive surgery.
The abbreviated operation has two main goals:
Stop bleeding.
Stop soilage of stool and intestinal contents. The goal of ICU resuscitation is to use fluid resuscitation to correct acidosis, coagulo‐pathy, and hypothermia. In the definitive operation, surgical procedures are per‐formed after correction of physiologic parameters. These procedures include vas‐cular (e.g., vein interposition grafts), gastrointestinal (e.g., small bowel anastomosis, colostomy maturations, etc.), and hemostatic (e.g., packing removal). Whereas civilian damage control trilogy is performed within the confines of a single building and the patient is moved only a few hundred meters, combat damage control surgery comprises global evacuation in which the patient is attended to in several combat support hospitals (CSHs). This need for global evacuation results in the civilian paradigm of a damage control trilogy’s replacement with a combat multiple‐stage surgical and resuscitative process (see Fig. 1). The combat surgeon also has to deal with limited supplies and lack of blood components, especially far forward. These challenges are often magnified by mass casualty (MASCAL) situations during which multiple surgeries may occur simultaneously at a CSH (example in Fig. 2).
Combat injury distributions (Fig. 3) have not changed since the Civil War. The extremities are still the most commonly injured anatomic region, accounting for over half of all injuries. Other anatomic sites commonly injured are the head/neck, face, thorax, and abdomen. Figure 4 lists recommended antibiotics and dosages for treating some of these types of injuries. In addition, combat clinical practice guidelines on a wide variety of traumatic injuries are available from the Joint Trauma System (JTS) at: http://www.usaisr.amedd.army.mil/clinical_practice_guidelines.html. The following sections provide vignettes of injuries, not only to the commonly injured anatomic sites but also to other sites (e.g., urologic, chest, brain/spine) that combat surgeons have had to deal with in a race against time to save soldiers’ lives. Each vignette is accompanied by a list of lessons learned from these situations that may be helpful to new combat surgeons as they encounter similar situations.

First to Cut
2
Figure 1. Combat damage control stages of surgical and resuscitative care.
Figure 2. Two tables with five board‐certified general surgeons performing two damage control laparotomies at a combat support hospital (CSH).

First to Cut
3
Guidelines on the Use of Antibiotics for Treating Combat Injuries* Anatomic Injury Antibiotic and Dosage Duration
Extremity soft tissue Cefazolin 2 grams IV q6‐8 hr 1‐3 days
Extremity open‐bone fracture Cefazolin 2 grams IV q6‐8 hr 1‐3 days
Thoracic penetrating injury: Without esophageal injury Cefazolin 2 grams IV q6‐8 hr 1 day With esophageal injury Cefazolin 2 grams IV q6‐8 hrs +
metronidazole 500 mg IV q 8‐12 hr 1 day post chest
closure
Abdomen Cefazolin 2 grams IV q6‐8 hr + metronidazole 500 mg IV q 8‐12 hr
1 day after last washout
Maxillofacial/neck Cefazolin 2 grams IV q6‐8 hr 1 day
Penetrating brain Cefazolin 2 grams IV q6‐8 hr (add metronidazole 500 mg; IV q 8‐12 hr if grossly contaminated)
5 days or until CSF leak is closed
Penetrating spinal cord Cefazolin 2 grams IV q6‐8 hr (add metronidazole 500 mg; IV q 8‐12 hr if grossly contaminated)
5 days or until CSF leak is closed
Penetrating eye Levofloxacin 500 mg IV/PO q day 7 days or until evalu‐ated by ophthalmology
*Table adapted from Duane Hospenthal et al. Guidelines for the prevention of infections associated with combat related injuries: 2011 update. J Trauma. 2011;71 S210‐S234.
Figure 3. Anatomic distribution of combat injuries.
Figure 4. Guidelines on the use of antibiotics for treating combat injuries.

First to Cut
4

First to Cut
5
Fragment Wounds

First to Cut
6
“Bleeding under the drapes” “A 25‐y.o. male suffered a total‐body fragment injury and arrived with an SBP of 70. I placed bilateral chest tubes; I wrapped KERLIX™ around all the LE frag wounds which were not bleeding in the ER. I took him directly to the OR for ex lap; ex lap revealed kidney injury, which was easily controlled with nephrectomy. The patient was unstable during the case and received 10 u of blood, 6 units FFP, and neosynephrine by anesthesia. After the abd was closed, I removed the drapes; and to my horror there were over 2 liters of blood on the table. The patient fell into the vortex of the lethal triad and died as I stood over him, helpless as he bled from every hole.”
The patient with multiple full‐body fragment wounds like the one in Figure 5 has no real equivalent in civilian trauma. Always be aware that fragment wounds that are not bleeding initially can and often do resume bleeding with resus‐citation and return of a normal systolic blood pressure (SBP). Always be vigilant of the possibility of “bleeding under the drapes.” If you encounter unexplained hypovolemia or unstable vitals, check repeatedly under the drapes for bleeding from fragments.
Lessons Learned:
Fragment wounds often do not bleed with hypotension.
Fragment wounds often re‐bleed with resuscitation.
Check areas of fragment wounding not visible (covered with drapes) during the OR case.
Staple large fragment holes closed for hemostasis.
Figure 5. Multiple full‐body fragment wounds.

First to Cut
7
“He had fragments all over his abdomen, and the FAST was negative.” “A 30‐y.o. male involved in an explosion came in with an SBP of 130. His CXR was normal, and his FAST exam was negative for intraperitoneal fluid. I did not know if I should ex lap him or not.”
Fragment wounds from explosions are an injury pattern unique to combat – there is no civilian equivalent. These fragments are often of low velocity. The focused assessment with sonography for trauma (FAST) is of limited value in patients with fragment wounds. A positive FAST exam mandates laparotomy (ex lap), but a negative FAST exam does not rule out intestinal injury, the most commonly encountered injury. In such patients, a CT scan of the abdomen will evaluate for peritoneal penetration, and patients with peritoneal penetration by a fragment require an ex lap. The CT scanner has been shown to be extremely sensitive for evaluating for intraperitoneal penetration (if available), whereas a positive CT mandates exploratory laparotomy that rules out intraperitoneal penetration can allow for safe observation even with global evacuation. At a level II, especially in a MASCAL facility, give intravenous (IV) antibiotics and consider transfer to a level III facility for the patient with abdominal fragment wounds, normal hemodynamics, and a negative FAST exam. Lessons Learned:
A negative FAST exam is of no value with abdominal fragment wounds as in the example above (Fig. 6).
A positive FAST exam should require an exploratory laparotomy.
A CT scan negative for intraperitoneal penetration can allow for safe observation.
A CT scan POSITIVE for intraperitoneal penetration mandates an exploratory laparotomy.
At level II, consider IV antibiotics and transfer to level III in the stable patient with abdominal fragment wounds and a negative FAST exam.
Figure 6. Multiple‐fragment wounds over the abdomen.
First to Cut
8
“Massive facial frag wounds and bleeding”
“A 23‐y.o. male involved in an explosion with massive facial injury arrives at the CSH coherent with significant arterial and venous bleeding.” Facial fragment wounds are a unique combat military wound. The first concern with these injuries is the airway – intubate as soon as possible (ASAP). The next concern is bleeding – most often, manual pressure will stop the bleeding. If the bleeding does not stop significantly with pressure, bring the patient to the OR emergently and call for your oral and maxillofacial (OMF) surgeons or ear, nose, and throat (ENT) colleagues to join you. Arterial bleeders are best controlled at the bleeding point; avoid proximal artery ligation except in life‐threatening bleeding as the flap blood supply is very important for reconstruction. If the bleeding is controlled with simple pressure, the patient should be brought to the CT scanner for brain, eye, and facial scans. Many patients with facial fragment wounds will have intraocular or intracranial fragments. One can ligate the external carotid artery to stop life‐threatening hemorrhage as a last resort. Lessons Learned:
With massive facial trauma, secure the airway ASAP.
Apply manual pressure to any bleeding areas.
Massive bleeding is best addressed in the OR.
Obtain a CT scan of the brain and the eyes as soon as feasible.
Obtain ophthalmology, OMF, and ENT consultations ASAP.
Control bleeders at the end point of bleeding, not by proximal arterial control unless absolutely necessary.
Ligation of the external carotid can be life‐saving.

First to Cut
9
“Creative wound vacs 101” “A 21‐y.o. male patient with left leg fragment wounds about 1‐3 cm in diameter. Strong pulses and no fractures on X‐ray. I was thinking, ‘How in the world do I wound‐vac all of these holes without a million of those suction connectors?’” Most surgeons would agree that wound vacs make life easier for the medical staff and patients. I would say they even lower pain and remove the need for painful dressing changes twice a day (b.i.d.). They also appear to close wounds quicker than traditional wet to dry dressings. A simple technique to connect the suction from a single source to many fragment holes is to pack all the holes with sponge, tack in place with a few staples, then roll up KERLIX™ and connect the sponges by the KERLIX™ “bridges,” then wrap with Ioban™ or the wound vac sealing drape and the suction will be applied to all of the holes. Lessons Learned:
Wound vacs can make everyone happy.
KERLIX™ can be used to connect multiple sponges in multiple fragment holes.
Wound vacs can be used safely after initial debridement.
First to Cut
10
“Wrong fragment projection”
“A 30‐y.o. male involved in an explosion. Multiple entrance wounds – large one over left pectoralis muscle. Placed chest tube with 200 cc of blood and air. Three days later, we got a CT to look for a retained hemothorax, found a frag next to his spleen, took him for ex lap, and found a 2‐cm hole in the diaphragm.” “A 27‐y.o. male involved in an explosion with multiple frag wounds – profuse bleeding from left subclavian hole. Took him to the OR for exposure of left subclavian artery. Had proximal control but still bleeding; he had a left pulmonary artery injury, not a subclavian artery injury.” Fragment wounds are unique to the combat wounded. The fragments are of various sizes, occur at various velocities, and can project anywhere based on the patient’s body position on impact. The unstable patient does not give you the luxury of an extensive preoperative radiologic evaluation. A quick look at the heart and abdomen with the FAST may reveal blood in one of these compartments, a chest tube can monitor bleeding from the pleural cavities, and exploratory laparotomy with pericardial window can be helpful to evaluate for abdominal injury or heart wound. If the patient has continued bleeding and is unstable, always consider another compartment or organ injury. A simple on‐table X‐ray may give clues to fragment projection as well. If unstable, always leave the abdomen open for easy re‐exploration. Lessons Learned:
Fragments take many routes through the body.
If the patient continues to bleed and is unstable, consider involvement of another body cavity, organ, or vessel.
Chest tubes can monitor the pleural cavities.
The FAST and the pericardial window will evaluate the heart.
FAST, diagnostic peritoneal lavage (DPL), and exploratory laparotomy will evaluate the peritoneal cavity for blood.

First to Cut
11
“Explosion frags, blunt trauma, and burn injury”
“A 23‐y.o. male s/p attack in a high‐speed MVC with fire arrived to the CSH hypotensive; frag wounds all over trunk and neck; right leg traumatic amputation; burns to face, arms, and trunk. I am thinking, ‘where do I start?’” The combat injured can have a combination of blunt and penetrating trauma, which can also be further complicated by an amputation topped off with a significant burn injury. This constellation of injuries can be very challenging. First priority is to rule out life‐threatening bleeding. The first question you have to ask yourself is, “should this patient be in the ED or the OR?” and then “is the hypotension continuing hemorrhage or blood loss from the amputation or burn injury hypovolemia?” A chest X‐ray (CXR) or bilateral chest tubes will evaluate for pleural bleeding. DPL or FAST (consider repeating the FAST exam if the initial FAST is negative) will evaluate for significant intraperitoneal bleeding with exploratory laparotomy reserved for definitive evaluation with the patient who does not respond to resuscitation. FAST (and repeated FAST) vs. pericardial window will evaluate for cardiac injury. Two windlass tourniquets or a pneumatic tourniquet will assure hemostasis in a major extremity injury or amputation. Pelvic fracture vs. penetrating pelvic injury is a hard call – the X‐ray will evaluate for significant bony disruption; but if the patient has penetrating fragments and a pelvic bony disruption, the patient should have an exploratory laparotomy to rule out major vessel injury in the pelvis due to the penetrating fragments and then pelvic packing. All of these diagnostic measures can be done in the OR. Lessons Learned:
The safest place for the hypotensive multiple trauma patient is the OR.
Rule out life‐threatening hemorrhage as your first priority.
CXR or bilateral chest tubes will evaluate for pleural bleeding.
Consider pneumatic tourniquet for all major extremity injuries.
FAST and pericardial window will evaluate for cardiac injury.
FAST (repeated FAST) or DPL will evaluate for significant intraperitoneal bleeding.
Exploratory laparotomy is the definitive rule out for intraperitoneal bleeding.
X‐ray, physical exam, and exploratory laparotomy will evaluate for pelvic fracture and pelvic bleeding.
The patient with blunt and penetrating pelvic trauma should have an exploratory laparotomy to rule out major pelvic vascular injury.
In the multiple‐trauma patient in extremis with penetrating and blunt trauma, consider bilateral chest tubes and exploratory laparotomy with pericardial window to rule out all major cavities for significant bleeding.

First to Cut
12
“Frag wounds head to toes – which cavity first?”
“A 25‐y.o. female involved in a mortar blast arrives at the FST hypotensive – she has frag wounds literally from her head to her toes. The neck has a stable non‐expanding hematoma; she is talking with decreased breath sounds on the left. I place a left chest tube, and we start PRBCs. Now, where do I start?”
Total‐body fragment wounds are a truly unique injury of the combat wounded. If the patient is hypotensive, the best and safest place to be is the OR. ABCs – intu‐bate (bilateral chest tubes). Abdominal injury can be ruled out with an exploratory laparotomy, and the heart can be evaluated with a FAST exam and/or pericardial window (if positive for blood, then median sternotomy). The two pleural cavities can be evaluated by the amount of blood draining from the chest tubes, with the caveat that a chest tube can become clotted with blood; if any doubt, place a second chest tube. If the neck is not actively bleeding, it can wait for exploration until after life‐threatening bleeding is ruled out in the more likely cavities (i.e., abdomen, chest). If you are dealing with exsanguinating subclavian or neck injuries, you must start there. If a second surgeon is available, simultaneous dissections can be carried out; but be wary of heat loss from opening up any body cavity, especially if you open up more than one area. Going to two operating teams is a judgment call: warm the room, warm the blood, start whole blood or fresh frozen plasma (FFP)/platelets, and consider factor VIIa if the patient is bleeding massively or is coagulopathic. Always think “life over limb” and re‐examine the extremities after life‐threatening cavitary bleeding has been ruled out; leave tourniquets up until major cavitary bleeding has been sorted out. Examine the patient during the OR case for “bleeding under the drapes” from fragment wounds after blood resuscitation. Lessons Learned:
The safest place for a hypotensive patient with total‐body fragment wounds is the OR.
The pleural cavities in the hypotensive patient can be evaluated with bilateral chest tubes.
The abdomen can be evaluated in the hypotensive patient with abdomen fragment wounds by exploratory laparotomy.
The heart can be evaluated for pericardial blood by FAST exam.
The heart can be evaluated in the OR by pericardial window and median sternotomy if the window is positive for blood.
The neck can be evaluated in the hypotensive patient with neck fragment wounds by neck exploration.
Examine the patient during the OR case for “bleeding under the drapes” after resuscitation.
After ruling out major cavity bleeding, re‐examine the patient from head to toe.
First to Cut
13
“How long do I continue IV antibiotics?”
“A 25‐y.o. male involved in an explosion arrives to the CSH normotensive with frag wounds up and down his legs. Started Unasyn® IV and took him to the OR and irrigated all of his wounds and removed any clothing in the wounds – obvious bacterial wound inoculation. How long should I continue the IV antibiotics? No one seemed to know. I just kept them going until he transferred out 2 days later.” Multiple wounds from fragments from an explosion have a unique pattern seen only in combat. The fragments differ in size and velocity, and almost all traverse clothing, often bringing cloth and other foreign bodies with them into the sub‐Q and muscle. The most important aspect of treating these wounds is to remove all visible foreign material, debridement of dead tissue, and irrigation along with leaving the wounds open. IV antibiotics should be given for at least 24 hours after injury, and some would continue therapy for 72 hours. Broad‐spectrum coverage for resistant pathogens (e.g., Acinetobacter, Pseudomonas, and Klebsiella) is typically not needed at the time of injury; therefore, a first‐generation cephalosporin such as cefazolin (ancef) is adequate. It is important to realize that short‐course therapy is likely adequate. Consider that we give IV prophylactic antibiotics for only 24 hours with colon injuries regardless of how massive the stool/bacterial load is. Lessons Learned:
Debride fragment wounds of necrotic tissue, remove foreign bodies, and irrigate.
Use prophylactic IV antibiotics for 24 hours (typically).
Reserve prolonged IV antibiotics for the diagnosis of a wound infection.
See Figure 4 for guidelines on the use of antibiotics.

First to Cut
14
“Thigh fragments just underneath the skin” “A 28‐y.o. male involved in an explosion; several fragments to leg – no bony involvement – normal distal pulse and ABI. Lots of frags felt just under the skin. Do I leave them or make incisions and remove all the superficial ones?” Fragment wounds are a very unique injury to the combat wounded. The basics include debridement of necrotic tissue, removal of any foreign material (e.g., clothing) from the entrance sites, and saline irrigation. Large fragments that will inhibit function should be removed in the OR. Small fragments, even if superficial, should be left in place; they can always be removed at a later date if symptomatic. Although initial studies evaluated 5 days of antibiotics, it is likely that a single dose of a first‐generation cephalosporin such as cefazolin (ancef) is adequate if the wound is cleaned and bandaged with close clinical monitoring. If an infection develops, the fragment can be removed at that time with bacterial cultures of the wound to direct further therapy although debridement alone is often adequate. Fragments in joints and in CSF are usually removed after evacuation. Lessons Learned:
Fragment entrance wounds should be cleared of necrotic tissue and foreign material and irrigated.
Large fragments that will impair function should be removed in the OR.
Small superficial fragments under the skin should be left in place.
Antibiotics should be given for 1 to 3 days (see Fig. 4), but a single dose is likely adequate.

First to Cut
15
“I packed the wound with KERLIX™, but it kept bleeding” “A 22‐y.o. female involved in explosion arrived hypotensive with a single frag wound below her distal right clavicle. Placed a chest tube – no blood – the wound is bleeding dark blood – packed it in the ED with a 4 × 4 and bring her straight to the OR. Explored the wound with a large proximal/distal control subclavicular incision. The axillary artery and vein were intact, and the fragment tract was just below through and through the chest. Missed all large vessels – no arterial bleeding, just muscle branches; but she was cold and coagulopathic. So we packed it with KERLIX™ – she oozed blood all night getting 10 units of blood and 10 of FFP until the bleeding stopped – she did fine.” Deep wounds without a major vascular injury can bleed profusely. Correcting coagulopathy is imperative – FFP and packed red blood cells (PRBCs) in a 1:1:1 ratio, platelets or whole blood, consider cryoprecipitate and factor VIIa if significant bleeding continues after standard measures. KERLIX™ often allows for significant wicking of coagulopathic bleeding; try a hemostatic wound agent like chitosan or ChitoFlex®. A “hemostatic plug” can be constructed with GELFOAM® (thrombin‐soaked is best) with Avitene® wrapped in a Surgicel sheet (like a cigarette) can be placed in smaller diameter holes and can be left in situ. Follow a hemostatic plug by more GELFOAM® or ChitoFlex®, or alternatively pack over the plug with KERLIX™ or lap pad. Suturing the skin over such a hemostatic dressing allows for tamponade and accumulation of blood that will hopefully form a clot. Lessons Learned:
KERLIX™ by itself can result in significant blood wicking and bleeding.
Consider a hemostatic plug in bleeding fragment holes without an identifiable vessel injury.
A hemostatic plug can be constructed with GELFOAM® (± thrombin), ± Avitene® wrapped in a sheet of Surgicel®. Combat Gauze can also be used.
Large soft‐tissue defects can be covered with Combat Gauze® packing, ± negative pressure.
Suturing skin over a hemostatic dressing with a large nylon suture will allow for tamponade.
First to Cut
16
“Full‐thickness bowel burn” “A 23‐y.o. male arrives to CSH with multiple frag wounds to abd and flank – normotensive – FAST exam negative. We bring him to the CT scanner; he has multiple intraperitoneal fragments without any free fluid – ex lap no succus but looking at the small bowel he has – no lie – full‐thickness burns in the small bowel from the hot fragments – we resect the areas and hook him back up.” Fragments come in different sizes and different velocities, depending on the metal, explosive charge, and distance from the explosion. Some fragments are extremely hot and can cause thermal injury to tissue, and the bowel is no exception. Even without succus soilage, run the bowel extremely carefully and run it more than once with fragment wounds to rule out thermal and small‐fragment injuries. Thermal injury from fragment wounds is truly a unique injury in combat surgery. Lessons Learned:
Fragments from explosions can be extremely hot.
Fragments can cause thermal injury to the bowel.
Run the bowel very carefully and repeatedly with fragment wounds.

First to Cut
17
“Local national – frag wounds everywhere – tetanus prophy?”
“A 27‐y.o. local national arrives to the FST with multiple frag wounds to lower extremities in sub‐Q, no obvious bony involvement, and b/l strong pulses. He has no idea of his past medical history – no idea about tetanus immunizations in the past.” Tetanus prophylaxis is a common question in combat wounded. All U.S. service members will be checked for current tetanus prophylaxis immunization prior to deployment. Recognize that if it has been longer than 5 years since the last tetanus immunization booster, then tetanus toxoid 0.5 ml intramuscular (i.m.) should be given for dirty, tetanus‐prone wounds, but immunoglobulin is not needed. For non‐immunized patients, provide anti‐tetanus human immunoglobulin 500 I.U. i.m (250 I.U. i.m. for children) if more than 24 hours has passed since injury. In addition, tetanus toxoid 0.5 ml i.m. are to be given at the time of injury and repeated at 4 weeks and 6 months later. Tetanus immunization status of local nationals is often unknown; and even if given, there is no way to know of any quality assurance. All tetanus‐prone injuries in local nationals need the full court press – immunization and immunoglobulin. If tetanus immunoglobulin is not available at the level II facility, the need for immunoglobulin must be communicated to the accepting facility. Lessons Learned:
Level II facilities should have tetanus immunizations and immunoglobulin on hand.
Local nationals with a tetanus‐prone injury should receive both the tetanus immunization and immunoglobulin if more than 24 hours have passed since wounding and initial debridement.
U.S. service members with a tetanus‐prone injury should receive a tetanus immunization.
Check current guidelines.

First to Cut
18
“Frag wounds – he will never change the dressings” “A 27‐y.o. local national civilian injured by explosion with multiple large frag wounds to legs – normal pulse and neuro exam – ABI >1.0 bilaterally. Started IV antibiotics and took him to the OR for washout/debridement and packed, brought him back the next day for washout and further debridement, and placed wound vac. He said he could not even look at the wound, let alone change any packing.” The general rule of combat surgery is to leave all war wounds open because of the risk of massive contamination and high risk of life‐threatening infection. Using multiple OR sessions for irrigation and serial debridement with negative pressure wound therapy (placed after initial debridement in the OR) has resulted in clean wounds that have been successfully treated with delayed primary closure. Lessons Learned:
Treat large wounds with serial debridements and irrigation.
Place a negative pressure dressing on all clean large wounds.
Delayed primary closure of all clean wounds after serial debridements and irrigations is safe.
Do not use a negative‐pressure dressing with a grossly contaminated or infected wound.
Change a negative‐pressure dressing every 3 days (remove if there are signs of infection and inspect the wound).

First to Cut
19
“24‐y.o. male injured in an IED blast”
“A 24‐y.o. male injured in an IED blast presented with fragment wounds in his proximal right arm and a rapidly expanding hematoma over the right neck and clavicular region. A C‐A‐T® tourniquet was in place, which was immediately converted to a pneumatic tourniquet. In the operating room a median sternotomy was performed and extended through the right supraclavicular region, where significant hematoma and bleeding were encountered. The right vertebral artery had been avulsed at its origin with active arterial hemorrhage. After addressing this injury, there appeared to be minimal ongoing bleeding. The incision was extended laterally along the medial right arm to evaluate the brachial artery, with release and removal of a pneumatic tourniquet. With tourniquet release, there was increased venous bleeding in the surgical field, although the source was difficult to ascertain. With additional surgical exposure a large plastic fragment was identified deep to the right clavicle. Fragment removal resulted in massive bleeding from the right thoracic outlet, unaffected by complete temporary occlusion of the right subclavian artery proximally. After partial clavicular resection, a long rent of the subclavian vein was identified and repaired. Finally, a focal injury to the proximal brachial artery was repaired primarily.” Do not let down your guard after an injury is identified and addressed in a patient with IED fragment wounds, but rather remain prepared to negotiate additional vascular injury anywhere along the potential missile tract. Although proximal control is mandatory prior to exploration of an active bleeding source from the thoracic outlet (best achieved via median sternotomy for right thoracic outlet injuries) proximal arterial control will not facilitate repair of a venous injury. A pneumatic tourniquet on the ipsilateral upper extremity may greatly reduce bleeding from a venous injury to the thoracic outlet or supraclavicular region and should not be removed until the suspected injury is either exposed or ruled out. Never remove an IED fragment before adequate exposure and before defining the extent of injury. The retroclavicular region can be particularly challenging to negotiate. Satisfactory exposure can generally be achieved either by temporary subluxation or removal of the clavicle. Lessons Learned:
Beware of multiple vascular injuries in the patient with high‐velocity fragment wounds.
Consider the use of a pneumatic upper extremity tourniquet for temporary control of a suspected venous injury in the thoracic outlet.
Never move or remove an IED fragment until you have achieved adequate exposure to repair a potential major vascular injury.

First to Cut
20
“A 43‐y.o. male with a 5‐cm fragment wound in his back from an IED explosion”
“A 43‐y.o. male with a 5‐cm fragment wound in his back from an IED explosion arrives stable and awake, but with progressive loss of sensation and strength in the right leg. A CT scan revealed a fragment in the lumbar spine, right perinephric hematoma, and an intraabdominal fragment. The patient was first decompressed by neurosurgery in the prone position and then placed supine for laparotomy. The perinephretic hematoma was confirmed at the operation and two perforations in the jejunum and duodenum and a small laceration to the head of the pancreas were found. After repairing these injuries, the integrity of the urinary tract was confirmed with IV methylene blue. The patient was then MEDEVAC’d with a temporary abdominal closure. At the next level of care, disruption of the right ureter was identified and repaired over a stent. Cholangiography was normal.” Laparotomy should generally precede laminectomy in a trauma patient. However, the opposite approach may be preferred in a hemodynamically stable patient with progressive neurological findings. Normally it is not necessary to repair small lacerations in the pancreas but suturing can be performed if bleeding is observed. Place at least one drain in the area and make sure the patient is further investigated with cholangiography or magnetic resonance cholangiopancreatography (MRCP). Surgical exploration is not indicated for lateral/perinephric hematoma (even due to a penetrating injury) unless there is involvement of the renal hilum, evidence of ongoing bleeding, or a suspected ureteral/collecting system injury. Although methylene blue is a useful adjunct to identify a urinary tract injury, it has limited sensitivity and does not obviate the need for complete exploration of the ureter when it is in proximity to the tract of a penetrating missile or fragment. Whenever there is a chance a patient will need re‐exploration at the next level of care, temporary closure is appropriate. Lessons Learned:
When a patient with multiple injuries is hemodynamically stable, it is possible to address critical neurosurgical issues prior to laparotomy.
Methylene blue adminstration is a relatively insensitive test for injury to the ureters or collecting system.
Drain all pancreatic injuries.

First to Cut
21
“A 23‐y.o. with IED blast wounds to the abdomen and extremities”
“A 23‐y.o. patient suffered IED blast wounds to the abdomen and extremities. At a Role II facility, a traumatic left BKA was completed and external fixation performed on an open right tibial fracture. In addition to massive transfusion, the patient received a very large volume (in excess of 10 L) of crystalloid during his resuscitation. On arrival to our facility, the patient was cold and coagulopathic. We performed a CT scan to evaluate what appeared to be superficial abdominal fragment wounds. The CT revealed pleural effusions, diffuse bowel edema, abdominal free fluid, periportal liver edema, and collapse of the inferior vena cava. After additional blood product resuscitation, laparotomy revealed no injuries.” The basic tenets of modern resuscitation for hemorrhagic shock include limited crystalloid infusion, “balanced” transfusion of blood components (or fresh whole blood where available), avoiding aggressive resuscitation until bleeding is controlled, and the strict avoidance of hypothermia, coagulopathy and acidosis (the lethal triad). The excessive use of crystalloid in the resuscitation of a bleeding trauma patient may lead to “shock bowel,” abdominal compartment syndrome, dilutional coagulopathy, and poor global tissue perfusion. When faced with abdominal free fluid on imaging after a massive resuscitation, it can be very difficult to differentiate between hollow viscous injury and ascites. In this setting, a diagnostic peritoneal aspiration may be useful, although laparotomy is always indicated if there is concern for penetrating abdominal injury based on injury mechanism or physical examination. Lessons Learned:
Minimize crystalloid use in the treatment of hemorrhagic shock, which is best treated with a 1:1:1 ratio of PRBCs to plasma and a platelet apheresis pack for every 6 units of PRBCs.
Aggressively treat hypothermia and coagulopathy, or all other treatments will be rendered ineffective.
Massive resuscitation may result in abdominal free fluid, which can be difficult to differentiate from hollow viscous injury.
First to Cut
22
“How do I deal with a soldier with multiple amputations?”
“A 30‐y.o. soldier involved in a dismounted IED explosion presented in critical condition with traumatic bilateral BKAs, a mid‐forearm amputation, scrotal injury, and an open pelvic injury.” Adequately positioned CAT tourniquets were placed proximally in each of the affected limbs with no visible hemorrhage. Initial resuscitation with PRBCs and FFP stabilized vital signs, but the patient proceeded to bleed through the tourniquets. The arm CAT was exchanged for a pneumatic tourniquet. Chest and pelvic films were obtained, and the patient was taken emergently to the OR for exploratory laparotomy with temporary iliac control, revision amputations (bilateral above‐knee amputations and a through‐elbow), scrotal exploration, and sigmoid diversion. Once the amputations were completed, the iliac control was released and a pelvic external fixator was placed. Temporary abdominal closure was used. A four‐surgeon team (two general and two orthopedic) was utilized with a total operative time of 80 minutes. Blood products administered intra‐operatively were 14 units of PRBCs, 8 units of FFP, and three 6‐packs of platelets. ICU resuscitation followed with repeat I&D of the scrotum, amputations, and colostomy maturation (with temporary abdominal closure) 9 hours later before transport up range.
First to Cut
23
Lessons learned: Properly placed field tourniquets and an expedited team approach will save the
life of a soldier with multiple amputations.
Be cautious of aggressive initial resuscitation in the multi‐amputation patient until adequate hemostasis has occurred.
When possible, exchange CAT or field tourniquets with pneumatic tourniquets because they provide more reliable hemorrhage control. These tourniquets should be placed as proximal as possible on the affected limb and may even be prepped into the surgical field.
Over‐aggressive resuscitation can increase volume and cardiac output and can contribute to further blood loss through potentially ineffective limb tourniquets or pressure dressings.
The most effective environment for a hemodynamically unstable multi‐amputee patient is in the operating theater.
With open pelvic injuries, laparotomy is used to obtain temporary proximal vascular control and to divert the fecal stream.
Debridement of genitourinary (GU) injuries should preserve as much tissue as possible.
With respect to the amputation sites, double suture ligation of all major named vessels is critical for hemostatic control.
The goal of initial surgical intervention in the multiple‐amputation patient is hemorrhage control with expedited revision amputation to a healthy level and subsequent fluid resuscitation. This goal can be achieved with general and orthopedic teams working simultaneously.
Conflict‐related blast wounds in OIF/OEF are notoriously contaminated with dirt, debris, and foreign fragments. Avoid the urge to decontaminate the entire wound and take the amputation to a definitive level.
The index procedure goals are best handled by using a team approach (when possible), which expedites the case flow and thereby decreasing the length of intra‐operative exposure to massive fluid shifts and potentially compromising recurrent hemodynamic collapse.
Once adequately resuscitated in a controlled ICU environment after the initial life‐saving operation, secondary and tertiary procedures can be performed under greater control to maximize optimal outcomes. These subsequent procedures are considered a continuum of surgical care and focus on maximizing operative efficiency and limiting surgical time. The timing of subsequent operations should not be dictated by dogma or timing but rather be tailored to the patient’s initial procedure, condition in the ICU, and logistical considerations of patient movement. This approach reduces mortality and utilizes operative resources effectively.

First to Cut
24

First to Cut
25
Damage Control Resuscitation

First to Cut
26
“We gave him FFP, but his INR was over 2 in the ICU” “A 28‐y.o. with GSW to RUQ. I took him emergently to the OR for an ex lap. I packed his liver and resected his transverse colon. He received 13 units of PRBCs and 4 u FFP. His INR in the ICU was 2.2, and he continued to ooze significantly until I got 10 more units of FFP in him.” The patient requiring a “massive” transfusion (>10 units of PRBCs) is also bleeding clotting factors at approximately 1 unit of FFP per unit of PRBC bleed – not to mention the clotting factors that form a clot at the site of injury. Coagulopathy is a part of the “lethal triad” of trauma with acidosis and hypothermia. In civilian trauma (and combat), the initial ICU international normalized ratio (INR) is directly correlated with mortality. Retrospective data of combat wounded requiring a massive transfusion have shown a mortality benefit from receiving FFP to platelet to PRBC at a 1:1:1 ratio. All patients requiring massive transfusion in the combat zone should receive FFP to platelet to PRBCs in a 1:1:1 ratio as soon as possible. Lessons Learned:
Post‐operative INR is correlated with mortality.
All combat‐wounded receiving a massive transfusion should receive FFP to platelet to PRBCs in a 1:1:1 ratio as soon as possible.

First to Cut
27
“O negative whole blood” “A 24‐y.o. with GSW to lower abd. We took him for ex lap. Small bowel injuries, mesenteric bleeding, and significant abd wall muscle bleeding. Packed him off – he was cold and coagulopathic. We had PRBCs but no FFP. We gave him some O positive whole blood. His type and cross‐returned AB negative. We transferred him to the CSH and heard he had a bad acute lung injury….”
Male patients can receive O negative or O positive PRBCs as the universal donor because PRBCs have no antibodies or an insignificant number of them. Female patients should receive O negative as the universal PRBC donor. Whole blood, on the other hand, has approximately 1 unit of FFP worth of antibodies; thus, O negative or positive is NOT the universal donor for whole blood. Whole blood (Fig. 7) should be TYPE‐SPECIFIC because of the antibodies it contains. Giving O negative or positive whole blood to an A or AB donor can result in transfusion reactions and transfusion‐related acute lung injury (TRALI). TRALI is treated with supportive care and usually recovers quickly but should be avoided. If the patient is in extremis and the only whole blood available is O negative or positive, it can be given successfully in combat situations.
Lessons Learned:
The PRBC universal donor for male patients is O negative or O positive.
The PRBC universal donor for females is O negative.
There is NO universal donor for whole blood, and donation should be type‐specific.
Giving O negative or positive whole blood can result in TRALI.
O negative/positive blood can be given to the patient in extremis if that is the only whole blood available.
Figure 7. Whole‐blood transfusion at a CSH.

First to Cut
28
“Is there an FFP universal donor?” “A 28‐y.o. male arrived after an explosion with frag holes all over and missing half of his buttock. We packed off the buttock and wrapped all wounds with KERLIX™, and he was very hypotensive in the ER. We started O pos PRBCs and ordered some O neg FFP. Then it hit us – is O neg FFP the universal donor?” Due to antibodies to blood antigens, the universal donor FFP is not O negative/positive. The universal donor FFP is AB as the donor will not make antibodies to self. FFP will last 12 months if frozen to ‐40° and 90 days if frozen to ‐20°. FFP is good for 5 days thawed (known as thawed plasma) but must be refrigerated. Room temperature FFP (room temperature thawed plasma) is good for 4 hours. A busy CSH should have thawed AB plasma ready (4 units) and available for the ER and OR. Of note, each unit of FFP has the equivalent of 2 units of cryoprecipitate of fibrinogen. Lessons Learned:
The universal donor FFP is AB.
Thawed FFP, known as “thawed plasma,” is good for 5 days in the refrigerator.
Room‐temperature thawed plasma is good for 4 hours.
Each unit of FFP contains fibrinogen equivalent of 2 units of cryoprecipitates.

First to Cut
29
“Factor VIIa” “A 30‐y.o. male with multiple GSWs to the abdomen arrived hypotensive. We took him immediately to the OR and started the ex lap. Tons of blood. Bleeding from shattered liver, mesentery, spleen, small bowel hole, colon holes. Packed everything we could, took out the spleen. Anesthesia gave FFP:platelets:PRBCs in a 1:1:1 ratio, but he was becoming cold and more coagulopathic. We gave him recombinant factor VIIa, and the bleeding stopped – it was very impressive.” Factor VIIa, a procoagulant, should be used in refractory or severe bleeding as an adjunct to FFP:platelets:PRBCs in a 1:1:1 ratio. It does not work with acidosis and needs adequate platelets for the full effect. Of note, factor VIIa works with hypothermia in vitro. All prospective randomized trials and retrospective trials on combat wounded have not shown any increase in thromboembolic events. Factor VIIa should not be used unless there is life‐threatening bleeding and coagulopathy, or the clinical judgment that clinically significant coagulopathy will ensue. Lessons Learned:
Use individual physician judgment when using factor VIIa in the bleeding, coagulopathic patient.
Factor VIIa does not work optimally with acidosis.
Factor VIIa needs adequate platelet levels for maximum effect.
Factor VIIa can be re‐dosed if needed.

First to Cut
30
“Why didn’t you tell me you were giving neo?”
“A 29‐y.o. male with total‐body fragment wounds and large buttock/flank soft tissue loss. Placed bilateral chest tubes with minimal drainage, packed off the soft tissue injury areas, took him for ex lap, packed his liver. Kept looking at the monitor and saw an SBP >90 at all times. Brought him to the ICU, and he crumped big‐time and needed a massive blood and blood product transfusion. Then I found out – unbeknownst to me – that he was receiving large doses of neosynephrine during the OR case.” Pressors in hemorrhagic shock have been demonstrated to increase mortality. The patient is not bleeding neosynephrine but blood and blood products. Bleeding trauma patients should receive blood and blood products; and if in extremis with a nonlife supporting blood pressure, as a last resort the anesthesia folks often give a dose of neosynephrine to give time for blood products to arrive in the OR, but the surgeon needs to be informed of all doses given. Communication is the key to the resuscitation of trauma patients. Surgeons must keep the anesthesia personnel informed on surgical hemostasis/bleeding, and anesthesia needs to keep the surgeon informed on the ongoing resuscitation and vital signs. Lessons Learned:
A pressor in hemorrhagic shock should be given only as a temporary “last resort.”
If a pressor is given to a bleeding patient, the surgeon needs to be informed immediately.
If the surgeon encounters significant bleeding, the anesthesia personnel need to be informed immediately.
Communication between both the anesthesia personnel and the surgeon on the status of ongoing resuscitation, vital signs, and the status of the surgical hemostasis is paramount.

First to Cut
31
“How do I handle unstoppable oozing?”
“A 23‐y.o. local national presented with innumerable small fragment wounds to the head, face, torso, and extremities. He had a penetrating brain injury with a moderate subdural as well as multiple intraparenchymal hemorrhages. He was coagulopathic, with an INR of 1.8 and hypotensive. He was resuscitated with 2U FWB, 2U RBC, and 2U FFP and taken to the OR for decompressive craniectomy, evacuation of the subdural, and control of other bleeding wounds. In the OR, he continued to bleed from cut surfaces, from his many fragment wounds, and from vascular access points despite 1:1 FFP to platelet to RBC resuscitation and additional units of FWB. The oozing finally stopped after he received 1 gm tranexamic acid in the OR followed by another 1‐gm dose in the ICU. The patient stabilized, required no further transfusions, and was ultimately transferred to a host nation hospital for rehabilitation.” Approximately a quarter of trauma patients present with coagulopathy, and enhanced fibrinolysis has been observed in the most severely injured patients. Increased fibrinolysis may be particularly common in severe traumatic brain injury, aggravating coagulation defects caused by consumption of factors, dilution from IV fluids, hypothermia, acidosis, and other mechanisms. Tranexamic acid inhibits the activation of plasmin and prevents activated plasmin from binding to fibrin, thus protecting clot from degradation. Lessons Learned:
Coagulopathic bleeding in severely injured trauma patients may be difficult to correct, even with 1:1:1 FFP to platelet to RBC transfusion and use of platelet‐containing products such as apheresis platelets, platelet concentrates or FWB.
Increased fibrinolysis contributes to the coagulopathy of trauma, particularly in the most severely injured patients and particularly in traumatic brain injury.
Tranexamic acid reduces mortality due to hemorrhage and to all causes in bleeding trauma patients. Tranexamic acid should be considered in the management of all bleeding trauma patients and should be given as early in the resuscitation as possible (within 3 hours of injury). Mortality is increased if tranexamic acid is given 3 hours after injury.

First to Cut
32

First to Cut
33
Extremity and Vascular Injuries

First to Cut
34
“Resuscitation and field tourniquets” “A 22‐y.o. male patient brought into CSH ER with an initial SBP of 80 with bilateral near complete traumatic above‐the‐knee amputations and bilateral windlass‐type tourniquets applied with complete cessation of bleeding. I started crystalloid and O negative PRBCs. His blood pressure quickly rose to 120, and he had significant arterial bleeding from his distal residual limbs. I brought him quickly to the OR for ligation of his vessels, debridement, and washout. He received 16 total units of PRBCs, several of which he lost on the way to the OR.”
With a traumatic amputation, the initial windlass field tourniquet almost always arrives with cessation of residual limb bleeding. With resuscitation and subsequent elevation of the SBP, the driving force often defeats the tourniquet or “pops the clot.” The initial resuscitation should not be too aggressive until you have surgical control of the vessels. Definitive tourniquet cessation of inflow can be obtained by placing a second field windlass tourniquet (Fig. 8) or rapidly placing an orthopedic pneumatic tourniquet (Fig. 9) from the OR. The morbidly obese patient with very large lower extremities can be refractory to tourniquet placement of any kind; these patients will benefit from groin cut‐down and temporary clamping of the femoral vessels.
Figure 8. Double windlass tourniquet placement by a combat medic.
Figure 9. Orthopedic pneumatic tourniquet can be placed in the ER or in the OR.

First to Cut
35
Lessons Learned:
Significant bleeding often resumes after resuscitation with a field tourniquet in place.
A second field windlass tourniquet can be placed next to the initial tourniquet in the ER.
An orthopedic pneumatic tourniquet can be placed in the ER.
Use minimal resuscitation until surgical control of the vessels.
Groin cut‐down and temporary clamping of the vessels can provide cessation of inflow in morbidly obese/massive thighs.
If all else fails, pre‐op; maintain manual pressure on way to the OR.

First to Cut
36
“Multiple frag wounds up and down the leg and no pulse”
“A 27‐y.o. female involved in an explosion arrived hemodynamically stable with a hundred frag wounds to the left leg and a windlass field tourniquet in place and no distal pulse. When we took down the field tourniquet, we had profuse bleeding from all frag wounds. We quickly replaced the field tourniquet with a pneumatic tourniquet and took her to the OR. Where to start? I couldn’t explore all the holes – too many. I did an on‐table angiogram and found a complete transection of the distal SFA.” A pulseless leg with multiple‐fragment wounds is similar to a shotgun blast in civilian trauma. One cannot fillet the leg open to visualize the entire vascular tree; it is best evaluated by angiogram. To minimize ischemic time, this can be performed in the OR by an “on table” angiogram. Proximal control is obtained and injection contrast followed by fluoro, or multiple plain X‐rays will define the arterial injury point. After completion of the vein interposition graft, check distal pulses and Doppler signals and consider obtaining a “completion” angiogram to evaluate your repair as well as to rule out additional distal arterial injuries. Prosthetic graft can be used as a temporary conduit as long as it is replaced at a more selective setting soon after a vein graft (Fig. 10). Lessons Learned:
Multiple fragment wounds and arterial injury are best pin‐pointed by on‐table angiogram.
After repair with multiple fragment wounds, perform on‐table completion angiogram to rule out distal injuries.
Use ONLY vein in all extremity vascular injuries for arterial and venous repairs.
Check distal pulses, Doppler signals, and completion angiogram after your repair.
Figure 10. Reversed interposition vein grafts in femoral arterialand venous position in thigh.

First to Cut
37
“A pulseless leg all by yourself – way out” “I was at a far‐forward Navy FRSS (level II) and had a 22‐y.o. with frag wound to his right popliteal artery and loss of pulse distally. He had a tourniquet placed on his upper thigh. I took him to the OR and placed a straight shunt. We did not have any more Fogarty embolectomy catheters but had adequate backflow. He had a Doppler signal before I sent him to the CSH. When he got to the CSH, the shunt had clotted off.” The options for far‐forward surgical facilities should be either ligation or tourniquets used in the patient in extremis and shunts (Figs. 11 and 12) for everyone else. It is important to make sure there is no clot distally with a Fogarty catheter if at all possible. Place the distal shunt in first and then place proximally with ongoing back‐bleeding through the shunt. Perform fasciotomy correctly and liberally. Studies have documented that the majority of shunts will stay patent and no cases of shunt dislodgement and exsanguinations have been reported; but this is a theoretical catastrophe – and the patient should be transported with a tourniquet in place (NOT tightened!). Lessons Learned:
Shunt and ligation are the options for far‐forward surgery for vascular injuries.
Secure vascular shunts with large silk ties.
Distal thrombectomy with a Fogarty catheter will maximize patency.
A tourniquet should be placed loosely (i.e., not used) proximal to the shunt for transport in case of shunt dislodgement.

First to Cut
38
Figure 11. Temporary interposition vascular shunt in place.
Figure 12. Extremity vascular shunt.
First to Cut
39
“We don’t need no stinking proximal control!” “A 26‐y.o. male with a single fragment to the mid thigh and a significant hematoma but with palpable pedal pulses. I thought it was going to be just muscle branches or a venous injury due to the palpable pulse; so I just dove into the hematoma and was greeted by pulsatile bright red blood all over my mask. I held pressure as my partner got proximal control in the groin. The patient had a 50% transection of his SFA.” Most combat surgeons do very little vascular surgery in the continental United States (CONUS). For those of us who do not do vascular surgery on a regular basis, the basic tenet of safe vascular surgery—proximal and distal control of the
vessels–is very important. Proximal control can be obtained with an orthopedic pneumatic tourniquet or surgical dissection proximally with placement of a Potts vascular loop. In every vascular case, get proximal control. Lessons Learned:
Get proximal and distal control of vascular injuries.
Consider “remote” proximal incisions for proximal control.
Pneumatic tourniquet or cut‐down can afford proximal control.
Maintain manual pressure on way to OR.
First to Cut
40
“Four hours of tourniquet time” “A 26‐y.o. male with foot traumatic amputation and multiple frag wounds to the right leg with a high thigh field tourniquet in place. Arrived to the CSH with an SBP of 100, HR of 120. We had no report on duration of the tourniquet. We took down the tourniquet, and he promptly coded. We put the tourniquet back up, intubated him, and gave him fluid and bicarb and he came back. We found out later that the tourniquet had been in place for over 4 hours.” The use of tourniquets – while rare in civilian trauma – is very common in combat injuries. Tourniquets are the No. 1 instrument that a medic can use to lower the number of soldiers killed in action. The use of tourniquet with application until the absence of a distal pulse by design causes distal ischemia. Release of a functioning tourniquet after several hours can result in the release of acidic fluid and potassium. The patient intubated and without a head injury can be briefly hyperventilated. Before taking down a long duration tourniquet, make sure the patient is well hydrated and resuscitated. Adding an ampule of sodium bicarbonate (bicarb) or THAM can counteract the release of “bad humors,” lactic acid, and potassium. Also release the tourniquet slowly – if the rare arrhythmia arises, re–use the tourniquet and retry after further bicarbonate and fluid. If the leg is necrotic, remember “life before limb” and perform an amputation. Lessons Learned:
Prolonged tourniquet times are rarely associated with clinically significant systemic hyperkalemia and acidosis.
Perform four‐compartment fasciotomy with all lower extremities with significant tourniquet times.
First to Cut
41
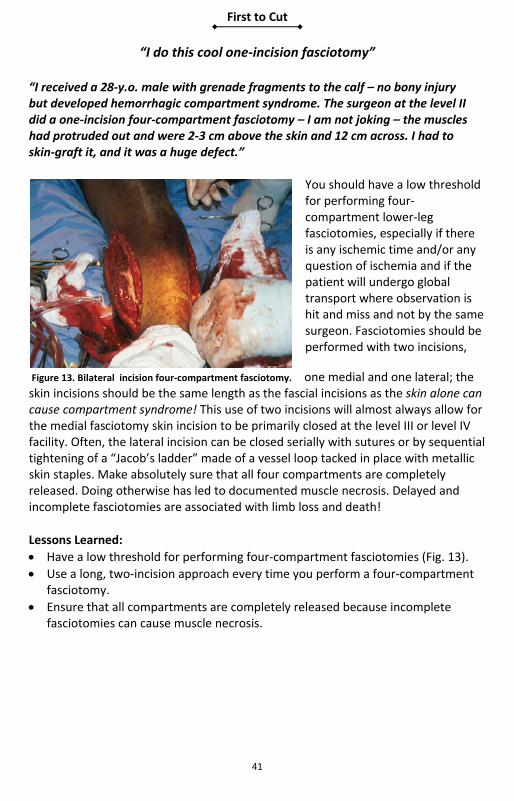
“I do this cool one‐incision fasciotomy”
“I received a 28‐y.o. male with grenade fragments to the calf – no bony injury but developed hemorrhagic compartment syndrome. The surgeon at the level II did a one‐incision four‐compartment fasciotomy – I am not joking – the muscles had protruded out and were 2‐3 cm above the skin and 12 cm across. I had to skin‐graft it, and it was a huge defect.”
You should have a low threshold for performing four‐compartment lower‐leg fasciotomies, especially if there is any ischemic time and/or any question of ischemia and if the patient will undergo global transport where observation is hit and miss and not by the same surgeon. Fasciotomies should be performed with two incisions,
one medial and one lateral; the skin incisions should be the same length as the fascial incisions as the skin alone can cause compartment syndrome! This use of two incisions will almost always allow for the medial fasciotomy skin incision to be primarily closed at the level III or level IV facility. Often, the lateral incision can be closed serially with sutures or by sequential tightening of a “Jacob’s ladder” made of a vessel loop tacked in place with metallic skin staples. Make absolutely sure that all four compartments are completely released. Doing otherwise has led to documented muscle necrosis. Delayed and incomplete fasciotomies are associated with limb loss and death!
Lessons Learned:
Have a low threshold for performing four‐compartment fasciotomies (Fig. 13).
Use a long, two‐incision approach every time you perform a four‐compartment fasciotomy.
Ensure that all compartments are completely released because incomplete fasciotomies can cause muscle necrosis.
Figure 13. Bilateral incision four‐compartment fasciotomy.

First to Cut
42
“The popliteal artery and vein were transected” “A 29‐y.o. male with frag wounds around his right knee with pulsatile bleeding. Placed a pneumatic tourniquet and brought him to the OR. Dissected proximally and distally – both the popliteal artery and vein were transected.” For some reason, it seems like fragments gravitate to the popliteal fossa. This is not an uncommon vascular injury in combat wounded. If in a level II facility, ligation or shunting of the vein and shunt placement in the artery are optimal with a four‐compartment fasciotomy. Your approach should be medial – this is the easiest approach for the nonvascular surgeon. At the level III, vein interposition grafts should be placed in both venous and arterial injuries. Perform the proximal anastomosis first and let the vein distend with pulsatile blood for optimal approximation of required length. While it used to be a law that you should not ligate the popliteal vein, current thinking is that popliteal vein reconstruction is optimal but that it can be ligated. If required in a damage control situation, perform the vein ligation with a four‐compartment fasciotomy. Lessons Learned:
Shunt popliteal artery injuries in a level II facility.
Shunt or ligate popliteal vein injuries in a level II facility.
Place interposition graft for popliteal venous injuries at a level III if feasible.
Ligate popliteal veins if reconstruction is not feasible at a level III facility.
Perform four‐compartment fasciotomy for all popliteal repairs.
First to Cut
43
“The femoral artery was transected, and the femur was in two pieces” “A 27‐y.o. male with GSW to the right thigh, large hematoma, tourniquet in place, obvious deformity, on X‐ray femur was in two pieces. We took down the tourniquet and no distal flow. We took him to the OR and placed an orthopedic pneumatic tourniquet. Fixed the artery with a reversed saphenous vein interposition graft and then orthopedic gents ‘ex fixed’ the femur. The graft then buckled, and we had to redo the graft. Afterwards, we did a four‐compartment fascial release.” With vascular injuries with a concomitant unstable fracture, most surgeons would much rather have the stability and defining lengthening of the bone with an external fixation (ex fix) before attempting definitive vascular repair. An ex fix can be placed very quickly if the orthopedic surgeon is notified early and is present in the OR. The performance of an adequate four‐compartment fasciotomy will be an easy prophylactic measure to ensure muscle viability. If an ex fix can be placed quickly, do the ex fix before the vascular repair. If the ex fix will delay the vascular repair significantly, consider placing a temporary shunt prior to ex fix. Lessons Learned:
Use a pneumatic tourniquet as soon as possible with leg vascular injuries or cut‐down for proximal control.
Notify the orthopedic surgeon upon arrival of an unstable fracture with a vascular injury.
Perform four‐compartment fasciotomy liberally.

First to Cut
44
“GSW transecting the subclavian artery, near death” “A 25‐y.o. male arrived with GSW to the right shoulder under the clavicle – hypotensive with pulsatile bright red blood pulsing out. We applied manual pressure, gave blood, intubated him, placed a chest tube – groin lines, got him ready to the OR; he exsanguinated on the way to the OR.” Subclavian artery injuries (Fig. 14) can get your attention quickly and can exsanguinate faster. One option in the ED is to place a 30‐cc Foley catheter (or more than one) through the skin defect and blow‐up balloon under the clavicle; placing a Kelly clamp at the skin can maintain tension. The best way to stop bleeding (or to at least diminish it) is to get proximal control as fast as possible. In the patient in extremis with a left subclavian artery injury, the fastest way to get control is to intubate, sedate, and perform an ER lateral thoracotomy above the nipple (2‐3 ICS). Clamp the left subclavian where it branches off the aorta – it is actually high and under the pleura but can be palpated and seen. If the vessel cannot be clamped, a fist up in the upper pleural cavity (cupula) can limit blood loss. Your options in the OR are ligation, shunt, or interposition graft. The right is more controversial; most textbooks recommend a median sternotomy for proximal control on the right – a good option if the patient can survive until the OR. Another option is to perform a clamshell thoracotomy in the ER and get a clamp on. Time is of the essence, and lines can be placed in the OR just as well as the ER. Endovascular options can be entertained where available in the stable patient after imaging. Lessons Learned:
Subclavian artery injuries can quickly exsanguinate.
Get proximal control ASAP with exsanguinating subclavian artery injuries.
Perform a left (2‐3 ICS) lateral thoracotomy for proximal control with a left subclavian injury.
Perform a median sternotomy or clamshell thoracotomy for an actively hemorrhaging right subclavian artery injury.
Always intubate and give positive pressure ventilation before entering the chest cavity.
Figure 14. Subclavian artery injury.
1
First to Cut
45
“Aortic injury – we tried and tried to put in a graft, but then she became coagulopathic.”
“A 24‐y.o. female with frag wounds to the back – hemodynamically normal; took her for CT scan. Large retroperitoneal hematoma below the kidneys with some contrast extravasation; took her immediately to the OR. Ex lap pulled the small bowel up, and the hematoma was just above the pelvis. Got proximal control just below the renal arteries and both iliacs. Opened it and had a hole in the very small aorta. Tried to primarily fix – no luck; then transected and tried to sew in a graft but lots of bleeding from lumbars – she got cold and coagulopathic.” Patients with aortic injuries rarely make it alive to a surgical facility. The aorta is actually very small in young healthy patients, and the retroperitoneum can allow for a significant tamponade effect at times. Proximal and distal control is paramount with aortic injuries, and exposure can be obtained below the renals like a repair of the abdominal aortic aneurysm (AAA). More proximal abdomen aortic control can be obtained with the left medial visceral rotation (also known as Mattox maneuver), including swinging the left kidney, pancreas, descending colon, and spleen to the middle line. In a level II and during damage control, your best option is often to place a pediatric chest tube as a shunt and perform bilateral four‐compartment lower leg fasciotomy. In extreme cases, ligation of the aorta is an option (with four‐compartment fasciotomy, it’s “life over limb”) and reconstruction later when the patient is stabilized. Remember that you can ligate lumbars liberally. Lessons Learned:
Proximal and distal control of aortic injuries is mandatory.
Shunting the aorta with a small pediatric chest tube is an option for level II and damage control.
Ligating the aorta below the renal arteries is an option in extreme cases to save life over limb.
Perform four‐compartment lower leg fasciotomy liberally with aortic flow compromise.
Ligate lumbar arteries as needed.

First to Cut
46
“External iliac artery transection, stool everywhere, and no long grafts” “A 28‐y.o. male with GSW to the pelvis. Arrived hypotensive to our FST. Brought him to the OR and did an ex lap. Stool everywhere. Active arterial bleeding from the pelvis. Packed it, got lots of blood ready, and then removed packing. The left common iliac was bleeding – transected. Easily clamped both ends. Now, what do I do? Stool all over.” Iliac artery injuries are not uncommon injuries in combat wounded. The basics of damage control must be followed. Stop bleeding and minimize soilage. The best option at a level II for limb salvage is to place a vascular shunt (and perform a four‐compartment fasciotomy) and staple off the leaking bowel; then ship ASAP. Playing the “worst case scenario” game, consider flying the patient with an intra‐abdominal shunt with a surgeon with a vascular clamp. The same procedures can be adhered to in a level III with a cold, coagulopathic patient. In the patient in extremis, simple ligation is an option with fasciotomy. When the patient is stabilized and coagulopathy is corrected, reconstruction can be entertained. Ligate the iliac and perform a femoral‐femoral graft outside the contaminated field. With minimal contamination and in situ graft can be entertained with retroperitonealization or omental covering. Optimally, a vascular consultation is obtained – it wouldn’t hurt to get one. Lessons Learned:
Shunt iliac artery injuries at level II and in damage control situations.
Ligation of the iliac artery is an option in the patient in extremis.
Perform four‐compartment fasciotomy with compromised iliac artery blood flow.

First to Cut
47
“Damage control laparotomy in extremis and a transected brachial artery”
“A 28‐y.o. male with multiple GSW to the abdomen arrives hypotensive, cold, acidotic. We take him immediately to the OR, pack him off, and get warm blood, Factor VIIa. Activate the “walking whole blood bank,” try to re‐warm him, remove packs, stop some mesenteric bleeders; but his pelvis and liver have capillary ooze‐ repack. We decide to wait in the OR to warm him and await the whole blood. During this time, we complete a rapid “tertiary” exam and find a GSW to his right upper arm and no distal pulse or Doppler signal, but at least his arm was not bleeding. He is so coagulopathic I did not even think of placing an incision for a shunt placement. I placed a tourniquet so we could have some control if he started to bleed from the arm.” “Life over extremity.” This is a clear case where the patient is in extremis and where placing an additional incision and attempt at a vascular shunt and fasciotomy would lead to additional bleeding (with hypotension) and heat loss and would likely worsen the coagulopathy. It is no crime to make a judgment call that attempting to save a limb would jeopardize the attempt to save a life. The bleeding extremity in the patient in extremis can also be sacrificed with the placement of a tourniquet – if your judgment is that the patient will die if you attempt salvage maneuvers. Lessons Learned:
“LIFE OVER EXTREMITY.”
The bleeding or pulseless extremity can be sacrificed to save life with a patient in the extremis of the lethal triad.
Options for the damage control patient with a concomitant extremity vascular injury are observation with pressure bandage, tourniquet, or shunt placement (clinical judgment).

First to Cut
48
“Exsanguinating axillary artery wound”
“A 22‐y.o. male involved in dismounted explosion with large fragment wound to the left axilla. Arrives delirious with active arterial bleeding. Rolled up a KERLIX™ and packed wound and had another surgeon hold pressure. Intubated him and got a groin cordis and started blood right away; he went into V‐tach on the way to the OR.” An exsanguinating axillary artery can be seen as a very similar to an exsanguinating subclavian artery. Manual pressure is often unable to occlude the artery bleeding under significant tissue mass. Proximal control is the goal and where in the hospital to get it is a judgment call. If minimal or if bleeding is slowed with manual pressure, the patient may be able to wait until the OR if it is immediately available. If the patient is exsanguinating in front of you, an ED thoracotomy should be used with a left superior to the nipple, anterolateral thoracotomy and clamping of the subclavian artery, on the right a median sternotomy in the OR, or a clamshell thoracotomy in the ED will allow for proximal right subclavian clamping. After an ED thoracotomy with proximal control, the patient is brought immediately to the OR for definitive repair. In the OR, your options for an axillary artery are ligation or shunt if the patient is in extremis. A shunt is preferred over ligation if feasible. In the more stable patient, vein or prosthetic interposition graft placement are options. Most young healthy patients will tolerate axillary artery ligation without limb loss – consider performing upper extremity (UE) fasciotomy. Lessons Learned:
Patients with an exsanguinating axillary artery injury need proximal control ASAP.
Immediately pack and manually place pressure on all axillary wounds, intubate, groin cordis, start blood.
Perform left above nipple anterolateral thoracotomy for exsanguinating LEFT axillary artery injury for proximal control.
Perform clamshell thoracotomy or median sternotomy for proximal control of RIGHT exsanguinating axillary artery injury.
If stable and not actively exsanguinating – get proximal control with supraclavicular proximal control of the subclavian artery.
Axillary artery ligation and shunt are options in the patient in extremis.
With axillary artery ligation, consider performing a UE fasciotomy (or delay until correction of coagulopathy).

First to Cut
49
“Land mine injury to lower leg – and pus”
“A 14‐y.o. male arrives at the FST with a mangled foot after stepping on a land mine. We took him straight to the OR; the foot was obviously unsalvageable, and we guillotine‐amputated above the ankle. Then we debrided and irrigated; we left the wound open and started IV antibiotics. Four days later, frank pus was leaking around the bone.” Land mine injuries are a unique injury that deployed surgeons will see around the world. The first rules of damage control surgery apply: stop the bleeding and then debride. At the first operation, remove all necrotic or marginal tissue and guillotine‐amputate at a safe proximal location and leave skin and muscle open to drain; irrigate and start IV antibiotics as soon as possible (preoperative). Always spare as much healthy tissue as possible. Land mine injuries are unique in that the pathway of least resistance for the explosion with contamination is most often up a bone proximally. A common surgical mistake is not to debride or transect proximal enough, resulting in infection and the need to revise the amputation proximally. Do not forget tetanus prophylaxis. Antibiotic therapy is augmenting adequate surgical debridement at the time of initial care. Although randomized controlled studies have not been undertaken to definitively identify the ideal antimicrobial agents to treat acute combat‐related injuries, a recent committee met to discuss which antibiotics should be implemented in this setting. It was decided that a first‐generation cephalosporin such as cefazolin (Ancef®) is the ideal therapy. Although studies have evaluated the use of enhanced gram‐negative coverage with an aminoglycoside or fluoroquinolone, there is ongoing concern for selecting more resistant pathogens. If aggressive surgical intervention is carried soon after the injury, then therapy for 24 hours out to 72 hours is likely adequate in this setting. If the wound develops purulent drainage after 4 days, broad spectrum antibiotics should be started after bacterial cultures are obtained. Therapy is subsequently dictated by those culture results targeting the specific pathogen and its antimicrobial resistance profile. Lessons Learned:
At the first operation, always use guillotine amputation with muscle and skin open.
With amputations, start IV antibiotics ASAP (see Fig. 4 for guidelines).
A common mistake with landmine amputations is not accounting for proximal bone pathway of contamination.
Multiple washouts and re‐debridements may be necessary; do not close until all is healthy.
Remember tetanus prophylaxis as indicated.

First to Cut
50
“What is that mold doing there?”
“A 29‐y.o. Marine suffered extensive traumatic blast injuries, including a traumatic left hip disarticulation; right traumatic through‐knee amputation with proximal femur fracture; extensive scrotal, bladder, and perineal injuries; colonic rupture; and fractures of the sacral bone and multiple bilateral hand bones while on a dismounted patrol. At the FOB on the day of injury, he underwent exploratory laparotomy with ligation of internal and external iliac arteries to obtain hemo‐stasis. He received 87 units of blood products in the first 24 hours (41 units PRBCs, 38 units FFP, and 8 units whole blood). At LRMC, he underwent abdominal wound closure and ostomy placement; debridement of left hip was also performed, and large amounts of necrotic tissue were removed. He was admitted to Bethesda 5 days after injury. Repeated debridements of the left hip, right leg, perineum, and scrotum were performed on the second, fourth, and sixth hospital days. Angioinva‐sive fungal elements were seen within the soft tissue and muscle of both the left hip and the right leg, and antifungal therapy with liposomal amphotericin B and voriconazole was begun. Upon each visit to the OR, we encountered substantial amounts of necrotic muscle, fat, and soft tissue despite debridement back to clean wounds by the end of the operation 2 days prior. Repeated operative cultures grew Mucor spp. and Fusarium spp. By the seventh hospital day, we placed bilat‐eral ureteral catheters and nephrostomy tubes as we anticipated cystectomy due to extensive necrosis of the bladder wall. The bladder was ultimately spared; but on the tenth hospital day, he underwent left hemipelvectomy. After a series of additional tissue debridements, he ultimately underwent right leg revision to AKA and delayed primary wound closure on 27th hospital day and received a split‐thickness skin graft to the left pelvic region on the 39th hospital day.” The British and now the U.S. military have been wrestling with invasive fungal infections (IFIs) for years while their area of operations were in the southern regions of Afghanistan (Helmand and Kandahar provinces). Risk factors that appear to be associated with these IFIs include large explosive injuries during dismounted patrols in certain regions of Afghanistan in which the casualties suffer extensive lower‐extremity injuries and require large blood product support. The current focus is on early recognition of IFI with appropriate diagnosis and aggressive surgical intervention with adjunctive empiric antifungal therapy. Lessons Learned:
Casualties with extremely severe lower‐extremity injuries requiring large blood product support in specific regions can be associated with IFIs.
Aggressive surgical intervention is required to control the infection.
Thorough diagnosis is required, including culture and histopathology along with empiric therapy with agents such as liposomal amphotericin B and voriconazole.

First to Cut
51
Abdominal Injuries

First to Cut
52
“Colon frag wounds – blow it up” “A 36‐y.o. involved in an explosion and fragment holes from foot to his head, normal vitals except for low sats. Intubated, rt chest tube with 300 cc blood and air, on CT fragments seen throughout his abd. Took him to the OR for ex lap. Two small holes in the transverse colon and 30+ hematomas all over his ascending and descending colon. Tried to open the majority of blood staining spots. Closed his fascia. Next day, hypotensive and tachycardic; brought him back to the OR for re‐exlap. I found fecal staining in his descending colon with a small perforation.” The only thing that comes close to a multiple fragment injury to the colon in civilian trauma is a shotgun injury. The classic teaching is to open (unroof) all colon hematomas and blood staining spots and look for a perforation. This teaching should also be followed in combat fragment wounds to the colon, but it can be hard if the mesentery is full of fat. One thing that can be very helpful is the “colon squeeze” test. Take a colonic segment between both hands and squeeze the colon to distend it to look for escape of gas. Have a low threshold for a “second look” within 24 hours if any doubt. Lessons Learned:
Unroof and open all colonic hematomas and blood staining looking for perforations.
Perform colonic “squeeze test.”
Have a low threshold for second look with multiple colonic fragment wounds.

First to Cut
53
“Packed abdomen and no abd wound vacs around” “A 27‐y.o. male with an RUQ GSW and hypotensive. Took him straight to the OR and packed his upper quadrant with complete cessation of significant bleeding. He received 12 u of PRBCs – no way to even just close skin – no wound vacs around, which I use back home.” The open abdomen is an essential initial condition of damage control surgery. A packed abdomen will require a second look; and if the abdomen is packed and the patient received a significant resuscitation, closing the fascia will be a setup for compartment syndrome. To remove the possibility of compartment syndrome, the abdomen should be left open. A wound vacuum is a good solution but is not always available. A “field expedient” abdomen wound vacuum can be constructed. The first layer over the bowel needs to be nonadherent plastic (no lap pads or towels directly on the bowel); a sterile radiology cassette drape or a towel encased by an Ioban works well). It is also important to keep the bowel separated from the parietal peritoneum; so place the plastic down into the gutters. The next layer on top of the plastic is KERLIX™ (again not on the bowel directly), then two JP drains with the tubing exiting superiorly, then more KERLIX™ over the JPs, then an all‐encompassing Ioban over the entire abdomen with small air‐tight “mesenteries” wrapped around the JP drains as they exit (some place JP drains through the skin). Place the JP drains on suction to remove any excess fluid draining. This will allow for coverage of the bowel and keep heat in and allow for drainage of fluid. Figure 15 shows the placement of abdominal dressing. Lessons Learned:
Keep all damage control abdomens OPEN.
Always keep plastic over bowel.
Place the plastic down into the gutters to keep bowel and parietal peritoneum separated.
A sterile radiology cassette drape or a blue towel encased in Ioban can provide a first layer.
JP drains in a KERLIX™ bed can allow for drainage of fluid.
JPs must exit superiorly as the “leaks” of fluid are always inferiorly.
Figure 15. Abdominal dressing over open abdomen.
First to Cut
54
“GSW through the colon and a bullet in the psoas muscle” “A 28‐y.o. male with GSW of the abdomen, brought him to the OR for ex lap – moderate stool soilage and significant descending colon tissue injury – stapled and removed the segment. The bullet was lodged in the psoas muscle with significant bleeding.” The question of what to do with a bullet that has been potentially contaminated by a colon pass is relatively simple for the combat surgeon. Although civilian case reports and case series report a higher incidence of peri‐bullet abscess formation after a colon pass‐through, the risk of going after a bullet embedded in a muscle is too high. Dissecting a bleeding or non‐bleeding retroperitoneal muscle can result in life‐threatening bleeding. These bleeding muscles should be packed with the first goal of damage control surgery in mind – stop bleeding – and you should consider a hemostatic plug or chitoflex for these injuries. If a retroperitoneal abscess forms, the area can be drained in a CONUS facility. Lessons Learned:
Leave embedded fragments or bullets in the retroperitoneal musculature in place, regardless of whether they pass through the colon.
Pack off all retroperitoneal bleeding holes and do not dissect out.

First to Cut
55
“IVC injury – we tried to fix it but had to ligate” “A 25‐y.o. male with frag wound to lower back, talking, SBP around 100, a little tachy. I took him to scanner – a single frag in his retroperitoneum with dye everywhere. Took him straight to the OR. Ex lap, Cattel, Kocher; then opened the hematoma over 50% transaction of the lower IVC – controlled with sponge sticks. We tried to run a suture but had a lot of blood loss, and the patient became coagulopathic. Had to just ligate the IVC. Postoperatively, his lower extremity compartments became real tight; and when his coagulopathy corrected, we took him back for four‐compartment fasciotomies.”
Infrarenal inferior vena cava (IVC) injuries can be ligated if primary suture repair is not successful or if you do not have the time to perform a patch graft (Fig. 16). Ligation of the suprarenal IVC carries a very high mortality due to renal failure and should not be performed except as a temporary last‐ditch effort and to return ASAP for return of flow. If possible, insert an IVC shunt to buy time. If one ligates the IVC, a lot of blood will pool into the lower
extremities and can result in muscle‐killing compartment syndrome. All combat‐wounded undergoing IVC ligation who will not be observed at one site or by one individual should undergo prophylactic B/L four‐compartment fasciotomy, leg elevation, and leg compression wrapping. Lessons Learned:
INFRArenal IVC injuries can be ligated.
SUPRArenal IVC injuries should not be ligated because of very high mortality.
Bilateral four‐compartment fasciotomy should be performed for IVC ligation in a combat zone.
If coagulopathic, return the patient to the OR for fasciotomy after coagulopathy is corrected.
Sponge sticks can be used to control IVC bleeding; Allis clamps can be applied to iliac vein bleeding points for control.
As blood pools in the lower extremities after IVC ligation, the patient will have significant fluid requirements.
Figure 16. Distal IVC ligated with a Prolene™ suture.

First to Cut
56
“The portal vein was transected – I tried to fix it; but the patient became coagulopathic, and I had 3 units of blood left.”
“A 29‐y.o. female with GSW to abdomen. Took her immediately to the OR and did ex lap; found a huge hematoma. Clamped the portal hepatitis off proximally and distally; opened it and found a complete transection of the portal vein. We had limited blood supply; so we ligated the portal vein and shipped her off to the CSH alive and warm.” All portal vein injuries should be primarily repaired if possible after proximal and distal control of the area of bleeding. If in a damage control mode, placing a shunt is an option; and if in extreme physiologic and massive destruction, ligation is an option. However, ligation carries at least a 50% mortality due to the massive fluid sequestration in the gut, and the patient will require massive amounts of fluid resuscitation for the first 24 to 36 hours post‐operative. Thus, leave the abdomen open. Always perform a “second look” at 24 hours for ischemic bowel. All applies for ligation of the superior mesenteric vein (SMV) as well. Lessons Learned:
Clamping the portal hepatitis proximally and distally for control of a portal vein injury.
The portal vein can be shunted if enough portal vein is intact.
The portal vein (or SMV) can be ligated if primary repair or shunt is not an option.
Expect massive fluid requirements after ligating the portal vein.
Leave the abdomen open with a portal vein injury.
Perform a second look for bowel ischemia in 24 hours with portal vein ligation, shunt, or repair.

First to Cut
57
“Frag right through the right hepatic artery, cold, coagulopathic.” “A 40‐y.o. with multiple frag wounds to the abd and hypotensive – took him straight to the OR. Blood, FFP, ex lap – he had liver holes bleeding; packed them off. He had a hematoma with active bright red bleeding from his portal hepatis; clamped it proximally and distally and then opened it up. His right hepatic artery was transected, and he was now cold, coagulopathic. I ligated both ends and got out, returned to the OR in 24 hr, and removed packs and removed his gallbladder; he did fine.” Ligating arteries is a life‐saving maneuver in damage control – if the artery can be ligated with few complications. The right hepatic artery can be ligated if the portal vein is intact (remember that the portal vein provides 75% of blood flow and 50% of the oxygen to the liver), but a cholecystectomy should be performed when the patient is stable and not coagulopathic due to gallbladder ischemia. In damage control, many arteries can be ligated, including the left or right hepatic arteries if the portal vein is intact, the celiac axis, splenic artery (perform splenectomy at some point), unilateral renal artery (perform nephrectomy), axillary artery (should have abundant collaterals for limb salvage), in the extremities a shunt and fasciotomy should be performed if at all possible for limb salvage. The superior mesenteric artery (SMA) cannot be ligated because of the high incidence of small‐bowel necrosis. If the pancreas is also injured, perform distal aorta to SMA interposition graft; place the shunt in a damage control case. Iliac artery transection should be treated with shunt in a damage control situation. Lessons Learned:
Arterial ligation can be performed as a life‐saving maneuver in damage control.
Perform cholecystectomy with right hepatic artery ligation.
The right or left hepatic artery can be ligated if the portal vein is intact.
The celiac artery can be ligated.
The SMA cannot be ligated; shunt and repair later.
The renal arteries can be ligated, but then perform a nephrectomy.
The splenic artery can be ligated with a splenectomy.
The axillary artery can be ligated.
Perform a shunt and fasciotomy for extremity vascular injury if possible over ligation.

First to Cut
58
“Massive abdominal wall destruction” “A 29‐y.o. male involved in an RPG explosion – close proximity; arrived to the FST hypotensive with massive abd wound and fragments over abd/pelvis. Took him to the OR. Performed ex lap – stopped all bleeding, packed liver and pelvis; had a huge right‐sided abd wall defect. Just covered with an Ioban and shipped….” A significant abdominal wall defect will get your attention. The same damage control principles are at play: stop the bleeding and resuscitate with blood and blood products. Ligate arterial bleeders from the abdomen wall after stopping any significant intra‐abdominal bleeding. After surgical bleeding has ceased, limit GI succus soilage. At this point, you have basically an open abdomen familiar to all general surgeons and treat it that way – plastic over bowel – KERLIX™ – ± JP drains over KERLIX™, and then cover the entire defect with benzoin on skin followed by a large Ioban™. The alternative is to place a Bogotá bag (IV or irrigation bag) sutured to the SKIN for temporary coverage. At the second look at a level III, the abdominal wall is debrided, and a wound vacuum is then placed if available (or replace the Ioban). Abdominal wall reconstruction can be attempted at level IV or above; the fall‐back position is always to let the bowel granulate (± single VICRYL™ mesh coverage) and split thickness skin graft (STSG). Then definitive repair at 12 months post STSG can be considered.
Lessons Learned:
Large abdominal wall defects are treated like an open abdomen.
Place plastic over bowel for all temporary closures to minimize adhesions.
If viral mesh is placed over an open abdomen, place a single layer to minimize time until granulation (see Fig. 17).
Wait 12 months before abdominal wall reconstruction after STSG to bowel.
Figure 17. STSG to granulation tissue of open abdomen.

First to Cut
59
“GSW right through the head of the pancreas and the duodenum” “A 34‐y.o. male with GSW to mid‐epigastrium went to ex lap and found a hole in the duodenum and head of pancreas with massive destruction. He needed a trauma Whipple, but we only had 10 units of blood; so we only finished half of the resection and called it quits and sent him to the CSH.” A trauma Whipple (pancreaticoduodenectomy) should NOT be attempted at a level II facility. In these situations, go back to the basic principles of damage control:
1. Stop all bleeding. 2. Stop succus soilage – do not attempt resection. 3. Stop all bleeding and soilage and place drains or simply pack off the area with
dry laparotomy pads and ship after adequate pre‐warming and resuscitation for the trip to the next level.
The definitive surgery can be successfully performed at a level III facility with adequate blood bank support and ICU care. Enlist the help of the most experienced surgeon. Lessons Learned:
Do not attempt a Whipple at a level II facility.
Stop all bleeding and soilage and transfer packed with an open abdomen to a level III facility.

First to Cut
60
“Ah, the packing will stop the bleeding” “A 27‐y.o. male with at least two GSWs to the RUQ – hypotensive – brought emergently to OR – ex lap – lots of blood and lots of bleeding from the RUQ. Packed it off – still blood – pringle and packed him off and started massive resuscitation, FFP, PRBCs, platelets, cryo, factor VIIa. Removed pringle and thought packing would hold off bleeding. Gave time for correction of coagulopathy. While we were waiting, he went bradycardic and then asystolic.” Although packing is a very important part of damage control, it cannot stop surgical bleeding. A transected portal vein or an IVC will not be held off very long with packing. If you still have significant bleeding after packing, you are usually dealing with one of two possibilities: major vessel bleeding or massive coagulopathy. In these cases, you must remove the packing and reassess to determine the culprit. This is true for any region. The one exception is a deep muscle bleeder from the psoas muscle. Do not go chasing a vessel in this area; just pack tightly and consider hemostatic agents such as fibrin‐soaked Gelfoam®, Surgical®, Avitene®, and Chitoflex®. Packing is not a cure‐all for massive bleeding. If packing stops the bleeding, do not remove the packs at that operation. Lessons Learned:
Packing will not stop major vessel bleeding.
If significant bleeding after packing consider, surgical bleeding or massive coagulopathy.
If significant bleeding after packing, remove packing and reassess the situation.
Do not dissect out psoas muscle bleeders.
Consider hemostatic agents.

First to Cut
61
“The rectum and nec fasc” “A 43‐y.o. male with GSW to the pelvis arrived to the CSH hypotensive. We took him straight to the OR. Ex lap. Packed his pelvis. Had complete transection of his rectum – stapled off the ends and packed him off. Returned 24 hr later for washout. Performed colostomy – did not place presacral drain based on the civilian data. He developed a swollen left thigh –took him to the OR; he had raging nec fasciitis.” While the classic teachings for a rectal injury from the Vietnam War are proximal diversion (colostomy), presacral drainage, distal rectal irrigation, and closure of the rectal injury if easily done, the civilian trend has been to not to irrigate and not to place presacral or other drains. The Vietnam data (with small numbers) suggest a benefit from the addition of distal rectal stool washout in high‐velocity wounds. Combat high‐velocity rectal injuries are not civilian injuries; and until we have data supporting otherwise, a drain is a minor thing that may help and should not hurt. A high rectal injury should be drained with a JP drain, and a distal rectal injury should be drained with a presacral drain (JP or Penrose). Distal rectal washout should be considered on a case‐by‐case judgment. If massive stool soilage and massive pelvic or rectal destruction, having a large stool reservoir may be a source of subsequent infection. Necrotizing fasciitis from a rectal injury often runs down the thighs and should be monitored. Lessons Learned:
Perform diverting colostomy for all rectal injuries.
Close rectal defect if accessible.
Place perirectal injury drainage.
Consider distal rectal stool washout for massive injuries.

First to Cut
62
“Pelvic fracture and hypotensive” “A 26‐y.o. male speeding away from an explosion, which he missed, ran into a tractor‐trailer head on. Arrived to the FST talking but hypotensive with an SBP of 95. Clear breath sounds and no SOB, FAST negative but unstable open‐book pelvis fracture by physical exam. We wrapped sheets around his pelvis and spun it and taped it tight with 100‐mph tape.” Blunt trauma is not uncommon with or without penetrating trauma in soldiers in vehicles, especially after exiting a danger zone. Unstable pelvic fractures can often be elicited by physical exam. The commercial pelvic binders work well if applied correctly, but often they are not available. When they are not available, a simple sheet can be life‐saving. Place the sheet under the buttocks and bring both ends anteriorly; twist the ends around each other and tighten down to the desired tension and then wrap the twisted ends with tape as close to the skin as possible. The knees should be taped together for extra support. Intraperitoneal bleeding should be evaluated with FAST or supraumbilical DPL. With a blunt pelvic fracture, FAST is helpful only if positive; a negative FAST with a blunt pelvic fracture cannot be trusted to rule out intraperitoneal bleeding; and DPL should be performed to rule out intraperitoneal bleeding. The role of extraperitoneal pelvic packing with exsanguinating pelvic fracture is gaining popularity in civilian centers and should be considered in the exsanguinating patient with a blunt trauma pelvic fracture – especially with limited blood supply. Lessons Learned:
Blunt trauma is seen in the combat zone.
An open book pelvic fracture needs to be closed ASAP.
A sheet wrapped, twisted, and taped down around the pelvis will close most pelvic fractures.
Tape the knees together for extra support.
With blunt trauma pelvic fracture, the FAST is accurate only if positive.
If FAST is negative in the unstable pelvic fracture patient, perform supraumbilical DPL.
Consider extraperitoneal packing in the unstable blunt trauma pelvic fracture patient.

First to Cut
63
“Transpelvic GSW and interventional radiology … NOT!” “A 34‐y.o. with transpelvic GSW arrives at the CSH hypotensive. Brought him straight to the OR for an ex lap. Iliac vein and arteries are intact; he has a small entrance hole on the right pelvic wall and a large hole on the left pelvic wall with profuse bleeding. I packed the small hole with surgical and lap pads. I tried to pack the large hole and placed lap pads, but he had continued bleeding; he is now getting coagulopathic. I tied off the left hypogastric with a zero silk and packed – it stopped bleeding.” Transpelvic GSWs can present with massive pelvic wall destruction and a combination of arterial and venous plexus bleeding. Small holes can be plugged with a “hemostatic plug” made up of thrombin‐soaked fibrin, Avitene® all rolled up like a cigarette in Surgicel. This plug can be placed in small holes followed by lap pads. Large holes are harder to pack off for hemostasis, but a hemostatic dressing such as Chitoflex or Surgicel/fibrin, followed by lap pads, often works; or consider a Foley catheter. If life‐threatening coagulopathic bleeding continues, consider excluding arterial inflow. In civilian practice, embolization is an option; but at most level III hospitals, it is not available or is rudimentary. The option to the surgeon is tying off the hypogastric or injecting Avitene into the hypogastric artery– this is tolerated if unilateral in the vast majority of young patients. The use of a large suture also allows the option of removing the suture at the second look. Another last resort with life‐threatening pelvic hemorrhage is packing the pelvis tight and then actually closing the lower one‐third of the abdominal fascia for a tamponade effect. Lessons Learned:
Use hemostatic plugs for small bleeding pelvic wall holes.
If unilateral pelvic wall bleeding refractory to packing, consider ipsilateral hypogastric ligation with a large suture.
If life‐threatening pelvic hemorrhage continues, as a last resort consider packing and closing the lower one‐third of the abdominal fascia for a tamponade.
Consider the use of a Foley catheter for hemostasis on defined holes.
First to Cut
64
“Stomach multiple frag wounds – blow it up” “A 29‐y.o. female involved in an explosion arrives hypotensive and with multiple abdominal frag wounds. Emergent ex lap – multiple small bowel wounds resect. I look at the stomach, and it has dozens of small hematomas. I open up the big ones; no full‐thickness injuries. Oversew any serosal defects; open up the lesser sac. Posteriorly, the stomach is fine; but how can I hedge my bet that no other of these hematomas are full‐thickness?” A multiple‐fragment wound of the stomach is an injury unique to combat‐wounded. You need to unroof all large hematomas and look for serosal or full‐thickness wounds. Full‐thickness wounds need to be closed in two layers and any serosal tears oversewn with Lembert stitches. One option successfully applied by combat surgeons in this situation is to place a nasogastric (NG) tube and fill the stomach bed with warm saline, then have your anesthesia colleagues inflate the stomach with air as you manually occlude the duodenum. Then assess for any air bubbles or succus extrusion from any holes in the stomach. Lessons Learned:
Always open the lesser sac to visualize the posterior stomach.
Unroof any stomach hematomas as feasible to rule out underlying hole.
Close full‐thickness stomach holes with two layers.
Oversew any stomach serosal tears with Lembert stitches.
Consider stomach inflation under saline to assess for missed injury to the stomach and a second‐look laparotomy if there is a high potential for missed injuries.

First to Cut
65
“Isolated frag wounds to the RUQ and liver” “A 28‐y.o. male with multiple frag wounds to RUQ and normal vitals. Took him to the CT scanner. Had several fragments that looked like they went through the liver and lodged in the lung. We brought him back to the ED; placed a chest tube; and, based on the civilian data, observed his abdomen. He developed a bronchobiliary fistula. We took him to the OR a week later and closed the diaphragm defect, but the fistula persisted. His CBD was 3 mm; so we did not think a T‐tube would be an uneventful enterprise. We sent him to a third country for an ERCP and stent placement; he did fine after that.” Combat wounds are not civilian injuries. You should think twice before applying new directions in civilian trauma to combat wounds. The safest approach for all combat penetrating wounds to the peritoneal cavity should be exploratory laparotomy. Penetrating wounds to the right upper quadrant (RUQ) in the patient with normal hemodynamics may have a nontherapeutic exploratory laparotomy and may miss a diaphragm injury or transverse colon. Missing such an injury may be disastrous, especially if the patient goes without surgical observation as he/she progresses through the multiple legs of global transport. Lesson Learned:
The safest approach to all combat penetrating injuries to the peritoneal cavity is exploratory laparotomy.

First to Cut
66
“The spleen had a small piece hanging off” “A 37‐y.o. male with multiple frag wounds to the LUQ from an explosion. Normal vital signs. Took him for a CT; he had a left pneumo and lots of fragments in his LUQ. Placed a chest tube and took him to the OR for an ex lap; found diaphragm holes, and the lower pole of the spleen was hanging by a few strands of tissue. Removed the devitalized tissue and performed a splenorrhaphy with interrupted pledget prolenes. He did fine at first; but 2 days later, while he was about to board the helicopter for transfer, he got hypotensive. We had to bring him back for re‐bleeding and then just performed a splenectomy.”
As all surgeons know, the spleen can bleed and can bleed any time post op after a splenorrhaphy. We have all heard or experienced life‐threatening rebleeding or delayed rupture from the spleen in our CONUS practices. Combat surgeons should not even consider splenorrhaphy in combat‐wounded service members; it is not worth the risk of re‐bleeding while in an aircraft 40,000 feet above the
ground. Local nationals are a different consideration – a judgment call; but you will need prolonged observation and must have immunizations given prior to discharge and probably a pre‐discharge CT scan to rule out any large hematomas or pseudo‐aneurysms. Immunizations should be given at level IV or V facility. Civilian studies have demonstrated maximal response to post‐splenectomy immunizations at 2 weeks post‐splenectomy, but combat‐wounded can be considered for immuniza‐tions after fluid shifts and major inflammation; optimally, consider any time between 7 and 14 days. Immunizations should include pneumovax, H. flu, and meningococcus. In the patient with a significant spleen injury from blunt trauma (like the one in Fig. 18) – when you would observe in CONUS civilian practice – you should have a low threshold for splenectomy to avoid subsequent life‐threatening splenic bleeding. Lessons Learned:
Rarely perform splenorrhaphy in service members in a combat zone.
Have a low threshold for splenectomy in blunt trauma if you do not plan to observe for 72 hours.
Give post‐splenectomy immunizations at role IV.
DOCUMENT immunizations.
Give post‐splenectomy immunizations to all local nationals PRIOR to discharge.
Low‐grade spleen I‐II can be observed for 3 days, then shipped.
Figure 18. Injured spleen.

First to Cut
67
“A large retroperitoneal hematoma (exposures)” “A 24‐y.o. female with multiple fragment wounds to her back from a suicide vest explosion, normal vitals. Scanned her; had a lot of frags in the retroperitoneum with lots of blood. Took her to the OR for an ex lap; found a large right retroperitoneal hematoma – not pulsatile or enlarging. We had time; so we set up the Bookwalter retractor and called for another surgeon; we found holes in the IVC and the ascending colon.” A large retroperitoneal hematoma (Fig. 19) will get your attention. These hematomas are often stable with the tamponade effect from the overlying tissues and peritoneum. If the patient is stable and you have a little time, optimal exposure can be obtained by using the Bookwalter retractor and calling in another surgeon (or two!). Proximal aortic control can be obtained at the diaphragm, and distal control can be obtained at the pelvis or by groin cut‐downs (by another surgeon). Almost the entire intra‐abdominal IVC can be exposed by performing a Cattel‐Braasch procedure (right medial visceral rotation) by taking down the ascending colon white line of Toldt and swinging the ascending colon to the midline. Performing a Kocher duodenal mobilization will then complete the dissection. On the left, the aorta can be exposed by performing the left medial visceral rotation (AKA Mattox maneuver). Take down the left white line of Toldt and swing the descending colon, spleen, pancreas to the midline; swing up the kidney as needed. Temporary hemostasis for exsanguinating bleeding can be obtained with placement of an Allis clamp on the bleeders opposing the two sides of a bleeding structure. IVC bleeding can be slowed or stopped by placing two sponge sticks proximally and distally to the bleeding point. Lessons Learned:
Retroperitoneal hematomas can be challenging.
Place Bookwalter retractor if the patient is stable.
Call for another surgeon or two.
Always attempt proximal and distal control if feasible.
The intra‐abdominal IVC can be exposed with right medial visceral rotation (Cattel‐Braasch procedure) and a Kocher maneuver.
The intra‐abdominal aorta can be exposed with a left medial visceral rotation (Mattox).
Figure 19. Large retroperitoneal hematoma.

First to Cut
68
“Colon injury and a red wound” “A 44‐y.o. male with multiple frag wounds to the abd, normal vitals, FAST negative, positive peritoneal penetration on CT. Went for ex lap; found multiple wounds to the ascending colon with mild stool soilage. I performed a right hemicolectomy and end‐to‐side ileocolostomy. Due to the minimal soilage, I closed his skin; 5 days later, he had a red wound with drainage; I opened up the wound and packed it.” Penetrating colon injuries have a huge bacterial load by definition. Civilian penetrating colon injuries have a 50% wound infection rate if the skin is primarily closed. Leave the skin incisions open in all penetrating colon injuries. With significant succus soilage, leave all the skin open, even after small bowel injuries. Change dressings at least twice a day and consider placement of wound vac when clean. A delayed primary closure is an option, but do not attempt unless you are going to be able to observe the wound yourself. Lessons Learned:
Leave the skin incision OPEN after all colon injuries.
Leave the skin incision open with all small bowel injuries with significant succus soilage.
Do not attempt a delayed primary skin closure unless you are able to observe the wound.

First to Cut
69
“Hypothermia, frag wounds to abdomen and head” “A 34‐y.o. male involved in an explosion with frag wounds to head and abd; he was unconscious and hypotensive. Took him to the OR for ex lap, packed pelvis and liver, stopped bleeding, and was resuscitating him in the ICU. Went for CT of head and had several intracranial fragments. The neurosurgeon wanted to take him to the OR and wanted to keep the room cool for a ‘hypothermic’ craniotomy; I refused – had to call the DCCS.” The benefits of hypothermia in brain injury are a hot area of neurosurgical research and currently are controversial. In combat‐wounded, it can be, and has been, used in the isolated head injury patient. There is no role for hypothermia in a fresh post‐op damage control patient. The patient with multiple injuries is the general surgeon’s patient – period. Everyone else is a consultant. If you think a craniotomy under hypothermic condition will hurt your patient, this issue usually can be resolved with a simple discussion with the neurosurgeon; if this does not work, that is why there is a chain of command – talk to the Deputy Commander of Clinical Services (DCCS). Lessons Learned:
The general surgeons direct all aspects of care for the damage control patient.
The DCCS can be the final arbitrator for treatment disputes.
There is no role for a hypothermic craniotomy in multisystem‐injured damage control patients.

First to Cut
70
“Massive colon injury – stoma or no stoma?” “A 25‐y.o. female with GSW to abdomen arrives at the CSH. Took her straight for ex lap – stool everywhere and transverse colon in multiple pieces and mesenteric bleeding and a transected small bowel. Stapled off all bowel, removed the injured segments of large and small bowel, stopped all mesenteric bleeding, returned to the ICU for resuscitation. The next day, she was normalized, and we brought her back to the OR. Colostomy or primary anastomosis?” Colon injury in the civilian world has made a shift to primary repair and primary anastomosis in almost all penetrating colon injuries. Small holes in the damage control patient should be closed in two layers. The question of what to do with colon destruction is not clear in combat. At a level II facility, all destructive colon injuries should be stapled off or ligated with an umbilical tape after all bleeding is stopped or packed. The patient should be shipped when normalized as much as possible to a level III facility. At a level III facility, the abbreviated operation should be the same – staple off, return to the ICU for resuscitation and re‐warming, and then bring back to the OR for a washout and definitive operation. Consideration must be made in locals regarding colostomy – colostomy bags are often extremely hard for the patient to get and will set up for severe stoma complications. These patients also give the individual the luxury of observing post‐op after an anastomosis, and you should have a lower threshold for performing a primary anastomosis in these local nationals. In service members who will undergo global evacuation with intermittent surgeon observation and different surgeons at each level must be kept in mind as well; this situation will lower your threshold for a colostomy. A review of combat colon injuries showed that transverse colon and left‐sided injuries were risk factors for anastomotic leak. In civilian trauma, a concomitant pancreatic or renal injury has been shown to increase the risk of anastomotic breakdown. Massive transfusion is a risk factor for anastomosis breakdown. Civilian damage control patients have shown no difference between stapled and hand‐sewn colon anastomosis in a multi‐institution study (the small bowel has a greater leak risk with stapled anastomosis).

First to Cut
71
Lessons Learned:
Small fragment wounds to the colon should be primarily closed.
All destructive colon injuries should be stapled off at a level II facility (remove the injured segment).
Colostomy should be performed with concomitant pancreatic or renal injury, persistent hypotension, and massive transfusion at a level III facility.
Isolated colon injury in the hemodynamically normal patient should be treated with primary anastomosis.
Have a lower threshold for colostomy in transverse and left‐sided colon injuries.
First to Cut
72
“The pelvis was packed with two lap pads floating in a pool of blood” “A 26‐y.o. male with multiple frag wounds to abdomen/pelvis, chest and lower extremities arrives to the CSH after an ex lap during a MASCAL at an FST. The abdomen had the following written in an indelible marker, “pelvis packed.” He was very unstable; so we took him to the OR, gave him warm blood/FFP, and took a second look. His pelvis was full of blood, and we found two lap pads basically floating in the blood. We heard they were running out of supplies during the MASCAL. We repacked him, and he did well post‐operatively.” The triage of medical supplies during a MASCAL at a level II facility is a reality at times. Just giving “enough” blood and other supplies to allow transfer to the next level is a reality a deployed surgeon may have to face. If running out of lap pads, you can use any sterile material that can help with filling up a space. Consider placing a few lap pads on the bleeding surface followed by sterile gowns, towels, gloves, and/or sterile drapes – these can be retrieved at the second look up the chain of evacuation. Bleeding must be stopped at any cost. Lessons Learned:
During a MASCAL at a level II facility, medical material may need to be triaged – this is a reality.
Lap pads can be extended with any sterile material that allows for volume; consider sterile gowns and drapes as packing material.
Stop bleeding with whatever is available.
First to Cut
73
“Hole in the stomach and left diaphragm” “A 28‐y.o. male with GSW to the left upper quadrant; brought him straight to the OR for ex lap. GSW to stomach and colon with large hole in the diaphragm. Closed hole in the stomach, stapled off colon, and fixed the diaphragm hole with 0‐PROLENE®. She developed a bad pleural empyema – we had to do a thoracotomy.” Penetrating injury to an intra‐abdominal hollow viscus with a concomitant diaphragm injury is a set‐up for cross‐contamination of the pleural cavity. With these injuries, it is important to irrigate the pleural cavity and to place a chest tube for drainage. It is easy and takes just a few minutes to get a new Yankauer suction tip and to irrigate the pleural cavity out through the diaphragm defect – irrigate until clear. Enlarge the diaphragm defect if you need to confirm a clean pleural cavity. Close the diaphragm defect and place a chest tube; then it is safe to irrigate the intra‐abdominal cavity so that no contaminated irrigation fluid goes into the chest. Lessons Learned:
Place a chest tube for all diaphragm injuries.
If you have a diaphragm injury and an intra‐abdominal hollow viscus injury, irrigate the pleural cavity before repairing the diaphragm.
Do not irrigate the abdominal cavity until after you have repaired the diaphragm to minimize cross‐contamination.

First to Cut
74
“Entrance left lower chest – large gaping wound on right” “A 29‐y.o. male with GSW to left lateral lower rib cage and large soft tissue defect over the 4‐5 right ribs in the midaxillary line. I was thinking transmediastinal GSW. Placed bilateral chest tubes with minimal output, and then he crashed and lost pulses in the ED. Performed an ED thoracotomy and found minimal blood; the pericardial sac was dry without evidence of any mediastinal bullet trajectory. We did an ex lap – he had his diaphragm, colon, and spleen injured. Resuscitated with splenectomy and stapled off colon; he survived. We found out later from the troops on scene that he had fallen and cut his right chest on a pipe.” Anything can happen in combat. This case illustrates that what appears obvious may be quite wrong – getting a report from the on‐scene medic can be crucial. Bullets and fragments can go in any direction; and with an unstable patient, you will be in the OR and without the benefit from any preop imaging. You must rule out life‐threatening bleeding in the chest, pericardium, abdomen, and “bleeding under the drapes” from extremities or large soft tissue defects; and you must know ASAP! Always keep in mind that the diaphragm can go up to the fourth intercostal space and that you can easily have a diaphragm or intra‐abdominal injury with lower chest wounds. You must remain flexible and aggressive in your approach to finding what is bleeding. If the patient is stable, an on‐table X‐ray may help locate bullets and fragments and help ascertain the path of destruction. In the patient with unexplained shock physiology, you must look in every cavity. Lessons Learned:
Projectile paths may be deceiving.
Aggressively rule out life‐threatening bleeding in the chest, pericardial sac, and abdomen.
Always evaluate for “bleeding under the drapes.”
Lower chest injuries may injure the intra‐abdominal contents and/or diaphragm.
In hemodynamically normal patients, consider an on‐table X‐ray to help for projectile path determination.
Medic report on what happened to the patient can be critical.
You must rule out intracavitory bleeding at the first operation.

First to Cut
75
“RPG blast with massive diaphragm loss” “A 28‐y.o. male near an RPG explosion arrives to the FRSS with a large gaping hole in his left flank, hypotensive. We take him to the OR; stool everywhere – staple off the colon – packed the flank – look up and he has a large diaphragm hole with diaphragm tissue loss; now what?” Diaphragm injuries with tissue loss are seen in combat injuries. The key to all damage control surgery is stopping bleeding and then stopping GI succus soilage. After this stoppage is completed, direct attention to the diaphragm. First, place a chest tube in the ipsilateral chest. Next, take a large Prolene and in a running fashion close any diaphragm that can be closed. IF a tissue defect remains, place a temporary barrier; a blue towel between two IOBAN drapes placed under the diaphragm should keep bowel form entering the pleural cavity. Another option is sewing a radiology cassette drape directly to the diaphragm. Leave the abdomen open and with a loose temporary closure (e.g., loose IOBAN) so as not to have any intra‐abdominal pressure to force bowel up into the chest. Resuscitate and ship ASAP. When the abdomen is cleaned out well at level III or level IV, a Gortex synthetic can be placed or the diaphragm can be released and reattached at a higher costal level to gain definitive closure. Lessons Learned:
With large diaphragm defects, stop bleeding and soilage first.
Place ipsilateral chest tube.
Leave the abdomen open.
Quickly attempt primary closure with a large nonabsorbable running suture.
Consider placing a temporary blue towel IOBAN barrier under the diaphragm or sewing radiology plastic cassette drape to the diaphragm.

First to Cut
76
“GSW to the duodenum – getting cold”
“A 38‐y.o. female with a GSW to abdomen arrives to the FRSS in extremis. We brought her straight to the OR; she was bleeding from the mesenteric vessels. Ligate them, resect some small and large bowels, do my quick run of the bowel, and find a major hole in the duodenum with tissue loss; she is now cold and coagulopathic.” Small holes in the duodenum can be easily closed in one or two layers. The large defects in the cold, coagulopathic damage control patient are another thing. You need to get out ASAP and do the Roux‐en‐Y reconstruction (duodenal augmentation) during the definitive surgery stage of damage control at a level III or level IV facility. The best option in these challenging patients is to place a drain directly into the duodenal defect and close the injury around the drain with a whip stitch, then pack off the area with laparotomy pads to soak up any succus drainage and ship to level III when resuscitated and warmed. Lessons Learned:
Do not attempt a Roux‐en‐Y duodenal augmentation during damage control with a large duodenal injury.
Place a drain in the duodenal hole and whip stitch the hole around the drain as best you can.
Place laparotomy pads around the injury.
At level II, if in extremis with massive duodenal injury, staple off the duodenum, pack and place a nasogastric tube (NGT).
Ship after resuscitation and warming to level III facility.
At level III, when physiologically normal, do the definitive duodenal augmentation with a Roux‐en‐Y anastomosis.
For devastating duodenal wounds, consider pyloric exclusion and gastrojejunostomy.

First to Cut
77
“The pelvis is unstable, and the patient’s blood pressure is dropping” “A 20‐y.o. male was in a blast event where his vehicle swerved and slammed into a wall. He arrived in the trauma bay with a low blood pressure that kept dropping. X‐ray of the pelvis showed a widened pubic symphysis plus a sacroiliac joint disruption. A sheet placed around the patient at the level of his greater trochanters was tightened and then secured with a towel clamp. With fluid resuscitation, his blood pressure steadily rose. He was then taken to the operating room for external fixator placement.”
An unstable pelvis is common in blunt trauma. When the deformation widens the pubic symphysis, pelvic volume increases permitting large hematomas from venous bleeding. If the pelvis is unreduced, the patient may get shock. The easiest way to stop ongoing blood loss into the potential space is by reducing the pelvis, usually with a sheet or a pelvic binder (Fig.19). Such devices should not be left in place for long times because the skin can break down. Once stable, the patient can go to the OR to stabilize the skeleton with an external fixator (Fig. 20). Two to three pins are placed in the iliac wings and clamped together. Alternatively, a single pin can be placed in the solid bone above the dome of the acetabulum. The superacetabular
technique works better when the posterior pelvic ring is disrupted because the pins are very sturdy and can be toggled to reduce the posterior and anterior pelvis. Definitive skeletal fixation in the United States usually includes a pubic symphysis plate and sacroiliac screws.
Lessons Learned: • Pelvic injuries (even closed) can be associated with significant blood loss. • Reduction of the pelvis to stop bleeding can be accomplished outside the OR. • External fixator pins can be placed in the iliac wing or the superacetabular
region.
Figure 20. Pelvic binder with reduced pelvic skeleton (used with
permission of Les White, www.pelvicbinder.com).
Figure 21. Pelvis externally fixed (used with permission of Scott Lewis, Stryker).

First to Cut
78

First to Cut
79
Urologic Injuries
First to Cut
80
“The bladder is blown wide open” “A 34‐y.o. male with a transpelvic GSW from an AK‐47 at close range arrives hypotensive. We take him straight to the OR for ex lap. Pelvis is a stool, urine, bloody mess. Pack it off. Staple off the sigmoid colon. The iliac vessels, amazingly, are intact, but the bladder is blown wide open. He is coagulopathic and bleeding from the entire surface of the bladder mucosa. I packed the bladder open and went to the ICU for resuscitation.” Massive bladder injury is a common occurrence with transpelvic high‐velocity GSWs. With coagulopathy, the injured and raw surface of the bladder will bleed. The best damage control principle in this case is to simply pack the bladder with lap pads to stem the bleeding and perform closure after the ICU resuscitation and correction of the coagulopathy at the definitive or second‐look operation. Generally, the bladder mucosa is very forgiving and can be closed primarily over a Foley catheter. However, when a significant portion of the bladder is destroyed by a projectile, augmenting the bladder volume with a portion of small bowel or totally diverting the urine via an ileal conduit may be required at a level III MTF. Lessons Learned:
Pack the bleeding major bladder injury during the first operation.
Attempt closure at the definitive or second‐look operation.
Bladder augmentation with a segment of bowel may be required if a large portion of bladder wall is lost.
Formal urinary diversion may be ultimately required if the bladder is unsalvageable.

First to Cut
81
“The ureter was cut in half”
“A 26‐y.o. male arrives to the FRSS with a GSW to flank. He is hypotensive; bring him straight away to the OR for ex lap. He has a big hole in the ascending colon, he is bleeding from the psoas muscle, and his right ureter is transected. Stapled off the colon, packed the psoas hole. Now what about the ureter?” Ureteral injury during damage control has low priority: stop the bleeding, stop GI succus/stool soilage, and then consider the ureter. Don’t dissect the ureter out; just leave it in place. If you are at a level II facility and have quick transport, your options are to simply pack the ureter off with lap pads or perform a simple ligation, leaving the sutures long for easy identification. Stenting or placing a small pediatric feeding tube for external drainage is of little added benefit and can be reserved for bailout at a level III facility. The definitive repair depends on the length of the injured segment and the location of the injury. Repair of small lacerations can be performed with interrupted absorbable sutures (e.g., polydioxanone sutures) over a stent at level III. Additional maneuvers that aid ureteral salvage are reimplantation with a psoas hitch (good for distal ureteral injuries) or transureterostomy (TUU) bypassing the injured ureter by anastomosing the proximal aspect of the damaged ureter to the normal contralateral side. If at a level III and there is concern for a ureteral injury, consider administering indigo carmine or methylene blue, either intravenously or by direct injection into the ureter to better identify ureteral injury. Lessons Learned:
Do not dissect out the ureter because of the fragile blood supply.
At level II, pack off the injured ureter or perform a simple ligation leaving long tails on the suture.
Placing a pediatric feeding tube or ureteral catheter into the proximal ureter for external drainage can buy time at level III.
Use a monofilament, absorbable suture with low tissue reactivity and a half life greater than 7 days over a stent for definitive repair.
Use absorbable sutures over a stent for definitive repair.
Repair strategy is dictated by length and location of the ureteral injury.
Consider urine dye to look for small perforations.
Direct inspection of the ureter is the most sensitive way to diagnose a suspected ureteral injury since radiologic studies often have false negatives.

First to Cut
82
“The kidney had 50 small frag holes”
“A 27‐y.o. with multiple fragments to flank after an explosion attack. Arrives hypotensive with a positive FAST exam. To OR emergently for ex lap. Large left retroperitoneal hematoma with multiple bleeding holes in the peritoneum. Did a Cattel maneuver, went straight into Gerota’s fascia, and delivered out the right kidney. Had multiple small frag wounds – no other injuries – still warm – not coagulopathic; so I just packed the kidney and shipped him.” Penetrating injury to the kidney that is actively bleeding is an easy fix if in damage control mode – just take it out if continuous bleeding is occurring. The uninjured normal‐sized contralateral kidney should be sufficient for life. When encountering a renal injury, the first issue is the need for isolation of the renal artery before opening Gerota’s fascia. Civilian data supports just opening Gerota’s fascia without renal artery isolation; it saves time and decreases blood loss. Opening Gerota’s fascia and bringing the kidney to the midline will give you access to a bleeding renal artery. The next question is, “should I take the kidney?” If not in damage control mode, minor fragment wounds to the kidney will often be stopped with simple packing. At the second look, laparotomy can be done at a level III facility if bleeding has ceased, and omentum can be packed around the kidney and J‐P drains placed. Fibrin‐based sealants and hemostatic agents can be used as helpful adjuncts to control renal parenchymal bleeding and prevent urine leakage. One caveat: each kidney receives 12% of cardiac output and can re‐bleed and re‐bleed impressively, which would be suboptimal 40,000 feet above ground: renal preservation is a judgment call. Lessons Learned:
The right kidney can be exposed with the Cattel maneuver (right medial visceral rotation).
The left kidney can be exposed with a Mattox maneuver (left medial visceral rotation).
Nephrectomy is the solution to an actively bleeding kidney injury in damage control.
Small fragment wounds can be treated with packing in stable warm patients.
Renal artery isolation prior to opening Gerota’s fascia in the hypotensive patient with penetrating renal injury results in loss of time and blood.
Drain (closed‐suction drainage) all renal injuries that require repair.
Omentum and fibrin‐based products can be used to help seal renal injuries.

First to Cut
83
“Both testicles disrupted” “A 28‐y.o. male arrives at the FST with multiple bleeding frag wounds to the groin from a mortar blast. On exam, the scrotum had multiple frag wounds actively bleeding with massive scrotal skin loss; testicles felt disrupted. On scrotal incision, the left testicle was in a hundred pieces, and I removed it; the right testicle had frag wounds but had a chance with a urologist. Because of the skin loss, we placed the right testicle in the subcutaneous tissue of the right thigh and shipped him to the CSH.” Testicle injury is a challenging injury for the general surgeon. The obviously destroyed testicle should be removed. For a testicle to survive and function, the tunica albuginea must be reapproximated around the exposed seminiferous tubules. This procedure may require additional coverage with graft material (tunica vaginalis) and is best done by a urologist at a level III. Stop all significant bleeding and cover the injured testicle with as much scrotal or penile skin if possible. Injured testes can be wrapped with moist gauze within a packed wound during evacuation to level III facility. If no scrotal skin is available after the testicle is repaired or inspected and deemed salvageable, place the testicle in a subcutaneous pocket in the upper thigh and ship ASAP. Lessons Learned:
Shattered testicles should be removed by controlling and ligating the spermatic cord proximal to the testis.
The testicular parenchyma must be completely covered by tunica albuginea or another suitable graft tissue for salvage.
The testicle may be placed in a subcutaneous thigh pocket if significant loss of scrotal skin occurs.
Early urology consultation is helpful for complex testicular injuries.

First to Cut
84
“GSW to the kidney, and we tried to fix it, but she became coagulopathic”
“A 34‐y.o. female arrives hypotensive with a GSW to the flank; we took her straight to the OR. Bleeding left zone II hematoma; opened it up and brought the kidney to midline. She had her lower pole hanging in the breeze. We called the urologist in, and we attempted to repair it; but she got cold and coagulopathic and had significant bleeding from the kidney parenchyma (her other kidney was normal in size and uninjured). We put the shattered left kidney in the bucket.” The bleeding kidney (Fig. 22) in a cold damage control patient should be removed (“life over kidney”), especially if the other kidney is intact and of normal size. Only one‐third of one kidney is required to keep a patient off hemodialysis. If both kidneys are injured, surgical measures should be used to attempt to salvage some renal tissue; packing the kidneys off and warm resuscitation are temporary measures to buy some time. Attempts to repair an isolated injured kidney in a stable patient can be made in select patients with smaller lacerations and viable‐appearing renal parenchyma. Exposed urinary collecting system injuries should be closed separately and in addition to the overlying parenchyma to prevent urinary extravasation. Urology should be involved if possible. Lessons Learned:
The bleeding unilateral kidney can be removed as a damage control measure.
One uninjured normal sized kidney can support life without the need for dialysis.
Drain all kidney repairs.
Use fibrin sealant if the collecting system is repaired.
Collecting system injuries should be closed prior to reapproximating the renal parenchyma.
Bolstered sutures are helpful for renal parenchymal repairs.
Figure 22. Shattered kidney.

First to Cut
85
Chest Injuries

First to Cut
86
“Chest frags, amputation, and 1000 cc from the chest tube”
“A 27‐y.o. male with left above‐the‐knee traumatic amputation and multiple frag wounds to the left chest arrives to the CSH from the FRSS; he is cold, coagulopathic, and hypotensive. It has been 4 hours now, and the left chest tube output was 1000 cc, and the amputation is not bleeding; they had already tied off the artery. We placed Bair® Huggers and gave him warm FFP and PRBCs. I was thinking that if I took him to the OR and opened his chest, the heat loss would kill him. I just warmed him up and gave him blood and blood products, and the chest tube output stopped. The tube was functioning, and the CXR revealed no retained hemothorax; he did well after that.” 85% of civilian penetrating chest wounds are treated with a simple chest tube. Although the textbooks state that the indication for a thoracotomy in civilian chest trauma is 1000 to 1500 cc from initial chest tube placement or 200 cc per hour for 4 hours, the combat surgeon does not have the luxury of such formulae. The decision to perform a combat thoracotomy is based on location (level II vs. level III facility), blood and blood product support, the condition of the patient (hypothermia, coagulopathy), and wounding pattern (GSW vs. fragments). The surgeon at a level II facility should have a lower threshold to perform a thoracotomy to stop bleeding earlier rather than later, whereas a surgeon at a level III facility may have a higher threshold because of the logistics needed to warm and correct a coagulopathy (improve base deficit, INR, pH, and temperature). Since we do not currently have data on the indications for thoracotomy based on chest tube output in combat wounds, we should use the civilian teaching as clear indicators for a thoracotomy (1500‐cc initial chest tube output and 200 cc per hour for 4 hours). Situations with less chest tube output should be a judgment call based on you and your patient’s situation/condition, but always beware of compensated shock in young healthy military personnel turning bad quickly. Lessons Learned:
Surgeons at a level II facility should have a lower threshold for performing a thoracotomy.
Correct hypothermia and coagulopathy aggressively with minimal to moderate chest tube output.
Have a low threshold for thoracotomy after a high‐velocity GSW to the chest with significant chest tube output.
Always perform a thoracotomy if initial chest tube output is >1500 cc.
Follow INR, temperature, and base deficit or lactic acid.

First to Cut
87
“Frag wounds to ‘the box’” “A 28‐y.o. female with multiple frag wounds to the parasternal region, stable with SOB. Placed bilateral chest tubes; performed a FAST exam, which was negative, and then she crumped. Brought her immediately to the OR, performed a median sternotomy, released tamponade, and fixed atrial hole; she walked out of the CSH a week later.” Injuries to the “box” are worrisome for a cardiac injury. The “box” is defined as an area from the clavicles to the costal margin and from nipple to nipple and includes back wounds over this same area. Although FAST exams with views of the heart looking for pericardial blood approach 100% sensitivity in civilian centers specializing in ultrasound, they have the luxury of constant observation and the best expertise in ultrasound in the world. Furthermore, if there is a concomitant hemothorax, the pericardium may have a hole with cardiac wound blood decompressing into the pleural cavity, making the pericardial blood hard to see on ultrasound. The combat surgeon, especially at a level II facility, does not have the luxury of constant observation – and the missed cardiac injury could easily result in death of the patient. Lung injury can be evaluated with a chest X‐ray (CXR) or with bilateral chest tubes. The heart can be assessed and reassessed with ultrasound, but the definitive way to assess the heart is to perform a pericardial window – a small incision is a small price to pay for not missing a cardiac injury. If the patient is hypotensive with fragments or GSW to the “box,” place bilateral chest tubes and OR for a pericardial window – and do not forget the abdomen. If in extremis, go to OR for median sternotomy or thoracotomy based on chest tube output. If you have significant bleeding from a chest tube, most surgeons would perform ipsilateral thoracotomy. You can release a tamponade from any thoracotomy, and then you can clamshell if you need more cardiac exposure. If minimal chest tube output in the patient in extremis, most would go straight to median sternotomy for maximal comfort when dealing with a cardiac injury. When performing a median sternotomy at a level II facility, you will not have a pneumatic sternal saw; you will be using a Lebske blade and mallet. Ask the anesthetist to hold the ventilation on exhalation and try to stay in the middle of the sternum.

First to Cut
88
Lessons Learned:
Penetrating injuries to the box can result in cardiac injuries.
In the normotensive patient, the pericardium can be assessed with FAST (and repeated FAST) and/or pericardial window.
The hypotensive patient with a penetrating “box” injury should have bilateral chest tubes, intubate, groin cordis and OR for pericardial window; if the window is positive, then perform a median sternotomy.
The patient in extremis with a penetrating “box” wound should have chest tubes, intubate, groin cordis, and median sternotomy or clamshell thoracotomy in the OR or ED.
Be familiar with the Lebske blade and mallet for performing a median sternotomy or for going across the sternum for a clam shell thoracotomy.
Do not forget that lower chest wounds can result in significant intra‐abdominal injury.
First to Cut
89
“Hole in the heart and no pledgets” “A 45‐y.o. pedestrian involved in an explosion attack arrives to the FST with frag wounds to anterior chest – hypotensive – had fluid around heart on FAST. Placed bilateral chest tubes with minimal output, took to the OR emergently; did a median sternotomy with the Lebske knife. Had a small frag hole in his ventricle. Took a 4‐0 prolene; asked for a pledget – we had none. Used pericardium as a pledget; he did fine.” Cardiac injuries from fragment wounds can be small and allow for survival to the surgical facility. Isolated cardiac wounds are best approached by a median sternotomy or if, in extremis, a left ED thoracotomy with decompression of tamponade. Always make incision anterior to the phrenic nerve. Bring the patient with vital signs to the OR and repair the injury. Holes next to a coronary artery are best repaired with a U stitch under the coronary artery. Holes next to a coronary artery are best repaired with a U stitch under the coronary artery so that do not inadvertently ligate the artery. Pledgets should be used; and if you do not have commercially available pledgets, a piece of pericardium can be used. Lessons Learned:
Isolated cardiac injuries are best approached by a median sternotomy.
At a level II facility, use a Lebske knife for sternal transection.
Use prolene sutures on cardiac injuries.
Use pledgets – the patient’s pericardium can be used as a pledget.

First to Cut
90
“Post‐op day #5 and a retained hemothorax”
“A 27‐y.o. local national with multiple frag wounds to his left chest arrives to the CSH with decreased breath sounds on the left. Placed a chest tube – 400 cc of blood and then <50 cc an hour for 2 hours; then stopped bleeding. The next day, the CXR was clear. On the third day, he had a moderate hemothorax on the CXR; we placed a second CT with CT direction. On the fifth day, he still had the hemothorax – no thoracoscopic equipment.” Retained hemothorax is a common complication after chest tube drainage for a hemothorax. The initial treatment is to place a second chest tube with CT mapping of the retained intrapleural blood. This maneuver is not always successful because of the solid clot that is often present. If the hemothorax is still present after placement of a chest tube, a thoracoscopic debridement and decortication should be undertaken with the best results if done in the first 5 days. If thoracoscopic equipment is not available, you can first try a small incision and Yankauer and irrigation; and if no significant return, then you should perform a thoracotomy for decortication of the blood rind – minimizing the incision as feasible. The danger is that the retained blood may become a firm rind socking down a lobe; thus, you want to remove the rind before it reaches this fibrotic stage in the first week. Lessons Learned:
Aggressively remove retained hemothorax.
Retained hemothorax is best diagnosed with a CT scan.
First move is to place a second chest tube with CT direction.
If thoracoscopic equipment is not available, try Yankauer suction and irrigation through a small incision; if unsuccessful, then perform minithoracotomy and decortications.
Perform a thoracoscopic decortication in the first 5 days.
If thorascopic decortication is unsuccessful, perform a thoracotomy.
Treatment of retained hemothorax: “the earlier the better.”
First to Cut
91
“Damage control and esophageal injury”
“A 28‐y.o. male involved in a mortar blast arrives at FST with head‐to‐toe frag wounds; he is hypotensive, the FAST is positive. Brought him to the OR for ex lap; colon, small bowel, spleen bleeding. Removed spleen, stapled off and removed injured colon and small bowel. On pass, I found a hole in the distal esophagus. About this time, he becomes cold and coagulopathic; I whip‐stitched the goose defect closed and packed and shipped him ASAP to the CSH.” Esophageal injury is a rare injury in both civilian and combat injured. From civilian data, it is clear that primary repair of esophageal wounds has the best shot at healing if completed in the first 24 hours; and the earlier, the better. If in damage control mode, the thoracic esophagus should be widely drained: Remember that the proximal and mid‐thoracic esophagus is best exposed by a RIGHT thoracotomy and the distal thoracic esophagus by a LEFT thoracotomy; place a JP drain in the hole and place a chest tube or two. The intra‐abdominal esophageal holes should be closed in two layers if possible and buttressed with a fundoplication at the definitive operation; a hedge with a JP drain close by should be placed as well. The esophageal holes should be closed in two layers and buttressed with intercostal muscle flap and always drained. Remember that the esophagus does not have a serosa and has a poor blood supply; do not perform an extensive dissection of the esophagus. If you are at a level III facility and receive a delayed esophageal hole, think wide drainage and consider a neck esophageal “spit fistula”: “better a live dog than a dead lion.” Always place gastric drainage (G‐tube) and enteral access with a J‐tube or Moss‐type tube with esophageal injuries at the second‐look operation. Lessons Learned:
The proximal to mid thoracic esophagus is best exposed with a RIGHT thoracotomy.
The distal thoracic esophagus is best exposed with a LEFT thoracotomy.
In damage control mode, place a JP drain in the esophageal defect and chest tubes.
Do not widely dissect the esophagus.
Always close the esophagus in two layers with a flap (intercostals or stomach).
The ultimate last resort drainage includes a neck “spit fistula.” Tie off the distal esophagus with an umbilical tape or staple off, and place a G‐tube and J‐tubes for gastric decompression and enteral feeding.
In the contaminated infected mediastinum, consider combined drainage by sewing a Penrose to the end of a chest tube and place the Penrose in the mediastinum and the chest tube in the pleural cavity.

First to Cut
92
“Diffuse bleeding from the parietal pleural”
“A 34‐y.o. male with high‐velocity GSW to the left chest arrived to the CSH hypotensive. We placed a chest tube – 1200‐cc initial output and with continued output. Took him to the OR and started PRBCs and FFP and did a thoracotomy. He had bleeding from the lung, but I was able to wedge it out; there was diffuse ooze form the entire lateral parietal pleura.” Diffuse bleeding from the pleura is not uncommon with a high‐velocity GSW with coagulopathic bleeding. First, stop all surgical bleeding from the lungs and from any intercostal arteries and rule out any cardiac bleeding. The chest can accommodate only limited packing because of loss of space. If the pleural is oozing from coagulopathic bleeding, of course aggressively resuscitate and attempt to correct the coagulopathy with PRBCs:platelets:FFP in a 1:1:1 ratio. Consider Factor VIIa if life‐threatening bleeding, platelets (or whole blood). You can coat the area with Surgicel®, and you may have room for a single layer of a laparotomy pad. Leave the chest open with an Ioban® (or close skin only) temporary closure (always place chest tubes to remove air and observe for surgical bleeding). Bring back to the ICU and correct hypothermia, coagulopathy, and acidosis and return later for second look, removal of lap pads, and definitive closure with chest tubes. Lessons Learned:
The chest has limited space for “packing.”
Consider Surgicel® covered by a single layer of a lap pad.
Leave all “packed” chests open with an Ioban® temporary closure.
Return to the ICU for correction of the lethal triad.
Return when resuscitated (coagulopathy, hypothermia, and acidosis resolved) for definitive closure and pack removal.

First to Cut
93
“It was just a little pneumothorax”
“A 29‐y.o. male with blunt injury and explosion frags to legs (in a moving vehicle hit by an explosion) intubated for GCS < 8. No frag wounds to chest or abd. ER CXR negative, slight widened mediastinum; scanned his chest and had a very, very small apical pneumothorax – the ‘occult PTX.’ Sent him to a neurosurgeon on a chopper. Arrived hypotensive and with low sats; he had a tension PTX treated luckily with a chest tube.” The occult pneumothorax (PTX), a small PTX seen only on a CT scan, can be observed successfully in civilian trauma without positive pressure (intubation and ventilator). But a significant percentage of patients receiving positive pressure and patients undergoing global evacuation with changes in atmospheric pressure will develop a larger PTX, with some going on to tension. This can be prevented by the simple placement of a chest tube. Lesson Learned:
All patients with an occult PTX in the combat setting should have a chest tube placed.

First to Cut
94
“Frag wounds with lung hamburger”
“A 28‐y.o. female involved in an explosion arrives to the FRSS hypotensive with multiple left chest frag wounds. Placed a left chest tube – get out 1700 cc of blood; start PRBCs and FFP and bring her immediately to the OR for a left thoracotomy. Her lower lobe is just torn to &%$@! and part of the middle lobe – bleeding and gurgling at me.” Lung injury is a common injury with fragment wounds to the chest. The majority are treated with a chest tube, followed by a FAST exam and then a CT scan. By civilian teachings, if more than 1500 cc at initial chest tube placement or more than 200 cc of blood drains out every hour for 4 hours, these patients clearly benefit from a thoracotomy. At thoracotomy, you must open the pericardium to rule out cardiac injury and esophageal injury. Most thoracotomies in our experience reveal lung injury. Do not perform an anatomic lobe resection or pneumonectomy except as a last resort. If massive bleeding from the lung with impending exsanguinations, consider a “lung twist” in which the inferior lung attachments are transected and the lung is twisted around the hilum. This is associated with a high mortality (although most likely better than pneumonectomy) and should only be performed in dire situations. After a “twist” resuscitation, then re‐examine. Use a GIA™ stapler and perform piecemeal non‐anatomic wedge resections for whatever is bleeding. For through and through GSWs, use a tractotomy. Less is better. Lessons Learned:
Most chest fragment wounds can be treated by a chest tube.
Do not perform a pneumonectomy or anatomic lobe resection except as a last resort.
Resect bleeding lung parenchyma with a GIA stapler in a non‐anatomic minimal approach.
Consider a “lung twist” with massive life‐threatening lung hemorrhage.
At thoracotomy, rule out cardiac injury and esophageal injury.

First to Cut
95
“Massive chest wall destruction” “A 28‐y.o. male involved in an RPG blast arrives to the CSH intubated, hypotensive with low sats, massive left chest wall destruction. Started blood, FFP and brought him straight to the OR. He had several areas of blood and bubbling of air from his lung; I stapled them off and tied a few intercostals arteries. He was missing about 12 cm of about five ribs; now what?” Massive chest wall injury is seen with military munitions. The first priority is to secure an airway and the OR. In the OR, stop all surgical bleeding, blood and blood product resuscitation, and warm. Non‐anatomic stapler resections allow for minimizing lung parenchyma resection. The intercostals can bleed very vigorously and should be inspected. Small vessel chest wall bleeding can be addressed with a layer of a hemostatic agent; e.g., Surgicel followed by a single layer of a lap pad. The pleural cavity does not allow for massive packing. After stopping bleeding as best you can, place a temporary chest wall closure with an Ioban drape or sew a Bogotá bag over the defect to the skin. Go to the ICU for resuscitation and correction of the “lethal triad.” Reconstruction will be undertaken at a level IV or level V facility. Lessons Learned:
Secure the airway and ventilation with massive chest wall injury first.
Stop all bleeding in the OR using non‐anatomic resections and minimal packing.
Place a temporary plastic closure (e.g., Ioban).
Post‐op go to the ICU for resuscitation.
Transfer as soon as physiology is normalized.

First to Cut
96
“ER thoracotomy in a MASCAL situation” “A 24‐y.o. male arrives during a MASCAL with GSW to abdomen and without a pulse; blood pressure reads 60/palpitation. We intubated him and performed an ER thoracotomy and clamped his thoracic aorta; we now had tachycardia of 180 and SBP of 65. All the ORs were full.” The “ER thoracotomy” is controversial. The one clear indication where there are some positive results is with chest penetrating injury. The data on ER thoracotomy for blunt trauma without vital signs, on the other hand, is dismal and has no role in a MASCAL. The role of an ER thoracotomy for exsanguinating abdominal trauma is undefined. There are no prospective randomized trials of ER thoracotomy versus rapid abdominal aortic control in the literature although there are anecdotal case reports and series with survival with ER thoracotomy with major abdominal vascular injuries. The use of ER thoracotomy is a judgment call based on logistics, MASCAL, and OR availability. Clearly, an ER thoracotomy should not be used with blunt trauma in a MASCAL. The abdominal injury and ER thoracotomy should be entertained only if an OR is available. The one clear indication for ER thoracotomy during a MASCAL is the patient with penetrating chest injury in extremis; relief of a cardiac tamponade will buy you some time. Extend the incision across the sternum into a “clamshell” and ligate the internal mammary arteries; the clamshell thoracotomy will give you full access to the heart (Fig. 23) and all intrathoracic arteries. You can transect the sternum with a Lebske blade and mallet or with a pair of trauma shears or even a Gigli saw.
Lessons Learned:
ER thoracotomy for blunt trauma has dismal results and should rarely be performed – never performed for blunt trauma in a MASCAL.
If an OR is available, the ER thoracotomy for abdominal penetrating trauma is a judgment call.
The best results for ER thoracotomy are for the patient in extremis with penetrating chest trauma.
In a MASCAL, reserve the ER thoracotomy for penetrating chest trauma.
Figure 23. Clamshell thoracotomy exposes the heart.

First to Cut
97
“GSW to the lung”
“A 31‐y.o. male with GSW to the left chest, anterior to posterior through and through, arrives to the FRSS hypotensive and SOB. Placed a chest tube and had an immediate return of 1600 cc of blood. Started PRBCs and took him straight to the OR for thoracotomy; one hole was bleeding profusely.” High‐velocity GSWs to the chest are actually rare in civilian trauma. The principles of damage control should be adhered to: stop bleeding as fast as possible with a minimalist approach – “physiology over anatomy.” The best way to get to the bleeding vessels is to expose them and then ligate them. This exposure can be obtained by performing a quick PULMONARY TRACTOTOMY. A tractotomy is performed by placing a GIA stapler into the bleeding tract and firing the GIA; this action will staple off the edges and expose the bleeding vessels. Then, ligate the exposed vessels and any bronchioles with a prolene suture. Any peripheral GSW to the lung can be wedged out with the GIA stapler in a nonanatomic resection. At a level II facility, consider a temporary chest closure with an Ioban®, which will allow for quick re‐exploration at a level III facility. Lessons Learned:
Deep‐bleeding parenchymal GSWs to the lung should be opened with a GIA stapler tractotomy.
After exposure, the vessels and bronchioles are oversewn with a prolene suture.
Peripheral GSWs should be removed with a nonanatomic wedge resection with a GIA stapler.
At a level II facility, consider Ioban® temporary closure.
First to Cut
98
“Two through‐and‐through GSWs in the left chest” “A 36‐y.o. male presented with two through‐and‐through GSWs in left chest just medial to nipple with a left chest tube already in place from a Role 1 facility and 300 cc in the pleurevac. A FAST was normal. He was initially hemodynamically stable but after placing his tube to suction he drained over 1L in 20 minutes and his systolic pressure dropped into the 70s. A left anterolateral thoracotomy was per‐formed in the OR, and the left chest was full of blood. The anesthesiologist facilitated left lung isolation by intentionally advancing the endotracheal tube into the right main stem bronchus. There were three through‐and‐through bullet tracts in the left lung with massive bleeding. The patient was crashing hemodynamically; so we initially just packed the chest to allow anesthesia to catch up, but packing did not effectively arrest his hemorrhage. We systematically addressed the lung injuries, starting by stapling off the lingula and performing two additional stapled tractotomies; but the patient arrested from ongoing blood loss. We opened the pericardium for open cardiac massage and performed a hilar twist, which had minimal effect on the bleeding. After suture repair controlled bleeding from one of the tractotomies, we explored the last tract, only to discover audible hemorrhage from a major PA branch. This was controlled with digital pressure until the patient’s hemodynamics were restored, after which we successfully repaired the PA injury with Prolene. He lost in excess of 7L of blood, but fortunately recovered without incident.” When faced with penetrating chest trauma and ongoing bleeding from a chest tube, do not hesitate to operate early. It is far better to do a potentially unnecessary thoracotomy under controlled conditions than to have to negotiate a “crash thoracotomy” in an arresting patient. It is important to remember that although the minority of these patients will require surgical intervention, those that do will generally have a major bleeding source (intercostal artery, PA, great vessel), therefore never initiate an operation without adequate intravenous access. Just as with all surgical cases in the face of active bleeding, good communication with anesthesia is paramount as these cases are a team effort. The flow of the operation must be guided by the patient’s hemodynamic status and the pace of resuscitation. Furthermore, rapid isolation of the left lung by advancement of the ETT into the right main stem bronchus may dramatically improve surgical exposure. Keep in mind that “blind” packing of the chest in the face of major injury is not likely to be very effective. Adequate temporary control will most likely be achieved only with focal pressure at the site of injury, necessitating surgical persistence in achieving adequate exposure by whatever means necessary regardless of the degree of hemorrhage. The “hilar twist” or temporary mass hilar clamping are always an option, but should be reserved as “last ditch” means for hemorrhage control in these patients (don’t forget to release the inferior pulmonary ligament prior to attempting a hilar twist). In the face of multiple pulmonary injuries, each injury must

First to Cut
99
be systematically addressed: generally start with the most anterior or most easily exposed injury first. Trauma pneumonectomy is certainly required in some cases of major hilar injury or complete pulmonary destruction but is associated with very high mortality (particularly in the combat theater) and should be reserved for situations where all other surgical options have been exhausted. Lessons Learned:
Operate early for major ongoing hemorrhage after penetrating thoracic injury.
Good communication between the surgical and anesthesia teams is critical to patient outcome.
Major focal thoracic bleeding may not be controlled with packing alone; the site of the injury must be exposed and controlled.
When dealing with multiple injuries to the lung, address each injury systematically.
Avoid trauma pneumonectomy wherever possible.

First to Cut
100
“Massive thoracic hemorrhage – where should I cut?”
“A 25‐y.o. soldier arrived to the CSH with a single gunshot wound to the right lateral chest wall; no exit wound was identified. He was clearly in extremis, and a right chest tube was placed that put out 1000 cc immediately and then continued steady bloody output. He was brought immediately to the OR, and the surgeon decided on left lateral decubitus positioning to “optimize exposure” for his likely lung injury. Unfortunately, the lung looked pristine and there was a large hole going through the diaphragm with large volume bleeding from the liver. The patient lost vitals while the team was trying to reposition him for a laparotomy, and he died from abdominal hemorrhage.” Thoracic trauma is significantly more common in combat scenarios than in civilian settings and is also much more likely to require some type of operative intervention. Unfortunately, most general/trauma surgeons have significantly less experience and comfort operating in the chest than the abdomen. The standard elective approach to most thoracic operations is to place the patient in the lateral decubitus position for a posterolateral thoracotomy, which is often erroneously applied in the combat trauma setting. The last place you want to be is in the lateral decubitus position when you get into the chest and discover that the bullet went through the media‐stinum to the other side of the chest or through the diaphragm into the abdomen. The standard positioning for an “exploratory” trauma operation, regardless of the body cavity, is supine. This position preserves all of your options for extending your incision or making new ones to access the other major body cavities. You can use adjuncts to the supine position such as a slight bump under the chest to elevate the side of interest or neck rotation and extension to provide better exposure while pre‐serving access to all other key areas if needed. Although bullets do need to obey the laws of physics, they will take unexpected courses and can end up almost anywhere regardless of where the entry wound is – always plan for the worst‐case scenario. Lessons Learned:
Elective incisions optimize exposure. Trauma incisions optimize OPTIONS and FLEXIBILITY.
If you are putting the patient in anything other than supine position for an exploratory trauma operation, re‐think it.
For thoracic trauma surgery, an anterolateral thoracotomy or median sternot‐omy can achieve adequate initial exposure for any life‐threatening injury.
Projectiles take unpredictable courses and can easily cross body cavities. If time allows, a few X‐rays to identify their location can be invaluable.
Even if you are starting in the chest, be prepared to cross over to the other chest or extend up into the neck or down into the abdomen.

First to Cut
101
Neck Injuries

First to Cut
102
“Exsanguinating proximal neck wound”
“A 27‐y.o. male with GSW to lower neck arrives to the FST with pulsatile arterial bleeding. I bypassed the ED and brought him straight to the OR and intubated him, held pressure, and started standard CEA incision. When I got down to the hematoma and opened it, the blood actually hit the ceiling. I got a few deep prolene sutures down in a deep hole; I’m not sure what I tied off, but it held the bleeding off long enough for transport.” Penetrating wounds low in the neck can be difficult to apply pressure to. The first priority is a secure airway so that you can apply significant pressure without cutting off the airway. The next concern is proximal control – it will be a judgment call. If you think it is distal enough to get proximal control with a standard neck incision (an incision down the anterior border of the sternocleidomastoid) like for a carotid endarterectomy (CEA), dissect down proximally first and clamp the carotid low or encircle it with a vessel loop. If you run into troublesome bleeding, go to short MEDIAN STERNOTOMY, enough to get a proximal clamp on the proximal carotid. If an OR is not immediately available, you can try a Foley catheter for tamponade. It may buy you time; but if the patient is exsanguinating in front of you or if in doubt, “attack” and perform a median sternotomy in the ED with a Lebske knife. In the multi‐ injured damage control patient within the vortex of the lethal triad, consider a shunt and reserve ligation as an extreme last‐ditch effort. If at a level II facility and the neck hematoma is stable, one option in many MASCAL situations is to intubate and transfer to a level III facility. Lessons Learned:
Definitive proximal control for proximal carotid artery injuries is a MEDIAN STERNOTOMY.
If an OR is not immediately available, you can try a Foley catheter tamponade.
If the patient is exsanguinating from a proximal carotid artery injury, consider an ED median sternotomy with a Lebske knife in the ED.
Consider a shunt for near death damage control patients with major carotid injuries.
Use vein patch repair or vein interposition graft if primary repair will result in narrowing.
Consider carotid artery ligation in comatose patients.

First to Cut
103
“The patient became coagulopathic, and I had to ligate the IJ”
“A 27‐y.o. male with GSW to the neck. Bleeding looked venous and well‐controlled with pressure. We took him to the OR and did a standard neck exploration. His internal jugular was transected with bleeding from the surrounding muscles. At this point, he had lost a significant amount of blood and was becoming coagulopathic; so I ligated the IJ – he did fine.” With penetrating trauma to the neck, the internal jugular (IJ) is the most commonly injured vascular structure. It should be primarily repaired if easy but ligated if unilateral without hesitation – unless there is a concomitant brain injury. Ligating a venous structure is common in damage control. Most large named veins should be repaired if feasible, but most can be ligated without penalty. The exceptions to ligation are both internal jugular veins, suprarenal vena cava (renal failure – high mortality), right renal vein (remove right kidney at some point), and splenic vein (perform splenectomy). The left renal vein has collaterals from the gonadal and adrenal veins and can be ligated close to the IVC. The popliteal vein should be sal‐vaged if possible, but ligation in damage control mode is no crime. The portal vein or SMV can be ligated if necessary, but there will be massive fluid requirements. Lessons Learned:
Venous ligation is often the best option during damage control surgery.
Avoid IJ ligation if at all possible with a brain injury.
Do NOT ligate BOTH internal jugular veins.
Do NOT ligate the suprarenal vena cava.
Splenectomy after splenic vein ligation.
Nephrectomy after right renal vein ligation.
Left renal vein can be ligated close to the IVC.
Massive fluid resuscitation with portal vein ligation and second look – leave the abdomen open.
Fasciotomy for IVC ligation.
Popliteal vein can be ligated or shunted if vein reconstruction is not feasible.

First to Cut
104
“GSW to the neck – normal neuro exam and wide awake”
“A 29‐y.o. male with GSW to his neck arrived at the FST with packed nonbleeding wound, wide awake, and neurologically intact. We intubated him and did a neck exploration. He was coagulopathic, so we packed the neck wound and called the helicopter. Then an RN asked me, ‘Should we put on a c‐collar?’” There is a danger in putting on a cervical collar on a patient with a penetrating neck injury: you cannot observe the wound for re‐bleeding. With a penetrating wound to the neck, if the patient is awake and is neurologically intact, the spine is stable. However, there are no reports in the world’s literature of a patient with an unstable cervical spine fracture due to a penetrating neck wound who is awake with a normal neurologic exam. Reserve the cervical collar for the patient with penetrating neck wound who has an abnormal neurological exam, who is involved in blunt trauma, or who is comatose. Lessons Learned:
Consider the c‐spine stable after penetrating neck trauma if the patient is awake with a normal neurological exam.
Place a c‐collar for penetrating neck trauma if the patient is comatose or if the neurological exam is abnormal.
If the patient has suffered blunt trauma, place a c‐collar until the neck is cleared.

First to Cut
105
“The ORs are full, and one patient had pulsatile neck bleeding”
“So there I was, at an FRSS in a MASCAL; the first four patients were billed as the worst, and two of them went straight to the OR for ex laps filling the only two tables we had. Then the next wave came in. One fellow had a pulsatile arterial bleed from his neck – had to be the carotid – I mean impressive – we intubated him and tried manual compression with little success. I screamed that I needed an OR table ASAP, but it would be 20 minutes until we could get in. I took a Foley catheter and placed it into the bleeding neck hole, inflated the balloon, and under tension clamped the catheter at the skin with a Kelly clamp. We had no more significant bleeding and brought him to the OR and fixed a frag penetrating wound to the carotid.” Pulsatile arterial bleeding from the neck can give a surgeon quite the adrenal squeeze in the best of conditions. The first consideration should be the airway because hematomas in the neck can distort the trachea and compromise the airway, especially with a combative patient and while you are trying to manually compress the bleeding point. After the airway is secured, sedation and placement of a Foley catheter should be considered if an OR is not readily available. The Foley catheter can provide a local tamponade effect. Direct finger compression against the vertebral column can also provide temporary control. Lessons Learned:
Secure the airway with penetrating exsanguinating neck wounds.
If an OR is not available, consider a Foley tamponade for exsanguinating neck wounds.
Direct finger compression against the vertebral column can also provide temporary control.

First to Cut
106

First to Cut
107
Brain and Spinal Injuries

First to Cut
108
“Ventilation, ICP, and the brain injured” “A 27‐y.o. male with explosion fragments to the brain arrives to the FST with a GCS of 5 – moving right side to pain – no movement on the left. I intubate him and stabilize, calling for MEDEVAC. I was considering hyperventilating him, had some mannitol, needed to send him to a neurosurgeon ASAP.” Given that neurosurgical specialists are available at selected level III facilities, the question of how to treat patients optimally before transfer is common. First, you must assure adequate blood pressure and oxygenation to the brain. Stop all bleeding and maintain blood pressure and oxygenation by providing an airway and ventilation and addressing exsanguination. Cerebral perfusion pressure (CPP) is optimally > 70. CPP is mean arterial pressure minus intracranial pressure (ICP). Hence, hypertension should not be treated in patients with acute head injuries. You will not have an ICP monitor. However, if lateralizing signs are present, one can assume an elevated ICP. A low PCO2 or high PCO2 in the brain‐injured in civilian trauma is associated with mortality and poor outcome. Ensure that the PCO2 is between 30 and 35 unless you are directed by a neurosurgical consultant or if signs of brain herniation are present. Signs of brain herniation include flexor or extensor posturing or a blown pupil. Consider IV mannitol in the patient who is normotensive. Alternatively, hypertonic saline can be used in hypotensive patients with equal efficacy. Stabilization and early transfer are obviously paramount. Lessons Learned:
Maintain MAP and saturations in the brain‐injured.
CPP is MAP‐ICP and should be >/=70.
Keep PCO2 between 30 and 35 unless you are directed by a neurosurgical consultation or you see signs of brain herniation.
Consider mannitol IV/hypertonic saline in the brain‐injured patient with signs of elevated ICP. Mannitol should be used with caution since it can cause hypotension. It should be given only after fluid resuscitation in a patient with lateralizing symptoms or impending herniation.
Transfer ASAP.

First to Cut
109
“Blunt spinal cord injury and damage control” “A 24‐y.o. male driver of a vehicle escaping an explosion at high speed runs into a pole; he arrives at the CSH unstable but talking and unable to move or feel his legs. The FAST is positive; we bring him to the OR. On table, the pelvis and chest X‐rays are both negative. Ex lap pack his liver and remove his spleen, cold, coagulopathic; we bring him to the ICU. Spine films show significant step off the lumbar spine – it is blunt and a spinal cord injury. Do I give steroids?” Giving high‐dose steroids to a damage control patient would represent a high infection risk. In light of the highly controversial benefit of steroids in blunt spinal injury in the first place, they have no role in a multiply injured combat‐wounded patient. Lessons Learned:
Do not use steroids in combat‐wounded.
First to Cut
110
“Head frag, pus, and all alone”
“Up in the mountains, no helicopters for the foreseeable future because of weather, I get a 32‐y.o. with a week‐old frag wound to his head, alter consciousness and frank pus coming from the head frag hole. I give him Rocephin and Vancomycin IV and get on the phone with a neurosurgeon, who says to perform a craniotomy and drain the pus. So I take him to the OR and drill holes, lift a bone flap with the Gigli saw and wash it out, and place a drain. I transfer him awake and alive 2 days later.” Neurosurgery for the general surgeon is challenging; but in remote locations, it may be a life‐saving endeavor. In these situations, it is best to get some feedback from a neurosurgeon if at possible. A skull bone flap can be made with a Gigli saw after drilling multiple skull holes. A JP drain can be cut to size and placed for pus or blood drainage. Before deploying, review the maneuvers for a simple craniotomy in case you are placed in this challenging situation. Lessons Learned:
The combat trauma surgeon needs to be able to perform a craniotomy with drill and Gigli saw.
Obtain neurosurgeon input prior to a craniotomy if possible.

First to Cut
111
Orthopedic Injuries

First to Cut
112
“He had had a fasciotomy, but we’re not sure why, where, when, or how.”
“A 30‐y.o. male was transferred to our hospital for care of an open tibia fracture; it was his third hospital. He had had forward surgery, but the records from the most forward and second hospitals were unclear. He had had a leg fasciotomy, a debridement and irrigation, and external fixation; but whether the fasciotomy was prophylactic (syndrome absent) or therapeutic (syndrome present) was unclear because the presence or absence of compartment syndrome was unrecorded. No indications were listed. It was unclear whether the fasciotomy was done at the first or the second hospital; so the procedure time was unknown. Thus, the lag to compartment syndrome onset and detection were incalculable, even if assumed present.” Wound inspection revealed some loss of the fibula shaft and did not indicate whether the fasciotomies were by one or two approaches. The records were absent technique details and surgical findings (shock duration, ischemia‐reperfusion times, expanding hematomas, response to fasciotomy, etc.). More surgery included re‐exploration, debridement, irrigation, and revision fasciotomy. The extension of his fasciotomy was formal but minimal and physiologically inconsequential—a formality for thoroughness and for the record. As some items here have been evidenced in the current war to affect casualty survival, there have been numerous, diverse, and comprehensive communications (e.g., publications, practice guidelines, teleconferences, videos, performance improvement projects, and protocols) about fasciotomies in war. Yet, forward surgeons still do not record adequate data pertinent to aftercare for both their casualties and the trauma system. This is one reason that compartment syndrome remains one of the most controversial topics in combat casualty care for limb‐injured casualties. Lessons Learned: • Optimal care should include a record of whether the fasciotomy is prophylactic or
therapeutic. • The indications, time, and findings of the procedures need to be recorded so that
study can improve care. • Adequate records are lacking for fasciotomies.

First to Cut
113
“Articular injuries to the knee” “A 25‐y.o. male was near a landmine explosion and sustained traumatic, right below‐knee amputation with large soft‐tissue injury extending into the knee joint; and multiple puncture wounds about the left knee with effusion. X‐rays showed a right mid‐shaft tibia amputation with many metallic objects about the left knee. He underwent an extensive wound debridement about the right knee joint. On exploration, he had a traumatic right knee arthrotomy that was extended surgically to allow inspection of the joint, debridement, and irrigation with 6 liters of sterile saline under gravity. The capsule was closed over a drain. The left knee effusion and surrounding metallic fragments indicated a joint penetration, another traumatic arthrotomy. Absent arthroscopic equipment, laparoscopic equipment was used instead. Fragments were removed from the knee. Nine months later, he had right knee instability and a valgus knee thrust when walking on his prosthesis. So he then had both anterior cruciate and medial collateral ligaments reconstructed.” Mine blasts force debris proximal to the apparent wound site, often along fascial planes. Such injuries can include major rotational or translational forces to the knee. Lessons Learned: • Blasts can fracture bones and tear ligaments. Instability may appear late. • Splint, if in doubt early, especially if there is major, concomitant soft tissue injury
near a joint. • Cartilage is resilient, but contaminated joints must be irrigated thoroughly and
drained. • If gross contamination is present, an arthrotomy and drain are best; if isolated
penetration is present, then debridement by arthroscopy or arthrotomy can suffice.
• Exposed cartilage must be kept moist and covered or it can die. Always close capsule if possible. Use muscle, fat, or a wound vacuum device if the capsule is absent.

First to Cut
114
“To fix or not to fix? That is the question.” “An infantry battalion operations officer arrived with a closed bi‐malleolar ankle fracture. He wanted us to fix it in theater so that he could stay with his troops. He said that staying with his troops was mission‐essential.” Nearly 20% of the fractures sustained by troops in theater are closed fractures (Owens et al., 2007). It is tempting to do an open reduction and internal fixation of fractures in theater, particularly for important U.S. personnel. Recent experience in theater with local national care is that such treatment seems safe, although follow‐up is absent, limited, or short. However, current consensus opinion remains that definitive open reduction and internal fixation in theater for U.S. casualties is best limited to fracture patterns that are difficult to stabilize (e.g., proximal femur fractures) or those in which treatment delay poses risk (e.g., displaced femoral neck or talar neck fractures). Sterility of the OR and instruments in theater is difficult to maintain. Implant and instrument availability is limited. X‐ray and fluoroscopy services are few or absent. Mass casualties can occur anytime and abort elective surgery. Post‐operative care is limited. Therapy is suboptimal, and patients often skip it because of work or transportation problems. Splints and casts often get wet and dirty; crutch use on dirt and gravel is difficult. Narcotics for pain render casualties unsafe for days to weeks. Those in casts or splints cannot save their own lives when attacked since they cannot quickly don protective gear or use their weapons adequately. Given combat constraints, you should hesitate to operate on a closed, non‐emergent fracture in theater. In most cases, the patient is better served by initial stabilization and evacuation to the next higher echelon of care. Lessons Learned:
No one is truly indispensable; someone can step in and fill the void. Do the right thing for the patient.
Internal fixation is better at a Level 4 facility than forward; return the patient after recovery.
Rehabilitation can be done forward but requires close care and unit coordination.

First to Cut
115
“Forearm fracture: rule out nerve injury”
“A 24‐y.o. male had a gunshot wound to a forearm with an open proximal radius fracture and loss and absent wrist extension or finger flexion. Pulses were palpable distally.” Most peripheral nerve injuries in penetrating war trauma are not transections but neurapraxias as the nerve is intact at the time of exploration (Bartlett et al., 2000; Wilson, 2003). Nerve dysfunction is from stretch deformation during or after wound cavitation. Priorities are hemorrhage control and perfusion assessment over nerve assessment. Although in unconscious casualties, nerve injury can be detected later or at exploration, nerve examination in a conscious patient can show motor function:
Radial (posterior interosseous) nerve: wrist and metacarpophalangeal joint (MCPJ) extension
Median (anterior interosseous) nerve: finger and thumb interphalangeal joint (IPJ) flexion
Ulnar nerve: finger abduction Pseudo‐paralysis from musculotendinous loss, laceration, or disruption mimics nerve injury. At wound exploration, each nearby major nerve is inspected for contusion, traction, or laceration. The nerve, handled gently, is traced from proximal to the zone of injury to distal so as to find normal nerve on both sides of the wound. If transected, tag proximal and distal ends with a 4‐0 colored monofila‐ment suture (e.g., prolene) for easy location at later surgeries. Maximize peripheral nerve length preservation because nerve rarely needs major debridement. Transections are repaired or reconstructed (with autograft, allograft, or nerve transfers) at level 5 care. After injury, reinnervation within 18 to 24 months can restore motor end plates from dormancy. Lessons Learned: • Hemorrhage control and limb perfusion trump nerve injury. Nerve repairs are
delayed. • Document the initial examination and neurologic deficit. • Tag transected nerve ends with colored, monofilament suture for easy location
at later surgery. • Beware: musculotendinous loss, laceration, or disruption mimic nerve injury.
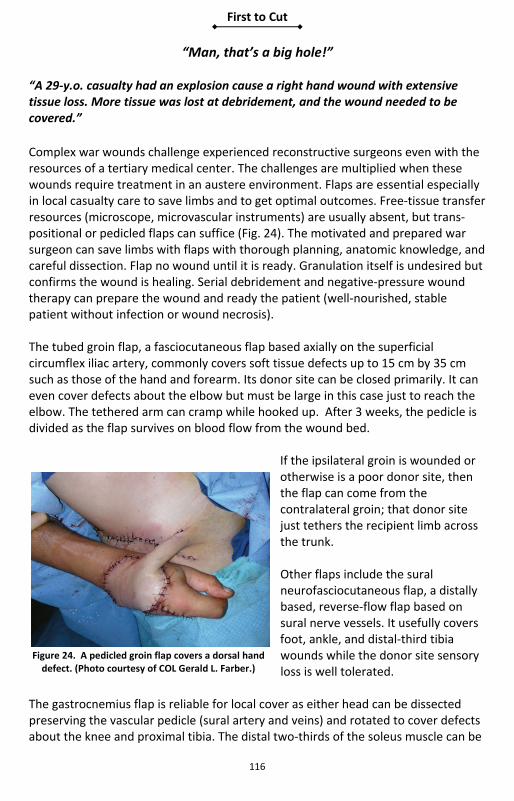
First to Cut
116
“Man, that’s a big hole!” “A 29‐y.o. casualty had an explosion cause a right hand wound with extensive tissue loss. More tissue was lost at debridement, and the wound needed to be covered.”
Complex war wounds challenge experienced reconstructive surgeons even with the resources of a tertiary medical center. The challenges are multiplied when these wounds require treatment in an austere environment. Flaps are essential especially in local casualty care to save limbs and to get optimal outcomes. Free‐tissue transfer resources (microscope, microvascular instruments) are usually absent, but trans‐positional or pedicled flaps can suffice (Fig. 24). The motivated and prepared war surgeon can save limbs with flaps with thorough planning, anatomic knowledge, and careful dissection. Flap no wound until it is ready. Granulation itself is undesired but confirms the wound is healing. Serial debridement and negative‐pressure wound therapy can prepare the wound and ready the patient (well‐nourished, stable patient without infection or wound necrosis). The tubed groin flap, a fasciocutaneous flap based axially on the superficial circumflex iliac artery, commonly covers soft tissue defects up to 15 cm by 35 cm such as those of the hand and forearm. Its donor site can be closed primarily. It can even cover defects about the elbow but must be large in this case just to reach the elbow. The tethered arm can cramp while hooked up. After 3 weeks, the pedicle is divided as the flap survives on blood flow from the wound bed.
If the ipsilateral groin is wounded or otherwise is a poor donor site, then the flap can come from the contralateral groin; that donor site just tethers the recipient limb across the trunk.
Other flaps include the sural neurofasciocutaneous flap, a distally based, reverse‐flow flap based on sural nerve vessels. It usefully covers foot, ankle, and distal‐third tibia wounds while the donor site sensory loss is well tolerated.
The gastrocnemius flap is reliable for local cover as either head can be dissected preserving the vascular pedicle (sural artery and veins) and rotated to cover defects about the knee and proximal tibia. The distal two‐thirds of the soleus muscle can be
Figure 24. A pedicled groin flap covers a dorsal hand defect. (Photo courtesy of COL Gerald L. Farber.)

First to Cut
117
mobilized and rotated to cover defects involving the middle third of the tibia, leaving the proximal third of the muscle undisturbed to receive blood supply from multiple posterior tibial artery perforators. Defects about the groin and anterior thigh can be covered by the rectus abdominus muscle, which is based distally on the inferior epigastric vessels. In the upper extremity, a volar fasciocutaneous flap based on the radial artery proximally or distally can reach defects from the hand to the elbow. The latissimus dorsi muscle can be raised on its thoracodorsal artery and vein, either as a muscle flap or as a myocutaneous flap. It can be rotated distally to reach the elbow and upper forearm or proximally to reach the shoulder. Cross‐leg flaps can be used when local tissue is inadequate; lower extremities can be linked by a spanning external fixator to protect the flap. Either a random pattern flap of skin and fascia, or a true pedicled flap (e.g., sural neurofasciocutaneous or gastrocnemius), is raised from the donor limb and inset into the defect on the recipient limb (Fig. 23). After 3 or 4 weeks, the pedicle is divided to separate the limbs. Lessons Learned: • Perform flap coverage only when the wound, the patient, and the surgeon are
ready. • Bring your books and telescopic spectacles, and contact your trusty wound
consultant.

First to Cut
118
“The spine was dislocated, and the patient was paraplegic.”
A 29‐y.o. male presented with an obvious spinal injury and bilateral lower extremity paralysis. Being a local national, he was managed by the local surgeons with bed rest and pain control [Fig. 24]. There were no spine implants available in theater and no higher echelon of care to evacuate the local civilian population. The spine was so unstable that the patient would not tolerate movement in bed. He developed heel and sacral ulcers. After inventorying available implants in the local civilian hospital, we located two 16‐hole 4.5‐mm dynamic compression plates, along with a spool of 18‐gauge wire. Applying standard fixation techniques with non‐standard implants, we stabilized the spine, allowing the patient to transfer from bed to chair on the first post‐operative day [Figs. 25 and 26]. He was discharged post‐operative day 5; and within 3 weeks, the patient healed his ulcers and could use a wheelchair. With spine fracture‐dislocations (Fig. 25), the spinal column is so unstable that mobilization is not tolerable for several weeks, leading to the complications of prolonged recumbency that include soft tissue ulceration, deep‐venous thrombosis, pulmonary embolism, and disuse atrophy. Using sound surgical principles of spine stabilization several segments above and below the three‐column disruption (Figs. 26 and 27), we can avoid these complications.
Lessons Learned: • Spine fracture‐dislocations are very unstable injuries. • Mobilization is not tolerated when the spine remains unstable. • Spine stabilization surgery in austere environments may preclude standard spinal
implants. • Non‐standard implants can be used to stabilize the spine using sound surgical
principles.
Figure 25. Sagittal MRI demonstrating the displaced spine fracture‐dislocation.
Figure 26. The reduced spine was fixed with 16‐hole 4.5‐mm dynamic compression plates and
sub‐laminar wires.
Figure 27. Lateral radiograph of reduced spine stabilized with internal fixation.

First to Cut
119
“How do I get rid of these bugs?”
“A 20‐y.o. male sustained a grossly contaminated open tibia and fibula with near circumferential skin loss following a vehicle roll‐over from an explosion. He had forward surgery consisting of irrigation and surgical debridement, external fixation, and prophylactic leg fasciotomies. Large soft tissue wounds were dressed with saline‐ soaked gauze for air transportation. On arrival for definitive management, his wounds had a foul odor with gross purulence and necrotic muscle in the anterior and lateral compartments. Motor examination revealed tibial nerve function; dorsalis pedis and posterior tibial pulses were palpable. Aggressive surgical debridement was performed systematically by removing all necrotic and nonviable skin, fascia, muscle, and bone with little or no soft‐tissue attachments. Copious irrigation with several liters of normal saline was performed with a low‐pressure gravity system. Anaerobic, aerobic, fungal, and acid‐fast bacilli cultures were obtained. Antibiotic‐impregnated polymethylmethacrylate (PMMA) beads were placed under a negative pressure wound therapy (wound vacuum) device. Cultures grew a rare fungus, Zygomycete. Broad spectrum and culture‐specific antibiotics were administered. Serial procedures were performed until the fungus was eradicated.” Infection remains the most common complication in survivors of complex combat‐related extremity trauma; adhering to basic principles from the onset of treatment can help minimize long‐term morbidity. Lessons Learned: • Aggressive and frequent sharp surgical debridements are the mainstay of
treatment and prevention of acute orthopedic infections. • Irrigation with low gravity pressure minimizes damage to bone and soft tissues. • Negative pressure wound therapy (NPWT) vacuum devices can be used to delay
definitive wound coverage until tissues are healthy. • Antibiotic‐impregnated PMMA beads should be used as an adjunct to systemic
antibiotics to provide high concentration of local antibiotics and close any potential dead space in complex traumatic wounds.

First to Cut
120
First to Cut
121
Burn Injuries

First to Cut
122
“Burn resuscitation and the open abdomen” “A 25‐y.o. male involved in an explosion while in a vehicle came into the CSH. I used the rule of nines and came up with approximately 42% total body surface area burn (TBSA) burn. He received 2‐liter bolus of LR before getting to us, and then we rebolused him another 2 liters of LR. We took him to the OR for scrubbing and escharotomies, and he received 7 more liters of LR. While awaiting transport, he received another 10 liters of LR and developed abdominal compartment syndrome. I took him for decompressive laparotomy. I heard he died at the ISR Burn Center 3 weeks later.” Secondary abdominal compartment syndrome is a well‐known complication of large resuscitation with crystalloid fluids and carries a high mortality in burn patients. Over‐resuscitation has caused a lot more harm in current operations than under‐resuscitation. Anecdotal reports have shown that placing an intraperitoneal drain may allow for enough intraperitoneal fluid removal to avoid a decompressive laparotomy. Placement of a JP drain before decompressive laparotomy should be considered. The best way to avoid over‐resuscitation injury is, of course, prevention (Fig. 28). MASCAL situations often do not allow time for calculating a burn intravenous fluid (IVF) rate formula. In adults, consider the ISR rule of 10, which will put you between the two most common burn resuscitation IVF formulas used in the United States, the Brooke formula (2 cc/kg/% burn) and the Parkland (4 cc/kg/% burn):
Too much urine is much worse than not enough urine. I like to stay on the dry side and aim for 30 to 35 cc/hour in adults.
In Operation Iraqi Freedom and Operation Enduring Freedom, we have not had a survivor with > 45% TBSA burn when the abdomen was opened. Blood pressure measurement is unreliable in burn patients and is not the end point of resuscitation. If you resuscitate to a ‘normal’ blood pressure, then you are giving too much fluid.
Figure 28. Continuous paracentesis to remove ascites from a massively resuscitated burn
patient. The catheter output is flowing freely into a plastic bottle. This is a temporizing measure at best: the best treatment is
prevention.

First to Cut
123
The ISR rule of 10 is very simple and is calculated by multiplying the % TBSA burn by 10 (estimated by using the Lund and Browder chart in Fig. 29) to arrive at the initial hourly rate of IVF for patient 40 to 80 kg. For example, 33% TBSA would be 33% × 10 = 330 cc/hr. If over 80 kg, then add 100 cc for every additional 10 kg; so a 100‐kg male with 33% burn would be 33 × 10 = 330 plus 200 for a total amount of 530 cc per hour of LR. For children, a weight‐based formula (Parkland or Brooke) must be used along with a maintenance IV of DS1/2 NS. Always use the Burn Flow Sheet (Fig. 30) as soon as possible.
Figure 29. Lund and Browder chart.

First to Cut
124
Figure 30. Burn flow sheet.

First to Cut
125
Lessons Learned: Over‐resuscitation of burned patients results in abdominal compartment
syndrome and a high mortality rate.
Consider starting the ISR rule of 10 to estimate the starting LR rate for adults.
Avoid boluses of IVF in burned patients – adjust IV fluid rate by 20%‐30% up or down each hour based on a urine output goal of 30 to 50 cc per hour (1‐2 cc/hr in children).
Blood pressure measurement is unreliable in burn patients and is not the end‐point of resuscitation. If you resuscitate to a “normal” blood pressure, then you may give too much fluid.
Consider placement of a JP drain (intraperitoneal) before decompressive laparotomy.
Use the Burn Flowsheet (Fig. 30) as soon as possible.
Figure 30. More is not better. Avoid this complication in burn patients by avoiding
over‐resuscitation.

First to Cut
126
“Smoke inhalation – that tube better not come out”
“A 24‐y.o. male in a vehicle hit by an explosion, secondary explosion, fire; trapped in the vehicle arrived with approximately 33% TBSA burn with black soot in his nose and mouth – obvious inhalation injury. We took him to the OR, intubated him, and performed escharotomies on circumferential burns on his arms and legs. CT scan was negative of abd/pelvis/chest/head/c‐spine. His airway was going to swell big time with resuscitation.” Inhalation injury with burn injuries is caused by breathing in smoke and not from hot air. The patient with inhalation injury (Fig. 32) and/or any burns over 20% TBSA should be intubated PROPHYLACTICALLY for transport. Inhalation injury often results in increased fluid requirements. Soot in the mouth and/or nose is clinical evidence enough for intubation; i.e., have a very low threshold for intubation. The positive bronchoscopic examination for inhalation injury can be made at a level III or level IV facility as you will not extubate a patient in theater based on the broncho‐scopic exam; nor is there a therapeutic indication for bronchoscopy acutely unless there are ventilatory problems (e.g., mucus plug). One option used at a level III facil‐ity is to have your OMF colleagues wire the endotracheal tube (ET) to the teeth. It sounds drastic; but if the ET dislodges, it may be impossible to put it back in the best of situations – let alone on a dark, cramped helicopter or airplane! See Figure 33.
Figure 33. Don’t let this tube come out! Cotton umbilical tape ties were used to secure the tube circumferentially around the head. Adhesive tape WILL NOT stick
to this face.
Figure 32. Bronchoscopic view of mucosal damage with inhalational injury.

First to Cut
127
Lessons Learned:
Intubate all burn patients with inhalation injury and/or >40% TBSA burns.
Have a low threshold for intubating.
Consider wiring the ET to the teeth for ET security during transport.
Consider nasotracheal intubation as it can be performed with minimal sedation and provides a secure airway.
Be judicious with anesthetics during intubation as burn patients may be profoundly hypovolemic.
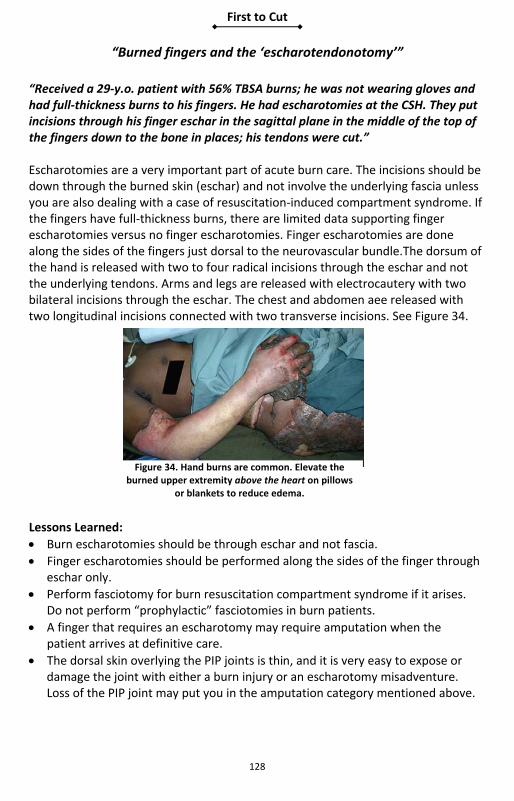
First to Cut
128
“Burned fingers and the ‘escharotendonotomy’”
“Received a 29‐y.o. patient with 56% TBSA burns; he was not wearing gloves and had full‐thickness burns to his fingers. He had escharotomies at the CSH. They put incisions through his finger eschar in the sagittal plane in the middle of the top of the fingers down to the bone in places; his tendons were cut.” Escharotomies are a very important part of acute burn care. The incisions should be down through the burned skin (eschar) and not involve the underlying fascia unless you are also dealing with a case of resuscitation‐induced compartment syndrome. If the fingers have full‐thickness burns, there are limited data supporting finger escharotomies versus no finger escharotomies. Finger escharotomies are done along the sides of the fingers just dorsal to the neurovascular bundle.The dorsum of the hand is released with two to four radical incisions through the eschar and not the underlying tendons. Arms and legs are released with electrocautery with two bilateral incisions through the eschar. The chest and abdomen aee released with two longitudinal incisions connected with two transverse incisions. See Figure 34.
Lessons Learned:
Burn escharotomies should be through eschar and not fascia.
Finger escharotomies should be performed along the sides of the finger through eschar only.
Perform fasciotomy for burn resuscitation compartment syndrome if it arises. Do not perform “prophylactic” fasciotomies in burn patients.
A finger that requires an escharotomy may require amputation when the patient arrives at definitive care.
The dorsal skin overlying the PIP joints is thin, and it is very easy to expose or damage the joint with either a burn injury or an escharotomy misadventure. Loss of the PIP joint may put you in the amputation category mentioned above.
Figure 34. Hand burns are common. Elevate the burned upper extremity above the heart on pillows
or blankets to reduce edema.

First to Cut
129
If you MUST perform a finger escharotomy, fully flex the fingers, look at the lateral creases formed at the DIP and PIP joints, and keep your incision just dorsal to these creases. Avoid escharotomy on functional surfaces – the radial surface of the index and the ulnar surface of the little finger.
Fasciotomy is not an innocuous procedure and should not be prophylactically performed “in case something goes wrong in flight.” Burn wound management of an extremity with an unnecessary fasciotomy is considerably more complicated than just dealing with the burned skin. There is a large potential for blood loss even in experienced hands. Figure 35, below, shows large blood loss requiring transfusion which occurred during a short helicopter transfer from a Level II to a Level III facility in Iraq following an unnecessary fasciotomy. (Note the color and water‐like appearance of the urine in the urometer tubing indicating over‐resuscitation).
Figure 35. Large blood loss requiring transfusion that occurred during a short
helicopter transfer from a level II to a level III facility in Iraq following an unnecessary
fasciotomy in a burn patient.

First to Cut
130
“I graft small burns, but they keep shearing”
“A 27‐y.o. female, local national involved in suicide vest explosion, arrived with a 3% burn to the right arm; we did an STSG. Post‐op, she was moving around; and the entire graft sheared off.” Taking care of small burns until completion of care is not an uncommon occurrence with local nationals. STSG should be done with 8/1000‐ to 12/1000‐inch thickness donors usually from the thighs. The burned skin needs to be excised down to good bleeding tissue. Epinephrine‐soaked lap pads and electrocautery provide hemostasis after adequate excision. The donor sites should be covered with Xeroform® and stapled into place and left to dry out and adhere. The grafted bed can be made almost immune to shearing by the placement of a negative‐pressure (wound VAC)
dressing. After the STSG is stapled into place, Xeroform® can placed over the STSG, and then the wound VAC sponge can placed. Cover with an Ioban or wound VAC plastic dressing (Fig. 36) and hook up to suction. This method prevents non‐apposition of the STSG and prevents shearing. Take the suction and sponge off after 72 hours – leave veil or Xeroform® on for 5 days, then remove.
Lessons Learned:
Small STSG grafts can be optimally treated with a wound VAC dressing.
STSG should be 8/1000 to 12/1000 of an inch.
Place Xeroform® over donor sites and let dry to adhere.
If no VAC, immobilize grafts across joints with plaster.
For small burns, use small meshes: a 3:1 mesh takes WEEKS to close; a 1.5: mesh is usually healed in 5 to 7 days.
On marginal beds, the best take is achieved by correcting the poor tissue bed, not by the size of the mesh.
Fine mesh gauze or Xeroform® can be used over small grafts. Likewise, in the absence of vacuums, Xeroform® covered by KERLIX™ and an ace bandage for 5 days work well.
Figure 36. VAC is a great post‐operative skin graft dressing. The hand VAC shown here takes time to construct but speeds up graft take and decreases graft loss. (Photo
courtesy of James Williams, PA‐C.)

First to Cut
131
“Antenna to high power line — electric injury”
“A 23‐y.o. male arrives to the FST after a report of high‐voltage electric injury. He has two contact point injuries on his left forearm and right thigh with surrounding approximately 2% TBSA full‐thickness skin burn – doesn’t look so bad.” Electric injuries are a “trap.” They do not look so bad on the surface; the real potential for damage is in the underlying muscle bellies and nerves. Muscle necrosis can lead to myoglobinuria and compartment syndrome, which will result in more muscle damage. The goals of treating a patient with an electric injury are to prevent myoglobinuria (Fig. 37) from causing kidney damage and to release any elevated compartments to minimize subsequent muscle damage. When gross pigmenturia (Fig. 38) is present, urine output goal should be 80 to 100 ml/hr. If pigment fails to gradually clear over 3 hours, (1) consider mannitol IV if hydration is optimized; (2) alkalinize the urine with sodium bicarbonate drip; and (3) strongly consider urgent fasciotomy and debridement of dead muscle. In the deployed setting at a level II facility, consider prophylactic fascial release of any involved compartments and any compartments that are tight to physical exam, and transfer to a level III facility ASAP. At a level III facility, in addition to physical exam compartment pressures can be monitored by rigging an A‐line to a needle and inserting the needle into the muscle compartment. Any circumferential burn injuries should, of course, also be released with a standard escharotomy. Work up patients for spinal injury (cervical to lumbar).
Figure 37. Myoglobinuria following high‐voltage electric injury. (Photo
courtesy COL David Barillo.)
Figure 38. There is no better way to document clearing of pigment from the urine than collecting the urine hourly and looking at it.

First to Cut
132
Lessons Learned:
Hydrate electrical injuries with gross pigmenturia to avoid myoglobin‐induced renal injury.
Consider IV mannitol in addition to sodium bicarbonate IV.
Prophylactically release obviously involved muscle fascial compartments.
Observe all muscle compartments with physical exam and A‐line pressure readings.
High‐voltage electric injuries are the only burn injuries in which fasciotomy is performed in contemporary burn practice. An increased index of suspicion for impending compartment syndrome is appropriate for electrical injuries.
The “100 cc of urine” rule is not automatic: if the patient has clear urine, titrate IV fluids to the usual goal of 30 to 50 cc/hr (or less!). If the urine is dark, aim for 75 to 100 cc/hr. Alkalinizing the urine (pH > 8), often preached, is rarely possible in reality. Once the urine regains a normal color, drop back resuscitation with a goal of 30 to 50 cc of urine per hour.
In austere conditions, it is not necessary to test for myoglobinuria or hemoglo‐binuria: if the urine is dark, you have it and need to treat it. If the urine is clear, you do not have clinical myoglobinuria or hemoglobinuria and do not need to treat it. Note: A urinalysis that is positive for “blood” on the dipstick but negative for blood on microscopy indicates the presence of hemoglobinuria or myoglobinuria.
Mannitol is an osmotic diuretic and will make subsequent urine output measurement inaccurate as an index of adequacy of resuscitation.
Transfer all major electrical injuries to a burn unit ASAP.

First to Cut
133
“Did you say ‘depleted uranium’?”
“In the old war, we had a chap involved in a friendly fire incident with frag wounds up and down his legs. Someone said it was depleted uranium shell; I wash them out – no fracture and good distal pulses. There was something about depleted uranium, but we had no copies of the memorandum; so we shipped him to the CSH.” Depleted uranium is used in friendly anti‐tank munitions. If you run into this, this is the one time you should remove fragments if the fragments are over 1 cm — unless their removal could be life‐threatening. LESSON LEARNED:
Remove all depleted uranium fragments over 1 cm in size.

First to Cut
134
“What does anyone use chlorine gas for anyway?” “A VBIED went off at the front gate – no initial wounded; then they started coming in droves complaining of shortness of breath. The EOD folks came in and said it was a chlorine gas attack. What do we do?” Chlorine gas has been used in explosions in combat. Treatment for inhalational injury is supportive. Remove any cutaneous contamination. LESSONS LEARNED:
Chlorine gas inhalational injury treatment is supportive as needed to include intubation and ventilation.
Remove all cutaneous contamination ASAP.
There is a high risk of pulmonary edema. Avoid volume overload; carefully
manage fluid resuscitation.

First to Cut
135
“Willie Pete” “A 27‐y.o. male was involved in a mortar explosion with white phosphorus. Had multiple lower‐extremity wounds; we packed all the wounds with saline‐soaked KERLIX™. Now what?” White phosphorus wounds are a rare occurrence. They are unique in that they can burn when exposed to air. White phosphorus is a flammable solid with an autoignition temperature of 86 °F. Above this temperature, on contact with air, white phosphorus particles spontaneously ignite/oxidize (without an ignition source) and form phosphorus pentoxide. LESSONS LEARNED:
Cover all white phosphorous wounds with saline‐soaked gauze.
At body temperature, white phosphorus particles in wounds will oxidize creating a yellow flame and wisps of white smoke. This process will continue until all white phosphorus particles are consumed or surgically removed.
White phosphorus converts from a solid to a liquid at 111 °F. Warm saline irrigation, although necessary, complicates particle identification and removal.
To avoid further burn injury, wounds containing white phosphorus particles should be covered in saline or saline‐soaked pads and then undergo rapid and repeated debridement. Removed phosphorus particles should be kept under water or in saline to avoid re‐ignition. Re‐look surgery should be performed at least daily until the surgeon is sure that all the particles have been removed.
Topical copper sulfate solution is not an antidote or treatment for white phosphorus burns. It became popular in the Vietnam era as a method of identifying phosphorus particles in wounds by staining them black. The application of topical copper sulfate solution to burn wounds can cause acute renal failure, fatal massive intravascular hemolysis, or cardiovascular collapse. For this reason, topical copper sulfate solution should never be used for white phosphorus burns. Identification of embedded phosphorus particles in wounds is facilitated by use of a Woods lamp, as the particles will fluoresce under ultraviolet light.
White phosphorus burn injuries can produce life‐threatening hypocalcemia or hyperphosphatemia as quickly as 1 hour after burn injury. Sudden and unexpected death can occur with burns as small as 10% body surface area. Electrolyte disturbances do not occur in all patients, and there is no reliable predictor of who is at risk for electrolyte disturbances following white phosphorus injury.
If available, EKG monitoring should be undertaken in all patients with white phosphorus burn injury, looking for QT prolongation, ST depression, T‐wave changes, or progressive bradycardia, all indicative of severe hypocalcemia.

First to Cut
136
If an I‐stat device is available, measure ionized calcium levels and replace calcium as needed.
White phosphorus burns are more difficult to manage and take longer to heal than conventional thermal burns. Early evacuation to a burn center is recommended.

First to Cut
137
“Mustard gas – be serious – will never happen” “A 35‐y.o. male disposing of old artillery rounds – one goes off, and he inhales some of the gas and has liquid on his arms. His arms blister up; EOD comes in and identifies the stuff. Mustard gas is a rare occurrence, usually from old munitions. Mustard gas has been infrequently used in war but has been produced and stockpiled in massive quantities by many nations since World War I. Although many nations are now destroying existing stocks, isolated munitions with liquid mustard agent can still be occasionally be found in old arms stockpiles, old training areas, or old military bases throughout the world. Prior to the 1970s, disposal of excess mustard munitions frequently involved ocean dumping or simple burial at the training site. Excavation of old bases or training sites or destruction of old arms caches may result in exposure to mustard agent. LESSONS LEARNED:
Treat all mustard gas injuries.
Inhalation injury or a TBSA greater than 25% is associated with high mortality.
Liquid agent in munitions is intended to vaporize when the munition explodes. Most wartime injuries result from vapor rather than liquid exposure.
Exposure to vapor may not produce symptoms for hours to days. Typically, skin irritation occurs in wet areas such as the axilla or groin.
In addition to skin injury, mustard exposure can produce eye injury, respiratory failure, or gastrointestinal symptoms. Lung injury may result in secondary bacterial pneumonia. The eyes are the most sensitive organ, and eye symptoms may be the first sign of exposure.
Mustard is radiomimetic and similar to radiation exposure affects rapidly dividing cells, including hematopoietic and GI mucosa cells. Serious exposure may cause a profound drop in white blood cell count.
Liquid exposure is very serious. One teaspoon of liquid mustard in contact with intact skin will produce a 25% TBSA burn and is considered the lethal dose for 50% of the population (LD50). For contact with open wounds, the lethal dose will be much lower.
Mustard takes only 2 minutes to penetrate intact skin. On contact with skin, 80% of the mustard evaporates, with the remainder becoming irreversibly bound to the skin or entering the circulation. Mustard is not found in blister fluid, and care of mustard burns poses no chemical hazard to health care providers. Fluid from mustard blisters do not cause further vesication, which is rather due to the natural history of the injury.
There is no specific antidote and treatment of eye, skin, lung, and GI; and hematopoietic exposure is symptomatic.

First to Cut
138
Diagnostics: the white blood cell (WBC) count should be examined at least daily. A 50% drop in lymphocyte count is significant. Blood and urine should be preserved for forensic analysis and submitted to the U.S. Army Medical Research Institute of Chemical Defense at Aberdeen Proving Ground.
Triage: Symptoms within 4 hours = severe injury, airway symptoms within 6 hours is often fatal, and GI symptoms within 24 hours of exposure indicate systemic toxicity.
The skin lesions usually start out as erythema. This may progress to vesicles, which start as a “string of pearls” at the periphery of the erythema, which then coalesce. The vesicles may then progress to large fluid‐filled bullae 0.5 to 5 cm in diameter.
Erythema may be treated with calamine lotion, topical steroids, or topical antibiotics. Do not apply steroid creams if the skin is not intact.
Small (< 1 cm) vesicles should be left unopened. When the lesions become confluent, unroof them by gentle debridement with a saline‐soaked lap pad. Large bulla should also be unroofed. In either case, protect the wound following debridement with a topical antibiotic.
Mustard lesions (Fig. 39) of any significant size should be referred to the U.S. Army Institute of Surgical Research/Army Burn Center for definitive care. Early consultation with the Institute of Surgical Research and the Medical Research Institute of Chemical Defense is recommended.
(a) Blistering. (b) Lesions.Figure 39. Effects of mustard gas exposure.

First to Cut
139
Explosion Injuries
First to Cut
140
“What do I do with a primary blast injury?”
“A 27‐y.o. male was involved in a dismounted explosion. His left ear drum was gone on exam, he had fragment wounds all over, and he had shortness of breath. We intubated him and scanned him. He had no pleural or peritoneal fragments but had what looked like a bilateral pulmonary contusion on the X‐ray 6 hours after injury. Blast injury? What do I do?” Explosion injury is the one of the most common injury patterns the combat surgeon sees. Primary blast injury is an injury caused simply by “overpressure” and is actually a rare injury. Secondary blast injury is most common and is from projectiles from the explosion (fragments). Tertiary blast injury is caused by blunt force as the body is propelled through the air and hits a structure. Quaternary blast injury is from burns from the explosion. Most primary blast injuries involve “air‐filled” structures – inner ear, lungs, bowel (most commonly the cecum). The most common primary blast injury is tympanic membrane rupture (5%‐20% involved in an attack), followed by lung injury (1%‐7% of attacks), and bowel injury (<1% of attacks). While tympanic membrane rupture is the most common primary blast injury pattern, it is not a screening test for primary blast injury. Many with primary lung injury do NOT have a concomitant tympanic membrane rupture. Tympanic rupture is not treated in the combat zone; GI perforation from a primary blast injury is treated as any other GI perforation. Primary lung blast injury is treated with airway and ventilatory support. Lessons Learned:
The most common primary blast injury is tympanic membrane rupture (around 12% upon admission to a level III facility).
Tympanic membrane rupture cannot be used as a screening test for primary blast injury to the lungs or the bowel.
Primary lung blast injury is treated with airway and ventilatory support.

First to Cut
141
“The pelvis is unstable, and the patient’s blood pressure is dropping”
“A 20‐y.o. male was in a blast event where his vehicle swerved and slammed into a wall. He arrived in the trauma with a low blood pressure that kept dropping. X‐ray of the pelvis showed a widened pubic symphysis plus a sacroiliac joint disruption. A sheet placed around the patient at the level of his greater trochanters was tightened, then secured with a towel clamp. With fluid resuscitation, his blood pressure steadily rose. He was then taken to the OR for external fixator placement.” An unstable pelvis is common in blunt trauma. When the deformation widens the pubic symphysis, pelvic volume increases permitting large hematomas from venous bleeding. If the pelvis is unreduced, the patient may get shock. The easiest way to stop ongoing blood loss into the potential space is by reducing the pelvis usually with a sheet or a pelvic binder. Such devices should not be left in place for long times because skin can break down. Once stable, the patient can go to the OR to stabilize the skeleton with an external fixator. Two to three pins are placed in the iliac wings and clamped together. Alternatively, a single pin can be placed in the solid bone above the dome of the acetabulum. The superacetabular technique works better when the posterior pelvic ring is disrupted because the pins are very sturdy and can be toggled to reduce the posterior and anterior pelvis. Definitive skeletal fixation in the United States usually includes a pubic symphysis plate and sacroiliac screws. Lessons Learned: • Pelvic injuries (even closed) can be associated with significant blood loss. • Reduction of the pelvis to stop bleeding can be accomplished outside the OR. • External fixator pins can be placed in the iliac wing or the superacetabular
region.

First to Cut
142

First to Cut
143
Soft‐Tissue Injuries

First to Cut
144
“Large soft‐tissue injury and coagulopathy”
“A 33‐y.o. male involved in an explosion arrives hypotensive. Looking him over, he had several frag wounds to the right leg with no bony involvement and equal pulses. But he had lost over one‐half the mass of his right buttock. We put a pressure dressing on best we could and resuscitated him with blood and FFP. He stabilized, and we scanned his pelvis – no fragments seen. We then brought him immediately to the OR. He was cold, coagulopathic.”
Large soft‐tissue defects (Fig. 40) are rarely seen in civilian trauma but are common in combat explosions. These wounds should be addressed with the guiding principles of damage control. Stop bleeding, remove soilage, resuscitate in the ICU, and return to OR. Stop all surgical bleeding (large veins and any arteries) which will increase with resuscitation and debride/warm irrigate any dirt and foreign bodies. After suturing, the wound should be packed, Chitosan pads and ChitoFlex® (basically Chitosan‐coated KERLIX™) has been used as well as plain KERLIX™. If skin is available it can be sutured over the packing to allow for a temporary tamponade effect. Although the classic teaching (dictum) is never to close a combat wound, the first goal of damage control (stop all bleeding) takes precedence. If a patient has life‐threatening coagulopathy and bleeding, fragment wounds can be temporarily stapled (skin stapler) and closed for tamponade; and after resuscitation and correction of the coagulopathy, the staples can be removed and wounds irrigated. Lessons Learned:
Large soft‐tissue injuries need damage control.
The skin sutured over packing can provide life‐saving tamponade.
Fragment wounds can be temporarily stapled closed for hemostasis.
Figure 40. Large soft‐tissue injury.

First to Cut
145
“His fevers will not go away” “A 30‐y.o. non‐US male with a GSW to the right thigh with large soft‐tissue defect is doing well after surgical debridement and wound vac placement. Despite negative wound, blood, urine, and sputum cultures along with no evidence of nosocomial infection on exam, he remains febrile with temperatures up to 104.0o F 7 days after surgery and appears very sick during the time of elevated temperatures. The laboratory technician noted intracellular organisms in the red blood cell during manual review of his CBC.” Mild temperature elevations after large soft‐tissue trauma are typical, but persistently elevated temperatures for days after surgery necessitate a closer look for the etiology of the fevers. The standard approach to evaluate the wound along with other sources of nosocomial infection, including possible pneumonia, bacteremia, urinary tract infection, catheter associated infection, etc., is necessary. When dealing with patients in a deployed setting or patients who have recently traveled to other countries, one must consider the endemic diseases associated with those regions of the world. In this case, the patient had malaria. Although U.S. personnel are mandated to take malaria chemoprophylaxis, the adherence is poor; so U.S. casualties are also at risk for malaria in Afghanistan. Other unusual infections described by surgeons have included worm bezoars during surgical intervention. A good source for a country’s endemic diseases is the National Center for Medical Intelligence (https://www.intelink.gov/ncmi/index.php). Lessons Learned:
Differential diagnosis of fevers in trauma patients should include standard complications you think of in the United States.
During deployments, fevers might also be associated with other diseases endemic to the region of deployment or the patient’s home country.

First to Cut
146

First to Cut
147
Anesthesia

First to Cut
148
“Large fragment to the face”
“A 22‐y.o. male with a wound caused by a projectile that destroyed most of his lower face. His mouth and lower jaw were a mess of bony fragments and strips of soft tissue. He was sitting up, coughing, and resisted any efforts to make him lie down.” This kind of presentation is very dramatic but actually can be easy to manage if some principles are followed. It is appropriate to be concerned about his airway, but keep in mind that he has been doing a good job of maintaining his own airway from time of injury to time of presentation. Sedating medications have the potential to interfere with the patient’s airway management. A prudent physician would not take away the patient’s ability to manage his own airway until the physician is ready to fully take over. If some analgesia is required, small doses of ketamine may be ideal. Immediate steps to take include the following:
Obtain intravenous access and apply non‐invasive monitors.
Provide supplemental oxygen as best possible.
Assemble a team consisting of the most experienced laryngoscopist and a surgeon who has everything he needs to obtain surgical access, including adequate lighting, Bovie device, and other instruments.
This may be in the OR rather than the ED. For the laryngoscopist, a gum bougie is a valuable adjunct. Two Yankauer suction systems are desirable in a case such as this, where there may be profuse bleeding into the airway. Induction and intubation should proceed only when everyone is ready, understands their role, and has all of the equipment. As long as bleeding is controlled, intubation by direct laryngoscopy actually tends to be easy when facial structures have been traumatically amputated. Lessons Learned:
If a patient with airway trauma is maintaining his own airway, let him continue to do so until you are ready to fully take over that function.
Gather the right personnel and the right equipment and agree on a plan for airway management before proceeding.
Consider managing the case in the OR rather than in the ED.
Have plenty of suction available.
Ketamine, both as an analgesic and as an induction agent, can allow for some degree of preservation of airway reflexes and spontaneous ventilation.
Difficult airways usually present when things are present that should not be (e.g., tumor, mass effect). When structures that are usually present have been blown away, it tends to make laryngoscopy that much easier.

First to Cut
149
“First to die was the anesthesia machine”
“In the middle of a mass casualty scenario, an unstable patient with a multiply penetrated abdomen and chest was immediately taken to the OR from the ED. After the patient was connected to the anesthesia circuit, the power failed. The surgeon and I both knew that the patient would die in a matter of seconds if I didn’t figure something out quickly.” Mass casualty situations are often chaotic; and just when you think it can’t get any worse, it does. One unpreventable situation occurs when equipment fails. The best way to prepare for this situation is to learn to do without. To practice, ask yourself during any given case, “How would I do this case if I didn’t have a ventilator? A central line? Electricity?” Understand what necessity is and what luxury is. For example, electricity and reliance on backup battery power is not required to ventilate a patient if you use an Ambu® bag connected to the auxiliary oxygen supply of the Narcomed M. Most anesthetics can be started with a muscle relaxant and ketamine while you ventilate with an Ambu® bag and maintained with total intravenous anesthesia (TIVA) delivered via a micro or macro dripper. If the anesthetic is properly prepared, you can focus on continuing the patient’s surgical care and rather than on troubleshooting your equipment while your patient bleeds to death. Lessons Learned:
Expect equipment to fail at the worst times.
Learn to deliver anesthetics and provide optimum surgical conditions and patient safety with different techniques, including low‐tech, no power techniques, so that you aren’t dependent upon anything.
Although amnesia is still a goal, not everyone needs anesthesia, particularly those in hemorrhagic shock.
Ketamine should always be available for trauma anesthesia.
Continually drill yourself on what you would do if different components of your plan or your equipment failed.

First to Cut
150
“Which patient are we talking about?”
“The young soldier on the OR table had a bloody dressing partially concealing a large, jagged piece of shrapnel that emerged from his lateral neck. He was pale and tachycardic but did not appear to be actively bleeding. I placed noninvasive monitors and began pre‐oxygenating while the nurse started taking the dressing down. I had my back turned and was looking in my anesthesia cart for supplies for a second IV when I heard the blood hit the floor. Lots of it.” In this case, either the dressing or the fragment or both had prevented or obscured the blood loss. The patient clearly manifested signs and symptoms of shock; and at this stage, his physiologic reserves were likely minimal. Obtaining surgical control of bleeding and preventing further blood loss while simultaneously providing appropriate resuscitation is paramount to the casualty’s survival. There are essentially two kinds of hemorrhagic trauma patients. The patient with ongoing hemorrhage needs to have the bleeding stopped right away. You stop the bleeding with a tourniquet for extremity trauma and with surgical interventions for thoraco‐abdominal trauma; e.g., laparotomy and packing, Pringle maneuver, thoracotomy, etc. These maneuvers should not be delayed by anything other than establishing an airway and ventilation. In these situations, it is imperative to control bleeding. Once bleeding is controlled, the anesthetist can focus on improving IV access or placing invasive monitors, etc. The second type of patient, like the patient in this scenario, is the one who needs to be handled very carefully until appropriate intravenous access and preparations are made to transfuse and manage potentially life‐threatening bleeding. While you concern yourself with the airway, ventilation, and vital monitoring, use the skilled hands of the surgeon to help you with additional peripheral or central venous access and arterial line placement. Whichever the case, everyone in the room must understand which kind of patient you are talking about. Ensure that other members of the surgical team understand the anesthetic and surgical plans. Lessons Learned:
In trauma, there must be two‐way communication between the surgeon and the anesthetist and other members of the surgical team.
Sometimes the first priority is to get the belly open and stop the bleeding.
Sometimes the first priority is to fully line and monitor the patient and get blood in the room before cutting.
Everyone in the room, including the nurses and the technicians, needs to understand what the priorities are.

First to Cut
151
“Out here, the difficult airway algorithm is very simple”
“A half‐dozen patients, on litters and on the ground, had been triaged ‘immediate,’ and several needed to be intubated. I had a grade 4 view on the first patient and put the tube in the esophagus. On the second attempt, my luck wasn’t any better. I felt like I could intubate him if I had a fiber‐optic scope, but there were none immediately available; at least four other patients needed to be intubated STAT.” The American Society of Anesthesiologists’ difficult airway algorithm is a great guide when you have one patient to think about and time is on your side. In a MASCAL, you must have a lower threshold to establish a surgical airway using a cricothyrotomy if you aren’t immediately successful with laryngoscopy. It’s a skill you need to have, but it may be feasible for a surgeon to perform it while you go on to the next patient needing airway management. A dose of ketamine can anesthetize the patient while preserving his respiratory drive; so it comes in handy in these situations. Out of necessity, the combat difficult airway algorithm is very compressed. Lessons Learned:
The anesthetist is a limited resource in a MASCAL.
Ketamine causes less respiratory depression than other anesthetics or opioids in equi‐analgesic doses.
One good optimal attempt at direct laryngoscopy, with a gum bougie at the ready, is the first step.
The next step is to establish a surgical airway and prepare to manage the next patient.
Before the surgical airway is obtained, a laryngeal mask airway (LMA) can be placed, allowing a medic to continue oxygenation and ventilation while you move on to the next patient.

First to Cut
152
“The worthless femoral cordis”
“The patient with multiple penetrating abdominal wounds received 2 units PRBCs and 2 units thawed plasma through a femoral cordis before arriving in the OR. Upon laparotomy, we found a disrupted vena cava and at least 5 units of blood in the belly.” For many practitioners in a combat hospital, the femoral vein is the easiest and most familiar site to establish large‐bore catheter IV access and place a central line. In all the commotion and confusion of the casualty receiving area, the contraindications can easily be overlooked. Blood given through a femoral vein never reaches the heart if the inferior vena cava is not intact. If there is any real chance that penetrating abdominal trauma has compromised the vena cava, it is essential to obtain venous access above the diaphragm. In the patient requiring fluid and blood resuscitation, 14‐ or 16‐gauge IVs function as well as, if not better than, central lines. Placement of central lines can take precious minutes, resulting in increased time before patients are taken to the OR. Additionally, central lines are associated with significant adverse events such as pneumothorax and carotid puncture. If the clinical situation dictates and a central line is necessary, there may be circumstances in which a subclavian or an internal jugular cordis is more advantageous than a femoral vein catheter. Lessons Learned:
Emphasis on central venous access may be overstated.
Central venous access should not delay operative intervention and can be performed simultaneously to surgery.
Two large‐bore 16‐ to 14‐g IVs should be the standard for most trauma patients.
Penetrating abdominal trauma demands IV access above the diaphragm.
Placing a femoral cordis in such a case is a waste of time, energy, and blood.
First to Cut
153
“I’ll do that case tomorrow”
“At midnight, the whole OR staff—surgeons, anesthetists, nurses, and techs—are tired. The surgeon says that he’ll do the last case, an extremity washout, in the morning, since the schedule for tomorrow is empty.” A superstitious person would say that the surgeon has now jinxed the OR. A realist knows that luck is unpredictable. You can’t count on the schedule being light at any time. Better to do the case now than risk not having it done by tomorrow. If a surgeon, nurse, or anesthetist is truly too tired to do a case, find someone who is not. If an unexpected bunch of surgical cases comes in the next morning, you’ll be glad the washout case was done the night before and won’t be put off another day. On the other hand, if the schedule stays empty, you have all day to rest and recover. Lessons Learned:
A free day can turn into a mess in the blink of an eye.
If a case must be done, you can’t wait until tomorrow.

First to Cut
154

First to Cut
155
Triage
First to Cut
156
“They just kept coming, one after another”
“A mortar went off in a parade field during a formation; the patients came in sets of 4 for a total of 30 patients. Many had total body fragment wounds, including head injuries. Four patients came in hypotensive with abdomen/pelvic wounds, and I took the two sickest to the OR; the rest were parked in the ED.” During a mass casualty situation, it struck me that the majority do not need to go to the OR immediately but that the OR was quickly filled. The main triage is done in the ED but not for the OR but for the CT scanner. The first priority as the triage surgeon is to list those who need to go to the OR for a life‐saving procedure followed by extremity salvage. The more difficult triage was for the CT scanner. We first made a list of all head injuries so that we could figure out who needed a craniotomy. Extremity vascular injuries controlled with a tourniquet were first triaged for transfer to another facility for surgical repair. Neurosurgical triage was based on CT results and availability of a neurosurgeon. Remember that patients who will be delayed to the OR can be triaged to transport to another surgical facility if stable and feasible. Lessons Learned:
MASCALs result in filling the OR quickly.
Initial CT scan triage is important and often is reserved for head injuries.
Consider transporting stable, controlled extremity vascular injuries to other surgical facilities, which will maximize limb salvage if the wait for the OR is prolonged.
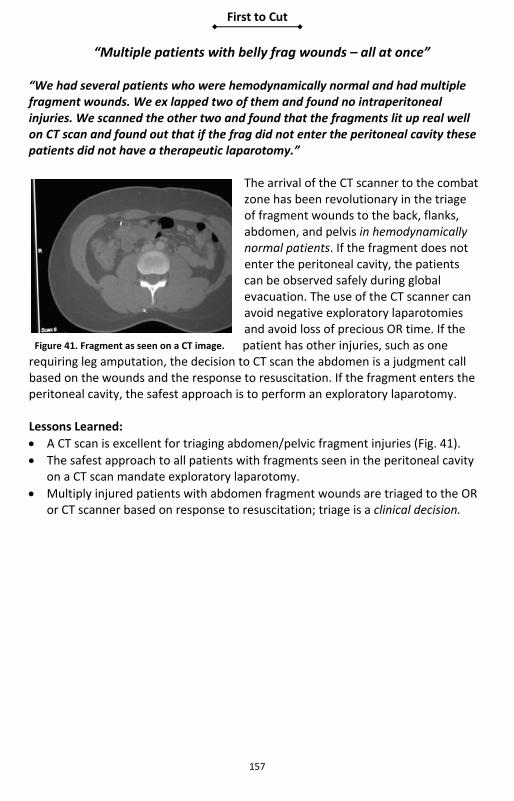
First to Cut
157
“Multiple patients with belly frag wounds – all at once” “We had several patients who were hemodynamically normal and had multiple fragment wounds. We ex lapped two of them and found no intraperitoneal injuries. We scanned the other two and found that the fragments lit up real well on CT scan and found out that if the frag did not enter the peritoneal cavity these patients did not have a therapeutic laparotomy.”
The arrival of the CT scanner to the combat zone has been revolutionary in the triage of fragment wounds to the back, flanks, abdomen, and pelvis in hemodynamically normal patients. If the fragment does not enter the peritoneal cavity, the patients can be observed safely during global evacuation. The use of the CT scanner can avoid negative exploratory laparotomies and avoid loss of precious OR time. If the patient has other injuries, such as one
requiring leg amputation, the decision to CT scan the abdomen is a judgment call based on the wounds and the response to resuscitation. If the fragment enters the peritoneal cavity, the safest approach is to perform an exploratory laparotomy. Lessons Learned:
A CT scan is excellent for triaging abdomen/pelvic fragment injuries (Fig. 41).
The safest approach to all patients with fragments seen in the peritoneal cavity on a CT scan mandate exploratory laparotomy.
Multiply injured patients with abdomen fragment wounds are triaged to the OR or CT scanner based on response to resuscitation; triage is a clinical decision.
Figure 41. Fragment as seen on a CT image.

First to Cut
158

First to Cut
159
Military‐Unique Injuries
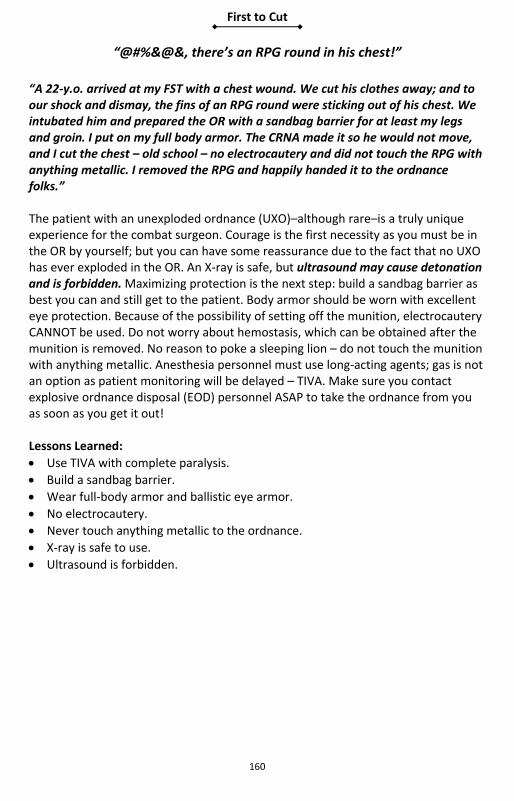
First to Cut
160
“@#%&@&, there’s an RPG round in his chest!”
“A 22‐y.o. arrived at my FST with a chest wound. We cut his clothes away; and to our shock and dismay, the fins of an RPG round were sticking out of his chest. We intubated him and prepared the OR with a sandbag barrier for at least my legs and groin. I put on my full body armor. The CRNA made it so he would not move, and I cut the chest – old school – no electrocautery and did not touch the RPG with anything metallic. I removed the RPG and happily handed it to the ordnance folks.” The patient with an unexploded ordnance (UXO)–although rare–is a truly unique experience for the combat surgeon. Courage is the first necessity as you must be in the OR by yourself; but you can have some reassurance due to the fact that no UXO has ever exploded in the OR. An X‐ray is safe, but ultrasound may cause detonation and is forbidden. Maximizing protection is the next step: build a sandbag barrier as best you can and still get to the patient. Body armor should be worn with excellent eye protection. Because of the possibility of setting off the munition, electrocautery CANNOT be used. Do not worry about hemostasis, which can be obtained after the munition is removed. No reason to poke a sleeping lion – do not touch the munition with anything metallic. Anesthesia personnel must use long‐acting agents; gas is not an option as patient monitoring will be delayed – TIVA. Make sure you contact explosive ordnance disposal (EOD) personnel ASAP to take the ordnance from you as soon as you get it out! Lessons Learned:
Use TIVA with complete paralysis.
Build a sandbag barrier.
Wear full‐body armor and ballistic eye armor.
No electrocautery.
Never touch anything metallic to the ordnance.
X‐ray is safe to use.
Ultrasound is forbidden.

First to Cut
161
“A local dog bit him and ran off”
“A 23‐y.o. male arrived to the CSH with a jagged wound to his lower leg after being bitten by a stray dog on the battlefield. The dog ran off. We irrigated the wound and wrapped it open. We started the vaccinations.” Interaction with local dogs on the battlefield is a very common occurrence. The rabies vaccination status of the local dogs is never truly known. All working dogs are vaccinated against rabies. Some units with high exposure to local dogs vaccinate against rabies. The best situation is to have all combat personnel vaccinated prior to deployment into a combat zone if delivery of the rabies immunoglobulin and vaccine are not rapidly available. If a local‐dog bite occurs, irrigate and remove all foreign bodies and debride necrotic tissue and leave the wound “open”; start antibiotics and the rabies vaccinations. For animal bites in theater, start the rabies immunoglobulin 20 units per kg body weight on day 0 with the full dose given into the site of the wound if possible and the remainder i.m. in the gluteal region. In addition, rabies vaccine should be given 1.0 ml i.m. in the deltoid on days 0, 3, 7, 14, and 28. Lessons Learned:
Consider vaccinating all combat personnel for rabies if there is high exposure to local dogs and if immunoglobulin and vaccine are not easily available through the evacuation chain.
Have rabies vaccination in stock.
If no prior vaccinations, start the rabies vaccination ASAP after a local dog bite.
Irrigate, remove foreign bodies, debride, and then leave all dog bites “open.”
Start antibiotics, typically augmentin.

First to Cut
162
“Working dog down, GSW to the belly” “A working dog had a GSW to the abdomen. Barely responsive and breathing heavily, we took him straight to the OR. We could always take him off the table if we had human patients. We tied his legs down, put bean bags on each side. The anesthesia folks looked up at me and said, ‘Uh, what do we use for anesthesia?’” Working dogs are a common site on the battlefield – and several surgeons and anesthetists have had to take care of injured dogs. Basic damage control principles are at play, but there are some specific ways of getting there. Anesthesia: Several anesthetics found normally in the CSH OR can be used. Typically, anesthesia is induced through a peripheral IV using ketamine, propofol, or thiopental and succinylcholine for intubation. Maintenance can be continued with the above induction agents or with the volatile gas agent isoflurane. Narcotics (including morphine and fentanyl) should be titrated to effect. Glycopyrrolate can be used for excessive salivation or to increase heart rate. Pavulon® can be administered if prolonged muscle relaxation is desired. Dogs can be orally intubated with a long Miller blade and a 5.0‐7.0 size ET depending on the size of the dog. Human O2 sat monitors work. Resuscitation: IVs can be obtained in extremities (first choice is the front leg below the elbow; second, hind leg medially; third, jugular). Dogs can take IV LR or NS but of course you cannot use human blood; use crystalloid, Hextend, or Hespan. Oxyglobin is the first and only oxygen therapeutic to receive marketing clearance from the U.S. Food and Drug Administration (FDA) for veterinary use. Oxyglobin, a chemically stabilized bovine hemoglobin, provides immediate relief from the clinical signs of anemia in dogs. Blood transfusions can be given from ANY dog (at least for the first transfusion) without regard to blood type with minor complications. Collect donor blood from any dog at 250 cc into human blood bags and transfuse as needed – after the first unit cross‐matching is indicated. Factor VIIa (Novo VII) has also been successfully administered to treat hemophilia in dogs. The normal heart rate and respiratory rate is same as humans – heart rate 60‐100 and RR 10‐20. For drug dosing, estimate most dogs at 70 pounds. Surgery: Chest tubes work the same but place into 7 or 8 intercostal space. Mid‐line laparotomy. Bowel can be stapled and anastomosed with hand sewing. Ex‐Fix can be placed.

First to Cut
163
Antibiotics: Antibiotics with low protein binding such as cefazolin and gentamicin have predictable serum levels in canines. Other canine antibiotics include clindamycin, metronidazole, amoxicillin, and ampicillin. After performing an abbreviated or definitive laparotomy, transfer the dog patient to a veterinarian ASAP for further care. Lessons Learned:
General surgeons can and have operated on working dogs.
Dogs can be orally intubated; use a long Miller blade.
Dogs can receive lactated Ringer’s (LR) solution or normal saline (NS) intravenously.
Tie down all four legs in the OR.
Most anesthetics are okay: ketamine, propofol, isoflurane.
Pain medications include fentanyl and morphine.
Use oxyglobin for hemoglobin replacement.
Use ANY dog for blood donor for first transfusion only.
Donor blood should be 250 cc.
Transfer and call a veterinarian ASAP.

First to Cut
164
“Call a surgeon”
“A 27‐y.o. male with frag wound to the neck; packed the wound by the field medic with good hemostasis. The ED physician on call was an internal medicine doc; he pulled the packing out, and we had massive arterial bleeding. I brought the patient up to the OR with my finger in the dike.” “A 34‐y.o. female with multiple frag wounds to the chest and SOB. The physician on call was a family practice doc; she put in a chest tube. When I went there, the patient was in significant respiratory distress. I asked the CRNA to intubate; and by this time, the chest X‐ray was on the box – the chest tube was subcutaneous.” “A 28‐y.o. hypotensive patient arrived to the CSH with full body fragment wounds. He had a central line placed, chest X‐ray, chest tubes, blood hanging for 20‐30 minutes before they called me (the surgeon). I took him for an ex lap; he had 2 liters of blood in his belly.” Trauma patients, especially unstable trauma patients, require the involvement of a surgeon as soon as possible – trauma is what surgeons do. Many CSHs and other level III facilities have non‐surgeons as first call in the ED; they do great work on non‐trauma, but a surgeon must be there to assess and direct care. The young, healthy combat‐injured patient can go from compensated shock (looking good) to uncompensated shock in an instant. Emergency physicians often do well with trauma initial stabilization, but they cannot take a patient to the OR. A surgeon must be called to assess the need to take a patient to the OR and in such a way as not to delay surgical hemostasis. It is a team effort. Lessons Learned:
A surgeon must be involved EARLY in the care of trauma patients.
Check all procedures performed by non‐surgeons.
The surgeon must direct all aspects of care with major trauma and all penetrating trauma.

First to Cut
165
“Half way around the world, and he wants a mole removed”
“A 40‐y.o. soldier comes to clinic at the deployed CSH and wants a mole removed; he stated it is getting bigger and darker. It looks benign, but I have been surprised by nevus pathology before. So I remove it and put it in formalin and send it to the level IV facility pathologist. The only problem is that they never received it, and there is no record of its being sent.” Getting pathology in the deployed scenario is a very risky business. No matter the pressure, a combat surgeon must refuse to remove any tissue that will need a pathologic examination except to save life or limb. The safest answer is to have the patient with possible pathology evacuated to a facility with a surgeon and a pathologist. Performing biopsies and skin excisions in the combat zone is inviting disaster with a lost pathology specimen. Lessons Learned:
Performing a biopsy or skin lesion excision in the combat zone is inviting specimen loss.
Do not perform any biopsy or excisions if you do not have a pathologist with you at your surgical facility.

First to Cut
166

First to Cut
167
Intensive Care Unit

First to Cut
168
“After we closed the fascia, we could not ventilate, no urine, hypotensive; he was dying.”
“A 40‐y.o. male s/p damage control lap with small bowel, colon injuries, and packed liver. We took him back for his definitive operation after two washouts on post‐op day #4. The bowel edema was down; his small bowel anastomoses looked good. We brought up his colostomy on post‐op day #3, and it looked good. We closed his fascia and had no increase in his peak inspiratory pressure in the OR. We brought him back to the ICU, and then next day his urine output fell to 5cc an hour refractory to fluid boluses, harder to ventilate. We measured his bladder pressure: it was 35. About this time, he dropped his pressure to 70 systolic – he was dying in front of me. I opened up the fascia, and his bowel came protruding out; and he dropped his pressure upon release to the 50s. We got him back with multiple fluid boluses and pressors.” The decision to close the fascia after damage control laparotomy is a judgment call. Look at the bowel edema and measure the peak inspiratory pressure in the OR before you leave – any significant increase – definitely if >10 – open the fascia back up. Approximately 80% of closures are carried out within the first 10 days in civilian trauma; so you do have some time. The abdominal wound vacuum allows separation of the bowel and the abdominal fascia with the plastic sheet. If the fascia is closed tightly, you can hedge your decision with Q4‐hour bladder pressure checks to monitor intra‐abdominal pressure. When getting bladder pressures, use less than 100 cc of saline (so you do not get involuntary bladder contraction); I use 50 cc. The triad of abdominal compartment syndrome to look for is decreased urine output, increase in peak airway pressure (decrease in tidal volume), and hypotension due to decreased venous return. Abdominal compartment syndrome is a clinical diagnosis but should be considered when bladder pressure is > 25. The treatment of abdominal compartment syndrome after a damage control operation is reopening the abdominal fascia. If the patient is in extremis, do it at bedside; but expect hypotension from an abrupt loss of preload as the intravascular volume fills the increased venous capacitance in the abdomen. If you are dealing with secondary abdominal compartment syndrome from burn injury over‐resuscitation, consider placing an intraperitoneal JP drain before laparotomy because of the very high mortality in these patients.

First to Cut
169
Lessons Learned:
Look for abdominal compartment syndrome with decreased urine output, increased peak airway pressure, and hypotension.
Check bladder pressures after closing the damage control abdominal fascia.
Give fluid boluses before, during, and after releasing abdominal fascia for compartment syndrome.
If the patient is in extremis, fascial release in the ICU can be life‐saving.

First to Cut
170
“Post‐op in the ICU, he was hypotensive and getting lots of blood” “A 27‐y.o. soldier with a GSW to abdomen, took him directly t the OR, packed off the retroperitoneum, pelvis, and liver; resuscitated with factor VIIa, FFP, and PRBCs in the OR. Started to get cold, so packed and brought him to the ICU. He continued to be hypotensive and required lots of blood; his laparotomy pads were blood‐soaked. Temperature was still 35°; do I continue to resuscitate or bring him back to the OR?” The decision to bring a patient back to the OR before the planned second look is a judgment call – one that can be easy or very difficult. Civilian data for damage control laparotomy has identified some basic guidelines for return to the OR:
>10 units transfused in the first 24‐hour post period, abdominal compartment syndrome from packing too tightly, and
progressive acidosis. But the call is often a judgment call: is the patient bleeding from coagulopathic bleeding or from a surgically correctable source? If blood is pooling, the patient is hypotensive; and you are having a hard time keeping up with the blood loss with transfusion; the best call is often to warm the OR suite and return for an early second look for surgical bleeding. This applies for laparotomy, thoracotomy, and large soft‐tissue injuries. LESSONS LEARNED:
Observe post‐op damage control patients in the ICU closely for surgical bleeding.
Evaluate, pH, signs of bleeding, blood pressure and blood transfusions closely.
Return to the O.R. early if you suspect continued bleeding from a source you can stop surgically or by repacking more efficiently.
Warm the O.R. as high as possible prior to returning.
Evaluate for “packing” abdominal compartment syndrome post op after packing the abd even with an open abdomen.
Always consider surgical bleeding if the post‐op resuscitation and indices are not moving in the right direction.

First to Cut
171
“Post‐op we got a CXR – classic TB” “24 coalition males with frag wounds to the abdomen. We did an ex lap, resected the bowel – nothing exciting. We got a post‐op CXR and found classic findings for TB. We had a makeshift isolation room.” Tuberculosis (TB) is not an uncommon finding in deployed medical settings. The primary focus is to adequately treat the patient and prevent transmission to other personnel. The keys to managing these patients are appropriate diagnosis and respiratory isolation. The patient should be in a negative pressure room or well ventilated room with lots of ultraviolet light as that kills the bacilli. When moving the patient, they should wear a surgical mask if they are coughing or have evidence of active pulmonary disease. Health‐care personnel should be wearing N95 masks during patient care. Overall, the key is having a plan for it before it arrives in your hospital. Level II facilities will rely on history and CXR for diagnosis, and these patients should be isolated as best as possible – one option would be to erect a separate tent area until evacuation. Evacuation should be in isolation as well following Air Force guidelines. At level III, contingency plans should be in place for such a patient or patients. Diagnostic plans along with testing the isolate for resistance should be available. Anti‐TB medications and respiratory masks should be in stock and ready. Lessons Learned:
Level II facilities should have a plan for the TB patient.
Level II facilities should have a plan for advice on evacuating a potential TB patient.
Level III facilities should have the following: An ICU and ward contingency plan for TB patients Isolation rooms with negative pressure and filters Respiratory masks available Anti‐TB medications in stock

First to Cut
172

First to Cut
173
Post‐Operative Complications

First to Cut
174
“S/P neck exploration with a fever”
“A 28‐y.o. male with multiple frag wounds to the neck arrived at the FST with a significant hematoma. We intubated and took him back to the OR for a neck exploration and found the IJ transected. We ligated the ends, found no other injury, irrigated by placing a small JP, and shipped off to the CSH.” “A 28‐y.o. male arrived to the CSH after frag wound to the neck s/p neck exploration and IJ ligation; he had a high fever and copious serosanguineous drainage from the JP drain. We brought him to the OR and re‐explored; we found a frag hole in the esophagus. We closed in two layers and placed a muscle flap between the repair and the trachea; I heard he did fine.” Receiving a fresh post‐operative trauma patient whom you did not operate on initially is a common scenario in combat surgery. After you receive the patient, that patient is your responsibility completely. Missing an injury and delaying repair can be life‐threatening. Have a low threshold for re‐exploring a transferred patient, especially if anything is amiss. Almost all transferred patients after an exploratory laparotomy from a level II facility should be transferred with the abdominal fascia open for a second look and washout at a level III facility – the re‐exploration should be thorough. Lessons Learned:
Have a low threshold for re‐exploring any transferred post‐operative patient.
Transfer post‐operative exploratory laparotomy patients with open abdomen fascia from a level II facility unless no injury or minimal injury is found.
The accepting surgeon assumes absolute responsibility for the transferred patient.

First to Cut
175
“Hey, that looks like a lap pad”
“A 44‐y.o. male involved in an explosion with multiple frag wounds to the abdomen and hypotensive. I took him emergently to the OR for ex lap and found small liver holes that had stopped bleeding and a few small bowel holes we primarily closed. He had a few chest frag wounds; so after placement of right chest tube, we scanned him post‐operatively. On the chest CT, he had what looked like a lap pad above his liver. We took him back and removed a lap pad.” The most common operation in civilian practice with a retained foreign body (e.g., lap pads, malleable retractors, etc.) is an emergent operation – all of our combat operations are in this category, especially during a MASCAL with multiple OR teams switching out. Even though we are far forward, the risk is still there. If you pack off the abdomen and then if you elect to close the fascia, it is essential that all counts are correct. An abdominal X‐ray to rule out a retained foreign body should be highly considered; if in a MASCAL situation, getting an X‐ray post‐operatively is an option. Lessons Learned:
Retained foreign body is high risk after an emergent exploratory laparotomy.
All counts must be correct.
Always get an X‐ray if you elect to close a cavity (chest or abdomen or extremity) after packing to rule out retained foreign body.

First to Cut
176
“Post‐op day #10 and an intraperitoneal abscess”
“A 28‐y.o. female s/p ex lap for small bowel and colon injury treated with small bowel resection and primary anastomosis and colostomy; fascia closed post‐op day #3. At one week, has fevers and intra‐abdominal abscess on CT. Radiologist ‘doesn’t feel comfortable’ perc draining.” Intra‐abdominal abscesses are a common complication after damage control laparotomy with bowel injuries. The patient should get 24 hours of prophylactic broad coverage (including anaerobe) IV antibiotics. Intra‐abdominal abscesses are diagnosed with CT scan after the first week; small abscesses are often treated successfully with IV antibiotics if there is not an anastomotic leak. The rest should be percutaneously drained by CT guidance (typically less than 5 cm in diameter) – if it is available. If larger than 5 to 7 cm or not accessible or not possible where you are, redo the exploratory laparotomy at the earliest opportune time to drain any pus and assess the anastomoses. Lesson Learned:
Abscess is a common post‐exploratory laparotomy complication.
Small abscesses are often treated successfully with IV antibiotics.
If percutaneous drainage is not available, consider transrectal, flank, or lateral incisional drainage. If you must redo the exploratory laparotomy, then it should be done earlier rather than later.

First to Cut
177
“Post‐op day #8 and elevated WBC and free air on CXR”
“A 43‐y.o. male POD # 8 s/p primary repair of a colon injury, had fever, vomiting, and elevated white count. Significant increase in free air on CXR and transverse preanastomotic colon dilated on AXR. Took him to the OR for re‐ex‐lap; the colon anastomosis was intact and was about to close. Then ran the bowel from stomach to terminal ileum and found a perforated duodenal ulcer even though was on a PPI. Patched it and closed; he did fine after that.” Post‐operative patients are at risk for peptic ulcer disease (PUD), especially when local nationals are involved, as they often do not have any documentation for their pre‐existing health care. Anytime you do a re‐look exploratory laparotomy, make sure you are very thorough. Appendicitis, abscesses, cholecystitis, perforated viscus, and necrotic bowel segments have been found after a trauma laparotomy – be paranoid. Lessons Learned:
Have a low threshold for a CT scan and re‐look exploratory laparotomy after a trauma laparotomy if the patient is not recovering on schedule.
The full range of complications is seen and needs to be ruled out with a thorough exploratory laparotomy if the patient is off trajectory.

First to Cut
178
“Anastomotic leak” “A 36‐y.o. male with multiple small bowel frag holes. Resected several segments with multiple holes with a GIA stapler. Packed the liver. Brought him the ICU for resuscitation. Brought him back in 24 hours. Removed liver packing (no bleeding) and anastomosed the small bowel with a GIA stapler and a TA™ 50 stapler. Returned in 24 hours for fascial closure; during the washout, had succus leaking from two of the sites. Took all the anastomoses down and hand‐sewed them all with a two‐layer closure; he did fine after that.” In damage control after a significant resuscitation, the bowel walls swell with edema. According to the civilian literature, small‐bowel anastomoses leak less if they are hand‐sewn. With bowel wall edema, the staples are less effective and the bowel leaks. Anecdotally, we have seen fewer small‐bowel anastomotic leaks with hand‐sewn anastomoses with the two‐layer closure (if the second layer Lembert sutures can be placed safely; otherwise, one layer) in damage control of small‐bowel injuries. Lessons Learned:
The small bowel has significant edema after a damage control resuscitation.
All small‐bowel injuries with damage control should be treated with a hand‐sewn anastomosis.

First to Cut
179
“Fascial dehiscence” “A 45‐y.o. local with a GSW to abdomen, small‐bowel injury, colon injury – all repaired primarily at 24 hrs post‐op. Bowel not very edematous, minimal resuscitation; closed fascia. No increase in peak airway pressure after closure. Next day, started draining straw‐colored fluid from the abdominal wound. Looked for and found all fascia wide open and could see bowel; went immediately back to the OR for fascia re‐closure.” The decision to primarily close fascia is a clinical judgment. The amount of resuscitation, edema in the bowel, the need for further resuscitation, subsequent surgeries with blood loss, and transport will all weigh in on your decision. Almost all exploratory laparotomies performed at a level IIb facility should have the fascia left open with a temporary coverage because the receiving surgeon will almost always like to take a look himself. If you close the fascia, in the OR check the peak airway pressure before and after fascial closure. A significant increase will signal that the fascia needs to stay open longer until bowel edema decreases. Local nationals anecdotally have poor protein nutrition in several AOs and have a higher fascial dehiscence rate. In these individuals, placement of retention sutures should be considered. Lessons Learned:
Exploratory laparotomies with damage control at a level IIb facility should have the abdominal fascia left open.
Consider retention sutures in local nationals at fascial closure.
Check peak airway pressure in the OR before and after closing the fascia.
With fascial dehiscence, return to OR immediately for reclosure or temporary coverage.

First to Cut
180
“Combined complications”
“A 27‐y.o. male with open abdomen, right brachial vein interposition graft – his liver packs had been removed 12 hours earlier. He was found with distended abdomen, stooling, vomiting, and hypotensive. His liver obviously was re‐bleeding; we took him to the OR (he had a large hematoma around liver); repacked with cessation of bleeding. At the end of the case, he was re‐examined from head to toe; we found that his brachial repair had clotted off from the hypotension (fogarties) and redid the brachial anastomosis with good result; he walked out of the hospital.” The combat wounded have a high incidence of multiple injuries. With a complication, it is paramount to re‐examine the patient for new problems and to assess prior repairs. Lessons Learned:
Combat wounded have multiple injuries and can have complex complications.
With one complication, rule out other complications by looking the patient over from head to toe.

First to Cut
181
End of Life, Consent, and
Ethics
First to Cut
182
“Three patients – one local national and two U.S. soldiers”
“MASCAL – 20 patients arriving within 30 minutes: 3 patients who needed to go to the OR but only 2 OR tables available: a hypotensive local national with a belly GSW and 2 U.S. servicemen with extremity vascular injuries. If I took the local national to the OR, at least one of the U.S. servicemen might lose a leg; but if I took both U.S. servicemen to the OR, the local national would probably die in the ED. I took the local national to the OR immediately.” Triage is rare in civilian practice, but it’s a real part of military medicine. Triage sounds deceptively simple – treat all patients the same. Triage of patients for available ORs and blood and blood products, factor VIIa, etc. is relatively easy, but emotionally it may be distressingly difficult. Remember that you yourself are a valuable resource that must be triaged where you can be most effective. Put your emotions aside, and triage the patients the same no matter if they are suspected enemy injured combatants, local civilian, or U.S. service personnel. Triage is a legal mandate of the Geneva Convention, and you can be held accountable for any deviation from this policy. This situation is also the burden of being a doctor on either side of a conflict. Lessons Learned:
Treat all patients the same.
Triage on the basis of need.

First to Cut
183
“The local national refused surgery”
“A 28‐y.o. local national arrived at the CSH with a pulseless arm after a GSW to the upper arm; she clearly had a brachial artery injury. She adamantly refused any surgery; she could lose the arm if we did not operate.” Questions regarding consent often come up in the deployed setting. The rights of individuals in the combat zone depend on the patient’s status. Detained individuals do not have right of refusal – we must do what we think is in their best interest to save life and limb. U.S. service personnel do not have the legal right to refuse life‐ or limb‐saving surgery. A local national not under detainment with a sound mind has the absolute right to refuse any and all surgeries. Unconscious or intubated patients are considered like U.S. civilian emergencies and “give” implied consent. These rules outline a general approach, but remember that consent is nothing if it is not informed. Explain (often with an interpreter) the risks, benefits, and consequences of surgery and possibly refusing surgery. Pay attention to local cultural and religious considerations in your discussion and honor every patient’s autonomy to make both good and bad decisions. If possible, document your discussion and document consent for any procedure—this will never be a bad decision. Lessons Learned:
U.S. servicemen and women cannot refuse life‐ or limb‐saving surgery.
Detainees cannot refuse life‐ or limb‐saving surgery, but all planned surgeries should be explained in detail.
Local national civilians can refuse surgery, but it is our moral obligation to make sure that they truly understand the consequences of refusing.
It is in everyone’s best interest to have U.S. service personnel, and anyone else, sign a consent form for all surgeries.

First to Cut
184
“Transferred to a local hospital” “A 28‐y.o. female local national with GSW to descending colon with large destructive injury underwent resection and colostomy; on post‐op day #3, we transferred her to a local hospital; and we heard she died a week later from pneumonia.” Whose standard of care are you following when you are in another country? With different capabilities? With limited resources? Do your best in every situation, but remember your surroundings. This situation can be an area of significant stress to combat surgeons – you have made a terrific “save” and literally brought someone back from certain death; but now it’s time to let them go. Transferring civilians to the local level of care is a natural progression of their care but can be fraught with problems. Nursing care can be much less than we are used to or nonexistent with all nursing duties carried out by a family – if family is available. Are medicines available? Is it a safe environment where combatants target? Is there any long‐term care for someone who has been seriously debilitated? It is imperative that a surgeon understand the capabilities of local hospitals and have communication whenever possible with an accepting surgeon prior to transferring a local national that you have operated on. This contact guarantees nothing, but it is the best you can do. It is often possible to accomplish both your personal and professional duties in the same efforts. Lessons Learned:
Learn local accepting hospital, nursing, physician capabilities wherever you go as part of YOUR duty—you can’t change them, but you can sometimes alter what you do based on this knowledge.
Transfer local nationals to the local level of care when it is safe and the timing is right.

First to Cut
185
“This is futile”
“A 25‐y.o. female U.S. service member hit with a mortar blast arrived to the CSH hypotensive and severely hypoxic: fragment wounds from head to feet, 20% TBSA burns, severe head injury, chest tubes. We did an ex lap and packed her liver and pelvis and removed the injured portions of the colon and small bowel. Initially, post‐op, she was hypotensive on two pressors. Her platelets dropped to 10,000. On day 3, she was on maximal ventilatory and pressor support, in renal failure and liver failure, and posturing; she was dying despite every effort.” Remember your purpose in a combat zone—you’re there to save the casualties that can be saved. Some casualties will die before you ever get a chance; others will be more difficult and die despite your chance to save them. If in your opinion your patient has no chance of living and is determined to be undergoing “futile” medical care, first seek the input of others—your colleagues, the patient’s family, your command. This will be one of your most difficult decisions, but it is your responsibility as a combat surgeon. Get help and a second opinion, but don’t let someone else make your decision for you. Futile care is difficult emotionally. Don’t limit the chances of another patient by consuming the resources you know will not save the patient in front of you. If possible, personally inform the patient’s family, but the chain of command must know what you are doing prior to any notifications. Tell them you did everything possible. Involve the chaplain for help. Consider transferring the patient to the next level of care and try to get them home (or have the family meet the patient at the level IV facility) even if the patient might die and even if this transfer may use valuable resources. Say goodbye to your patient and let him/her go–either an attempt at going home or in another journey that he/she must take. Lessons Learned:
Try to avoid “withdrawal of care” in a combat zone; it is best to transfer the “futile” patient ASAP to the next level of care.
Triage the futile patient to expectant if others will die while you continue their futile care.
If possible, personally inform the family of the condition of any patient undergoing “futile” medical care.

First to Cut
186

First to Cut
187
En‐Route Care
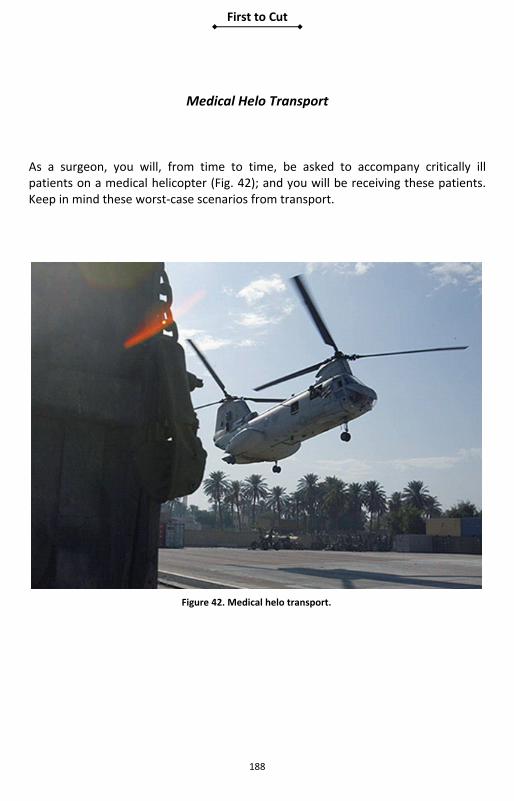
First to Cut
188
Medical Helo Transport As a surgeon, you will, from time to time, be asked to accompany critically ill patients on a medical helicopter (Fig. 42); and you will be receiving these patients. Keep in mind these worst‐case scenarios from transport.
Figure 42. Medical helo transport.

First to Cut
189
Transferring an intubated patient
“A forward surgery team (FST) electively intubated for flight to the CSH. The patient self‐extubated and reinserted at CSH; aspiration injury suspected.” “A 30‐y.o. with a head injury was combative and intubated. We sent him by chopper to the neurosurgeon. When he arrived, he had self‐extubated. It is hard to monitor sedation level in a cramped chopper.” Adequate sedation and analgesia are very important for transfer of an intubated patient. The under‐sedated patient can self‐extubate, and self‐extubation can be a disaster in the air – and can cause death. In addition, recall of the events can lead to severe emotional trauma and may lead to post‐traumatic stress disorder (PTSD). Always keep in mind that paralytics do not afford ANY analgesia or sedation. If you paralyze a patient, it is your moral obligation to provide adequate sedation and analgesia! If you accompany an intubated patient, bring enough sedation and analgesic medications to get the job done. Always plan for the worst‐case scenario – self extubation – and plan out what you would do. Your oral and maxillofacial (OMF) colleagues can easily provide ET tethering to the teeth for high‐risk airway patients (e.g., inhalation injury, neck hematoma, etc.). Lessons Learned:
Ventilated patients undergoing transport must have adequate analgesia AND sedation.
You must have a plan if the patient becomes extubated (e.g., a bag with O2).
Consider wiring the ET to the teeth in burn patients and in cases where loss of airway will be life‐threatening.
If a paralyzed patient arrives severely tachycardic, first consider hypovolemia, then inadequate sedation and analgesia.

First to Cut
190
“The oxygen ran out, and then his heart slowed and then went asystolic; we started CPR.”
“A 55‐y.o. male arrived at the CSH after an ex lap at a level II facility. He arrived without vital signs and with CPR. The accompanying medic stated that the oxygen canister ran out on the chopper half way to the CSH.” When visualizing every possible in‐flight problem, you can prevent one problem – running out of supplies. A preflight checklist should include adequate and backup supplies of oxygen, sedation, tourniquets, analgesia, decompressive needles, etc. Lesson Learned:
The preflight checklist must be reviewed to ensure that adequate and extra supplies are available for in‐flight care.

First to Cut
191
“We could not ventilate him” “We were transporting a patient who was post‐op from an ex lap; and then the ventilator started alarming, and his sats went down into the 70s. We took him off the vent and started hand‐bagging him; we had a lot of resistance. We checked the ET tube, and it seemed to be in good position. The chopper was real loud, and we could not auscultate anything; we darted both lung fields and had a rush of air from the left chest.” A tension pneumothorax can happen at any time, especially after positive pressure ventilation. If the patient has any problems with ventilation, the first move is to remove the ventilator from the equation and handbag. If further problems continue, you must consider the airway; the ET can be dislodged, kinked, or occluded. The next common problem with difficult ventilation is a tension pneumothorax. One cannot ausculate – let alone move much – in a helicopter. Quickly looking and feeling for tracheal deviation may point you to the correct side; otherwise, a long 14‐gauge inserted in the two intercostals spaces (ICSs) bilaterally is the most expedient and first option for relieving a tension pneumothorax in flight. Lessons Learned:
A tension pneumothorax can develop at anytime, especially with positive pressure ventilation.
If difficulty with ventilation, remove the patient from the ventilator bag and check the airway.
One cannot auscultate for breath sounds in a helicopter.
Looking and feeling for tracheal deviation may point to the correct side of a pneumothorax.
The most expedient way to decompress a tension pneumothorax in a helicopter is bilateral needle decompression.

First to Cut
192
“His leg stump started to bleed”
“A 27‐y.o. underwent an above‐knee amputation at the CSH. I accompanied him on the chopper ride to the next leg of his journey around the globe. In the middle of the flight, his stump started to bleed progressively worse. I removed the dressing; he had arterial bleeding. I placed a windlass tourniquet and stopped the bleeding.” All initial amputations involve ligation of vessels and debridement. After resuscitation, the systolic blood pressure (SBP) inevitably increases; and the amputation can rebleed or a suture can become dislodged with movement. Always plan for the worst‐case scenario. The same can happen with a vascular repair or vascular shunt. Always have a tourniquet available or, better yet, place loosely around the leg proximal to the vascular intervention or amputation for in‐flight ease in applying the tourniquet. Lessons Learned:
When transporting amputee patients or vascular patients, plan for the worst‐case scenario.
Always have a tourniquet ready or loosely applied when transporting amputees or vascular patients.

First to Cut
193
“He arrived with a head injury, and his initial PCO2 was 17.”
“A 32‐y.o. male with a penetrating head injury and impaired GCS seen initially at the FST, intubated there, and then transported hand‐bagged to the CSH. On arrival, he had normal vitals and sats, but his ABG revealed a PCO2 of 17.” Civilian trauma data has shown that head‐injured patients who arrive from the field with a PCO2 below 30 and above 35 have a worse outcome and worse mortality. Hand‐bagging has also been shown to result in lower PCO2 levels from hyperventilation than mechanical ventilators. Brain‐injured patients should have their PCO2 between 30 and 35 on a mechanical ventilator for transport to a neurosurgeon. Lessons Learned:
HYPERventilation and HYPOventilation can be deleterious in head injury.
The goal for PCO2 is 30 to 35 in brain‐injured patients unless otherwise directed by a neurosurgeon.
Ventilators are more consistent than hand‐bagging during transport. Always use an end tidal CO2 monitor if available.

First to Cut
194
“She arrived cold at about 92°”
“A 27‐y.o. female s/p ex lap and packing at a FST arrives after 30‐minute helicopter ride to the CSH with a single wool blanket cold – 92 °F and hypotensive. We had no idea if she was bleeding or not but did not want to run her up to the OR and open her abd up. We put on Bair® huggers and gave her warm fluids and warm blood.”
Hypothermia is highly associated with mortality in civilian and combat trauma. Because of the door gunners, helicopters cannot be closed up and can result in significant temperature loss. Combat surgeons have had significant anecdotal results from using the “HOT POCKET” (Fig. 43) (placing the live patient in a body bag, covered in two wool blankets and a space blanket, and cutting out a hole for the endotracheal tube). Commercially available
hypothermia kits with blankets and an active heat source have also been used with good anecdotal results. Lessons Learned:
HYPOTHERMIA KILLS.
A “hot pocket” with two wool blankets and a space blanket wrapped in an altered body bag will preserve body heat in most hypothermia‐risk situations.
The Committee on Tactical Combat Casualty Care recommends the use of hypothermia prevention kits.
Figure 43. Hot pocket.

First to Cut
195
“On transport, the cordis shifted position”
“A 24‐y.o. male s/p an ex lap at the FST arrived at the CSH after a 25‐minute helicopter transport severely; hypotensive. We gave him 2 liters of NS; started blood, good b/l breath sounds. We brought him straight to the OR, remained hypotensive, opened his abd – no blood, just dry packs. Put in b/l prophylactic chest tubes and gave him more blood; then we noticed the huge hematoma around his right groin cordis. It had shifted on transport out of the vein, and we were filling the sub‐Q tissues with fluid and blood.” A cordis is used in trauma patients specifically for their large bore and short length to rapidly transfuse fluids; these properties, however, also put the cordis at risk for being pulled from the vein on transfer. Of note, all large catheters placed for abdominal trauma should be placed in the subclavian or jugular vein because the fluid will be wasted into the abdomen if there is an inferior vena cava (IVC) or an iliac vein injury. All catheters need to be sutured secure in place and checked, especially if the patient is not responding to fluid resuscitation. If any doubt, place a second catheter. Catheters have also been known to come disconnected, and again the short fat cordis is a setup for a major air embolism. If a patient is suspected of having an air embolus, place in left lateral decubitus in the Trendelenberg position to capture the air bubbles in the right atrium/ventricle. Prior to removing the cordis, aspirate as much air as possible; then consider attempting air retrieval by a Swan‐Ganz catheter aspiration. A cordis can be life‐saving; but if malfunctioning, it can be a major hazard. Lessons Learned:
Do not use groin cordis for abdominal penetrating trauma.
Suture secure and check connections with a cordis.
Consider cordis malpositioning after transport, especially with unexplained response to resuscitation.
If feasible, place patient in left lateral decubitus in the Trendelenberg position if you suspect air embolus.

First to Cut
196

First to Cut
197
Field Expediency

First to Cut
198
Final Tips to Keep in Mind Here are some final tips to keep in mind:
If chest tubes run out, an ET can be used as a thoracostomy tube.
Canteens can be marked and used as urinals in a mass casualty situation.
The finger of a sterile glove tied to a chest tube with a hole on the end can be used as a temporary Heimlich valve.
Sterile gloves can be used as sterile light handle covers.
A sterile gown can be used as a sterile drape for minor procedures.
Use Excedrin® with caffeine far forward to avoid caffeine headaches.
For going days without showers, antifungal cream can come in handy.
A Petzl headlamp is great for reading and can be used as a backup OR light.
In a pinch, IV tubing can be used to secure an ET or cricothyroidotomy tube.
A nasogastric tube or IV tubing can be used as a temporary vascular shunt.
A Swan‐Ganz catheter has been used as a Fogarty catheter in larger arteries.
If you run out of laparotomy pads, anything sterile will work for packing – gowns, drapes, towels, gloves.
Cardiac pledgets can be made from pericardium.
Placing irrigation fluid and IV fluid in a box and then running a Bair® hugger hose into the box can warm the fluids.

First to Cut
199
ACRONYMS AAA abdominal aortic aneurysm abd abdomen; abdominal ABI ankle‐brachial index AKA above‐knee amputation AO alert and oriented; area of operation ASAP as soon as possible ax‐fem axillofemoral AXR abdominal X‐ray b.i.d. bis in die (twice a day) bicarb bicarbonate BKA below‐knee amputation B/L bilateral c‐collar cervical collar c‐spine cervical spine C‐A‐T® Combat Application Tourniquet CBC complete blood count CBD common bile duct CEA carotid endarterectomy CONUS continental United States CPP cerebral perfusion pressure CRNA certified registered nurse anesthetist cryo cryoprecipitate CSF cerebrospinal fluid CSH combat support hospital (US Army Level III Surgical Hospital) CT computed tomography CXR chest X‐ray DCSS Department of Clinical Support Services DIP distal interphalangeal (joint) DPL diagnostic peritoneal lavage ED emergency department EMEDS Expeditionary Medical System (US Air Force levels II and III) ENT ear, nose, and throat EOD explosive ordnance disposal ER emergency room ERCP endoscopic retrograde cholangiopancreatography ET endotracheal ex fix external fixation ex lap exploratory laparotomy FAST focused assessment with sonography for trauma

First to Cut
200
FDA Food and Drug Administration fem‐fem femoral‐femoral FFP fresh frozen plasma FOB forward operating base frag fragment FRSS forward resuscitative surgery system (US Navy Level IIb Surgical
Facility FST Forward Surgical Team a Level IIb Surgical) FST forward surgical team GCS Glasgow coma scale GI gastrointestinal GIA gastrointestinal anastomosis GSW gunshot wound HR heart rate ICP intracranial pressure ICS intercostal space ICU intensive care unit IED improvised explosive device IFI invasive fungal infection IJ internal jugular i.m. intramuscular INR international normalized ratio ISR Institute of Surgical Research I.U. immunizing unit IV intravenous IVC inferior vena cava IVF intravenous fluid IVP intravenous pyelogram JP drain Jackson Pratt drainKIA killed in action LA data local anesthesiaLE left extremity LMA laryngeal mask airway LR lactated Ringer’s (solution) LRMC Landstuhl Regional Medical Center LUQ left upper quadrant MAP mean arterial pressure MASCAL mass casualty MCP metacarpophalangeal (joint) medevac medical evacuation MRCP magnetic resonance cholangiopancreatography MTF military treatment facility MVC motor vehicle collision

First to Cut
201
nec necrosis nec fasc necrotizing fasciitis neg negative (blood type) NG nasogastric (tube) NGT nasogastric tube nl normal NNMC National Naval Medical Center NS normal saline OMF oral and maxillofacial (surgery) OR operating room pH measure of acidity and alkalinity of a solution pneumo pneumothorax PCO2 partial pressure of carbon dioxide PDS polydioxanone suture perc percutaneous PIP proximal interphalangeal (joint) POD post‐operative day pos positive (blood type) PPI proton pump inhibitor PRBC packed red blood cell pre‐op pre‐operative pt patient PTSD post‐traumatic stress disorder PTX pneumothorax PUD peptic ulcer disease RN registered nurse RPG rocket‐propelled grenade rt right RUQ right upper quadrant (of the abdomen) sat saturation SBP systolic blood pressure SFA superficial femoral artery SMA superior mesenteric artery SMV superior mesenteric vein SOB short (shortness) of breath s/p surgical procedure STAT statim, Latin for “immediately” STSG split thickness skin graft sub‐Q subcutaneous TBSA total body surface area THAM tris(hydroxymethyl)aminomethane TIVA total intravenous anesthesia

First to Cut
202
TRALI transfusion‐related acute lung injury TUU transureteroureterostomy u unit UE upper extremity UXO unexploded ordnance vac vacuum VBIED vehicle‐borne improvised explosive device V‐tach ventricular tachycardia WBC white blood cell y.o. year‐old

Rear Cover Photo Credits (From left to right, top to bottom)
U.S. Marine Corps and Air Force personnel from the 435th Contingency Aeromedical Staging Facility work together to offload patients returning from Balad, Iraq, Jan. 13, 2009, at Ramstein Air Base, Germany. More than 30 patients who were wounded in battle were flown to Germany for treatment. (U.S. Air Force photo by Airman 1st Class Grovert Fuentes‐Contreras/Released)
U.S. Marine Corps Majs. Mike Castellano and Brad Weston bid farewell to Marine Lt. Andrew Kinard as he departs following a Valentine’s luncheon at Marine Barracks, Washington, D.C., Feb. 16, 2008. (DOD photo by Staff Sgt. D. Myles Cullen, U.S. Air Force/Released)
U.S. Army Sgt. Mike Peterson receives hugs and kisses from his wife for the first time since coming home from Iraq at Brooklyn Park Armory, Minnesota, July 17, 2007. (U.S. Army photo by Sgt. Kenneth Toole/Released)
U.S. Marine Corps BGen. W. Lee Miller embraces Sgt. Stan Roberts during a ceremony called Operation Coming Home in Fuquay‐Varina, North Carolina, Nov. 4, 2010. (U.S. Marine Corps photo by Lance Cpl Justin D. Loya/Released)
U.S. Navy Yeoman 1st Class Jorge Ulloa greets his wife, Laidy, during a homecoming ceremony for guided‐missile frigate USS Klakring (FFG 42), July 29, 2009, Mayport, Florida. (U.S. Navy photo by Mass Communication Specialist 2nd Class Gary B. Granger, Jr./Released)
U.S. Navy Lt. Cmdr. Richard Langton, right, meets his daughter for the first time on the 62 Area Parade Deck upon returning to Marine Corps Base Camp Pendleton, California, April 11, 2011, following a 7‐month deploy‐ment to Afghanistan. (U.S. Marine Corps photo by Lance Cpl. Alfred V. Lopez/Released)
U.S. Air Force Master Sgt. Erik Clemenson, with the 119th Security Forces Squadron, hugs his wife and son upon his return to Hector International Airport, Fargo, North Dakota, Aug. 18, 2009, after a 6‐month deployment to Iraq. (U.S. Air Force photo by Senior Master Sgt. David H. Lipp/Released)
