five-string fiddle - bluefiddles.com · fiddle. i asked him a few questions as well, and he...
TRANSCRIPT

i
The
Building
of an
Oliver
Five-String Fiddle
© Chet Bishop, Luthier

ii

iii
Foreword
Credits:
Credit to Those Who Contributed:
First, I want to give thanks for my wonderful wife, Ann, who offered her love, patience,
support, and faith, believing that the things I have attempted were worth doing.
Second, for my friend Jake Jelley, who saw in me the potential; the “raw materials”
necessary to become a luthier. He gave time, materials, tools, books, and unfailingly
friendly support and encouragement.
Finally, for a host of teachers, some now dead, some still alive: Some have made it clear
they do not want to be named, so I will comply with their wishes. Nevertheless: if you
are one of my teachers, and find yourself alluded to in these lines, please know that I do
appreciate you and deeply respect your expertise. I especially appreciate your kind
attention and patience as you helped me to learn to see, and to bring my dreams to
fruition. To those who have passed on: I sincerely wish you were here to share my joy.
Disclaimer:
“Descriptive, not Prescriptive”
When I was in school, a writing professor made a point of distinguishing the several
types of analyses available in Technical Writing: If I were writing a user’s manual,
directions for assembly, a building code, or something similar, then a prescriptive
analysis would be appropriate. But since I am writing a report of something that actually
happened, description is the appropriate thing. I am telling no one what they should do.
Further, a description can be either formal or informal, in varying degrees. This book is
an informal description, with sufficient illustrations to allow the observer to find
information that was not necessarily spelled out. (If you need more, please call me.)
This book is “Show and Tell”, in the most innocent sense: It is a factual account of how
this particular instrument was made. There are some parts that may seem too vague, if
you are looking for a step-by-step instruction manual, and others that may contain detail
you do not find interesting. That’s OK! Life is chock-full of things that may or may not
interest us, and things we may or may not like. This is simply a slice of life.
I make no attempt to instruct anyone as to “how to build violins” in this book, though I
do share things I have learned. I also make no attempt to hide how I did or accomplished
anything. If you find it helpful, inspiring, or, at least enjoyable… then I am pleased.
Blessings to all… Chet Bishop, 2015

iv
Usual Order of Operations in Building a Violin/Viola, etc.:
(This is my usual flow of activity, in making any instrument; other makers may vary.)
1. Choose a design.
2. Make the templates, from personal design, an existing instrument, or drawings.
3. Use the main template to make a 2-part (or one-piece) corpus mold.
4. Cut and install the blocks.
5. Prepare the ribs, by sawing, then planing, scraping or sanding (or all three).
6. Bend the ribs and install them on the blocks (several steps).
7. Prepare, install and shape the linings (front only, for one-piece molds).
8. Use sanding board to flatten front and back of garland (see items #7 and #27)
9. Prepare the plate stock (book-match and flatten inner side).
10. Use the completed garland to establish the shape of the plates.
11. Cut the plates exactly to size, filing and sanding (except the button) edges.
12. Begin the outer arching, including the (exact) edge thickness.
13. Complete the outer arching, using the arching templates.
14. Begin the inner arching/graduation.
15. Complete the graduation using a graduation map.
16. Complete the channel, and the final scraping outside
17. Complete the final scraping inside.
18. Cut the f-holes, install the bassbar.
19. Install the front plate.
20. Install the front purfling.
21. Complete the neck and scroll.
22. Cut the neck mortise.
23. Temporarily install the fingerboard and nut.
24. Install the neck.
25. Level the back of the garland (see #27), using the sanding board.
26. Remove the 2-part (or one-piece) corpus mold.
27. If using a one-piece mold: install back linings, then level the back of the garland.
28. Install the label.
29. Install the back plate.
30. Install the back purfling.
31. Remove the fingerboard and varnish the instrument.
32. Install the saddle and finish it. Reinstall the fingerboard and dress it.
33. Fit and install the sound-post.
34. Fit the pegs, nut and the bridge.
35. Install the fittings and strings, set-up the violin
36. Play it for final adjustment of bridge and sound-post.
v
Introduction
“Genesis” of the Oliver 5-String Design
About five or six years ago, I was participating in my first “Musical Instrument
Makers’ Show” at Marylhurst University, in West Linn, Oregon. I was sitting next
to a master violin maker on my left, and there was a guitar-maker on my right. My
wife sat with me, and we fielded questions and encouraged visitors to play my
instruments. It was a very educational day, for me, as I observed that the people
who were interested in the master instruments on my left did not even glance at
mine (which was a little discouraging at first), but, the people who were interested
in mine did not glance at his. I was evidently fitting into a “niche” of some sort.
A lean, quiet, serious-looking fellow came by, the last day of the show, and looked
at the violins and violas. He picked up a 14-7/8” viola with double purfling, and
admired it, declaring that he liked the texture of my work (some do not), and the
fact that one can still see and feel the wood, rather than it being so mirror-smooth
as to feel like plastic. Then he started asking questions:
“Have you ever made a five-string fiddle?”
“What would you charge to make one?”
“How much extra do you charge for double purfling?”
“What would you do differently on a five-string, compared to a regular violin?”
I was starting to get the picture that this fellow was really interested in a five-string
fiddle. I asked him a few questions as well, and he emphasized that he wanted it to
fit in a violin case…he did NOT want an oversized instrument. (I had suggested
that possibly a 15” viola with five strings would work better, and have a better C
string sound. I still think it might, but he was very clear on what he wanted.)
The man identified himself as Cliff Stansell, of Southern Oregon. I got his contact
information, and after some thought, decided to build my first five-string fiddle on
speculation, knowing that, in the end, he might not want it after all.
I had an old fiddle-back that I had salvaged from a student violin of dubious origin.
The violin top had evidently been stepped-on, as it was irreparably shattered, and
the only piece worth saving was the back. It had pretty wood, and seemed too good
to throw away, so this seemed as good a time as any to build a violin on that back.

vi
The original purfling was not very good, and the man had indicated he liked double
purfling anyway, so I painstakingly dug out all the old purfling, and re-installed my
type of purfling, as well as switching to double-purfling and adding a purfling
weave, in the graceful form of a modified “fleur-de-lis”.
I was pretty certain that more interior air volume would enhance the C-string, so I
made the garland about 5 mm taller than usual, and, like a viola, they were not
cambered, but stayed the same height throughout.
I designed a scroll with added pegbox length (about 20mm extra) for the additional
peg, and planned a taller bass-bar, to support the extra pressure on the bass side.
That was all I could think of in terms of changes, so I “pressed on”, and began
sending progress reports to Cliff, hoping he would return to the show the next year.
Cliff did return, and for two days, he was nearly the only person who got to play
that fiddle. He took it into the hall and played it for a long time, then would come
back and get a different five-string fiddle from another maker, and play it for a
while. Then he’d come back and get mine again. At the end of the second day, he
decided for sure that he wanted the fiddle, and he and his wife gave me a check.
I went home and immediately began another five-string, because Cliff (it turned
out) was a professional fiddler, and he told me he had students who might want
one, too. The second one was even better, and it sold immediately to a person who
showed up at Marylhurst the next season. By this time, my wife, Ann, was urging
me to specialize in 5-string fiddles, but I really wanted to keep building all the
violin-family instruments. So I told her that I would continue to build whatever
was selling. (And I do.)
But that was the beginning of the Oliver 5-string fiddles…and they keep getting
better. (By the way, “Oliver” is simply my middle name, as well as that of my
father and grandfather…and I apply it to all my personal designs.)
Here are a couple of pictures of that first five-string fiddle:

vii

viii
Table of Contents
Foreword page iii
Order of Operations page iv
Introduction page v
Chapter 1: Five String Fiddle Beginning page 1
Chapter 2: One Long Day’s Work page 5
Chapter 3: Arching and F-holes page 14
Chapter 4: Graduation of Front plate page 18
Chapter 5: F-holes and Bass-Bar page 21
Chapter 6: Front Plate Installation and Purfling page 31
Chapter 7: Scroll Carving page 39
Chapter 8: Neck-set and More page 43
Chapter 9: Back Plate page 53
Chapter 10: Arching page 62
Chapter 11: Back Plate Completed and Installed page 66
Chapter 12: Back Plate Purfling page 71
Chapter 13: Completing the Purfling Weave page 75
Chapter 14: Final Varnish Preparation page 81
Chapter 15: Varnishing page 90
Chapter 16: Adding the Fittings page 96
Chapter 17: Finally finished: Set-up and Playing page 104
Epilogue: The Five String Fiddle Finally Went Home page 115
Some Suggestions for the Reader page 125

1
Chapter 1
Five String Fiddle Beginning
A fellow approached me a few months back, asking whether I could build a five-
string fiddle of some exotic wood (Hawaiian Koa) which he had bought almost 33
years ago, and which he had hung onto all this time. Of course I am delighted to
make an instrument that is special to a client, so I said “Sure!”
Wood
Here is the wood (Nice stuff! I can see why he hung onto it!):
The wood from which this fiddle will be built.
The neck, back and ribs will all be cut from this block. Actually there will be a fair
amount left over, so I will try to use it in an efficient manner so that we can use the
scraps for something nice, too. The front plate will be spruce. The blocks and
linings are willow…I’m not sure which specific variety.
I had already made the mold and templates, and used them for earlier instruments.
In this particular case (see page iv, item 27) I am using a one-piece mold, and
removing it before installing the back linings.

2
Templates–Patterns
Here is how the pattern will fit–with lots of room left over:
Plenty of extra from which to cut rib-stock.
The section from which the back plate will be cut will be sawn into two pieces,
each to be half the thickness of the original block. The two pieces will be glued
edge to edge, so that they are “bookmatched”: That is to say, the straight edge of
the mold template will become the centerline of the back plate. (I will show photos
of how it is done when I get to that part.) The same thing will happen with the
spruce for the front plate.
Progress and Plans
The five string fiddle will be built to my usual “Oliver 5-string” pattern. So, the
first thing I needed to do was to cut the ribstock using a band-saw. (I sliced them
off at 2mm thick, later to be thinned to 1mm thick before bending to shape.) I also
cut willow blocks for the four corners and the two ends.
Willow is usually my “wood-of-choice” for linings and blocks. It is stable, it cuts
easily and bends easily. And when I carve the taper into the linings by hand, after
they are glued in place, it is the easiest-carving wood I have seen. Of course, that
depends on the variety of willow: Someone once gave me some curly willow from
a decorative tree they had pruned. It did not work at all well. Weeping willow
seems to be my favorite, so far, though there are several other varieties that work
well, too. Obviously, Weeping Willow does not show up in lumber stores: I have
to watch, after wind or snow storms, and see if people have lost any large branches
in their front yards. They are happy to have me haul the branch(es) away, and I
count it “found treasure.”

3
Ribs and blocks with wood and patterns
Then I needed to glue the blocks into the mold, and mark them for their outer
shape. This shape will be the inside shape of the ribs, and the blocks will become a
permanent portion of the finished instrument. The mold will be removed as soon as
the rib structure is safely glued to the front plate (not pictured here.) Once the glue
was dry, I laid the mold-template on the centerline of the blocks, and scribed
around it with a pencil.
Blocks glued into the mold, and marked for shaping. (Lighting wasn’t too good….)

4
Shaping the Blocks
After the blocks were marked, I was ready to begin shaping them. I really only
want the center curves shaped to their final profile: the rest of the corner blocks
need to stay a little thick, so as to guarantee they will not deform when I am gluing
and clamping the center ribs in place. I went ahead and shaped the end blocks as
well, using a bandsaw and spindle sander, though in the past I have used gouges.
C-bouts and end blocks shaped to receive the ribs.
Here’s a side view of the same thing:
Blocks and Mold, side view.
Once the center ribs are bent to the correct shape, I will glue them to the center
bout surfaces of the corner blocks, and after the glue is dry, I will shape the outer
surfaces to receive the upper and lower ribs. From that point forward, it will begin
to look more and more like a violin.

5
Chapter 2
One Long Day’s Work: Good Progress!
A Day off from Work means a Long Day on Lutherie!
I got up at 5:45 AM (usually I get up at 3:45, so this was luxury), had breakfast,
watered some fruit trees, checked e-mail, and got to work. I knew the outbuilding
shop, where my power tools are, was going to get hot very rapidly today (99 deg. F
predicted, I think), so I did all I could do out there, while it was still cool, then
worked in the basement shop for the rest of the day.
1. I took those rough-sawn ribs and thinned them to 1mm all over, using a
fixture I made for my oscillating spindle sander (one of the few power tools
I use), and cut out the neck block using my small bandsaw. I have a large
bandsaw for cutting up large pieces of wood, etc. That is what I used to
divide the back block into the two pieces to be joined at the back center
seam (next.)
2. I then cut out the back and front plate pieces, and joined them, book-
matched, so that the grain is nearly symmetrical, bilaterally, both front and
back. It wasn’t easy this time. I don’t know why. I used a small hand-plane
to flatten the edges until they fit nearly air-tight– definitely light-tight. I have
a larger plane but this wood (the koa) was so wild that it required a very
low-angle plane, set very light, or it tore out, at all the curly grain.
3. I glued the two halves of the front plate together using hot hide glue, and,
while it was drying, I cut the ribs to the correct widths and lengths for each
of the six pieces, planning ahead, as best I could, to get the grain to line up
appropriately at all junctions.
4. Once the front plate was dry enough to remove the clamps, I glued up the
back plate, in the same manner. Some people get a great center-join using a
rubbed-joint method. I have done it that way, but I am more comfortable if I
add three clamps after I do the rub.
5. While the back dried, I planed the front plate to get it more or less level
across the inner face.

6
6. I took the neck blank and laid out all the measurements on it, and began
shaping it a little while I was waiting for other things to dry.
About 11:00 AM I decided I was hungry, so I had a salad and some coffee, and
then took a picture of the work as it stood:
All the wood in progress.
Back to Work!
1. I drilled 1/8″ pilot-holes in the scroll block for the pegs. When I drill them
early, like this, I can use the drill press and get the holes perpendicular to the
center line. My teacher does not do them this way– he says it risks sags in
the varnish, and he advocates drilling after all varnishing is complete. (He is
probably right, but I can never seem to drill the holes correctly by hand, so I
will risk the varnish issues.) I was right about working early in the outside
shop– it is really getting hot out there now.
2. I used the small bandsaw to cut the side-cheek excess wood off the pegbox,
and trued up the heel where it was too long. From here on out the scroll will
all be hand-work.

7
3. I used the electric bending iron to bend all six ribs, as well as the front
linings. I will have to make some more lining stock– this was all I had for
the moment. Fortunately they are easy to make. The linings add strength to
the edges of those 1mm ribs, which are otherwise extremely fragile. They
also triple the gluing surface of the rib edges, so the joint between the ribs
and plates are much more secure. I try to get as much done as I can while the
iron is hot, and then turn it off; for one thing, it takes about 20 minutes to
heat up: but also, if you leave it on, and then forget it is hot, you can get a
bad burn. (I keep mine at about 400 degrees F.) My bending strap is a strip
of aluminum, spiral-cut from a large beverage can I found at work.
4. I installed the C-bout (center) ribs, and glued them in place with hot hide
glue, using wine-cork clamping cauls (donated by a friend) for the small-
radius upper corners and broom-handle cauls for the lower corners. (This is
really going to be a pretty instrument. The wood is gorgeous. I hope it plays
well.) The upper and lower surfaces are an even larger radius, so they will be
clamped using a section of large wooden closet rod. Sorry I didn’t take
photos of these steps. Wasn’t thinking about pictures…I was just working.
More Pictures
Ribs and linings bent; Center ribs installed; upper and lower corner surfaces shaped; Scroll begun. (Yes,
the lower ribs are positioned backward…I didn’t notice until later.)

8
As you can see, the ribs sprang back quite a bit after being bent. I should have
thought ahead and prepared a block to which to clamp them while they were
waiting to be glued in place. I even already have such a block: I just didn’t expect
the spring-back to be so severe. It did not make much difference in the long run…it
was not too difficult to form the ribs around the mold.
Close-up photo of the Scroll…pretty rough-looking, at this point, but that is how they start out… at least
they do when I carve them.
In this photo, you can see some of the layout lines of the pegbox. The wood is so dark that the pencil lines
are hard to see.

9
As you can see above, after the glue was dry on the center ribs, I worked the final
shape on the upper and lower surfaces of the corner blocks to ready them for the
upper and lower ribs. Then:
1. I installed the upper ribs, and, while the glue was drying on those ribs,
2. I worked some more on the scroll. At this point the simplest way to begin
removing excess wood is by cutting from the sides in, to a point very near
the layout lines for the scroll volute (the back of the scroll.) I do this by
clamping the neck to a work-surface (in this case a lap-board.) and carefully
starting the cuts, one at a time, spiraling up the scroll from each side.
Usually I can then remove the waste wood with a knife or a flat wood-
carving chisel, but the grain in this wood is far too wild for that, so I had to
try to follow the cuts around the scroll with the pull-saw, then do the final
cutting with sharp gouges and small planes. The only other wood that has
forced me to do such a thing was a viola scroll I carved from maple burl
wood. Burl-wood grain is about as wild as it gets.
Pull-saw and clamp.
Wood Removal.

10
Meanwhile, the glue was dry enough that I could remove the clamps from the
upper ribs and install the lower ribs. When the lower rib glue was dry, I installed
the front linings. These little spring clamps are really handy. I got them on a sale,
once, at Home Depot, for about 37 cents apiece, if I remember correctly. They are
just right for this sort of work, and I bought over 100 of them; cleaned ’em out at
Home Depot, for that day.
Ribs and linings all installed…waiting for glue to dry.
Side view of lining clamps holding the linings while the glue dries.

11
The glue is dry enough to hold, so I am removing the clamps. Here you can see the linings contrasted
against the dark wood of the ribs.
All front linings visible, here. They will still need to be shaped (tapered and scraped smooth) before the
violin is closed up.
I had been working on the scroll between other tasks, so it is coming along, too,
but I am getting pretty tired, so this is about as far as I expect to get tonight. Here
are a few more photos:

12
This is difficult wood to work, but the scroll is progressing in satisfactory manner.
Other side (Treble side.)

13
And, the back; barely begun, but you can see the Volute beginning.
And that is it for today! Too tired…I think I’ll call it a night. It is 11:45 PM.
This chapter (taken from one day’s web log post) was only intended to show that it
is possible to get a lot done in a fairly short time. I can’t do that every day, partly
because I get too tired, and my hands begin to hurt, and partly (mainly) because I
still work a full-time job as I write this, and simply cannot have all day to myself
like this very often.
Furthermore, families are more important than fiddles, so I would not put in this
long a day except on rare occasions. That was somewhere between 16 and 18 hours
of work. I know people who could reliably crank out a violin in-the-white, at a
professional level, in 40 hours or less…but they are now well-established makers,
and see no reason to push themselves in that manner. I am older than the average
newcomer to the field, and am still not well-established, so I just have to do what I
can do. I have never actually recorded the working-time for a single violin, but I
think it is right about 100 hours, for me. Perhaps I will get faster with practice.

14
Chapter 3
Arching and F-holes
In the last chapter, I had traced and cut out the top plate, and, actually, I began the
work on it, thinning the plate to the desired arching height– but that is when I
discovered that there was a bark inclusion that extended right through the upper
bouts. So, for those “sharp-eyed” observers among you, who notice that the grain
has changed: “Yep! It surely has!” (Too bad, too…I liked the grain of the spruce in
the plate I first chose, but it turns out it was just a little too interesting.)
So, on this plate, all I have done is the outer arching and the layout and incision of
the f-holes. After completing the arching, but before final scraping, I laid out the
distance from the upper edge of the plate to the “stop” line (where the bridge will
stand) at 195 mm, then laid out the distance between the upper eyes at 42 mm. I
used a clear plastic template that I made years ago (cut out of an old flexible face-
shield– the kind welders use when they are grinding steel) to lay out the shape of
the holes, then incised them deeply with a thin knife. They would have been
virtually invisible in the photos, so I traced them again with a sharp pencil after
incising them, so that you could easily see them in these photos.
Arching complete, f-holes laid out and incised.

15
Arching: Final Check
Next I checked the arching by sighting edge-ways at the plate, to see whether the
main stem of each f-hole is fairly parallel to the rib-plane. Usually I find that I have
left the arching a little too “puffy” around the lower stem and lower eye area of the
f-holes and need to plane away a few more strokes to get the stems lined up. I
don’t think the looks of the f-holes are the main issue, here– the shape of the
arching is fairly critical to the sound, as best I can understand, and this is just a
“marker” for me to check.
Checking to see that f-holes are aligned with rib-plane.
Obviously, this alignment is something I have to do before I try to complete the
inside carving, or there might not be sufficient thickness left to do the final
adjustment. I try to estimate and get this area as close to correct as possible before
laying out the f-holes, but I have had to adjust them at least a little, every time, so
far. I try to make the arching of a five-string fiddle a little more like that of a viola,
to enhance the C-string sound.
After I am satisfied with the overall shape of the arching, I use scrapers to reduce
all the lines and ridges left by the finger planes into a smooth continuum.

16
Graduation: Beginning the Interior
Once I have the outside arching the way I want it, I can start on the inside, and the
final graduation of the plate. I hold a pencil in my fingers so that about 9 mm
protrudes onto the plate, and then run my fingers around the edges…nothing
precise about it: it is just a guideline for carving. I want to leave this area
untouched until the last bit when I am scraping the inside, before installing the
bassbar. I use the same template that I use for the final shape of the end blocks to
scribe the shape of the area to be glued to the blocks. I scribe in the corner blocks
with a curved scraper that just happens to fit the shape I want. All this outer
perimeter area will be left flat until the last step before installing the bassbar,
and/or installing the plate on the ribs. I want just the gluing surface flat when I am
ready to install the plate.
Inside carving plan.
Preparing for Graduation: Measure First!
It pays to use a caliper and check the thickness all over before beginning to carve. I
do have a mental image of the desired shape of the interior, but I do not have a
mental map of the thickness of the plate, so I measure at least the areas that already
feel pretty thin to my fingers, and decide how much should come off in each area.
As it turns out, this time, no areas are really borderline, but some are within 1.5

17
mm or so, so I will be careful around those places. I am aiming for about 3.5 mm
down the middle, fairing down to 2.5 mm in the upper and lower flanks, and a few
places 2 mm, very likely. I will try to leave some areas a little thick, where there is
a likelihood of cracking (say, above and below the f-holes, for example), but in
general, I expect this will be a pretty thin plate…the spruce is a little dense (which
I have had good results with in the past), so it can stand to be a little thinner than
usual.
I have spent a lot of time looking at other peoples’ “graduation maps”—schemes
by which to achieve whatever it is they wanted out of their violin. And I have
looked at maps of “old master” existing instruments…I have settled into some
patterns of thinking that seem to work, but I would strongly suggest to anyone else
that they spend the time looking, listening, and then make the decisions
themselves.
I am intentionally vague on this point, because I am not sure what is “right”. One
thing I have tried in the past is to mimic a particular “old master” instrument, using
the detailed technical drawings supplied with most (not all) of the posters from
“The Strad” magazine. The problem with that is that some drawings of the old
instruments show graduations that are quite thin, making me wonder about the
accuracy of the measurements, and a little scared to consider following that path.
A great deal ultimately depends upon the density and stiffness of the individual
piece of wood being used. In this particular book, for instance, the specific Sitka
spruce chosen, and the Hawaiian Koa, of course, were very dense, stiff wood, so I
made my graduations proportionately thinner…and it worked well.
Lacking something better to offer; I guess I can say, “do your homework, buy the
best wood you can afford, and make a lot of instruments to find out what works
best for you. Good luck with it all.”
After the inside is carved and scraped to my satisfaction, I will complete the
cutting out and shaping of the f-holes, then chalk-fit and install the bassbar. I will
include photos of all that process.

18
Chapter 4
Graduation of Front plate
Measure First
Graduation begins with measuring in the spots where it already feels a little thin, so
as not to make a fatal mistake and carve right through the plate. (It happens!)
Once I know where I am free to carve, and where I need to take it easy, I begin by
carving cross-grain with a medium-large gouge. I check periodically with a caliper.
When it begins looking closer to the right shape inside, I measure again, and
double check those “special spots.”
Beginning graduation, using a gouge.
Then I go after it with a toothed finger-plane (next photo). This is really just an
Ibex 18 mm finger-plane with a toothed blade, and a wooden handle added to save
my fingers. I originally added that handle to keep from blistering my forefinger
and thumb, as I had done so on every single instrument up to that point. (That was
my #16 instrument– a cello.) I was surprised to discover that it also gave me much
more power and control so that I was able to set the blade deeper and carve much
more aggressively, taking off much thicker shavings.

19
Using a Toothed Finger Plane to further the Graduation process.
Once it is smooth inside, and within a millimeter or so of completion, I switch to a
smaller finger plane and cut more gingerly, until it is all within a few tenths of a
millimeter of the goal thicknesses, and then I finish with scrapers. Here is how the
plate looks at that point:
Graduation nearly completed– the skewers are only there to create shadows so that the contour will show
in the photograph.

20
Another view, at a lower angle. There are still a few lumps to smooth out, but the graduation is
essentially complete.
Usually, by that point, I am beginning to see the interior of the f-holes, too,
because, as you may recall, I had incised them pretty deeply. Once the inside is
complete, I finish cutting the f-holes. And that is what I will show in the next
chapter.

21
Chapter 5
F-holes and Bass-Bar
F-hole Drill
We had just completed the graduation in the last chapter: Usually, by this point, I
am beginning to see the interior outlines of the f-holes, too, because I incise them
quite deeply. In this particular case, I could just barely see some portions, so I
guess they were not as deep as I thought they were.
Once the inside is complete, I finish cutting the f-holes. Many people use a
jeweler’s saw, a fretsaw, or a coping saw to cut out the f-holes. I generally just use
the knife, except that I do have a special tool for cutting the round upper and lower
eyes. I didn’t take any photos of it this time…but here are some pictures from an
earlier instrument; a cello:
F-hole drill being used to cut the lower eyes on a cello.

22
F-hole drill with completed eyes and cut-out plugs.
F-holes Completed and Clean
Just getting the f-holes cut is only part of the job…they need to be clean, smooth,
and relatively symmetrical. I will keep touching them up and “tweaking” them
until the day I begin the varnish, most likely, but here they are; close to being
complete, but not completely done.
F-holes essentially complete.

23
By the way, you may have noticed that on this instrument (and the last one, if you
read my blogs) I purfled after installing the plates. I was taught to purfle early, but
I always had trouble getting my edge overhang even, and getting my purfling
parallel to the ribs. So I tried purfling after closing: it works fine and looks better.
“Diff’rent strokes”, I guess….
Bass Bar
When the f-holes are complete, and clean, I can fit the bass-bar. The bass-bar is a
spruce brace supporting the bass-side of the bridge, and providing for a good sound
on the low strings.
I lay out the location of the bassbar, 1/14th of the width off center, at both upper
and lower bouts. It usually ends up about 15 mm off center at the lower bout and
12 mm off center at the upper bout. (Those were the exact measurements this time:
the upper bout was 168mm wide and the lower was 210 mm wide. So 1/14th of
each was 12mm and 15mm respectively.) When I lay the bass-bar blank along that
line, the side of the blank should just about “kiss” the upper eye on the bass side. I
make slight adjustments as needed to make sure it does not obstruct the f-hole at
all, then scribe the line in with a flexible steel ruler and a soft pencil. The line ends
40mm from each end of the plate, so the bassbar is just under 11″ long, (and about
7mm thick where it contacts the plate, tapering to 5mm along the free edge.)
Bass-bar layout lines complete.

24
Chalk-Fit Trick
At this point I do something a little unusual: lots of luthiers chalk-fit bass-bars …
in fact, probably most of them do. I have only known one or two who can
successfully “eye-ball” the thing in. But I do not like the looks of chalk-residue
mixed with yellowish hide-glue, either. I can’t see the white chalk clearly enough
to use it, and the others leave an ugly residue– especially the green or blue chalks.
So… what could I do? Someone, years ago (probably my friend Jake Jelley),
pointed out that the paper-gauze tape sold in pharmacies will stick securely, you
can see the line through the tape, and it holds the chalk very well. The tape (3M
Micropore) is so thin and fragile that you get a very good fit, but when you take the
tape off after the fit is perfect, all the chalk comes off with it. (Careful! It can pull
splinters off, too!) But, “Hey, Presto!” Clean wood, and you are ready to glue in
the bass bar!
Pre-Fitting the Bar
I pre-fit the bass-bar by eye, using a compass to mark the contour from both sides,
then trimming with knife and plane until the fit is close.
Bass-bar pre-fit by eye, using a knife and plane to trim the wood to a close fit. Chalk-fitting is next.

25
Then I apply the paper tape, darken the line on the tape as needed, and begin the
chalk-fit process. It is important to learn to JUST plane or scrape away the portion
of the bass bar with chalk on it, on each try. Don’t plane off whole sections…it is
possible that only that one little place with the chalk was too high.
There is the paper tape…you can still see my layout lines.
Beginning chalk-fit.

26
Chalk-fit complete, and tape removed. Notice the arrow on the upper end of the bar: that is to keep me
from forgetting which end is which.
Final Check and Installation
I check the fit by clamping the bar in place, dry.
Bassbar dry-fit and clamped, for final check. It seems to fit acceptably….

27
Then I remove the clamps, and slather on the hot hide glue–carefully. I quickly re-
position the bar and clamp it securely, then clean up, using hot water and a brush.
The small amount of watered-down glue soaking into the wood around the bar
doesn’t seem to hurt anything, so I don’t worry about it.
Bass-bar glued, clamped and brushed down with hot water.
Shaping the Bass Bar
When the glue is completely dry, I remove the clamps and shape the bar, “just so”.
The glue is dry… see the sketched-in proposed shape of the finished bass-bar. The dark area
beside the bar is just a shadow from the overhead lamp, not glue.
28
I do not have a “scheme”, here, and I do not measure it, beyond occasionally
checking the center height. I am just going by feel, by eye, and by experience. I
know if the bass bar is too weak, it will affect the sound of the bass string…so I err
on the side of a tall bar. I am certain that many will frown upon this. I am not
telling you how you should cut a bass-bar; just sharing how I handle mine.
So; I use gouges and finger-planes, initially, to shape the bar, finishing up with
scrapers, files, and even sandpaper. (Yes, I know… “nobody uses sandpaper”…but
it’s OK, honest!)
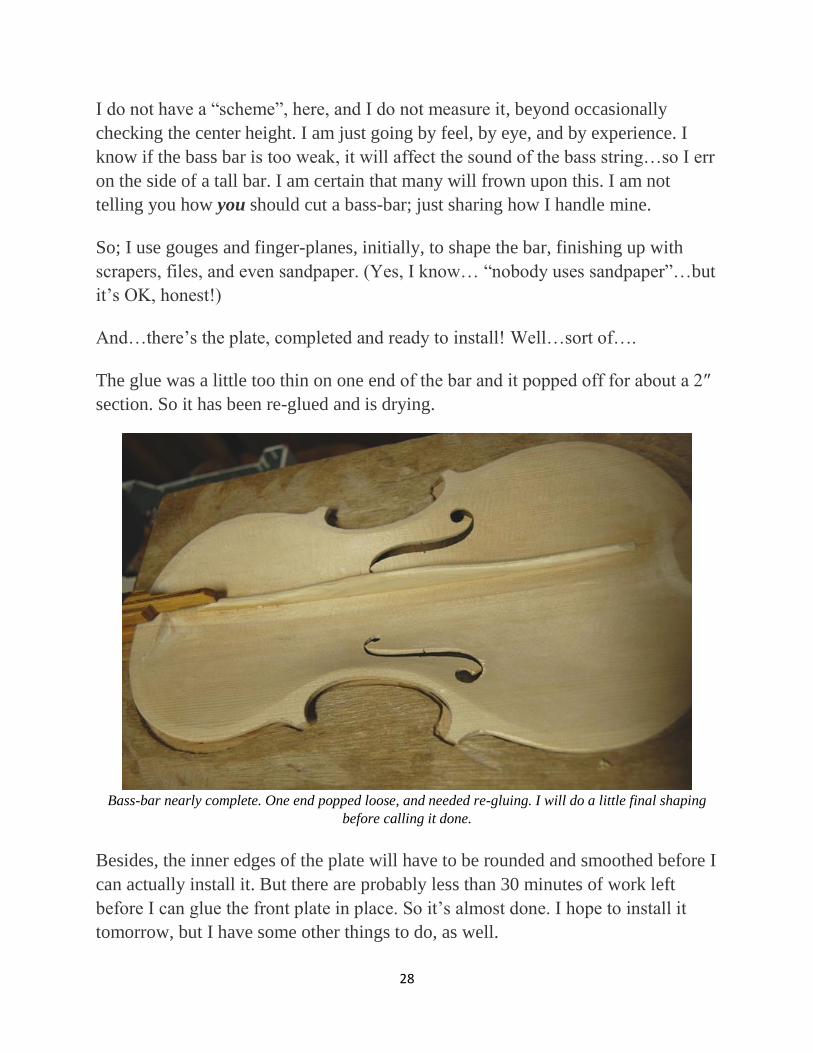
And…there’s the plate, completed and ready to install! Well…sort of….
The glue was a little too thin on one end of the bar and it popped off for about a 2″
section. So it has been re-glued and is drying.
Bass-bar nearly complete. One end popped loose, and needed re-gluing. I will do a little final shaping
before calling it done.
Besides, the inner edges of the plate will have to be rounded and smoothed before I
can actually install it. But there are probably less than 30 minutes of work left
before I can glue the front plate in place. So it’s almost done. I hope to install it
tomorrow, but I have some other things to do, as well.

29
Some of you may wonder why I install the front plate first: I was actually taught to
do the back plate first, and to install the neck last, but it finally occurred to me that
I could fit the neck before installing the back plate, and before removing the mold,
and get a perfect neck-set, then trim the back of the heel flush with the rib plane,
and install the back last, after removing the mold and cleaning up the interior. It
worked very well, so I have continued the practice. Again; different ways of doing
things result from different skill-sets and different problem-solving methods. There
is nothing wrong with either way. (I even knew of a fellow who set the neck before
installing either plate…but I can’t see that one. On the other hand, that guy made
over 1000 instruments before he died, and sold every one of them; he must have
been doing something right.)
So, the next chapter will involve completing the neck and fingerboard assembly,
installing the front plate, and setting the neck.
Later the same evening:
Bassbar is finally complete!

30
Side view…getting the lighting just right is difficult, but you can see the profile.

31
Chapter 6
Front Plate Installation and Purfling
Installing the Front Plate
I levelled the garland by scrubbing it back and forth on a sanding board (see
chapter 9), then aligned the plate on the garland and clamped it with spool clamps.
After heating up the glue, I removed a few clamps at a time and inserted the glue
with a thin palette-knife, and re-applied the clamps. In this way, I can work my
way around the perimeter, accurately and easily, gluing the plate in place without
fear that the glue will gel before I can get the plate clamped in place.
Front plate glued in place
Ready to Begin Purfling
The purfling is an inlay that is partially decorative, and to some degree a protection
against cracks and splits– an edge reinforcement. There are some (usually very
cheap) instruments that have the purfling simply painted on, so that it only looks
good, but has no other function. They are usually seen as sub-standard, though, and
I will not consider making an instrument that way…so, here is the beginning point:
the purfling marker. Two blades set apart by the exact thickness of the purfling to
be inlaid, and the distance from the edge set, as well.
Those among you who are luthiers will notice that I have rounded the corners of
my blades: It seems to be easier to use that way, and the blades do not have as
strong a tendency to follow a grain, line and throw off the cut, so that it is out of
parallel with the edge.

32
Purfling marker Purfling marker in use: see the double lines.
Some people call this a “purfling cutter,” but it really does not work well if you try
to use it to cut the slot. I mark the slot with this tool and then cut the slot with a
sharp, thin knife. In use, the purfling marker should be held exactly perpendicular
to the plate, and tightly against the plate edge.
The purfling marker will not complete the corners, at all, and the corners are fairly
critical to the overall look of the instrument, so I carefully sketch them in with a
very sharp pencil.
Sketching the corners

33
Cutting the Purfling Slot
I usually use an X-acto knife to cut the slot, and pick the center out with one of
several tools made for that purpose.
Some of my Purfling tools.
The first trip around the plate it is important to go lightly but very accurately, so
that I am barely deepening the marks left by the purfling marker: after that I can
cut more deeply. A rounded blade sometimes works better for this task, too, for the
same reason as with the purfling marker. Note the very flat cutting angle, below.
Incising the Purfling Slot

34
Cleaning the Purfling Slot
After I am satisfied that the cuts are the correct depth all the way around, I
carefully pick out the center of the slot and clean the slot, using a purfling pick. I
have some that I made myself, but this one was given to me by Jake Jelley, and it
works very well.
Purfling Pick in Use
Ready to Install Purfling

35
Installing the Purfling
Some people make their own purfling…maybe I will try it someday, but for now, I
buy mine in three-ply strips, and that is challenging enough for me. The strips are
too brittle to bend, so I use a bending iron (see Chapter 13) to make them flexible
and to bend them to the correct curvature for the tight corners.
Purfling strips with prepared front plate
I try to install the C-bout purfling first, then force the mitered ends of the upper and
lower bout purfling against the mitered ends of the c-bout purfling. It takes practice
to get good at this: I do not claim to have “arrived”. But it does seem to be getting
a little easier.
I read the other day that someone, years ago, asked Pablo Casals, the word-
class cellist, why, at 93 years of age, he was still practicing the cello for three
hours every day. He replied, “I think I am seeing some improvement!” (Good
one, Maestro!)
So, I guess I’ll just have to keep practicing!

36
C-bout Purfling installed dry. F-hole still needs smoothing.
Then I install the rest of the purfling strips: I want the slots to fit snugly, but not so
tight that I will have to struggle to install them once I apply the hide glue.
All Purfling installed dry. Spliced in some places, but after gluing the splices will be invisible.
37
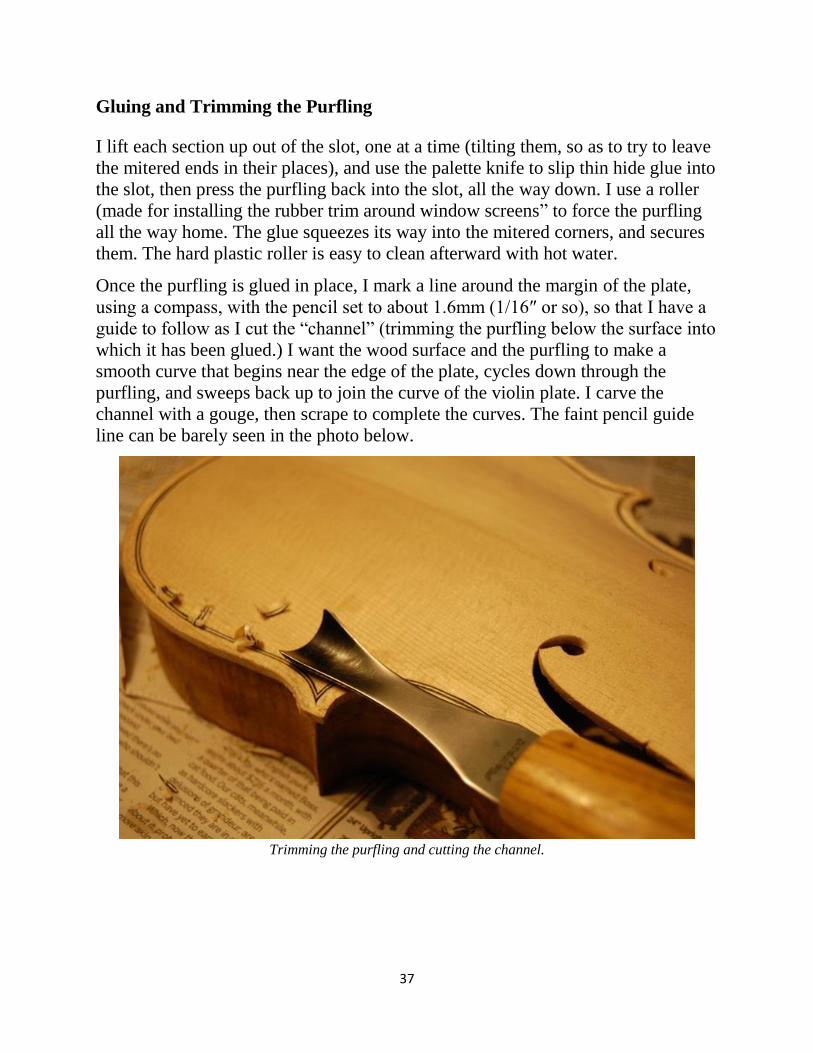
Gluing and Trimming the Purfling
I lift each section up out of the slot, one at a time (tilting them, so as to try to leave
the mitered ends in their places), and use the palette knife to slip thin hide glue into
the slot, then press the purfling back into the slot, all the way down. I use a roller
(made for installing the rubber trim around window screens” to force the purfling
all the way home. The glue squeezes its way into the mitered corners, and secures
them. The hard plastic roller is easy to clean afterward with hot water.
Once the purfling is glued in place, I mark a line around the margin of the plate,
using a compass, with the pencil set to about 1.6mm (1/16″ or so), so that I have a
guide to follow as I cut the “channel” (trimming the purfling below the surface into
which it has been glued.) I want the wood surface and the purfling to make a
smooth curve that begins near the edge of the plate, cycles down through the
purfling, and sweeps back up to join the curve of the violin plate. I carve the
channel with a gouge, then scrape to complete the curves. The faint pencil guide
line can be barely seen in the photo below.
Trimming the purfling and cutting the channel.
38
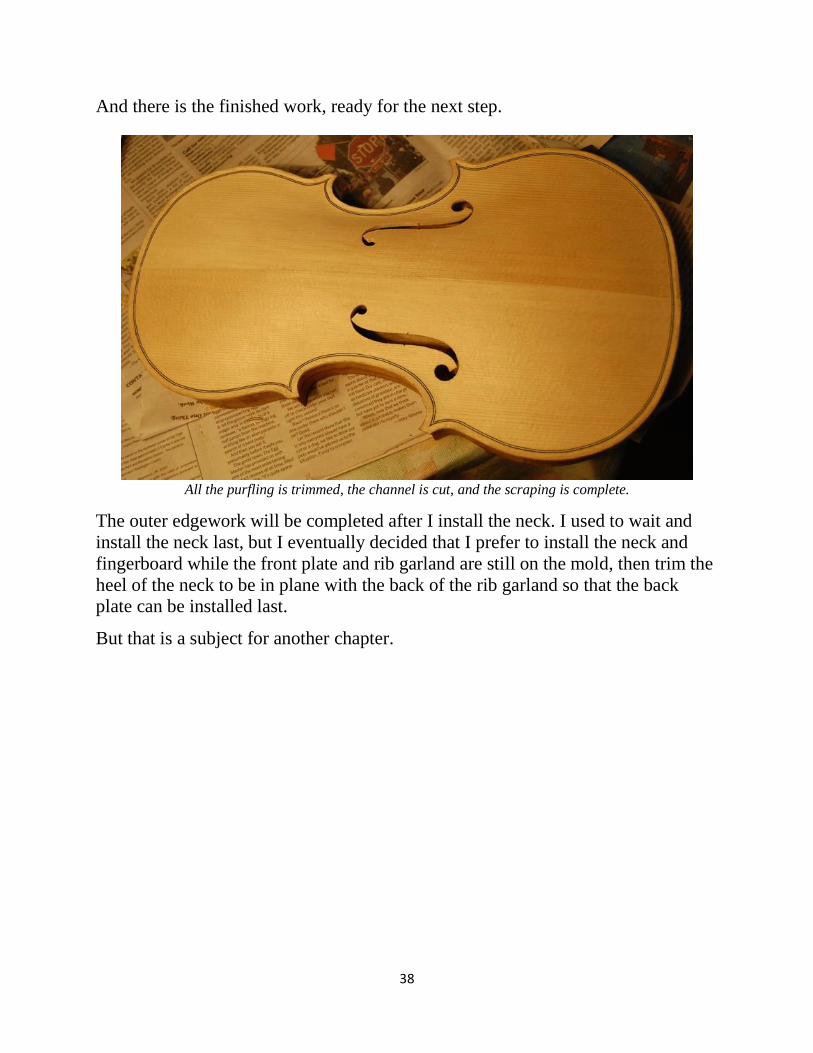
And there is the finished work, ready for the next step.
All the purfling is trimmed, the channel is cut, and the scraping is complete.
The outer edgework will be completed after I install the neck. I used to wait and
install the neck last, but I eventually decided that I prefer to install the neck and
fingerboard while the front plate and rib garland are still on the mold, then trim the
heel of the neck to be in plane with the back of the rib garland so that the back
plate can be installed last.
But that is a subject for another chapter.

39
Chapter 7
Scroll Carving
Step by step progress
I spent a day trying to carve this scroll. This is the hardest wood I have ever carved
for a fiddle scroll– not in the least like Maple, which is tough, but not so difficult
to carve. In the last chapter, I had left the scroll partially carved, and the neck
roughly shaped. The pilot holes are in place. Rough-cuts have been made to outline
the scroll.
Scroll beginning
So: I completed most of the neck shape and temporarily secured the fingerboard to
the neck, using three “dots” of hide-glue.
Fingerboard temporarily glued and clamped to the neck

40
Then I went to work, shaping the neck and fingerboard as a unit, and continuing to
shape the scroll:
Carefully carving away the excess wood around the eye of the scroll.
Trying to work both sides the same way, so that the finished result will be symmetrical.

41
Beginning the pegbox. The narrow gouge gives me more control and better penetration into the extremely
hard Koa wood.
Deepening the pegbox and beginning the outer fluting.

42
The pegbox is nearing completion.
And that is as far as I got, today.
You can see that I have begun undercutting the turns of the scroll, and chamfering
the edges, but there is still a long way to go, before the scroll is complete.

43
Chapter 8
Neck-set and more
Completing the Scroll
In the last chapter, I had left the scroll nearly finished, but still lacking the outer
fluting under the neck, and still pretty rough. (I always continue “fine-tuning”
scrolls right up ’til I begin varnishing.) So, the first thing was to get the scroll and
neck completed well enough that I could set the neck. The light is different in this
photo so the wood looks much lighter, but it is really not.
Completed scroll and neck
Completed pegbox

44
I am never fully satisfied with my work, but I have to decide at an appropriate
point that it is OK to move to the next step. However, scroll and neck carving is
much more difficult after the neck is set, so I want to have them pretty close to
how I want the finished product to look, before I begin setting the neck.
Setting the Neck
Setting the neck begins with careful layout of the heel “footprint” on the neck
block of the violin body (often called “corpus”). I already had the centerline of
each laid out, so it was a matter of transferring lines accurately, and then cutting
along those lines so that when the wood was carved from between the saw-cuts, the
heel of the violin neck should fit, snug and straight, into the prepared neck-mortise.
I always leave a little extra, so that the mortise is too small to begin with: it is
much easier to take off a little more, than to replace wood.
I did not take pictures of this procedure– simply wasn’t thinking about
photographs, and I forgot. It went very smoothly, this time, though, and I think I
had it ready to fit in around 30 minutes, or a little more. (Usually it takes me
longer.)
Here’s the neck mortise, ready to receive the neck:
Completed neck mortise

45
Side view of neck mortise
And here is the neck, dry-fitted into the mortise:
Dry-fit neck

46
Once I knew that everything fit correctly, and that it was going to be straight, tight,
and at all the correct angles, I was ready to glue.
I have to check five points of measurement:
1. The distance from the upper end of the fingerboard (where the nut will be) to
the upper edge of the top plate (both sides) has to be 130 mm.
2. The neck has to be measurably straight, so that the centerline of the neck and
scroll are a continuation of the centerline of the corpus.
3. The neck can’t be twisted (rolled side to side)…it should be level with the
plane of the ribs, side to side.
4. The height of the upper edge of the heel of the neck (underside of the
fingerboard) should be 6 mm above the top plate.
5. The height of the end of the fingerboard above the top plate should be
between 19 mm and 23 mm, with 21 mm being optimum.
There are different ways of approaching virtually everything in lutherie, and there
are sure to be experts reading this, who are shaking their heads, but: this is the way
I was taught, and it has worked well for me. I am not telling anyone else what they
should do.
I prepared the hot hide glue, and brushed it into the mortise, and onto the bottom of
the neck-heel, and along the edges of the heel. Then I quickly rammed the neck
heel home in the mortise, and checked to make sure all my measurements had held
(primarily the height of the fingerboard above the plate.) All was in order, so I set
it aside to dry. Here is the completed neck joint, with the glue squeezing out
around the joint:

47
Glued neck-joint
Side view. You can see that I will have to plane off the back of the neck-heel so that the back plate will fit.

48
Back view. When the glue is dry, I will remove the mold, and trim the blocks.
After the glue dried, I planed the neck heel flat, then I removed the mold by
breaking the glue-joint at each block (six places) and simply lifting out the mold.
Then I trimmed the blocks and was ready for the back linings.

49
Inside view, ready for back linings.
There is a “perception change” that occurs for me somewhere along here: actually
probably right after I close the corpus: At that point, I cease seeing the instrument
as my “building a violin”, and start seeing it as a “violin that I am working on.” I
no longer think of it so much as “something I made”: it now has a “life of its own.”

50
Exterior view: Looks good, doesn’t it? But it still has a long way to go.

51
Installing the Back Linings
The first thing I do to prepare for installing linings is to cut mortises in both sides
of each block, into which I will insert the linings. I use a thin knife and a very
narrow chisel (1/16”) to cut the mortises.
I make the linings by first sawing the chosen wood (willow, usually) to about 2
mm thick, in 2”- to 3″-wide “planks”, about 18 inches long, and then using a
wheel-style marking gauge to cut off strips 7 mm wide. I wet each strip and bend
them around a hot bending iron, until I can fit them into the corpus. I want them to
fit tightly. The center bout linings are bent in such a way that without clamps they
would tend to buckle away from the ribs, so I use small spring clamps to dry-fit
them. The upper and lower bouts will stay put on their own.
Linings, dry-fit.

52
Then, one by one, I remove each lining and brush hot hide glue along the portion
of the rib that will receive it, as well as on the lining itself, making sure the ends
are liberally coated, as well as the full length and width of the gluing surface. I
quickly re-insert the rib, and clamp it in place with as many small spring clamps as
I can fit along its length.
Linings glued and clamped in place.
The next step will be to level the back surface of the ribs and neck heel, and then
trace the back plate from that pattern, so that it will fit perfectly. (The neck heel is
still not in the correct finished shape, but the back plate button and the neck heel
will be shaped as one piece, after the back plate is glued in place.)
In the next chapter I’ll start carving the back.

53
Chapter 9
Back Plate
Flattening the back of the Garland
After the glue was completely dry, I removed all the clamps from the linings and
cleaned up the interior: that is to say, I tapered the back linings, so that they faired
smoothly into the ribs, and I shaved and scraped the blocks to their final shape.
Then I rubbed the back surface of the garland (rib and block structure) on a
“sanding-board” to level the back of the garland, and to ensure that the back of the
neck heel was completely level with the back of the garland. That way, I can fit the
back plate absolutely flat against the garland, and trace the shape.
I didn’t take any pictures of this procedure, this time. Here are some which taken
when I was building a cello:
Sanding board with cello garland

54
Flattening a cello garland on a sanding board.
I make pencil-marks on the edges of the linings, ribs and blocks, all around, and
scrub until the marks disappear. When all the marks are gone, the garland is flat. It
gets pretty vigorous and physical, but it is quite effective.
Here is the flattened garland, ready to trace the back plate:
Flattened garland. Notice that the neck heel is now dead-flat level with the back of the garland.

55
As you can see on the previous page, the blocks are quite smooth, now, and the
linings taper gently into the ribs. After this point, there will be no more changes to
the interior of the corpus, except as it directly affects the back plate.
Tracing the Plate
I clamped the plate to the corpus, carefully centering the glue-seam of the back
plate on the centerline of the neck and the end block.
Garland centered on the back plate
Garland clamped to the plate.

56
Then I traced around the garland using a ball-point pen and a flat washer whose
flange is exactly 2.5 mm wide, so that my line will be 3 mm from the ribs, all
around. I watch carefully to make sure the washer stays flat on the plate…they
have a tendency to flip up and follow the pen. I work along the perimeter, giving
several strokes to every part, so that the line will be visible against the dark wood.
Notice that this procedure makes “round” corners. I will modify them before
cutting them out, so that they are the correct shape.
Tracing the shape of the plate, using a washer and a pen.
And, there is the plate, almost ready to be cut out:
Traced plate, almost ready for cutting out.

57
Re-shaping the Corners
One thing I do, that I forgot to photograph, is that I “re-shape the corners”. I use a
straight-edge to connect a line from the end of the rounded corner (where the pen
circumscribed the corner of the rib) to the center glue line at the location where the
purfling will cross the far end of the plate. (Or, one can just use a 30/60/90 triangle
to lay out a 30-degree angle off the center glue line to touch the end of each corner.
But I use the straight-edge.) Then I continue the curves of the inner bouts to
connect with the straight lines I just scribed in, and the corners are complete. I use
a sharp scraper to remove any ink lines that are not part of the perimeter outline,
and then I really am ready to cut out the plate.
Cutting out the Plate
I use a band-saw to cut within a millimeter of the line, and then use an oscillating
spindle sander to perfect the edge, right up to the lines. These and my drill press
are pretty much the only power tools I use, though I have occasionally used an
angle-grinder with a coarse sanding disc to remove rough excess wood, on larger
instruments.
I run my fingers around the edges looking for lumps, and work those out as well,
using a file as needed. Here is the completed plate blank:
Plate cut out and ready for arching. (This is the outer side.)

58
At this point I also sketch in the interior graduation plan–just the outline of the
inside boundaries of the plate, so that I know where I am going to carve. There is
no reason it has to be done at this point, but it helps me remember which side was
outside and which inside…and that really does matter, as the plates are virtually
never exactly bilaterally symmetrical. If I forgot and arched the wrong side, the
completed plate would never fit the garland. (Ask me how I know….)
Interior graduation boundaries sketched on correct side (inside).
You can see that there are numerous bark inclusions in this piece of wood, which I
will fill with matching wood…but I will wait until the arching is complete before I
attempt to fill the holes, so that I do not plane away my plugs. It is unusual to use
wood with holes in it like this, but it is also unusual to use anything other than
maple for a violin back. However, five-string bluegrass fiddles are not burdened by
the same 300+ years of tradition as violins, so exotic woods can be used. This
wood has amazing flame and figure in it, and the plugged holes will not detract
from the beauty of the wood.
Before I begin arching, I establish the edge-thickness all the way around, using a
“wheel-style marking gauge“, set to 4 mm. It has a tiny sharp wheel that does the
marking, and it makes very cleanly scribed lines.

59
Edge thickness marked on correct edge. (Notice the bark inclusion on the other edge)
Beginning Arching
I used a Japanese-style pull-saw to cut the approximate height of the plate
thickness on each of the corners, so as to avoid unnecessary stress on the corners
while carving the arching. It looks a little odd until the arching is complete, but it
helps avoid the possibility of breaking off a corner (it can happen).
I use a large, sharp gouge to reduce the edges and begin the arching; then a toothed
finger plane to continue the curves until I am very close to the desired shape. At
that point I will switch to a smooth, curved-sole plane and bring the arching to
nearly the desired shape. From that point on, a variety of scrapers will be my only
shaping tools, for fear of tearing out wood along the figuring.
Here are some photos of the progress. This is very hard, difficult wood to carve,
and my hands were giving out, so this is about as far as I went that night:

60
Beginning arching: notice the saw-cut corners: the one on the right has been carved almost to a normal
curve.
Different viewing angle: The cradle is made of thick pine, with a plywood door-skin on the upper surface,
to secure the plate. Inside, it is cut away at an angle, so that the plate can fit arched-side down. The
plywood is right at 4mm thick, same as the finished plate.

61
Continuing arching. There was still quite a way to go, and I was getting tired.
So…that was it for that day. Pretty fancy wood, isn’t it? The customer bought it in Hawaii 33
years ago, or so, and has dragged it around all these years, until he decided that he wanted a five-
string fiddle. Probably the only opportunity I will ever have to make a fiddle out of curly Koa,
but it is really going to be a beautiful instrument.
My hands were getting too tired to work effectively. Time to stop.

62
Chapter 10
Arching
Completing the Back Plate Arching
When I left off, last time, I was too tired and sore to continue carving, so I took a
break and completed other responsibilities for a few days. Saturday, I came back
and spent some time carving and scraping:
Final outer carving complete–beginning scraping.
As you can see, the basic shape is complete. Scraping will be the method of
moving wood from here on, on the outside… the inside is still a flat, rough plank.
But I continued scraping for a while on the outside before beginning the inside. It
is pretty satisfying to see the smooth curves of the fiddle emerging from the rough
wood.

63
Back plate with scrapers: I used the “shmoo”-shaped scraper (lower left) to clean around the inner bout
edges and the others to establish the final shape of the outer curves.
Once the plate is essentially the exact shape I want it, (checking with low-angle
lights, etc.) I move to finer scrapers– sharpened at 90 degrees, and used gently,
flexing the blade to match the curvature of the plate.
Final scraping: this is not to say that more scraping will not be done later, but that will be after the
purfling is completed. This is about as far as I will go until then.

64
Beginning the Inside Arching and Graduation
Now I can flip the plate over and begin carving out the inside of the back. Here is
the cradle without the plate. Notice that the plywood cutout matches the shape of
the plate fairly closely, while the thick pine board simply supports the plate while I
am carving. The plywood is what holds it still, laterally. The spring clamps prevent
the plate from flipping out of the cradle.
Working cradle for violins and five-string fiddles. The hollow shape allows the cradle to be used on both
sides of the plate. The full-thickness cutout allows chips to drop through and not obstruct the work.
The back plate has already been marked for inside arching. I will have to monitor
thickness constantly, but here it is, ready to carve:
Back plate ready for carving. Notice the lines mapping out the general shape to be “excavated.”

65
And, the “fun” begins again. This Koa wood is by far the most difficult wood I
have ever used on a back…but it has to be done, so, chip by gouged-out chip, here
we go:
Beginning the inside arching, using a gouge again.
In the next chapter, I will be ready to install purfling.

66
Chapter 11
Back Plate Completed and Installed
Inside Arching
The inside arching took a lot of time and energy, but it is just part of the job. Once
it begins to get closer to completion it is a lot more encouraging, but initially, it is
just a lot of work.
Bit by bit, however, the project begins to take shape. I use gouges when it seems to
work well, and planes when they seem to work better. The nice thing about the
planes is that I can set the blade to make a shallow cut, in hard woods, or a deeper
cut in softer woods, and maintain pretty good control even when working fast.
Some people can do that with a gouge, but I feel that I have better control with the
planes.
Back inside arching in progress. I made those wooden handles for my Ibex planes so I would not keep
blistering my fingers using the planes. (Ibex owners: you can see I have reversed the screw.)
The smaller planes give me even better control, because the cut is narrower, and
requires less force, but of course, they require more cuts to do the same task.

67
Graduation:
Here, you can see the curvature of the plate, but you can also see (by the low-angle
light) why I have to stop using the planes relatively early, and revert to scrapers:
the curly wood tears out badly under the plane, even when “following the flame.”
I also have to measure the thickness over and over, using a graduation caliper, so
as not to cut too deeply. This process is called “graduation”, I suppose, because the
thicknesses have to gradually change from area to area. They are not entirely
symmetrical, but there is a general plan and there are some practical limitations.
Inside graduations in progress.

68
Scraping:
Now we work with scrapers: Those transverse lines in the wood are the flame
beginning to show:
Scrapers cut very smoothly, and usually without any tear-out. You can make the scrapers any shape you
want, but you have to keep them sharp.
Scraping can be hard on the hands: some people make handles for them. I haven’t done that yet. My
thumbs get pretty tired, sometimes, though.

69
Final Inside Preparation for Gluing:
I almost forgot to take pictures! At this point the plate is complete, except for
purfling. In the past, I have always installed the purfling before attaching the plates
to the corpus, but on this instrument I decided to try purfling after installation of
each plate. I think I like it. I have better control of my edge over-hang in terms of
both size and shape.
So: the inside edgework has been done, the label is installed, and the plate is ready
to be glued in place.
The advantage to my placing the label before I close the box is obvious—it is a lot
easier to get the label in straight and smooth if I don’t have to install it through the
f-hole.
One disadvantage, however, to my installing the label before I install the plate is
that if there is a delay between the installation of the back plate and the actual
completion of the instrument, it makes the date on the label seem inaccurate.
But I have reconciled myself to simply explaining that my dates reflect the day the
back plate went on, not the day it first played music.
All my instruments are signed, dated and numbered.
Back plate ready to install.

70
Plate Installation:
What I do, nowadays, is carefully dry-fit the plate to the garland so that it is
exactly the way I want it, clamping securely over all the blocks (about eight clamps
in all). Then I remove a couple of clamps at a time and slip hot hide glue into the
joint, wipe it down with a rag and hot water, and re-clamp that area, adding as
many clamps as will fit. I work my way all the way around the plate, and never
have to hurry, or suffer any fear that something will get out of alignment while I
am working.
For the first four or five instruments I made, I would apply glue all the way around
the garland then engage in a panicky race to get the plate aligned and all the
clamps in place before the glue gelled. Not good…lots of stress. Usually, about
that time, the phone would ring, too… (Sigh).
This way is very peaceful, by comparison, but I have learned to be less compulsive
about answering the phone while gluing, too.
And here is the completed corpus, with the back plate glued in place and secured
with spool clamps:
Back plate secured with hide glue and spool clamps.
Once the glue is dry, I will be ready to begin purfling the back plate.
71
Chapter 12
Back Plate Purfling
Layout
I use the same purfling marker to begin the layout of the back purfling as I did on
the front purfling, except that, because I have a habit of using a “signature” fleur-
de-lis on the upper and lower ends of my five-string fiddles, I have to stop short of
the corners and ends, and sketch those areas in by hand. However, I had noticed
that, since I have literally been sketching them in by hand, no two were alike, and
they were pretty time consuming. So, this time, I made a small template out of tag-
board…a junk-mail offer for something or another… that just happened to arrive at
the time I needed such a thing. (Serendipitous, that….)
I used the purfling marker to lay out everything except the corners and ends, then
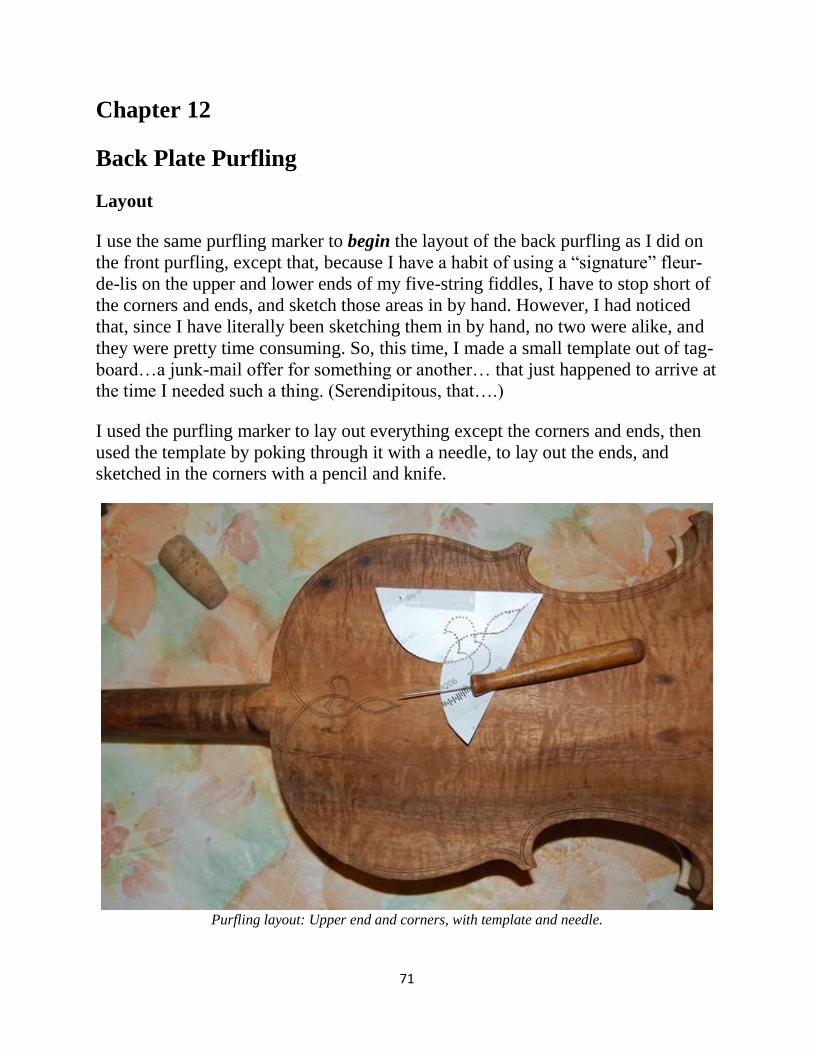
used the template by poking through it with a needle, to lay out the ends, and
sketched in the corners with a pencil and knife.
Purfling layout: Upper end and corners, with template and needle.

72
Purfling layout: Lower end and corners, with template, needle and knife.
Now I can cut the purfling grooves, pick them out, and begin installing purfling.
All back purfling laid out and ready to cut.

73
Cutting the Groove and Picking out the Waste Wood.
This part of the job is hard on the hands. Some very good luthiers, nowadays, do
this part using a Dremel tool as a router, but I tried it a couple of times and had
some rather nasty accidents, requiring some clever patching to hide the error. So, I
reverted to cutting the grooves by hand. It is harder on my hands, but I end up
doing better work. I just have to take breaks now and then.
Something I had to bear in mind on this fiddle, too, is that the Koa grain is so curly
and wild that I could have no confidence that the purfling pick would not chip out
a larger piece than I intended. So, I had to move carefully, and take small “bites.”
Also, inlaying the “purfling-weave” (the fleurs-de-lis) was risky, as the graduation
was already complete, so I did not have lots of extra wood to work with. I had to
make sure I did not cut too deeply. I worked carefully, and took my time, and got
through the challenge without mishap. Aggravated my arthritis somewhat, but that
is OK, too; I will just take a break for a day and do some other things.
But in the afternoon and evening, I went back and got back to work on the fiddle.
Section by section I sliced along those marks and cut the grooves as deep as I
thought I needed them, then began picking out the wood from between the cuts.
Upper purfling groove, partly cleaned and nearly ready for the purfling strips.

74
Lower purfling groove. Ran out of energy, but this is all that was left to do. I’ll get it another day.
Whole back, as it stands, now.
Once I have the groove completed, I can begin the purfling weave.

75
Chapter 13
Completing the Purfling Weave
“Over and Under” Illusion
Some makers, especially those making violas da gamba, Lutes, etc., make much
more complex purfling weaves. Some of the Celtic designs employ the technique
in very sophisticated ways. The point is to make an illusion of 3-D “over and
under” weave in the purfling. As far as I know it has no effect on tone; just
appearance.
Installing Purfling
In the last chapter, the purfling groove was nearly complete, but not quite: I
finished picking out the last bits of wood in the “fleur de lis” areas, then went all
the way around checking for depth and width.
My purfling bending “iron” is an old-fashioned solder-iron affixed to a brass
cylinder with various diameters. I don’t know who made it…I got it from my
friend Jake Jelley.
Purfling bending iron: my bending strap is spiral-cut from a large energy-drink can I found at work.

76
Starting with the completed purfling groove, I first cut and bent the center-bout
purfling strips, and inserted them into the grooves, making sure the mitered ends
were all the way into the corners of the “bee-stings”, as the sharp miter-ends are
commonly called.
Then I cut and bent the long upper and lower bout strips, and fitted them into
place, jamming them tightly into the miters at the corners, and trimming them to fit
exactly at the other ends.
Dry-fit lower and center bout purfling strips
Upper bout purfling dry-fit

77
Then I began gluing the long strips in place, so that they would stay put while I
installed the short ones. I tipped the center strips up and inserted hide glue in the
groove, then pushed them back in place, and forced them to the bottom of the
groove, so that the glue was squeezed out all the way along each strip. Then I
repeated that procedure on all the upper and lower-bout purfling strips. Afterward,
I could begin work on the “fleur-de-lis” designs.
Lower fleur-de-lis design begun
Upper fleur-de-lis begun

78
The “Weave”
I have to decide, initially, which strip goes “over” and which goes “under”: In
reality, of course, they are all at the same level, but, choosing which gets cut off
(thus looking as though it goes “under”) and which goes on through an intersection
(thus appearing to go “over”) determines which way the “weave” seems to go.
Once I pick a direction, I have to pay close attention to see that it continues with
the “over and under” look, to make the “weave” illusion appear correctly. I also try
to make both ends the same way (starting “left over right”, for instance).
Purfling weave, about half done
It is hard to make the tight bends in the purfling to complete the weave, because
they frequently either break or delaminate; but I like the end results, so I press on,
and keep working at it until I get them done.
My customers like the extra decoration, too. I try not to “go overboard” with it.
There is a practical side to the design, as well. Frequently the usual upper back
“button” gets broken off, in an accident. This pattern eliminates the purfling cut
that weakens the button, as it is moved further down the plate. Maybe that helps. I
hope so.

79
Lower purfling weave complete, ready for final scraping and edgework (which is not yet begun.)
Upper purfling weave complete.

80
All that is left on the back, now, is the channel, the edgework, and final scraping. We are officially “on
the home stretch!”

81
Chapter 14
Final Varnish Preparation
Advance Warning:
My apology in advance: as I warned some time ago, I have a tendency to get out of
“photography mode” and just pursue the tasks at hand, then suddenly realize that I
was supposed to be doing “show and tell”. So, (sigh…) this time it will be more
“tell” than “show.” But I do, at least, have some photographs of the tools involved.
Cutting the Purfling Channel
The first step in cutting the channel is to determine its boundaries. I usually use a
compass to scribe a line 1.6 mm in from the raw edge of the plate, all the way
around, including the corners and the ends, where the channel has to follow the
purfling away from the edge. (This time I used a special tool, made by Jake Jelley,
to do the same thing. I think it worked better…it was easier to maintain the proper
distance.)
Tool for scribing the crest of the edge. There is a collet-style pencil lead held in place, there.

82
That marks the outer edge of the channel, as well as locating the crest of the
finished edge. I extend that line at the same distance from the purfling at the ends,
following the purfling weave, so, at the ends I have two lines: one forms the crest
of the edge, the other the edge of the channel. The dark Koa wood did not easily
show the pencil mark, so I had to scribe firmly, and usually in several strokes, to
make the mark dark enough to be easily visible..
I then cut the channel with a sharp gouge, trying to keep it fairly shallow, but
following the scribed line all the way around, and extending the same width on
both sides of the purfling. I used a larger gouge for the upper and lower bouts: a
smaller one for the C-bouts.
Larger gouge for upper and lower bout channels.
Smaller gouge for c-bout channels

83
Scraping the Channel and Fairing the Curves
Then I used scrapers to “fair in” the channel with the curve of the arching, and
make sure there are no humps or hollows.
Large radius scraper (this scraper has four edges…each a different curve.)
Small radius scraper

84
Smaller radius scraper
Smallest radius scraper. This one has a long flat edge, a long curved edge, and both ends have a very
small radius.

85
Flat scraper for final fairing-in of curves.
Outer Edgework
Finally, I use a tiny plane and a file to shape the outer edge, curving smoothly from
the scribed “crest” to the outer edge, where, hopefully, it will smoothly join the
curve from the inner edge.
Planing the outer edge curve.

86
Filing the outer curves smooth.
Final Neck and Scroll-Work
I also double-check the scroll and neck shape and contours. They must be scraped
to perfection before I can move on. I use a template (copied from Henry Strobel’s
books) to check the upper and lower shape and size of the “handle” portion of the
neck, and then try for smooth transitions between the two.
Neck template for upper and lower neck cross-sectional shapes.

87
Upper neck shape with template.
Lower neck shape with template

88
The volute has to be scraped in both directions, otherwise the scraper will simply follow the grain and
leave humps. (Ask me how I know…)
Scraping the transverse curve in the volute.
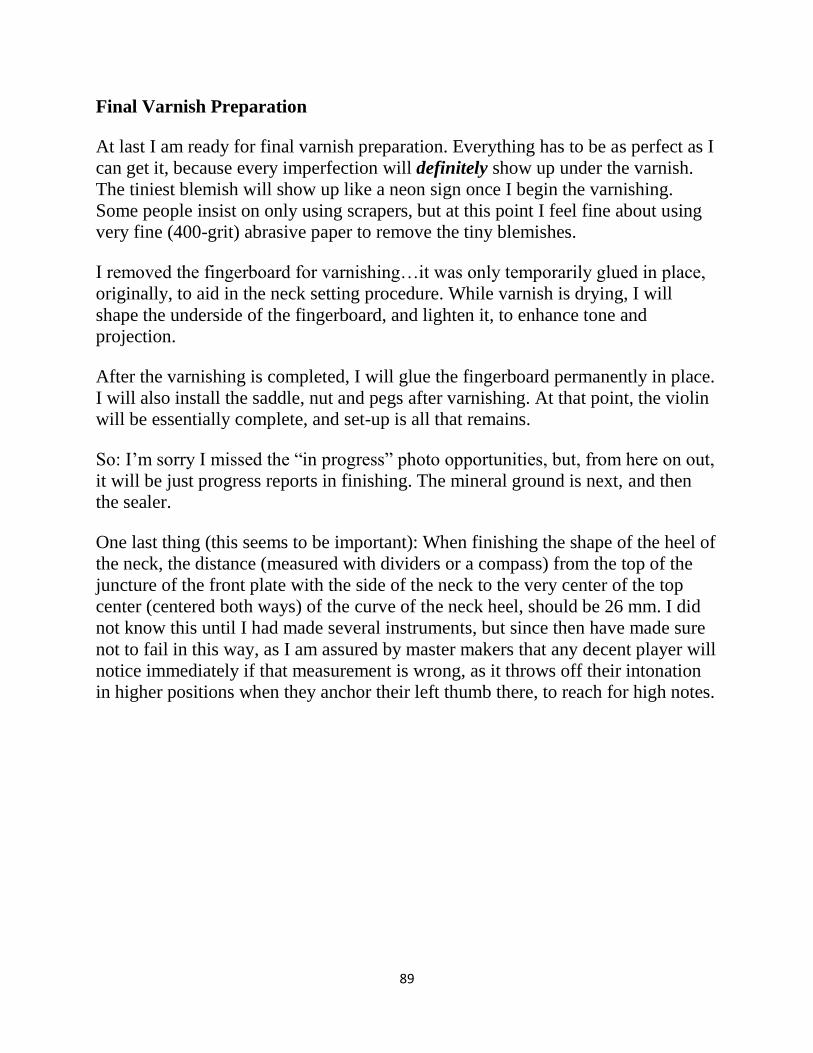
89
Final Varnish Preparation
At last I am ready for final varnish preparation. Everything has to be as perfect as I
can get it, because every imperfection will definitely show up under the varnish.
The tiniest blemish will show up like a neon sign once I begin the varnishing.
Some people insist on only using scrapers, but at this point I feel fine about using
very fine (400-grit) abrasive paper to remove the tiny blemishes.
I removed the fingerboard for varnishing…it was only temporarily glued in place,
originally, to aid in the neck setting procedure. While varnish is drying, I will
shape the underside of the fingerboard, and lighten it, to enhance tone and
projection.
After the varnishing is completed, I will glue the fingerboard permanently in place.
I will also install the saddle, nut and pegs after varnishing. At that point, the violin
will be essentially complete, and set-up is all that remains.
So: I’m sorry I missed the “in progress” photo opportunities, but, from here on out,
it will be just progress reports in finishing. The mineral ground is next, and then
the sealer.
One last thing (this seems to be important): When finishing the shape of the heel of
the neck, the distance (measured with dividers or a compass) from the top of the
juncture of the front plate with the side of the neck to the very center of the top
center (centered both ways) of the curve of the neck heel, should be 26 mm. I did
not know this until I had made several instruments, but since then have made sure
not to fail in this way, as I am assured by master makers that any decent player will
notice immediately if that measurement is wrong, as it throws off their intonation
in higher positions when they anchor their left thumb there, to reach for high notes.

90
Chapter 15
Varnishing
Mineral Ground
I did not take any photos of this process…it only consisted of vigorously rubbing a
gypsum suspension into the wood, all over, then rubbing it back off, as completely
as possible. The goal is to fill the wood pores, so as to limit the penetration of
varnish into the wood. Apparently the varnish tends to dampen vibrations, and
deaden the violin sound just a little. I don’t know how much effect it really has, but
I got the idea from Roger Hargrave, who said it made a big difference in his work.
If it is good enough for him, I am game to try it. My suspicion is that my ears are
no longer good enough to hear the difference, due to a lifetime of work in heavy
steel. But…I have had very good reviews on the few instruments on which I have
used the ground, so… either it really helps, or I have just improved my building
skills a lot, lately.
The mineral ground does leave the surface looking very milky-white, until the
sealer/ground coat permeates it and “magically” makes it transparent, much as oil
on paper makes it translucent.
Pretty much ready to varnish. Looks pretty plain at this point, doesn’t it? The mineral ground produces
that look. The whole instrument becomes a pale whitish color, but it clears up with the sealer coat.

91
Sealer
My sealer is pretty simple: it is raw pine pitch dissolved in a combination of pure
spirits of gum turpentine and alcohol. It penetrates pretty deeply, but the alcohol
and turpentine (in that order) evaporate rapidly, and leave the pine resin thinly
dispersed in the wood. I rub off as much as I can of whatever is left on the surface,
and let it dry in the sun. Sometimes I have hung it up to dry indoors, but it does
make the house smell of turpentine. My wife has very little sense of smell, and I
don’t happen to mind the smell, but others might, so I try to limit that sort of thing.
Front with sealer
Edge with sealer: quite a change, isn’t it? Notice the contrast between front and side. I hope to correct
that, somewhat, with varnish.
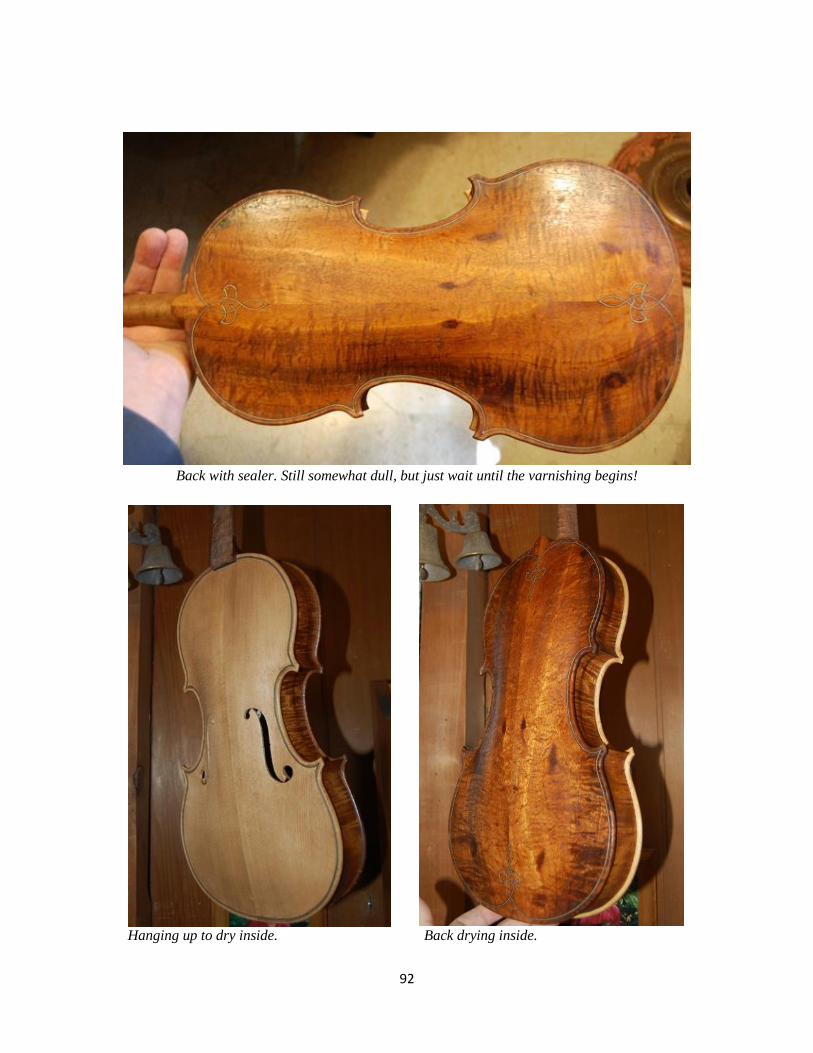
92
Back with sealer. Still somewhat dull, but just wait until the varnishing begins!
Hanging up to dry inside. Back drying inside.

93
I decided the weather was warm enough, and I moved the violin outside, propped
in an old lawn chair, so the sunlight (rare enough in NW Oregon) could help dry it.
Sealer drying in the sun: it was interesting to see that, as the wood warmed up, the sealer began to ooze
back out of the pores, making tiny dots all over. I wiped them all off, later.
Varnish
Once the violin was very warm, and quite dry to the touch, I vigorously rubbed it
down with a paper towel, to remove any residue, then coated the back with a
yellow spirit varnish, and the belly with a brown spirit varnish of similar make. I
hoped to even out the color, somewhat, and diminish the sharp contrast between
the dark, curly Koa and the nearly white Sitka Spruce. It seems to have worked.
One thing about spirit varnish is that I have to use a lot of coats of varnish, and so I
have the opportunity to see changes happening, and change course a little, if
needed. I have used oil varnish as well, and may revert to it someday, as there are
things about oil varnish that I really like, too. I am convinced that oil varnish is
what the Cremonese masters used.

94
First coat of varnish on the front: makes quite a difference, doesn’t it?
There’s the whole fiddle in the sun, with one coat of varnish.

95
And…the back! Look how the curly Koa is catching the fire from the sun.
Pretty serious flame in this curly Koa wood! You can see why it was tough to carve.
I expect to use at least another six coats before calling it complete, but it will not
really make an appreciable visual difference until it is done.

96
Chapter 16
Adding the Fittings
End Pin
I failed to take any photos of this, but…it is pretty simple: I centered a hole on the
center joint between the lower ribs, and centered between the plates, as well. I
drilled it first to 1/8″, then to 7/32″, and finally reamed it with a 1:30 tapered
reamer… the same one I use for tuning pegs. I shaved the endpin blank to the
correct size and taper using my peg-shaper, while gripping the endpin with a
special homemade gripper. I shaved the endpin until it would just fit into the hole,
leaving a little clearance between the collar and the rib surface (photos, below.)
Fingerboard:
In the photo below you can see some of the tools I used to fit the ebony fittings to
the violin. Looking at the fingerboard, you can see traces of the three “dots” of
glue that secured it to the neck while I was shaping both the neck and the
fingerboard. When I re-install the fingerboard, there will be glue on the whole
faying surface. The carved out portion will help to lighten the fingerboard, and
apparently helps tone.
The black mechanism (upper left, in the photo below) is the peg shaver I use.
Many people don’t like this style, but I have found that if I keep it sharp and use it
carefully, the pegs come out round, and with the right taper, and exactly the size I
want.
The block next to the peg shaver is the “gripper” I use for end-pins. The endpin
blank is right next to the shaper. The small ebony block between the shaper and
fingerboard is the nut blank. The larger ebony block midway along the fingerboard
is the saddle blank. The fingerboard has the shape laid out in pencil, where I intend
to carve wood away, and the gouges and scrapers on the right are the tools with
which I eventually did the work.

97
Fittings waiting to be shaped and installed.
So, one of the first things I did was to make sure my tools were sharp, then I went
all around the edges of that trough shape, carving away small chips of ebony to
produce a shallow trench all around the edge. Then I carved as best I could with
the gouges, until I decided it was time to get the planes into the “fight.”
The little Ibex plane worked well, but the little wooden homemade plane actually
worked better, because it has a deeper curve in the sole. It was made of a small
section of a broken hammer handle, a piece of scraper blade, and a threaded steel
plate to adjust tension and hold the blade in place.

98
Fingerboard hollowed, and ready for installation. This part took me about an hour. Ebony is
hard stuff.
Saddle
Next I worked on the saddle: I cut my saddles with radiused (curved) front corners,
so as to avoid saddle cracks, which are extremely common in violin-family
instruments.
The reason they are so common, is partly (I am convinced) because virtually
everyone makes them with sharp, square corners, which adds a huge stress-riser to
that location in the spruce. To me, that is asking for a crack.
I try to avoid such things. If you want a graphic illustration of why sharp corners
are bad, research “Stress risers”, online, and specify the “Comet” jet airline
company of Great Britain. (The early jet airliners had square-cornered windows,
and three of those aircraft disintegrated in flight before the engineers realized that
the window shape was the problem. Pretty sad way to learn.
I try to make the radius of the front corner the same as the width (front to back) of
the saddle. (If the saddle is 7mm from front to back the radius is 7mm, etc.)
Time will tell whether it is a right choice, but it makes sense to me.

99
Saddle footprint with curved front corners.
Some luthiers try to avoid cracks by simply leaving a small gap on the ends; that
makes good sense, and I do that, too, but why not eliminate the “notch” altogether?
(Just my opinion.) Either way, you have to remove the wood of the violin front
plate to receive the ebony saddle. I use a thin knife to slice through the spruce, and
then a flat chisel along the edges, to loosen the piece being removed.
I set aside the removed piece in case it turns out I made an error of some kind, and
need to put some wood back (it happens). It is a whole lot easier to match grain
from the piece you just removed, rather than from some random piece of spruce.
Once the saddle fits the mortise perfectly, leaving a small gap on each end (about
the thickness of a business card), I carve the upper portion of the saddle to as
nearly exactly the desired shape as I can get it, then glue the saddle in place, and
forget about it. More precisely, I coat the mortise with hot hide glue and press the
cold ebony saddle into the mortise, displacing the excess glue, and instantly gelling
the glue remaining in the joint. I hold it tightly in place for a minute or so, to make
sure, but then I can gently wipe the excess glue away, and leave the saddle alone to
dry. It needs no further attention (nor any special care) until final finish time.

100
I didn’t take photos while I was carving. I frequently get pretty wrapped up in what
I am doing and I forget to take pictures. (Sorry.) After the glue is dry, I do some
final scraping and very fine sanding (400-grit, 600-grit, and 1500-grit) to achieve
perfect fit and polish. Here is a photo of the finished saddle. (Probably taken before
the final rub-down, as it doesn’t look all that well “polished”.)
Saddle and endpin
Another view of the saddle and endpin. (Pretty ribs, huh?) Varnish touch-up still has to happen, too.

101
Pegs
The next issue was the pegs. I wanted them done before I installed the fingerboard,
simply because I wanted to be able to set the instrument aside so that the glue
under the fingerboard could dry, undisturbed, and I would not feel that I was being
prevented from working.
I had earlier drilled pilot holes in the pegbox, so that I would have guides to help
keep the holes perpendicular to the centerline. So I reamed out all those holes, to
approximately the same size, using the same reamer (1:30 taper) as I used for the
endpin.
Then I sliced a shallow groove next to the collar, on each peg, all the way around,
using a very fine razor-saw, to avoid breaking off the collar. (It doesn’t always
work, but it seems to help.) I shaved the pegs until they fit the holes, at nearly the
right depth, then “greased ’em up” with peg dope, and worked them in, twisting
round and round, and pressing inward, so that the holes and pegs fit perfectly.
Later I trimmed off the excess length of each peg on the far side of the pegbox,
domed and polished the cut ends, so they would look nice, and put the pegs back in
place.
Saddle and pegs installed.

102
Fingerboard Installation
Last, I installed the fingerboard…I had marked ahead of time the exact location
where the nut and fingerboard were to meet; so now, all I have to do is put the
fingerboard exactly where it was before (against that line) and glue it in place. I
positioned it using a single spring clamp and aligned the upper end as closely as I
could, then aligned the lower end as well, and added a large spring clamp in that
location. Finally, I re-adjusted the upper and lower clamps until both ends were
perfect.
Then I removed the lower clamp, and, using a thin palette knife, I ladled hot hide
glue into the space between the neck and fingerboard, sliding the blade up the neck
as far as it would comfortably go, and replaced that clamp so that it squeezed out
hot hide glue all around. I cleaned up the excess quickly, and double checked to
make sure that the position was again perfect.
Then I removed the upper clamp, and repeated the gluing routine, but this time, as
I cleaned up, I kept adding more clamps, removing a previous one, and wiping
carefully, until I had four clamps in place and no glue drops where they did not
belong.
Fingerboard installed with hot hide glue and spring clamps.

103
That was pretty much the end of the day. My hands were tired and hurting, from
carving the ebony, and I had other things that needed to be done. Much later, I
came back and removed the clamps:
Side view with fittings.
Back view with fittings.
The nut has to wait until the fingerboard has been planed, scraped, filed, and
sanded to exactly the right curvature, and then polished silky-smooth. We call that
“dressing” the fingerboard. After that it will be “set-up” time.
The next chapter will show the finished fiddle, strings and all.

104
Chapter 17
Finally Finished: Set-up and Playing!
Fair Warning:
I got “cranking on the task” again, and did not take photos until the job was done. I
will explain, in text, what I did in each step. What I accomplished was to:
Dress and polish the fingerboard
Install, file to final shape (including string grooves) and polish the nut
Install the sound-post
Drill and finish the string-holes in the pegs
Fair in the ends of the nut with the sides of the upper end of the fingerboard
Polish the saddle and endpin
Polish the “handle” portion of the neck one last time, and
Touch up the varnish around the saddle and other “dings”
Rub 2-3 drops of shellac into the neck: just enough to seal and polish it
Fit the bridge
Fit the tailpiece
Install the strings and chinrest
Play that thing!
Dressing the Fingerboard
When we last looked at the fiddle, the fingerboard had been permanently glued in
place, but it had not been planed to the proper curvature, either longitudinally, or
transversely.
I want the completed fingerboard to have just enough “scoop”
longitudinally, that there is nearly a string’s-width of clearance under the
center of the largest string. This seems to help prevent buzzes, among other
things, and helps with intonation, I think.
The transverse curve is set at a 42 mm radius.
o I have a steel template I made of scraper stock that is flat on one side,
and has the 42 mm curve on the other. I primarily use it to check the
curve, but I can also use it to scrape, and sometimes I do so.
105
All the board-dressing has to be done with the nut removed, obviously. It is smart
to mask off the scroll with something, too– tape rags over it, maybe, to prevent
hitting it with the plane.
I began with the small “hammer-handle” curved-sole plane, reducing the surface in
the center of the board; then a very small, inexpensive Stanley plane, razor-sharp
and adjusted for a fine cut. I checked every few minutes to see how the curve was
developing. When it began to look reasonable, I switched to a scraper, working
diagonally across the board, to get rid of the plane marks. Then I switched to a
coarse Swiss file, held flat on the board, lengthwise, and working up and down the
board until all the “dull-spots” had begun to be more shiny. I check the curve again
when it is all smooth, then switch to abrasives, using a hard plastic block that looks
like Teflon, but is some sort of high-density plastic they use at work sometimes.
This was given to me, as a scrap, and it works well for a sanding block, though a
hard wooden block would be fine, too. It is about 3″ long, 1-1/2″ wide, and 1″
thick.
I started with about 100 grit, then almost immediately switched to 220-grit, then to
400 grit, then to 600 and finally to 1500 grit. With each change, I worked up and
down the board until all the board had the same look: all dull to the same degree—
no irregularities. After the 1500-grit work the board was very shiny, and exactly
the right curvature in both directions.
Installing the Nut
Ultimately, the nut has to support the upper ends of the strings, just a little above
the surface of the fingerboard: about the thickness of a good business card is ideal.
Bear in mind that every “non-open” note (fingered, that is) is actually touching the
fingerboard, so the closer you can get to the board without touching it, the better.
This does require that the fingerboard be perfectly dressed, without even the
slightest hump or hollow: otherwise it will buzz, for sure.
I had already shaped the nut so that it was about a millimeter taller than the end of
the fingerboard, exactly the width between the end of the fingerboard and the
beginning of the pegbox cavity, and curved to perfectly match the top of the
fingerboard. Also, the top of the nut has to “roll off” into the pegbox smoothly, so
that there is no sharp break in the curve as the strings go over the nut toward the
pegs. We are trying to avoid any unnecessary stress risers in the strings. Strings are
expensive, and they break easily, if they are stressed over a sharp edge.

106
The sides of the nut have to fair smoothly into both the fingerboard and the
pegbox. A player will feel a sharp edge there, immediately, and will not like it.
I glued the nut in place using the amount of hot hide glue that covered the end of a
toothpick. It doesn’t take much at all. Some people only glue the nut to the
fingerboard end, not the neck. In some ways that makes sense to me, but I am still
in the habit of gluing to both surfaces. Probably I ought to change that.
Consider this: the pressure of the strings, alone, is holding the nut immovably in
place; the only reason you need the glue at all is so that you don’t lose the nut
when you are changing the strings. (Ah, well… maybe next time.)
Soundpost
While the glue on the nut was drying, I fitted the soundpost. I want the completed
soundpost to start out about one post-width behind the treble foot on the bridge,
and pretty much centered on that foot, laterally. In addition, I want it vertical:
parallel with the vertical edges of the end and corner blocks. So I remove the end-
pin, shove my bi-focals as close to the hole as possible, and, using a bright light
source, I maneuver the soundpost into the position I want it. Too tight is better than
too loose, as I can keep trimming until the fit is perfect. I can’t put wood back,
though, so if I make it too short, the game is over and I have to begin again. (I have
done that many times. This takes practice, believe it or not.) A perfectly fitted
soundpost is airtight on both ends, just tight enough that it will not fall over when
you change the strings, and in exactly the right spot. I will share how I adjust it,
though there are undoubtedly as many opinions about that as there are luthiers, so I
expect many will disagree. The adjustment has to come after the strings are tuned.
String-holes in the Pegs
By this time, the nut was dry enough I could handle it without fear of knocking it
loose, so I could drill the string-holes in the tuning pegs. I used a 1/16″ bit, in an
“egg-beater” style hand-cranked drill, to pierce the pegs.
Knowing that the pegs will work their way deeper, over time, as they are used, I
have deliberately cut the pegs just a little bit short, so that as they work deeper,
they will not stick out the other side of the pegbox too far. With that in mind, I also
place my string-holes slightly toward the fat end of the peg, inside the box, so that
it will not eventually disappear into the other cheek of the pegbox.

107
I mark the locations with the tip of my small knife, and drill them out, avoiding
going through into the pegbox back. What I did this time was to drill part way, and
then remove the peg, and complete the hole with the peg held freehand. A lot of
luthiers make a drilling jig, which emulates the pegbox, and holds the pegs firmly,
and is much more accessible while offering no danger to the fiddle. (I keep telling
myself I need to make one of those…one of these days I will get around to it.)
After drilling the holes, I dress the ends of the holes with a tiny round file, so they
offer less stress to the strings where they pass through the holes.
String-grooves in the Nut
At this point I felt confident that the glue had set on the nut, so I carefully
measured and scribed the string grooves in the nut. Then I filed each groove, using
an appropriately sized file. As I said before, I use the little tip-cleaning files
available in welding shops. You have to make sure you are actually getting the file-
type cleaners…the new ones are just twisted wire.
I cut each groove down until it seems the right height above the surface of the
board, but I know it will require some fine-tuning once the strings are actually
installed. I extend each groove over the curve, and aiming the direction I want the
strings to go. I slope the outside two string grooves inward a little to keep the
strings from rubbing on the inside of the pegbox cheek.
Final Polishing
I also file and scrape both ends of the nut, to fair them into the sides of the upper
end of the fingerboard, then polish the sides until the joint is very smooth. I
polished the saddle and the end-pin, until the ebony glowed like jewelry. I realize it
will get dull later, but for now it looks great.
I went ahead and polished the “handle” portion of the neck one last time, using
600-grit and then 1500-grit. Finally, I used a tiny artist’s paint brush to touch-up
the varnish anywhere it had been scratched or in any way damaged during
installation of the fitting, and, applying a dime-sized dot of shellac to a rag (about
2-3 drops), I rubbed it vigorously into the handle portion of the neck to seal it
against sweaty hands and to polish it so it glows. (Nice-looking fiddle!)
Fitting the Bridge
I no longer use sandpaper in cutting a bridge. I have finally gotten good enough at
spotting what needs to be trimmed that I can achieve full fit without resorting to

108
abrasives or even chalk-fitting. This is a job for a sharp knife, and a “calibrated
eyeball”. I do sometimes finish up with a scraper.
I begin by setting the bridge blank (I used a Milo Stamm bridge blank this time) on
the belly of the violin, centered between the inner nicks of the f-holes. I position
the bridge with the branded side toward the tailpiece (away from the fingerboard).
There are many luthiers who do this the other way, with the brand toward the
player. That’s fine. I’m sure they have their reasons.
I tip the bridge toward the tail-block just enough to make the “south side” of the
bridge perpendicular to the belly (at that point). Then I usually slide a sharp pencil
along the base of the feet on the south side, to establish the curvature of the belly
on the feet, so I know where to begin. When I am done, I want the back side (tail-
piece side–south side) of the bridge to be perpendicular to the belly, and the feet to
have achieved an “air-tight” fit in their respective spots. When I have managed that
starting point, I can begin carving away all “excess wood” on the upper part of the
bridge.
I carve, using a very sharp, fairly large knife, to get the feet fitted to the top. To
complete the fit, I sometimes switch to a very sharp, slightly curved scraper. Once
the feet fit perfectly, I hold the bridge firmly in place, with one hand, and slide a
pencil along on the fingerboard with the other hand, with the pencil projecting out
far enough to scribe the curve onto the bridge. That line will not be correct, but it
gives me a place to start. I usually raise up the center of the curve about 3 mm; the
bass side about 2.5 mm; and the treble side 1 mm. I fair in the curve across the top,
so that it is similar to the fingerboard but more sharply curved.
Using the knife, I trim the top down to that new line, or just above it a millimeter
or so, and establish the string positions, making small notches for each string, in
exactly the right location (but knowing that the height will be wrong.) I then set the
height using the strings. I install the tailpiece and all the strings, spacing them out
across the bridge, in their respective slots, and measure the height of each string. I
want about 5 to 5.5 mm on the C string, about 5.5 to perhaps 6 at most, on the G
string, the same on the D, a little lower on the A, and about 3 to 3.5 mm on the E
string. I check, calculate about how much to take off on each string, if any, then
use a string jack to raise the strings so I can remove the bridge. The string jack will
also maintain tension while I work on the bridge, so I can just slip it back in and
check the height as I work.

109
When the string heights are right, I complete the trimming of the bridge, removing
all excess wood. I open the “kidneys” and “heart” somewhat, lower the knees, thin
the bridge from front to back, so that the upper edge is about 1 mm to 1.5 mm
thick. I thin the feet so they are about 1 mm thick at the toes, and thin the ankles
appropriately, as well. I don’t like the look of a fresh-cut bridge, so I rub that fresh-
white bridge on the back of my head, where there is enough oily scalp under the
hair, to take off the white, and leave a thin oily film that looks a little more
subdued. At that point I tune the violin, and check the height of the strings at the
nut. I loosen one string at a time, and file the grooves until the strings come very
close to the fingerboard, at the nut, then re-tune. (Strings in this case were a
Helicore 5-string set. They usually seem to work well.)
Adjusting the Tailpiece
This time I got lucky, and arrived at the correct adjustment on the first attempt, but
usually I have to take the strings back off, and adjust the tailpiece. What I try to do
is to adjust the ratio of the vibrating string length to the “afterlength” between the
bridge and the tailpiece to exactly a 6:1 ratio. In this case, the vibrating string
length was exactly 330 mm, and the afterlength (measured from the contact point
the bridge to the contact point on the tailpiece) was exactly 55 mm. Couldn’t be
better!
Installing the Chinrest
There are many types of chinrests, made of many different substances. I have made
them from scratch, and have bought ebony, boxwood, Rosewood, and Bakelite
chinrests. People have different tastes and needs (Allergies are a problem for some
people, using some substances…Cocobolo is a bad one for some people;
Rosewood for others.) I used Bakelite, this time, on the theory that it is light, and
will not dampen the vibration of the instrument very much. Besides, I have never
heard of anyone having an allergic reaction to Bakelite. But fittings are pretty easy
to make, and if someone wanted a curly maple chinrest, or whatever, I would
certainly make it for them.
Play-in, and Soundpost adjustment
I can’t prove that “play-in” really happens. Most players feel that something
changes in the instrument over the first month or so of playing…and that it
happens faster if one plays aggressively, loudly, and frequently. So, initially, I play
a lot of double-stops, re-tune frequently, and play a lot of scales and songs that are
110
simple enough I can manage them. (I only play by ear, and nothing fancy; Hymns,
waltzes, etc., and a few Celtic pieces thrown in…)
I adjust the soundpost to try to get the best balance from string to string, and the
best quality of sound I can coax out of the violin. I begin by tuning very carefully,
then I play the G note on the C string, for instance, and alternate between the open
G and the G note on the C-string, listening to the quality of sound, and the relative
volume, brightness, etc. If one is significantly weaker (say, the C-string is
weaker than the G), then I fudge the soundpost very slightly toward the weak-
sounding string. Usually just a tiny move is sufficient. Once I have adjusted so that
the balance is fair across all five strings, if I want it brighter as a whole, I can move
the soundpost slightly north, etc. I still want it close to vertical, and still have to
have that “air-tight fit”.
Over the next week, I will play it a lot, and keep checking the sound, the balance,
etc.
Results?
This seems to have about the strongest C-string of all the five-string fiddles I have
made. I don’t know if it is due to the Koa wood, or the special arching I
experimented with this time. I really hope it is the arching, as I probably can repeat
that, but may never get to work with Koa again. The only way to find out is to
make another fiddle of some other wood, and duplicate the arching.
The balance is good across all five strings, and quite strong…definitely on the
bright side. I expect that the hard heavy Koa wood, in thin graduations, affected
that aspect of the sound. The sound is clear, even in higher positions on the bass
strings. My anticipation is that, as it plays-in, the sound will open up a good deal
more, and mellow somewhat.
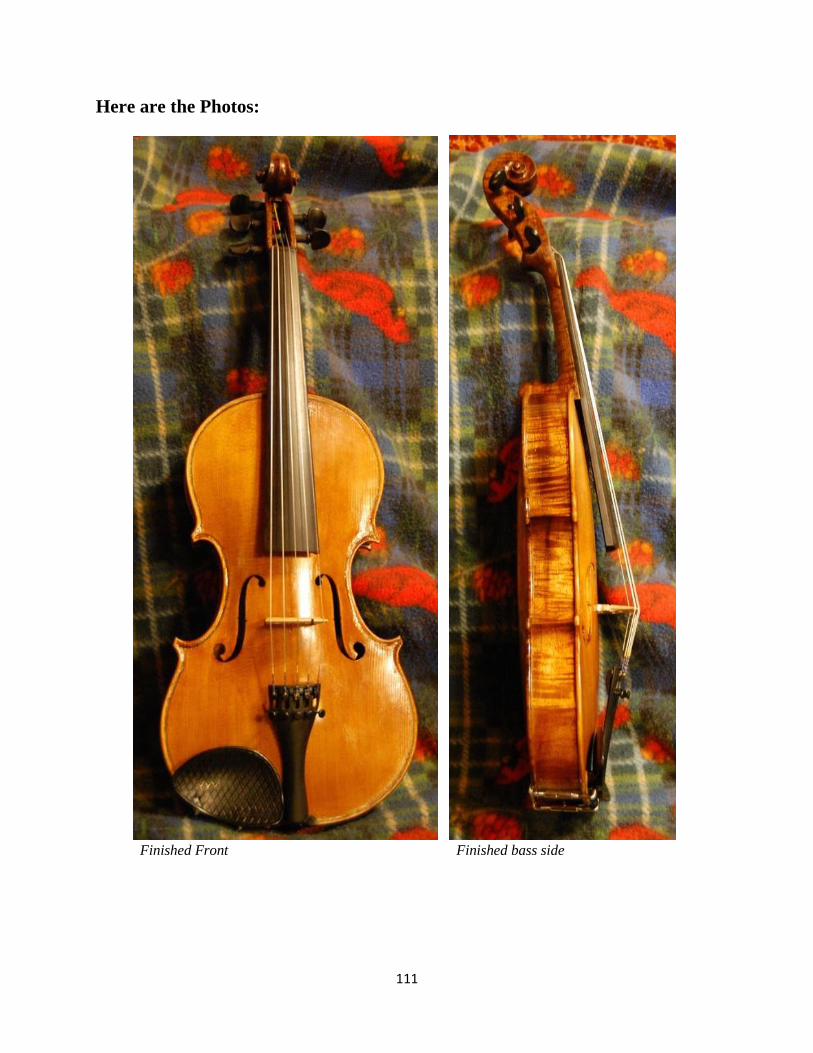
111
Here are the Photos:
Finished Front Finished bass side

112
Finished Treble side Finished Back

113
Bass side scroll Treble side scroll
Back of Scroll Front of Scroll

114
Upper “Fleur-de-lis”
Lower “fleur-de-lis”

115
Epilogue
The Five String Fiddle Finally Went Home
(More “Professional-Looking” Photos:)
We (my wife and I) went to the home of the customers who had commissioned the
Koa Five-string Fiddle. They received us graciously, and were thrilled with the
new instrument.
We spent an hour or so visiting, playing the instrument, etc. and finally left to go
back home.
The new owners generously volunteered to lend me their new 5-string Koa fiddle
in April to show at the Marylhurst University Musical Instrument show. So, those
who came to the show were privileged to play the curly Koa Five-string fiddle.
Here are pictures my son took the night before we made delivery:

116
Front view

117
Bass side

118
Treble side

119
Back view

120
Bass side scroll

121
Treble side scroll

122
Back side scroll

123
Front side scroll

124
Bass side f-hole detail
These photos were a lot better than the ones I took:
I thought some people might like to see them.

125
Some Suggestions for the Reader:
If you catch the (yes, it is contagious) lutherie bug, here are some suggestions:
Books:
Violin Making, Step-by-Step, by Henry Strobel
o This, as the name implies, is literally a step-by-step manual for
building your first instrument by pretty much traditional methods. It is
inexpensive, at around $30, and includes a full-size paper pattern
(two, actually; one to use, and one to leave in the book.) The pattern is
copied from an instrument by Bisiach, but it is very similar to a
Stradivari-pattern violin. You could also use the book and use a
different pattern, if you have one you prefer. But I have known a
number of people to build their first violin solely from this book, and
turn out a very respectable first instrument, some of which are
currently being played in symphony orchestras, believe it or not.
The point is, this book gets results. You can certainly use it as a
foundation to better things later on, and not break the bank getting
started. That is why I have consistently recommended it as a “first
primer” for lutherie, above all the others available.
I have a friend who I coached through his first violin and his first
cello. He used Henry’s books for both. He had never worked with
wood before, and knew nothing about tools when he began. He did
break a few ribs, as I predicted, so some of the ribs on the violin do
not match the others…but the violin sounds great, and is being played
by one of the first violinists in his orchestra—on loan—and he is
playing the cello there, himself. (The violinist wants to buy his violin,
but he refuses to sell it, because it was his first instrument.)
The cello was built using Henry Strobel’s Cello Making, Step-by-Step,
and it is a truly magnificent instrument, especially when you consider
the “pedigree”.
Art and Method of the Violin Maker by Henry Strobel
o This book goes into some of the finer points of violin-making, as
Henry says on his website.

126
Useful Measurements for Violin Makers by Henry Strobel
o This book is a collection of measurements needed in lutherie, and is a
reference book for many luthiers today.
The Art of Violin Making by Chris Johnson and Roy Courtnall
o This is a much richer “diet” in lutherie-related reading, and, as I write,
it is about $85 on Amazon. Lots of high-quality color photos of old
master instruments, as well as very clear and very correct instruction.
One of my teachers, Michael Darnton, recommends this book almost
exclusively, because he feels that there are no “false leads” and
nothing is missing… except a pattern. There is no pattern with this
book—you simply have to go find one and work up your own
templates, molds, etc. (He suggested posters from The Strad
magazine. You can look them up online—most are about $15 or so,
and most have good technical information and drawings, dimensions,
etc. on the back side.)
Had I purchased this book first, I might still be “drooling over the
pictures” and have yet to build my first instrument. It is too good a
read, and not straightforward enough to make me want to put down
the book and start moving wood. I now have two copies of it, but I
still use Henry Strobel’s books more frequently, when there is a
measurement (or most anything else) that I can’t remember.
Wood:
Use the best wood you can get, but not necessarily highly figured wood.
Highly figured wood is more difficult to work with, and you may simply
cause yourself undue frustration. It is your call, however: it very much
depends on your level of woodworking experience…and patience.
There are a lot of good sources for tonewood. I have bought from John
Tepper, of Tepper Tonewoods, from Elon Howe, of Wood n Strings, from
The Wood Well, and from International Violin Company. All were good
sources. You can snoop around online and find a source.
The reason I say to get the best wood available, is that you will spend 200+
hours on your first violin, and the cost of the wood will be negligible
compared to the cost of your labor. You want the finished work to be

127
something that you feel good about every time you see it or play it… not
something you feel like hiding because you used crummy wood.
Get extra rib-stock. You can almost guarantee you will break a few ribs in
the learning process, and violin ribs are cheap. This is one reason I
recommend building a violin or viola first, as opposed to a cello or double
bass. It is much more difficult to bend the larger ribs, and replacing them is
not cheap.
Use traditional woods until you have mastered the technique. That way,
when you branch out and build a fiddle out of zebrawood, or purpleheart, or
something, and it “doesn’t sound right”, you will know it was the wood
choice, and not necessarily your skill or technique.
o Maple is the traditional wood for back, ribs and neck, Spruce for the
belly and bass-bar, and either spruce or willow for the blocks and
linings. Ebony has become the standard for fittings, fingerboards, etc.
but I have sometimes used rosewood or ipé for fittings. African
Blackwood is gaining popularity, too, as a substitute for ebony.
Tools:
Look over the various lists (especially those in Henry’s books) and only buy
what you really need. My first instrument was a small viola, and I had a
small set of Flex-Cut® gouges, one homemade gouge I forged from drill-rod,
a small homemade finger plane, and some homemade scrapers. I gradually
acquired more tools as I continued to build, and, of course, now I have tools
I never use. The point is, you DO want good steel in the tools you buy or
make, but you do NOT need a $300 hand-plane to build a good violin.
I searched second-hand stores, and estate sales, etc. to find tools. You can do
this, if you want to…and it doesn’t have to be a very expensive project. I
spent $60 on my first instrument. No joke.
Workshops:
The only one I can recommend without reservation is the one put on by
James Brown Violins, in Claremont, CA, every summer. It features Michael
Darnton as the primary instructor, and I have seldom met a more effective
teacher. (Other teachers are there, too, but teaching other skills.)