fixing guide - original style · fixing guide. 2 contents page/s ... * a detailed fixing guide for...
TRANSCRIPT

for Ceramic, Porcelain, Stone and Glass Tilesand Mosaics
FIXING GUIDE

2
Contents Page/s
Introduction 3
Successful tiling 4
Glossary of tiling terms 5
The right tools for the job 6
Selecting tiles / Suitability 7-9
Shade variation / Polished tiles 10
How many tiles will you need? 11
Preparation 12-14
Planning 15-17
Marking out the work area 16
Sealing your tiles 18-20
Sealants, adhesives, grouts 21-29
Fixing tiles 30-39
Cutting and drilling tiles 40
Cleaning and maintenance 41-42
Sealing Terracotta 43
Limits of liability 44
2
CONTENTS

3
Welcome to Original Style’s Fixing Guide for Ceramic, Porcelain, Stone and Glass
Tiles and Mosaics
Introduction
Tiles from Original Style come in a wide range of types, sizes and finishes, with a design to suitevery taste and every home. Using this guide will help you to:• Choose a suitable product for your project• Calculate how many tiles you require• Prepare and plan for the installation• Mark out the work area• Fix, grout and seal• Clean and maintain your finished installation
This guide provides installation information on the following Original Style products:
Artworks and Artworks Masterpieces* EarthworksDesigner Classics La Belle CollectionGlassworks and Splashbacks Pop ArtMosaics Tileworks
Separate Fixing Guides are available for Victorian Floor Tiles and Odyssey.They can be downloaded from here: www.originalstyle.com/guides
* A detailed fixing guide for Klimt masterpiece tiles is included with each product.
Where applicable, Original Style tiles are manufactured and tested to BS EN14411
3
INTRODUCTION
4
The key to success is to:1. Gather together all the tools, tiles and materials you need before you start2. Plan the installation3. Thoroughly prepare the surfaces to be tiled; time spent on this will save time later4. Keep the work area clear and clean as you go along5. Work methodically and avoid mistakes by allowing sufficient time for each task
This guide is not intended to be a definitive guide to fixing tiles. If you are uncertain about anything having read this guide you should consult a professional tile installer.
PLEASE NOTEIt is the responsibility of the purchaser of Original Style products to adhere to the following guidelines in accordance with the British Standards Institute Wall and Floor Tiling Codes of Practice:
BS 5385-1:2009 Code of practiceWall and floor tiling. Design and installation of ceramic, natural stone and mosaic wall tiling in normal internal conditions.
BS 5385-3:2014 Code of practiceWall and floor tiling. Design and installation of internal and external ceramic and mosaic floor tiling in normal conditions.
• To store products in an adequate, clean, dry and secure space that is free from frost and moisture• To ensure that installation is carried out in adequate artificial lighting conditions• To ensure that work is adequately protected during and after fixing
IMPORTANT INFORMATION
METAL MOSAICS AND MIXED MOSAICS AND BORDERS CONTAINING METALDue to their metallic, conductive nature it is essential that a qualified electrician carries out all electrical work around mosaics and borders made from or containing metal.
GLASSWORKS SPLASHBACKSCare must be taken when handling Splashbacks before and during installation. They are made from toughened (also known as tempered) glass, which is a type of safety glass. Toughened glass should receive the same care as annealed (ordinary) glass. Careless handling and improper installation sometimes causes edge damage, and delayed breakage can occur when edge-damaged tempered glass is subjected to mechanical stress, as in installation. Further, if cut, knocked or dropped, this material will produce instantaneous total fragmentation.
DO NOT under any circumstances attempt to cut or drill a Splashback.
OPTICAL HAZING‘Optical haze’ is a phenomenon that can occur with polished tiles, it is also known as ‘diffused reflection’. In relatively rare occurrences it can appear as a haze or dull patch under certain lighting conditions.If at all unsure, please place a number of tiles in situ and view them in different lighting conditions prior to fixing, to check if any of the tiles are affected.Porcelain tiles with optical hazing still conform to all aspects pertaining to EN14411.Please note that claims cannot be considered after the tiles have been installed as installation constitutes acceptance of the tiles.
If you are in doubt about anything stated within this Fixing Guide please ask your Original Style retailer for further information.
SUCCESSFUL TILING

5
Adhesive The glue used to fix tiles to the substrate. There is a wide choice available, so always ask your stockist for advice on your particular project and type of tiles.
Grout A hardening compound used to seal the joints between tiles. There is such a wide choice available, it is best to seek advice from your stockist on your particular project and type of tiles to be used.
Movement joint
Where tiles meet another surface, the joint is filled with silicone sealant, not grout, to allow for minor expansion and contraction. Should be placed according to architect’s specifications, over existing joints and any changes in plane. Movement joints eliminate stress transferring from the substrate.Internal: Please refer to BS5385-1 2009, 6.5-6.5.2 External: Please refer to BS5385-3 2014, 7.1.6.1-7.1.6.4
PointingWhere grout is mixed to a thicker consistency than usual and applied into the joints with a squeegee, pressed in firmly and finished off with a grouting tool to give a neat finish. Any excess is removed using a damp sponge and the surface wiped clean.
Render A wall finish made up of sand and cement, usually made up of sand/cement in the ratio of 4:1.
Screed A floor screed is usually a cementitious material made from 1:3 or 1:4, 5 ratio cement to sharp sand.
Silicone sealant A material with elastic and waterproofing properties used to fill movement joints instead of grout.
Solid bed A method of tiling where there are no voids under the surface of the tile.
Slurry grouting
Where the grout mix is runnier than normal and is spread across a large area at a time using a spreader. Care is needed to ensure the grout goes right into the joint and no areas are missed out. This method is recommended where a pitted tile has been fitted and the pits or holes need to be filled in for hygiene or cleaning reasons, for example on a kitchen floor or splashback.
Stud wall Internal walls in a home, usually constructed of plasterboard over a wooden framework.
Substrate Any surface on to which tiles are laid.
Thin set A layer of adhesive applied to a depth of less than 5mm /1/4”.
GLOSSARY OF TILING TERMS

6
These tools will help you complete your tiling project to a professional standard. Most are readily available to buy or to hire.
Adhesive spreader/ trowel The notched edge of this tool ensures an even spread of adhesive
Chinagraph pencilFor marking any tiles that need cutting. This will not stain the tiles and will resist being washed away when using a water-fed cutting machine. Never use a felt tip pen as they can leave permanent marks.
Drill Use a masonry or tile drill bit. For glass use a hollow tipped bit.
Electric water-fed diamond wheel cutter
A diamond wheel cutter is the best way of cutting difficult tile shapes. These are available from tool-hire companies, tile shops, or DIY stores. Follow the manufacturer’s advice regarding protective goggles, masks and gloves.
Epoxy squeegee A rigid squeegee specifically designed for the application of Epoxy grouts.
Eye protection, gloves and dust mask
It is vital that you use all possible protection when using any cutting instructions/machinery. Always use personal protective equipment as advised by the HSE. Visit www.hse.gov.uk for further health and safety advice.
Gauging trowel For removing the grout from its container, or the vessel used for mixing the grout. Use it to place adhesive onto a bedding trowel.
Glasscutter
This is specifically for cutting glass. Original Style Glassworks tiles cannot be cut or shaped like ceramic tiles, but a glasscutter makes cutting tiles with a thickness of 5-6mm/1/4” easy. Simply mark the outline of your cut, score it with the glasscutter, lay a thin wire under the score and apply even but firm pressure either side. An acceptable tile cutter is a Rubi DW250N with a CPC2 blade. Tiles may be scribed and snapped using a Rubi TR tile cutter with a 18mm/ 3/4” scoring wheel.
Grout finishing toolThis tool is run along the grout lines before they set completely to give consistent, neat finished grout lines. A piece of dowel can work just as well. NB: NOT to be used on Epoxy grout.
Light, white rubber mallet Useful for tapping natural stone tiles into the adhesive, and levelling up.
Spacers
These small pieces of plastic are inserted between the corners of the tiles or mosaic sheets to provide consistent spacing. Push them in side-on so they are at right angles to the surface, and place them at regular intervals to maintain the spaces, and remove them before the grout is applied. For mosaics, ensure that the spacers you use are the same width as the spaces between the individual tiles on a sheet.
Spirit level /laser level /plumb line
One or more of these tools will be necessary to ensure that your tile installation is level and that verticals are straight. A plumb line can be made from a small weight on a length of string.
SpongesUse to remove grout residue and for smooth joints. Always use new sponges and grouting tools rather than old sponges and tools which may have adhesive or grout residue which could scratch tiles.
Squeegee orrubber trowel Used for spreading grouting compound into the spaces between the tiles.
Steel ruler /tape measure
For accurate measuring. NB DO NOT use a steel ruler on stainless steel mosaics.
Tile cutter A scribe and snap machine for straight cuts.
Tile gauge A device for accurately measuring and shaping your tiles.
Tile nippers A specialist tool for ‘nibbling’ away unwanted sections of tiles.
Wedges These are wooden or plastic for minute tile adjustment.
THE RIGHT TOOLS FOR THE JOB

7
This is obviously the most important and enjoyable task. With such a large range of tiles to choose from,you may like to order some samples to see how they fit in with the rest of your furnishings and decorations.
Tiles differ in size and thickness and choosing the right size is just as important as choosing which type. Small tiles and mosaics are often better suited to covering small areas, whereas larger areas look better with larger tiles. Suitability of your chosen tiles is also an important factor.
SUITABILITY OF TILES FOR YOUR INSTALLATION
Here are some guidelines but before you plan your installation please refer to the latest specific product brochures for limitations and suitability regarding colour variation, durability, interior/exterior use, floors, showers/wet rooms/swimming pools and special notes. If you are in any doubt about the suitability of any tiles for your particular requirements, please contact our Customer Services Team for advice by emailing [email protected].
Range Interior walls Interior floors Exterior use*
Artworks YES NO NO
Colourworks YES NO NO
Designer Classics YES NO NO
Earthworks YES YES most are: check suitability of specific products NO
Glassworks YES NO NO
La Belle Collection YES NO NO
Mosaics YES YES some are: check suitability of specific products NO
Pop Art YES NO NO
Serenity YES NO NO
Splashbacks YES NO NO
Tileworks YES YES most are: check suitability of specific products
YES some are: check suitability of specific products
See separate fixing guides for the following:
Odyssey YES YES YES
Victorian Floor Tiles YES YES YES
*Exterior usePlease check if a specific product is suitable for exterior use. If you are uncertain please ask your Original Style retailer for further information.
Swimming pools Please refer to the latest Original Style Pool and Spa brochure.NB the following are not recommended for use in swimming pools:Earthworks natural stone tiles and stone mosaics, certain mosaics including metals, glass tiles.
SELECTING YOUR TILES

8
SUITABILITY OF SPECIFIC PRODUCTSARTWORKSSigma, Victoria and Albert Mouldings
Not recommended for use in areas subject to wall movement due to their shape. It is imperative that care is taken when grouting these to ensure that moisture cannot get into the back of them, as this may cause the moulding to crack.
Victoria Mouldings Should not be used on any wooden surfaces due to thermal expansion of the wood which may cause the moulding to crack. Silicone expansion joints should be incorporated above or beneath these mouldings.
Victorian Green Tile and Mouldings, Gold and Platinum Tiles and Mouldings Art Deco Fan Tile, Black Fan Tile, Manhattan Border and Black Manhattan Border
These tiles and mouldings should never be used in wet areas such as showers, bath surrounds or basin splashbacks. These tiles have a copper-based glaze which is prone to discolouration by very mild acids often found in the home. To avoid such discolouration they should be cleaned only with pure water and should always be wiped dry after cleaning
EARTHWORKSPlease check suitability for all products on individual pages throughout the brochure. Original Style cannot accept responsibility for any faults after tiles and mosaics have been fixed, for issues raised in this Fixing Guide once the product has been laid or installed.Earthworks tiles and mosaics are not recommended for external use as natural stone is porous to some extent. If laid outside, it is possible water could be absorbed and the tiles become susceptible to frost damage.Stone is a natural product and therefore subject to colour variation, pitting, blemishes, chipped edges, size variation and sometimes staining. Natural stone may fade in UV light. No guarantee can be made against this happening.Adhesive: When installing light coloured porous stone products such as limestone and travertine it is advisable to use a white, fast setting C2 type of adhesive. This will reduce the possibility of water staining on the surface of the tile from the adhesive during the curing process. It will also reduce colour ‘show through’ on the light coloured stone tile.Sealing, maintenance and cleaning: natural stone tiles and mosaics need to be sealed before use.
TravertineVoids or pinholes can sometimes appear on the surface of travertine tiles after installation. No guarantees can be given against this happening. Any voids that do appear can be filled using grout or epoxy resin. It is vital that this feature is taken into account when choosing travertine.
Limestone
Care must be taken when installing any stone tiles, particularly limestone, on any timber substrate. The surface needs to be strong and rigid with no likelihood of movement, otherwise limestone tiles could suffer damage or cracking. Greyfriars Abbey is prone to surface scratching, an inherent feature of this particular stone. Any scratches that occur during use will blend in over time. Alexandrian Desert/Cream/Sun/Sand Limestone can contain areas of iron oxide. If these areas within the tiles are in prolonged contact with water the iron content may react and expand, causing delamination of the surface. The stone must be completely dry when first sealed, the correct amount of sealer must be applied following all manufacturer’s instructions.
MarbleOccasional veining effects are inherent features of this natural stone. As each piece of marble is individually cut into the various formats of trims, flat tiles, bevel edged tiles and mosaics, there will be differences in shades, tones and vein effects. This might be more noticeable when flat tiles and the smaller cut pieces such as the brick and bevel formats and mosaics are placed adjacent to each other. They may not match exactly however the overall impression will be stunning.
BasaltThe surface of Basalt is pitted with tiny holes or voids, an inherent feature of this particular stone. Black grout needs to be used with this product. Grout and clean the tile surface prior to fixing. This will prevent adhesive from being accidentally spread into the voids, which will cause grey speckling. Then grout using black grout in the usual way.
Natural Slate Delamination (flaking) sometimes occurs with slate due to the nature of this type of stone. If this happens during laying remove all loose pieces. If it happens at a later date, clean then reseal the affected area.
Terracotta As terracotta tiles are very porous they will need to be sealed. Visit www.originalstyle.com/guides for more detailed instructions on sealing and maintenance.
Sinks Although these sinks are re-treated with a resin seal we recommend that that they are sealed again before use. Seal in the same way as travertine floor tiles.
Pebble Mosaics To avoid visible grout lines, some pebbles may require adjusting slightly so that they interlock with adjoining pebble sheets.
Mixed Format Borders
Some borders contain metal. Extreme caution must be taken when using metal mosaics in an electric shower. Always consult a qualified electrician before installation.
GLASS TILES, GLASS MOSAICS, SPLASHBACKSAll Glassworks tiles including Splashbacks must be a minimum of 3cm /11/8” from any direct heat source. This will include any hot water pipe work concealed within walls and any radiant heat sources such as hobs, heated towel rails or radiators. Hot pans must not come in direct contact with glass Splashbacks. When cooking on hobs hot pans must be kept from Splashbacks by a minimum of 30mm, to avoid scorching the surface.
NB Splashbacks MUST NOT be cut.
NB Glass Mosaics with a mesh backing are NOT suitable for installation close to extremely high continuous heat sources such as woodburners. The mesh backing and adhesives are not designed to withstand the very high temperatures likely in these conditions.
We DO NOT recommend installing Glassworks glass tiles or Splashbacks onto wood or as counter tops. As with all glass products, glass tiles can be scratched. We recommend that care is taken during installation and that glass tiles are not put in high-risk areas for scratching. Avoid sharp objects coming into contact with your Glassworks tiles and never use any kind of abrasive product for cleaning.
SUITABILITY

9
LA BELLE COLLECTION
Crazed TilesTube Lined Tiles(Seaside Collection;Floral Garland)
Highly glazed ceramic tiles may craze with time, no guarantee can be given against this happening. Tube-lined tiles are more prone to this process and additional care should be taken as to where these are used. (Tube lining: the design outline is piped onto the tile by hand, then translucent coloured glazes are applied to create the final design). When used in wet areas, crazed tiles should be sealed with an impregnator to stop moisture penetrating and causing discolouration.
Laurel (Dark Green, code KE) and Graphite Glazed (code NN) Tiles
Only for use in dry areas and should never be installed in areas such as showers, bath surrounds or behind basins as a splashback. Laurel and Graphite glazed tiles have a copper-based glaze which is prone to discolouration by very mild acids often found in the home, eg lemon scented soaps. To minimise this, wash the tiles with clean water only and wipe dry immediately.
Use of tiles on counter top surfacesSnowdrop (code KA)Clematis (code KB)Camellia (code KT)
Snowdrop, Clematis and Camellia field tiles are manufactured with a harder glaze than other colours. Accordingly, these are the only colours suitable for counter top surfaces. However, that if using these tiles on kitchen work surfaces, knives and other implements can still scratch the glaze so the use of a chopping board or toughened glass surface protector is recommended. Tiles and grout must be sealed.
MOSAICS
Gold Fleck, Iridescent, Ethereal, Paper and Film Faced Mosaics
The surfaces and edges of certain individual tiles may be slightly uneven, creased, pitted or chipped. Such relatively insignificant imperfections should be considered normal and not the result of poor workmanship. When calculating the number of tiles/mosaic sheets for your installation, allow five to ten per cent extra for rectifying mistakes, imperfections and wastage purposes.
Tumbled Earth, Beach Washed, Frosted Pebbles
These are the only glass tiles suitable for floors, however slip-resistance may not be adequate for use in wet conditions
Mosaics made from and containing glass
All tiles made from glass must be a minimum of 3cm /11/8” from any direct heat source. This will include any hot water pipe work concealed within walls and any radiant heat sources such as hobs, heated towel rails or radiators.
NB Glass Mosaics with a mesh backing are NOT suitable for installation close to extremely high continuous heat sources such as woodburners. The mesh backing and adhesives are not designed to withstand the very high temperatures likely in these conditions.
We do not recommend that glass mosaics are used on counter tops because of the likelihood of scratching.
Inca Gold EW-INGMOSS15,Inca Gold EW-INGMOSS23, Armada Gold EW-AMMGMOS, Sunflower EW-SFWMOS(Elite Collection)/Seasons/Emotion/Safari/Mystique
These mosaics can be placed in kitchens and bathrooms but are not suitable for showers.
Feng Shui range:Kobushi GW-KOBMOS,Sukai GW-SUKMOS,Tekari GW-TEKMOS,Yari GW-YARMOS,Zao GW-ZAOMOS
Do not place in direct sunlight as this may cause them to fade over time.Not suitable for external use.
Only suitable for dry areas, not suitable for wet areas such as wet rooms, bathrooms, showers or splashbacks or where they will be exposed to excessive moisture. Do not install near heat sources.
Mosaics made from or containing wood, bamboo, coconut Ceylon EW-CEYMOSLombok GW-LOMMOSSurabaya EW-SURMOS
Only suitable for dry areas, not suitable for wet areas such as wet rooms, bathrooms, showers or splashbacks or where they will be exposed to excessive moisture.Do not install near heat sources.Mosaics made from or containing wood are subject to natural blemishes such asknots and holes.
Mosaics made fromor containing Shell: Purity EW-PURMOSMother of Pearl EW-PARMOSCarthage EW-CARTHBPearl Brickbond EW-PRLMOSBBPearl EW-PRLMOSInnocence EW-INNMOSGrace EW-GRCMOSModesty EW-MDYMOS
Not suitable for pools or excessively wet areas such as wet rooms and steam rooms, although they can be used in showers. Do not place in direct sunlight as this may cause them to fade over time.
Torque EW-TORMOS A three dimensional mosaic. Some edges will be sharp even after installation. Not recommended for installation where it can be brushed past or where small children will come into contact with the surface. It is important to take this into account before choosing this product.
Cuirassier Black EW-CURBBSteel Cuirassier EW-CURBSJules Verne EW-JUVEP
Only suitable for dry areas. Do not grout.
Alchemy Copper MosaicsSquare EW-ALCAC20 Cube EW-ALCAC48 Brick EW-ALCACBB
Earth & FireZamo EW-ZAMMOS
Must not be used in kitchens, bathrooms, showers and wet rooms. When installed outside and exposed to air/moisture the copper may, over time, form a patina of verdi gris (a green coating). It is vital that this feature is taken into account when choosing copper mosaics as the colour may change.
SUITABILITY

10
Shade variation may be an inherent feature of some Original Style glass, ceramic and porcelain tiles, whilst tiles and mosaics made from natural stone are prone to shade variations. We recommend that your tiles/mosaics are loosely laid out and ‘blended’ prior to fixing to achieve the most pleasing distribution of shades. Differences between batches can be more marked, so for this reason we recommend that you buy all the tiles at one time. No liability for shading issues can be accepted after installation.
Glassworks and Splashbacks: As each glass tile is individually coloured, there may be distinctive yet subtle variations in shade, especially between batches. When planning designs it is important to dry lay the tiles prior to fixing. This is particularly relevant regarding Metallica tiles. We strongly recommend that you buy all the tiles you need for your project at one time. Decorative tiles are made individually and are therefore unique. Due to the different density, glass tiles with a thickness of 5mm and 10mm will vary in tone.Because of the way they are made, the Aurora Borealis Splashbacks and frosted tiles have distinct differences between them, and if they are placed together they may not match or line up with each other, however, the overall effect will be stunning. There may also be shade variations with Champagne, Zinc and the other metallic effect Splashbacks and tiles.
Some tiles, for example, Earthworks natural stone, may be delivered damp. This is due to the manufacturing process and tiles need to be allowed to dry completely before installation. Moisture content may affect their shading as wet tiles may appear much darker than dry tiles.
POLISHED TILES
‘Optical haze’ is a phenomenon that can occur with polished tiles (within Tileworks and Earthworks ranges), it is also known as ‘diffused reflection’. In relatively rare occurrences it can appear as a haze or dull patch under certain lighting conditions. Porcelain tiles with Optical hazing still conform to all aspects pertaining to EN14411.
If at all unsure, please place a number of tiles in situ and view them in different lighting conditions prior to fixing, to check if any of the tiles are affected.
Please note that claims cannot be considered after the tiles have been installed as installation constitutes acceptance of the tiles.
SPECIAL NOTE REGARDING GLASSWORKS ARCTIC WHITE TILES
Because the Arctic White colour is achieved by using an optical clear glass, when two tiles of different length are placed side by side the amount of light passing through the tile can affect the colour. This effect is caused by refraction, prismatic effect or chromatic aberration. We recommend that any voids (e.g. corners) are fully filled before tiling to avoid this or other shadowing effects. The glass should also be cut using a suitable glass cutting electric tile saw with a glass cutting blade, with any uneven edges filed away with a suitable glass file. NB Splashbacks must NOT be cut.
Glass tiles and mosaics:Glass thickness will have an effect on the colour of the tile.
SHADE VARIATION / POLISHED TILES
11
HOW MANY TILES WILL YOU NEED?
Once you have decided on a type and size of tile, calculate how many you will need by measuring the area to be tiled.
1 How to calculate the square metre/square foot measurement of the area to be tiled:
Wall: measure the height of your room or the height you will require the tiling to end and multiply by the width.
Floor: measure the length of the area to be tiled and multiply by the width.
The result will be the square metre/square foot measurement of the area to be tiled*.
2 How to calculate the number of tiles required:
a) If the shape of the area to be tiled is a simple square or rectangle you can simply calculate the area of each tile and divide it into the area of the floor or room. This assumes that the area being tiled is square at the edges, if not you will need to allow some extra for part tiles.
b) An alternative method is to make a scale drawing of the floor and/walls on a piece of graph paper, draw the outline of each tile (including dados, trims and borders where appropriate) and add
them up.
We recommend that you allow for grout gaps, part tiles, wastage and any imperfections by adding at least five per cent to the total for mosaics and 10 per cent for larger tiles. It can be a false economy to only order the exact quantity. You may break some tiles when cutting or you may end up with awkward shapes that take more tiles than anticipated. There is nothing worse than getting near the end of the job only to find that you are short of one or two tiles, especially as colours can vary between different batches.
*Please use the handy guide on our website to quickly work out the number of tiles you will need.Each product brochure also includes ‘how many tiles will you need’ tables for your information.
If you have any problems calculating the number of tiles required please do not hesitate to email our Customer Services Team at [email protected].
TILE COVERAGE

12
The secret to a perfectly laid wall or floor is to lay the tiles as flat and as evenly as possible. To do this successfully you need the firmest, flattest and driest possible surface to work on. Some surfaces are ideally suited for tiling, others require a certain amount of preparation first, and a few are totally unsuitable.
StoragePlease store all Original Style tiles and any fixing materials such as grouts and adhesives in a cool and dry storage area. All tiles must be dry before installation. Original Style cannot guarantee that any products will be delivered completely dry (see note on Damp Tiles, further in this section).
Important NoteAll surfaces must be allowed to dry out completely before tiling. Failure to do this can result in moisture being trapped behind the tiles which can react with some tiles causing them to deteriorate over a period of time.
Tiles are completely inflexible. With this in mind, it is important to ensure that the substrate will not move otherwise cracking will occur. If there is movement in the substrate, we strongly advise that you seek professional advice before proceeding any further. Please look at www.schluter.com/6_1_ditra.aspx for further information.
Floors
ALL floors must be primed prior to installation.
Sand and cement (screed) floors must be completely dry. Allow seven days to cure then another 14 days to dry. Please be aware that certain installations may require a longer drying time, due to thickness of the screed, humidity within the room and weather conditions. Use a hygrometer to test for moisture.
Anhydrite screed and asphalt surfaces: always seek professional advice before installing over anhydrite screeds and asphalt.
Timber and joist floors must be rigid and solid without movement. The best way to achieve this is to lay marine plywood boards measuring 15mm/5/8” or thicker over the entire floor, screwing it down every 150mm/6” in each direction. Before screwing the marine ply down, apply PVA to the reverse and sides (but not on the surface to be tiled). We advise employing a tiling professional to tile onto all wooden surfaces, as it is essential that any movement or flexing in the floor is removed and special flexible adhesives are used.
Old stone, or quarry tiles are best removed. If this is impossible or impractical, and they are completely sound, they should be thoroughly cleaned of any contaminates i.e. dirt, grease, oil, waxes etc.
Vinyl tiles should always be removed. If tiled over they can sweat and cause debonding of the adhesive.
IMPORTANT NOTE:Do not lay tiles directly onto a bed of wet sand and cement. This may give rise to efflorescence on the surface of some tiles. Efflorescence (which is a natural chemical reaction) is the name for a whitish bloom that can appear if there is moisture within the tile. See section on Cleaning Earthworks Natural Stone tiles and mosaics.
PREPARATION

13
Underfloor Heating is an excellent and extremely efficient way of heating, either as the sole source of heat in a room or as a backup to an existing heating system. There are two types, electric and piped water. The electric method is extremely simple to install. A length of wire and rolled out mat is laid out on the substrate prior to tiles being fixed. A wall mounted thermostat enables complete control over the temperature. Natural stone, Victorian and Odyssey floor tiles, ceramic and porcelain floor tiles can be used effectively with underfloor heating systems providing expansion joints are incorporated. These absorb thermal expansion and contraction between the tiles and adjoining surfaces. Electric underfloor heating will heighten the floor by approximately 5-6mm/ 1/4”, so this should be planned into your installation.
When installing underfloor heating, please note that the adhesive and grout manufacturers’ instructions must also be followed. It is very important to obtain all information concerning installation, particularly regarding delay times before and after installation, before the actual work begins. If the installation is done incorrectly, the tiles may be subject to cracking, due to thermal expansion and contraction, and drying.
Underfloor heating should not be switched on until 28 days after installation of the tiles, to allow the adhesive to cure fully. On the first day after the 28 day curing period, turn up the heating to 5°C and then raise it by 5°C per day for the next five days.
Walls
ALL walls should be primed before tiling.
Make sure the wall to which you are fixing tiles is able to take the weight of the adhesive and tiles.
Painted surfaces are unsuitable for tiles. You will need to scrape off all loose paint and rub the whole surface down with coarse sand paper until all the paint is removed.
Plasterboard walls may be suitable for tiles, depending on their weight and how well the plasterboard is fixed to the stud wall underneath. You may need to seek advice on this. Normally a plasterboard wall which has not been skimmed has a load bearing of 32kgs per m2. These walls should be primed first, left to dry and then the adhesive applied directly to the wall.
Plaster is a suitable surface as long as it is dry and in good condition. Normally a plaster wall has a load bearing of 20kgs per m2. Remove any loose or crumbling plaster and repair it with new plaster or filler before rubbing down to a level finish. Prime the walls and leave to dry before commencing to tile. It is important to check weight restrictions before fixing tiles. Always seek professional advice if you are tiling over plaster.
Rendered walls can be tiled but, as with floors, new rendering must be allowed to dry out completely before tiling; normally a period of 21 days is recommended. Rendered vertical walls are a good base for tiles up to 15mm /5/8” thick with a maximum height of 3.6 metres/approx 12 foot. For tiles thicker than this the render must be reinforced with metal mesh screwed to the wall. Professional advice regarding this is recommended.
Papered walls cannot be tiled. Strip the paper completely, check for loose plaster or other damage, repair as necessary and then allow the wall to dry out thoroughly before priming.
Old ceramic wall tiles We do not recommend tiling over old tiles because of weight restrictions and stability. Old tiles should be removed and the exposed surface should be prepared as appropriate (see above).
PREPARATION
14
Wet rooms and showers: certain mosaics, natural stone, ceramic and porcelain tiles can be used in showers provided you take certain precautions in preparing the surfaces, and use the correct adhesive and grout. It is vitally important to prepare all substrates in any area subject to frequent water (such as around a bath, basin or shower) carefully to protect them from water absorption. The best substrates are normally water resistant boards such as Wedi or Marmox. The underlying surface must be waterproofed first, using a waterproofing kit known as a tanking system (see below), to prevent the ingress of water into the substrate. There must also be sufficient falls for water to drain away.
Tanking SystemsWe recommend using a tanking system for power showers, shower cubicles, steam rooms and wet rooms in hotels, guest houses, leisure centres, fitness centres and in domestic homes. These normally consist of a primer, a liquid waterproofing membrane that you brush on to the wall and floor, and a tape for reinforcing all internal corners. Please refer to specific manufacturer instructions or, preferably, get a professional to do this job. Tanking a previously painted surface is not recommended. You can usually apply the tile adhesive 24 hours after the wall and floors are waterproofed.
We recommend that all waterproofing processes are carried out by a professional.
Damp tilesYou may have to allow for drying time, as some products, in particular Earthworks stone tiles, may be damp following storage and transit. The drying time will depend on several factors such as the ambient temperature and humidity plus the size, thickness and substance of the tiles. To dry, stand damp tiles on end in a well-ventilated room, or place damp tiles in bright sunlight for at least 24 hours, allowing a flow of air around the tiles. This is best achieved by leaning them against an exterior wall at a 45o angle, while ensuring that the edges in contact with the wall and floor are sufficiently protected against damage. All tiles must be thoroughly dry before installation.
Any moisture content may also affect the shading as wet tiles may appear much darker than dry tiles.
Please note that in some cases it will take several days for tiles to dry out completely. We cannot guarantee that products will be delivered completely dry.
PREPARATION

15
It is important to plan the installation of your floor or wall before starting to fit any tiles. You need to consider the following in the planning stage:
Which adhesive and grout?There is a wide range of adhesives and grouts to choose from – see section below. Sealing TilesSome tiles need sealing before installation; again you may have to allow time for sealants to be applied and drying time. Please refer to the section below on sealing before starting your installation.
Protecting your installationWe advise that you do not install any tiles until heavy construction has been completed. In between the installation and putting a floor into service, it is important to protect the tile and grout in order to avoid construction related cleaning problems. Do not use plastic covers as this may induce sweating and discolouration by not allowing the grout and bedding material to dry adequately.
Protecting your tilesBefore installation, please make sure you store any fixing materials and your tiles in their packaging in a clean and dry area. It is particularly important that any paper faced mosaics must be kept thoroughly dry in order to avoid the mosaics separating from the paper sheets before installation.
PLANNING

16
MARKING OUT THE WORK AREA
FloorsBegin by taking a good look at the room. Establish the centre of the room by measuring the midpoints of two opposite walls and drawing a line between these points. Now find the centre of this line.
1 You may have to adjust the midpoint tile or mosaic sheet to re-duce wastage as you reach the edges of the room. You can use the midlines as edges or centres of the first row of tiles.
2 Now lay out the tiles or mosaic sheets loosely, allowing for the joints. The joints will depend on what you are trying to achieve and on your choice of tiles/mosaic.
How wide should the joints be?• If you have chosen a tile with a straight edge finish (which should be fairly even), tiles can be laid with
thinner grout lines • If you have chosen a rustic style tile, the tile edges can be uneven and to allow for this you will need
thicker grout lines• If you are covering the whole area with mosaics ensure the grout gaps between the sheets are the same
as the width between the individual tiles on the sheet• When mosaics are used as a border they may not be exactly the same length as the tiles that they
are being placed next to, so it may be necessary to adjust the widths of the grout gaps around the surrounding, tiles so everything lines up in a pleasing way
Also, if you are using more than one product, check the thickness of the tiles – you may have to adjust levels with extra adhesive to ensure an even and flat surface when the tiling is completed. Different levels can also be built up by using Pecidor, Marmox or Wedi boards.
The aim is to achieve a pleasing pattern whilst avoiding unnecessary cutting or thin slivers of tile at the edges of the room. It is desirable to maintain whole tiles in the doorway. If you are tiling through a doorway (i.e. installing tiles in two different rooms), make sure you install a movement joint at the threshold. This will allow for differing substrates and ambient temperatures between the rooms.
Once you have marked out where the tiles/mosaics are going, begin laying at the centre end of the room i.e. furthest from the door.
The first row is the most important; get this straight and level and laying the rest of the tiles will be easy. Get it wrong and it will become progressively more difficult to obtain a pleasing result.
PLANNING

17
BathroomsBaths and shower trays must be perfectly level before you start tiling. To ensure a visually pleasing result, use the window as your centre point, and place larger cuts rather than smaller ones into the corners, floors and ceilings.
WallsFirst, make a tiling gauge. Use approximately 1m/39” length of straight, planed, wooden batten approximately 30 x 20mm /11/8” x 3/4” in cross-section. Use a pencil to mark off the length of your tiles/mosaic sheets, plus the space between them. For instance, if you are fixing tiles that measure 300 x 300mm /1113/16” x 1113/16” and have gaps between each tile of 2mm /1/16” you will mark every 302mm /117/8”.
Mark out the work area. You must always check to see whether the ceiling is level first. Aim to position the tiles/mosaic sheets so that they fit either at the top or at the bottom. This way you will be cutting one edge. This can only be achieved if the floor or ceiling is level.
The first row you fix is the most important. If this is sloping or uneven, then all the other rows will be uneven too.If the skirting board or floor looks even you may be tempted to start tiling directly up to it. Don’t! Very few properties, old or new, have walls and floors that are perfectly square so you will need to set the level for the first row. Here’s how:
Take a straight length of timber batten (dimensions as above).
Using a spirit level, make sure the top of the wooden batten is perfectly level then lightly nail it horizontally along the area to be tiled.
NB. Check for concealed plumbing or electrical wiring before nailing into any walls.
Place your homemade gauge vertically against the wall, its end on the top edge of the fixed wooden batten. Work up the wall making pencil marks as you go, making sure that you won’t have to cut lots of fiddly small tiles at the top.
Now use a measure to find the horizontal mid-point of the wall. Put your gauge against this point and work horizontally to determine the location of the last whole tile, and mark the batten. Again, make sure you are not left with small slivers of tiles at each end and, if necessary, adjust the ‘mid-point’ slightly to avoid this.
Next hang the plumb line so that the line hangs directly over the batten mark. Alternatively, you can use a laser level, a long set-square or an upright spirit level to produce a vertical line. Once you have the precise starting point for your first tile you can begin tiling.
If you are placing a patterned border to run around a room, you need to choose one centre point on one wall, and align all the borders to that one point.
PLANNING

18
Sealing before installation
Please consult the sealant manufacturer if you are in any doubt about the suitability of a sealer.
Please note that Glassworks tiles and mosaics made from metal and glass do not require sealing (unless otherwise stated).
Application of penetrating sealersThe correct application of penetrating sealers is important. Follow the manufacturer’s application guidelines. The tile surface must be thoroughly clean and free of any material that may prevent the sealer from penetrating. Apply the sealer following the manufacturer’s instructions. A lint-free roller should be used. Do not allow the penetrating sealer/ impregnator to dry on the surface. Penetrating sealers have a life expectancy of five years. Please seek advice on this from the sealer manufacturer.
NB: Not all adhesives, cleaners, grouts and sealers are equally suitable for all types of tiles. For example, please note that some Earthworks stone tiles contain high levels of iron oxides: for this reason we recommend a solvent based sealer. Take advice from your sealant supplier.
Sealing after Installation
Switch off any underfloor heating and wait until the floor cools before applying any sealants.
See note regarding suitability on page 5, the table below and the adhesives and grouts table on page 16. Walls and floors need at least one layer of sealer prior to and after grouting. Make sure you use only new brushes and new, clean, lint-free white cloths for sealing and keep dirt and dust away from the work area.
FloorsAfter the final seal, avoid walking on the floor until the sealer has set thoroughly (follow manufacturer’s recommendations).
SEALING INFORMATION FOR SPECIFIC PRODUCTSARTWORKS CRACKLE GLAZE TILES
These crackle glazed metro tiles and finishing pieces are suitable for dry and wet areas as long as they are impregnated before use. They also need to be impregnated after three months and then again a year after installation. Recommended products to use are Lithofin KF StainStop, LTP Mattstone, LTP Crackle Glaze Protector, Fila MP90.
EARTHWORKS TILES AND STONE MOSAICSSealing the surface of Earthworks tiles protects them from adhesive staining during installation and absorbing moisture and other stains. They should be sealed prior to installation using a breathable sealer, for both interior and exterior use. Tiles should be completely clean and dry (see note about damp tiles in Preparation section). When applying, sealer must soak into the tile. Prevent excess sealer from spoiling the surface by wiping it away with a clean, dry, lint free cloth before it can harden. Depending on the type of tile, sealer is applied twice: once before the tiles are fixed and again after grouting to cover the grout and the tile (see ‘Sealing after Installation’ section).
Alexandrian Cream
Must be allowed to breathe so that moisture from the substrate and adhesive can permeate through to the surface. Alexandrian Cream tiles are denser than many other natural stone tiles and require extra drying time; approx 48 hours for rapid set, 72 hours for standard set. Certain impregnating sealers will allow moisture to escape from inside while preventing moisture ingress from the surface. If tiles are sealed before all the moisture has escaped (or a non-breathable sealer has been used) this may lead to staining or delamination within the tile as the moisture reacts with the naturally occurring iron particles and trapped salts within the stone.
SEALING YOUR TILES

19
Pebble Mosaics
Pre-sealing pebbles can make the eventual removal of grout easier and may be carried out before the pebbles are laid or just before grouting. After ensuring the sealer is appropriate, apply in accordance with instructions, then remove any excess and leave to dry. Ensure the sealer used is the same as, or is compatible with your final sealer. IMPORTANT Test the sealers on a single pebble first to ensure it gives you the result you want and is compatible. Sealers should not saturate the pebbles as this can dissolve the backing glue.
All Stone mosaicsMother-of-Pearl EW-PARMOS, Purity EW-PURMOS
Need sealing before installation (for example HG Marble Neutral Impregnator).
MOSAICS
The surfaces of some mosaics may be slightly uneven, creased or pitted. This is an inherent feature of some mosaics. Unless they are sealed first, any pitted surface may become unavoidably filled during the grouting process, resulting in a speckled appearance.
All mosaics made from or including shell. Need sealing before installation (for example HG Marble Neutral Impregnator).
Telstar EW-TLSMOSTorque EW-TORMOS Seal with Seal Guard.
Alluvial GW-ALLMOS,Silurian GW-SILMOSCretaceous GW-CREMOS
Before installing, seal stone pieces with a penetrating sealer, clean excess away before it dries with a white lint free cloth. Do not oversaturate as some solvent sealers may affect the backing material. Dark coloured grouts may stain the stone pieces.
Lombok GW-LOMMOS Contains metal pieces which are protected by film. Use finely sanded grout to avoid scratching. Seal the bamboo pieces to avoid any leaching into the grout and staining it.
Batu GW-BATMOSManaslu GW-MANMOS Pagai GW-PAGMOS
Impregnate with Seal Guard before and after grouting.
Copper Mosaics Alchemy Square EW-ALCAC20,Alchemy Cube EW-ALCAC48, Alchemy Brick EW-ALCACBBZamo GW-ZAMMOS
Neutral cure sealants (for example Soudal Low Modulus Neutral Cure Silicone) should only be used with Copper mosaics. Acetoxy cure sealants are corrosive in nature and will damage sensitive metals including copper and bronze.
Alluvial GW-ALLMOS,Silurian GW-SILMOSCretaceous GW-CREMOS
Before installing, seal stone pieces with a penetrating sealer, clean excess away before it dries with a white lint free cloth. Do not over-saturate as some solvent sealers may affect the backing material.
Mosaics made from or containing wood, bamboo, coconut Ceylon EW-CEYMOSLombok GW-LOMMOSSurabaya EW-SURMOS
As with all wood products there are numerous ways in which wooden mosaics can be sealed, such as varnishes, oils and waxes. We recommend that testing various products to achieve the depth of colour you require.
LA BELLE COLLECTION
Crazed Tiles
Highly glazed ceramic tiles may craze with time, and no guarantee can be given against this happening. Tube-lined tiles, in particular, are more prone to this natural process and additional care should be taken as to where these are used. When used in wet areas, crazed tiles should be sealed with an impregnator to stop moisture penetrating the body of the tile and causing discolouration.
SEALING YOUR TILES

20
TILEWORKS CERAMIC AND PORCELAIN TILESTo prevent tiles from staining, unglazed ceramics and polished porcelains should be sealed with a liquid penetrating sealer prior to installation. As with any polished surface, polished porcelain is susceptible to staining if it is not protected with an appropriate sealer such as LTP MPG Sealer. We recommend that all of our polished porcelains are treated with an appropriate product. Always follow the manufacturer’s instructions. Penetrating sealers will fill any exposed pores, making the tiles highly resistant to surface staining; this also makes general maintenance easier. Penetrating sealers do not generally alter the appearance of polished porcelain products since they are designed to only fill the microscopic pores. The slip resistance of the tile will not be affected.
Dream BeigeCS523-4040,CS523-6030,CS523-6060
Certain polished porcelain products may have wax or nano coating on the surface of the tiles. Some batches of Dream Beige polished porcelain may have been treated with a nano coating after manufacture, which means they do not need to be sealed. The wax can be removed with LTP Grimex, Lithofin Wexa. The Nano coating removal can be achieved with LTP Fullers Earth as follows:
CLEANING Approx coverage 150g per 10m² / 5oz per 108 sq ftAfter fixing and before grouting remove excess nano coating from the polished surface of the tile using LTP Fullers Earth. Dust surface with an even coat of fuller’s earth and leave for 5–10 minutes. Buff well using a soft cloth or buffing machine and soft white pad. Vacuum up excess fullers earth and then rinse surfaces with warm water.Approx coverage 1ltr per 20 m² / 41/4 cups per 215 sq ftIf grouting has occurred prior to removal of excess nano coating, it may be necessary to use a residual grout remover after the Fullers Earth to successfully remove all traces of residual grout.Apply LTP Grout Stain Remover to the surface and agitate immediately using an emulsifying pad. Rinse well using a sponge and plenty of clean fresh water. Use these products in well ventilated areas and use gloves. When using fullers earth do not breathe the dust. Wear a dust mask and use eye protection. Allow to dry.
MAINTENANCEUse LTP Waxwash to regularly clean surfaces. This detergent has been especially formulated to clean nano treated surfaces without compromising the protection. It is highly concentrated so only a small amount is required for each application.
DAILY/WEEKLY CLEANINGApprox coverage 1ltr per 800 sq.m / 41/4 cups per 8611 sq ft Add 1-2 caps full of LTP Waxwash to a bucket of water and apply to the surface of the tiles using a mop/scrubber dryer and leave to dry. This product does not require rinsing. Leave to dry before allowing traffic. N.B this product will not leave a waxy film on the surface of the tiles, however on highly polished surfaces it may require a light dry buff to finish.
SEALING YOUR TILES

21
Particular care should be taken to use the correct adhesive, grout and sealants, according to where the tiles are to be installed and the materials that they are made from. Carefully read manufacturers’ information and always follow the manufacturer’s instructions regarding storage, mixing and applying. If in doubt, please consult the dealer you purchased the products from or your installer for more information.
NB: Not all adhesives, cleaners, grouts and sealers are equally suitable for all types of tiles. Take advice from your supplier.
ADHESIVESFor substrates that can expand and contract i.e. wood or floors with underfloor heating, it is important to use a flexible adhesive. This will allow for tiny movements and will stop tiles and grout from cracking. How-ever, some changes of plane will require expansion joints. Always seek professional advice.
Adhesive is available as standard set or rapid set. Standard set takes up to 24 hours to go off, whereas rapid set can take up to two hours depending on the thickness, temperature and humidity conditions. All tiles should have a 2mm/1/16” layer of adhesive spread onto the backs before laying, in addition to the adhesive spread on the floor/wall. This method is known as solid bed.
Important Note Epoxy adhesive can be difficult to use and because of the nature of Epoxy, can be extremely hard to remove once cured. For this reason, we recommend keeping hot water and a supply of clean sponges at hand to remove excess Epoxy quickly and safely. Emulsifying pads should not be used on glass or metal tiles as they may damage or scratch the surface. Always test Epoxy prior to using with our products.
It is vital that adhesive is completely dry before grouting. Any moisture left behind glass tiles can cause the paint backing to deteriorate.
Which adhesive and grout?Certain adhesives are unsuitable for use in wet situations therefore we strongly advise contacting the adhe-sive and grout manufacturers for their recommendations. Original Style makes no representations as to the fitness for purpose of third party adhesives and grouts.
Adhesives and Grouts for wet areasThe requirements for adhesives, grouts and sealers differ according to the type of tile used, the background material, and the width of the joints and whether the shower is gravity fed or a power shower, accordingly it is important that you seek advice from your supplier.
Although most adhesives and grouts are water resistant in normal situations, they can be further improved using a flexible additive. For power showers we recommend Epoxy grouting.
ADHESIVES / GROUTS

22
GROUTSGrouting gives a neat appearance to the tiled surface, it stops dirt or grease building up between the tiles Grouting should always be finished flush with the tiled surface.
Allow the adhesive to dry out for a minimum of 24 hours before grouting. Thick layers of adhesive, cool tem-peratures and other factors can prolong drying.
How to grout tilesAlways try a small amount before grouting your entire tiled area to check you are happy with the look of the grouted tiles before grouting the complete area. Clean the surface where you are going to tile and allow it to dry before proceeding.
Regardless of the grout colour chosen it is advised that you test a tile prior to grouting to ensure the grout pigment will not contaminate the surface of the tile.
Useful TipAlways aim to complete whole sections of grouting in one session to ensure an even finish with no colour variation. Wash down with clean water and a sponge every square metre to avoid any excess grout drying on the surface. Never grout corners of rooms; these must be grout-free and filled with a suitable silicone to allow for wall/floor expansion. It is very important to mix the grout following the manufacturers’ instructions. Once mixed, let the grout stand for two minutes, then apply to the wall/floor using a squeegee working in a diagonal motion across the tiles. We recommend you cover about one metre at a time, then leave for five minutes before removing any excess grout with a squeegee. Wait another five minutes before wiping the tiled surface with a clean sponge. Always check that there are no lines left in the grout.Repeat until the whole wall is complete.
Once the whole work is completed, leave for two hours, wash down all the tiles with clean water and sponge, and correct any faults.
Important Note:If using Mapei Ultra Colour Plus Grout, it must be mixed with an electric mixer using 1-1.1 litres of water per 5kg bag (41/4 cups per 11 lb) of Ultra Colour Plus. Pour all the water in to the bucket and then add all the grout and mix on a slow setting. Leave to stand for two minutes and remix. Do not add more water. If the material begins to harden after 15-20 minutes, remix with just the paddle but do not add any more water. The grout has a pot life of one hour.
Finishing offOnce your tiling is complete, inspect it carefully for any joints that the grout has missed, and refill if neces-sary. Wipe over the entire wall with a damp sponge or cloth and allow it to dry out completely. We also rec-ommend sealing grout seven days after installation with a grout protective sealer, which can be purchased through any reputable tile outlet.
Always test a small inconspicuous area before proceeding. Always follow manufacturers’ instructions. Use the utmost care when grouting to preserve the beauty of your tiles.
ADHESIVES / GROUTS

23
Coloured grouts can be used on our tiles and mosaics and they can enhance your installation. Many colours are now available so we suggest you check the range with your retailer. As they may alter the overall appearance of the tile or mosaic colour, we strongly recommend that a small area is tested before installation. Some dark grouts may stain light coloured stone. Make sure that the grout is recommended for stone/glass/ceramic as appropriate. Some grouts are not UV resistant and will fade when placed in direct sunlight, so advice must be sought from the grout manufacturer.
Using coloured grouts with ceramic wall tiles An inherent feature of our dark coloured ceramic wall tiles (for example in Artworks, Designer Classics,La Belle Collection and Pop Art ranges) is a faint lighter line along the outer edge of the tile glaze.This is the case for all glazed ceramics that are not rectified. It is not a fault; it results from the firing process and is known as a surface tension effect. This lighter edge is more visible when dark coloured grouts are used. It is important to bear this in mind when considering the overall effect of your installation before you start your project.
ADHESIVES / GROUTS

24
ADHESIVES INFORMATION FOR SPECIFIC PRODUCTS
EARTHWORKS STONE TILES AND STONE MOSAICS
Cement-based adhesives are recommended for fixing stone tiles using the solid bed method (where adhesive is put on both the reverse of the tile and the floor to produce a solid bed). This is particularly important when installing travertine tiles.
Light coloured adhesives are strongly recommended for fixing paler stone (such as marble and limestone) to avoid staining but also to avoid discolouration through the tile, which can happen due to a chemical reaction between the minerals in the stone and the adhesive.
Dark coloured adhesives are fine for dark stone tiles.
All natural stone tiles should have a 2mm /1/8” layer of adhesive spread onto the backs before laying, in addition to the adhesive spread on the floor/wall.
TravertineAll voids on the reverse of travertine tiles should be filled with white adhesive. The entire back of the tile should then be ‘buttered’ with adhesive before fixing.
Translucent stoneFor fixing any translucent stone, an SI white flexible cement-based adhesive is recommended.
LimestoneCare must be taken when installing any stone tiles, particularly limestone, on any timber substrate. The surface needs to be strong and rigid with no likelihood of movement, otherwise limestone tiles could suffer damage or cracking.
Pebble mosaicsWe recommend that the tiles are laid dry before fixing, so that variations in colour and size are distributed evenly across the installation. Some pebbles may require adjusting slightly so that they interlock with adjoining pebble sheets, the gaps between each pebble sheet should match (as closely as possible) the gaps between individual pebbles. This will ensure that the joins between sheets are not revealedafter grouting.Normal, non-flexible cement-based adhesive is generally suitable on masonry substrates where no movement is anticipated. Where slight movement could occur through thermal or pedestrian loads, then a modified cement adhesive (probably two-part) should be used as a minimum. It is important that each pebble is embedded in the adhesive. Select a product suitable for the application, use a solid bed trowel and apply no more than about one square metre of adhesive at a time, always wiping off the adhesive residue as you work.
MOSAICS
All surfaces to be tiled should be primed and allowed to dry thoroughly before tiling.Spread adhesive over as much of the floor or wall as you can work on within 15 minutes – about half to one square metre is usually about right. Spread an even layer of adhesive (about 3-4mm/3/4” thin-set) using a ‘V’ notched trowel. Place the whole mosaic sheet on the adhesive and press it in firmly. Remove any excess adhesive that wells up between the tiles with a damp sponge. Check the mosaic sheet is straight and level. Use a 30cm /12” piece of batten to tamp the mosaics down lightly to achieve a level finish. Some translucent tiles with require solid bed installation.
ADHESIVES / GROUTS

25
Most Original Style mosaics are supplied as sheets on a mesh backing for ease of installation. The mesh side is simply pressed into the adhesive and so does not need removal unless the mosaic sheets include pieces that are semi-transparent. If this is the case we recommend removing some of the mesh with a sharp blade to avoid show-through after installation. Some mosaics have paper or film facings,see below.
SPECIAL NOTE REGARDING GLASSWORKS ARCTIC WHITE TILES
Because the Arctic White colour is achieved by using an optical clear glass, when two tiles of different length are placed side by side the amount of light passing through the tile can affect the colour. This effect is caused by refraction, prismatic effect or chromatic aberration. We recommend that any voids (e.g. corners) are fully filled before tiling to avoid this or other shadowing effects. The glass should also be cut using a suitable glass cutting electric tile saw with a glass cutting blade, with any uneven edges filed away with a suitable glass file. NB Splashbacks must NOT be cut.
Glass tiles and mosaics:Glass thickness will have an effect on the colour of the tile.
Paper faced mosaics – Lagoon CollectionDue to the translucent nature of these tiles, the Lagoon Collection mosaics are paper faced to avoid the appearance of mesh showing through the glass mosaics once installed. Paper faced tiles should be adhered in the same way as glass mosaics, however, unlike mesh backed tiles the paper should face outwards.A white latex, cement-based, rapid setting flexible adhesive is recommended. Adhere a small section at a time. Fifteen to twenty minutes after application of the mosaic sheet, use a damp sponge and warm water to lightly wet the paper until it turns dark. Test a corner of the paper by pulling lightly at a downward angle. If the paper does not peel away cleanly sponge again until it peels away easily. Once the paper has been removed, inspect the installation and straighten any joints not aligned. Should you discover any unacceptable tiles, remove and replace them before the adhesive dries. Always remove the paper as you go, do not wait until all the sheets have been fixed before removing it. Repeat the above process until all sheets have been installed. The Lagoon Collection mosaics are not recommended for floors.
Plastic film faced mosaics - Tropical CollectionThe Tropical Collection mosaics are faced with a plastic film and should be adhered in the same way as other mosaics, but with the film facing outwards. A white latex, cement-based, rapid setting flexible adhesive is recommended. The adhesive should be left for at least 24 hours to allow the adhesive to completely set and dry before the film is peeled off. If it is necessary to make slight adjustments to straighten the mosaics before the adhesive sets, then the film can be carefully cut with a sharp knife. If it’s necessary to make slight adjustments to straighten the mosaics before the adhesive sets, then cut the film carefully with a sharp knife.
If the small pieces of mosaic come off when removing the plastic film it means that the adhesive has not been left long enough to dry. Use a sharp knife and cut small slits in the film to allow more air to the adhesive to speed up the process. When the adhesive is dry, remove the film by peeling it from one corner to the opposite corner.
Some Earth & Fire mosaics have a protective film covering either the whole surface or certain individual pieces. Keep the film in place during installation then carefully peel away. It is important to factor in time needed to peel off the film from some of those with film on individual pieces.
ADHESIVES / GROUTS

26
ADHESIVES AND GROUTS SPECIAL INSTRUCTIONS
PRODUCT ADHESIVE GROUTARTWORKS TILES AND MOULDINGS Flexible fast-set groutArtworks Tiles and Mouldings which are suitable for wet and dry walls need to be installed with a water resistant grout. The grout must be fully flush with the face of the tile, to prevent the ingress of water into the back of the tile. This could cause changes to the glaze colour giving a patchwork effect.EARTHWORKS STONE MOSAICS Flexible fast-set groutMOSAICSWe recommend a white, rapid setting cement latex based flexible adhesive and non sanded or finely sanded grout unless stated otherwise in this guide. No guarantee can be made against some minor scratch marks appearing on mosaic tile surfaces even when using non sanded grout. Always test a small inconspicuous area before installation.Glass mosaicsUse a thin-set polymer modified latex cement-based adhesive. This must be applied evenly due to the transparent nature of some mosaics. Failure to do this can lead to the adhesive being visible through the mosaics in certain light.
Gold and Shell Mother of Pearl EW-PARMOSEastern Light GW-EASMOSKasba GW-KASMOS
Epoxy based primer and adhesive,Use solid bed of adhesive behind tiles (following manufacturer’s instructions). Failure to do this may cause gold to tarnish, please test before installation. Cement based adhesives not recommended.
Epoxy grout
Elite Collection: Pure Gold,Gold Rush, Byzantium
Epoxy based primer, adhesive and grouts when installing in showers and wet rooms
Inca Gold EW-INGMOS15,EW-INGMOS23,Armada Gold EW-AMGMOS,Sunflower EW-SFWMOS,Opulence EW-OPUMOS,Seasons, Mystique, Emotion and Safari ranges
Mapei Keracolor FF (which is available in a selection of colours) or any unsanded or finely sanded cement based grout as these products are sensitive to scratching.
GlassUp to 100 x 100mm4” x 4”
As glass is fully vitrified (impervious to water), it is important to choose a latex-based adhesive and grout to suit. Use a thin bed of adhesive to prevent the adhesive coming through the joints.
Polymer modified finely sanded grout
Nobu GW-NBUMOS Gavroche GW-GAVMOSMasa GW-MSAMOSPlaza GW-PLAMOSAtelier GW-ATEMOSHolocene GW-HOLMOSCenozoic GW-CENMOSCharleston GW-CHRMOS
Install using white Epoxy adhesive to both fix and grout: this is called the one step method.
Transparent, Mixed Blend and Gold FleckSome of the mixed blends and gold fleck mosaic sheets contain transparent pieces Apply adhesive evenly. Use a white latex based adhesive for any transparent mosaics. Carefully remove mesh backing behind transparent pieces with a sharp blade before fixing so the mesh is not visible after installation. Otherwise the mesh may be visible through the tiles in certain lights.
Gold Fleck, Iridescent, Ethereal, Paper and Film FacedSurfaces and edges of certain individual tiles may be slightly uneven, creased, pitted or chipped, which is an inherent feature. Unless they are sealed first, any pitted surface may become unavoidably filled during the grouting process, resulting in a speckled appearance. Apply a protective sealer before grouting. Although thorough cleaning after grouting will remove most of the grout, there may always be some grout remaining within the pinholes or surface creases. The amount of visible grout after installation will depend on the colour contrast between grout colour and tile, and how well the tiles are cleaned after grouting. Test a small inconspicuous area before installation.
ADHESIVES / GROUTS

27
PRODUCT ADHESIVE GROUT
Metal including the Alchemy copper mosaics
Unless otherwise stated, use a flexible adhesive with a latex additive. No guarantee can be given against scratching.Test a small area first.
Unless otherwise stated, use a non sanded or finely sanded flexible grout. No guarantee can be given against scratching.Test a small area first.
Cuirassier Black EW-CURBB Steel Cuirassier EW-CURBS
Unless otherwise stated, use a flexible adhesive with a latex additive.No guarantee can be given against scratching.Test a small area first.
No grouting required
Aluminium*Stellar EW-STLMOSTelstar EW-TLSMOS Torque EW-TORMOS
R2T Epoxy AdhesiveMapei keralastic
No grouting required forTelstar EW-TLSMOSand Torque EW-TORMOS.Seal with Seal Guard.
*Considerable care needs to be taken when installing Stellar (EW-STLMOS), Telstar (EW-TLSMOS) and Torque (EW-TORMOS) aluminium mosaics as they have very sharp edges. Wear thick protective gloves when handling these mosaics. Torque should only be installed in situations where it will not be touched or brushed past.
Mixed mosaics containing stone and glass: Mellow GW-MELMOSActamira EW-ACTMOSMogao EW MOGMOSPostojna EW-POSMOS
Grout may fill small surface voids (an inherent feature of individual stone pieces) and alter their finished appearance.Use Keraquick Latex Plus adhesive.
Finely sanded grout
Mixed mosaics containing metal,stone and glass:Carinthia GW-CRAMOS Viedo GW-VIEMOSZamo GW-ZAMMOSValen GW-VALMOS
Care must be taken when installing to void scratching individual metal tiles, which are protected by film. Use Mapei Keraquick mixed with Latex Plus.Test before installation.
Finely sanded grout
Rakoram GW-RKOMOS Rena GW-RENMOS Epoxy based primer and Epoxy adhesive Epoxy grout
Lombok GW-LOMMOS Contains metal pieces which are protected by film.
Use finely sanded grout to avoid scratching. Seal the bamboo pieces to avoid any leaching into the grout and staining it.
Self adhesive mosaics Jules Verne EW-JUVEP
Dry areas only.Self adhesive mosaics need placing carefully. Once they are adhered to the surface they cannot be moved without damage No adhesive required
No grouting required
Pastiche EW-PASMOS,Grande Pastiche EW-GRPASMOS,Segovia EW-SEGMOSand Jade 2.3 EW-VMJADE
Epoxy based primer, Mapei Keraquick with Latex Plus adhesive Epoxy grout
Carthage Border (EW-CARTHB) Epoxy based primer, Epoxy adhesives
Finely sanded Epoxy groutContains mother of pearl pieces protected with plastic film. Remove film as soon as the grout is washed off and fill any missing grout. Use HG Marble Neutral Impregnator by wiping on then wiping off.
ADHESIVES / GROUTS

28
PRODUCT ADHESIVE GROUT
Wood, Coconut:Ceylon EW-CEYMOSSurabaya EW-SURMOS
Use contact adhesive or Mapei Ultrabond P997 1KT
No grouting required. Use varnish or teak oil to seal the wood if required. Leave for 15 minutes then clean off with a lint-free cloth. Caution must be taken when applying the teak oil as overspill from the roller may affect other surfaces.
Alluvial GW-ALLMOSSilurian GW-SILMOS Cretaceous GW-CREMOS
Dark coloured grouts may stain the stone pieces
GLASSWORKSColoured Grouts Can be used if the adhesive supplier states that it is suitable for glass tiles. NB coloured grouts may change the colour of the glass tiles so we recommend a test area be done first. Avoid the use of expoxy grouts containing glitter as they may contain siliceeous aggregates that will cause scratching to glass tiles and mosaics containing metal and/ or glass pieces.
Glass tiles 100 x 100mm/4” x 4” and under
R1 R2 epoxy adhesive or Laticrete 254 Platinum Mapei Keraquick with Latex Plus
Laticrete 1600 Unsanded Grout mixed with Laticrete 1776 Grout EnhancerMapei Keracolor SF or FF
Glass tiles over 100 x 100mm/ 4” x 4”
High grab mirror adhesive or R1 R2 epoxy adhesive Mapei Kerapoxy DesignMapei Keraquick with Latex Plus
Laticrete 1600 Unsanded Grout mixed with Laticrete 1776 Grout EnhancerMapei Keracolor SF or FF Mapei Kerapoxy Design
Decorative effect tiles
Vinyl Back FinishSilver Leaf GW-SLF6030, Karnak GW-KNK6030Copper Leaf GW-CLF6030, Cleopatra GW-CLE6030Tutankhamun GW-TUT6030, Solstice GW-SOL6030Saturn GW-STN6030, Mercury GW-MRC6030Platinum Crest GW-PCR6030, Silver Crest GW-SCR6030 Graphite Wave GW-GRP6020, Solar GW-SLR6030Aduro GW-ADR6030, Caeli GW-CAE6030Paua GW-PAU6030, Crushed Cowrie GW-CCW6030Crushed Pearl GW-CPL6030, Arctic Crushed Pearl GW-ACP6030, Crushed Black Pearl GW-CBP6030Honfleur Silver GW-HSL6030, Honfleur Gold GW-HGL6030
High Grab mirror adhesiveR1 or R2 epoxy adhesiveCT1 Power Grab and BondMapei Kerapoxy DesignMapei Keraquick with Latex Plus
Laticrete 1600 unsanded grout mixed with Laticrete 1776 Grout EnhancerMapei Kercolor SF or FFMapei Kerapoxy Design
Painted Back FinishGold Leaf GW-GLF6030, Giza GW-GZA6030Pharaoh GW-PHR6030, Amun-Ra GWAMR6030Arabia GW-ABA6030, Ammon Mosaic GW AMMMOSSiva Mosaic GW-SIVMOS, Arabia Mosaic GW-ABAMOSSilver Crest GW-SCR6030, Futura Dichroic Hexagon Mosaic, Futura Zirconia Hexagon Mosaic, Futura Sepia Hexagon Mosaic, Beauville Silver GW-BFS6030P,Beauville Black Positive GW-BFB6030P,Beauville Black Negative GW-BFB6030N,Aurora Borealis Aura Frosted GW-AUR6030F,Aurora Borealis Ventus Frosted GW-VEN6030F,Aurora Borealis Aqua Frosted GW-AQA6030F,Aurora Borealis Silver GW-SRB6030,Aurora Borealis Dark Silver GW-DSR6030,
High Grab mirror adhesiveR1 or R2 epoxy adhesiveCT1 Power Grab and BondMapei Kerapoxy DesignMapei Keraquick with Latex Plus
Laticrete 1600 unsanded grout mixed with Laticrete 1776 Grout EnhancerMapei Kercolor SF or FFMapei Kerapoxy Design
ADHESIVES / GROUTS

29
PRODUCT ADHESIVE GROUT
All splashbacks and upstands
High grab mirror adhesive CT1 Power Grab n Bond
We recommend a 2.5mm/1/8”expansion joint around the splashback
Laticrete 1600 Unsanded Grout mixed with Laticrete 1776 Grout EnhancerMapei Keracolor SF
Semi opaque glass tiles Any light refraction from other substrates may be visible through the edges of certain pale coloured tiles. We recommend that any voids (eg corners) are fully filled before tiling to avoid a shadowing effect. See note on page 10 regarding Arctic White tiles.
Use an adhesive that does not shrink and crack as this may be seen from the front when the adhesive dries.
Cygnus and Andromeda have very subtle patterns and so care should be taken to ensure they are fixed with the front face showing.
Equinox tilesThe colour and patina vary within this range and should be considered when installing.
Avoid slurry grouting: finger grout around the tile to avoid getting grout in the patina.
Iridescent drop-in tilesColour variation is inherent with these tiles which should be considered when planning. The clear Drop-In tiles can be fixed either side. It is therefore important to achieve the desired effect before fixing.
Due to the production methods used in creating this range it is important to use a thicker/stiffer consistency of grout to avoid leaching between tile layers.Please note the level of reflectivity can be influenced by the depth of grout, test before fixing to achieve the desired effect
LA BELLE COLLECTIONIn all installations, seal joints with an impervious grout. If joints are not completely watertight, moisture can be absorbed into the tile body causing stains to show through the translucent glaze. Use an average grout space of at least 3mm (1/8”) to allow for the variations in tile dimensions.
ADHESIVES / GROUTS

30
Please refer to sealing, adhesives and grouts tables on pages 16 and 22 for specific information on individual products and ranges
It is essential to first mix tiles or mosaics from different boxes so that variations in colour are blended together thoroughly to give a pleasing design or pattern. Please note, variations in shade and pattern are an inherent feature of ceramics and porcelains. Do not fix tiles if an acceptable blend cannot be achieved. No responsibility can be accepted for shading or quality once the tiles have been fixed. Please see section on Shade Variation above.
It is important that your tile installer understands the pattern or blended effect you want, the requirements for surface preparation and protecting newly installed tiles from on-going work. Floors and walls may require expansion joints.
WeightMake sure that, if fixing to a wall, it is able to take the weight of your tiles and adhesive.
Control jointsThere are numerous reasons for movement and expansion joints. Divide a larger tiled area into a series of smaller ones with sealant and bond breaker between them. Designers may show points at which joints are needed but these are mandatory where tiles adjoin walls or some other building material and where there is an expansion joint in the substrate, among other circumstances. Always seek advice on this.
Applying the adhesiveAcrylic-prime the surface to be tiled and leave to dry. Then spread adhesive over as much of the wall/floor as you can work on, within about 15 minutes; approximately one square metre /one square yard is usually about right. Spread the adhesive as a solid, even layer (rather than using spots of adhesive). Use a notched trowel to form parallel lines. The thickness should be approximately 3mm/1/8” for mosaics, 6mm/1/4” for 152mm/6” ceramic tiles, 8mm/5/16” for large format wall tile and 8-10mm/5/16 – 3/8” for floors. If you are installing thick tiles, spread a 2mm/1/8” layer of adhesive on the back of the tiles as well and the surface of the substrate, making sure to always spread the adhesive over the entire back surface of the tile rather than spotting it on, otherwise the tiles may break after installation.
Place the first whole tile on the adhesive, press it down firmly. Earthworks tiles can be tapped gently into place with a white rubber mallet.
Check the first tile is straight and level. Now lay the adjacent tiles in the same way, using spacers (see note, ‘Using spacers’) to create an even joint between them.
Using spacersIf spacers are used by inserting them vertically on floors and horizontally on walls (ie they stick out at right angles to the tiled surface) they need to be removed from the joints as soon as the adhesive setting time is achieved.
When you get to the edge of the room, cut the tile to fit the gap. Where floor and wall tiles meet, a neater finish will be achieved if the wall tiles sit over the floor tiles. Leave a gap between the edge of the floor tile and the wall to allow for expansion and fill with neutral cure silicone for stone, acetoxy cure silicone for ceramic/porcelain (high modulus silicone for floors and low modulus silicone for walls).
FIXING TILES

31
Be careful to keep adhesive off the face of the tiles – wipe away any surplus with a clean, damp sponge as you go. During installation of all mosaics it is important to ensure that the adhesive is not applied too thickly, as it may permeate into the grout lines. If this then dries, it can be difficult and time consuming to remove.
Work to the lines you have marked on the walls for centre points and level lines, then begin applying the tiles.
Where there is any chance of movement from the substrate it is important to use a flexible adhesive.This will allow for tiny movements and will stop tiles and grout from cracking. However, some changes of plane will require expansion joints. Always seek professional advice.
Adhesive is available as standard set or rapid set. Standard set can take up to 24 hours to go off, whereas rapid set can take up to two hours depending on the thickness and temperature and humidity conditions.
When you get to the edge of the room, you can either cut the tiles to fit the gap (if necessary) or leave it until the end of the job, but you must clean away the excess adhesive before it dries from the open spaces for easier installation.
When you have covered the first square metre prepare another area, and so on.
If there are any untiled areas around the edges of the wall you will need to cut the tiles to fit (please see section on Cutting tiles).
SPECIFIC INSTRUCTIONS FOR INDIVIDUAL RANGES
ARTWORKS
Fixing Artworks tiles, mouldings and skirting piecesPlease note that the front face of the Artworks field tile and half tile is marginally smaller than the back face, whereas the moulding and skirting pieces have the same dimension for both front and back facings.
To ensure that tiles and mouldings are aligned when they are included in the same installation, we recommend the following:
Use 1mm spacers when fixing field tiles and half tiles. Push the spacer right into the gap between the tiles so that it touches the back surface of the wall.
Use 2mm spacers when fixing mouldings, trims and skirting pieces. Push the spacer right into the gap between the pieces so that it touches the back surface of the wall.
It may be necessary to make minor adjustments by eye as the tiling proceeds to make sure the tiles and moulding pieces align satisfactorily.
Victoria and Albert MouldingsDue to their shape, Victoria and Albert mouldings are not recommended for use in areas subject to wall movement. It is also imperative that care is taken when grouting these mouldings to ensure that moisture cannot get into the back of them, as this may cause the moulding to crack.
FIXING TILES

32
Victoria MouldingsThese should not be used on any wooden surfaces due to thermal expansion of the wood which may crack the moulding. Silicone expansion joints should be incorporated above or beneath these mouldings.
Fixing mouldings to outside cornersTo fix the Plain Cornice and other moulded tiles to an outside corner, one end of the tile must be carefully mitred at 45° with a carborundum or diamond edged saw. This has the effect of shortening the surface of the tile in contact with the wall. Therefore, to maintain a consistent vertical joint line, all non-moulded tiles laid above and below the moulding must also be cut to the shorter width. However this does not apply to the skirting and Victoria and Albert external corners which have been specifically designed for use on outside corners.
45º Angle BlockWe recommend this handy 45º Angle Block, which is invaluable for cutting the internal and external 45º angle corners of the Plain Cornice moulding (code 9929), thus ensuring a professional finish. It needs to be used with an electric tile cutting machine with a minimum cutting depth of 75mm/27/8”, or a carbide tile saw and mitre block (the Cornice moulding sits on top of the angle block and is placed inside the mitre block, then cut with the carbide tile saw).
Please note that, as the angle block is made from Plaster of Paris it is water soluble and likely to only last for one or two installations. Always seek professional advice when using cutting equipment.
ARTWORKS MASTERPIECE TILES
NB: It is recommended that Masterpiece tiles and frames are installed by an experienced professional tiler.
PreparationEnsure that the surface on to which the tiles are to be laid is sound, ie in good general condition with no flaking paint, loose plaster, wallpaper etc. See preparation section above. The surface should be flat and rigid. Masterpiece tiles are up to 565mm /221/4” long, so it is essential for a good bond that the entire area of the tile comes into close and permanent contact with the wall surface.
Installing the Masterpiece tileIf the Masterpiece tile is to be laid in a field of other tiles, lay most of these first, leaving a space larger than the Masterpiece and frame, equivalent to a whole number of the field tiles. See figure 1.
Using a rule and spirit level, mark the outline of the Masterpiece tile, excluding the frame, centrally in the untiled area.
Attach a straight wooden batten firmly to the wall horizontally along and below the bottom outline.
Spread the wall tile adhesive evenly over the outlined area and comb with a 6-8mm/1/4”-5/8” notched trowel.
FIXING TILES
Angle Block
Figure 1
Angle Block shown with Plain Cornice
Figure 2

33
Position the Masterpiece tile firmly into the adhesive by sliding it slightly to and fro and apply substantial pressure across its entire surface. Ensure that the Masterpiece tile is correctly positioned, wipe off surplus adhesive with a damp cloth and leave to dry for at least 24 hours without removing the batten. Select an adhesive manufactured to recognised national standards which is appropriate for the particular surface on to which the Masterpiece tiles are to be laid.
Installing the Masterpiece frameRemove the batten and re-secure it approximately 35mm (13/8”) lower to support the bottom frame tiles.
Lay out the 8 frame tiles on the floor to establish their correct positions. One at a time, starting with the bottom tiles, fill the cavity of each frame tile with wall tile adhesive suitable for porcelain and push it firmly on to the wall in the correct position with the lip overlapping the Masterpiece tile. To achieve an even better bond it is advisable to apply a narrow line of clear silicone sealant along the underside of the lip.See figure 2.
Ensure that all 8 frame tiles are correctly positioned, leaving a space approximately 2mm/1/8” wide at each joint, wipe off surplus adhesive and sealant with a damp cloth and leave to dry for at least 24 hours without removing the batten.
FinishingCarefully remove the batten and check that all the frames are firmed secured. Cut field tiles to fit the remaining space between the Masterpiece frame and the tile area and lay them in the normal way. Once all the adhesive is dry, grout the entire installation, including the spaces between each frame section. Wipe clean.
GeneralHandle Masterpiece tiles with extreme care at all times. Each tile weighs up to 5.5kg (12lb) and could cause personal injury if dropped. Masterpiece tiles have a maximum water absorption capacity of less than 3 per cent.
These instructions are intended as a supplement to and not a replacement for the provisions of BS Codes of Practice or ANSI 108 which set standards for the installation of ceramic wall tiles. Adhesive manufacturers’ instructions should also be strictly followed.
EARTHWORKSThere are numerous makes and types of grouting compound, so check with your tile retailer for the most appropriate grout for your application. Cement-based grouts are recommended for grouting Earthworks stone tiles. Make sure you choose the correct grout for the width of grout joint you want. Honed and polished stones generally have joint gaps of 1-2mm (1/8”), whereas antique and textured tiles tend to have grout joints of 6-10mm (3/8”).
We recommend a flexible fast-set grout for Earthworks stone mosaics.
There are two types of grouting methods; pointing and slurry grouting. There are no hard and fast rules about which type of grouting to use but we recommend pointing large tiles, or tiles where the joints are wide. If you are laying textured tiles and you want to preserve the slightly pitted texture, you are also advised to use pointing.
FIXING TILES

34
The pointing method is the most commonly used. This method requires the mix to be thicker in consistency and is applied by working in small areas at a time, applying grout into the joints with a squeegee. The mix is then pressed into the joints firmly and finished off using a grouting tool to give a neat finish. Any excess is removed using a damp sponge and the surface wiped clean.
The slurry grouting method can be used to fill small imperfections in textured tiles and to grout stone mosaics, which would take too long to point. The mix is runnier than normal and is spread across a large area at a time using a spreader. This is usually easier if the tiled area is on a horizontal plane, although this method can be used on the vertical; however more care is needed to ensure the grout goes right into the joint and no areas are missed out. This method is also used where a pitted tile has been fitted and the ‘pits’ or ‘holes’ need to be filled in for hygiene or cleaning reasons, for example on a kitchen floor or splashback.
There are many different grout colours. We recommend asking your retailer for a sample of the mixed grout when dry or trying a small amount before grouting your entire tiled area.
Joint widthsWe recommend joints of 2-12mm (1/8” - 1/2”) between tiles. The exact width will depend on the size and type of tile and personal preference. In general, rustic tiles such as slate, some travertines and terracotta tend to look better with wide joints whereas quarry tiles, finished stone tiles and machine cut tiles need narrower joints.
Always use the same width between mosaic sheets as the width between the individual tiles on the sheets.
Certain tiles have a high water absorption, such as limestone, so before grouting, allow the tiles to dry out for a minimum of 24 hours after laying them. Thick layers of adhesive, cool temperatures and other factors can prolong drying.
Other than these recommendations, choose the method of grouting that will give you the effect you prefer.
Important note - Honed Travertine and LimestoneGrout should cover the whole tile in order to prevent a ‘tram-lining’ effect. (‘Tram lining’ occurs in certain natural stone tiles with high water absorbency characteristics, when the grouting compound is mixed with water and placed only within the grouting joints. The water then is drawn into sides of these tiles and once dry will leave magnesium/calcite water stains behind.)
Grouting Pebble MosaicsThe grouting should be a wide grout joint for both external and internal installations. Generally grouts are water mixed, but if some flexibility is needed, then a wide joint polymer modified grout will be required. It is important to wait only the interval recommended by the adhesive and grout manufacturer before grouting to minimise dirt getting between the pebbles and avoid the possibility of dislodging them.
Grouting Splitface Venetian MosaicsBefore Earthworks Splitface mosaics are grouted they should be impregnated with Lithofin MN Stainstop or similar, and left for two hours or until dry. Mix a rapid setting grout to a thick consistency and apply with a squeegee. Leave for five minutes then remove excess with a stiff paint brush (you may have to cut one down for this purpose). Clean away any excess grout with a damp sponge (more than one sponge may be required because of the rough surface). Wash down with clean cold water. In certain situations a propriety grout residue remover could be used once the grout has been cleaned and is completely dry. However, take care to protect any surfaces when using grout removers, as most of these products may contain acids which can damage chrome fittings and stone. Please note no guarantee can be given by Original Style that all grout will be removed.
FIXING TILES

35
MOSAICS (INCLUDING EARTHWORKS STONE MOSAICS)
Handle glass mosaics with care especially when being cut or if broken. Ensure that the surfaces do not come into contact with each other or sharp/abrasive objects.Ethereal and Stained Glass ranges are fragile and need careful handling.
Metal mosaics and mixed mosaics and borders containing metalIMPORTANT NOTE: Due to their metallic, conductive nature it is essential that a qualified electrician carries out all electrical work around mosaics made from or containing metal.
Cutting metal mosaicsMetal mosaics can be cut with a water-fed electric cutting machine with a normal diamond blade.
Before deciding on metal mosaics it is important to consider where they will be used. Metal mosaics may be cut, however we do not recommend using metal mosaics on external corners as this will leave a cut edge. This point is especially relevant when using brick-bond metal mosaics. After cutting, finish by carefully filing off any rough edges or burrs.
During and after installation: Fingerprints and watermarks can be wiped away with a soft cloth or kitchen paper, wipe with a damp cloth then buff dry. A pH neutral cleaner will remove most stains and dirt, or use warm soapy water, wipe with a damp cloth and buff dry. Alternatively use a stainless steel cleaner following the manufacturer’s instructions. Do not use harsh or abrasive cleaning products, scourers and never use bleach. Do not allow other metals such as steel wool pads to come in contact with stainless steel mosaics, as small metal fragments may enter the surface and start to corrode, resulting in rust spots.
Earth & Fire mixed mosaicsPlease note the appearance of certain Earth & Fire Mixed Mosaics may change when wet. This is particularly noticeable in Dias (EW-DASMOS). This is significant if you intend using these mosaics in wet areas. We suggest that you test a sample before installation.
Special precautions for metal and glass mosaicsBefore deciding on metal mosaics it is important to consider where they will be used.
As metal can be scratched, we recommend that care is taken when installing metal mosaics and that they are not put in high-risk areas for scratching.
Make sure that the grain of brushed stainless steel is going in one direction; otherwise the sheets will appear to be different colours.
Use a grout with a fine texture and always use new sponges and grouting tools to avoid scratching. Take care if using Epoxy adhesive as some Epoxy products can scratch. Please be sure to clean all adhesive residues from the tiles. Never reuse a sponge that has been used to clean off adhesive as sand grains can scratch surfaces.
FIXING TILES

36
Grouting glass mosaicsColoured grouts can be used for some glass mosaics; however you should always check that the grout is suitable for use with glass tiles and check with your Original Style retailer, as the colour used may change the appearance of the mosaics. Please be aware that recycled glass mosaics have a slightly pitted surface, so grouting may alter the finish and appearance of the tiles. Use a finely sanded grout to reduce the risk of scratching during installation.Wipe surplus grout off at once using a damp cloth or sponge. We recommend that you use the same colour adhesive as grout.
GLASSWORKS
Some Glassworks tiles have a subtle surface texture and once grout is allowed to harden it can be very difficult to remove. This also applies to the plain frosted finish tiles. When you have completed the grouting, run a finishing tool or a piece of dowel along each joint to achieve an attractive, level finish. Special care and attention must be taken with the use of Epoxy Grouts when fixing any Glassworks products. Ensure the tiles are cleaned before the grout sets completely. Do not use the finishing tool when using Epoxy.GLASSWORKS SPLASHBACKS
Care must be taken when handling your Splashback before and during installation. *Most of Original Style Glassworks Splashbacks have been tested to British Standards BS EN 12150: these Splashbacks have been made from toughened (also known as tempered) glass, which is a type of safety glass. Toughened glass should receive the same care as annealed (ordinary) glass. Careless handling and improper installation sometimes causes edge damage, and delayed breakage can occur when edge-damaged tempered glass is subjected to mechanical stress, as in installation. Further, if cut, knocked or dropped, this material will produce instantaneous total fragmentation. DO NOT under any circumstances attempt to cut or drill a Splashback as it will shatter.
*The following Splashbacks are not made from toughened glass, although they should be handled and treated in exactly the same way as above and below:GW-AQA2406C, GW-AQA3606C Aurora Borealis AquaGW-AUR2406C, GW-AUR3606C Aurora Borealis AuraGW-VEN2406C, GW-VEN3606C Aurora Borealis VentusGW-STR2406C, GW-STR3606C StratosphereGW-TRO2406C, GW-TRO3606C Troposphere
When you install a Glassworks Splashback next to or within a tiled surface, for example, Original Style Glassworks tiles, you must incorporate silicone expansion joints of 2.5mm /1/8” around the perimeter of the Splashback. This will allow for any thermal expansion and contraction. Any change of plane (i.e. internal corners) will also require a silicone expansion joint.
NB: if you are installing a Glassworks Splashback with Original Style Earthworks tiles, always refer to the manufacturer’s recommendations when applying silicone, as some silicone products can stain naturalstone tiles.
AdhesiveUse neutral cure silicone adhesive or mirror adhesive for Splashbacks and Upstands.All surfaces must be clean and free from any dust particles or contaminating substances. The surface to which you are fixing the Splashback must be primed 24 hours beforehand and allowed to dry completely.
FIXING TILES
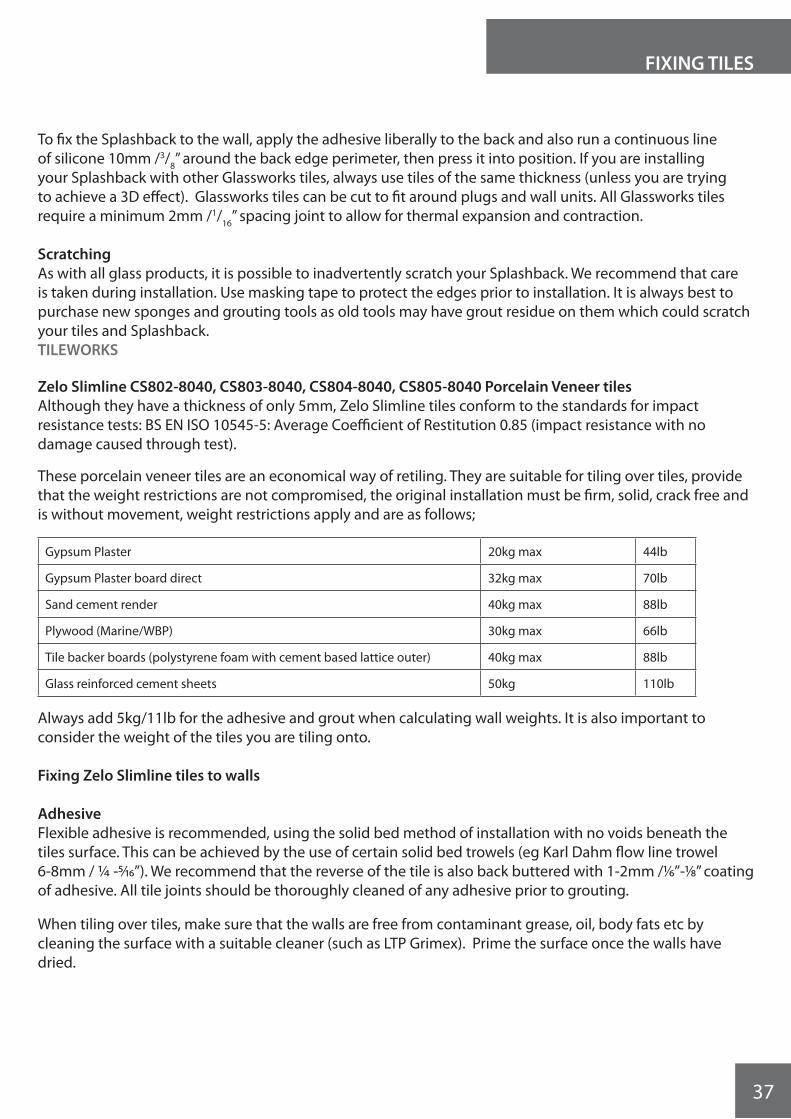
37
To fix the Splashback to the wall, apply the adhesive liberally to the back and also run a continuous line of silicone 10mm /3/8” around the back edge perimeter, then press it into position. If you are installing your Splashback with other Glassworks tiles, always use tiles of the same thickness (unless you are trying to achieve a 3D effect). Glassworks tiles can be cut to fit around plugs and wall units. All Glassworks tiles require a minimum 2mm /1/16” spacing joint to allow for thermal expansion and contraction.
Scratching As with all glass products, it is possible to inadvertently scratch your Splashback. We recommend that care is taken during installation. Use masking tape to protect the edges prior to installation. It is always best to purchase new sponges and grouting tools as old tools may have grout residue on them which could scratch your tiles and Splashback.TILEWORKS
Zelo Slimline CS802-8040, CS803-8040, CS804-8040, CS805-8040 Porcelain Veneer tilesAlthough they have a thickness of only 5mm, Zelo Slimline tiles conform to the standards for impact resistance tests: BS EN ISO 10545-5: Average Coefficient of Restitution 0.85 (impact resistance with no damage caused through test).
These porcelain veneer tiles are an economical way of retiling. They are suitable for tiling over tiles, provide that the weight restrictions are not compromised, the original installation must be firm, solid, crack free and is without movement, weight restrictions apply and are as follows;
Gypsum Plaster 20kg max 44lb
Gypsum Plaster board direct 32kg max 70lb
Sand cement render 40kg max 88lb
Plywood (Marine/WBP) 30kg max 66lb
Tile backer boards (polystyrene foam with cement based lattice outer) 40kg max 88lb
Glass reinforced cement sheets 50kg 110lb
Always add 5kg/11lb for the adhesive and grout when calculating wall weights. It is also important to consider the weight of the tiles you are tiling onto.
Fixing Zelo Slimline tiles to walls
AdhesiveFlexible adhesive is recommended, using the solid bed method of installation with no voids beneath the tiles surface. This can be achieved by the use of certain solid bed trowels (eg Karl Dahm flow line trowel 6-8mm / 1/4 -5/16”). We recommend that the reverse of the tile is also back buttered with 1-2mm /1/6”-1/8” coating of adhesive. All tile joints should be thoroughly cleaned of any adhesive prior to grouting.
When tiling over tiles, make sure that the walls are free from contaminant grease, oil, body fats etc by cleaning the surface with a suitable cleaner (such as LTP Grimex). Prime the surface once the walls have dried.
FIXING TILES

38
Fixing Zelo Slimline tiles to floors: installation on to pre- existing floors
AdhesiveRecommended adhesives are Mapei Kerapoxy, Mapei Keraquick & Latex Plus or Mapei Keraflex Maxi, although the adhesive chosen is dependant on the substrate.
These tiles are ideal for covering onto pre-existing floors. However, care must be taken if there are any areas where trolleys with hard wheels could be used. A C2TE S1 class adhesive is recommended, and a solid bed method of installation is required with no voids beneath the tiles surface. This can be achieved by the use of certain solid bed trowels (such as Karl Dahm flow line trowel 6-8mm / 1/4 -5/16”). We recommend that the reverse of the tile is also back buttered with a 1-2mm/1/16-1/8” coating of adhesive.When tiling over tiles, make sure that the floor is free from contaminant grease, oil, body fats etc by cleaning the surface with a suitable deep cleaning product. Once cleaned, leave to dry and use a suitable primer (such as Mapei Primer T). Floors must be stable and solid with no movement and perfectly flat, do not install tiles onto a substrate were cracking has previously occurred. To check that the adhesive is properly distributed under the tiles please ask your installer to carefully lift a tile during installation. It is very important that the adhesive is allowed to cure before walking on the surface. Keep other trades off.Fixing Zelo Slimline tiles to floors: installation on to new slabs
Bases commonly found in the building industry can be tiled onto provided that they are perfectly flat and stable: these could be sand cement screeds, Anhydrite screeds (<0.5% and primed) concrete etc. Trolley traffic areas are not recommended. Solid bed trowels must be used (Karl Dahm flow line trowel 6-8mm / 1/4 -5/16”). Adhesive should conform to CTE S1 for thin gauge porcelain stone ware. We recommend that the reverse of the tile is also back buttered with a 1-2mm/1/16-1/8” coating of adhesive.The application of the tiles must be a solid bed method with no voids behind the tiles and all expansion joints must be followed and uncoupling systems set in place if required.It is vital that all possible protection is used when operating any cutting instruments/ machinery. Always use personal protective equipment (PPE) such as goggles, a dusk mask and gloves as advised by the HSE. You can visit www.hse.gov.uk for further health and safety advice.
We recommend that all cutting and installation work is carried out by an experienced, professional tiler.
CERAMIC TILESCeramic tiles can be easily cut using standard tile cutting equipment and the usual precautions. When cutting individual tiles to fit in small area, please take extreme care and always try to keep each cutno less than 38mm/11/2”.
GLASSWORKS TILES It is sometimes necessary to cut glass tiles for the perfect installation, and most of our Glassworks tiles can be cut using glasscutters without any problems, as long as the proper procedures are followed.The exception is Splashbacks – DO NOT under any circumstances attempt to cut or drill a Splashback as it will shatter. For cutting information for specific products, please see notes below.
Glass Tiles including Upstands Although glass tiles cannot be cut or shaped like ceramic tiles, a glasscutter makes it easy to cut tiles with a thickness of 5-6mm/1/4”. Simply mark the outline of your cut, score it with the glasscutter, lay a thin wire under the score and apply even but firm pressure either side.
To avoid light refraction which could be a result of glass tiles being cut, please use a suitable glass cutting electric tile saw with a glass cutting blade, then file away any uneven edges with a suitable glass file.
FIXING TILES

39
Upstands have been designed to co-ordinate with our Splashbacks and can be cut like our other glass tiles when needed to fit around appliances, cupboards and fittings, and also to allow for electrical sockets. Upstands can be cut by using a tile cutter with a scoring wheel. Mark the outline of the cut, score the line with the cutter then snap the pieces apart. It is better to work around electrical sockets and minimise the number of cuts to avoid cutting out in the centre of an Upstand. However, if central cuts are required and you find it difficult to do these, we suggest these are done at a water jet cutting facility.
GLASSWORKS
Painted Back FinishRefer to page 28 for the list of decorative tiles with a painted back finish.
These may be cut using a thin glass cutting disc that is water fed. Glass cutting discs are thin and have very fine industrial diamonds coating the circumference of the tile. They are different from porcelain and ceramic cutting discs which have coarse industrial diamond coatings that chip the tile. Porcelain and ceramic cutting discs are thicker than glass cutting discs and unsuitable for the glass cutting procedure.
They may also be cut by the scribe and snap cutting method using an 18mm / 11/16 scoring wheel.
Glass cutting must be done slowly by applying gentle pressure and the cutting equipment must be in good condition.
Some difficult cuts may need to be done at a water jet cutting facility.Water jet facilities may be found on the internet and are widespread.
Vinyl Back FinishRefer to page 28 for the list of tiles with a vinyl back finish.
These may be cut as above but when cutting using the scribe and snap method, once they are snapped, fold to approximately 22o and use a sharp knife to cut along the slightly folded backing.
Some difficult cuts may need to be done at a water jet cutting facility.Water jet facilities may be found on the internet and are widespread.
MOSAICSNB We do not recommend cutting mosaics. Almost inevitably though, at some point you will have to cut or drill a few of your tiles, perhaps to fit around a window or sink, accommodate wiring or to finish off an area where it meets the ceiling or skirting. Where cutting is unavoidable it must be done with the utmost care. Beware of sharp edges after cutting. You will need protective eyewear and gloves.
For all Original Style glass mosaics, use a diamond blade designed for glass, or a wet saw. Specialist glass cutters provide the best finish and can usually be hired from your local tool hire centre. Cutters designed for ceramic tiles will work on glass although their blades are coarse and your tiles will end up chipped and misshapen. Score/scribe the reverse of the tile then turn to scribe the front then snap. Smooth sharp edges with a diamond pad.
Drilling glass tiles requires great care and patience and needs to be done with a drill and a special diamond tip. The tile must be firmly supported to avoid cracking. Putting a strip of masking tape over the tile will help to stop the drill tip skidding until the hole starts to form.
FIXING TILES

40
Cutting metal mosaicsMetal mosaics can be cut with a water-fed electric cutting machine with a normal diamond blade.
Before deciding on metal mosaics it is important to consider where they will be used. Metal mosaics may be cut, however we do not recommend using metal mosaics on external corners as this will leave a cut edge. This point is especially relevant when using brick-bond metal mosaics. After cutting, finish by carefully filing off any rough edges or burrs.
Cutting porcelain tilesRecommended tile cutters: Rubi TS-40, TS-60, with a suitable carbide scoring wheel 6mm/ 1/4”, 8mm/ 5/16”or 18mm/ 11/16”.
Tiles should be cut with diamond blades mounted on manual electric grinders or on a cutting station with water cooled tile saw (thin glass cutting blades are most suitable for this purpose); for precision cuts the usual techniques apply i.e. water jet cutting. Use an electric water fed diamond blade saw fordifficult shapes.
Drilling porcelain tilesPorcelain is a very hard product, which needs a special drill bit. We strongly recommend that you always use a cordless drill. First mark the centre of the hole to be drilled into the tile with a chinagraph pencil then attach a sticky adhesive drive pad. This drive pad will act as a gauge for a hollow diamond tipped drill bit. It may also have a water attachment to ensure that there is a constant supply of cold water aimed directly at the drill bit, in order to keep the diamond core cool and to help remove any debris that may build up whilst drilling the tile. It is not advisable to try to cool the diamond drill bit by using a hand held aspirator or drilling through a wet sponge. These methods will not keep the drill bits cool enough, and will drastically shorten the life of the drill bit.
If you use a self adhesive drive pad, simply start the drill in a vertical position and the sticky pad will ensure that the drill does not slip. Once you have finished drilling the tile, simply peel off the self adhesive drive pad.
NB: Not all cleaners are equally suitable for all types of tiles. Take advice from your supplier. However, pH neutral cleaners are suitable for most tiles.
CUTTING AND DRILLING

41
ALL PRODUCTS
Please note, the use of certain acid based cleaning products may cause some of our tiles to react and change in character. We recommend the use of pH neutral cleaning products on our tiles unless otherwise stated below. It is advisable to test a new cleaning product on a small inconspicuous area before use.
ARTWORKS
Victorian GreenThese have a copper-based glaze which is prone to discolouration by very mild acids often found in the home. To avoid such discolouration they should be cleaned only with pure water and should always be wiped dry immediately after cleaning.
EARTHWORKS NATURAL STONE TILES AND MOSAICS
EfflorescenceDuring the drying out process, soluble salts from within the substrate may appear on the surface of natural stone tiles. This can be removed (once all excess moisture has gone) using water. The presence of efflorescence in an existing building may indicate a structural problem, e.g. a defective damp-proof course or a leaking pipe. Any suspected defect should be identified and repaired before tiling.
An over-application of impregnator can sometimes be mistaken for efflorescence. The clouding or ‘white haze’ of excess impregnator can be removed with an appropriate remover.
Acid cleaning agents must never be used on natural stone. Use a pH neutral cleaner. Sweep or vacuum tiled floors to remove loose dirt and mop occasionally to remove spills and dirt.
Basalt Basalt should be cleaned on a regular basis to prevent any build-up of dirt, grease residue, soap detergents, etc, and to maintain a clean surface and lessen any slippery conditions. First, clean with clear water and/or a soap free, neutral liquid cleaner. Rinse with clear water then wipe dry to prevent film formation.
GLASSWORKS TILES AND SPLASHBACKS
Wash glass tile surfaces with clean water or a pH neutral glass or window cleaner. Use a soft lint-free cloth to avoid scratching. Never use vinegar to clean Glassworks tiles or Splashbacks as this may affect the grouting.
LA BELLE COLLECTION
Laurel (Dark Green, code KE) and Graphite Glazed (code NN) Tiles
Wash down tiled surfaces with either clean water or a neutral detergent. Do NOT use abrasive materials or strong acid or alkaline cleaners. Dry off and polish with a dry duster. Special WarningLaurel tiles and Graphite glazed tiles have a copper-based glaze which is prone to discolouration by very mild acids often found in the home, for example lemon scented soaps. To minimise this, wash the tiles with clean water only and immediately wipe dry. These tiles are recommended for use in dry areas only and should never be installed in areas such as showers, bath surrounds or basin splashbacks.
MOSAICS
Glass Wash down glass mosaic surfaces with clean water, a normal spirit or alcohol based glass or window cleaner. Use a soft cloth to avoid scratching.
CLEANING AND MAINTENANCE
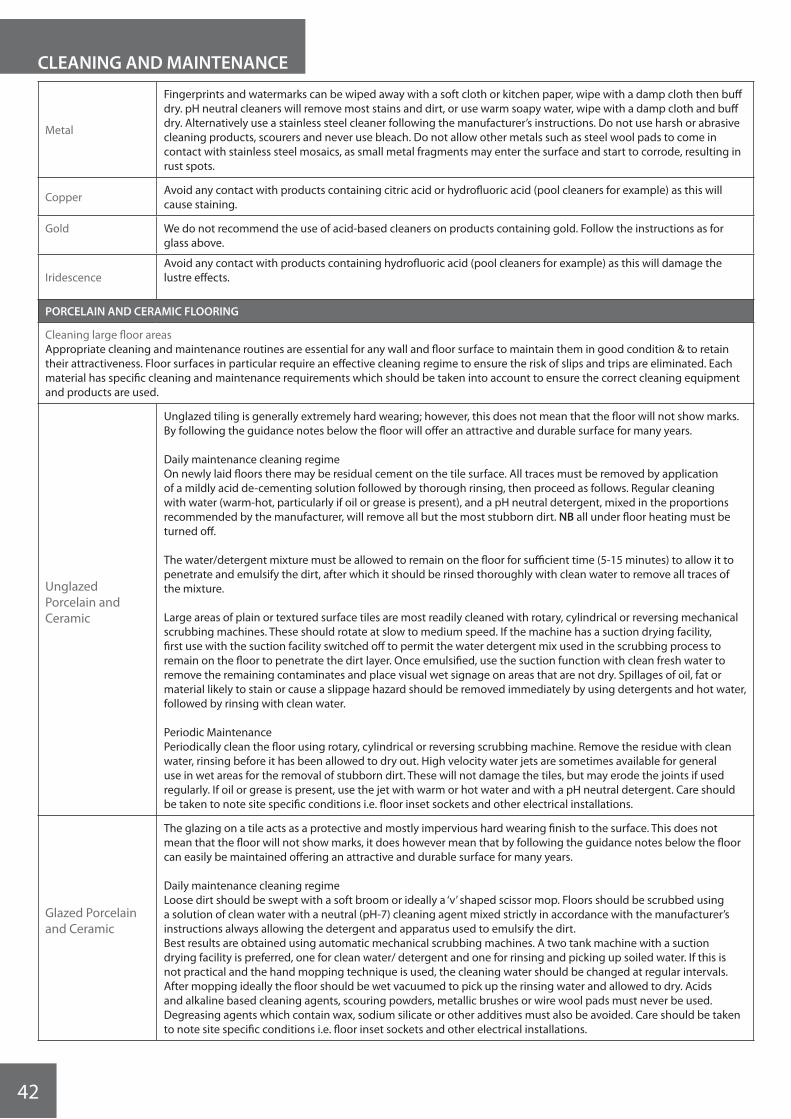
42
Metal
Fingerprints and watermarks can be wiped away with a soft cloth or kitchen paper, wipe with a damp cloth then buff dry. pH neutral cleaners will remove most stains and dirt, or use warm soapy water, wipe with a damp cloth and buff dry. Alternatively use a stainless steel cleaner following the manufacturer’s instructions. Do not use harsh or abrasive cleaning products, scourers and never use bleach. Do not allow other metals such as steel wool pads to come in contact with stainless steel mosaics, as small metal fragments may enter the surface and start to corrode, resulting in rust spots.
Copper Avoid any contact with products containing citric acid or hydrofluoric acid (pool cleaners for example) as this will cause staining.
Gold We do not recommend the use of acid-based cleaners on products containing gold. Follow the instructions as for glass above.
IridescenceAvoid any contact with products containing hydrofluoric acid (pool cleaners for example) as this will damage the lustre effects.
PORCELAIN AND CERAMIC FLOORING
Cleaning large floor areasAppropriate cleaning and maintenance routines are essential for any wall and floor surface to maintain them in good condition & to retain their attractiveness. Floor surfaces in particular require an effective cleaning regime to ensure the risk of slips and trips are eliminated. Each material has specific cleaning and maintenance requirements which should be taken into account to ensure the correct cleaning equipment and products are used.
Unglazed Porcelain and Ceramic
Unglazed tiling is generally extremely hard wearing; however, this does not mean that the floor will not show marks. By following the guidance notes below the floor will offer an attractive and durable surface for many years.
Daily maintenance cleaning regimeOn newly laid floors there may be residual cement on the tile surface. All traces must be removed by application of a mildly acid de-cementing solution followed by thorough rinsing, then proceed as follows. Regular cleaning with water (warm-hot, particularly if oil or grease is present), and a pH neutral detergent, mixed in the proportions recommended by the manufacturer, will remove all but the most stubborn dirt. NB all under floor heating must be turned off.
The water/detergent mixture must be allowed to remain on the floor for sufficient time (5-15 minutes) to allow it to penetrate and emulsify the dirt, after which it should be rinsed thoroughly with clean water to remove all traces of the mixture.
Large areas of plain or textured surface tiles are most readily cleaned with rotary, cylindrical or reversing mechanical scrubbing machines. These should rotate at slow to medium speed. If the machine has a suction drying facility, first use with the suction facility switched off to permit the water detergent mix used in the scrubbing process to remain on the floor to penetrate the dirt layer. Once emulsified, use the suction function with clean fresh water to remove the remaining contaminates and place visual wet signage on areas that are not dry. Spillages of oil, fat or material likely to stain or cause a slippage hazard should be removed immediately by using detergents and hot water, followed by rinsing with clean water.
Periodic Maintenance Periodically clean the floor using rotary, cylindrical or reversing scrubbing machine. Remove the residue with clean water, rinsing before it has been allowed to dry out. High velocity water jets are sometimes available for general use in wet areas for the removal of stubborn dirt. These will not damage the tiles, but may erode the joints if used regularly. If oil or grease is present, use the jet with warm or hot water and with a pH neutral detergent. Care should be taken to note site specific conditions i.e. floor inset sockets and other electrical installations.
Glazed Porcelain and Ceramic
The glazing on a tile acts as a protective and mostly impervious hard wearing finish to the surface. This does not mean that the floor will not show marks, it does however mean that by following the guidance notes below the floor can easily be maintained offering an attractive and durable surface for many years.
Daily maintenance cleaning regimeLoose dirt should be swept with a soft broom or ideally a ‘v’ shaped scissor mop. Floors should be scrubbed using a solution of clean water with a neutral (pH-7) cleaning agent mixed strictly in accordance with the manufacturer’s instructions always allowing the detergent and apparatus used to emulsify the dirt.Best results are obtained using automatic mechanical scrubbing machines. A two tank machine with a suction drying facility is preferred, one for clean water/ detergent and one for rinsing and picking up soiled water. If this is not practical and the hand mopping technique is used, the cleaning water should be changed at regular intervals. After mopping ideally the floor should be wet vacuumed to pick up the rinsing water and allowed to dry. Acids and alkaline based cleaning agents, scouring powders, metallic brushes or wire wool pads must never be used. Degreasing agents which contain wax, sodium silicate or other additives must also be avoided. Care should be taken to note site specific conditions i.e. floor inset sockets and other electrical installations.
CLEANING AND MAINTENANCE
43
Traditional method for sealingTerracotta tiles are a more porous material than any other tiles. The traditional impregnating fluid used is boiled linseed oil, which soaks into the product and reduces its porosity. It also gives you the option of choosing the colour you want. By adding more boiled linseed oil the colour and appearance of the tiles will be enhanced. Linseed oil can be used as it is or diluted with white spirit. You normally need to apply more than one coat and sometimes as many as four to saturate the tile. The number of coats can vary from tile to tile, so do not allow any excess to dry on the surface. Remove any excessive oil using clean, lint-free rags. Take care when disposing of the rags and leave them unfolded, as they can combust. Leave the tiles for 24 hours, and then grout using a flexible wide joint grout, removing any residue as you go. All grouting must then be left to dry before applying two coats of neutral beeswax, using a lint-free cloth. After application buff to the required finish.
Natural colour sealingIf you require the terracotta to keep its natural look then we would strongly recommend that you impregnate the terracotta without using any oils or enhancers. Using silicone, potassium or sodium silconate sealers offer only a short time for oils to penetrate through the seal, whilst water-reactive polysiloxanes and flouropolymers offer increased reaction times – hours rather than minutes. There are numerous products on the market, so we strongly advise that you contact your nearest sealant supplier.
LTP (www.ltp-online.co.uk) Tel: +44 (0) 1823 666213H.G.Hagesan (www.hg.eu) Tel: +44 (0) 1206 795200Lithofin (www.lithofin.com) Tel: +44 (0) 1962 732126Fila (www.filachim.com)
Maintenance for terracottaSweep or vacuum regularly to remove loose dirt. Wipe off any spillages immediately with a clean, damp cloth. Stubborn marks can often be removed with a little white spirit. Polish regularly with wax polish. Polish new floors once a week for the first six weeks and apply more polish every two to four months after this. Apply the polish with a clean cloth, allow it to harden for 30 minutes then buff the floor by hand or with an electric polisher. If the wax starts to build up on the surface, reduce the frequency of polishing, whereas if the floor begins to look dull, polish more often.
Original Style accepts no liability for the faulty installation of its tiles. In the case of any claim relating to the tiles themselves, Original Style’s liability, to the extent permitted by law, is limited to either the replacement of the product or a refund of the cost of the product, and does not extend to cover any consequential loss. Tiles must be inspected prior to installation and claims cannot be considered after the tiles have been installed. Claims must be reported within seven working days from the receipt of the tiles. Tile sizes may vary slightly from the stated nominal dimensions within internationally accepted standards.
Please be advised that installation constitutes acceptance of the quality, colour, size, texture and shade of the tiles. Please note, the use of certain acid-based cleaning products may cause some of the tiles to react and change in character. Original Style warrants that its tiles conform to their description and are fit for their purpose. Original Style makes no other express or implied warranty as to fitness or suitability of the products for particular installations. We extend no guarantees, express or implied, as to wear resistance or maintenance procedures.
SEALING TERRACOTTA

44
LIMITS OF LIABILITY
It is imperative to follow all manufacturers’ instructions regarding their suitability with our products. If in doubt please consult your grout/adhesive/sealant stockist from whom you purchased the products. Original Style makes no representations as to the fitness for purpose of third party products.
In the USA please follow the recommendations of reputable product manufacturers in conjunction with this Fixing Guide, and always comply with American National Standards Institution (ANSI) specifications as set out in the Handbook for Ceramic Tile Installation published by the Tile Council of America.Useful links: ctioa.org, tileusa.com

45
NOTES

46
NOTES

47
NOTES

48
NOTES

49
NOTES

© Original Style Falcon Road, Sowton Industrial Estate, Exeter, Devon, England EX2 7LB
12/15