flare images guide - madcap software
TRANSCRIPT

MadCap Flare
Images Guide
Version 8.0
Copyright 2012MadCap Software. All rights reserved.
Information in this document is subject to change without notice. The software described in this document is fur-nished under a license agreement or nondisclosure agreement. The softwaremaybe used or copied only inaccordance with the termsof those agreements. No part of this publicationmaybe reproduced, stored in aretrieval system, or transmitted in any form or anymeanselectronic or mechanical, including photocopying andrecording for anypurpose other than the purchaser's personal use without the written permission of MadCapSoftware.
MadCap Software7777 FayAvenueLa Jolla, California 92037858-320-0387www.madcapsoftware.com
Scan to open online Help

i
CONTENTS
CHAPTER 1 Images 1Raster Versus Vector Images 2Tasks Associated with Images 6
CHAPTER 2 Adding and Inserting Images 11Adding Images to Projects 12Inserting Images 14Adding Screen Capture Files to Projects 20Inserting Screen Capture Images 25
CHAPTER 3 Editing Images 31Ways to Edit Images 32Editing Image Properties Using Styles 33Editing Image Properties Using Local Formatting 35Opening Images in Capture for Editing 38Adding Backgrounds to Images 39Adding Borders to Images 44Moving Images in Topics 49Positioning Images 50Resizing Images 56Adding Margins to Images 63Adding Padding to Images 67Showing Images as Thumbnails in Output 71Showing Images as Thumbnails While Editing 77Showing and HidingWeb Images in the XML Editor 80
CHAPTER 4 Additional Image Tasks 81
CreatingWatermarks 83Inserting Image Hyperlinks 85Creating Image Maps 89Deleting Images from Topics 95Deleting Image Files from the Project 95Opening Images 96Pasting Images from Other Programs 97Regenerating Images 98Removing Images from Headings in a Generated TOC 101Selecting an Image for the About Box 102Adding Images to Page Layout Frames 104Creating a List of Images 105Launching MadCap Capture 107Embedding Images in Microsoft Word Output 108Creating Single-Source Images 109Generating Web-Safe Images 112
APPENDIX A PDFGuides 113
MADCAP FLARE
ii

1
CHAPTER1 Images
This feature is supported in all outputs.
You can insert an image into a content file (e.g., topic, snippet) to help explain something. Flare sup-ports the following typesof raster and vector image files: BMP, EMF, EPS, EXPS, GIF, HDP, JPG,JPEG, PNG, PS, SVG, SWF, TIF, TIFF,WDP,WMF, XAML, XPS.
This chapter discusses the following.
Raster Versus Vector Images 2
Tasks Associated with Images 6
Raster Versus Vector ImagesFlare supports common raster image formats such asBMP, GIF, JPG, and PNG. In addition, it supports vectorimage formats such asEPS, PS, and SVG.
A vector image comprisesgeometric elements such as lines, points, and curves, based onmathematical equa-tions. On the other hand, raster graphics aremade up of pixels. A vector image is ideal for print-based outputbecause the clarity ismaintained even when you reduce the size of the graphic. If you generate an online out-put type such asWebHelp or DotNet Help, all vector imagesare converted to PNG.
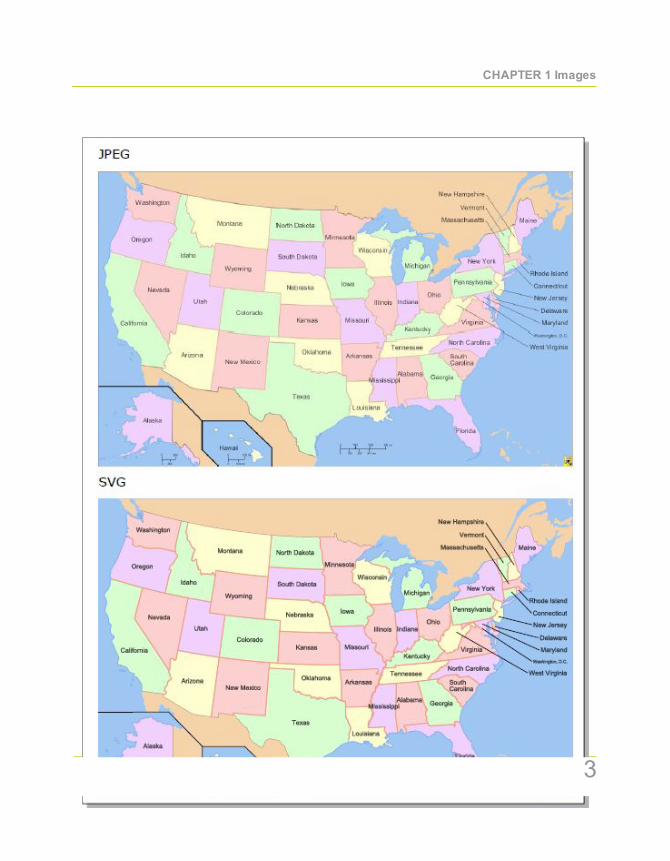
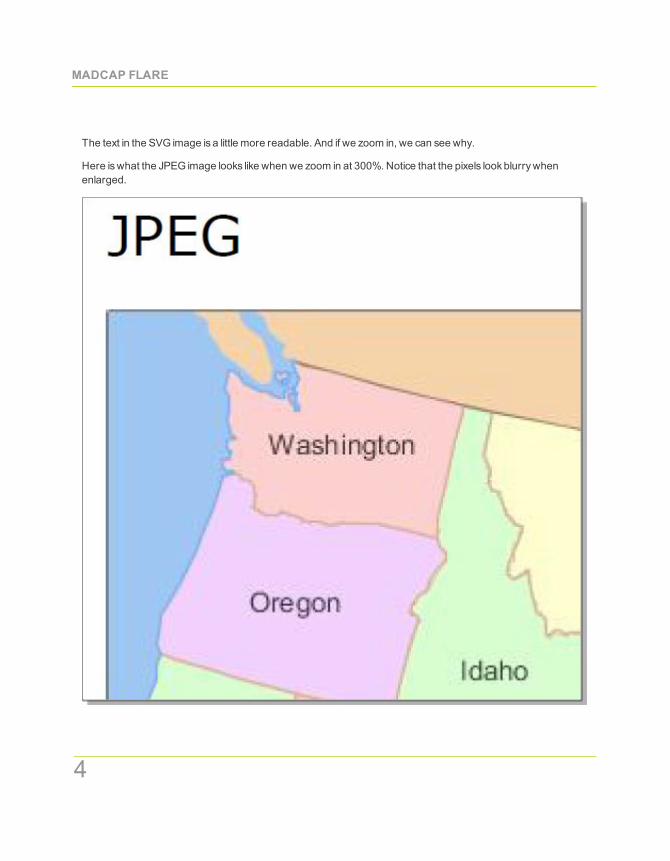
It is sometimesdifficult to tell the difference between a vector and raster graphicwhen viewing it at 100%. But ifyou zoom in the difference becomesapparent. Following is an example of a PDF document with the sameimage in JPEGand SVG format.
MADCAP FLARE
2
CHAPTER 1 Images
3
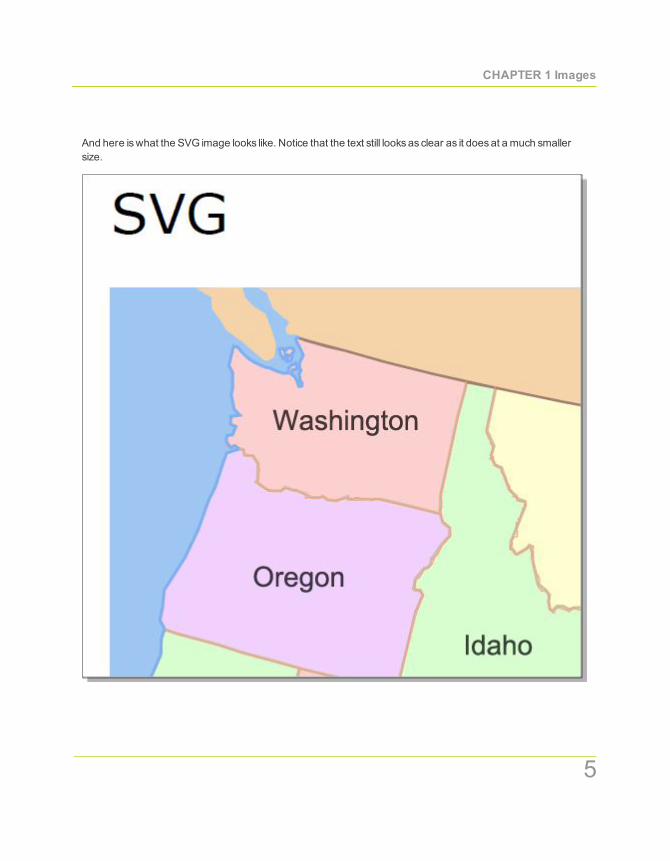
The text in the SVG image is a little more readable. And if we zoom in, we can see why.
Here iswhat the JPEG image looks like when we zoom in at 300%. Notice that the pixels lookblurrywhenenlarged.
.
MADCAP FLARE
4
CHAPTER 1 Images
And here iswhat the SVG image looks like. Notice that the text still looksas clear as it doesat amuch smallersize.
.
5
Tasks AssociatedWith ImagesYou can accomplish the following with images.
Adding And Inserting ImagesImage file (add) These steps show you how to add an image to your project, without inserting it into atopic. See "Adding Images to Projects" on page 12.
Images (insert) These steps show you how to insert an image file that alreadyexists. See "InsertingImages" on page 14.
Screen capture (add) Follow these steps if you haveMadCapCapture installed on your computerand you want to capture an image from your screen and add it to the project, without inserting it into atopic at the same time. See "Adding Screen Capture Files to Projects" on page 20.
Screen capture (insert) Follow these steps if you haveMadCapCapture installed on your computerand you want to capture an image from your screen and insert it into a topic at the same time. See"Inserting Screen Capture Images" on page 25.
Editing ImagesImage (edit) If you haveMadCapCapture installed on your computer, you can open any image inyour project. The image opens in Capture, where you canmake changes to it. See "Editing Images"on page 31.
Background (add) You can add background settings to an image. This includes the ability to specifya color, another image, and a repeating pattern for the background image. Normally you would notsee an image's background, but if you give the image a certain amount of padding, you would see thebackground around the edgesof it. See "Adding Backgrounds to Images" on page 39.
Borders (add) You can add borders around an image, specifying the border size, color, and type.See "Adding Borders to Images" on page 44.
Image (move) After you insert a picture or screen capture image into a topic, you can easilymove thatimage around. See "Moving Images in Topics" on page 49.
Image (position) You can use object positioning to precisely place an inserted image anywhere youneed it on a page. This includes the ability to wrap text around an image or float an image outside theframe holding the regular flow of text. See "Positioning Images" on page 50.
Image (resize) You can resize imageswith variousmethods. See "Resizing Images" on page 56.
Margins (add) You can adjust themarginsaround an image so that there is extra space above,below, to the right, or to the left of it. See "AddingMargins to Images" on page 63.
MADCAP FLARE
6
CHAPTER 1 Images
Padding (add) You can add padding (i.e., extra space) between an image's border and the imageitself. See "Adding Padding to Images" on page 67.
Thumbnails (show in output) When you insert images into Flare content, you can specify that theimages should be displayed as thumbnails (i.e., much smaller versionsof the image) in the output. Thisis a way to condense topics so that imagesare not taking up asmuch real estate.When you use thisfeature, you can specifyways that the user can enlarge the image to see its full size (e.g., by hoveringover the thumbnail, by clicking the thumbnail). See "Showing ImagesasThumbnails in Output" onpage 71.
Thumbnails (show while editing) You can specify that thumbnail images should be shownwhileyou are editing the content. This is simply a feature for you as the author, allowing you to scale allimagesdown to 48 pixels high (if the original size is larger than that). This lets you seemore contentand lessof your imagesas you edit topics. The imagesare only scaled for your editing purposes; theyare not shown as thumbnails in the output. See "Showing ImagesasThumbnailsWhile Editing" onpage 77.
Web images (show/hide in XML Editor) If you havemany image tags that link to websites (e.g.,<img src="http://www.madcapsoftware.com/images/home/company.png" />), rather than linking toimages in the project, slow website response timesmayslow down your work in the Flare project.Therefore, youmight want to disable the rendering of such images in the XMLEditor. See "Showingand HidingWeb Images in the XMLEditor" on page 80.
Additional Image TasksBackground for topics (add) You can add a background image on topics byusing the <body> styletag. See "CreatingWatermarks" on page 83.
Hyperlink and image map (insert) After you insert an image, you can turn that picture into a hyper-link, connecting it to another topic, a topic in an imported HTMLHelp file, an external file (such asawebsite), or an email. See "Inserting Image Hyperlinks" on page 85.
You can also createmultiple hyperlinks for specific sectionsof the image. This is called an "imagemap." See "Creating ImageMaps" on page 89.
Image (delete) These steps show you how to delete an image that you have previously inserted into atopic. See "Deleting Images from Topics" on page 95.
You can also remove an image file from a project. See "Deleting Image Files from the Project" on page95.
Image (open) You can open an image that you have added to your project. When you open theimage , it displays in the Image Viewer within Flare. See "Opening Images" on page 96.
7

Image (paste) You can copyand paste an image from another program, such asMicrosoftWord,into a content file (e.g., topic, snippet). When you do this, a copyof the image file is added in PNG for-mat to your project with a name that you provide. See "Pasting Images fromOther Programs" on page97.
Image (regenerate) If necessary, you can quickly regenerate (update) all of the images in yourproject. See "Regenerating Images" on page 98.
Image (remove from generated TOC) If you have inserted images into the headings in your topics,you canmake sure those imagesdo not appear in the generated TOC of the printed output. See"Removing Images fromHeadings in a Generated TOC" on page 101.
Image (select for About box) You can select an image to be used for the "About box" in the outputwindow. You can use thisAbout box for anypurpose you like. See "Selecting an Image for the AboutBox" on page 102.
Image frame (add) You can draw an image frame in a page layout. The image you select is added toa frame of the same size, which you can place on the page asnecessary. This allowsyou to place animage automatically onmultiple pages in the output. Youmight use this feature, for example, if youwant to place your company logo somewhere on each page. See "Adding Images to Page LayoutFrames" on page 104.
List of images (create) You can use the list-of proxy to generate a list of various typesof elements(e.g., tables, images) in your output, with links to the corresponding content. See "Creating a List ofImages" on page 105.
MadCap Capture (launch) If you haveMadCapCapture installed on your computer, you canlaunch it fromwithin Flare. You can then use Capture to edit any images in your project. See "Launch-ingMadCapCapture" on page 107.
Microsoft Word output (embed) An option on the Advanced tab of the Target Editor lets youensure that imagesare embedded inMicrosoftWord output. This option is enabled bydefault. See"Embedding Images inMicrosoftWord Output" on page 108.
Single-source image (create) If you are creating a project containing imagesand need to generateoutput for both online and printed output, chancesare good that you require different image settings(e.g., file format, color depth, resolution) for those outputs. In the past, the easiest way to accomplishthis taskwas to create one set of images for the online output and another set for the printed output.However, there is another alternative. If you have bothMadCap Flare andMadCapCapture installed,you can single-source your images, producing only one set of images for all outputs. You can specifythat the online images should have one group of settings, while the printed imageshave anothergroup of settings. See "Creating Single-Source Images" on page 109.
You can also single-source imageswhen resizing them. This can be done through the use of styles(applying the settings tomany imagesat once) or local formatting (applying the settings to one image).
MADCAP FLARE
8

CHAPTER 1 Images
When you generate online output, the image will be displayed in one size, and when you generateprint-based output, the image will be displayed in another size. See "Resizing Images" on page 56.
Web-safe images If you have used non–web-safe image formats (e.g., WMF, EMF, BMP, TIF,TIFF, XPS, EXPS) in your project and want those images to be converted to web-safe formats (e.g.,GIF, JPEG, PNG) when you generate online output—e.g., DotNet Help, Microsoft HTMLHelp,Web-Help,WebHelp 2.0 (HTML5),WebHelp AIR,WebHelpMobile,WebHelp Plus—you can use an optionon the Advanced tab of the Target Editor. For print-based output types (Adobe FrameMaker, AdobePDF,MicrosoftWord, Microsoft XPS, XHTML), the original image file formatswill be used when yougenerate output. See "GeneratingWeb-Safe Images" on page 112.
Note:When you insert an image from outside your project into a topic, a copyof the image file isadded to your project. The image file is stored in the Resources\Images folder of the ContentExplorer, unless you specify another location.
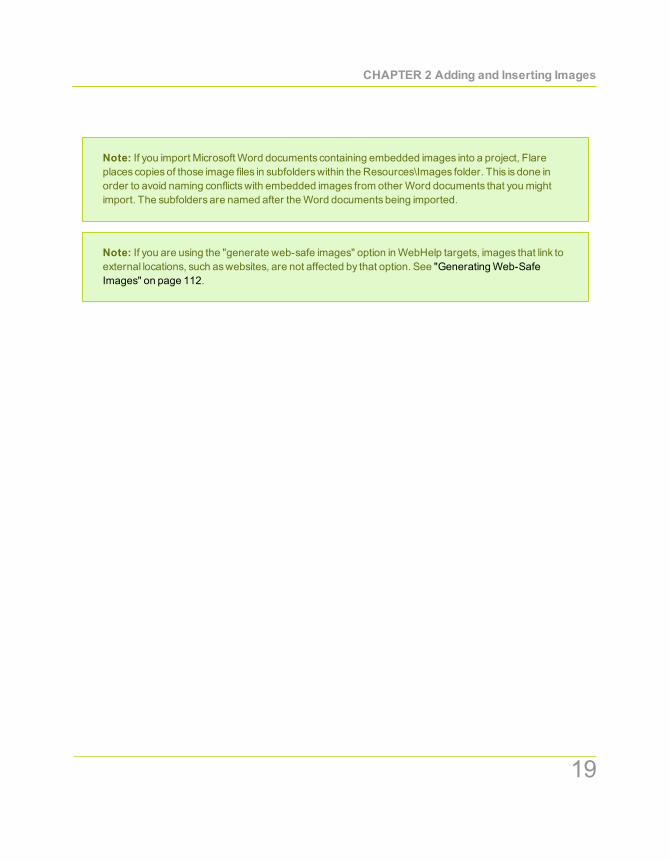
Note: If you import MicrosoftWord documents containing embedded images into a project, Flareplaces copiesof those image files in subfolderswithin the Resources\Images folder. This is done inorder to avoid naming conflictswith embedded images from other Word documents that youmightimport. The subfolders are named after theWord documents being imported.
Note: If you apply certain special effects or artwork (e.g., arrows) to images inWord and then importthem into Flare, those effectswill not be retained. For example, a rotated image will return to itsstraight, original state. However, there are someworkarounds that mayallow you to keep the effectsor artwork. One solution is to apply another effect such asa shadow or 3-D to the image inWord (e.g.,add a shadow to a rotated image that you want to keep). This forcesWord to save the image asanentirely new image with the effects. Another possible solution is to save theWord document asaWebPage, manually copy that HTM file into the Flare folder, and then open it within Flare. As for text float-ing around images, this effect is not supported in Flare.When you import fromWord, the text is addedbelow the image.
Note: If you have used non–web-safe image formats (e.g., WMF, EMF, BMP, TIF, TIFF, XPS,EXPS) in your project and want those images to be converted to web-safe formats (e.g., GIF, JPEG,PNG) when you generate online output—e.g., DotNet Help, Microsoft HTMLHelp,WebHelp,Web-Help 2.0 (HTML5),WebHelp AIR,WebHelpMobile,WebHelp Plus—you can use an option on theAdvanced tab of the Target Editor. For print-based output types (Adobe FrameMaker, Adobe PDF,
9

MicrosoftWord, Microsoft XPS, XHTML), the original image file formatswill be used when you gen-erate output.
MADCAP FLARE
10
11
CHAPTER2 Adding and Inserting Images
You can add imagesand screenshots to your project and insert them into topics and snippets.
This chapter discusses the following.
Adding Images to Projects 12
Inserting Images 14
Adding Screen Capture Files to Projects 20
Inserting Screen Capture Images 25
Adding Images To ProjectsThe following steps show you how to add an image to your project, without inserting it into a content file. If youfollow the steps for inserting an image, the image file is added to the project aswell.
How to add an image file to a project
1. Do one of the following, depending on the part of the user interface you are using.
Ribbon Select theProject ribbon. In theContent section selectNew>Image.
You can use theOptionsdialog to switch between ribbonsand the classicmenu/toolbar lay-out. For more information see the online Help.
Keep inmind that the smaller the application window becomes, themore the options in a rib-bon shrink. Therefore, youmight only see a small icon instead of text, or youmight see only asection name displayed with a down arrow to access the options in it. You can hover oversmall icons to see tooltips that describe them. You can also enlarge the application window orclick one of the section drop-downs in the ribbon to locate a hidden feature.
Menu SelectProject>Add Image.
The Add File dialog opens.
2. Click the File Type field at the top of the dialog and select Image.
3. In theSource area select one of the following.
New from template This lets you choose either a factory template file or one of your own cus-tomized template files asa starting point. The new file will take on all of the settings containedin the template. If you want to use a factory template provided byFlare, expand the FactoryTemplates folder and click on a template file. If you want to use your own customized tem-plate file, expand the appropriate folder and click on a file. For more information about tem-plates, see the online Help.
Note: In some dialogsand wizards you can click theManage Templates buttonif you want to open the TemplateManager. This lets youmanage anyof your
template files (e.g., add new templates, enter descriptions for templates). For moreinformation see the online Help.
New from existing This lets you choose an existing file of the same type—that you'vealready created and stored somewhere—asa starting point for your new file. Aswith
MADCAP FLARE
12
CHAPTER 2 Adding and Inserting Images
template files, your new file will take on all of the settings contained in the file you select. To
use this option, click the browse button , use theOpen File dialog to find a file, and dou-ble-click it.
4. (Optional) If you want to place the file into a subfolder that you previously created in the Content
Explorer, in the Folder field click and select the subfolder. Otherwise, keep the default location.
5. In the File Name field, type a new name for the image file.
6. ClickAdd.
7. ClickOK. The image file is added to the Resources\Imagessubfolder in the Content Explorer. TheImage Viewer opens to the right, displaying the picture.
13
Inserting ImagesThe following steps show you how to insert an image into a content file (e.g., topic, snippet), adding the imagefile to the project aswell.
If instead you follow the steps for adding an image to a project, the image file is added to the project, but notinserted into a topic.
How to insert an image
1. Open the content file (e.g., topic, snippet).
2. In the XMLEditor place your cursor where you want to insert the image.
3. Do one of the following, depending on the part of the user interface you are using.
Ribbon Select the Insert ribbon. In theMultimedia section, select Image.
You can use theOptionsdialog to switch between ribbonsand the classicmenu/toolbar lay-out. For more information see the online Help. Keep inmind that the smaller the applicationwindow becomes, themore the options in a ribbon shrink. Therefore, youmight only see asmall icon instead of text, or youmight see only a section name displayed with a down arrowto access the options in it. You can hover over small icons to see tooltips that describe them.You can also enlarge the application window or click one of the section drop-downs in the rib-bon to locate a hidden feature.
Menu Select Insert>Image.
Keyboard shortcut PressCTRL+G.
Local toolbar In the local toolbar of the XMLEditor, click .
The Insert Image dialog opens.
4. Select theGeneral tab.
5. Select an image file to insert. You can do this in variousways.
You can select an image file already in the project by finding and choosing it in the Select File Area. Usethe buttons in the local toolbar to view all files in a list, view files in their folder structure, etc.
Showsall of the files in the project in a list in the area below. If you click the button again, itswitches to a folder tree view. In the list, you can click the "File," "Type," or "Path" columnheaders to sort the list alphabetically by that column data.
MADCAP FLARE
14
CHAPTER 2 Adding and Inserting Images
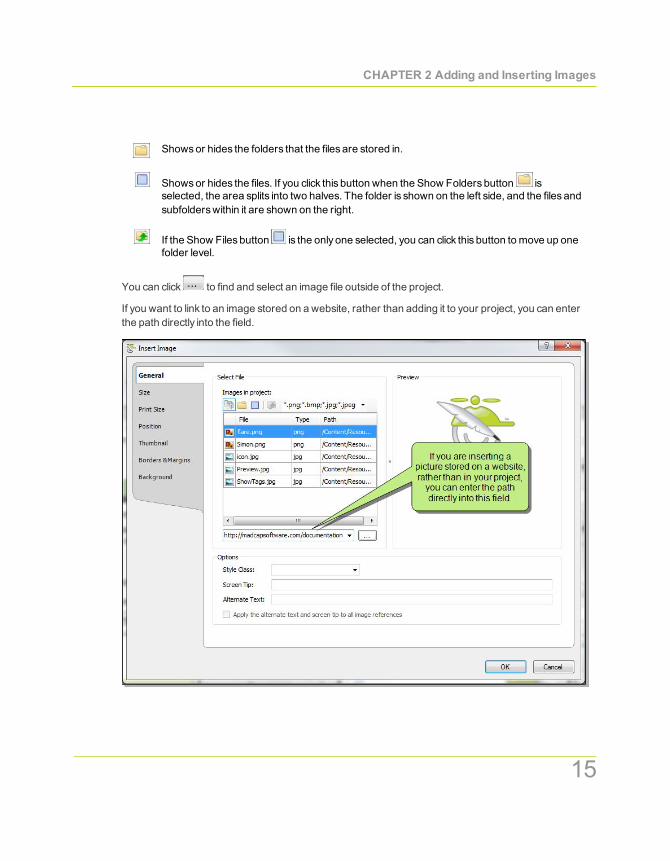
Showsor hides the folders that the files are stored in.
Showsor hides the files. If you click this button when the Show Folders button isselected, the area splits into two halves. The folder is shown on the left side, and the files andsubfolderswithin it are shown on the right.
If the Show Files button is the only one selected, you can click this button tomove up onefolder level.
You can click to find and select an image file outside of the project.
If you want to link to an image stored on a website, rather than adding it to your project, you can enterthe path directly into the field.
15
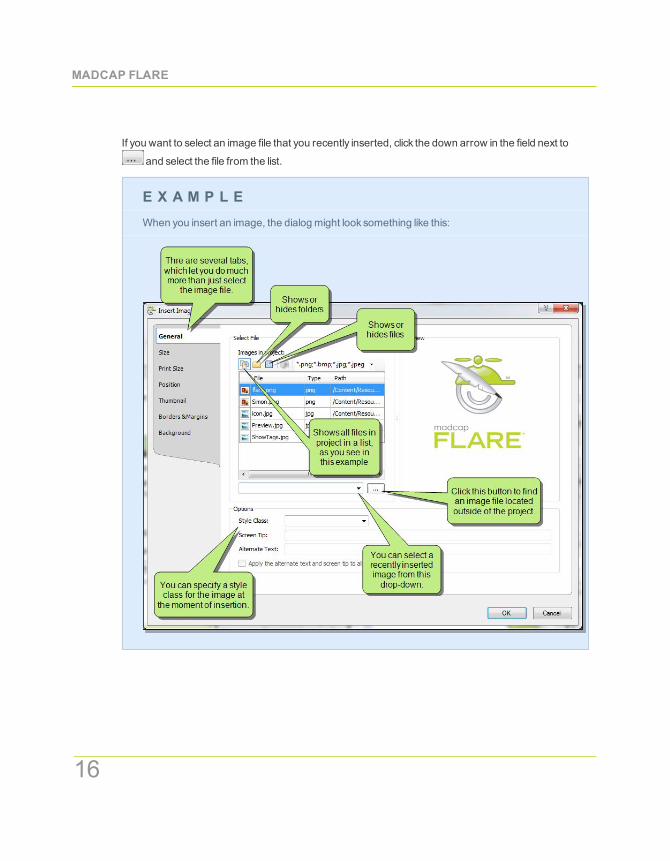
If you want to select an image file that you recently inserted, click the down arrow in the field next to
and select the file from the list.
E X A M P L EWhen you insert an image, the dialogmight look something like this:
MADCAP FLARE
16
CHAPTER 2 Adding and Inserting Images
Note: If you select an image outside the project, that file is then copied and placed inside theproject. The image file is stored in the Resources\Images folder of the Content Explorer.
6. (Optional) If you want to apply a specific style class to the image, you can select it from theStyle Classfield.
E X A M P L ELet's say that you have created in your stylesheet a classof the <img> tag called "button" (i.e.,img.button) and you have set amaximum size on that style class. The idea is that you want touse that style classwhenever you insert an image of a button, ensuring that the image alwaysdisplays in a very small size. Rather than using the default parent <img> tag when you insertthe image, you select img.button from the Style Classdrop-down.
7. (Optional) In theScreen Tip field you can type a phrase that will appear when the end user hoversover the image.
8. (Optional) In theAlternate Text field you can type alternate text to displaywhen the image is not avail-able, such aswhen a disabled individual is using a screen reader.
For more information see the online Help.
9. (Optional) SelectApply the alternate text and screen tip to all image references if you wantthe same alternate and screen tip text to be used everywhere the image is used in the project.
10. (Optional) Use anyof the other tabs to provide additional settings for the image.
Size and Print Size tabsYou can use these tabs to resize the image. If you want to provideonly one group of settings for the image, use the Size tab. If you want to provide two groupsofsettings—one for online output and another for print-based output—use theSize tab foronline output, then use thePrint Size tab for print-based output. See "Resizing Images" onpage 56.
Position tab You can use this tab to adjust the positioning of the image on the page. Thisincludes the ability to wrap text around an image or float an image outside the frame holdingthe regular flow of text. See "Positioning Images" on page 50.
Thumbnail tab You can use this tab to create a thumbnail version of the image in the output.See "Showing ImagesasThumbnails in Output" on page 71.
Borders & Margins tab You can use this tab to set borders, margins, or padding for the
17
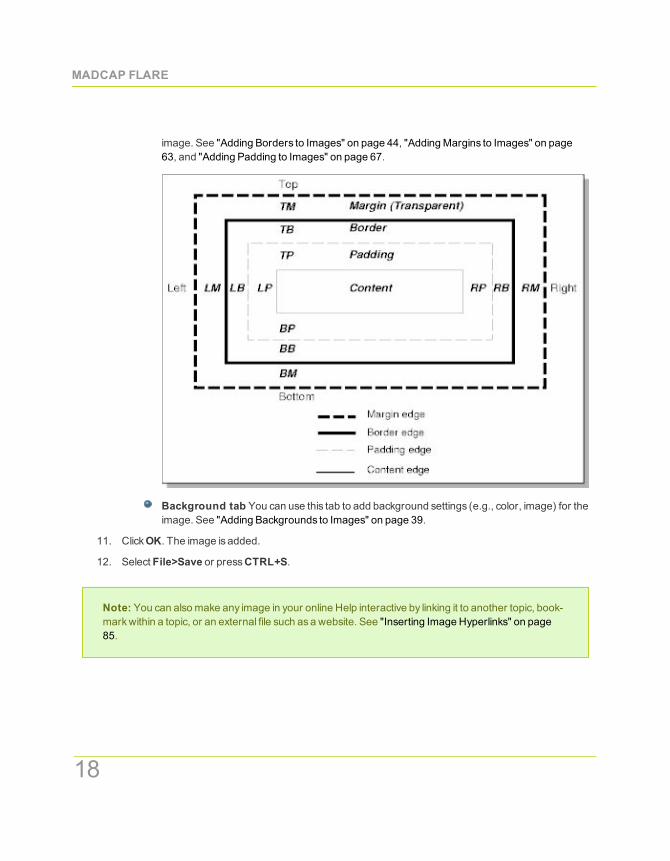
image. See "Adding Borders to Images" on page 44, "AddingMargins to Images" on page63, and "Adding Padding to Images" on page 67.
Background tab You can use this tab to add background settings (e.g., color, image) for theimage. See "Adding Backgrounds to Images" on page 39.
11. ClickOK. The image is added.
12. Select File>Save or pressCTRL+S.
Note: You can alsomake any image in your online Help interactive by linking it to another topic, book-markwithin a topic, or an external file such asa website. See "Inserting Image Hyperlinks" on page85.
MADCAP FLARE
18
CHAPTER 2 Adding and Inserting Images
Note: If you import MicrosoftWord documents containing embedded images into a project, Flareplaces copiesof those image files in subfolderswithin the Resources\Images folder. This is done inorder to avoid naming conflictswith embedded images from other Word documents that youmightimport. The subfolders are named after theWord documents being imported.
Note: If you are using the "generate web-safe images" option inWebHelp targets, images that link toexternal locations, such aswebsites, are not affected by that option. See "GeneratingWeb-SafeImages" on page 112.
19
Adding Screen Capture Files To ProjectsCapture isMadCap's screen capture and editing tool, which is tightly integrated with Flare. If you have Captureinstalled on your computer, you can use it to do anyof the following fromwithin Flare.
You can capture an image on your screen and add the image file to the project (without inserting the pictureinto a topic).
How to add a screen capture file to a project
1. Do one of the following, depending on the part of the user interface you are using.
Ribbon Select theProject ribbon. In theContent section selectNew>Screen Capture.
You can use theOptionsdialog to switch between ribbonsand the classicmenu/toolbar lay-out. For more information see the online Help.
Keep inmind that the smaller the application window becomes, themore the options in a rib-bon shrink. Therefore, youmight only see a small icon instead of text, or youmight see only asection name displayed with a down arrow to access the options in it. You can hover oversmall icons to see tooltips that describe them. You can also enlarge the application window orclick one of the section drop-downs in the ribbon to locate a hidden feature.
Menu SelectProject>Add Screen Capture.
The Add Screen Capture dialog opens.
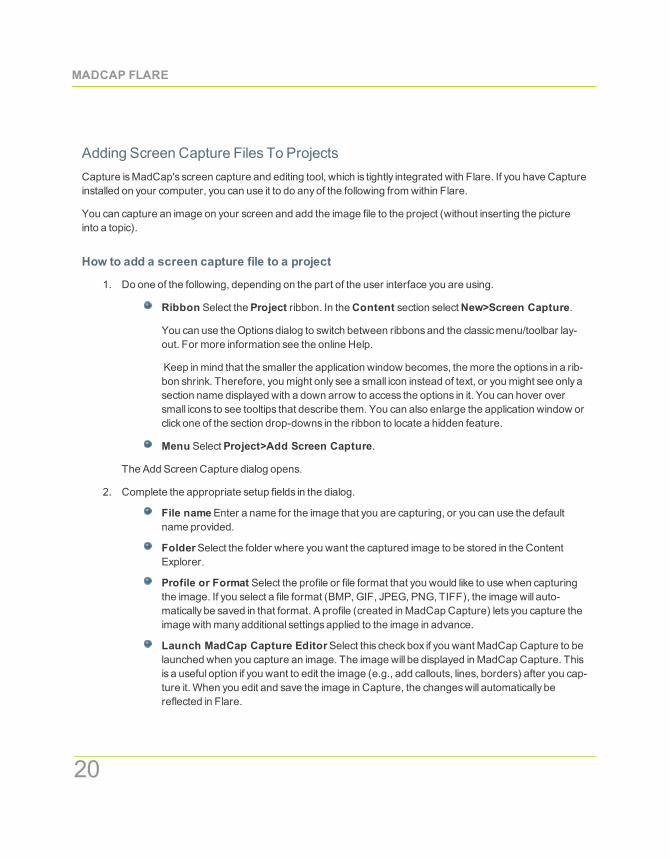
2. Complete the appropriate setup fields in the dialog.
File nameEnter a name for the image that you are capturing, or you can use the defaultname provided.
FolderSelect the folder where you want the captured image to be stored in the ContentExplorer.
Profile or Format Select the profile or file format that you would like to use when capturingthe image. If you select a file format (BMP, GIF, JPEG, PNG, TIFF), the image will auto-matically be saved in that format. A profile (created inMadCapCapture) lets you capture theimage with manyadditional settingsapplied to the image in advance.
Launch MadCap Capture EditorSelect this checkbox if you want MadCapCapture to belaunched when you capture an image. The image will be displayed inMadCapCapture. Thisis a useful option if you want to edit the image (e.g., add callouts, lines, borders) after you cap-ture it. When you edit and save the image in Capture, the changeswill automatically bereflected in Flare.
MADCAP FLARE
20

CHAPTER 2 Adding and Inserting Images
3. Select the capture option that you want to use, and complete the steps for each one asnecessary.
Capture UI Element Capturesa fixed area of a window (e.g., menu bar, toolbar, editor,individual button, entire window), depending on where youmove your mouse and click. Asyoumove themouse in an application, a red border surroundseach separate region.
Capture Application Capturesan open application.When you click this button, the Selectwindow opens, displaying a list of all open applications. You can select the application that youwant to capture.
Capture Region Capturesa rectangular region of your computer screen.When you clickthis button, a rectangle with a red border displaysover your screen. You canmove and resizethis rectangle in the following ways.
Drag edgeYou can resize the capture areamanually by clicking anyof the handles(small squares) around the edge of the rectangle and dragging them to resize thewidth and/or height.
21
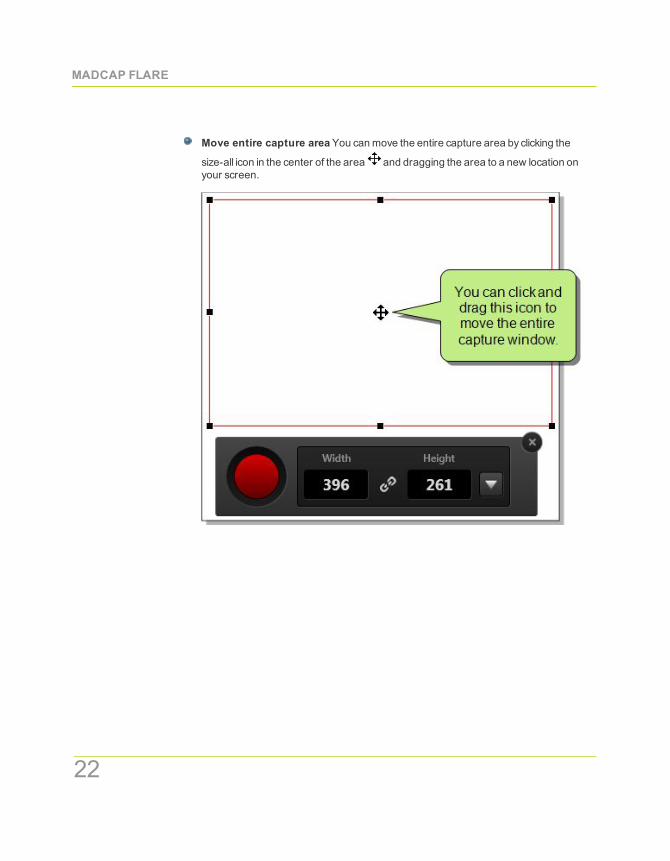
Move entire capture areaYou canmove the entire capture area by clicking the
size-all icon in the center of the area and dragging the area to a new location onyour screen.
.
MADCAP FLARE
22
CHAPTER 2 Adding and Inserting Images
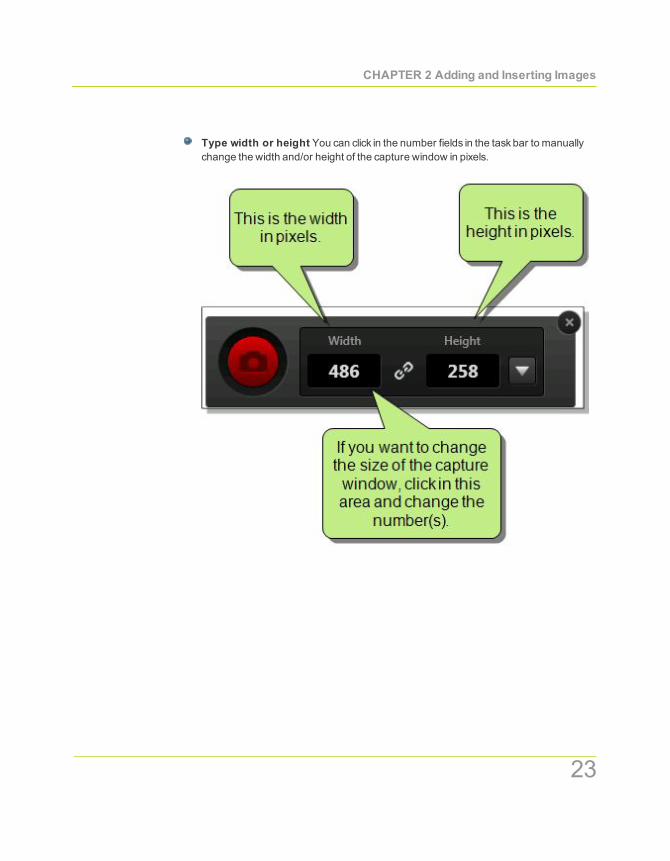
Type width or height You can click in the number fields in the taskbar to manuallychange the width and/or height of the capture window in pixels.
.
23
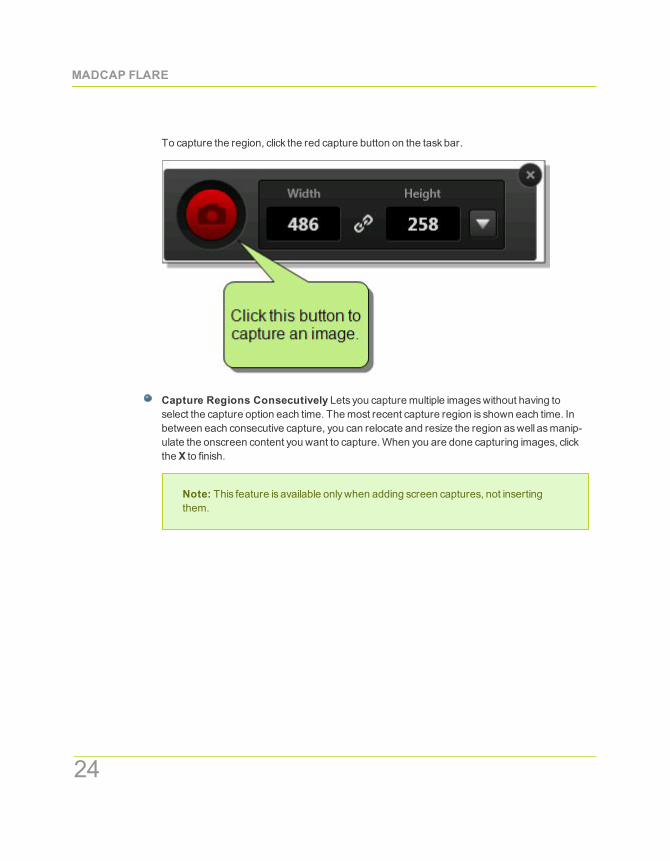
To capture the region, click the red capture button on the taskbar.
Capture Regions Consecutively Lets you capturemultiple imageswithout having toselect the capture option each time. Themost recent capture region is shown each time. Inbetween each consecutive capture, you can relocate and resize the region aswell asmanip-ulate the onscreen content you want to capture.When you are done capturing images, clicktheX to finish.
Note: This feature is available onlywhen adding screen captures, not insertingthem.
MADCAP FLARE
24
CHAPTER 2 Adding and Inserting Images
Inserting Screen Capture ImagesIf you haveMadCapCapture installed on your computer, you can use it to capture an image from your screenand insert it into a topic at the same time.
How to insert a screen capture into a topic
1. Open the content file (e.g., topic, snippet).
2. In the XMLEditor, place your cursor where you want to insert the image.
3. Do one of the following, depending on the part of the user interface you are using.
Ribbon Select the Insert ribbon. In theMultimedia section, selectScreen Capture.
You can use theOptionsdialog to switch between ribbonsand the classicmenu/toolbar lay-out. For more information see the online Help. Keep inmind that the smaller the applicationwindow becomes, themore the options in a ribbon shrink. Therefore, youmight only see asmall icon instead of text, or youmight see only a section name displayed with a down arrowto access the options in it. You can hover over small icons to see tooltips that describe them.You can also enlarge the application window or click one of the section drop-downs in the rib-bon to locate a hidden feature.
Menu Select Insert>Screen Capture.
The Screen Capture dialog opens.
4. Complete the appropriate setup fields in the dialog.
File nameEnter a name for the image that you are capturing, or you can use the defaultname provided.
Folder Select the folder where you want the captured image to be stored in the ContentExplorer.
Profile or Format Select the profile or file format that you would like to use when capturingthe image. A profile (created inMadCapCapture) lets you capture the image with manyaddi-tional settingsapplied to the image in advance.
Launch MadCap Capture EditorSelect this checkbox if you want MadCapCapture to belaunched when you capture an image. The image will be displayed inMadCapCapture. Thisis a useful option if you want to edit the image (e.g., add callouts, lines, borders) after you cap-ture it. When you edit and save the image in Capture, the changeswill automatically bereflected in Flare.
25

5. Select the capture option that you want to use, and complete the steps for each one asnecessary.
Capture UI Element Capturesa fixed area of a window (e.g., menu bar, toolbar, editor,individual button, entire window), depending on where youmove your mouse and click. Asyoumove themouse in an application, a red border surroundseach separate region.
Capture Application Capturesan open application.When you click this button, the Selectwindow opens, displaying a list of all open applications. You can select the application that youwant to capture.
Capture Region Capturesa rectangular region of your computer screen.When you clickthis button, a rectangle with a red border displaysover your screen. You canmove and resizethis rectangle in the following ways.
Drag edgeYou can resize the capture areamanually by clicking anyof the handles(small squares) around the edge of the rectangle and dragging them to resize thewidth and/or height.
MADCAP FLARE
26

CHAPTER 2 Adding and Inserting Images
Move entire capture areaYou canmove the entire capture area by clicking the
size-all icon in the center of the area and dragging the area to a new location onyour screen.
.
27

Type width or height You can click in the number fields in the taskbar to manuallychange the width and/or height of the capture window in pixels.
.
MADCAP FLARE
28
CHAPTER 2 Adding and Inserting Images
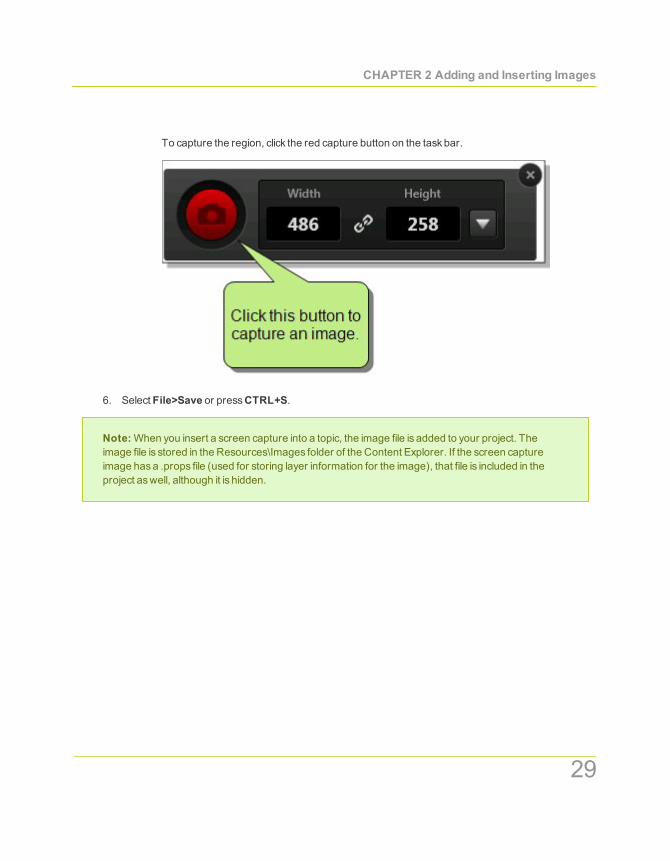
To capture the region, click the red capture button on the taskbar.
6. Select File>Save or pressCTRL+S.
Note:When you insert a screen capture into a topic, the image file is added to your project. Theimage file is stored in the Resources\Images folder of the Content Explorer. If the screen captureimage hasa .props file (used for storing layer information for the image), that file is included in theproject aswell, although it is hidden.
29

MADCAP FLARE
30
31
CHAPTER3 Editing Images
Not only can you add images to your project, you canmodify them tomeet your needs.
This chapter discusses the following.
Ways to Edit Images 32
Editing Image Properties Using Styles 33
Editing Image Properties Using Local Formatting 35
Opening Images in Capture for Editing 38
Adding Backgrounds to Images 39
Adding Borders to Images 44
Moving Images in Topics 49
Positioning Images 50
Resizing Images 56
Adding Margins to Images 63
Adding Padding to Images 67
Showing Images as Thumbnails in Output 71
Showing Images as Thumbnails While Editing 77
Showing and Hiding Web Images in the XML Editor 80
Ways To Edit ImagesYou can edit images in a couple of different ways.
Edit image propertiesYou can edit the properties for an image, including its size, position, borders,margins, andmore. This can be done through styles or byusing local formatting. Using styles is usuallyrecommended because the setting is automatically applied to any content using that style throughoutthe project, whereas local formatting affects only the particular content that you are working on.
Edit image in MadCap Capture If you haveMadCapCapture installed, you can open the image inthat application tomodify it (e.g., add callouts, crop).
Capture isMadCap's screen capture and editing tool, which is tightly integrated with Flare. If you haveCapture installed on your computer, you can use it to do anyof the following fromwithin Flare.
Insert screen capture images into topicsYou can capture an image on your screen andinsert it into a topic at the same time. See "Inserting Screen Capture Images" on page 25.
Add screen capture files to projectsYou can capture an image on your screen and addthe image file to the project (without inserting the image into a topic). See "Adding ScreenCapture Files to Projects" on page 20.
Edit imagesYou can open any image in your project. The image opens in Capture, whereyou canmake changes to it.
Launch MadCap CaptureYou can simply open the Capture application from Flare. See"LaunchingMadCapCapture" on page 107.
Some advantagesof using Capture include the following.
LayersYou can add special effects or objects such as callouts, shapes, or lines. Because lay-ers are used (rather thanmerging the objects into the image), you can easily return to theimage later after you have saved it andmodify just a single object (rather than re-creating theentire image).
Changes reflected automaticallyAssoon as you save the image in Capture, the changesare automatically reflected anywhere the image was inserted in your project.
Single-sourcing images This feature reflectsCapture's tight integration with MadCapFlare. For a single image, you can provide one group of settings for online output, andanother group of settings for printed output. For example, youmight want to use a resolutionof 72 DPI for online output, and a resolution of 300 DPI for printed output. Rather than cre-ating two separate images, you can single-source the image outputs. For more informationsee "Creating Single-Source Images" on page 109.
MADCAP FLARE
32
CHAPTER 3 Editing Images
Editing Image Properties Using StylesFollowing are steps for using your stylesheet to make changes to images in your project.
How to edit image properties using a style
1. Open the stylesheet that you want to modify. This can be found inthe Resources/Stylesheets subfolder in the Content Explorer.
2. Complete one of the following sets of steps, depending on whether you want to use the Simplified viewor Advanced view in the Stylesheet Editor.
Simplified The Simplified view is better for new users. It providesan easier way to apply prop-erties to styles, with format optionsavailable from a toolbar (similar to the wayone would usethe Text Format toolbar to change the look topic content without a style). In manycases, onlythemost common property optionsare available in the Simplified view (e.g., font, letter/wordspacing, paragraph alignment/indentation, auto-numbering format, borders, background).One advantage of the Simplified view is that you can apply a property to multiple styles at thesame time. You can also click a checkbox to hide the properties in the editor, allowing you tosee only the styles.
Advanced The Advanced view displays style classesand properties in hierarchical tree struc-tures. It is not asquick asusing the Simplified view, but it allows you to edit a great dealmoresettings than are available in the Simplified view.
Warning:When editing styles, make sure the proper medium is selected in the StylesheetEditor before you begin (you can do this from theMediumdrop-down list). Flareremembers the last medium that you used whenworking in the stylesheet, so it mayor maynot be the one that you want to use the next time around. If you want allmediums to use thesame setting, select the "default" medium and the propertieswill "trickle down" to the othermediums. If you are not using different mediums, you do not need to worry about selectingone when you edit styles.
If using the Simplified view:
a. In the local toolbar, make sure the first button displays (whichmeans that the
Simplified view is currently shown in the editor). If the button displays instead,then click it.
33
b. In the upper-left corner of the editor, click in theShow Styles fieldand selectShow Image Styles.
c. From the area below, select the img tag. If you created classesof the tag, you can click theplus button next to the <img> tag and select the class instead.
d. In the local toolbar of the editor, click . The Properties dialog opens.
e. Use the tabs in the dialog to set anyof the following:
Background See "Adding Backgrounds to Images" on page 39.
BorderSee "Adding Borders to Images" on page 44.
MarginsSee "AddingMargins to Images" on page 63.
Padding See "Adding Padding to Images" on page 67.
Position See "Positioning Images" on page 50.
SizeSee "Resizing Images" on page 56.
f. ClickOK.
If using the Advanced view:
a. In the local toolbar, make sure the first button displays (whichmeans that the
Advanced view is currently shown in the editor). If the button displays instead,then click it.
b. In the upper-left corner of the editor, click in theShow Styles fieldand selectShow Image Styles.
c. From the area below, select the img tag. If you created classesof the tag, you can click theplus button next to the <img> tag and select the class instead.
d. Use the properties section on the right side of the editor to apply settings for the style.
Background See "Adding Backgrounds to Images" on page 39.
BorderSee "Adding Borders to Images" on page 44.
MarginsSee "AddingMargins to Images" on page 63.
Padding See "Adding Padding to Images" on page 67.
3. Select File>Save or pressCTRL+S.
MADCAP FLARE
34

CHAPTER 3 Editing Images
Editing Image Properties Using Local FormattingFollowing are steps for using local formatting tomake changes to images in your project.
How to edit image properties using local formatting
1. Do one of the following.
Open a topicwhere the image is inserted. Right-click on the image.
OR
In the Content Explorer, locate and right-click the image file that you want to edit (e.g.,Resources\Images\NameOfFile.png).
2. From the context menu selectEdit Image. The Edit Image dialog opens.
3. You can use theGeneral tab tomake the following changes.
You can select a different image file. You can do this in variousways.
You can select an image file already in the project by finding and choosing it in the Select FileArea. Use the buttons in the local toolbar to view all files in a list, view files in their folder struc-ture, etc.
Showsall of the files in the project in a list in the area below. If you click the buttonagain, it switches to a folder tree view. In the list, you can click the "File," "Type," or"Path" column headers to sort the list alphabetically by that column data.
Showsor hides the folders that the files are stored in.
Showsor hides the files. If you click this button when the Show Folders button isselected, the area splits into two halves. The folder is shown on the left side, and thefiles and subfolderswithin it are shown on the right.
If the Show Files button is the only one selected, you can click this button tomove up one folder level.
You can click to find and select an image file outside of the project.
If you want to link to an image stored on a website, rather than adding it to your project, youcan enter the path directly into the field.
35
If you want to select an image file that you recently inserted somewhere in your project, click
the down arrow in the field next to and select the file from the list.
Note: If you select an image file outside the project, that file is then copied andplaced inside the project. The image file is stored in the Resources\Images folder ofthe Content Explorer.
If you want to apply a specific style class to the image, you can select it from theStyle Classfield.
E X A M P L ELet's say that you have created in your stylesheet a classof the <img> tag called "but-ton" (i.e., img.button) and you have set amaximum size on that style class. The ideais that you want to use that style classwhenever you insert an image of a button,ensuring that the image alwaysdisplays in a very small size. Rather than using thedefault parent <img> tag when you insert the image, you select img.button from theStyle Classdrop-down.
In theScreen Tip field, you can type a phrase that will appear when the end user hovers overthe image.
In theAlternate Text field, you can type alternate text to displaywhen the image is not avail-able, such aswhen a disabled individual is using a screen reader.
For more information see the online Help.
SelectApply the alternate text and screen tip to all image references if you want thesame alternate and screen tip text to be used everywhere the image is used in the project.
4. You can use anyof the other tabs to provide additional settings for the image.
Size and Print Size tabsYou can use these tabs to resize the image. If you want to provideonly one group of settings for the image, use the Size tab. If you want to provide two groupsofsettings—one for online output and another for print-based output—use theSize tab foronline output, then use thePrint Size tab for print-based output. See "Resizing Images" onpage 56.
Position tab You can use this tab to adjust the positioning of the image on the page. Thisincludes the ability to wrap text around an image or float an image outside the frame holdingthe regular flow of text.. See "Positioning Images" on page 50.
MADCAP FLARE
36

CHAPTER 3 Editing Images
Thumbnail tab You can use this tab to create a thumbnail version of the image in the output.See "Showing ImagesasThumbnails in Output" on page 71.
Borders & Margins tab You can use this tab to set borders, margins, or padding for theimage. See "Adding Borders to Images" on page 44, "AddingMargins to Images" on page63, and "Adding Padding to Images" on page 67.
Background tab You can use this tab to add background settings for the image. See "Add-ing Backgrounds to Images" on page 39.
5. ClickOK.
6. Select File>Save or pressCTRL+S.
37
Opening Images In Capture For EditingFollowing are steps for quickly opening an image inMadCapCapture so that you canmake changes to it, whichare reflected in Flare immediately.
How to open image in MadCap Capture for editing
1. Do one of the following.
Open a topicwhere the image is inserted. Right-click on the image.
OR
In the Content Explorer, locate and right-click the image file that you want to edit (e.g.,Resources\Images\NameOfFile.png).
2. From the context menu selectEdit With MadCap Capture. The image opens inMadCapCapture.
3. Edit the image in Capture. For details, see Capture's online Help.
4. Save your work in Capture.
Note: You can alsomake any image in your online Help interactive by linking it to another topic, book-markwithin a topic, or an external file such asa website. See "Inserting Image Hyperlinks" on page85.
MADCAP FLARE
38
CHAPTER 3 Editing Images
Adding Backgrounds To ImagesYou can add background settings to an image. This includes the ability to specify a color, another image, and arepeating pattern for the background image. Normally you would not see an image's background, but if yougive the image a certain amount of padding, you would see the background around the edgesof it.
The changesdo not alter the actual image file; they simplymodify the appearance of the image at that location.
This can be done through styles or byusing local formatting. Using styles is usually recommended because thesetting is automatically applied to any content using that style throughout the project, whereas local formattingaffects only the particular content that you are working on.
How to add a background to images using a style
1. Open the stylesheet that you want to modify. This can be found inthe Resources/Stylesheets subfolder in the Content Explorer.
2. Complete one of the following sets of steps, depending on whether you want to use the Simplified viewor Advanced view in the Stylesheet Editor.
Simplified The Simplified view is better for new users. It providesan easier way to apply prop-erties to styles, with format optionsavailable from a toolbar (similar to the wayone would usethe Text Format toolbar to change the look topic content without a style). In manycases, onlythemost common property optionsare available in the Simplified view (e.g., font, letter/wordspacing, paragraph alignment/indentation, auto-numbering format, borders, background).One advantage of the Simplified view is that you can apply a property to multiple styles at thesame time. You can also click a checkbox to hide the properties in the editor, allowing you tosee only the styles.
Advanced The Advanced view displays style classesand properties in hierarchical tree struc-tures. It is not asquick asusing the Simplified view, but it allows you to edit a great dealmoresettings than are available in the Simplified view.
Warning:When editing styles, make sure the proper medium is selected in the StylesheetEditor before you begin (you can do this from theMediumdrop-down list). Flareremembers the last medium that you used whenworking in the stylesheet, so it mayor maynot be the one that you want to use the next time around. If you want allmediums to use thesame setting, select the "default" medium and the propertieswill "trickle down" to the othermediums. If you are not using different mediums, you do not need to worry about selectingone when you edit styles.
39
If using the Simplified view:
a. In the local toolbar, make sure the first button displays (whichmeans that the
Simplified view is currently shown in the editor). If the button displays instead,then click it.
b. In the upper-left corner of the editor, click in theShow Styles fieldand selectShow Image Styles.
c. From the area below, select the img tag. If you created classesof the tag, you can click theplus button next to the <img> tag and select the class instead.
d. In the local toolbar of the editor, click . The Properties dialog opens.
e. Select theBackground tab.
f. Use the tab to specify the settings that you want for the background.
Set a color for the background:
In theColor field, click the down arrow and select a color from the popup. Foradvanced color options, selectMore Colors and use the fields in the Color Pickerdialog.
Add an image to the background:
i. Next to the Image field, click theBrowse button. The Insert Image dialog opens.
ii. Select an image file to insert. You can do this in one of the following ways.
Select an image already in the project by finding and selecting it in the built-intree.
OR
Click to find and select an image file outside of the project.
Note: If you want to select an image file that you recently inserted some-where in your project, click the down arrow in the field next to the Browsebutton and select the file from the list.
iii. ClickOK.
MADCAP FLARE
40
CHAPTER 3 Editing Images
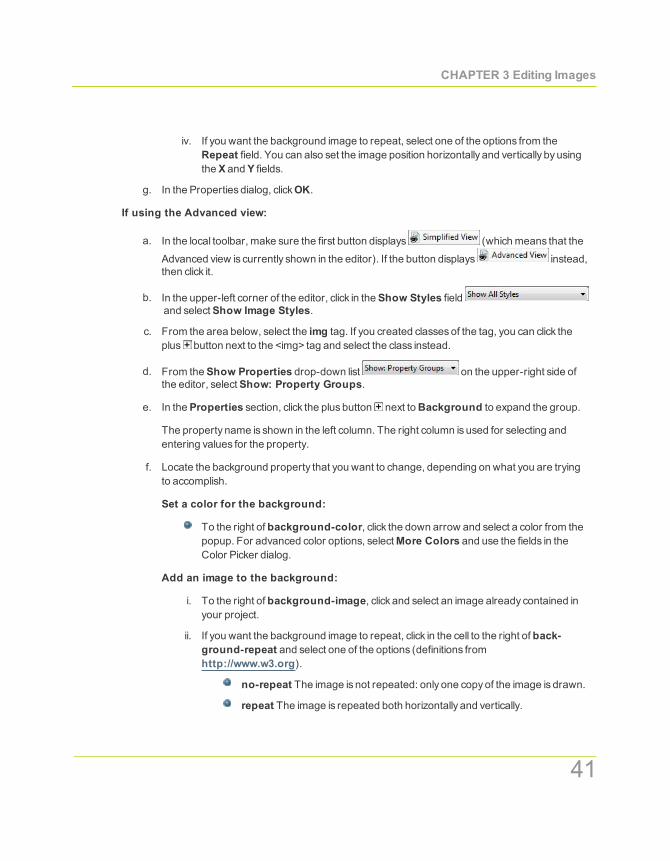
iv. If you want the background image to repeat, select one of the options from theRepeat field. You can also set the image position horizontally and vertically byusingtheX andY fields.
g. In the Properties dialog, clickOK.
If using the Advanced view:
a. In the local toolbar, make sure the first button displays (whichmeans that the
Advanced view is currently shown in the editor). If the button displays instead,then click it.
b. In the upper-left corner of the editor, click in theShow Styles fieldand selectShow Image Styles.
c. From the area below, select the img tag. If you created classesof the tag, you can click theplus button next to the <img> tag and select the class instead.
d. From theShow Properties drop-down list on the upper-right side ofthe editor, selectShow: Property Groups.
e. In theProperties section, click the plusbutton next toBackground to expand the group.
The property name is shown in the left column. The right column is used for selecting andentering values for the property.
f. Locate the background property that you want to change, depending on what you are tryingto accomplish.
Set a color for the background:
To the right of background-color, click the down arrow and select a color from thepopup. For advanced color options, selectMore Colors and use the fields in theColor Picker dialog.
Add an image to the background:
i. To the right of background-image, click and select an image already contained inyour project.
ii. If you want the background image to repeat, click in the cell to the right of back-ground-repeat and select one of the options (definitions fromhttp://www.w3.org).
no-repeat The image is not repeated: only one copyof the image is drawn.
repeat The image is repeated both horizontally and vertically.
41
repeat-x The image is repeated horizontally only.
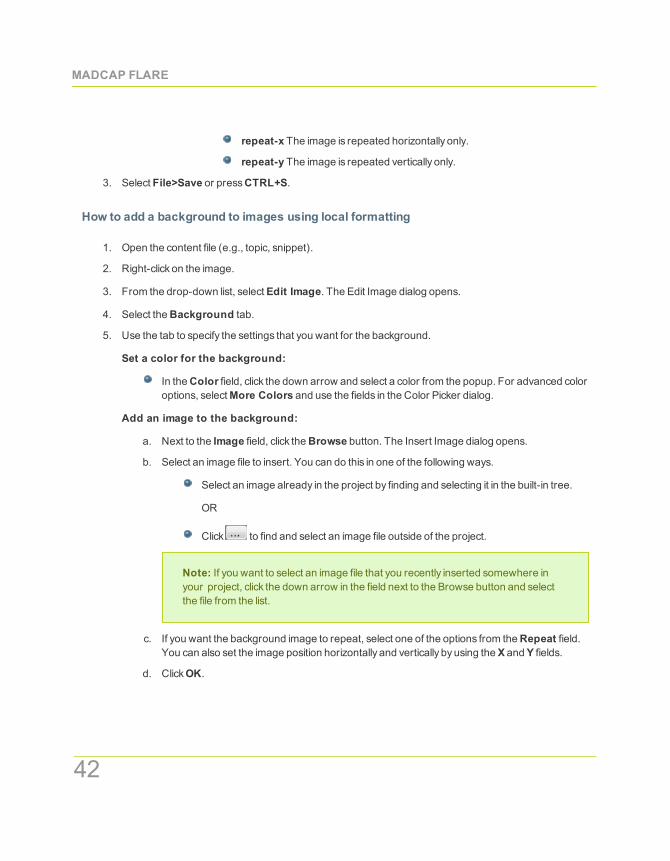
repeat-y The image is repeated vertically only.
3. Select File>Save or pressCTRL+S.
How to add a background to images using local formatting
1. Open the content file (e.g., topic, snippet).
2. Right-click on the image.
3. From the drop-down list, selectEdit Image. The Edit Image dialog opens.
4. Select theBackground tab.
5. Use the tab to specify the settings that you want for the background.
Set a color for the background:
In theColor field, click the down arrow and select a color from the popup. For advanced coloroptions, selectMore Colors and use the fields in the Color Picker dialog.
Add an image to the background:
a. Next to the Image field, click theBrowse button. The Insert Image dialog opens.
b. Select an image file to insert. You can do this in one of the following ways.
Select an image already in the project by finding and selecting it in the built-in tree.
OR
Click to find and select an image file outside of the project.
Note: If you want to select an image file that you recently inserted somewhere inyour project, click the down arrow in the field next to the Browse button and selectthe file from the list.
c. If you want the background image to repeat, select one of the options from theRepeat field.You can also set the image position horizontally and vertically byusing theX andY fields.
d. ClickOK.
MADCAP FLARE
42

CHAPTER 3 Editing Images
6. In the other dialog, clickOK.
7. Select File>Save or pressCTRL+S.
43

Adding Borders To ImagesYou can add borders around an image, specifying the border size, color, and type.
The changesdo not alter the actual image file; they simplymodify the appearance of the image at that location.
This can be done through styles or byusing local formatting. Using styles is usually recommended because thesetting is automatically applied to any content using that style throughout the project, whereas local formattingaffects only the particular content that you are working on.
MADCAP FLARE
44
CHAPTER 3 Editing Images
How to add a border to images using a style
1. Open the stylesheet that you want to modify. This can be found inthe Resources/Stylesheets subfolder in the Content Explorer.
2. Complete one of the following sets of steps, depending on whether you want to use the Simplified viewor Advanced view in the Stylesheet Editor.
Simplified The Simplified view is better for new users. It providesan easier way to apply prop-erties to styles, with format optionsavailable from a toolbar (similar to the wayone would usethe Text Format toolbar to change the look topic content without a style). In manycases, onlythemost common property optionsare available in the Simplified view (e.g., font, letter/wordspacing, paragraph alignment/indentation, auto-numbering format, borders, background).One advantage of the Simplified view is that you can apply a property to multiple styles at thesame time. You can also click a checkbox to hide the properties in the editor, allowing you tosee only the styles.
Advanced The Advanced view displays style classesand properties in hierarchical tree struc-tures. It is not asquick asusing the Simplified view, but it allows you to edit a great dealmoresettings than are available in the Simplified view.
Warning:When editing styles, make sure the proper medium is selected in the StylesheetEditor before you begin (you can do this from theMediumdrop-down list). Flareremembers the last medium that you used whenworking in the stylesheet, so it mayor maynot be the one that you want to use the next time around. If you want allmediums to use thesame setting, select the "default" medium and the propertieswill "trickle down" to the othermediums. If you are not using different mediums, you do not need to worry about selectingone when you edit styles.
If using the Simplified view:
a. In the local toolbar, make sure the first button displays (whichmeans that the
Simplified view is currently shown in the editor). If the button displays instead,then click it.
b. In the upper-left corner of the editor, click in theShow Styles fieldand selectShow Image Styles.
c. From the area below, select the img tag. If you created classesof the tag, you can click theplus button next to the <img> tag and select the class instead.
45
d. In the local toolbar of the editor, click . The Properties dialog opens.
e. Select theBorders tab.
f. Set the options in theBorders section.
i. Click in anyof the individual fields (Left,Right, Top,Bottom) to specify the settingsfor the border. If you click the down arrow to the right of all the fields, the settingswillbe applied to all of the border fields.
When you click that down arrow or in one of the individual fields, a small popup dis-plays.
ii. Use the lower-left area of the popup to enter a number for the border thickness.
iii. Use the lower-middle area to select a unit of measurement (e.g., point, pixel, cen-timeter) for the number you entered.
iv. Use the upper-right area to select a color for the border.
v. Use the lower-right area to select a line type (e.g., solid, double, dashed) for the bor-der.
vi. ClickOK.
g. In the Properties dialog, clickOK.
If using the Advanced view:
a. In the local toolbar, make sure the first button displays (whichmeans that the
Advanced view is currently shown in the editor). If the button displays instead,then click it.
b. In the upper-left corner of the editor, click in theShow Styles fieldand selectShow Image Styles.
c. From the area below, select the img tag. If you created classesof the tag, you can click theplus button next to the <img> tag and select the class instead.
d. From theShow Properties drop-down list on the upper-right side ofthe editor, selectShow: Property Groups.
e. In theProperties section, click the plusbutton next toBorder to expand the group.
The property name is shown in the left column. The right column is used for selecting andentering values for the property.
MADCAP FLARE
46
CHAPTER 3 Editing Images
f. Locate the border property that you want to change. Each side (bottom, left, right, top) hasseparate properties that you can set for the color, style, and width (e.g., border-bottom-style). You can set these properties individually, or you can set themain property for each side(e.g., border-bottom), which lets you specify the color, style, and width in one place. Evenbetter, if you plan to have the same settings for all four sides, you can simply use the borderproperty to set the color, style, and width all the wayaround.
When you click in the cell to the right of one of the broad properties (e.g., border, border-bot-tom), a small popup displays.
i. Use the lower-left area of the popup to enter a number for the border thickness.
ii. Use the lower-middle area to select a unit of measurement (e.g., point, pixel, cen-timeter) for the number you entered.
iii. Use the upper-right area to select a color for the border.
iv. Use the lower-right area to select a line type (e.g., solid, double, dashed) for the bor-der.
v. ClickOK.
3. Select File>Save or pressCTRL+S.
How to add a border to images using local formatting
1. Open the content file (e.g., topic, snippet).
2. Right-click on the image.
3. From the drop-down list, selectEdit Image. The Edit Image dialog opens.
4. Select theBorders & Margins tab.
5. Set the options in theBorders section:
a. Click in anyof the individual fields (Left,Right, Top,Bottom) to specify the settings for theborder. If you click the down arrow to the right of all the fields, the settingswill be applied to allof the border fields.
When you click that down arrow or in one of the individual fields, a small popup displays.
b. Use the lower-left area of the popup to enter a number for the border thickness.
c. Use the lower-middle area to select a unit of measurement (e.g., point, pixel, centimeter) forthe number you entered.
d. Use the upper-right area to select a color for the border.
47

e. Use the lower-right area to select a line type (e.g., solid, double, dashed) for the border.
f. ClickOK.
6. In the dialog, clickOK.
7. Select File>Save or pressCTRL+S.
MADCAP FLARE
48

CHAPTER 3 Editing Images
Moving Images In TopicsAfter you insert a picture or screen capture image into a topic, you can easilymove that image around. To dothis, simply click on the image and drag it to the new location. A vertical red bar servesasa guide as youmovethemouse.When you release themouse button, the image will bemoved to the location identified by the ver-tical red bar.
49

Positioning Images
This feature is supported in Adobe PDF,Microsoft XPS, and XHTML output.
After you insert an image, you can adjust its positioning on the page. This includes the ability to wrap textaround an image or float an image outside the frame holding the regular flow of text.
MADCAP FLARE
50
CHAPTER 3 Editing Images
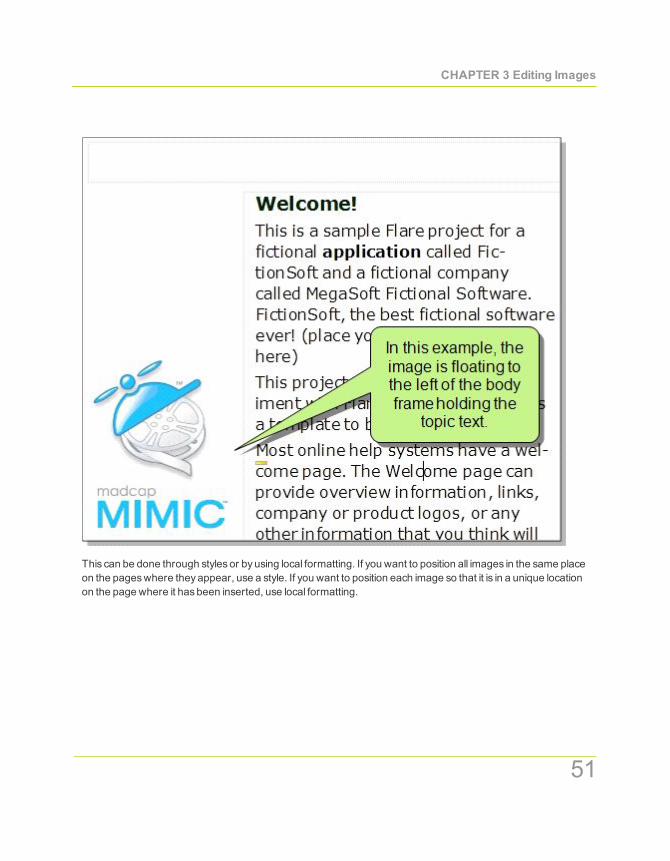
This can be done through styles or byusing local formatting. If you want to position all images in the same placeon the pageswhere theyappear, use a style. If you want to position each image so that it is in a unique locationon the page where it hasbeen inserted, use local formatting.
.
51
How to position images using a style
1. Open the stylesheet that you want to modify. This can be found inthe Resources/Stylesheets subfolder in the Content Explorer.
2. Make sure the appropriatemedium is selected. If you are not using stylesheet mediums for your dif-ferent outputs or if you want allmediums to have the same settings, just leave themedium set to"default" and continue.
Mediumscan be used if you want to use one group of settings for online output types (DotNet Help,Microsoft HTMLHelp,WebHelp,WebHelp 2.0 (HTML5),WebHelp AIR,WebHelpMobile,WebHelpPlus) and another group of settings for print-based output types (Adobe FrameMaker, Adobe PDF,MicrosoftWord, Microsoft XPS, XHTML). For example, youmight use the "default" medium for youronline outputs and youmight use the "print" medium for your print outputs.
3. In the local toolbar, make sure the first button displays (whichmeans that the Sim-
plified view is currently shown in the editor). If the button displays instead, then click it.
4. In the upper-left corner of the editor, click in theShow Styles field andselectShow Image Styles.
5. From the area below, select the img tag. If you created classesof the tag, you can click the plus but-ton next to the <img> tag and select the class instead.
6. In the local toolbar of the editor, click . The Properties dialog opens.
7. Select thePosition tab.
8. In thePosition section, you can select a Float and aClear setting. You can also set theVerticalAlignment of the text box.
Float Use this field to specifywhere to place the image on the page.
NoneDoesnot place the image in a specific location.
Left Positions the image on the left side of the page frame, allowing you to type text to theright of the image.
Right Positions the image on the right side of the page frame, allowing you to type text to theleft of the image.
Center of Column Positions the image in the center of the column on the page.
Outside Left Margin Positions the image beyond the left margin of the topic text.
Outside Right Margin Positions the image beyond the right margin of the topic text.
MADCAP FLARE
52
CHAPTER 3 Editing Images
Outside FramePositions the image outside of the page frame.
Outside Frame, Top Align Positions the image outside of the page frame, aswell as align-ing it with the top of the frame.
Left of FramePositions the image to the left of the page frame.
Right of FramePositions the image to the right of the page frame.
Center of FramePositions the image both vertically and horizontally in themiddle of thepage frame.
Clear Use this field to position an image so that it is "clear" of an adjacent image. For example, let'ssay you have already inserted an image and applied the float left property to it. If you then insertanother image immediately after the first image, you want to make sure that the second image doesn'trest next to the first image. Instead, you want the second image to be placed completely below the firstimage. Therefore, you can apply a clear property to the second image.
NoneDoesnot apply the clear property to the image.
Left Side The image will be placed below the bottom outer edge of a previous image that isfloating left.
Right Side The image will be placed below the bottom outer edge of a previous image that isfloating right.
Both Sides The image will be placed below the a previous image, whether it is floating left orright.
Vertical Alignment Use this field to adjust where the item is positioned vertically.
Baseline The baseline of the boxwill be aligned with the baseline of the parent box.
Text Top The top of the boxwill be aligned with the top of the parent element's font.
Text BottomThe bottom of the boxwill be aligned with the bottom of the line box.
Top The top of the boxwill be aligned with the top of the line box.
Middle The verticalmidpoint of the boxwill be aligned with the baseline of the parent box,plus half the x-height of the parent.
BottomThe bottom of the boxwill be aligned with the bottom of the line box.
9. In the Properties dialog, clickOK.
10. Select File>Save or pressCTRL+S.
.
53
How to add position images using local formatting
1. Open the content file (e.g., topic, snippet).
2. Right-click on the image and from themenu, selectEdit Image. The Edit Image dialog opens.
3. Select thePosition tab.
4. In thePosition section, you can select a Float and aClear setting. You can also set theVerticalAlignment of the image.
Float Use this field to specifywhere to place the image on the page.
NoneDoesnot place the image in a specific location.
Left Positions the image on the left side of the page frame, allowing you to type text to theright of the image.
Right Positions the image on the right side of the page frame, allowing you to type text to theleft of the image.
Center of Column Positions the image in the center of the column on the page.
Outside Left Margin Positions the image beyond the left margin of the topic text.
Outside Right Margin Positions the image beyond the right margin of the topic text.
Outside FramePositions the image outside of the page frame.
Outside Frame, Top Align Positions the image outside of the page frame, aswell as align-ing it with the top of the frame.
Left of FramePositions the image to the left of the page frame.
Right of FramePositions the image to the right of the page frame.
Center of FramePositions the image both vertically and horizontally in themiddle of thepage frame.
Clear Use this field to position an image so that it is "clear" of an adjacent image. For example, let'ssay you have already inserted an image and applied the float left property to it. If you then insertanother image immediately after the first image, you want to make sure that the second image doesn'trest next to the first image. Instead, you want the second image to be placed completely below the firstimage. Therefore, you can apply a clear property to the second image.
NoneDoesnot apply the clear property to the image.
Left Side The image will be placed below the bottom outer edge of a previous image that isfloating left.
MADCAP FLARE
54
CHAPTER 3 Editing Images
Right Side The image will be placed below the bottom outer edge of a previous image that isfloating right.
Both Sides The image will be placed below the a previous image, whether it is floating left orright.
Vertical Alignment Use this field to adjust where the item is positioned vertically.
Baseline The baseline of the boxwill be aligned with the baseline of the parent box.
Text Top The top of the boxwill be aligned with the top of the parent element's font.
Text BottomThe bottom of the boxwill be aligned with the bottom of the line box.
Top The top of the boxwill be aligned with the top of the line box.
Middle The verticalmidpoint of the boxwill be aligned with the baseline of the parent box,plus half the x-height of the parent.
BottomThe bottom of the boxwill be aligned with the bottom of the line box.
5. ClickOK.
6. Select File>Save or pressCTRL+S.
Note: If you want to adjust the space between the object and the text that flowsnext to it, you canmod-ify themarginson the object (using the Borders&Margins tab in the dialog).
Note: For additional details on the rules for floating objects, see http://www.w3c.org.
55
Resizing ImagesYou can resize imageswith variousmethods.
Following are the tasks you can perform.
Resize with stylesYou can resizemany imagesat once byusing the <img> style tag in the Style-sheet Editor. Not only can you select a specific image size, but you can also set amaximum or mini-mum height or width. You can set either the width or height on the image tag and let Flare set the otherproperty automatically, maintaining the aspect ratio (i.e., size proportion of the image). Using thismethod, you can take advantage of single-sourcing byalso using a print medium in the stylesheet.Simply specify one group of settings for themedium used for the online output, and use another groupof settings for themedium used for print-based output. See "How to resize imagesbyusing styles" onthe next page.
Resize locally using propertiesYou can resize an image locally by setting its height and width prop-erties, includingmaximum or minimum height or width. This is similar to the stylesmethod, except thatthe properties are set only for a specific image, not on a style that can be applied tomany images. Thismethod also lets you take advantage of single-sourcing, because there is one group of settings thatcan be used for online output and another for print-based output (based on themedium that you areusing for the target—e.g., default, print, non-print).See "How to resize images locally byusing prop-erties" on page 60.
Resize locally dragging the icon You can resize an image locally by clicking and dragging the iconin the lower-right corner of the image.When you use this feature, Flare automatically sets the new
height and width on the image tag. See "How to resize images locally bydragging the icon" on page61.
Reset size If you resize an image and then decide you want it to be its original size (even after yousave your work), you can easily reset it. See "How to reset the size of an image" on page 62.
Note: You can also use show imagesas small thumbnails in the output (either byusing styles orlocally). End users can see the full size of the image byhovering over it or clicking it. See "ShowingImagesasThumbnails in Output" on page 71.
MADCAP FLARE
56
CHAPTER 3 Editing Images
How to resize images by using styles
1. Open the stylesheet that you want to modify. This can be found inthe Resources/Stylesheets subfolder in the Content Explorer.
2. Make sure the appropriatemedium is selected. If you are not using stylesheet mediums for your dif-ferent outputs or if you want allmediums to have the same settings, just leave themedium set to"default" and continue.
Mediumscan be used if you want to use one group of settings for online output types (DotNet Help,Microsoft HTMLHelp,WebHelp,WebHelp 2.0 (HTML5),WebHelp AIR,WebHelpMobile,WebHelpPlus) and another group of settings for print-based output types (Adobe FrameMaker, Adobe PDF,MicrosoftWord, Microsoft XPS, XHTML). For example, youmight use the "default" medium for youronline outputs and youmight use the "print" medium for your print outputs.
3. In the local toolbar, make sure the first button displays (whichmeans that the
Advanced view is currently shown in the editor). If the button displays instead, thenclick it.
4. In the upper-left corner of the editor, click in theShow Styles field andselectShow Image Styles.
5. From the area below, select the img tag. If you created classesof the tag, you can click the plus but-ton next to the <img> tag and select the class instead.
E X A M P L ELet's say that you are creating a PDF manual that is 8 incheswide and you want to ensurethat none of your largest imagesare wider than 6 inches. You can create a classof the <img>tag and name it "MaxWidth6Inches." For most of your images, you can use the parent <img>tag, but for the large ones, you can use the img.MaxWidth6Inches style class. The largeimageswill automatically be resized if necessary so that theyare no wider than 6 inches.
6. From theShow Properties drop-down list on the upper-right side of the editor,selectShow: Property Groups.
7. You can use the following steps to specify a precise width or height for the style. You can also specify amaximum or minimumwidth or height.
.
57
To set a precise width and/or height:
a. In theProperties section, click the plusbutton next toBox to expand the group.
The property name is shown in the left column. The right column is used for selecting andentering values for the property.
b. To the right of height and/orwidth, click the down arrow and complete the fields in thepopup. First you need to select Length in the top drop-down list. You can then enter a valuein the lower-left area and choose from several different units of measurement (points, pixels,centimeters, etc.) in the lower-right area. ClickOKwhen you are finished.
Note:When resizing objects, you can ensure that the aspect ratio ismaintained. Forexample, if you want certain objects to be resized so that each is exactly 3 incheshigh, you canmake sure that the width of each object is adjusted accordingly so thatit stays in proportion. To do this, you would first set the height at 3 inches. Then forthe width property, you would selectAutomatic (instead of "Length") from the topdrop-down list. In the sameway, if you were to specify an exact width, you couldmaintain the aspect ratio by setting the height to "Automatic."
To set the maximum width and/or height:
If the original image is larger than themaximumwidth or height that is set, it will be reduced in size sothat it is no greater than themaximum value. If the original image is smaller than themaximumwidth orheight, it will not be resized.
a. In theProperties section, click the plusbutton next toUnclassified to expand the group.
The property name is shown in the left column. The right column is used for selecting andentering values for the property.
b. To the right ofmax-height and/ormax-width, click the down arrow and complete the fieldsin the popup. First you need to select Length in the top drop-down list. You can then enter avalue in the lower-left area and choose from several different units of measurement (points,pixels, centimeters, etc.) in the lower-right area. ClickOKwhen you are finished.
Note:When resizing objects, you can ensure that the aspect ratio ismaintained. Forexample, if you want certain objects to be resized so that theyare nomore than 5incheswide, you canmake sure that the height of each object is adjusted accordingly
MADCAP FLARE
58
CHAPTER 3 Editing Images
so that it stays in proportion. To do this, you would set themaximumwidth of the styleat 5 inches. You would then leave themaximum height property unspecified. In thesameway, if you were to specify amaximum height, you couldmaintain the aspectratio bynot setting themaximumwidth property.
To set the minimum width and/or height:
If the original image is smaller than theminimumwidth or height that is set, it will be enlarged so that itreaches theminimum value. If the original image is larger than theminimumwidth or height, it will notbe resized.
a. In theProperties section, click the plusbutton next toUnclassified to expand thegroup.The property name is shown in the left column. The right column is used for selectingand entering values for the property.
b. To the right ofmin-height and/ormin-width, click the down arrow and complete the fields inthe popup. First you need to select Length in the top drop-down list. You can then enter avalue in the lower-left area and choose from several different units of measurement (points,pixels, centimeters, etc.) in the lower-right area. ClickOKwhen finished.
Note:When resizing objects, you can ensure that the aspect ratio ismaintained. Forexample, if you want certain objects to be resized so that theyare at least 2 incheswide, you canmake sure that the height of each object is adjusted accordingly sothat it stays in proportion. To do this, you would set theminimumwidth at 2 inches.You would then leave theminimum height property unspecified. In the sameway, ifyou were to specify aminimum height, you couldmaintain the aspect ratio bynot set-ting theminimumwidth property.
8. Select File>Save or pressCTRL+S.
To apply a particular style class to an image (after you create it in the Stylesheet Editor), simply right-click theimage where it is inserted. Then from themenu, selectStyle Class and choose the appropriate style.
Note: Please be aware that if you are using percentage for the size of an object, the percentagerefers to the block containing that object, not to the object itself. For example, if you have an object in atopic and set the width to 60%, this doesnot mean that the object will be reduced to 60%of its size.Instead, it means that the object will be resized so that itswidth is 60%of the "container" where it isinserted.
59
How to resize images locally by using properties
1. Open the content file (e.g., topic, snippet).
2. Right-click on the image.
3. From the context menu, selectEdit Image. The Edit Image dialog opens.
4. If you want to provide only one group of settings for the image, select the Size tab and complete the fol-lowing steps. If you want to provide two groupsof settings—one for online output and another forprint-based output—select theSize tab and complete the following steps for online output, then selectthePrint Size tab and complete the same steps for print-based output.When you generate a targetthat is using the "default," the "non-print," or a custommedium (specified on the Advanced tab in theTarget Editor), the settingson the Size tab will be used; when you generate a target that is using the"print" medium, the settingson the Print Size tab will be used.
To set a precise width and/or height:
In theWidth and/or Height field of theSize section, provide the settings. First you need toselect Length in the top drop-down list. You can then enter a value in the lower-left area andchoose from several different units of measurement (points, pixels, centimeters, etc.) in thelower-right area.
Note:When resizing objects, you can ensure that the aspect ratio ismaintained. Forexample, if you want certain objects to be resized so that each is exactly 3 incheshigh, you canmake sure that the width of each object is adjusted accordingly so thatit stays in proportion. To do this, you would first set the height at 3 inches. Then forthe width property, you would selectAutomatic (instead of "Length") from the topdrop-down list. In the sameway, if you were to specify an exact width, you couldmaintain the aspect ratio by setting the height to "Automatic."
To set the minimum width and/or height:
If the original image is smaller than theminimumwidth or height that is set, it will be enlarged so that itreaches theminimum value. If the original image is larger than theminimumwidth or height, it will notbe resized.
In theWidth and/or Height field of theMinimum Size section, provide the settings. First youneed to select Length in the top drop-down list. You can then enter a value in the lower-leftarea and choose from several different units of measurement (points, pixels, centimeters,etc.) in the lower-right area.
MADCAP FLARE
60

CHAPTER 3 Editing Images
Note:When resizing objects, you can ensure that the aspect ratio ismaintained. Forexample, if you want certain objects to be resized so that theyare at least 2 incheswide, you canmake sure that the height of each object is adjusted accordingly sothat it stays in proportion. To do this, you would set theminimumwidth at 2 inches.You would then leave theminimum height property unspecified. In the sameway, ifyou were to specify aminimum height, you couldmaintain the aspect ratio bynot set-ting theminimumwidth property.
To set the maximum width and/or height:
If the original image is larger than themaximumwidth or height that is set, it will be reduced in size sothat it is no greater than themaximum value. If the original image is smaller than themaximumwidth orheight, it will not be resized.
In theWidth and/or Height field of theMaximum Size section, provide the settings. First youneed to select Length in the top drop-down list. You can then enter a value in the lower-leftarea and choose from several different units of measurement (points, pixels, centimeters,etc.) in the lower-right area.
Note:When resizing objects, you can ensure that the aspect ratio ismaintained. Forexample, if you want certain objects to be resized so that theyare nomore than 5incheswide, you canmake sure that the height of each object is adjusted accordinglyso that it stays in proportion. To do this, you would set themaximumwidth of the styleat 5 inches. You would then leave themaximum height property unspecified. In thesameway, if you were to specify amaximum height, you couldmaintain the aspectratio bynot setting themaximumwidth property.
5. ClickOK.
6. Select File>Save or pressCTRL+S.
How to resize images locally by dragging the icon
1. Open the content file (e.g., topic, snippet).
2. Hover over the image. The following icon displays in the lower-right corner of the image:
61
3. Click on the icon and drag your mouse either up and to the left (to reduce the size of the image) ordown and to the right (to increase the size of the image).
4. Select File>Save or pressCTRL+S.
How to reset the size of an image
1. Open the content file (e.g., topic, snippet).
2. Right-click on the image.
3. From the context menu, selectReset Size. The image returns to its original size.
4. Select File>Save or pressCTRL+S.
Note: If you use the "Flare Print tab" feature in MadCapCapture to single-source your images, youmayneed to take into account the DPI (dots per inch) setting that you set for the image in Capture. Ifyou specify a large DPI that is recommended for print output (e.g., 300 DPI), youmaynotice that theimage shrinkswhen you generate print output. If necessary, you can resize the width and/or height ofthe image ahead of time in Capture or later in the Flare project to enlarge the image asnecessary forthe generated output. The DPI that you specifywill be retained, and you will end up with the imagedimensions that you need. See "Creating Single-Source Images" on page 109.
Note: When you use Flare's resizing features to scale images, you can specifywhether you wantFlare to pre-compile the resized images. You can do this for the online outputs (DotNet Help, Micro-soft HTMLHelp,WebHelp,WebHelp 2.0 (HTML5),WebHelp AIR,WebHelpMobile,WebHelp Plus),aswell as for MicrosoftWord and Adobe FrameMaker output.What does thismean? It means thatFlare will create new copiesof imageswherever you have specified resizing, rather than relying onthe browser to render the new size from the original. Thismeansbetter quality images, but it alsomeansmore image files in the output. It is recommended that you leave the default pre-compile set-ting as it is (enabled). However, if you want to disable it, you can open the Target Editor, select theAdvanced tab, and selectGenerate resized copies of scaled images to remove the checkmark.(For Adobe PDF,Microsoft XPS, and XHTML output, the resized imageswill alwaysbe pre-compiled,whether this option is enabled or not.)
MADCAP FLARE
62
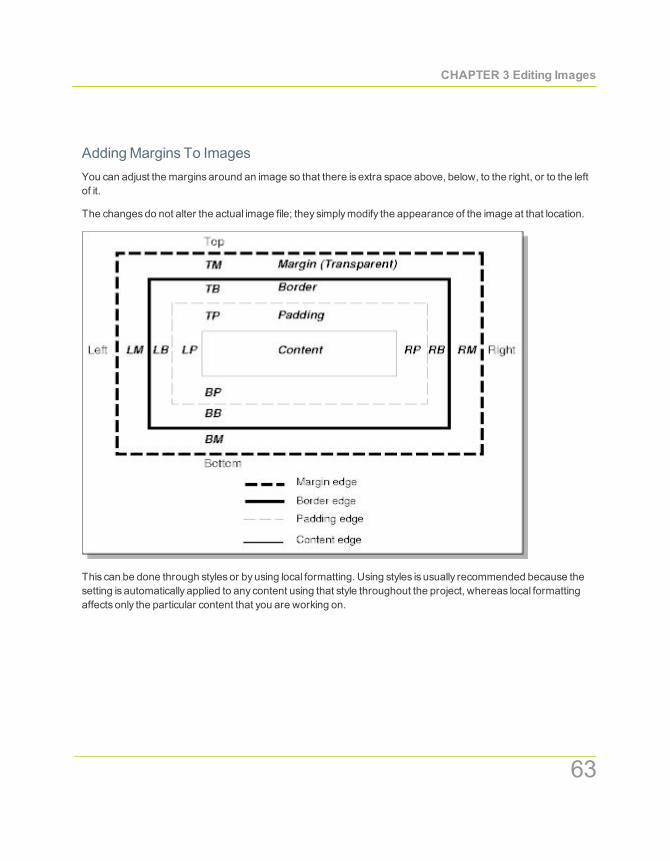
CHAPTER 3 Editing Images
AddingMargins To ImagesYou can adjust themarginsaround an image so that there is extra space above, below, to the right, or to the leftof it.
The changesdo not alter the actual image file; they simplymodify the appearance of the image at that location.
This can be done through styles or byusing local formatting. Using styles is usually recommended because thesetting is automatically applied to any content using that style throughout the project, whereas local formattingaffects only the particular content that you are working on.
63
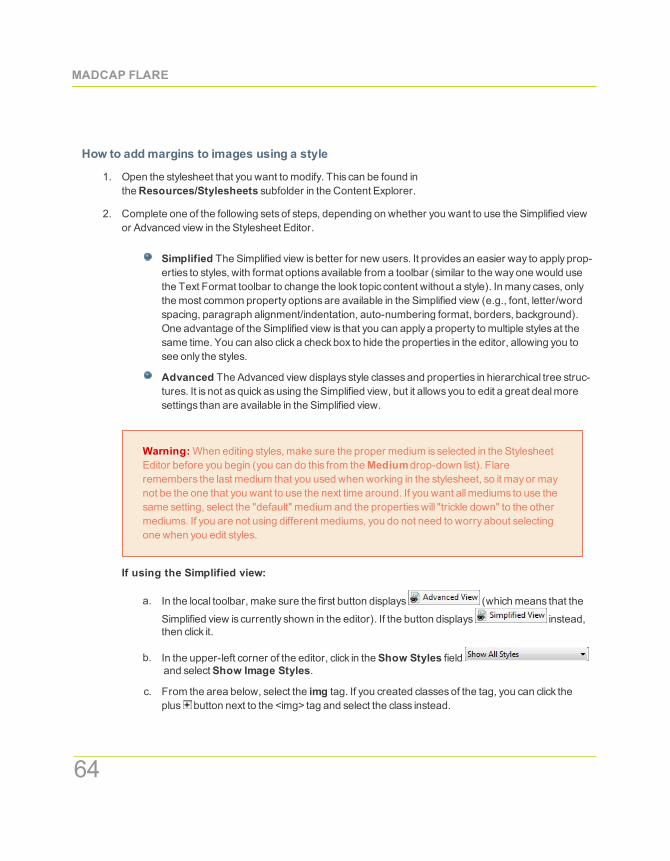
How to add margins to images using a style
1. Open the stylesheet that you want to modify. This can be found inthe Resources/Stylesheets subfolder in the Content Explorer.
2. Complete one of the following sets of steps, depending on whether you want to use the Simplified viewor Advanced view in the Stylesheet Editor.
Simplified The Simplified view is better for new users. It providesan easier way to apply prop-erties to styles, with format optionsavailable from a toolbar (similar to the wayone would usethe Text Format toolbar to change the look topic content without a style). In manycases, onlythemost common property optionsare available in the Simplified view (e.g., font, letter/wordspacing, paragraph alignment/indentation, auto-numbering format, borders, background).One advantage of the Simplified view is that you can apply a property to multiple styles at thesame time. You can also click a checkbox to hide the properties in the editor, allowing you tosee only the styles.
Advanced The Advanced view displays style classesand properties in hierarchical tree struc-tures. It is not asquick asusing the Simplified view, but it allows you to edit a great dealmoresettings than are available in the Simplified view.
Warning:When editing styles, make sure the proper medium is selected in the StylesheetEditor before you begin (you can do this from theMediumdrop-down list). Flareremembers the last medium that you used whenworking in the stylesheet, so it mayor maynot be the one that you want to use the next time around. If you want allmediums to use thesame setting, select the "default" medium and the propertieswill "trickle down" to the othermediums. If you are not using different mediums, you do not need to worry about selectingone when you edit styles.
If using the Simplified view:
a. In the local toolbar, make sure the first button displays (whichmeans that the
Simplified view is currently shown in the editor). If the button displays instead,then click it.
b. In the upper-left corner of the editor, click in theShow Styles fieldand selectShow Image Styles.
c. From the area below, select the img tag. If you created classesof the tag, you can click theplus button next to the <img> tag and select the class instead.
MADCAP FLARE
64
CHAPTER 3 Editing Images
d. In the local toolbar of the editor, click . The Properties dialog opens.
e. Select theParagraph tab.
f. Set the options in the Indentation andSpacing sections to specify the left/right and top/bot-tommargins, respectively.
g. In the Properties dialog, clickOK.
If using the Advanced view:
a. In the local toolbar, make sure the first button displays (whichmeans that the
Advanced view is currently shown in the editor). If the button displays instead,then click it.
b. In the upper-left corner of the editor, click in theShow Styles fieldand selectShow Image Styles.
c. From the area below, select the img tag. If you created classesof the tag, you can click theplus button next to the <img> tag and select the class instead.
d. From theShow Properties drop-down list on the upper-right side ofthe editor, selectShow: Property Groups.
e. In theProperties section, click the plusbutton next toBox to expand the group.
The property name is shown in the left column. The right column is used for selecting andentering values for the property.
f. Locate themargin property that you want to change. Each side (bottom, left, right, top) hasseparate properties that you can set (e.g., margin-top). If you plan to have the same settingsfor all four sides, you can simply use themargin property.
3. Select File>Save or pressCTRL+S.
.
65
How to add margins to images using local formatting
1. Open the content file (e.g., topic, snippet).
2. Right-click on the image.
3. From the drop-down list, selectEdit Image. The Edit Image dialog opens.
4. Select theBorders & Margins tab.
5. Set the options in theMargin section. Click in anyof the individual fields (Left,Right, Top,Bottom)to specify the settings for themarginsaround the object. If you click the down arrow to the right of allthe fields, the settingswill be applied to all of themargin fields.
6. ClickOK.
7. Select File>Save or pressCTRL+S.
Note: Different browsersmay treat margin and padding settingsdifferently. For example, InternetExplorer 8 and Firefoxhonor padding settingsmore than theyhonor margin settings. If you were toset a left margin at, say, 1 inch, Internet Explorer 7 would show it that way. However, in order to getthe same results in Internet Explorer 8 or Firefox, you would also need to set the left padding at 1 inch.
MADCAP FLARE
66
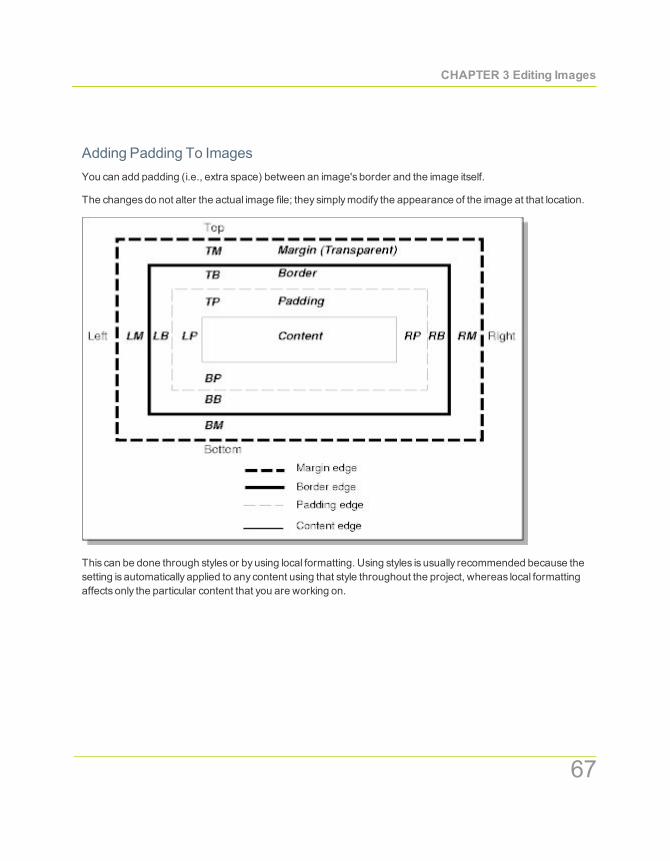
CHAPTER 3 Editing Images
Adding Padding To ImagesYou can add padding (i.e., extra space) between an image's border and the image itself.
The changesdo not alter the actual image file; they simplymodify the appearance of the image at that location.
This can be done through styles or byusing local formatting. Using styles is usually recommended because thesetting is automatically applied to any content using that style throughout the project, whereas local formattingaffects only the particular content that you are working on.
67

How to add padding to images using a style
1. Open the stylesheet that you want to modify. This can be found inthe Resources/Stylesheets subfolder in the Content Explorer.
2. Complete one of the following sets of steps, depending on whether you want to use the Simplified viewor Advanced view in the Stylesheet Editor.
Simplified The Simplified view is better for new users. It providesan easier way to apply prop-erties to styles, with format optionsavailable from a toolbar (similar to the wayone would usethe Text Format toolbar to change the look topic content without a style). In manycases, onlythemost common property optionsare available in the Simplified view (e.g., font, letter/wordspacing, paragraph alignment/indentation, auto-numbering format, borders, background).One advantage of the Simplified view is that you can apply a property to multiple styles at thesame time. You can also click a checkbox to hide the properties in the editor, allowing you tosee only the styles.
Advanced The Advanced view displays style classesand properties in hierarchical tree struc-tures. It is not asquick asusing the Simplified view, but it allows you to edit a great dealmoresettings than are available in the Simplified view.
Warning:When editing styles, make sure the proper medium is selected in the StylesheetEditor before you begin (you can do this from theMediumdrop-down list). Flareremembers the last medium that you used whenworking in the stylesheet, so it mayor maynot be the one that you want to use the next time around. If you want allmediums to use thesame setting, select the "default" medium and the propertieswill "trickle down" to the othermediums. If you are not using different mediums, you do not need to worry about selectingone when you edit styles.
If using the Simplified view:
a. In the local toolbar, make sure the first button displays (whichmeans that the
Simplified view is currently shown in the editor). If the button displays instead,then click it.
b. In the upper-left corner of the editor, click in theShow Styles fieldand selectShow Image Styles.
c. From the area below, select the img tag. If you created classesof the tag, you can click theplus button next to the <img> tag and select the class instead.
MADCAP FLARE
68

CHAPTER 3 Editing Images
d. In the local toolbar of the editor, click . The Properties dialog opens.
e. Select theBorders tab.
f. Set the options in thePadding section. Click in anyof the individual fields (Left,Right, Top,Bottom) to specify the settings for the padding. In the left side of the field, enter a number forthe amount of padding. In the right side of the field, select a unit of measurement (e.g., point,pixel, centimeter) for the number you entered.
If you click the down arrow to the right of all the fields, the settingswill be applied to all of thepadding fields.When you click that down arrow, a small popup displays.
g. In the Properties dialog, clickOK.
If using the Advanced view:
a. In the local toolbar, make sure the first button displays (whichmeans that the
Advanced view is currently shown in the editor). If the button displays instead,then click it.
b. In the upper-left corner of the editor, click in theShow Styles fieldand selectShow Image Styles.
c. From the area below, select the img tag. If you created classesof the tag, you can click theplus button next to the <img> tag and select the class instead.
d. From theShow Properties drop-down list on the upper-right side ofthe editor, selectShow: Property Groups.
e. In theProperties section, click the plusbutton next toBox to expand the group.
The property name is shown in the left column. The right column is used for selecting andentering values for the property.
f. Locate the padding property that you want to change. Each side (bottom, left, right, top) hasseparate properties that you can set (e.g., padding-top). If you plan to have the same settingsfor all four sides, you can simply use the padding property.
3. Select File>Save or pressCTRL+S.
.
69

How to add padding to images using local formatting
1. Open the content file (e.g., topic, snippet).
2. Right-click on the image.
3. From the drop-down list, selectEdit Image. The Edit Image dialog opens.
4. Select theBorders & Margins tab.
5. Set the options in thePadding section. Click in anyof the individual fields (Left,Right, Top,Bottom)to specify the settings for the padding. In the left side of the field, enter a number for the amount of pad-ding. In the right side of the field, select a unit of measurement (e.g., point, pixel, centimeter) for thenumber you entered.
If you click the down arrow to the right of all the fields, the settingswill be applied to all of the paddingfields.When you click that down arrow, a small popup displays.
6. ClickOK.
7. Select File>Save or pressCTRL+S.
Note: Different browsersmay treat margin and padding settingsdifferently. For example, InternetExplorer 8 and Firefoxhonor padding settingsmore than theyhonor margin settings. If you were toset a left margin at, say, 1 inch, Internet Explorer 7 would show it that way. However, in order to getthe same results in Internet Explorer 8 or Firefox, you would also need to set the left padding at 1 inch.
MADCAP FLARE
70
CHAPTER 3 Editing Images
Showing Images As Thumbnails In Output
This feature is supported in all online outputs (DotNet Help, Microsoft HTMLHelp,WebHelp,WebHelp2.0 (HTML5),WebHelp AIR,WebHelpMobile, andWebHelp Plus).
When you insert images into Flare content, you can specify that the images should be displayed as thumbnails(i.e., much smaller versionsof the image) in the output. This is a way to condense topics so that imagesare nottaking up asmuch real estate.When you use this feature, you can specifyways that the user can enlarge theimage to see its full size (e.g., by hovering over the thumbnail, by clicking the thumbnail).
This can be done through styles or byusing local formatting. Using styles is usually recommended because thesetting is automatically applied to any content using that style throughout the project, whereas local formattingaffects only the particular content that you are working on.
How to show images as thumbnails by using styles
1. Open the stylesheet that you want to modify. This can be found inthe Resources/Stylesheets subfolder in the Content Explorer.
2. Complete one of the following sets of steps, depending on whether you want to use the Simplified viewor Advanced view in the Stylesheet Editor.
Simplified The Simplified view is better for new users. It providesan easier way to apply prop-erties to styles, with format optionsavailable from a toolbar (similar to the wayone would usethe Text Format toolbar to change the look topic content without a style). In manycases, onlythemost common property optionsare available in the Simplified view (e.g., font, letter/wordspacing, paragraph alignment/indentation, auto-numbering format, borders, background).One advantage of the Simplified view is that you can apply a property to multiple styles at thesame time. You can also click a checkbox to hide the properties in the editor, allowing you tosee only the styles.
Advanced The Advanced view displays style classesand properties in hierarchical tree struc-tures. It is not asquick asusing the Simplified view, but it allows you to edit a great dealmoresettings than are available in the Simplified view.
Warning:When editing styles, make sure the proper medium is selected in the StylesheetEditor before you begin (you can do this from theMediumdrop-down list). Flare
71
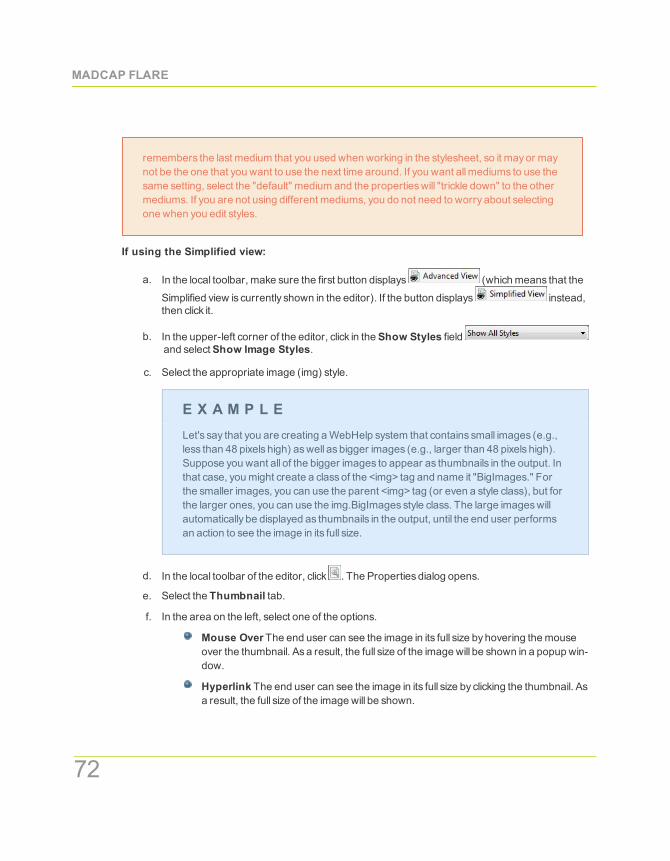
remembers the last medium that you used whenworking in the stylesheet, so it mayor maynot be the one that you want to use the next time around. If you want allmediums to use thesame setting, select the "default" medium and the propertieswill "trickle down" to the othermediums. If you are not using different mediums, you do not need to worry about selectingone when you edit styles.
If using the Simplified view:
a. In the local toolbar, make sure the first button displays (whichmeans that the
Simplified view is currently shown in the editor). If the button displays instead,then click it.
b. In the upper-left corner of the editor, click in theShow Styles fieldand selectShow Image Styles.
c. Select the appropriate image (img) style.
E X A M P L ELet's say that you are creating aWebHelp system that contains small images (e.g.,less than 48 pixels high) aswell as bigger images (e.g., larger than 48 pixels high).Suppose you want all of the bigger images to appear as thumbnails in the output. Inthat case, youmight create a classof the <img> tag and name it "BigImages." Forthe smaller images, you can use the parent <img> tag (or even a style class), but forthe larger ones, you can use the img.BigImagesstyle class. The large imageswillautomatically be displayed as thumbnails in the output, until the end user performsan action to see the image in its full size.
d. In the local toolbar of the editor, click . The Properties dialog opens.
e. Select the Thumbnail tab.
f. In the area on the left, select one of the options.
Mouse OverThe end user can see the image in its full size byhovering themouseover the thumbnail. Asa result, the full size of the image will be shown in a popup win-dow.
Hyperlink The end user can see the image in its full size by clicking the thumbnail. Asa result, the full size of the image will be shown.
MADCAP FLARE
72
CHAPTER 3 Editing Images
Popup The end user can see the image in its full size by clicking the thumbnail. Asaresult, the full size of the image will be shown in a popup window.
Note: If you selectNone, the image will not be shown asa thumbnail. If you selectInherit, the image will use whatever thumbnail settingsare applied to the parent<img> tag.
g. If you want to set amaximumwidth or height for thumbnail images, complete theMax WidthorMax Height fields. You probably only need to complete one of these areas.
The default setting is to show imagesas thumbnails if theyaremore than 48 pixels high. If thatis the case, the image will be resized in the output to be 48 pixels high, and the width will beadjusted accordingly. The image will be shown in its full size when the user performsone ofthe actions you specified in the previous step.
If you want to change either themaximumwidth or height settings, first click in the upper-rightdrop-down and select Length. Enter a number in the field and use the down arrow in thelower-right corner to select a unit of measurement.
h. In the Properties dialog, clickOK.
If using the Advanced view:
a. In the local toolbar, make sure the first button displays (whichmeans that the
Advanced view is currently shown in the editor). If the button displays instead,then click it.
b. In the upper-left corner of the editor, click in theShow Styles fieldand selectShow Image Styles.
c. Select the appropriate image style. For example, you can select the parent img tag, or youcan select a class that youmayhave created for that tag. If you created classesof the tag, youcan click the plus button next to the <img> tag and select the class instead.
E X A M P L ELet's say that you are creating aWebHelp system that contains small images (e.g.,less than 48 pixels high) aswell as bigger images (e.g., larger than 48 pixels high).Suppose you want all of the bigger images to appear as thumbnails in the output. Inthat case, youmight create a classof the <img> tag and name it "BigImages." For
73
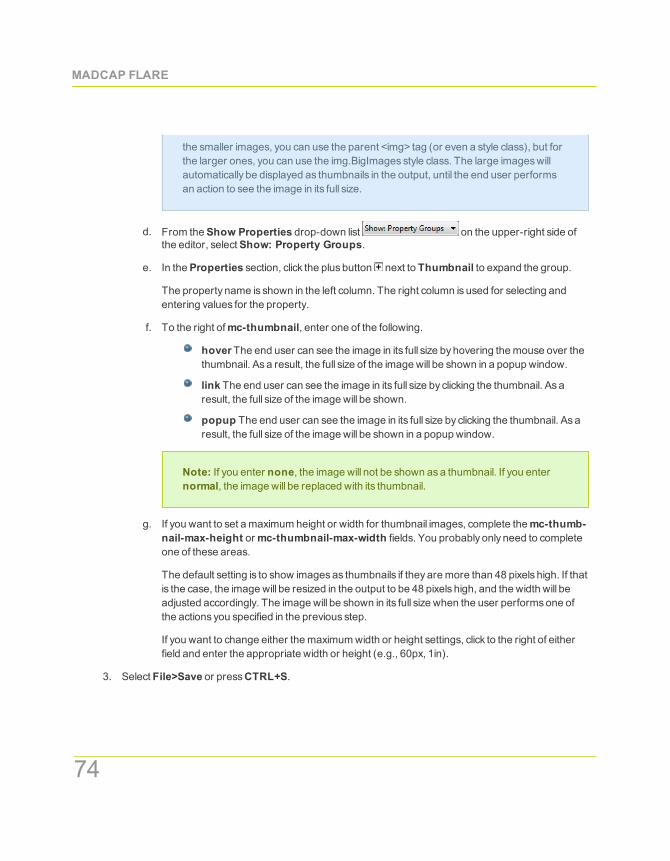
the smaller images, you can use the parent <img> tag (or even a style class), but forthe larger ones, you can use the img.BigImagesstyle class. The large imageswillautomatically be displayed as thumbnails in the output, until the end user performsan action to see the image in its full size.
d. From theShow Properties drop-down list on the upper-right side ofthe editor, selectShow: Property Groups.
e. In theProperties section, click the plusbutton next to Thumbnail to expand the group.
The property name is shown in the left column. The right column is used for selecting andentering values for the property.
f. To the right ofmc-thumbnail, enter one of the following.
hoverThe end user can see the image in its full size byhovering themouse over thethumbnail. Asa result, the full size of the image will be shown in a popup window.
link The end user can see the image in its full size by clicking the thumbnail. Asaresult, the full size of the image will be shown.
popup The end user can see the image in its full size by clicking the thumbnail. Asaresult, the full size of the image will be shown in a popup window.
Note: If you enter none, the image will not be shown asa thumbnail. If you enternormal, the image will be replaced with its thumbnail.
g. If you want to set amaximum height or width for thumbnail images, complete themc-thumb-nail-max-height ormc-thumbnail-max-width fields. You probably only need to completeone of these areas.
The default setting is to show imagesas thumbnails if theyaremore than 48 pixels high. If thatis the case, the image will be resized in the output to be 48 pixels high, and the width will beadjusted accordingly. The image will be shown in its full size when the user performsone ofthe actions you specified in the previous step.
If you want to change either themaximumwidth or height settings, click to the right of eitherfield and enter the appropriate width or height (e.g., 60px, 1in).
3. Select File>Save or pressCTRL+S.
MADCAP FLARE
74
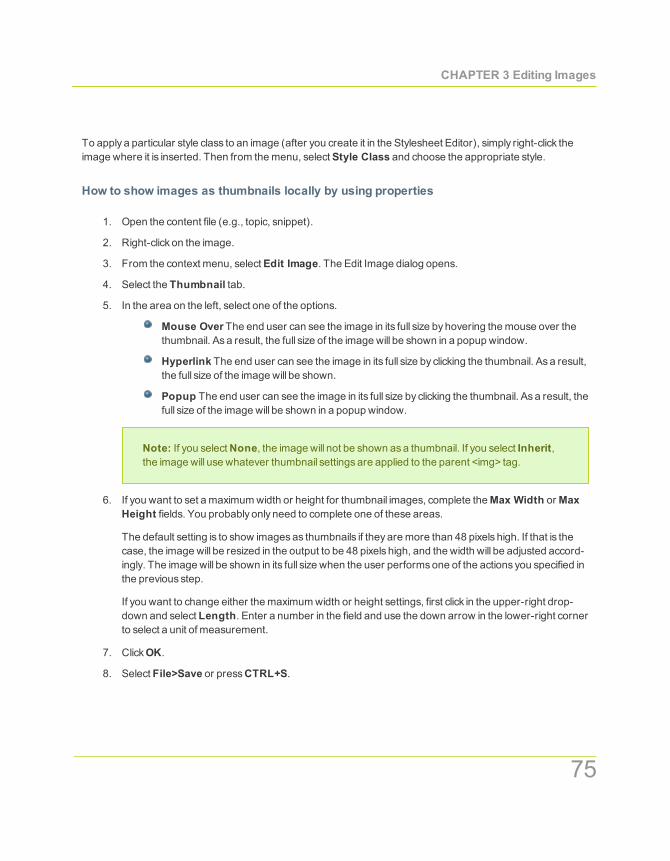
CHAPTER 3 Editing Images
To apply a particular style class to an image (after you create it in the Stylesheet Editor), simply right-click theimage where it is inserted. Then from themenu, selectStyle Class and choose the appropriate style.
How to show images as thumbnails locally by using properties
1. Open the content file (e.g., topic, snippet).
2. Right-click on the image.
3. From the context menu, selectEdit Image. The Edit Image dialog opens.
4. Select the Thumbnail tab.
5. In the area on the left, select one of the options.
Mouse OverThe end user can see the image in its full size byhovering themouse over thethumbnail. Asa result, the full size of the image will be shown in a popup window.
Hyperlink The end user can see the image in its full size by clicking the thumbnail. Asa result,the full size of the image will be shown.
Popup The end user can see the image in its full size by clicking the thumbnail. Asa result, thefull size of the image will be shown in a popup window.
Note: If you selectNone, the image will not be shown asa thumbnail. If you select Inherit,the image will use whatever thumbnail settingsare applied to the parent <img> tag.
6. If you want to set amaximumwidth or height for thumbnail images, complete theMax Width orMaxHeight fields. You probably only need to complete one of these areas.
The default setting is to show imagesas thumbnails if theyaremore than 48 pixels high. If that is thecase, the image will be resized in the output to be 48 pixels high, and the width will be adjusted accord-ingly. The image will be shown in its full size when the user performsone of the actions you specified inthe previous step.
If you want to change either themaximumwidth or height settings, first click in the upper-right drop-down and select Length. Enter a number in the field and use the down arrow in the lower-right cornerto select a unit of measurement.
7. ClickOK.
8. Select File>Save or pressCTRL+S.
75
Note: In addition to showing imagesas thumbnails in output, you can also show imagesas thumbnailswhile you are editing. See "Showing ImagesasThumbnailsWhile Editing" on the next page.
Note: If you experience problems in the output with thumbnail imagesnot opening to the full size, thismight be caused by "Markof theWeb" being enabled on the Advanced tab of the Target Editor. Youcan try disablingMarkof theWeb from your target to fix the issue.
MADCAP FLARE
76
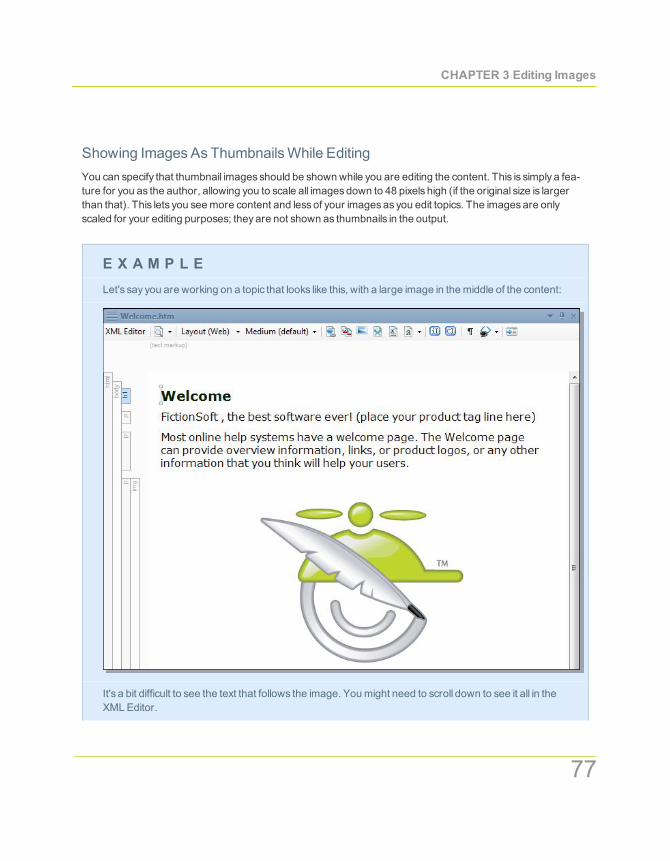
CHAPTER 3 Editing Images
Showing Images As ThumbnailsWhile EditingYou can specify that thumbnail images should be shownwhile you are editing the content. This is simply a fea-ture for you as the author, allowing you to scale all imagesdown to 48 pixels high (if the original size is largerthan that). This lets you seemore content and lessof your imagesas you edit topics. The imagesare onlyscaled for your editing purposes; theyare not shown as thumbnails in the output.
E X A M P L ELet's say you are working on a topic that looks like this, with a large image in themiddle of the content:
It's a bit difficult to see the text that follows the image. Youmight need to scroll down to see it all in theXMLEditor.
77
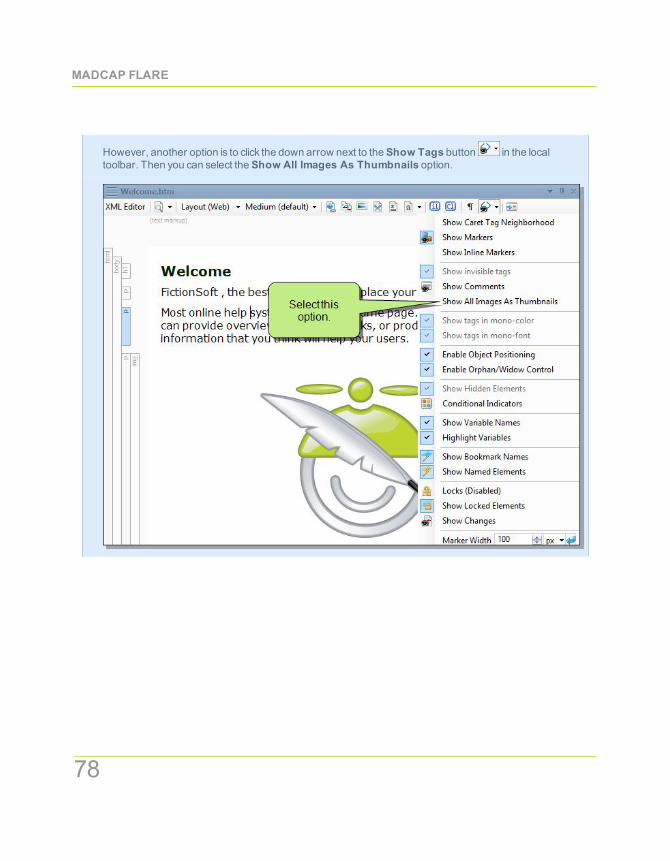
However, another option is to click the down arrow next to theShow Tags button in the localtoolbar. Then you can select theShow All Images As Thumbnails option.
.
MADCAP FLARE
78

CHAPTER 3 Editing Images
After you select this option, the topic looks like this:
If you want to see the image at its full size oncemore, simply select that option again from the drop-down list.
How to show images as thumbnails while editing
1. Open the content file (e.g., topic, snippet).
2. In the local toolbar of the XMLEditor, click the down arrow of theShow tags button . Then selectShow All Images As Thumbnails to add the checkmarknext to it. (If you select this option and thecheckmark is removed, imagesare shown in their full size again.)
Note: In addition to showing imagesas thumbnailswhile editing, you can also show imagesas thumb-nails in output. See "Showing ImagesasThumbnails in Output" on page 71.
79

Showing And HidingWeb Images In The XMLEditorIf you havemany image tags that link to websites (e.g., <img src="http://w-ww.madcapsoftware.com/images/home/company.png" />), rather than linking to images in the project, slowwebsite response timesmayslow down your work. Therefore, youmight want to disable the rendering of suchimages in the XMLEditor.
How to show and hide web images in the XML Editor
1. Do one of the following, depending on the part of the user interface you are using.
Ribbon Select File>Options.
You can use theOptionsdialog to switch between ribbonsand the classicmenu/toolbar lay-out. For more information see the online Help.
Keep inmind that the smaller the application window becomes, themore the options in a rib-bon shrink. Therefore, youmight only see a small icon instead of text, or youmight see only asection name displayed with a down arrow to access the options in it. You can hover oversmall icons to see tooltips that describe them. You can also enlarge the application window orclick one of the section drop-downs in the ribbon to locate a hidden feature.
Menu Select Tools>Options.
TheOptionsdialog opens.
2. Select theXML Editor tab.
3. ClickShow web images. A checkmark in the box indicates that the feature is enabled.
Note: If you are using the "generate web-safe images" option inWebHelp targets, images that link toexternal locations, such aswebsites, are not affected by that option. See "GeneratingWeb-SafeImages" on page 112.
MADCAP FLARE
80
81
CHAPTER4 Additional Image Tasks
In addition to themany featuresalready covered in this guide, there aremanymore image-relatedthat you can perform in Flare.
This chapter discusses the following.
Creating Watermarks 83
Inserting Image Hyperlinks 85
Creating Image Maps 89
Deleting Images from Topics 95
Deleting Image Files from the Project 95
Opening Images 96
Pasting Images from Other Programs 97
Regenerating Images 98
Removing Images from Headings in a Generated TOC 101
Selecting an Image for the About Box 102
Adding Images to Page Layout Frames 104
Creating a List of Images 105
Launching MadCap Capture 107
Embedding Images in Microsoft Word Output 108
Creating Single-Source Images 109
Generating Web-Safe Images 112
MADCAP FLARE
82
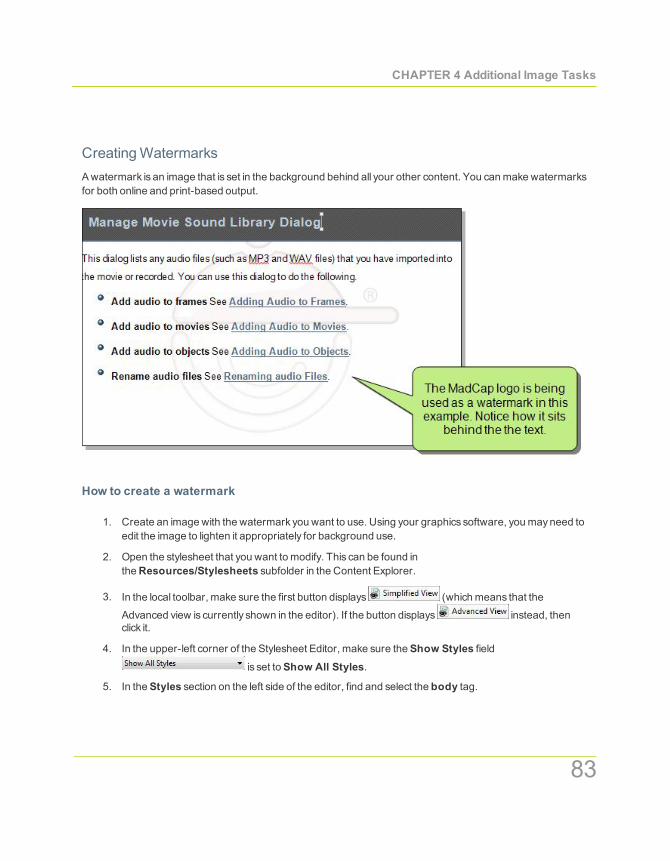
CHAPTER 4 Additional Image Tasks
CreatingWatermarksAwatermark is an image that is set in the background behind all your other content. You canmake watermarksfor both online and print-based output.
How to create a watermark
1. Create an image with the watermark you want to use. Using your graphics software, youmayneed toedit the image to lighten it appropriately for background use.
2. Open the stylesheet that you want to modify. This can be found inthe Resources/Stylesheets subfolder in the Content Explorer.
3. In the local toolbar, make sure the first button displays (whichmeans that the
Advanced view is currently shown in the editor). If the button displays instead, thenclick it.
4. In the upper-left corner of the Stylesheet Editor, make sure theShow Styles fieldis set toShow All Styles.
5. In theStyles section on the left side of the editor, find and select the body tag.
83
6. From theShow Properties drop-down list on the upper-right side of the editor,selectShow: Property Groups.
7. In theProperties section, click the plusbutton next toBackground to expand the group.
8. To the right of background-image, click and select an image file.
9. If you want a specific position for the background image, click in the cell to the right of background-position and enter the appropriate command (definitions from http://www.w3.org).
percentageApercentage X aligns the point X%across (for horizontal) or down (for vertical)the image with the point X%across (for horizontal) or down (for vertical) the element's pad-ding box. For example, with a value pair of '0%0%',the upper left corner of the image isaligned with the upper left corner of the padding box. A value pair of '100%100%' places thelower right corner of the image in the lower right corner of the padding box.With a value pairof '14%84%', the point 14%acrossand 84%down the image is to be placed at the point 14%acrossand 84%down the padding box.
length A length L aligns the top left corner of the image a distance L to the right of (for hor-izontal) or below (for vertical) the top left corner of the element's padding box. For example,with a value pair of '2cm 1cm', the upper left corner of the image is placed 2cm to the right and1cm below the upper left corner of the padding box.
top Equivalent to '0%' for the vertical position.
right Equivalent to '100%' for the horizontal position.
bottomEquivalent to '100%' for the vertical position.
left Equivalent to '0%' for the horizontal position.
centerEquivalent to '50%' for the horizontal position if it is not otherwise given, or '50%' forthe vertical position if it is.
10. If you want the background image to repeat, click in the cell to the right of background-repeat andselect one of the options (definitions from http://www.w3.org).
no-repeat The image is not repeated. Only one copyof the image is drawn.
repeat The image is repeated both horizontally and vertically.
repeat-x The image is repeated horizontally only.
repeat-y The image is repeated vertically only.
11. Select File>Save or pressCTRL+S.
MADCAP FLARE
84
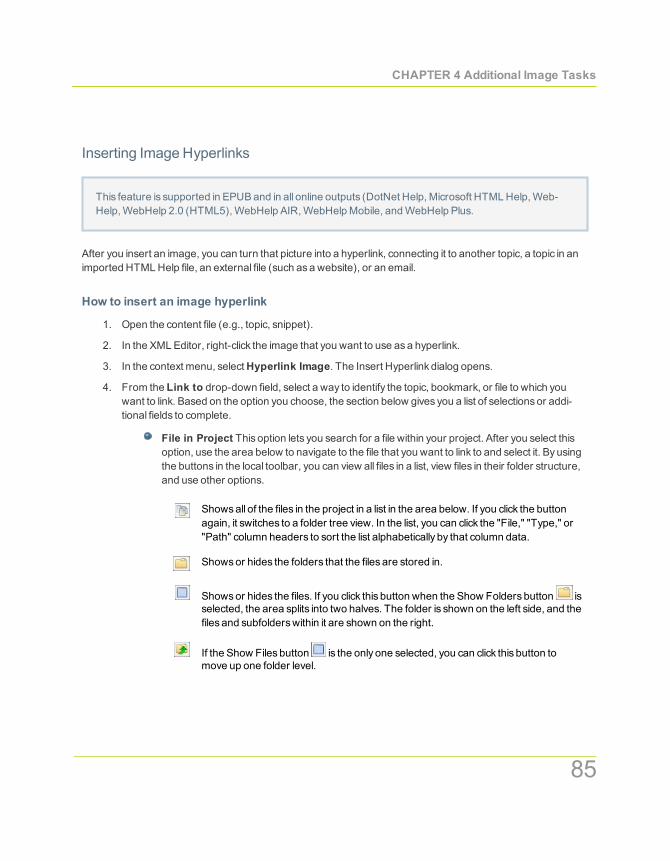
CHAPTER 4 Additional Image Tasks
Inserting Image Hyperlinks
This feature is supported in EPUBand in all online outputs (DotNet Help, Microsoft HTMLHelp,Web-Help,WebHelp 2.0 (HTML5),WebHelp AIR,WebHelpMobile, andWebHelp Plus.
After you insert an image, you can turn that picture into a hyperlink, connecting it to another topic, a topic in animported HTMLHelp file, an external file (such asa website), or an email.
How to insert an image hyperlink
1. Open the content file (e.g., topic, snippet).
2. In the XMLEditor, right-click the image that you want to use asa hyperlink.
3. In the context menu, selectHyperlink Image. The Insert Hyperlink dialog opens.
4. From the Link to drop-down field, select a way to identify the topic, bookmark, or file to which youwant to link. Based on the option you choose, the section below gives you a list of selectionsor addi-tional fields to complete.
File in Project This option lets you search for a file within your project. After you select thisoption, use the area below to navigate to the file that you want to link to and select it. Byusingthe buttons in the local toolbar, you can view all files in a list, view files in their folder structure,and use other options.
Showsall of the files in the project in a list in the area below. If you click the buttonagain, it switches to a folder tree view. In the list, you can click the "File," "Type," or"Path" column headers to sort the list alphabetically by that column data.
Showsor hides the folders that the files are stored in.
Showsor hides the files. If you click this button when the Show Folders button isselected, the area splits into two halves. The folder is shown on the left side, and thefiles and subfolderswithin it are shown on the right.
If the Show Files button is the only one selected, you can click this button tomove up one folder level.
85

You can also click to display and select anybookmarkswithin the destination file, or ifyou have selected a PDF file.
Place in this Document This option displaysanyheadingsand bookmarks in the currentfile. After you click this option, use the section below to choose the heading or bookmark towhich you want to link.
External File This option lets you search for a file (e.g., HTM, HTML, XML, PDF,MicrosoftOffice files) outside your project. This is especially useful if you want to link from one topic toanother in separate project outputs, such asCHM files. After you select this option, enter thepath to the file in the field next to the External File button.
You can also click to display and select anybookmarkswithin the destination file, or ifyou have selected a PDF file.
Note: Because the link usually needs to be relative, based on the final locationsofyour output files, it is preferable to enter the text directly into the field, rather thanclicking the External File button.
Website This option lets you enter the path to an external file, such as the URL for a website.After you click this option, simply type the path in the field next to the Website field (e.g.,http://www.acme.com).
You can create links to specific topics in HTML5,WebHelp,WebHelp Plus, or WebHelpMobile output. This includes the ability to incorporate search stringsand skin references (forsome outputs).
Email This option lets you add an email addressand subject line so that the user can quicklysend an email.
E X A M P L EYoumight use this feature to help the end user send an email to your company'stechnical support department.When users click the link, it opens their email programand beginsa new emailmessage for them, inserting the email addressand subjectline for them. After you click this option, complete theE-mail address andSubjectfields to the right (or select a recent email address from the list below).
HTML Help File This option lets you search for a topicwithin an HTMLHelp (CHM) file that
MADCAP FLARE
86
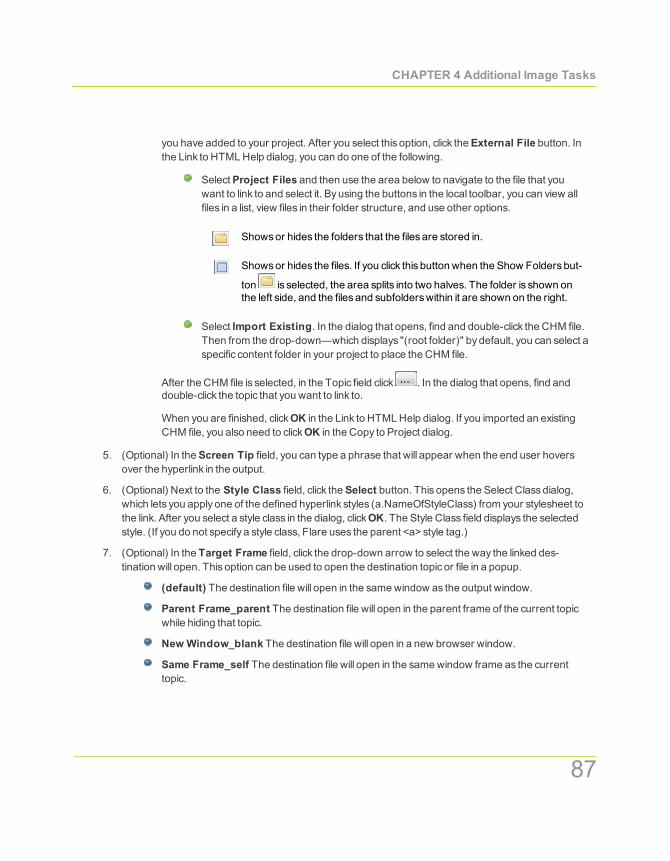
CHAPTER 4 Additional Image Tasks
you have added to your project. After you select this option, click theExternal File button. Inthe Link to HTMLHelp dialog, you can do one of the following.
SelectProject Files and then use the area below to navigate to the file that youwant to link to and select it. Byusing the buttons in the local toolbar, you can view allfiles in a list, view files in their folder structure, and use other options.
Showsor hides the folders that the files are stored in.
Showsor hides the files. If you click this button when the Show Folders but-
ton is selected, the area splits into two halves. The folder is shown onthe left side, and the files and subfolderswithin it are shown on the right.
Select Import Existing. In the dialog that opens, find and double-click the CHM file.Then from the drop-down—which displays "(root folder)" by default, you can select aspecific content folder in your project to place the CHM file.
After the CHM file is selected, in the Topic field click . In the dialog that opens, find anddouble-click the topic that you want to link to.
When you are finished, clickOK in the Link to HTMLHelp dialog. If you imported an existingCHM file, you also need to clickOK in the Copy to Project dialog.
5. (Optional) In theScreen Tip field, you can type a phrase that will appear when the end user hoversover the hyperlink in the output.
6. (Optional) Next to the Style Class field, click theSelect button. This opens the Select Classdialog,which lets you apply one of the defined hyperlink styles (a.NameOfStyleClass) from your stylesheet tothe link. After you select a style class in the dialog, clickOK. The Style Class field displays the selectedstyle. (If you do not specify a style class, Flare uses the parent <a> style tag.)
7. (Optional) In the Target Frame field, click the drop-down arrow to select the way the linked des-tination will open. This option can be used to open the destination topic or file in a popup.
(default) The destination file will open in the samewindow as the output window.
Parent Frame_parent The destination file will open in the parent frame of the current topicwhile hiding that topic.
New Window_blank The destination file will open in a new browser window.
Same Frame_self The destination file will open in the samewindow frame as the currenttopic.
87
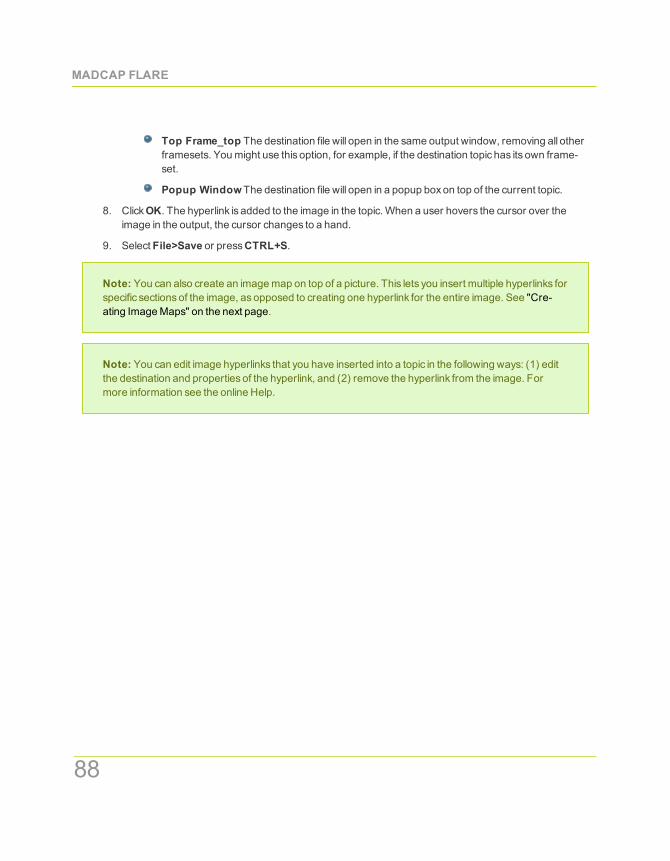
Top Frame_top The destination file will open in the same output window, removing all otherframesets. Youmight use this option, for example, if the destination topic has its own frame-set.
Popup WindowThe destination file will open in a popup boxon top of the current topic.
8. ClickOK. The hyperlink is added to the image in the topic.When a user hovers the cursor over theimage in the output, the cursor changes to a hand.
9. Select File>Save or pressCTRL+S.
Note: You can also create an imagemap on top of a picture. This lets you insert multiple hyperlinks forspecific sectionsof the image, asopposed to creating one hyperlink for the entire image. See "Cre-ating ImageMaps" on the next page.
Note: You can edit image hyperlinks that you have inserted into a topic in the following ways: (1) editthe destination and properties of the hyperlink, and (2) remove the hyperlink from the image. Formore information see the online Help.
MADCAP FLARE
88
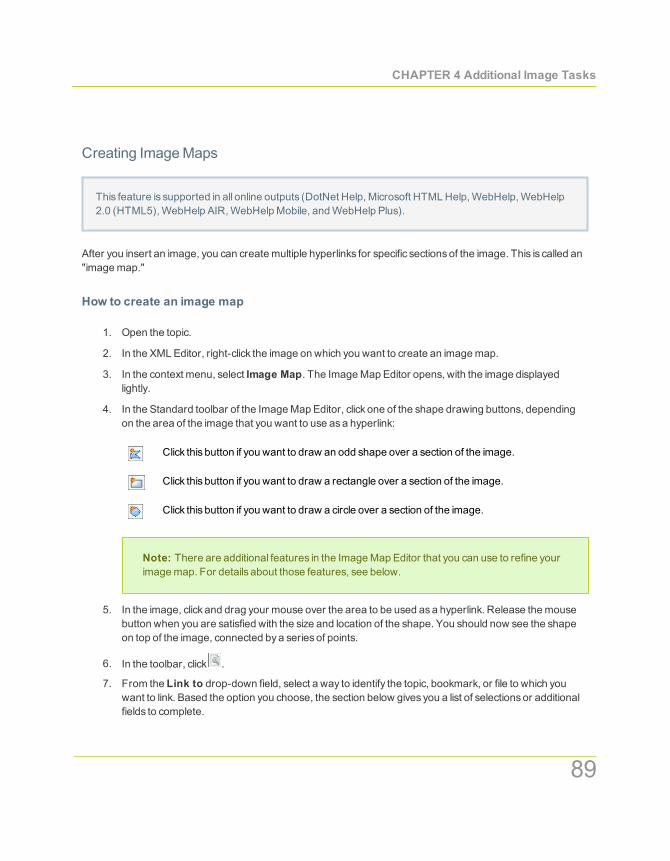
CHAPTER 4 Additional Image Tasks
Creating ImageMaps
This feature is supported in all online outputs (DotNet Help, Microsoft HTMLHelp,WebHelp,WebHelp2.0 (HTML5),WebHelp AIR,WebHelpMobile, andWebHelp Plus).
After you insert an image, you can createmultiple hyperlinks for specific sectionsof the image. This is called an"imagemap."
How to create an image map
1. Open the topic.
2. In the XMLEditor, right-click the image on which you want to create an imagemap.
3. In the context menu, select Image Map. The ImageMap Editor opens, with the image displayedlightly.
4. In the Standard toolbar of the ImageMap Editor, click one of the shape drawing buttons, dependingon the area of the image that you want to use asa hyperlink:
Click this button if you want to draw an odd shape over a section of the image.
Click this button if you want to draw a rectangle over a section of the image.
Click this button if you want to draw a circle over a section of the image.
Note: There are additional features in the ImageMap Editor that you can use to refine yourimagemap. For details about those features, see below.
5. In the image, click and drag your mouse over the area to be used asa hyperlink. Release themousebutton when you are satisfied with the size and location of the shape. You should now see the shapeon top of the image, connected bya series of points.
6. In the toolbar, click .
7. From the Link to drop-down field, select a way to identify the topic, bookmark, or file to which youwant to link. Based the option you choose, the section below gives you a list of selectionsor additionalfields to complete.
89

File in Project This option lets you search for a file within your project. After you select thisoption, use the area below to navigate to the file that you want to link to and select it. Byusingthe buttons in the local toolbar, you can view all files in a list, view files in their folder structure,and use other options.
Showsall of the files in the project in a list in the area below. If you click the buttonagain, it switches to a folder tree view. In the list, you can click the "File," "Type," or"Path" column headers to sort the list alphabetically by that column data.
Showsor hides the folders that the files are stored in.
Showsor hides the files. If you click this button when the Show Folders button isselected, the area splits into two halves. The folder is shown on the left side, and thefiles and subfolderswithin it are shown on the right.
If the Show Files button is the only one selected, you can click this button tomove up one folder level.
You can also click to display and select anybookmarkswithin the destination file, or ifyou have selected a PDF file.
Place in this Document This option displaysanyheadingsand bookmarks in the currentfile. After you click this option, use the section below to choose the heading or bookmark towhich you want to link.
External File This option lets you search for a file (e.g., HTM, HTML, XML, PDF,MicrosoftOffice files) outside your project. This is especially useful if you want to link from one topic toanother in separate project outputs, such asCHM files. After you select this option, enter thepath to the file in the field next to the External File button.
You can also click to display and select anybookmarkswithin the destination file, or ifyou have selected a PDF file.
Note: Because the link usually needs to be relative, based on the final locationsofyour output files, it is preferable to enter the text directly into the field, rather thanclicking the External File button.
Website This option lets you enter the path to an external file, such as the URL for a website.After you click this option, simply type the path in the field next to the Website field (e.g.,
MADCAP FLARE
90
CHAPTER 4 Additional Image Tasks
http://www.acme.com).
You can create links to specific topics in HTML5,WebHelp,WebHelp Plus, or WebHelpMobile output. This includes the ability to incorporate search stringsand skin references (forsome outputs).
Email This option lets you add an email addressand subject line so that the user can quicklysend an email.
E X A M P L EYoumight use this feature to help the end user send an email to your company'stechnical support department.When users click the link, it opens their email programand beginsa new emailmessage for them, inserting the email addressand subjectline for them. After you click this option, complete theE-mail address andSubjectfields to the right (or select a recent email address from the list below).
HTML Help File This option lets you search for a topicwithin an HTMLHelp (CHM) file thatyou have added to your project. After you select this option, click theExternal File button. Inthe Link to HTMLHelp dialog, you can do one of the following.
SelectProject Files and then use the area below to navigate to the file that youwant to link to and select it. Byusing the buttons in the local toolbar, you can view allfiles in a list, view files in their folder structure, and use other options.
Showsor hides the folders that the files are stored in.
Showsor hides the files. If you click this button when the Show Folders but-
ton is selected, the area splits into two halves. The folder is shown onthe left side, and the files and subfolderswithin it are shown on the right.
Select Import Existing. In the dialog that opens, find and double-click the CHM file.Then from the drop-down—which displays "(root folder)" by default, you can select aspecific content folder in your project to place the CHM file.
After the CHM file is selected, in the Topic field click . In the dialog that opens, find anddouble-click the topic that you want to link to.
When you are finished, clickOK in the Link to HTMLHelp dialog. If you imported an existingCHM file, you also need to clickOK in the Copy to Project dialog.
91
8. (Optional) In theScreen Tip field, you can type a phrase that will appear when the end user hoversover the hyperlink in the output.
9. (Optional) In the Target Frame field, click the drop-down arrow to select the way the linked des-tination will open. This option can be used to open the destination topic or file in a popup.
(default) The destination file will open in the samewindow as the output window.
Parent Frame_parent The destination file will open in the parent frame of the current topicwhile hiding that topic.
New Window_blank The destination file will open in a new browser window.
Same Frame_self The destination file will open in the samewindow frame as the currenttopic.
Top Frame_top The destination file will open in the same output window, removing all otherframesets. Youmight use this option, for example, if the destination topic has its own frame-set.
Popup WindowThe destination file will open in a popup boxon top of the current topic.
10. ClickOK. The hyperlink is added to the imagemap.
11. If you want to addmore hyperlinks to the image, select a shape button again and repeat the stepsabove.
12. When you are finished creating hyperlinkson the image, clickOK in the ImageMap Editor.
13. Select File>Save or pressCTRL+S.
.
MADCAP FLARE
92

CHAPTER 4 Additional Image Tasks
Buttons And Sections
Following are descriptionsof buttonsand sections found in the ImageMap Editor.
Button/Section Description
File Use thismenu to selectOK (to accept changes in the editor) or Cancel (to close theeditor without saving changes).
Edit Use thismenu to select basic editing options (such asundo, redo, cut, copy, andpaste).
View Use thismenu to open and close certain elements in the editor (such as toolbars,messages, and the statusbar).
OK Click this button to accept your changes in the editor.
Cancel Click this button to close the editor without saving changes in the editor.
Click this button to toggle between seeing a clear image of the picture and a fadedimage.
Click this button to hide the shapes that you draw over areasof the image.
Click this button to fill the shapes that you draw over areasof the image.
Click this button to open the Area Properties dialog, which lets you find and select adestination file to link to a shape that you've drawn. Youmust select a shape beforethis button is enabled.
Click this button to delete a selected point in the editor.
Click this button to enable "Select" mode so that you can click on shapes that youhave drawn in the editor.
Click this button to draw a polygon shape over an area of the image. You can thenselect the shape and link it to a destination file.
Click this button to draw a rectangle shape over an area of the image. You can thenselect the shape and link it to a destination file.
93

Button/Section Description
Click this button to draw a circle shape over an area of the image. You can thenselect the shape and link it to a destination file.
Click this button to bring a shape up one layer (if it is overlapped byone or more othershapes).
Click this button to bring a shape up to the top layer (if it is overlapped byone or moreother shapes).
Click this button tomove a shape down one layer (if it is overlapped byone or moreother shapes).
Click this button tomove a shape down to the bottom layer (if it is overlapped byoneor more other shapes).
Click this button tomove the selected shape slightly to the left.
Click this button tomove the selected shape slightly to the right.
Click this button tomove the selected shape slightly up.
Click this button tomove the selected shape slightly down.
Href You can enter a path to the destination file so that it can be linked to the selected
shape. Alternatively, you can click to find and select a destination file. The path tothat file will then be displayed in this field.
Alt You can enter an Alt tag in this field. An Alt tag providesa textual equivalent for theimage. This code allows the page to be usable bypersonswith graphics turned off orwho are blind and using a screen reader.
MADCAP FLARE
94

CHAPTER 4 Additional Image Tasks
Deleting Images FromTopicsUse the following steps to delete an image that you previously inserted into a topic.
How to delete an image from a topic
1. Open the content file (e.g., topic, snippet).
2. In the XMLEditor, right-click the image.
3. From the context menu, clickDelete. The image is deleted from the topic.
4. Select File>Save or pressCTRL+S.
Note: If you want to remove an image from a project entirely, see "Deleting Image Files from theProject" below.
Deleting Image Files FromThe ProjectUse the following steps to remove an image file from a project. Image files are added to the project auto-maticallywhen you insert an image into a topic.
How to delete an image file from the project
1. Make sure the Content Explorer is open.
2. Double-click theResources folder to open it.
3. Double-click the Images folder to open it.
4. Locate and select the image file that you want to delete.
5. On your keyboard pressDelete.
6. Youmaybe asked if you are certain you want to send the file to the recycle bin. If so, clickYes.
Note: If you want to remove an image from a specific topic, see "Deleting Images from Topics" above.
95

Opening ImagesYou can open an image that you have added to your project. When you open the image , it displays in theImage Viewer within Flare.
How to open an image
1. Make sure the Content Explorer is open.
2. Double-click theResources folder.
3. Double-click the Images subfolder. All of your image files are displayed under the Images subfolder.
4. Do one of the following.
Locate and double-click the image file that you want to open.
Locate and click the image file that you want to open. In the local toolbar, click .
The image opens in the Image Viewer.
Note: If you have imported a project that already contained images, Flare keeps the images in the filestructure of the source project (as opposed to placing the image files in the Resources folder).
MADCAP FLARE
96

CHAPTER 4 Additional Image Tasks
Pasting Images FromOther ProgramsYou can copyand paste an image from another program, such asMicrosoftWord, into a content file (e.g.,topic, snippet). When you do this, a copyof the image file is added in PNG format to your project with a namethat you provide.
Tip: Before copying an image from another application, you should set its size to 100%.This enables you to resize the image later within Flare without lossof quality. On the otherhand, let's say you resized the image to 50% inMicrosoftWord and then pasted the imageinto Flare. Later, you decide to enlarge the image in Flare. But in the output the qualitydoesnot look very good because it wasnecessary to add pixels.
How to paste images from other programs
1. After copying the image in the other program, open acontent file (e.g., topic, snippet) in Flare.
2. Place your cursor where you want to paste the image.
3. PressCTRL+V on your keyboard.
4. In the Save Image dialog that opens, find and select the folder where you want to add the copyof theimage in your project (the default location is the Resources\Images folder). You can use the buttons inthe local toolbar to navigate.
Showsor hides the folders that the files are stored in.
Showsor hides the files. If you click this button when the Show Folders button isselected, the area splits into two halves. The folder is shown on the left side, and the files andsubfolderswithin it are shown on the right.
Showsor hideshidden files and folders.
If the Show Files button is the only one selected, you can click this button tomove up onefolder level.
5. In the File name field, enter a name for the image.
6. ClickSave. The image is added.
7. Select File>Save or pressCTRL+S.
97

Regenerating ImagesYou can quickly regenerate (update) all of the images in your project.
How to regenerate images
Do one of the following, depending on the part of the user interface you are using.
Ribbon Select the Tools ribbon. In theUpdate section selectRegenerate Captured Images.
You can use theOptionsdialog to switch between ribbonsand the classicmenu/toolbar layout. Formore information see the online Help.
Keep inmind that the smaller the application window becomes, themore the options in a ribbonshrink. Therefore, youmight only see a small icon instead of text, or youmight see only a section namedisplayed with a down arrow to access the options in it. You can hover over small icons to see tooltipsthat describe them. You can also enlarge the application window or click one of the section drop-downs in the ribbon to locate a hidden feature.
Menu Select Tools>Regenerate Captured Images.
The two primary reasons for using this option are:
Remove trial watermarks If you install Flare on a trial basis before purchasing the product, water-marksappear on all images that you capture and insert during the trial period. After you become alicensed user, you can use this option to remove the watermarkson all images.
Modify PROPS files If youmanipulate the PROPS file that accompaniesan image file, the image filebecomesout of syncwith the PROPS file. The "Regenerate Captured Images" option updates theimagesbased on the latest PROPS files.
What is a PROPS (or "Properties") file? It is a file created along with an image file in MadCapCaptureto hold all of the property information about that image.
E X A M P L ELet's say you useMadCapCapture to create a JPG image and you name it "MyImage." Youadd a text callout to the image in Capture. Therefore, when you are finished you will have onefile called "MyImage.jpg," which is the raw image file. Along with this file, you will have anotherfile called "MyImage.jpg.props," which contains the information about the text callout that youadded to the image.
MADCAP FLARE
98

CHAPTER 4 Additional Image Tasks
One reason tomanipulate the PROPS file is to translate the text into another language.
E X A M P L ELet's say you write an English version of your Flare project, and you have it translated intoSpanish aswell. This includesany text found in your images, such as this one.
Youmake a copyof this image file and the associated PROPS file, and you add them to theSpanish version of your Flare project. Now you need to translate the callout text for theimage. So you open the PROPS file in Notepad and you change the text.
But when you lookat the image in the Spanish version of the Flare project, the callout text forthe image is still in English. Therefore, you select Tools>Regenerate Captured Images.The image is updated and now looks like this in your project.
99
Note: If you need to translate image callouts in a Flare project, it is recommended that youuseMadCap Lingo, rather thanmanually editing each PROPS file in an editor such asNote-pad.
MADCAP FLARE
100
CHAPTER 4 Additional Image Tasks
Removing Images FromHeadings In A Generated TOC
This feature is supported in all print outputs (Adobe FrameMaker, Adobe PDF,MicrosoftWord, Micro-soft XPS, and XHTML).
If you have inserted images into the headings in your topics, you canmake sure those imagesdo not appear inthe generated TOC of the printed output.
This option works somewhat differently for Word output than it does for the other outputs.
Word
If the option is disabled, imagesappear in both content headingsand the print TOC.
If the option is enabled, imagesare removed from both content headingsand the print TOC.
PDF, XHTML, XPS, FrameMaker
If the option is disabled, imagesappear in content headingsonly.
If the option is enabled, imagesare removed completely.
How to remove images from headings in a generated TOC
1. Open the target.
2. In the Target Editor, select theAdvanced tab.
3. In theGenerated TOC section, selectRemove images from paragraphs with heading levels.
4. Select File>Save or pressCTRL+S.
Note: Keep inmind that, with this feature, the imagesare also removed from the heading in the con-tent of the document. Therefore, if you want to have the images in the content, but not in the printTOC, you should not use this feature. Instead, youmust remove the images from the print TOCman-ually after generation (if you compile an editable output, such asWord or FrameMaker).
101
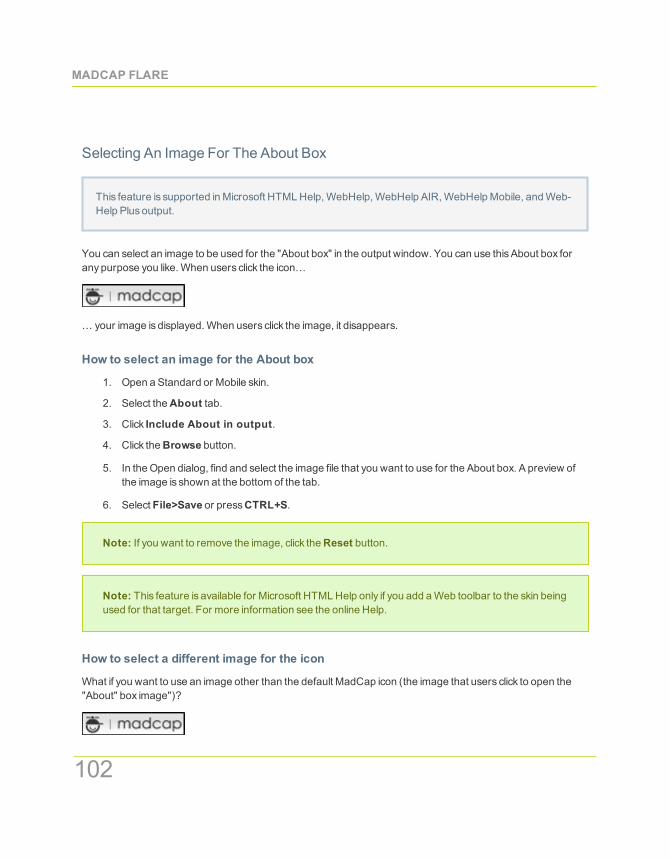
Selecting An Image For The About Box
This feature is supported inMicrosoft HTMLHelp,WebHelp,WebHelp AIR,WebHelpMobile, andWeb-Help Plusoutput.
You can select an image to be used for the "About box" in the output window. You can use thisAbout box foranypurpose you like.When users click the icon…
… your image is displayed.When users click the image, it disappears.
How to select an image for the About box
1. Open a Standard or Mobile skin.
2. Select theAbout tab.
3. Click Include About in output.
4. Click theBrowse button.
5. In the Open dialog, find and select the image file that you want to use for the About box. A preview ofthe image is shown at the bottom of the tab.
6. Select File>Save or pressCTRL+S.
Note: If you want to remove the image, click theReset button.
Note: This feature is available for Microsoft HTMLHelp only if you add aWeb toolbar to the skin beingused for that target. For more information see the online Help.
How to select a different image for the icon
What if you want to use an image other than the default MadCap icon (the image that users click to open the"About" box image")?
MADCAP FLARE
102

CHAPTER 4 Additional Image Tasks
Use the following steps to accomplish this.
1. In the skin select theStyles tab.
2. In the Styles section, expand the ToolbarItemnode.
3. Under it, clickLogo.
4. Select theProperty Groups option.
5. In theProperties section, click in the cell to the right of Icon.
6. SelectBrowse for Image.
7. In the dialog that opens, find and double-click the image that you want to use.
8. Select File>Save or pressCTRL+S.
103

Adding Images To Page Layout Frames
This feature is supported in all print outputs (Adobe FrameMaker, Adobe PDF,MicrosoftWord, Micro-soft XPS, and XHTML).
If you want to insert an image so that it automatically appears in several (or all) pages in the output, you cancreate an image frame in a page layout.
How to add images to page layout frames
1. Open the page layout. The Page Layout Editor opens.
2. In the local toolbar, click theNew Frame button .
3. In the drop-down, selectNew Image Frame. The Insert Image dialog opens, prompting you to pro-vide an image file.
4. Select an image file to insert. You can do this in one of the following ways.
Select an image already in the project by finding and selecting it in the built-in tree.
OR
Click to find and select an image file outside of the project.
Note: If you want to select an image file that you recently inserted somewhere in yourproject, click the down arrow in the field next to the Browse button and select the file from thelist.
5. ClickOK. The image is added to a frame of the same size, which you can place on the page asnec-essary.
6. Select File>Save or pressCTRL+S.
Note: In addition to using image frames, you can open other content frames (header, footer, dec-oration) and insert imagesas you normallywould.
MADCAP FLARE
104
CHAPTER 4 Additional Image Tasks
Creating A List Of Images
This feature is supported in all outputs.
You can use the list-of proxy to generate a list of various typesof elements (e.g., tables, images) in your output,with links to the corresponding content.
How to create a list of images
1. Add a new topic as you normallywould.
2. At the top of the topic, enter a title for your list (e.g., "List of Figures").
3. Do one of the following, depending on the part of the user interface you are using.
Ribbon Select the Insert ribbon. In theProxy section selectProxy>List-Of Proxy.
You can use theOptionsdialog to switch between ribbonsand the classicmenu/toolbar lay-out. For more information see the online Help.
Keep inmind that the smaller the application window becomes, themore the options in a rib-bon shrink. Therefore, youmight only see a small icon instead of text, or youmight see only asection name displayed with a down arrow to access the options in it. You can hover oversmall icons to see tooltips that describe them. You can also enlarge the application window orclick one of the section drop-downs in the ribbon to locate a hidden feature.
Menu Select Insert>Proxy>Insert List-Of Proxy.
The List-Of Proxydialog opens.
4. In the Tag Name field, select the parent style tag to be used for creating the list.
E X A M P L ELet's say you have added a caption below each image in your project (e.g., "Figure 5: MyImage Caption"). Perhaps you created a style classbased on the <p> tag called "Image-Caption" (i.e., "p.ImageCaption"). In a case such as this, you would select "p" from the TagName field when inserting the list-of proxy.
.
105
5. (Optional) In the Tag Class field, select the style class to be used for creating the list.
E X A M P L EUsing the example above, you would select "ImageCaption" from this field.
6. (Optional) In theStylesheet class for each generated entry field, you can select yet another styleclass. This class can be used to determine how each item in the generated list looks. You would usethis style class, for example, if you want to change the font of the entries or add a leader (e.g., series ofdots) between the entries and the page numbers. For more information about using styles, includingsteps, see the online Help or the FlareStylesGuide.
7. (Optional) In theStylesheet class for proxy field, you can select a class to affect the lookof theentire list. Youmight create and use a proxy style class, for example, if you want to add a borderaround the generated list. If you do not select a class from this field, the list will use the style settingsfrom the parent <MadCap|listOfProxy> style. You have the option of creating a class for this proxy stylein the Stylesheet Editor. To do this, select theMadCap|listOfProxy style and clickAdd Class tocreate a class. The classwill then be available from this field.
8. ClickOK. The proxy is added to the topic.
9. Select File>Save or pressCTRL+S.
Note: For some proxies, you can specifywhich output types should support them. If an output typesupports a particular proxy, the generated content is displayed in the output where the proxywasinserted. If an output type doesnot support a particular proxy, it is simply ignored when the output isgenerated. You can use themc-output-support style property to change which output types support aproxy.
MADCAP FLARE
106

CHAPTER 4 Additional Image Tasks
LaunchingMadCapCaptureYou can openMadCapCapture from the Flare interface.
How to launch MadCap Capture
Select Tools>MadCap>MadCap Capture.
Capture isMadCap's screen capture and editing tool, which is tightly integrated with Flare. If you have Captureinstalled on your computer, you can use it to do anyof the following fromwithin Flare.
Insert screen capture images into topicsYou can capture an image on your screen and insert itinto a topic at the same time. See "Inserting Screen Capture Images" on page 25.
Add screen capture files to projectsYou can capture an image on your screen and add theimage file to the project (without inserting the image into a topic). See "Adding Screen Capture Files toProjects" on page 20.
Edit imagesYou can open any image in your project. The image opens in Capture, where you canmake changes to it. See "Editing Images" on page 31.
Launch MadCap CaptureYou can simply open the Capture application from Flare.
Some advantagesof using Capture include the following.
LayersYou can add special effects or objects such as callouts, shapes, or lines. Because layers areused (rather thanmerging the objects into the image), you can easily return to the image later afteryou have saved it andmodify just a single object (rather than re-creating the entire image).
Changes reflected automaticallyAssoon as you save the image in Capture, the changesare auto-matically reflected anywhere the image was inserted in your project.
Single-sourcing images This feature reflectsCapture's tight integration with MadCap Flare. For asingle image, you can provide one group of settings for online output, and another group of settings forprinted output. For example, youmight want to use a resolution of 72 DPI for online output, and a res-olution of 300 DPI for printed output. Rather than creating two separate images, you can single-source the image outputs. For more information see "Creating Single-Source Images" on page 109.
107
Embedding Images InMicrosoft Word Output
This feature is supported inMicrosoftWord output.
An option on the Advanced tab of the Target Editor lets you ensure that imagesare embedded inMicrosoftWord output. This option is enabled bydefault.
How to embed images in Microsoft Word output
1. Open the target being used for Word output.
2. Select theAdvanced tab.
3. Click the checkboxnext toEmbed images in output so that it contains a checkmark.
4. Select File>Save or pressCTRL+S.
MADCAP FLARE
108
CHAPTER 4 Additional Image Tasks
Creating Single-Source ImagesIf you are creating a project containing imagesand need to generate output for both online and printed output,chancesare good that you require different image settings (e.g., file format, color depth, resolution) for thoseoutputs. In the past, the easiest way to accomplish this taskwas to create one set of images for the online out-put and another set for the printed output. However, there is another alternative. If you have bothMadCapFlare andMadCapCapture installed, you can single-source your images, producing only one set of images forall outputs. You can specify that the online images should have one group of settings, while the printed imageshave another group of settings.
E X A M P L ELet's say you create a Flare project and you are using Capture to produce images for it. You want togenerate two different outputs from that Flare project. Let's say the first output is an online Help sys-tem to be placed on a website, and the other output is a PDF document, which you will send to aprinter. Right away, you have a dilemmawhen it comes to the DPI (dots per inch) setting for theimages in your project. The typicalDPI setting for imagesdisplayed in an Internet browser is usuallysomewhere between 72 and 96. The DPI is automatically set for online output when you capture theimage, depending on the computer that you are using. However, the DPI setting for printed outputoften needs to be higher (say, 300 DPI). Therefore, when you edit the image in Capture, you use theFormat tab in the Image Properties dialog to specify the image settings for the online output (youmayelect not to change anyof the default settings). For print-based output, you use the Flare Print tab tospecify the image settings; in the DPI field, youmaywant to select 300. In Flare, you insert the Cap-ture image.When you generate output for the website (e.g., WebHelp), Flare displays the image inthe DPI used when you captured the image (e.g., 96 DPI).When you generate the PDF output fromthe project, Flare displays the same image in 300 DPI.
109
How to create a single-source image
This requiresa combination of tasks in MadCapCapture, followed by tasks in Flare.
MadCap Capture tasks:
1. Capture the image. (You also have the option of initiating this step from Flare. See "Inserting ScreenCapture Images" on page 25)
2. In the Capture Editor, double-click on the image. The Image Properties dialog opens.
3. On the Format tab, enter the appropriate settings for image when it is displayed in online output. Formore details about these settings, see Capture's online Help.
4. On the Flare Print tab, enter the appropriate settings for the image when it is used in outputs intendedfor printed distribution.
Note: The Flare Print tab is displayed only if the image in question alreadyexists in aMad-Cap Flare project.
5. ClickOK.
6. Save the changes to the image.
MadCap Flare tasks:
7. After completing theMadCapCapture tasksabove, insert the image into the appropriate topic(s).
8. Make sure you develop targets for online and printed outputs.
9. When you are finished with your project, build the targets.
10. View the output for the targets.
In the output, notice that the images for online outputs (DotNet Help, Microsoft HTMLHelp,WebHelp,WebHelp 2.0 (HTML5),WebHelp AIR,WebHelpMobile,WebHelp Plus) contain the online settings.Meanwhile, the images in the printed outputs (Adobe FrameMaker, Adobe PDF,MicrosoftWord,Microsoft XPS, XHTML) contain the printed settings.
Note: If you use the "Flare Print tab" feature in MadCapCapture to single-source your images, youmayneed to take into account the DPI (dots per inch) setting that you set for the image in Capture. Ifyou specify a large DPI that is recommended for print output (e.g., 300 DPI), youmaynotice that theimage shrinkswhen you generate print output. If necessary, you can resize the width and/or height of
MADCAP FLARE
110
CHAPTER 4 Additional Image Tasks
the image ahead of time in Capture or later in the Flare project to enlarge the image asnecessary forthe generated output. The DPI that you specifywill be retained, and you will end up with the imagedimensions that you need.When resizing images in Flare, you also have access to single-sourcing fea-tures (i.e., one group of size settings for online output and another group of settings for print outputthrough the use of stylesheet mediums). See "Resizing Images" on page 56.
111

GeneratingWeb-Safe Images
This feature is supported in all online outputs (DotNet Help, Microsoft HTMLHelp,WebHelp,WebHelp2.0 (HTML5),WebHelp AIR,WebHelpMobile, andWebHelp Plus).
If you have used non–web-safe image formats (e.g., WMF, EMF, BMP, TIF, TIFF, XPS, EXPS) in your projectand want those images to be converted to web-safe formats (e.g., GIF, JPEG, PNG) when you generateonline output—e.g., DotNet Help, Microsoft HTMLHelp,WebHelp,WebHelp 2.0 (HTML5),WebHelp AIR,WebHelpMobile,WebHelp Plus—you can use an option on the Advanced tab of the Target Editor. For print-based output types (Adobe FrameMaker, Adobe PDF,MicrosoftWord, Microsoft XPS, XHTML), the originalimage file formatswill be used when you generate output.
How to generate Web-safe images
1. Open a target.
2. Select theAdvanced tab.
3. SelectGenerate "web-safe" images.
4. From the drop-down list, select the image format that you want to use.
5. Select File>Save or pressCTRL+S.
Note: If you are using this option, images that link to external locations (such aswebsites), rather thanto imageswithin the project, are not affected.
MADCAP FLARE
112
113
APPENDIXA PDFGuides
Getting Started Guidehttp://docs.madcapsoftware.com/FlareV8/FlareGettingStartedGuide.pdf
What's New Guidehttp://docs.madcapsoftware.com/FlareV8/FlareWhatsNewGuide.pdf
Accessibility Guidehttp://docs.madcapsoftware.com/FlareV8/FlareAccessibilityGuide.pdf
Analyzer Guidehttp://docs.madcapsoftware.com/FlareV8/FlareAnalyzerGuide.pdf
Auto-numbers Guidehttp://docs.madcapsoftware.com/FlareV8/FlareAutoNumbersGuide.pdf
Condition Tags Guidehttp://docs.madcapsoftware.com/FlareV8/FlareConditionTagsGuide.pdf
Context-Sensitive Help Guidehttp://docs.madcapsoftware.com/FlareV8/FlareCSHGuide.pdf
DotNet Help Guidehttp://docs.madcapsoftware.com/FlareV8/FlareDNHGuide.pdf
Global Project Linking Guidehttp://docs.madcapsoftware.com/FlareV8/FlareGlobalProjectLinkingGuide.pdf
HTML Help Guidehttp://docs.madcapsoftware.com/FlareV8/FlareHTMLHelpGuide.pdf
Images Guidehttp://docs.madcapsoftware.com/FlareV8/FlareImagesGuide.pdf
Import Guidehttp://docs.madcapsoftware.com/FlareV8/FlareImportGuide.pdf
MADCAP FLARE
114

APPENDIX A PDF Guides
Indexing Guidehttp://docs.madcapsoftware.com/FlareV8/FlareIndexingGuide.pdf
Key Features Guidehttp://docs.madcapsoftware.com/FlareV8/FlareKeyFeaturesGuide.pdf
Movies Guidehttp://docs.madcapsoftware.com/FlareV8/FlareMoviesGuide.pdf
Navigation Links Guidehttp://docs.madcapsoftware.com/FlareV8/FlareNavigationLinksGuide.pdf
Printed Output Guidehttp://docs.madcapsoftware.com/FlareV8/FlarePrintedOutputGuide.pdf
Project Creation Guidehttp://docs.madcapsoftware.com/FlareV8/FlareProjectCreationGuide.pdf
QR Codes Guidehttp://docs.madcapsoftware.com/FlareV8/FlareQRCodesGuide.pdf
Reports Guidehttp://docs.madcapsoftware.com/FlareV8/FlareReportsGuide.pdf
115

Reviews and Contributions Guidehttp://docs.madcapsoftware.com/FlareV8/FlareReviewsAndContributionsGuide.pdf
Search Guidehttp://docs.madcapsoftware.com/FlareV8/FlareSearchGuide.pdf
SharePoint Guidehttp://docs.madcapsoftware.com/FlareV8/FlareSharePointGuide.pdf
Shortcuts Guidehttp://docs.madcapsoftware.com/FlareV8/FlareShortcuts.pdf
Skins Guidehttp://docs.madcapsoftware.com/FlareV8/FlareSkinsGuide.pdf
Snippets Guidehttp://docs.madcapsoftware.com/FlareV8/FlareSnippetsGuide.pdf
Source Control Guidehttp://docs.madcapsoftware.com/FlareV8/FlareSourceControlGuide.pdf
Styles Guidehttp://docs.madcapsoftware.com/FlareV8/FlareStylesGuide.pdf
MADCAP FLARE
116
APPENDIX A PDF Guides
Tables of Contents Guidehttp://docs.madcapsoftware.com/FlareV8/FlareTablesOfContentsGuide.pdf
Tables Guidehttp://docs.madcapsoftware.com/FlareV8/FlareTablesGuide.pdf
Targets Guidehttp://docs.madcapsoftware.com/FlareV8/FlareTargetsGuide.pdf
Templates Guidehttp://docs.madcapsoftware.com/FlareV8/FlareTemplatesGuide.pdf
Topics Guidehttp://docs.madcapsoftware.com/FlareV8/FlareTopicsGuide.pdf
Touring the Workspace Guidehttp://docs.madcapsoftware.com/FlareV8/FlareTouringTheWorkspaceGuide.pdf
Transition From Framemaker Guidehttp://docs.madcapsoftware.com/FlareV8/FlareTransitionFMGuide.pdf
Variables Guidehttp://docs.madcapsoftware.com/FlareV8/FlareVariablesGuide.pdf
117
WebHelp Outputs Guidehttp://docs.madcapsoftware.com/FlareV8/FlareWebHelpOutputGuide.pdf
MADCAP FLARE
118