flare table of contents guide - madcap software
TRANSCRIPT
MadCap Flare
Table ofContents Guide
Version 9.1
THIS USER GUIDE WAS CREATED USING MADCAP FLARE

Copyright 2013MadCap Software. All rights reserved.
Information in this document is subject to change without notice. The software described in this document is fur-nished under a license agreement or nondisclosure agreement. The softwaremaybe used or copied only inaccordance with the termsof those agreements. No part of this publicationmaybe reproduced, stored in aretrieval system, or transmitted in any form or anymeanselectronic or mechanical, including photocopying andrecording for anypurpose other than the purchaser's personal use without the written permission of MadCapSoftware.
MadCap Software7777 FayAvenueLa Jolla, California 92037858-320-0387www.madcapsoftware.com
Tables of Contents Guide iii
CONTENTS
CHAPTER 1 Introduction 5Steps for Using Tables of Contents 6Additional Steps for Print-based Output 7FAQs 8
CHAPTER 2 Adding a Table of Contents 11CHAPTER 3Opening a Table of Contents 13CHAPTER 4Creating a Table of Contents 15CHAPTER 5 Autogenerating a Table of Contents 31CHAPTER 6 Editing TOC Entries 33CHAPTER 7 Enabling Tables of Contents in Skins 37CHAPTER 8 Associating TOCs 39Associating a Master Table of Contents with a Project 40Associating a Master Table of Contents with a Target 41
CHAPTER 9 Additional TOC Tasks 43Automatically Set the Title for a TOC Entry 45Changing the Label for TOC Entries 46Creating a Binary TOC 47Creating New Topics from the TOC Editor 48Deleting Tables of Contents 50Finding and Fixing Issues in a Table of Contents 50Importing Tables of Contents 51Movie Links in TOCs 52
Linking a TOC Entry to a Browse Sequence 54Linking a TOC Entry to a Topic 55Linking Tables of Contents 56Linking to CHM Files 58Marking a TOC Entry as New 58Merging Projects 60Renaming Tables of Contents 61Selecting a Skin for a TOC Entry 62Selecting a Style Class for a TOC Entry 63Selecting an Icon for a TOC Entry in HTML Help Output 64Specifying Style Settings for TOC Entries 65Specifying the Automerge Location in a TOC for WebHelp Plus 70Specifying the Browser Frame for a TOC Entry 72Synchronizing the TOC with Open Topics 73Using Styles to Determine the Look of an Online Mini-TOC 74Viewing Topics Not in a TOC 76
CHAPTER 10 Printed Output TOC Tasks 79Creating a Topic for a Print TOC 80Specifying Chapter and Page Layout Breaks 83Specifying Section Breaks and Master Pages 94Including Print Topics in an Outline TOC 98Autonumbering Flow for Output 101Creating a Mini-TOC for Print Output 104Creating Headings for Unlinked Books in a Generated TOC 114Determining Heading Levels for a Print TOC 117Using Styles to Determine the Look of a Print TOC 124Using Styles to Determine the Look of a Print Mini-TOC 131Removing Images from Headings in a Generated TOC 136Suppressing Page Numbers in a Print TOC 137Suppressing Page Numbers in a Print Mini-TOC 142
APPENDIX PDFGuides 147
MADCAP FLARE
iv Tables of Contents Guide
Tables of Contents Guide5
CHAPTER1 Introduction
When your end users need to find specific information in your project, the threemost commonmethods theyuseare: the search feature, a table of contents (TOC), and an index.
You can create a TOC byadding booksand itemswith links (to topics, external files, other Help systems, movies,etc.) in a structure that you thinkwould be useful for the individual. End users then browse through a TOC to findinformation.
In manycases, Flare provides you with an initial TOC, which you further "build" (or create) using the TOCEditor. You can use this TOC asyour primary, or "master," TOC. At some point, youmaydecide to add anotherTOC to the project. The extra TOCs that you add can then be linked to themaster TOC (see the online Help formore information about linking andmerging TOCs).
For print-based (Adobe FrameMaker, Adobe PDF,MicrosoftWord, Microsoft XPS, XHTML) and EPUBout-put, you need to use the TOC Editor to create a TOC just as you would create one for online output (DotNetHelp, Microsoft HTMLHelp,WebHelp,WebHelp 2.0 (HTML5),WebHelp AIR,WebHelpMobile,WebHelpPlus). However, there is a fundamental difference. Performing this task for online output createsan actual TOCin the output, which people use to navigate from topic to topic. This is not the case for print-based output. Per-forming this task for print-based output lets you indicate which topicswill be included in the output and in whatorder. In that sense, this TOC functionsmore asan outline for print-based output. Therefore, for print-basedoutput, you can think of it as an "outline TOC." If you want to include a generated TOC in print-based output, youneed to use a TOC proxy in a topic instead (see "Creating a Topic for a Print TOC" on page 80).
This chapter discusses the following.
Steps for Using Tables of Contents 6
Additional Steps for Print-based Output 7
FAQs 8
Steps for Using Tables of Contents
Following are the tasksnecessary for including a TOC in your project.
1. Add/open TOC If you do not want to use the initial TOC often provided byFlare, you can add one.And you can open an existing TOC from the Project Organizer whenever you need to work on it. See"Adding a Table of Contents" on page 11 and "Opening a Table of Contents" on page 13.
2. Create TOC You can create a TOCmanually or automatically, adding booksand links to topics orother files. See "Creating a Table of Contents" on page 15 or "Autogenerating a Table of Contents" onpage 31.
3. Edit TOC entries After you create a table of contents, you can edit the individual entries in manyways. This includes linking entries to other files, setting titles automatically, and applying condition tags.See "Editing TOC Entries" on page 33.
4. Enable TOC After creating the TOC, you need to enable the TOC in the skin you want to use for the tar-get (for online output). See "Enabling Tablesof Contents in Skins" on page 37.
5. Associate skin with target Now that the TOC is enabled in the skin, you need to associate that skinwith the target you are building (for online output). For more information see the online Help.
6. (Optional) Associate master TOC with a project or target In most situations, you will have oneTOC that you use for a particular output (target). In that case, you simply associate the appropriateTOC with the target. If you havemultiple TOCs that you want to include in the same project or output tar-get, the TOC that you associate with the project or target servesas the "master" TOC. In your masterTOC, you have the option of creating links to the other TOC that you want to include in the output. If youdo not select a TOC, Flare will use the first one in the project (if there ismore than one). If you have spe-cified amaster TOC at the project level and another at a target level, the TOC at the target will take pre-cedence.See "Associating TOCs" on page 39 and "Associating aMaster Table of Contentswith aTarget" on page 41.
MADCAP FLARE
6 Tables of Contents Guide
CHAPTER 1 Introduction
Additional Steps for Print-based Output
For print-based output, the following additional stepsmaynecessarywhen working with an outline TOC.
1. Include print topics in outline TOC You need tomake sure that all of the topics to be included inyour printed output (those that are ONLY for printed output, aswell as those that are for printed ANDonline output) are added to an "outline TOC." See "Including Print Topics in anOutline TOC" on page98.
2. (Optional) Specify chapter breaks with TOC If you are creating print-based output with page lay-outs, youmaywant to complete this task. After you create a page layout and configure its framesandsettingsasnecessary, you need to associate the page layout with the appropriate content. In mostcases, you will probablywant to associate different page layoutswith variousentries in your outlineTOC (so that different page layouts can be used for different parts or chapters in amanual). Otherwise,you would associate a single "master" page layout with an entire target or project; in that case, thesame page layout will be applied to all topics in that target or project. You can associate a page layoutwith an outline TOC entrywith or without creating a chapter breakat the same time. See "SpecifyingChapter and Page Layout Breaks" on page 83.
3. (Optional) Specify section breaks with TOC If you are creatingWord or FrameMaker output withmaster pages (or if you want to use "section" autonumbers), youmaywant to complete this task. Afteryou create amaster page for print output and configure it as necessary, you need to associate themas-ter page with the appropriate content. In manycases, you will probablywant to associatemultiple mas-ter pageswith variousentries in your outline TOC (so that different master pages can be used fordifferent parts or "chapters" in amanual). Otherwise, you would associate a singlemaster page with anentire target; in that case, the same page layout will be applied to all topics in that target.Whenever youassociate amaster page with a TOC entry, youmust first create a section break in order to do so. See"Specifying Section BreaksandMaster Pages" on page 94.
Tables of Contents Guide7
FAQs
Following are some answers to questions youmight have about creating TOCs.
What Should You Put in a TOC?
In TOC, you typically include a combination of the following.
Books, which sort of act like file folders to help keep your TOC organized. They can link to topics,external files, MadCapMimicmovies, or to nothing at all if you like.
Topic pages, which link to topics in your project.
Links to other files, such asa website on the Internet, another TOC, a browse sequence, oranother Help system.
It is completely up to you to decide the specific pieces to include in your TOC andwhat to leave out. Some-times, authors canmake themistake of including toomuch in a TOC, causing it to become too cluttered andunusable. Not necessarily every topic is a good candidate for the TOC. For example, youmight not want toinclude a small topic about an issue or feature that doesnot raise its head very often. Instead of including it inthe TOC, link to it from other related topics andmake sure it is indexed well so users can quickly find the inform-ation that way.
How Big Should a TOC Be?
ATOC doesnot need to include absolutely every topic andmorsel in your project. Use the TOC to provideyour userswith the information theyneedmost. Try not to includemore than three or four levels of books in aTOC, Anymore than that and a TOC almost becomes too unwieldyand difficult to use.
When Should You Create a TOC?
There is no right or wrong answer to this. As you gain experience asa Help author, you will develop your ownworkhabits that fit you best. Some authors create a TOC at the beginning of the project development pro-cess, others begin creating it later on in the process. Once you start creating the TOC, however, you arealmost certain to continuemaking changesand improvements to it until the end.
Youmaywant to try creating the TOC at the beginning of the project development process, at the same timethat you create new topics.
.
MADCAP FLARE
8 Tables of Contents Guide
CHAPTER 1 Introduction
Can YouHaveMore ThanOne TOC in the SameProject?
Yes. You can include asmanyTOCs in your project as you want, linking them together so that theyappearseamless in the final output that your end users see.
Unless you are importing a project, Flare provides you with an initial TOC, which you further "build" (or create)using the TOC Editor. You can use this TOC (or another one) as your "master" TOC. In addition to themasterTOC, you can easily addmore TOCs, naming themwhatever you want. Behind the scenes, Flare createsaTOC file (an XML file with an .fltoc file extension) for each TOC that is created (including themaster). TheseTOC files are separate from themain project (FLPRJ) file. Thismeans that, not only can you havemultipleTOCs in one project, you can also havemultiple authorsworking on different TOCs for that same project.
What If YouWant to Merge Your TOC with TOCs fromOther Projects?
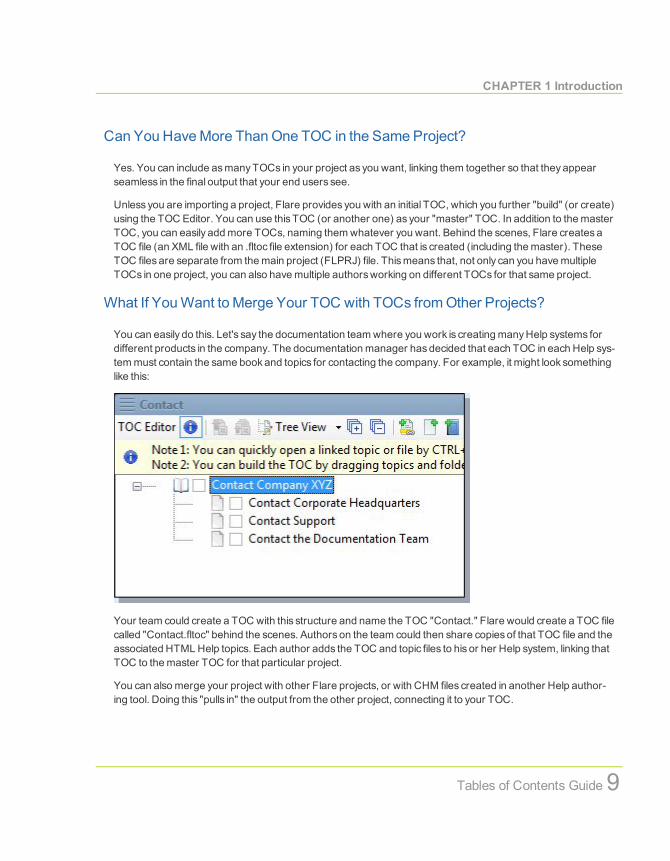
You can easily do this. Let's say the documentation teamwhere you work is creatingmanyHelp systems fordifferent products in the company. The documentationmanager hasdecided that each TOC in each Help sys-temmust contain the same bookand topics for contacting the company. For example, it might look somethinglike this:
Your team could create a TOC with this structure and name the TOC "Contact." Flare would create a TOC filecalled "Contact.fltoc" behind the scenes. Authors on the team could then share copiesof that TOC file and theassociated HTMLHelp topics. Each author adds the TOC and topic files to his or her Help system, linking thatTOC to themaster TOC for that particular project.
You can alsomerge your project with other Flare projects, or with CHM files created in another Help author-ing tool. Doing this "pulls in" the output from the other project, connecting it to your TOC.
Tables of Contents Guide9

HOW DID YOU DO THAT?Oneway to learn about this subject andmanyothers is to createa test Flare project with theWeb Print Mobile template. Then refer to the "How Did You DoThat?" topics in the online Help to learn how certain featureswere created in that project.
MADCAP FLARE
10 Tables of Contents Guide
Tables of Contents Guide11
CHAPTER2 Adding a Table of Contents
In manycases, Flare provides you with an initial TOC, which you further "build" (or create) using the TOCEditor. You can use this TOC, but youmaydecide to addmore TOCs to the project so that you can have dif-ferent TOCs for different outputs. The stepsbelow show you how to add a new TOC.
HOW TO ADD A TABLE OF CONTENTS
1. Do one of the following, depending on the part of the user interface you are using.
Ribbon Select theProject ribbon. In theContent section selectNew>Table of Contents.
You can use theOptionsdialog to switch between ribbonsand the classicmenu/toolbar layout.For more information see the online Help.
Keep inmind that the smaller the application window becomes, themore the options in a rib-bon shrink. Therefore, youmight only see a small icon instead of text, or youmight see only asection name displayed with a down arrow to access the options in it. You can hover over smallicons to see tooltips that describe them. You can also enlarge the application window or clickone of the section drop-downs in the ribbon to locate a hidden feature.
Menu SelectProject>>Add Table of Contents.
Right-click In the Project Organizer, right-click on the TOCs folder and from the contextmenu selectAdd Table of Contents.
The Add File dialog opens.
2. In the File Type field at the top, make sure TOC is selected.
3. In theSource area select one of the following.
New from template This lets you choose either a factory template file or one of your own cus-tomized template files asa starting point. The new file will take on all of the settings contained inthe template. If you want to use a factory template provided byFlare, expand the Factory
Templates folder and click on a template file. If you want to use your own customized templatefile, expand the appropriate folder and click on a file. For more information about templates,see the online Help.
Note: In some dialogsand wizards you can click theManage Templates
button if you want to open the TemplateManager. This lets youman-age anyof your template files (e.g., add new templates, enter descriptionsfor templates). For more information see the online Help.
New from existing This lets you choose an existing file of the same type—that you'vealready created and stored somewhere—asa starting point for your new file. Aswith templatefiles, your new file will take on all of the settings contained in the file you select. To use this
option, click the browse button , use theOpen File dialog to find a file, and double-click it.
4. (Optional) If you want to place the file into a subfolder that you previously created in the Project Organ-
izer, in the Folder field click and select the subfolder. Otherwise, keep the default location.
5. In the File Name field, type a new name for the TOC.
6. ClickAdd. The TOC is added to the TOCs folder in the Project Organizer. The TOC Editor opens to theright, with the page for the new TOC shown and some initial TOC booksand entries added for you.
7. Click to save your work.
MADCAP FLARE
12 Tables of Contents Guide

Tables of Contents Guide13
CHAPTER3 Opening a Table of Contents
You can quickly open a TOC anytime you need to work on it.
HOW TO OPEN THE MASTER TOC
Do one of the following, depending on the part of the user interface you are using.
Ribbon Select theProject ribbon. In thePrimary Files section selectPrimary TOC.
Project toolbarClick .
To open the Project toolbar from themenu view, selectView>Toolbars>Project.
Keyboard shortcut PressCTRL+F8.
HOW TO OPEN A SPECIFIC TOC
1. Make sure the Project Organizer is open.
2. Double-click the TOCs folder. The TOC(s) in your project are displayed.
3. Double-click the TOC that you want to open. The TOC opens in the TOC Editor to the right.

MADCAP FLARE
14 Tables of Contents Guide

Tables of Contents Guide15
CHAPTER4 Creating a Table of Contents
In manycases, Flare provides you with an initial TOC, which you further "build" (or create) using the TOCEditor.
The following steps show you how tomanually create a TOC byadding booksand links to topics, movies,external files, other TOCs, browse sequences, or other Help systems in any kind of structure you want. You willquickly find that creating a TOC is quite an easyprocess. You can also generate parts of a TOC automatically,based on the folder structure in the Content Explorer or based on heading levels in your topics (<h1> through<h6>). For more information see "Autogenerating a Table of Contents" on page 31.
Whichmethod should you choose (amanual TOC or an autogenerated TOC)? There are advantages to bothmethods. Plus, you can use bothmethods if you want. You can start by autogenerating a TOC and then changeit or supplement it manually.
The advantage of creating a TOCmanually is that you havemore flexibility in the way to structure a TOC. In addi-tion, you can includemore than just topics and bookswhen creating a TOCmanually. For example, you caninclude links to other TOCs.
The advantage of autogenerating a TOC is that it is faster.
.
HOW TO CREATE A TABLE OF CONTENTS
1. From the Project Organizer, open your TOC.
If you need to add a new TOC file, you can selectProject>New>Table of Contents (if using the rib-bon view) or Project>Add Table of Contents (if using themenu view) and complete the options inthe dialog. After theyare added, TOC files are stored in the TOCs folder in the Project Organizer.When creating a new project, Flare provides you with an initial TOC; therefore, youmaynot need toadd one.
2. Make sure the Content Explorer is open.
3. (Optional) If you want to select and addmultiple topics to the TOC at the same time (asopposed to onetopic at a time), complete the following steps.
a. In the local toolbar of the Content Explorer, click theShow Files button .
The Content Explorer splits into two halves.
b. On the right half of the Content Explorer, find and select the folder and topic files that you wantto include in the TOC. You can hold theSHIFT key to select a range, or you can hold theCTRLkey to select individual items.
Note: Make sure you do not select the "Resources" folder in the ContentExplorer, which holds your ancillary content files (e.g., images, stylesheets).If you do, that folder and its contentswill also be included in the TOC.
4. Drag topic files (and folders, if applicable) from the Content Explorer to the TOC Editor.
Note: For print-based output, make sure to also include any topics that you createdwith TOC, index, or glossary proxies in order to produce those typesof generatedcontent in the output.
Also, you can use the buttons in the TOC Editor local toolbar to add elements (e.g., books, topic pages)to the TOC and to determine how theybehave (e.g., link them to topics, external files, other TOCs). Fol-lowing are descriptionsof options in the TOC Editor. After that are steps for some of themore commontasks.
MADCAP FLARE
16 Tables of Contents Guide
CHAPTER 4 Creating a Table of Contents
Description
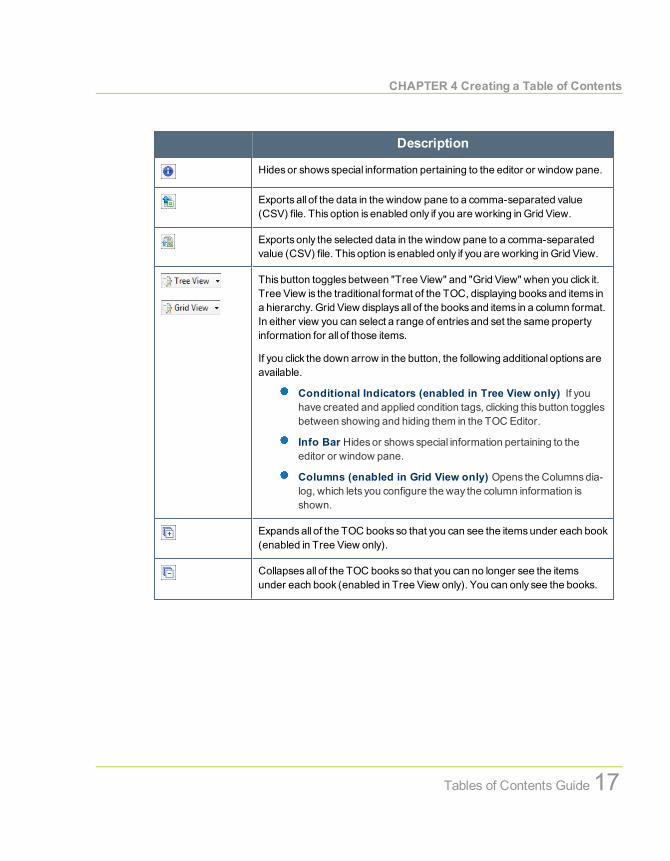
Hidesor showsspecial information pertaining to the editor or window pane.
Exports all of the data in the window pane to a comma-separated value(CSV) file. This option is enabled only if you are working in Grid View.
Exports only the selected data in the window pane to a comma-separatedvalue (CSV) file. This option is enabled only if you are working in Grid View.
This button togglesbetween "Tree View" and "Grid View" when you click it.Tree View is the traditional format of the TOC, displaying booksand items ina hierarchy. Grid View displaysall of the booksand items in a column format.In either view you can select a range of entries and set the same propertyinformation for all of those items.
If you click the down arrow in the button, the following additional optionsareavailable.
Conditional Indicators (enabled in Tree View only) If youhave created and applied condition tags, clicking this button togglesbetween showing and hiding them in the TOC Editor.
Info Bar Hidesor showsspecial information pertaining to theeditor or window pane.
Columns (enabled in Grid View only) Opens the Columnsdia-log, which lets you configure the way the column information isshown.
Expandsall of the TOC books so that you can see the itemsunder each book(enabled in Tree View only).
Collapsesall of the TOC books so that you can no longer see the itemsunder each book (enabled in Tree View only). You can only see the books.
Tables of Contents Guide17
Description
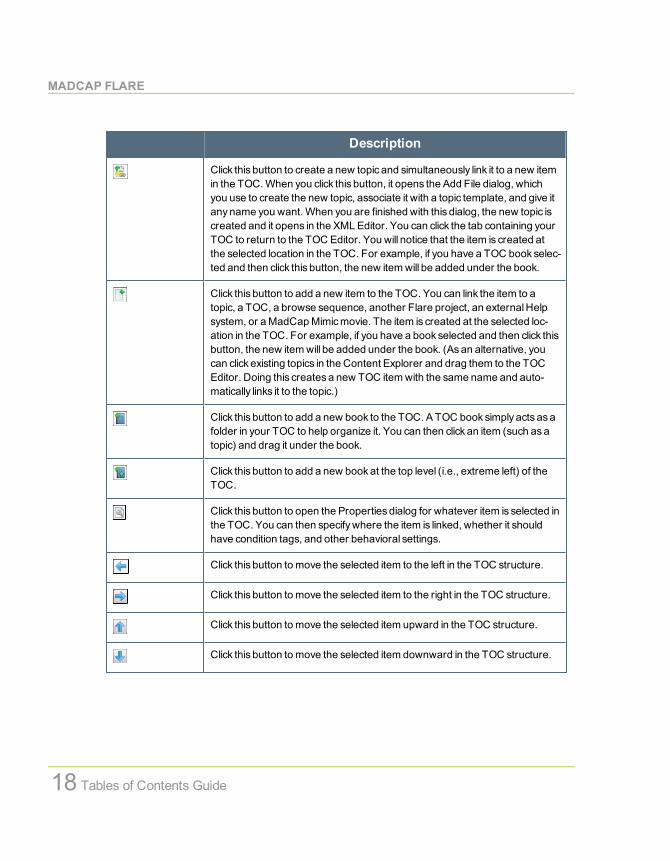
Click this button to create a new topic and simultaneously link it to a new itemin the TOC.When you click this button, it opens the Add File dialog, whichyou use to create the new topic, associate it with a topic template, and give itanyname you want.When you are finished with this dialog, the new topic iscreated and it opens in the XMLEditor. You can click the tab containing yourTOC to return to the TOC Editor. You will notice that the item is created atthe selected location in the TOC. For example, if you have a TOC bookselec-ted and then click this button, the new itemwill be added under the book.
Click this button to add a new item to the TOC. You can link the item to atopic, a TOC, a browse sequence, another Flare project, an externalHelpsystem, or aMadCapMimicmovie. The item is created at the selected loc-ation in the TOC. For example, if you have a book selected and then click thisbutton, the new itemwill be added under the book. (Asan alternative, youcan click existing topics in the Content Explorer and drag them to the TOCEditor. Doing this createsa new TOC itemwith the same name and auto-matically links it to the topic.)
Click this button to add a new book to the TOC. ATOC booksimply acts asafolder in your TOC to help organize it. You can then click an item (such asatopic) and drag it under the book.
Click this button to add a new bookat the top level (i.e., extreme left) of theTOC.
Click this button to open the Properties dialog for whatever item is selected inthe TOC. You can then specifywhere the item is linked, whether it shouldhave condition tags, and other behavioral settings.
Click this button tomove the selected item to the left in the TOC structure.
Click this button tomove the selected item to the right in the TOC structure.
Click this button tomove the selected item upward in the TOC structure.
Click this button tomove the selected item downward in the TOC structure.
MADCAP FLARE
18 Tables of Contents Guide
CHAPTER 4 Creating a Table of Contents
Description
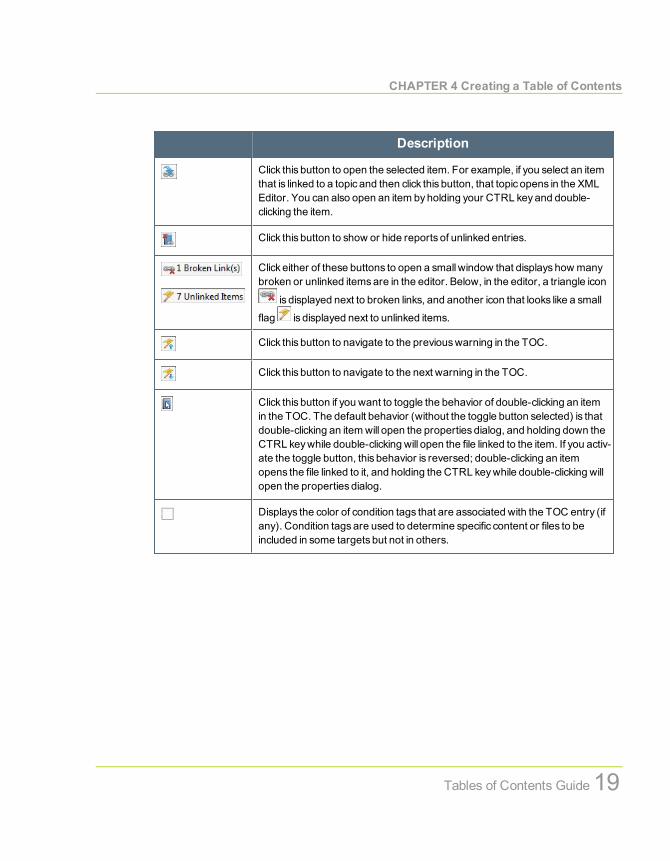
Click this button to open the selected item. For example, if you select an itemthat is linked to a topic and then click this button, that topic opens in the XMLEditor. You can also open an item byholding your CTRL keyand double-clicking the item.
Click this button to show or hide reports of unlinked entries.
Click either of these buttons to open a smallwindow that displayshowmanybroken or unlinked itemsare in the editor. Below, in the editor, a triangle icon
is displayed next to broken links, and another icon that looks like a small
flag is displayed next to unlinked items.
Click this button to navigate to the previouswarning in the TOC.
Click this button to navigate to the next warning in the TOC.
Click this button if you want to toggle the behavior of double-clicking an itemin the TOC. The default behavior (without the toggle button selected) is thatdouble-clicking an itemwill open the properties dialog, and holding down theCTRL keywhile double-clicking will open the file linked to the item. If you activ-ate the toggle button, this behavior is reversed; double-clicking an itemopens the file linked to it, and holding the CTRL keywhile double-clicking willopen the properties dialog.
Displays the color of condition tags that are associated with the TOC entry (ifany). Condition tagsare used to determine specific content or files to beincluded in some targets but not in others.
.
Tables of Contents Guide19
TO CREATE A NEW TOPIC AND SIMULTANEOUSLY LINK IT TO A NEW ENTRY
a. Open your TOC.
b. Select the location in the TOC where you want to add the new topic.
E X A M P L E
If you select a topic entry that alreadyexists in the TOC, your new topicwill beplaced directly after that existing topic.
c. In the local toolbar of the TOC Editor, click . The Add File dialog opens.
d. Complete the options in the Add File dialog.
i. In theSource area select one of the following.
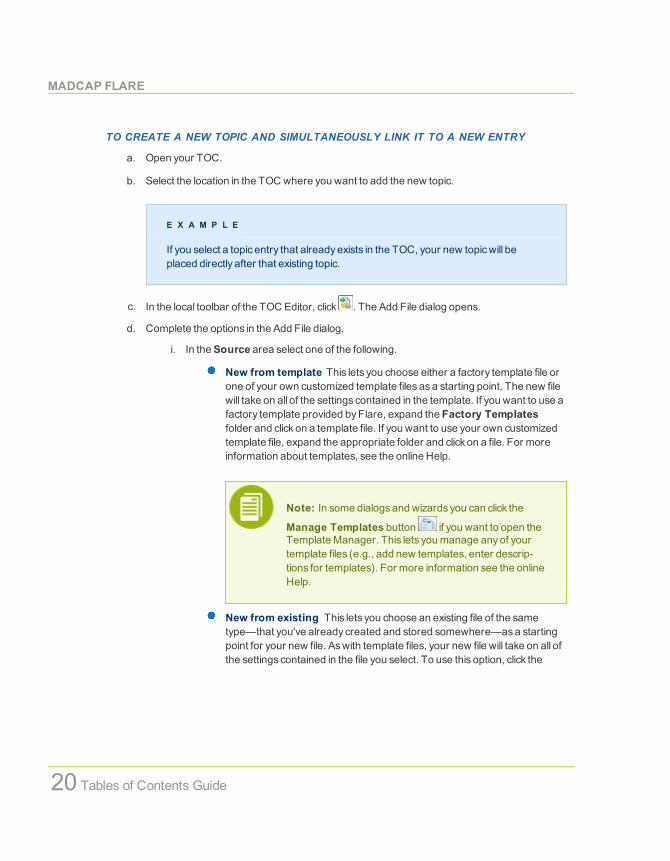
New from template This lets you choose either a factory template file orone of your own customized template files asa starting point. The new filewill take on all of the settings contained in the template. If you want to use afactory template provided byFlare, expand the Factory Templatesfolder and click on a template file. If you want to use your own customizedtemplate file, expand the appropriate folder and click on a file. For moreinformation about templates, see the online Help.
Note: In some dialogsand wizards you can click the
Manage Templates button if you want to open theTemplateManager. This lets youmanage anyof yourtemplate files (e.g., add new templates, enter descrip-tions for templates). For more information see the onlineHelp.
New from existing This lets you choose an existing file of the sametype—that you've already created and stored somewhere—asa startingpoint for your new file. Aswith template files, your new file will take on all ofthe settings contained in the file you select. To use this option, click the
MADCAP FLARE
20 Tables of Contents Guide
CHAPTER 4 Creating a Table of Contents
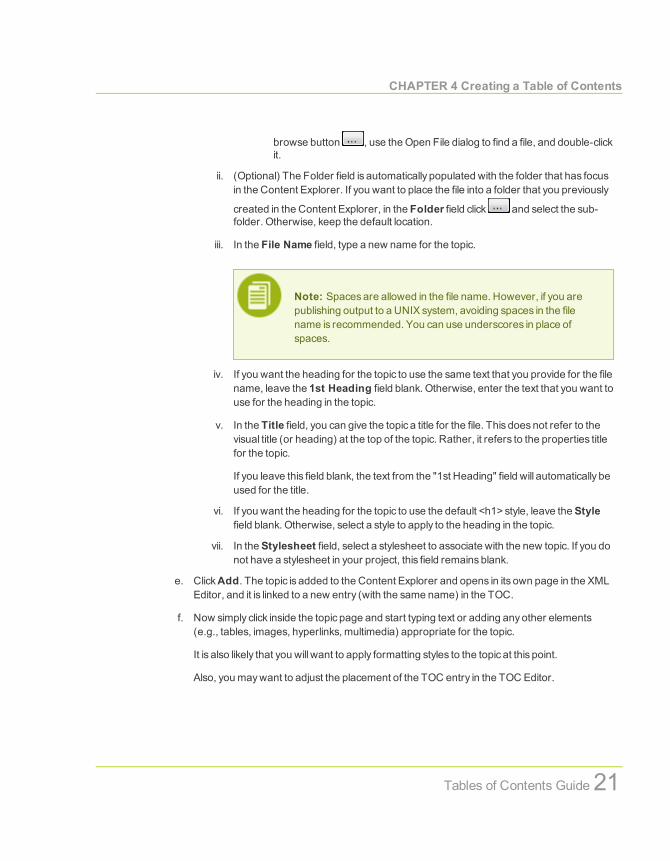
browse button , use theOpen File dialog to find a file, and double-clickit.
ii. (Optional) The Folder field is automatically populated with the folder that has focusin the Content Explorer. If you want to place the file into a folder that you previously
created in the Content Explorer, in the Folder field click and select the sub-folder. Otherwise, keep the default location.
iii. In the File Name field, type a new name for the topic.
Note: Spacesare allowed in the file name. However, if you arepublishing output to a UNIX system, avoiding spaces in the filename is recommended. You can use underscores in place ofspaces.
iv. If you want the heading for the topic to use the same text that you provide for the filename, leave the 1st Heading field blank. Otherwise, enter the text that you want touse for the heading in the topic.
v. In the Title field, you can give the topic a title for the file. This doesnot refer to thevisual title (or heading) at the top of the topic. Rather, it refers to the properties titlefor the topic.
If you leave this field blank, the text from the "1st Heading" field will automatically beused for the title.
vi. If you want the heading for the topic to use the default <h1> style, leave theStylefield blank. Otherwise, select a style to apply to the heading in the topic.
vii. In theStylesheet field, select a stylesheet to associate with the new topic. If you donot have a stylesheet in your project, this field remainsblank.
e. ClickAdd. The topic is added to the Content Explorer and opens in its own page in the XMLEditor, and it is linked to a new entry (with the same name) in the TOC.
f. Now simply click inside the topic page and start typing text or adding anyother elements(e.g., tables, images, hyperlinks, multimedia) appropriate for the topic.
It is also likely that you will want to apply formatting styles to the topic at this point.
Also, youmaywant to adjust the placement of the TOC entry in the TOC Editor.
Tables of Contents Guide21
Click the tab for the TOC to return to the TOC Editor. If you want to adjust the position of the
topic entry in the TOC, select it and then use the arrow buttons in the local toolbar ( , ,, ). You can also drag and drop the topic entry to the location you want in the TOC.
TO CREATE A NEW ENTRY
a. Select the location in the TOC where you want to add the new entry. For example, if youselect an entry that alreadyexists in the TOC, your new topicwill be placed directly after thatexisting entry.
b. In the local toolbar of the TOC Editor, click . An entry called "New entry" is added to theTOC.
c. Click once on the selected new entry and pressF2 on your keyboard. The text for the entryis now highlighted.
d. Type a new name for the entry (just as you want it to appear in the TOC output) and pressEnter. The new entry is now ready to be linked to a topic, an external file, another TOC, abrowse sequence, or another Help system.
Note: Use the arrow buttons tomove the entry to the left, right, up, ordown asneeded.
TO CREATE A NEW BOOK
a. Select the location in the TOC where you want to add the new book.
b. In the local toolbar of the TOC Editor, click or (if you want the book to be placed at thefar left side). An entry called "New book" is added to the TOC. Also, a new entry is addedunder the bookbecause a bookmust contain at least one entry in order to be seen in the out-put.
c. Click once on the selected new bookentry and pressF2 on your keyboard. The text for theentry is now highlighted.
d. Type a new name for the book (just as you want it to appear in the TOC output) and pressEnter. You can leave the bookas it is, or you can link it to a topic, an external file, anotherTOC, a browse sequence, or another Help system. You can also rename the entry con-tained under the bookand link it to something.
.
MADCAP FLARE
22 Tables of Contents Guide
CHAPTER 4 Creating a Table of Contents
TO LINK AN ENTRY OR BOOK TO AN EXISTING TOPIC
a. Select the TOC entry or book.
b. In the local toolbar of the TOC Editor, click . The Properties dialog opens.
c. ClickSelect Topic. The Link to Topic dialog opens, displaying all the topics in your project.
d. Select the topic to which you want to link the entry and clickOpen.
e. In the Properties dialog, clickOK. The entry is now linked to the topic.
TO LINK AN ENTRY OR BOOK TO AN EXTERNAL FILE
a. Select the TOC entry or book.
b. In the local toolbar of the TOC Editor, click . The Properties dialog opens.
c. In the Link field, type the path to the external file (e.g., http://www.acme.com).
d. ClickOK. The entry is now linked to the external file.
TO LINK AN ENTRY OR BOOK TO ANOTHER TOC
a. Select the TOC entry or book.
b. In the local toolbar of the TOC Editor, click . The Properties dialog opens.
c. ClickSelect TOC. The Link to TOC dialog opens, displaying all the TOCs in your project.
d. Select the TOC to which you want to link the entry and clickOpen.
e. In the Properties dialog, clickOK. The icon in the TOC Editor changes to , indicating thatthe entry is linked to a TOC.
.
Tables of Contents Guide23
TO LINK AN ENTRY OR BOOK TO A BROWSE SEQUENCE
a. Select the TOC entry or book.
b. In the local toolbar of the TOC Editor, click . The Properties dialog opens.
c. ClickSelect Browse Sequence. The Link to Browse Sequence dialog pens, displaying allthe browse sequences in your project.
d. Select the browse sequence to which you want to link the entry and clickOpen.
e. In the Properties dialog, clickOK. The icon in the TOC Editor changes to , indicating thatthe entry is linked to a browse sequence.
TO LINK AN ENTRY OR BOOK TO ANOTHER FLARE PROJECT AND TARGET
a. Select the TOC entry or book.
b. In the local toolbar of the TOC Editor, click . The Properties dialog opens.
c. ClickSelect Flare Project and Target. The Link to Flare Project and Target dialog opens.
d. Do one of the following.
ClickBrowse for Project. Then clickProject File and find/select a Flare project towhich you want to link.
OR
ClickSelect Recent Project. Then select a recently opened Flare project from thelist on the right.
e. From theSelect Target field, choose a specific target in the Flare project.
f. ClickOK.
g. In the Properties dialog, clickOK.
.
MADCAP FLARE
24 Tables of Contents Guide
CHAPTER 4 Creating a Table of Contents
TO LINK AN ENTRY OR BOOK TO AN HTML HELP SYSTEM (CHM FILE)
a. Select the TOC entry or book.
b. In the local toolbar of the TOC Editor, click . The Properties dialog opens.
c. ClickSelect HTML Help. The Link to HTMLHelp dialog opens.
d. Do one of the following.
SelectProject Files and then use the area below to navigate to the file that youwant to link to and select it. Byusing the buttons in the local toolbar, you can view allfiles in a list, view files in their folder structure, and use other options.
Showsor hides the folders that the files are stored in.
Showsor hides the files. If you click this button when the Show Folders
button is selected, the area splits into two halves. The folder is shownon the left side, and the files and subfolderswithin it are shown on theright.
Select Import Existing. In the dialog that opens, find and double-click the CHMfile. Then from the drop-down—which displays "(root folder)" by default, you canselect a specific content folder in your project to place the CHM file.
e. After the CHM file is selected, in the Topic field click . In the dialog that opens, find anddouble-click the topic that you want to link to.
f. When you are finished, clickOK in the Link to HTMLHelp dialog.
g. In the Properties dialog, clickOK.
.
Tables of Contents Guide25
TO LINK AN ENTRY OR BOOK TO AN EXTERNAL HELP SYSTEM (FLARE DOTNETHELP OUTPUT FILE, FLARE WEBHELP OUTPUT FILE)
a. Select the TOC entry or book.
b. In the local toolbar of the TOC Editor, click . The Properties dialog opens.
c. ClickEnter External Help System. The Link to Help System dialog opens.
d. Do one of the following.
Enter the name of the Help system output file to which you want to link.
OR
ClickBrowse. Then find and select the Help system output file to which you want tolink.
Note: If you enter a full, valid path to a Help system output file, that file iscopied to your Flare project output folder when this project is compiled. Ifyou just enter a name of the Help system output file, you will need to pub-lish that output to the same folder as the output for the current project.
Note: For merging Flare DotNet Help andWebHelp output files—Youshould publish the subsystems into the "Subsystems" folder in the outputfolder for themaster project. For example, if themaster project is pub-lished to C:\TestFolder\Master\Master.mchelp, subsystemsshould bepublished into the folder C:\TestFolder\Master\Subsystems (e.g.,C:\TestFolder-\Master\Subsystems\AnotherHelpSystem\AnotherHelpSystem.mchelp).
e. ClickOK.
f. In the Properties dialog, clickOK. For more information see "Merging Projects" on page 60.
.
MADCAP FLARE
26 Tables of Contents Guide
CHAPTER 4 Creating a Table of Contents
TO LINK AN ENTRY OR BOOK TO A MIMIC MOVIE
a. Select the TOC entry or book.
b. In the local toolbar of the TOC Editor, click . The Properties dialog opens.
c. Select theGeneral tab.
d. ClickMimic Movie or Movie Collection. TheOpen dialog opens.
e. Find and select an individualMimicmovie or amovie collection to which you want to link theentry. You can select anyof the following typesof files:
MIMOV This is an individualMimicmovie file (whether part of a collection or stan-dalone).When you want to work on an individualmovie, you open this file.
MIPRJ This is themainMimic collection file, which contains one or moremovie(MIMOV) files. It is not required that you create a collection in Mimic; it is simply anoption that you can use if you want to create amovie collection, asopposed to astandalonemovie. Neither theMIPRJnor theMIMOV files are finalizedmovies.Theyaremerely the files that are used to generate the finalizedmovies.When youwant to work on amovie collection, you open theMIPRJ file.
MCMOVIE This is an output file that is created when you generate amovie(whether themovie is part of a collection or standalone). AMimic collection can con-tain severalmovies.When you generate the finalizedmovies in Mimic, anMCMOVIE file is created for eachmovie in the collection (e.g., myfirst-movie.mcmovie, mysecondmovie.mcmovie). The output plays in theMadCapMovie Viewer.
MCMV This is an optional output file that lets you view themovie(s) in theMadCapMovie Viewer, rather than in a browser window.
MCMOVIESYS This is an output file that is created when you generate amovie col-lection. The file is named after your collection (e.g., mycollection.mcmoviesys) andcan be used asan entry point to view themovie collection. The output plays in theMadCapMovie Viewer.
f. ClickOpen.
.
Tables of Contents Guide27
g. (Optional) You can click in the drop-down field to the right and specify an output format.
(default) Themost appropriatemovie format is used, based on the Flare outputtype that you generate. If you build a DotNet Help target, themovie uses theMimicMovie Format (MMF). If you build aMicrosoft HTMLHelp,WebHelp, HTML5, orWebHelp Plus target, themovie uses the HTML5movie format. If you build aWebHelp AIR target, themovie uses the Adobe Flash format. If you want to over-ride these settings, select one of the specificmovie typesbelow.
MadCap Movie Player Themovie is generated inMMF and displays in theMadCapMovie Viewer or MadCapHelp Viewer.
Adobe Flash Themovie is generated in a Flash SWF file.
Microsoft Silverlight Themovie is generated in theMicrosoft Silverlight format.
HTML5 Themovie is generated in the HTML5movie format.
h. In the Properties dialog, clickOK. The entry is now linked to themovie or collection.
5. Click to save your work.
Note: You can also rename a TOC entry and replace it with a variable from a variable set. Todo this, click on the entry and highlight the text. Then replace it with this syntax: mcvari-able:VariableSet.VariableName. That syntaxworks if the variable is the only content in theentry. If you want the entry to have text plus a variable, you would instead use this syntax:
. For example, if your variable set is called "MyVari-ables" and you want to use a variable called "CompanyName," you would enter this as thename of the TOC entry: mcvariable:MyVariables.CompanyName. But if you want the entry todisplay as "Contact MyCompany" (where "Contact" is simply text you addmanually and "MyCompany" is the variable definition), you would enter this as the name of the TOC entry:Contact . Please note that if you insert variablesyntax, the variable text maynot always show up in search results. Of course, if you also insertthe variable into the header in the actual topic, search resultswill find it. Another way to ensurethat search finds the variable text is to enter the following syntaxas the topic title in the Prop-
erties dialog: (e.g.,).
MADCAP FLARE
28 Tables of Contents Guide
CHAPTER 4 Creating a Table of Contents
Note: You can add evenmore TOCs to your project, building them in conjunction with the"master" TOC. Thismight be a good option if you have an especially large project or if you areworking with other authors on the same project.
Note: When you drag a topic from the Content Explorer to a TOC, the default text shown forthat TOC label dependson whether the topic in question hasa title or heading. The title set inthe Properties dialog has the highest level of precedence. If there is no topic title specified inthe Properties dialog, Flare uses text associated with <h1> through <h6>heading styles. Ifthere is no topic title or headings in a topic, Flare uses the topic file name.
Tables of Contents Guide29

MADCAP FLARE
30 Tables of Contents Guide

Tables of Contents Guide31
CHAPTER5 Autogenerating a Table of Contents
In manycases, Flare provides you with an initial TOC, which you further "build" (or create) using the TOCEditor. You can easily create a TOCmanually, adding books, aswell as links to topics,other TOCs, and externalfiles, in any kind of structure you want. Another option is to autogenerate a TOC. You can do this bygeneratingparts of a TOC based on the heading levels in your topics (<h1> through <h6>).When you autogenerate aTOC, you will use some of the same steps that you used when creating a TOCmanually; you still add topicentries to a TOCmanually. The difference is that autogenerating lets you create sub-entries in a TOC for thesub-headings in your topics.
Whichmethod should you choose (amanual TOC or an autogenerated TOC)? There are advantages to bothmethods. Plus, you can use bothmethods if you want. You can start by autogenerating a TOC and then changeit or supplement it manually.
The advantage of creating a TOCmanually is that you havemore flexibility in the way to structure a TOC. In addi-tion, you can includemore than just topics and bookswhen creating a TOCmanually. For example, you caninclude links to other TOCs.
The advantage of autogenerating a TOC is that it is faster.
.

HOW TO AUTOGENERATE A TABLE OF CONTENTS
1. Make sure your topics include headingswith the <h1>, <h2>, <h3>, <h4>, <h5>, or <h6> styles.
2. Create at least part of a TOC manually.
3. Double-click a TOC entry for which you want to auto-create sub-entries. The Properties dialog opens.
4. Select theAutogenerate tab.
5. Select the checkboxCompute sub-entries from linked file.
6. In theAction field, select either Insert Computed Entries or Replace with Computed Entries."Insert Computed Entries" will add the TOC sub-entries below the one you selected. "Replace withComputed Entries" will remove the TOC entry that you selected, replacing it with the sub-entries basedon the <h1> through <h6> styles in the topic.
7. In theDepth field, click the down arrow and select a number from the list to specify howmany levels ofheadings you want to include in the autogeneration.
E X A M P L E
If you select 3, Flare will create TOC sub-entries for all <h1>, <h2>, and <h3>headings in thetopic.
8. ClickOK.
9. Click to save your work.
MADCAP FLARE
32 Tables of Contents Guide
Tables of Contents Guide33
CHAPTER6 Editing TOCEntries
After you create a table of contents, you can edit the individual entries in the following ways.
Autogenerate In manycases, Flare provides you with an initial TOC, which you further "build" (or cre-ate) using the TOC Editor. You can easily create a TOCmanually, adding books, aswell as links to files,in any kind of structure you want. Another option is to autogenerate a TOC. See "Autogenerating aTable of Contents" on page 31.
Note: This feature is for online output typesonly (DotNet Help, Microsoft HTMLHelp,WebHelp,WebHelp 2.0 (HTML5),WebHelp AIR,WebHelpMobile,WebHelpPlus). It is not intended for print-based outputs (Adobe FrameMaker, Adobe PDF,MicrosoftWord, Microsoft XPS, XHTML).
Automerge You can determine where other Flare project outputs aremerged relative to your "mas-ter" project's TOC if you are generatingWebHelp Plusor HTML5 server-based output and you are pub-lishing the files to aWeb server runningMicrosoft IIS. For more information see the online Help.
Autonumbers - flow You can specify the flow for autonumbers if the output is to be split into multiplesectionsor chapters. See "Autonumbering Flow for Output" on page 101.
Browser frame You can specify the kind of browser frame that a linked file should open when a userclicks the TOC entry in the output. See "Specifying the Browser Frame for a TOC Entry" on page 72.
Chapters - breaks You can specify that the TOC entry should result in a new chapter when buildingprint-based output. See "Specifying Chapter and Page Layout Breaks" on page 83.
Condition tags You can associate condition tagswith a particular TOC entry so that it appears insome outputs but not in other outputs. For more information see the online Help.
Icon for HTML Help You can select an icon to use for a particular TOC entry in HTMLHelpoutput. See "Selecting an Icon for a TOC Entry in HTMLHelp Output" on page 64.
Label You can change the label text for a TOC entry. See "Changing the Label for TOC Entries" onpage 46.
Link to browse sequence You can link a TOC entry to a browse sequence. See "Linking a TOCEntry to a Browse Sequence" on page 54.
Link to CHM file You can link a TOC entry to an HTMLHelp (CHM) file that you have alreadybrought into your project (perhaps via the external resources feature), or you can select a CHM file loc-ated elsewhere, in which case a copyof it is added to your project. That CHM file will then bemergedwith the current project when you build the output. For more information see the online Help.
Link to external Help system You can link a TOC entry to the output file from another Help project.This option is useful if you are sharing a Help systemwith another author and need to retrieve it from aremote location. You can select Flare output files (e.g., DotNet Help andWebHelp). That output file willthen become linked to the TOC entry andmerged with the current project when you build the output.For more information see the online Help.
Link to Flare project and target You can link a TOC entry to a target in a Flare project. (Make sureyou select a target of the same output type as the current project.) That project and target will thenbecome linked to the TOC entry andmerged with the current project when you build the output. Formore information see the online Help.
Link to Mimic movie You can link a TOC entry to aMadCapMimicmovie or project. See "MovieLinks in TOCs" on page 52.
Link to TOC You can link a TOC entry to another TOC. See "Linking Tablesof Contents" on page 56.
Link to topic If you drag topics from the Content Explorer to the TOC Editor, the entry that is createdis automatically linked to that topic. If you want to change the link, or if you have created an entry that isnot yet linked to a topic, you can easily do somanually. See "Linking a TOC Entry to a Topic" on page55.
Mark as new You can specifywhether a TOC entry should be displayed as "new" in the output. Thisfeature is not supported in DotNet Help. See "Marking a TOC Entry asNew" on page 58.
Page layouts You can specify a particular page layout that should be used in the output, starting atthe point of the selected entry. See "Specifying Chapter and Page Layout Breaks" on page 83.
Page numbers You can specify how page numbering should work in the output, if you have insertedpage numbers into the page layout or master page. This includes the ability to specify the starting num-ber, whether the numbers should continue from the previouspages, and the kind of format to use (e.g.,decimal, Roman, alpha). For more information see the online Help.
MADCAP FLARE
34 Tables of Contents Guide
CHAPTER 6 Editing TOC Entries
Sections - breaks You can specify that the TOC entry should result in a new section when buildingprint-based output (and specifymaster pages). See "Specifying Section BreaksandMaster Pages" onpage 94.
Skin You can add skins to your project to help create a lookand feel for online output that you gen-erate. After you create a TOC, you can associate a TOC entrywith a particular skin.
Style class For certain elements of the online output window (e.g., navigation pane, TOC or browsesequence entries, index keywords) you can determine skin style settings. If you are generating one oftheWebHelp output types, you can use the TocEntry style in the Styles tab of the Skin Editor to changethe lookof individual entries in your TOC. You can also select the TocEntry style in the Skin Editor anduse the Add Classbutton in its local toolbar to create classesof that style. If you do that, you can select aparticular class for a TOC entry so that you can give it the look you want. For more information see theonline Help.
Title You can automatically set the name of the TOC entry as the title for the topic in the output. Thisoverrides the title that youmayhave provided for the topic in the Properties dialog for that topic. See"Additional TOC Tasks" on page 43.
Note: If you have included a generated TOC in print-based output and want to change itslook, see "Using Styles to Determine the Lookof a Print TOC" on page 124.
Tables of Contents Guide35

MADCAP FLARE
36 Tables of Contents Guide
Tables of Contents Guide37
CHAPTER7 Enabling Tables of Contents in Skins
After you create a TOCmanually or automatically, you need to enable TOCs in the skin that you intend to use foryour target.
HOW TO ENABLE A TOC IN A SKIN
1. Open the skin.
2. On theGeneral tab, click the TOC checkbox so that it contains a checkmark.
3. Click to save your work.

MADCAP FLARE
38 Tables of Contents Guide

Tables of Contents Guide39
CHAPTER8 Associating TOCs
In most situations, you will have one TOC that you use for a particular output (target). In that case, you simplyassociate the appropriate TOC with the target. If you havemultiple TOCs that you want to include in the sameproject or output target, the TOC that you associate with the project or target servesas the "master" TOC. Inyour master TOC, you have the option of creating links to the other TOC that you want to include in the output. Ifyou do not select a TOC, Flare will use the first one in the project (if there ismore than one). If you have specifiedamaster TOC at the project level and another at a target level, the TOC at the target will take precedence.
Associating a Master Table of Contents with a ProjectThe following steps show you how to associate amaster TOC with a project.
HOW TO ASSOCIATE A MASTER TOC WITH A PROJECT
1. Do one of the following, depending on the part of the user interface you are using.
Ribbon Select theProject ribbon. In theProperties section selectProject Properties.
Menu SelectProject>Project Properties.
Project toolbarClick .
To open the Project toolbar from themenu view, selectView>Toolbars>Project.
The Project Properties dialog opens.
2. Select theDefaults tab.
3. Click in theMaster TOC field, and from the drop-down, select the TOC.
4. ClickOK.
5. Select File>Save>Save All (if using ribbons), select File>Save All (if usingmenus), or pressCTRL+SHIFT+S.
MADCAP FLARE
40 Tables of Contents Guide
CHAPTER 8 Associating TOCs
Associating a Master Table of Contents with a TargetThe following steps show you how to associate amaster TOC with a target.
HOW TO ASSOCIATE A MASTER TOC WITH A TARGET
1. Open the target from the Project Organizer.
2. On theGeneral tab in the Target Editor, click the drop-down arrow in theMaster TOC field, and selectthe TOC that you want to associate with the target.
3. Click to save your work.
Tables of Contents Guide41

MADCAP FLARE
42 Tables of Contents Guide
Tables of Contents Guide43
CHAPTER9 Additional TOCTasks
In addition to themany featuresalready covered in this guide, there aremanymore tasks related to tablesofcontents (TOCs) that you can perform in Flare.
This chapter discusses the following.
Automatically Set the Title for a TOC Entry 45
Changing the Label for TOC Entries 46
Creating a Binary TOC 47
Creating New Topics from the TOC Editor 48
Deleting Tables of Contents 50
Finding and Fixing Issues in a Table of Contents 50
Importing Tables of Contents 51
Movie Links in TOCs 52
Linking a TOC Entry to a Browse Sequence 54
Linking a TOC Entry to a Topic 55
Linking Tables of Contents 56
Linking to CHM Files 58
Marking a TOC Entry as New 58
Merging Projects 60
Renaming Tables of Contents 61
Selecting a Skin for a TOC Entry 62
Selecting a Style Class for a TOC Entry 63
Selecting an Icon for a TOC Entry in HTML Help Output 64
Specifying Style Settings for TOC Entries 65
Specifying the Automerge Location in a TOC for WebHelp Plus 70
Specifying the Browser Frame for a TOC Entry 72
Synchronizing the TOC with Open Topics 73
Using Styles to Determine the Look of an Online Mini-TOC 74
Viewing Topics Not in a TOC 76
MADCAP FLARE
44 Tables of Contents Guide
CHAPTER 9 Additional TOC Tasks
Automatically Set the Title for a TOC EntryYou can automatically set the name of the TOC entry as the title for the topic in the output. This overrides the titlethat youmayhave provided for the topic in the Properties dialog for that topic. The display title is used in the fol-lowing situations.
Help control links The title displaysasa selection when users clickHelp control links (i.e., related top-ics links, concept or "see also" links, and index keyword links) that are associated with that topic.
Window title bar If the topic is opened in a new window or outside of the project, the title is shown inthe title bar of that window.
HOW TO AUTOMATICALLY SET THE TITLE FOR A TOC ENTRY
1. Open the table of contents.
2. Select a TOC entry.
3. In the local toolbar, click . The Properties dialog opens.
4. Select theAdvanced tab.
5. In the field labeledAuto-set title of linked file, selectYes.
6. In the Properties dialog, clickOK.
7. Click to save your work.
Tables of Contents Guide45
Changing the Label for TOC EntriesYou can change the label text for a TOC entry.
HOW TO CHANGE THE LABEL FOR A TOC ENTRY
1. Open the table of contents.
2. Select a TOC entry.
3. In the local toolbar, click . The Properties dialog opens.
4. Select theGeneral tab.
5. In the Label field, type the text that you want to be displayed for the entry.
6. In the Properties dialog, clickOK.
7. Click to save your work.
Note: For print-based output the TOC labels are based on actual headingswithin topics. Thereason for this is that the TOC file in a Flare project is used asa TOC in online output, but itfunctionsmore asan outline for print-based output.
MADCAP FLARE
46 Tables of Contents Guide
CHAPTER 9 Additional TOC Tasks
Creating a Binary TOC
This feature is supported inMicrosoft HTMLHelp output.
You can create a binary table of contents (TOC) for your project. BinaryTOCsare intended for very large com-piledMicrosoft HTMLHelp projects, reducing the amount of time it takes to load a TOC.
If you use this feature, please keep inmind that binary content files:
Do not workwith external TOC files
Only support TOC bookand entry icons (not custom icons)
Do not support TOC style options such asborders and plus/minus squares
Do not support custom fonts
HOW TO CREATE A BINARY TOC
1. Create a TOC.
2. Open a Standard skin.
3. Select theHTML Help Setup tab.
4. Click the TOC Options button.
5. In the HTMLHelp TOCOptionsdialog, selectBinary.
6. ClickOK.
7. Click to save your work.
Tables of Contents Guide47
Creating New Topics from the TOC EditorAfter you start a project, you can create new topics in several different ways. This topic focuseson amethod thatlets you create topics at the same time that you create a table of contents (TOC). Thismethod is especially use-ful at the beginning of a project when you are first determining the structure of your output.
HOW TO CREATE A NEW TOPIC FROM THE TOC EDITOR
1. Open your TOC.
2. Select the location in the TOC where you want to add the new topic.
E X A M P L E
If you select a topic entry that alreadyexists in the TOC, your new topicwill be placed directlyafter that existing topic.
3. In the local toolbar of the TOC Editor, click .
4. Complete the options in the Add File dialog.
a. In theSource area select one of the following.
New from template This lets you choose either a factory template file or one of yourown customized template files asa starting point. The new file will take on all of the set-tings contained in the template. If you want to use a factory template provided byFlare, expand the Factory Templates folder and click on a template file. If you wantto use your own customized template file, expand the appropriate folder and click on afile. For more information about templates, see the online Help.
Note: In some dialogsand wizards you can click theManage Tem-
plates button if you want to open the TemplateManager. Thislets youmanage anyof your template files (e.g., add new tem-plates, enter descriptions for templates). For more information seethe online Help.
New from existing This lets you choose an existing file of the same type—thatyou've already created and stored somewhere—asa starting point for your new file.Aswith template files, your new file will take on all of the settings contained in the file
MADCAP FLARE
48 Tables of Contents Guide
CHAPTER 9 Additional TOC Tasks
you select. To use this option, click the browse button , use theOpen File dialogto find a file, and double-click it.
b. (Optional) If you want to place the file into a subfolder that you previously created in the Project
Organizer, in the Folder field click and select the subfolder. Otherwise, keep the defaultlocation.
c. In the File Name field, type a new name for the topic.
Note: Spacesare allowed in the file name. However, if you are publishingoutput to a UNIX system, avoiding spaces in the file name is recommended.You can use underscores in place of spaces.
d. If you want the heading for the topic to use the same text that you provide for the file name,leave the 1st Heading field blank. Otherwise, enter the text that you want to use for the head-ing in the topic.
e. In the Title field, you can give the topic a title for the file. This doesnot refer to the visual title (orheading) at the top of the topic. Rather, it refers to the properties title for the topic.
If you leave this field blank, the text from the "1st Heading" field will automatically be used forthe title.
f. If you want the heading for the topic to use the default <h1> style, leave theStyle field blank.Otherwise, select a style to apply to the heading in the topic.
g. In theStylesheet field, select a stylesheet to associate with the new topic. If you do not have astylesheet in your project, this field remainsblank.
5. ClickAdd. The topic is added to the Content Explorer and opens in its own page in the XMLEditor, andit is linked to a new entry (with the same name) in the TOC.
6. Now simply click inside the topic page and start typing text or adding anyother elements (e.g., tables,images, hyperlinks, multimedia) appropriate for the topic.
It is also likely that you will want to apply formatting styles to the topic at this point.
Also, youmaywant to adjust the placement of the TOC entry in the TOC Editor. Click the tab for theTOC to return to the TOC Editor. If you want to adjust the position of the topic entry in the TOC, select it
and then use the arrow buttons in the local toolbar ( , , , ). You can also drag and drop thetopic entry to the location you want in the TOC.
Tables of Contents Guide49
Deleting Tables of ContentsYou can delete a table of contents (TOC) in the Project Organizer.
HOW TO DELETE A TOC
1. Make sure the Project Organizer is open.
2. Double-click the TOCs folder. The TOC(s) in your project are displayed.
3. Select the TOC you want to delete.
4. On your keyboard pressDelete. Amessage asks if you want to send the file to the recycle bin.
5. ClickYes.
Finding and Fixing Issues in a Table of ContentsYou can use buttons in the local toolbar of a table of contents (TOC) to navigate to the next warning and pre-viouswarning. This helps you to find and then fix issues (e.g., broken links) in the TOC.
HOW TO FIND AND FIX ISSUES IN A TOC
1. Open the TOC. If the TOC containsunlinked itemsor broken links, it will be indicated in the local toolbar.
2. Click to find and highlight the next issue in the TOC. Tomove to the previous issue, you can click .
3. After you find an issue, you can take action, such as removing the item or clicking to open the prop-ertieswhere you can link the item to a file.
What if you do not want it to find the unlinked books, but rather the broken itemsonly? In that case, simply click
theShow Unlinked Books button . This hides the unlinked book icons. Therefore, when you click the FindPreviousWarning or Find NextWarning button, it will skip over the unlinked booksandmove to the previousornext broken item.
MADCAP FLARE
50 Tables of Contents Guide

CHAPTER 9 Additional TOC Tasks
Importing Tables of ContentsNot only can you add a new table of contents (TOC), but you can also import an existing TOC (FLTOC file).
HOW TO IMPORT A TOC
1. Do one of the following, depending on the part of the user interface you are using.
Ribbon Select theProject ribbon. In theContent section selectNew>Table of Contents.
Menu SelectProject>>Add Table of Contents.
Right-click In the Project Organizer, right-click on the TOCs folder and from the contextmenu selectAdd Table of Contents.
The Add File dialog opens.
2. SelectNew from existing and click .
3. Find and select the FLTOC file that you want to import.
4. ClickOpen. The Source File field now contains the path to the file that you are importing. Also, thename of the file is displayed in the File Name field.
5. If you want to give the TOC a different name than that for the imported file, click in the File name fieldand replace the text.
6. ClickAdd. The TOC is added and opens in the TOC Editor.
Tables of Contents Guide51
Movie Links in TOCsIf you have usedMimic to produce amovie, you can use this feature to create a link in a table of contents entry tothemovie's output.
HOW TO INSERT A MOVIE LINK INTO A TOC
1. Open the TOC where you want to insert themovie link.
2. In the TOC Editor, double-click the TOC entry that you want to link to themovie. The Properties dialogopens.
3. Select theGeneral tab.
4. SelectMimic Movie or Movie Collection as. TheOpen dialog opens.
5. Find and select an individualMimicmovie or amovie collection to which you want to link the entry. Youcan select anyof the following typesof files.
MIMOV This is an individualMimicmovie file (whether part of a collection or standalone).When you want to work on an individualmovie, you open this file.
MIPRJ This is themainMimic collection file, which contains one or moremovie (MIMOV) files.It is not required that you create a collection in Mimic; it is simply an option that you can use ifyou want to create amovie collection, asopposed to a standalonemovie. Neither theMIPRJnor theMIMOV files are finalizedmovies. Theyaremerely the files that are used to generatethe finalizedmovies.When you want to work on amovie collection, you open theMIPRJ file.
MCMOVIE This is an output file that is created when you generate amovie (whether themovie is part of a collection or standalone). AMimic collection can contain severalmovies.When you generate the finalizedmovies in Mimic, anMCMOVIE file is created for eachmoviein the collection (e.g., myfirstmovie.mcmovie, mysecondmovie.mcmovie). The output plays intheMadCapMovie Viewer.
MCMV This is an optional output file that lets you view themovie(s) in theMadCapMovieViewer, rather than in a browser window.
MCMOVIESYS This is an output file that is created when you generate amovie collection. Thefile is named after your collection (e.g., mycollection.mcmoviesys) and can be used asan entrypoint to view themovie collection. The output plays in theMadCapMovie Viewer.
6. ClickOpen.
.
MADCAP FLARE
52 Tables of Contents Guide
CHAPTER 9 Additional TOC Tasks
7. (Optional) You can click in the drop-down field to the right and specify an output format.
(default) Themost appropriatemovie format is used, based on the Flare output type thatyou generate. If you build a DotNet Help target, themovie uses theMimicMovie Format(MMF). If you build aMicrosoft HTMLHelp,WebHelp, HTML5, or WebHelp Plus target, themovie uses the HTML5movie format. If you build aWebHelp AIR target, themovie uses theAdobe Flash format. If you want to override these settings, select one of the specificmovietypesbelow.
MadCap Movie Player Themovie is generated inMMF and displays in theMadCapMovieViewer or MadCapHelp Viewer.
Adobe Flash Themovie is generated in a Flash SWF file.
Microsoft Silverlight Themovie is generated in theMicrosoft Silverlight format.
HTML5 Themovie is generated in the HTML5movie format.
8. ClickOK in the Properties dialog. Themovie link is added to the TOC entry.
9. Click to save your work.
Note: You do not need to add theMimicmovie files to your Flare project. When you generatethe target(s) in Flare, themovie output file(s) will automatically be copied to the target outputfile or folder.
Tables of Contents Guide53
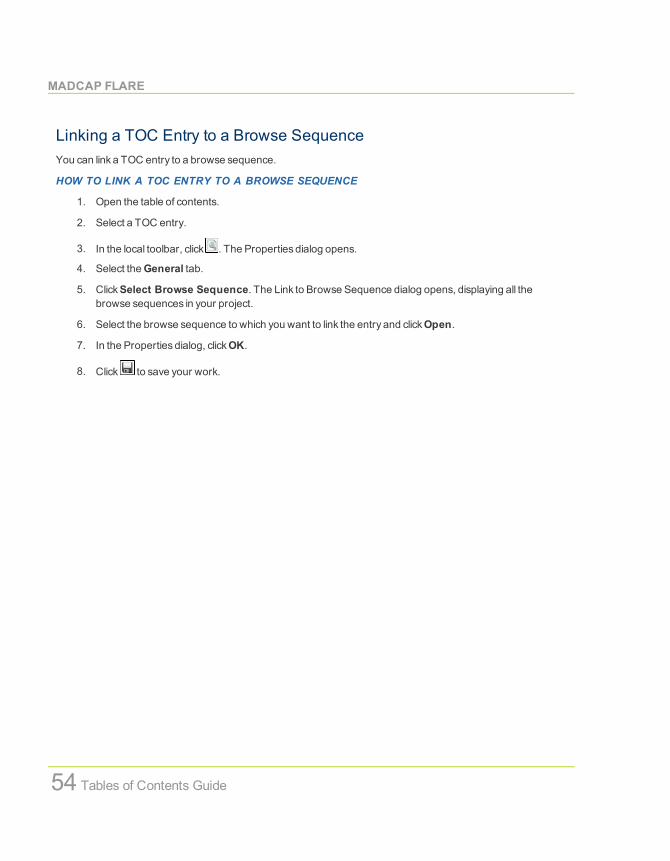
Linking a TOC Entry to a Browse SequenceYou can link a TOC entry to a browse sequence.
HOW TO LINK A TOC ENTRY TO A BROWSE SEQUENCE
1. Open the table of contents.
2. Select a TOC entry.
3. In the local toolbar, click . The Properties dialog opens.
4. Select theGeneral tab.
5. ClickSelect Browse Sequence. The Link to Browse Sequence dialog opens, displaying all thebrowse sequences in your project.
6. Select the browse sequence to which you want to link the entry and clickOpen.
7. In the Properties dialog, clickOK.
8. Click to save your work.
MADCAP FLARE
54 Tables of Contents Guide
CHAPTER 9 Additional TOC Tasks
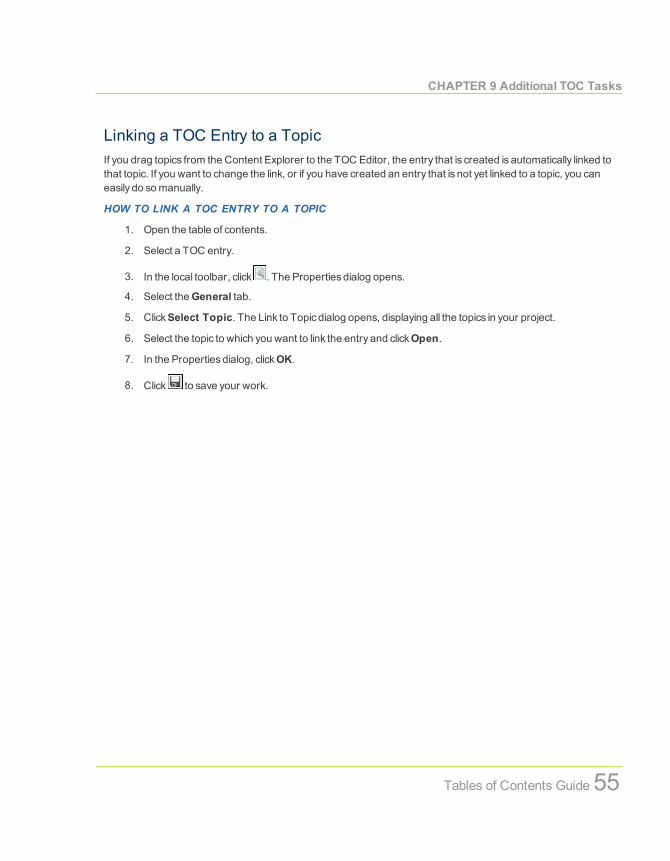
Linking a TOC Entry to a TopicIf you drag topics from the Content Explorer to the TOC Editor, the entry that is created is automatically linked tothat topic. If you want to change the link, or if you have created an entry that is not yet linked to a topic, you caneasily do somanually.
HOW TO LINK A TOC ENTRY TO A TOPIC
1. Open the table of contents.
2. Select a TOC entry.
3. In the local toolbar, click . The Properties dialog opens.
4. Select theGeneral tab.
5. ClickSelect Topic. The Link to Topic dialog opens, displaying all the topics in your project.
6. Select the topic to which you want to link the entry and clickOpen.
7. In the Properties dialog, clickOK.
8. Click to save your work.
Tables of Contents Guide55
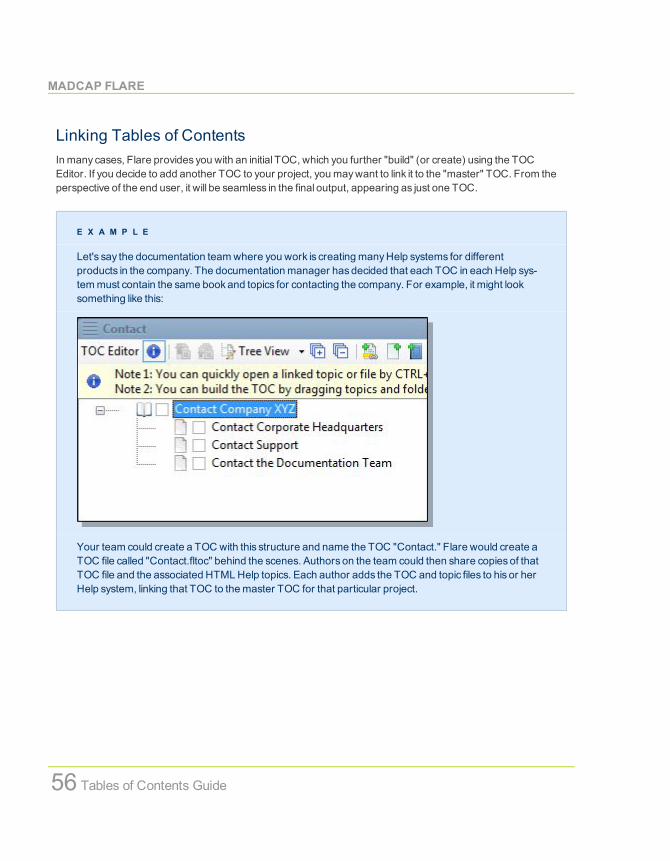
Linking Tables of ContentsIn manycases, Flare provides you with an initial TOC, which you further "build" (or create) using the TOCEditor. If you decide to add another TOC to your project, youmaywant to link it to the "master" TOC. From theperspective of the end user, it will be seamless in the final output, appearing as just one TOC.
E X A M P L E
Let's say the documentation teamwhere you work is creatingmanyHelp systems for differentproducts in the company. The documentationmanager hasdecided that each TOC in each Help sys-temmust contain the same bookand topics for contacting the company. For example, it might looksomething like this:
Your team could create a TOC with this structure and name the TOC "Contact." Flare would create aTOC file called "Contact.fltoc" behind the scenes. Authors on the team could then share copiesof thatTOC file and the associated HTMLHelp topics. Each author adds the TOC and topic files to his or herHelp system, linking that TOC to themaster TOC for that particular project.
.
MADCAP FLARE
56 Tables of Contents Guide
CHAPTER 9 Additional TOC Tasks
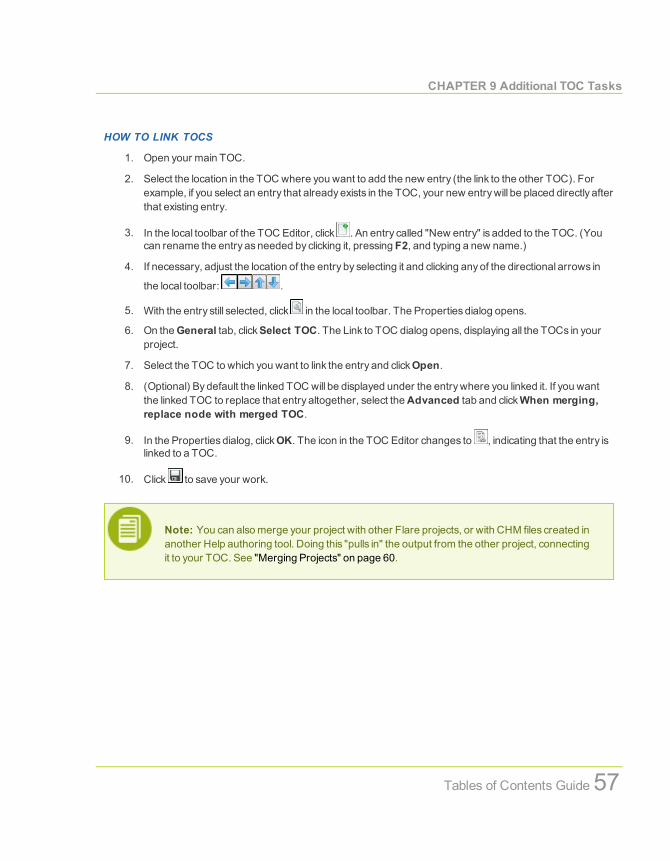
HOW TO LINK TOCS
1. Open your main TOC.
2. Select the location in the TOC where you want to add the new entry (the link to the other TOC). Forexample, if you select an entry that alreadyexists in the TOC, your new entrywill be placed directly afterthat existing entry.
3. In the local toolbar of the TOC Editor, click . An entry called "New entry" is added to the TOC. (Youcan rename the entry asneeded by clicking it, pressing F2, and typing a new name.)
4. If necessary, adjust the location of the entry by selecting it and clicking anyof the directional arrows in
the local toolbar: .
5. With the entry still selected, click in the local toolbar. The Properties dialog opens.
6. On theGeneral tab, clickSelect TOC. The Link to TOC dialog opens, displaying all the TOCs in yourproject.
7. Select the TOC to which you want to link the entry and clickOpen.
8. (Optional) Bydefault the linked TOC will be displayed under the entrywhere you linked it. If you wantthe linked TOC to replace that entry altogether, select theAdvanced tab and clickWhen merging,replace node with merged TOC.
9. In the Properties dialog, clickOK. The icon in the TOC Editor changes to , indicating that the entry islinked to a TOC.
10. Click to save your work.
Note: You can alsomerge your project with other Flare projects, or with CHM files created inanother Help authoring tool. Doing this "pulls in" the output from the other project, connectingit to your TOC. See "Merging Projects" on page 60.
Tables of Contents Guide57
Linking to CHM FilesYou can include a CHM file in the TOC in your project so that it can be opened in your output.
If you do thiswhen generatingMicrosoft HTMLHelp, the linked CHMwill bemerged with the TOC in the project.
If you do thiswhen generating DotNet Help,WebHelp,WebHelp 2.0 (HTML5),WebHelp AIR,WebHelpMobile, or WebHelp Plus, the user will be able to download the CHM.
For more information see the online Help.
Note: Links to CHM files can be configured in two ways. First, links can point to the CHM file ingeneral. Second, they can point to a specific topicwithin the CHM. The first method is sup-ported in all of the online outputsmentioned above. The secondmethod is supported only inMicrosoft HTMLHelp output.
Marking a TOC Entry as New
This feature is supported inMicrosoft HTMLHelp,WebHelp,WebHelp 2.0 (HTML5),WebHelp AIR,WebHelpMobile, andWebHelp Plusoutput.
You can specifywhether a TOC entry should be displayed as "new" in the output.
HOW TO MARK A TOC ENTRY AS NEW
1. Open the table of contents.
2. Select a TOC entry.
3. In the local toolbar, click . The Properties dialog opens.
4. Select theGeneral tab.
5. In theMark as New field, select one of the following.
Default Uses the information that is specified in the "TocEntry" style (which can be set in theSkin Editor).
Yes Marks the selected entry as "new," adding an asterisk to that entry in the output. Selecting"Yes" overrides the settings in the "TocEntry" style.
MADCAP FLARE
58 Tables of Contents Guide
CHAPTER 9 Additional TOC Tasks
No Doesnot mark the selected entry as "new." Selecting "No" overrides the settings in the"TocEntry" style.
6. In the Properties dialog, clickOK.
7. Click to save your work.
Tables of Contents Guide59
Merging Projects
This feature is supported in all online outputs (DotNet Help, Microsoft HTMLHelp,WebHelp,WebHelp2.0 (HTML5),WebHelp AIR,WebHelpMobile, andWebHelp Plus).
In Flare you canmerge projects in manyways.
Merging Flare projects using targets Use thismergingmethod if you have access to all of theFlare project files to bemerged. You canmerge projects together by linking targetswith the same out-put type (e.g., linking DotNet Help to DotNet Help, linkingMicrosoft HTMLHelp toMicrosoft HTMLHelp, linkingWebHelp toWebHelp). This is one of the easiest method to use for merging projects. Formore information see the online Help.
Merging output from Microsoft HTML Help projects Use thismergingmethod if you are devel-opingMicrosoft HTMLHelp (a CHM file) and you want to merge your output with another CHM file.Thismethod is useful, for example, if another author isworking on the externalMicrosoft HTMLHelpproject to which you are linking and you only have access to the other CHM file (not the project files).For more information see the online Help.
Note: You can also link to CHM files from the TOC in DotNet Help and allWebHelpoutputs (WebHelp,WebHelp 2.0 (HTML5),WebHelp AIR,WebHelpMobile, andWebHelp Plus). However, linking to a specific topicwithin the CHM isnot supported inthese outputs.
Merging output from DotNet Help projects Use thismergingmethod if you are developingDotNet Help and you want to merge the output files from your parent project with the DotNet Help out-put files from an external project. Thismethod is useful, for example, if another author isworking on theexternalDotNet Help project to which you are linking and you only have access to the output files (notthe project files). For more information see the online Help.
Merging output from Flare WebHelp projects Use thismergingmethod if you are developing oneof theWebHelp outputs (WebHelp,WebHelp 2.0 (HTML5),WebHelp AIR,WebHelpMobile,WebHelpPlus) and you want to merge the output files from your parent project with theWebHelp output filesfrom an external Flare project. Thismethod is useful, for example, if another author isworking on theexternalWebHelp project to which you are linking and you only have access to the output files (not theproject files). For more information see the online Help.
Merging output at runtime using HTML5 or WebHelp Plus Use thismergingmethod if you aredeveloping HTML5 or WebHelp Plusand you are hosting the output files on aWeb server running
MADCAP FLARE
60 Tables of Contents Guide
CHAPTER 9 Additional TOC Tasks
Microsoft IIS. This is an easyway tomerge the output frommultipleWebHelp Plusor HTML5 server-based Flare targets into one Help system. These targets can be originated from the same Flare projector from different Flare projects. You simply place the output files in the correct location on the server(i.e., within your master project'sAutoMerge folder). Flare then automaticallymerges the output fromall of the targetswhen users access the Help. From the end user's perspective, the results are seam-less, appearing asone large Help system. All of the TOCs, browse sequences, indexes, glossaries, andsearch capabilities for the projects aremerged. For more information see the online Help.
Note: If you are working with HTMLHelp and import a RoboHelp project that hasbeenmerged with other CHM files, the linked CHM files are placed in a special subfolder in the Con-tent Explorer (Resources\CHMSupport).
Note: If you have previouslymerged Flare projectswithWebHelp outputs and then decide togenerateWebHelp Plusoutput from themaster project instead, youmust make sure that thechild projects linked to themaster contain at least oneWebHelp Plus target each. Even if youkeep the link from themaster project to aWebHelp target in the child, the child project mustalso have aWebHelp Plus target.
Note: If youmerge projects, synonym fileswill remain separate in each project. For example,if you create synonyms in Project A but not in project B, only the topics from Project Awill usethe synonymswhen users perform searches in the output.
Renaming Tables of ContentsYou can easily rename your master table of contents (TOC) or anyadditional TOCs that youmayhave added toa project.
HOW TO RENAME A TOC
1. Make sure the Project Organizer is open.
2. Double-click the TOCs folder. The TOC(s) in your project are displayed.
3. Click on the TOC that you want to rename.
4. PressF2 on your keyboard. The TOC name is highlighted.
5. Type a new name for the TOC and pressEnter.
Tables of Contents Guide61
Selecting a Skin for a TOC Entry
This feature is supported in all online outputs (DotNet Help, Microsoft HTMLHelp,WebHelp,WebHelp2.0 (HTML5),WebHelp AIR,WebHelpMobile, andWebHelp Plus).
You can add skins to your project to help create a lookand feel for online output that you generate. After you cre-ate a TOC, you can associate a TOC entrywith a particular skin.
HOW TO SELECT A SKIN FOR A TOC ENTRY
1. Open the table of contents.
2. Select a TOC entry.
3. In the local toolbar, click . The Properties dialog opens.
4. Select theAdvanced tab.
5. In theOpen in Skin field, select a skin from your project.
6. In the Properties dialog, clickOK.
7. Click to save your work.
MADCAP FLARE
62 Tables of Contents Guide
CHAPTER 9 Additional TOC Tasks
Selecting a Style Class for a TOC EntryFor certain elements of the online output window (e.g., navigation pane, TOC or browse sequence entries,index keywords) you can determine skin style settings. If you are generating one of theWebHelp output types,you can use the TocEntry style in the Styles tab of the Skin Editor to change the lookof individual entries in yourTOC. You can also select the TocEntry style in the Skin Editor and use the Add Classbutton in its local toolbar tocreate classesof that style. If you do that, you can select a particular class for a TOC entry so that you can give itthe look you want.
HOW TO SELECT A STYLE FOR A TOC ENTRY
1. Open the table of contents.
2. Select a TOC entry.
3. In the local toolbar, click . The Properties dialog opens.
4. Select theGeneral tab.
5. In theStyle Class field, select a style class if you have created one under "TocEntry" in the Skin Editor.If you want to use the parent TocEntry style, leave the field set to (default).
6. In the Properties dialog, clickOK.
7. Click to save your work.
Tables of Contents Guide63
Selecting an Icon for a TOC Entry in HTML Help OutputYou can select an icon to use for a particular TOC entry in HTMLHelp output.
HOW TO SELECT AN ICON FOR A TOC ENTRY IN HTML HELP OUTPUT
1. Open the table of contents.
2. Select an entry in the TOC. You can hold theSHIFT key to select a range, or you can hold theCTRLkey to select individual items.
3. In the local toolbar, click . The Properties dialog opens.
4. Select theAdvanced tab.
5. In theHTML Help Icon field, select one of the icons from the drop-down.
6. In the Properties dialog, clickOK.
7. Click to save your work.
MADCAP FLARE
64 Tables of Contents Guide
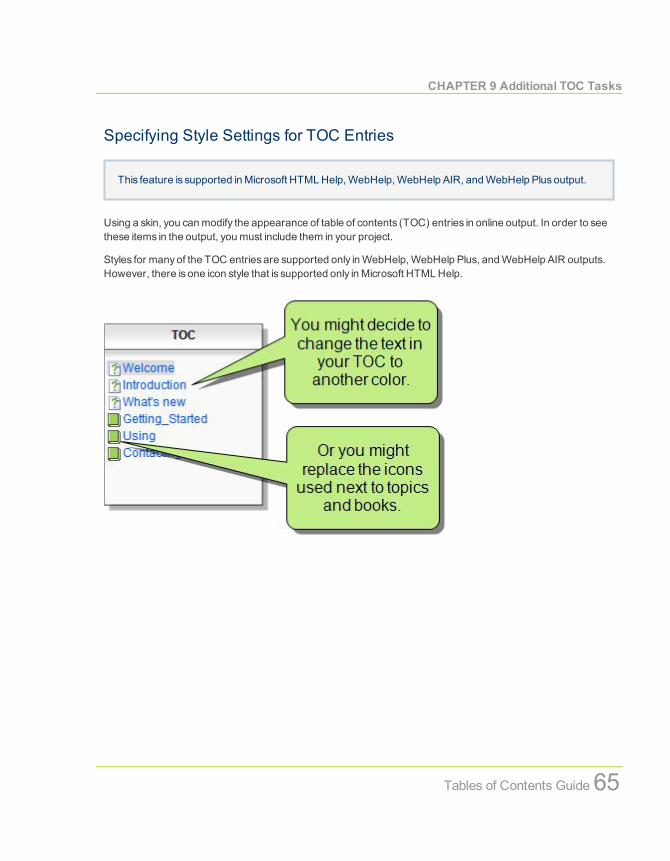
CHAPTER 9 Additional TOC Tasks
Specifying Style Settings for TOC Entries
This feature is supported inMicrosoft HTMLHelp,WebHelp,WebHelp AIR, andWebHelp Plusoutput.
Using a skin, you canmodify the appearance of table of contents (TOC) entries in online output. In order to seethese items in the output, youmust include them in your project.
Styles for manyof the TOC entries are supported only inWebHelp,WebHelp Plus, andWebHelp AIR outputs.However, there is one icon style that is supported only in Microsoft HTMLHelp.
.
Tables of Contents Guide65
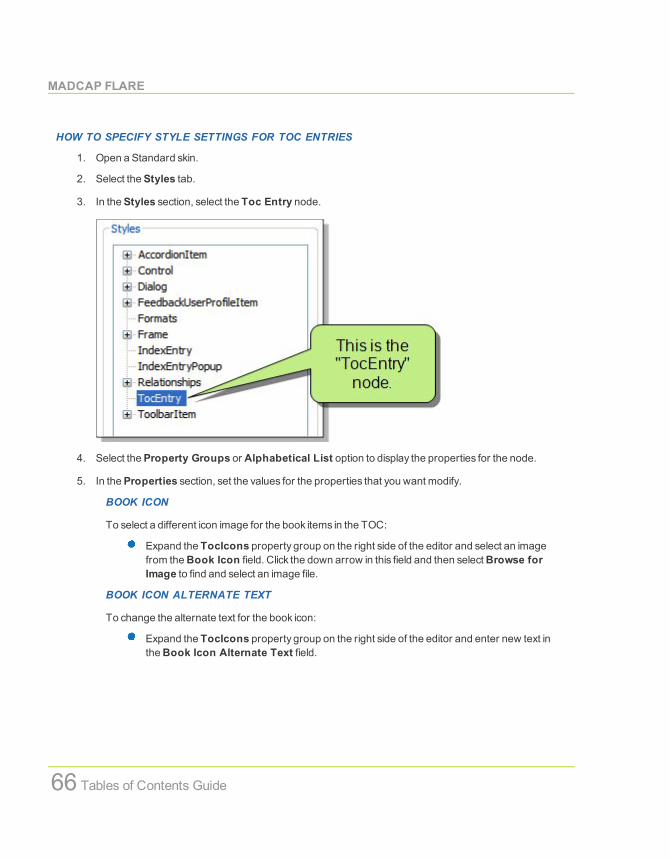
HOW TO SPECIFY STYLE SETTINGS FOR TOC ENTRIES
1. Open a Standard skin.
2. Select theStyles tab.
3. In theStyles section, select the Toc Entry node.
4. Select theProperty Groups or Alphabetical List option to display the properties for the node.
5. In theProperties section, set the values for the properties that you want modify.
BOOK ICON
To select a different icon image for the book items in the TOC:
Expand the TocIcons property group on the right side of the editor and select an imagefrom theBook Icon field. Click the down arrow in this field and then selectBrowse forImage to find and select an image file.
BOOK ICON ALTERNATE TEXT
To change the alternate text for the book icon:
Expand the TocIcons property group on the right side of the editor and enter new text intheBook Icon Alternate Text field.
.
MADCAP FLARE
66 Tables of Contents Guide
CHAPTER 9 Additional TOC Tasks
BOOK OPEN ICON
To select a different icon image for the book items in the TOC when theyare open (or selected):
Expand the TocIcons property group on the right side of the editor and select an imagefrom theBook Open Icon field. Click the down arrow in this field and then selectBrowsefor Image to find and select an image file.
BOOK OPEN ICON ALTERNATE TEXT
To change the alternate text for the book icons in the TOC when theyare open (or selected):
Expand the TocIcons property group on the right side of the editor and enter new text intheBook Open Icon Alternate Text field.
FONT BACKGROUND COLOR
To change the color of the area behind the font:
Expand the Font property group on the right and change the value in theBackgroundColor field. Click the down arrow to open a color palette window. You can click a colorshown, or you can clickMore colors and select a different color or create a custom color. Ifyou are change the color for a style item that also hasa gradient, the gradient propertieshave precedence over the solid color.
FONT COLOR
To change the color of the font:
Expand the Font property group on the right and change the value in theColor field. Clickthe down arrow to open a color palette window. You can click a color shown, or you can clickMore colors and select a different color or create a custom color. If you are change thecolor for a style item that also hasa gradient, the gradient properties have precedence overthe solid color.
FONT FAMILY
To select a specific font family (e.g., Arial, Tahoma, Verdana):
Expand the Font property group on the right and change the value in the Font Family field.After you click in the field, the Font FamilyPicker dialog opens. Use this dialog to select thefont family and clickOK.
.
Tables of Contents Guide67
FONT SIZE
To change the size of the font:
Expand the Font property group on the right and change the value in the Font Size field.Click the down arrow to open a smallwindow. In thiswindow, you can enter the size of thefont in the lower-left field (either type a number or use the up and down arrows). You canselect the unit of measurement (e.g., pixels, points, centimeters) using the lower-right drop-down arrow. You can return to the default setting byusing the upper-right drop-downarrow.
FONT STYLE
To change the style of the font (e.g., make it italic):
Expand the Font property group on the right and change the value in the Font Style field.Click the down arrow and select either italic or normal.
FONT WEIGHT
To change the weight of the font (e.g., make it bold):
Expand the Font property group on the right and change the value in the Font Weightfield. Click the down arrow and select either bold or normal.
HTML HELP ICON INDEX
To select a different icon image for the items in HTMLHelp:
Expand the TocIcons property group on the right side of the editor and select an imagefrom theHtml Help Icon Index field.
MARK AS NEW
To specifywhether all TOC icons to include an asterisk (indicating a new entry). This feature is notsupported in DotNet Help.
Expand the TocIcons property group on the right and change the value in theMark AsNew field. Click the down arrow and select either false or true.
MARK AS NEW ALTERNATE TEXT
Expand the TocIcons property group on the right side of the editor and enter new text intheMark As New Icon Alternate Text field.
.
MADCAP FLARE
68 Tables of Contents Guide
CHAPTER 9 Additional TOC Tasks
TOPIC ICON
To select a different icon image for the topic items in the TOC:
Expand the TocIcons property group on the right side of the editor and select an imagefrom the Topic Icon field. Click the down arrow in this field and then selectBrowse forImage to find and select an image file.
TOPIC ICON ALTERNATE TEXT
To change the alternate text for the topic icon:
Expand the TocIcons property group on the right side of the editor and enter new text inthe Topic Icon Alternate Text field.
6. Click to save your work.
Tables of Contents Guide69
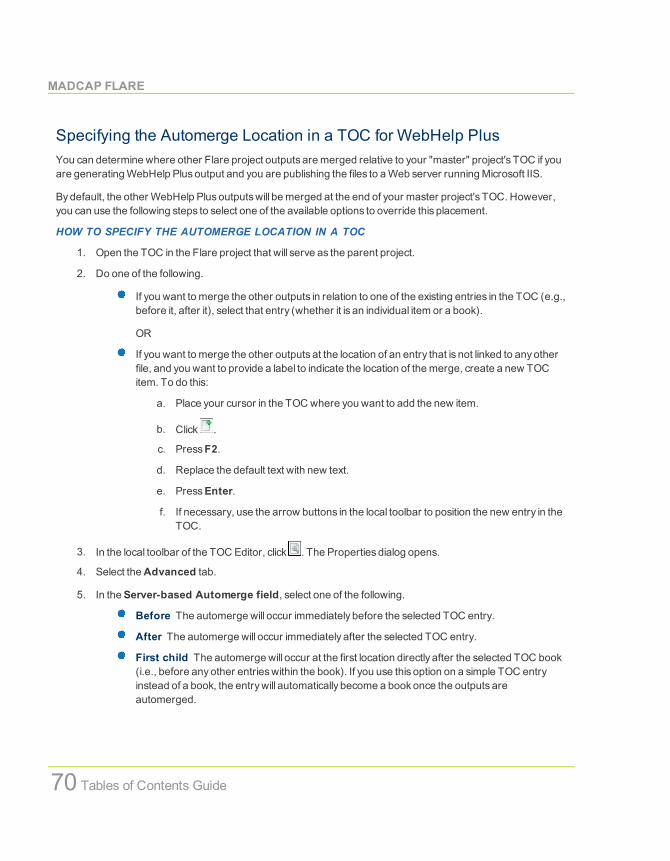
Specifying the Automerge Location in a TOC for WebHelp PlusYou can determine where other Flare project outputs aremerged relative to your "master" project's TOC if youare generatingWebHelp Plusoutput and you are publishing the files to aWeb server runningMicrosoft IIS.
Bydefault, the other WebHelp Plusoutputswill bemerged at the end of your master project's TOC. However,you can use the following steps to select one of the available options to override this placement.
HOW TO SPECIFY THE AUTOMERGE LOCATION IN A TOC
1. Open the TOC in the Flare project that will serve as the parent project.
2. Do one of the following.
If you want to merge the other outputs in relation to one of the existing entries in the TOC (e.g.,before it, after it), select that entry (whether it is an individual item or a book).
OR
If you want to merge the other outputs at the location of an entry that is not linked to anyotherfile, and you want to provide a label to indicate the location of themerge, create a new TOCitem. To do this:
a. Place your cursor in the TOC where you want to add the new item.
b. Click .
c. PressF2.
d. Replace the default text with new text.
e. PressEnter.
f. If necessary, use the arrow buttons in the local toolbar to position the new entry in theTOC.
3. In the local toolbar of the TOC Editor, click . The Properties dialog opens.
4. Select theAdvanced tab.
5. In theServer-based Automerge field, select one of the following.
Before The automerge will occur immediately before the selected TOC entry.
After The automerge will occur immediately after the selected TOC entry.
First child The automerge will occur at the first location directly after the selected TOC book(i.e., before anyother entrieswithin the book). If you use this option on a simple TOC entryinstead of a book, the entrywill automatically become a bookonce the outputs areautomerged.
MADCAP FLARE
70 Tables of Contents Guide
CHAPTER 9 Additional TOC Tasks
Last child The automerge will occur at the last location after the selected TOC book (afterthe last entrywithin the book). If you use this option on a simple TOC entry instead of a book,the entrywill automatically become a bookonce the outputs are automerged.
Replace The automerge will occur at the location of the TOC entrywhere you have specifiedthis option. It would replace any links that might otherwise be applied to that entry. Youmightuse this option, for example, if you want to create a new entry in themaster TOC so that youcan add a label at the point where the automerge occurs.
6. In the Properties dialog, clickOK.
7. Click to save your work.
Tables of Contents Guide71
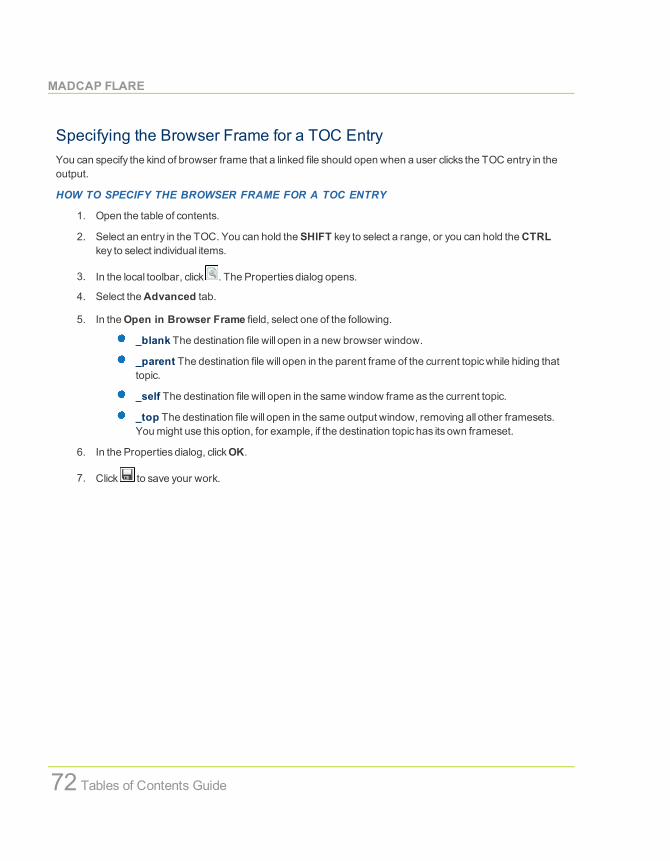
Specifying the Browser Frame for a TOC EntryYou can specify the kind of browser frame that a linked file should open when a user clicks the TOC entry in theoutput.
HOW TO SPECIFY THE BROWSER FRAME FOR A TOC ENTRY
1. Open the table of contents.
2. Select an entry in the TOC. You can hold theSHIFT key to select a range, or you can hold theCTRLkey to select individual items.
3. In the local toolbar, click . The Properties dialog opens.
4. Select theAdvanced tab.
5. In theOpen in Browser Frame field, select one of the following.
_blank The destination file will open in a new browser window.
_parent The destination file will open in the parent frame of the current topicwhile hiding thattopic.
_self The destination file will open in the samewindow frame as the current topic.
_top The destination file will open in the same output window, removing all other framesets.Youmight use this option, for example, if the destination topic has its own frameset.
6. In the Properties dialog, clickOK.
7. Click to save your work.
MADCAP FLARE
72 Tables of Contents Guide
CHAPTER 9 Additional TOC Tasks
Synchronizing the TOC with Open Topics
This feature is supported in DotNet Help, Microsoft HTMLHelp,WebHelp,WebHelp 2.0 (HTML5),WebHelp AIR, andWebHelp Plusoutput.
You can customize your output so that users can always see where the current topic belongs in the table of con-tents (TOC), even if theydid not access the topic via the TOC. This can be done by selecting the "AutomaticallySynchronize TOC" option in the Skin Editor.When users navigate from topic to topic in the output, the TOC auto-matically changesaccordingly, highlighting the topic that is open.
HOW TO SYNCHRONIZE THE TOC WITH OPEN TOPICS
1. Open a Standard or HTML5 skin.
2. On theGeneral tab of the Skin Editor, select the checkboxnext toAutomatically Synchronize TOC.
3. Click to save your work.
Tables of Contents Guide73
Using Styles to Determine the Look of an Online Mini-TOCYou can use the <MadCap|miniTocProxy> style tomodify the lookof mini-TOCs in your online output.
HOW TO DETERMINE THE LOOK OF AN ONLINE MINI-TOC1. From the Content Explorer, open the stylesheet that you want to modify. The traditional location for reg-
ular stylesheets is in the Resources\Stylesheets folder, but you can store them elsewhere if you like.
2. In the local toolbar, make sure the first button displays (whichmeans that the Advanced
view is currently shown in the editor). If the button displays instead, then click it.
Note: Some of the necessary style properties can also be changed in the Simplifiedview in the Stylesheet Editor.
3. In the upper-left corner of the editor, make sure theShow Styles field is set to.
4. In the Styles section of the editor, scroll down and select theMadCap|miniTOCProxy style or a classthat you have created under it (e.g., MadCap|miniTOCProxy.myclass).
5. From theShowdrop-down list on the upper-right side of the editor, select
. Themost relevant properties for that style are shown on the right sideof the editor.
6. In theProperties section to the right, you can change a variety of style settings for mini-TOCs. Youmayneed to click the plusbutton next to a property group (e.g., Font, Block, Box) to see the actualpropertieswithin it.
7. Locate the specific property that you want to change. The property name is shown in the left column.Use the right column to select and enter values for the property. Depending on the type of property,you can either type the value, select it from a drop-down list, or complete the value entries in a popupbox. Here are some of themore common properties that youmight change.
Border above To change the border line that appears at the top of themini-TOC, click theplusbutton next to theBorders property group. Then click in the right column next to bor-der-top, set the border width, unit of measurement, color, and/or style in the small drop-downwindow. ClickOK. You can also use the other cells in this property group to add bordersbelow, to the left, or to the right of themini-TOC.
DepthTo change the number of levels of topic links that are shown in themini-TOC, click in theright column next tomc-toc-depth and enter a number. The default setting is 3.
MADCAP FLARE
74 Tables of Contents Guide
CHAPTER 9 Additional TOC Tasks
Font familyTo change the font family (e.g., Arial, Verdana), click the plusbutton next to theFont property group. Click in the right column next to font-family, set the font family in theFont FamilyPicker dialog, and clickOK.
Font size To change the font size (e.g., 10 pt, 11 pt), click the plusbutton next to the Fontproperty group. Then click in the right column next to font-size, set the font size in the smalldrop-downwindow, and clickOK.
Padding aboveTo change the amount of empty space (padding) above the text within themini-TOC container, click the plusbutton next to theBox property group. Then click in theright column next to padding-top, set the padding value in the small drop-downwindow, andclickOK.
Padding leftTo change the amount of empty space (padding) to the left of the text within themini-TOC container, click the plusbutton next to theBox property group. Then click in theright column next to padding-left, set the padding value in the small drop-downwindow, andclickOK.
Space above To change the amount of space above themini-TOC container, click the plusbutton next to theBox property group. Then click in the right column next tomargin-top,set themargin value in the small drop-downwindow, and clickOK.
Note: Another task youmight perform is to add a background to themini-TOC. Click
in theShow Properties drop-down list on the upper-right sideof the editor, and change the selection toShow: Set Properties. Then click the plusbutton next to theBackground property group to expand it and change anyof thepropertieswithin it.
Note: Different browsersmay treat margin and padding settingsdifferently. Forexample, Internet Explorer 8 and Firefoxhonor padding settingsmore than theyhonor margin settings. If you were to set a left margin at, say, 1 inch, InternetExplorer 7 would show it that way. However, in order to get the same results in Inter-net Explorer 8 or Firefox, you would also need to set the left padding at 1 inch.
8. Click to save your work.
Tables of Contents Guide75
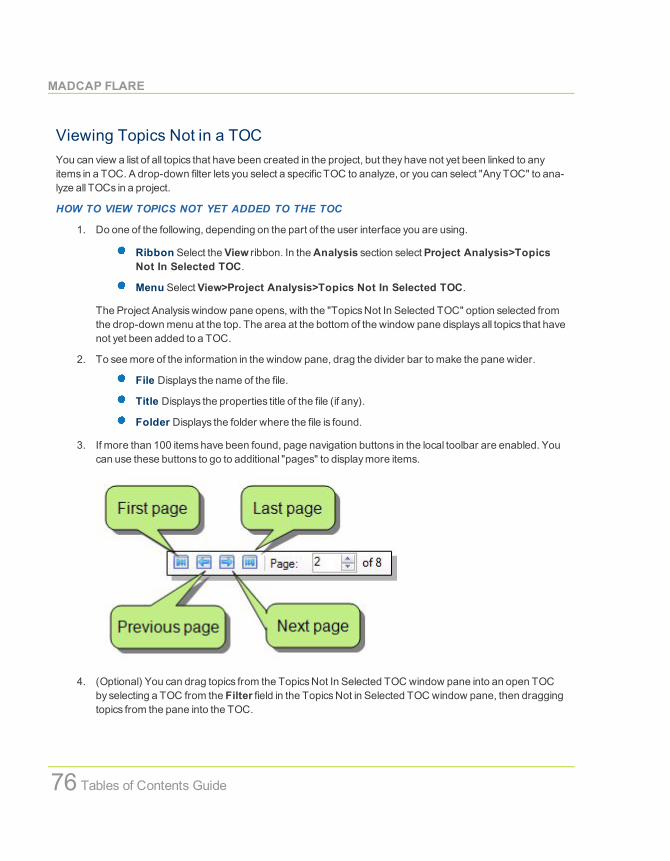
Viewing Topics Not in a TOCYou can view a list of all topics that have been created in the project, but theyhave not yet been linked to anyitems in a TOC. A drop-down filter lets you select a specific TOC to analyze, or you can select "AnyTOC" to ana-lyze all TOCs in a project.
HOW TO VIEW TOPICS NOT YET ADDED TO THE TOC
1. Do one of the following, depending on the part of the user interface you are using.
Ribbon Select theView ribbon. In theAnalysis section selectProject Analysis>TopicsNot In Selected TOC.
Menu SelectView>Project Analysis>Topics Not In Selected TOC.
The Project Analysiswindow pane opens, with the "TopicsNot In Selected TOC" option selected fromthe drop-downmenu at the top. The area at the bottom of the window pane displaysall topics that havenot yet been added to a TOC.
2. To seemore of the information in the window pane, drag the divider bar to make the pane wider.
File Displays the name of the file.
Title Displays the properties title of the file (if any).
Folder Displays the folder where the file is found.
3. If more than 100 itemshave been found, page navigation buttons in the local toolbar are enabled. Youcan use these buttons to go to additional "pages" to displaymore items.
4. (Optional) You can drag topics from the TopicsNot In Selected TOC window pane into an open TOCbyselecting a TOC from the Filter field in the TopicsNot in Selected TOC window pane, then draggingtopics from the pane into the TOC.
MADCAP FLARE
76 Tables of Contents Guide

CHAPTER 9 Additional TOC Tasks
5. (Optional) You can double-click any topic in the list to view or modify it.
Tables of Contents Guide77

MADCAP FLARE
78 Tables of Contents Guide
Tables of Contents Guide79
CHAPTER10 Printed Output TOCTasks
There are special tasks that youmayneed to perform if you are creating print-based output.
This chapter discusses the following.
Creating a Topic for a Print TOC 80
Specifying Chapter and Page Layout Breaks 83
Specifying Section Breaks and Master Pages 94
Including Print Topics in an Outline TOC 98
Autonumbering Flow for Output 101
Creating a Mini-TOC for Print Output 104
Creating Headings for Unlinked Books in a Generated TOC 114
Determining Heading Levels for a Print TOC 117
Using Styles to Determine the Look of a Print TOC 124
Using Styles to Determine the Look of a Print Mini-TOC 131
Removing Images from Headings in a Generated TOC 136
Suppressing Page Numbers in a Print TOC 137
Suppressing Page Numbers in a Print Mini-TOC 142
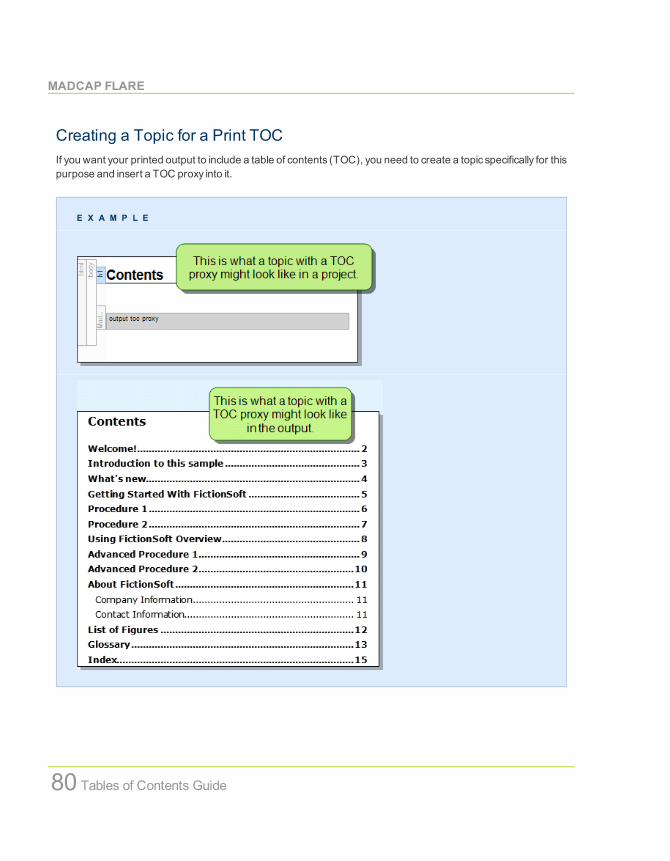
Creating a Topic for a Print TOCIf you want your printed output to include a table of contents (TOC), you need to create a topic specifically for thispurpose and insert a TOC proxy into it.
E X A M P L E
.
MADCAP FLARE
80 Tables of Contents Guide
CHAPTER 10 Printed Output TOC Tasks
HOW TO CREATE A TOPIC FOR A PRINT TOC
1. Add a new topic as you normallywould.
2. At the top of the topic, enter a title for your TOC (e.g., "Contents").
Note: You should be careful about using anyof Flare's <h1> through <h6> style tagsfor your TOC title, unless you want it to also show up in the generated TOC.However, it is possible to configure your stylesheet so that certain <h1> through <h6>stylesdo not show up in the generated TOC. In the sameway, it is possible to createother styles besides<h1> through <h6>and configure them so that theydo show upin the generated TOC.
3. Remove anyunnecessary text after the topic title.
4. Do one of the following, depending on the part of the user interface you are using.
Ribbon Select the Insert ribbon. In theProxy section selectProxy>TOC Proxy.
You can use theOptionsdialog to switch between ribbonsand the classicmenu/toolbar layout.For more information see the online Help.
Keep inmind that the smaller the application window becomes, themore the options in a rib-bon shrink. Therefore, youmight only see a small icon instead of text, or youmight see only asection name displayed with a down arrow to access the options in it. You can hover over smallicons to see tooltips that describe them. You can also enlarge the application window or clickone of the section drop-downs in the ribbon to locate a hidden feature.
Menu Select Insert>Proxy>Insert TOC Proxy.
The TOC Proxydialog opens.
5. (Optional) From theStylesheet class field, you can select a style for the TOC.
For example, youmight create and use style classes if you want to generatemultiple TOCswith dif-ferent looks for each output. Otherwise, the generated TOC in the output will use the style settings fromthe parent <MadCap|tocProxy> style. You can create a style class for this purpose in the StylesheetEditor. To do this, select theMadCap|tocProxy style and clickAdd Class to create a class. The classwill then be available from this field.
Note: If you want to affect the lookof the individual entries in the generated TOC,
Tables of Contents Guide81
you can use the TOC1 through TOC9 styles (classesof the <p> tag) in the StylesheetEditor. For example, if you want to use blue font for the first-level headings in the gen-erated TOC, you can change the font color setting on the p.TOC1 style. See "UsingStyles to Determine the Lookof a Print TOC" on page 124.
6. ClickOK. The proxy is added to the topic.
7. Click to save your work.
HOW DID YOU DO THAT?Oneway to learn about this subject andmanyothers is to createa test Flare project with theWeb Print Mobile template. Then refer to the "How Did You DoThat?" topics in the online Help to learn how certain featureswere created in that project.
Note: In order to include a generated TOC inAdobe FrameMaker output, youmust split theoutput into multiple Adobe FrameMaker documents. However, if you are creatingMicrosoftWord output, youmust keep the output in a singleMicrosoftWord document. For more inform-ation about splitting content into multiple Adobe FrameMaker or MicrosoftWord documents,see "Specifying Chapter and Page Layout Breaks" on the next page.
MADCAP FLARE
82 Tables of Contents Guide
CHAPTER 10 Printed Output TOC Tasks
Specifying Chapter and Page Layout Breaks
This feature is supported in EPUBand in all print outputs (Adobe FrameMaker, Adobe PDF,MicrosoftWord, Microsoft XPS, XHTML).
After you create a page layout and configure its framesand settingsasnecessary, you need to associate thepage layout with the appropriate content. In most cases, you will probablywant to associate different page lay-outswith variousentries in your outline TOC (so that different page layouts can be used for different parts orchapters in amanual). Otherwise, you would associate a single "master" page layout with an entire target or pro-ject; in that case, the same page layout will be applied to all topics in that target or project. You can associate apage layout with an outline TOC entrywith or without creating a chapter breakat the same time.
Following are steps for creating chapter breaksand associating page layoutswith TOC entries. Before com-pleting these steps, youmust first create an outline TOC. See "Including Print Topics in anOutline TOC" onpage 98.
In addition to specifying page layouts, chapter breaksalso allow you to generate output in multiple files (asopposed to just one file), although a "multi-chapter" output can be also contained in a single file, depending onthe output type.With chapter breaks, you can also take advantage of autonumbering at the chapter level andautomatically include endnotesat the end of each chapter. Finally, setting a chapter break can have an effect onwhether a generated TOC can be included in the output (if you are producingWord or FrameMaker output).
HOW TO SPECIFY CHAPTER BREAKS AND PAGE LAYOUTS
1. Make sure the Project Organizer is open.
2. Double-click the TOCs folder.
3. Double-click the TOC that you plan to use for the printed output. The TOC Editor opens to the right.
4. Select the entry in the TOC where you want to insert a chapter or page layout break.
5. In the local toolbar, click .
6. Click thePrinted Output tab.
7. In theBreak Type field, select one of the following.
None This prevents a break from being used for the outline TOC entry.
Chapter Break This createsa chapter breakon the outline TOC entry. You can then selectthe page layout to be used until another breakoccurs in the outline TOC. The chapter breakalso allowschapter autonumber settings to be applied.
.
Tables of Contents Guide83
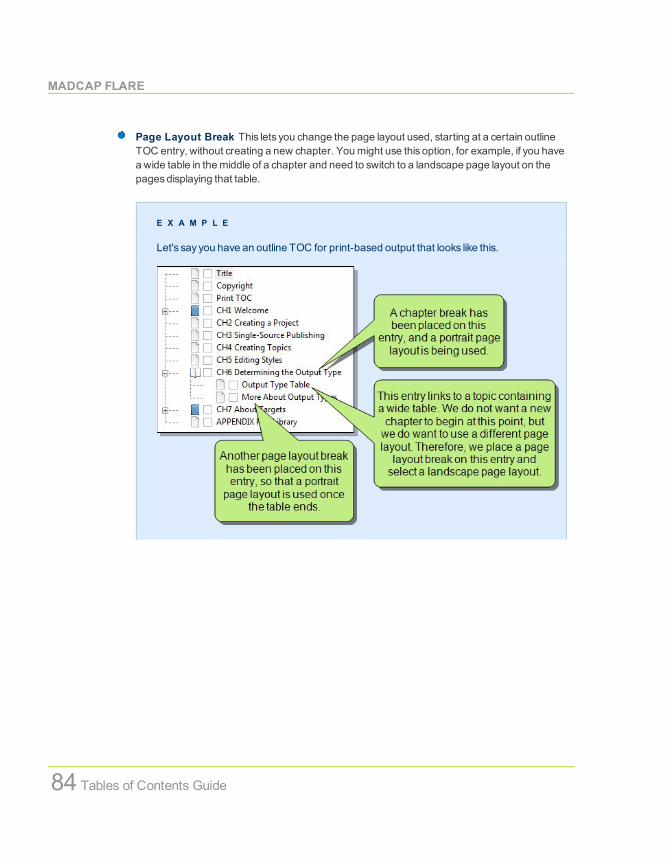
Page Layout Break This lets you change the page layout used, starting at a certain outlineTOC entry, without creating a new chapter. Youmight use this option, for example, if you havea wide table in themiddle of a chapter and need to switch to a landscape page layout on thepagesdisplaying that table.
E X A M P L E
Let's say you have an outline TOC for print-based output that looks like this.
.
MADCAP FLARE
84 Tables of Contents Guide
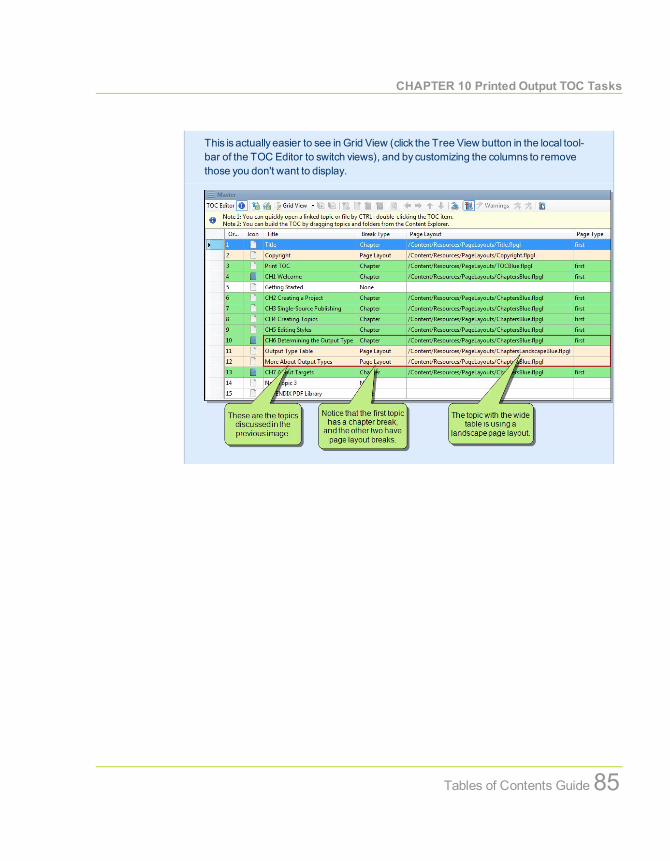
CHAPTER 10 Printed Output TOC Tasks
This is actually easier to see in Grid View (click the Tree View button in the local tool-bar of the TOC Editor to switch views), and by customizing the columns to removethose you don't want to display.
.
Tables of Contents Guide85
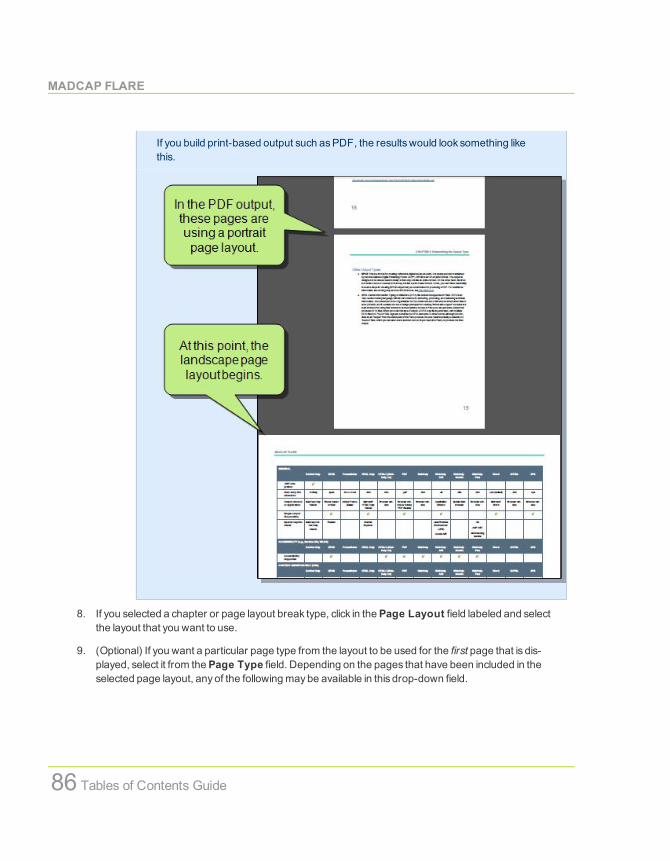
If you build print-based output such asPDF, the resultswould look something likethis.
8. If you selected a chapter or page layout break type, click in thePage Layout field labeled and selectthe layout that you want to use.
9. (Optional) If you want a particular page type from the layout to be used for the first page that is dis-played, select it from thePage Type field. Depending on the pages that have been included in theselected page layout, anyof the followingmaybe available in this drop-down field.
MADCAP FLARE
86 Tables of Contents Guide
CHAPTER 10 Printed Output TOC Tasks
For details and graphics that show how breaksand page typeswork together to create output thatflows the wayyou want, see the online Help.
(default) This letsFlare choose the default page type for you, depending on the type of breakyou created.
(continue L/R) Select this option to specify a Left/Right page sequence, using whicheverpage comesnext in the normal flow.
(continue FL/FR) Select this option to continue the First Left/First Right page sequence,using whichever page comesnext in the normal flow.
Title Select this type if you want the settings to be applied to the first page in your output,which typically displays themanual title. If you include an Empty page type in your page layout,the title page in the output will be followed by the empty page. It is not mandatory that you usethis page type for a title. Instead, you can use one of the other types, such asNormal.
First Select this type for the first page of a new chapter. This page type can be used in a situ-ation where you are creating a simple configuration and you are not concerned with left andright pages (e.g., a document for electronic distribution only). In most cases, a First page typewould be followed byNormal pages.
First Left Select this page type if you want chapters to begin on left-sided pages, and youneed a different look for those pages than would be used for a regular left page.
First Right Select this page type if you want chapters to begin on right-sided pages, and youneed a different look for those pages than would be used for a regular right page.
Left Select this type if you want the settings to be applied to a page in the output when itappears on a left (or even) page (e.g., page 42).
Right Select this type if you want the settings to be applied to a page in the output when itappears on a right (or odd) page (e.g., page 43).
Normal Select this type if you do not want a Left/Right type of page flow, but instead just wantthe same layout on every page, perhaps like a screenplay.
Note: Emptypage typesare not shown in this field. If you are using empty pages inyour PDF or XPSoutput, make sure your page layout hasan empty page type andthe target is set to automatically apply empty pageswhen necessary. To do this, openthe target. On theAdvanced tab, click Inject empty pages as needed to ensureTOC nodes start on their selected pages. This is recommended over the older"Auto-end on left page" option.
Tables of Contents Guide87

10. (Optional) If you want to specify a particular file name for the chapter being created, enter it in theChapter File Name field.
For PDF, XPS, andWord outputs, the default setting is to create a single file for the entire output.However, you can use an option in the Advanced tab of the Target Editor to generate a new PDF, XPS,or Word file for each chapter break. The Chapter File Name field in the Properties dialog would beapplicable if you decide to generatemultiple PDF, XPS, or Word files instead of just one.
11. (Optional) In thePage Number section, you can specify how you want page numbers treated (if youhave inserted them into the page layout).
Reset to If you want the first page number in the chapter to begin at a specific number, youcan select this option and enter the number in the field. If you select the "text" option from theFormat field, you can type any kind of text into this field. That text will be used instead of num-bering.
Format If you want a particular format of numbering to be used (e.g., decimal, upper Roman,lower alpha, text), select it from this drop-down. If you select the "text" option, you can type anykind of text into the "Reset to" field. That text will be used instead of numbering.
Increment number If you want the first page number in the page layout to continue from theprevious layout, you can select this option.
Note: If you want to include autonumbers in the page numbering (e.g., the chapterautonumber followed bya period and then the page number), you can do so using acouple of different methods.With the first method, you can insert the appropriateautonumber variable next to the page number variable in a page layout.With thesecondmethod, you can use the "Reset to" and "Format" fields on this tab. First, youcan select "text" from the Format field. Then in the "Reset to" field, you can enter theappropriate codes for the autonumbering. For example, if you want each page toshow the chapter autonumber followed bya period and the page number, you wouldtype {chapnum}.{n} in the "Reset to" field. Using this secondmethod ensures thatyour page autonumbersare also displayed accurately in a print index.
12. ClickOK.
.
MADCAP FLARE
88 Tables of Contents Guide
CHAPTER 10 Printed Output TOC Tasks
13. Repeat these steps for each area in the content where you want to specify a new chapter or page lay-out break.
Tip: If you want to apply the same settings tomanyTOC entries, you can hold downthe CTRL or SHIFT keyand select those entries. Then open the Properties dialogand specify the settings.
Note: You do not have to follow these steps for every single TOC entrywithin thatchapter—only for the TOC entrieswhere you want a chapter or page layout break.The page layout will be used in the print-based output starting at that location in thecontent and continuing to the end of the document, or until it comesacrossanotherchapter or page layout break.
14. Click to save your work.
.
Tables of Contents Guide89
HOW CHAPTER BREAKS AFFECT THE VARIOUS OUTPUT TYPES
When creating chapter breaks, you should keep the following inmind.
NATIVE PDF OR XPS OUTPUT
The following points are relevant if you are sending output directly to PDF or XPS.
IF YOU SELECT THE OPTION TO CREATE A CHAPTER BREAK
It determineswhere a new chapter will be created at this point in the output TOC. However, it will notnecessarily create a new PDF or XPS file in the output for each chapter. If you want multiple files inthe output, youmust also select the "Generatemultiple documents for native XPS/PDF output"option in the Advanced tab of the Target Editor. If you do not select the "Generatemultiple doc-uments for native XPS/PDF output" option, only one file will be created in the output (but it will containchapter breaks).
You will be able to use chapter autonumbering, even if you only have one PDF or XPS file asa resultof the output.
You will be able to insert footnotes in your topics that are consolidated and placed at the end of eachchapter.
IF YOU DO NOT SELECT THIS OPTION FOR ANY OF YOUR TOC ENTRIES
Only one PDF or XPS file will be created when you build your output. Even if you select the "Generatemultiple documents for native XPS/PDF output" option in the Advanced tab of the Target Editor, onlyone PDF or XPS file will be created, because youmust create chapter breaks in the Properties dialogto tell Flare where you want new documents to start.
You willnot be able to use chapter autonumbering (because no chapter breaksexist).
FRAMEMAKER OUTPUT
The following points are relevant if you are sending output to FrameMaker.
IF YOU SELECT THE OPTION TO CREATE A CHAPTER BREAK
Anew FrameMaker document will be created at this point in the output TOC, giving youmultipleFrameMaker documents.
You will be able to include a generated TOC in the FrameMaker output.
You will be able to use chapter and volume autonumbering.
You will be able to insert footnotes in your topics that are consolidated and placed at the end of eachchapter.
MADCAP FLARE
90 Tables of Contents Guide
CHAPTER 10 Printed Output TOC Tasks
IF YOU DO NOT SELECT THIS OPTION FOR ANY OF YOUR TOC ENTRIES
Only one FrameMaker document will be created when you build your output.
You willnot be able to include a generated TOC in the FrameMaker output. Youmust havemultipleFrameMaker documents in order to have a generated TOC.
You willnot be able to use chapter and volume autonumbering because FrameMaker requiresmul-tiple documents in order to take advantage of that feature.
WORD OUTPUT
The following points are relevant if you are sending output toWord.
IF YOU SELECT THE OPTION TO CREATE A CHAPTER BREAK
It determineswhere a new chapter will be created at this point in the output TOC. However, it will notnecessarily create a newWord file in the output for each chapter. If you want multipleWord doc-uments in the output, youmust also select the "Generatemultiple documents for native XPS/PDF out-put" option in the Advanced tab of the Target Editor. If you do not select the "Generatemultipledocuments for native XPS/PDF output" option, only oneWord document will be created in the output(but it will contain chapter breaks).
You willnot be able to include a generated TOC in theWord output (if you also select the"Generatemultiple documents for native XPS/PDF output" option in the Target Editor). However, if you create achapter break in the Properties dialog but do not select the"Generatemultiple documents for nativeXPS/PDF output" option in the Target Editor, you will be able to include a generated TOC in theWord output. In other words, youmust have only a singleWord document in order to have a gen-erated TOC. (This is the opposite of the FrameMaker situation, wheremultiple documents are neces-sary.)
You will be able to use chapter autonumbering, even if you only have oneWord document asa resultof the output.
You will be able to insert footnotes in your topics that are consolidated and placed at the end of eachchapter.
.
Tables of Contents Guide91
IF YOU DO NOT SELECT THIS OPTION FOR ANY OF YOUR TOC ENTRIES
Only oneWord file will be created when you build your output. Even if you select the "Generatemul-tiple documents for native XPS/PDF output" option in the Advanced tab of the Target Editor, only oneWord file will be created, because youmust create a chapter break in the Properties dialog to tellFlare where you want new documents to start.
You will be able to include a generated TOC in theWord output (because only oneWord documentwill be generated).
You willnot be able to use chapter autonumbering (because no chapter breaksexist).
EPUB OUTPUT
The following points are relevant if you are sending output to EPUB.
IF YOU SELECT THE OPTION TO CREATE A CHAPTER BREAK
Anew HTM file is created at each point where a chapter breakoccurs. This can be seen if you extractthe EPUB file using another tool
IF YOU DO NOT SELECT THIS OPTION FOR ANY OF YOUR TOC ENTRIES
The EPUB contains just one HTM file.
Note: Some aspects of this feature (e.g., page layouts) are used only in the print-based out-puts. EPUB supports this feature only in the sense that it uses chapter breaks to determinehowmanyHTM files are created asa result.
Note: There is an order of precedence with the three levelswhere you can specify a page lay-out. Specific entries in an outline TOC have the highest precedence, followed bypage layoutsat the target level, followed bypage layouts at the project level. So if you've got a page layoutset at the project or target level and it doesn't seem to be working the wayyou think it should,youmight check to see if you have anypage layouts set on specific TOC entries that are over-riding the target- or project-level setting.
Note: When it comes to associating page layoutswith entries in an outline TOC, it is importantto understand themeaning of the word "chapter" in the Properties dialog. In that dialog, a
MADCAP FLARE
92 Tables of Contents Guide
CHAPTER 10 Printed Output TOC Tasks
"chapter" is simply the designation for a new portion of content that will use a particular pagelayout. It doesnot mean a chapter in the traditional sense of amanual. For example, if youhave a title page, a TOC, 10 chapters, and an index in your manual, each one of thosemightbe considered a separate chapter as far as the dialog is concerned, because you are creatinga chapter breakwith a particular page layout specified at each of those locations in the outlineTOC. Therefore, although you only have 10 chapters in the traditionalmeaning of the word,youmight have 13 chapters as far as the dialog is concerned (one for the title page, one forthe TOC, one for each traditional chapter, and one for the index).
Note: If you extract the EPUB file using another tool, you will find that it contains one or moreHTM files. If you have used chapter breaks in the outline TOC, a new HTM file is created ateach point where a chapter breakoccurs. If you do not use chapter breaks, the EPUB con-tains just one HTM file.
Tables of Contents Guide93
Specifying Section Breaks and Master Pages
This feature is supported in Adobe FrameMaker andMicrosoftWord output.
In Flare, you can specify section breaks for print-based output. Doing this allowsyou to accomplish the following.
You can add actual section breaks intoMicrosoftWord output. Section breaksare a feature unique toWord.
You can take advantage of section autonumbering.
You can use a section break to apply amaster page toMicrosoftWord or FrameMaker output, startingat that location in the content. Master pages can be used to add header and footer content, insert pagenumbers, and specify the page size and orientation. The rest of this topic dealswith using sectionbreaks to applymaster pages.
Note: Asan alternative tomaster pages, you can use page layouts for print-basedoutput.Whereasmaster pagesare used only for Word and FrameMaker outputs,page layouts can be used for all print-based outputs.
If you create one or moremaster pages for Word or FrameMaker output, you need to specify how thosemasterpageswill be used. You have a couple of options.
You can use one or moremaster pages for specific sectionsof your print-based output (specify sectionbreaksandmaster pages).
OR
You can use just onemaster page for every page of the output (associate amaster page with a target).
.
MADCAP FLARE
94 Tables of Contents Guide
CHAPTER 10 Printed Output TOC Tasks
HOW TO SPECIFY SECTION BREAKS AND MASTER PAGES FOR PRINT-BASED OUTPUT
If you are producingMicrosoftWord or Adobe FrameMaker output, you can specify places in your outline TOCwhere you want to create section breaks for your print-based output. A primary reason for using a section breakis to specify that a particular chunkofWord or FrameMaker output should use a certain print master page. Theoutput uses the specifiedmaster page for the rest of the document, or until it comesacrossanother sectionbreak/master page that you have included in the outline TOC.
E X A M P L E
Let's say you are producing a print-based document that includesa title page, a TOC, 15 chapters, andan index. If you want to include page numbering in the printed document, starting with the first chapter(i.e., no page numberson the title page or TOC) and continuing to the end of the document, you cancreate a print master page for this purpose. You can specify in the print master page that the even num-bers are placed at the bottom-left of those pagesand the odd numbersare placed at the bottom-rightof those pages. Then, in your outline TOC, you can create a section breakwhere the first page of thefirst chapter occurs and associate themaster page with that section.
Use the following steps if you want to use thismethod.
1. Make sure the Project Organizer is open.
2. Double-click the TOCs folder.
3. Double-click the TOC that you plan to use for the print-based output. The TOC Editor opens to theright.
4. Select the entry in the TOC where you want to insert a section break, and where you want a print mas-ter page to start being displayed in the print-based output.
5. In the local toolbar, click . The Properties dialog for the TOC entry opens.
6. Click thePrinted Output tab.
7. ClickStart a new section.
8. Click the down arrow in the fieldConfigure section using this Master Page, and select the printmaster page that you want to use.
9. ClickOK.
10. Repeat steps4-9 for each print master page that you want to associate with a particular section.
Tables of Contents Guide95
Tip: If you want to apply the same settings tomanyTOC entries, you can hold downthe CTRL or SHIFT keyand select those entries. Then open the Properties dialogand specify the settings.
Note: You do not have to follow these steps for every single TOC entrywithin thatsection—only for the first TOC entry in that section. Themaster page will be used inthe print-based output starting at that location in the content and continuing to theend of the document, or until it comesacrossanother section break/master page thatyou have designated.
11. Click to save your work.
.
MADCAP FLARE
96 Tables of Contents Guide
CHAPTER 10 Printed Output TOC Tasks
HOW TO ASSOCIATE A MASTER PAGE WITH A PRINT TARGET
Use the following steps if you want to include only onemaster page in your Word or FrameMaker output, dis-playing that master page on every page of the output.
1. Open theWord or FrameMaker target that you are using to create the output.
2. Click theAdvanced tab.
3. Click the drop-down arrow in theMaster Page field, and select the print master page that you want toassociate with the target.
4. Click to save your work.
Tables of Contents Guide97
Including Print Topics in an Outline TOCYou need tomake sure that all of the topics to be included in your printed output are added to an outline table ofcontents (TOC).We refer to it as an "outline TOC" because for print-based output it really servesmore asanoutline than a TOC. You have a couple of options.
Create a new TOC just for your printed output (most commonmethod).
OR
Incorporate the print topics into a shared TOC (along with topics for other outputs) and use conditiontags.
HOW TO CREATE A NEW TOC (JUST FOR YOUR PRINT-BASED OUTPUT)
1. Add a new TOC to the project.
2. Make sure the Content Explorer is open.
3. (Optional) If you want to select and addmultiple topics to the TOC at the same time (asopposed to onetopic at a time), complete these steps.
a. In the local toolbar of the Content Explorer, click theShow Files button . The ContentExplorer splits into two halves.
b. On the right half of the Content Explorer, find and select the folder and topic files that you wantto include in the TOC. You can hold theSHIFT key to select a range, or you can hold theCTRLkey to select individual items.
Note: Make sure you do not select the Resources folder in the ContentExplorer, which holds your ancillary content files (e.g., images, stylesheets).If you do, that folder and its contentswill also be included in the TOC.
.
MADCAP FLARE
98 Tables of Contents Guide
CHAPTER 10 Printed Output TOC Tasks
4. Drag the topics that are to be included in the printedmanual from the Content Explorer to the appro-priate locations in the TOC Editor.
E X A M P L E
Drag the topic that contains a TOC proxy (for displaying a generated TOC) near the top of theTOC (since you will want the TOC in your printed output to be placed near the front of it). Dragthe topic that contains an indexproxy (for displaying a generated index) near the bottom of theTOC (since you will want the index to be placed at the end of your printedmanual).
Also, you can use the buttons in the TOC Editor local toolbar to add elements (e.g., books, topic pages)to the TOC and to determine how theybehave (e.g., link them to topics).
5. Click to save your work.
.
Tables of Contents Guide99
HOW TO INCORPORATE THE PRINT TOPICS INTO A TOC (TO BE SHARED WITH ANY OTHEROUTPUT)
1. Open the TOC.
2. Make sure the Content Explorer is open.
3. (Optional) If you want to select and addmultiple topics to the TOC at the same time (asopposed to onetopic at a time), complete these steps.
a. In the local toolbar of the Content Explorer, click theShow Files button . The ContentExplorer splits into two halves.
b. On the right half of the Content Explorer, find and select the folder and topic files that you wantto include in the TOC. You can hold theSHIFT key to select a range, or you can hold theCTRLkey to select individual items.
Note: Make sure you do not select the Resources folder in the ContentExplorer, which holds your ancillary content files (e.g., images, stylesheets).If you do, that folder and its contentswill also be included in the TOC.
4. Drag the topics that are to be included in the printedmanual from the Content Explorer to the appro-priate locations in the TOC Editor.
E X A M P L E
Drag the topic that contains a TOC proxy (for displaying a generated TOC) near the top of theTOC (since you will want the TOC in your printed output to be placed near the front of it). Dragthe topic that contains an indexproxy (for displaying a generated index) near the bottom of theTOC (since you will want the index to be placed at the end of your printedmanual).
Also, you can use the buttons in the TOC Editor local toolbar to add elements (e.g., books, topic pages)to the TOC and to determine how theybehave (e.g., link them to topics).
5. Create condition tags for your topics.
6. Apply these condition tags to the appropriate entries in your print TOC.
7. Associate the condition tagswith your print target.
MADCAP FLARE
100 Tables of Contents Guide
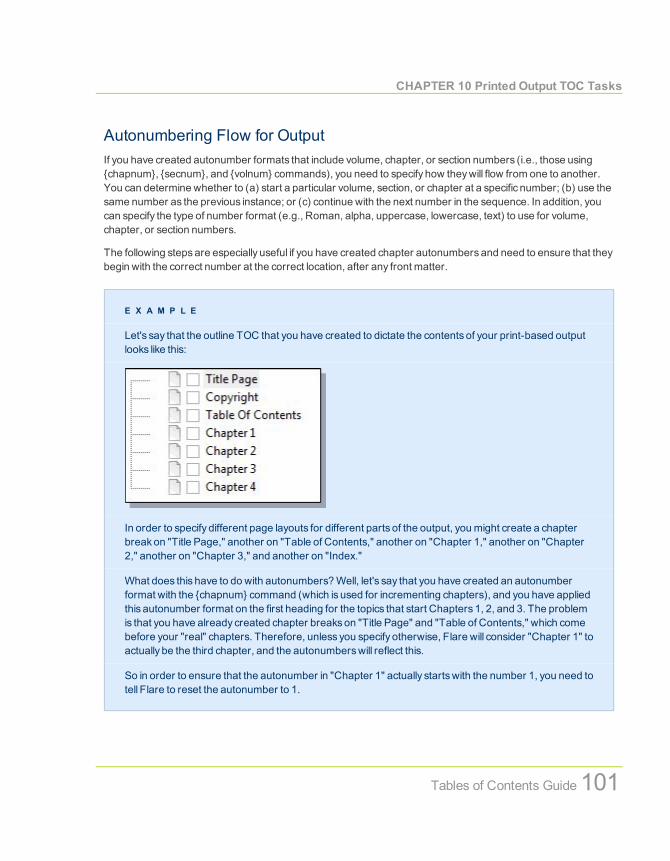
CHAPTER 10 Printed Output TOC Tasks
Autonumbering Flow for OutputIf you have created autonumber formats that include volume, chapter, or section numbers (i.e., those using{chapnum}, {secnum}, and {volnum} commands), you need to specify how theywill flow from one to another.You can determine whether to (a) start a particular volume, section, or chapter at a specific number; (b) use thesame number as the previous instance; or (c) continue with the next number in the sequence. In addition, youcan specify the type of number format (e.g., Roman, alpha, uppercase, lowercase, text) to use for volume,chapter, or section numbers.
The following stepsare especially useful if you have created chapter autonumbersand need to ensure that theybegin with the correct number at the correct location, after any front matter.
E X A M P L E
Let's say that the outline TOC that you have created to dictate the contents of your print-based outputlooks like this:
In order to specify different page layouts for different parts of the output, youmight create a chapterbreakon "Title Page," another on "Table of Contents," another on "Chapter 1," another on "Chapter2," another on "Chapter 3," and another on "Index."
What does this have to do with autonumbers?Well, let's say that you have created an autonumberformat with the {chapnum} command (which is used for incrementing chapters), and you have appliedthis autonumber format on the first heading for the topics that start Chapters 1, 2, and 3. The problemis that you have already created chapter breakson "Title Page" and "Table of Contents," which comebefore your "real" chapters. Therefore, unless you specify otherwise, Flare will consider "Chapter 1" toactually be the third chapter, and the autonumberswill reflect this.
So in order to ensure that the autonumber in "Chapter 1" actually startswith the number 1, you need totell Flare to reset the autonumber to 1.
Tables of Contents Guide101
HOW TO SPECIFY AUTONUMBERING FLOW FOR OUTPUT
1. Make sure the Project Organizer is open.
2. Double-click the TOCs folder.
3. Double-click the TOC that you are using for the print-based output. The TOC Editor opens to the right.
4. Select the entry in the TOC for which you want to specify autonumber settings.
For example, if a particular entry in the TOC is linked to a topic that contains an autonumber format witha {chapnum} or {volnum} command, youmaywant to specify the settings for that entry.
5. In the local toolbar, click . The Properties dialog for the TOC entry opens.
6. (Optional) Click thePrinted Output tab.
If you are creating chapters You can click in theBreak Type field and selectChapter Break tospecify that a chapter break should be created at this location, and you can use thePage Layout fieldto assign a page layout for the content starting at that point. Wherever a chapter breakoccurs in the out-put, chapter and volume autonumberswill be incremented. (For FrameMaker, this option will create anew document in the output. For the other outputs—PDF, XPS, XHTML,Word—thismerely createschapter breaks. If you want this to producemultiple PDF, XPS, or Word documents in the output, youalso need to select the "Multi-DocOutput" option in the Advanced tab of the Target Editor.)
If you are creating sections in Word or FrameMaker output You can selectStart a new sec-tion if you want a new section break to be created starting at this location in the content.Wherever asection breakoccurs in the output, section autonumberswill be incremented. Another reason to selectthis option is to include amaster page for that section of the document for either MicrosoftWord orFrameMaker output. Master pagesare not used for PDF, XPS, or XHTML output.
7. Click theAutonumbers tab.
8. Complete the fields on the tab. Make sure you select the option in the appropriate area (Chapter,Volume, or Section).
Reset to Select this option if you want the section, chapter, or volume numbers in topics start-ing at this point in the TOC to begin at a specific number. Enter the number in the blank field. Ifyou select the "text" option from the Format field, you can type any kind of text into this field.That text will be used instead of numbering.
Format Select the type of numbering to be used for the section, chapter, or volume autonum-bers (e.g., decimal, Roman, uppercase, lowercase, text). If you select the "text" option, youcan type any kind of text into the "Reset to" field. That text will be used instead of numbering.
Same as previous Select this option if you want the section, chapter, or volume numbers intopics starting at this point in the TOC to begin at the same number as the previous section,chapter, or volume.
MADCAP FLARE
102 Tables of Contents Guide
CHAPTER 10 Printed Output TOC Tasks
Increment Select this option if you want the section, chapter, or volume numbers in topicsstarting at this point in the TOC to begin at the next number after the previous section, chapter,or volume.
9. ClickOK.
10. Click to save your work.
Tables of Contents Guide103
Creating a Mini-TOC for Print Output
This feature is supported in EPUBand in all print outputs (Adobe FrameMaker, Adobe PDF,MicrosoftWord, Microsoft XPS, XHTML).
Amini-TOC proxyallowsyou to generate a portion of your table of contents (TOC) or topic headingsat a par-ticular location in the output. Amini-TOC proxy can be used for both online and print-based output. For onlineoutput, you can insert a mini-TOC proxy into amaster page or a topic. For print-based output formats, you caninsert a mini-TOC proxy into any topicwhere you want to generate a small TOC. For example, let's say you wantthe first page of each chapter in amanual to start out with a small TOC, showing the page numberswhere sub-headingsoccur within that chapter. In that case, you can insert a mini-TOC proxy into each topic that you plan touse as the beginning of each chapter. If you insert the proxy into amaster page, each topic using that masterpage will have amini-TOC. If you insert the proxy into certain topics only, mini-TOCswill be generated onlywithin those particular topics.
How It Works
How doesFlare decide which topic links to include in amini-TOC? It worksa bit differently for online output thanit does for print-based output.
PRINT-BASED OUTPUT
Bydefault themini-TOC for print-based output is based on the <h1> through <h6> tags that you have appliedto content in your topics.When you insert the proxy, you select a number for the heading depth. This numberrefers to the absolute heading level. For example, if you place the proxyafter an <h1>heading and select 4 asthe depth, the proxywill include headings that are using <h2>, <h3>, and <h4> styles (but not <h5>or <h6>). Ifyou place the proxyafter an <h2>heading with 4 as the depth, the proxywill include the <h3>and <h4> stylesonly. Please note that the print mini-TOC created from the proxy isnot necessarily based on the structure ofyour outline TOC (i.e., the file found in the TOCs folder in the Project Organizer). However, there is a switchon the Advanced tab in the Target Editor that lets you base the generatedmini-TOC on the structure of youroutline TOC.
.
MADCAP FLARE
104 Tables of Contents Guide
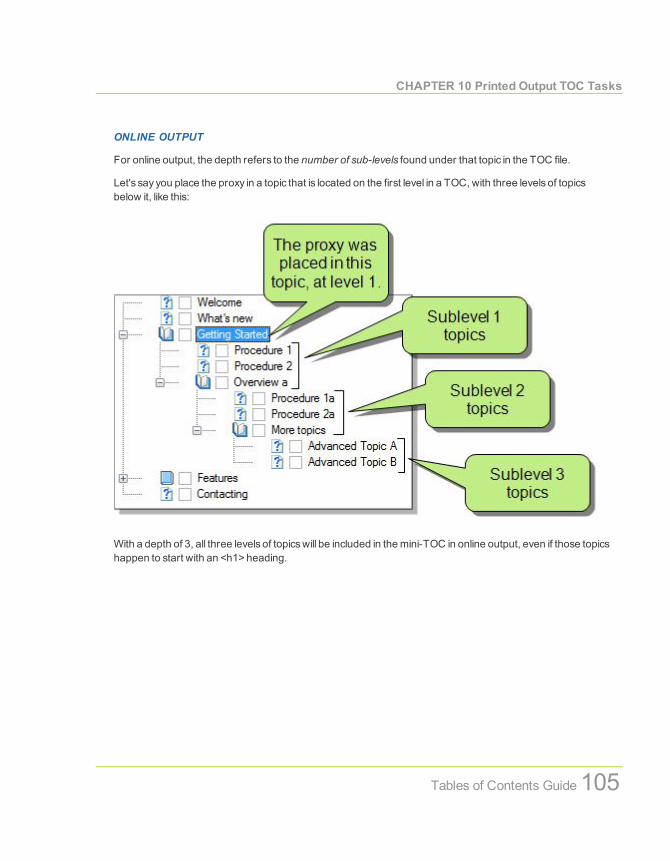
CHAPTER 10 Printed Output TOC Tasks
ONLINE OUTPUT
For online output, the depth refers to the number of sub-levels found under that topic in the TOC file.
Let's say you place the proxy in a topic that is located on the first level in a TOC, with three levels of topicsbelow it, like this:
With a depth of 3, all three levels of topicswill be included in themini-TOC in online output, even if those topicshappen to start with an <h1>heading.
Tables of Contents Guide105
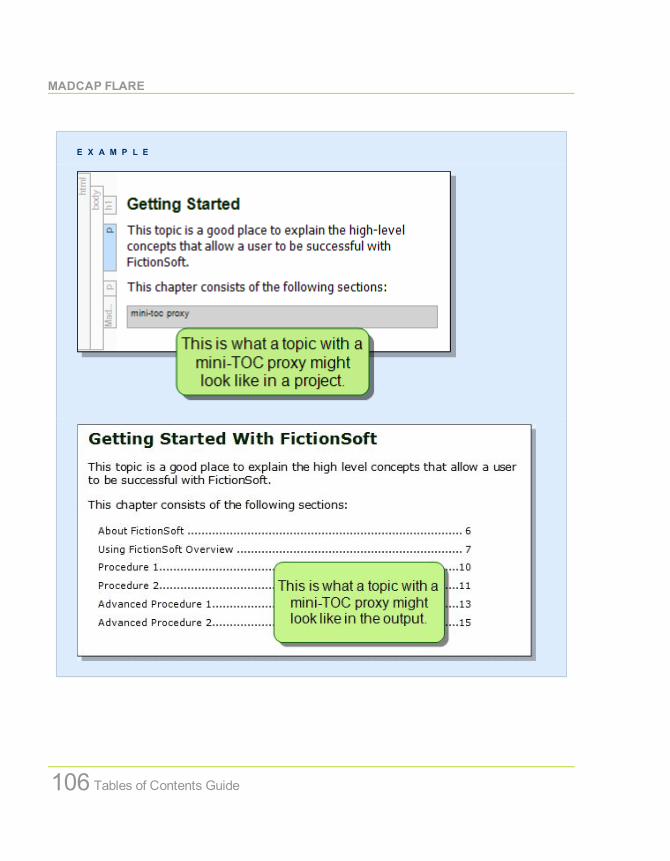
E X A M P L E
MADCAP FLARE
106 Tables of Contents Guide
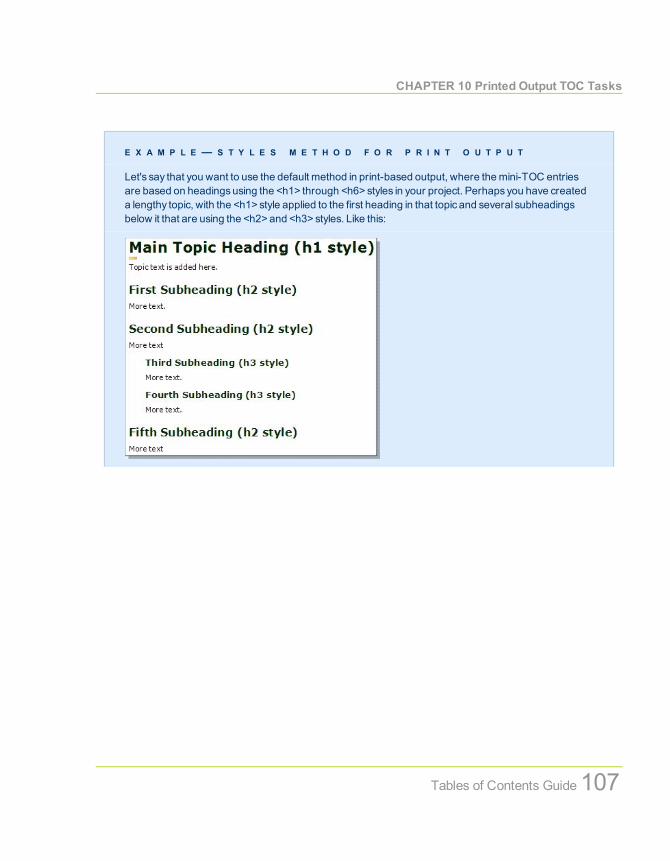
CHAPTER 10 Printed Output TOC Tasks
E X A M P L E — S T Y L E S M E T H O D F O R P R I N T O U T P U T
Let's say that you want to use the default method in print-based output, where themini-TOC entriesare based on headingsusing the <h1> through <h6> styles in your project. Perhaps you have createda lengthy topic, with the <h1> style applied to the first heading in that topic and several subheadingsbelow it that are using the <h2>and <h3> styles. Like this:
.
Tables of Contents Guide107
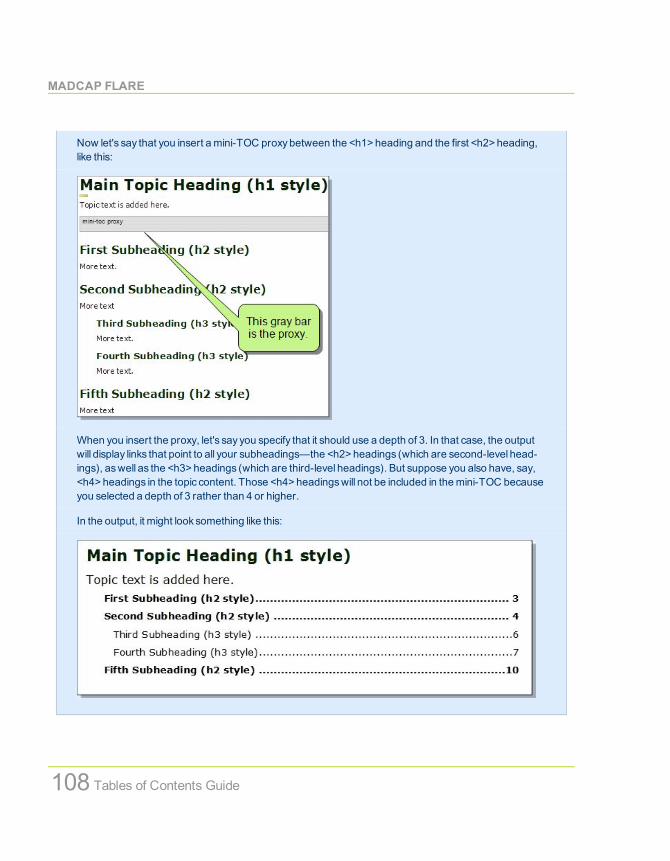
Now let's say that you insert a mini-TOC proxybetween the <h1>heading and the first <h2>heading,like this:
When you insert the proxy, let's say you specify that it should use a depth of 3. In that case, the outputwill display links that point to all your subheadings—the <h2>headings (which are second-level head-ings), aswell as the <h3>headings (which are third-level headings). But suppose you also have, say,<h4>headings in the topic content. Those <h4>headingswill not be included in themini-TOC becauseyou selected a depth of 3 rather than 4 or higher.
In the output, it might look something like this:
MADCAP FLARE
108 Tables of Contents Guide

CHAPTER 10 Printed Output TOC Tasks
E X A M P L E — T O C S T R U C T U R E M E T H O D F O R P R I N TO U T P U T
Let's say that you want to use themethod where themini-TOC entries are based on the structure ofyour outline TOC. Perhaps you have created several topics that are organized in your TOC, like"Chapter 5" in this example:
.
Tables of Contents Guide109
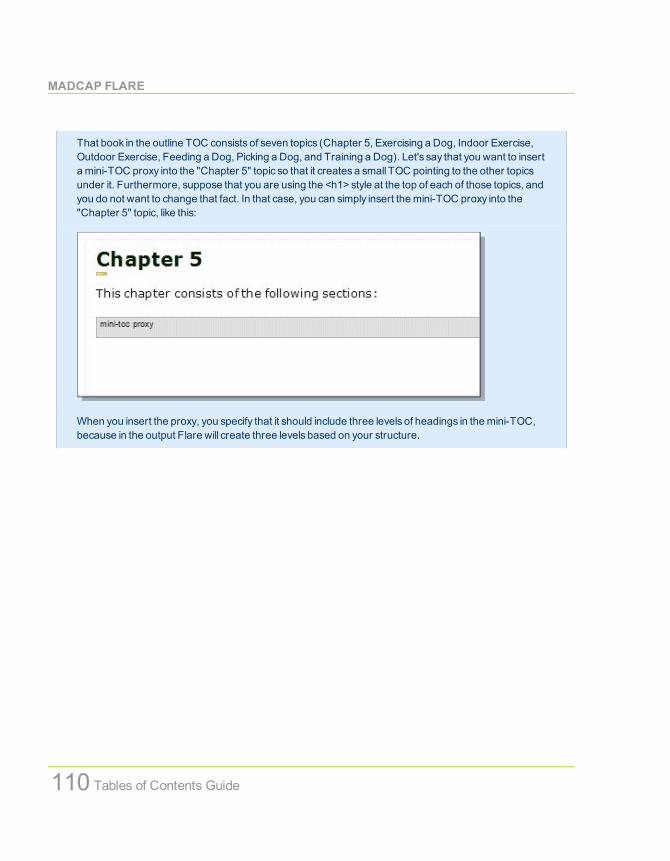
That book in the outline TOC consists of seven topics (Chapter 5, Exercising a Dog, Indoor Exercise,Outdoor Exercise, Feeding a Dog, Picking a Dog, and Training a Dog). Let's say that you want to inserta mini-TOC proxy into the "Chapter 5" topic so that it createsa small TOC pointing to the other topicsunder it. Furthermore, suppose that you are using the <h1> style at the top of each of those topics, andyou do not want to change that fact. In that case, you can simply insert themini-TOC proxy into the"Chapter 5" topic, like this:
When you insert the proxy, you specify that it should include three levels of headings in themini-TOC,because in the output Flare will create three levels based on your structure.
.
MADCAP FLARE
110 Tables of Contents Guide

CHAPTER 10 Printed Output TOC Tasks
You can then open the target that you want to generate, select the Advanced tab, and click the optionto generate your TOC based on the structure of the outline TOC in your project.
Like this:
Tables of Contents Guide111
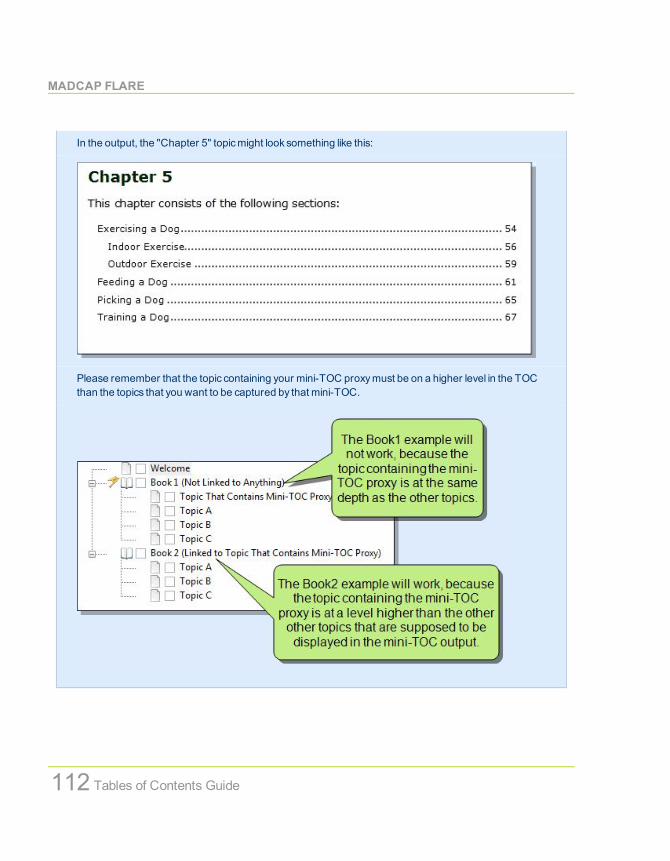
In the output, the "Chapter 5" topicmight look something like this:
Please remember that the topic containing your mini-TOC proxymust be on a higher level in the TOCthan the topics that you want to be captured by that mini-TOC.
.
MADCAP FLARE
112 Tables of Contents Guide
CHAPTER 10 Printed Output TOC Tasks
HOW TO CREATE A MINI-TOC FOR PRINT OUTPUT
1. Open a topic.
2. Do one of the following, depending on the part of the user interface you are using.
Ribbon Select the Insert ribbon. In theProxy section selectProxy>Mini-Toc Proxy.
Menu Select Insert>Proxy>Insert Mini-Toc Proxy.
TheMini-TOC Proxydialog opens.
3. (Optional) From the TOC Depth field, select a number to dictate which heading levels are to beincluded in themini-TOC. For example, if you place the proxyafter an <h1>heading and select 4 as thedepth, the proxywill include headings that are using <h2>, <h3>, and <h4> styles (but not <h5>or<h6>).
4. (Optional) From theStylesheet class field, you can select a style for themini-TOC.
Youmight create and use style classes if you want to generatemultiple mini-TOCswith different looksfor each output. Otherwise, the generatedmini-TOC will use the style settings from the parent<MadCap|miniTocProxy> style. You can create a style class for this purpose in the Stylesheet Editor.To do this, select theMadCap|miniTocProxy style and clickAdd Class to create a class.
Note: If you want to affect the lookof the individual entries in the generatedmini-TOC, you can use theMiniTOC1 throughMiniTOC9 styles (classesof the <p> tag) inthe Stylesheet Editor. For example, let's say that you want to use blue font for thefirst-level headings in the generatedmini-TOC. You can change the font color settingon the p.MiniTOC1 style. You can alsomodify the entire container holding themini-TOC. See "Using Styles to Determine the Lookof a Print Mini-TOC" on page 131.
5. ClickOK. The proxy is added to the topic.
6. Click to save your work.
HOW DID YOU DO THAT?Oneway to learn about this subject andmanyothers is to createa test Flare project with theWeb Print Mobile template. Then refer to the "How Did You DoThat?" topics in the online Help to learn how certain featureswere created in that project.
Tables of Contents Guide113
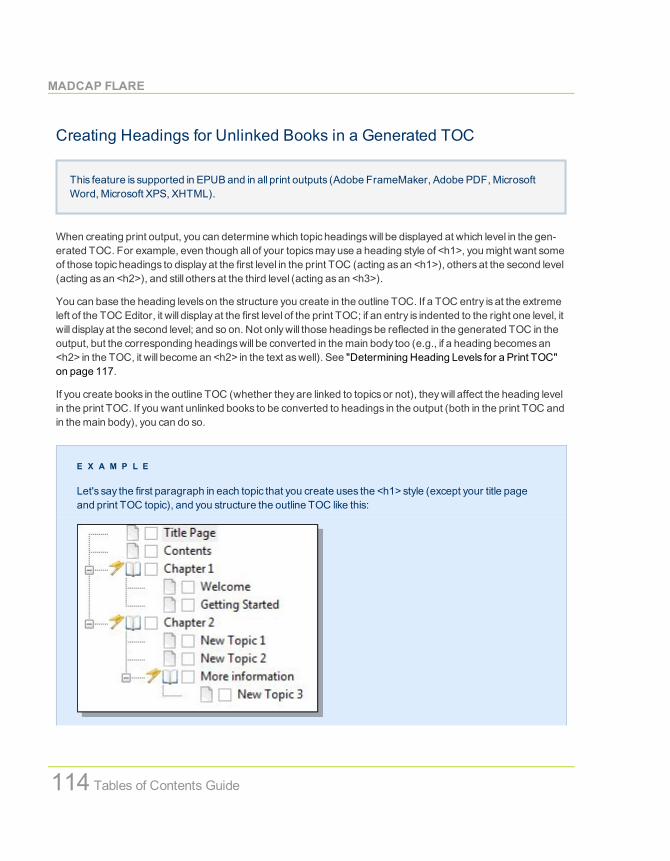
Creating Headings for Unlinked Books in a Generated TOC
This feature is supported in EPUBand in all print outputs (Adobe FrameMaker, Adobe PDF,MicrosoftWord, Microsoft XPS, XHTML).
When creating print output, you can determine which topic headingswill be displayed at which level in the gen-erated TOC. For example, even though all of your topicsmayuse a heading style of <h1>, youmight want someof those topic headings to display at the first level in the print TOC (acting asan <h1>), others at the second level(acting asan <h2>), and still others at the third level (acting asan <h3>).
You can base the heading levels on the structure you create in the outline TOC. If a TOC entry is at the extremeleft of the TOC Editor, it will display at the first level of the print TOC; if an entry is indented to the right one level, itwill display at the second level; and so on. Not onlywill those headingsbe reflected in the generated TOC in theoutput, but the corresponding headingswill be converted in themain body too (e.g., if a heading becomesan<h2> in the TOC, it will become an <h2> in the text aswell). See "Determining Heading Levels for a Print TOC"on page 117.
If you create books in the outline TOC (whether theyare linked to topics or not), theywill affect the heading levelin the print TOC. If you want unlinked books to be converted to headings in the output (both in the print TOC andin themain body), you can do so.
E X A M P L E
Let's say the first paragraph in each topic that you create uses the <h1> style (except your title pageand print TOC topic), and you structure the outline TOC like this:
MADCAP FLARE
114 Tables of Contents Guide
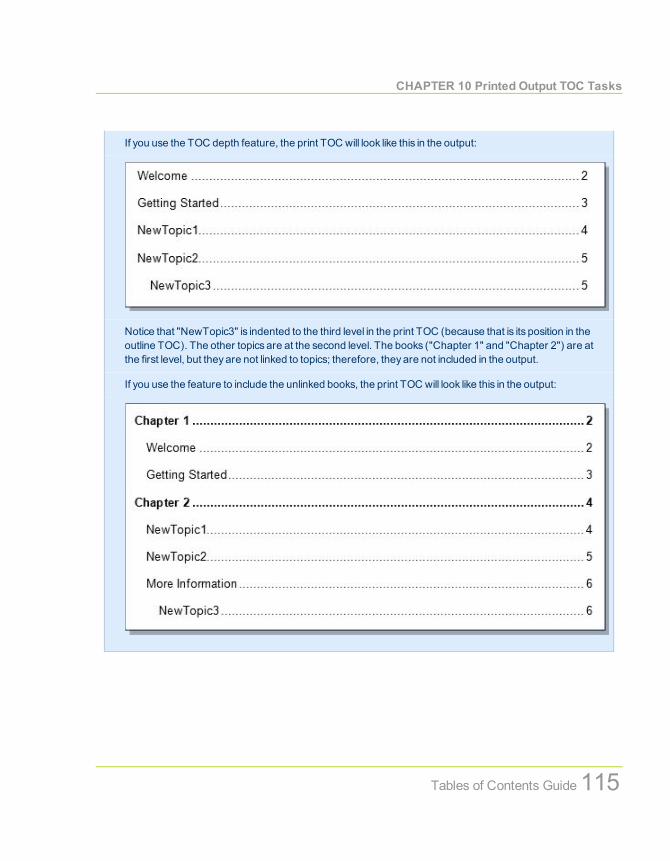
CHAPTER 10 Printed Output TOC Tasks
If you use the TOC depth feature, the print TOC will look like this in the output:
Notice that "NewTopic3" is indented to the third level in the print TOC (because that is its position in theoutline TOC). The other topics are at the second level. The books ("Chapter 1" and "Chapter 2") are atthe first level, but theyare not linked to topics; therefore, theyare not included in the output.
If you use the feature to include the unlinked books, the print TOC will look like this in the output:
.
Tables of Contents Guide115
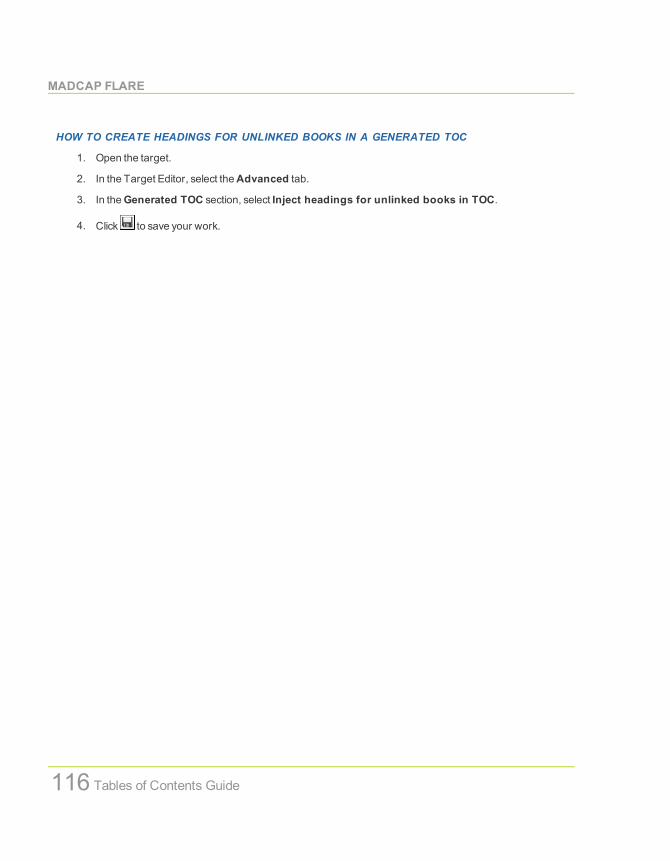
HOW TO CREATE HEADINGS FOR UNLINKED BOOKS IN A GENERATED TOC
1. Open the target.
2. In the Target Editor, select theAdvanced tab.
3. In theGenerated TOC section, select Inject headings for unlinked books in TOC.
4. Click to save your work.
MADCAP FLARE
116 Tables of Contents Guide
CHAPTER 10 Printed Output TOC Tasks
Determining Heading Levels for a Print TOC
This feature is supported in EPUBand in all print outputs (Adobe FrameMaker, Adobe PDF,MicrosoftWord, Microsoft XPS, XHTML).
When creating print output, you can determine which topic headingswill be displayed at which level in the gen-erated TOC. For example, even though all of your topicsmayuse a heading style of <h1>, youmight want someof those topic headings to display at the first level in the print TOC (acting asan <h1>), others at the second level(acting asan <h2>), and still others at the third level (acting asan <h3>). This can be determined via one of thefollowingmethods.
TOC depth With thismethod, you can base the heading levels on the structure you create in the out-line TOC.
Heading styles With thismethod, the structure of the generated TOC is based on the heading stylesthat you use in your topics and the "mc-heading-level" property setting for that style.
Youmight even use bothmethods for your print output. Maybe you decide to use the TOC depth to determinethe heading levels. But you alsomigh use themc-heading-level, setting it to 0 for certain styles (e.g., h3, h4, h5,h6) in order to limit the number of levels shown in the generated TOC.
.
Tables of Contents Guide117
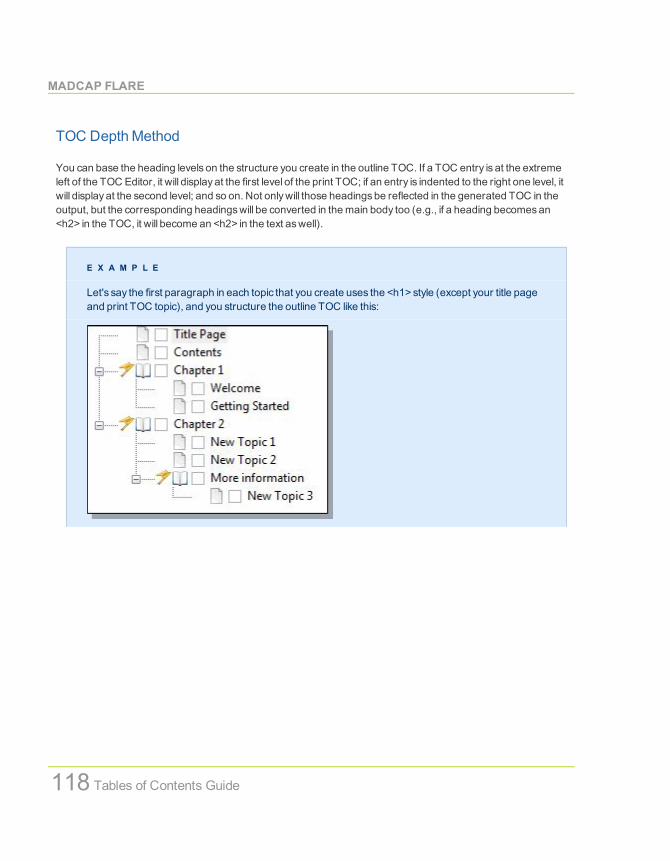
TOC DepthMethod
You can base the heading levels on the structure you create in the outline TOC. If a TOC entry is at the extremeleft of the TOC Editor, it will display at the first level of the print TOC; if an entry is indented to the right one level, itwill display at the second level; and so on. Not onlywill those headingsbe reflected in the generated TOC in theoutput, but the corresponding headingswill be converted in themain body too (e.g., if a heading becomesan<h2> in the TOC, it will become an <h2> in the text aswell).
E X A M P L E
Let's say the first paragraph in each topic that you create uses the <h1> style (except your title pageand print TOC topic), and you structure the outline TOC like this:
MADCAP FLARE
118 Tables of Contents Guide
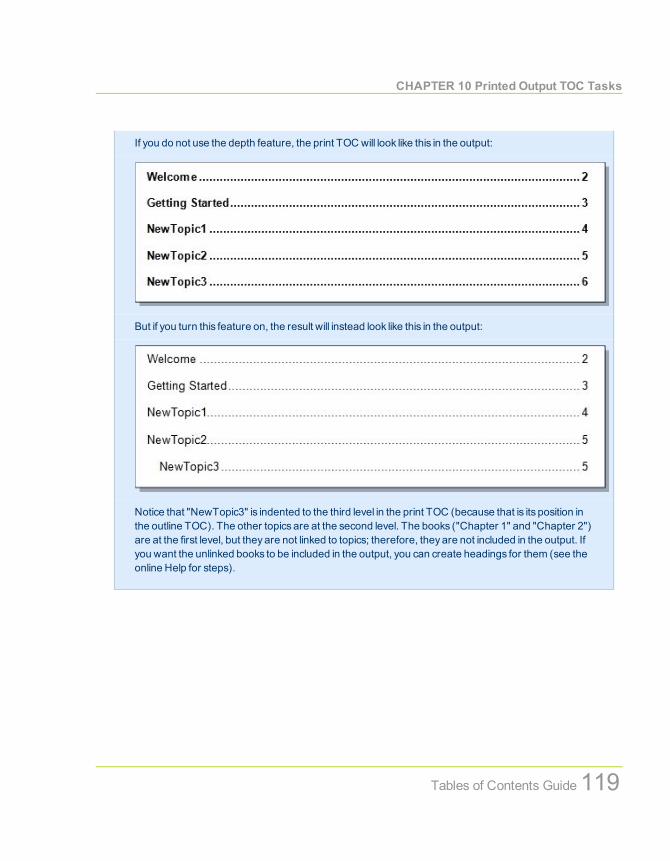
CHAPTER 10 Printed Output TOC Tasks
If you do not use the depth feature, the print TOC will look like this in the output:
But if you turn this feature on, the result will instead look like this in the output:
Notice that "NewTopic3" is indented to the third level in the print TOC (because that is its position inthe outline TOC). The other topics are at the second level. The books ("Chapter 1" and "Chapter 2")are at the first level, but theyare not linked to topics; therefore, theyare not included in the output. Ifyou want the unlinked books to be included in the output, you can create headings for them (see theonline Help for steps).
.
Tables of Contents Guide119
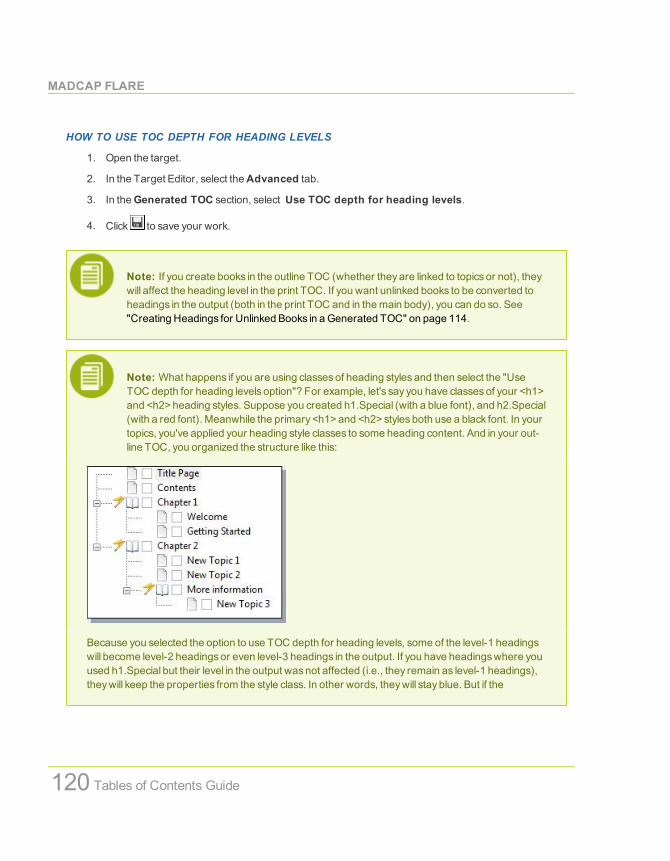
HOW TO USE TOC DEPTH FOR HEADING LEVELS
1. Open the target.
2. In the Target Editor, select theAdvanced tab.
3. In theGenerated TOC section, select Use TOC depth for heading levels.
4. Click to save your work.
Note: If you create books in the outline TOC (whether theyare linked to topics or not), theywill affect the heading level in the print TOC. If you want unlinked books to be converted toheadings in the output (both in the print TOC and in themain body), you can do so. See"Creating Headings for Unlinked Books in a Generated TOC" on page 114.
Note: What happens if you are using classesof heading styles and then select the "UseTOC depth for heading levels option"? For example, let's say you have classesof your <h1>and <h2>heading styles. Suppose you created h1.Special (with a blue font), and h2.Special(with a red font). Meanwhile the primary<h1>and <h2> styles both use a black font. In yourtopics, you've applied your heading style classes to some heading content. And in your out-line TOC, you organized the structure like this:
Because you selected the option to use TOC depth for heading levels, some of the level-1 headingswill become level-2 headingsor even level-3 headings in the output. If you have headingswhere youused h1.Special but their level in the output wasnot affected (i.e., they remain as level-1 headings),theywill keep the properties from the style class. In other words, theywill stay blue. But if the
MADCAP FLARE
120 Tables of Contents Guide
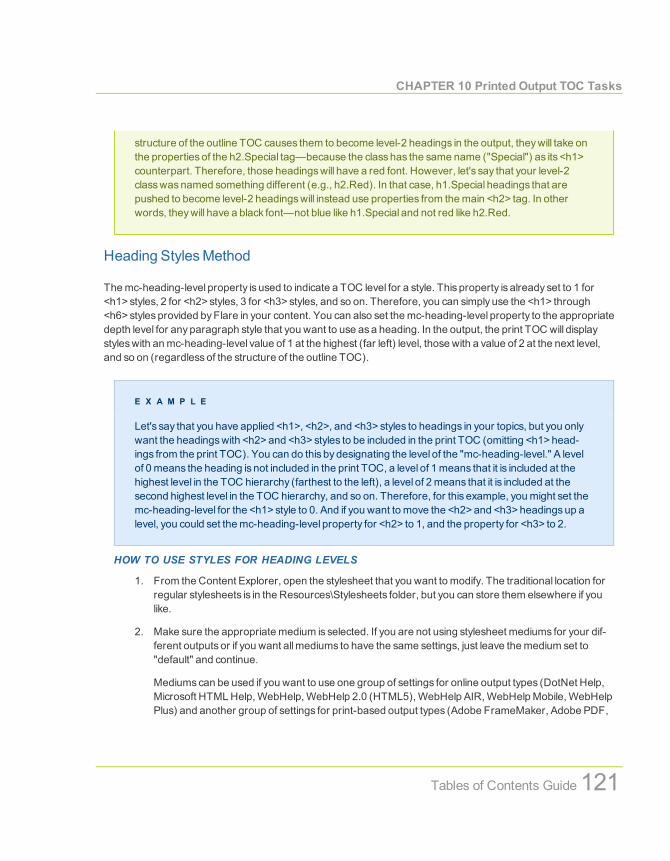
CHAPTER 10 Printed Output TOC Tasks
structure of the outline TOC causes them to become level-2 headings in the output, theywill take onthe properties of the h2.Special tag—because the classhas the same name ("Special") as its <h1>counterpart. Therefore, those headingswill have a red font. However, let's say that your level-2classwasnamed something different (e.g., h2.Red). In that case, h1.Special headings that arepushed to become level-2 headingswill instead use properties from themain <h2> tag. In otherwords, theywill have a black font—not blue like h1.Special and not red like h2.Red.
Heading StylesMethod
Themc-heading-level property is used to indicate a TOC level for a style. This property is already set to 1 for<h1> styles, 2 for <h2> styles, 3 for <h3> styles, and so on. Therefore, you can simply use the <h1> through<h6> styles provided byFlare in your content. You can also set themc-heading-level property to the appropriatedepth level for anyparagraph style that you want to use asa heading. In the output, the print TOC will displaystyleswith anmc-heading-level value of 1 at the highest (far left) level, those with a value of 2 at the next level,and so on (regardlessof the structure of the outline TOC).
E X A M P L E
Let's say that you have applied <h1>, <h2>, and <h3> styles to headings in your topics, but you onlywant the headingswith <h2>and <h3> styles to be included in the print TOC (omitting <h1>head-ings from the print TOC). You can do this bydesignating the level of the "mc-heading-level." A levelof 0means the heading is not included in the print TOC, a level of 1means that it is included at thehighest level in the TOC hierarchy (farthest to the left), a level of 2means that it is included at thesecond highest level in the TOC hierarchy, and so on. Therefore, for this example, youmight set themc-heading-level for the <h1> style to 0. And if you want to move the <h2>and <h3>headingsup alevel, you could set themc-heading-level property for <h2> to 1, and the property for <h3> to 2.
HOW TO USE STYLES FOR HEADING LEVELS
1. From the Content Explorer, open the stylesheet that you want to modify. The traditional location forregular stylesheets is in the Resources\Stylesheets folder, but you can store them elsewhere if youlike.
2. Make sure the appropriatemedium is selected. If you are not using stylesheet mediums for your dif-ferent outputs or if you want allmediums to have the same settings, just leave themedium set to"default" and continue.
Mediumscan be used if you want to use one group of settings for online output types (DotNet Help,Microsoft HTMLHelp,WebHelp,WebHelp 2.0 (HTML5),WebHelp AIR,WebHelpMobile,WebHelpPlus) and another group of settings for print-based output types (Adobe FrameMaker, Adobe PDF,
Tables of Contents Guide121
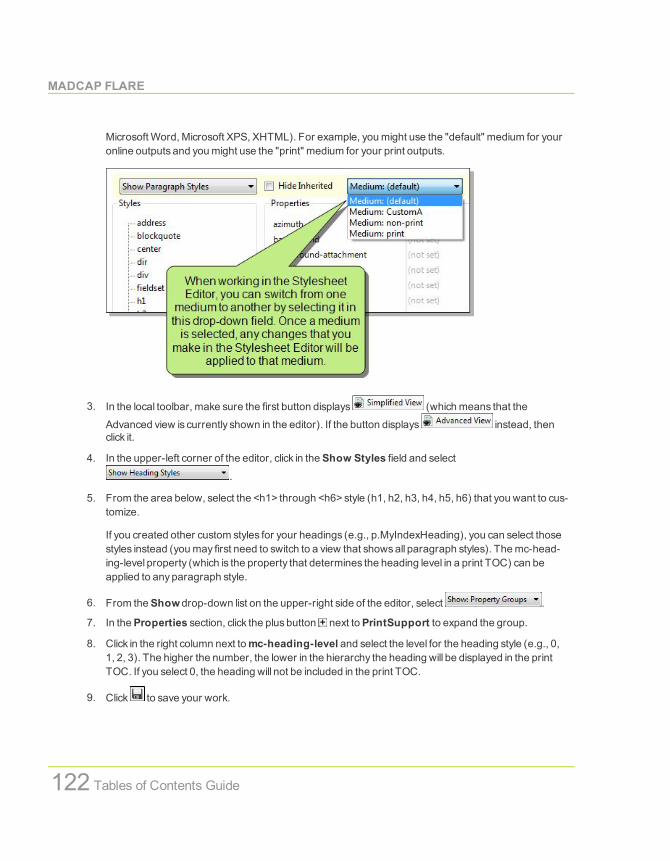
MicrosoftWord, Microsoft XPS, XHTML). For example, youmight use the "default" medium for youronline outputs and youmight use the "print" medium for your print outputs.
3. In the local toolbar, make sure the first button displays (whichmeans that the
Advanced view is currently shown in the editor). If the button displays instead, thenclick it.
4. In the upper-left corner of the editor, click in theShow Styles field and select.
5. From the area below, select the <h1> through <h6> style (h1, h2, h3, h4, h5, h6) that you want to cus-tomize.
If you created other custom styles for your headings (e.g., p.MyIndexHeading), you can select thosestyles instead (youmay first need to switch to a view that showsall paragraph styles). Themc-head-ing-level property (which is the property that determines the heading level in a print TOC) can beapplied to anyparagraph style.
6. From theShowdrop-down list on the upper-right side of the editor, select .
7. In theProperties section, click the plusbutton next toPrintSupport to expand the group.
8. Click in the right column next tomc-heading-level and select the level for the heading style (e.g., 0,1, 2, 3). The higher the number, the lower in the hierarchy the heading will be displayed in the printTOC. If you select 0, the heading will not be included in the print TOC.
9. Click to save your work.
MADCAP FLARE
122 Tables of Contents Guide
CHAPTER 10 Printed Output TOC Tasks
HOW DID YOU DO THAT?Oneway to learn about this subject andmanyothers is to createa test Flare project with theWeb Print Mobile template. Then refer to the "How Did You DoThat?" topics in the online Help to learn how certain featureswere created in that project.
Make sure you apply the styles to be used in the generated TOC to the appropriate headings in your content.For more information see the online Help.
Tables of Contents Guide123
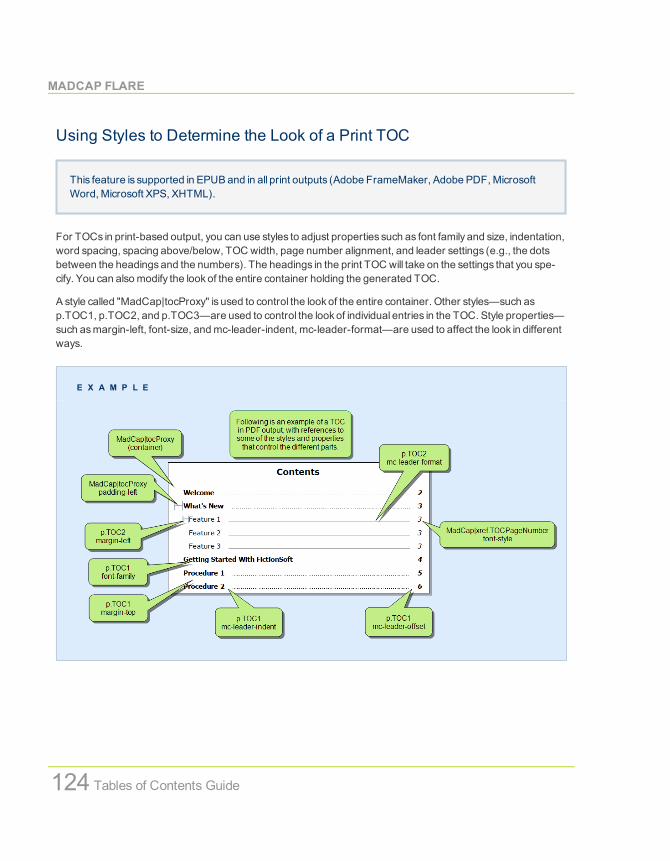
Using Styles to Determine the Look of a Print TOC
This feature is supported in EPUBand in all print outputs (Adobe FrameMaker, Adobe PDF,MicrosoftWord, Microsoft XPS, XHTML).
For TOCs in print-based output, you can use styles to adjust properties such as font family and size, indentation,word spacing, spacing above/below, TOC width, page number alignment, and leader settings (e.g., the dotsbetween the headingsand the numbers). The headings in the print TOC will take on the settings that you spe-cify. You can alsomodify the lookof the entire container holding the generated TOC.
A style called "MadCap|tocProxy" is used to control the lookof the entire container. Other styles—such asp.TOC1, p.TOC2, and p.TOC3—are used to control the lookof individual entries in the TOC. Style properties—such asmargin-left, font-size, andmc-leader-indent, mc-leader-format—are used to affect the look in differentways.
E X A M P L E
.
MADCAP FLARE
124 Tables of Contents Guide
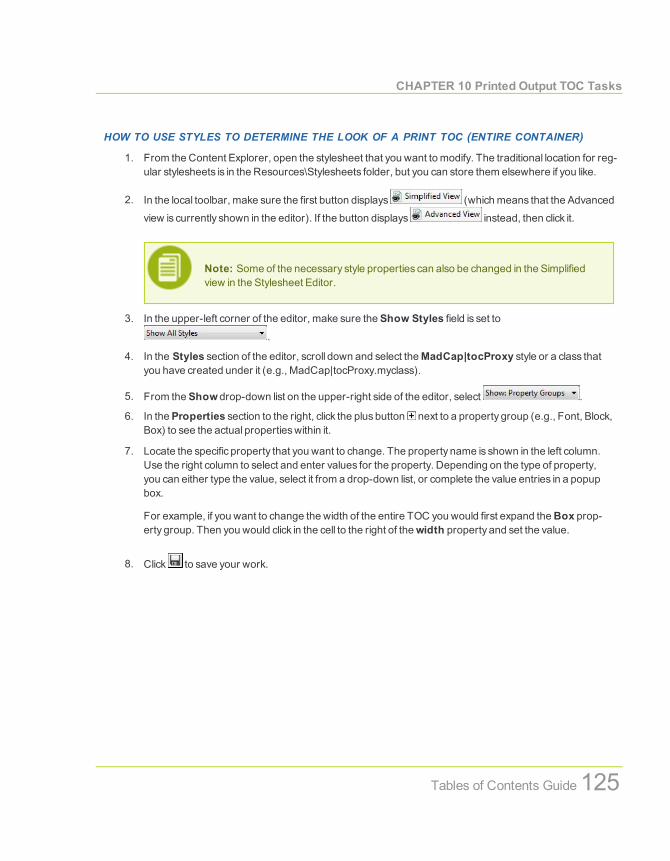
CHAPTER 10 Printed Output TOC Tasks
HOW TO USE STYLES TO DETERMINE THE LOOK OF A PRINT TOC (ENTIRE CONTAINER)
1. From the Content Explorer, open the stylesheet that you want to modify. The traditional location for reg-ular stylesheets is in the Resources\Stylesheets folder, but you can store them elsewhere if you like.
2. In the local toolbar, make sure the first button displays (whichmeans that the Advanced
view is currently shown in the editor). If the button displays instead, then click it.
Note: Some of the necessary style properties can also be changed in the Simplifiedview in the Stylesheet Editor.
3. In the upper-left corner of the editor, make sure theShow Styles field is set to.
4. In the Styles section of the editor, scroll down and select theMadCap|tocProxy style or a class thatyou have created under it (e.g., MadCap|tocProxy.myclass).
5. From theShowdrop-down list on the upper-right side of the editor, select .
6. In theProperties section to the right, click the plusbutton next to a property group (e.g., Font, Block,Box) to see the actual propertieswithin it.
7. Locate the specific property that you want to change. The property name is shown in the left column.Use the right column to select and enter values for the property. Depending on the type of property,you can either type the value, select it from a drop-down list, or complete the value entries in a popupbox.
For example, if you want to change the width of the entire TOC you would first expand theBox prop-erty group. Then you would click in the cell to the right of thewidth property and set the value.
8. Click to save your work.
.
Tables of Contents Guide125
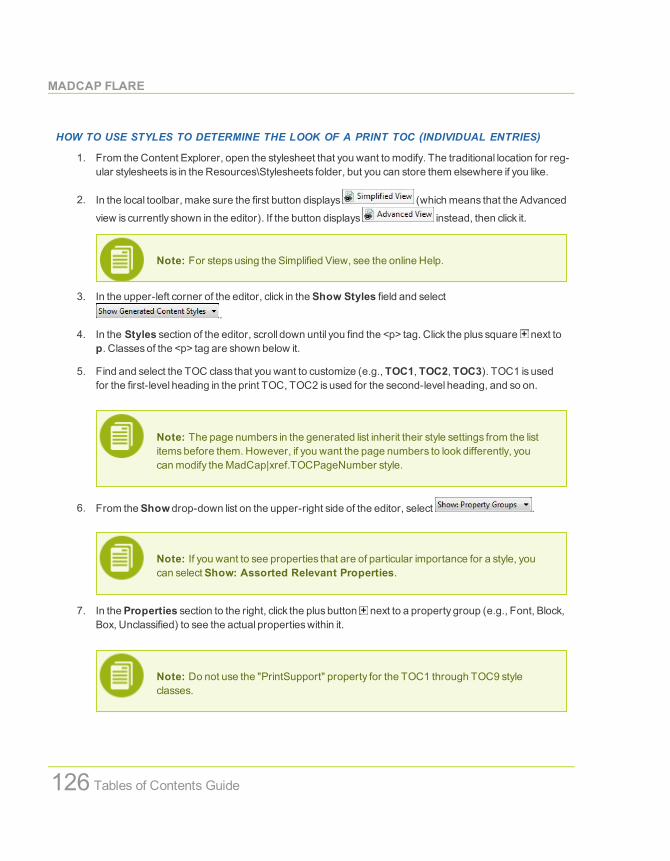
HOW TO USE STYLES TO DETERMINE THE LOOK OF A PRINT TOC (INDIVIDUAL ENTRIES)
1. From the Content Explorer, open the stylesheet that you want to modify. The traditional location for reg-ular stylesheets is in the Resources\Stylesheets folder, but you can store them elsewhere if you like.
2. In the local toolbar, make sure the first button displays (whichmeans that the Advanced
view is currently shown in the editor). If the button displays instead, then click it.
Note: For stepsusing the Simplified View, see the online Help.
3. In the upper-left corner of the editor, click in theShow Styles field and select.
4. In the Styles section of the editor, scroll down until you find the <p> tag. Click the plus square next top. Classesof the <p> tag are shown below it.
5. Find and select the TOC class that you want to customize (e.g., TOC1, TOC2, TOC3). TOC1 is usedfor the first-level heading in the print TOC, TOC2 is used for the second-level heading, and so on.
Note: The page numbers in the generated list inherit their style settings from the listitemsbefore them. However, if you want the page numbers to lookdifferently, youcanmodify theMadCap|xref.TOCPageNumber style.
6. From theShowdrop-down list on the upper-right side of the editor, select .
Note: If you want to see properties that are of particular importance for a style, youcan selectShow: Assorted Relevant Properties.
7. In theProperties section to the right, click the plusbutton next to a property group (e.g., Font, Block,Box, Unclassified) to see the actual propertieswithin it.
Note: Do not use the "PrintSupport" property for the TOC1 through TOC9 styleclasses.
MADCAP FLARE
126 Tables of Contents Guide
CHAPTER 10 Printed Output TOC Tasks
8. Locate the specific property that you want to change. The property name is shown in the left column.Use the right column to select and enter values for the property. Depending on the type of property,you can either type the value, select it from a drop-down list, or complete the value entries in a popupbox. Here are some of themore common properties that youmight change.
Alignment of page number To change the alignment (left, right, center) of the page num-ber, click the plusbutton next to theUnclassified property group. Then click in the rightcolumn next tomc-leader-align and select the type of alignment.
Font family To change the font family (e.g., Arial, Verdana), click the plusbutton next tothe Font property group. Click in the right column next to font-family, set the font family in theFont FamilyPicker dialog, and clickOK.
Font size To change the font size (e.g., 10 pt, 11 pt), click the plusbutton next to the Fontproperty group. Then click in the right column next to font-size, set the font size in the smalldrop-downwindow, and clickOK.
Leader format To change the format of the area between the TOC heading and the pagenumber, expand theUnclassified property group. Then click in the right column next tomc-leader-format and type the character to use. For example, if you want a series of dots, type aperiod. If you do not want to use a leader format, leave this field blank.
Note: For Word output, you can enter one character only (period, hyphen,or underscore). For FrameMaker, you can specify a combination of char-acters and spaces, which repeat between the text and page number.
Leader space before/after Click the plusbutton next to theUnclassified propertygroup. To change the distance from the end of the list entry to the start of the leader, click in theright column next tomc-leader-indent, set themargin value in the small drop-downwindow,and clickOK. To change the distance between the end of the leader and the page number,click in the right column next tomc-leader-offset, set themargin value in the small drop-downwindow, and clickOK.
Page break (avoid heading orphans) To avoid orphan TOC headings (e.g., a first-levelheading in the TOC that is stuckby itself at the bottom of the page, with its second-level head-ings continuing at the top of the next page), you can set that style (e.g., p.TOC1) to avoid apage breakafter it. To do this, click the plusbutton next to thePrintSupport propertygroup. Then click in the right column next to page-break-after and select avoid.
Tables of Contents Guide127
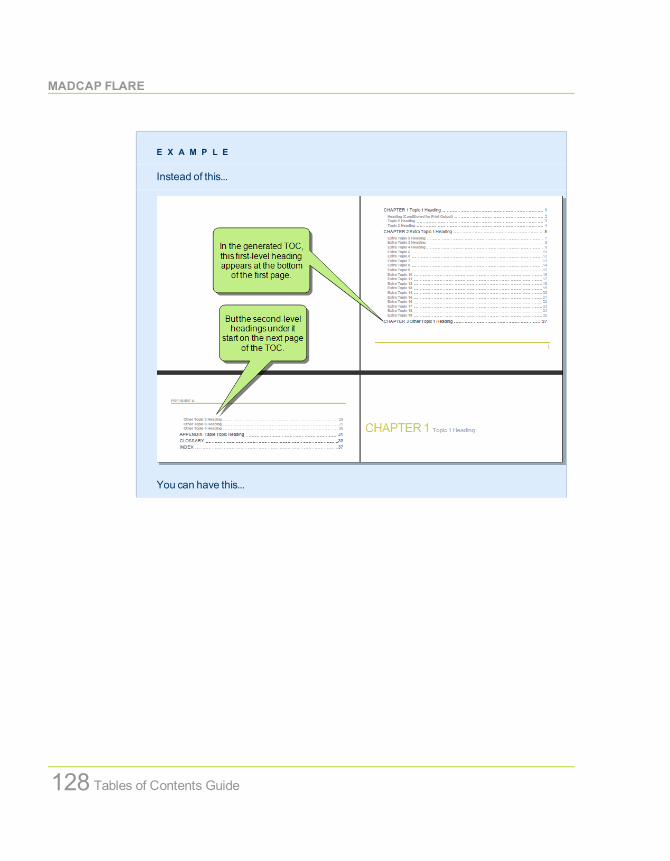
E X A M P L E
Instead of this…
You can have this…
MADCAP FLARE
128 Tables of Contents Guide
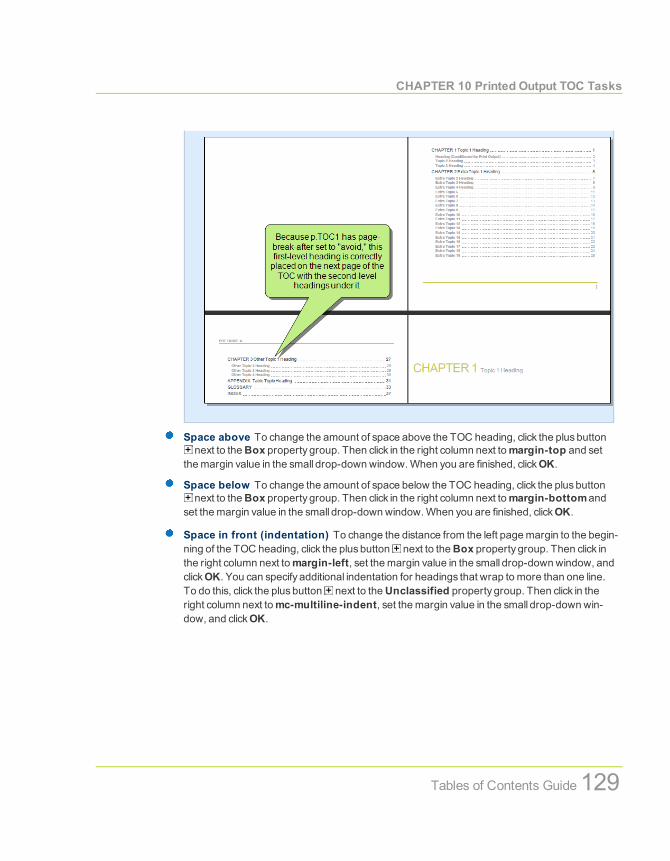
CHAPTER 10 Printed Output TOC Tasks
Space above To change the amount of space above the TOC heading, click the plusbuttonnext to theBox property group. Then click in the right column next tomargin-top and set
themargin value in the small drop-downwindow.When you are finished, clickOK.
Space below To change the amount of space below the TOC heading, click the plusbuttonnext to theBox property group. Then click in the right column next tomargin-bottomand
set themargin value in the small drop-downwindow.When you are finished, clickOK.
Space in front (indentation) To change the distance from the left pagemargin to the begin-ning of the TOC heading, click the plusbutton next to theBox property group. Then click inthe right column next tomargin-left, set themargin value in the small drop-downwindow, andclickOK. You can specify additional indentation for headings that wrap tomore than one line.To do this, click the plusbutton next to theUnclassified property group. Then click in theright column next tomc-multiline-indent, set themargin value in the small drop-downwin-dow, and clickOK.
Tables of Contents Guide129
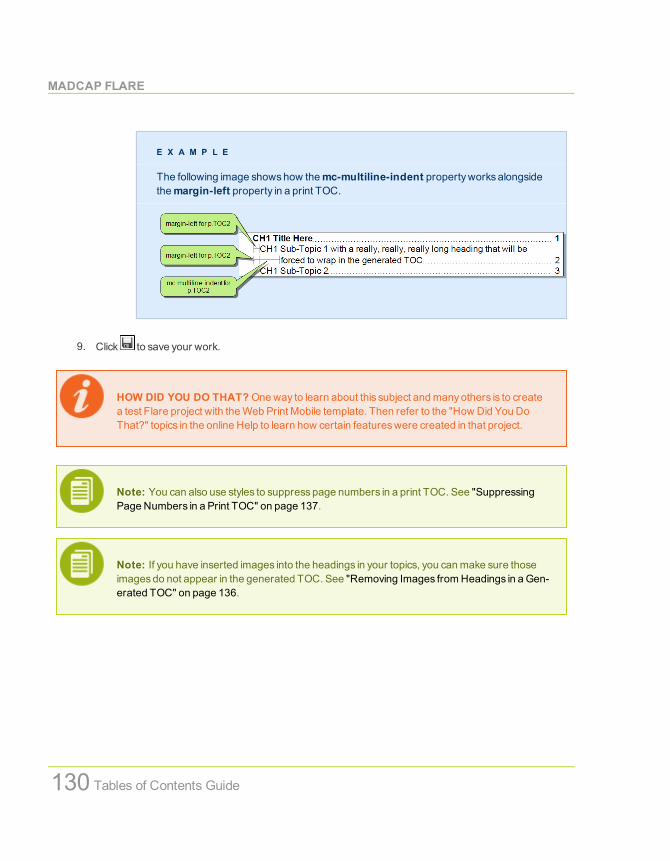
E X A M P L E
The following image showshow themc-multiline-indent propertyworksalongsidethemargin-left property in a print TOC.
9. Click to save your work.
HOW DID YOU DO THAT?Oneway to learn about this subject andmanyothers is to createa test Flare project with theWeb Print Mobile template. Then refer to the "How Did You DoThat?" topics in the online Help to learn how certain featureswere created in that project.
Note: You can also use styles to suppresspage numbers in a print TOC. See "SuppressingPage Numbers in a Print TOC" on page 137.
Note: If you have inserted images into the headings in your topics, you canmake sure thoseimagesdo not appear in the generated TOC. See "Removing Images fromHeadings in a Gen-erated TOC" on page 136.
MADCAP FLARE
130 Tables of Contents Guide
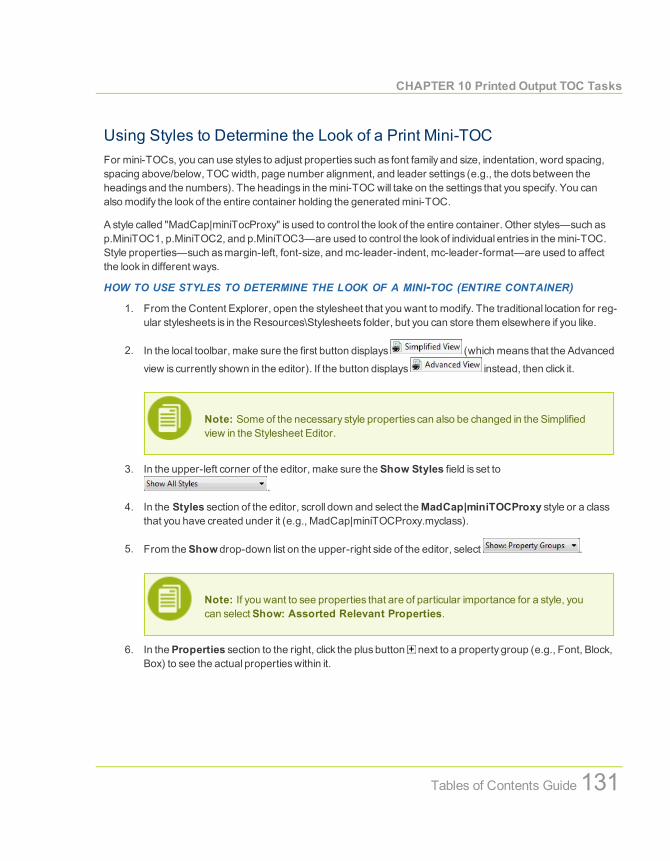
CHAPTER 10 Printed Output TOC Tasks
Using Styles to Determine the Look of a Print Mini-TOCFor mini-TOCs, you can use styles to adjust properties such as font family and size, indentation, word spacing,spacing above/below, TOC width, page number alignment, and leader settings (e.g., the dots between theheadingsand the numbers). The headings in themini-TOC will take on the settings that you specify. You canalsomodify the lookof the entire container holding the generatedmini-TOC.
A style called "MadCap|miniTocProxy" is used to control the lookof the entire container. Other styles—such asp.MiniTOC1, p.MiniTOC2, and p.MiniTOC3—are used to control the lookof individual entries in themini-TOC.Style properties—such asmargin-left, font-size, andmc-leader-indent, mc-leader-format—are used to affectthe look in different ways.
HOW TO USE STYLES TO DETERMINE THE LOOK OF A MINI-TOC (ENTIRE CONTAINER)
1. From the Content Explorer, open the stylesheet that you want to modify. The traditional location for reg-ular stylesheets is in the Resources\Stylesheets folder, but you can store them elsewhere if you like.
2. In the local toolbar, make sure the first button displays (whichmeans that the Advanced
view is currently shown in the editor). If the button displays instead, then click it.
Note: Some of the necessary style properties can also be changed in the Simplifiedview in the Stylesheet Editor.
3. In the upper-left corner of the editor, make sure theShow Styles field is set to.
4. In the Styles section of the editor, scroll down and select theMadCap|miniTOCProxy style or a classthat you have created under it (e.g., MadCap|miniTOCProxy.myclass).
5. From theShowdrop-down list on the upper-right side of the editor, select .
Note: If you want to see properties that are of particular importance for a style, youcan selectShow: Assorted Relevant Properties.
6. In theProperties section to the right, click the plusbutton next to a property group (e.g., Font, Block,Box) to see the actual propertieswithin it.
.
Tables of Contents Guide131

7. Locate the specific property that you want to change. The property name is shown in the left column.Use the right column to select and enter values for the property. Depending on the type of property,you can either type the value, select it from a drop-down list, or complete the value entries in a popupbox.
For example, if you want to change the width of the entire mini-TOC you would first expand theBoxproperty group. Then you would click in the cell to the right of thewidth property and set the value.
8. Click to save your work.
.
MADCAP FLARE
132 Tables of Contents Guide
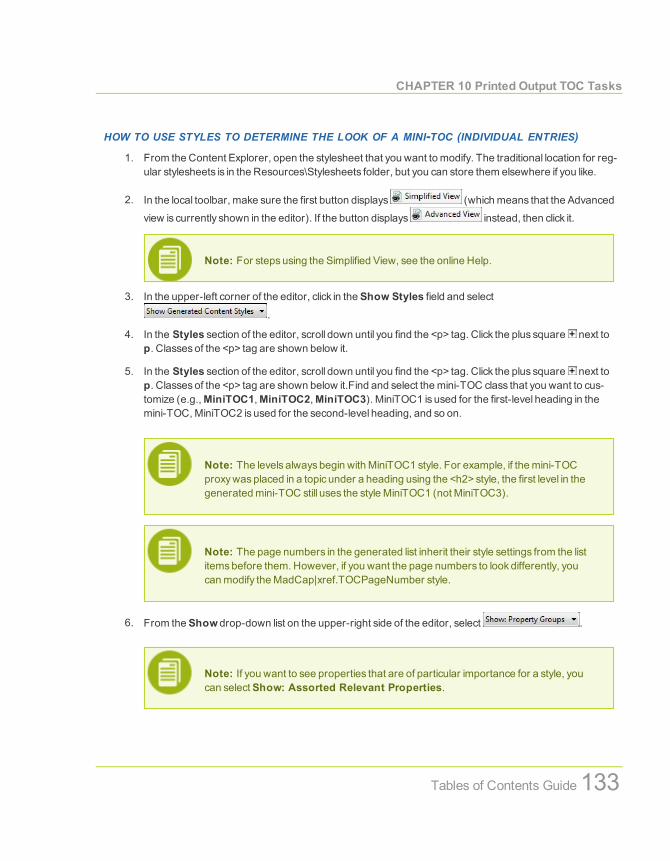
CHAPTER 10 Printed Output TOC Tasks
HOW TO USE STYLES TO DETERMINE THE LOOK OF A MINI-TOC (INDIVIDUAL ENTRIES)
1. From the Content Explorer, open the stylesheet that you want to modify. The traditional location for reg-ular stylesheets is in the Resources\Stylesheets folder, but you can store them elsewhere if you like.
2. In the local toolbar, make sure the first button displays (whichmeans that the Advanced
view is currently shown in the editor). If the button displays instead, then click it.
Note: For stepsusing the Simplified View, see the online Help.
3. In the upper-left corner of the editor, click in theShow Styles field and select.
4. In the Styles section of the editor, scroll down until you find the <p> tag. Click the plus square next top. Classesof the <p> tag are shown below it.
5. In the Styles section of the editor, scroll down until you find the <p> tag. Click the plus square next top. Classesof the <p> tag are shown below it.Find and select themini-TOC class that you want to cus-tomize (e.g.,MiniTOC1,MiniTOC2,MiniTOC3). MiniTOC1 is used for the first-level heading in themini-TOC,MiniTOC2 is used for the second-level heading, and so on.
Note: The levels alwaysbegin with MiniTOC1 style. For example, if themini-TOCproxywasplaced in a topic under a heading using the <h2> style, the first level in thegeneratedmini-TOC still uses the style MiniTOC1 (not MiniTOC3).
Note: The page numbers in the generated list inherit their style settings from the listitemsbefore them. However, if you want the page numbers to lookdifferently, youcanmodify theMadCap|xref.TOCPageNumber style.
6. From theShowdrop-down list on the upper-right side of the editor, select .
Note: If you want to see properties that are of particular importance for a style, youcan selectShow: Assorted Relevant Properties.
Tables of Contents Guide133
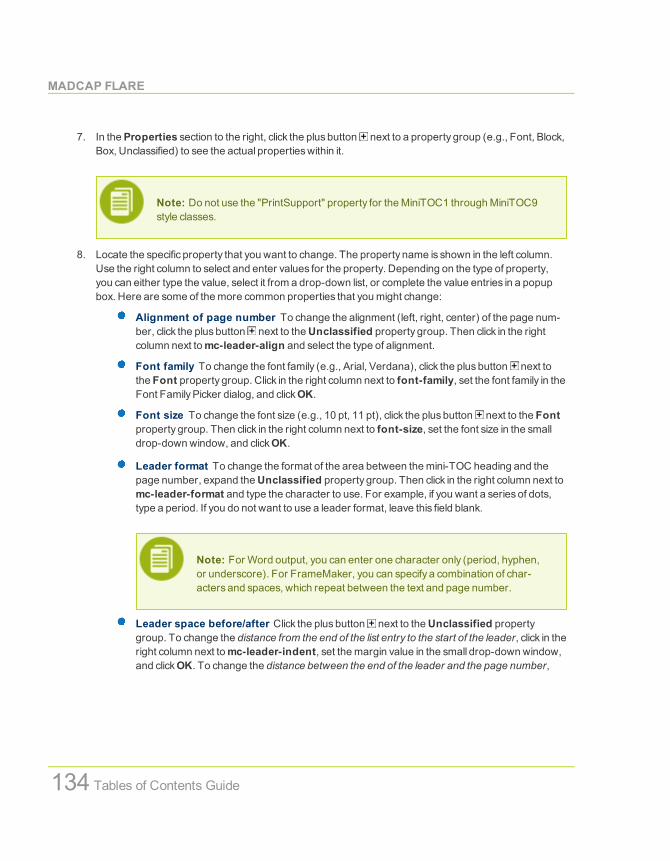
7. In theProperties section to the right, click the plusbutton next to a property group (e.g., Font, Block,Box, Unclassified) to see the actual propertieswithin it.
Note: Do not use the "PrintSupport" property for theMiniTOC1 throughMiniTOC9style classes.
8. Locate the specific property that you want to change. The property name is shown in the left column.Use the right column to select and enter values for the property. Depending on the type of property,you can either type the value, select it from a drop-down list, or complete the value entries in a popupbox. Here are some of themore common properties that youmight change:
Alignment of page number To change the alignment (left, right, center) of the page num-ber, click the plusbutton next to theUnclassified property group. Then click in the rightcolumn next tomc-leader-align and select the type of alignment.
Font family To change the font family (e.g., Arial, Verdana), click the plusbutton next tothe Font property group. Click in the right column next to font-family, set the font family in theFont FamilyPicker dialog, and clickOK.
Font size To change the font size (e.g., 10 pt, 11 pt), click the plusbutton next to the Fontproperty group. Then click in the right column next to font-size, set the font size in the smalldrop-downwindow, and clickOK.
Leader format To change the format of the area between themini-TOC heading and thepage number, expand theUnclassified property group. Then click in the right column next tomc-leader-format and type the character to use. For example, if you want a series of dots,type a period. If you do not want to use a leader format, leave this field blank.
Note: For Word output, you can enter one character only (period, hyphen,or underscore). For FrameMaker, you can specify a combination of char-acters and spaces, which repeat between the text and page number.
Leader space before/after Click the plusbutton next to theUnclassified propertygroup. To change the distance from the end of the list entry to the start of the leader, click in theright column next tomc-leader-indent, set themargin value in the small drop-downwindow,and clickOK. To change the distance between the end of the leader and the page number,
MADCAP FLARE
134 Tables of Contents Guide
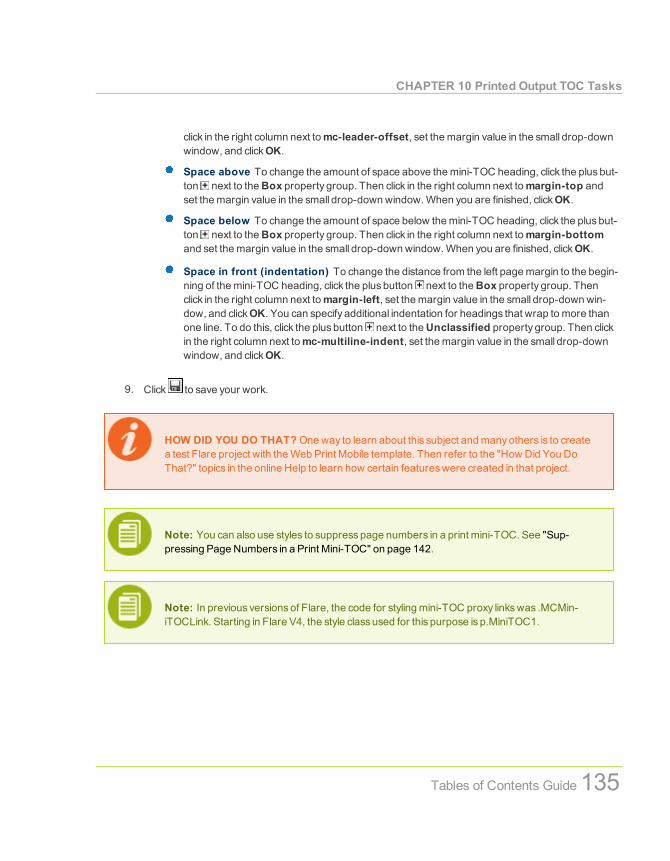
CHAPTER 10 Printed Output TOC Tasks
click in the right column next tomc-leader-offset, set themargin value in the small drop-downwindow, and clickOK.
Space above To change the amount of space above themini-TOC heading, click the plusbut-ton next to theBox property group. Then click in the right column next tomargin-top andset themargin value in the small drop-downwindow.When you are finished, clickOK.
Space below To change the amount of space below themini-TOC heading, click the plusbut-ton next to theBox property group. Then click in the right column next tomargin-bottomand set themargin value in the small drop-downwindow.When you are finished, clickOK.
Space in front (indentation) To change the distance from the left pagemargin to the begin-ning of themini-TOC heading, click the plusbutton next to theBox property group. Thenclick in the right column next tomargin-left, set themargin value in the small drop-downwin-dow, and clickOK. You can specify additional indentation for headings that wrap tomore thanone line. To do this, click the plusbutton next to theUnclassified property group. Then clickin the right column next tomc-multiline-indent, set themargin value in the small drop-downwindow, and clickOK.
9. Click to save your work.
HOW DID YOU DO THAT?Oneway to learn about this subject andmanyothers is to createa test Flare project with theWeb Print Mobile template. Then refer to the "How Did You DoThat?" topics in the online Help to learn how certain featureswere created in that project.
Note: You can also use styles to suppresspage numbers in a print mini-TOC. See "Sup-pressing Page Numbers in a Print Mini-TOC" on page 142.
Note: In previous versionsof Flare, the code for stylingmini-TOC proxy linkswas .MCMin-iTOCLink. Starting in Flare V4, the style classused for this purpose is p.MiniTOC1.
Tables of Contents Guide135
Removing Images from Headings in a Generated TOC
This feature is supported in all print outputs (Adobe FrameMaker, Adobe PDF,MicrosoftWord, MicrosoftXPS, and XHTML).
If you have inserted images into the headings in your topics, you canmake sure those imagesdo not appear inthe generated TOC of the printed output.
This option works somewhat differently for Word output than it does for the other outputs.
WORD
If the option is disabled, imagesappear in both content headingsand the print TOC.
If the option is enabled, imagesare removed from both content headingsand the print TOC.
PDF, XHTML, XPS, FRAMEMAKERIf the option is disabled, imagesappear in content headingsonly.
If the option is enabled, imagesare removed completely.
HOW TO REMOVE IMAGES FROM HEADINGS IN A GENERATED TOC
1. Open the target.
2. In the Target Editor, select theAdvanced tab.
3. In theGenerated TOC section, selectRemove images from paragraphs with heading levels.
4. Click to save your work.
Note: Keep inmind that, with this feature, the imagesare also removed from the heading inthe content of the document. Therefore, if you want to have the images in the content, but notin the print TOC, you should not use this feature. Instead, youmust remove the images fromthe print TOCmanually after generation (if you compile an editable output, such asWord orFrameMaker).
MADCAP FLARE
136 Tables of Contents Guide
CHAPTER 10 Printed Output TOC Tasks
Suppressing Page Numbers in a Print TOC
This feature is supported in Adobe PDF,Microsoft XPS, and XHTML output.
If you are generating one of Flare's native print-based output formats (PDF, XPS, or XHTML), you can sup-presspage numbers for specific levels in the table of contents (TOC) or mini-TOC. This can be done bymodi-fying the TOC or mini-TOC style (e.g., p.TOC1, p.TOC2, p.MiniTOC1) and selecting an option in themc-pagenum-display property.
HOW TO SUPPRESS PAGE NUMBERS IN A PRINT TOC
1. From the Content Explorer, open the stylesheet that you want to modify. The traditional location for reg-ular stylesheets is in the Resources\Stylesheets folder, but you can store them elsewhere if you like.
2. In the local toolbar, make sure the first button displays (whichmeans that the Advanced
view is currently shown in the editor). If the button displays instead, then click it.
3. In the upper-left corner of the editor, click in theShow Styles field and select.
4. In the Styles section of the editor, scroll down until you find the <p> tag. Click the plus square next top. Classesof the <p> tag are shown below it.
5. Find and select the TOC class that you want to customize (e.g., TOC1, TOC2, TOC3). TOC1 is usedfor the first-level heading in the print TOC, TOC2 is used for the second-level heading, and so on.
.
Tables of Contents Guide137
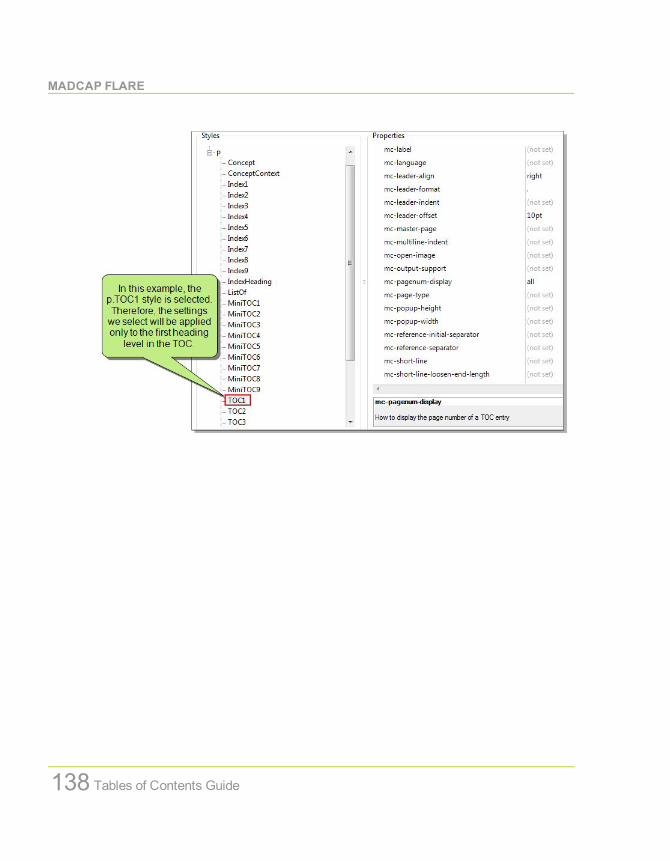
.
MADCAP FLARE
138 Tables of Contents Guide
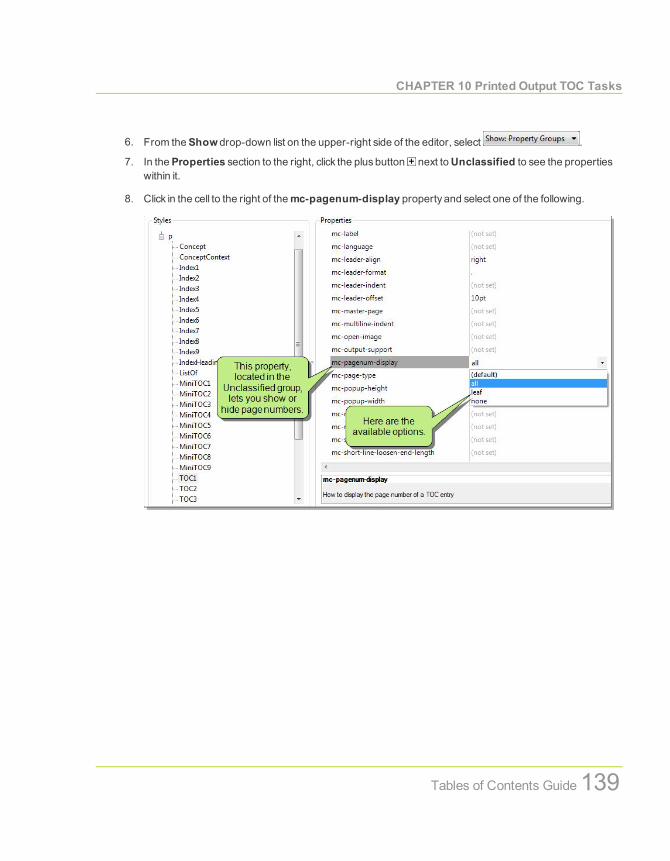
CHAPTER 10 Printed Output TOC Tasks
6. From theShowdrop-down list on the upper-right side of the editor, select .
7. In theProperties section to the right, click the plusbutton next toUnclassified to see the propertieswithin it.
8. Click in the cell to the right of themc-pagenum-display property and select one of the following.
.
Tables of Contents Guide139
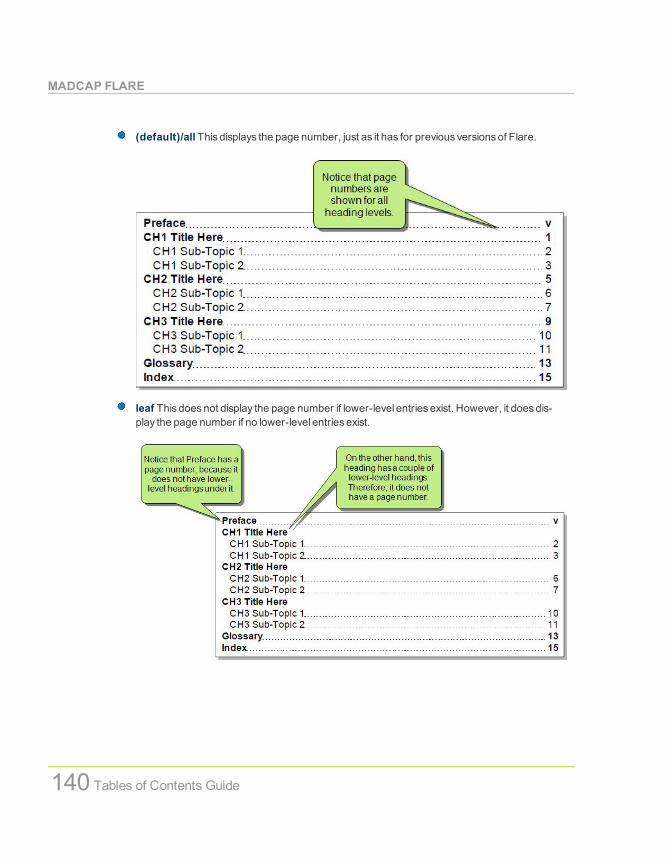
(default)/all This displays the page number, just as it has for previous versionsof Flare.
leaf This doesnot display the page number if lower-level entries exist. However, it doesdis-play the page number if no lower-level entries exist.
.
MADCAP FLARE
140 Tables of Contents Guide
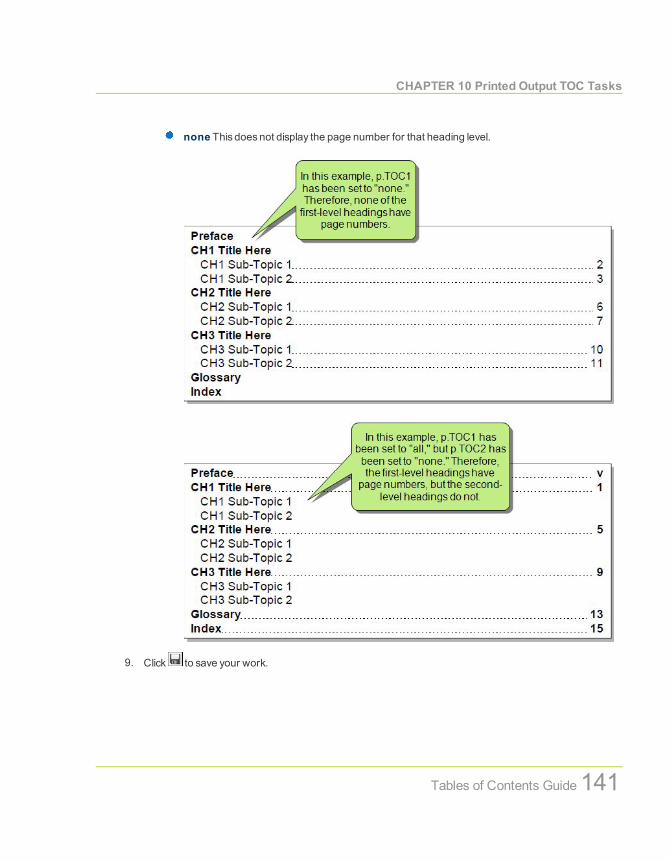
CHAPTER 10 Printed Output TOC Tasks
none This doesnot display the page number for that heading level.
9. Click to save your work.
Tables of Contents Guide141
Suppressing Page Numbers in a Print Mini-TOC
This feature is supported in Adobe PDF,Microsoft XPS, and XHTML output.
If you are generating one of Flare's native print-based output formats (PDF, XPS, or XHTML), you can sup-presspage numbers for specific levels in the table of contents (TOC) or mini-TOC. This can be done bymodi-fying the TOC or mini-TOC style (e.g., p.TOC1, p.TOC2, p.MiniTOC1) and selecting an option in themc-pagenum-display property.
HOW TO SUPPRESS PAGE NUMBERS IN A PRINT MINI-TOC1. From the Content Explorer, open the stylesheet that you want to modify. The traditional location for reg-
ular stylesheets is in the Resources\Stylesheets folder, but you can store them elsewhere if you like.
2. In the local toolbar, make sure the first button displays (whichmeans that the Advanced
view is currently shown in the editor). If the button displays instead, then click it.
3. In the upper-left corner of the editor, click in theShow Styles field and select.
4. In the Styles section of the editor, scroll down until you find the <p> tag. Click the plus square next top. Classesof the <p> tag are shown below it.
5. Find and select themini-TOC class that you want to customize (e.g.,MiniTOC1,MiniTOC2,Mini-TOC3). MiniTOC1 is used for the first-level heading in the print mini-TOC,MiniTOC2 is used for thesecond-level heading, and so on.
MADCAP FLARE
142 Tables of Contents Guide
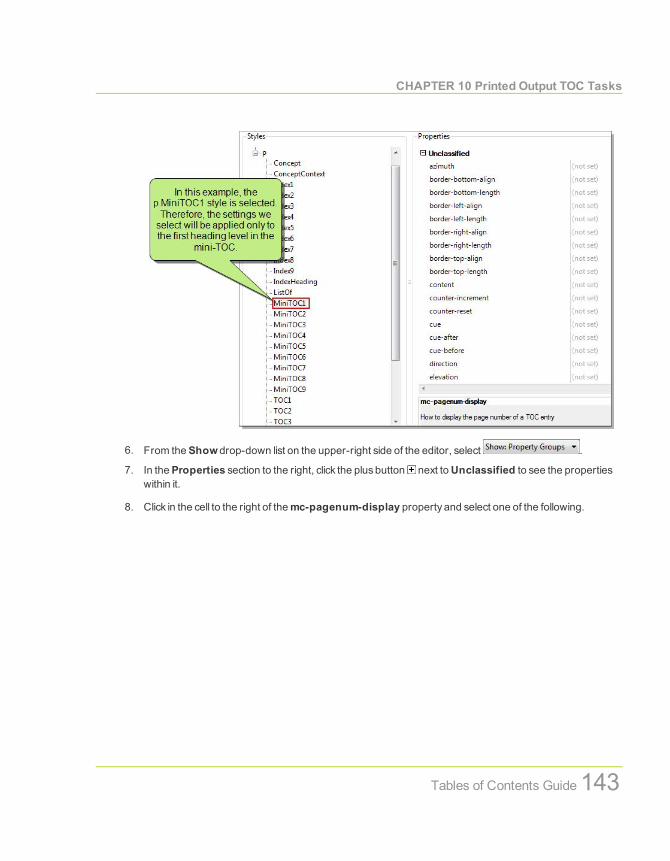
CHAPTER 10 Printed Output TOC Tasks
6. From theShowdrop-down list on the upper-right side of the editor, select .
7. In theProperties section to the right, click the plusbutton next toUnclassified to see the propertieswithin it.
8. Click in the cell to the right of themc-pagenum-display property and select one of the following.
Tables of Contents Guide143
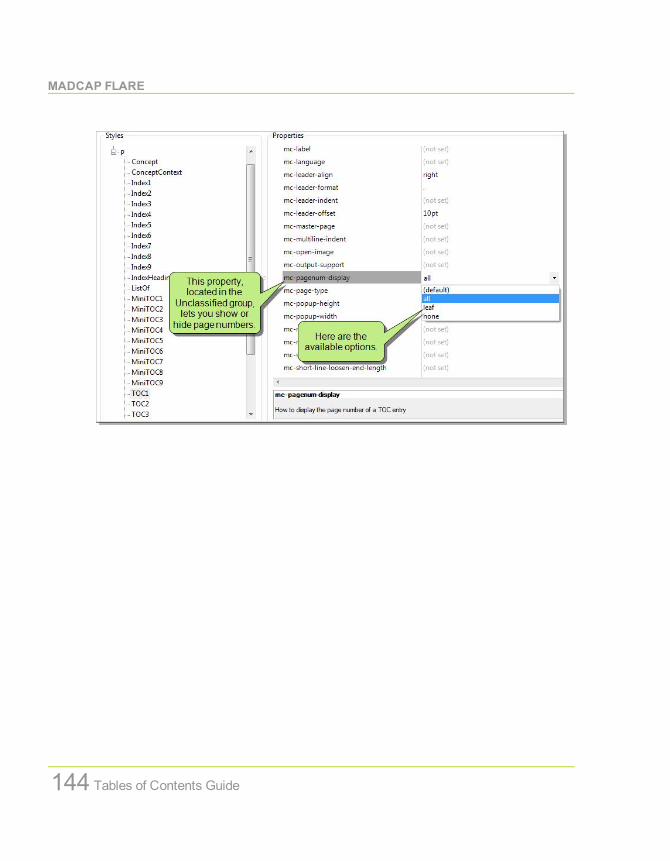
MADCAP FLARE
144 Tables of Contents Guide
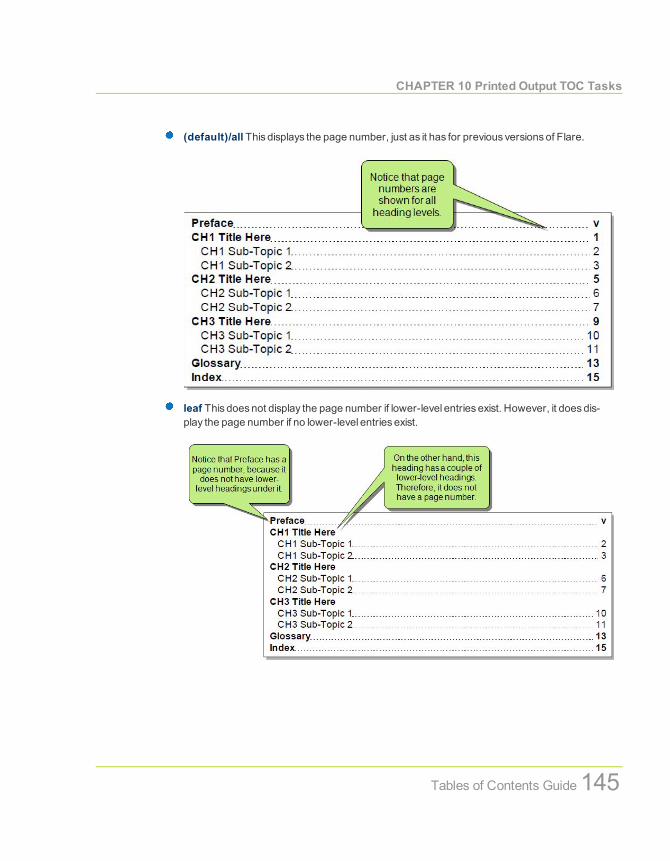
CHAPTER 10 Printed Output TOC Tasks
(default)/all This displays the page number, just as it has for previous versionsof Flare.
leaf This doesnot display the page number if lower-level entries exist. However, it doesdis-play the page number if no lower-level entries exist.
.
Tables of Contents Guide145
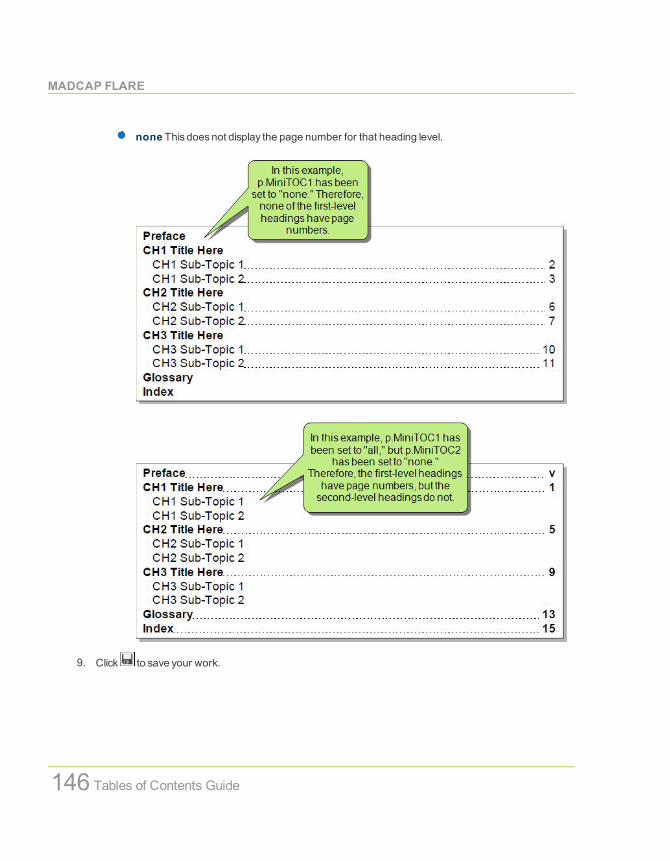
none This doesnot display the page number for that heading level.
9. Click to save your work.
MADCAP FLARE
146 Tables of Contents Guide
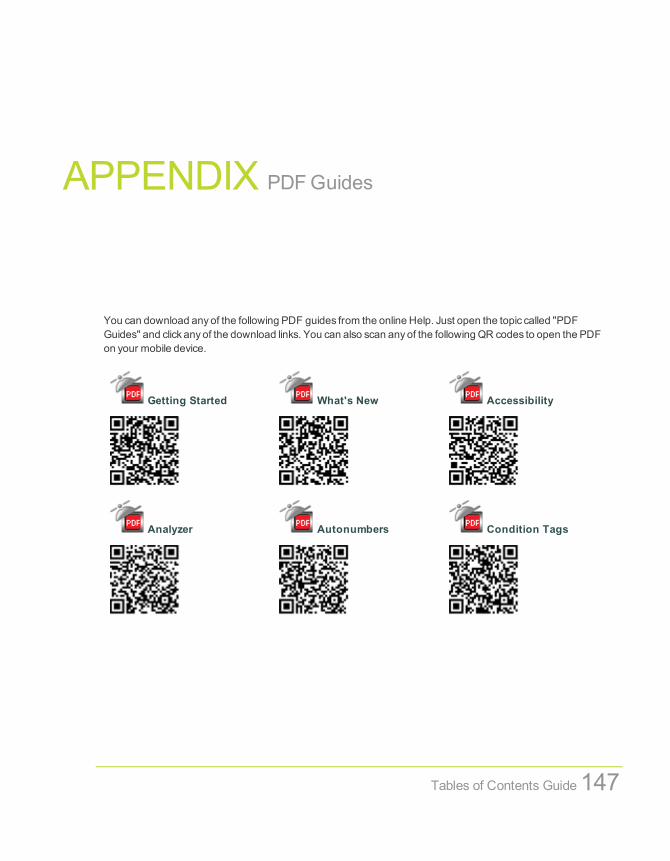
Tables of Contents Guide147
APPENDIX PDFGuides
You can download anyof the following PDF guides from the online Help. Just open the topic called "PDFGuides" and click anyof the download links. You can also scan anyof the followingQR codes to open the PDFon your mobile device.
Getting Started What's New Accessibility
Analyzer Autonumbers Condition Tags
CSH DotNet Help Global Project Linking
HTML Help Images Importing
Index Key Features Language Support
Movies Navigation Links Print-based Output
MADCAP FLARE
148 Tables of Contents Guide
APPENDIX PDF Guides
Project Creation Pulse QR Codes
Reports Reviews/Contributions Search
SharePoint Shortcuts Skins
Snippets Source Control Styles
Tables of Contents Guide149
Tables Targets Templates
TOCs Topics Tour Workspace
Transition FrameMaker Variables WebHelp Outputs
MADCAP FLARE
150 Tables of Contents Guide