flexitouch system - tactile medical · troubleshooting and ... the flexitouch system is medical...
TRANSCRIPT

i Customer Service Toll-Free: 866.435.3948
Flexitouch® System U S E R G U I D E
MODEL PD32-U
Advanced Pneumatic Compression

Table of Contents
Chapter 1Before You Get Started . . . . . . . . . . . 1
1.1 How to Contact Tactile Medical . . . . . . . . . . . . . . 11.2 Safety Precautions and Explanation of Symbols . . . . . 11.3 Indications for Use . . . . . . . . . . 31.4 Contraindications . . . . . . . . . . . 41.5 Unpacking Instructions . . . . . . 4
Chapter 2The Flexitouch® System . . . . . . . . . . 6
2.1 System Components . . . . . . . . 62.2 Programmed Pressure Levels. . . . . . . . . . . . . . . . . . . . . . . 72.3 Treating the Lower Extremity . . . . . . . . . . . . . . . . . . . 82.4 Treating the Upper Extremity . . . . . . . . . . . . . . . . . .11
Chapter 3Controller Set-Up . . . . . . . . . . . . . . . 13
3.1 Setting Up the Controller Unit . . . . . . . . . . . . . . . . . . . . . . .133.2 Select Your Settings . . . . . . . .14
Chapter 4Garment and Accessory Application–Lower Extremity . . . 16
4.1 Applying the Full Leg Garment . . . . . . . . . . . . . . . . . . .164.2 Applying the Full Leg Garment and Trunk Accessory . . . . . . . .184.3 Applying the Calf-Foot Garment and Trunk-Thigh Accessory . . . . . .20
Chapter 5Garment and Accessory Application– Upper Extremity . . . . . . . . . . . . . . . . 22
5.1 Applying the Arm Garment . . . . . . . . . . . . . . . . . . .225.2 Applying the Trunk Accessory and Arm-Shoulder Garment . . . . . . . . . . . . . . . . . . .23
Chapter 6Connecting the Hoses to the Controller . . . . . . . . . . . . . . . . . . 28
Chapter 7Conducting a Therapy Session . . . 31
7.1 Starting the Session . . . . . . . .317.2 Pausing the Session . . . . . . . .317.3 Completing the Session . . . .327.4 Turning the Controller Unit Off . . . . . . . . . . . . . . . . . . . .327.5 Storing the Flexitouch System . . . . . . . . . . . . . . . . . . . .327.6 Cleaning the Flexitouch System . . . . . . . . . . . . . . . . . . . .32
Chapter 8Troubleshooting and Specifications . . . . . . . . . . . . . . . . . . 34
8.1 Troubleshooting . . . . . . . . . . .348.2 Limited Warranty and Service for Home Use . . . . . .368.3 Limited Warranty and Service for Facility Use . . . . . .368.4 Equipment Lifetime . . . . . . . .368.5 Return Policy . . . . . . . . . . . . . . .368.6 Patents . . . . . . . . . . . . . . . . . . . .378.7 Technical Information . . . . . .37 For Additional Questions . . .42

1 Customer Service Toll-Free: 866.435.3948
CHAPTER 1
Before You Get StartedRead the entire guide before attempting to connect or operate this product. Keep this guide for future reference.
The Flexitouch System is designed for at-home treatment of lymphedema, chronic edema and chronic wounds. When used daily, the Flexitouch System can help you manage your condition, improve your health, and allow you to enjoy a better quality of life.
This guide provides the information needed to set up and use your Flexitouch System.
1 .1 How to Contact Tactile MedicalIf you have questions about the Flexitouch System operation, or if your Flexitouch System requires service, contact Tactile Medical.
Customer Service is available at 612.355.5100 or toll-free at 866.435.3948 (U.S. only). You may also email us at [email protected].
If you have medical questions, please contact your physician or healthcare provider.
1 .2 Safety Precautions and Explanation of Symbols
IMPORTANT: Read Instructions Before Using Before attempting to connect or operate this product, please read the entire guide. Keep this guide available for future reference.
CAUTION
MANUFACTURER’S PART NUMBER
Rx OnlyCAUTION: U.S. Federal law restricts this device to sale by or on the order of a licensed healthcare professional.
Consult your physician or other healthcare provider for recommendations regarding your therapy program, treatment cycles and/or duration of treatment. Use this product only at the settings prescribed by your healthcare provider.
2
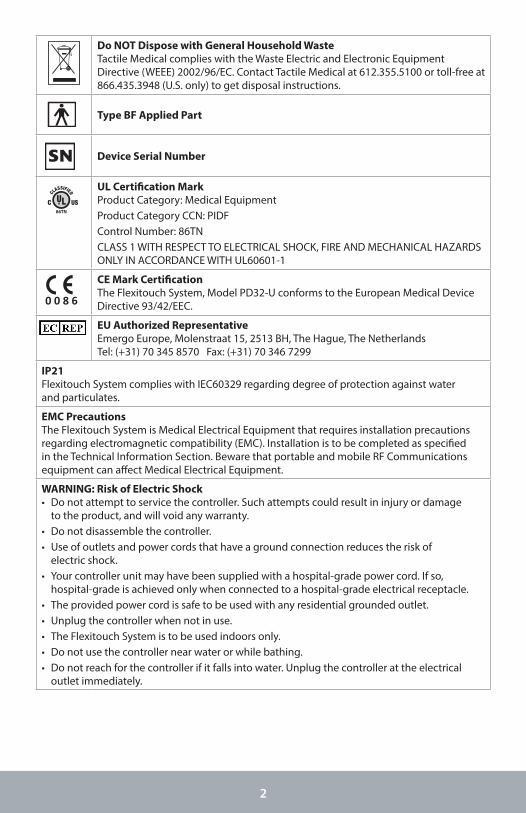
Do NOT Dispose with General Household WasteTactile Medical complies with the Waste Electric and Electronic Equipment Directive (WEEE) 2002/96/EC. Contact Tactile Medical at 612.355.5100 or toll-free at 866.435.3948 (U.S. only) to get disposal instructions.
Type BF Applied Part
Device Serial Number
UL Certification MarkProduct Category: Medical EquipmentProduct Category CCN: PIDFControl Number: 86TNCLASS 1 WITH RESPECT TO ELECTRICAL SHOCK, FIRE AND MECHANICAL HAZARDS ONLY IN ACCORDANCE WITH UL60601-1
CE Mark CertificationThe Flexitouch System, Model PD32-U conforms to the European Medical Device Directive 93/42/EEC.
EU Authorized RepresentativeEmergo Europe, Molenstraat 15, 2513 BH, The Hague, The Netherlands Tel: (+31) 70 345 8570 Fax: (+31) 70 346 7299
IP21Flexitouch System complies with IEC60329 regarding degree of protection against water and particulates.
EMC PrecautionsThe Flexitouch System is Medical Electrical Equipment that requires installation precautions regarding electromagnetic compatibility (EMC). Installation is to be completed as specified in the Technical Information Section. Beware that portable and mobile RF Communications equipment can affect Medical Electrical Equipment.
WARNING: Risk of Electric Shock• Do not attempt to service the controller. Such attempts could result in injury or damage
to the product, and will void any warranty.• Do not disassemble the controller.• Use of outlets and power cords that have a ground connection reduces the risk of
electric shock.• Your controller unit may have been supplied with a hospital-grade power cord. If so,
hospital-grade is achieved only when connected to a hospital-grade electrical receptacle.• The provided power cord is safe to be used with any residential grounded outlet. • Unplug the controller when not in use.• The Flexitouch System is to be used indoors only.• Do not use the controller near water or while bathing.• Do not reach for the controller if it falls into water. Unplug the controller at the electrical
outlet immediately.
0 0 8 6

3 Customer Service Toll-Free: 866.435.3948
WARNING: Risk of Personal Injury• Use the controller only for its intended purpose, as directed in this guide. • Use accessories only if recommended or supplied by Tactile Medical.• Setup the controller in a manner that provides easy access to the power cord should it
become necessary to unplug quickly.• Never operate the controller if the cord or plug is not working properly, if it has been
damaged, or if the controller has been dropped into water. Return it to Tactile Medical for inspection or repair. Do not modify the cord or plug.
• Keep the power cord away from heated surfaces.• Never operate the controller where the cord or tubing harness will present a strangulation or
tripping hazard.• Strangulation potential: Power cord and tubing bundle should never be placed near or
around a person’s neck.
CAUTION: Risk of Device Damage• Never block the ventilation openings on the back or the sides of the controller. Keep the
ventilation openings free of debris such as lint and hair.• Never operate the controller on a soft surface, such as a bed, couch, or pillow, where the
ventilation openings may be blocked.• Never drop or insert any object into any opening of the controller.• Never use sharp objects, such as pins, scissors or clasps on or near the Flexitouch System.• Never use hot devices such as irons or blow dryers, on or near the Flexitouch System.
1 .3 Indications for UseThe Flexitouch System is intended for use by medical professionals and patients who are under medical supervision, for the treatment of many conditions such as:
• Lymphedema
• Primary lymphedema
• Post mastectomy edema
• Edema following trauma and sports injuries
• Post immobilization edema
• Venous insufficiencies
• Reducing wound healing time
• Treatment and assistance in healing stasis dermatitis, venous stasis ulcers, or arterial and diabetic leg ulcers

4
1 .4 ContraindicationsThe Flexitouch System should not be used if you have one or more of the following conditions:
• Pulmonary edema
• Thrombophlebitis
• Congestive heart failure
• Deep vein thrombosis
• Episodes of pulmonary embolism
• Infections and inflammations
• Acute cancer
• Conditions in which increased venous and lymphatic return is undesirable
The Flexitouch Trunk accessory should not be used during pregnancy.
1 .5 Unpacking InstructionsWhen your Flexitouch System arrives, allow the controller to reach room temperature for one hour before using. It is important that you carefully unpack the contents and ensure that you have all the equipment required to begin operation.
Included in the box, you should find the following:
• User Guide
• Controller unit
• Garments and accessories needed to treat your condition
• Power cord (10’ maximum)
• Training DVD
• Welcome packet
The garments and accessories you receive will depend upon your individual therapy requirements.
If you are missing any of the items listed for your prescribed treatment, please contact Customer Service.

5 Customer Service Toll-Free: 866.435.3948
Lower Extremity Treatment
The garments and accessories needed for lower extremity treatment may include the following:
• Full Leg garment (available in short petite, short, medium or long)
• Trunk-Thigh accessory (available in short, long or EXT)
• Calf-Foot garment (available in reg or EXT)
• Trunk accessory
• Waist extender(s)
Upper Extremity Treatment
The garments and accessories needed for upper extremity treatment may include the following:
• Arm/Arm-Shoulder garment
• Trunk accessory
• Waist extender(s)
Labels
Each label is located where the tubing attaches to the garment or accessory. It indicates the body area the garment or accessory is to be applied (Full Leg, Trunk, Calf-Foot, Trunk-Thigh, Chest and Arm). See Figure 1a.
Figure 1a . Label Examples

6
The Flexitouch SystemCHAPTER 2
The Flexitouch System is an advanced pneumatic compression device clinically proven to stimulate the lymphatic system. The device helps direct and move excess fluid from an impaired lymphatic region to healthy regions, where fluid can be absorbed and processed naturally by your body.
NOTE: No special skills, training or knowledge is required to operate the Flexitouch System.
2 .1 System ComponentsThe Flexitouch System consists of two primary components:
Controller
The controller is a programmable pneumatic compressor with four connector outlets. Each connector has eight outflow ports in which the garment hoses plug into. Air passes through the hoses, delivering treatment through the sequential inflation and deflation of up to 32 air chambers in the garments. By selecting the appropriate treatment program, calibrated gradient pressure is delivered to the chambers and assists in moving excess fluid out of affected limb(s).
Garments and Accessories
The air-chambered garments and accessories are made of soft, pliable fabric. They are designed to fit the contours of your body by wrapping around the limb(s) and attaching with hook and loop fasteners. A variety of upper and lower extremity treatment options are available in order to address your specific needs.
The upper extremity garment(s) and accessories are used to treat the arm or the arm and core. Depending on your clinical needs, you may be prescribed an arm garment, or arm-shoulder garment and trunk accessory.
The lower extremity garment(s) and accessories are used to treat the leg or the leg and core. Depending on your clinical needs, you may be prescribed a leg garment, or both a leg garment and trunk accessory.

7 Customer Service Toll-Free: 866.435.3948
Table 1: Treatment Programs and Therapy Times
Program Program Display Body Regions Treated Single Cycle Time (min .)
Available Cycles
Primary Upper Extremity Treatment Programs
U1 Full arm & core Trunk, chest, biceps, forearm and hand
60 1
U4 Arm-Shoulder Biceps, forearm and hand
47 1–5
U7 Full arm Arm 30 1–5
Supplemental Upper Extremity Treatment Programs
U2 Trunk ONLY-UPPER Trunk 12 1–5
U3 Trunk & chest Trunk and chest 24 1–5
U5 Forearm & hand Forearm and hand 24 1–5
U6 Hand only Hand 12 1–5
Primary Lower Extremity Treatment Programs
L1 Full leg & core Trunk, thigh, calf and foot
60 1
L4 Full leg plus Thigh, calf and foot 45 1–5
L5 Half leg plus Calf and foot 30 1–5
L7 Half leg Calf and foot 30 1–5
L8 Full leg Thigh, calf and foot 45 1–5
Supplemental Lower Extremity Treatment Programs
L2 Trunk ONLY-LOWER Trunk 15 1–5
L3 Trunk & thigh Trunk and thigh 30 1–5
L6 Foot only Foot 15 1–5
2 .2 Programmed Pressure LevelsProgrammed pressure levels in each of the air chambers are based on physiological principles of how lymph fluid moves through the system. Your healthcare provider will determine what individual programs are appropriate for you. In certain medical circumstances, your healthcare provider may wish to increase the pressure settings specifically for your hand or foot regions. The Flexitouch controller allows for selection of INCREASED pressure settings. Please consult with your healthcare provider before changing those settings.
Upp
er E
xtre
mit
yLo
wer
Ext
rem
ity

8
2 .3 Treating the Lower Extremity
Figure 2a: Full LegTreatment Program L8
Providing traditional leg treatment, this option moves excess lymphatic fluid in a distal to proximal (Foot to top of Thigh) direction
via multiple chambers in a continuous wave-like motion.
(Approximate treatment time: 45 minutes)
Full Legdirects fluid from toes to top of Thigh in one continuous motion

9 Customer Service Toll-Free: 866.435.3948
Figure 2b: Full Leg and CoreTreatment Program L1
This treatment option provides the ability to deliver therapy to both the leg and trunk regions when clinically appropriate. Incremental proximal clearing of lymphatic fluid in the trunk, thigh,
calf and foot regions is followed by delivery of the traditional full leg treatment.
(Approximate treatment time: 60 minutes. Preparation phase: 30 minutes, Drainage phase: 30 minutes)
1. Trunkdirects fluid from top of the thigh to waist
4. Foot directs fluid from toes to ankle
3. Calfdirects fluid from ankle to knee
2. Thighdirects fluid from knee to top of the thigh
54
3
2
1 5. Full Leg To Trunk directs fluid from toes to top of waist in one continuous motion

10
Figure 2c: Full Leg PlusTreatment Program L4
This treatment option provides the ability to deliver expanded therapy to the leg when clinically appropriate. Incremental proximal clearing of lymphatic fluid in the
thigh, calf and foot regions is followed by delivery of the traditional full leg treatment.
(Approximate treatment time: 45 minutes.Preparation phase: 22 minutes, Drainage phase: 23 minutes)
3 . Foot directs fluid from toes to ankle
2 . Calfdirects fluid from ankle to knee
1 . Thighdirects fluid from knee to top of thigh
4 . Full Legdirects fluid from toes to top of thigh in one continuous motion
43
2
1
11 Customer Service Toll-Free: 866.435.3948
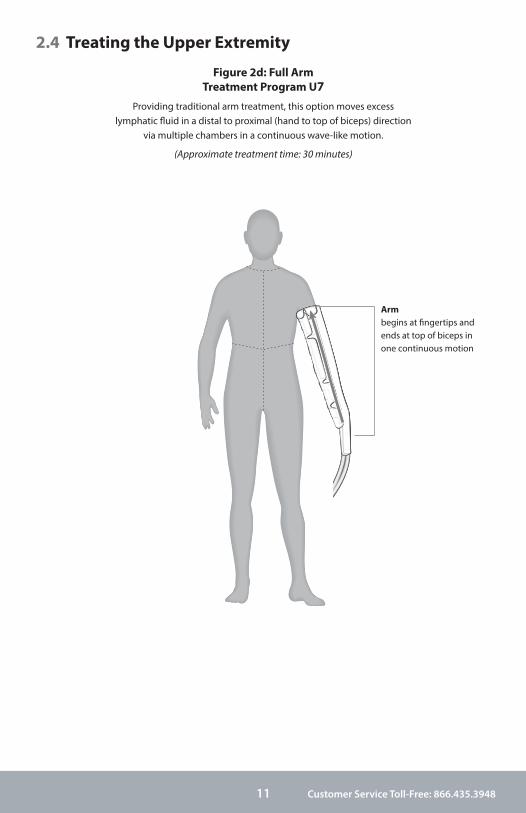
2 .4 Treating the Upper Extremity
Figure 2d: Full ArmTreatment Program U7
Providing traditional arm treatment, this option moves excess lymphatic fluid in a distal to proximal (hand to top of biceps) direction
via multiple chambers in a continuous wave-like motion.
(Approximate treatment time: 30 minutes)
Armbegins at fingertips and ends at top of biceps in one continuous motion

12
Figure 2e: Full Arm and CoreTreatment Program U1
This treatment option provides the ability to deliver therapy to the arm, chest and trunk regions when clinically appropriate. Incremental proximal clearing of lymphatic fluid in the trunk, chest,
biceps, forearm and hand regions is followed by delivery of the traditional full arm treatment.
(Approximate treatment time: 60 minutes.Preparation phase: 30 minutes, Drainage phase: 30 minutes)
1 . Trunkdirects fluid
from waist toward top
of thigh
2 . Chestdirects
fluid from shoulder
toward waist
5 . Handdirects fluid from fingers toward wrist
4 . Forearmdirects fluid from wrist toward elbow
3 . Bicepsdirects fluid from elbow toward shoulder
4
32
1
56
6 . Full arm and trunkdirects fluid from fingers to the top of Thigh in one continuous motion

13 Customer Service Toll-Free: 866.435.3948
Controller Set-UpCHAPTER 3
The Flexitouch System uses a controller and a set of garments and accessories to provide therapy. In this chapter you will learn how to set up the controller and select the proper settings prior to receiving therapy. You will learn how to apply the garments in Chapter 4.
3 .1 Setting up the Controller UnitFollow the steps outlined below:
1. Find an appropriate location for the controller unit. Place the controller on a sturdy, flat surface near a grounded electrical outlet. Position the device so you have easy access to the plug.
2. Plug the power cord into the power cord inlet on the back of the controller. Then, plug the three-pronged plug into a grounded 120 Volt AC or 230 Volt AC electrical outlet. (Figure 3a.)
Figure 3a . Grounded AC Outlet
Grounded Outlet
Three-pronged Plug
NOTE: The power cord required for your country may be different than shown.
WARNING: RISK OF ELECTRICAL SHOCKThis equipment is intended to be electrically grounded and is supplied with a hospital-grade power cord that contains a three-pronged plug (a plug with a grounding pin). This plug is designed for use only with a grounded 120 Volt AC or 230 Volt AC outlet. Only use the power cord supplied with your unit.Do not attempt to cut off, bend, or remove the ground connection or alter the plug in any way, as this may result in an electrical hazard.
14
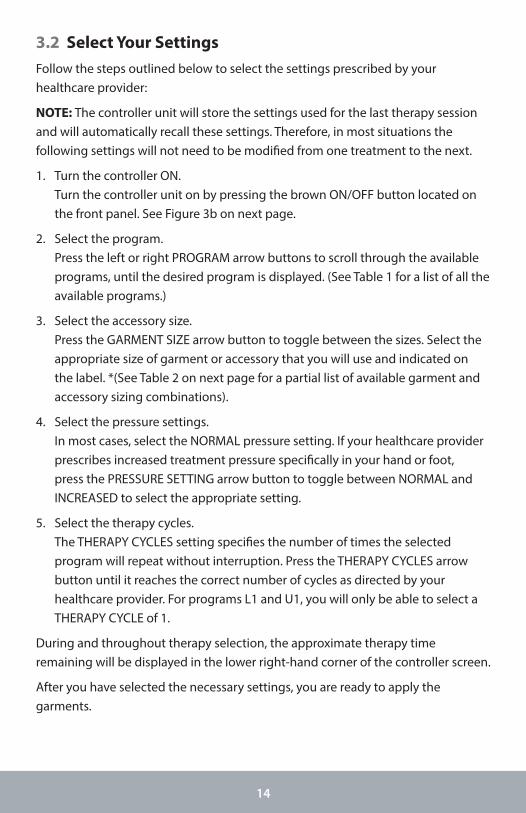
3 .2 Select Your SettingsFollow the steps outlined below to select the settings prescribed by your healthcare provider:
NOTE: The controller unit will store the settings used for the last therapy session and will automatically recall these settings. Therefore, in most situations the following settings will not need to be modified from one treatment to the next.
1. Turn the controller ON. Turn the controller unit on by pressing the brown ON/OFF button located on
the front panel. See Figure 3b on next page.
2. Select the program. Press the left or right PROGRAM arrow buttons to scroll through the available
programs, until the desired program is displayed. (See Table 1 for a list of all the available programs.)
3. Select the accessory size. Press the GARMENT SIZE arrow button to toggle between the sizes. Select the appropriate size of garment or accessory that you will use and indicated on the label. *(See Table 2 on next page for a partial list of available garment and accessory sizing combinations).
4. Select the pressure settings. In most cases, select the NORMAL pressure setting. If your healthcare provider prescribes increased treatment pressure specifically in your hand or foot, press the PRESSURE SETTING arrow button to toggle between NORMAL and INCREASED to select the appropriate setting.
5. Select the therapy cycles. The THERAPY CYCLES setting specifies the number of times the selected program will repeat without interruption. Press the THERAPY CYCLES arrow button until it reaches the correct number of cycles as directed by your healthcare provider. For programs L1 and U1, you will only be able to select a THERAPY CYCLE of 1.
During and throughout therapy selection, the approximate therapy time remaining will be displayed in the lower right-hand corner of the controller screen.
After you have selected the necessary settings, you are ready to apply the garments.

15 Customer Service Toll-Free: 866.435.3948
Program
Garment
Pressure
Therapy Cycles
Start/Pause
On/Off
Time Remaining
Connector Number
Figure 3b . Controller Unit Front Panel
Table 2: Garment and Accessory Size SelectionsLower Extremity Upper ExtremityLONG FULL LEG SHORT ARM
MEDIUM FULL LEG LONG ARMSHORT FULL LEG SZ 1 CHEST/SHORT ARM
TRUNK/SHORT FULL LEG SZ 1 CHEST/LONG ARMTRUNK/MED FULL LEG SZ 2 CHEST/SHORT ARM
TRUNK/LONG FULL LEG SZ 2 CHEST/LONG ARMSHORT TRUNK/REG CALF SZ 3 CHEST/SHORT ARMSHORT TRUNK/EXT CALF SZ 3 CHEST/LONG ARMLONG TRUNK/REG CALF SZ 4 CHEST/SHORT ARMLONG TRUNK/EXT CALF SZ 4 CHEST/LONG ARMEXT TRUNK/REG CALFEXT TRUNK/EXT CALF
* NOTE: The short petite full leg garment utilizes the short full leg garment size setting on the controller.

16
Garment and Accessory Application— Lower Extremity
CHAPTER 4
Before starting, be sure you are using the recommended garments and accessories for your condition.
Before applying the garments and accessories, prepare yourself for an uninterrupted therapy session — these typically last about one hour.
CAUTIONWear lightweight, loose-fitting (non-elastic) cotton clothing to avoid skin irritation that may result from contact with the nylon material. If skin irritation develops, consult with your doctor.
Lymph fluid is moved through the vessels in the skin. It is important to avoid wearing anything during therapy that may hamper the lymph flow. These items include:
• Belts • Jewelry • Restrictive clothing such as:
- Elastic-banded underwear - Compression bandaging
- Elastic-banded socks - Compression garments
- Bra
4 .1 Applying the Full Leg Garment If you have only received a garment labeled full leg, follow the preparation and application instructions below.
Full Leg Garment Preparation:
1. Unfold and place the full leg garment on the bed or sofa so that the hose seam will run along the back of your leg.

17 Customer Service Toll-Free: 866.435.3948
Full Leg Garment Application:
2. Sit down and place your leg on the garment. Center your heel between the second set of fabric notches (when counting from the toe of the garment).
3. Begin by wrapping the foot section snugly around your toes and the arch of your foot. Secure the fabric in place with the hook fastener tabs.
4. Next wrap your ankle, following its contours. Secure the fabric with the hook fasteners.
5. Continue up your leg, wrapping the calf next and the thigh last. When wrapping, try to minimize any bunches or folds in the fabric and adjust the hook fastener tabs as necessary to get a well-contoured fit.
6. Finally, place a couple of pillows under your calf and foot to elevate them just above your hips for optimal treatment. Place the hoses alongside your body so they are easy to reach when attaching them to the controller unit.
You are now ready to attach the hoses to the controller. See Chapter 6 for further instructions.
Figure 4 .1 .a . Applying the Full Leg Garment
5
4
2
36

18
4 .2 Applying the Full Leg Garment and Trunk Accessory
If you have received garments and accessories labeled full leg and trunk, follow the preparation and application instructions below.
Full Leg Garment And Trunk Accessory Preparation:
NOTE: If you are treating both legs, you will only receive one trunk accessory, which is designed to treat either side of the body. You will have to follow these directions for both sides.
1. Unfold and place the trunk accessory and leg garments on a bed or sofa.
2. Position the trunk accessory so that when you sit on it, the hose seam will run along the side of your hip and the tubing harness will be at your waist.
3. Position the leg garment so that the hose seam will run up the back of your leg.
4. When using both the leg garment and trunk accessory, make sure they overlap near the thigh by a couple of chambers. This ensures they are properly applied so there will be no gap in treatment.
5. If you need a waist extender, attach it to the trunk accessory.
Full Leg Garment Application:
6. Sit down and place your leg on the garment, centering your heel between the second set of fabric notches (when counting from the toe of the garment).
7. Begin by wrapping the foot section snugly around your toes and the arch of your foot. Secure the fabric in place with the hook fasteners.
8. Next wrap your ankle, following its contours. Secure the fabric with the hook fastener tabs.
Figure 4 .2 .a . Applying the Full Leg Garment and Trunk Accessory
6
9
87
WAIST EXTENDER
5

19 Customer Service Toll-Free: 866.435.3948
9. Continue up your leg, wrapping the calf next and the thigh last. When wrapping, try to minimize any bunches or folds in the fabric and adjust the hook fastener tabs as necessary to get a well-contoured fit.
10. Finally, place a couple of pillows under your calf and foot to elevate them just above your hips for optimal treatment. Place the hoses alongside your body so they will be easy to reach when you are ready to attach them to the controller unit.
Trunk Accessory Application:
To receive a full therapy treatment, the full leg garment and trunk accessory must overlap at the thigh by a couple of chambers.
11. Before you begin wrapping the trunk accessory, check to make sure the U-shaped notch (see 11 below) on the accessory will be centered at the groin area when properly applied.
12. Begin applying the trunk accessory by starting with the thigh section. Bring the fabric up between your thighs, wrapping snugly as you follow the crease where your thigh meets your trunk. Use the hook fastener tabs to secure the fabric in position.
13. Lay back with your head on the pillow. Grasp the top of the trunk fabric, wrapping it over your abdomen. Bring the fabric with the hook fasteners over your abdomen, in an upward direction for the best fit. Attach the hook fastener tabs so the fabric is securely in place.
You are now ready to attach the hoses to the controller. See Chapter 6 for further instructions.
Figure 4 .2 .b . Fully Applied Full Leg Garment and Trunk Accessory
10
11

20
4 .3 Applying the Calf-Foot Garment and Trunk-Thigh AccessoryIf you have received garments and accessories labeled calf-foot and trunk-thigh, follow the preparation and application instructions below.
(The labels applicable to this section could read: EXT trunk-thigh, long trunk-thigh or short trunk-thigh and ext calf-foot or reg calf-foot.)
Calf-Foot Garment And Trunk-Thigh Accessory Preparation:
1. Unfold and place the trunk-thigh accessory on the bed or sofa, positioned so when you sit on it, the seam will be along the outside of your leg.
2. If you need a waist extender, attach it to the trunk accessory.
3. Place the calf-foot garment on the bed so that it overlaps the trunk-thigh accessory by a couple of chambers and so the hose seam will run along the back of your leg.
Calf-Foot Garment Application:
4. Sit down and place your heel into the heel cup area of the garment.
5. Begin wrapping the foot section with the non-hook fastener side of the fabric. Snugly wrap the arch of the foot and the toes. Secure the fabric with the hook fastener tabs.
6. Grasp the non-hook fastener side of the calf fabric. Wrap this section by starting mid-calf then move up and down your leg making sure the fabric is smooth and there are no gaps around the toes, ankle and knee. Secure the fabric with the hook fastener tabs, starting at the midpoint of the calf and continuing to attach the hook fasteners up and down your calf.
7. If necessary, readjust the fasteners to obtain a well-contoured and comfortable fit.
5
7
6
4
Figure 4 .3 .a . Applying the Calf-Foot Garment
WAIST EXTENDER
2

21 Customer Service Toll-Free: 866.435.3948
8. Place a couple of pillows under your calf and foot to elevate them just above your hips for optimal treatment. Place the hoses alongside your body so they are easy to reach when you are ready to attach them to the controller unit.
Trunk-Thigh Accessory Application:
9. Check to make sure the U-shaped notch on the trunk accessory will be centered on the groin area when fully applied.
10. Hold the non-hook fastener side of the thigh accessory at the midpoint and bring it up between your thighs. Starting mid-thigh, wrap this section over your thigh so that the fabric is snug and follows the crease where your thigh meets your trunk.
11. Grasp the hook fastener side of the thigh accessory at the midpoint wrapping it over the non-hook fastener fabric. Secure the hook fastener tabs starting at the midpoint and working up and down your thigh. Adjust the hook fastener tabs as necessary to ensure a snug fit without gaps, paying particular attention to where the trunk-thigh accessory and calf-foot garment meet.
12. Lay back and snugly wrap the non-hook fastener side of the trunk fabric over your abdomen. Bring the hook fastener side of the fabric as far as you can over your trunk. Secure the hook fastener tabs.
You are now ready to attach the hoses to the controller . See Chapter 6 for further instructions .
Figure 4 .3 .b . Fully Applied EXT Lower Extremity Garment Set
119
1012

22
CAUTION
Wear lightweight, loose-fitting (non-elastic) cotton clothing to avoid skin irritation that may result from contact with the nylon material. If skin irritation develops, consult with your doctor.Lymph fluid is moved through the vessels in the skin. It is important to avoid wearing anything during therapy that may hamper the lymph flow. These items include:
Garment and Accessory Application— Upper Extremity
CHAPTER 5
Before starting, be sure you are using the recommended garment(s) and accessory(ies) for your condition.
Before applying the garments and accessories, prepare yourself for an uninterrupted therapy session — these typically last about one hour.
• Belts • Jewelry • Restrictive clothing such as: - Elastic-banded underwear - Compression bandaging - Elastic-banded socks - Compression garments - Bra
5 .1 Applying the Arm Garment If you have only received a garment labeled arm, follow the preparation and application instructions below.
Arm Garment Preparation:
1. In preparation for donning the arm garment, loosely form the garment into a cone shape and fasten the hook tabs.
NOTE: Adjust the tabs so that you will be able to slide your affected arm into the garment easily.
2. Next fold the four hook fastener tabs on the top of the arm garment back so they are secured to the arm garment itself.

23 Customer Service Toll-Free: 866.435.3948
Arm Garment Application:
3. Slide your arm into the pre-shaped cone, making sure the tabs run along the side of the garment closest to your torso.
4. Pull the arm garment up toward your biceps making sure that your fingertips remain fully enclosed in the garment.
5. Readjust the tabs on the inside of the arm garment to obtain a well-contoured fit around the arm. Pay particular attention to snugly fitting the contours of the wrist and elbow areas.
You are now ready to attach the hoses to the controller . See Chapter 6 for further instructions .
2
1
4
3
Figure 5 .1 .a . Preparing the Arm Garment
Figure 5 .1 .c . Fully Applied Arm Garment
Figure 5 .1 .b . Adjusting the Arm
Garment for a Snug Fit
5
5 .2 Applying the Trunk Accessory and Arm-Shoulder Garment
If you have received garments and accessories labeled trunk and arm-shoulder, follow the preparation and application instructions below.
The upper extremity garments and accessories work together to deliver effective therapy. It is easiest to apply them in the order presented: trunk first, and arm-shoulder last.

24
Trunk Accessory Preparation:
NOTE: If you are treating both arms, you will only receive one trunk accessory, which is designed to treat either side of the body. You will have to follow these directions for both sides.
1. Place the trunk accessory on the bed or sofa. Position it so that when you sit on it, the seam will run along the side of your leg with the tubing harness near your waist.
2. If you need a waist extender, attach it to the trunk accessory.
Trunk Accessory Application:
3. Before you begin wrapping the trunk accessory, check to make sure the U-shaped notch (see 3 below) on the accessory will be centered at the groin area when properly applied.
4. Begin applying the trunk accessory by starting with the thigh section. Bring the fabric up between your thighs, wrapping snugly as you follow the crease where your thigh meets your trunk. Use the hook fastener tabs to secure the fabric in position.
5. Lay back with your head on the pillow. Grasp the top of the trunk fabric, wrapping it over your abdomen. Bring the fabric with the hook fasteners over your abdomen, in an upward direction for the best fit. Attach the hook fastener tabs so the fabric is securely in place.
4
1
The trunk section must fit close to the groin area.
Figure 5 .2 .a . Fully Applied Trunk Accessory
3
WAIST EXTENDER
2

25 Customer Service Toll-Free: 866.435.3948
Arm-Shoulder Preparation:
6. In preparation for donning the arm-shoulder garment, loosely form the arm portion of the garment into a cone shape and fasten the hook tabs.
NOTE: Adjust the tabs around the biceps section so you will be able to slide your affected arm into the garment easily.
7. Unfasten the chest strap on the front of the garment so you are able to apply the garment.
Arm-Shoulder Application:
8. Slide your arm into the pre-shaped cone, making sure the tabs run along the front of the garment.
NOTE: Pay particular attention to snugly fitting the contours of the wrist and elbow areas.
9. Pull the arm portion of the garment up toward your shoulder, making sure your fingertips remain fully enclosed in the garment.
10. Ensure the chest flap attached to the arm piece crosses the center line of your chest and is flat against your chest.
6
7
Figure 5 .2 .b .Preparing the Garment
Figure 5 .2 .c .Applying the Garment
The arm section must fit close to the armpit.
8
10
9

26
11. Place your free hand (extremity not being treated) in the pocket located at the end of the chest strap, wrap it around the front of your chest, and snugly secure it to the chest flap to obtain a well-contoured fit.
12. Readjust and tighten the hook fasteners on the biceps, under the arm, and on the arm to obtain a well-contoured fit.
Figure 5 .2 .e .Applying the Arm-Shoulder Garment
Figure 5 .2 .f .Ensure a Well-Contoured Fit
11
12

27 Customer Service Toll-Free: 866.435.3948
Fully Applied Arm-Shoulder Garment
13. Properly applied, the garment and accessories will follow the contours of your body and fit snugly, yet comfortably. Make any necessary adjustments after you lie down to ensure a well-contoured fit.
14. Use a pillow to elevate your arm slightly above your torso during treatment and angle your arm about 45 degrees out from the side of your body.
You are now ready to attach the hoses to the controller . See Chapter 6 for further instructions.
Figure 5 .2 .g . Fully Applied Arm-Shoulder Garment
Figure 5 .2 .h . Fully Applied Trunk and Arm-Shoulder Garment

28
Connecting the Hoses to the ControllerCHAPTER 6
The final step before therapy can be delivered is connecting the hoses to the controller unit. Notice that both the hose latches and the ports on the controller unit are numbered 1 through 4. When connected properly, latch number 1 will connect to port number 1, and so on.
NOTE: One or more of the ports will be capped if you received full leg only or full arm only. Do not remove, as your prescribed therapy does not use this port(s).
Bottom
TopRamp
Connector Collar
Latch
Figure 6a . Hose Connector
Follow the steps below to attach the hoses to the controller:
1. Hold the hose connector by the tabs on the back of the latch making sure that the numbers are facing up.
2. Gently squeeze the tabs to widen the front end of the hose connector. (Figure 6b.)
Numbered Controller Connector
Controller Notch
Numbered Connector
Figure 6b . Corresponding Hose Connector with Controller Connector

29 Customer Service Toll-Free: 866.435.3948
3. Align the numbered latch with the notch on the corresponding controller port.
4. Reposition your hand so that your thumb and fingers are positioned on the top and bottom latch ramps, this enables you to slide the latch. (Figure 6c.)
Figure 6c . Proper Handling of the Hose Connector
Reposition your hand so it is now pushing forward with the collar against the ramps on the latch.
5. Push the latch forward, it will hook on the top and bottom of the controller connector. You should hear a click when each of the latches is properly connected. Two clicks will be heard, one for the top and one for the bottom latch. (Figure 6d.)
Figure 6d . Properly Connecting the Latches
6. Repeat for all connectors required for your prescribed treatment. (Figure 6e, 6f and 6g on next page.)

30
NOTES: Holding the back of the controller may help to stabilize the unit as you attach the harness connectors. If you are having trouble connecting the latches, try connecting the bottom latch first then tipping the top latch into place.
You may see black numerical markings through the tubing harness. This is normal and does not affect performance.
Figure 6e . Fully Attached Hose Connectors When Full Leg Treatment is Prescribed
Figure 6f . Fully Attached Hose Connectors When Full Arm Treatment is Prescribed
Figure 6g . Fully Attached Hose Connectors When Both Extremity and Core Treatment are Prescribed

31 Customer Service Toll-Free: 866.435.3948
Conducting a Therapy SessionCHAPTER 7
Now you are ready for your therapy session with the Flexitouch System. Be sure that you have followed the instructions outlined in the previous chapters. Then, begin the process of starting your therapy session using the instructions outlined below.
CAUTIONTo achieve maximum benefit from your session, it should be completed without interruption. Once started, the controller program settings cannot be changed without turning off the controller.
7 .1 Starting the Therapy Session1. Prepare yourself for an uninterrupted therapy session.
2. Lay down on your back with your hips and legs positioned straight. Do not sit in a chair or bend your affected limbs during the therapy session.
3. Elevate the affected limb on a pillow approximately five inches above your hip.
4. Check your program settings to ensure you have selected the correct program.
5. When properly positioned, press the START/PAUSE button on the controller to begin the therapy session. (See Figure 3b for an illustration of the controller unit front panel.)
6. For best results, relax and take deep abdominal breaths during the therapy session.
7 .2 Pausing the Therapy SessionIf you need to interrupt your therapy session for any reason, press the START/PAUSE button. (See Figure 3b for an illustration of the controller unit front panel.) The controller will remain paused for fifteen minutes. After that time, the controller will power down, requiring you to restart your session. To resume therapy, press the START/PAUSE button again.
32
7 .3 Completing the Therapy SessionThe therapy program will stop automatically when the treatment has been completed and TIME REMAINING will display DONE.
7 .4 Turning the Controller Unit OffWhen your treatment is complete, turn the controller unit off by pressing the ON/OFF button located on the front panel.
7 .5 Storing the Flexitouch SystemTo store the Flexitouch System, follow the steps outlined below:
1. Unplug the power supply cord from the controller and from the electrical outlet.
2. Store the garments and accessories by first coiling the harnesses for each of the supplied garments or accessories. Avoid kinking the tubing. It is preferable to store them by laying them flat. Do not stack anything on top of them.
3. Store the controller, garments and accessories in a cool, dry place. Keep them out of excessive heat or cold. Store them away from children and pets.
7 .6 Cleaning the Flexitouch SystemTo clean the controller unit and/or garments and accessories, follow the steps outlined below.
Cleaning the Controller Unit
The controller is to be cleaned as needed using a damp cloth and mild household cleaner.
1. Unplug the power supply cord from the electrical outlet.
2. Wipe all accessible surfaces, including the power cord.
3. After cleaning, allow the unit to dry completely prior to using.
WARNING: RISK OF ELECTRICAL SHOCKUnplug the power supply cord from the electrical outlet prior to cleaning the controller. Allow the controller to dry completely prior to connecting the power cord to the electrical outlet.
33 Customer Service Toll-Free: 866.435.3948
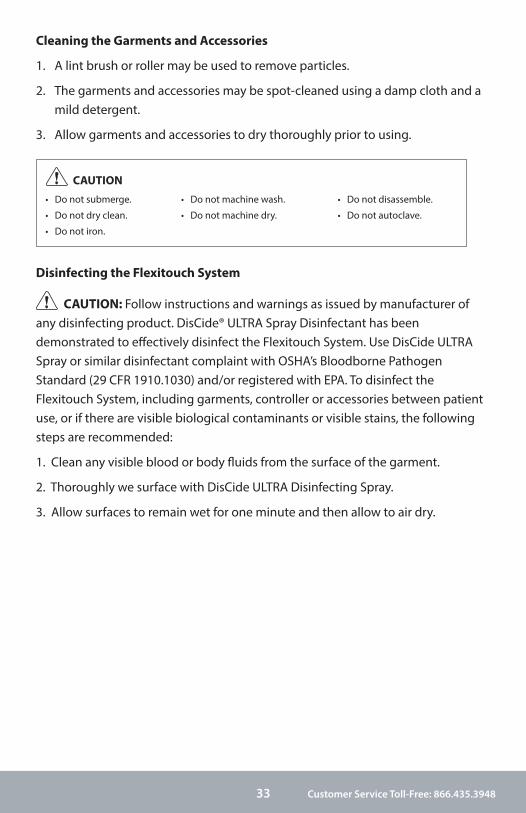
Cleaning the Garments and Accessories
1. A lint brush or roller may be used to remove particles.
2. The garments and accessories may be spot-cleaned using a damp cloth and a mild detergent.
3. Allow garments and accessories to dry thoroughly prior to using.
CAUTION• Do not submerge. • Do not machine wash. • Do not disassemble.
• Do not dry clean. • Do not machine dry. • Do not autoclave.
• Do not iron.
Disinfecting the Flexitouch System
CAUTION: Follow instructions and warnings as issued by manufacturer of any disinfecting product. DisCide® ULTRA Spray Disinfectant has been demonstrated to effectively disinfect the Flexitouch System. Use DisCide ULTRA Spray or similar disinfectant complaint with OSHA’s Bloodborne Pathogen Standard (29 CFR 1910.1030) and/or registered with EPA. To disinfect the Flexitouch System, including garments, controller or accessories between patient use, or if there are visible biological contaminants or visible stains, the following steps are recommended:
1. Clean any visible blood or body fluids from the surface of the garment.
2. Thoroughly we surface with DisCide ULTRA Disinfecting Spray.
3. Allow surfaces to remain wet for one minute and then allow to air dry.
34
Troubleshooting and SpecificationsCHAPTER 8
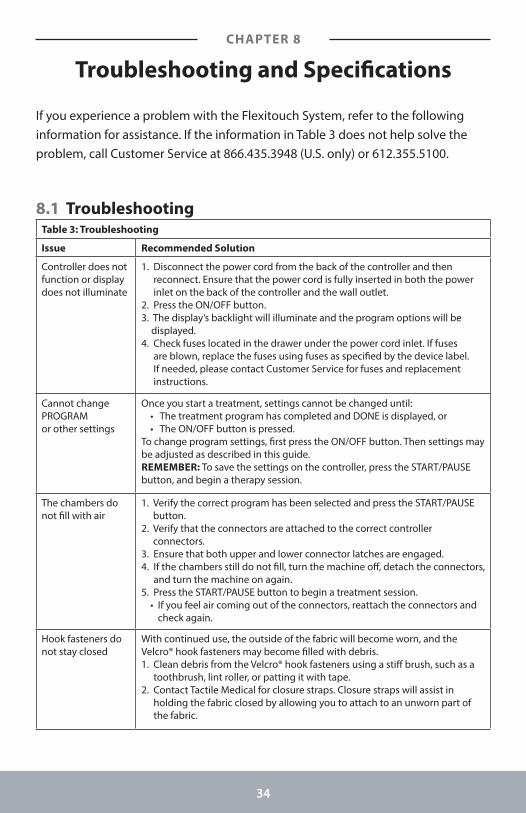
If you experience a problem with the Flexitouch System, refer to the following information for assistance. If the information in Table 3 does not help solve the problem, call Customer Service at 866.435.3948 (U.S. only) or 612.355.5100.
8 .1 TroubleshootingTable 3: Troubleshooting
Issue Recommended Solution
Controller does not function or display does not illuminate
1. Disconnect the power cord from the back of the controller and then reconnect. Ensure that the power cord is fully inserted in both the power inlet on the back of the controller and the wall outlet.
2. Press the ON/OFF button.3. The display’s backlight will illuminate and the program options will be
displayed.4. Check fuses located in the drawer under the power cord inlet. If fuses
are blown, replace the fuses using fuses as specified by the device label. If needed, please contact Customer Service for fuses and replacement instructions.
Cannot change PROGRAM or other settings
Once you start a treatment, settings cannot be changed until: • The treatment program has completed and DONE is displayed, or • The ON/OFF button is pressed. To change program settings, first press the ON/OFF button. Then settings may be adjusted as described in this guide. REMEMBER: To save the settings on the controller, press the START/PAUSE button, and begin a therapy session.
The chambers do not fill with air
1. Verify the correct program has been selected and press the START/PAUSE button.
2. Verify that the connectors are attached to the correct controller connectors.
3. Ensure that both upper and lower connector latches are engaged.4. If the chambers still do not fill, turn the machine off, detach the connectors,
and turn the machine on again. 5. Press the START/PAUSE button to begin a treatment session. • If you feel air coming out of the connectors, reattach the connectors and
check again.
Hook fasteners do not stay closed
With continued use, the outside of the fabric will become worn, and the Velcro® hook fasteners may become filled with debris.1. Clean debris from the Velcro® hook fasteners using a stiff brush, such as a
toothbrush, lint roller, or patting it with tape.2. Contact Tactile Medical for closure straps. Closure straps will assist in
holding the fabric closed by allowing you to attach to an unworn part of the fabric.
35 Customer Service Toll-Free: 866.435.3948
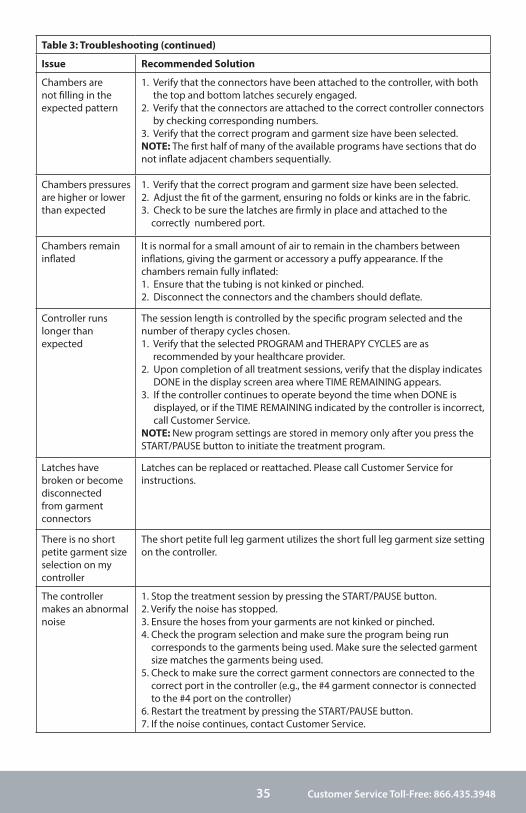
Table 3: Troubleshooting (continued)
Issue Recommended Solution
Chambers are not filling in the expected pattern
1. Verify that the connectors have been attached to the controller, with both the top and bottom latches securely engaged.
2. Verify that the connectors are attached to the correct controller connectors by checking corresponding numbers.
3. Verify that the correct program and garment size have been selected.NOTE: The first half of many of the available programs have sections that do not inflate adjacent chambers sequentially.
Chambers pressures are higher or lower than expected
1. Verify that the correct program and garment size have been selected. 2. Adjust the fit of the garment, ensuring no folds or kinks are in the fabric.3. Check to be sure the latches are firmly in place and attached to the
correctly numbered port.
Chambers remain inflated
It is normal for a small amount of air to remain in the chambers between inflations, giving the garment or accessory a puffy appearance. If the chambers remain fully inflated:1. Ensure that the tubing is not kinked or pinched.2. Disconnect the connectors and the chambers should deflate.
Controller runs longer than expected
The session length is controlled by the specific program selected and the number of therapy cycles chosen.1. Verify that the selected PROGRAM and THERAPY CYCLES are as
recommended by your healthcare provider.2. Upon completion of all treatment sessions, verify that the display indicates
DONE in the display screen area where TIME REMAINING appears.3. If the controller continues to operate beyond the time when DONE is
displayed, or if the TIME REMAINING indicated by the controller is incorrect, call Customer Service.
NOTE: New program settings are stored in memory only after you press the START/PAUSE button to initiate the treatment program.
Latches have broken or become disconnected from garment connectors
Latches can be replaced or reattached. Please call Customer Service for instructions.
There is no short petite garment size selection on my controller
The short petite full leg garment utilizes the short full leg garment size setting on the controller.
The controller makes an abnormal noise
1. Stop the treatment session by pressing the START/PAUSE button.2. Verify the noise has stopped.3. Ensure the hoses from your garments are not kinked or pinched. 4. Check the program selection and make sure the program being run
corresponds to the garments being used. Make sure the selected garment size matches the garments being used.
5. Check to make sure the correct garment connectors are connected to the correct port in the controller (e.g., the #4 garment connector is connected to the #4 port on the controller)
6. Restart the treatment by pressing the START/PAUSE button.7. If the noise continues, contact Customer Service.
36
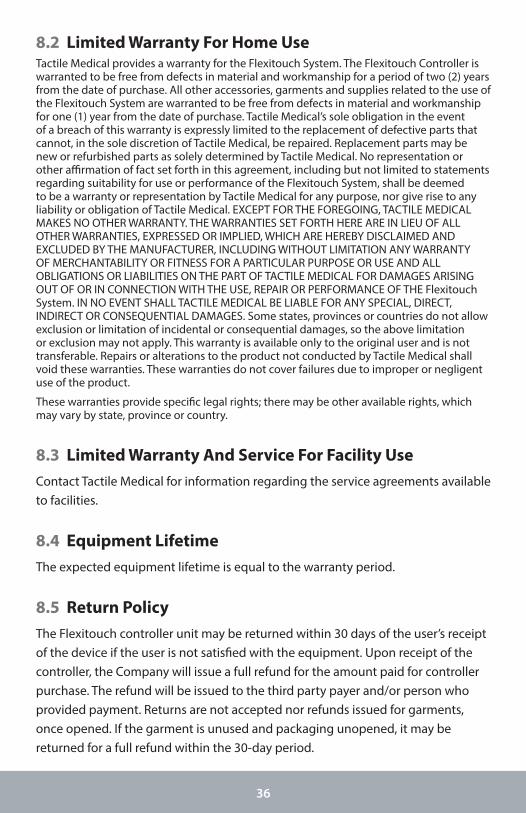
8 .2 Limited Warranty For Home UseTactile Medical provides a warranty for the Flexitouch System. The Flexitouch Controller is warranted to be free from defects in material and workmanship for a period of two (2) years from the date of purchase. All other accessories, garments and supplies related to the use of the Flexitouch System are warranted to be free from defects in material and workmanship for one (1) year from the date of purchase. Tactile Medical’s sole obligation in the event of a breach of this warranty is expressly limited to the replacement of defective parts that cannot, in the sole discretion of Tactile Medical, be repaired. Replacement parts may be new or refurbished parts as solely determined by Tactile Medical. No representation or other affirmation of fact set forth in this agreement, including but not limited to statements regarding suitability for use or performance of the Flexitouch System, shall be deemed to be a warranty or representation by Tactile Medical for any purpose, nor give rise to any liability or obligation of Tactile Medical. EXCEPT FOR THE FOREGOING, TACTILE MEDICAL MAKES NO OTHER WARRANTY. THE WARRANTIES SET FORTH HERE ARE IN LIEU OF ALL OTHER WARRANTIES, EXPRESSED OR IMPLIED, WHICH ARE HEREBY DISCLAIMED AND EXCLUDED BY THE MANUFACTURER, INCLUDING WITHOUT LIMITATION ANY WARRANTY OF MERCHANTABILITY OR FITNESS FOR A PARTICULAR PURPOSE OR USE AND ALL OBLIGATIONS OR LIABILITIES ON THE PART OF TACTILE MEDICAL FOR DAMAGES ARISING OUT OF OR IN CONNECTION WITH THE USE, REPAIR OR PERFORMANCE OF THE Flexitouch System. IN NO EVENT SHALL TACTILE MEDICAL BE LIABLE FOR ANY SPECIAL, DIRECT, INDIRECT OR CONSEQUENTIAL DAMAGES. Some states, provinces or countries do not allow exclusion or limitation of incidental or consequential damages, so the above limitation or exclusion may not apply. This warranty is available only to the original user and is not transferable. Repairs or alterations to the product not conducted by Tactile Medical shall void these warranties. These warranties do not cover failures due to improper or negligent use of the product.
These warranties provide specific legal rights; there may be other available rights, which may vary by state, province or country.
8 .3 Limited Warranty And Service For Facility UseContact Tactile Medical for information regarding the service agreements available to facilities.
8 .4 Equipment LifetimeThe expected equipment lifetime is equal to the warranty period.
8 .5 Return PolicyThe Flexitouch controller unit may be returned within 30 days of the user’s receipt of the device if the user is not satisfied with the equipment. Upon receipt of the controller, the Company will issue a full refund for the amount paid for controller purchase. The refund will be issued to the third party payer and/or person who provided payment. Returns are not accepted nor refunds issued for garments, once opened. If the garment is unused and packaging unopened, it may be returned for a full refund within the 30-day period.
37 Customer Service Toll-Free: 866.435.3948
8 .6 PATENTSThe Flexitouch System is protected by the following United States patents:*
6,179,796 6,645,165
6,860,862 6,966,884*Additional patents are pending.
Tactile Medical reserves the right to modify product specifications as part of its continuing program of product development and quality improvement.
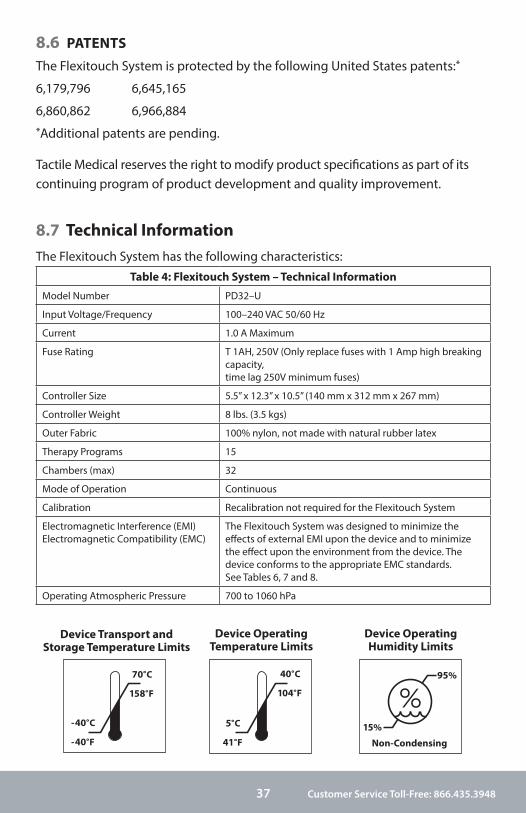
8 .7 Technical InformationThe Flexitouch System has the following characteristics:
Table 4: Flexitouch System – Technical Information
Model Number PD32–U
Input Voltage/Frequency 100–240 VAC 50/60 Hz
Current 1.0 A Maximum
Fuse Rating T 1AH, 250V (Only replace fuses with 1 Amp high breaking capacity, time lag 250V minimum fuses)
Controller Size 5.5” x 12.3” x 10.5” (140 mm x 312 mm x 267 mm)
Controller Weight 8 lbs. (3.5 kgs)
Outer Fabric 100% nylon, not made with natural rubber latex
Therapy Programs 15
Chambers (max) 32
Mode of Operation Continuous
Calibration Recalibration not required for the Flexitouch System
Electromagnetic Interference (EMI)Electromagnetic Compatibility (EMC)
The Flexitouch System was designed to minimize the effects of external EMI upon the device and to minimize the effect upon the environment from the device. The device conforms to the appropriate EMC standards. See Tables 6, 7 and 8.
Operating Atmospheric Pressure 700 to 1060 hPa
Device Transport andStorage Temperature Limits
Device Operating Temperature Limits
Device Operating Humidity Limits

38
Table 5: Flexitouch System – Classification Information
US FDA Medical Device Class II per 21CFR 870.5800 & 21 CFR 890.5650
Canada Medical Device Class II per Canadian Medical Devices Regulations SOR/98-282
European Union Medical Device Class IIa per Medical Devices Directive 93/42/EEC
Protection Against Electric Shock Hazard
Class I per UL/EN/IEC 60601-1
Protection Against Fluid Ingress IP21
Applied Part BF
Table 6: Flexitouch System – Conformance Information
Quality Assurance FDA 21 CFR 820 QSRISO 13485
Safety UL/EN/IEC 60601-1CAN/CSA C22.2 No. 601.1
Electromagnetic Compatibility (EMC) EN 60601-1-2
Waste Electrical & Electronic Equipment (WEEE)
Directive 2002/96/EC
Restriction of Hazardous Substances (RoHS)
Directive 2002/95/EC
Table 7: Guidance and Manufacturer’s Declaration – Electromagnetic Emissions
The PD32-U Flexitouch System is intended for use in the electromagnetic environment specified below.The customer or the user of the Flexitouch System should assure that it is used in such an environment.
Emissions Test Compliance Electromagnetic Environment – Guidance
RF emissions CISPR 11
Group 1 The Flexitouch System uses RF energy only for its internal function. Therefore, its RF emissions are very low and are not likely to cause any interference in nearby electronic equipment.
RF emissions CISPR 11
Class B The Flexitouch System is suitable for use in all establishments, including domestic establishments and those connected to the public low-voltage power supply network that supplies buildings used for domestic purposes.
Harmonic emissions IEC 61000-3-2
Not applicable
Voltage fluctuations/ flicker emissions IEC 61000-3-3
Complies

39 Customer Service Toll-Free: 866.435.3948
Table 8: Guidance and Manufacturer’s Declaration – Electromagnetic Immunity
The PD32-U Flexitouch System is intended for use in the electromagnetic environment specified below. The customer or the user of the Flexitouch should assure that it is used in such an environment.
Immunity Test IEC 60601 Test Level
Compliance Level Electromagnetic Environment – Guidance
Electrostatic discharge (ESD) IEC 61000-4-2
± 6 kV contact ± 8 kV air
± 6 kV contact ± 8 kV air
Floors should be wood, concrete or ceramic tile. If floors are covered with synthetic material, the relative humidity should be at least 30%.
Electrical fast transient/burst IEC 61000-4-4
± 2 kV for power supply lines± 1 kV for input/ output lines
± 2 kV for power supply lines± 1 kV for input/ output lines
Mains power quality should be that of a typical commercial or hospital environment.
Surge IEC 61000-4-5
± 1 kV line to line ± 2 kV line to earth
± 1 kV line to line ± 2 kV line to earth
Mains power quality should be that of a typical commercial or hospital environment.
Voltage dips, short interruptions and voltage variations on power supply lines IEC 61000-4-11
< 5% UT (> 95% dip in UT) for 0,5 cycle 40% UT (60% dip in UT) for 5 cycles70% UT (30% dip in UT) for 25 cycles< 5% UT (> 95% dip in UT) for 5 seconds
< 5% UT (> 95% dip in UT) for 0,5 cycle 40% UT (60% dip in UT) for 5 cycles70% UT (30% dip in UT) for 25 cycles< 5% UT (> 95% dip in UT) for 5 seconds
Mains power quality should be that of a typical commercial or hospital environment. If the user of the Flexitouch System requires continued operation during power mains interruptions, it is recommended that the device be powered from an uninterruptible power supply.
Power frequency (50/60 Hz) Magnetic field IEC 61000-4-8
3 A/m 3 A/m Power frequency magnetic fields should be at levels characteristic of a typical location in a typical commercial or hospital environment.
NOTE: UT is the a.c. mains voltage prior to application of the test level.
During treatment, LCD screen operation is NOT required for essential performance or basic safety and degradation of its operation does NOT result in an unacceptable risk.

40
Table 8: Guidance and Manufacturer’s Declaration – Electromagnetic Immunity (continued)
The PD32-U Flexitouch System is intended for use in the electromagnetic environment specified below.The customer or the user of the Flexitouch should assure that it is used in such an environment.
Immunity Test
IEC 60601 Test Level
Compliance Level
Electromagnetic Environment – Guidance
Conducted RF IEC 61000-4-6
Radiated RF IEC 61000-4-3
3 Vrms 150 kHz to 80 MHz
3 V/m 80 MHz to 2,5 GHz
[V1] 3 Vrms
[E1] 3 V/m
Portable and mobile RF communications equipment should be used no closer to any part of the Flexitouch System, including cables, than the recommended separation distance calculated from the equation applicable to the frequency of the transmitter.
Recommended separation distance:
d = [ 3,5/V1 ] P
d = [ 3,5/E1 ] P 80 MHz to 800 MHz
d = [ 7/E1 ] P 800 MHz to 2.5 GHz
Where P is the maximum output power rating of the transmitter in watts (W) according to the transmitter manufacturer and d is the recommended separation distance in meters (m).Field strengths from fixed RF transmitters, as determined by an electromagnetic site survey,a should be less than the compliance level in each frequency range.b
Interference may occur in the vicinity of equipment marked with the following symbol:
NOTE 1: At 80 MHz and 800 MHz, the higher frequency range applies.NOTE 2: These guidelines may not apply in all situations. Electromagnetic propagation is affected by
absorption and reflection from structures, objects and people.a Field strengths from fixed transmitters, such as base stations for radio (cellular/cordless) telephones
and land mobile radios, amateur radio, AM and FM radio broadcast and TV broadcast cannot be predicted theoretically with accuracy. To assess the electromagnetic environment due to fixed RF transmitters, an electromagnetic site survey should be considered. If the measured field strength in the location in which the Flexitouch System is used exceeds the applicable RF compliance level above, the Flexitouch System should be observed to verify normal operation. If abnormal performance is observed additional measures may be necessary, such as re-orienting or relocating the Flexitouch System.
b Over the frequency range 150 kHz to 80 MHz, field strengths should be less than [V1] V/m.

41 Customer Service Toll-Free: 866.435.3948
DEV
ICE
LAB
ELTh
e de
vice
labe
l is
foun
d on
the
back
of y
our d
evic
e. To
read
the
labe
l, pl
ace
the
devi
ce fa
cing
aw
ay
from
you
at e
ye le
vel a
t a d
ista
nce
that
max
imiz
es c
hara
cter
cla
rity
— g
ener
ally
20
inch
es (5
0 cm
) to
40
inch
es (1
00 c
m) w
ith a
n ill
umin
atio
n of
500
lx m
inim
um.
• Ca
ll Ta
ctile
Med
ical
Cus
tom
er S
ervi
ce if
labe
l rea
ding
issu
es re
mai
n.
NO
TES:
• D
evic
e la
bel n
ot to
sca
le.
• D
evic
e la
bel d
epic
tion
may
be
diffe
rent
than
that
on
your
dev
ice.
• Se
e pa
ges
1 an
d 2
for s
ymbo
l defi
nitio
ns.

Tactile Medical 1331 Tyler Street NE, Suite 200Minneapolis, MN 55413 USAT: 612.355.5100 F: 612.355.5101
Flexitouch and the Flexitouch logo are registered trademarks of Tactile Systems Technology Inc., DBA Tactile Medical. Velcro® is a registered trademark of Velcro Industries B.V. DisCide® is a registered trademark of Palmero Health Care Corporation.©2016 Tactile Systems Technology Inc., DBA Tactile Medical. All rights reserved. No part of the contents of this guide may be reproduced or transmitted in any way, form, or by any means without the written permission of Tactile Medical. D/N: 500020-000-00 Rev J 1/2016
Customer Service:Toll-Free Tel: 866.435.3948Toll-Free Fax: 866.435.3949Hours: Monday through Friday, 7 a.m. – 7 p.m. CTwww.tactilemedical.com
For Additional QuestionsIf you have any questions that are not covered by this user guide, contact:
Tactile Medical 1331 Tyler Street NE, Suite 200 Minneapolis, MN 55413
Telephone: 612.355.5100 Toll-free Telephone: 866.435.3948 (U.S. only) Fax: 612.355.5101 Toll-free Fax: 866.435.3949 (U.S. only)
Hours of Operation: Monday–Friday 7 a.m. to 7 p.m. CT Email: [email protected] www.tactilemedical.com
EU Authorized RepresentativeEmergo Europe Molenstraat 15 2513 BH, The Hague The Netherlands
No part of the contents of this guide may be reproduced or transmitted in any way, form, or by any means without the written permission of Tactile Medical.
0 0 8 6