flooring installation, care and maintenance guide - formica · 6 additional accessories you may...
TRANSCRIPT

FLOORINGINSTALLATION, CARE AND MAINTENANCE GUIDE

Formica 8mm Laminate flooring in Golden Wattle FRONT Formica 12mm Laminate flooring in Blackbutt.
FORMICA® FLOORING provides good looks that last. With the
depth and beauty of a natural wood appearance, it’s tougher and
more durable than most solid timber surfaces, making it incredibly
resistant to wear, scratches, and stains. With the latest in flooring
technology built-in, Formica Flooring is able to withstand the
busiest home or commercial environments. Thanks to the unique
Forma-Lock™ locking system, it’s incredibly easy to install and
maintain. This Installation, Care and Maintenance guide will guide
you step-by-step through the installation process, ensuring that
you have the necessary tools and accessories to get the job done.
You’ll also find out how to care for your floors, so that they continue
to last for years to come.

4
Formica Flooring is hard wearing and installation is straightforward. Thanks to the unique Forma-Lock™ locking system, you won’t need any messy glues or nails. It simply installs over most hard flat surfaces, and in some instances there is no need to remove your existing floor covering. Once panels are locked, they stay locked, so you can walk on them immediately after they’ve been laid.
You’ll find everything you need to know in this checklist before you begin installing your new floor.
■ Formica Flooring must be laid as a floating floor. It must not be glued or nailed to the sub floor.
■ Defective planks should not be laid, so carefully check each one before installing. Planks that are damaged or do not fit together must be returned to the retailer. Replacement stock will then be organised.
■ Do not heat or air-condition the room prior to or during the installation period.
■ Open only one pack at a time when installing Formica Laminate flooring. If you are installing Formica Supergloss flooring, four packs should be mixed for greater pattern variation.
PLEASE NOTE an expansion gap of 1.5mm per lineal metre per side is required around the perimeter of the floor, with 10mm being the absolute minimum. For example, a 10m x 8m room requires a 15mm gap each side of the 10m length, and a 12mm gap each side of the 8m length (nominal measurements).
■ Floor area 10m2 to 80m2: requires a 10mm to 15mm gap
■ Floor area 80m2 or greater: install an expansion profile to divide the floor into even parts
■ Leave a minimum 10mm expansion gap around the perimeter of the laid floor.
■ It’s important to leave the recommended expansion gap around flooring where there are pipes, columns or door jambs. Without one, the flooring will not be able to expand or contract properly as temperatures in the room change. Fill the gap with colour flooring oil.
■ Formica Flooring must be laid separately between adjoining rooms. Allow a 20mm gap between the door frames of the adjoining rooms. And make sure you cover the gap with an expansion profile .̂
PLEASE NOTE It’s recommended that a laminate floor sealant* be used between planks in areas subject to frequent accidental water spillage. For example, kitchens, cafes, restaurants, bars, retail and hairdressing salons and exterior doorways. (Please refer to the instructions listed on the bottle for correct application.)
■ Ensure you have an additional 5% allowance of flooring above what’s required to complete the job. This is to cover wastage during the installation process. Refer to the Formica Flooring Room Calculator within this booklet to work out exactly what you need.
■ Depending on the length and width of your room, Formica Flooring planks are recommended to be laid parallel to the incoming light source. This will not always be suitable, and is a recommendation only; long rooms and hallways may dictate that the planks need to follow the length of the room. This is to maximize the appearance of the floor’s grain or pattern. However, it will be a matter of personal choice.
■ Check that you have all the correct accessories and tools to complete the installation. Refer to the Accessories Checklist section of this booklet.
■ For further information on laying Formica Flooring, please visit formica.com.au.
PRE-INSTALLATION CHECKLIST

5
To help make your job easier, make sure you have the necessary accessories on hand.
■ COMBINATION FOIL/FOAM UNDERLAY. This is to be laid on top of the sub-floor (foil side up) for moisture protection, sound deadening and insulation. A 2.5mm foam backed aluminium foil underlay must be used for 8mm Formica Flooring. The underlay must create a total moisture barrier, so some underlays may require the use of silver PVC tape to join lengths of underlay together. We recommend the use of 2.5mm Superfoil underlay, which features a self-adhesive strip used to join lengths of underlay and create a total moisture barrier. Do not use foam underlay with 12mm Formica Flooring as this can cause joins to squeak.
■ MOISTURE BARRIER (200um POLYETHYLENE FILM). Must be laid over the sub-floor for moisture protection for use with 12mm Formica Flooring. Do not use foam underlay with 12mm Formica Flooring as this can cause joins to squeak.
■ SILVER PVC (MOISTURE RESISTANT) TAPE. This is used on the jointing seam of combination underlay. It’s not required if Formica Superfoil Underlay is used, as this already has a pre-adhered joining tape.
■ INSTALLATION SPACERS (WEDGES USED FOR CREATING EXPANSION GAPS). Make sure you remove these after installation.
■ EXPANSION PROFILES.̂ These are used as a threshold cover between doorways or when dividing the floor into sections.
■ QUAD BEADING^/SCOTIA. This is used to conceal the expansion gap left around the perimeter of the laid flooring and or skirting board. PLEASE NOTE The quad or scotia base must be a minimum of 12mm to be suitable for Formica Flooring. A guide for Commercial expansion systems and cover strips is detailed on pages 13-16.
■ ADHESIVE SEALER.* This is used for joining cut-off sections of flooring around pipes/columns and when the ‘stopper’ is trimmed off the locking tongue to allow for door jambs. It’s also required for sealing edges of planks in areas that are susceptible to accidental water spillage.
Please also make sure you have the correct quantity of accessories to complete the installation. For assistance, refer to the Formica Flooring Room Calculator within this booklet.
*For detailed information regarding accessories listed, refer to page 6. ^Refer to the Trim Guide on page 13.
ACCESSORIES CHECKLIST

6
ADDITIONAL ACCESSORIES
You may need one or all of the following accessories for the installation, care and maintenance of your Formica Flooring.
■ COLOURED FLOORING OIL. This is a coloured compound developed to repair chips and scratches that may accidentally occur when installing laminate or timber flooring. Can also be used to fill open joints that may appear between planks. Follow manufacturers instructions.
■ FLOORING ADHESIVE AND SEALANT. This adds additional water resistance to floor joints in areas where accidental water spillage may occur. Its adhesive properties also provide added strength to the end lock of the plank, or to areas where the tongue is removed to allow fitting in confined areas.
■ DEEP CLEANER. This is a strong activating cleaner that removes wax residue, floor polish, difficult stains, pen markings and scuffmarks without harming the flooring surface. Follow the manufacturers instructions.
■ FLOORING CLEANER. Use a high quality, appropriate cleaning product to help maintain laminate flooring appearance. Follow the manufacturers instructions when using this product.
QUICK TOOLS CHECKLIST
Do you have all the right tools?
■ Pencil and set square to draw straight lines.
■ Razor-knife or scissors to cut the combination underlay.
■ A saw that’s suitable for cutting High Density Fibreboard (HDF).
■ Fine sharp tooth hand or jigsaw.
■ Measuring tape and 2m straight edge ruler.
■ Electric drill and 6mm bit for fitting expansion profiles or door threshold trims.
■ Long thin nails, approx 30mm, or liquid nail adhesive to fix quad beading/scotia to skirting boards around cement walls.
■ Screws and screwdriver for fixing expansion profile (optional).
ACCESSORIES CHECKLIST

7
IMPORTANT PRODUCT INFORMATION
Getting the most out of your Formica Flooring.
■ Do not install Formica Flooring in bathrooms, laundries and toilets or any areas exposed to potential flooding.
■ Formica Flooring is not recommended for installation on sub-floors with electrical under floor heating systems.
■ Take care when transporting the boxes to avoid any possible damage. Damaged boxes may void the product warranty. Place unopened boxes inside the building where the floor is to be laid. Do not leave outside or in extreme temperature conditions.
■ Before commencing the installation, open one box only and carefully read the laying instructions.
■ Always use the correct accessories when laying Formica Flooring to ensure the product warranty does not become void.*
■ Formica Flooring is manufactured from approximately 90% natural wood fibre, and like all wood based products, it will expand and contract with changes in room temperature and humidity. Uneven joints and gaps between planks of 0.1mm and 0.2mm are within normal product tolerances.
■ Formica Flooring meets Australian Standards for UV resistance, however flooring may fade according to the degree of exposure to UV sunlight and ageing of the floor. This is within normal product tolerances.
■ For dark colour planks, white lines may appear between joints after flooring has been installed and may be removed with a laminate flooring cleaner. This is within normal product tolerances and will diminish as the floor is used.
IMPORTANT GUIDELINES FOR COMMERCIAL FLOOR AREAS
■ As a general rule, heavy furniture such as reception counters should not exceed 500kg. Any heavy furniture over 300kg should avoid point loading on the floor, and weight should be evenly distributed across the unit(s). Moving of such items should be by lifting and placing, not dragging across the floor.
■ Heavy objects supported on legs or castors that inhibit weight distribution should be avoided.
■ Do not attach units or fixtures to Formica Flooring. You must fix these items to the sub-floor and allow sufficient expansion gaps around any fixing points.̂
■ A commercial grade-skirting product may be used to conceal the floorings perimeter expansion gap.̂ Skirting must be fixed to the wall and not the Formica Flooring.
*For more detailed information regarding accessories listed, please refer to page 6. ^Refer to the Trim Guide on page 13.
IMPORTANT INFORMATION

ROOM CALCULATOR
FORMICA FLOORING ROOM CALCULATOR
FORMICA FLOORING ACCESSORIES CALCULATOR
ROOM NAME LENGTH WIDTH m2 (LxW)
Room 1
Room 2
Room 3
Total of each column =A B C
Add 5% extra for wastage to part C figure D = C + 5% D
LAMINATE FLOORING | 8mm = 2.40m2, 9 planks per pack | 12mm = 1.76m2, 8 planks per pack SUPERGLOSS FLOORING | 8mm = 2.20m2, 10 planks per pack
PRODUCT E (Room calculator) F (Pack qty) G (Amount needed)
Formica Flooring Underlay (Laid on top of the sub-floor underneath Formica Flooring for moisture protection and sound insulation.)
10m2 or 30m2 per roll (i.e. ÷ by 10 or 30)
Total part D No. of rolls
Scotia(Used to conceal the expansion gap left around the perimeter of the laid floor and skirting board.)
Scotia beading comes in 12.6m lengths (i.e. ÷ by 2.6)
= (2 x A) + (2 x B) No. of lengths
Multifloor Trim(Used as threshold between doorways. When dividing the floor into sections. Available in 1800mm.)
900mm for each doorway
No. of doorways No. of trims
Flooring Adhesive Sealant(Used for joining cut-off pieces around pipes, columns and doorways. For joining planks in areas of high moisture or accidental spills.)
500ml bottle = 50 linear metres(5 packs)
Room specific No. of bottles/tubes
8

9
Ensuring the sub-floor is ready for your new flooring is incredibly important. Carefully read the following guidelines for the best possible installation result.
■ All sub-floors (concrete, solid timber floor boards, plywood, particleboard, vinyl, cork and ceramic tiles) must be level, clean and dry.
■ Carpets are not suitable sub-floors.
■ Existing sub-floors must be checked to ensure they are securely fixed and level. If any parts of the existing sub floor are loose they must be refixed prior to installing Formica Flooring.
■ Depressions in the sub-floor must not exceed 3mm under a 1m straight edge. Depressions greater than 3mm must be filled in with a floor-levelling compound. Similarly, raised areas exceeding 3mm over a 1m straight edge must be levelled by sanding or grinding.
■ For 8mm Formica Flooring a combination underlay (0.2mm polyethylene film and 2.5mm foam underlay) must be laid over all existing sub-floors. Superfoil underlay has a pre-adhered joining tape. All other underlays must be secured with a silver PVC tape along the seams.
■ The combination underlay must be laid along the length of the room in the installation of 8mm Formica Flooring.
■ 12mm Formica Flooring has an acoustic underlay already attached. A moisture barrier of 200um polyethylene film must be laid over the sub-floor and taped down prior to laying this product. Do not use foam underlay with 12mm Formica Flooring.
SUB-FLOOR PREPARATION

10
STEP-BY-STEP GUIDE TO INSTALLATION
IMPORTANT Do not use a tapping block or pull bar in the installation of Formica Flooring. And under no circumstances, use a hammer to connect the planks, as this will damage the locking system.
1 Prepare the sub-floor as per the Sub-Floor Preparation Guide on page 9. It’s recommended that all skirting boards and trims be removed prior to installing Formica Flooring. However, for residential applications, skirting boards can be left in place. Quad beading/scotia can then be used to conceal the perimeter expansion gap.
2 (Refer Diagram 1) Check if the bottom of the door fits over the laminate flooring through the entire arc of swing. If the door touches the plank, the bottom of the door will need to be trimmed.
3 (Refer Diagram 2) Start laying the planks from the left corner (working left to right). Place the plank with the groove on both the end and side facing the wall. PLEASE NOTE The protruding long lip on the side, referred to as the tongue, should be facing you and not the wall. Insert installation spacers for the perimeter expansion gap (refer Pre-Installation Checklist to calculate the correct gap for the floor area). A minimum of 10mm is required at all times.
4 (Refer Diagram 3) Connect the next plank in the row by placing the end groove into the adjoining plank’s end tongue. Repeat until you reach the end of the row. Continue to place installation spacers at 300mm intervals and when starting the next row, on the ends.
5 (Refer Diagram 4) For the last piece in the row, move the tongue side of the plank to face the tongue of the adjoining plank (so the groove on the end faces the wall). Insert the installation spacer to allow for an expansion gap, and then mark where the plank is to be cut. Once cut, the plank with the groove on the end should be connected to the end tongue of the adjoining plank (refer Diagram 3). PLEASE NOTE When using a jigsaw to cut planks, make sure you face the decorative side down. When using a handsaw, face the decorative side up. Always use a sharp fine saw tooth.
6 (Refer Diagram 5) Before starting the next row, check the first row is straight with a string line or 2m straight edge ruler (align against the protruding tongue). More installation spacers may be needed to make the first row straight. If the wall is too uneven, then the line of the wall must be marked onto the plank surface and the plank then cut lengthwise to fit the profile of the wall.
1
4
5
2
3

11
7 (Refer Diagram 6) To start the next row, use the off cut from the previous row (ensure the minimum length is 300mm) or use a new plank. If using a new plank, ensure this is not a full plank (suggest two thirds of a plank), so that the end joins for adjacent rows are offset.
8 Connect the planks of the second row at the ends and place them on top of the bottom lip of the protruding tongue (refer Diagram 7). Then lift the planks gently and slot them into the protruding tongue of the adjoining plank, working left to right (refer Diagram 8.) PLEASE NOTE You may need to use masking tape to hold down the planks already laid. Once the planks are connected in the row you can remove the tape.
9 (Refer Diagram 9) When laying the last row – using the off cut from the previous row – turn the plank over with the groove side facing the wall and the decorative side facing down. Make sure you have installation spacers placed against the wall for an expansion gap, then mark a line indicating where you need to cut. Once the plank has been cut, take the piece with the groove side (decorative side facing up) and place on top of the bottom lip of the protruding tongue and repeat Step 8.
10 Fitting around the door jambs and between the door frame. Allow for a 10mm expansion gap when laying planks around door jambs and fill the gap with colour sealant. Formica Flooring must be laid separately between door frames. Allow a 20mm gap between the door frame and cover the gap with an expansion profile.̂ When installing around pipes and columns, you need to mark the centre of each pipe/column on the plank. To do this, place the plank in front of, and then alongside, the pipe/column. This should give an accurate centre point to drill holes (refer Diagram 10). To allow for an expansion gap, drill holes 10mm larger than the pipes/columns on the marked area of the plank. Next, cut the plank crossways through the centre of the drilled holes. Fit the largest piece of the plank first, then apply flooring sealant* to the smaller section of flooring (as per the instructions on the bottle). Fit the smaller section around the pipes/columns, being careful not to glue the piece to the sub floor, pipes/columns or wall and fill the gap with the recommended colour sealant.
11 When you have finished laying the floor, remove all installation spacers and fix the quad beading to the skirting boards (by laying it on top of the laminate flooring), to cover the perimeter expansion gap. Use long thin nails, approximately 30mm, to fix the quad beading onto the skirting board. For cement walls use liquid nail adhesive. PLEASE NOTE Quad beading placed around corners are to be cut at 45 degree angles at both joining ends for a neat fit.
Finally, inspect the floor. If there are small chips on the plank surface these sections need to be cut out and replaced.
Wall
^Refer to the Trim Guide on page 13.*For more detailed information regarding accessories listed, please refer to page 6.
6
7
8
9
11
10

12
DAMAGED BOARD REPLACEMENT
The process involves removing the damaged plank in the centre of a room, utilizing a saw or router, then replacing the plank using PVA adhesive. Follow these steps.
1 Mark the damaged plank 25mm from ends and side. Drill holes at corners of marked area.
2 Cut along lines between the drilled holes and remove the center section. Then cut the remaining piece in the center on both sides and remove.
3 Prepare a replacement plank by cutting and removing the factory tongue along the short end of the plank and remove the bottom edge and top nib of the groove of the new plank.
4 Apply adhesive to the base of the plank and replace the plank by aligning the tongue on the replacement plank with the groove of the abutting plank, and snap back into place.
5 Make sure all edges are even on either side of the joints. Use a heavy object to apply pressure for at least 24 hours. Make sure the weight is evenly distributed across the new piece.
13
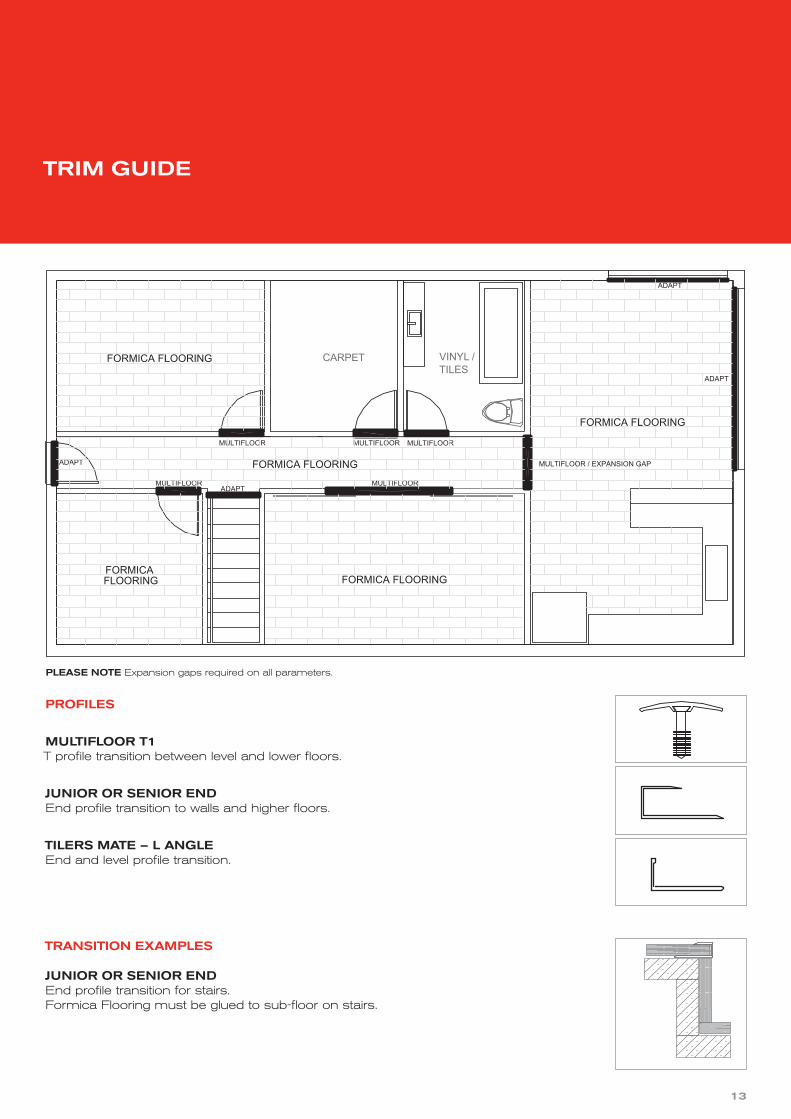
PROFILES
MULTIFLOOR T1 T profile transition between level and lower floors.
JUNIOR OR SENIOR END End profile transition to walls and higher floors.
TILERS MATE – L ANGLE End and level profile transition.
TRANSITION EXAMPLES
JUNIOR OR SENIOR END End profile transition for stairs. Formica Flooring must be glued to sub-floor on stairs.
PLEASE NOTE Expansion gaps required on all parameters.
MULTIFLOOR MULTIFLOOR
MULTIFLOOR MULTIFLOOR
ADAPT
ADAPT
ADAPT
ADAPT
CARPET VINYL /TILES
MULTIFLOOR
FORMICA FLOORING
MULTIFLOOR / EXPANSION GAP
FORMICA FLOORINGFORMICA FLOORING
FORMICA FLOORING
FORMICA FLOORING
MULTIFLOOR MULTIFLOOR
MULTIFLOOR MULTIFLOOR
ADAPT
ADAPT
ADAPT
ADAPT
CARPET VINYL /TILES
MULTIFLOOR
FORMICA FLOORING
MULTIFLOOR / EXPANSION GAP
FORMICA FLOORINGFORMICA FLOORING
FORMICA FLOORING
FORMICA FLOORING
TRIM GUIDE
MULTIFLOOR MULTIFLOOR
MULTIFLOOR MULTIFLOOR
ADAPT
ADAPT
ADAPT
ADAPT
CARPET VINYL /TILES
MULTIFLOOR
FORMICA FLOORING
MULTIFLOOR / EXPANSION GAP
FORMICA FLOORINGFORMICA FLOORING
FORMICA FLOORING
FORMICA FLOORING
MULTIFLOOR MULTIFLOOR
MULTIFLOOR MULTIFLOOR
ADAPT
ADAPT
ADAPT
ADAPT
CARPET VINYL /TILES
MULTIFLOOR
FORMICA FLOORING
MULTIFLOOR / EXPANSION GAP
FORMICA FLOORINGFORMICA FLOORING
FORMICA FLOORING
FORMICA FLOORING
MULTIFLOOR MULTIFLOOR
MULTIFLOOR MULTIFLOOR
ADAPT
ADAPT
ADAPT
ADAPT
CARPET VINYL /TILES
MULTIFLOOR
FORMICA FLOORING
MULTIFLOOR / EXPANSION GAP
FORMICA FLOORINGFORMICA FLOORING
FORMICA FLOORING
FORMICA FLOORING

14
END PROFILE TRANSITION OPTIONS – FLOORING JOINS
MULTIFLOOR T1 Transition from Formica Flooring to a lower hard floor surface, such as tiles, wood or vinyl.
MULTIFLOOR T1 Transition from Formica Flooring to a raised floor surface, such as ceramic tiles.
MULTIFLOOR T1 Transition from Formica Flooring to carpet.
MULTIFLOOR T1 Transition from Formica Flooring to Formica Flooring. Use at doorways and expansion joints.
TILERS MATE - L ANGLE Transition from Formica Flooring to a level hard floor surface (+/-2mm), such as tiles, wood or vinyl. Keep minimum gap and fill with the recommended colour sealant.
TILERS MATE - L ANGLE Transition from Formica Flooring to Formica Flooring. Keep minimum 10mm gap. Fill with the recommended colour sealant used at expansion joints and doorways.
JUNIOR OR SENIOR END End profile transition from Formica Flooring to a level hard floor surface (+/-2mm), such as tiles, wood or vinyl.
JUNIOR OR SENIOR END End profile transition from Formica Flooring to carpet.
15
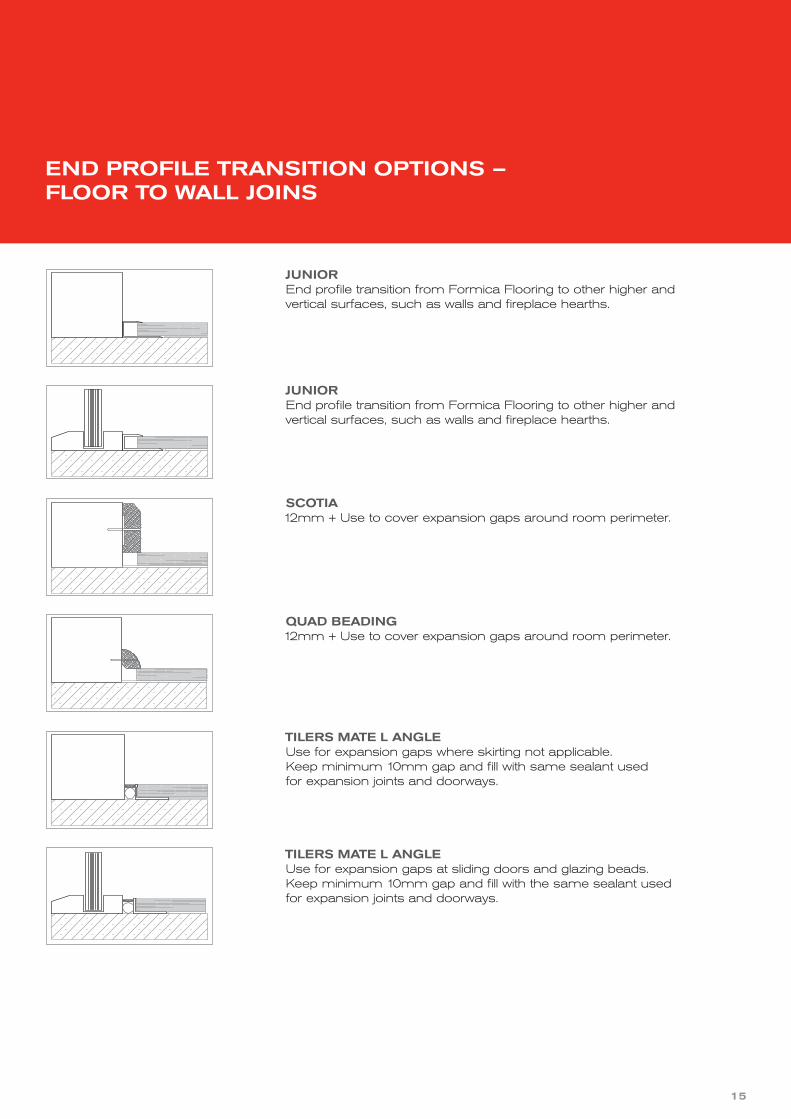
JUNIOR End profile transition from Formica Flooring to other higher and vertical surfaces, such as walls and fireplace hearths.
JUNIOR End profile transition from Formica Flooring to other higher and vertical surfaces, such as walls and fireplace hearths.
SCOTIA 12mm + Use to cover expansion gaps around room perimeter.
QUAD BEADING 12mm + Use to cover expansion gaps around room perimeter.
TILERS MATE L ANGLE Use for expansion gaps where skirting not applicable. Keep minimum 10mm gap and fill with same sealant used for expansion joints and doorways.
TILERS MATE L ANGLE Use for expansion gaps at sliding doors and glazing beads. Keep minimum 10mm gap and fill with the same sealant used for expansion joints and doorways.
END PROFILE TRANSITION OPTIONS – FLOOR TO WALL JOINS

16
AFTER CARE AND CLEANING
The best ways to keep your floors clean
■ Under no circumstances should you wash the floor with wet cloths or mops. This only spreads dirt and can cause swelling of the joints.
■ Do not clean Formica Flooring with wax, polish, floor cleaner, detergent or scouring materials. Use only flooring cleaning products suitable for laminate flooring.
■ Steam mops must not be used on Formica Flooring. They will cause irreversible damage and will void the product’s warranty.
■ Regularly clean Formica Flooring with a micro-fibre mop or duster.
■ If the floor is very dirty or has stains, use a soft broom to remove dust and loose dirt. Then use an appropriate deep cleaner* following the instructions on the bottle. (Available from major flooring retail outlets.)
TIPS ON MAINTENANCE
■ Wipe up accidental spills immediately with a clean, dry cloth. Liquid spills left on Formica Flooring will cause swelling of the joints.
■ Fit all movable furniture, like tables and chairs, with felt pads.
■ Place a doormat outside all external doors. Sand, dirt and grit act like abrasive paper and will damage the Formica Flooring surface layer.
■ Place a plastic mat or rug under rolling chairs.
■ Lay dirt-absorbing mats down in areas most often exposed to dirt, such as entrance halls or hallways.
■ Do not wax, polish or varnish Formica Flooring. It has been designed and manufactured with a high strength stain resistant surface layer. Applying wax or varnish will smear, yellow and glaze the surface.
■ Should accidental scratches occur on the surface layer of the plank, apply a colour fill* to repair (available from major flooring and hardware retail outlets, or simply cut the damaged board out and replace it with a new one (refer to Damaged Board Replacement section).
CARE AND MAINTENANCE

17
TECHNICAL INFORMATION
FLOORTHICKNESS
12mm Premium Plank
8mm Standard Plank
8mm Premium Plank
Product Class 32 32 32
Commercial Limited Warranty
7 years 7 years 7 years
Residential Limited Warranty
30 years 30 years 30 years
Size Per Plank (mm) 1383 x 159 x 12mm 1380 x 193 x 8mm 1383 x 159 x 8mm
Planks Per Pack 8 9 10
m2 Per Pack 1.76m2 2.40m2 2.20m2
Weight Per Pack (approx) 15.8kg 16.2kg 15.1kg
Substrate Low Swelling HDF
Low Swelling HDF Aquastop 6 HDF
Silent Underlay Yes – -
Formaldehyde Emission E1 E1 E1
Swelling (EN 317) <6% <6% <6%
Impact Resistance (EN 685)
IC2 IC2 IC2
Abrasion Resistance (EN 685)
AC4 AC4 AC4
TECHNICAL INFORMATION
LAMINATEFLOORING
SUPERGLOSS FLOORING

18
TEST METHOD TYPICAL RESULT
12mm Formica Laminate Flooring
Acoustic Testing ISO140-8 and 140-6 Max 62dB
Slip Testing AS/NZS 4586: 2004 Wet PendulumOil-wet Ramp
ZR9
Fire Rating AS ISO 9239.1: 2003Critical Radiant Flux
Average Smoke Obscuration
7.1kW/m2
Less than 20%
8mm Formica Laminate Flooring
Acoustic Testing ISO140-8 and 140-6 Max 62dB
Slip Testing AS/NZS 4586: 2004 Wet PendulumOil-wet Ramp
Y R9
Fire Rating AS ISO 9239.1: 2003Critical Radiant Flux
Average Smoke Obscuration
7.1kW/m2
Less than 20%
8mm Formica Supergloss Flooring
Acoustic Testing ISO140-8 and 140-6 Max 62dB
Slip Testing AS/NZS 4586: 2004 Wet PendulumOil-wet Ramp
ZNot Rated
Fire RatingCritical Radiant Flux
Average Smoke Obscuration
TECHNICAL INFORMATIONTECHNICAL INFORMATION

1. Subject to the conditions and limitations set out in this warranty below, Laminex Group Pty Limited ABN 98 004 093 092 trading as Laminex warrants to the original purchaser of any Formica® Flooring for interior residential or commercial use who is a “consumer” as defined in section 3 of the Australian Consumer Law that Laminex will at its option, repair or replace any Formica Flooring without charge if it is defective directly as a result of its manufacture by Laminex or the materials used in its manufacture by Laminex, during the applicable product warranty period (below) after the initial purchase (proof of purchase will be required) Subject to paragraph 7, this obligation terminates at the expiration of the applicable product warranty period from the date of purchase of the product concerned from Laminex.
Range Floor Thickness
RESIDENTIAL Limited Warranty Period
COMMERCIAL Limited Warranty Period
Laminate flooring 12mm 30 years 7 years
Laminate flooring 8mm 30 years 7 years
Supergloss flooring 8mm 30 years 7 years
2. This warranty does not cover any defect caused by: a) any natural occurrence or any other circumstance beyond
Laminex’s control; orb) If Laminex considers that you have incurred or will incur reasonable labour
charges which are necessary for the repair or replacement of the Formica Flooring product covered by this warranty, it will pay you the amount of those charges or pay those charges directly to a third party to undertake the necessary repair or replacement works.
c) movement in the flooring or expansion caused as a direct result of the following: a) Moisture rising from the sub floor, absorbed into the product. b) Moisture absorbed into the product as a direct result of water/liquid spillage or excess water used to clean the product; or
d) damage caused as a direct result of the following: a) Vehicular traffic b) Abnormal use c) Abusive use d) Poor maintenance e) Exposing the floor to excessive sand, grit or gravel
e) physical abuse, misuse, accidents, exposure to excessive heat, the use of solvents or inappropriate cleaning products/materials, improper maintenance, normal ‘wear and tear’, scratches, scuffs, burns, stains, wipe marks on darker colour surfaces, exposure to chemical products; or
f) general fading and discolouration (exposure to sunlight should be avoided); or g) the product being used in applications that are not recommended by Laminex in the product literature published; or h) where the defect has been caused by faulty workmanship by any person other
than Laminex; or i) variation in colour, pattern, shade of the material against the sample material,
displays and/or printed illustrations The warranty also does not cover: j) where the defect is trivial or insubstantial; or k) where, as at the date of notification of the defect to Laminex, the type or colour
of the alleged defective product no longer forms part of Laminex’s standard stock range and the person complaining of the defect does not agree to the supply of a replacement which is as close a type or colour match as is possible from Laminex’s then prevailing stock range; or
l) anything that has been disclosed as a feature or limitation of Formica Flooring in any literature published by Laminex; or m) outdoor application.3. This warranty applies only to Formica Flooring: a) Purchased from Laminex after 1 July 1994 for interior residential
or commercial use in Australia; b) That has remained installed at the location at which it was first installed after
its sale by Laminex; c) Which has been installed, maintained, used and protected in the manner
recommended by Laminex, as at the relevant time of such installation, maintenance, use or protection, in its literature published from time to time concerning Formica Flooring, a copy of which may be obtained, free of charge, at the point of purchase or by writing directly to Laminex at the address given below; and
d) where Laminex has been notified of the defect within seven days of the first person to become aware of it.
4. Costs of claiming: a) Laminex will bear the expense of the reasonable labour charges which are
necessary for the repair or replacement of the Formica Flooring product covered by this warranty. When submitting a claim, please provide details of the quantum of the labour charges necessary for the repair or replacement of the Formica Flooring product (including any quotes you have obtained verifying the labour charges).
b) If Laminex considers that you have incurred or will incur reasonable labour charges which are necessary for the repair or replacement of the Formica
Flooring product covered by this warranty,
it will pay you the amount of those charges or pay those charges directly
to a third party to undertake the necessary repair or replacement works.
c) Subject to a), the person claiming the warranty will bear all other expenses
of claiming the warranty.
5. A replacement product may not be reasonably available from Laminex in the
same shape, type or colour as the original Formica Flooring product covered by
this warranty. If a replacement product of the same shape, type or colour is not
reasonably available, Laminex reserves the right to provide a replacement product
of as close a shape, type and colour match as is reasonably possible from
Laminex’s then prevailing product range in satisfaction
of its obligations under this warranty
6. Except as expressly provided in paragraphs 8 and 9, all terms, conditions, warranties,
undertakings, inducements and representations, whether express or implied,
statutory or otherwise relating in any way to Formica Flooring are excluded. Without
limiting the generality of the preceding sentence, Laminex will not be under any other
liability in respect of any loss or damage (including consequential loss or damage)
however caused (whether by negligence or otherwise) which may be suffered or
incurred or which may arise directly or indirectly in respect of Formica Flooring.
7. Where any applicable legislation implies any term, condition or warranty into the
contract of sale between Laminex and a person, or Laminex’s relationship with a
person, which has acquired Laminex Formica Flooring, or otherwise gives that
person a particular remedy against Laminex, and that legislation or any legislation
voids or prohibits any provision excluding, or modifying the application of, or exercise
of, any liability under such term, condition, warranty or remedy, then that term,
condition warranty or remedy shall be deemed to be included in or, as the case may
be, apply to that contract or relationship. However, Laminex’s liability for any breach
of such term, condition or warranty or under such remedy, shall be limited, at
Laminex’s option, in any one or more of the ways permitted by that legislation including,
where so permitted:
a) If the breach related to Formica Flooring:
i. The replacement of Formica Flooring or the supply of equivalent product;
ii. The repair of Formica Flooring
iii. The payment of the cost of replacing Formica Flooring or acquiring equivalent
product; or
iv. The payment of the cost of having Formica Flooring repaired; and b)
If the breach relates to services:
i. The supplying of the services again; or
ii. The payment of the cost of having the services supplied again.
8. Please note that the benefits given by this warranty are in addition to other rights and
remedies of the person under a law in relation to the goods or services to which this
warranty relates. This warranty should not therefore be read as an exclusive
statement of the rights of the original purchaser or any other person.
9. Our goods come with guarantees that cannot be excluded under the Australian
Consumer Law. You are entitled to a replacement or refund for a major failure
and compensation for any other reasonably foreseeable loss or damage.
You are also entitled to have the goods repaired or replaced if the goods fail to
be of acceptable quality and the failure does not amount to a major failure.
10. This warranty does not cover any other product used or installed in connection
with Formica Flooring.
11. This warranty is not transferable or assignable.
12. Any inquiries regarding this warranty should be sent to Formica Flooring Warranties,
Laminex, P.O. Box 407, Doncaster, VIC 3108. Inquiries can also be made by calling
132 136 or emailing [email protected].
13. To claim this warranty, please send the following written details to the address set out
above:
• Your name, address and telephone number
• Place where the Formica Flooring product was purchased and amount you
paid for it. Please also provide a copy of your proof of purchase
• If the Formica Flooring product has been installed - the address at which
it was installed, the date of installation, the name of the person and company
that installed it, the quantum of the labour charges necessary for the repair or
replacement of the Formica Flooring product (including any quotes you have
obtained verifying the labour charges)
• Description of how the Formica Flooring product is defective and when you
found out that it was defective. Please also provide any photographs taken of
the defect(s)
After we receive your written claim, we will contact you to discuss. In some
circumstances Laminex may need to remove a sample of the
installed Formica Flooring product for testing.
Formica Flooring is marketed and distributed by Laminex Group Pty Limited A.B.N. 98 004 093 092, trading as Laminex. Formica®, Supergloss™
19
FLOORING LIMITED WARRANTY

formica.com.au Formica Flooring is marketed and distributed by Laminex Group Pty Limited ABN 98 004 093 092, trading as Laminex. The colours and finishes of the products featured within the imagery in this brochure are as close to Formica Flooring as photographic lighting and our printing processes allow. Different camera angles, although not designed to be misleading, can sometimes distort actual size and distances. Formica Flooring is no different than any other material in that darker colours will always show scratches and superficial wear and tear more readily than lighter colours. Formica Flooring should be protected from strong, direct sunlight as continuous exposure may cause discolouration or fading to the surface. Please obtain a copy of the terms and conditions of Formica Flooring 7-30 year limited warranty from formica.com.au. This warranty is in addition to any rights that may exist under the Australian Consumer Law. Formica® , SuperglossTMAS
W 9
5719
1
LN
X30 1
1/1
4
Formica stockist
For more inspiration join us on facebook.com/thelaminexgroupau
INFORMATION Visit formica.com.au for
colour and design tips, technical information,
care, maintenance and more.
ENQUIRIES Call 132 136.
SAMPLES Visit formica.com.au or call 1800 002 204.
RESIDENTIAL WARRANTY 30 year limited warranty.
COMMERCIAL WARRANTY 7 year limited warranty.