florida hospital computerized provider order entry new meds/prescriptions ... power chart and...
TRANSCRIPT
Florida Hospital
Computerized
Provider Order
Entry
June 2012 Version 3.2

2

3
INTRODUCTION
Florida Hospital is continuing the journey with i-Extend, to become a hospital system utilizing an electronic medical record, with the use of Computerized Provider Order Entry (CPOE). This project is an affirmation of how to bring the most innovative technology into the lives of Providers and all healthcare personnel. The CPOE project is not a replacement for verbal communication, but a tool to assist the Provider to directly benefit the patient. Benefits Include:
Improved Patient Quality and Safety
Decreased Medication Errors
Complete and Legible Orders
Improved Workflow and Removal of Delays
Improved Regulatory Compliance
Security Reminder With the introduction of CPOE, password security is more important than ever. Your password is your electronic signature
Never share your User ID or password
Never use anyone else’s user ID and password
Log off the computer before walking away
If you think your password may have been compromised, then change it IMMEDIATELY
4
Contents
Computerized Provider Order Entry ........... 1
INTRODUCTION .......................................... 3
Security Reminder ...................................... 3
PLACING SINGLE ORDERS ........................... 7
PowerChart Orders Page .............................. 7
Step.1 Searching for an Order ........... 8
Step 2. Placing an Order .................. 11
Step 3. Signing an Order .................. 14
INTERACTING WITH ORDERS.................... 14
USING A POWERPLAN .............................. 21
Step 1. PowerPlan Selection ........... 21
Step 2: Merge View ......................... 23
Step 3: Orders Selection .................. 23
Step 4: Orders for Signature ........... 25
Step: 5: Sign ..................................... 26
TYPES OF POWERPLANS ............................. 26
Single Phase PowerPlans .................. 26
Multiphase PowerPlans ................... 27
Subphases ........................................ 28
INTERACTING WITH POWERPLANS .......... 29
View-Excluded Components .......... 29
Discontinue .................................... 30
Reset ................................................ 31
Add to Phase .................................. 31
Copy/Forward ................................ 32
Creating PowerPlan Favorites .......... 32
Searching for PowerPlan Favorites .. 33
Plan for later..................................... 34
5
ORDER ALERTS ......................................... 36
Duplicate Orders Alert ..................... 36
Decision Support .............................. 37
Discern Alerts ................................... 38
Discern Alert – “Other” .................... 43
ORDERING TIPS ........................................ 44
Insulin PowerPlans………………………………..46
Continuous Infusions (IV) Ordering ............ 48
Weight-based medications ......................... 50
Therapeutic Interchange ............................ 51
Respiratory Medications ............................ 52
Non Formulary Medications ....................... 54
AHP Ordering .............................................. 54
Diagnostic Tests Orders .............................. 54
Laboratory Orders ...................................... 55
Add-on Labs/ Specimen in Lab ......... 55
Microbiology .................................... 56
Blood cultures X 2 ............................ 56
Nurse Draw vs. Lab Draw ................. 56
Peak & Trough .................................. 57
IVT orders ......................................... 57
Blood transfusions ........................... 58
Diet Orders ....................................... 59
Additional Diet Instructions ............. 60
Procedures .................................................. 60
Consult Orders ............................................ 61
Med Reconciliation & Depart Process ...... 62
AMR (Admission Med Reconciliation) ........ 63
TMR (Transfer Med Reconciliation) ............ 65
DMR (Discharge Med Reconciliation) ......... 66
Completing the Med Reconciliation ........... 68
Adding New Meds/Prescriptions ................ 70
Convert to Prescription .............................. 70
6
Discharge Med Reconcilliation Tips ......... 71
Complementary meds ................................ 71
Ordering Insulin .......................................... 71
Continuous Infusions or IV med ................. 72
Miscellaneous Prescriptions ....................... 73
Printing Prescriptions ................................. 73
DEPART PROCESS ..................................... 74
Follow-up appointments ............................ 74
Patient Education ....................................... 77
Final Steps for Depart Process .................... 78
Enter a Discharge Order ............................. 78
Chart Search…..……………….....…….……………79 Summary Pages……..………..………..…………..80
7
PLACING SINGLE ORDERS This section will involve the basics of order entry, including adding and interacting with orders using the single order entry method.
PowerChart Orders Page The Orders Tab is defaulted when opening Power Chart and displays all Orders entered for the patient. In the Navigator under Plans, all of the
patient’s PowerPlan(s) will display. A
PowerPlan is a collection of orders grouped
together within i-Extend, similar to how orders
are listed on a paper orderset.
You can also select this view by clicking on
Orders from the Navigator. All Orders are
displayed under Clinical Categories, which are
highlighted in blue such as Patient care,
Continuous Infusions and Laboratory.
Orders are further classified in Clinical Sub-
Categories. For example: Hematology and
Chemistry are Clinical Sub-Categories of
Laboratory.
NOTE: Today, all orders, whether they are
placed by the physician, allied health
professional, nurse, HUC or pharmacist, will
display on the i-Extend Orders tab; As such,
the orders tab is the source of truth for all
orders placed on the patient.
Home medications that have been
documented by Nursing are called
“Documented Meds by History” and will be
8
seen on the Orders tab and on the Medication
List tab. The Prescription and Documented
Meds by Hx will display in 2 sections, Active
and Inactive. It is the physician’s responsibility
to review the Active medications.
The Inpatient Medication Work list will no
longer be printed and put on the chart, as the
electronic Medication List is the source of
truth
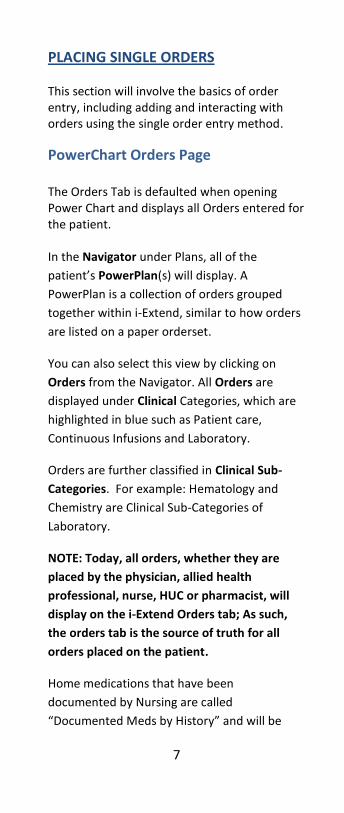
The Display Filter drop down can be used to include or exclude certain orders from your view. It is recommended to keep this to All Orders All Statuses. The orders are grouped under Clinical Categories highlighted in blue. You can also select this view by clicking on Orders from the Navigator.
Step.1 Searching for an Order
First, click on the +Add button
Display Filter Add Button
Navigator Order Profile
9
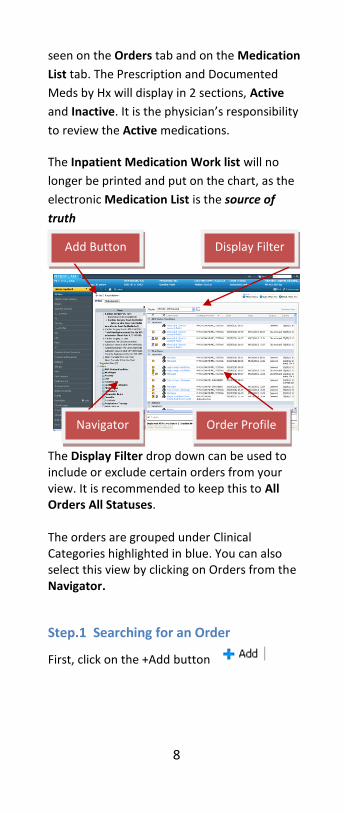
Using Favorite Folders
In the Add Order window, you can select the Adult Department Folder where you find several subfolders that contain the most commonly used orders and PowerPlans selected by your department.
A Physician Informatics Team member can assist you with setting this as your default folder.
Additional icons display to assist you with navigating to different views in this window: (left to right)
Move up – returns to the previous folder Home – returns to default folder Favorites – displays the Favorite orders and Favorite Sub Folders The Favorites Drop down- used to organize Favorites and displays all sub folders within that folder Folders- MIS use only
Copy Forward- - used to locate previously used
renal and HBO PowerPlans to copy for the current encounter. This icon is only used with renal patients and HBO Patients at this time.
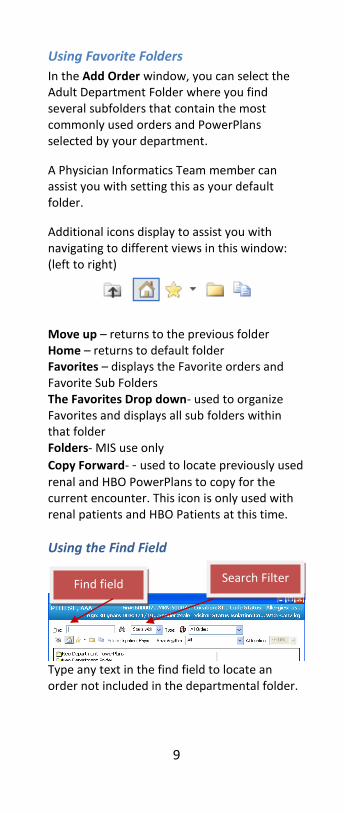
Using the Find Field
Type any text in the find field to locate an order not included in the departmental folder.
Search Filter Find field
10
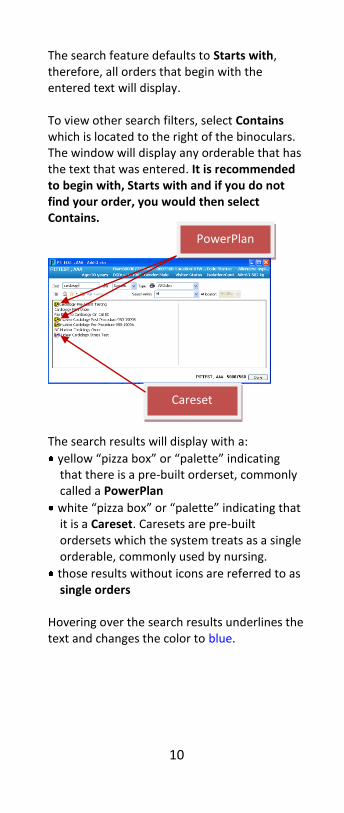
The search feature defaults to Starts with, therefore, all orders that begin with the entered text will display. To view other search filters, select Contains which is located to the right of the binoculars. The window will display any orderable that has the text that was entered. It is recommended to begin with, Starts with and if you do not find your order, you would then select Contains.
The search results will display with a:
yellow “pizza box” or “palette” indicating that there is a pre-built orderset, commonly called a PowerPlan
white “pizza box” or “palette” indicating that it is a Careset. Caresets are pre-built ordersets which the system treats as a single orderable, commonly used by nursing.
those results without icons are referred to as single orders
Hovering over the search results underlines the text and changes the color to blue.
Careset
PowerPlan
11
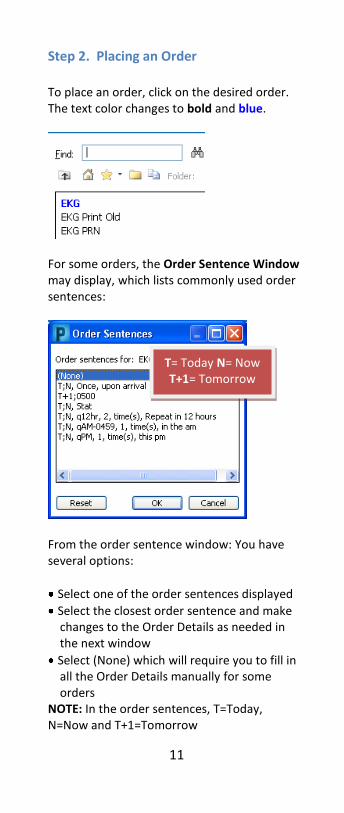
Step 2. Placing an Order
To place an order, click on the desired order. The text color changes to bold and blue.
For some orders, the Order Sentence Window may display, which lists commonly used order sentences:
From the order sentence window: You have several options:
Select one of the order sentences displayed
Select the closest order sentence and make changes to the Order Details as needed in the next window
Select (None) which will require you to fill in all the Order Details manually for some orders
NOTE: In the order sentences, T=Today, N=Now and T+1=Tomorrow
T= Today N= Now T+1= Tomorrow

12
NOTE: For lab and radiology orders, clicking (None) will default to T;N. Please do not change or modify the time on
lab orders with T+1;0459, changing the time
will alter the draw time and may cause the lab
not to be done. If there is not a T+1 order
sentence, change the time to tomorrows date
and put in time of 0459.
Multiple orders can be searched and chosen from the Add order window at the same time.
When you click Done from the Add Order window, the orders will display on the “scratchpad”. The scratchpad is any window that displays items prior to signing.
Order Details Window
The Order Details Window displays for the selected Order and some details are required to complete an order.
Different Order details will display based on the type of order. For example, medications will show different Order details than Diagnostic Tests. Order
details
Detail values

13
On the Details tab, order details display the following:
If the required field has been filled in, the font will be bolded
If you click on a detail, it will be highlighted in blue
If the detail is missing a value it will be highlighted in yellow
The Detail values correspond with the selected Order detail and can be changed as needed. You will also see the Missing Required Details
icon , which will prompt you to enter a value. Orders cannot be signed until all required fields are met. There is also a Missing Required Detail button
, at the bottom of the window which can be used to quickly take you to the order details that need to be filled in when selected. Enter Detail values until all missing required details are filled in and then the Missing Required Details icon will disappear.
Order Comments
The Order Comments Tab is used to communicate information to the person/department completing the order. NOTE: When you click on the Order sentence on the scratchpad, you will see all of the order details including the comment that was added.
14
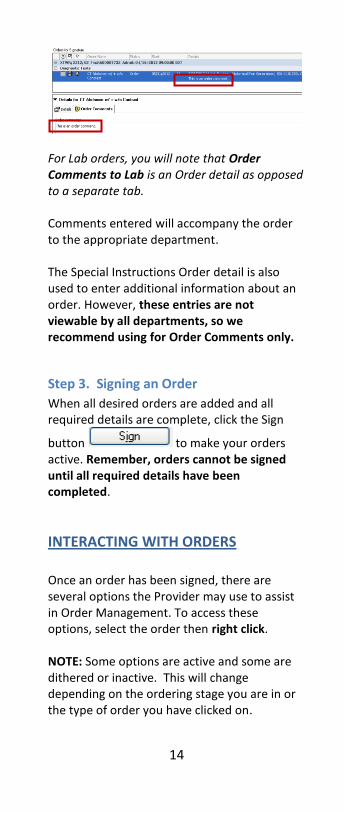
For Lab orders, you will note that Order Comments to Lab is an Order detail as opposed to a separate tab. Comments entered will accompany the order to the appropriate department. The Special Instructions Order detail is also used to enter additional information about an order. However, these entries are not viewable by all departments, so we recommend using for Order Comments only.
Step 3. Signing an Order
When all desired orders are added and all required details are complete, click the Sign
button to make your orders active. Remember, orders cannot be signed until all required details have been completed.
INTERACTING WITH ORDERS
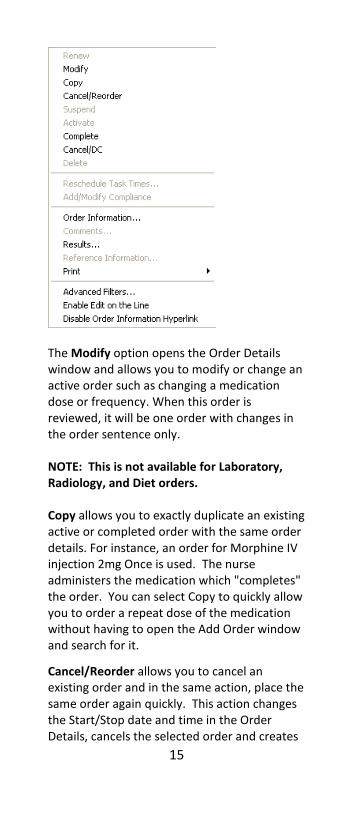
Once an order has been signed, there are several options the Provider may use to assist in Order Management. To access these options, select the order then right click. NOTE: Some options are active and some are dithered or inactive. This will change depending on the ordering stage you are in or the type of order you have clicked on.
15
The Modify option opens the Order Details window and allows you to modify or change an active order such as changing a medication dose or frequency. When this order is reviewed, it will be one order with changes in the order sentence only. NOTE: This is not available for Laboratory, Radiology, and Diet orders. Copy allows you to exactly duplicate an existing active or completed order with the same order details. For instance, an order for Morphine IV injection 2mg Once is used. The nurse administers the medication which "completes" the order. You can select Copy to quickly allow you to order a repeat dose of the medication without having to open the Add Order window and search for it.
Cancel/Reorder allows you to cancel an existing order and in the same action, place the same order again quickly. This action changes the Start/Stop date and time in the Order Details, cancels the selected order and creates
16
a new order. When this order is reviewed, it will appear as two distinct orders with separate Start/Stop dates and times in the Order Details, canceling the selected order, and creating a new order. This can be used to re-time Labs.
Suspend is a quick and easy method to
communicate that the medication is being held
due to a specific patient condition and will not
be restarted until the patient’s condition
changes. The medication remains on the MAR
in turquoise color and on the Active Order
Profile with a status of “Suspend”. It will also
display on the electronic medication
reconciliation tools. However, the physician
must remember to resume the medication
when the patient’s condition changes.
While Suspend does allow a physician to
suspend or hold a medication (ex: hold
Metformin for 48 hours after radiology dye), it
is best to use Cancel/Reorder when you know
that you are going to resume the medication
after a specific period of time. You can
specifically enter the date and time when the
medication should stop, and a new copy of the
order is on the scratch pad, which allows you
to enter the date and time to resume the
medication.
The Cancel/DC option allows the provider to:
Cancel a one-time existing signed order
Discontinue a continuing order
This option must be used when correcting Laboratory and Radiology orders and may require you to enter a Cancel / Discontinue reason
17
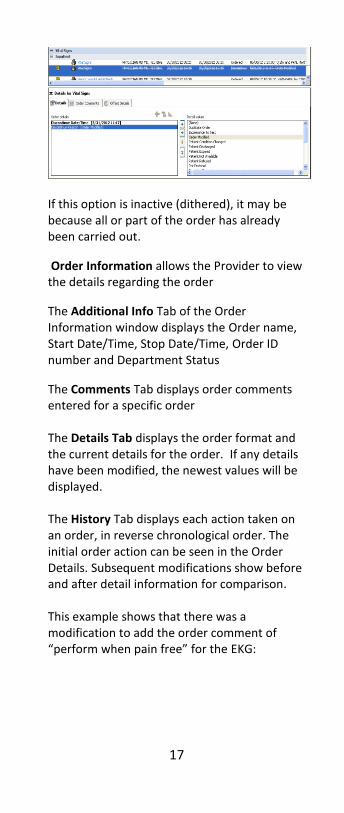
If this option is inactive (dithered), it may be because all or part of the order has already been carried out.
Order Information allows the Provider to view the details regarding the order
The Additional Info Tab of the Order Information window displays the Order name, Start Date/Time, Stop Date/Time, Order ID number and Department Status
The Comments Tab displays order comments entered for a specific order The Details Tab displays the order format and the current details for the order. If any details have been modified, the newest values will be displayed. The History Tab displays each action taken on an order, in reverse chronological order. The initial order action can be seen in the Order Details. Subsequent modifications show before and after detail information for comparison. This example shows that there was a modification to add the order comment of “perform when pain free” for the EKG:

18
The results associated with this order, may be seen in the Results Tab. The Pharmacy Tab shows the dispensing information for medications. The Order Information can also be accessed by single clicking the order directly from the Order Profile. The Results right-click option opens the Results Page of the Order Information window. Reference Information displays information regarding the order. Instructions for preparation, drug information, and protocols are displayed here. Medications that display with this reference
text icon , may have this option available. The Print option on the Orders Page is not used by physicians at Florida Hospital. Clicking Advanced Filter opens the Advanced Filter window displaying the different types of orders that can be selected to view. It is not recommended to change any of these filters.
19
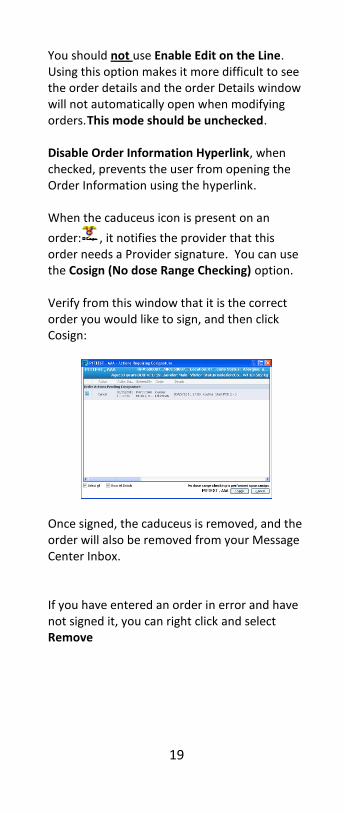
You should not use Enable Edit on the Line. Using this option makes it more difficult to see the order details and the order Details window will not automatically open when modifying orders. This mode should be unchecked. Disable Order Information Hyperlink, when checked, prevents the user from opening the Order Information using the hyperlink. When the caduceus icon is present on an
order: , it notifies the provider that this order needs a Provider signature. You can use the Cosign (No dose Range Checking) option. Verify from this window that it is the correct order you would like to sign, and then click Cosign:
Once signed, the caduceus is removed, and the order will also be removed from your Message Center Inbox. If you have entered an order in error and have not signed it, you can right click and select Remove
20
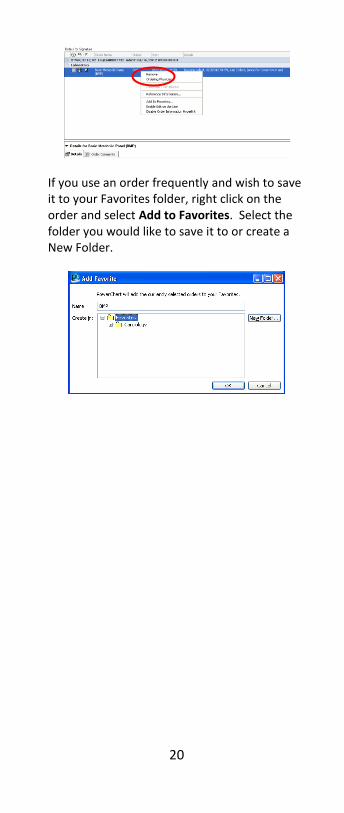
If you use an order frequently and wish to save it to your Favorites folder, right click on the order and select Add to Favorites. Select the folder you would like to save it to or create a New Folder.

21
USING A POWERPLAN
As discussed earlier, PowerPlans are a
collection of orders grouped together and may
have supporting sub-plans built into them for
things such as medications, procedures, etc.
PowerPlans also have embedded clinical
support and will alert the provider to a
potential situation and allow the provider to
alter the original action.
Using PowerPlans is a multiple-step process. It
is set up this way in order for certain alerts to
fire, as well as allowing the Provider to review
selected items before signing
Step 1. PowerPlan Selection
To add a PowerPlan click the Button. The simplest way to find the PowerPlan you need is to type its name in the FIND field. Enter Adm in the field, to search for the
PowerPlan titled Admission General Adult, and
then selected in the search results
TIP: Type the first two or three letters of the
symptom that closely matches the patient
NOTE: When the PowerPlan is selected, the font in the Search Window turns bold and the name of the PowerPlan appears in the Navigator
22
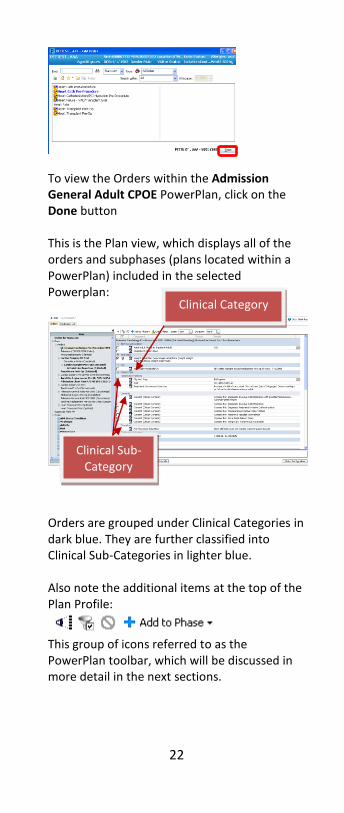
To view the Orders within the Admission General Adult CPOE PowerPlan, click on the Done button This is the Plan view, which displays all of the orders and subphases (plans located within a PowerPlan) included in the selected Powerplan:
Orders are grouped under Clinical Categories in dark blue. They are further classified into Clinical Sub-Categories in lighter blue. Also note the additional items at the top of the Plan Profile:
This group of icons referred to as the PowerPlan toolbar, which will be discussed in more detail in the next sections.
Clinical Category
Clinical Sub- Category
23
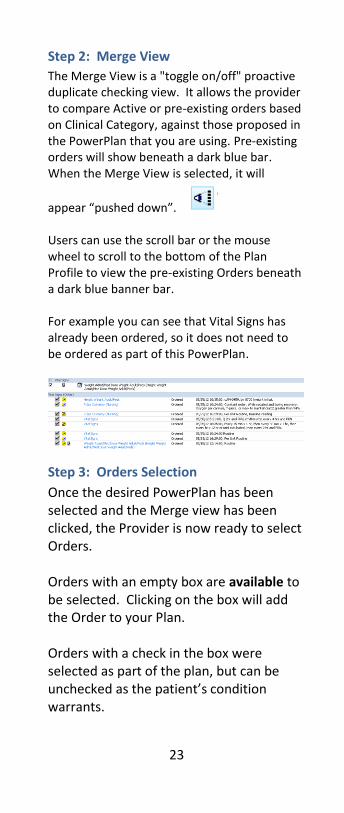
Step 2: Merge View
The Merge View is a "toggle on/off" proactive duplicate checking view. It allows the provider to compare Active or pre-existing orders based on Clinical Category, against those proposed in the PowerPlan that you are using. Pre-existing orders will show beneath a dark blue bar. When the Merge View is selected, it will
appear “pushed down”. Users can use the scroll bar or the mouse wheel to scroll to the bottom of the Plan Profile to view the pre-existing Orders beneath a dark blue banner bar. For example you can see that Vital Signs has already been ordered, so it does not need to be ordered as part of this PowerPlan.
Step 3: Orders Selection
Once the desired PowerPlan has been selected and the Merge view has been clicked, the Provider is now ready to select Orders. Orders with an empty box are available to be selected. Clicking on the box will add the Order to your Plan. Orders with a check in the box were selected as part of the plan, but can be unchecked as the patient’s condition warrants.

24
Remember, in the Plan view, Orders are
organized by Clinical Categories and Clinical
Sub-Categories.
Once you have reviewed Orders within each
Clinical Category, collapse the view by clicking
on the minus sign in the box next to the name
of the Clinical Category
PowerPlan orders may be defined as:
Included (order is pre-selected in the PowerPlan, but can be de-selected if needed)
Excluded (order is available for selection). Clicking on the box will add the Order to your Plan
Required (order is included and the Provider cannot make changes. Many of the Required orders are built as Indicators which are used for reporting purposes.
Once you have reviewed Orders within each Clinical Category, collapse the view by clicking on the box in front of the Clinical Category
Orders may contain more than one order sentence.
Orders with an ellipsis icon have a dropdown list of additional order sentences or order details.
Click to Collapse
Click to Expand
25
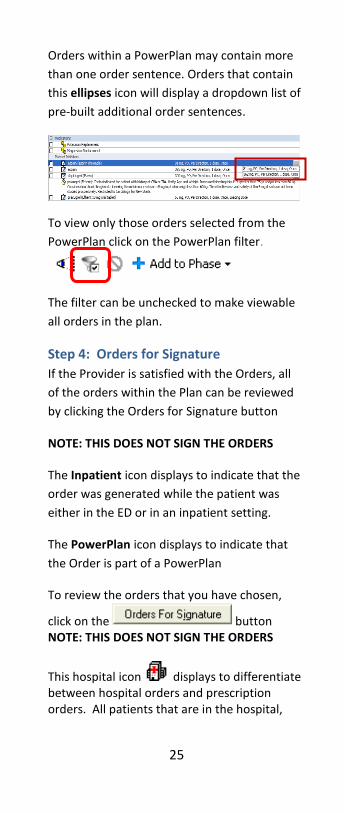
Orders within a PowerPlan may contain more
than one order sentence. Orders that contain
this ellipses icon will display a dropdown list of
pre-built additional order sentences.
To view only those orders selected from the
PowerPlan click on the PowerPlan filter.
The filter can be unchecked to make viewable
all orders in the plan.
Step 4: Orders for Signature
If the Provider is satisfied with the Orders, all
of the orders within the Plan can be reviewed
by clicking the Orders for Signature button
NOTE: THIS DOES NOT SIGN THE ORDERS
The Inpatient icon displays to indicate that the
order was generated while the patient was
either in the ED or in an inpatient setting.
The PowerPlan icon displays to indicate that
the Order is part of a PowerPlan
To review the orders that you have chosen,
click on the button NOTE: THIS DOES NOT SIGN THE ORDERS
This hospital icon displays to differentiate between hospital orders and prescription orders. All patients that are in the hospital,
26
either ED or Inpatient will display with this icon.
The PowerPlan icon displays to indicate that the Orders are part of a PowerPlan.
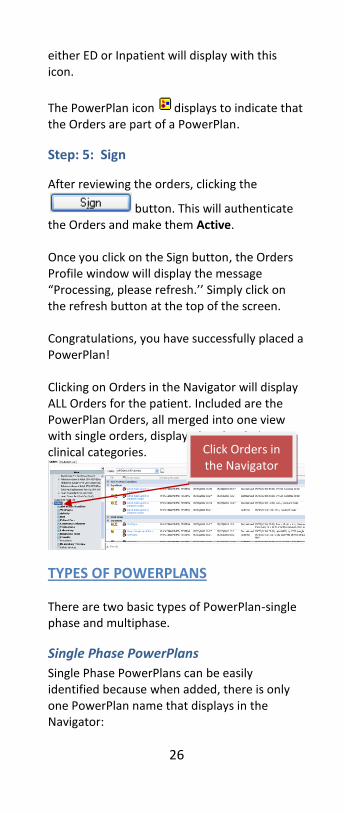
Step: 5: Sign
After reviewing the orders, clicking the
button. This will authenticate the Orders and make them Active. Once you click on the Sign button, the Orders Profile window will display the message “Processing, please refresh.’’ Simply click on the refresh button at the top of the screen. Congratulations, you have successfully placed a PowerPlan! Clicking on Orders in the Navigator will display ALL Orders for the patient. Included are the PowerPlan Orders, all merged into one view with single orders, displayed under their clinical categories.
TYPES OF POWERPLANS
There are two basic types of PowerPlan-single phase and multiphase.
Single Phase PowerPlans
Single Phase PowerPlans can be easily identified because when added, there is only one PowerPlan name that displays in the Navigator:
Click Orders in the Navigator

27
Multiphase PowerPlans
Multiphase PowerPlans are built differently than Single-phase PowerPlans. This is an example of the Bronchoscopy IP PowerPlan.
When ordering Bronchoscopy Inpatient, three PowerPlan phases automatically display.
Each phase is independent of each other. The Provider must Initiate the second and/or third phase manually after first phase has been automatically initiated. This step is an extra step that the user will have to perform when working on a Multiphase PowerPlan as we will describe. In the example of a patient needing Bronchoscopy IP power plan, the Provider will select the orders in the Bronchoscopy IP pre-procedure phase, sign them and that phase will show its status as Initiated which is indicated by the light bulb icon.
After the procedure, the Bronchoscopy IP phase would then be selected from the Navigator. Notice that the status shows as Planned Pending. As soon as you select this phase, the Initiate button will appear in the bottom right. Note: To minimize duplicate orders and alerts providers are encouraged to discontinue the prior phase prior to ordering any subsequent phase of the PowerPlan.
Phase 1
Phase 2
Name of PowerPlan

28
The Initiate button must be clicked after selecting your additional orders from the Gastrointestinal Endoscopy Inpatient GI Post-
procedure plan. Clicking on the button prior to signing, will ensure the Orders are Active and gives the opportunity for alerts to fire.
The light bulb icon indicates the PowerPlan and its selected Orders have been Initiated. The Provider may add additional orders if desired.
Subphases
In some PowerPlans, like in the Admission General Adult CPOE power plan, there are other PowerPlans built within them called Subphases. They are identified by "two pizza
boxes/palettes" called the Subphase Icon .
It is important to scroll through each
PowerPlan to look for Subphases. Subphases
are located within their respective Clinical
Categories
There are two examples of Subphases within the Admission General Adult CPOE Power Plan: VTE Prophylaxis subphase and Continuous Infusions subphase. Note the Subphases in their respective Clinical Categories:
To use a Subphase and add orders from it to include in the plan, check the box next to the Subphase; the orders associated with the Subphase will automatically display.
29
To return to the main PowerPlan, click on its name in the Navigator or click the Return to Return to Admission General Adult CPOE button at the top of the Plan view:
INTERACTING WITH POWERPLANS When working with PowerPlans, there are many things that can be done once it is Initiated. This section involves the PowerPlan toolbar, as well as some Right-click functions while working with PowerPlans. Remember, clicking on the name of the PowerPlan in the navigator will display the orders included in the PowerPlan as well as the PowerPlan toolbar. The Merge View
icon , has already been discussed.
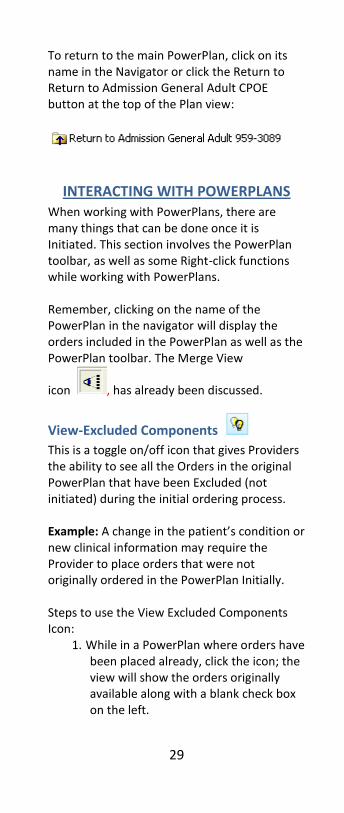
View-Excluded Components
This is a toggle on/off icon that gives Providers the ability to see all the Orders in the original PowerPlan that have been Excluded (not initiated) during the initial ordering process. Example: A change in the patient’s condition or new clinical information may require the Provider to place orders that were not originally ordered in the PowerPlan Initially. Steps to use the View Excluded Components Icon:
1. While in a PowerPlan where orders have been placed already, click the icon; the view will show the orders originally available along with a blank check box on the left.

30
2. Check the orders you need and repeat the process described before for reviewing and signing orders
Discontinue
When this icon is clicked, it will discontinue the Orders that are within the PowerPlan or SubPhase. The Provider can also discontinue the Plan by going to the Navigator and right-click on the Plan’s name. The discontinue option will be available in the dropdown. The Discontinue window will display all the orders set to be discontinued. A Discontinue Reason must be selected from the dropdown box.
The Provider will have the option of selecting the most appropriate reason available in the dropdown menu. You also have the option to Keep Orders and not set them to Discontinue by clicking on the empty box under the Keep column. If there are missing required details, the Provider will fill in those details and then click Sign and refresh the screen to complete the process of discontinuing orders within a PowerPlan.
The PowerPlan will display a Discontinue state in the Navigator and the Orders will display in
Discontinue reason
dropdown
Keep

31
the Profile. Also note that any order selected to be kept will display as an active order.
Reset
Right-click options such as Reset are available
for individual orders before you click the
Orders for Signature button
Selecting Reset allows the Provider to undo a
Discontinue for that specific order.
NOTE: Discontinuing the main PowerPlan will also Discontinue the SubPhases associated with it. However, Discontinuing the Subphase will not Discontinue the main PowerPlan or the other Subphases within that main Powerplan.
Right clicking on the name of the PowerPlan
before clicking the Orders for Signature button
allows you to Revert Discontinue, which resets
all the orders to the ones previously selected.
If the provider has not signed a PowerPlan, and would like to remove it, the provider can right click on the Plan name and the Remove option will be available for selection.
Add to Phase
Clicking the Add to Phase Dropdown allows the
Provider to add an Order to the PowerPlan that
is not already included. Using Add to Phase
includes the specific orders within the
PowerPlan rather than adding them as single
orders.
The Add Order Window will open and the Provider can enter any additional Orders to include in the plan.

32
Once selected, signed and refreshed, the order will be included in the plan.
Copy/Forward This icon can be located from the Add Order window.
Copy /Forward allows you to pull forward Renal and HBO PowerPlans that have been previously ordered on a patient (from a prior encounter) and can be re-used during the current hospital visit.
You would click the icon, select the PowerPlan, modify the orders if needed and complete the ordering process.
Creating PowerPlan Favorites
An existing PowerPlan can be modified and saved to a user’s personal favorites. To do so, a user will select a pre-existing plan and add or modify orders in the plan.
NOTE: You will not able to remove any orders from the pre-existing plan and can only modify the orders that display.
In the Navigator, right click and select Save as My Favorite or click the Save as my Favorite at the bottom of the screen:
The Save as My Favorite window opens and you can create a name for your favorite plan folder. The plan favorite name defaults to the current name of the selected PowerPlan.
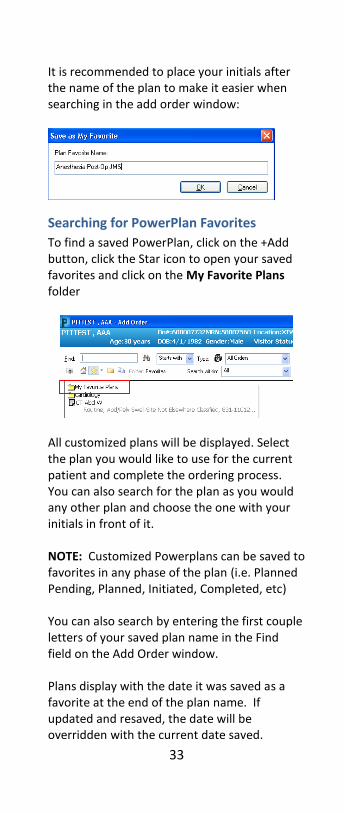
33
It is recommended to place your initials after the name of the plan to make it easier when searching in the add order window:
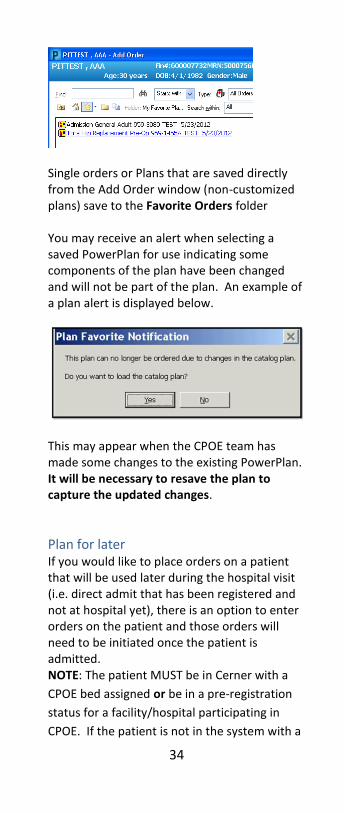
Searching for PowerPlan Favorites
To find a saved PowerPlan, click on the +Add button, click the Star icon to open your saved favorites and click on the My Favorite Plans folder
All customized plans will be displayed. Select the plan you would like to use for the current patient and complete the ordering process. You can also search for the plan as you would any other plan and choose the one with your initials in front of it. NOTE: Customized Powerplans can be saved to favorites in any phase of the plan (i.e. Planned Pending, Planned, Initiated, Completed, etc) You can also search by entering the first couple letters of your saved plan name in the Find field on the Add Order window. Plans display with the date it was saved as a favorite at the end of the plan name. If updated and resaved, the date will be overridden with the current date saved.
34
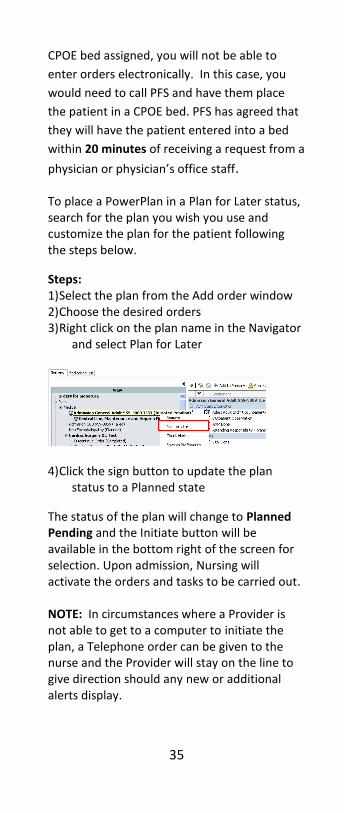
Single orders or Plans that are saved directly from the Add Order window (non-customized plans) save to the Favorite Orders folder You may receive an alert when selecting a saved PowerPlan for use indicating some components of the plan have been changed and will not be part of the plan. An example of a plan alert is displayed below.
This may appear when the CPOE team has made some changes to the existing PowerPlan. It will be necessary to resave the plan to capture the updated changes.
Plan for later
If you would like to place orders on a patient that will be used later during the hospital visit (i.e. direct admit that has been registered and not at hospital yet), there is an option to enter orders on the patient and those orders will need to be initiated once the patient is admitted. NOTE: The patient MUST be in Cerner with a
CPOE bed assigned or be in a pre-registration
status for a facility/hospital participating in
CPOE. If the patient is not in the system with a
35
CPOE bed assigned, you will not be able to
enter orders electronically. In this case, you
would need to call PFS and have them place
the patient in a CPOE bed. PFS has agreed that
they will have the patient entered into a bed
within 20 minutes of receiving a request from a
physician or physician’s office staff.
To place a PowerPlan in a Plan for Later status, search for the plan you wish you use and customize the plan for the patient following the steps below.
Steps: 1) Select the plan from the Add order window 2) Choose the desired orders 3) Right click on the plan name in the Navigator
and select Plan for Later
4) Click the sign button to update the plan
status to a Planned state
The status of the plan will change to Planned Pending and the Initiate button will be available in the bottom right of the screen for selection. Upon admission, Nursing will activate the orders and tasks to be carried out. NOTE: In circumstances where a Provider is not able to get to a computer to initiate the plan, a Telephone order can be given to the nurse and the Provider will stay on the line to give direction should any new or additional alerts display.

36
Should the provider need to give additional telephone orders the inpatient nurse will write the orders on paper and scan any medication orders to the pharmacy.
ORDER ALERTS
This section will discuss the most common alerts that Providers may be faced with when entering orders.
Duplicate Orders Alert
The Duplicate Orders Alert indicates that the Provider is attempting to place an order that has already been ordered.
You have the option to select the following: Order Anyway- allows the duplicate order to be placed Remove- cancels the selected order Cancel/DC- cancels or discontinues the Active Order Modify- opens the Order Details window and allows the Provider to make changes to the selected Order (ie. retiming the test) After making your selection(s), click OK. Repeat this process for each duplicate order NOTE: Not every order will elicit a Duplicate Orders Alert. Review the Orders Profile before placing any orders
New Order
Active Order
37
Decision Support
The Decision Support Alert may display to provide clinical information to help the Provider make a more informed decision when ordering medications.
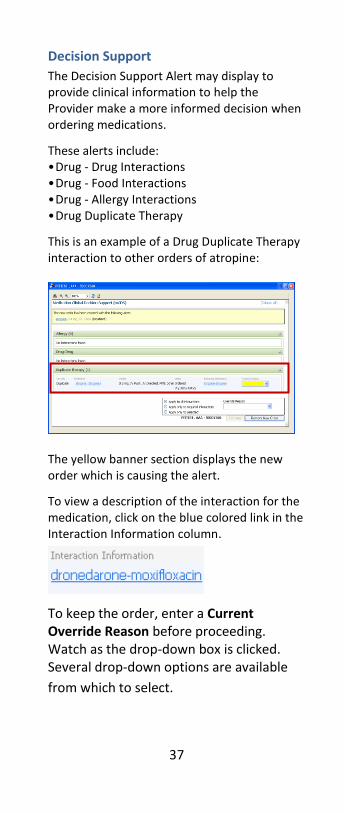
These alerts include: • Drug - Drug Interactions • Drug - Food Interactions • Drug - Allergy Interactions • Drug Duplicate Therapy This is an example of a Drug Duplicate Therapy interaction to other orders of atropine:
The yellow banner section displays the new order which is causing the alert.
To view a description of the interaction for the medication, click on the blue colored link in the Interaction Information column.
To keep the order, enter a Current Override Reason before proceeding. Watch as the drop-down box is clicked. Several drop-down options are available
from which to select.

38
This section allows you to select an
override reason for multiple medication
interactions.
In this example, the Override Reason of
Physician Approved Override has been
applied to all the interactions.
Once you have addressed all the alerts, click Continue.
If you would like to remove the new order,
click in the bottom right corner of the screen.
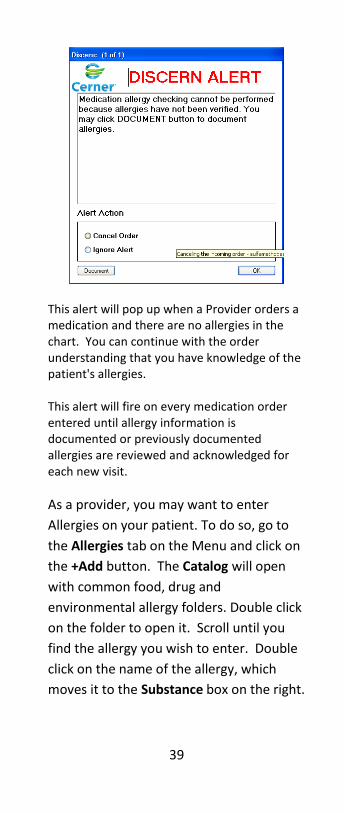
Discern Alerts
These alerts are based on rules that run in the background looking for certain situations.
There is an Allergy rule that checks to see if a patient’s allergies have been documented, every time a medication is ordered:
39
This alert will pop up when a Provider orders a medication and there are no allergies in the chart. You can continue with the order understanding that you have knowledge of the patient's allergies. This alert will fire on every medication order entered until allergy information is documented or previously documented allergies are reviewed and acknowledged for each new visit.
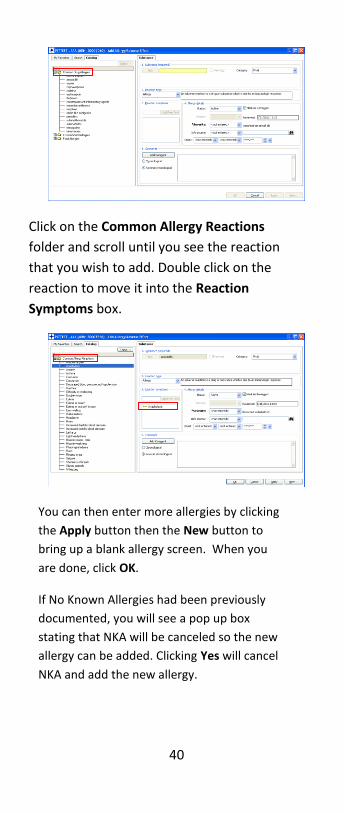
As a provider, you may want to enter
Allergies on your patient. To do so, go to
the Allergies tab on the Menu and click on
the +Add button. The Catalog will open
with common food, drug and
environmental allergy folders. Double click
on the folder to open it. Scroll until you
find the allergy you wish to enter. Double
click on the name of the allergy, which
moves it to the Substance box on the right.
40
Click on the Common Allergy Reactions
folder and scroll until you see the reaction
that you wish to add. Double click on the
reaction to move it into the Reaction
Symptoms box.
You can then enter more allergies by clicking
the Apply button then the New button to
bring up a blank allergy screen. When you
are done, click OK.
If No Known Allergies had been previously
documented, you will see a pop up box
stating that NKA will be canceled so the new
allergy can be added. Clicking Yes will cancel
NKA and add the new allergy.

41
This Change alert notifies you that something has changed in the system, regarding the patient, while you were in the process of placing an Order or initiating a PowerPlan:
Clicking Continue Signing Orders allows you to continue with the ordering process. Clicking Sign Nothing and Return to Profile will cancel all proposed orders for the patient. The Patient Profile Lock prevents two clinicians from entering medications on the same patient at the same time, so that appropriate duplicate drug checking can take place. This can occur when another clinician is ordering medications or documenting home meds and you are trying to place a medication order at the same time. This is a profile lock when entering a single order. You will not be able to enter your order until that lock is released by the other user displayed on the alert:
42
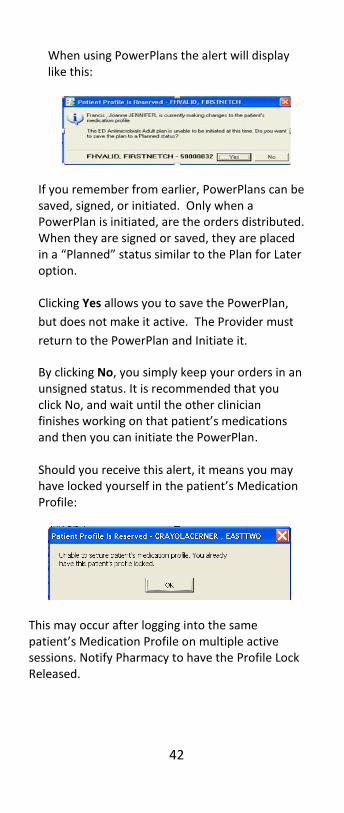
When using PowerPlans the alert will display like this:
If you remember from earlier, PowerPlans can be saved, signed, or initiated. Only when a PowerPlan is initiated, are the orders distributed. When they are signed or saved, they are placed in a “Planned” status similar to the Plan for Later option.
Clicking Yes allows you to save the PowerPlan,
but does not make it active. The Provider must
return to the PowerPlan and Initiate it.
By clicking No, you simply keep your orders in an unsigned status. It is recommended that you click No, and wait until the other clinician finishes working on that patient’s medications and then you can initiate the PowerPlan.
Should you receive this alert, it means you may have locked yourself in the patient’s Medication Profile:
This may occur after logging into the same patient’s Medication Profile on multiple active sessions. Notify Pharmacy to have the Profile Lock Released.
43
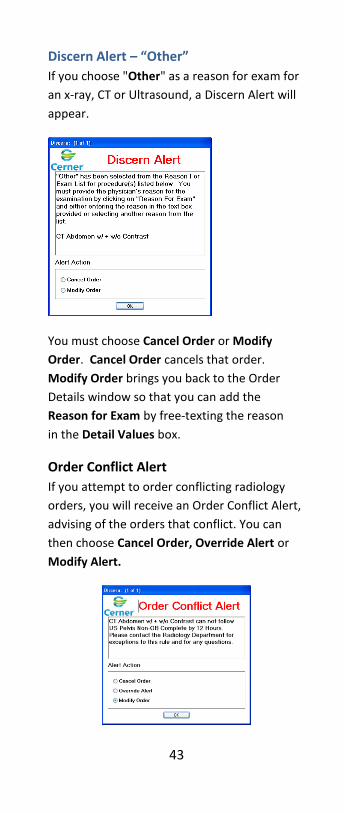
Discern Alert – “Other”
If you choose "Other" as a reason for exam for
an x-ray, CT or Ultrasound, a Discern Alert will
appear.
You must choose Cancel Order or Modify
Order. Cancel Order cancels that order.
Modify Order brings you back to the Order
Details window so that you can add the
Reason for Exam by free-texting the reason
in the Detail Values box.
Order Conflict Alert
If you attempt to order conflicting radiology
orders, you will receive an Order Conflict Alert,
advising of the orders that conflict. You can
then choose Cancel Order, Override Alert or
Modify Alert.
44
NOTE: If you choose Override Alert, you
must provide a reason for the override.
ORDERING TIPS
This section will describe some special order details tips and suggested PowerPlans to assist with entering orders.
Medication Order Details
There are many order Details that will assist in
communicating to the nurse how a medication
can be given.
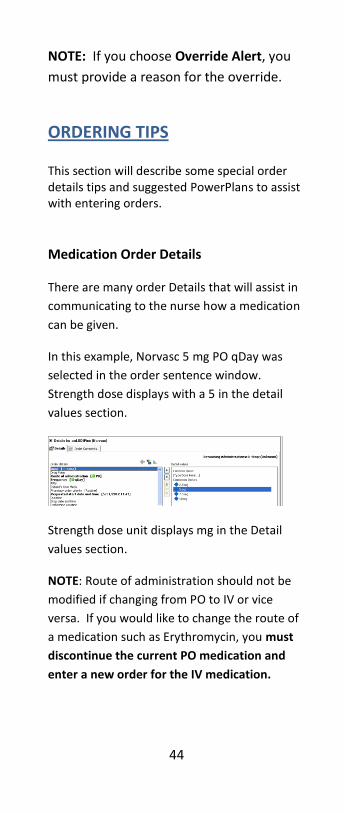
In this example, Norvasc 5 mg PO qDay was
selected in the order sentence window.
Strength dose displays with a 5 in the detail
values section.
Strength dose unit displays mg in the Detail
values section.
NOTE: Route of administration should not be
modified if changing from PO to IV or vice
versa. If you would like to change the route of
a medication such as Erythromycin, you must
discontinue the current PO medication and
enter a new order for the IV medication.
45
If you choose qh, like q8h, for example, then
the medication will be given at the standard
hospital administration times (0800, 1600,
2400).
However, if you choose qhr, like q8hr, it means
that the medication administration times will
start from the time you entered the order and
then every 8 hours after that.
For example, if you ordered this Norvasc at
1615 for q8hr, the administration times will be
for 1615, 0015, 0815, etc.
If you want a medication to start at a specific
date and/or time, you must change the Order
Detail Requested Start Date and Time. In the
Detail values section, you may enter the date
and time for the first dose, the second dose
and following doses. For example, if you
wanted to start at midnight, you would enter
the time here.
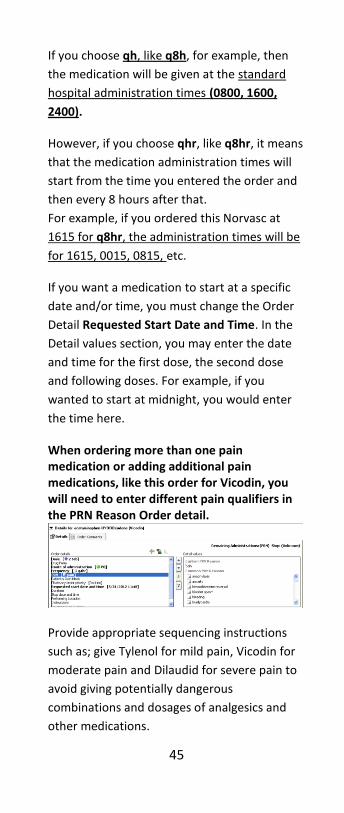
When ordering more than one pain medication or adding additional pain medications, like this order for Vicodin, you will need to enter different pain qualifiers in the PRN Reason Order detail.
Provide appropriate sequencing instructions
such as; give Tylenol for mild pain, Vicodin for
moderate pain and Dilaudid for severe pain to
avoid giving potentially dangerous
combinations and dosages of analgesics and
other medications.

46
If a medication is to be given only for a certain
period of time, or a certain number of doses,
you can enter that information in the Duration
and Duration unit.
Insulin PowerPlans There are a number of PowerPlans that are
made for diabetics and insulin coverage. Click
the +Add button then search for and chose the
appropriate PowerPlan by typing Insulin in the
Find field.
For hypoglycemic patients, type Hypoglycemia.
Choose the orders as you would for any
PowerPlan. Note the ellipses at the end of
some orders, which contain premade order
sentences.
These PowerPlans may contain patient care
items, labs and Notifications, which you may
choose to include. Click Orders for Signature,
review your orders and make changes if
47
needed. Sign and refresh the screen to make
your orders active.
NOTE: It is recommended that you use
PowerPlans when ordering Insulin as they are
built with the specific drips, labs, etc. so you
don’t have to search for them and order them
separately.
Insulin Correction Scale
When a change to the insulin scale is required it can be done using the following steps:
For Patients with Multimodal or Correction Scale Insulin PowerPlans initiated:
Cancel the current insulin scale, View Excluded Components and order the new scale from within the PowerPlan. This will insure that the dose of “Low”, “Medium” or “High” matches to the correct scale.
If the insulin scale was entered outside of a PowerPlan and does not meet the dose the patient requires, the provider can edit the scale using the “Order Comments” tab.
For providers who want to write for a custom scale, order sentences are available under the insulin order options. Select an order sentence that starts with “Correction Scale” and a scale template will be available in the “Order Comments” tab for ease of order entry.
48
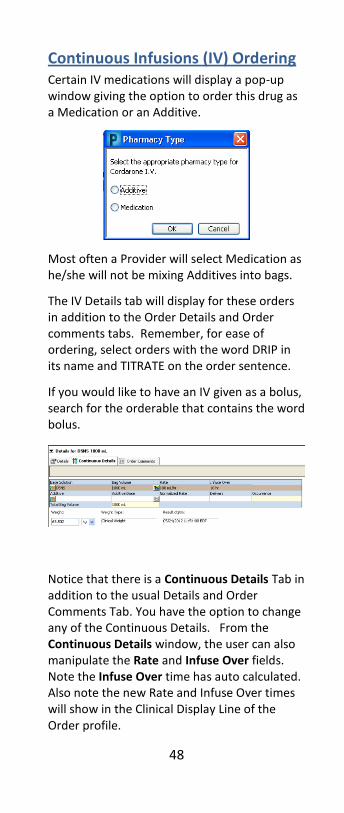
Continuous Infusions (IV) Ordering Certain IV medications will display a pop-up window giving the option to order this drug as a Medication or an Additive.
Most often a Provider will select Medication as he/she will not be mixing Additives into bags.
The IV Details tab will display for these orders in addition to the Order Details and Order comments tabs. Remember, for ease of ordering, select orders with the word DRIP in its name and TITRATE on the order sentence.
If you would like to have an IV given as a bolus, search for the orderable that contains the word bolus.
Notice that there is a Continuous Details Tab in addition to the usual Details and Order Comments Tab. You have the option to change any of the Continuous Details. From the Continuous Details window, the user can also manipulate the Rate and Infuse Over fields. Note the Infuse Over time has auto calculated. Also note the new Rate and Infuse Over times will show in the Clinical Display Line of the Order profile.
49
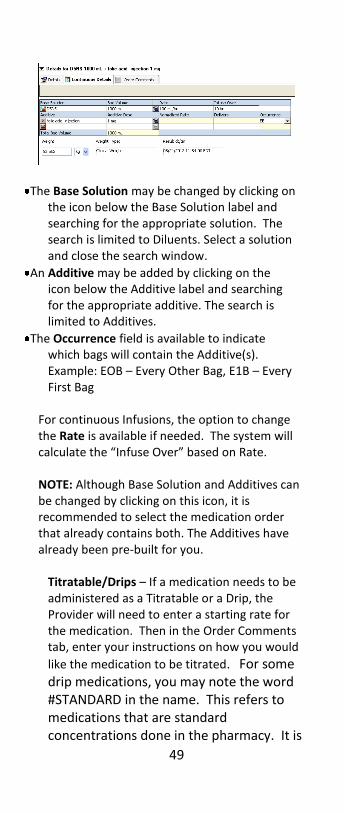
The Base Solution may be changed by clicking on the icon below the Base Solution label and searching for the appropriate solution. The search is limited to Diluents. Select a solution and close the search window.
An Additive may be added by clicking on the icon below the Additive label and searching for the appropriate additive. The search is limited to Additives.
The Occurrence field is available to indicate which bags will contain the Additive(s). Example: EOB – Every Other Bag, E1B – Every First Bag
For continuous Infusions, the option to change the Rate is available if needed. The system will calculate the “Infuse Over” based on Rate.
NOTE: Although Base Solution and Additives can be changed by clicking on this icon, it is recommended to select the medication order that already contains both. The Additives have already been pre-built for you.
Titratable/Drips – If a medication needs to be administered as a Titratable or a Drip, the Provider will need to enter a starting rate for the medication. Then in the Order Comments tab, enter your instructions on how you would
like the medication to be titrated. For some drip medications, you may note the word #STANDARD in the name. This refers to medications that are standard concentrations done in the pharmacy. It is

50
recommended to select these orderable names. Weight-based medications Weight-based medications can be identified by
the pill and calculator icon in PowerPlans or by their order sentence that displays dose by weight.
Click on the calculator icon to open the Dosage Calculator. The two main sections to
be concerned with most are the Target dose and the Final dose. The Target dose is derived from the Order Sentence. The Final dose is what the patient will receive and is calculated based on a charted weight. It is recommended to Round the final dose to assist with dispensing and administration.
If the weight is missing, the Provider can add the weight to complete the order. NOTE: Changing the weight here only assists with calculating your current dose; it does not chart the medication dose weight for the patient.
If labs were drawn and resulted, creatinine and/or creatinine clearance will display. It does not auto-calculate for these levels, but merely alerts the Provider what the levels are.
Final Dose

51
Clicking Cancel will abort the calculation and will not place a final dose for the patient. Once the desired final dose displays, click on the
"Apply Dose" button.
Therapeutic Interchange (TI)
When ordering medications, you may come across some that are on Florida Hospital’s list of therapeutic interchange drugs. Therapeutic interchange drugs are identified with the letters T and I at the end of the order name.
This window will describe the therapeutic interchange where you have the option to select the alternative drug(s). In this example, Zyrtec (cetirizine) can be selected instead of the Allegra
If the circumstances call for the inability to substitute, the medication will need to be ordered as a Miscellaneous Medication and the Order Comments would include the request for non-substitution. The provider may be contacted by Pharmacy for further clarification.

52
Respiratory Medications For Respiratory Medications, an order for modality is required along with the medication. (For example, via Single Neb, MDI, or Continuous Aerosol) For Respiratory medications it is recommended to use PowerPlans because these were built to include the medications along with the modality.
NOTE: If a respiratory medication is ordered, an order will be auto-generated for the modality (Neb or Inhaled only) if the patient is 18 years of age or older and the patient is NOT in the ED. NOTE: If you search for PowerPlans using “RT” or “Respiratory” you may not necessarily see all the PowerPlans that you are looking for. It is recommended that you search for the type of respiratory care that you wish to order, such as BiPAP. NOTE: It is recommended that you utilize the Ventilator Management PowerPlan(s) when you have a patient on a ventilator, which has Sub Phases for things like Neuromuscular Blockade agents.
53
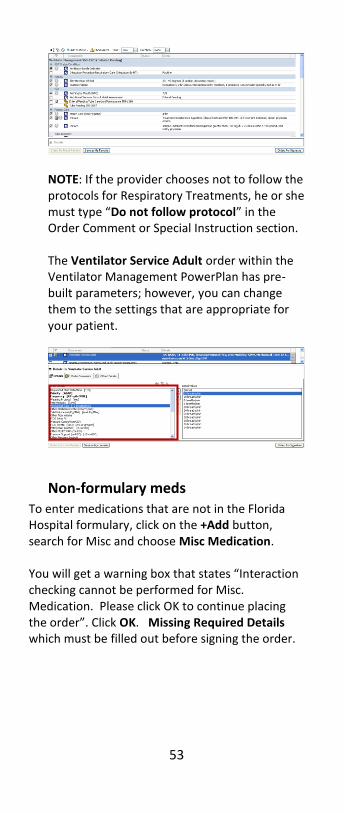
NOTE: If the provider chooses not to follow the protocols for Respiratory Treatments, he or she must type “Do not follow protocol” in the Order Comment or Special Instruction section. The Ventilator Service Adult order within the Ventilator Management PowerPlan has pre-built parameters; however, you can change them to the settings that are appropriate for your patient.
Non-formulary meds To enter medications that are not in the Florida Hospital formulary, click on the +Add button, search for Misc and choose Misc Medication.
You will get a warning box that states “Interaction checking cannot be performed for Misc. Medication. Please click OK to continue placing the order”. Click OK. Missing Required Details which must be filled out before signing the order.

54
AHP Ordering
It is in the scope of AHPs to order Class II meds, without co-signature, as long as the supervising physician has delegated the authority to the AHP to do so, and in the case of ARNPs and CRNAs, they have filed a scope of practice with the State Board.
Diagnostic Tests Orders
If an order is placed outside a PowerPlan, the Provider will need to complete all required Order Details including "Reason for Exam". Cardiology exams like this Echocardiogram order will have a required field: "Physician to Read" in addition to "Reason for exam".
After selecting the Reason for Exam, click on the next required detail (highlighted in yellow) or use the yellow arrow to advance to the next required field
If you are unable to locate your reason for exam from the list, you can select Other and click on the Reason for Exam order detail and enter any free text reason NOTE: Specifically for Echo orders, the Provider must select the reading physician's actual
No Caduceus
55
name within the Detail Values window to assist with timely results The Reading Physician's name for Cardiology exams, like this Echo order, can be the patient's private FH Cardiologist or the Cardiologist on call for the Reading Panel for Cardiology exams.
NOTE: Remember, as in current states, Echo STAT orders require a physician to physician conversation before placing the order
Laboratory Orders
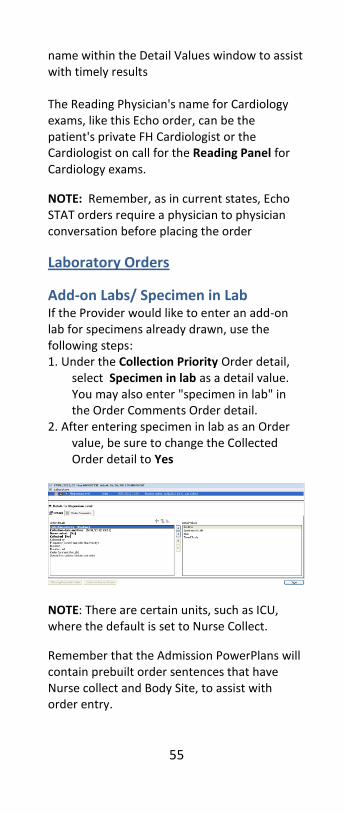
Add-on Labs/ Specimen in Lab If the Provider would like to enter an add-on lab for specimens already drawn, use the following steps: 1. Under the Collection Priority Order detail,
select Specimen in lab as a detail value. You may also enter "specimen in lab" in the Order Comments Order detail.
2. After entering specimen in lab as an Order value, be sure to change the Collected Order detail to Yes
NOTE: There are certain units, such as ICU, where the default is set to Nurse Collect.
Remember that the Admission PowerPlans will contain prebuilt order sentences that have Nurse collect and Body Site, to assist with order entry.
56
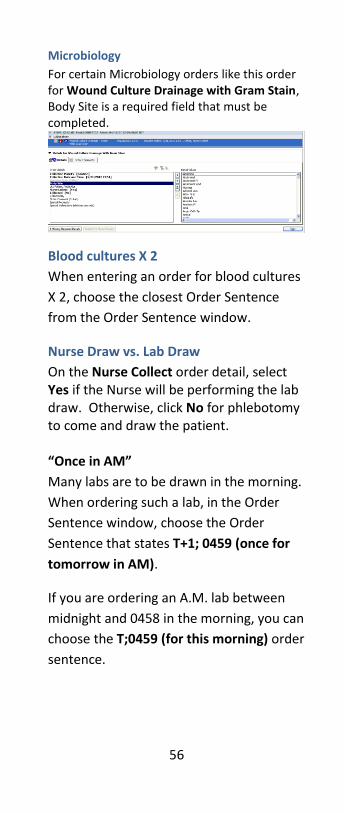
Microbiology
For certain Microbiology orders like this order for Wound Culture Drainage with Gram Stain, Body Site is a required field that must be completed.
Blood cultures X 2
When entering an order for blood cultures
X 2, choose the closest Order Sentence
from the Order Sentence window.
Nurse Draw vs. Lab Draw
On the Nurse Collect order detail, select Yes if the Nurse will be performing the lab draw. Otherwise, click No for phlebotomy to come and draw the patient. “Once in AM”
Many labs are to be drawn in the morning.
When ordering such a lab, in the Order
Sentence window, choose the Order
Sentence that states T+1; 0459 (once for
tomorrow in AM).
If you are ordering an A.M. lab between
midnight and 0458 in the morning, you can
choose the T;0459 (for this morning) order
sentence.

57
NOTE: Do not change the date or time that
the lab is to be drawn in the Order Details
window.
Peak & Trough
You can search for single orders for Peak and Trough levels for certain medications, and those orders also exist within certain PowerPlans.
Click the +Add button and search for the name of the medication, such as Gentamycin. Choose the order that states Gentamycin Peak Level – Nurse to enter Order.
This creates a task for the Nurse to draw the lab after the dose you specify in the order details.
IVT orders
For orders directed to the IV Team, such as IVT PICC Surveillance, search for IVT in the +Add
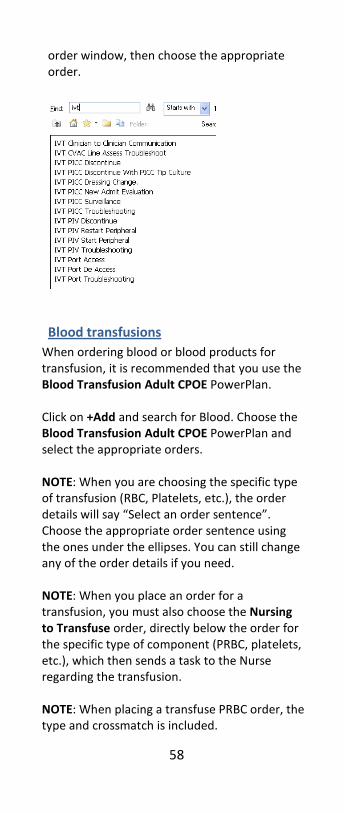
58
order window, then choose the appropriate order.
Blood transfusions
When ordering blood or blood products for transfusion, it is recommended that you use the Blood Transfusion Adult CPOE PowerPlan. Click on +Add and search for Blood. Choose the Blood Transfusion Adult CPOE PowerPlan and select the appropriate orders. NOTE: When you are choosing the specific type of transfusion (RBC, Platelets, etc.), the order details will say “Select an order sentence”. Choose the appropriate order sentence using the ones under the ellipses. You can still change any of the order details if you need. NOTE: When you place an order for a transfusion, you must also choose the Nursing to Transfuse order, directly below the order for the specific type of component (PRBC, platelets, etc.), which then sends a task to the Nurse regarding the transfusion. NOTE: When placing a transfuse PRBC order, the type and crossmatch is included.
59
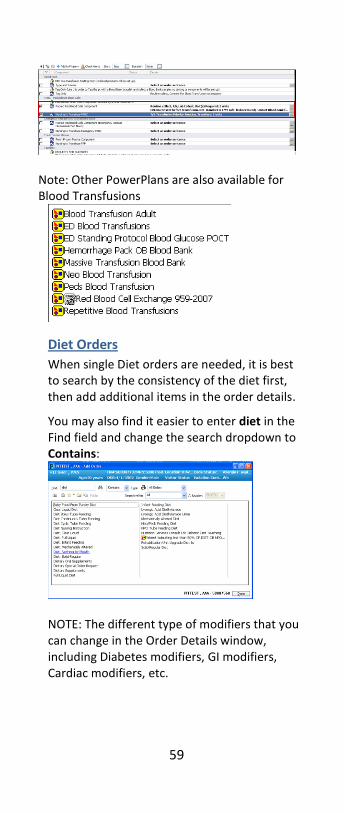
Note: Other PowerPlans are also available for Blood Transfusions
Diet Orders
When single Diet orders are needed, it is best to search by the consistency of the diet first, then add additional items in the order details.
You may also find it easier to enter diet in the Find field and change the search dropdown to Contains:
NOTE: The different type of modifiers that you can change in the Order Details window, including Diabetes modifiers, GI modifiers, Cardiac modifiers, etc.

60
NOTE: Admission PowerPlans, contain commonly used diets prebuilt into the Plan.
Placing a new diet order for a patient will cancel the previous order.
Additional Diet Instructions
To communicate any additional dietary instructions to Nursing, Choose the order called Diet Nursing Instructions. Complete the order details provided, such as advance diet as tolerated. You can also free-text information into the order details such as “Once patient is awake and alert.”
NOTE: If an order is entered with a future start date/time (example: NPO after midnight), the rule will automatically cancel the existing diet at the appropriate time.
Procedures
When entering orders for Procedures, it is recommended that you use a PowerPlan, as it includes orders for Nursing set-up, possible lab tests and radiology studies that may be needed.

61
This is the view of the Chest Tube Insertion and Management CPOE PowerPlan.
This PowerPlan includes orders for setup for Nursing, Medications, Lab tests, Chest X-rays.
DNR – Do Not Resusitate
Completing a DNR is a two-part process; requiring both an order to be placed in i-Extend and completion of the paper DNR form.
Isolation
To place an order for isolation use the Isolation PowerPlan. The plan includes types of isolation as well as orders for patient education.
Consult Orders There are two ways to place a Consult order. Consult Physician: This order should be used when the name of the consulting physician is known. This order automatically adds the patient to that Provider’s Patient List. You must enter the consulting physician’s name and the reason for the consult.

62
Consult On Call Physician: This order can be used to consult a specific specialty or group when the name of the physician on call is not known. You must enter the Service Requested and Reason for Consult.
If the Service required is not in the list it can be entered into the Other Service Requested detail field. To request a specific group enter the group name under Special Instructions. Note: You can also consult other departments, such as Case Management by searching for Consult in the FIND field and changing the filter to contains.
Medication Reconciliation
Medication errors are one of the most frequent causes of preventable harm in healthcare and a focus of the Joint Commission. Taking the time to do Med Reconciliation will greatly diminish the number of medication errors.
Icons that may display next to the medications:
Scroll icon - a documented home medication

63
Hospital building icon - a medication being taken in the hospital
Pill bottle icon - any new medication prescription
Orange circled star - a discharge reconciliation action has not yet been taken on that
“Pizza box” - indicates that the medication came from a PowerPlan
AMR (Admission Medication Reconciliation)
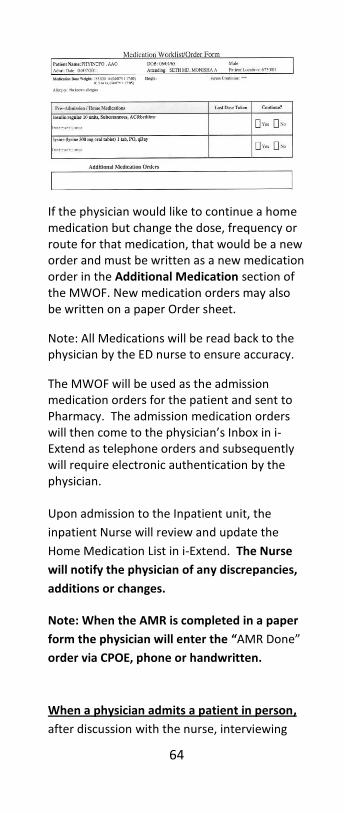
ED, Pre-op, Cath Lab, and Inpatient Nursing will collect the medications; including dosages, frequencies, and routes, and enter them into i-Extend.
The validated medications will appear on the Medication List in i-Extend and on the printed Medication Worklist / Order Form (MWOF).
If the physician is not available in person, the Nurse will read the medication list to the physician over the phone from the MWOF.
64
If the physician would like to continue a home medication but change the dose, frequency or route for that medication, that would be a new order and must be written as a new medication order in the Additional Medication section of the MWOF. New medication orders may also be written on a paper Order sheet.
Note: All Medications will be read back to the physician by the ED nurse to ensure accuracy.
The MWOF will be used as the admission medication orders for the patient and sent to Pharmacy. The admission medication orders will then come to the physician’s Inbox in i-Extend as telephone orders and subsequently will require electronic authentication by the physician. Upon admission to the Inpatient unit, the
inpatient Nurse will review and update the
Home Medication List in i-Extend. The Nurse
will notify the physician of any discrepancies,
additions or changes.
Note: When the AMR is completed in a paper
form the physician will enter the “AMR Done”
order via CPOE, phone or handwritten.
When a physician admits a patient in person,
after discussion with the nurse, interviewing

65
the patient and/or family and reviewing
medication list, the physician will then
complete the electronic AMR and enter any
new or additional medications. At this point,
the patient’s complete and current home
medication list can also be viewed directly in i-
Extend, under the Medication List tab.
NOTE: The physician will no longer be required
to hand-write the admission medication
orders.
NOTE: The AMR must be completed within 24
hours of admission.
TMR (Transfer Med Reconciliation)
TMR is a process required for post-op patients and transfers in and out of ICU.
For ICU patients, the Attending physician is responsible for completion of TMR.
For post-op patients, if the surgeon wants to
address only the surgically relevant medication
and there is an attending or consulting
physician on the case the surgeon may request
that other physician do the TMR by using either
“Contact Attending for remaining Post Op
Orders” or “Contact Consultant for remaining
Post Op orders” whichever is appropriate.
66
Unlike the AMR and DMR which require information input into a form; TMR is a process accomplished by the following steps: 1. From the patients EMR view the Medication
List 2. Add the Ordering physician as a field in the
Medication List (This can be done by clicking on the “Customize View”)
3. Review the Medication List with viewing All Medications (All Statuses)
4. Change, Add, or Delete medications as required
5. If indicated place the following order: “Contact Attending for Remaining Post Op Orders” “Contact Consultant for Remaining Post Op Orders”
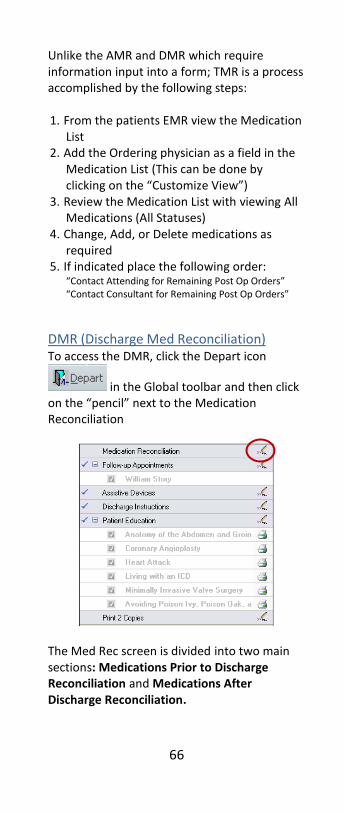
DMR (Discharge Med Reconciliation) To access the DMR, click the Depart icon
in the Global toolbar and then click on the “pencil” next to the Medication Reconciliation
The Med Rec screen is divided into two main sections: Medications Prior to Discharge Reconciliation and Medications After Discharge Reconciliation.

67
Medications Prior to Discharge Reconciliation on the left displays inpatient and home medications, including suspended medications. These are medications you will make a decision on to continue or discontinue. Medications After Discharge Reconciliation on the right displays each medication selected to continue after discharge and any new medications added.
The status bar indicates the completion phase of each state of the meds reconciliation.
Categories of Medications Prior to Discharge include:
Home Medications - home meds which were not continued in the hospital
Continued Home Medications - home medications that were continued in the hospital
Medications - new medications that were started in the hospital.
Continuous Infusions - Continuous infusions started in the hospital – In order to continue an IV after discharge an order for “IV for Discharge/Home Med” must be entered.
68
Note: In an effort to help decrease the amount of alerts that Providers are receiving in the DMR process, the Inpatient meds will default to “Do Not Continue.” If the Provider wants to continue any meds
that defaulted to “Do Not Continue”, click on
the column “Create New Rx” or if no script is
needed click on “Continue After Discharge”
Note: Always select the Home Med when there is no difference in the order.
When there is a Home Med and an Inpatient
Med:
If Inpatient Med is selected to “Continue After Discharge”, a duplicate alert will display.
If “Create New Rx” is selected, a duplicate alert will display.
Completing the Medication
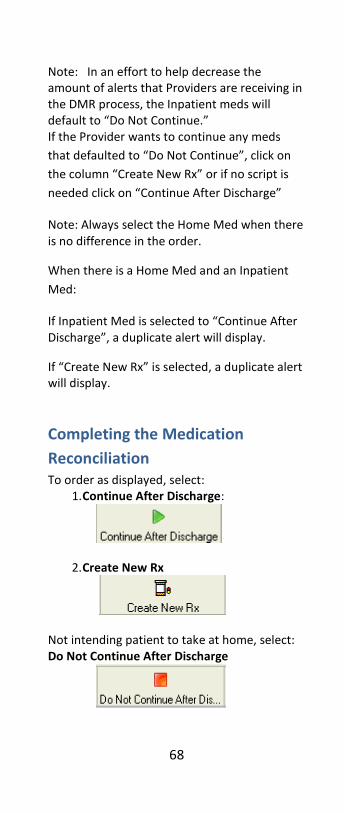
Reconciliation To order as displayed, select:
1. Continue After Discharge:
2. Create New Rx
Not intending patient to take at home, select: Do Not Continue After Discharge

69
To order the medication with changes, select: Create New Rx and click on the medication on the right column to make changes in the Order details window. The Order details window may display these icons for dosage
-most frequently used
-Commonly used
-Uncommonly used Refill: Defaults to “0” Duration: Completing duration first will allow Dispense to auto calculate Dispense: Type the number, hit Enter and select from list If the wrong med was selected, right click on the medication and select Reset or Remove. This will return the medication to look as it did prior to being modified or remove it from the list of medications to be taken after discharge. When you complete the DMR, click the Reconcile and Sign button:
When all medications have been addressed the status bar will display a check mark indicating the Discharge Med Rec is complete:
70
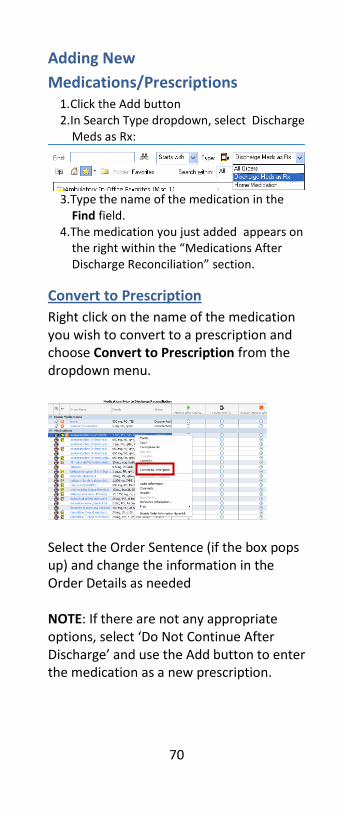
Adding New
Medications/Prescriptions 1. Click the Add button 2. In Search Type dropdown, select Discharge
Meds as Rx:
3. Type the name of the medication in the
Find field. 4. The medication you just added appears on
the right within the “Medications After Discharge Reconciliation” section.
Convert to Prescription
Right click on the name of the medication you wish to convert to a prescription and choose Convert to Prescription from the dropdown menu.
Select the Order Sentence (if the box pops up) and change the information in the Order Details as needed NOTE: If there are not any appropriate options, select ‘Do Not Continue After Discharge’ and use the Add button to enter the medication as a new prescription.

71
DMR Tips To add additional instructions: Use the Comment tab and type in any free text.
Complementary meds
To order as displayed, right click on medication and select Modify. In Order Details select OTC/NON-Rx and change the detail value to “Yes”: The DC instructions will print with “Please review the list with your primary care Provider.”
Ordering Insulin The simplest way to order insulin with the sliding scale included, is to select “Do not continue” on any existing inpatient insulin order. Then use the +Add button to enter a new order. This will populate a pre-existing sliding scale that can be modified if needed.
Steps to do this:
Click the Add button
Ensure the medication type is set to Discharge Meds as Rx
Search for “Correction/sliding scale” by typing correction in the Find field
Change the field from “Starts with” to “Contains”
Select the desired sliding scale, order sentence and click done
In the details window, fill out any required fields, including Dispense amount
Verify the existing sliding scale/taper in the Order Comments tab

72
To make any changes, you can delete values and add free-text
Click on the Details tab and highlight Verified sliding scale/taper in the order comments?
Click Yes in the detail values.
In the Order details, fill out any Missing Required Details.
Continuous Infusions or IV med To order IV fluids or IV meds to be continued post discharge:
Click on the +Add button
Enter IV for Discharge/Home Med
Select the fluid and order sentence
Acknowledge the Interaction Checking pop up alert by clicking ‘OK’; this indicates since the order is being placed as a discharge medication, interaction checking will not be performed against the listed allergies/drugs
Complete the Order Details window
Enter the rate under the Order Comments tab

73
Miscellaneous Prescriptions If a medication is not available in the Discharge Meds as Rx lookup such as foreign drugs:
Type ‘Misc’ in the Find field from the Add
order window
From the available options, select “Miscellaneous Prescription” (NOT Miscellaneous Medication)
Acknowledge the pop up alert by clicking OK
Enter the Order Details starting with Drug Name and the other required details.
Printing Prescriptions
The printer selection field is within the Details window and displays for new prescriptions. Make sure to select the printer that says “script”:
Those meds will then be printed on watermarked paper. You also have the option to not print by selecting “Do not Send” if the patient does not need a new script. Completing the Medication Reconciliation When you complete the Meds Reconciliation, click on the Reconcile and Sign button
and scripts will print to the printer they were routed to.

74
If interrupted during the discharge med rec process, click Reconcile and Sign on the bottom right. Information will be saved and scripts will print ONLY for those meds addressed. When you return, complete the reconciliation and click Reconcile and Sign; prescriptions will print ONLY for the meds reconciled during this return session. If you need to reprint a script, right click on the medication and select Resend. Note: Nursing does not have the capability of
reprinting your scripts. Only Nursing
supervisors, nurse managers and/or
pharmacists have the right to reprint your
scripts should that be necessary.
Please make sure that Generic Nursing is logged in and not another provider’s OPID because the Script printer will not appear.
\
DEPART PROCESS
Follow-up appointments After entering prescriptions, Follow-up appointments and Patient Education will need to be completed.

75
From the Depart Process Window, click on the “pencil” icon next to Follow-up Appointments
You can choose a specific provider, an organization or clinic, or free-text a name or place for follow up. Use the radio buttons and their respective fields to perform your search or select from the Quick Picks area.
In this example, Dr. Silverstein was searched and populated. Add any additional instructions in these fields.
76
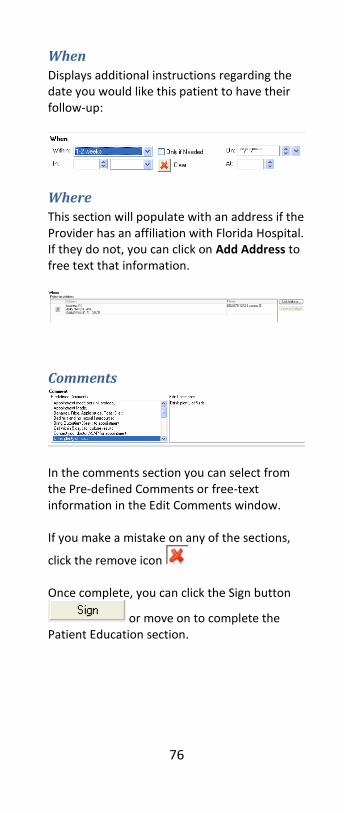
When
Displays additional instructions regarding the date you would like this patient to have their follow-up:
Where
This section will populate with an address if the Provider has an affiliation with Florida Hospital. If they do not, you can click on Add Address to free text that information.
Comments
In the comments section you can select from the Pre-defined Comments or free-text information in the Edit Comments window. If you make a mistake on any of the sections,
click the remove icon Once complete, you can click the Sign button
or move on to complete the Patient Education section.

77
Patient Education
You can enter patient education by clicking on the Instructions tab in this same screen. To search for patient education, enter your search in the field and make sure the All button is clicked. Double click on the education topic to view the content in the lower right of the screen. You may edit this information by typing in the box.
Note: Changing information here only changes it for this patient. If you have selected in a topic in error, click on
the remove icon to remove it.
Search
Preview of the
instructions
Search results
Click
Instructions tab
78
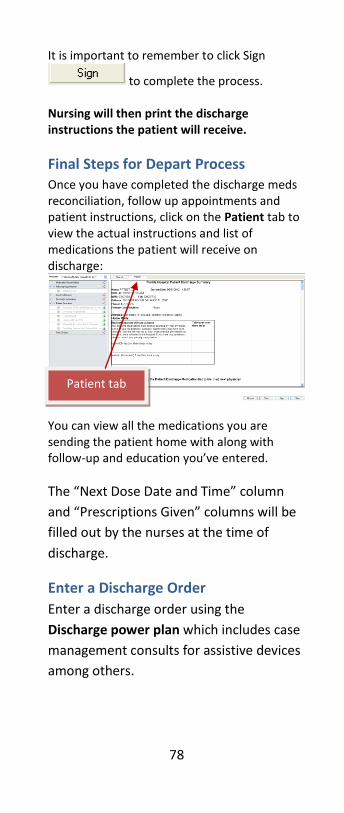
It is important to remember to click Sign
to complete the process. Nursing will then print the discharge instructions the patient will receive.
Final Steps for Depart Process Once you have completed the discharge meds reconciliation, follow up appointments and patient instructions, click on the Patient tab to view the actual instructions and list of medications the patient will receive on discharge:
You can view all the medications you are sending the patient home with along with follow-up and education you’ve entered.
The “Next Dose Date and Time” column
and “Prescriptions Given” columns will be
filled out by the nurses at the time of
discharge.
Enter a Discharge Order
Enter a discharge order using the
Discharge power plan which includes case
management consults for assistive devices
among others.
Patient tab

79
Chart Search • Enables clinicians to search within a patient’s
medical record for information related to
their past medical history.
1. Locate Chart Search in the Navigator 2. Enter a word or phrase in the Search Bar 3. Click Search or press Enter to begin the
search process
Results may be filtered by different facets, such as time, document type, location, drug classes, and drug. Filter the results by clicking the appropriate filter to limit the search results. Chart Seach currently does not index scanned documents.

80
Summary Pages
Summary Pages such as the InPatient and ICU Summary pages enable the clinician to review recent patient data in a single page format. The Summary pages can be accessed by clicking on the page title in the Navigator.
Single Order Favorites display on the page for quick ordering.
NOTE: Orders placed from the Summary Pages cannot be modified. NOTE: Orders placed from the Summary Page must be signed before closing the chart or be lost.
To add a new order or search click on the
icon, this will open the Order Search window.

81
NOTES

82