flotec shallow well quick start guide
TRANSCRIPT

5 6
1 2 3
Quick Start Guide: Shallow WellJet Pumps, 115/230 Volt
4
FromWell
Ejector
Outlet Valve PrimingPlug
Relief Valve
Pump Outlet Line
FromWell
Outlet Valve
Relief Valve
Ejector
Pump Outlet Line
Fuse Box orCircuit Breaker
Priming Teeand Plug
Outlet Valve Rellef ValveMotorCapacitor Cover
Quick-SetVoltageSwitch
Pressure Switch
Flow to Pressure Tank and Household Water System
Foot Valve
Ejector (Jet kitcontains nozzle and venturi)
Suction Pipe
Drive Point
Well Seal
Check Valve
Cased WellDriven Point
Well
Drive Coupling
115 Volt
Power SupplyTerminals
230 Volt
1 15
230230
1 1515
230
INSTALL THE PUMP1. Locate the pump near the water source.2. Consult manual for booster applications.
CHECK VOLTAGE SETTING1. Turn off power to the pump!2. Determine if the circuit for the pump is 115 or 230 volts.
Qualified person must install electrical wiring.3. 4. The voltage switch is factory set to 230 volts for 3/4, 1,
1-1/2, and some 1/2 HP motors. Some 1/2 HP motors arepreset at the factory for 115 volts.
5. To change the motor voltage (if necessary), a) remove the motor capacitor cover and slide the switch to the correct voltage, or b) remove the motor end cover and turn the dial switch to the correct setting.
6. Reinstall the cover.
Do Not Turn On Power Yet!
CONNECT POWER SUPPLY WIRING TO PRESSURE SWITCH1. Remove the pressure switch cover.2. Attach power lines and ground wires to the pressure
switch as indicated.3. Reinstall the cover.4. Do Not Turn On Power Yet!
Do Not Turn On Power Yet!
PUT WATER IN THE PUMP.1.
operating. Once running, the pump is self-priming. It The pump must be filled with water (primed) before
should not need priming again unless air enters the pump or the inlet line.
2. Install the priming plug.3. Make sure all plumbing connections are tight.
Do Not Turn On Power Yet!
OPEN VALVESCheck the air charge in the pressure tank. With no waterpressure, the tank air charge must be 2 psi LESS THANthe pressure switch ON setting.Open the outlet valve in the outlet line.
NOTE: No pressure regulator required for shallow wellinstallation.
APPLY POWER
For support, navigate to pentair.com/flotec.
Turn on circuit breaker to apply power to pump.
Water should flow within 5 minutes. If it does not, turnoff power and re-prime per step 4.
APPLY POWER
Circuit Breaker
Ground
Line To Motor Line Ground
•
•
•
NOTE: Hazardous voltage. Disconnect power before installation.High pressure. Risk of high heat and possible explosion if pump is run with outlet closed.• DO NOT run the pump without
water, and never operate it with aclosed outlet line.
DO NOT connect hosesto the pump.
DO NOT connect to pressurizedsupply (city water or otherpump’s output) unless safetydevices are properly installed.
DO NOT reduce the pipe size for inlet or outlet lines.
••
DO have an air-tight inlet line. DO read and follow the instructions in the manual.
•
•
DO have electrical and plumbing systems installed by qualified professionals.Some pumps are not recommended for use as a booster.Consult factory or refer to owners manual to determineif the product can be applied as a booster.
U834 (05/20/20)
Refer to the Installation and Operations Manual for further information.Accessories sold separately.
FLOTEC
Typical Pressure Switches (Covers Removed)
5 6
1 2 3
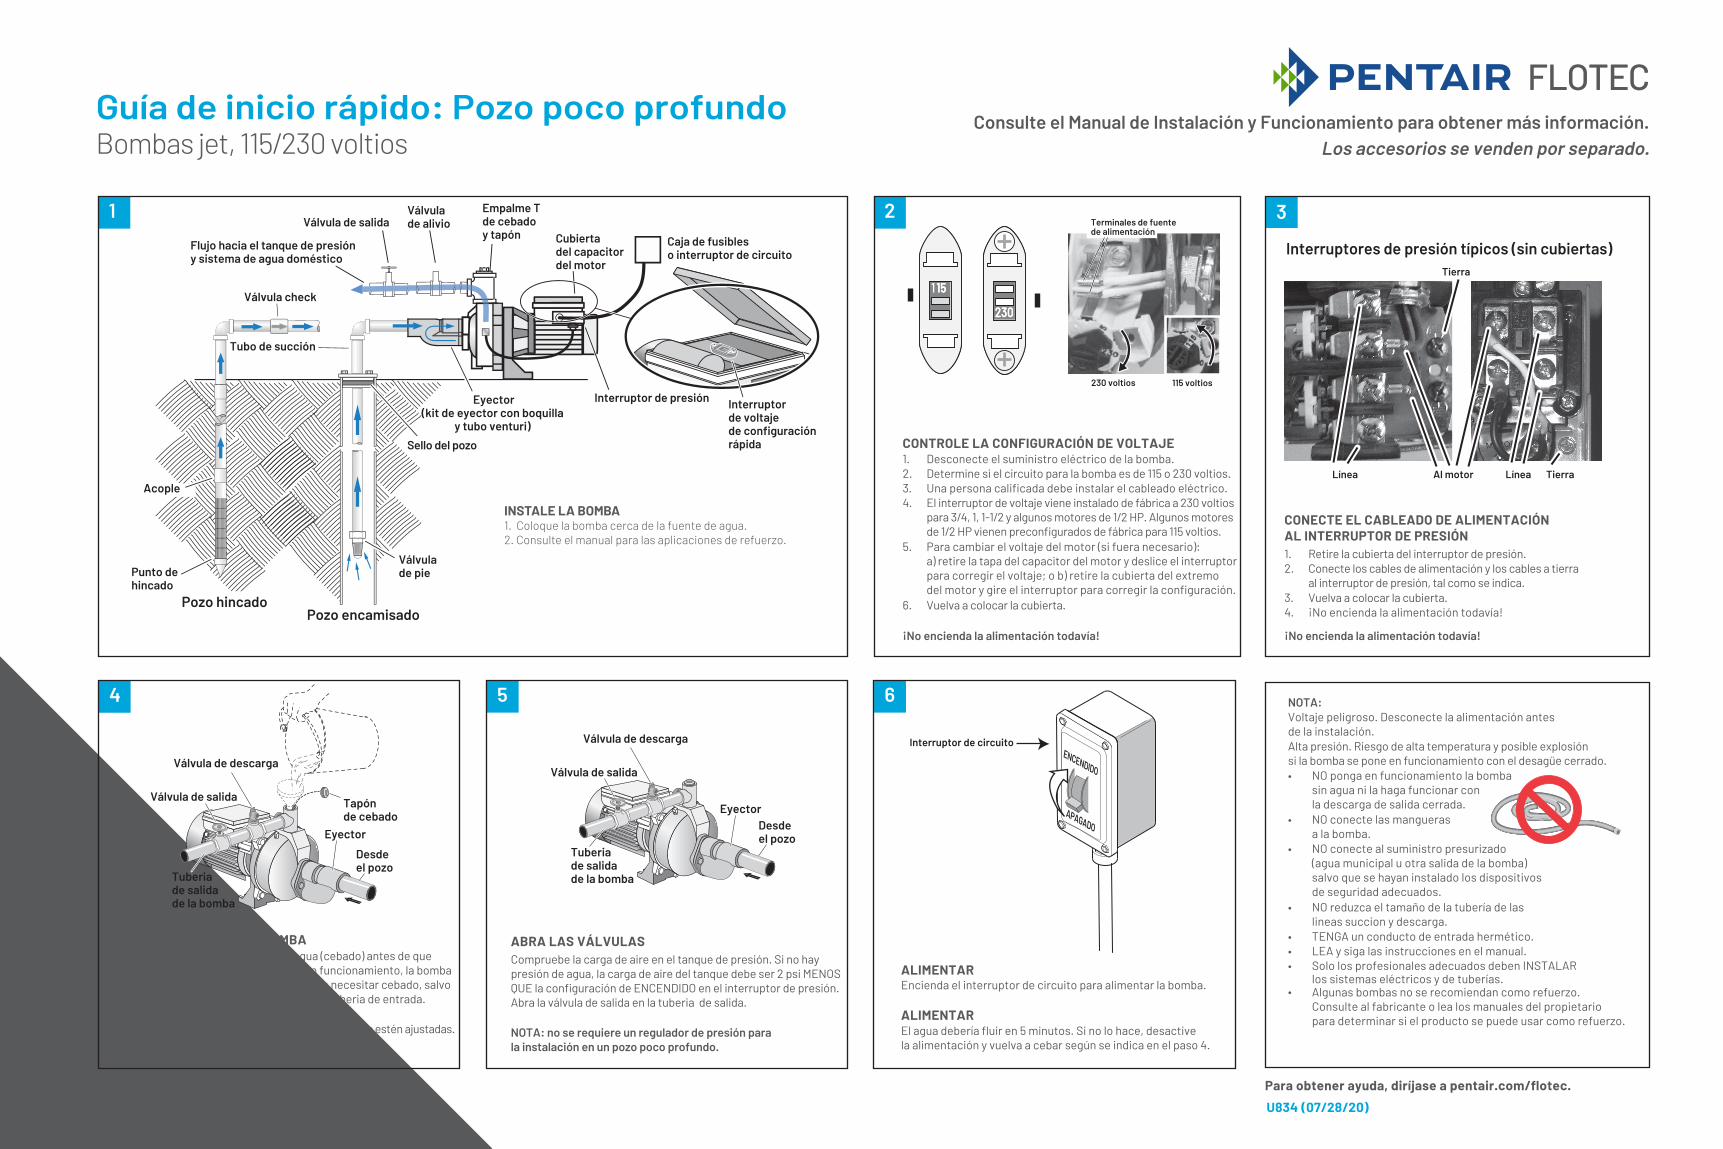
Guía de inicio rápido: Pozo poco profundo Bombas jet, 115/230 voltios
4
Eyector
Válvula de salida
Válvula de descarga
Tuberiade salida de la bomba
Válvula de salida
Válvula de descarga
Eyector
Tuberiade salida de la bomba
Válvula de salida Válvula de alivio
Interruptor de presión
Tubo de succión
Sello del pozo
Válvula check
Pozo encamisado
115 voltios230 voltios
1 15
230230
1 1515
230
INSTALE LA BOMBA1. Coloque la bomba cerca de la fuente de agua. 2. Consulte el manual para las aplicaciones de refuerzo.
CONTROLE LA CONFIGURACIÓN DE VOLTAJE1. Desconecte el suministro eléctrico de la bomba. 2. Determine si el circuito para la bomba es de 115 o 230 voltios.
Una persona calificada debe instalar el cableado eléctrico.3. 4. El interruptor de voltaje viene instalado de fábrica a 230 voltios
para 3/4, 1, 1-1/2 y algunos motores de 1/2 HP. Algunos motores de 1/2 HP vienen preconfigurados de fábrica para 115 voltios.
5.
6. Vuelva a colocar la cubierta.
¡No encienda la alimentación todavía!
CONECTE EL CABLEADO DE ALIMENTACIÓNAL INTERRUPTOR DE PRESIÓN1. Retire la cubierta del interruptor de presión. 2.
3. Vuelva a colocar la cubierta. 4. ¡No encienda la alimentación todavía!
¡No encienda la alimentación todavía!
COLOQUE AGUA EN LA BOMBA1.
2. Coloque el tapón de cebado.3. Verifique que todas las conexiones de tuberías estén ajustadas.
¡No encienda la alimentación todavía!
ABRA LAS VÁLVULAS
ALIMENTAR
Para obtener ayuda, diríjase a pentair.com/flotec.
Encienda el interruptor de circuito para alimentar la bomba.
El agua debería fluir en 5 minutos. Si no lo hace, desactive la alimentación y vuelva a cebar según se indica en el paso 4.
ALIMENTAR
Interruptor de circuito
Tierra
Línea Al motor Línea Tierra
•
•
•
NOTA:
•
••
TENGA un conducto de entrada hermético. LEA y siga las instrucciones en el manual.
•
•
Solo los profesionales adecuados deben INSTALAR los sistemas eléctricos y de tuberías.Algunas bombas no se recomiendan como refuerzo. Consulte al fabricante o lea los manuales del propietario para determinar si el producto se puede usar como refuerzo.
Voltaje peligroso. Desconecte la alimentación antes de la instalación. Alta presión. Riesgo de alta temperatura y posible explosión si la bomba se pone en funcionamiento con el desagüe cerrado.
NO ponga en funcionamiento la bomba sin agua ni la haga funcionar con la descarga de salida cerrada. NO conecte las mangueras a la bomba. NO conecte al suministro presurizado (agua municipal u otra salida de la bomba) salvo que se hayan instalado los dispositivos de seguridad adecuados. NO reduzca el tamaño de la tubería de las lineas succion y descarga.
U834 (07/28/20)
Consulte el Manual de Instalación y Funcionamiento para obtener más información. Los accesorios se venden por separado.
FLOTEC
Interruptores de presión típicos (sin cubiertas)
Empalme T de cebado y tapón
Flujo hacia el tanque de presión y sistema de agua doméstico
Cubierta del capacitor del motor
Caja de fusibles o interruptor de circuito
Acople
Punto de hincado
Pozo hincado
Válvula de pie
Eyector(kit de eyector con boquilla
y tubo venturi)
Interruptor de voltaje de configuraciónrápida
Terminales de fuente de alimentación
Para cambiar el voltaje del motor (si fuera necesario): a) retire la tapa del capacitor del motor y deslice el interruptor para corregir el voltaje; o b) retire la cubierta del extremo del motor y gire el interruptor para corregir la configuración.
Conecte los cables de alimentación y los cables a tierra al interruptor de presión, tal como se indica.
Tapón de cebado
Desde el pozo
La bomba se debe llenar con agua (cebado) antes de que comience a funcionar. Una vez en funcionamiento, la bomba es autocebante. No debería volver a necesitar cebado, salvo que ingrese aire en la bomba o en la tuberia de entrada.
Desde el pozo
Compruebe la carga de aire en el tanque de presión. Si no hay presión de agua, la carga de aire del tanque debe ser 2 psi MENOS QUE la configuración de ENCENDIDO en el interruptor de presión.Abra la válvula de salida en la tuberia de salida.
NOTA: no se requiere un regulador de presión para la instalación en un pozo poco profundo.
ENCENDIDO
APAGADO