fly away jib pole - sailenterprise.co.uk · fly away jib pole introduction this document has been...
TRANSCRIPT
This document has been put together in response to several requests forfurther information on flyaway poles, and the approaches and fittings
that have been used to fit the various systems.
FLY AWAY JIB POLEwww.sailenterprise.co.uk
www.sailenterprise.co.uk

Fly Away Jib Pole
Introduction This document has been put together in response to several requests for further information on flyaway poles, and the approaches and fittings that have been used to fit the various systems. For those wanting a single definitive answer the news is disappointing, as several ways of controlling and deploying the pole have been identified. The good news is that they all seem to work well, and most are described here. Hopefully you will find this information useful, and it will enable you to select a method which you believe is the most suitable for you and your crew. What’s a flyaway pole? A flyaway pole is in effect an automatic jib stick, making the job of deploying and retrieving the pole very much easier. It also potentially offers additional performance benefits by acting as a kicker for the jib, and allowing the crew to adjust the angle of the jib whilst still maintaining leach tension. The pole system is composed of a number of components (see fig 1). They are described briefly here and in greater detail later in this document. The pole is a hollow carbon fibre or alloy tube 2 meters in length. The inboard end of the pole is attached to a ring which runs on a line stretched between the spreaders and the foot of the mast. The outboard end is attached to the jib clew by a line which runs trough the pole to a block fitted about 3” from the other end. This line controls the angle of the pole. Pulling the control line moves the inboard end of the pole down the running line, and pushes the pole until the outboard end meets the jib clew. Releasing the tension from the control line disengages the pole, and the inboard end
of the pole is pulled up towards the Figure 1: General view of pole and control and running lines.
spreaders by a bungee cord attached to the ring on the running line. To give it sufficient elasticity the bungee is passed through a block on the spreaders and down to a clip fastened on the foot of the mast. Control systems Jon Woodward was one the first Enterprise sailors to trial a flyaway pole. His approach of fitting the control line on an extended mast step is favoured by many sailors, and is described in Jon’s article on this site. Other methods of controlling and deploying the pole are now also being used successfully. The three approaches I have identified are:-
1. Block and cam cleat mounted on an extended mast step or screwed alongside a normal mast step.
2. Control line passed through a hole in the mast step to a block on the hog and back up to a cam cleat mounted on the king post.
3. Block and cleat mounted on the side of the mast Probably one of the best and most detailed explanations of the workings of a flyaway pole, and the fittings used in his system was given by Steve Blackburn in an article for the Spring 2009 Enterprise Diary. Steve’s article is reproduced in the next section. It has been modified slightly to bring it in line with Steve’s current views. The major difference is that Steve now uses a commercial asymmetric mast step to mount the cam cleat and block. The reason for the change is that jib sheets tended to catch under his home made extended mast step. The article also contains Steve’s latest thoughts on when the pole should be deployed, and tips on its use. Fitting and Evaluation of a Fly Away Jib Pole - by Steve Blackburn I’m sure most of the Enterprise fleet are wondering if the Fly Away Jib Pole is a good idea, how much it costs, and will it really make that much difference to boat speed. In this report, I will describe the process of installing a fly away jib stick, my thoughts and evaluation of the system. I ‘phoned round all of the main chandlers, to check on the availability, price and their knowledge of the pole. I went with Pinnell & Bax, although I am sure other chandlers are busy building their own kits. P&B supply plenty of poles to the National 12 fleet, who have been using fly away poles for some time.

I also researched the length of the pole as some sailors had been trialing them last season. Most had been using a pole 1.5metres in length, which is now considered to be a bit short. So I opted for 2m, which at least gives me the option of being able to reduce the length (Steve has now decided that a pole 2metres long is the optimum length). The construction: I hope these instructions are clearer than those you find with an Ikea flat pack! As I didn’t want to screw cleats the foredeck I had to think of an efficient and secure system that did not damage the deck. My arrangement meets these criteria, and what’s more it’s cheap!! I bought a 1cm thick white plastic chopping board from M&S (cost <£5). Anything less than 1cm thick may not be sufficiently robust. The board was cut to the size of two mast steps, and a hole cut through the left hand section to accommodate the mast. Holes were drilled in four positions at the corners of “the mast hole” so the shaped board could be screwed to the mast step. On the other side (right hand) I fastened a Ronstan mainsheet jammer (RF67). This consists of a bullseye on a swiveling base with an integral jammer for 2-6mm diameter line (cost about £40). See figure 1 for a photograph of the fittings in place on my boat.
Figure 2: Plastic board screwed onto the mast step with Ronstan swivelling bulls eye and cleat attached. Notice the hole cut to accommodate the mast. The other bits and pieces I left to the chandlers. These consisted of one 2m carbon pole with fittings (£144.60 - Aluminium cost less), RWO clip eye mount (R2850) £1.94, Holt dynamic cheek block (HA2026), £10.25,
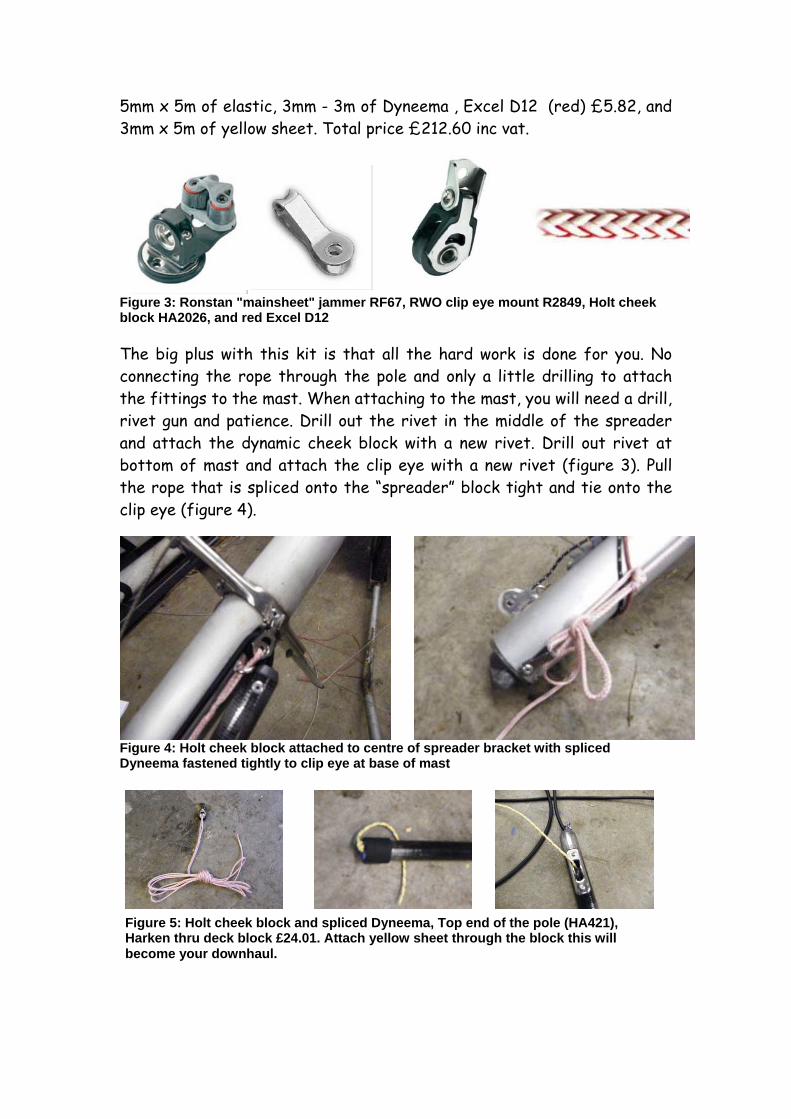
5mm x 5m of elastic, 3mm - 3m of Dyneema , Excel D12 (red) £5.82, and 3mm x 5m of yellow sheet. Total price £212.60 inc vat.
Figure 3: Ronstan "mainsheet" jammer RF67, RWO clip eye mount R2849, Holt cheek block HA2026, and red Excel D12 The big plus with this kit is that all the hard work is done for you. No connecting the rope through the pole and only a little drilling to attach the fittings to the mast. When attaching to the mast, you will need a drill, rivet gun and patience. Drill out the rivet in the middle of the spreader and attach the dynamic cheek block with a new rivet. Drill out rivet at bottom of mast and attach the clip eye with a new rivet (figure 3). Pull the rope that is spliced onto the “spreader” block tight and tie onto the clip eye (figure 4).
Figure 4: Holt cheek block attached to centre of spreader bracket with spliced Dyneema fastened tightly to clip eye at base of mast
Figure 5: Holt cheek block and spliced Dyneema, Top end of the pole (HA421), Harken thru deck block £24.01. Attach yellow sheet through the block this will become your downhaul.
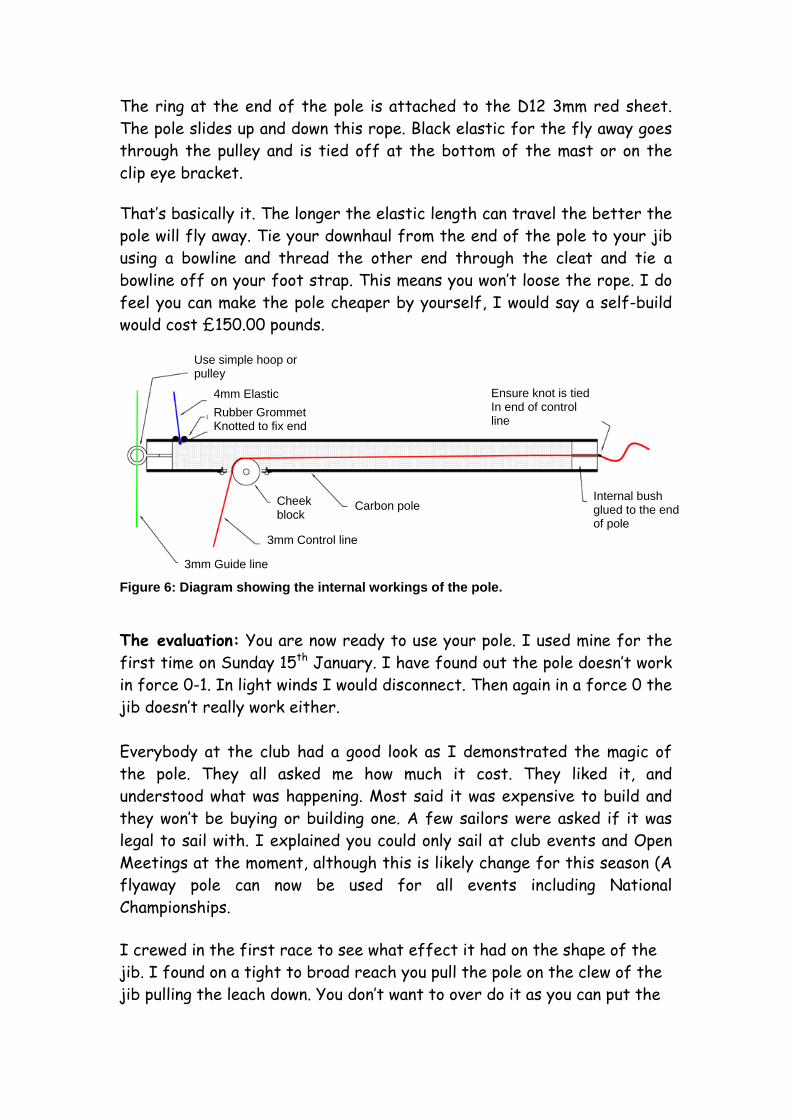
The ring at the end of the pole is attached to the D12 3mm red sheet. The pole slides up and down this rope. Black elastic for the fly away goes through the pulley and is tied off at the bottom of the mast or on the clip eye bracket. That’s basically it. The longer the elastic length can travel the better the pole will fly away. Tie your downhaul from the end of the pole to your jib using a bowline and thread the other end through the cleat and tie a bowline off on your foot strap. This means you won’t loose the rope. I do feel you can make the pole cheaper by yourself, I would say a self-build would cost £150.00 pounds.
Figure 6: Diagram showing the internal workings of the pole.
The evaluation: You are now ready to use your pole. I used mine for the first time on Sunday 15th January. I have found out the pole doesn’t work in force 0-1. In light winds I would disconnect. Then again in a force 0 the jib doesn’t really work either. Everybody at the club had a good look as I demonstrated the magic of the pole. They all asked me how much it cost. They liked it, and understood what was happening. Most said it was expensive to build and they won’t be buying or building one. A few sailors were asked if it was legal to sail with. I explained you could only sail at club events and Open Meetings at the moment, although this is likely change for this season (A flyaway pole can now be used for all events including National Championships. I crewed in the first race to see what effect it had on the shape of the jib. I found on a tight to broad reach you pull the pole on the clew of the jib pulling the leach down. You don’t want to over do it as you can put the
Use simple hoop or pulley
4mm Elastic Rubber Grommet Knotted to fix end
Ensure knot is tied In end of control line
Internal bush glued to the end of pole
Carbon pole Cheek block
3mm Guide line
3mm Control line

brake on the jib very easily. I also found the jib had extra power getting you up on a plane and keeping you on longer, even on a small lake. We had only one run on the course and I found it easy to pull out and release the pole as we jibed for the following buoy. The only problem I had it was pulling on the sail making it curl harshly. I really did feel the pole was too long. I do feel 1.8m maybe the best length. But before I cut the pole I will try again. (Steve now thinks 2metres is the optimum pole length). In the second race I was the helm. My crew couldn’t get his head round the extra sheet. So he didn’t use it much.
Steve’s Tips on how to use the pole. I have been using the fly away jib stick for a good month or so. I have found that the length is perfect, 2m long. You can’t really have it any longer; the reason being it would hit your deck. Applying the pole on a run for goosewinging. Let the helm pull quickly on the jib sheet, and then let go while the pole is being pulled down. This is the quickest method of applying the pole. As soon as the pole is out you can cleat the jib. When goosewinged let the pole and jib clue go past 90 degrees from your forestay then head up on a very broad reach. Your boat will be very fast down wind and straight up on plane if hit by a gust. The boat responds so much better downwind. Make sure in windy weather you set your jib first and then pull the pole down hard, so the leech is held in a good shape. Gybing with the pole is a doddle, just leave it in position and gybe. You get forward momentum as you gybe the boat. (Same applies if you are using a standard pole.)
Figure 7: The pole in action on 23131, which has the same setup as Steve’s boat.

Make sure you don’t use your jib pole in a close reach, as you will upset the flow of the air through your slot, it will become apparent when you manoeuvre the boat from beam reach to close reach. A great tip, don’t use the pole if you have to make lots of manoeuvres, as it will cause you to loose concentration on the job in hand. Namely, beating your competitors! Make sure you have clean air and do not get into any quick luffing battles, as your crew will be go ballistic. Happy Sailing Steve Blackburn 21333 and 21350 Current control line options This section concentrates on the various approaches that have been used to deploy the pole. Taken in turn they are:-
• Through the deck system • Mast mounted system • Block and cleat mounted on or alongside the mast step
Through the deck system In the example shown below both the control line and the running line are led though the mast step and deck down to pulleys on the hog. There is no need to run both lines through the step. The running line could simply be attached to a “P” clip at the base of the mast. This method does however enable the running line to be easily tightened, and can even be adjusted when underway. Figure 8: Through the deck system – Control line and pole running
line passed through holes drilled in mast step and deck. Grommit fitted where lines pass through deck.
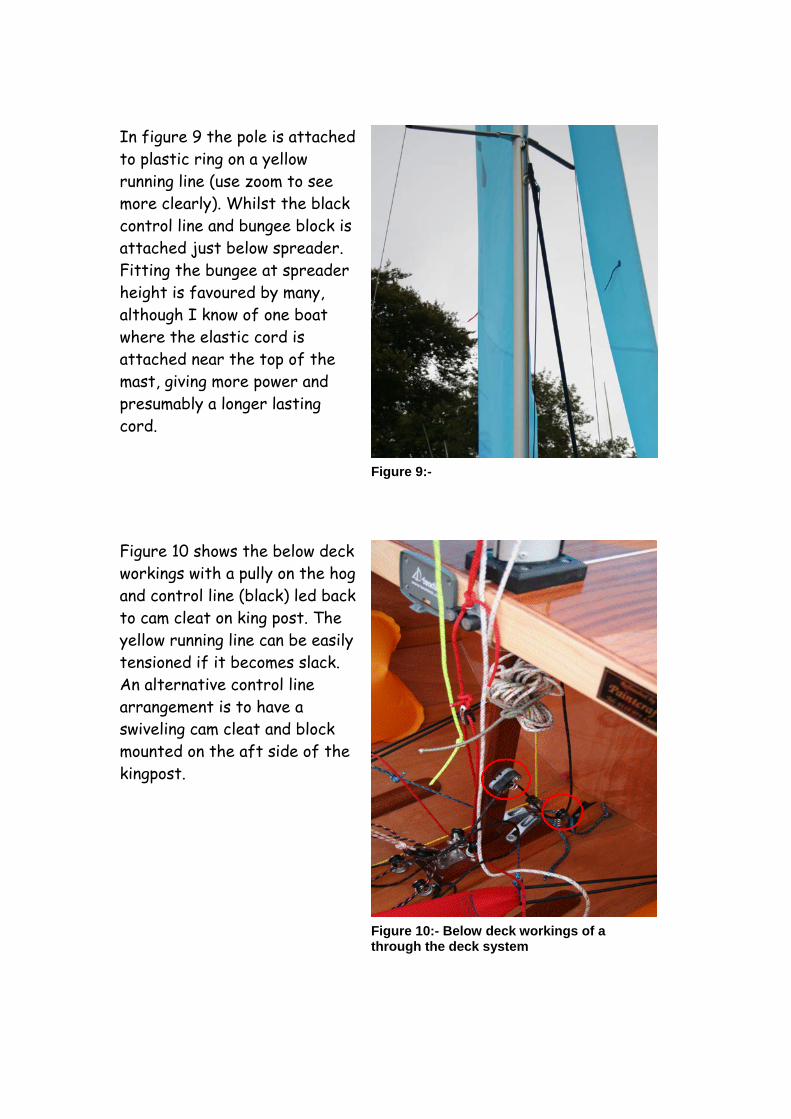
In figure 9 the pole is attached to plastic ring on a yellow running line (use zoom to see more clearly). Whilst the black control line and bungee block is attached just below spreader. Fitting the bungee at spreader height is favoured by many, although I know of one boat where the elastic cord is attached near the top of the mast, giving more power and presumably a longer lasting cord. Figure 10 shows the below deck workings with a pully on the hog and control line (black) led back to cam cleat on king post. The yellow running line can be easily tensioned if it becomes slack. An alternative control line arrangement is to have a swiveling cam cleat and block mounted on the aft side of the kingpost.
Figure 9:-
Figure 10:- Below deck workings of a through the deck system

Mast Mounted control line system This next section is lifted from Alan Hamilton’s Bristol Corinthian Enterprise Fleet Newsletter. The notes on the rigging of the flyaway pole were written by Bryan Smith.
Mast mounted Flyaway Jib Pole - Basic Information by Bryan Smith Rig 5/6mm jack stay for the pole to travel up/down the mast. Fittings needed at heel & spreader, with a tensioning system. Modify pole. Remove end fittings, replace with plain caps each with two 7mm holes thro’. Length of pole 1.5 to 1.8 m extend, or buy new pole. Cut out rectangular slot in pole for sheave 6mm bungee to spreaders or higher To jib clew Sheave in pole Small sheave to travel on jack stay Halyard 4/6mm 4cm of rope Pole halyard to jammer on Mast or deck In action, pulling on pole halyard pulls pole initially down to the jib clew against the bungee, and then pulls pole further down the jackstay, forcing the jib out from the mast. A combination of adjusting the jib sheet and the pole halyard alters the angle of the jib, and the angle of the pole gives downhaul to the clew; see photographs.
Figure 11: Control line led through small block to cam cleat on side of mast. Pole runs up line on front of mast on a pulley.
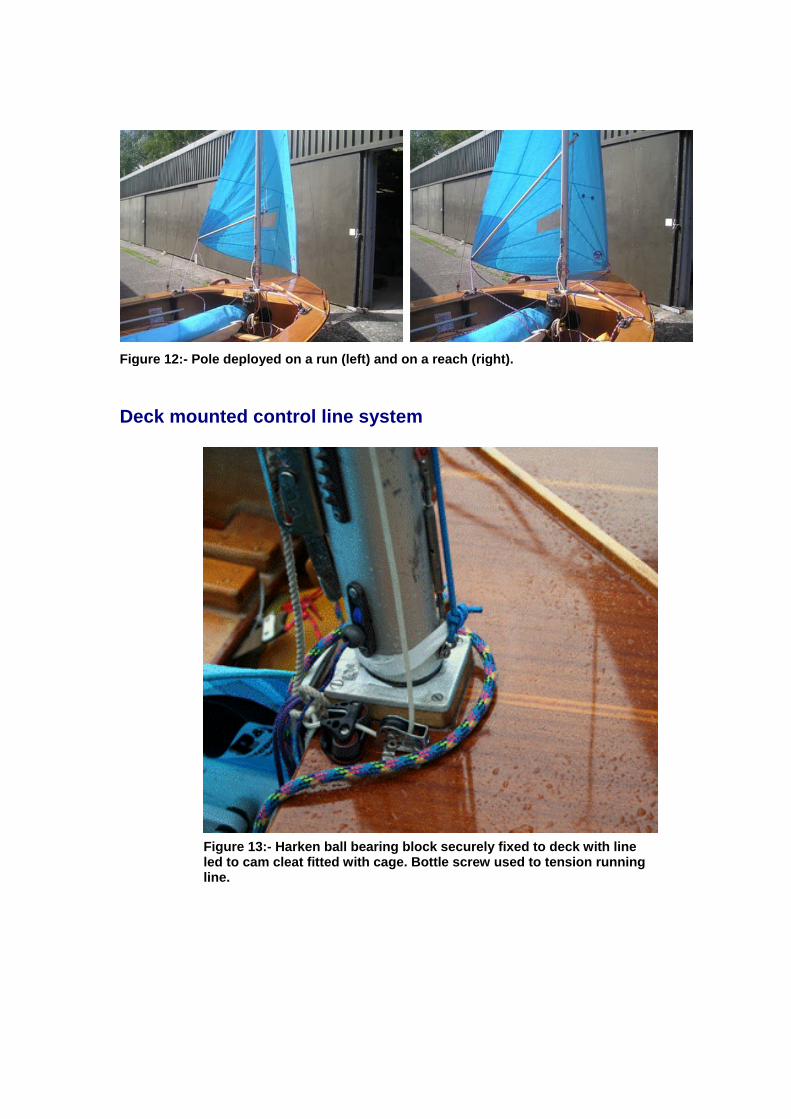
Deck mounted control line system
Figure 12:- Pole deployed on a run (left) and on a reach (right).
Figure 13:- Harken ball bearing block securely fixed to deck with line led to cam cleat fitted with cage. Bottle screw used to tension running line.

Figure 13: Deck mounted system with (white) control line led through Harken block and cam cleat. Red rope running line. Control pulley line and bungee attached to spreader bracket. P&B have produced an excellent illustrated description of a deck systems produced which can be viewed by clicking on the attached Acrobat document or going to this link.
Adobe Acrobat Document
For those of you who are reluctant to fasten a cleat and pulley to your deck, and also do not want to drill holes in your deck, an extended mast step maybe the answer (figure 14). Jonathan Woodward uses and makes a step which is 30mm wider on one side than the other, which leaves ample room for a block and cam cleat system used in figures 12 and 13. It is also possible to squeeze a Clamcleat® and integral block (CL236) onto a conventional mast step (a Camcleat is only 18mm wide). However for efficient operation a keeper (CL236, to prevent the control line re-
Figure 14: Steve Blackburn’s original extended step. Steve now uses a similar commercial step which is 35mm wider than a conventional mast step.

engaging) and a cage (CL816, to allow operation from extreme angles) is required. These additional fittings bring the width up to 29mm (at its widest point), and hence a maximum overhang of 6mm. Thus whilst the Clamcleat® can be screwed to a conventional step, an extra piece is required to prevent any snagging with the jib sheets. This arrangement is show in figure 14.
Figure 14: Alternative deck mounted control line system - Clamcleat® fitted with keeper and cage on a conventional mast step. There is enough space between the Clamcleat® and the mast for a Highfield lever cover. The mast step has been extended in width by 2cms to prevent snagging with the jib sheets. (This boat is 40 years old, and in deference to its construction the kicker is led back to the forward thwart because there is no central knee on the side seat.)
Figure 7: Holt cheek block HA2026 fitted on older mast* just above spreader bracket with spacer to raise block plate to same level as spreader. (*no central rivet on Spreader) Ring is attached to pole by 3mm rope (blue) and black bungee cord which runs through block.
Tim Coleman has written a great blog on his set up and use of a flyaway pole. You can find all Tim’s information here. Videos of the pole in action Two videos were taken at the NW Areas at Wigan in August 2009 by Giles Ruel. They are 6 and 9 minutes long and show general shots of the racing (in quite windy conditions), and some good footage of boats using flyaway poles. Have patience as general sailing shots do predominate. You can find the videos here and here. (Both videos also contain good footage of Pete Lawson sailing with a centre main. Details of Pete’s system are given in an article in the Documents section of this website). A short video taken at the Southport November Plate (1-11-09) in extreme conditions shows the red boat (JW again) with a flyaway pole eating up the others on a broad reach. Commercial systems I have trawled through all the chandlers I can think of, but so far, I have only found three who either advertise a full flyaway pole system on their website or I know will make one up for you. I am sure you local chandler will do this for you too. The three I have found are:-
• First Mark (Golbourne) • Pinnell and Bax (Northampton) • Trident-UK (Gateshead)
The cost for an all ball bearing and cam cleat system with a carbon pole is about £150. Alloy pole systems are considerably cheaper. An extended mast step will be an additional £35-£40 or so. The expensive bits are the pole (typically £75ish) and the ball bearing block in the pole. A Harken 16mm through the deck Air Block, HK421, which is suitable for this purpose costs in the region of £28. However, I know of one person who has made a dramatic saving on the cost of his pole by buying a carbon fibre landing net pole from a fishing tackle shop!