foex 2 day developer's guide 2 day developer guide.pdf · contents requirements..... 4 about...
TRANSCRIPT

2 Day Developer's Guide
Release 1.1
February 2013

FOEX 2 Day Developer's Guide, Release 1.1
Copyright © 2013, FOEX GmbH. All rights reserved. Authors: Peter Raganitsch, Matt Nolan
This software and related documentation are provided under a license agreement containing restrictions on use and disclosure and are protected by intellectual property laws. Except as expressly permitted in your license agreement or allowed by law, you may not use, copy, reproduce, translate, broadcast, modify, license, transmit, distribute, exhibit, perform, publish, or display any part, in any form, or by any means. Reverse engineering, disassembly, or de-compilation of this software, unless required by law for interoperability, is prohibited.
The information contained herein is subject to change without notice and is not warranted to be error-free. If you find any errors, please report them to us in writing.
ContentsREQUIREMENTS ................................................................................................................... 4
ABOUT THE APPLICATION YOU BUILD IN THIS TUTORIAL .............................................. 5
CREATING THE FOEX DEVELOPER APPLICATION ........................................................... 5
CREATING AN UPDATABLE GRID (PAGE 2) ....................................................................... 6 CREATING A FOEX GRID IN ROW EDITING MODE ........................................................................ 6 MODIFYING FOEX GRID COLUMNS ......................................................................................... 12 ADDING A LOV AND COLUMN FORMATS ................................................................................... 14 ADDING INSERT AND DELETE BUTTONS .................................................................................... 15 CHANGING THE DESIGN OF THE PANE TO FIT .............................................................................. 17 ADDING CUSTOMER VALIDATION TO THE GRID ............................................................................. 18 CHANGE ROW EDITING TO CELL EDITING MODE ......................................................................... 21
CREATING A MASTER - GRID AND A DETAIL - FORM (PAGE 3) ..................................... 23 CREATING A READ-ONLY FOEX GRID ........................................................................................ 23 FREEZING COLUMNS IN A GRID ............................................................................................... 25 MAKING COLUMNS SORTABLE ................................................................................................... 26 SAVING GRID STATE ............................................................................................................. 26 CREATING A FOEX FORM ....................................................................................................... 27 CHANGING THE DESIGN OF THE PANE TO VBOX ......................................................................... 29 LINKING A FOEX GRID AS MASTER TO A FOEX FORM AS DETAIL ............................................... 30 STYLING THE ITEMS WITHIN A FOEX FORM ............................................................................... 34
CREATING A TREE GRID (PAGE 4) .................................................................................... 36 EXPLAINING THE SQL-QUERY FOR TREE GRIDS ........................................................................ 40 EXPORT DATA FROM THE TREE GRID ........................................................................................ 43
CREATING A FOEX FORM (PAGE 5) .................................................................................. 45
CREATING MASTER/DETAIL/DETAIL – RELATIONSHIP WITH THREE GRIDS AND ADDING A FOEX FORM AS MODAL WINDOW (PAGE 6) .................................................. 49
CREATING TWO RELIANT FOEX GRIDS WITHIN A LAYOUT ............................................................. 49 ADDING A THIRD READ ONLY GRID TO THE CENTER PANE ........................................................... 53 BINDING THE SECOND GRID TO THE THIRD ONE ........................................................................... 56 INCLUDE PL/SQL DYNAMIC ACTION ......................................................................................... 58 CREATING A FOEX FORM WHICH IS OPENED AS MODAL WINDOW ................................................ 61 CREATING A FOEX GRID COMBO ............................................................................................ 64 MAKING THE MODAL WINDOW NOT MODAL ................................................................................ 68
CREATING A TREE WITH LINKS TO PREVIOUSLY CREATED PAGES (PAGE 1) ............ 69 ADDING A HTML-REGION TO THE CENTER PANE ....................................................................... 69 CREATING A FOEX TREE WITH LINKS TO OTHER PAGES FROM THE SAME APPLICATION .................... 70 ADDING A TOOLBAR TO THE NORTH PANE ................................................................................. 76

Requirements
This Document is based on the assumption that on the Oracle APEX Instance you are going to test the FOEX Plugins Framework is already installed and set up and a Workspace with the Demo Applications is installed.If that is not the case please refer to FOEX Plugins Installation Guide, which is part of the FOEX Shipment.
For Development of FOEX Applications a current Version of Firefox Browser or Google Chrome Browser is required.
The basis for all pages described in this document are tables you get by creating the APEX-Sample Database Application (DEMO_CUSTOMERS, DEMO_STATES, DEMO_ORDERS, DEMO_ORDER_ITEMS, DEMO_PRODUCT_INFO).

About the application you build in this tutorial
In this tutorial we create an application to show the different possibilities with FOEX Plug-Ins on the basis of an imaginary Mail Order Business. We create a simple FOEX Form to insert new Customers, a FOEX updatable Grid with the possibility to insert/update/delete Customers. We bind a read-only FOEX Grid to a FOEX Form as Master/Detail-Relationship to insert/update/delete Products. We create three reliant FOEX Grids with Master/Detail/Detail-Relationship on the basis of Order Items, that belong to an Order, which belong themselves to a Customer. We create a FOEX Tree Grid to summarize Orders, which can be exported as CSV.
On the Start Page we combine all these pages with a FOEX Tree, that gives the option to open all pages in the Center Pane of the same page.
Creating the FOEX Developer Application
Create a new FOEX Application (see FOEX First Steps for further explanation).

Creating an updatable Grid (page 2)
In this tutorial we create a Grid where you can insert/updated/delete one record after the other in row editing mode, then we modify the Grid to cell editing mode where you can execute changes on several records at the same time. We integrate some customer-specific validations and change the format of our items.To perform this task you'll create a page with FOEX Viewport and one updatable FOEX Grid in the Center pane.
Creating a FOEX Grid in Row Editing Mode
1. Press the yellow Create FOEX Page > Button2. Enter 2 as Page Id, Customers – updatable Grid as Page Title in the Modal
Window (Center is ticked and can't be ticked off).Press Create
FOEX opens a window:
3. Edit page 2 by clicking on it
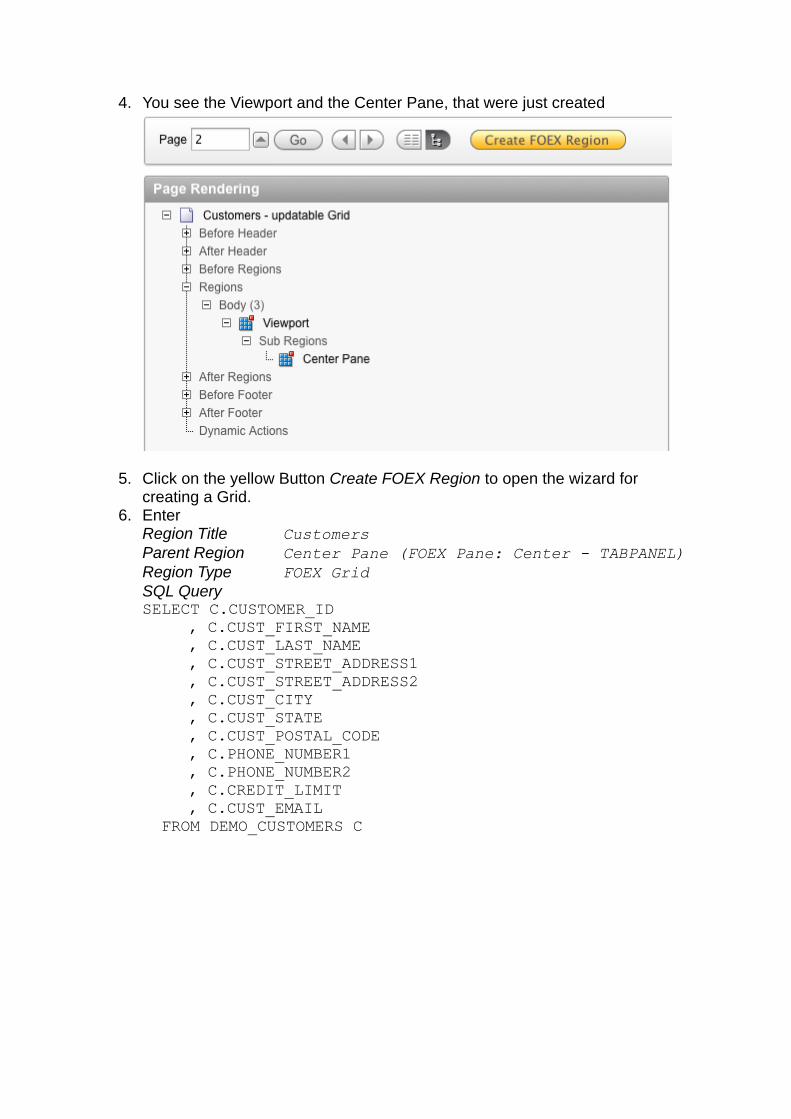
4. You see the Viewport and the Center Pane, that were just created
5. Click on the yellow Button Create FOEX Region to open the wizard for creating a Grid.
6. EnterRegion Title Customers Parent Region Center Pane (FOEX Pane: Center - TABPANEL)Region Type FOEX Grid SQL QuerySELECT C.CUSTOMER_ID
, C.CUST_FIRST_NAME , C.CUST_LAST_NAME, C.CUST_STREET_ADDRESS1, C.CUST_STREET_ADDRESS2, C.CUST_CITY, C.CUST_STATE, C.CUST_POSTAL_CODE, C.PHONE_NUMBER1, C.PHONE_NUMBER2, C.CREDIT_LIMIT, C.CUST_EMAIL
FROM DEMO_CUSTOMERS C

Press Create
7. FOEX opens a window
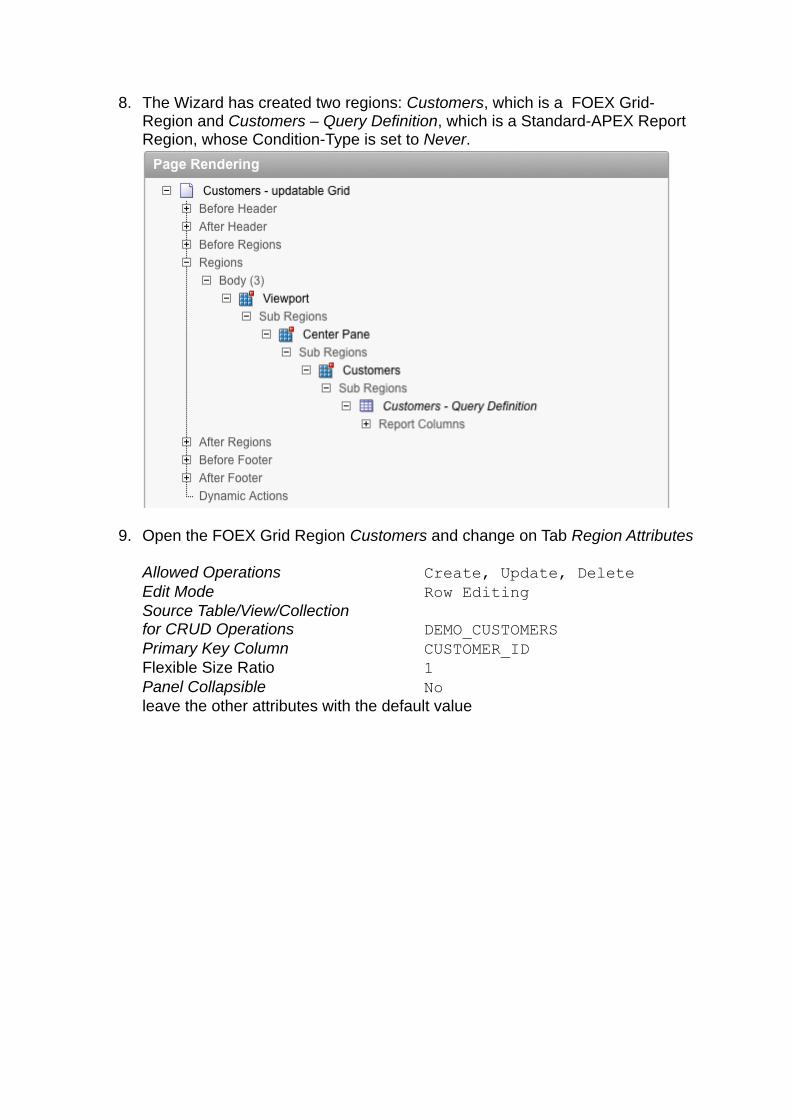
8. The Wizard has created two regions: Customers, which is a FOEX Grid-Region and Customers – Query Definition, which is a Standard-APEX Report Region, whose Condition-Type is set to Never.
9. Open the FOEX Grid Region Customers and change on Tab Region Attributes
Allowed Operations Create, Update, DeleteEdit Mode Row EditingSource Table/View/Collectionfor CRUD Operations DEMO_CUSTOMERSPrimary Key Column CUSTOMER_IDFlexible Size Ratio 1Panel Collapsible Noleave the other attributes with the default value
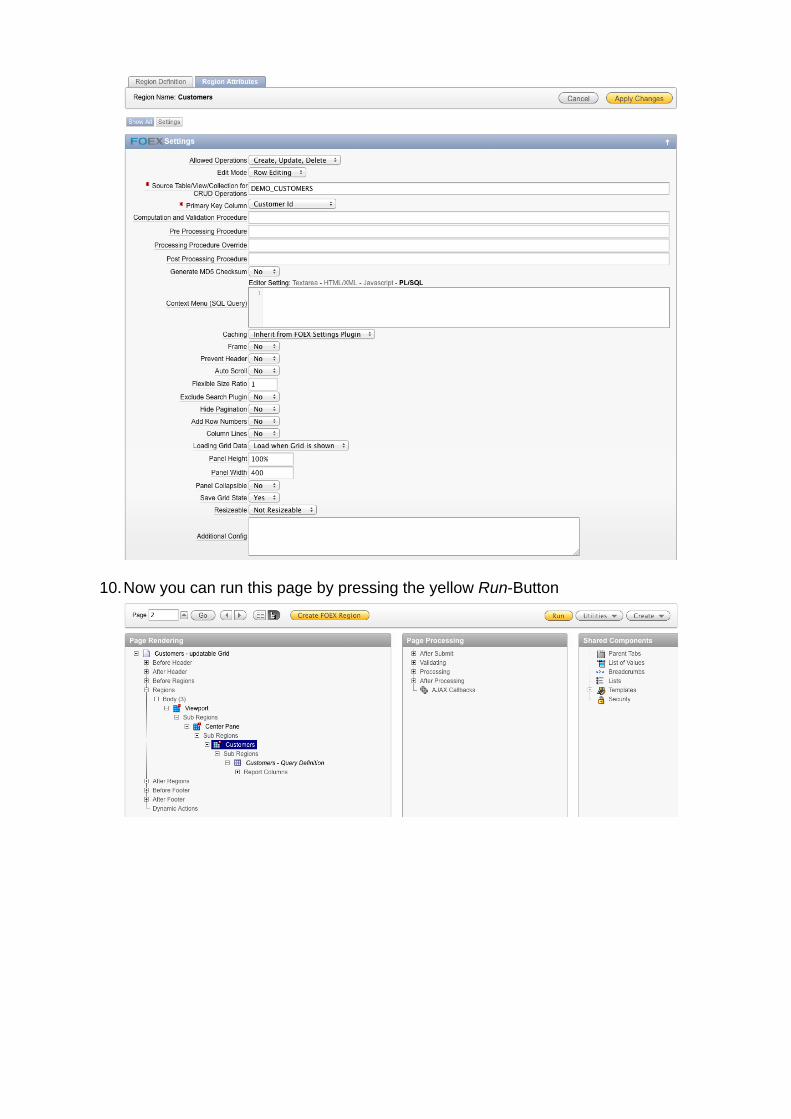
10.Now you can run this page by pressing the yellow Run-Button

11. Your first self-made FOEX Grid is displayed
12.Click on one row in the FOEX Grid, and you can see that no column is updatable yet.
Modifying FOEX Grid Columns
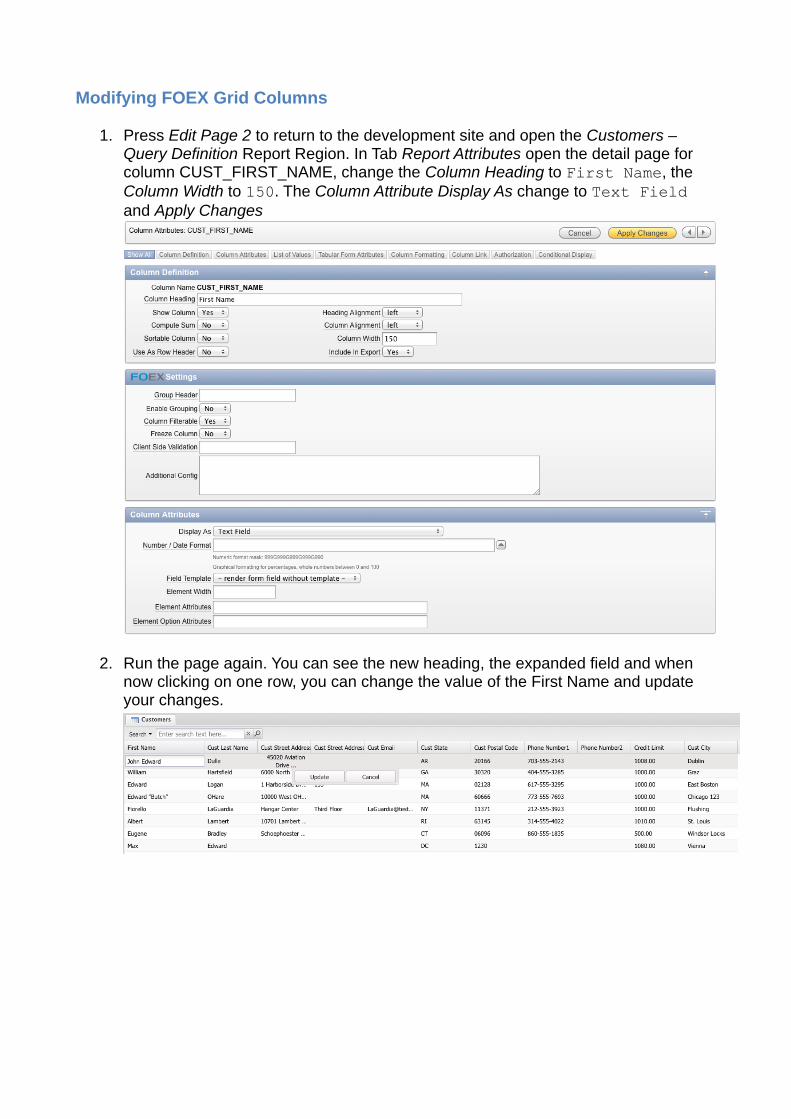
1. Press Edit Page 2 to return to the development site and open the Customers – Query Definition Report Region. In Tab Report Attributes open the detail page for column CUST_FIRST_NAME, change the Column Heading to First Name, the Column Width to 150. The Column Attribute Display As change to Text Field and Apply Changes
2. Run the page again. You can see the new heading, the expanded field and when now clicking on one row, you can change the value of the First Name and update your changes.

3. Go back to the development site and change all Column Attributese.g. as shown below: for the CUST_STREET_ADDRESS2 we want an empty heading, therefore take Numbers align right,and all fields change to Displayed As Text Fields.When you don't define a column width 100 is taken as default.

Adding a LOV and Column Formats
1. For column CUST_STATE change the Attribute Display As to Select List (query based LOV) and enter the following SQL - Query in List of Values Definition.SELECT INITCAP(STATE_NAME) AS D , ST AS R FROM DEMO_STATES
2. For column CREDIT_LIMIT add the Number/Date Format you want to use to display the number (e.g. $999G999G999G999G990D00)
3. Run the page and when you click on one State you get a LOV you can select from and the Credit Limit is displayed as currency amount.

Adding Insert and Delete Buttons
You can now update records, but not insert or delete them. Therefore add two buttons, one for adding new records and one for deleting them.
1. Choose CREATE Region Button when right-click on Customers (the FOEX Grid).
2. Enter the Button Name ADD, Text Label/Alt AddLeave the default settings for Button Style, Button Template and Button TypePress Next >

3. Leave the defaults for the Display Properties and press Next >.
4. Change the Action to Defined by Dynamic Actionand press Create Button
5. Edit the Add-Button and set Button Icon to Add
and change Database Action within the section Action When Button Clicked to SQL INSERT action.
6. Do the same for the Delete-Button (Button Name: DELETE, Text Label / Alt Delete) with the Button Icon Delete and the Database Action SQL DELETE action.

7. Now run the page and after pressing Add an empty row is displayed where you can insert a new record.
With pressing Update you commit the new record to the database.8. Click on a record you want to delete and press Delete.
You are asked if you really want to delete the record. Confirm with OK and the record is deleted in the database.
Changing the Design of the Pane to fit
Up to now the Pane is shown as a Tab. As there will be no other Panes on this page we change this.

1. Open the Region Attributes of the Center Pane and change the Layout to Only one Child Region (fit) and press Apply Changes
2. When you run the page the Pane uses the whole Viewport
Adding customer Validation to the Grid
We'll now add some customer validation - you can add some for each Grid Item. We check that the Credit Limit is between 0 and 5000 and the name of the City has at least 2 Char. Therefore we write our own procedure FOEX2DAYS_GRID_VALIDATION

1. To add the Procedure go to SQL Workshop ---> SQL CommandsCREATE OR REPLACEPROCEDURE foex2days_grid_validation( p_crud_request IN FX_CRUD_REQUEST_T)AS
BEGIN FOR i IN 1.. p_crud_request.new_record.count LOOP -- IF p_crud_request.new_record(i).name = 'CREDIT_LIMIT' THEN -- IF to_number( p_crud_request.new_record(i).value_varchar2 ) < 0 OR to_number( p_crud_request.new_record(i).value_varchar2 ) > 5000 THEN fx_p_grid.add_grid_error ( p_column_name => p_crud_request.new_record(i).name , p_message => 'The credit limit has to be '|| 'between 0 and 5000' ); END IF; -- END IF; -- IF p_crud_request.new_record(i).name = 'CUST_CITY' THEN -- IF length( p_crud_request.new_record(i).value_varchar2 ) < 2 THEN fx_p_grid.add_grid_error ( p_column_name => p_crud_request.new_record(i).name , p_message => 'The city must be at least ' || '2 characters in length' ); END IF; -- END IF; -- END LOOP;END;

2. Open Region Attributes of Customers (FOEX Grid-Region) and insert FOEX2DAYS_GRID_VALIDATION to Computation and Validation Procedure
3. Run the page and modify a City to a single character and the Credit Limit to 9999. Now press Update and you'll get the message

4. Confirm that message and move the Mouse-Cursor over one of the red triangles and you'll get the message you've defined in the procedure.
Change Row Editing to Cell Editing Mode
We change the Editing Mode from Row to Cell Editing to get the possibility to change different records within one step and we modify the Address to be a Text-area.
1. Open Region Attributes of Customers (FOEX Grid) and change the Edit Mode to Cell Editing and press Apply Changes
2. Create a new Region-Button SAVE similar to the other two buttons but with Button Icon Save and Database Action SQL UPDATE action
3. When you now run the page you can add new rows and update cells from different rows within one stepAll changes are marked with a red triangle in the upper left corner in the cell. By pressing Save you commit all changes to the database.
4. When deleting a record all pending changes are committed.

5. In Cell Editing mode you can display textfields with longer content as Text-areas. Therefore go to Customers – Query Definition and open the Column Attributes for CUST_STREET_ADDRESS1 and change Display As to Text Area.
6. When you click on a street the whole text is shown as a text-area where you can add/change some text. The full profit you'll get when you change the length of the field in the database, as DEMO_CUSTOMERS.CUST_STREET_ADDRESS1 is VARCHAR2(60).

Creating a Master - Grid and a Detail - Form (page 3)In this tutorial you create a “List of Products” as a read-only FOEX Grid which works as master and a FOEX Form as detail, where you can update/insert/delete Products. To have a better overview you freeze the Product Name in the FOEX Grid, so you can scroll to the right and the Product Name will always be displayed.To perform this task you create a page with Viewport and a Center Pane, where both regions are placed. To synchronize the records between master and detail you use dynamic actions.
Creating a read-only FOEX Grid
1. Create a new FOEX page in your Application with Page Id 3 and Name Products - ReadOnlyGrid (Master) Form (Detail). Just create the Center Pane for this page.
2. Open page 3.3. Click on Create FOEX Region and enter the following values:
Region Title ProductsParent Region Center Pane (FOEX Pane: Center - TABPANEL)Region Type FOEX Grid SQL QuerySELECT PRODUCT_ID , PRODUCT_NAME , PRODUCT_DESCRIPTION , CATEGORY , LIST_PRICE , CASE PRODUCT_AVAIL WHEN 'Y' THEN 'Yes' WHEN 'N' THEN 'No' END AS PRODUCT_AVAILABLE FROM DEMO_PRODUCT_INFO
4. When you run this page all columns are displayed.

5. As we don't want to see the Primary key column, edit page 3 and open the Column Attribute of PRODUCT_ID and change Display As to Hidden.(don't tick off the Show Check Box in Report Attributes, change Display As in Column Attributes)
6. Change the Column Attributes (Heading, Column width, Alignment, Number Format ..) of the report columns as described for page 2.Enter Maximum Row Count to 500 and delete the default-number of Rows.

Freezing columns in a Grid
1. Open the Column Attributes of PRODUCT_NAME and set Freeze Column in Section FOEX Settings to Yes.
2. When you now run page 3 you see that the Product Name always is on the first position also when scrolling to the right.
Making Columns sortable
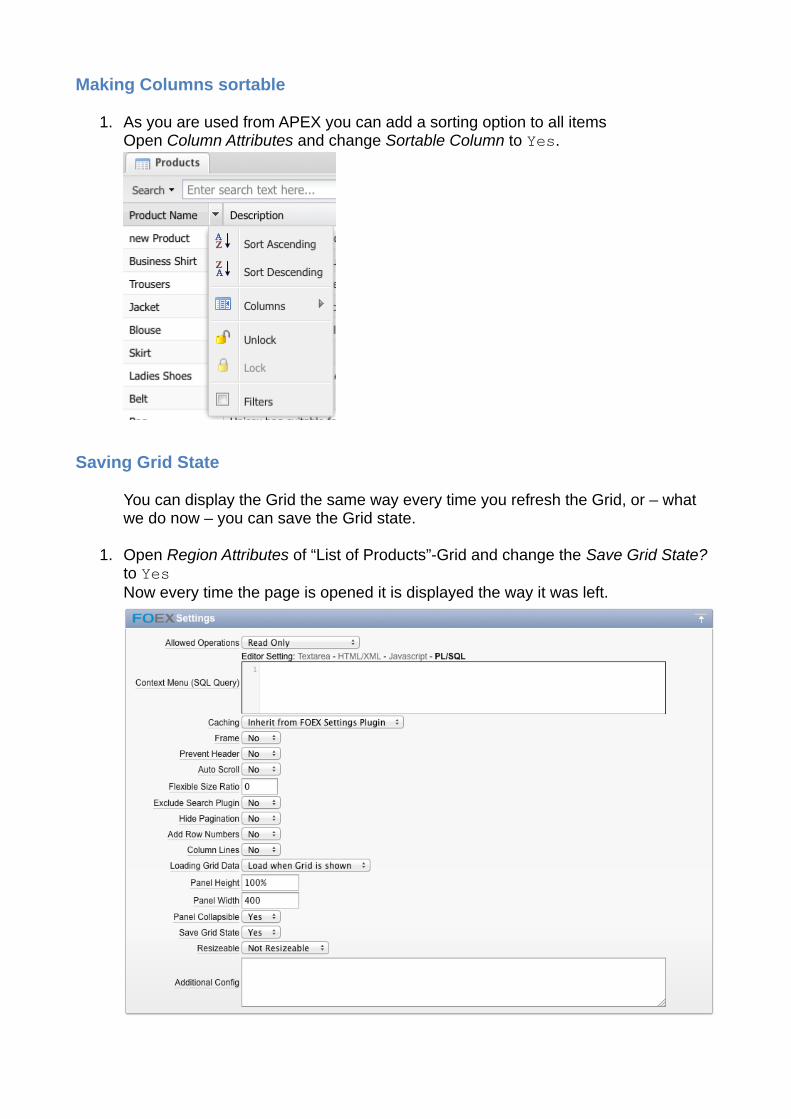
1. As you are used from APEX you can add a sorting option to all itemsOpen Column Attributes and change Sortable Column to Yes.
Saving Grid State
You can display the Grid the same way every time you refresh the Grid, or – what we do now – you can save the Grid state.
1. Open Region Attributes of “List of Products”-Grid and change the Save Grid State? to Yes Now every time the page is opened it is displayed the way it was left.
Creating a FOEX Form
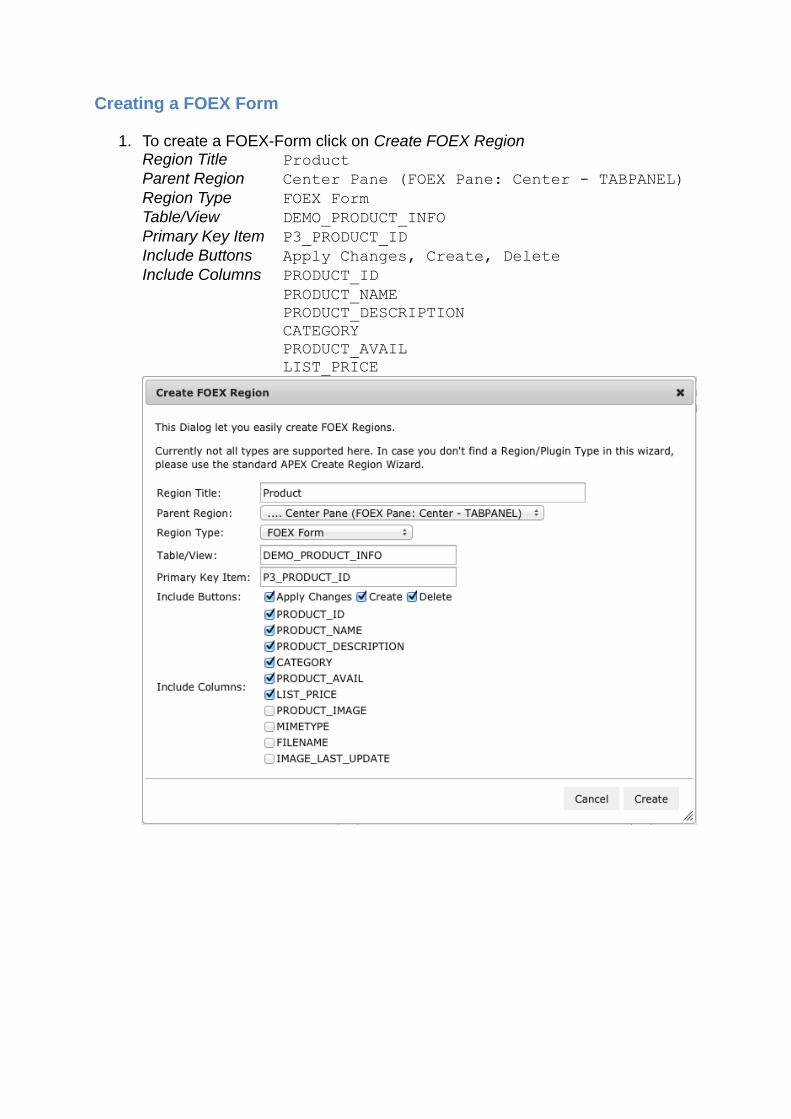
1. To create a FOEX-Form click on Create FOEX RegionRegion Title Product Parent Region Center Pane (FOEX Pane: Center - TABPANEL)Region Type FOEX FormTable/View DEMO_PRODUCT_INFOPrimary Key Item P3_PRODUCT_IDInclude Buttons Apply Changes, Create, DeleteInclude Columns PRODUCT_ID
PRODUCT_NAMEPRODUCT_DESCRIPTION CATEGORYPRODUCT_AVAIL LIST_PRICE

2. On page 3 you see the recently created Grid and the newly created Form.
3. The buttons are displayed in order of their sequence, therefore change the
sequences the order you prefer. (e.g. Delete(10) , SAVE (20), CREATE (30))4. When running the page you see one tab for the Grid and another for the Form,
therefore we change the layout.

Changing the Design of the Pane to vbox
1. Open the Region Definition of the Center Pane and change the Layout to Vertically Stack Regions (vbox) on the Region Attributes Tab.
2. When you run page 3 you can see both regions, although without any synchronization.

Linking a FOEX Grid as Master to a FOEX Form as Detail
1. Create a Dynamic Action for the FOEX Grid Products
2. Choose Advanced Implementation
3. Name Grid Form Binding and Load

4. Select the Event FOEX Grid – Row Selection Change [FOEX Grid] change the Selection Type to Region and Region to ........ Products (FOEX Grid) if they aren't that way.
5. As True Action choose FOEX Grid Row Select Bind Form [Plug-in]. Tick off Fire On Page Load if that's not done by default.
6. As Affected Element choose Selection Type Region and Region ........ Product (FOEX Form: ANCHOR)

7. To see all items when you click on one row of the Grid add another True Action to this Dynamic ActionAction FOEX Form Load [Plug-in]Selection Type RegionRegion ........ Product (FOEX Form: ANCHOR)
8. To make sure that after refreshing the page always the first row is selected create another Dynamic Action for the FOEX Grid Products Name SetFirstRowSequence 5 (to be executed before Grid Form Binding)Event After RefreshRegion ........ Products (FOEX Grid)

9. as True Action chooseAction FOEX Grid Select Row [Plug-in]Row Index 0so the first row (RowIndex 0) is chosen
10.The Affected Elements areSelection Type RegionRegion ........ Products (FOEX Grid)
11. Now run page 3 and the first row will be selected due to the SetFirstRow-DynamicAction. Click on another row in the Grid and it will be synchronized with the form

Styling the Items within a FOEX Form
1. Open the FOEX Field Container Product – Field Container and change the Default Label Width to 200 (within the Tab Region Attributes)
2. Open P3_PRODUCT_NAME and set Label Template to Required and Value Required to Yes.
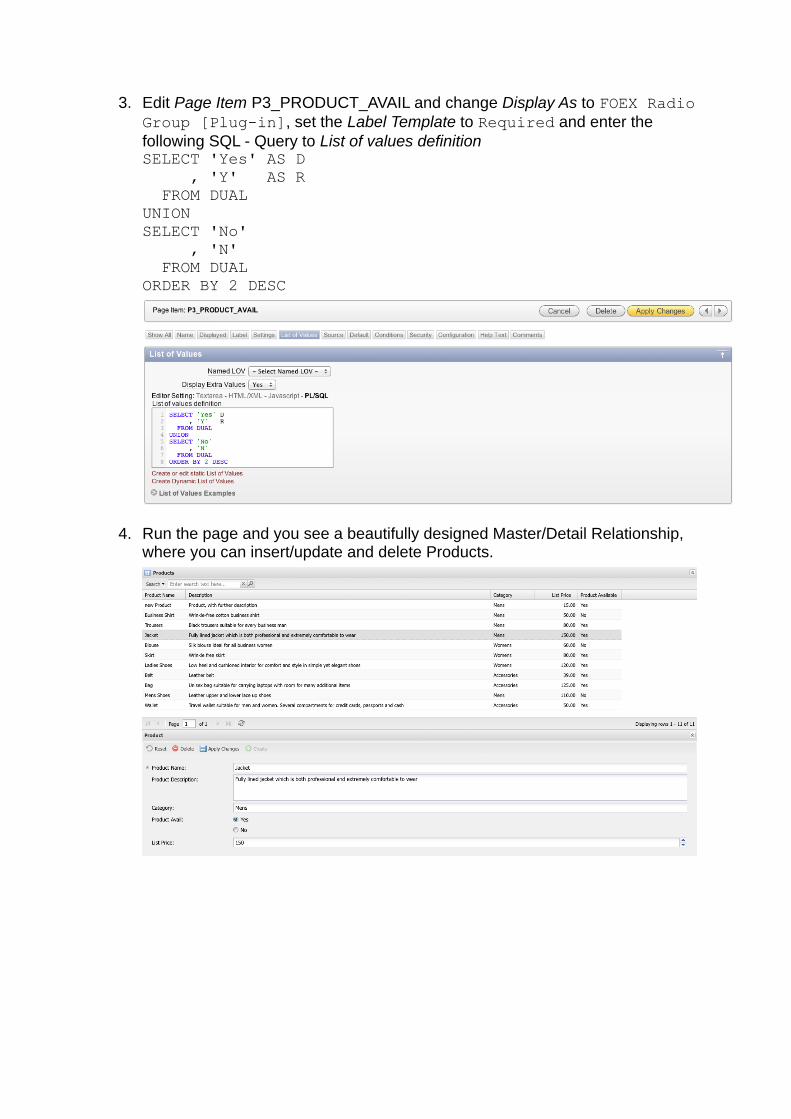
3. Edit Page Item P3_PRODUCT_AVAIL and change Display As to FOEX Radio Group [Plug-in], set the Label Template to Required and enter the following SQL - Query to List of values definitionSELECT 'Yes' AS D , 'Y' AS R FROM DUALUNIONSELECT 'No' , 'N' FROM DUALORDER BY 2 DESC
4. Run the page and you see a beautifully designed Master/Detail Relationship, where you can insert/update and delete Products.

Creating a Tree Grid (page 4)In this tutorial you create a page with Viewport and one FOEX Tree Grid in the Center pane.
1. Create a new FOEX page in your Application with Page Id 4 and Name Orders per Customer – Tree Grid. Again just create the Center Pane for this page.
2. Open page 4.3. Change the Layout of the Center Pane to Only 1 Child Region (fit) and
Flexible Size Ratio to 1 4. Click on Button Create FOEX Region and enter
Region Title Orders per CustomerParent Region Center Pane (FOEX Pane: Center – FIT)Region Type FOEX TreeGridSQL-QuerySELECT 'C'||TO_CHAR(C.CUSTOMER_ID) AS ID , TO_CHAR(NULL) AS PID , C.CUST_FIRST_NAME ||' '|| C.CUST_LAST_NAME AS TEXT , NULL AS URL , NULL AS DISPLAY_SEQ , NULL AS CSS_CLASS , TO_CHAR('Customer ID: '||C.CUSTOMER_ID) AS INFO , NULL AS CUSTOM , COUNT(OI.ORDER_ITEM_ID) AS ORDERS_TOTAL FROM DEMO_CUSTOMERS C , DEMO_ORDERS O , DEMO_ORDER_ITEMS OI WHERE C.CUSTOMER_ID = O.CUSTOMER_ID AND O.ORDER_ID = OI.ORDER_IDGROUP BY C.CUSTOMER_ID , C.CUST_FIRST_NAME , C.CUST_LAST_NAME UNION/* all Categories per Customers */SELECT 'O'||C.CUSTOMER_ID||SUBSTR(PI.CATEGORY,1,1) AS ID , 'C'||TO_CHAR(C.CUSTOMER_ID) AS PID , PI.CATEGORY AS TEXT , NULL AS URL , NULL AS DISPLAY_SEQ , NULL AS CSS_CLASS , 'Customer Name: '||C.CUST_LAST_NAME AS INFO , NULL AS CUSTOM , COUNT(OI.ORDER_ITEM_ID) AS ORDERS_TOTAL FROM DEMO_CUSTOMERS C , DEMO_ORDERS O , DEMO_ORDER_ITEMS OI , DEMO_PRODUCT_INFO PI

WHERE C.CUSTOMER_ID = O.CUSTOMER_ID AND O.ORDER_ID = OI.ORDER_ID AND OI.PRODUCT_ID = PI.PRODUCT_IDGROUP BY C.CUSTOMER_ID , C.CUST_LAST_NAME , PI.CATEGORYUNION/* all Products per Customer and Category */SELECT 'P'||C.CUSTOMER_ID||PI.PRODUCT_ID AS ID , 'O'||C.CUSTOMER_ID||SUBSTR(PI.CATEGORY,1,1) AS PID , PI.PRODUCT_NAME AS TEXT , NULL AS URL , NULL AS DISPLAY_SEQ , NULL AS CSS_CLASS , 'Category: '||PI.CATEGORY AS INFO , NULL AS CUSTOM , COUNT(OI.ORDER_ITEM_ID) AS ORDERS_TOTAL FROM DEMO_CUSTOMERS C , DEMO_ORDERS O , DEMO_ORDER_ITEMS OI , DEMO_PRODUCT_INFO PI WHERE C.CUSTOMER_ID = O.CUSTOMER_ID AND O.ORDER_ID = OI.ORDER_ID AND OI.PRODUCT_ID = PI.PRODUCT_IDGROUP BY C.CUSTOMER_ID , PI.PRODUCT_NAME , PI.PRODUCT_ID , PI.CATEGORY

5. Change the following settings in Regions Attributes of Orders per Customer (Tree Grid):Save Tree State? NoGet Child Nodes Via AJAX? NoHide Headers NoFlexible Size Ratio 1

6. Run page 4 and you can expand/collapse nodes as you like

Explaining the SQL-Query for Tree Grids
1. The first UNION selects all parent nodes (all different Customers) with PID (Parent Id) NULLthe TEXT is the displayed informationin INFO we write the tooltipSELECT 'C'||TO_CHAR(C.CUSTOMER_ID) AS ID , TO_CHAR(NULL) AS PID , C.CUST_FIRST_NAME ||' '|| C.CUST_LAST_NAME AS TEXT , NULL AS URL , NULL AS DISPLAY_SEQ , NULL AS CSS_CLASS , TO_CHAR('Customer ID: '||C.CUSTOMER_ID) AS INFO , NULL AS CUSTOM , COUNT(OI.ORDER_ITEM_ID) AS ORDERS_TOTAL FROM DEMO_CUSTOMERS C , DEMO_ORDERS O , DEMO_ORDER_ITEMS OI WHERE C.CUSTOMER_ID = O.CUSTOMER_ID AND O.ORDER_ID = OI.ORDER_IDGROUP BY C.CUSTOMER_ID , C.CUST_FIRST_NAME , C.CUST_LAST_NAME
2. The second UNION selects the number of products per customer and category.As Parent ID (PID) we have the corresponding IDs from the first select, these are the first child-nodes SELECT 'O'||C.CUSTOMER_ID||SUBSTR(PI.CATEGORY,1,1) AS ID , 'C'||TO_CHAR(C.CUSTOMER_ID) AS PID , PI.CATEGORY AS TEXT , NULL AS URL , NULL AS DISPLAY_SEQ , NULL AS CSS_CLASS , C.CUST_FIRST_NAME ||' '|| C.CUST_LAST_NAME AS INFO , NULL AS CUSTOM , COUNT(OI.ORDER_ITEM_ID) AS ORDERS_TOTAL FROM DEMO_CUSTOMERS C , DEMO_ORDERS O , DEMO_ORDER_ITEMS OI , DEMO_PRODUCT_INFO PI WHERE C.CUSTOMER_ID = O.CUSTOMER_ID AND O.ORDER_ID = OI.ORDER_ID AND OI.PRODUCT_ID = PI.PRODUCT_IDGROUP BY C.CUSTOMER_ID , C.CUST_FIRST_NAME ||' '|| C.CUST_LAST_NAME , PI.CATEGORY
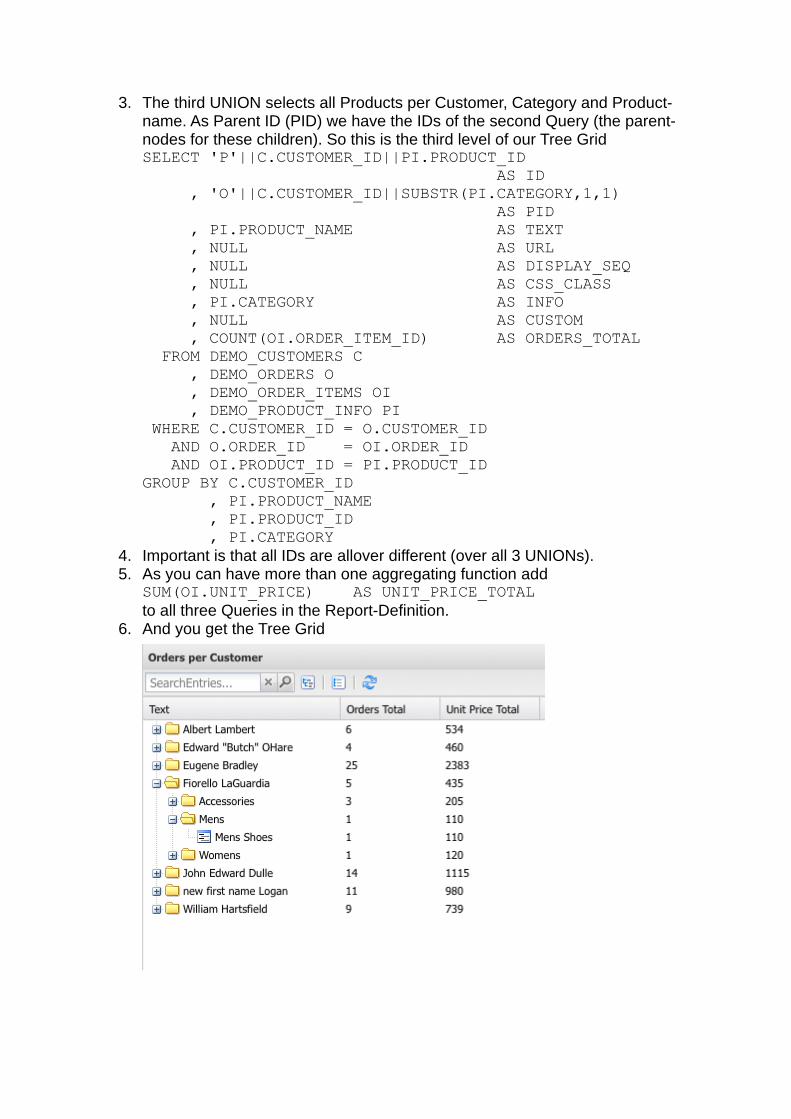
3. The third UNION selects all Products per Customer, Category and Product-name. As Parent ID (PID) we have the IDs of the second Query (the parent-nodes for these children). So this is the third level of our Tree GridSELECT 'P'||C.CUSTOMER_ID||PI.PRODUCT_ID AS ID , 'O'||C.CUSTOMER_ID||SUBSTR(PI.CATEGORY,1,1) AS PID , PI.PRODUCT_NAME AS TEXT , NULL AS URL , NULL AS DISPLAY_SEQ , NULL AS CSS_CLASS , PI.CATEGORY AS INFO , NULL AS CUSTOM , COUNT(OI.ORDER_ITEM_ID) AS ORDERS_TOTAL FROM DEMO_CUSTOMERS C , DEMO_ORDERS O , DEMO_ORDER_ITEMS OI , DEMO_PRODUCT_INFO PI WHERE C.CUSTOMER_ID = O.CUSTOMER_ID AND O.ORDER_ID = OI.ORDER_ID AND OI.PRODUCT_ID = PI.PRODUCT_IDGROUP BY C.CUSTOMER_ID , PI.PRODUCT_NAME , PI.PRODUCT_ID , PI.CATEGORY
4. Important is that all IDs are allover different (over all 3 UNIONs).5. As you can have more than one aggregating function add
SUM(OI.UNIT_PRICE) AS UNIT_PRICE_TOTALto all three Queries in the Report-Definition.
6. And you get the Tree Grid

7. Open the Report Attributes of the Report-Region and change the heading of TEXT to Customer, of ORDERS_TOTAL and of UNIT_PRICE_TOTAL, change the Column Alignment of the number fields to right and add a Number / Date Format for column UNIT_PRICE_TOTAL (e.g.: $999G999G999G999G990D00)
8. The new design of your Tree Grid looks like that:

Export Data from the Tree Grid
1. Open the Region Attributes of the Tree Grid (Orders per Customer)2. Add "serverExportCSV": true to Additional Config

3. At the bottom on the right side you see a CSV-Export Button
4. Press CSV Export and you get a list of all level of the Tree Grid.5. To export just those information that is shown on the screen go back to the Region
Attributes of the Tree Grid and add "visibleRowsOnly": true to Additional Config

Creating a FOEX Form (page 5)
On this page we create a simple FOEX Form, which will be included as Modal Window to our application. The Items within the FOEX Container are formatted as useful for an Input Mask.The development of the FOEX Form follows the same steps as the ones on page 3.
6. Create a new FOEX page in your Application with Page Id 5 and Name New Customer. Just create the Center Pane for this page.
7. Open page 5.8. Change the Layout in the Center Pane to Only 1 Child Region (fit) 9. Click on Button Create FOEX Region and enter
Region Title CustomersParent Region Center Page (FOEX Pane: Center - FIT)Region Type FOEX FormTable/View DEMO_CUSTOMERSPrimary Key Item P5_CUSTOMER_IDInclude Buttons Create (tick off Apply Changes and Delete)Choose all columns to be included on the form CUSTOMER_IDCUST_FIRST_NAMECUST_LAST_NAMECUST_STREET_ADDRESS1CUST_STREET_ADDRESS2CUST_CITYCUST_STATECUST_POSTAL_CODEPHONE_NUMBER1PHONE_NUMBER2CREDIT_LIMITCUST_EMAIL
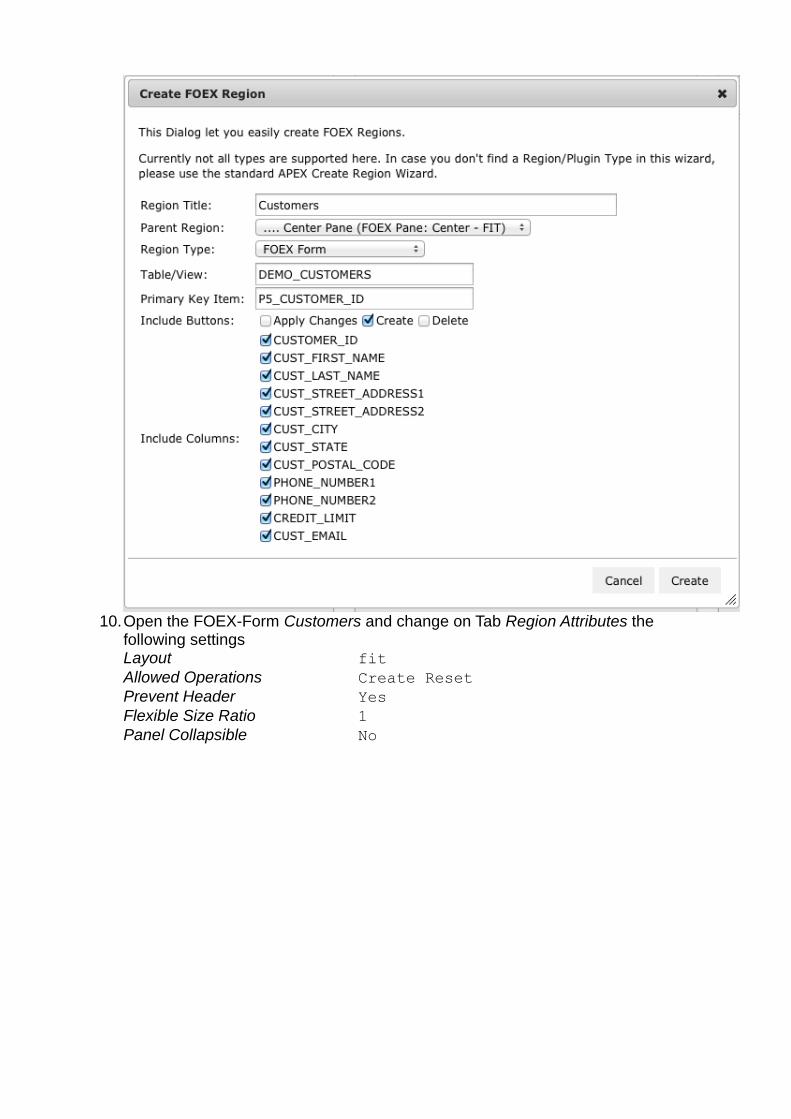
10.Open the FOEX-Form Customers and change on Tab Region Attributes the following settingsLayout fitAllowed Operations Create ResetPrevent Header YesFlexible Size Ratio 1Panel Collapsible No
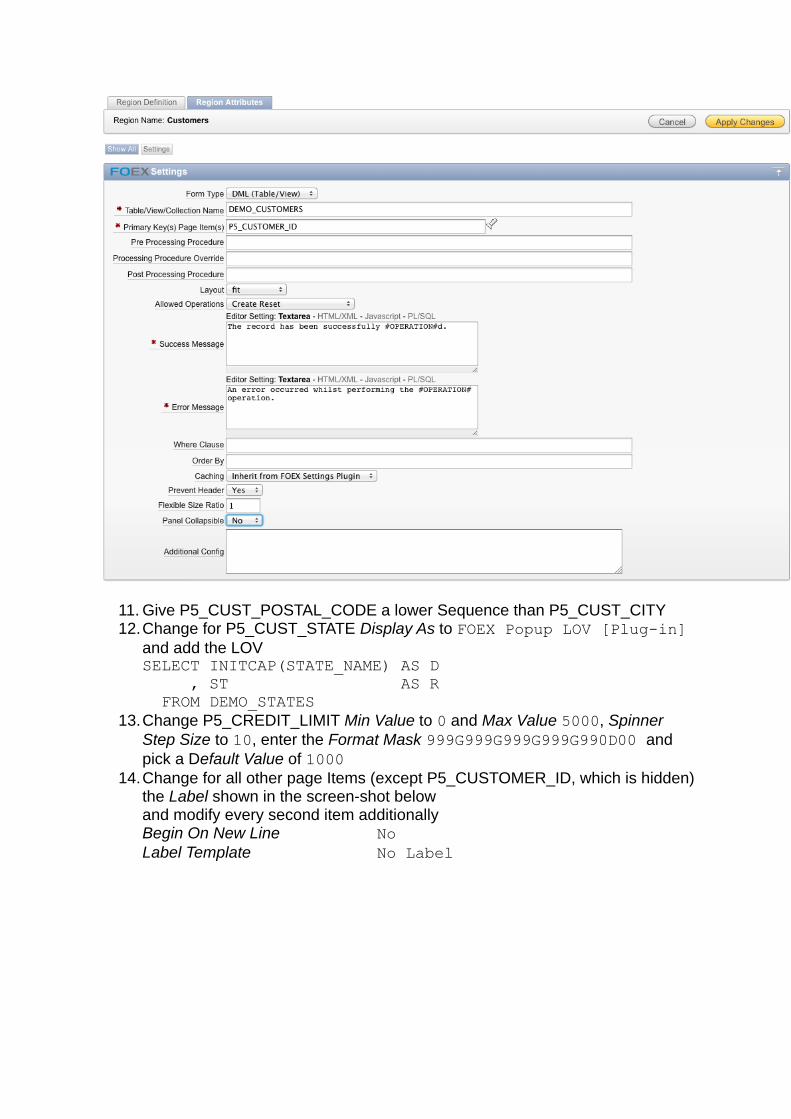
11. Give P5_CUST_POSTAL_CODE a lower Sequence than P5_CUST_CITY12.Change for P5_CUST_STATE Display As to FOEX Popup LOV [Plug-in]
and add the LOVSELECT INITCAP(STATE_NAME) AS D , ST AS R FROM DEMO_STATES
13.Change P5_CREDIT_LIMIT Min Value to 0 and Max Value 5000, Spinner Step Size to 10, enter the Format Mask 999G999G999G999G990D00 and pick a Default Value of 1000
14.Change for all other page Items (except P5_CUSTOMER_ID, which is hidden) the Label shown in the screen-shot below and modify every second item additionally Begin On New Line NoLabel Template No Label

for P5_CUST_EMAIL add additionally "vtype": "email" to Custom Config (Component Level)
15.Now your page looks like this

Creating Master/Detail/Detail – Relationship with three Grids and adding a FOEX Form as Modal Window (page 6)In this tutorial we combine a Layout with two Grids placed beside each other with a third Grid underneath them. So we can get the best fragmentation of the Viewport. For inserting new records we include a PL/SQL-Process, on the other hand we add a button which opens a Modal Window defined on the same page.
Creating two reliant FOEX Grids within a Layout
1. Create a new FOEX page in your Application with Page Id 6 and Name Existing and New Order - MasterDetailDetail Grid + new Window. Just create the Center Pane for this page.
2. Open page 6.3. Create a FOEX Layout as SUB-Region for the Center Pane: Plug-ins →
FOEX Layout with Title Customer and Order
4. Change Layout to hbox (horizontal) as we want to have two Grids beside each other and create the Region.

5. Open the newly created FOEX Layout-Region Customer and Order and change on Tab Region Attributes in Section FOEX Settings Prevent Header to Yes and Flexible Size Ratio to 1. And in Section FOEX Child Object Default Settings Flexible Size Ratio to 1.
6. Create an updatable Grid named Customers in Row Editing Mode on Table DEMO_CUSTOMERS as on page 2, but set Panel Collapsible to Yes for this Grid and create the Add and Delete-Buttons. This Grid is placed in the newly created Layout Region (Customer and Order)
7. To connect the first and second Grid create a hidden Page Item P6_CUSTOMER_ID_DRILL in the Report Region Customers – Query Definition
8. Create a second Grid, this time read-only as Sub-Region of Customer and Order - Layout as for page 3. Name the Grid OrdersSQL - QuerySELECT O.ORDER_ID , O.CUSTOMER_ID , NVL(O.ORDER_TOTAL, 0) AS ORDER_TOTAL , O.ORDER_TIMESTAMP , O.USER_NAME FROM DEMO_ORDERS O WHERE O.CUSTOMER_ID = :P6_CUSTOMER_ID_DRILLORDER BY O.ORDER_ID DESC

9. and format the columns as shown below (ORDER_ID and CUSTOMER_ID shall be hidden)e.g. Timestamp change to Date Picker and use the format DD.MM.YYYY HH24:MI
10.Change for the FOEX-Grid Orders the Region Attribute Flexible Size Ratio to 1 and Loading Grid Data to Load on Demand
11. To bind these two Grids create a Dynamic Action for the first Grid Region Customers with the Name Customer Drill Down
12.Pick the Event FOEX Grid – After Row Select [FOEX Grid]
13.as Action choose FOEX Grid Row Select Set Item Values [Plug-in], tick off Fire On Page Load, if that's not done by default and in Settings choose Column CUSTOMER_ID for Page Item P6_CUSTOMER_ID_DRILL

14.Don't choose any Affected Elements and Create the Dynamic Action.
15.Add a second true Action to this Dynamic Action which refreshes the Region Orders.
16.Run the page and on click on one Customer you'll get the List of Orders in the second Grid.

17.Again we want the first row to be selected after refresh, therefore create a second dynamic action for the Grid Customers similar to SetFirstRow on page 3.
18.Run the page and from the beginning you'll have both Grids filled with reliant data.
Adding a third Read Only Grid to the Center Pane
1. To combine Orders with the following Grid create a hidden Page Item P6_ORDER_ID_DRILL in the Report Region Orders – Query Definition.

2. Add a read-only Grid to the Center Pane named Order Items using the SQL - QuerySELECT OI.ORDER_ITEM_ID , OI.ORDER_ID , OI.PRODUCT_ID , OI.UNIT_PRICE , OI.QUANTITY FROM DEMO_ORDER_ITEMS OI WHERE (OI.ORDER_ID = :P6_ORDER_ID_DRILL OR :P6_ORDER_ID_DRILL IS NULL) AND EXISTS (SELECT 1 FROM DEMO_ORDERS O WHERE (O.CUSTOMER_ID = :P6_CUSTOMER_ID_DRILL OR :P6_CUSTOMER_ID_DRILL IS NULL) AND OI.ORDER_ID = O.ORDER_ID )
hide the Items ORDER_ITEM_ID and ORDER_IDchange PRODUCT_ID to Select List (query based LOV) and use the SQL - Query SELECT PRODUCT_NAME AS D , PRODUCT_ID AS R FROM DEMO_PRODUCT_INFO Change in FOEX Grid Order Items Flexible Size Ratio to 1 and Loading Grid Data to Load on Demand.
3. Run the Page and you'll see the Layout-Region on one Tab and the Grid on a second one.
4. In this Example we want to see all three regions on one page and therefore we open the Center Pane and change the Layout to Vertically Stack Regions (vbox). Our FOEX-Layout-Region Customer and Order has the Layout hbox (horizontal box), therefore the first two grids are beside each other. If you want to have all three regions above each other change this also to vbox (for this tutorial we'll leave it to hbox).

Initially we want to see all Ordered Items of a Customer, when we change the Customer, therefore we set item P6_ORDER_ID_DRILL to NULL and refresh the third Grid Region.
5. Open the Report Definition of Customers - Query Definition and add the value NULL AS ORDER_ID to the SQL - Query and set the Item to Hidden.
6. Open the first True Action FOEX Grid Row Select Set Item Values [Plug-in] of our Dynamic Action Customer Drill DownAdd ,ORDER_ID to Columns and ,P6_ORDER_ID_DRILL to Page Items (the items are separated by comma)

7. Add a third True Action to this Dynamic Action to refresh the third Grid
8. Run the page and when you click on a Customer the other two Grids are refreshed and show details, that belong exactly to the chosen Customer.
Binding the second Grid to the third one
1. Add a dynamic Action to the Grid Orders named Order Drill Downfor the Event FOEX Grid After Row Select [FOEX Grid]
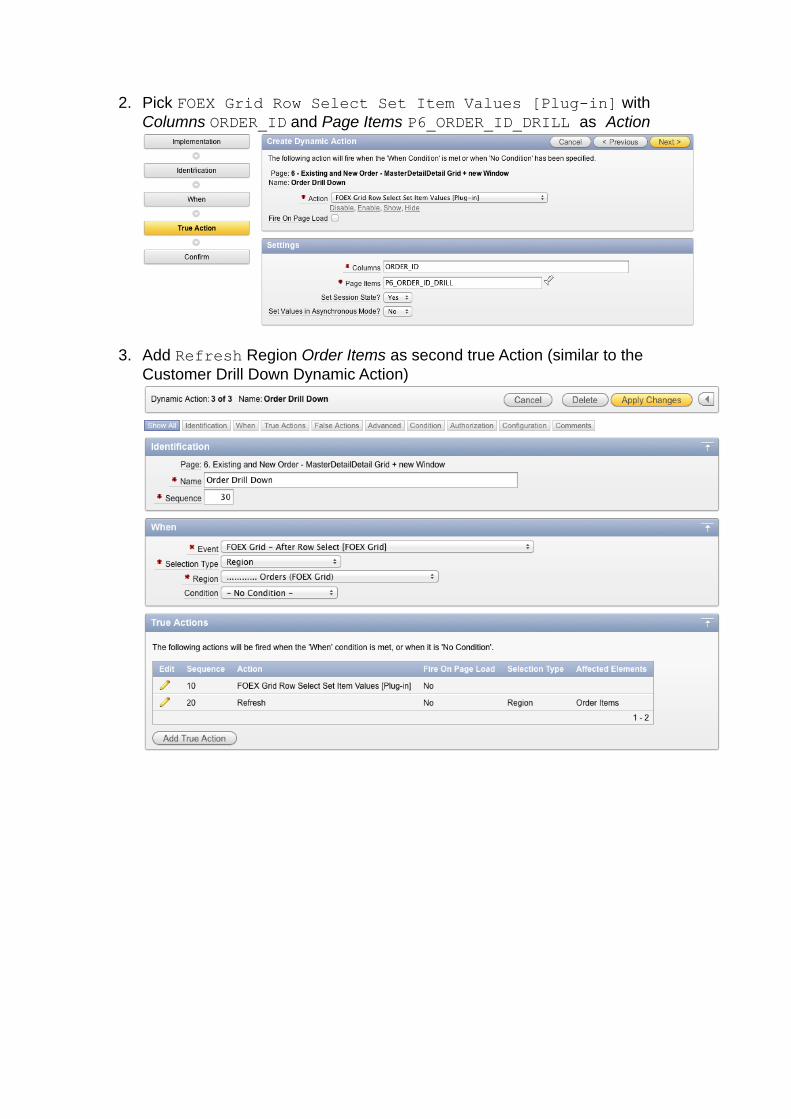
2. Pick FOEX Grid Row Select Set Item Values [Plug-in] with Columns ORDER_ID and Page Items P6_ORDER_ID_DRILL as Action
3. Add Refresh Region Order Items as second true Action (similar to the Customer Drill Down Dynamic Action)

4. And again a second Dynamic Action for After Refresh Set First Row
5. As the third Grid is now bound to the second we remove the TRUE Action Refresh in Customer Drill Down for the Order Items – Region.
Include PL/SQL Dynamic ActionThe next step is to integrate a Button for adding New Orders to Orders.
1. Create a Region Button within the Orders-Grid. Button Name ADD_ORDERButton Icon AddAction Defined by Dynamic ActionEdit the Button and addStatic ID NEWORDER
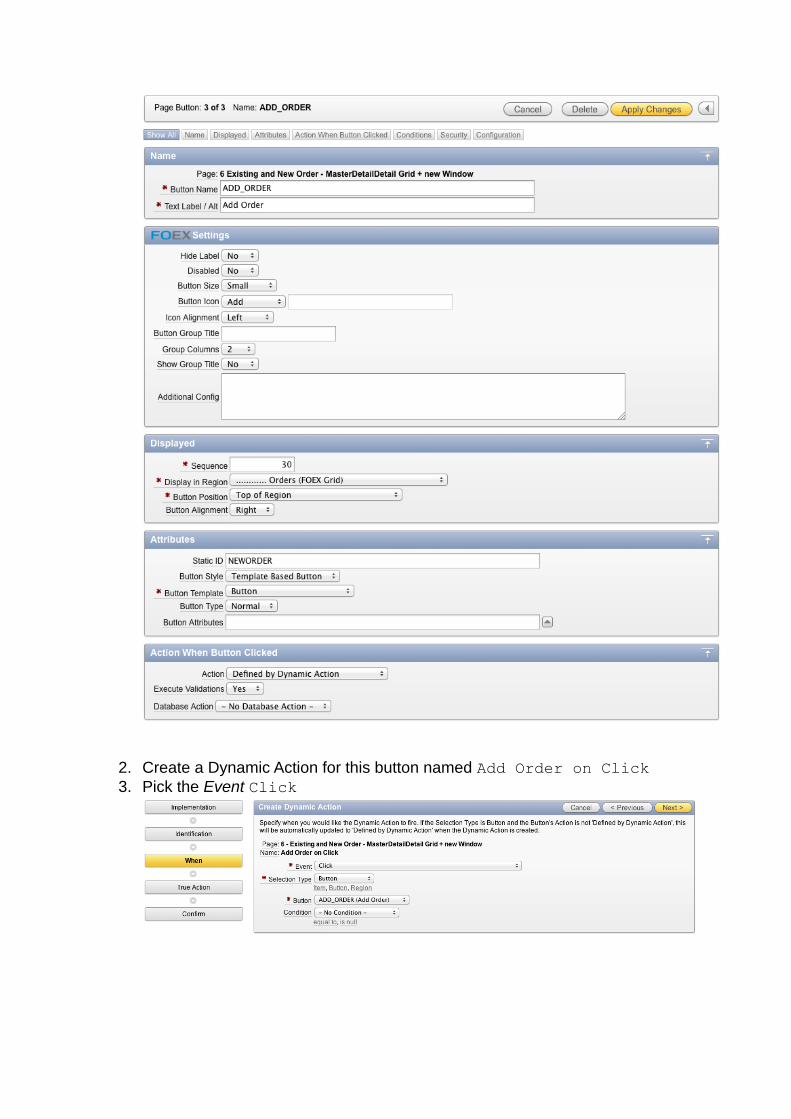
2. Create a Dynamic Action for this button named Add Order on Click3. Pick the Event Click
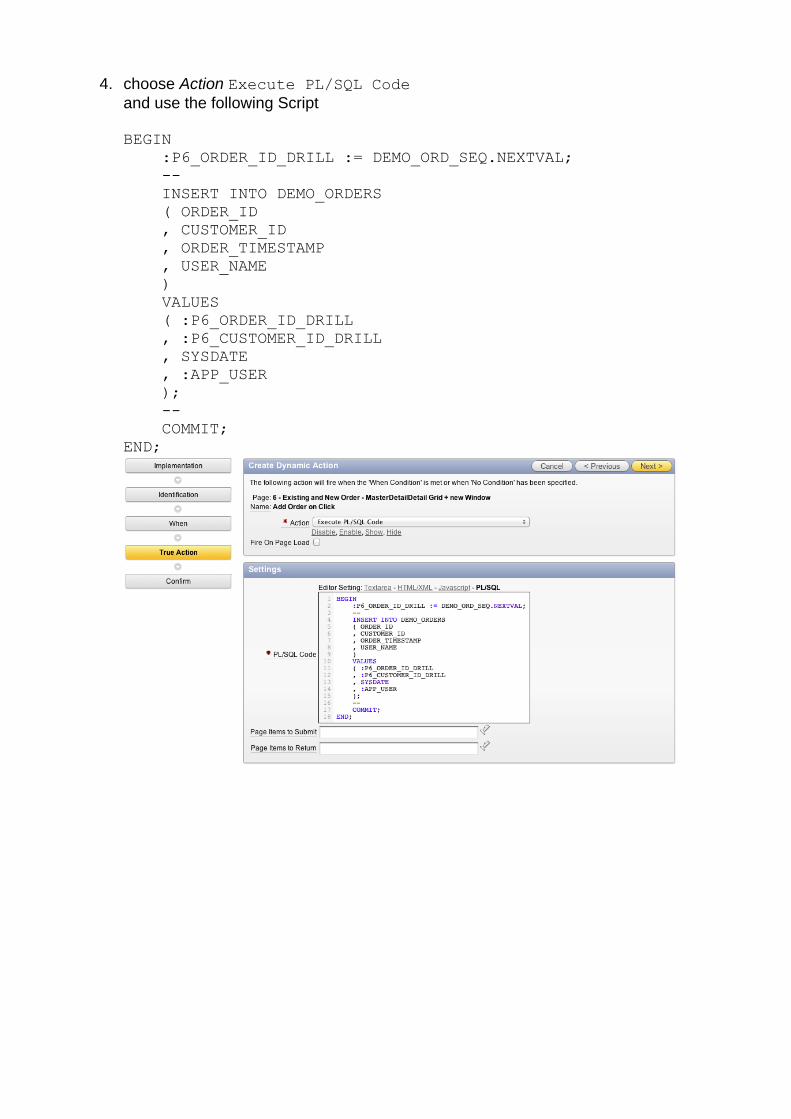
4. choose Action Execute PL/SQL Codeand use the following Script
BEGIN :P6_ORDER_ID_DRILL := DEMO_ORD_SEQ.NEXTVAL; -- INSERT INTO DEMO_ORDERS ( ORDER_ID , CUSTOMER_ID , ORDER_TIMESTAMP , USER_NAME ) VALUES ( :P6_ORDER_ID_DRILL , :P6_CUSTOMER_ID_DRILL , SYSDATE , :APP_USER ); -- COMMIT;END;
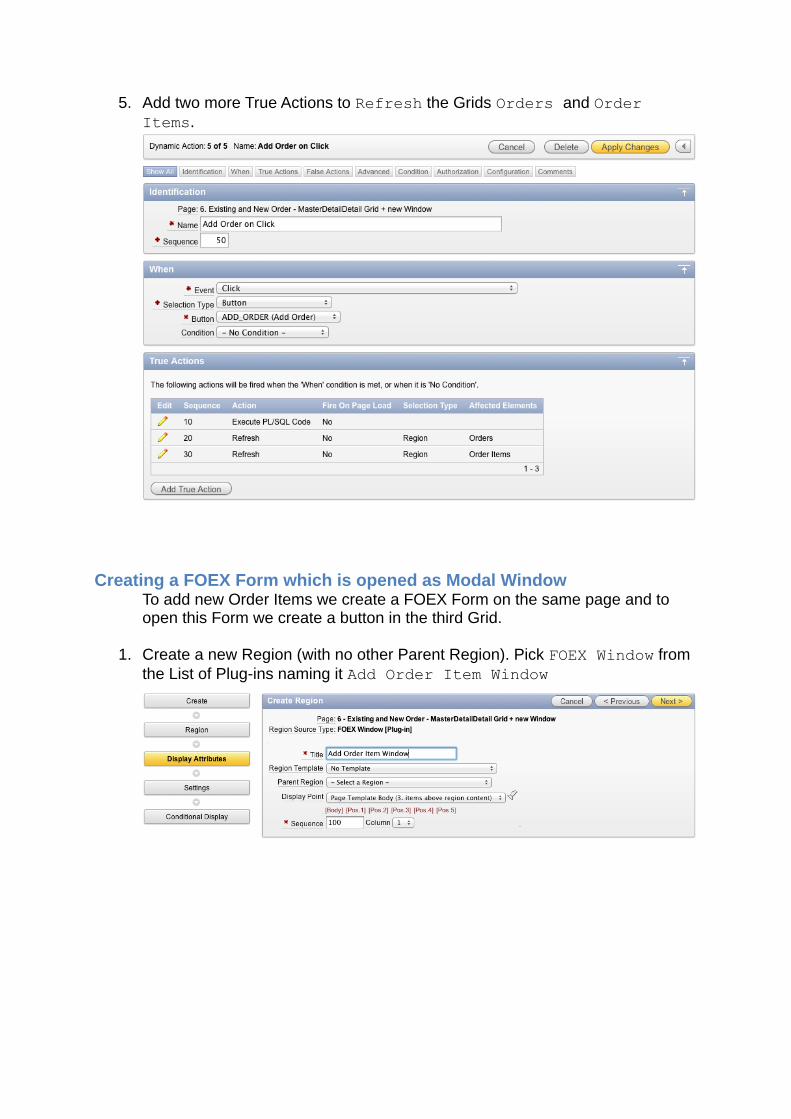
5. Add two more True Actions to Refresh the Grids Orders and Order Items.
Creating a FOEX Form which is opened as Modal WindowTo add new Order Items we create a FOEX Form on the same page and to open this Form we create a button in the third Grid.
1. Create a new Region (with no other Parent Region). Pick FOEX Window from the List of Plug-ins naming it Add Order Item Window

2. Choose Add Order Item as Window Title and leave all other items with their predefined values and create the Region.
3. Create a FOEX Form by using the Button Create FOEX RegionRegion Title Add Order Item Parent Region Add Order Item Window (FOEX Window: FIT – Modal)Region Type FOEX FormTable DEMO_ORDER_ITEMS Primary Key Item P6_ORDER_ITEM_IDCreate all three buttonsChoose all Items to be created ORDER_ITEM_IDORDER_IDPRODUCT_IDUNIT_PRICEQUANTITY

4. Add a Region Button to Grid-Region Order Items named ADD_ORDER_ITEM with Button Icon AddAction Defined by Dynamic Action
5. Create a Dynamic Action for this buttonName Open Window on Add Order Item Button Click
6. leave the Event on Click7. Choose the Action Show and tick off Fire On Page Load.8. Selection Type Region
Region Add Order Items Window (FOEX Window: FIT - Modal)
9. Add a second True Action to reset the window every time it is refreshedAction FOEX Form Reset [Plug-in]Selection Type Region Region .... Add Order Item (FOEX Form: ANCHOR)
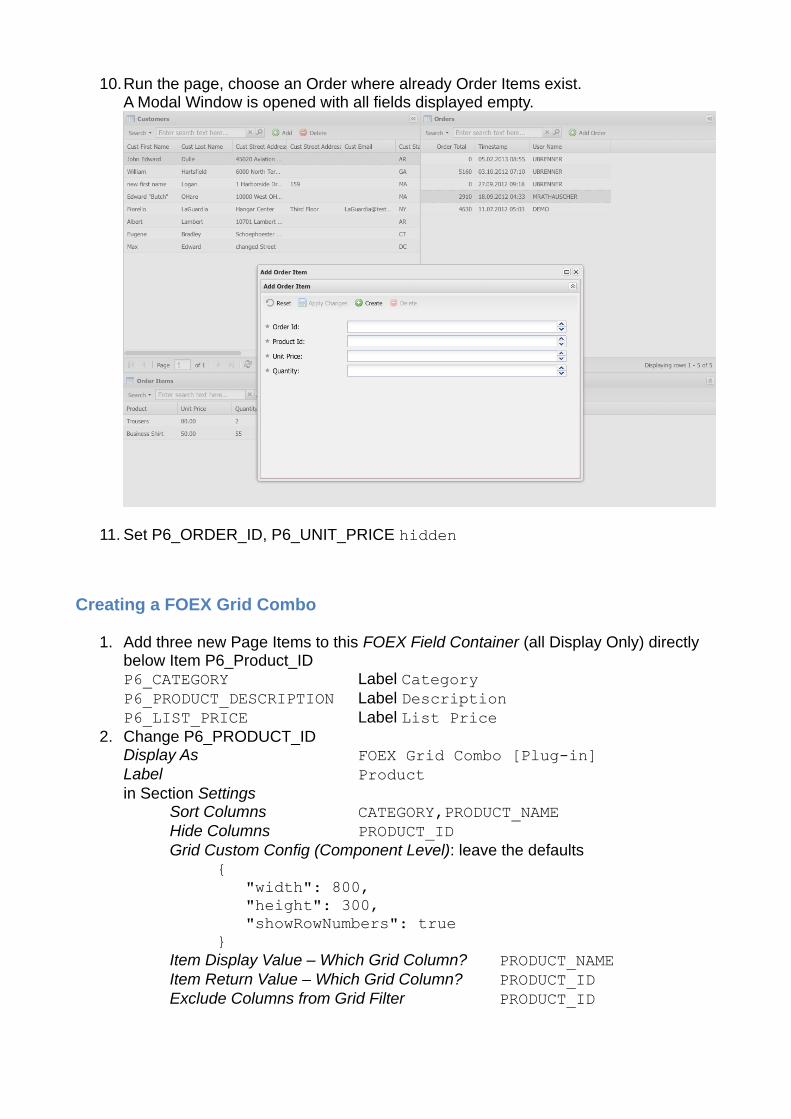
10.Run the page, choose an Order where already Order Items exist. A Modal Window is opened with all fields displayed empty.
11. Set P6_ORDER_ID, P6_UNIT_PRICE hidden
Creating a FOEX Grid Combo
1. Add three new Page Items to this FOEX Field Container (all Display Only) directly below Item P6_Product_IDP6_CATEGORY Label CategoryP6_PRODUCT_DESCRIPTION Label DescriptionP6_LIST_PRICE Label List Price
2. Change P6_PRODUCT_ID Display As FOEX Grid Combo [Plug-in]Label Productin Section Settings
Sort Columns CATEGORY,PRODUCT_NAMEHide Columns PRODUCT_IDGrid Custom Config (Component Level): leave the defaults
{ "width": 800, "height": 300, "showRowNumbers": true}
Item Display Value – Which Grid Column? PRODUCT_NAMEItem Return Value – Which Grid Column? PRODUCT_IDExclude Columns from Grid Filter PRODUCT_ID

Set Other ItemsP6_PRODUCT_DESCRIPTION:PRODUCT_DESCRIPTION,P6_CATEGORY:CATEGORY,P6_LIST_PRICE:LIST_PRICE
List of Values definitionSELECT PRODUCT_ID , PRODUCT_NAME AS "Product Name" , PRODUCT_DESCRIPTION AS "Product Description" , CATEGORY AS "Category" , LIST_PRICE AS "List Price" FROM DEMO_PRODUCT_INFO WHERE (PRODUCT_AVAIL = 'Y' AND :P6_ORDER_ITEM_ID IS NULL) OR :P6_ORDER_ITEM_ID IS NOT NULL
3. Run page 6 and open the window

When you choose one record the display items are filled with the corresponding values (as defined within set other items).
4. To remove one headline in the Modal Window open FOEX Form Add Order Item and set within Section FOEX Settings Prevent Header to Yes
5. To bind the Grid to the Form we add a Dynamic Action similar to the one on page 3, but this time we want to show the FOEX Window when a record is selectedCreate a Dynamic Action for Region Order Items named Bind Grid to Formadd True ActionsFOEX Grid Row Select Bind Form [Plug-in] Region Add Order Item FOEX Form Load [Plug-in] Region Add Order Item Show Region Add Order Item Window
(tick off Fire On Page Load) 6. Run page 6 and click on one Order Item. The FOEX Window appears and all Fields
are filled with the corresponding values.7. Finally we set the ORDER_ID for new Order Items.
Open Page Item P6_ORDER_ID, set Value Protected to NO and insert the default value :P6_ORDER_ID_DRILL and change the Default Value Type to PL/SQL Expression
8. When choosing an Order you can insert/update/delete an Order Item. 9. To Refresh the Order Items after successfully committing one Order Item add a
Dynamic Action to FOEX Form Add Order Item named On Save Success Event FOEX Form – CRUD Success [FOEX Form]
10.Action Refresh

11. Selection Type Region Region ........ Order Items (FOEX Grid)
Now all changes are immediately shown in the Grid although the Modal Window is still open.
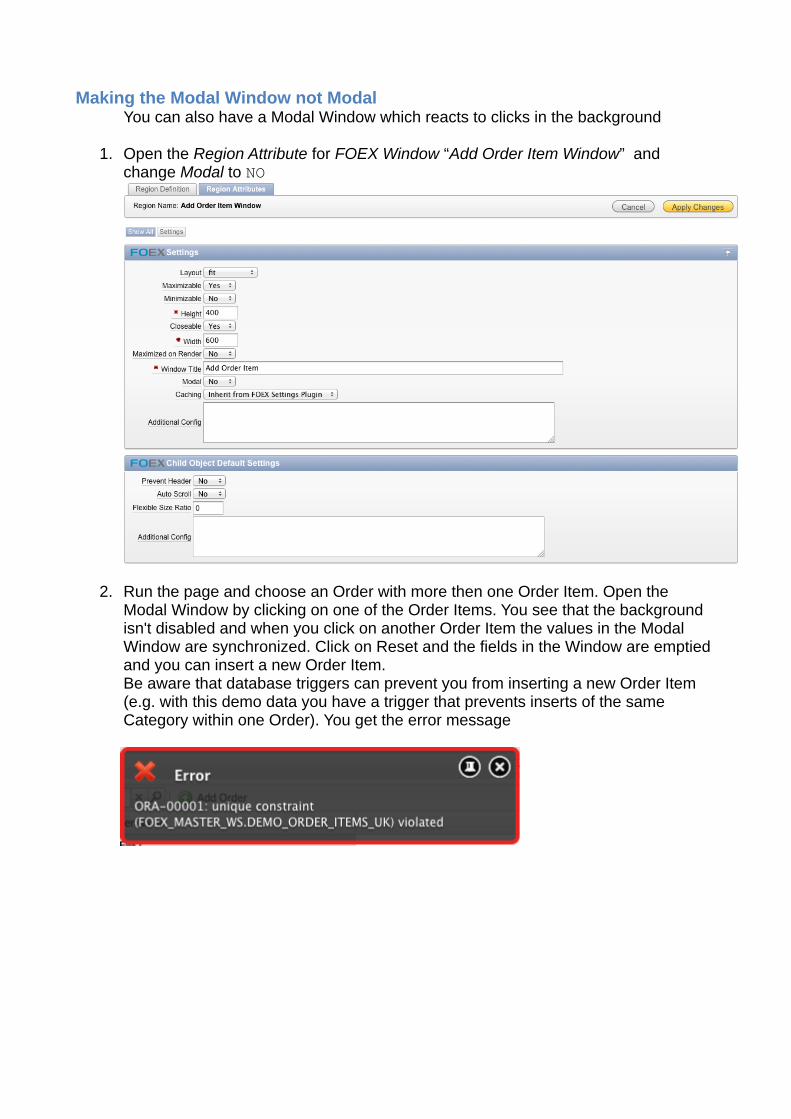
Making the Modal Window not ModalYou can also have a Modal Window which reacts to clicks in the background
1. Open the Region Attribute for FOEX Window “Add Order Item Window” and change Modal to NO
2. Run the page and choose an Order with more then one Order Item. Open the Modal Window by clicking on one of the Order Items. You see that the background isn't disabled and when you click on another Order Item the values in the Modal Window are synchronized. Click on Reset and the fields in the Window are emptied and you can insert a new Order Item. Be aware that database triggers can prevent you from inserting a new Order Item (e.g. with this demo data you have a trigger that prevents inserts of the same Category within one Order). You get the error message

Creating a Tree with Links to previously created Pages (page 1)In this tutorial we create a Welcome-Region, which is surrounded by a Toolbar on Top and a Navigation-Tree to its left. The leaves of the Tree open previously created pages from this Application in the Center Pane, using a Tab for each of them. Finally we will include a button to the Toolbar, which opens a Modal Window with a previously created page.
Adding a HTML-Region to the Center Pane
1. Create a new FOEX page in your Application with Page Id 1 and Name Start Page and 3 Panes (North, West, Center).
2. Open page 1.3. Open the Page Definition and add for further styling the following css-definition
to HTML Header and Body Attribute<style type="text/css"> div.welcomeUser { padding:20px; font-size:18px; font-weight:bold; color:#0082C0; }
div.toolbarUser { font-size: 16px; font-weight:bold; color:#0082C0; }</style>
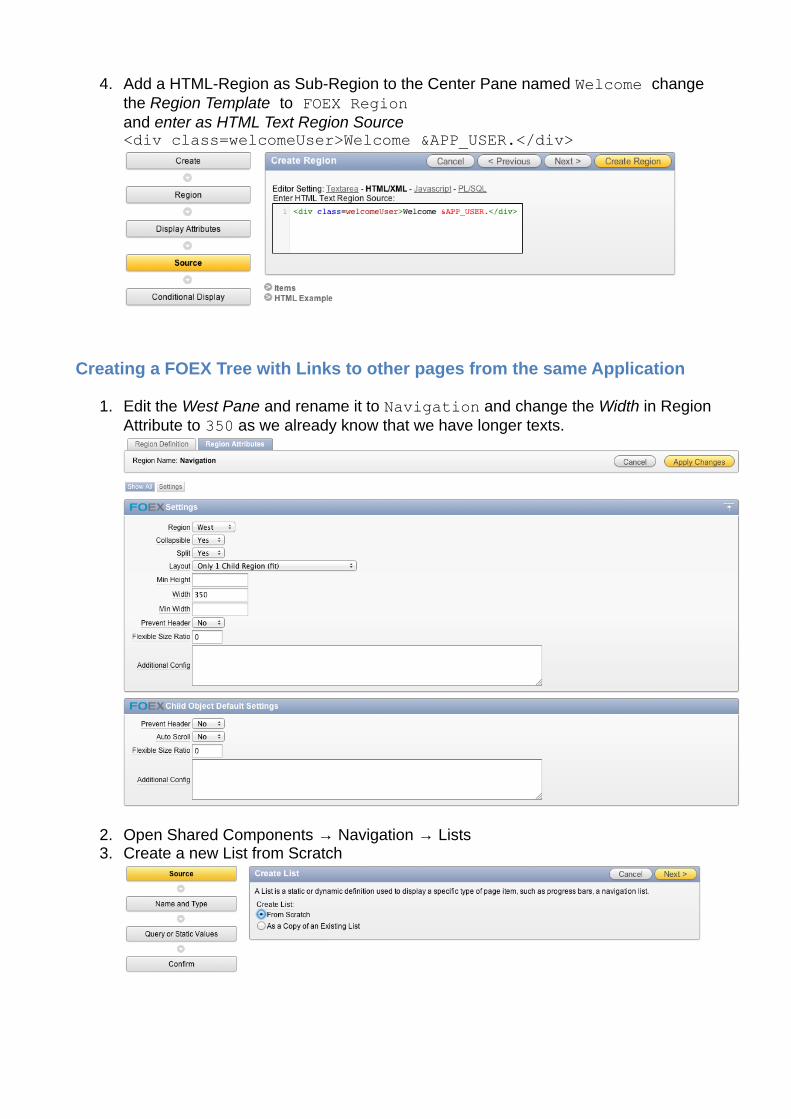
4. Add a HTML-Region as Sub-Region to the Center Pane named Welcome change the Region Template to FOEX Regionand enter as HTML Text Region Source <div class=welcomeUser>Welcome &APP_USER.</div>
Creating a FOEX Tree with Links to other pages from the same Application
1. Edit the West Pane and rename it to Navigation and change the Width in Region Attribute to 350 as we already know that we have longer texts.
2. Open Shared Components → Navigation → Lists3. Create a new List from Scratch

4. Name FOEX2Days Page IndexType Static
5. List Entry Label Target Page ID or custom URL2 Day FOEX Developer's Pages
Customers - Updatable Grid 2
Products - Master/Detail 3
Products per Customer - Tree Grid
4
Existing and New Order - Master/Detail/Detail Grid
6
6. Do not create list region(s) and press create.

7. Do the following changes on List Entry “2 Days FOEX Developer's Pages” as this is our Root, which has no Link.List used with FOEX Plugin Set FOEX Tree, Button or WizardTooltip Tooltip for Main NodeIcon CSS Class 'Not in List' and icon-foexTarget - No Target -
8. For all other List Entries do the following:Parent List Entry 2 Days FOEX Developer's PagesList used with FOEX Plugin Set FOEX Tree, Button or WizardTooltip Tooltip for page 2Clear Cache the target page (e.g. 2)

9. Go back to page 1 and add a FOEX Tree via Button Create FOEX RegionRegion Title Tree PluginParent Region NavigationRegion Type FOEX TreeSQL QuerySELECT TO_CHAR(LIST_ENTRY_ID) ID , TO_CHAR(LIST_ENTRY_PARENT_ID) PID , ENTRY_TEXT TEXT , ENTRY_TARGET URL , DISPLAY_SEQUENCE DISPLAY_SEQ , ENTRY_ATTRIBUTE_03 CSS_CLASS , ENTRY_ATTRIBUTE_02 INFO , ENTRY_ATTRIBUTE_04 CUSTOM FROM APEX_APPLICATION_LIST_ENTRIES WHERE APPLICATION_ID = :APP_ID AND LIST_NAME = 'FOEX2Days Page Index' AND 0 = CASE WHEN CONDITION_TYPE_CODE IS NOT NULL OR AUTHORIZATION_SCHEME_ID IS NOT NULL THEN FX_P_UTILS.AUTH_CONDITION_CHECK ( CONDITION_TYPE_CODE , CONDITION_EXPRESSION1 , CONDITION_EXPRESSION2 , AUTHORIZATION_SCHEME_ID ) ELSE 0 END

10. in Settings of Region Tree Plugin change Get Child Nodes Via AJAX? to NoStop Default Node Click Event? to YesPrevent Header to YesFlexible Size ratio to 1leave the other settings as predefined

11. Add a Dynamic Action to FOEX Tree Region Tree Plugin Name Tree Leaf ClickEvent FOEX Tree – Leaf Click/
Select [FOEX Tree]Action FOEX Content Loader [Plug-
in] (from Section Execute)Use URL from Triggering Element? YesRegion is on Parent Page? NoReload if Already Open? YesInsert at Position LastShare/Reuse Tab/Panel/Slice? No
12.Affected Element:Selection Type RegionRegion .... Center Pane (FOEX Pane: Center -
TABPANEL)
13.After expanding the Tree the page looks like that
14. If you just see the loading sign and no page opens when you click on the leaves of the tree Edit Application Properties and change in Section Browser Security (Tab Security) Embed in Frames Allow from same origin
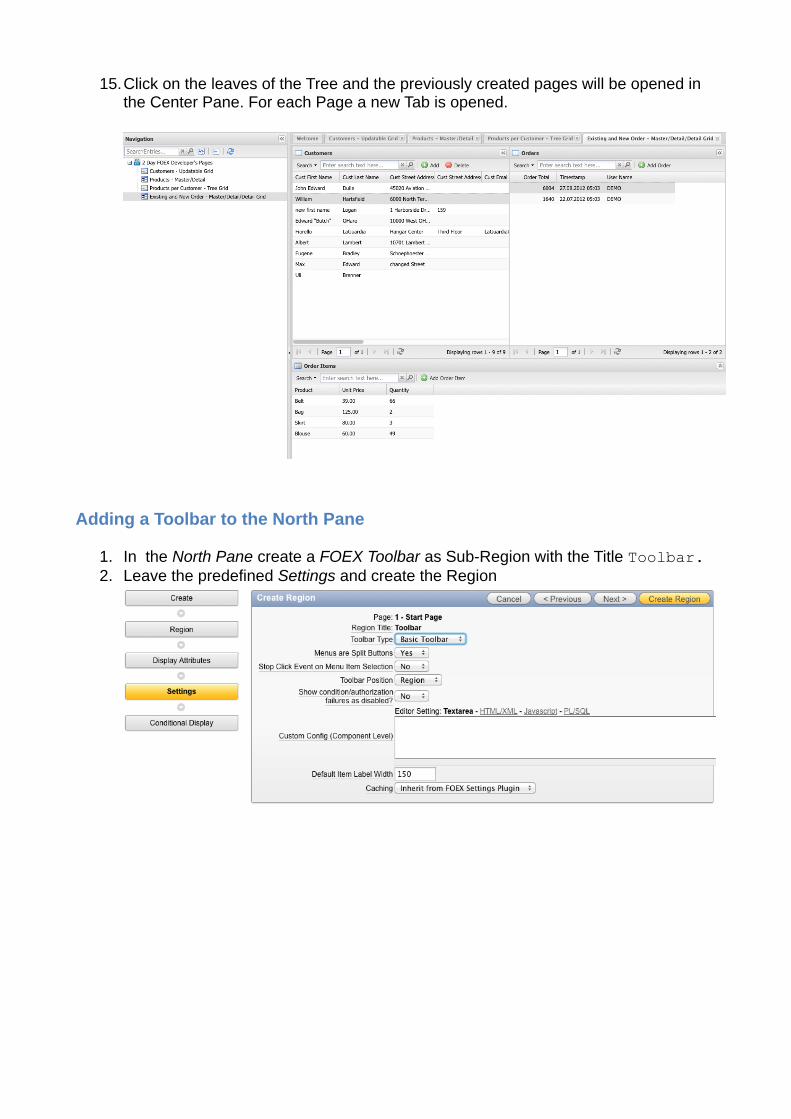
15.Click on the leaves of the Tree and the previously created pages will be opened in the Center Pane. For each Page a new Tab is opened.
Adding a Toolbar to the North Pane
1. In the North Pane create a FOEX Toolbar as Sub-Region with the Title Toolbar.2. Leave the predefined Settings and create the Region

3. Add a FOEX Display Field as Page Item to the Toolbar-Region where we include our Logo to the Start Page (P1_Logo).Change Label Template to No LabelAdd <img src="&FOEX_SOURCE_DIR.images/FOEX.png" width="103" height="25" /> as Item Source Value
4. Add another FOEX Display Field for P1_USERNAME with the label logged in as the CSS-class toolbarUser (we defined on the page) and the Item APP_USER as Source.

5. Add a Logout-Button (Region Button) to the Toolbar Action Redirect to URLURL Target &LOGOUT_URL.Sequence 50 (as the Items in the Toolbar are ordered by Sequence)Button Icon Not in List and fx-icon-logout
Finally we add a Button for page 5 to open a page from this Application as Modal Window
6. Create another Region Button within Toolbar called NEW_CUSTOMER7. Sequence 40
Action Defined by Dynamic ActionButton Icon Add
8. Create a Dynamic Action for this ButtonName Open new Window for New CustomerEvent ClickAction FOEX Window Open [Plug-in]Use URL from Triggering Element? NoOpen URL f?p=&APP_ID.:5:&APP_SESSION.::&DEBUG.:5New Content Title New CustomerModal YesMaximizable YesMaximized in Render NoCloseable YesWindow ID WINDOW_FOR_CUSTOMERWidth 600Height 400

9. We want to close the Modal Window after a new Customer was inserted, therefore add a Dynamic Action to Page 5.Name On CRUD Success Close WindowEvent FOEX Form – CRUD Success [FOEX Form]Selection Type RegionRegion ........ Customers (FOEX Form: FIT)Action FOEX Window Close [Plug-in]The Window is on this page? NoSelection Type jQuery SelectorjQuery Selector #WINDOW_FOR_CUSTOMER
10.Run page 1 and after inserting successfully a New Customer via the newly created Button, the Modal Window is closed.