follow the steps as they appear in these pages, as you ...telescope control system (tcs) console,...
TRANSCRIPT

1
Mees Observatory telescope checklist
Last revised 6 November 2018 DMW
This guide is meant to be used as a cookbook, not for light reading, or as a tutorial in observations. Have it at hand at the beginning of observations or tours. Always follow the steps as they appear in these pages, as you would a recipe. Even if you think you remember everything, it will still prove useful to follow the written steps.
Call Dan on his cell phone (585-414-1004) to be talked through any problems you have with telescope or instruments.
I. Telescope startup ...................................................................................................................................................................................................................... 2
II. Telescope shutdown ............................................................................................................................................................................................................... 12
III. FAQ: problems you may encounter, and their solutions ................................................................................................................................................... 14
TCS
TCS
CCD TCS
CCD
Figure 1: ingredients of the control room. At left is the telescope control system (TCS) console, with its computer and two monitors. At right, on the other table, is the CCD
camera’s laptop computer and its external monitor. In between and above is the patch panel by which one connects the computers to the focal-plane instruments.
Patch panel

2
I. Telescope startup
Beginning in Fall 2018, the telescope and most of its systems will stay on all the time, to facilitate remote access to the TCS and – soon – remote observations. If all is well you will find that
• All the circuit breakers are switched on, the TCS rack is plugged in and powered on, and the TCS computer is up and running.
• The video-camera program FrameGrab is running, and the view of one of cameras shows on the TCS computer monitor.
• The weather station program WeatherLink is running, with current conditions displayed on the TCS monitor (Figure 2).
• The HALT MOTORS button on the TCS front panel is pushed in.
• The telescope is pointing at zenith, with the covers on.
• Both dome shutters are closed, and the dome is parked in its home position.
If the outdoor relative humidity is greater than 95% according to the weather-station readout (Figure 2), STOP. You may not remove the telescope cover or open the dome until the relative humidity is below 95%.
If the relative humidity is below 95% – and of course if the weather is promising in other respects, with low (< 20 mph) wind speed, no precipitation in sight, and clear skies on the way – you may proceed.
Figure 2: current conditions at the Mees weather station, which is displayed by pushing the Bulletin Window banner button (indicated). Note the indoor and outdoor relative humidity values. The weather station itself is on top of the utility pole, across the driveway from the dome’s loading dock.
Our weather station pushes its data to Weather Underground. Check it out on www.wunderground.com, in which it is known as personal weather station KNYNAPLE17.
Basic safety
Know how to use the fire extinguishers: pull the pin, squeeze the handle, aim, sweep the base of the fire, remove/escape, call 911.
There is a first-aid kit in the control room. Use it to stabilize injuries; call 911 in case of severe ones.

3
1. Check switches on telescope control system (TCS) front panel (Figure 3). The HALT MOTORS button should be pushed in, TRACK/OFF and EXTERNAL COMPUTER/OFF should be set to OFF (switch down). All other switches on the upper row (TRACK/AUXILIARY TRACK, DRIVES, AUTO
DOME, DOME TRACK), and the MTR DRIVER CHASSIS switch (locking toggle switch between the fuses) should be in the UP position. The lowest row of switches should have the EAST/WEST switch on EAST, and the HARD LIMIT OVERRIDE switch OFF. Important note: Always be sure that the TCS computer operator does not inadvertently hit any of the switches with their knees.
2. Push the HALT MOTORS button out.
3. If, and only if, you find the system completely shut down when you arrive:
a. Turn on all circuit breakers in the breaker box by the front door. (The breakers marked with yellow tape are always on.) For tours, make sure that the solar lights are placed near the bottom stair.
b. Plug in the uninterruptible power supply, on the floor to the right of the TCS (Figure 3).
c. Turn on system power (middle switch in the lower row).
d. Turn on telescope control computer. This computer is the middle item in the TCS rack (Figure 3).
e. Let the TCS computer boot into Windows. Check the date and time, visible in the lower right corner of the screen: this should display the current local date and time (EST or EDT according to season; not UT).
f. Upstairs on the dome floor: make sure the dome motor is switched on, and that its signal switch is set to REMOTE CONTROL (Figure 4).
Figure 3: the Telescope Control System (TCS) front panel, and the settings that the switches should have when you enter the control room or start the system up from scratch (U = up, D = down).
Also labelled are the TCS computer and the uninterruptible power supply (UPS).
1
Initial switch settings:
In
U-D-U-U-D-U
U
U-on-off
TCS computer
UPS

4
Figure 4: dome-power connections and switches, which should always be left in the positions indicated.
3f
3f
3f

5
4. Start the telescope control program, DFMTCS, by doubleclicking its desktop icon:
The telescope operating system will take a few minutes to initialize, the longest step being the finding of the focus reference point (fiducial). Wait until it’s done initializing the focus, before proceeding with instructions to the TCS computer. Certain of these instructions, issued while initialization is in progress, will cause the system to hang. When the system initialization is complete, the TCS window will look like it does in Figure 3. The Focus value should be that for the CCD camera, somewhere around 3000. The value depends upon temperature.
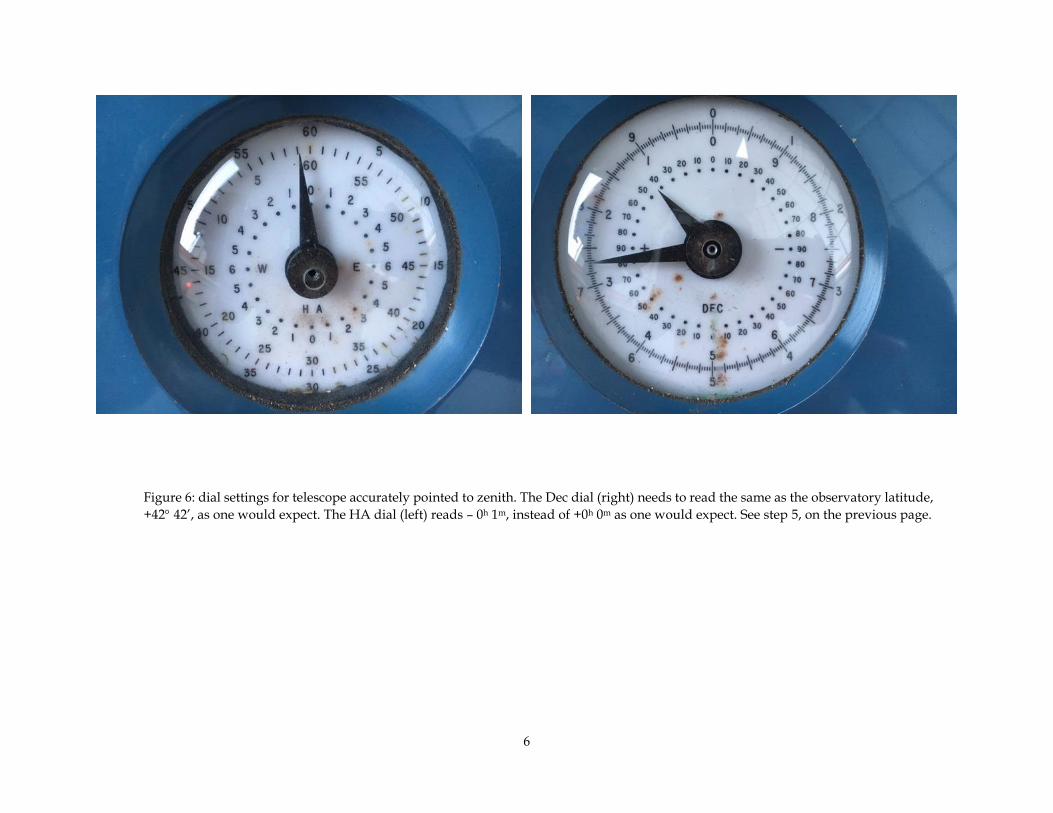
5. Check the HA and Dec values displayed in the TCS window. Make sure that they are close to the values shown on the telescope’s RA drum (Figure 6), and that RA and ST have the same values (Figure 5). If and only if they are not, then do the following:
a. While on the dome floor, use the paddle to slew the telescope precisely to zenith, according to the settings on the HA and Dec dials on the telescope’s RA drum (Figure 6).
b. Return to the TCS, and use the commands in Telescope > Initialization, on the Telescope Position tab, to tell the telescope it’s pointing at zenith: that is, set RA = ST as given on the TCS main window (Figure 5), Dec = observatory latitude (42° 42’ 01”).
Figure 5: state of telescope after initialization. Note that the telescope is pointed near zenith, where it was left by the previous observers; that the dome is still Off, and parked at its home azimuth of 103.5°; and that tracking is still off by virtue of the TRACK switch being off and the tracking rates being set to zero.
5
5
6
Figure 6: dial settings for telescope accurately pointed to zenith. The Dec dial (right) needs to read the same as the observatory latitude,
+42 42’, as one would expect. The HA dial (left) reads – 0h 1m, instead of +0h 0m as one would expect. See step 5, on the previous page.

7
c. Then verify that this has been done correctly, by comparing ST with the telescope RA on the TCS window (Figure 8). They should be the same, within a second or so; repeat Steps 5a-b if they aren’t.
6. If, and only if, they aren’t already running – for example, if the system was completely shut down when you arrived – start
FrameGrab, WeatherLink, and your favorite Web browser, using their desktop icons.
a. FrameGrab: push the Capture Video button at upper left (Figure 7). On Options > Settings > Channel, select one of the four cameras. It is useful to leave the Options window open to enable switching among cameras.
b. WeatherLink: push one of the banner buttons to get a variety of displays. Particularly useful is the Bulletin Window (Figure 8).
c. Your favorite browser: by default, one of the windows that will open is the Mees Wiki (see below, Step 14).
Figure 7 (upper right): the FrameGrab window, with Camera 1 selected. It is dark, and the telescope is pointing toward the northeast.
Figure 8 (lower right): banner of commands and reports available in WeatherLink.
6a
6b

8
If it’s cloudy: stop here, until it’s clear. Monitor the cloud cover on www.cleardarksky.com and/or www.wunderground.com.
7. On the Telescope > Misc. window, select the Display Epoch/Side of
pier/Dome tab (Figure 9). Open the dome: push the Upper Shutter Open button, wait for the upper shutter to open, then push the Lower Shutter Open button. (The upper shutter must be opened first, and closed last.) You can watch the process best on Camera 1 or Camera 4.
8. Then, on the Switches tab (Figure 10), click the Off next to Dome to turn the dome On; push the Apply button. Do the same to the red Home, turning it to Track, and once again pushing Apply. Verify that these changes are also reflected in the main TCS display. If they are not, repeat, making sure you push Apply with each setting.
Figure 9 (upper right): the Display Epoch/Side of pier/Dome tabs of Telescope > Misc., by which one opens and closes the dome shutters. Again: always open the upper shutter first, and close it last.
Figure 10 (lower right): the Switches tab of Telescope > Misc., by which one turns the dome on and off, and sets it to track the telescope.
7
8

9
9. On Telescope > Movement, select the Offset/Other tab (Figure 12). Find the Set Covers Position box and push the Apply button within; then push the Start Slew button. This steers the top of the telescope over to the top of the tallest ladder; climb the ladder and remove the covers of the main and finder telescopes. If the dome has not followed the telescope through this move, revisit step 8, and toggle the dome tracking to Home – Apply and Track – Apply (Figure 10), so that the last time Track is selected the dome swings over to place its slit in front of the telescope.
10. Then, on the same window, find the Set Zenith Position box. Push its Apply button, then the Start Slew button (Figure 12). Now the telescope is back at zenith.
11. On Telescope > Rates, in the Track Rates tab (Figure 11), make sure the RA rate is set to the celestial-equator sidereal rate, 15 arcsec/sec. If it isn’t, enter this value and push Apply. Then switch the front-panel TRACK switch from OFF to TRACK. Verify on the TCS main window
that tracking is now On, and that the hour angle of the telescope increases at about a second per second.
12. Start TheSky, by double-clicking its icon on the left of the left-hand screen.
13. Link TheSky with the TCS by using TheSky’s Telescope > Link > Establish command. The telescope position will then appear on TheSky’s display as a white, circled crosshair.
Figure 11: the Track Rates screen. The RA rate should be set to 15 arcsec/sec. The auxiliary RA rate is set to the lunar tracking rate of 14.451 arcsec/sec. One can toggle between the two using the leftmost switch on the TCS front panel (Figure 3).
Figure 12. Movement Offset/Other tab, with commands for sending the telescope to a few predetermined positions.
11
9
9, 10
10

10
14. Log into the Mees Wiki, using the page conveniently opened in your web browser. Navigate to the online observing logbook (Figure 13), and begin to keep notes of your observing session there.
15. Start with the most recent value of focus recorded in the observing logbook, also usually written on the whiteboard by the control-room door. The focus can be set either with the hand paddles – using SET along with IN or OUT to move the focal position fastest – or with the TCS Telescope > Misc. > Focus tab.
If the telescope is way out of focus, the image will not look starlike. It will look like a donut: an illuminated image of the primary mirror, with the shadow of the secondary mirror and its supports superimposed. When you have focused so that stars in CCD images look point-like, record the Focus position, as displayed on the TCS main window, in the online observing logbook.
16. Find a bright star near zenith on TheSky’s display, click on it to bring up its Object Information window, and slew the telescope to this star by clicking the green telescope icon at the bottom of the Object
Information window, and confirming this command appropriately. If you know the name of a star or other object at which you want to point, use TheSky’s Edit > Find command to enter its name. This command can be invoked from the keyboard, if TheSky’s window is selected, with Cntl+F.
17. Verify that this star lies in the center of the field, eyepiece or CCD camera. If it does not, move it there with the hand paddle, simultaneously holding down the SET button and whichever of the
Warning: do not point the telescope at Polaris, nor slew the telescope close to the celestial north pole.
If you do, confusing and potentially harmful errors are introduced into the tracking and directional configuration of the system – as would be the case on any nonportable, equatorially-mounted, computer-controlled telescope. See FAQ #2 for details.
Figure 13: the Wiki’s online observing logbook. Follow the instructions to enter notes in the text box provided; press the button at the end of your observing session to post your entry.

11
direction buttons is appropriate. When it’s centered, update the telescope’s idea of this star’s position by pressing the Sync button, on the Telescope tab of the Object Information window in TheSky (see Figure 14). After this you should be able to point confidently to any object in the sky. The TCS monitors should look something like what’s shown in Figure 14. WARNING: do not point the telescope below an
elevation of 20, or within 10 of the north pole (e.g. Polaris). The software is booby-trapped for the former restriction but not the latter.
18. For viewing the bright Moon by eye, there is a variable Moon filter (rotatable, cross-able polarizers) in the wooden cabinet where the eyepieces are stored. For viewing nebulae, there is a nebular filter ([O III] 500.7 nm line) in the same spot. To install either, carefully remove the eyepiece, screw the appropriate filter on the bottom of the eyepiece, and replace the eyepiece. Don’t forget to remove it before you observe a fainter or continuously-emitting object.
Figure 14: TCS display for the happy telescope, currently observing NGC 891: left monitor on top, right monitor below.
20

12
II. Telescope shutdown
1. Turn TRACK/OFF switch OFF.
2. If the CCD camera was in use, shut it down and secure it, according to the instructions in the camera’s startup/shutdown cookbook.
3. Slew telescope south to the “covers” position, as you did during telescope startup (step 9; Figure 12). Put the telescope covers back on. It’s important that this be done before shutting the dome. Unless you’re the last observer before the onset of winter, you need not cover the telescope with the tarp.
4. Slew the telescope to zenith, using the Apply button of Set Zenith Position, and the Start Slew button, in Telescope > Movement > Offset/Other (Figure 12). Make sure that the telescope’s final position is really the zenith, as indicated on the dials (Figure 6).
5. Push the HALT MOTORS button in.
6. In Telescope > Misc. > Switches, toggle from Dome Track to Dome Home, and push Apply. (This can also be done by flipping the DOME TRACK/HOME switch on the TCS front panel to HOME. See Figure 3.) If Dome already shows Home, click it twice to turn it to Track and back to Home, and then push Apply. In either case, verify that the dome lands at azimuth 103.5°, which places the slit close to, but not quite, directly over the deck doorway.
7. Again in Telescope > Misc. > Switches, click to toggle from Dome On to Dome Off, and push Apply.
8. Now close the dome doors: in Telescope > Misc. > Display Epoch/Side of pier/Dome, push Lower Shutter Close. When this is done, push Upper Shutter
Close. (Remember, the upper shutter is opened first, and closed last.)
9. Verify that both shutters are closed all the way, and that the door to the deck is closed and locked.
10. Shut down TheSky (File > Exit).
11. Shut down DFMTCS (File > Exit).
12. Complete and post your entry in the online observing logbook before logging out of the Wiki. The logbook is a good way to report any problems to Dan, Kelly, Kurt or Carol. Also report to them via logbook posts which supplies might be running low, especially flashlight batteries, coffee, tea, hot cocoa, etc.
13. Leave FrameGrab and WeatherLink running on the TCS computer.

13
14. Do not shut down the computer, nor the TCS electronics, nor the uninterruptible power supply. Do not unplug anything. Do not turn off the breakers.
15. If there’s any chance that outside temperatures will drop below freezing: make sure that the space heaters in the walls on either end of the control room, in the storage room, and in the bathroom, are not switched off.
16. Make sure that ALL the doors to the rooms inside the dome are closed.
17. Did the loading dock get icy while you were observing? If so, deice it, using the ice melter compound found in the storage room just inside the front door. Don’t walk on the dock or stairs until the ice is melted.
18. Lock the front door behind you.
19. Is it 2:30 AM or later? If so, go to the Gannett House and sleep for at least four hours before proceeding to the next step. This important safety rule will be enforced rigorously.
20. If you went into the Gannett House, make sure that its doors are locked. Pay special attention to the double patio doors as these have a somewhat unusual lock: one has to pull up on the handle, in order to enable the lock latches. Test these doors to make sure they’re locked.
21. Make sure the gate is locked securely behind you. Now you are ready to drive home. Be careful of the deer.

14
III. FAQ: problems you may encounter, and their solutions
1. TCS can’t seem to find the focus fiducial. Please note that this process takes a few minutes, but that the fiducial is normally found, at an analog-focus reading of about 12-22 depending upon temperature. So please try Patience first. If TCS really can’t find the fiducial, then click the DFM-TCS window’s Stop button twice, and the Start Slew button once (see Figure 15), to stop the system from seeking the digital focus fiducial. Keep track of the Analog Focus reading thenceforth, not the Focus reading.
2. I instructed the telescope to go north but it went south instead (or vice versa). This is most commonly the result of the EAST/WEST switch (Figure 3; see Section I, Step 1) being inadvertently set to WEST. It can be fixed simply by switching it to EAST again. It is also possible to create a similar condition by pointing the telescope underneath the north pole, or slewing the telescope through the pole. If this is what has happened, the telescope’s operating mode (see Figure 15) will have changed to “Through the pole LIMIT” instead of “East side operation” and will resist being changed back. The cure is to point the telescope back to zenith – using whichever paddle buttons do that – and reinitializing the telescope position accordingly (see Section I, Step 5). At once the normal directions will be restored and the operating mode will revert to East side operation.
3. TheTCS monitors are turning red and dimming, and nothing I do with the monitor adjustments can stop it. This is due to the program f.lux, which presumes the observer to want to stay dark adapted, and dims/reddens the screens appropriately according to time of day or night, (wisely) locking out the monitor adjustments as it does. f.lux’s icon can be seen in the Windows system tray, at lower right on the left screen. If you want to shut f.lux off, right-click on its system tray icon and choose Exit.
4. The telescope is tracking my first object, but it’s not responding to the paddle buttons or input from the TCS window. This is because the track rate is zero, either due to the TRACK/OFF switch being OFF, or due to the tracking rate being left at zero instead of 15 arcsec per second (Section I, Step 11). A clue to either case will be a SLEW ENABLED warning in the Status section of the TCS window: the telescope is continuously slewing to your target, rather than tracking. I hope it’s just the TRACK/OFF switch; toggling it will usually restore control and erase the warning. If the problem is the rate setting, you may have to exit TCS, either by clicking the red X in the upper right corner of the window, or by doing
1
Figure 15: TCS’s buttons which may be used to stop the focus initialization process.
2
1

15
Windows’ Control-Alt-Delete, choosing Task Manager, choosing TCS on the task manager list, and hitting the Delete key. Then repeat the telescope startup procedure, starting at Section I, Step 4.
5. The dome has lost track of the telescope. Send the dome to its Home position by flipping the TCS front-panel DOME TRACK/HOME switch to HOME and back. The dome will rotate until it parks at its home position at azimuth 103.5 degrees. Then shut down dome tracking (Section II, Steps 6 and 7), and turn it back on again (Section I, Step 8). The dome will then rotate to match its azimuth to the telescope azimuth, within an elevation-dependent range, and will follow subsequent telescope moves. Point the telescope at something far away from the current position, to make sure it’s all working.
6. The dome can no longer be moved by TCS or its own remote control. On the dome floor, locate the Dome Radio Control box, mounted on the wall to the right of the dome’s power supply boxes pictured in Figure 4. Note the power cable leading from this box to a nearby power outlet. Unplug this from the power outlet, count to ten, and plug it back in. Command of the dome should be immediately restored. If not, repeat the unplug/wait/plug-back-in sequence.
7. We’ve tried the remedies in FAQs 5 and 6 and the TCS still can’t move the dome. Send the telescope to zenith; move the dome to its home position using the buttons on its wall-mounted control box (Figure 4); shut down the TCS program (not the whole system) using File > Exit, then restart it, starting at Section I, Step 4.
8. We accidentally drove the telescope into the horizon limit and now it won’t move. Don’t try to fix this: call Dan to be talked through the remedy.
9. The wireless network in the dome won’t let me connect my laptop. Make sure the network you’re trying to join is the one named MeesObservatory_Dome-guest, which is intended for all of us to use with our laptops, tablets, and phones, despite the “guest” moniker. The password for this network is written on the whiteboard in the control room. The other network your computer will detect is MeesObservatory_Dome, which is used by the TCS and CCD camera computers to connect and share files. It isn’t intended for general use. Lest anybody inadvertently lose or change a file of importance to either system, the password for this network is not posted on the whiteboard.
10. I can’t get a cell phone signal, and my phone battery runs out after being at the telescope for a couple of hours. This happens because the observatory has an all-metal exterior, which prevents radio-frequency signals from penetrating into the building. (Google “Faraday cage” to find out why.) Your phone uses a lot of power in its continuous search for a signal, if it’s having trouble connecting. If you connect your phone to the wireless network (see FAQ #9) the battery will last longer and you’ll still receive texts and emails, though not phone service. If you prop the front door open, you will usually have a 3G or LTE connection indoors, leading to full phone service and the usual battery life, but also leading to an intolerable concentration of bugs in the building. Alternatively, you can set up WiFi Calling, which is a good idea independent of Mees. WiFi Calling installation instructions for iPhone users can be found here. This lets fewer bugs in the building.