food and beverage module - e-hors
TRANSCRIPT

FOOD AND BEVERAGE MODULE
RECIPE TYPE – A recipe type is used to segregate the different sources of revenue. The program
“Revenue Accounts” is used to link recipe types to the chart of accounts. The golden rule here is that for
each revenue account there should be at least 1 recipe type. There are more “rules” that are discussed
in the program “Revenue Accounts”.
There can be many recipe types linked to the same account, but per account there must be at least 1
recipe type.
E.g. If the COA only has an account Revenue F&B, than 1 recipe type F&B would be enough (if there is
only 1 F&B outlet), but if the COA has an account Revenue Food and Revenue Beverage there should be
at least 2 recipe types; Food and the other one Beverage.
By keeping the names consistent with the name of the account, the work is easy and recognizable.
If a recipe type is not linked (including outlet) the revenue will be booked on an account called
“Uncleared Outlet Revenue”.
Example of Recipe Types.

How to add?
• Click the add button.
• Type the Recipe Type Name
• Select the Code if it’s (alcohol, non-alcohol, food or others) the code is used for the grouping of
discount.
• Enter the description, recipe type & description can be the same.
• Click Submit.
How to edit?
• Click on the recipe type you want to edit and click the “edit button”
• Start editing and click submit when you’re done.

How to Deactivate?
• Click on the recipe type you want to deactivate and click active “no”.
• Click submit.
How to Reactivate?
• Untick the box “hide inactive recipe types”.
• Locate the recipe type that you want to reactivate.
• Click active yes and submit.
RECIPE – is a collection of one or more items. Recipe can also be compared with a bill of materials
(BOM). The basic of the recipe is item. Before adding a new recipe, search first if the recipe that you
want to add already exist.
How to add?
• Click the add button

• (1). Recipe Name – Enter the recipe name, this name will appear on your POS. Try not make the
recipe name too long.
• (2). Description – A brief explanation about the menu/recipe. Description can also be the same
name as the recipe.
• (3). Pax – For how many pax is the serving of the recipe.
• (4) Recipe Type – Select the Recipe Type where this recipe belongs.
Wrong selection of recipe type will lead to wrong classification of revenue.
• (5) Measurement – Select the exact measurement of the recipe.
• (6) Recipe is “Tip” yes or no? - You only click “yes” if it’s a recipe for a TIP.
• (7) Recipe Image – You can also upload the photo of the recipe. This image will be shown on TV
(if you are using the GMS of Ehors) it will also appear on the POS mobile.
• (8) Misc. Charge for recipe – Tick the taxes applicable to the recipe.

• (9) Misc. Charge for Take away – Tick the taxes applicable, in other establishments, they don’t
charge Service charge if the order is for take away/take out.
• (10) Click the + button to add the item (ingredients) of the recipe. Enter the qty of the item that
will be used for the recipe.
If you mistakenly added the wrong ingredient, click the item you want to delete and click the
delete icon next to the + button.
• (11) Sub Recipe – any recipe created can be a sub recipe. Click the + button if the sub recipe is
applicable.
• Click Submit.
Example of a Recipe
RECIPE TYPE MARGIN – Recipe Type Margin is used in the calculation of the min. Selling Price in
Menu per outlet management Linking. Recipe type will not appear on the selection if the margin of the
recipe type is 0.00%.

Example
- costing times margin plus costing let say margin is 150% and recipe costing is 100 ex (1.5 * 100) + 100 = 250 (min. SP) Ehors will not allow you to enter a lower selling price than the suggested min. SP unless you overwrite the calculation by clicking “FOC” yes. (refer to the menu per outlet management)
REPLACE ITEM - This is where you can search the ingredient of your recipe and replace the item
with the new one. You can do it in bulk or one by one. This program can be found under F&B module. How to use it?
• Search the item you wished to replace, you can simply type the item name on the search box, or you can filter it by category. In this example I will try to replace ingredient/item cherry tomato with cherry.
• Double click on the item that needs to be replaced.
• The lists of the recipe(s) that contains cherry tomato will be shown.

• Select the recipe that needs a replacement of a new ingredient/item. You can also select all the recipe on the list by clicking the 1st square box on the left side of the Header “Recipe Name”.
• Click the button “replace item”.

• A new box will populate after clicking the replace item button.
• Search the new item that will replace the old item/ingredient. In this case I will be searching cherry.
• E-hors will only allow the replacement if the units of the 3 measurements are uniform or the same with the old item.
• Select the item and click “replace item button”.
SET MENU MANAGER - Set menu is a new feature available in Ehors that enables you to create a
set menu. In one set menu you can define as many courses as you like, and per course you can define as many recipes as you like. Within one course you can also select the number of recipes if this needs to be more than one. The set menu button only works when you have created the menu under the set menu manager program. Refer to the set menu manager manual for more details.
CATEGORY NAMING – Is your meal period. Ehors has 5 default category naming. You can only
rename them, but you cannot add more. Category naming is used for all the outlets within the property. So be careful when you rename it.
- All day Menu
- Breakfast
- Dinner
- Lunch
- Supper
How to rename?
• Select the meal period that you want to rename.
• You can only edit the “main menu category field”
• Click Update

MENU CATEGORY MANAGEMENT – should reflect how your physical menu is organized. For
example, you might have categories like All day breakfast, Salads, Sandwiches, Hot Drinks, Juices. If in one category you have more than 30 menus, it’s better if you divide the category into two. That would be easier for operational people to locate the menu. If you have 3 outlets in one property and all of them are using the same category, there is no need to create 3 categories.
Example of Menu category

How to add a menu category?
• Enter the category name & the description
• Click submit
How to Deactivate a Menu Category?
Deactivating a category might affect another outlet. Double check first before deleting the category.
• Select the category that you want to deactivate and click cancel
How to Reactivate a Menu Category?
• Select the category that you want to Reactivate and click Reactivate
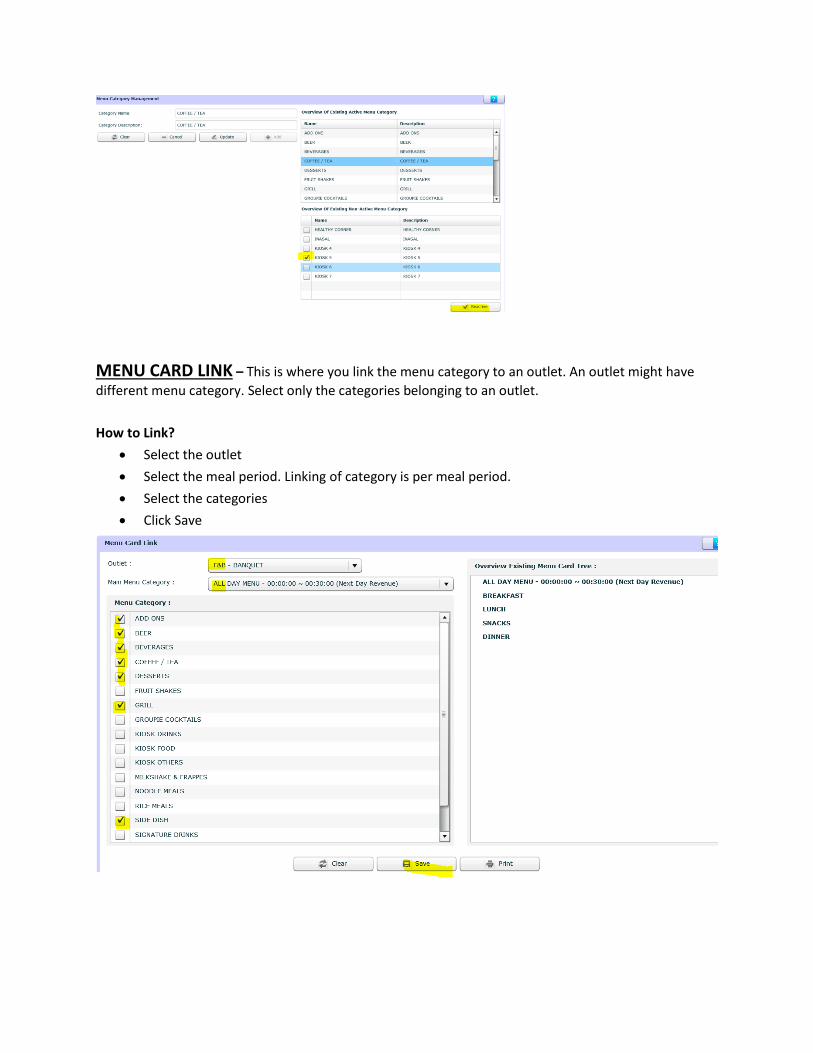
MENU CARD LINK – This is where you link the menu category to an outlet. An outlet might have
different menu category. Select only the categories belonging to an outlet.
How to Link?
• Select the outlet
• Select the meal period. Linking of category is per meal period.
• Select the categories
• Click Save

Overview of the linking
MENU PER OUTLET MANAGEMENT – Each recipe can be used in multiple outlets with their
own pricing, this program allows you to link a recipe to an outlet.
How to add a new linking?
• (1) Select the outlet
• (2) Select the meal period (if you have 3 meal period) and your menus are the same, linking must be done 3 times. Linking is per meal period.
• (3) Menu Category, Menu Name, Menu Description - You only type the menu name & menu Description once. If it doesn’t exist on the list of the overview of the active menu.
• (4) Kitchen Printer – You can assign a kitchen/bar printer for each category, make sure to select
the exact name of the printer. Select the dummy/default printer if you don’t want all the order for that category to be printed in the kitchen/bar.
• (5) Click Add.

• (6) Select the Recipe Type of the menu that you want to link.
• (7) Select the recipe
• (8) Enter the PLU number (price look up number) This is the data that appears in the POS before ordering the item. This is useful for the salesperson. So, they immediately see the selling price of an item without having to order it.
• (9) Selling Price – Ehors doesn’t allow you to enter a selling price lower than the suggested min. SP. The selling price that you enter here should match your setting in outlet management. If your setting in outlet management is incl VAT and excl SC, the selling price should be based on that setting.
• FOC yes or no – by default is no, Ehors calculates the min selling price based on the recipe type margin. If you want to overwrite the auto calculation of the min. SP click, FOC “yes”.
• (10) Stock Location – Select the stock location where the ingredients of the recipe will be deducted.
Double check before you click add. Selecting a wrong stock location cannot be edited.
• (11) Click Add to menu
This is how it looks like after clicking “add to menu”

• Follow step number 7- 11 to add more recipe.
• You only click “Submit” when all the recipe/menu for that category are added.
How to edit or to continue the Linking?
• (12) Select the Outlet you want to edit
• (13) Select the meal period
• (14) Select the category of where you want to add more recipe or edit.
• (15) After clicking the category from the overview, the “edit” button will enable and it will direct you to the Menu details.
Remarks: Cancel button will deactivate the category.

• Follow step 7-11 to add more recipe.
Where to edit the PLU, selling price and remove the recipe from the linking?
MANAGE INSTRUCTION – this is where you add the pre- defined kitchen instructions. Any instructions added in this program will be available in the POS program.
How to add?
• Select the Recipe Type
• Enter the instruction you want to add for example, no sugar.
• Click Add

How to Edit & Delete?
• Select the kitchen instruction you want to delete or edit.
• Click the delete button to delete.
• If you want to rename the instructions, click on the kitchen instructions field and edit the name. The button “edit & Save” will enable.
• Click edit & save.
How to reactivate a kitchen instruction?
• Select from the list of the overview of In-active kitchen instructions.
• Click Reactivate.
