foods - api.ag.purdue.edu
TRANSCRIPT
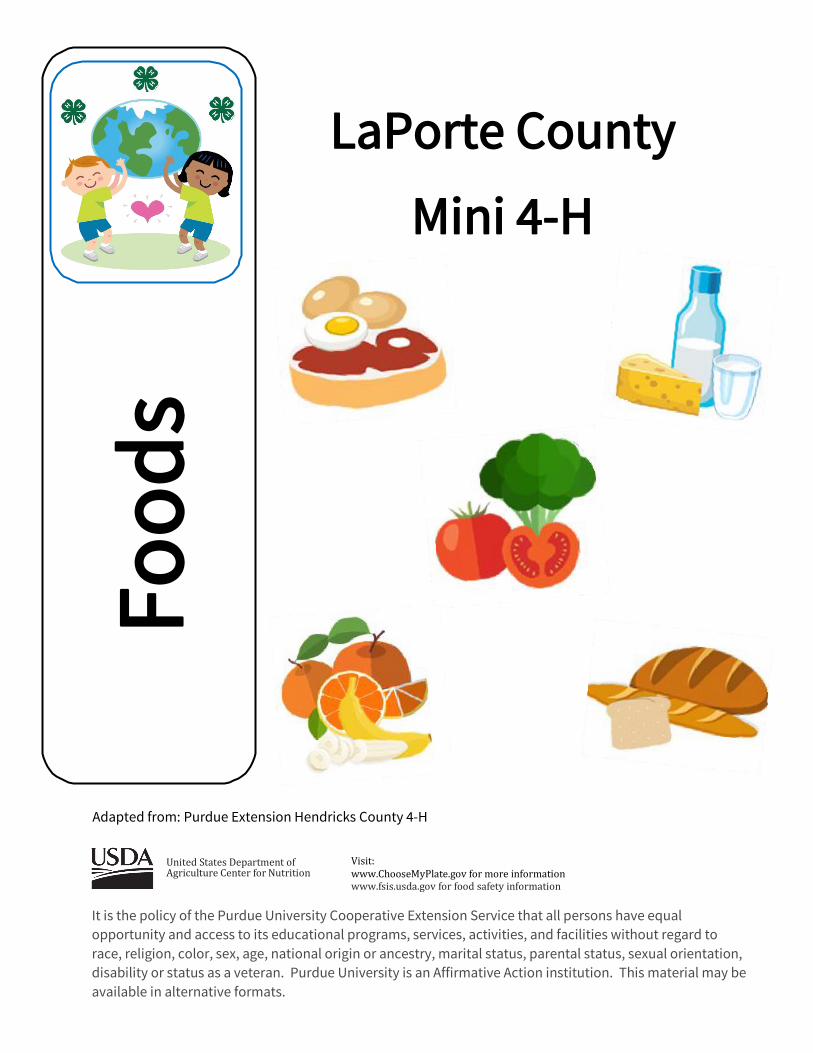
LaPorte County
Mini 4-H
Adapted from: Purdue Extension Hendricks County 4-H
United States Department of Agriculture Center for Nutrition
Visit: www.ChooseMyPlate.gov for more information www.fsis.usda.gov for food safety information
It is the policy of the Purdue University Cooperative Extension Service that all persons have equal opportunity and access to its educational programs, services, activities, and facilities without regard to race, religion, color, sex, age, national origin or ancestry, marital status, parental status, sexual orientation, disability or status as a veteran. Purdue University is an Affirmative Action institution. This material may be available in alternative formats.
Food
s


3
Mini 4-H Parent’s Page We welcome you and your child to the LaPorte County Mini 4-H program. Mini 4-H is for youth
who are in kindergarten, first or second grade during the 4-H year (October 1-September 30). This program is designed to encourage positive development, give youth the opportunity to explore interests, practice small and large muscle control, and introduce you to the LaPorte County 4-H program.
As a Mini 4-H parent or guardian, please support your child through the activities in this handbook. Encourage and praise your child as they have fun learning and sharing with you. Please avoid completing activities for them. Learning by doing is the best educational tool that we can provide for youth.
Mini 4-H exhibition, held annually at the LaPorte County Fair, is an exciting time for all 4-H members, families and friends. It is a week that allows youth to showcase their talents, interests and enthusiasm for learning.
Where Do I Begin? 1. Mini 4-H is open to any youth who is enrolled in either kindergarten, first or second grade on
January 1st of the current year.
2. Enroll your Mini 4-H youth on v24honline.com and pay the annual $5 program fee to be an active Mini 4-H member. Once registered, you will receive a bimonthly email bulletin keeping you informed of Mini 4-H and 4-H opportunities. Any questions can be answered by LaPorte County Purdue Extension at 219-324-9407.
3. Mini 4-H participants complete activities and projects found in this guide. Activities and projects are completed at home.
4. One (1) project from this handbook can be exhibited at the Mini 4-H exhibition. Please complete the Mini 4-H Exhibit tag and attach it to your project, as well as a record sheet (both are included in this manual). Watch your email for dates of exhibit check-in.
5. Some projects require a poster to exhibit. Following are POSTER EXHIBIT guidelines:
A. Stiff backing 14” high by 22” wide. (This can be cardboard or foam core board.)
B. Position poster board HORIZONTALLY.
Mini 4-H Exhibit Tag
4
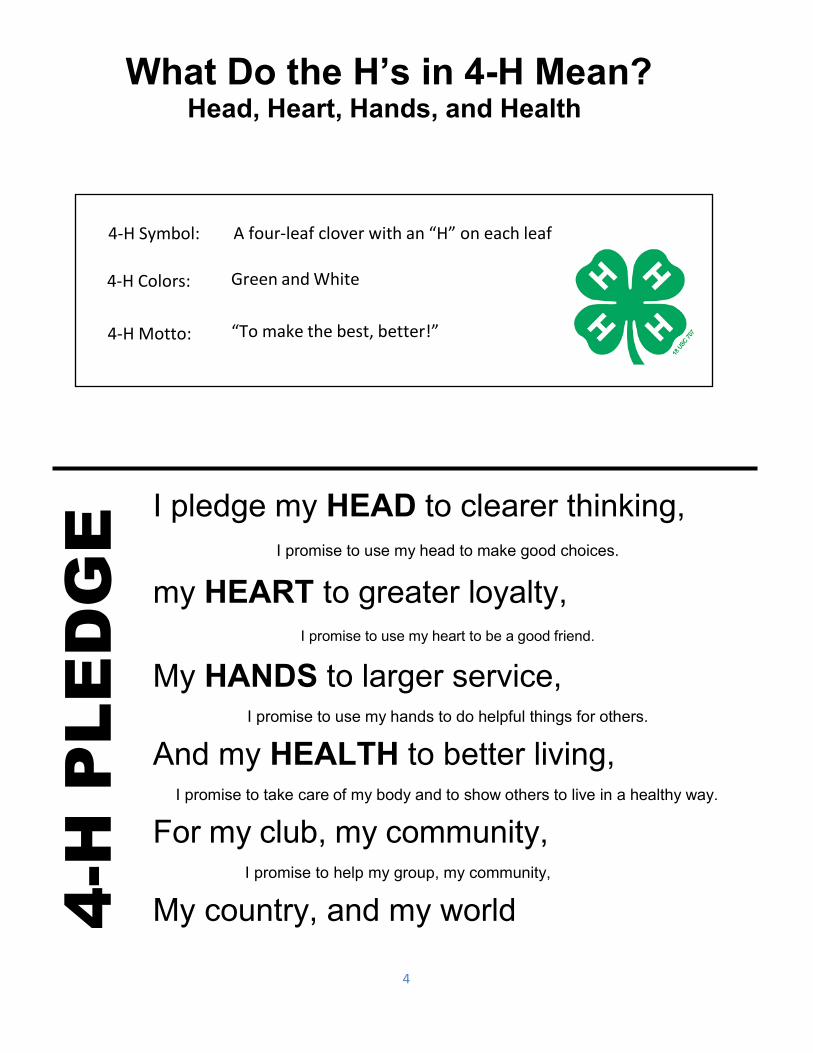
What Do the H’s in 4-H Mean? Head, Heart, Hands, and Health
I pledge my HEAD to clearer thinking, I promise to use my head to make good choices.
my HEART to greater loyalty, I promise to use my heart to be a good friend.
My HANDS to larger service, I promise to use my hands to do helpful things for others.
And my HEALTH to better living, I promise to take care of my body and to show others to live in a healthy way.
For my club, my community, I promise to help my group, my community,
My country, and my world 4-H
PLE
DG
E
4-H Symbol: A four-leaf clover with an “H” on each leaf
4-H Colors: Green and White
4-H Motto: “To make the best, better!”
5
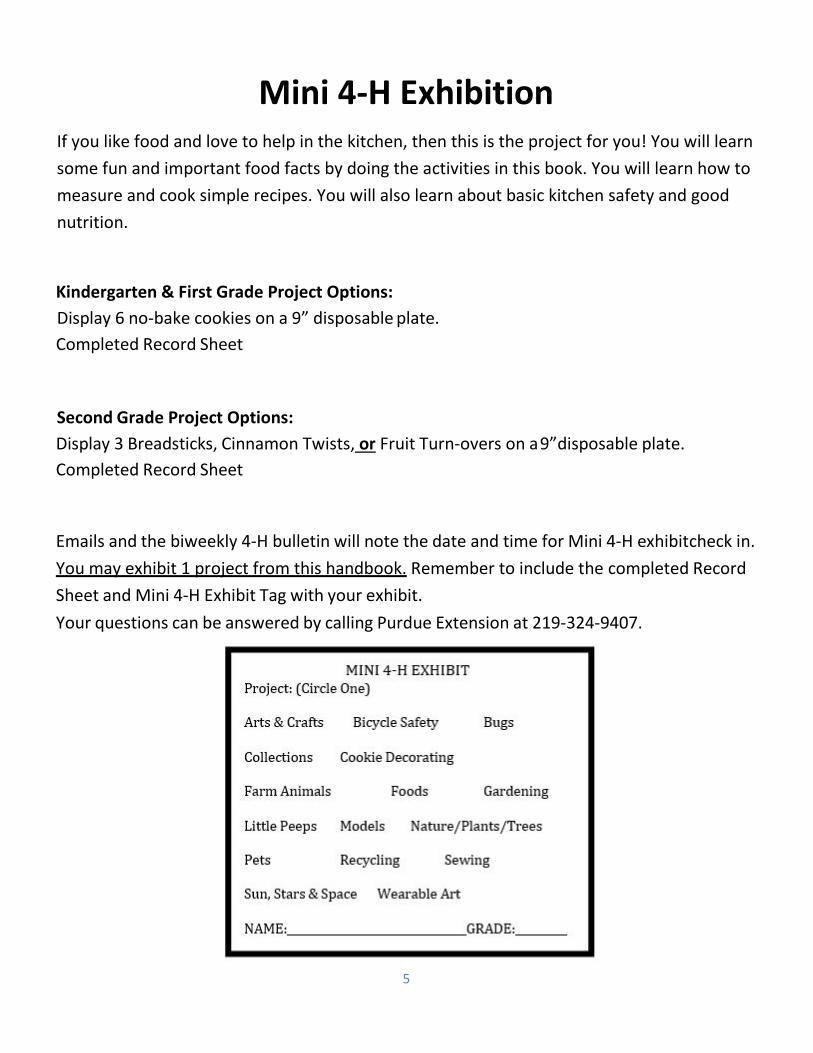
Mini 4-H Exhibition If you like food and love to help in the kitchen, then this is the project for you! You will learn some fun and important food facts by doing the activities in this book. You will learn how to measure and cook simple recipes. You will also learn about basic kitchen safety and good nutrition.
Kindergarten & First Grade Project Options: Display 6 no-bake cookies on a 9” disposable plate. Completed Record Sheet
Second Grade Project Options: Display 3 Breadsticks, Cinnamon Twists, or Fruit Turn-overs on a 9” disposable plate. Completed Record Sheet
Emails and the biweekly 4-H bulletin will note the date and time for Mini 4-H exhibit check in. You may exhibit 1 project from this handbook. Remember to include the completed Record Sheet and Mini 4-H Exhibit Tag with your exhibit. Your questions can be answered by calling Purdue Extension at 219-324-9407.
6
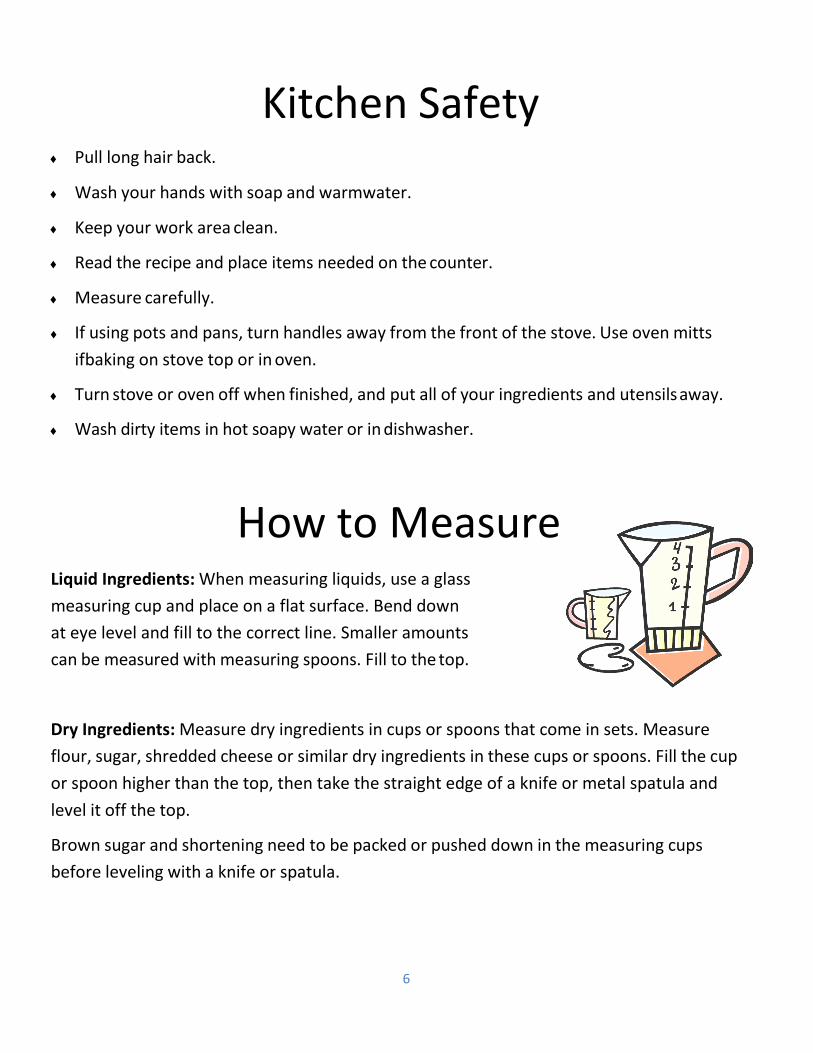
Kitchen Safety ♦ Pull long hair back.
♦ Wash your hands with soap and warmwater.
♦ Keep your work area clean.
♦ Read the recipe and place items needed on the counter.
♦ Measure carefully.
♦ If using pots and pans, turn handles away from the front of the stove. Use oven mitts if baking on stove top or in oven.
♦ Turn stove or oven off when finished, and put all of your ingredients and utensils away.
♦ Wash dirty items in hot soapy water or in dishwasher.
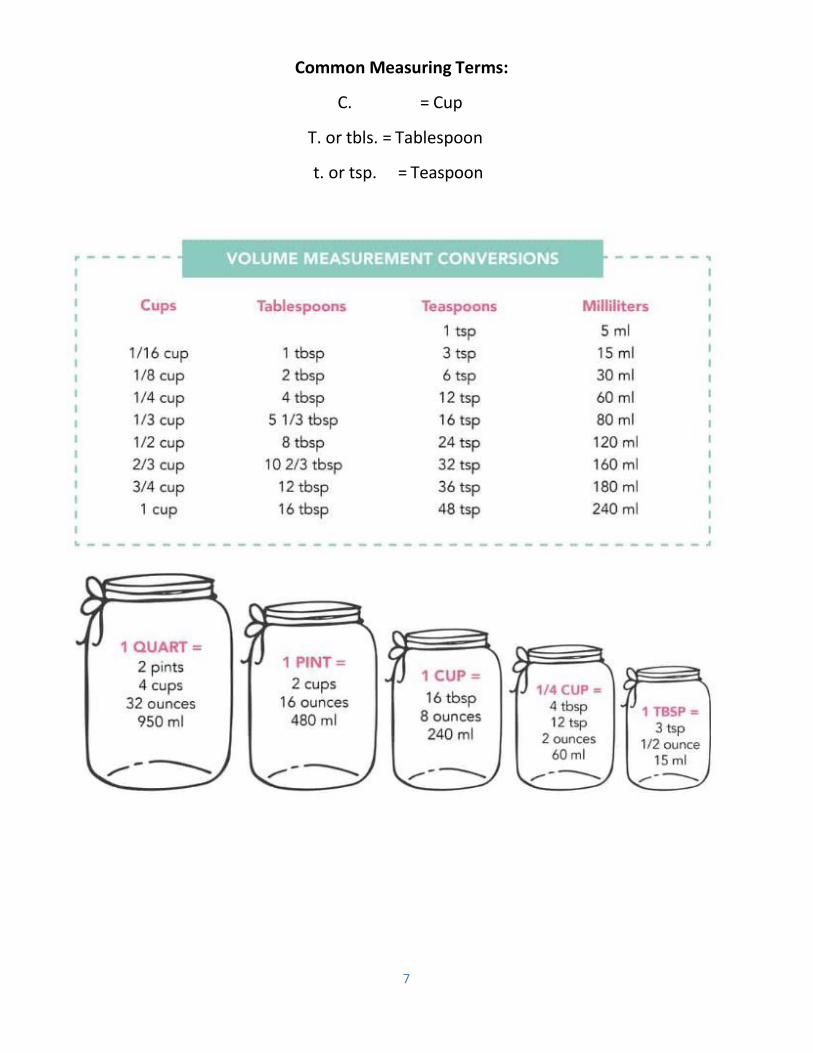
How to Measure Liquid Ingredients: When measuring liquids, use a glass measuring cup and place on a flat surface. Bend down at eye level and fill to the correct line. Smaller amounts can be measured with measuring spoons. Fill to the top.
Dry Ingredients: Measure dry ingredients in cups or spoons that come in sets. Measure flour, sugar, shredded cheese or similar dry ingredients in these cups or spoons. Fill the cup or spoon higher than the top, then take the straight edge of a knife or metal spatula and level it off the top.
Brown sugar and shortening need to be packed or pushed down in the measuring cups before leveling with a knife or spatula.
7
Common Measuring Terms:
C. = Cup
T. or tbls. = Tablespoon
t. or tsp. = Teaspoon
8
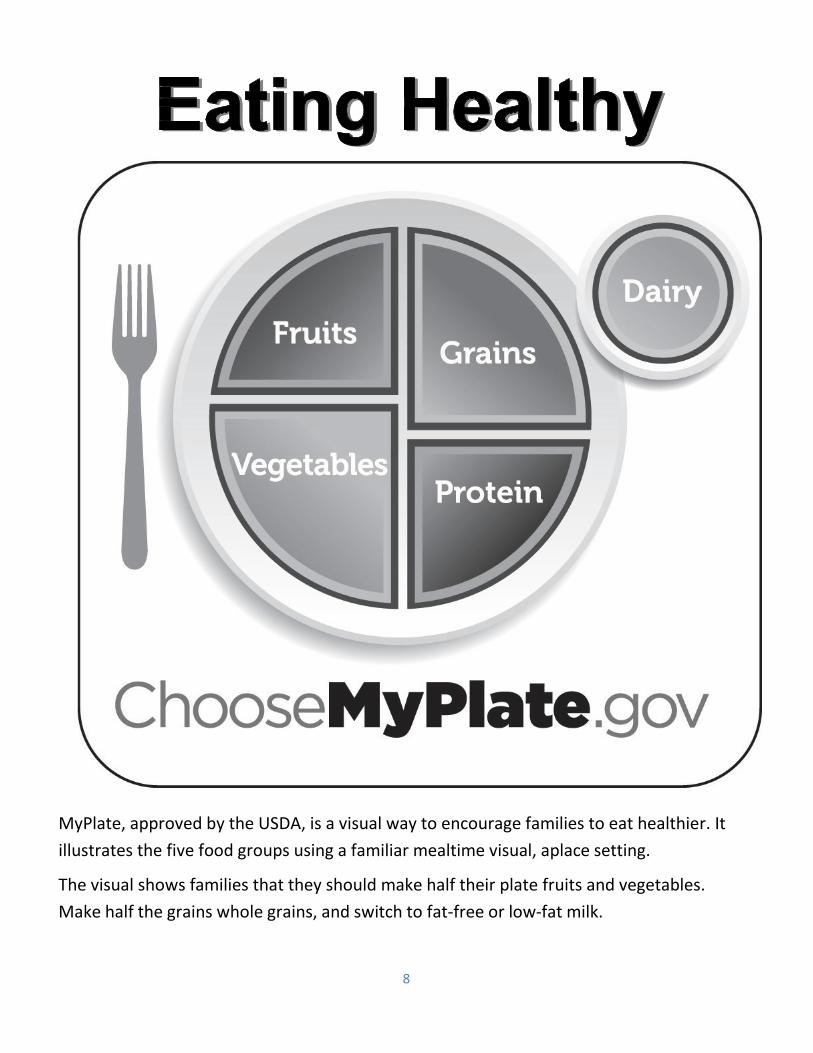
MyPlate, approved by the USDA, is a visual way to encourage families to eat healthier. It illustrates the five food groups using a familiar mealtime visual, a place setting.
The visual shows families that they should make half their plate fruits and vege tables. Make half the grains whole grains, and switch to fat-free or low-fat milk.
9
Kindergarten & First Grade Trail Mixes
Trail mix is one of the best snack foods because it is good for you, it is easy to make, and there are so many different combinations of ingredients that can be used. These recipes will help you learn how to measure dry ingredients.
Crunchy Trail Mix
Needed Materials:
• Mixing Bowl
• Air tight Container/Sandwich Bags
• Spoon
• Measuring Cup (1 Cup)
• 2 1/2 cups candy coated chocolate pieces
• 10 oz. package Peanut Butter Chips
• 3 oz. can Chow Mein Noodles
• 1 1/2 cups raisins
• 1 1/4 cups peanuts
Directions:
In a large bowl, combine all ingredients; mix well. Store in air tight container or bag.
Clean up your area.

10
Fancy Trail Mix
Needed Materials:
• Mixing Bowl
• Air tight Container/Sandwich Bags
• Spoon
• 1 pound (16 oz.) dry roasted peanuts
• 1-pound (16 oz.) cashews
• 1/2 pound (8 oz.) dried cranberries, cherries, or blueberries
• 1/2-pound (8 oz.) candy coated chocolate pieces
• 1/4 pound (4 oz.) flaked coconut
Directions:
In a large bowl, combine all ingredients; mix well. Store in air tight container or bag.
Clean up your work area.
Make My Own Mix
Needed Materials:
• Mixing Bowl
• Air tight Container/Sandwich Bags
• Spoon
• Any combination of Nuts, Seeds (sunflower, flax, pumpkin), Cereals (granola, puffed rice, toasted oat rings, etc.), Crackers, Pretzels, Popcorn, Dried Fruit, Mini- Marshmallows, or Sweet additions (candy coated chocolate pieces or chocolate chips).
Directions:
Choose the snack foods that you want to include in your mix. You can take these basic ingredients in any combination that sounds good and play around with them to make new types of trail mix. Be Creative!! Store in an air tight container or bag.

11
No-Bake Cookies For your exhibit, pick a recipe below or make your own no-bake cookie recipe from home.
Chocolate Peanut Butter No-Bake Cookies
Needed Materials:
• Saucepan
• Spoon
• Waxed Paper
• Measuring Cups and Spoons
• Container with lid
• 2 cups sugar
• 1/2 cup butter or margarine
• 1/2 cup Milk
• 1/3 cup Unsweetened Cocoa Powder
• Pinch of Salt
• 1 teaspoon Vanilla Extract
• 3 Tablespoons Peanut Butter
• 3 cups Quick Oats
• 9” throw away plate
Directions:
In large saucepan, combine sugar, butter or margarine, milk, cocoa and salt. Bring to a boil over medium heat, stirring frequently. Continue boiling 3 minutes, stirring frequently.
Remove from heat. Stir in vanilla and peanut butter; stirring until peanut butter is melted. Add oats and blend well.
Drop by rounded teaspoonfuls onto waxed paper.
Keep in covered container.
If this is your exhibit, display 6 cookies on a 9” plate.
If this is your exhibit for the county fair, attach the County Tag.

12
Chewy Chocolate No-Bakes
Needed Materials:
• Saucepan
• Spoon
• Waxed Paper
• Measuring Cups and Spoons
• Container with lid
• 1 cup Semi-Sweet Chocolate chips
• 5 Tablespoons Butter or Margarine
• 16 Large Marshmallows
• 1 teaspoon Vanilla Extract
• 2 cups Oats (quick or old fashioned)
• 1 cup Raisins, Diced Dried Fruit, Shredded Coconut, Nuts, Marshmallows, (any combination)
• 9” throw away plate
Directions:
In large saucepan, melt chocolate chips, butter or margarine, and marshmallows over low heat. Stir until smooth.
Remove from heat; cool slightly.
Stir in vanilla. Stir in oats and fruit, nuts etc.
Drop by rounded teaspoonfuls onto waxed paper. Let them stand at room temperature until firm.
Keep in covered container.
If this is your exhibit, display 6 cookies on a 9” plate.
If this is your exhibit for the county fair, attach the County Tag.
Clean up your area and put all of your supplies away.
13
Peanut Butter No-Bakes
Needed Materials:
• Saucepan
• Spoon
• Measuring Cups and Spoons
• Waxed paper
• Covered container with lid
• 1 cup Sugar
• 1 cup Light Corn Syrup
• 4 cups Corn Flakes
• 1 1/2 cups Creamy or Crunchy peanut butter
• 1 cup semi-sweet chocolate chips
• 1 cup mini-marshmallows
• 9” throw away plate (if displaying)
Directions:
Combine the sugar and corn syrup in a medium saucepan and bring to a boil. Cook 1 minute.
Remove from heat and stir in vanilla and peanut butter until well blended. Stir in the cereal, mixing well.
Drop by tablespoonfuls on waxed paper. Cool completely.
Keep in covered container.
If this is your exhibit, display 6 cookies on a 9” plate.
If this is your exhibit for the county fair, attach the County Tag.
Clean up your work area and put all of your supplies away.

14
Second Grade Finding Fatty Foods Needed Materials:
• Finding Fatty Foods sheet—in this manual
• Fat Facts sheet—in this manual
• Pencil or Marker
• Brown Paper Bag
• Foods (1 each): Shelled Peanut, Apple, Avocado, Cooked Bacon, Bread, Raw Potato, Butter, Cheese, Chocolate Candy, Cooked Ground Beef or Sausage, Tomato, Lettuce
• Poster Board (see page 3)
Directions:
Rub the foods listed on a brown paper bag. If you rub food on the bag, it may leave a spot. If the food contains fat, the spot will not dry and go away. If you hold the bag up to the light, the spot looks bright.
After rubbing the foods on the bag, mark your chart to show if the foods are fatty.
Mount your chart on a poster board (see page 27) and add your own pictures (drawn or printed). Use Fat Facts to add to your poster. You may want to make some observations about the fat content found in different foods.
If this is your exhibit for the county fair, attach the County Tag.
Clean up your work area and put supplies away.

15
Baking with Biscuits Use one of the recipes below to bake an item using refrigerated biscuit dough or crescent dough.
Cinnamon Twists
Needed Materials:
• Baking Sheet
• Cooling Rack
• Bowl
• Saucepan
• Spatula
• 2 Tablespoons Butter or Margarine
• 1 teaspoon Cinnamon
• 1/4 cup Sugar
• 1 package Refrigerated Biscuits or Crescent Rolls
• 9” throw away plate
Directions:
Preheat oven to 425 degrees.
Melt butter in saucepan and remove from heat. Combine sugar and cinnamon in a
bowl.
Roll each biscuit or crescent roll section into a 9-inch rope. P inch ends of rope together to
make a circle.
Dip biscuit circles in melted butter, then dip into the cinnamon sugar mixture.
Twist each circle one time to make a figure 8.
Place on baking sheet and bake 8-10 minutes.
Remove twists with a spatula and place twists on a cooling rack. If this is your exhibit,
display 3 twists on a 9” disposable plate and attach the County tag.

16
Breadsticks
Needed Materials:
• Baking Sheet
• Cooling Rack
• Pastry Brush or Plastic Ziploc Bag
• Spatula
• 1/4 cup Butter or margarine, softened
• 1 package Refrigerated Biscuits or Crescent Rolls
• Garlic or Onion Powder, Herbs, Garlic or Onion Salt, or a seasoning of your choice
• 9” throw away plate
Directions:
Preheat oven to 425 degrees.
Set butter or margarine out so it can soften.
Roll each biscuit or crescent roll section into a 9-inch rope and twist.
Place twisted rope on baking sheet and press the ends down on the baking sheet.
Brush butter on top of each rope (or place a Ziploc bag over your hand and rub the butter on top).
Sprinkle with your favorite seasoning.
Bake 8-10 minutes.
Remove breadsticks with a spatula and place twists on a cooling rack.
If this is your exhibit, display 3 twists on a 9” disposable plate.
If this is your exhibit for the county fair, attach the County Tag.
Clean up your work area and put all of your supplies away.
NOTE: Do NOT use any cheese as a topping because the item will become “perishable” and should be stored in the refrigerator. ALL foods exhibits must be “non-perishable”. If you have any questions, please call the Extension Office for clarification.

17
Fruit Turn-Overs
Needed Materials:
• Baking Sheet
• Cooling Rack
• Spatula
• 1 package Refrigerated Crescent Rolls
• 1 can of light fruit pie filling
• 1 c powdered sugar
• 1-2 t water
• 9” throw away plate
Directions:
Preheat oven to 400 degrees.
Place 2 crescent rolls together to form a square on a baking sheet.
Spoon 1 –2 T of fruit pie filling into one corner of the square.
Fold the square into a triangle.
Bake 10-12 minutes or until golden brown.
Remove with a spatula.
Mix together sugar and water to make a simple icing
Remove breadsticks with a spatula and place twists on a cooling rack.
If this is your exhibit, display 3 turn-overs on a 9” disposable plate.
If this is your exhibit for the county fair, attach the County Tag.
Clean up your work area and put all of your supplies away.
Fruit

18
Finding Fatty Foods Rub the foods listed on a brown paper bag. If you rub food on the bag, it may leave a spot. If the food contains fat, the spot will not dry and go away. If you hold the bag up to the light, the spot looks bright.
After rubbing the foods on the bag, mark your chart to show if the foods are fatty.
Food Item Contains Fat Fat Free
Peanut
Apple
Avocado
Cooked Bacon
Bread
Raw Potato
Butter/Margarine
Cheese
Chocolate Candy
Cooked Ground Beef or Sausage
Tomato
Lettuce
19
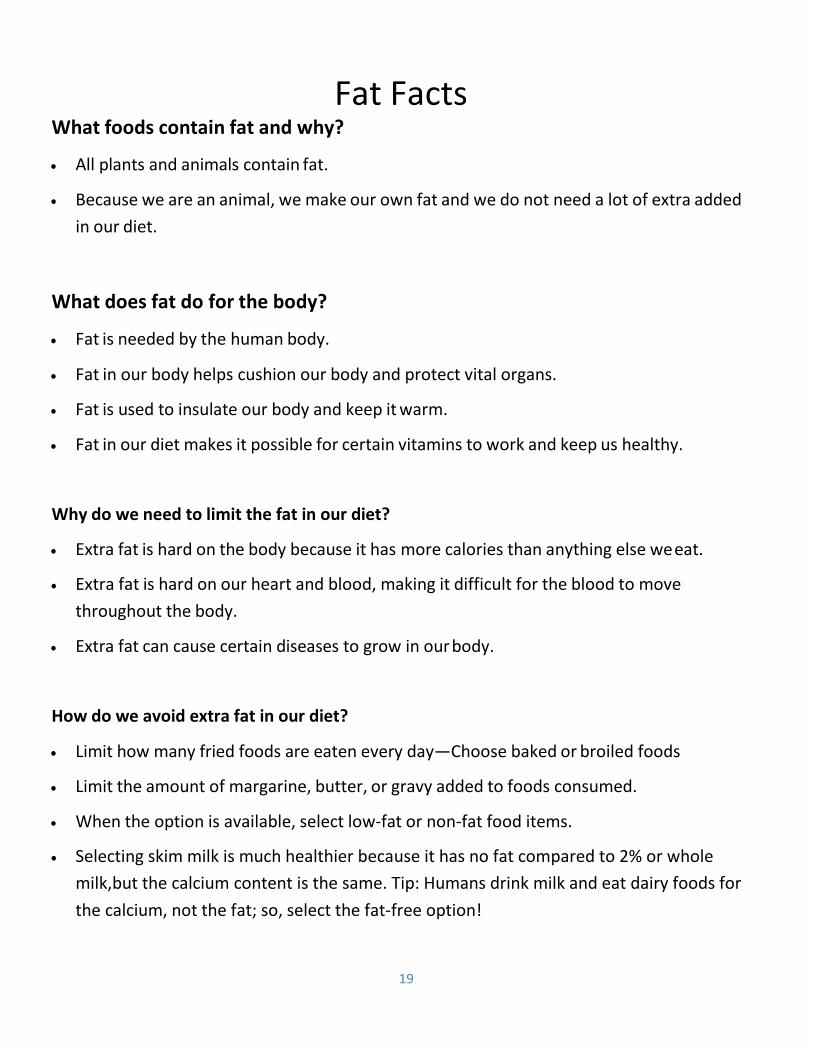
Fat Facts What foods contain fat and why?
• All plants and animals contain fat.
• Because we are an animal, we make our own fat and we do not need a lot of extra added in our diet.
What does fat do for the body?
• Fat is needed by the human body.
• Fat in our body helps cushion our body and protect vital organs.
• Fat is used to insulate our body and keep it warm.
• Fat in our diet makes it possible for certain vitamins to work and keep us healthy.
Why do we need to limit the fat in our diet?
• Extra fat is hard on the body because it has more calories than anything else we eat.
• Extra fat is hard on our heart and blood, making it difficult for the blood to move throughout the body.
• Extra fat can cause certain diseases to grow in our body.
How do we avoid extra fat in our diet?
• Limit how many fried foods are eaten every day—Choose baked or broiled foods
• Limit the amount of margarine, butter, or gravy added to foods consumed.
• When the option is available, select low-fat or non-fat food items.
• Selecting skim milk is much healthier because it has no fat compared to 2% or whole milk, but the calcium content is the same. Tip: Humans drink milk and eat dairy foods for the calcium, not the fat; so, select the fat-free option!

20
On My Plate
Where does our food come from? Draw lines to match.
21
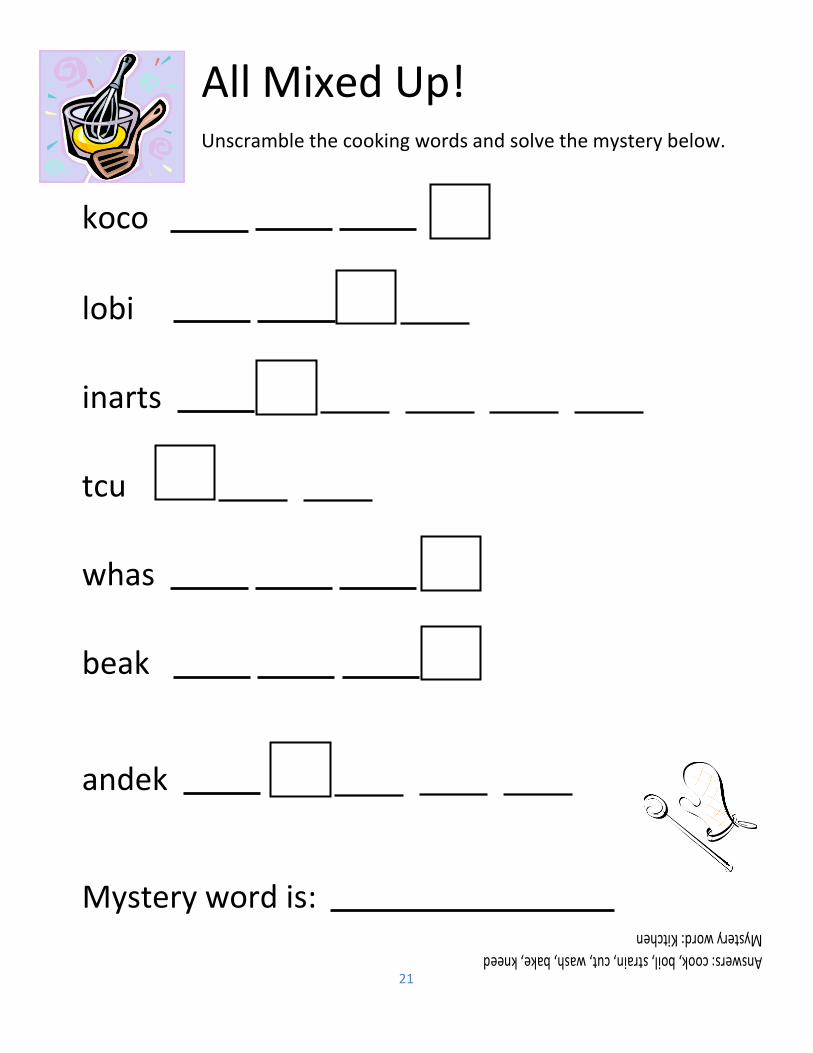
koco
All Mixed Up! Unscramble the cooking words and solve the mystery below.
lobi
inarts
tcu
whas
beak
andek
Mystery word is:

22
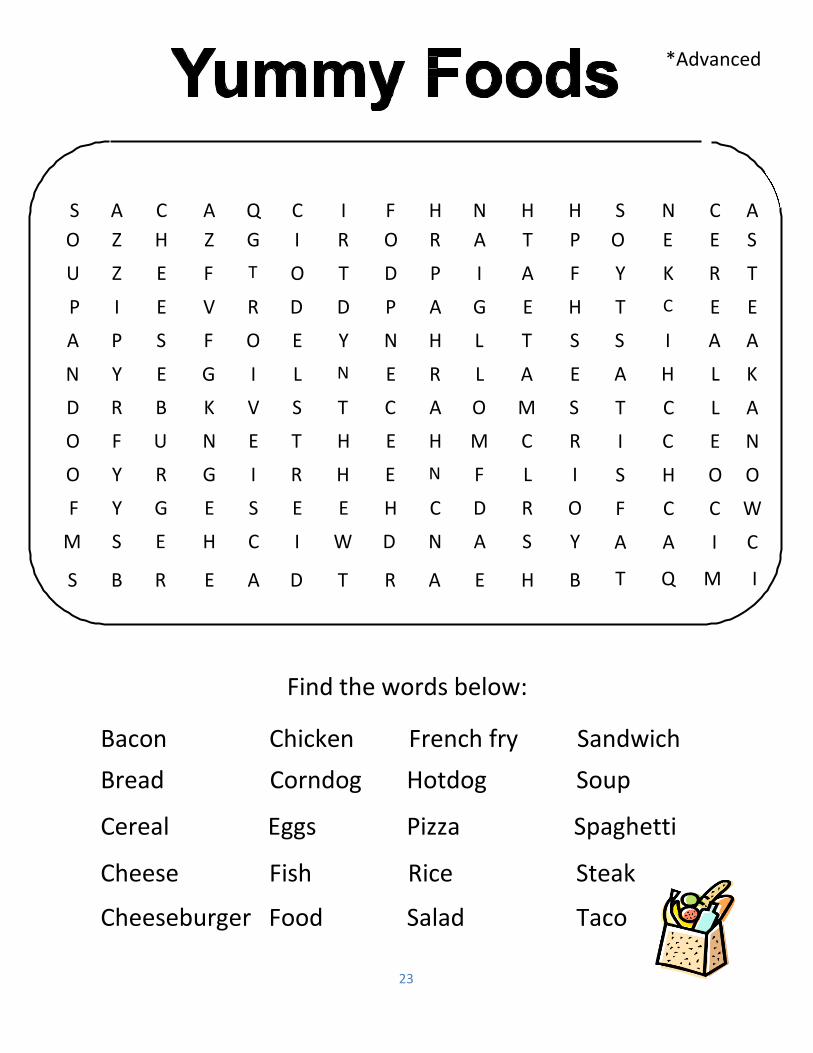
23
*Advanced
Find the words below:
Bacon Chicken French fry Sandwich Bread Corndog Hotdog Soup
Cereal Eggs Pizza Spaghetti
Cheese Fish Rice Steak
Cheeseburger Food Salad Taco
S A C A Q C I F H N H H O Z H Z G I R O R A T P U Z E F T O T D P I A F
P I E V R D D P A G E H A P S F O E Y N H L T S
N Y E G I L N E R L A E D R B K V S T C A O M S O F U N E T H E H M C R O Y R G I R H E N F L I F Y G E S E E H C D R O
M S E H C I W D N A S Y
S B R E A D T R A E H B
S N C A O E E S Y K R T
T C E E S I A A A H L K
T C L A I C E N
S H O O F C C W
A A I C
T Q M I

24
25
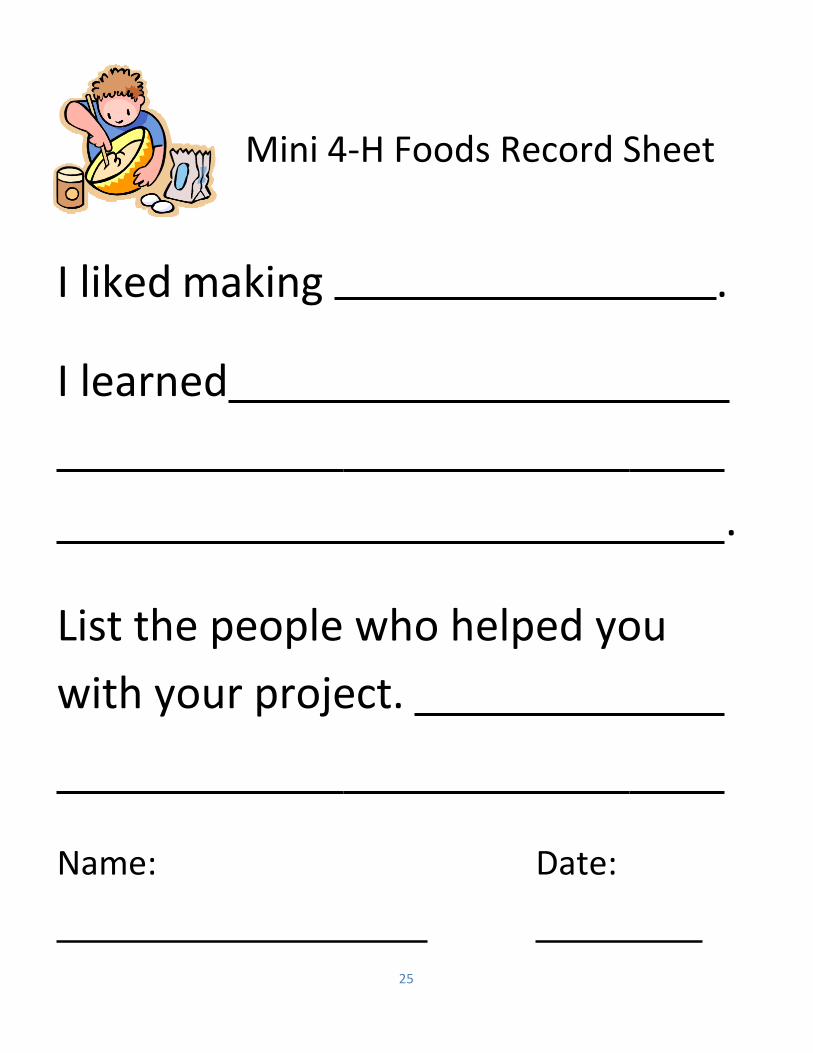
Mini 4-H Foods Record Sheet
I liked making .
I learned
.
List the people who helped you with your project.
Name: Date:

26

27
Additional Recipes
Alaska Sandwiches ½ cup vanilla yogurt 1/4 cup sifted powdered sugar 1/4 cup chopped peanuts 1/4 cup peanut butter 24-28 chocolate chip, peanut butter or oatmeal cookies
For filling, in a small mixing bowl, stir together vanilla yogurt, powdered sugar, chopped peanuts and peanut butter till well mixed.
On the flat side on one cookie, spread filling ½ inch thick, spreading almost to the edge. Top with another cookie, flat side down. Press cookies together gently so filling is even with edge. Repeat with remaining cookies and filling. Wrap individually. Freeze several hours or till firm.
Strawberry Slush 6 ice cubes 16 strawberries ½ cup frozen concentrated limeade ½ cup water
Place the ice cubes in a blender or food processor and pulse until crushed. Add the strawberries, limeade, and water. Puree until smooth and thick. Pour into tall glasses with flexible straws. Serves 2.
28
Hit the Trail Mixes For all of these recipes, put the ingredients in a medium-size paper bag and shake well. Store in a closed plastic bag or tightly covered container.
Gorp 1 cup raisins 1 cup peanuts 1 cup M & M's
S'more Gorp 2 cups honey graham cereal 1 cup tiny marshmallows 1 cup peanuts ½ cup semisweet chocolate pieces ½ cup
Rain Forest Munch Mix dried pineapple, dried papaya, unsweetened coconut flakes, macadamia nuts, cashews, and chocolate chips.
Morning Sunburst Mix up an all-fruit mix with dried apples, pineapples, cranberries, cherries, banana chips, and raisins.
Shake-a-Sack Cracker Snack 3 cups small square cheese crackers 3 cups oyster crackers 2 cups bite-size pretzel nuggets 1 0.4 ounce package buttermilk salad dressing mix ½ teaspoon dried dillweed or dried oregano 1/4 cup cooking oil
In a medium paper sack or large plastic bag, combine the cheese crackers, oyster crackers, pretzel nuggets, dressing mix and dillweed or oregano. Close the end of the bag and shake till everything is mixed together well. Pour oil into the bag and shake well again. Store in a closed plastic bag or a tightly covered container.

29
Apple Rings 4 apples (McIntosh and Golden Delicious work well) 1 tablespoon lemon juice 3 tablespoons water Sturdy thread or twine
Peel, core, and slice the apples into rings about 1/8 inch thick. Mix the lemon juice and water in a shallow dish. To prevent discoloring, dip each ring into the mixture, then pat dry with a paper towel. String the fruit through the center of each ring and hang in a dry, warm place (near a fireplace or sunny window is ideal). The rings will take 1 to 2 weeks to dry, depending on the room conditions. Periodically taste them to determine if they are ready (dry rings will have a chewy, almost leathery texture).
Flavored Popcorn To 4 cups of popped popcorn, add any of the following flavors:
► 1/4 cup grated Parmesan cheese with 1½ tablespoons melted butter
or margarine.
► Shake popcorn with cinnamon sugar
► Grated Parmesan cheese and garlic salt
► Add a pinch of chili powder or taco seasoning to melted butter, pour over popcorn and toss.
► Add a pinch of oregano, basil, and parsley to butter and toss.
► Heat caramel or butterscotch sauce, pour over popcorn, and stir until
coated. Spread on waxed paper and dry or roll into balls.
Delectable Dominoes Spread graham crackers with a thin layer of cream cheese, peanut butter or
melted chocolate. Arrange chocolate, butterscotch and white chocolate chip dots in domino patterns. Enjoy!

30
Cheese Ball Beach Balls 1 3-ounce package cream cheese ½ cup shredded cheddar or mozzarella cheese 1/4 cup sunflower nuts 1/4 to 1/3 cup Grape Nuts cereal
Take the cream cheese out of the refrigerator. Let it stand on the counter for 30 minutes so it will be easy to mix. In a small mixing bowl, place the softened cream cheese and the shredded cheese that you want to use. Mash the cheeses together with a fork till they are well mixed. Stir in the sunflower nuts. Shape the cheese mixture into 1-inch balls by rolling small amounts between the palms of your hands. Put the Grape Nuts cereal in a bowl. Roll each cheese ball in the cereal till it's coated. Eat right away or store in a tightly covered container in the refrigerator till you're ready to eat them.
Tuna Schooners 3.25 oz can tuna, drained and flaked 1/4 cup mayonnaise or salad dressing 1/4 cup chopped apple 2 tablespoons sunflower nuts 2 whole grain English muffins 8 triangular tortilla chips
In a small mixing bowl, combine tuna, mayonnaise or salad dressing, chopped apple, and sunflower nuts. Mix well. If desired, cover and chill. Split and toast the English muffins. On each muffin half, spread one- fourth of the tuna mixture. For sails, insert two tortilla chips, short side down, into the tuna mixture on each muffin. Makes 4 servings.
An Edible Fishbowl 6 3-oz packages of blueberry gelatin dessert 1 cup blueberries or grapes gummy fish
Prepare the blueberry gelatin in a large mixing bowl according to package directions and refrigerate until partially set. Make a rocky ocean floor by pouring the blueberries or grapes into a well-cleaned fishbowl. Spoon the blue "water" over the fruit, arranging the gummy fish into the gelatin. Chill
31
Peanut Butter Balls 1 1/4 cups confectioners’ sugar 1 cup creamy or chunky peanut butter 1 cup powdered milk 1 cup honey
In a medium-size mixing bowl, combine all the ingredients. Roll the dough into 1-inch balls and set on waxed paper. Refrigerate until firm.
Peanutty Fudge ½ cup peanut butter 1/4 cup milk 1 tsp vanilla 2 1/4 cups powdered sugar ½ cup unsweetened cocoa powder ½ cup finely chopped peanuts
In a large mixer bowl, beat together peanut butter, milk, and vanilla. Gradually beat in 1 1/4 cups of the powdered sugar and the cocoa powder. Stir in peanuts. Stir in remaining powdered sugar. Turn out onto a work surface and knead till well blended. Press into a foil-lined 8x8x2-inch baking pan; cut into 1-inch squares. Or, shape into 3/4-inch balls. Makes about 1 1/3 pounds.
Honeybees ½ cup peanut butter 1 tablespoon honey 1/3 cup nonfat dry milk powder 2 tablespoons toasted wheat germ unsweetened cocoa powder sliced almonds
In a mixing bowl, use a wooden spoon to mix the peanut butter and honey. Stir in the dry milk powder and wheat germ till well-mixed. Lay waxed paper on a baking sheet. Using a teaspoon at a time, shape the peanut butter mixture into ovals to look like bees. Put on the baking sheet. Dip a toothpick in cocoa powder, then press gently across top of bees to make stripes. Stick almonds in for wings. Chill in refrigerator 30 minutes. Makes 30.

32
Fluttery Creations 2 3-ounce packages of cherry, blueberry or lemon Jell-0 1 cup boiling water twisted licorice shoestring licorice candy dots
In a medium-size bowl, dissolve the gelatin dessert with the boiling water. Pour the mixture into an 8-inch square pan and refrigerate for at least 3 hours. Using a 2½-inch butterfly cookie cutter, carefully cut out the gelatin. If the butterflies are difficult to remove, dip the bottom of the pan in warm water for a few seconds. Arrange a short length of twisted licorice in the center of the wings for a body. For antennae, insert shoestring licorice into the heads. For added color, remove several candy dots from their paper and press them into the wings.
Graham Cracker "Gingerbread" House 1 package white ready-to-spread frosting pint-size milk cartons (thoroughly washed out and dried) graham crackers nonpareils, slivered almonds, peanut halves assorted candy such as caramels, marshmallows, red hots, gumdrops, candy fruit slices, Life Savers, candy canes, rock candy sticks, etc. Sugar or shredded coconut
Spoon some icing into a pastry bag fitted with a writing tip or a sealable plastic bag with a hole cut in one corner. Arrange milk carton(s) on a piece of foil-covered cardboard. Tape them down to secure them. Use the icing to glue graham crackers to the sides of each carton. Frost two roof crackers to the top of each carton, then apply shingles of nonpareils, slivered almonds or peanut halves. Pipe icing along the roof ridge and cap with another row of candy. Use caramels or a marshmallow covered with red hots for a chimney. For windowpanes, apply gumdrops, candy fruit slices or fruit leather and trim with piped icing. Make doors out of decorated graham crackers. To create a wreath, attach a shoestring licorice bow to a green Live Saver. "String" colorful holiday lights by decorating roof edges with rows of mini jawbreakers. For landscaping, plant spearmint gumdrop shrubs. Lay cobblestone walkways of nonpareils. Build snowmen out of skewered marshmallows for lampposts, top peppermint sticks with yellow gumdrops. Fix them along the street with frosting. Once all the details are set, let it snow with a generous sprinkling of sugar or shredded coconut.
33
Apple Skins a la Mode 1 apple 1 tablespoon margarine or butter cinnamon sugar granola and/or wheat germ 1 scoop frozen yogurt or ice cream
Quarter an apple, scoop out the seeds, and place skin side down in a microwave-safe bowl. Place a pat of butter on each quarter. Sprinkle with cinnamon sugar and granola or wheat germ. Microwave on high for 1 minute or until the apple is soft. Top with ice cream or yogurt.
Rumpelstilt-Skins 1 medium potato, baked 2 teaspoons cooked bacon pieces, finely chopped fully cooked ham, finely chopped cooked turkey or flaked tuna 1 teaspoon shredded cheddar cheese and/or French-fried onions, slightly crushed
Cut potato lengthwise into quarters. Scoop out the potato, leaving skins 1/4 inch thick. Place on a microwavable plate. Sprinkle with meat, cheese, and/or French-fried onions. Microwave on high for 15-30 seconds or till hot.
Chocolate Peanut Butter Cups 1 tablespoon chocolate chips 1 heaping tablespoon peanut butter
Place half the chips in a double paper muffin cup and microwave on high for 1 minute. Stir, then repeat for 30 seconds, or until chips are completely melted. Place the cups in the freezer for 5 minutes. Spoon the peanut butter on top of the chocolate, then sprinkle with remaining chips. Microwave on high for another minute. Stir and swirl with a butter knife. Microwave for 30 seconds more, or until chips are completely melted. Freeze for 5 minutes, remove and eat. Makes 1 muffin cup so rich it can be shared.
34
Chocolate Peanut Butter Pizza 1 6-oz package chocolate chips 1 6-oz package peanut butter chips 2 ounces white baking chocolate candies for decoration
Microwave the chips in a microwave-safe dish on high for 1 minute, stir, and microwave for 1 more minute. Grease a 12-inch pizza pan and spread on the melted chips with a spatula. Microwave the white chocolate for 1-2 minutes or until melted, and drizzle over the pizza to look like cheese. Decorate with candy and refrigerate for 20 minutes.
Easy Indoor S’mores 6 cups miniature marshmallows 1/3 cup light corn syrup 6 tablespoons margarine or butter 1½ cups milk chocolate chips 1 teaspoon vanilla 8 cups Golden Grahams cereal
Place marshmallows, corn syrup, margarine, and chocolate chips in a large microwavable bowl. Microwave uncovered on high 2-3.5 minutes, stirring after each minute, until mixture is melted and smooth when stirred. Stir in vanilla. Pour over cereal in large bowl. Spread in buttered 9X13 pan.