for passenger car glass replacement - sika uk · the professional agr technician. sika’s...
TRANSCRIPT

Sika Technicians' Handbook for Passenger Car Glass Replacement

2_Sika Automotive Aftermarket
Sika Technicians' Handbook Version 1 / 2010
Copyright © 2010 Sika Services AG. All Rights Reserved.
This handbook is intended only for Sika professionals. The information contained herein is the property of Sika AG and is supplied without liability for errors or omissions. No part of this handbook may be reproduced, stored in a retrieval system, or transmitted in any form whatsoever, without the prior written consent of the Vice President of Automotive Aftermarket, Sika Services AG.Due to the ongoing development of Sika products, the information contained herein is subject to change without notice. No part of this publication shall be deemed a warranty; implied or expressed.
Sika refers to Sika AG in Switzerland and to all other members of the worldwide Sika organization.
Sika Services AG, Tüffenwies 16, 8048 Zürich, Switzerland
Tel +41 58 436 40 40Fax +41 58 436 45 30www.sika.com
Sika Automotive Aftermarket_3
Sika Technicians' Handbook Version 1 / 2010
Introduction
Sika is a tier-one supplier and development partner to the automotive OEM industry. The knowledge Sika has acquired from this partnership is also beneficial to the product range for the automotive aftermarket.Since entering into this market in the early 1980s, Sika has continuously developed products that have provided added value for customers. Understanding benefits and their impact on the system have lead to concepts like the Sika® All-in-One Modulus, the perfect adhesive for every car. At Sika, we strive to keep things simple.
Sika has been working diligently for over 20 years to become the leader in adhesive systems for the automotive glass replacement (AGR) industry. Innovation, performance and automotive OEM competence, coupled with proven safety, reliability and ease of use, make the Sika System the number one choice of direct glazing professionals all around the world.
Customer Safety is our MissionThe auto glass replacement technician’s profession is a very important one. The use of inadequate products and poor workmanship has resulted in fatal accidents that have cost the glass replacement industry millions. Pride in workmanship and attention to detail are key to providing 100% installations 100% of the time.
The variety of cars available is growing every day. The increasing complexity of new designs, changing components and windshields puts an ever-increasing demand on AGR technicians. For Sika, the safety of all occupants of cars with Sika bonded replacement windshields is paramount. For this reason the Technicians’ Handbook and Certification Program has been introduced specifically to support the professional AGR technician.
Sika’s Technician Handbook for Passenger Car Glass Replacement describes the procedures for safe and durable glass installation. This ensures that the vehicle is restored to the OEM design specification for structural integrity and aesthetic appearance.
4_Sika Automotive Aftermarket
Sika Technicians' Handbook Version 1 / 2010
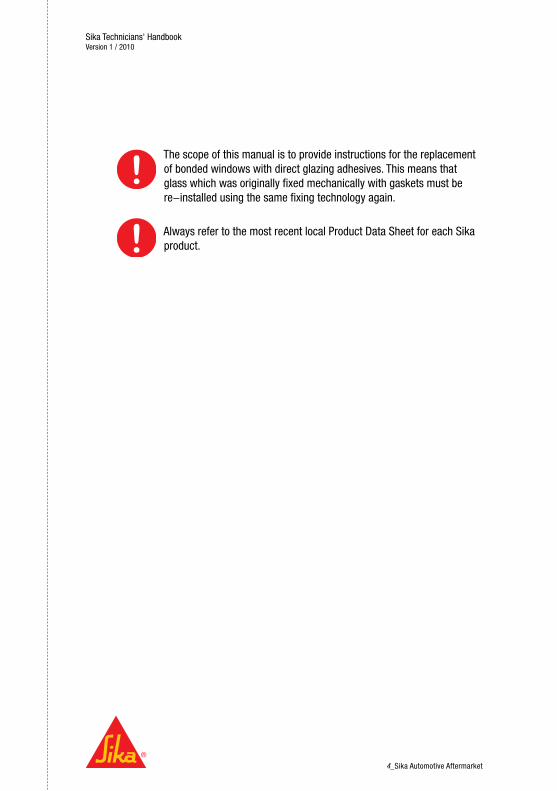
The scope of this manual is to provide instructions for the replacement of bonded windows with direct glazing adhesives. This means that glass which was originally fixed mechanically with gaskets must be re-installed using the same fixing technology again.
Always refer to the most recent local Product Data Sheet for each Sika product.

Sika Automotive Aftermarket_5
Sika Technicians' Handbook Version 1 / 2010
About Sika
Sika is one of the world’s foremost manufacturers of specialty chemicals. Today, Sika Industry is one of the leading suppliers of process materials for the Automotive OEM, Automotive Aftermarket, Transportation and Appliances and Components customer groups. As a producer of specialty chemicals, Sika relies on a strong and independent R&D and operates on the principle that the company bears responsibility for safety and the environment at every stage of the production and marketing cycle. Sika is committed to a comprehensive quality and service culture. Sika Management System conforms to international standards ISO 9001, ISO 14001 and QS 9000.
Disclamer:The information contained herein and any other advice are given in good faith based on Sika's current knowledge and experience of the products when properly stored, handled and applied under normal conditions in accordance with Sika's recommendations. The information only applies to the application(s) and product(s) expressly referred to herein. In case of changes in the parameters of the application, such as changes in substrates etc., or in case of a different application, consult Sika's Technical Service prior to using Sika products. The information contained herein does not relieve the user of the products from testing them for the intended application and purpose. All orders are accepted subject to our current terms of sale and delivery. Users must always refer to the most recent issue of the local Product Data Sheet for the product concerned, copies of which will be supplied on request.

6_Sika Automotive Aftermarket
Sika Technicians' Handbook Version 1 / 2010

Sika Automotive Aftermarket_7
Sika Technicians' Handbook Version 1 / 2010
Contents
Introduction .............................................................................................. 3Contents ................................................................................................... 7Important .................................................................................................. 9
Step-by-Step Guide1 Inspect the Vehicle ............................................................................... 132 Always Start with the Glass .................................................................. 153 Protect Vulnerable Areas of the Vehicle ................................................. 174 Remove Trim, Wipers and Rear-View Mirrors ...................................... 185 Cut Out the Windshield......................................................................... 196 Preparation of the Pinchweld (Full Cut Method) .................................... 217 Dry-Fit the New Windshield ................................................................. 258 Preparation of the Windshield ............................................................. 279 Installation of the Windshield ............................................................... 3110 Post Inspection .................................................................................. 35
Detailed SectionsIdentification of Butyl, Silicone and Polyurethane ..................................... 39Complete Removal Procedure ................................................................. 41Corrosion Treatment................................................................................ 45Freshly Painted Vehicles .......................................................................... 49Removal of Contamination ...................................................................... 51Special Windshields ................................................................................ 55Special Weather Procedures ................................................................... 59
Appendix SectionSika Products ......................................................................................... 63Sika Application Gun ............................................................................... 77Glossary of Terms ................................................................................... 88FAQ ........................................................................................................ 91Technician Training Test .......................................................................... 96

8_Sika Automotive Aftermarket
Sika Technicians' Handbook Version 1 / 2010

Sika Automotive Aftermarket_9
Sika Technicians' Handbook Version 1 / 2010
The work that a glass technician does is critically important to the safety and welfare of the customer and the integrity of the vehicle. Use of the wrong products and poor workmanship has resulted in fatal accidents that have cost the glass industry significant financial losses. Every step described in the handbook is important and must be followed, in keeping with the training provided by Sika personnel. Always refer to the latest edition of the Product Data Sheets and Material Safety Data Sheets for all Sika products before use.It is important to note that some of the instructions in the Product Data Sheets are different from those given in this manual, e.g. flash-off times/drying times. The reason is that the Product Data Sheets are made for the general user, whereas this handbook is intended specifically for professional technicians trained by Sika specialists. Technicians using this handbook are expected to work to the highest standards of their profession by delivering a safe and quality-proven installation 100% of the time. Anything less may be fatal!
Safety Instructions
Pre-treatment products and adhesives are chemical products. Please follow safety instructions:
Wear chemical-resistant gloves and safety glasses. Material Safety Data Sheets and instructions for use (Product Data Sheet) must be strictly adhered to.
Important

10_Sika Automotive Aftermarket
Sika Technicians' Handbook Version 1 / 2010

Sika Automotive Aftermarket_11
Step-by-Step Guide

12_Sika Automotive Aftermarket
Sika Technicians' Handbook Version 1 / 2010

Sika Automotive Aftermarket_13
Sika Technicians' Handbook Version 1 / 2010
Before working on any vehicle, conduct an inspection. Look for existing damage such as scratches or dents in the areas around where work is to be carried out. This step can save thousands in damage claims and is a professional courtesy that the insurance industry respects.
It is equally important to inspect for any conditions that may compromise the safe retention of the glass. Such conditions include, but are not limited to, corrosion, vehicle body damage, paint system failure, missing parts, improper workmanship from previous glass repair or replacement work and use of improper products.
It is also advisable to check for the operability of all mechanical and electrical parts and devices related to auto glass systems. All conditions discovered prior to and during the auto glass replacement process should be recorded and the owner/operator of the vehicle notified. Any conditions discovered that would compromise the retention system must be fully remedied prior to the installation of the glass.
Inspect for pre-existing damage Inspect any rain and light sensors
1 Inspect the Vehicle
Before Returning to Customer
Vacuumed *doneTrim secure *checkedGlass cleaned *doneAir condition runs *checkedRadio *checkedRain sensor *checked
Interior Tears Stains Area Headliner * * * Seats * * * Dashboard * * * Door panels * * * Floor front * * * Floor rear * * * Rain sensor * checked
Sika Vehicle Inspection SheetPre-Inspection
Mark all damages as follows: S = Scratched, P = Peeled paint, D = Dented, C = Chipped, M = Missing part, R = Rusted spots, O = Others _____________________________
Customer name ________________________ Date ____________________________________
Phone no. ____________________________ Color vehicle ______________________________
Type vehicle___________________________ VIN (Vehicle Identification) no. __________________
Glass DOT no. _________________________ Glass part no. _____________________________
Urethane system used ___________________ Car inspection by ___________________________
Urethane batch no. ______________________ SikaAktivator® PRO batch no. ___________________
SikaPrimer®-206 batch no. ________________
Safe drive-away Time job finished at _______ Your car will be safe to drive at _______________
I hereby have read the inspection sheet, authorization and agreement, before affixing my signature below, and warrant that I fully understand the contents thereof.
Customers signature ____________________ Date ____________________________________
Exterior
www.sika.com
Our most current General Sales Conditions shall apply. Please consult themost current local Product Data Sheet prior to any use.
Post-Inspection
Template is available from your local Sika Organisation.

14_Sika Automotive Aftermarket
Sika Technicians' Handbook Version 1 / 2010

Sika Automotive Aftermarket_15
Sika Technicians' Handbook Version 1 / 2010
Never begin work on the vehicle before cleaning and inspecting the glass to be installed. Inspect both the quality and the suitability of the selected glass for installation on the target vehicle. There have been occasions, especially in mobile work, where the glass had a small scratch or blemish that went undetected in the shop and was not discovered until after the new glass was installed on the vehicle. There have been other incidents where the technician did not realize he had the wrong part; he prepared the glass and applied the adhesive, and only when he tried to install it in the vehicle, did he realise his mistake. Pre-inspection and cleaning of the glass helps to avoid these two time-consuming errors.
2 Always Start with the Glass
Is the glass free of scratches or blemishes? Is it the correct glass for the vehicle? Is it the right color? Is there a rain sensor?

16_Sika Automotive Aftermarket
Sika Technicians' Handbook Version 1 / 2010

Sika Automotive Aftermarket_17
Sika Technicians' Handbook Version 1 / 2010
3 Protect Vulnerable Areas of the VehicleIt is advisable to use bonnet and wing covers as well as some form of seat covering before working on a vehicle.Taping vulnerable paint areas to protect them from becoming scratched is also a good idea. Never leave tools or equipment on painted surfaces, seats or dashboards. Such mistakes result in many needless damage claims.
Cover parts to be protected. Use seat covers.
Mask adjacent surfaces prior to any activating/priming/bonding operation.

18_Sika Automotive Aftermarket
Sika Technicians' Handbook Version 1 / 2010
Check the specific vehicle information for trim and accessories before starting to dismantle. Gaskets must be reinstalled on the new glass immediately after glass preparation or after removal of trims. Always wear nitrile rubber gloves during installation to avoid leaving any fingerprints on the bonding area.
When removing cowls, wipers and other equipment from the vehicle, store them in a safe area to eliminate the risk of damage from inadvertent contact.
4 Remove Trim, Wipers and Rear-View Mirrors
Check for specific vehicle information for trims and accessories.
Ensure availability of all necessary spares and accessories.
Carefully remove all fitted trims and accessories and store them in a safe area.
Where possible, use new trims.

Sika Automotive Aftermarket_19
Sika Technicians' Handbook Version 1 / 2010
Always wear safety glasses and cut-resistant gloves during windshield removal. Use tools appropriate to the type of windshield to be removed.
Sika recommends the use of either cold knife or cheese wire, as these tools allow cutting out a windshield with minimal damage to the vehicle. Also oscillating knifes can be used but here care must be taken to avoid damage to the car body.
5 Cut Out the Windshield
Wear personal protective equipment. Cut out glass. Remove debris with vacuum cleaner
or brush. Clean the bonding area with
Sika® CleanGlass.
Remove the damaged windshield.

20_Sika Automotive Aftermarket
Sika Technicians' Handbook Version 1 / 2010
These are two methods for preparing the pinchweld:
Full Cut Removal Method Complete Removal Method
Use the full-cut removal method when: The old adhesive is a polyurethane. The existing bead of cured
adhesive is well bonded to the flange and is in good condition.
There are no signs of corrosion There was no damage during the
removal procedure.
For instructions on detection of other materials such as butyl and silicone please refer to:
Identification of Butyl, Silicone and Polyurethane
In all other cases, use the complete removal method. Please see the indicated tab section:
Complete Removal Method
If the surface is rusty, please refer to:
Corrosion Treatment

Sika Automotive Aftermarket_21
Sika Technicians' Handbook Version 1 / 2010
Use the full-cut method only if the existing adhesive is well bonded to the aperture and is in excellent condition, the aperture shows no signs of corrosion or rust and the correct procedures and were used on a suitable polyurethane adhesive (NOT silicone or butyl).
For detection of silicones and butyls, etc., please refer to:
Identification of Butyl, Silicone and Polyurethane
If rust or surface corrosion is detected please refer to:
Corrosion Treatment
6 Preparation of the Pinchweld (Full Cut Method)
Short cuts like lightly trimming the existing urethane beads and using minimal amounts of new urethane are unacceptable and potentially very DANGEROUS. Short cuts taken to replace a windshield will void all Safe Drive-Away Time (SDAT) guidelines and can cause possible loss of glass adhesion and serious personal injury. Since too little space would remain to accommodate an adequate depth of urethane between the new windshield and the old bead of urethane, the application will not comply with all applicable FMVSS regulations, and may also fail during normal day-to-day use to the vehicle.
Remove debris with vacuum cleaner or brush.
Clean the entire aperture using Sika® CleanGlass, making sure the surface is completely dry and no moisture remains.
22_Sika Automotive Aftermarket
Sika Technicians' Handbook Version 1 / 2010
0.5 - 2 mm
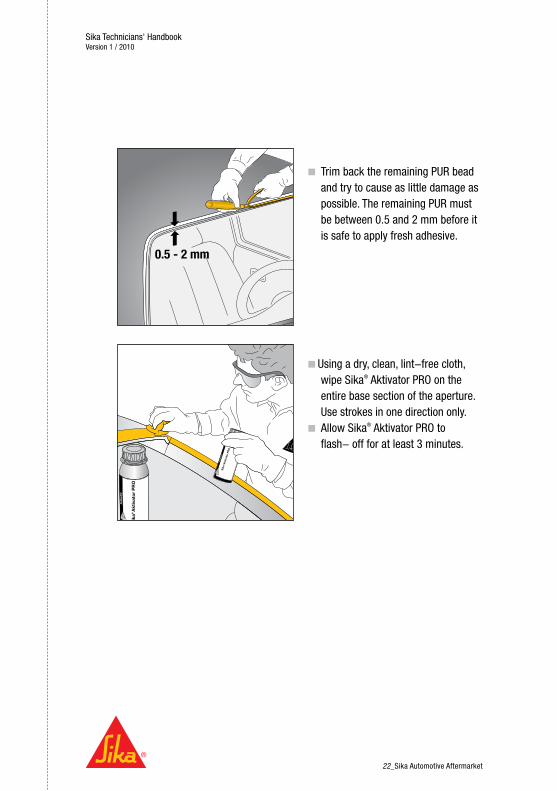
Trim back the remaining PUR bead and try to cause as little damage as possible. The remaining PUR must be between 0.5 and 2 mm before it is safe to apply fresh adhesive.
Using a dry, clean, lint-free cloth, wipe Sika® Aktivator PRO on the entire base section of the aperture. Use strokes in one direction only.
Allow Sika® Aktivator PRO to flash- off for at least 3 minutes.

Sika Automotive Aftermarket_23
Sika Technicians' Handbook Version 1 / 2010
Apply a thin but complete and homogeneous layer of Sika® Primer-206 G+P into the scratch using a small brush or dauber. Ensure that there is an overlap of 5 mm between the damaged area and the undamaged area to provide adequate protection.
Allow to flash-off for at least 3 minutes or until touch dry.
3 min
Scratches and Fresh Rubs <5 cm2
For treatment of fresh scratches or bright metal rubs and scrapes that are 5 cm2 in area or less, Sika recommends that these areas be covered with Sika® Primer-206 G+P.
One coat of Sika® Primer-206 G+P will provide a good level of corrosion protection if the area is also covered by adhesive. Sika recommends that a second coat of Sika® Primer-206 G+P should be applied for even better performance.

24_Sika Automotive Aftermarket
Sika Technicians' Handbook Version 1 / 2010
Apply a thin but complete and homogeneous layer of Sika® Primer-206 G+P into the scratch, using a small brush or dauber. Make sure you have an overlap of 5 mm between the damaged area and the undamaged area to ensure adequate protection.
Allow to flash-off for at least 3 minutes or until touch dry.
Apply a second coat of Sika® Primer-206 G+P and allow to flash-off for 10 minutes or until touch dry.
Scratches and fresh rubs 5 cm2 – 150 cm2
For fresh scuffs and scrapes that are greater than 5 cm2 but less than 150 cm2,two coats of Sika® Primer-206 G+P are required for sufficient corrosion protection.
Do not use Sika® Primer-206 G+P on the surface of fresh-cut PUR as it considerably reduces the strength of the bond.
3 min
10 min
Sika Automotive Aftermarket_25
Sika Technicians' Handbook Version 1 / 2010
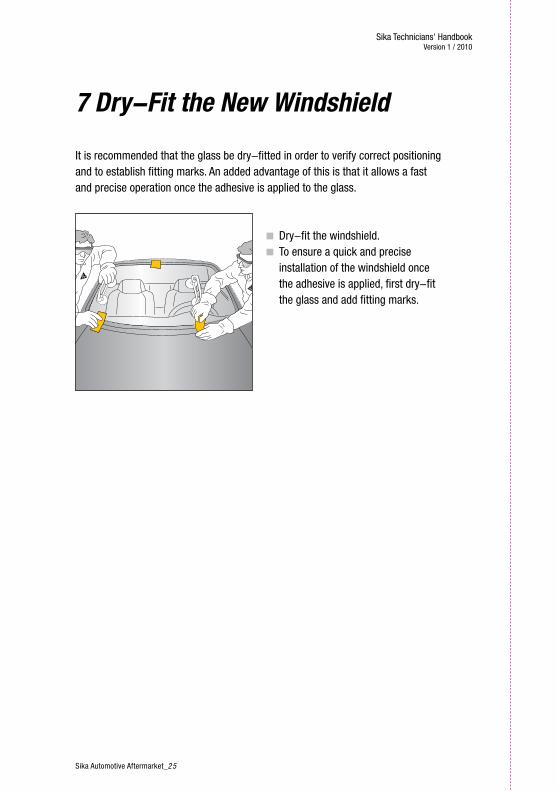
It is recommended that the glass be dry-fitted in order to verify correct positioning and to establish fitting marks. An added advantage of this is that it allows a fast and precise operation once the adhesive is applied to the glass.
7 Dry-Fit the New Windshield
Dry-fit the windshield. To ensure a quick and precise
installation of the windshield once the adhesive is applied, first dry-fit the glass and add fitting marks.

26_Sika Automotive Aftermarket
Sika Technicians' Handbook Version 1 / 2010

Sika Automotive Aftermarket_27
Sika Technicians' Handbook Version 1 / 2010
Each time a windshield installation is performed, a key component of the vehicle’s structural system is put in place. An essential part of this component is the bond between the adhesive and the glass. This critical area can experience leaks and problems if there are contaminants between the adhesive and the glass.
Most new cars have a ceramic frit or band near or along the edge of the glass, which also needs to be cleaned. Care must be taken to prevent contaminants coming into contact with the edge of the glass, leaving behind solvents, grease, oily fingerprints and other substances. These can adversely affect the performance of the adhesives with potentially serious consequences!
Cleaning the glass with Sika's recommended products is vital for safe and leak-free installations.
Clean the new windshield with Sika® CleanGlass.
8 Preparation of the Windshield

28_Sika Automotive Aftermarket
Sika Technicians' Handbook Version 1 / 2010
Sika® Aktivator PRO must be used on every windshield before applying the adhesive.
Windshields installed without the use of Sika® Aktivator PRO may be subject to leaks, stress cracks and retention problems. The loss of windshield retention can cause serious injuries. Therefore, the use of Sika® Aktivator PRO cannot be over- emphasized. After the application of Sika® Aktivator PRO, the windshield installation must be completed within 8 hours or the Sika® Aktivator PRO must be re-applied.
Make sure the windshield is stored in a clean, dry place. Do not touch the activated area.
Unnatural contamination can be detected by spraying the Sika® CleanGlass onto the ceramic frit.
If contamination similar to the picture is detected, please refer to:
Removal of Contamination

Sika Automotive Aftermarket_29
Sika Technicians' Handbook Version 1 / 2010
Activate the bonding area with Sika® Aktivator PRO by wetting a clean lint-free cloth and wiping the surface in one direction only.
Allow to dry for at least 3 minutes. 3 min
Sika® Aktivator PRO can be used on glass with a ceramic frit as bonding surface, glass with a float glass surface, glass with a Pre-Applied Adhesive System (PAAS) and glass with factory pre-applied black primer. Sika® Aktivator PRO also works on encapsulated quarter- and backlights.
Sika® Aktivator PRO can be used to reactivate pre-applied black primer that has been put onto the windshield in a controlled factory setting. This ensures that there is sufficient adhesion between the factory-applied black primer and the bond area of the glass, and consistent application between the two. Under no other circumstances should primers be interchanged, nor glass activators, nor adhesives from different adhesive suppliers. If the installation technician is unable to determine if the primer has been applied by an automotive OEM, then Sika recommends that the glass is not installed and that it is returned to the distributor.
For plastic windshields and windshields without a ceramic frit, please refer to:
Special Windshields
If Sika® Aktivator PRO is applied to the clear area of the window it will be visible and the customer will be justified to complain.

30_Sika Automotive Aftermarket
Sika Technicians' Handbook Version 1 / 2010

Sika Automotive Aftermarket_31
Sika Technicians' Handbook Version 1 / 2010
Independently of the place the application occurs, it is important that the adhesive matches both to the activated surface of the glass and to the freshly cut bead of urethane.
Set the gun at an 80 - 90° angle to the surface.
Sika adhesives are supplied with a pre-cut triangular V-notched nozzle. This is the recommended nozzle tip that must be used in order to apply the proper bead size. A round bead can trap air when compressed between the glass and pinchweld.
Make sure that the depth of the V-notched nozzle is the same height or up to 3 mm greater than the space between the aperture mounting surface and the roof of the car. This can be checked by simply placing the nozzle on the aperture near the roofline. If it is too short, cut the V in the nozzle deeper and wider. When applying Sika adhesives, it is imperative for the fresh adhesive to match the location and profile (height and width) of the trimmed OEM bead on the aperture. This will ensure that there is a sufficient amount of new adhesive available to meet FMVSS standards for safety.
The best bonding surface for Sikaflex® and SikaTack® Adhesives is a freshly cut, uncontaminated bead of original urethane. It is recommended that the newly extruded urethane make contact with the original bead.
The Sikaflex® and SikaTack® Adhesives can be applied to the windshield or to the aperture. However, application to the glass offers benefits such as easier control of the bead dimension during application, which can help to prevent water leaks. However, if it is not possible to accurately determine where the new bead will make contact with the original bead of urethane, it is recommended to apply the adhesive to the trimmed bead or the pinchweld instead.
9 Installation of the Windshield

32_Sika Automotive Aftermarket
Sika Technicians' Handbook Version 1 / 2010
Position the glass. Depending on the dimensions and weight of the windshield, tape might be required to keep it in the exact position until the adhesive has developed enough strength.
Remount trim and moldings so that they fit properly. Ensure that all dismantled parts are installed correctly.

Sika Automotive Aftermarket_33
Sika Technicians' Handbook Version 1 / 2010
Always inform customers about the Safe Drive-Away Time of the product and notify them as to the time that they can drive the car away. Sika provides “Mirror Hangers” designed for this purpose*.
After a windshield replacement, a vehicle must meet the FMVSS 212/208 standards to be safe to operate. This requires that the adhesive system is adequate to hold the windshield in place in the event of an accident occurring while the vehicle is being driven. The two key tips to ensure a safe auto glass installation is to follow the written instructions provided within this manual and to allow adequate time for the adhesive to set fully before driving off.
The Save Drive-Away Time (SDAT) for each Sika AGR adhesive can be identified through use of either the Sika SDAT chart, located in the product section of this manual or the Sika Product Data Sheet, available for each Sika AGR adhesive available on www.sika.com.
The vehicle must remain out of service and NOT be operated until the appropriate SDAT has been reached; the owner/operator of the vehicle must be notified of this time restriction.
* Availability depends on the local Sika organization.
Your windshield has been replaced using the SikaTack® adhesive system.
Sika is the leading supplier of adhesive systems for
windshield replacements. We apply highest safety
standards and develop our windscreen adhesives
in accordance with the specifications of the leading
car manufacturers.
Your Safety is Sika‘s highest priority!To see by yourself why there must be no shortcut
to safety when it comes to windshield installations
visit
www.no-shortcuts-to-safety.com Your windshield was replaced by
Your car will be safe to drive at:
:Your windshield has been replaced using the
SikaTack® adhesive system, which is designed to
restore your car to a standard at least equivalent
to the original maufacturer‘s specification.After installing a new windshield, the adhesive
requires a certain curing time until it can develop
enough strength to keep the windshield in place
and you inside the car in event of an accident.
Your car is safe to drive at the time shown above
and will develop even greater strenght over the
next few days.
Drive carefully!Always wear Seatbelts!

34_Sika Automotive Aftermarket
Sika Technicians' Handbook Version 1 / 2010

Sika Automotive Aftermarket_35
Sika Technicians' Handbook Version 1 / 2010
After installation is complete, inspect and clean all areas affected by the work. Glass, carpets, seats, dashes and all painted surfaces around new windows must be cleaned and vacuumed. Air ducts must be blown out and cleared of any glass fragments. Check to see that all parts that have been removed have been replaced again. Test their operation where applicable. Check operation of wipers and windshield fluid hose dispenser. Test the operation of all applicable electrical devices. Conduct a glass-leak-check if possible. Complete and maintain a record of all post inspection procedures. As a courtesy, provide the owner/operator of the vehicle with a copy. The technician should also wear appropriate eye protection while clearing the heater vents to avoid injury. All airbags and safety belts must be in place and functional.
To finish the job, also clean the windshield on the outside to remove finger marks and any marks made by the suction pads.
10 Post Inspection

36_Sika Automotive Aftermarket
Sika Technicians' Handbook Version 1 / 2010
Sika Automotive Aftermarket_37
Detailed Sections

38_Sika Automotive Aftermarket
Sika Technicians' Handbook Version 1 / 2010

Sika Automotive Aftermarket_39
Sika Technicians' Handbook Version 1 / 2010
Iden
tific
atio
n of
But
yl,
Silic
one
and
Poly
uret
hane
When installing a replacement windshield, it is essential to ensure that the residual material on the pinchweld is polyurethane. SikaTack® and Sikaflex® polyurethane direct glazing adhesives develop very strong adhesion to many different brands of polyurethanes and also to some of the newer MS Polymer direct glazing adhesives. However, if the residual material on the pinchweld is a butyl or silicone, it must be completely removed. SikaTack® or Sikaflex® polyurethane direct glazing adhesives do not adhere to butyls or silicones. If left on the surface, these materials could interfere with the adhesion of the ceramic coating or paint.
How can it be determined if it is a polyurethane adhesive bead? Press very firmly with the fingernail into the existing material. If it is a polyurethane or a direct glazing MS Polymer, it should hardly be
possible to make an indentation into the material. If it is a butyl or silicone, it should be possible to press half way into the
material or possibly all the way through to the pinchweld. If it is a butyl, there should be an indentation at the point of depression. The
butyl should retain a finger mark in it, where it does not regain its original shape.
If it is still unidentified: Cut out a long piece of the material and pull it apart. If it is polyurethane, a great amount of force will need to be applied in order to
pull the material apart and break it. If it is a silicone, it will stretch a great distance, without exerting too much
force. It will also be “snappy”, where it will stretch back and forth rather easily. If it is a butyl, it should pull apart very easily.
If it remains unidentified: Completely remove the old adhesive and follow the procedures as indicated in
the following section.
Identification of Butyl, Silicone and Polyurethane

40_Sika Automotive Aftermarket
Sika Technicians' Handbook Version 1 / 2010

Sika Automotive Aftermarket_41
Sika Technicians' Handbook Version 1 / 2010
If the technician discovers that either inappropriate procedures or products (such as butyl or silicone) were used on previous glass replacements or that the existing aperture and urethane conditions would compromise the retention system, they are NOT to use the full cut method. Instead, it is recommended to fully correct any adverse glass installation related conditions, providing a clean and sound substrate for bonding. A complete adhesive removal requires the total removal of existing material down to the frame. During a complete removal, the aperture must be cleaned of all products and materials other than the clean weld area and the original paint. This method must be used when:
The aperture has been repainted for any reason (e.g. body shop corrosion treatment).
The aperture is damaged and will be repainted. The existing urethane adhesive is loose or has deteriorated. An improper product was previously used (e.g. – butyl, silicone).
Complete Removal Procedure
Com
plet
e Re
mov
al
Proc
edur
e
After exposing the original paint, carefully scuff the paint on the aperture to remove the clear coat. Care must be taken so that the e-coat and phosphate coatings, which lie beneath the OEM primer, are not removed. The e-coat and phosphate coatings are essential part of the OEM corrosion inhibiting system and it is not possible to replace these in the after market.
42_Sika Automotive Aftermarket
Sika Technicians' Handbook Version 1 / 2010
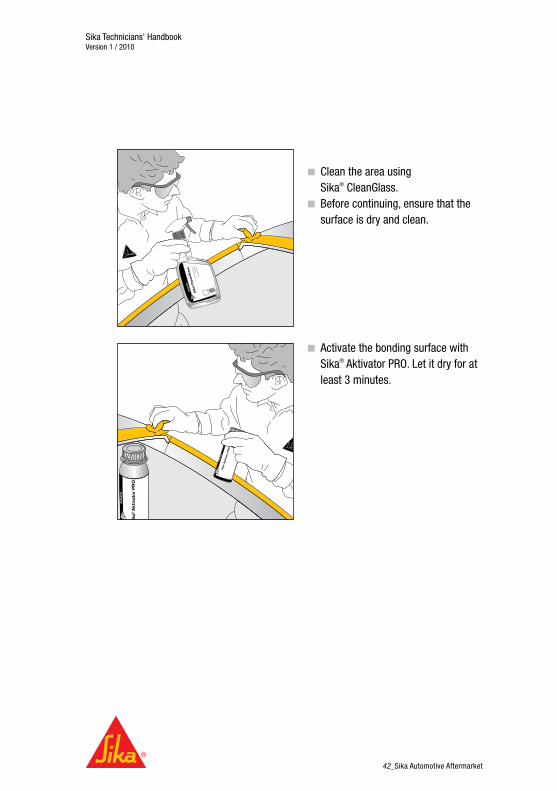
Clean the area using Sika® CleanGlass.
Before continuing, ensure that the surface is dry and clean.
Activate the bonding surface with Sika® Aktivator PRO. Let it dry for at least 3 minutes.
Sika Automotive Aftermarket_43
Sika Technicians' Handbook Version 1 / 2010
For further information please refer to:
Corrosion Treatment
Freshly Painted Vehicles
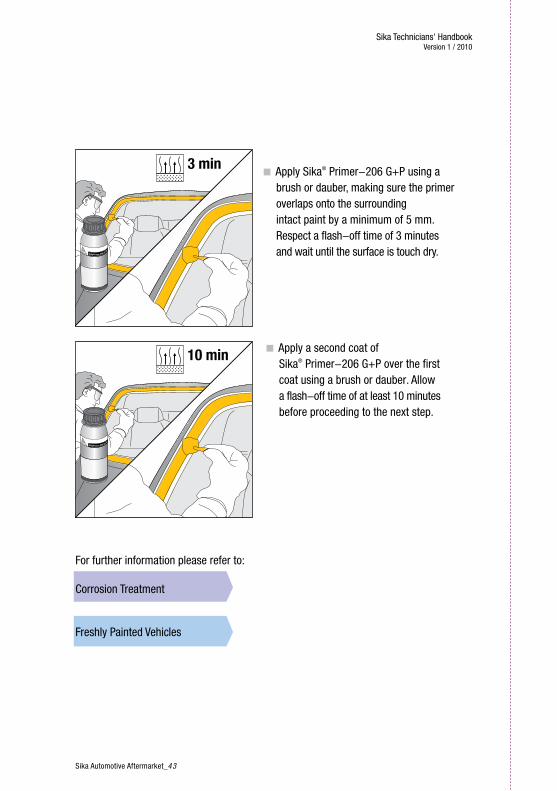
Apply Sika® Primer-206 G+P using a brush or dauber, making sure the primer overlaps onto the surrounding intact paint by a minimum of 5 mm. Respect a flash-off time of 3 minutes and wait until the surface is touch dry.
Apply a second coat of Sika® Primer-206 G+P over the first coat using a brush or dauber. Allow a flash-off time of at least 10 minutes before proceeding to the next step.
3 min
220.107 mm
10 min
220.107 mm

44_Sika Automotive Aftermarket
Sika Technicians' Handbook Version 1 / 2010
Sika Automotive Aftermarket_45
Sika Technicians' Handbook Version 1 / 2010
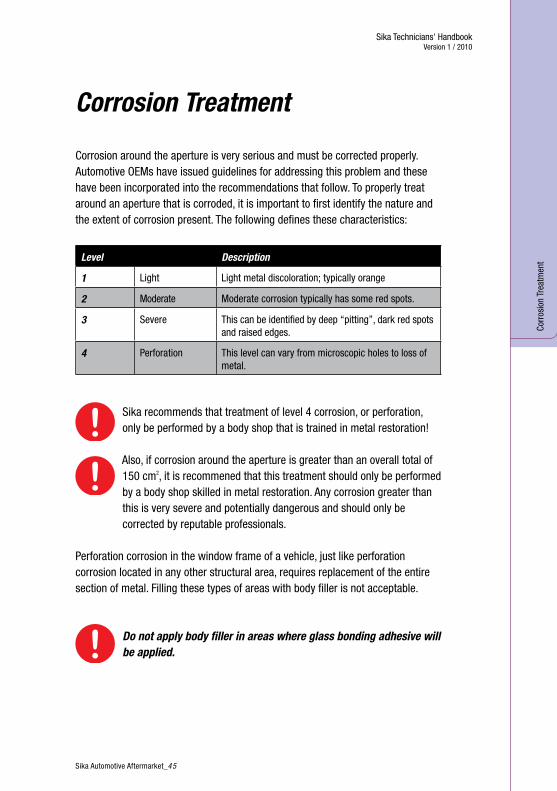
Corrosion around the aperture is very serious and must be corrected properly. Automotive OEMs have issued guidelines for addressing this problem and these have been incorporated into the recommendations that follow. To properly treat around an aperture that is corroded, it is important to first identify the nature and the extent of corrosion present. The following defines these characteristics:
Level Description
1 Light Light metal discoloration; typically orange
2 Moderate Moderate corrosion typically has some red spots.
3 Severe This can be identified by deep “pitting”, dark red spots and raised edges.
4 Perforation This level can vary from microscopic holes to loss of metal.
Sika recommends that treatment of level 4 corrosion, or perforation, only be performed by a body shop that is trained in metal restoration!
Also, if corrosion around the aperture is greater than an overall total of 150 cm2, it is recommened that this treatment should only be performed by a body shop skilled in metal restoration. Any corrosion greater than this is very severe and potentially dangerous and should only be corrected by reputable professionals.
Perforation corrosion in the window frame of a vehicle, just like perforation corrosion located in any other structural area, requires replacement of the entire section of metal. Filling these types of areas with body filler is not acceptable.
Do not apply body filler in areas where glass bonding adhesive will be applied.
Corrosion Treatment
Corr
osio
n Tr
eatm
ent

46_Sika Automotive Aftermarket
Sika Technicians' Handbook Version 1 / 2010
Corrosion Removal Remove corrosion to obtain a bright
and corrosion-free metal surface. Ideally this should be done prior to trimming the remaining well-bonded adhesive bead.
Abrade the intact paint for a further 5 mm beyond the paint edges surrounding the fresh bright metal areas where corrosion has been removed. Use a sia or 3M Scotch Brite abrasive pad for this purpose.
Level Recommended Procedure
1 Light Remove corrosion with 80 grit sand paper, wire wheel or Dremel® and a grinding stone.
2 Moderate Remove corrosion with wire wheel or chemical rust remover.
3 Severe Remove corrosion with media blast or chemical rust remover.
4 Perforation The panel must be replaced and treated by a body shop.
Sika Automotive Aftermarket_47
Sika Technicians' Handbook Version 1 / 2010
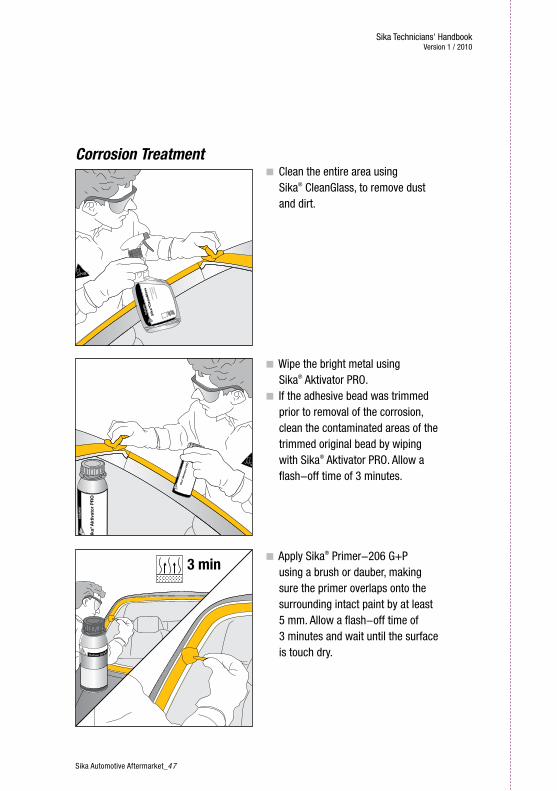
Corrosion Treatment Clean the entire area using
Sika® CleanGlass, to remove dust and dirt.
Wipe the bright metal using Sika® Aktivator PRO.
If the adhesive bead was trimmed prior to removal of the corrosion, clean the contaminated areas of the trimmed original bead by wiping with Sika® Aktivator PRO. Allow a flash-off time of 3 minutes.
Apply Sika® Primer-206 G+P using a brush or dauber, making sure the primer overlaps onto the surrounding intact paint by at least 5 mm. Allow a flash-off time of 3 minutes and wait until the surface is touch dry.
3 min
220.107 mm

48_Sika Automotive Aftermarket
Sika Technicians' Handbook Version 1 / 2010
Apply a second coat of Sika® Primer-206 G+P over the first coat using a brush or dauber. Allow a flash-off time of at least 10 minutes before proceeding to the next step.
10 min
220.107 mm

Sika Automotive Aftermarket_49
Sika Technicians' Handbook Version 1 / 2010
Abrade the bonding area with a suitable scouring pad or very fine grade sandpaper (grade 120).
Clean the aperture with Sika® CleanGlass.
If the bond is to be made to a freshly painted vehicle and it is uncertain which paint or paint drying system was used or the correct paint drying times are unknown, allow the paint to dry for 24 hours first before treating the aperture. If the drying times are known, use the paint shop recommandations and proceed as follows:
Freshly Painted Vehicles
Fres
hly
Pain
ted
Vehi
cles

50_Sika Automotive Aftermarket
Sika Technicians' Handbook Version 1 / 2010
Activate the bonding area with Sika® Aktivator PRO and let it dry for a minimum of 3 minutes.
Using a brush or dauber, paint a thin coat of Sika® Primer-206 G+P and let it dry for a minimum of 10 minutes.
10 min
220.107 mm
Sika Automotive Aftermarket_51
Sika Technicians' Handbook Version 1 / 2010
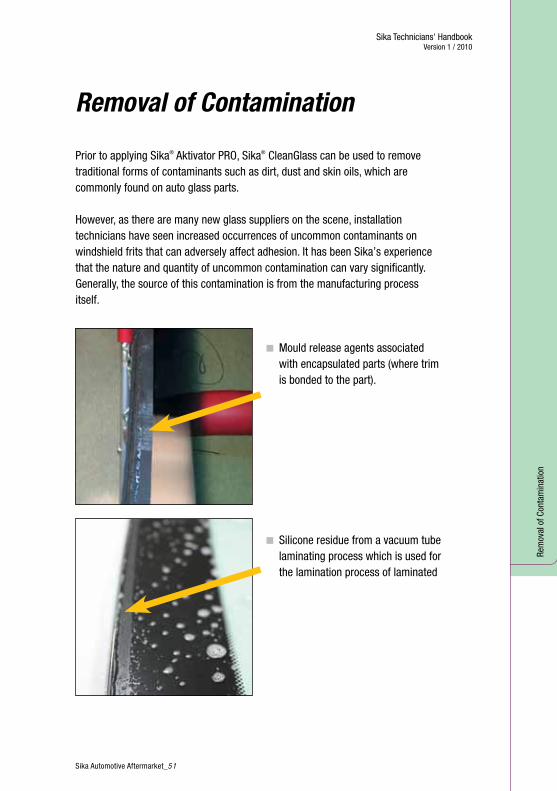
Prior to applying Sika® Aktivator PRO, Sika® CleanGlass can be used to remove traditional forms of contaminants such as dirt, dust and skin oils, which are commonly found on auto glass parts.
However, as there are many new glass suppliers on the scene, installation technicians have seen increased occurrences of uncommon contaminants on windshield frits that can adversely affect adhesion. It has been Sika’s experience that the nature and quantity of uncommon contamination can vary significantly. Generally, the source of this contamination is from the manufacturing process itself.
Removal of Contamination
Mould release agents associated with encapsulated parts (where trim is bonded to the part).
Silicone residue from a vacuum tube laminating process which is used for the lamination process of laminated
Rem
oval
of C
onta
min
atio
n

52_Sika Automotive Aftermarket
Sika Technicians' Handbook Version 1 / 2010
While many incidents of contamination are clearly visible to the naked eye, some contaminants are not as easy to see without introducing additional tests. To verify the presence of contaminants, the auto glass Technician should be trained to inspect the bond areas of each part for inconsistent areas of surface tension. After it has been applied to the frit, the Technician should be able to see whether the glass cleaner migrates or changes appearance along the contaminated areas.
Recommended Treatment for ContaminationOnce it has been determined that the bond area of a window has been contaminated, the following universal treatment procedure should be followed:
Apply small dots of Sika® Cleaner S (II) on the contaminated area. Alternatively Sika® Cleaner S (II) can be applied onto a paper towel, cloth or Abrasive Pad (as available from sia or 3M Scotchbrite).
Scrub the Sika® Cleaner S (II) into the contaminated area.
Apply adequate pressure with a clean, dry paper rag to wipe it off.
Clean the glass with Sika® CleanGlass.

Sika Automotive Aftermarket_53
Sika Technicians' Handbook Version 1 / 2010
Alternative Method for Removing Silicone Residue Contamination from the Lamination Process.Although the Sika® Cleaner S (II) method given above will treat all known types of windshield contamination, a procedure specifically designed for treating silicone oil residue derived from a vacuum tube lamination process should be followed. A contaminant can be identified as a silicone residue if the glass cleaner reveals an area of low surface tension in a relatively straight line that runs parallel to the edge of the glass (see photo page 51). If the glass cleaner migrates or changes appearance and the technician suspects silicone contamination, then the area can be treated using the Sika® Cleaner S (II) method above or using the glass cleaner “wet scrub” methods given below. If the technician finds contamination but is unsure whether it is silicone, then it is recommended that the universal method be followed:
Apply glass cleaner to the frit and lightly “wet-scrub” the affected area with a fine weave abrasive pad (e.g. sia or 3M Scotch-briteTM) using small circular motions.
Care should be taken not to scratch the glass or frit. After the “wet-scrub” has been completed, clean the frit area with
Sika® CleanGlass and a clean paper towel. Check the performance by spraying Sika® CleanGlass over the contaminated
area. It should now wet the glass uniformly with no reaction. Allow the surface to completely dry before applying Sika® Aktivator PRO.
This method is only recommended for removing silicone residue resulting from the glass manufacturer’s laminating process and is NOT to be used to remove silicone contamination that originated from a glass manufacturer’s encapsulation process.

54_Sika Automotive Aftermarket
Sika Technicians' Handbook Version 1 / 2010

Sika Automotive Aftermarket_55
Sika Technicians' Handbook Version 1 / 2010
Special WindshieldsBonding Plastic Windshields (PMMA and PC)Plastic windshields can be found on vehicles such as:Building machines.Special-purpose vehicles (BGS, Police).Light-weight construction vehicles.
Typical materials are PMMA (Polymethylmethacrylate) and PC (Polycarbonate). In the manufacturing process, many polycarbonate sheets are coated with a scratch resistant surface. Unlike standard float glass, plastic windshields have a much higher coefficient of thermal expansion, resulting in greater movement (expansion and contraction of the window).
In addition, plastic windshields do not have the ceramic coating that glass windshields have that provides UV-protection for the adhesive bond-line. For these reasons, the following procedures must be followed when bonding plastic windshields.
Permanent Glazing Pre-Treatment PC or PMMA Windshield If there is an unknown coating, it is recommended that the surface is tested before bonding (contact Sika); otherwise, use the following procedure:
Step 1 Abrade bonding area with Scotch Brite or sia abrasive pad.
Remove scratch resistant coating.
Step 2 Remove dust (Note: Use only oil free compressed air or wipe with a clean paper towel).
Clean surface of dust.
Step 3 Apply Sika® Aktivator PRO. Flash-off for 3 minutes.
Clean and activate the surface.
Step 4 Apply Sika® Primer-206 G+P. Flash-off for 10 minutes.
Create a suitable surface for bonding. (Note: Primerless bonding is not possible).
Sika® Primer-206 G+P must be used for bonding plastic windshields. Black-primerless bonding is not possible.
Spec
ial W
inds
hiel
ds

56_Sika Automotive Aftermarket
Sika Technicians' Handbook Version 1 / 2010
Adhesive Thickness
Largest Windshield length Triangular Bead Required Adhesive Bead Dimension*
L [m] H [mm] B [mm] D [mm] B [mm]
0.5 8 6 3 8
1.0 8 8 4 8
1.5 12 10 6 10
2.0 16 12 8 12
Over 2.0 Meter contact Sika
*Important: Conform to minimal adhesive thickness, D.
UV-ProtectionTo ensure a durable bond, transparent windshields must be surface protected against UV.Possible solutions are:Suitable print color.Protective metal or opaque plastic trim.Sika UV Shielding Tape*.
Without this protection, Sika® Primer-206 G+P will eventually detach from the plastic windshield. The exact period until failure depends largely on the weather, the synthetic material quality and the general load.
LDH
BB

Sika Automotive Aftermarket_57
Sika Technicians' Handbook Version 1 / 2010
Surrounding Conditions and Safe Drive-Away Time It is recommended that plastic windshield bonding is carried out at temperatures between +10 °C to +35 °C. It is important to comply with the recommended flash-off times (see pre-treatment). The vehicle must not be moved for 16 hours after the replacement.
Remarks Sikaflex®-222 UV is recommended for the durable bonding of plastic windshields. This adhesive has a low modulus (soft) and can handle the thermal expension of the windshield without resulting in mechanical over-load. PMMA is particularly sensitive to stress cracks. For this reason, windshields should remain flat during the bonding process. If there are larger than specified dimensions of PC or PMMA to be bonded, please contact Sika before commencing work.
Temporary Glazing of PC or PMMA WindshieldsThis procedure is used when a short-term application is required for plastic windshields. Temporary glazing is carried out if the original glass windshield is not available at the time of the repair. At the most, this temporary glazing is only to be used for two weeks until the correct glass windshield can be installed.
Temporary Glazing: Pre-Treatment PC or PMMA Windshields Step 1 Abrade bonding area with Scotch Brite or
sia abrasive pad.Remove scratch resistant coating.
Step 2 Remove dust (Note: Use only oil free compressed air or wipe with a clean paper towel).
Clean surface of dust.
Step 3 Wipe on with Sika® Aktivator PRO.Flash-off for 3 minutes.
Clean and activate the surface.
Step 4 Apply Sika® Primer-206 G+P. Flash-off time 10 minutes.
Create a suitable surface for bonding. Note: Primerless bonding is not possible.
Step 5 Bond the part using standard direct glazing adhesive and refer to the indicated drive-away times.
Bonding.
Sika® Primer-206 G+P must be used for bonding plastic windshields. Black-primerless bonding is not possible.
58_Sika Automotive Aftermarket
Sika Technicians' Handbook Version 1 / 2010
Gasket Set WindshieldsWhile some vehicles will come from the factory having used both a gasket and polyurethane set process, some may have come with only the gasket and some form of sealant compound. Other than for egress rated windows, antique or classic vehicles not licensed for highway use or in cases where the introduction of urethane conflicts with current OEM specifications, polyurethane must be used. When using polyurethane on gasket set windshields, Sika recommends the following procedure:
Use appropriate personal protective equipment when performing the following tasks.
Remove original windshield and gasket.Use a new gasket if the original has been damaged.Clean the glass with Sika® CleanGlass.Remove contaminants from around the aperture, and the inside of the gasket
where the edge of the aperture and glass locate using a clean towel and water. Sika® CleanGlass may be used to clean these areas if necessary.
Allow water and glass cleaner to thoroughly dry before proceeding.Prepare all areas of the glass that will sit in the gasket with Sika® Aktivator PROApply Sika® Aktivator PRO to the aperture, where the gasket will sit, and to the
inside of the channels of the gasket. A total flash time of 15 minutes is required for all gasket set installations as Sika® Aktivator PRO will react slower due to the porosity and geometry of the rubber gasket.
Set the windshield, making sure that the gasket is fully seated on the aperture, and be sure to apply the desired Sika AGR adhesive into the channels of the gasket at the appropriate time.
Clean up uncured urethane using Sika® Remover-208 or Sika® HandClean.
When sealing air or water leaks within a gasket set windshield, make sure to identify whether or not a polyurethane product is required and then use only a compatible sealant system.
Sika Automotive Aftermarket_59
Sika Technicians' Handbook Version 1 / 2010
Special Weather Procedures
Spec
ial W
eath
er P
roce
dure
s
General Precautions Store all chemical products in an area above +5 °C for an adequate period
before use. Bear in mind that push-in trims will be more difficult to fit at low temperatures
because the adhesive is stiffer. Use extra care when removing and replacing scuttles and trim pieces as they
become more brittle below freezing point. As bonding cannot take place in air temperatures below -10 °C, the vehicle
should be stored somewhere with a higher air temperature or the job postponed.
Cold TemperatureAdditional measures must be taken when bonding glass at temperatures between -10 °C and +5 °C so that the glass can be bonded safely by all methods.
Sika® CleanGlass If air temperature is below -5 °C the glass cleaner will freeze when it comes in
contact with the glass and will malfunction. In such a case move the glass and the vehicle to a warmer environment.
Sika® Cleaner S (II) If air temperature is below -5 °C the Sika® Cleaner S (II) will freeze when it
comes in contact with the glass and it will malfunction. In such a case move the glass to a warmer environment.
Sika®®Aktivator PRO Condensation on the glass does not inhibit Sika® Aktivator PRO. Below -10 °C at least 10 minutes flash-off time must be allowed for instead
of the standard 3 minutes.
Sika® Primer-206 G+P Below -10 °C at least 20 minutes flash-off time must be allowed if it is used
for bonding purposes. Tip: Warming up the primer surface with a hot air gun until it is “touch” dry will save considerable time.
Adhesives It is recommended that the adhesives are temperature soaked to above +5
°C prior to application. With products approaching their expiry date, the higher viscosity combined with the low temperature can cause unsatisfactory decking or fitment, resulting in poor adhesion.
60_Sika Automotive Aftermarket
Sika Technicians' Handbook Version 1 / 2010
Hot Temperature To avoid bubble formation in the adhesive bead, it is recommended that when replacing the glass at air temperatures greater than +35 °C, the glass components and vehicle’s aperture are not exposed to direct sunlight during and until the Save Drive-Away Time have passed the process.
Another important fact is, that at higher temperatures chemical reactions work faster, and the open times can be reduced down to less than 5 minutes. It is therefore essential that the windshield be installed within this period in order to ensure a good bond between the polyurethane adhesive and the aperture/glass. This is necessary to prevent leaks and to guarantee customer safety.

Sika Automotive Aftermarket_61
Appendix Section
62_Sika Automotive Aftermarket
Sika Technicians' Handbook Version 1 / 2010
Activated Surface A surface that has been wiped with Sika® Aktivator PRO, where deposits of adhesion promoters remain and which is ready for adhesiv e bonding or a primer application. (I.e. A ceramic coat that is wiped with Sika® Aktivator PRO, remains activated for 8 hours).
Antenna Suitability Automotive OEM standards specify that the impedance of an adhesive must fall within a specific range of values (epsilon ε). Impedance is a compound product of the resistance, capacitance, and frequency, and is measured using an alternating current. When an antenna compatible adhesive is used, it will not interfere with radio reception on windshields with integrated antennas.
Ceramic Coating A black, ceramic composite applied to the perimeter of the windshield glass for cosmetic and protective purposes. This ceramic composition protects the polyurethane adhesive against harmful ultraviolet (UV) rays.
Compression Pressure exerted on a sealant or adhesive in a joint.
Cure Time The time required to effect a complete cure at a given temperature and relative humidity.
Curing conditions The factors that influence the curing of adhesives, e.g. temperature, relative humidity, etc.
Direct Glazing Where a window is bonded directly to the body or structure of the vehicle, vessel, or building.
Encapsulated Windshields Windshields which contain a polyurethane profile moulding around the edges.
EPDM A rubber material that is commonly used for framing plastic side windows.
Glossary of Terms

Sika Automotive Aftermarket_63
Sika Technicians' Handbook Version 1 / 2010
FMVSS 212/208 The Federal Motor Vehicle Safety Standard which states that, when a vehicle travelling at 48 km per hour crashes, more than 75% of the adhesive bond-line must be retained, whereas no more than 50% on any one side can be lost.
Fresh-cut PUR A cured polyurethane bead that has been freshly cut.
Modulus The ratio of stress to strain.
Non-Conductive Adhesive Automotive OEM standards specify an adhesive as non-conductive when the electrical resistance, measured according to DIN 53482, is greater than 108 Ω/cm for aluminium body vehicles and greater than 109 Ω/cm for magnesium body vehicles.
Nozzle The plastic tip of the applicator gun from which the bead of adhesive is extruded.
One-component Polyurethane Adhesive
A polyurethane adhesive supplied as a single premixed compound, which cures on exposure to moisture.
Open Time The maximum period of time that may elapse between application of the adhesive and assembly of the joint, depending on the adhesive and environmental conditions.
Pre-Applied Adhesive System (PAAS)
A polyurethane adhesive applied in a specific shape by the glass manufacturer to the edge of the glass. This can be used as a moulding and decorative trim for flush-mounted auto glass.
Plunger The disc-shaped component at the end of the rod, within the Sika® Application Gun, that pushes the material along the tubular body.

64_Sika Automotive Aftermarket
Sika Technicians' Handbook Version 1 / 2010
Polyurethane A family of polymers, ranging from rubbery to brittle, usually formed by the reaction of diisocyanate with a hydroxylic compound.
Primer A special paint coating designed to inhibit corrosion as well as improve adhesion between adhesives and some substrates. The contribution made to corrosion inhibition will depend on composition and paint thickness.
Tack-free or Skinning Time The time between the application of the adhesive and the formation of a skin on its surface, after which point bonding can no longer take place.
Tackiness The stickiness of the surface of the sealant or adhesive.
Ultraviolet Light Part of the light spectrum. Ultraviolet rays cause chemical changes in rubbery materials.

Sika Automotive Aftermarket_65
Sika Technicians' Handbook Version 1 / 2010
FAQ
A Can SikaTack® polyurethane adhesives be applied to wet surfaces? No. Polyurethane can not be applied onto wet surfaces because a reaction with
water can cause the polyurethane to lift from the surface. All surfaces must be dry.
B Can Sika® Aktivator PRO be used in damp conditions? Yes, Sika® Aktivator PRO can be used in damp conditions, e.g. on windshields
with a light misting of condensation. (In this application, ‘damp’ refers to any humid condition where larger water droplets are NOT visible, either as pooled condensation or as spots of rain). However, it is better if the part is dried first.
C How long will primers and cleaners last after they have been opened? All Sika cleaners and primers have a reduced shelf life when opened. With
proper storage conditions, they will remain usable up to 1 month after opening, or until the expiration date, whichever comes first. Always tightly reseal both the inner liner and outer cap after each use. If the product becomes thick or cloudy, or inhomogeneous, immediately discard according to the information provided in the Material Safety Data Sheet.
D If the open time of Sika® Aktivator PRO has passed, is it ok to perform the activation step again?
Yes. It is OK to apply Sika® Aktivator PRO up to three times onto the bonding surface. It is important that the surface is clean and activated. You can tell if the surface has been activated when it has a shimmery aspect to it. If you are uncertain it is better to re-apply Sika® Aktivator PRO.
If Sika® Aktivator PRO is applied a second time without following through with the bonding, the activated surfaces must be cleaned with a solvent such as Isopropanol or a glass cleaner. After that, pre-treatment of the surfaces can start again.
66_Sika Automotive Aftermarket
Sika Technicians' Handbook Version 1 / 2010
E Why is the use of daubers with Sika® Aktivator PRO not recommended?1. Sika® Aktivator PRO performs a cleaning function, as well as an activating
function. Application with a dauber simply moves dirt around and does not clean it off.
2. Daubers apply too much product, which is unnecessary and wasteful.3. They can become dirty and contaminate the activator if they are dipped in the
bottle several times.4. It is difficult to cover the required area using daubers.
F Why is the use of daubers recommended for Sika® Primer-206 G+P, when applied to clear glass, but only brushes recommended for scratches on the flange?
Many prefer using the daubers for Sika® Primer-206 G+P when it is applied as the bonding surface, because of the smooth uniform application. It is recommended that a brush is used when covering scratches, because it is important that the product is applied INTO the scratch. Some installers find that the use of cotton buds sticks or Q-tips is also effective to apply Sika® Primer-206 G+P to the scratches in the flange.
G Why does Sika® Primer-206 G+P need to be shaken? Shaking primers mixes the solids that may have settled at the bottom of the
bottle and ensures a thin, uniform mixture and coverage. All manufacturer's primers containing solids should be shaken before use.
H Why is it not recommended to apply Sika® Primer-206 G+P onto the old PUR bead?
Cured Sika® Primer-206 G+P forms a rigid layer, which if incorporated between two soft layers (the old PUR bead and the new PUR) reduces the strength of the bond. If performing scratch treatment, it is acceptable if a small area of the old PUR bead comes into contact with Sika® Primer-206 G+P, but it must never be applied to large areas of old PUR bead.

Sika Automotive Aftermarket_67
Sika Technicians' Handbook Version 1 / 2010
I What happens if the recommended flash-off time of the pre-treatment products is not adhered to?
In addition to bonding products, pre-treatment products also require time to react. For example, a primer is like a diluted adhesive that also requires moisture for curing to occur. If the pre-treatment product is not allowed to fully react, it can reduce the bond strength of the system and in the worst case, the bond may fail. Lower temperatures increase the flash-off time of Sika® Primer-206 G+P.
J Cutting out a windshield has revealed that the old PUR bead contained a bubble between the adhesive and the windshield. How can this be prevented?
This is known as ‘Tunneling’ which, in most cases, is caused by errors by the technician. When the adhesive is applied, ensure that the nozzle is at a right angle to and is in contact with the substrate. Always apply a triangular bead so that when compressed no air is trapped.
K Having cut out a windshield, the old PUR bead contained lots of small bubbles in the adhesive bead. How can this be prevented?
The PUR adhesive releases carbon dioxide while curing. If the adhesive bead is heated during curing, the gas is released more quickly which can result in small bubbles dispersed throughout the bead. This can happen if the car is parked with the windshield exposed to sunlight on a warm day. Parking the car in the shade will prevent this problem.
L Are there any aggressive components in Sika® Aktivator PRO or Sika® Primer-206 G+P that could attack surfaces?
Sika® Aktivator PRO and Sika® Primer-206 G+P contain reactive components which react chemically with glass, paint and other materials. Once cured, they can only be removed mechanically and the upper layer of the substrate is damaged in the process. Care must be taken to apply Sika® Aktivator PRO only to the required areas. If the product is applied to the transparent area of the glass, it will be visible and the customer will have cause for complaint.

68_Sika Automotive Aftermarket
Sika Technicians' Handbook Version 1 / 2010
M What happens if too thick a layer of Sika® Primer-206 G+P is applied? Applying a thick layer of Sika® Primer-206 G+P results in a longer flash-off
time. But if applied as corrosion protection on bare metal it is recommended that two thick layers of Sika® Primer-206 G+P be applied for long lasting protection.
N Is there a product for cleaning Sika® Primer-206 G+P from Interior parts? Sika® Primer-206 G+P can be cleaned using Sika® Remover-208 or
Sika® HandClean Tissues as long as it has not cured completely. Once cured, it must be removed mechanically.
O What is the minimum temperature to perform a replacement job? Sika’s products are intended for use at temperatures between +5 °C and
+35 °C. For all other conditions Sika has special hot and cold weather recommendations. While a job can be carried out at -10 °C, there is a question of adequate dexterity with cold hands. It may be too cold to carry out the job to a suitable professional standard. In this case, the job should be deferred.

Sika Automotive Aftermarket_69
Sika Technicians' Handbook Version 1 / 2010

70_Sika Automotive Aftermarket
Sika Technicians' Handbook Version 1 / 2010
1 When preparing the glass using Sika® Aktivator PRO (orange cap) at a temperature of -5 °C, there are special low temperature requirements to be considered.
❒ true ❒ false
2 A complete adhesive removal is required if the bonded window was installed using a non-urethane adhesive.
❒ true ❒ false
3 There is no reason to worry about scratching the paint of a vehicle because Sika® Primer-206 G+P (black cap) can be used to restore the corrosion protection system back to OEM level.
❒ true ❒ false
4 It is acceptable to apply Sika® Primer-206 G+P over rust. ❒ true ❒ false
5 SikaTack® Drive is rated non-conductive and antenna compatible. ❒ true ❒ false
6 A bonded window that was previously installed using a silicone adhesive can be reinstalled if properly prepared using Sika® Aktivator PRO.
❒ true ❒ false
7 Glass that has been prepared properly using Sika® Aktivator PRO (orange cap) can be installed 8 hours after the Sika® Aktivator PRO’s application.
❒ true ❒ false
8 A higher modulus urethane may be considered to be stiffer than a conventional urethane with normal modulus.
❒ true ❒ false
Technician Training TestPlease indicate whether each statement is true or false
Sika Automotive Aftermarket_71
Sika Technicians' Handbook Version 1 / 2010
9 If a 250 ml can of Sika® Aktivator PRO (orange cap) expires 8 months from today but the can is opened today, it can be used for the intervening months or until it becomes cloudy.
❒ true ❒ false
10 The full-cut method requires trimming the existing bead of urethane to a height of:
❒ 0.5 to 1.2 cm. ❒ 0.5 to 2 mm. ❒ 1 to 2 cm.
11 The factors affecting safe drive-away time are❒ when the customer wants their car put back into service.❒ temperature, humidity and presence of passenger side airbag.❒ following the proper application procedure specified by the adhesive
manufacturer.
12 One reason to apply Sika® Primer-206 G+P (black-cap) around the aperture of a vehicle is to:
❒ Provide a UV barrier for the paint of the vehicle.❒ Provide coverage for bare metal in order to reduce future corrosion.❒ To cover the existing urethane bead for improved adhesion.
13 When installing a gasket set windshield the preparation of the gasket requires
❒ removal of contaminants from within both slots of the gasket using Sika® Primer-206 G+P and allow to dry for 10 minutes. Then apply Sika® Aktivator PRO per normal application procedure and allow to cure for 15 minutes.
❒ removal of contaminants from within both slots of the gasket using a towel, water or an approved glass cleaner for additional cleaning power. After drying completely, apply Sika® Aktivator PRO to both slots and allow a minimum of 15 minutes before proceeding.
❒ removal of contaminants from within both sides of the gasket using compressed air. Do not apply any form of liquid in case of rubber contamination.

72_Sika Automotive Aftermarket
Sika Technicians' Handbook Version 1 / 2010
14 When applying Sika® Aktivator PRO (orange cap) to the windshield it is critical to
❒ apply in one direction to avoid spreading contaminants.❒ apply Sika® Aktivator PRO only to the ceramic band or bonding area as it will
leave a visible residue on the glass.❒ only use the product between +5 °C and +35 °C and do a wipe off step after
the application.
15 Any glass cleaner is acceptable to use as long as ❒ there is no alcohol or ammonia within the product.❒ the glass cleaner has no odor or fragrance.❒ the glass cleaner does not contain anti-static ingredients.
16 Which of the following Sika products are not rated non-conductive and antenna compatible?
❒ SikaTack® Drive ❒SikaTack® MOVEIT ❒Sikaflex®-256
17 The shelf life of a 250 ml can of Sika® Aktivator PRO is ❒ 9 months. ❒ 6 months. ❒12 months.
18 The reason for applying a triangular bead using a V cut nozzle is ❒ to prevent air from being trapped between the adhesive bead and the glass.❒ to prevent adhesive from skinning over too quickly.❒ to provide OEM appearance.
19 The shortcut method of removing existing urethane should not be used because
❒ it won’t allow enough time for the new urethane system to reach its SDAT strength.
❒ it doesn’t provide a bondable surface for the new urethane.❒ it doesn’t provide enough space for the proper amount of new urethane to be
applied which is required for a safe installation.

Sika Automotive Aftermarket_73
Sika Technicians' Handbook Version 1 / 2010
20 The proper procedure for cleaning around a dirty aperture is to❒ remove loose debris using a towel and water or glass cleaner or oil-free
compressed air if necessary. For heavy cleaning Sika® Aktivator PRO can be used. Then trim the existing urethane bead.
❒ blow out loose debris after trimming urethane to ensure all contaminants are removed. If additional cleaning is required use Sika® Aktivator PRO.
❒ remove loose debris prior to trimming the bead. After trimming the existing urethane bead, clean the opening with any type of solvent.
21 The procedure to use when installing a window with a Pre-Applied Adhesive System (PAAS) is to
❒ apply Sika® Primer-206 G+P to the bonding surfaces of the pre-applied adhesive following normal application procedures.
❒ just clean the surface with the glass cleaner and apply the adhesive.❒ apply Sika® Aktivator PRO to the bonding surfaces of the pre-applied adhesive
following normal application procedures as for other glass parts.
22 To maximize shelf life, Sika urethanes should be stored❒ at temperature above +25 °C.❒ at temperature below +25 °C.❒ it doesn’t matter, Sika urethanes are usable for 9 months no matter what the
storage conditions are.
23 The shelf life of Sika® Primer-206 G+P (black cap) in 250 ml cans is ❒ 6 months. ❒ 9 months. ❒ 12 months.
24 When applying Sika® Primer-206 G+P (black cap) at temperatures below +5 °C
❒ confirm the dryness of the primer by touching a non-bonding area with a clean nitrile-glove. It may take up to 25 minutes to dry.
❒ dry the primer with a heat gun and test with a nitrile glove to assure that it is dry.
❒ Lightly spray wet primer surfaces with warm water to speed up the cross-

74_Sika Automotive Aftermarket
Sika Technicians' Handbook Version 1 / 2010
linking of the urethane polymer that is in the primer.25 When applying the V bead to the aperture or glass, the height of the bead
should❒ exceed the roofline by 1 cm. ❒ not exceed the pre-cut dimensions of the provided Sika nozzle.❒ match the height of the vehicle’s roofline.
26 Level 3 corrosion can best be characterized by which of the following descriptions:
❒ Moderate corrosion which typically has some red spots.❒ Identified by deep pitting, dark red spots and raised edges.❒ Varies from microscopic holes to loss of metal.
27 It is acceptable to treat up to 150 cm2 of corrosion around the aperture using the following procedures, assuming that the corrosion has not perforated the metal.
❒ Remove all corrosion, abrade the paint edges, apply Sika® Aktivator PRO and then one coat of Sika® Primer-206 G+P (black cap) according the recommended application procedure.
❒ Remove all corrosion, abrade the paint edges, apply Sika® Aktivator PRO and then one coat of Sika® Primer-215 according the recommended application procedure.
❒ Remove all corrosion, abrade the paint edges, apply Sika® Aktivator PRO and then two coats of Sika® Primer-206 G+P according the recommended application procedure.
28 Under which of the following circumstances may a removed window be reinstalled using Sika’ AGR adhesive system?
❒ The adhesive that remains on the glass is polyurethane and does not have good adhesion around the entire perimeter.
❒ The adhesive that remains on the glass has good adhesion around the perimeter, but it cannot be confirmed that it is a polyurethane.
❒ The adhesive that remains on the glass is a polyurethane that has good adhesion to the entire perimeter.
Sika Automotive Aftermarket_75
Sika Technicians' Handbook Version 1 / 2010
29 The reason for using a paper towel and rotating it to the clean side when re-applying Sika® Aktivator PRO from a can is
❒ to guarantee proper coverage and thickness of application that only a paper towel can provide.
❒ to avoid allowing contaminants from the towel to mix with the contents of the can.
❒ to avoid over usage of product through use of daubers.
30 Windshields that are supplied pre-primed with a factory applied black-primer can be installed
❒ if prepared with an additional coat of Sika® Primer-206 G+P.❒ by removing the primer down from the frit and applying Sika® Aktivator PRO.❒ by preparing with glass cleaner and Sika® Aktivator PRO just as if the part was
not pre-primed.
31 The installation of used glass is not allowed when using any Sika AGR adhesive system because
❒ the part is of unknown origin and the age and brand of the glass may not be identifiable, voiding its acceptability.
❒ the part is of unknown origin and the conditions of the glass edge cannot be determined to assure a bondable surface.
❒ the part is of unknown origin and only glass parts that are new and provided through approved AGR distributors are considered eligible for use with Sika AGR adhesive systems.
32 In order to validate that any of the Sika re-sealable cans of activators and primers are being used within their defined open shelf-life of 1 month, technicians should:
❒ Make sure that purchase orders and invoices are available to review the dates when the products were purchased.
❒ Make sure they understand and are able to identify the shelf life listed on the label of the product.
❒ Make sure that the date opened is marked either on the bottom of the can or on the label.

76_Sika Automotive Aftermarket
Sika Technicians' Handbook Version 1 / 2010

Sika Automotive Aftermarket_77
Sika Technicians' Handbook Version 1 / 2010
Notes

78_Sika Automotive Aftermarket
Sika Technicians' Handbook Version 1 / 2010
Notes

Sika Automotive Aftermarket_79
Sika Technicians' Handbook Version 1 / 2010
Notes

www.sika.co.uk
Our most current General Sales Conditions shall apply. Please consult themost current local Product Data Sheet prior to any use.
/101
0
SikaWorldwide
Sika is a globally active company supplying the specialty chemical markets. It is a leader in processing materials used in sealing, bonding, damping, reinforcing and protecting load-bearing structures in construction (buildings and infrastructure construction) and in industry (vehicle, building component and equipment production).
Sika’s product lines feature high-quality concrete admixtures, specialty mortars, sealants and adhesives, damping and reinforcing materials, structural strengthening systems, industrial flooring and membranes. Subsidiaries in more than 70 countries worldwide and approximately 12,900 employees link customers directly to Sika.