formation offense - 144.217.254.8144.217.254.8/c5/digitalbooks/bookpreviews/9781606793220.pdf ·...
TRANSCRIPT

STACKED-I STACKED-I STACKED-I STACKED-I STACKED-I STACKED-I STACKED-I STACKED-I STACKED-I STACKED-I STACKED-I STACKED-I FORMATION OFFENSEFORMATION OFFENSEFORMATION OFFENSE
C O A C H I N G T H E
M A T T M I E R S
MIERS
COACH
ES CHO
ICECO
ACHIN
G TH
E STACKED-I FO
RMATIO
N O
FFENSE
STACKED-I STACKED-I STACKED-I STACKED-I STACKED-I STACKED-I STACKED-I STACKED-I STACKED-I STACKED-I STACKED-I STACKED-I FORMATION OFFENSEFORMATION OFFENSEFORMATION OFFENSE
C O A C H I N G T H E
This book on the stacked-I formation offense is a must-read. I am pleased to endorse this easy-to-understand book that includes excellent detailed diagrams of proven successful plays. It will be a very valuable addition to any football coach’s library.
Steve StakerHead Football CoachCoe College
Matt’s explanations and attention to detail in this book are outstanding. I would recommend Coaching the Stacked-I Formation Offense to any coach, player, or fan who is looking to understand the game of football in greater detail.
Matt HughesCo-Head Football CoachClear Creek Amana High School (IA)
If you are a coach who is seeking to expand your knowledge on football offense, then this book is a must-read. I have known Matt Miers for several years and have learned that he is a true student of the game. He has been able to put together in an easy-to-understand format a variety of ways that defenses can be successfully attacked. Matt gives you many options to use depending on the personnel abilities at your disposal. Finally, and most importantly, Matt is a man of great integrity, and his work ethic, knowledge, and love for the game of football make Coaching the Stacked-I Formation Offense an important addition to your library.
Dan Dickel Former Head Football CoachHighland-Lone Tree High School (IA)Former NFL Player
Coach Miers’ book is extremely insightful, informative, and practical. He brings a great deal of passion, knowledge, and detail to informing the reader about the stacked-I offense.
Tim LewisFormer Head Football CoachKennedy High School (IA)
ISBN 978-1-60679-322-0
9 781606 793220
5 1 9 9 5
$19.95

Coaching the Stacked-I
Formation Offense
Matt Miers

2
©2015 Coaches Choice. All rights reserved. Printed in the United States.
No part of this book may be reproduced, stored in a retrieval system or transmitted, in any form or by any means, electronic, mechanical, photocopying, recording, or otherwise, without the prior permission of Coaches Choice.
ISBN: 978-1-60679-322-0Library of Congress Control Number: 2014955967Book layout: Cheery SugaboCover design: Cheery SugaboFront cover photo: Cathy Thompson/www.kennedyactivities.comBack cover photo: Jon Read/Read Photography
Coaches ChoiceP.O. Box 1828Monterey, CA 93942www.coacheschoice.com

3
Dedication
This book is dedicated to my Lord and Savior Jesus Christ. I am far from a perfect person, and I acknowledge my need for a Savior!

4
Acknowledgments
As with any book, numerous people need to be acknowledged for the information they supplied, help they gave, and encouragement and support they provided. First, I owe my sincerest thanks to former Cedar Rapids Kennedy head coach Tim Lewis for supporting and encouraging me all of these years. I could not have asked for a better man to coach with. Patrick Cory, who began the process of writing this book with me, provided most of the ideas for our offensive line blocking concepts that appear in this book. Rick Mooberry also contributed ideas to the stacked-I formation offense. I also thank Don Knock, who allowed me to first volunteer at Cedar Rapids Kennedy in 1999. I first began to learn about the use of the stacked-I formation from him. I also wish to acknowledge Bret Hoyer and the impact he made on the stacked-I formation while he coached football at Kennedy High School. I am also very grateful to Kevin Miller, the head coach at Solon Community High School, for bringing me on staff and trusting me with the passing game.
I thank all of the Kennedy High School players that I have had the privilege of coaching, as well as their parents. I especially wish to acknowledge Riley Fergus and Alex Hillyer for posing for pictures that are used in this book.
Most importantly, I wish to acknowledge my wife, Kimberly, and son, Tyler. I know that my passion can consume me, but your unending love, support, and encouragement are so much appreciated. I thank Kimberly and my mom, Shirley, for editing my book. Who knew that one day you would read a whole book on football?

5
Contents
Dedication 3Acknowledgments 4Preface 6
Chapter 1: Why the Stacked-I Formation Offense? 7Chapter 2: Terminology 9Chapter 3: Power Series 18Chapter 4: Counter Series 39Chapter 5: Trap Series 51Chapter 6: Option Series 61Chapter 7: 50 Series—Five-Step Drop 77Chapter 8: 60/70 Series—Sprint-Out Pass 90Chapter 9: 80 Series—Play-Action Pass 99Chapter 10: 90 Series—Three-Step Drop 114Chapter 11: Screens and Draws 124Chapter 12: Multiple Formations in the Stacked-I Offense 131
About the Author 143

6
Preface
The idea to write this book began right after the end of the 2012 football season. We had just lost in the second round of the playoffs, and we were debating how to improve our offense. As we were looking at our personnel that were returning for the 2013 football season, we saw that we had a multitude of good running backs. We debated running the wishbone, the T-formation, or some other three-back offense. We always ran the stacked-I formation, even when we ran a spread offense, and every year it had been a successful formation for us. It was decided that the stacked-I was going to be our base offense for every level in our program. As we looked around for resources to expand our stacked-I offense, we realized there was not much available, which led to the idea of writing this book.
We talked about our goals offensively and how they related to the stacked-I. Ideally, all four backs needed to be potential ballcarriers on every play. We wanted to be able to stretch the defense horizontally by attacking multiple gaps on every play, which opens up running lanes. The passing game needed to stretch the defense vertically with multiple play-action pass routes, as well as effective three-step, five-step, and sprint-out pass concepts. These pass plays needed to be simple and easily applied to multiple formations.
The majority of the book focuses on plays that can be run from the stacked-I formation, however Chapter 12 gives a few examples of how plays can be run from different formations. It is not recommended that all of the plays in the book be run at the high school level, as most high school teams do not have the time to become great running them. It is far better to run a few plays well than many plays poorly. It is up to each coach to decide which of these plays can be adapted into his offense.
Chapter 6 (on the option series) focuses strictly on double option plays. We were primarily a power, iso, and toss team. However, we recognized that those plays are difficult to run when the defense loads the box with nine or even 10 defenders. In researching ways to attack these defenses, it was realized that running double option plays allows the offense to get a hat on a hat, which simply means the offense is able to block all the defenders by optioning just one defender. Because we focused on the power series, we did not want to commit the time it takes to run the triple option. Double option plays take significantly less reps than triple option plays. Any coach who wants to run triple options plays, such as inside veer and outside veer, can easily adapt these plays to the stacked-I formation.
I have read numerous coaching books over the years, and I learned so much from those coaches. I hope coaches who read this book will be able to take one or two concepts and apply it to their offense. I believe the stacked-I formation offense was a big part of our success over the years.

7
1
Why the Stacked-I Formation Offense?
The stacked-I formation offense offers teams many advantages due to the structure of the formation. One of the biggest advantages is in the use of personnel. A team that has two great tailbacks can line them up in an I formation and attack both sides of the formation equally. It also allows teams that have one outstanding running back to use him as a feature back, similar to regular I formation offenses.
The stacked-I is also a very dangerous goal line and short-yardage offense. It matches strength on strength, and with the use of two lead backs, it can overwhelm short-yardage defenses.
The stacked-I formation offense is balanced. It allows the offense to attack either side of the formation quickly without motion. If the defense is unbalanced, the offense can quickly attack the other side with equal power and strength. The balanced look eliminates any tendencies that motions may cause.
Another advantage of the stacked-I formation offense is that it allows misdirection to any of the three backs. The misdirection makes it difficult for the defense key on one back. The defense is put under tremendous pressure with the threat of all three backs carrying the ball on any given play.
The stacked-I formation offense is a very strong run-oriented offense. Due to this strength, the play-action pass opportunities are greatly enhanced. Another great feature of the stacked-I formation offense is that play-action passes can be run toward either

8
side with equal effectiveness. Also, multiple play-action pass concepts can be run from the stacked-I formation in order to take advantage of what the defense is doing.
The stacked-I formation offense forces the defense to make a choice. Either they load up the box with defenders to stop the run, or they keep one or two deep safeties to defend the pass to the wideouts. If they put less than nine defenders in the box, the offense outnumbers the defense. If they arrange the defense to put nine men in the box, the defense is forced to cover the wide receivers 1-on-1 with no deep help.
Blocking schemes do not have to be adjusted in order to have multiple backs carry the ball. The tailback and the Z-back run the exact same plays. This approach saves time on teaching the offensive line. The fewer blocking schemes or concepts that an offensive line has to learn, the better they will be at running their plays.
Many defensive coordinators are forced to make special preparations in order to defend the stacked-I formation offense. This offense is very uncommon and difficult for teams to defend. Teams are forced to decide to take away the run or the pass, but they cannot defend both. When option plays are added, the offense becomes almost unstoppable.
The offense is very adaptable to the passing game. Slants, fades, hitches, and outs are all run very easily out of the stacked-I, especially when teams use nine defenders to stop the run. The intermediate pass game also lends itself well to the stacked-I offense. Adding motion from one of the backs can easily create different passing game concepts. As has already been discussed, the play-action passing game is extremely effective in the stacked-I offense. Sprint-out passes are also a valuable addition to the stacked-I formation offense. Screen passes, such as bubble screens, slip screens, and rocket screens, are easily adaptable to the stacked-I offense.
Even when one of the backs is motioning, the defense still has to be ready for any play out of the I formation. The motion forces the defense to have to adjust before the snap, or they face the possibility of being outnumbered in the secondary. At the same time, the defense still has to be wary of a strong running game to either side of the formation.
Finally, the stacked-I is easily adapted to numerous offensive systems. Both zone- and gap-blocking schemes are run from the stacked-I. The stacked-I is made for the option game, especially triple option. Wing-T plays, such as buck sweep and trap, are also run from the stacked-I formation.

9
XYQB
FB
TB
Z
Figure 2-1. Lucky formation
2
Terminology
FormationsThe base formation in the stacked-I formation offense is Lucky (Figure 2-1). Lucky puts the tight end on the left and splits the X-receiver out wide to the right. The opposite of Lucky is Ringo, which tells the tight end to line up right and the X-receiver to line up left (Figure 2-2).
X YQB
FB
TB
Z
Figure 2-2. Ringo formation
The next formation is Lucky wide or Ringo wide (Figures 2-3 and 2-4). This formation tells the tight end to split out wide opposite the X-receiver. The tight end lines up on the bottom of the numbers to the wideside of the field and five yards from the sideline to the boundary side. The purpose of Lucky wide is to give the offense two wideouts. This opens up the passing game and forces the defense to remove defenders from the box, or they have to defend the wideouts 1-on-1.

10
XYQBFB
TB
Z
Figure 2-3. Lucky wide formation
X YQBFB
TB
Z
Figure 2-4. Ringo wide formation
X YQB
FB
TB
Z
5 yards
Figure 2-6. Ringo flex formation
Another formation is Lucky flex or Ringo flex (Figures 2-5 and 2-6). The tight end in this formation lines up five yards from the offensive tackle. The purpose of this formation is to force the defensive end to widen or face getting crack-blocked by the tight end. If the defensive end does widen, then the defense opens up the off-tackle run game.
XYQB
FB
TB
Z
5 yards
Figure 2-5. Lucky flex formation
XYQBFB
TB
Z
Figure 2-7. Lion formation
Lion (Figure 2-7) is a double tight formation that puts the tight end on the left. The X-receiver lines up as the second tight end on the right. The opposite of Lion is Ram (Figure 2-8), which aligns the tight end on the right and the X-receiver on the left. A second tight end can substitute in for the X-receiver for this formation.
X YQBFB
TB
Z
Figure 2-8. Ram formation
In Lucky wing or Ringo wing (Figures 2-9 and 2-10), the fullback lines up one yard wide by one yard deep off the tight end. The fullback is in a two-point stance with shoulders square to the line of scrimmage. The Z-back aligns with his heels at four yards and is in a three-point stance. The wing position creates a strong power running set to the tight end side. Because the Z-back and tailback are both in the backfield, the defense has to remain balanced, or they are vulnerable to run plays away from the tight end.

11
X YQBFB
TB
Z
Figure 2-12. Ringo wing over
A formation that moves the fullback to a wing position away from the tight end is Lucky wing over or Ringo wing over (Figures 2-11 and 2-12). Over tells the fullback to line up opposite the tight end. This formation puts weakside pressure on the defense and gives the offense two quick receivers to the weakside, while still giving the offense a chance to run to the strongside.
XYQBFB
TB
Z
Figure 2-9. Lucky wing formation
X YQBZ
TB
FB
Figure 2-13. Liz formation
XYQB FB
TB
Z
Figure 2-11. Lucky wing over
X YQB FB
TB
Z
Figure 2-10. Ringo wing formation
Several formations allow the Z-back to get out into a wing position. The advantage of these formations is that they allow a better athlete than the fullback to get out in pass routes. Also, with some simple motion, the Z-back can be given the ball quickly, while running full speed, such as 48/49 toss. Liz (Figure 2-13) puts the Z-back in a wing position on the left, one yard wide by one yard deep off of the tackle away from the tight end. The X-receiver also lines up on the same side as the Z-back. Rip (Figure 2-14) is the opposite of Liz. The Z-back lines up as a wing on the right side along with the X-receiver, as the tight end lines up on the left side.
XYQB Z
TB
FB
Figure 2-14. Rip formation
The formation that tells the Z-back to align as a wing one yard by one yard off of the tight end on the left side is called Lou (Figure 2-15). The X-receiver lines up on the right side. Similar to Lucky wing, this formation creates stress on the defense to the tight end side, while allowing the offense to attack both sides of the formation with equal strength. The opposite of Lou is Rog (Figure 2-16).

12
An unbalanced formation is Lucky distort and Ringo distort (Figures 2-17 and 2-18). This unbalanced formation puts stress on the defense to the strongside. When the defense slides to the strongside, the stacked-I allows the offense to attack the weakside with power. The tight end and the X-receiver line up on the same side of the formation. In Lucky distort, they line up on the left, and in Ringo distort they line up on the right.
X YQB
FB
TBZ
Figure 2-17. Lucky distort formation
XYQB
FB
TB
Z
Figure 2-19. Right formation
XYQB
FB
TBZ
Figure 2-18. Ringo distort formation
The standard pro-I formation which has the tight end on the left along with the Z-back lined up as a flanker on the left and the X-receiver lined up on the right is called left (Figure 2-19). The opposite, which tells the tight end and Z-back to line up on the right and the X-receiver lines up on the left, is called right (Figure 2-20).
X YQB
FB
TB
Z
Figure 2-20. Left formation
A formation that is commonly used in the quick passing game is a twins formation that is called Lizzard (Figure 2-21) and Ripper (Figure 2-22). Lizzard has the tight end line up on the right side of the formation and the X-receiver lines up on the left side. The Z-back aligns off the ball halfway between the X-receiver and the offensive tackle. The advantage of Lizzard and Ripper is that they allow the offense to attack the defense quickly with the pass game while keeping a strong running threat.
X YQB Z
TB
FB
Figure 2-16. Rog formation
XYQBZ
TB
FB
Figure 2-15. Lou formation

13
X YQB
FB TBZ
Figure 2-24. Ringo T formation
XYQB
FBTB Z
Figure 2-23. Lucky T formation
X YQB
FB
TB
Z
Figure 2-21. Lizzard formation
XYQB
FB
TB
Z
Figure 2-22. Ripper formation
Line SplitsThe guards line up two feet from the center, and the tackles line up two feet from the guards. The tight end also lines up two feet from the tackle (Figure 2-25). The X-receiver lines up according to the wideside of the field or the boundary. If he is on the wideside of the field, the X-receiver aligns on the bottom of the numbers. To the boundary side, the X-receiver lines up five yards from the sideline. In the backfield, the fullback lines up with his heels at four yards from the ball in a three-point stance. The Z-back lines up one yard behind the fullback in a two-point stance. The tailback lines up two yards behind the Z-back, also in a two-point stance.
XYQB
FB
TB
Z
2 feet 2 feet 2 feet 2 feet 2 feet
Figure 2-25. Line splits
A final formation that is easily adapted to many plays in the stacked-I formation offense is Lucky T and Ringo T (Figures 2-23 and 2-24). The advantage of the T formation is that it allows the offense a way to run the fullback iso play (30/31 iso; see Chapter 3). Additionally, the location of the tailback and Z-back in this formation allows them to release on pass routes faster. The tailback aligns on the same side as the tight end, and the Z-back aligns on the same side as the X-receiver. Both the tailback and the Z-back line up even with the fullback and place their inside leg even with the outside leg of the guard on their side. This alignment can be adjusted slightly, depending on the play call and the speed of the back.

14
Gaps and Hole NumberingThe gaps are labeled A, B, C, and D (Figure 2-26). The space between the center and guard is the A gap. The space between guards and tackles is the B gap. The space between the tackles and tight ends is the C gap. Outside the tight end is the D gap.
XYQB
FB
TB
Z
B A A BCD C D
Figure 2-26. Gap labels
The holes are numbered with odd numbers on the left and even numbers on the right (Figure 2-27). The 0 hole is the right A gap while the 1 hole is the left A gap. The 2 hole is the right B gap, and the left B gap is the 3 hole. The right C gap is the 4 hole, and the left C gap is the 5 hole. Immediately outside the tight end to the right is the 6 hole, while the 7 hole is to the left. Between the area immediately outside the tight end and the outside receiver is the 8 hole on the right side and the 9 hole on the left side. Outside the wide receiver on the right side in the 10 hole, and on the left side is the 11 hole.
XYQB
FB
TB
Z
1357911 0 642 108
Figure 2-27. Hole numbers
Play CallsPlays are called in the huddle by the quarterback. The quarterback calls the formation followed by any motion or shift. Then he calls the play number followed by any tags. The play number is a two- or three-digit number. The backs are numbered: quarterback = 1, tailback = 2, fullback = 3, Z-back = 4. If it is a run play, the first number is 1, 2, 3, or 4 and tells who is carrying the football. The second number indicates which hole the run play goes through. As Figure 2-28 shows, Ringo wide T 8 41 iso is the play called in the huddle. Ringo wide is the formation, followed by the motion call (T 8). Next is the play number, 41, where the Z-back is getting the handoff and is running to the 1 hole. The tag, iso, tells everyone that the play is blocked using iso concepts. If the play is a pass, the play number begins with 50, 60, 70, 80, or 90. The five-step

15
intermediate passing game are 50s numbers. Sprint-out passes are 60s to the right, while 70s are sprint-out passes to the left. Play-action passes are 80s numbers, and 90s are three-step quick pass game plays.
Formation Call Motion or Shift Play Number Play Tag
Ringo Wide T 8 41 Iso
Figure 2-28. Ringo wide T 8 41 Iso
MotionMotion is called one of two ways. The first way motion is called is by using the term fill, followed by the letter of the player to be motioned. Fill tells the player to motion to where he needs to be at the snap in order to carry out his assignment on that play. An example of fill motion is Lucky Z fill 30 iso (Figure 2-29).
XYQBFB
TB
Z
Figure 2-29. Lucky Z fill 30 iso
The second way that motion is called relates to the hole number (for example, Ringo flex Z 10 56 Y flag, shown in Figure 2-30). The Z-back motions out past the tight end and runs his route in 56, which is a post-curl route.
X YQB
FB
TB
Z
Figure 2-30. Ringo flex Z 10 56 Y flag

16
Another example is Lucky T 8 41 iso (Figure 2-31). The tailback motions out toward the X-receiver. After the snap, the offense runs 41 iso.
XYQBFB
TB
Z
Figure 2-31. Lucky T 8 41 iso
ShiftTwo main shifts are used in the stacked-I offense. The first shift involves the tight end. It simply moves the tight end from one side of the formation to the other. To accomplish this shift, the term change is added to the formation name. The name of the formation is where the tight end should finish. For example, Lucky distort change has the tight end start in Ringo and change to the other side, creating Lucky distort (Figure 2-32).
X YQBFB
TB
Z
Figure 2-32. Lucky distort change
The second kind of shift involves wholesale change from one formation into another. To accomplish this shift, the play calls one formation “to” the final formation (for example, Lucky wing over to Ringo, shown in Figure 2-33). The offense starts in Lucky wing over
X YQB
FB
TB
Z
XYQB FB
TB
Z
Figure 2-33. Lucky wing over to Ringo

17
and then shifts to Ringo before the ball is snapped. An important coaching point is that all players must remain set for one second before the ball is snapped.
CadenceThe cadence begins with the quarterback calling out “Rip” or “Liz.” Rip and Liz tell the offensive line where to slide their protection for 90 series pass plays (Chapter 10). It is important that the quarterback call out “Rip” or “Liz” before every snap in order to avoid giving the defense any indication as to if the play is a run or pass. After the Rip or Liz call, the quarterback calls out a city, state, or color, followed by a two-digit number, to both sides of the formation. After this, he calls “Set, hit.” If the play is on two, the quarterback says, “Set, hit, hit.” An example of the quarterback’s cadence is: “Rip, Rip; Chicago 26, Chicago 26; set, hit.”
AudiblesAny word can be a live or hot word, indicating that the number that follows is the play. For example, if the hot word is red and the quarterback calls, “Red 41” before the snap, the offense knows that they run 41 iso.

18
3
Power Series
The first series of plays in the stacked-I formation offense is the power series. As the name implies, the plays in the power series are tough power plays. These plays are designed to control the ball and develop toughness in the offense. They also are designed to make the defense defend multiple gaps, creating space in the defense, which opens holes for the ballcarrier to run. This series includes the following plays: iso, power, and toss.
20/21 IsoIso is an abbreviation for isolation. On this play, the fullback isolate blocks the playside linebacker. This play is the first to be installed because it requires a certain amount of toughness to run and defend successfully. This play should be introduced to players with this thought in mind, which is why it is part of the power series plays.
For the offensive line, the blocking schemes are not taught rules by position (e.g., left guard: on/over/inside). Instead, the offensive line is taught blocking concepts for each play. For iso, the concepts are as follows:

19
XTNE E
SM
Y
W
QB
C
FB
C
TB
FS
Z
SS
Figure 3-2. Bubble vs. 4-3 over
X
E N TSM W
Y
E
QB
C
FB
C
TB
FS
Z
SS
Figure 3-1. Bubble vs. 4-3 under
• The fullback attacks the first bubble past the center.• All linemen part the seas away from the bubble.• The offensive linemen find double-teams along the line of scrimmage and
execute them.
Part the seas is the term used to describe the blocking assignments, the placement of the helmet, and the lead step of the lineman. Wherever the bubble is, the linemen block away from the bubble. Their helmet placement is to the inside of the defender in relation to where the bubble is. Their lead step is with the foot nearest the bubble. This is a drive block. The offensive line fires off the line of scrimmage on the snap and creates movement, keeping their head on the playside of the defensive lineman.
Depending on the alignment of the defense, the first bubble may be at the A gap, B gap, or even the C gap. The advantage of using concepts instead of rules is that they allow players to internalize the play quickly, which allows them to play faster. It also allows for flexibility with the players, so they can quickly learn multiple positions along the offensive line. Another advantage of teaching concepts is that if the defense moves around (or stems) late, the offensive line can easily follow their concepts and still block the play successfully. Figures 3-1 through 3-8 show the bubble versus various defensive fronts.
XT N T
BB
B
YB
QB
C
FB
C
TB
FS
Z
SS
Figure 3-3. Bubble vs. 3-4
XTNE E
MW
Y
B
QB
C
FB
C
TB
FS
Z
SS
Figure 3-4. Bubble vs. 4-4

20
XTN EES
M
Y
W
QB
C
FB
C
TB
FS
Z
SS
Figure 3-7. Bubble vs. 5-3
XTNE E B
B
YB
QB
C
FB
C
TB
FS
Z
SS
Figure 3-6. Bubble vs. 6-2
XT N T
B B B
Y
B
QB
C
FB
C
TB
FS
Z
SS
Figure 3-5. Bubble vs. 3-3
XTNE E S
M
Y
W
QB
C
FB
C
TB
FS
Z
SS
Figure 3-8. Bubble vs. split-6
The quarterback reverses out and gets the ball as deep as he can to the tailback. After he hands the ball off, the quarterback carries out the boot to the playside, following the Z-back. The quarterback, after he hands the ball off, keeps his off hand on his outside hip to make the defense think he has the ball. He accelerates and carries out his fake for 10 yards beyond the line of scrimmage. The quarterback is setting up the quarterback keep off the same play-action.
As mentioned, iso means the fullback lead blocks on the playside linebacker. The key to the success of this play is for the fullback to block the linebacker on the defensive side of the line of scrimmage. The fullback steps with his playside foot and quickly attacks the linebacker. His aiming point is the linebacker’s outside number. Ideally, the fullback blocks the linebacker to the inside. However, a good linebacker keeps his outside shoulder free so it is up to the tailback to read the fullback’s block. As the fullback approaches the linebacker, he chops his feet and lowers his hips. His inside shoulder makes contact with the linebacker’s outside number. The fullback’s feet accelerate on contact. Throughout the entire play, the fullback keeps his eyes and head up and focuses on his aiming point. It is important for the fullback not to assume that the bubble that was there before the snap is still there after the snap. The fullback needs to keep his eyes wide open to see if the bubble closes after the snap and adjust his route to the linebacker accordingly. Also, if the linebacker blitzes, the fullback must be ready for a massive collision at the line of scrimmage. No matter what, the fullback cannot make his block on the offensive side of the line of scrimmage.

21
XTNE E
SM
Y
W
QB
C
FB
C
TB
FS
Z
SS
Figure 3-11. Ringo 20 iso vs. 4-3 over
X
E N TSM W
Y
E
QB
C
FB
C
TB
FS
Z
SS
Figure 3-10. Lucky 20 iso vs. 4-3 under
The tailback also steps with his playside foot and quickly attacks the line of scrimmage. His eyes need to be up and reading the block of the fullback on the linebacker. The tailback cuts in the same direction of the fullback’s butt. Similar to the fullback, the tailback needs keep his eyes wide open to see if the bubble closes after the snap (Figure 3-9). It is important for the tailback to keep both hands on the ball as he runs through the line of scrimmage. Since iso is a fast attacking play, the tailback makes one cut off the block of the fullback and gets north and south (i.e., sprints straight to the end zone).
X
E N TSM W
Y
E
QB
C
FB
C
TB
FS
Z
SS
Figure 3-9. Bubble closes after the snap. Fullback and tailback adjust their route to the open bubble.
The Z-back accelerates to the playside and blocks the first defender outside the end man on the line of scrimmage (EMLOS). He is the lead blocker for the quarterback. The idea behind this scheme for the Z-back is to keep the outside defenders from crashing in on the iso and honoring the quarterback. When the outside defenders start to tackle the tailback, then it is time to run the quarterback keep.
The X-receiver stalk blocks the cornerback. It is important for the X-receiver to be very physical when blocking the cornerback. Figures 3-10 through 3-17 show 20/21 iso versus various defensive fronts.

22
XTNE E
MW
Y
B
QB
C
FB
C
TB
FS
Z
SS
Figure 3-13. Ringo 21 iso vs. 4-4
XT N T
BB
B
YB
QB
C
FB
C
TB
FS
Z
SS
Figure 3-12. Lucky 21 iso vs. 3-4
XT N T
BB B
Y
B
QB
C
FB
C
TB
FS
Z
SS
Figure 3-14. Lucky 21 iso vs. 3-3
XTNE E B
B
YB
QB
C
FB
C
TB
FS
Z
SS
Figure 3-15. Ringo 20 iso vs. 6-2
XTN EES
M
Y
W
QB
C
FB
C
TB
FS
Z
SS
Figure 3-16. Lucky 21 iso vs. 5-3
XTNE E S
M
Y
W
QB
C
FB
C
TB
FS
Z
SS
Figure 3-17. Ringo 20 iso vs. split-6
20/21 BlastOne of the many advantages of the stacked-I formation offense is the ability to send the fullback and Z-back through the same hole, into different holes, or opposite directions, depending on what the defense is keying. This approach creates conflicting reads by the defense, which forces them to play slow. Blast is the term used to tell both the fullback and Z-back that they are going to lead the tailback to the playside and block for him. Blast is a great play call against defenses that load the box. It is also a great goal line and short-yardage play call.

23
XE N T SW
M
YE
QB
C
FB
C
TB
FS
Z
SS
Figure 3-19. Ringo 20 blast vs. 6-2
XTNE E
SM
Y
W
QB
C
FB
C
TB
FS
Z
SS
Figure 3-18. Ringo 21 blast vs. 4-3 over
The offensive line follows the same blocking concepts for 20/21 blast as they do for 20/21 iso. They part the seas at the first gap past the center.
The quarterback’s technique also does not change for 20/21 blast. He reverses out and brings the ball as deep as he can to the tailback. After the handoff, he accelerates outside for 10 yards, pretending he has the ball.
The fullback’s assignment does not change. He still blocks the playside linebacker, using the same technique. The tailback’s assignment also does not change. He receives the handoff and reads the fullback’s block on the linebacker.
Before the snap, the Z-back needs to identify the possible defender that he blocks. After the snap, the Z-back follows the fullback and reads his block on the linebacker. It is important that he reads this block and leads the tailback correctly. He then blocks the first defender he sees.
Figure 3-18 shows 21 blast against a 4-3 over defense with the free safety cheating up to stop the run. Blast allows the offense to block him. Figure 3-19 shows 20 blast versus a 6-2 defense. Notice in Figure 3-19 the offensive line has to block all of the defensive players on the line, leaving no linemen left to block a linebacker. Calling blast eliminates this problem.
20/21 Keep20/21 keep is blocked just like 20/21 iso, except that the playside tackle or tight end reach blocks the defensive end instead of blocking him out. The purpose of the reach block is to allow the quarterback to get outside. Ideally, this block looks to the defensive end like a poor kick-out block, allowing the defensive end to get inside to tackle to tailback on the iso action.
The quarterback once again reverses out and this time gives a great fake to the tailback by placing the ball into the belly of the tailback and then pulling the ball down to his outside hip while his offhand extends with the fake. The quarterback’s eyes should follow the tailback for two quick steps. The quarterback follows the Z-back

24
outside, looking to get to the sideline. The key to this play is the quarterback selling the fake on 20/21 iso every time. Then, when 20/21 keep is called, the defense is fooled into thinking the tailback has the ball.
The fullback and tailback run iso. The tailback gives a great fake by rolling hard over the quarterback’s hand and accelerating into the hole. His goal is to be tackled by at least one defender because he gave a great fake. If he is not tackled, the tailback needs to find a defender to block.
The Z-back blocks the first defender outside the EMLOS. His block is very important to the success of the play. If he is blocking this player hard every time 20/21 iso is called, then when 20/21 keep is called, it is an easy block.
Just like iso, the X-receiver stalk blocks the cornerback. It is important for the X-receiver to be very physical when blocking the cornerback. Figure 3-20 shows 21 keep against a 4-3 over defense.
XTNE E
SM
Y
W
QB
C
FB
C
TB
FS
Z
SS
Figure 3-20. Ringo 21 keep vs. 4-3 over
40/41 IsoOne of the many benefits of the stacked-I formation offense is that multiple backs can carry the ball without changing the blocking scheme. 40/41 is an isolation play to the Z-back and is blocked just like 20/21. The only difference in the play is that the Z-back is the ballcarrier and the tailback lead blocks for the quarterback. Since the Z-back’s alignment is two yards closer to the quarterback, the quarterback has to be quicker on his reverse pivot to get the ball as deep as possible to the Z-back. Figures 3-21 through 3-28 show 40/41 iso against various defensive fronts.

25
XT N T
BB
B
YB
QB
C
FB
C
TB
FS
Z
SS
Figure 3-23. Lucky 41 iso vs. 3-4
XTNE E
SM
Y
W
QB
C
FB
C
TB
FS
Z
SS
Figure 3-22. Ringo 40 iso vs. 4-3 over
X
E N TSM W
Y
E
QB
C
FB
C
TB
FS
Z
SS
Figure 3-21. Lucky 40 iso vs. 4-3 under
XT N T
BB B
Y
B
QB
C
FB
C
TB
FS
Z
SS
Figure 3-25. Lucky 41 iso vs. 3-3
XTNE E
MW
Y
B
QB
C
FB
C
TB
FS
Z
SS
Figure 3-24. Ringo 41 iso vs. 4-4
XTNE E B
B
YB
QB
C
FB
C
TB
FS
Z
SS
Figure 3-26. Ringo 40 iso vs. 6-2
XTN EES
M
Y
W
QB
C
FB
C
TB
FS
Z
SS
Figure 3-27. Lucky 41 iso vs. 5-3
XTNE E S
M
Y
W
QB
C
FB
C
TB
FS
Z
SS
Figure 3-28. Ringo 40 iso vs. split-6

26
30/31 Iso30/31 iso is the classic fullback belly. The lead blocker is either the Z-back, who is lined up in a wing formation, or the tailback. Some of the formations that 30/31 iso can be run from include Ringo T/Lucky T and Rip/Liz.
The offensive line blocks 30/31 iso exactly like they block 20/21 iso and 40/41 iso. They part the seas at the first bubble outside the center by stepping with the foot nearest the bubble. They drive block their defender away from the bubble.
The quarterback quickly reverses out and gives the ball to the fullback. After handing the ball off, the quarterback accelerates with both hands up by the numbers on his jersey and fakes 30/31 iso option (Chapter 6). The quarterback continues sprinting outside and draws the defense to himself.
The fullback steps with his playside foot to his aiming point, which is the crack of the guard. He secures the handoff and follows the Z-back’s block on the playside linebacker. He reads the block exactly like the tailback reads the block. However, because the lead block is coming from the wing position, the fullback can expect to cut outside behind the block.
In order to set up the iso option play, the tailback, from the I formation, takes one lateral step opposite the play. After this initial step, he gets into an option pitch relationship with the quarterback. After the quarterback hands the ball off, the tailback accelerates with the quarterback, faking the option. If the play is run from a T formation, the tailback pushes off his outside foot and bubbles back slightly to gain separation from the quarterback. His assignment does not change as he still fakes the option.
Before the ball is snapped, the Z-back identifies the first bubble to the playside. From the wing position, he takes a lateral step to the bubble by pushing off his outside foot. His eyes must be up as he finds the playside linebacker. He attacks the linebacker and tries to get his head on the opposite numbers of the linebacker. This block should be a fun block for the Z-back because the linebacker may not see him coming to block him. If the Z-back is aligned in the backfield, he still attacks the first bubble past the center and aggressively attacks the linebacker. Similar to the fullback’s block on 20/21 iso, the Z-back must be the aggressor and block the linebacker on the defensive side of the line of scrimmage.
Just like iso, the X-receiver stalk blocks the cornerback. It is important for the X-receiver to be very physical when blocking the cornerback. Figure 3-29 shows 31 iso from both the Ringo T and Liz formations. Notice that nobody’s assignment changes when the play is run from different formations—the play is run exactly the same. Figure 3-30 demonstrates 30 iso from Ringo T. The tailback is now the lead blocker for the fullback, and the Z-back runs the option fake. As can be seen, the ability to run the same play from multiple formations within the stacked-I offense creates tremendous pressure on the defense.

27
XEN T
W SM
YE
QB
C
FB
C
TB
FS
Z
SS
XEN T
W SM
YE
QB
C
FB
C
TB
FS
Z
SS
Figure 3-29. Ringo T 31 iso and Liz 31 iso vs. 4-4
XEN T
W SM
YE
QB
C
FB
C
TB
FS
Z
SS
Figure 3-30. Ringo T 30 iso vs. 4-4
26/27 Power26/27 power is an off-tackle play where the fullback blocks out the EMLOS and the backside guard pulls and leads up the hole, looking for the playside linebacker. As with iso, this play relies on toughness to run effectively.
The concept begins by teaching the playside offensive line to build a wall, leaving the EMLOS and the playside linebacker. The playside offensive line includes the tight end, tackle, guard, and center. The wall begins with the first defender inside the EMLOS and playside linebacker. They are finding double-teams as they block down away from the hole. Ideally, double-teams occur at the point of attack, but sometimes defenses take that away by alignment. Additionally, not all double-teams look the same or are blocked with the same teammates. The down block may be to a defensive lineman, a linebacker, or a double-team to a linebacker. The backside guard pulls playside, stays tight off the wall, and leads up on the playside linebacker. It is very important that the
28
X
E N TSM W
Y
E
QB
C
FB
C
TB
FS
Z
SS
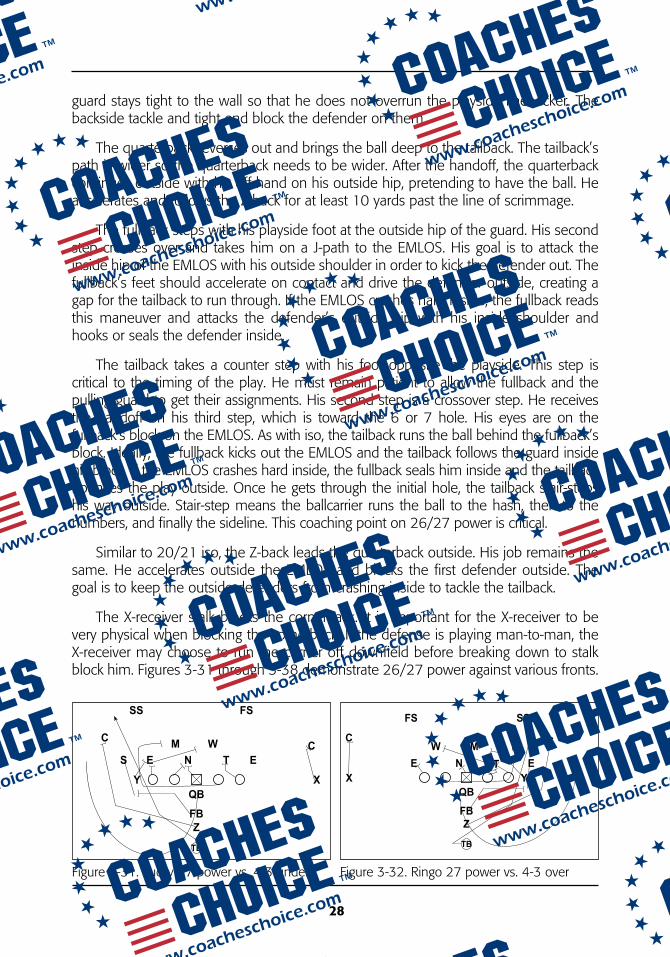
Figure 3-31. Lucky 27 power vs. 4-3 under
guard stays tight to the wall so that he does not overrun the playside linebacker. The backside tackle and tight end block the defender on them.
The quarterback reverses out and brings the ball deep to the tailback. The tailback’s path is wider so the quarterback needs to be wider. After the handoff, the quarterback continues outside with his off hand on his outside hip, pretending to have the ball. He accelerates and follows the Z-back for at least 10 yards past the line of scrimmage.
The fullback steps with his playside foot at the outside hip of the guard. His second step crosses over and takes him on a J-path to the EMLOS. His goal is to attack the inside hip of the EMLOS with his outside shoulder in order to kick the defender out. The fullback’s feet should accelerate on contact and drive the defender outside, creating a gap for the tailback to run through. If the EMLOS crashes hard inside, the fullback reads this maneuver and attacks the defender’s outside hip with his inside shoulder and hooks or seals the defender inside.
The tailback takes a counter step with his foot opposite the playside. This step is critical to the timing of the play. He must remain patient to allow the fullback and the pulling guard to get their assignments. His second step is a crossover step. He receives the handoff on his third step, which is toward the 6 or 7 hole. His eyes are on the fullback’s block on the EMLOS. As with iso, the tailback runs the ball behind the fullback’s block. Ideally, the fullback kicks out the EMLOS and the tailback follows the guard inside his block. If the EMLOS crashes hard inside, the fullback seals him inside and the tailback bounces the play outside. Once he gets through the initial hole, the tailback stair-steps his way outside. Stair-step means the ballcarrier runs the ball to the hash, then to the numbers, and finally the sideline. This coaching point on 26/27 power is critical.
Similar to 20/21 iso, the Z-back leads the quarterback outside. His job remains the same. He accelerates outside the EMLOS and blocks the first defender outside. The goal is to keep the outside defenders from crashing inside to tackle the tailback.
The X-receiver stalk blocks the cornerback. It is important for the X-receiver to be very physical when blocking the cornerback. If the defense is playing man-to-man, the X-receiver may choose to run the corner off downfield before breaking down to stalk block him. Figures 3-31 through 3-38 demonstrate 26/27 power against various fronts.
XTNE E
SM
Y
W
QB
C
FB
C
TB
FS
Z
SS
Figure 3-32. Ringo 27 power vs. 4-3 over

29
XTNE E
MW
Y
B
QB
C
FB
C
TB
FS
Z
SS
Figure 3-34. Ringo 26 power vs. 4-4
XT N T
BB
B
YB
QB
C
FB
C
TB
FS
Z
SS
Figure 3-33. Lucky 27 power vs. 3-4
XT N T
BB B
Y
B
QB
C
FB
C
TB
FS
Z
SS
Figure 3-35. Lucky 27 power vs. 3-3
XT N EEB
B
YB
QB
C
FB
C
TB
FS
Z
SS
Figure 3-36. Lucky 26 power vs. 6-2
XTN EES
M
Y
W
QB
C
FB
C
TB
FS
Z
SS
Figure 3-37. Lucky 26 power vs. 5-3
XTNE E S
M
Y
W
QB
C
FB
C
TB
FS
Z
SS
Figure 3-38. Ringo 26 power vs. split-6
46/47 Power46/47 power is run to the Z-back. The quarterback has to reverse pivot quickly in order to get the ball as deep as possible to the Z-back. After the handoff, the quarterback accelerates outside for at least 10 yards. The tailback assumes the role of blocking the first defender outside the EMLOS while leading for the quarterback. The fullback takes the same J-path to block the EMLOS. The offensive line blocks exactly the same way as they do for 26/27 power. Figures 3-39 through 3-46 demonstrate how 46/47 power is blocked against different defensive fronts.