fortios handbook - managing devices for fortios...
TRANSCRIPT

FortiOS™ Handbook Managing Devices for FortiOS 5.0
FortiOS™ Handbook Managing Devices for FortiOS 5.0
October 31, 2013
01-505-122870-20131031
Copyright© 2013 Fortinet, Inc. All rights reserved. Fortinet®, FortiGate®, and FortiGuard®, are
registered trademarks of Fortinet, Inc., and other Fortinet names herein may also be trademarks
of Fortinet. All other product or company names may be trademarks of their respective owners.
Performance metrics contained herein were attained in internal lab tests under ideal conditions,
and performance may vary. Network variables, different network environments and other
conditions may affect performance results. Nothing herein represents any binding commitment
by Fortinet, and Fortinet disclaims all warranties, whether express or implied, except to the
extent Fortinet enters a binding written contract, signed by Fortinet’s General Counsel, with a
purchaser that expressly warrants that the identified product will perform according to the
performance metrics herein. For absolute clarity, any such warranty will be limited to
performance in the same ideal conditions as in Fortinet’s internal lab tests. Fortinet disclaims in
full any guarantees. Fortinet reserves the right to change, modify, transfer, or otherwise revise
this publication without notice, and the most current version of the publication shall be
applicable.
Technical Documentation docs.fortinet.com
Knowledge Base kb.fortinet.com
Customer Service & Support support.fortinet.com
Training Services training.fortinet.com
FortiGuard fortiguard.com
Document Feedback [email protected]

Contents
Introduction....................................................................................................... 4
Before you begin...................................................................................................... 4
Managing “bring your own device” ................................................................ 5
Device monitoring .................................................................................................... 5
Device Groups ......................................................................................................... 6
Creating a custom device group........................................................................ 7
Controlling access with a MAC Address Access Control List ................................. 8
Device policies......................................................................................................... 8
Creating device policies................................................................................... 10
Endpoint Protection ....................................................................................... 12
Endpoint Protection overview................................................................................ 12
User experience ............................................................................................... 12
FortiGate endpoint registration limits............................................................... 13
Configuration overview .......................................................................................... 14
Changing the FortiClient installer download location ...................................... 14
Creating a FortiClient profile .................................................................................. 15
Enabling Endpoint Protection in security policies ................................................. 17
Configuring endpoint registration over a VPN ....................................................... 18
Endpoint registration on an IPsec VPN............................................................ 18
Endpoint registration on the SSL VPN............................................................. 18
Synchronizing endpoint registrations .............................................................. 18
Monitoring endpoints............................................................................................. 19
Modifying the Endpoint Protection replacement messages.................................. 19
Vulnerability Scan........................................................................................... 20
Configuring vulnerability scans.............................................................................. 20
Running a vulnerability scan and viewing scan results.......................................... 22
Requirements for authenticated scanning and ports scanned.............................. 22
Microsoft Windows hosts - domain scanning ................................................. 23
Microsoft Windows hosts - local (non-domain) scanning................................ 24
Windows firewall settings ................................................................................ 24
Unix hosts ........................................................................................................ 24
Index ................................................................................................................ 27
Page 3
Fortinet Technologies Inc. Page 4 FortiOS™ Handbook - Managing Devices for FortiOS 5.0
Introduction
Welcome and thank you for selecting Fortinet products for your network protection.
This chapter contains the following topics:
• Before you begin
• How this guide is organized
Before you begin
Before you begin using this guide, please ensure that:
• You have administrative access to the web-based manager and/or CLI.
• The FortiGate unit is integrated into your network.
• The operation mode has been configured.
• The system time, DNS settings, administrator password, and network interfaces have been
configured.
• Firmware, FortiGuard Antivirus and FortiGuard Antispam updates are completed.
• Any third-party software or servers have been configured using their documentation.
While using the instructions in this guide, note that administrators are assumed to be
super_admin administrators unless otherwise specified. Some restrictions will apply to other
administrators.
How this guide is organized
This FortiOS Handbook chapter contains the following sections:
Managing “bring your own device” describes device monitoring, devices, device groups, and
device policies. The administrator can monitor all types of devices and control their access to
network resources.
Endpoint Protection describes how you can enforce the use of FortiClient Endpoint Control and
apply an endpoint profile to users’ devices. Endpoint profiles include real-time antivirus
protection, application control, web category filtering, and VPN provisioning.
Vulnerability Scan describes how perform network vulnerability scanning to look for security
weaknesses in your servers and workstations.
Managing “bring your own device”
FortiOS can control network access for different types of personal mobile devices that your
employees bring onto your premises. You can:
• identify and monitor the types of devices connecting to your networks, wireless or wired
• use MAC address based access control to allow or deny individual devices
• create policies based on device type
• enforce endpoint control on devices that can run FortiClient Endpoint Control software
Device monitoring
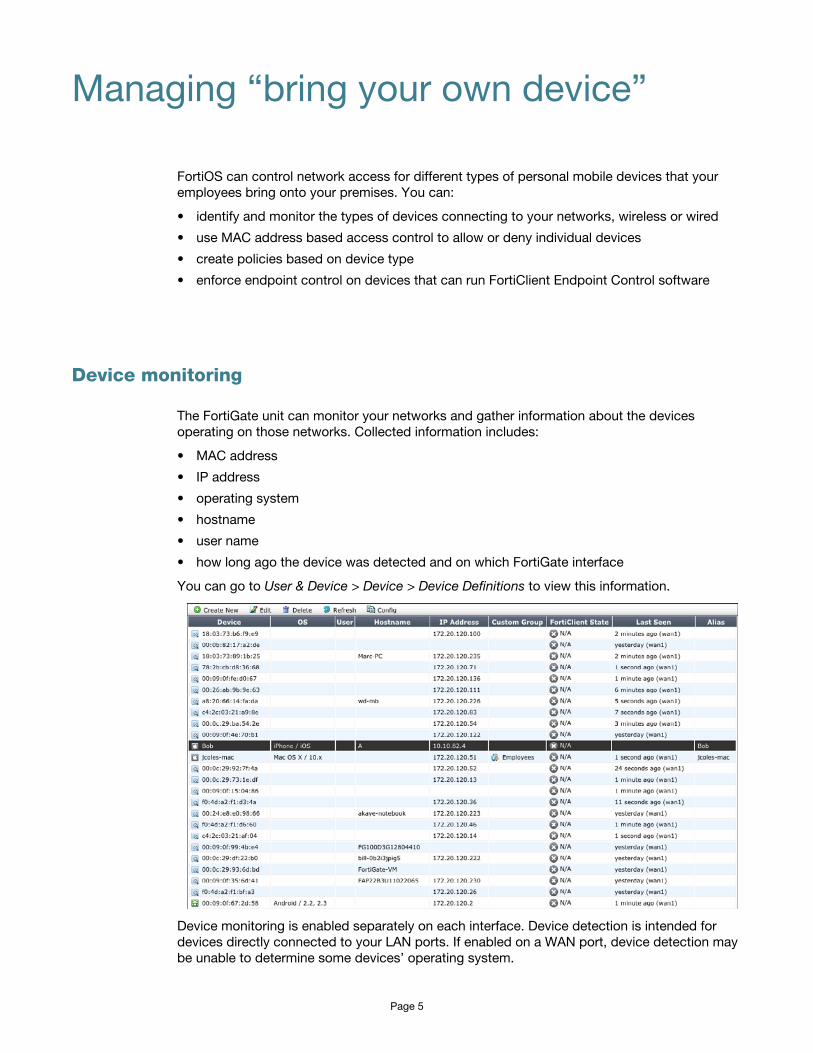
The FortiGate unit can monitor your networks and gather information about the devices
operating on those networks. Collected information includes:
• MAC address
• IP address
• operating system
• hostname
• user name
• how long ago the device was detected and on which FortiGate interface
You can go to User & Device > Device > Device Definitions to view this information.
Device monitoring is enabled separately on each interface. Device detection is intended for
devices directly connected to your LAN ports. If enabled on a WAN port, device detection may
be unable to determine some devices’ operating system.
Page 5

To configure device monitoring
1. Go to System > Network > Interfaces.
2. Edit the interface that you want to monitor devices on.
3. In Device Management, select Detect and Identify Devices.
4. Select OK.
5. Repeat steps 2 through 4 for each interface that will monitor devices.
To assign an alias to a detected device or change device information
1. Go to User & Device > Device > Device Definitions.
2. Double-click the device entry or right-click it and select Edit.
3. Enter an Alias such as the user’s name to identify the device.
This is step is compulsory. The alias replaces the MAC address in the device list.
4. Change other information as needed.
5. Select OK.
To add a device manually
1. Go to User & Device > Device > Device Definitions and select Create New.
2. Enter the following information.
• Alias (required)
• MAC address
• Device Type
3. Optionally, select Custom Groups or enter Comments.
4. Select OK.
Device Groups
Device Groups are used in device policies to specify which devices match the policy. FortiOS
automatically adds detected devices of well-known device types to predefined device groups.
You can also create custom device groups so that you can create a different policy for devices
that you know than for devices in general.
Go to User & Device > Device > Device Groups to view the list of device groups. To view all
groups, select Show Empty Groups at the top right of the list.
Table 1: Predefined Device Groups
Group Devices
All All devices.
Android Phone All Android-based phones in the Device Visibility database.
Android Tablet Tablets running Android OS.
BlackBerry Phone All BlackBerry-based phones in the Device Visibility database.
BlackBerry PlayBook All BlackBerry PlayBook devices in the Device Visibility database.
Collected Emails All devices from which FortiOS has collected a user email address.
Fortinet Device FortiGate, FortiManager, FortiAnalyzer, FortiMail, etc.
Fortinet Technologies Inc. Page 6 FortiOS™ Handbook - Managing Devices for FortiOS 5.0

Creating a custom device group
In addition to the predefined device groups, you can create custom device groups, where you
choose the member devices.
For ease of identifying devices, Fortinet recommends that you assign each device an Alias. For
previously detected devices, you can edit the existing device definition to assign an alias. For
devices that have not yet been detected, you can add a device definition if you know the
device’s MAC address. At that time you can also assign an alias for the device.
To create a custom device group and add devices to it
1. Go to User & Device > Device > Device Groups and select Create New.
2. Enter a Name for the group, Employees for example.
3. Click in the Members field and click a device to add. Repeat to add other devices.
4. Select OK.
The devices are added to the custom device group.
Gaming Console All Gaming consoles listed in the Device Visibility database. This
includes Xbox, PS2, PS3, Wii, PSP.
IP Phone All IP phones.
iPad All IOS-based tablets in the Device Visibility database.
iPhone All IOS-based phones in the Device Visibility database.
Linux PC PCs running a Linux-based OS.
Mac Apple Macintosh computers.
Media Streaming Media streaming devices such as Apple TV.
Router/NAT Device Router.
Windows PC PCs running a Windows OS.
Windows Phone All Windows OS based phones.
Windows Tablet All Windows-based tablets.
Other Network Device All other network devices not categorized under any other group.
Table 1: Predefined Device Groups
Group Devices
Fortinet Technologies Inc. Page 7 FortiOS™ Handbook - Managing Devices for FortiOS 5.0

Controlling access with a MAC Address Access Control List
A MAC Address Access Control List is best used to handle exceptions. If you want to limit
network access to a larger group such as your employees, it is better to create a custom device
group and specify that group in your device-based security policies.
A MAC Address Access Control List functions as either a list of blocked devices or a list of
allowed devices. This is determined by the Unknown MAC Address entry.
• By default, unknown MAC addresses are allowed: Action is Assign IP. You add an entry for
each MAC address that you want to block and set its Action to Block.
• If you want to restrict access to a limited set of devices, you set the Unknown MAC Address
entry to Block and add an entry for each allowed MAC address with Action set to Assign IP.
To create a MAC Address Access Control List
1. In the SSID or other interface configuration, select Enable DHCP Server.
2. Enter the required Address Range and Netmask.
3. Expand Advanced.
4. In MAC Address Access Control List, select Create New and enter the device’s MAC
Address.
5. Select Assign IP to allow the device or Block to block the device and then select OK.
6. Repeat Steps 4 and 5 for each additional MAC address entry.
7. If needed, edit the Unknown MAC Address entry to set the correct Action.
Device policies
Policies based on device identity enable you to implement policies according to device type.
For example:
• Gaming consoles cannot connect to the company network or the Internet.
• Personal tablet and phone devices can connect to the Internet but not to company servers.
• Company-issued laptop computers can connect to the Internet and company servers. Web
filtering and antivirus are applied.
• Employee laptop computers can connect to the Internet, but web filtering is applied. They
can also connect to company networks, but only if FortiClient Endpoint Security is installed
to protect against viruses.
Figure 1 and Figure 2 show these policies implemented for WiFi to the company network and to
the Internet.
Fortinet Technologies Inc. Page 8 FortiOS™ Handbook - Managing Devices for FortiOS 5.0

Figure 1: Device policies for WiFi access to the company network
Figure 2: Device policies for WiFi access to the Internet
The next section explains device policy creation in detail.
Fortinet Technologies Inc. Page 9 FortiOS™ Handbook - Managing Devices for FortiOS 5.0

Creating device policies
Device-based security policies are similar to policies based on user identity:
• The policy enables traffic to flow from one network interface to another.
• NAT can be enabled.
• Authentication rules can allow or deny specific devices or device groups.
• UTM protection can be applied.
To create a device identity policy
1. Go to Policy > Policy > Policy and select Create New.
2. In Policy Subtype, select Device Identity.
3. Choose Incoming Interface, Source Address, and Outgoing Interface as you would for any
security policy.
4. Select Enable NAT if appropriate.
You are now ready to create authentication rules.
To create an authentication rule
1. Select Create New.
2. Enter Destination, Schedule, and Service as you would for any security policy.
3. In Device, select the devices or device groups to which this policy applies.
You can select multiple devices or groups.
4. Select Compliant with Endpoint Profile if you want to enforce use of FortiClient Endpoint
Security by the client devices. This is available here only if Action is ACCEPT. See “Adding
endpoint protection” next.
5. Select either ACCEPT or DENY as the policy Action.
6. Configure UTM Security Profiles as you would for any security policy.
7. Select OK.
8. Select OK again to complete creation of the security policy.
Adding endpoint protection
Optionally, you can require that users’ devices have FortiClient Endpoint Security software
installed. The software provides FortiOS more detailed information about the applications being
used. FortiOS pushes a FortiClient profile out to the FortiClient software, configuring network
protection such as antivirus, application control, and web category filtering. Devices without an
up-to-date installation of FortiClient software are restricted to a captive portal from which the
user can download a FortiClient installer.
If you have already created an ACCEPT rule for particular device groups, you simply edit this
rule and enable Compliant with Endpoint Profile. Then select the device policy option that
directs FortiClient-compatible devices to a captive portal.
Figure 3: Authentication rule with Endpoint compliance and captive portal enabled
For more information, see “Endpoint Protection” on page 12.
Fortinet Technologies Inc. Page 10 FortiOS™ Handbook - Managing Devices for FortiOS 5.0

Setting Device Policy Options
1. Optionally, enable Attempt to detect all Unknown device types before implicit deny.
2. Redirect all non-compliant/unregistered FortiClient compatible devices to a captive portal
enables the captive portal. Select which device platforms to include.
3. Optionally, enable Prompt Email Address Collection Portal for all devices. This requests an
email address from the device user. See “Guest access in a retail environment” on page 994.
Fortinet Technologies Inc. Page 11 FortiOS™ Handbook - Managing Devices for FortiOS 5.0

Endpoint Protection
This section describes the Endpoint Protection feature and how to configure it.
The following topics are included in this section:
• Endpoint Protection overview
• Configuration overview
• Creating a FortiClient profile
• Enabling Endpoint Protection in security policies
• Configuring endpoint registration over a VPN
• Monitoring endpoints
• Modifying the Endpoint Protection replacement messages
Endpoint Protection overview
Endpoint Protection enforces the use of up-to-date FortiClient Endpoint Security software on
endpoints (workstation computers and mobile devices). It pushes a FortiClient profile to the
FortiClient application, specifying security settings, including:
• Real-time antivirus protection - on or off
• FortiClient web category filtering based on web filters defined in a FortiGate web filter profile
• FortiClient application control (application firewall) using application sensors defined in the
FortiGate application control feature
• Endpoint vulnerability scanning daily, weekly, or monthly
The FortiClient profile can also specify:
• VPN configurations
• Uploading of logs to the FortiGate unit hourly or daily
• Configuration profile (.mobileconfig file for iOS)
• Dashboard banner
You enable Endpoint Security in device identity security policies by enabling Compliant with
FortiClient Profile. Optionally, the security policy can redirect non-compliant endpoints to a
captive portal to download FortiClient software. Otherwise, non-compliant endpoints are
blocked.
User experience
Endpoint Protection applies to users attempting to make a connection that is controlled by a
firewall policy that specifies a FortiClient profile. The user of a non-compliant endpoint using a
web browser receives a replacement message HTML page from the FortiGate unit. The
message explains the non-compliance. Depending on the FortiClient profile, the user may be
allowed to continue or is blocked from further access. For information about modifying these
replacement pages, see “Modifying the Endpoint Protection replacement messages” on
page 19.
Page 12

FortiClient non-compliance
If the authentication rule in a device identity policy requires endpoint protection, a device
without the latest version of FortiClient Endpoint Security installed is denied access. Optionally,
the user is redirected to a captive and sees a message like this:
Figure 4: Default FortiClient non-compliance message for Windows
After installing FortiClient Endpoint Security, the user will receive an invitation to register with
the FortiGate unit. If the user accepts the invitation, the FortiClient profile is sent to the device's
FortiClient application. Now the user can pass the authentication rule and connect to the
network. FortiClient Endpoint Security registered with a FortiGate unit does not need to be
separately licensed with FortiGuard.
The FortiGate unit can also register endpoints who connect over the Internet through a VPN.
The user can accept an invitation to register with the FortiGate unit. See “Configuring endpoint
registration over a VPN” on page 18.
FortiGate endpoint registration limits
To view the number of endpoints that are registered and the total that can be registered, go to
System > Dashboard > Status. Under License Information, find FortiClient Software. You will see
a line like “Registered/Allowed 4 of 10”. This means that there are four registered endpoints and
a total of ten are allowed.
When the registration limit is reached, the next FortiClient-compatible device will not be able to
register with the FortiGate unit. The user sees a message in FortiClient application about this.
The FortiClient profile is not sent to client and the client cannot connect through the FortiGate
unit.
For all FortiGate models, the maximum number of registered endpoints is ten. For all models
except 20C and 40C, you can purchase an endpoint license to increase this capacity:
Fortinet Technologies Inc. Page 13 FortiOS™ Handbook - Managing Devices for FortiOS 5.0

To add an endpoint license - web-based manager
1. Go to System > Dashboard > Status.
2. In the License Information widget, under FortiClient Software, select [Enter License], enter
the license key, and select OK.
Configuration overview
Endpoint Protection requires that all hosts using the firewall policy have the FortiClient Endpoint
Security application installed. Make sure that all hosts affected by this policy are able to install
this application. Currently, FortiClient Endpoint Security is available for Microsoft Windows
(2000 and later) and Apple Mac OSX only.
To set up Endpoint Protection, you need to
• Enable Central Management by the FortiGuard Analysis & Management Service if you will
use FortiGuard Services to update the FortiClient application or antivirus signatures. You do
not need to enter account information. See “Centralized Management” in the System
Administration chapter of the FortiOS Handbook.
• By default, the FortiGuard service provides the FortiClient installer. If you prefer to host it on
your own server, see “Changing the FortiClient installer download location” on page 14.
• In Security Profiles, configure application sensors and web filters profiles as needed to
monitor or block applications. See the Security Profiles Guide chapter of the FortiOS
Handbook.for details.
• Create a FortiClient profile or use a predefined profile. See “Creating a FortiClient profile” on
page 15. Enable the application sensor and web category filtering profiles that you want to
use.
• Enable Compliant with FortiClient Profile in the authentication rules of Device Identity
security policies that the endpoints will use.
• Optionally, configure the FortiGate unit to support endpoint registration by IPsec or SSL
VPN.
Changing the FortiClient installer download location
By default, FortiClient installers are downloaded from the FortiGuard network. You can also host
these installers on a server for your users to download. In that case, you must configure FortiOS
with this custom download location. For example, to set the download location to a customer
web server with address custom.example.com, enter the following command:
config endpoint-control settingsset download-location customset download-custom-link "http://custom.example.com"
end
Table 2: Maximum registered endpoints with endpoint license
Model type Max Registered Endpoints
Desktop 200
Rack - 1U 2000
Rack - 2U+ 8000
Fortinet Technologies Inc. Page 14 FortiOS™ Handbook - Managing Devices for FortiOS 5.0

Creating a FortiClient profile
Each FortiClient profile is assigned to particular device groups, user groups, or individual users.
When Compliant with FortiClient Profile is selected in an authentication rule, all users of that rule
must have FortiClient Endpoint Security installed. The FortiGate unit pushes the FortiClient
profile settings to the FortiClient application on the client.
To create a FortiClient profile - web-based manager
1. If you will use the Application Firewall feature, go to Security Profiles > Application Control >
Application Sensors to create the Application Sensors that you will need.
2. If you will use Web Category Filtering, go to Security Profiles > Web Filter > Profiles to create
the web filter profile that you will need.
3. Go to User & Device > Endpoint Protection > FortiClient Profiles.
The list of FortiClient profiles is displayed.
4. Select Create New or select an existing profile and Edit it.
5. In Assign Profile To, select one or more device groups, user groups, and users to which this
FortiClient profile applies. You can also select user groups and users. This is not available for
the default profile.
6. Enter the FortiClient Configuration Deployment settings for Windows and Mac:
Antivirus Protection ON — enable the FortiClient realtime AntiVirus feature.
Web Category Filtering ON — enable web category filtering. Select the web filter
profile to use.
Disable Web
Category
Filtering when
protected by this
FortiGate
Disables FortiClient web category filtering when client traffic is
filtered by the FortiGate unit. Selected by default.
Client VPN Provisioning Enable to configure the FortiClient VPN client. Enter the VPN
configuration details.
Application Firewall ON — enable application control. Select the application sensor
to use.
Endpoint Vulnerability
Scan on Client
ON — FortiGate unit will perform vulnerability scan on client.
Select the desired schedule.
Initiate Scan
After Client
Registration
Enables scan following registration, regardless of schedule.
Selected by default.
Upload logs to
FortiAnalyzer
/FortiManager
ON — FortiClient software will upload its logs to the specified
FQDN or IP address. Select the desired schedule.
Use FortiManager for
client software/signature
update
ON — FortiClient software obtain AV signatures and software
updates from the specified FQDN or IP address. Failover to
FDN when FortiManager is not available is enabled by default.
Dashboard Banner ON — Display dashboard banner.
Fortinet Technologies Inc. Page 15 FortiOS™ Handbook - Managing Devices for FortiOS 5.0
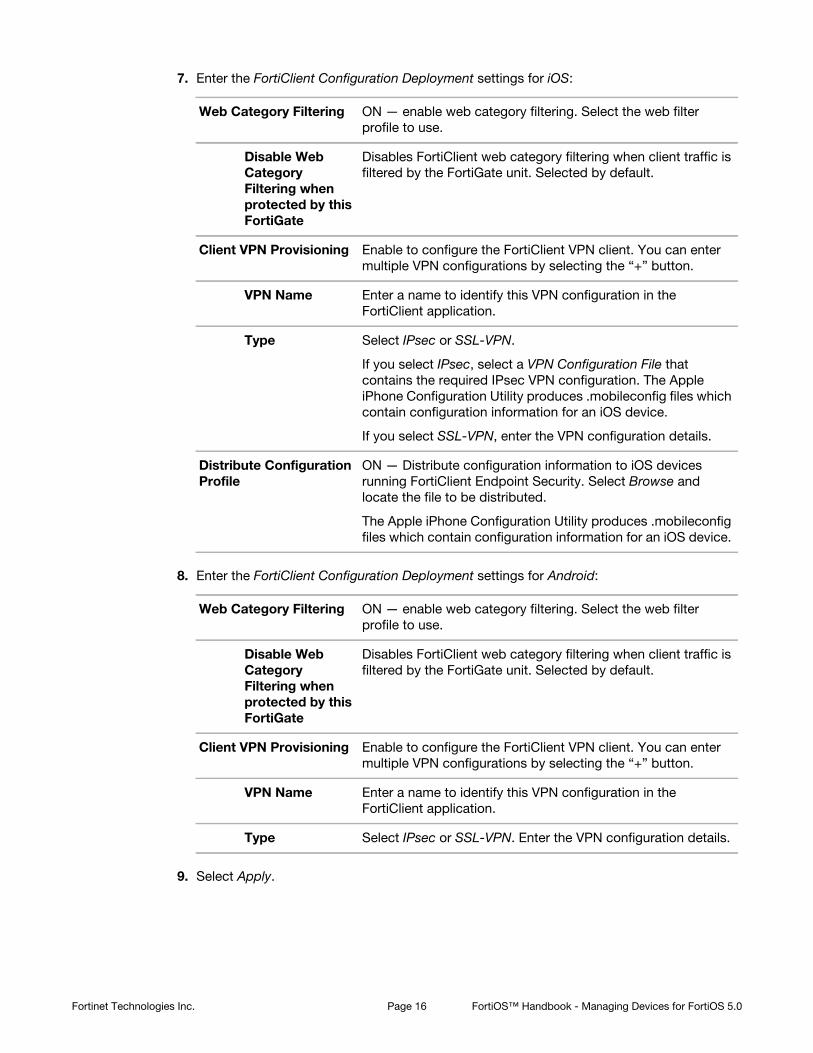
7. Enter the FortiClient Configuration Deployment settings for iOS:
8. Enter the FortiClient Configuration Deployment settings for Android:
9. Select Apply.
Web Category Filtering ON — enable web category filtering. Select the web filter
profile to use.
Disable Web
Category
Filtering when
protected by this
FortiGate
Disables FortiClient web category filtering when client traffic is
filtered by the FortiGate unit. Selected by default.
Client VPN Provisioning Enable to configure the FortiClient VPN client. You can enter
multiple VPN configurations by selecting the “+” button.
VPN Name Enter a name to identify this VPN configuration in the
FortiClient application.
Type Select IPsec or SSL-VPN.
If you select IPsec, select a VPN Configuration File that
contains the required IPsec VPN configuration. The Apple
iPhone Configuration Utility produces .mobileconfig files which
contain configuration information for an iOS device.
If you select SSL-VPN, enter the VPN configuration details.
Distribute Configuration
Profile
ON — Distribute configuration information to iOS devices
running FortiClient Endpoint Security. Select Browse and
locate the file to be distributed.
The Apple iPhone Configuration Utility produces .mobileconfig
files which contain configuration information for an iOS device.
Web Category Filtering ON — enable web category filtering. Select the web filter
profile to use.
Disable Web
Category
Filtering when
protected by this
FortiGate
Disables FortiClient web category filtering when client traffic is
filtered by the FortiGate unit. Selected by default.
Client VPN Provisioning Enable to configure the FortiClient VPN client. You can enter
multiple VPN configurations by selecting the “+” button.
VPN Name Enter a name to identify this VPN configuration in the
FortiClient application.
Type Select IPsec or SSL-VPN. Enter the VPN configuration details.
Fortinet Technologies Inc. Page 16 FortiOS™ Handbook - Managing Devices for FortiOS 5.0

To create a FortiClient profile - CLI
This example creates a profile for Windows and Mac computers.
config endpoint-control profileedit ep-profile1
set device-groups mac windows-pcconfig forticlient-winmac-settings
set forticlient-av enableset forticlient-wf enableset forticlient-wf-profile default
endend
Enabling Endpoint Protection in security policies
Endpoint Protection is applied to any traffic where the controlling firewall policy has Endpoint
Security enabled. The device group to which the device belongs determines which FortiClient
profile is applied. The policy searches the list of FortiClient profiles starting from the top and
applies the first profile assigned to the device group.
To enable Endpoint Protection - web-based manager
1. Go to Policy > Policy > Policy and edit the device identity firewall policy where you want to
enable Endpoint Protection.
2. Create or edit an authentication rule.
3. Select Compliant with FortiClient profile.
4. Select OK.
To configure the firewall policy - CLI
In this example, the LAN connects to Port 2 and the Internet is connected to Port 1. a
FortiClient profile is applied.
config firewall policyedit 0
set srcintf port2set dstintf port1set srcaddr LANusersset dstaddr allset action acceptset identity-based enableset identity-from deviceset nat enableconfig identity-based-policy
edit 1set schedule alwaysset service ALLset devices allset endpoint-compliance enable
endend
Fortinet Technologies Inc. Page 17 FortiOS™ Handbook - Managing Devices for FortiOS 5.0

Configuring endpoint registration over a VPN
FortiGate units can register FortiClient-equipped endpoints over either an interface-based IPsec
VPN or a tunnel-mode SSL VPN. After the user authenticates, the FortiGate unit sends the
FortiClient application the IP address and port to be used for registration. If the user accepts the
FortiGate invitation to register, registration proceeds and the FortiClient profile is downloaded to
the client.
Users without FortiClient Endpoint Security connecting to the SSL VPN through a browser can
be redirected to a captive portal to download and install the FortiClient software. The security
policy must enable Redirect all non-compliant/unregistered FortiClient compatible devices to a
captive portal, but not select any specific device types.
Endpoint registration on an IPsec VPN
You can enable endpoint registration when you configure the FortiClient VPN or you can enable
it on an existing FortiClient VPN.
To enable endpoint registration while configuring the VPN
• Enable Allow Endpoint Registration on the Network page of the VPN Wizard when creating
the FortiClient VPN.
To enable endpoint registration on an existing VPN
1. Go to System > Network > Interfaces and edit the VPN’s tunnel interface.
The tunnel is a subinterface of the physical network interface.
2. In Administrative Access, make sure that FCT-Access is enabled.
3. Select OK.
Endpoint registration on the SSL VPN
To enable endpoint registration on the SSL VPN
1. Go to VPN > SSL > Portal.
2. Make sure Enable Tunnel Mode is enabled.
3. Optionally, enable Include FortiClient Download.
Users who access the VPN with a browser will be able to download FortiClient Endpoint
Security for their device.
4. Select Apply.
5. Go to VPN > SSL > Config, make sure Allow Endpoint Registration (Tunnel Mode Only) is
enabled, then select Apply.
This procedure does not include all settings needed to configure a working SSL VPN.
Synchronizing endpoint registrations
To support roaming users in a network with multiple FortiGate units, you need to configure
synchronization of the endpoint registration databases between the units. The registered
endpoints are then recognized on all of the FortiGate units. This is configured in the CLI. For
Fortinet Technologies Inc. Page 18 FortiOS™ Handbook - Managing Devices for FortiOS 5.0

example, to synchronize this FortiGate unit’s registered endpoint database with another unit
named other1 at IP address 172.20.120.4, enter:
config endpoint-control forticlient-registration-syncedit other1
set peer-ip 172.20.120.4end
Monitoring endpoints
Go to User & Device > Monitor > FortiClient to monitor endpoints.
Modifying the Endpoint Protection replacement messages
If the security policy has Redirect all non-compliant/unregistered FortiClient compatible devices
to a captive portal enabled, users of non-compliant devices are redirected to a captive portal
that is defined by the Endpoint NAC Download Portal replacement message. There are different
portals for Android, iOS, Mac, Windows, and “other” devices. Optionally, you can modify them.
To modify the Endpoint NAC Download Portal
1. Go to System > Config > Replacement Message Group and select Extended View.
2. In the Endpoint Control section select the message that you want to edit.
The replacement message and its HTML code appear in a split screen in the lower half of the
page.
3. Modify the text as needed and select Save.
Fortinet Technologies Inc. Page 19 FortiOS™ Handbook - Managing Devices for FortiOS 5.0

Vulnerability Scan
The Network Vulnerability Scan helps you to protect your network assets (servers and
workstations) by scanning them for security weaknesses. You can scan on-demand or on a
scheduled basis. Results are viewable on the FortiGate unit, but results are also sent to an
attached FortiAnalyzer unit. The FortiAnalyzer unit can collect the results of vulnerability scans
from multiple FortiGate units at different locations on your network, compiling a comprehensive
report about network security.
This section describes how to configure a single FortiGate unit for network scanning and how to
view the results of the scan.
The following topics are included in this section:
• Configuring vulnerability scans
• Running a vulnerability scan and viewing scan results
• Requirements for authenticated scanning and ports scanned
Configuring vulnerability scans
You can configure the scan schedule and the assets to be scanned.
To configure scanning - web-based manager
1. Go to User & Device > Vulnerability Scan > Scan Definition.
2. Beside Schedule select Change to set the scan schedule and mode:
3. Select Apply to save the schedule and scan type.
4. Select Create New under Asset Definitions to select the devices on the network to scan.
An asset can be a single server or workstation computer on your network or a range of
addresses on your network. You must add assets to the vulnerability scan before you can
run a scan.
To scan an entire network or part of a network you can just add the appropriate IP address
range to the asset configuration. You can also add the IP addresses of Windows and Linux
computers to include the user names and passwords for these machines. The vulnerability
scanner will use these credentials to log into the computers and do more detailed
vulnerability scanning.
Recurrence Select Daily, Weekly, or Monthly and configure the details for the
option you have selected.
Suspend Scan
between
Set a time during which the scan should be paused if its running.
Vulnerability Scan
Mode
Quick — check only the most commonly used ports
Standard — check the ports used by most known applications
Full — check all TCP and UDP ports
For a detailed list of the TCP and UDP ports examined by each scan
mode, see Table 3 on page 25.
Page 20

Even if the asset is an address range you can add Windows and Linux credentials. The
vulnerability scanner will attempt to log into all network device it finds using these
credentials.
5. Enter the following information and select OK:
6. Select Apply to save the configuration.
To configure scanning - CLI
To configure, for example, a standard scan to be performed every Sunday at 2:00am, you would
enter:
config netscan settingsset scan-mode standardset schedule enableset time 02:00set recurrence weeklyset day-of-week sunday
end
To add an asset - CLI
This example adds a single computer to the Asset list:
config netscan assetsedit 0
set name "server1"set addr-type ipset start-ip 10.11.101.20set auth-windows enableset win-username adminset win-password zxcvbnm
Name Enter a name for this asset.
Type Select IP Address to add a single IP address.
Select Range to add a range of IP addresses to scan.
IP Address Enter the IP address of the asset. (Type is IP Address.)
Range Enter the start and end of the IP address range. (Type is Range.)
Enable Scheduled
Vulnerability Scanning
Select to allow this asset to be scanned according to the schedule.
Otherwise the asset is not scanned during a scheduled
vulnerability scan.
Windows
Authentication
Select to use authentication on a Windows operating system. Enter
the username and password in the fields provided.
For more information, see “Requirements for authenticated
scanning and ports scanned” on page 22.
Unix Authentication Select to use authentication on a Unix operating system. Enter the
username and password in the fields provided.
For more information, see “Requirements for authenticated
scanning and ports scanned” on page 22.
Fortinet Technologies Inc. Page 21 FortiOS™ Handbook - Managing Devices for FortiOS 5.0

set scheduled enableend
This example adds an address range to the Asset list. Authentication is not used:
config netscan assetsedit 0
set name "fileservers"set addr-type rangeset start-ip 10.11.101.160set end-ip 10.11.101.170set scheduled enable
end
Running a vulnerability scan and viewing scan results
To run a vulnerability scan - web-based manager
1. Go to User & Device > Vulnerability Scan > Scan Definition and select Start Scan.
When the scan is running you can pause or stop it at any time. You can also watch the
progress of the scan.
2. When the scan is complete go to User & Device > Vulnerability Scan > Vulnerability Result to
view the results of the scan.
To run a vulnerability scan - CLI
Use the following CLI commands:
execute netscan start scanexecute netscan statusexecute netscan pauseexecute netscan resumeexecute netscan stop
To view vulnerability scan results
1. To view vulnerability scan results go to User & Device > Vulnerability Scan > Vulnerability
Result.
2. Select any log entry to view log details.
Requirements for authenticated scanning and ports scanned
The effectiveness of an authenticated scan is determined by the level of access the FortiGate
unit obtains to the host operating system. Rather than use the system administrator’s account,
it might be more convenient to set up a separate account for the exclusive use of the
vulnerability scanner with a password that does not change.
The following sections detail the account requirements for various operating systems.
Fortinet Technologies Inc. Page 22 FortiOS™ Handbook - Managing Devices for FortiOS 5.0

Microsoft Windows hosts - domain scanning
The user account provided for authentication must
• have administrator rights
• be a Security type of account
• have global scope
• belong to the Domain Administrators group
• meet the Group Policy requirements listed below:
Group Policy - Security Options
In the Group Policy Management Editor, go to Computer Configuration > Windows Settings >
Security Settings > Local Policies > Security Options.
Setting Value
Network access: Sharing and security model for local accounts Classic
Accounts: Guest account status Disabled
Network access: Let Everyone permissions apply to anonymous users Disabled
Group Policy - System Services
In the Group Policy Management Editor, go to Computer Configuration > Windows Settings >
Security Settings > System Services.
Setting Value
Remote registry Automatic
Server Automatic
Windows Firewall Automatic
Group Policy - Administrative Templates
In the Group Policy Management Editor, go to Computer Configuration > Administrative
Templates > Network > Network Connections > Windows Firewall > Domain Profile.
Setting Value
Windows Firewall: Protect all network connections Disabled
or
Setting Value
Windows Firewall: Protect all network connections Enabled
Windows Firewall: Allow remote administration exception Enabled
Allow unsolicited messages from1 *
Fortinet Technologies Inc. Page 23 FortiOS™ Handbook - Managing Devices for FortiOS 5.0
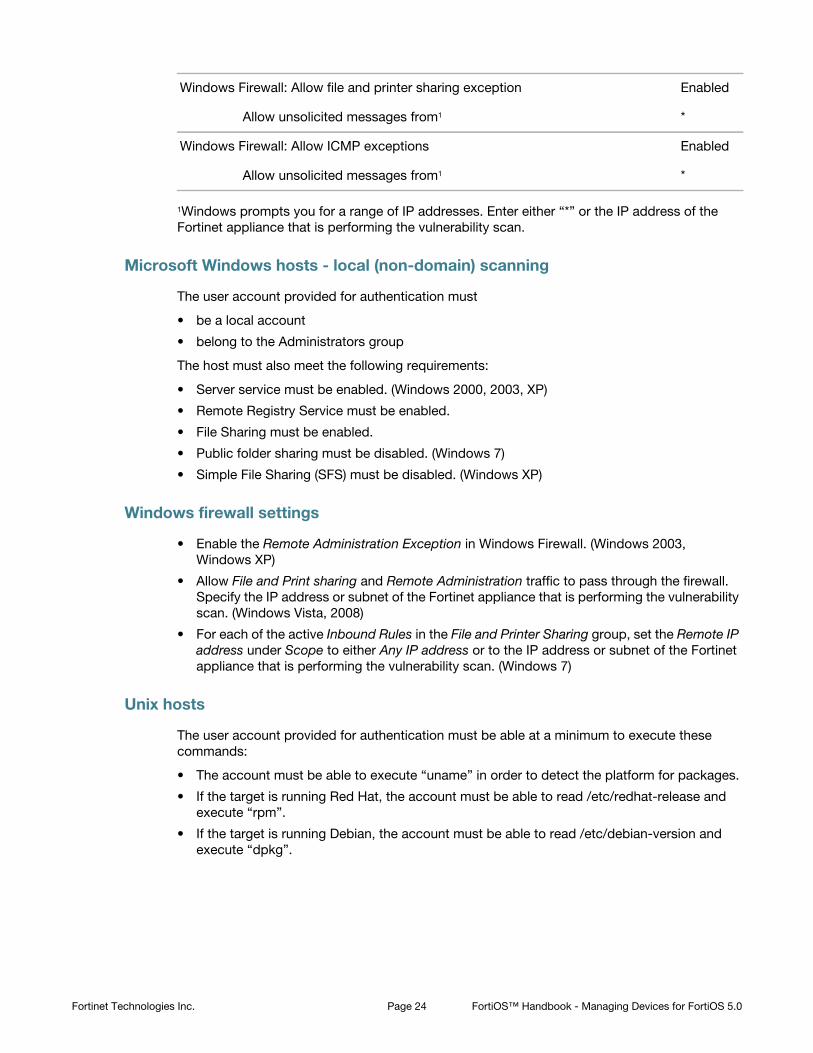
1Windows prompts you for a range of IP addresses. Enter either “*” or the IP address of the
Fortinet appliance that is performing the vulnerability scan.
Microsoft Windows hosts - local (non-domain) scanning
The user account provided for authentication must
• be a local account
• belong to the Administrators group
The host must also meet the following requirements:
• Server service must be enabled. (Windows 2000, 2003, XP)
• Remote Registry Service must be enabled.
• File Sharing must be enabled.
• Public folder sharing must be disabled. (Windows 7)
• Simple File Sharing (SFS) must be disabled. (Windows XP)
Windows firewall settings
• Enable the Remote Administration Exception in Windows Firewall. (Windows 2003,
Windows XP)
• Allow File and Print sharing and Remote Administration traffic to pass through the firewall.
Specify the IP address or subnet of the Fortinet appliance that is performing the vulnerability
scan. (Windows Vista, 2008)
• For each of the active Inbound Rules in the File and Printer Sharing group, set the Remote IP
address under Scope to either Any IP address or to the IP address or subnet of the Fortinet
appliance that is performing the vulnerability scan. (Windows 7)
Unix hosts
The user account provided for authentication must be able at a minimum to execute these
commands:
• The account must be able to execute “uname” in order to detect the platform for packages.
• If the target is running Red Hat, the account must be able to read /etc/redhat-release and
execute “rpm”.
• If the target is running Debian, the account must be able to read /etc/debian-version and
execute “dpkg”.
Windows Firewall: Allow file and printer sharing exception Enabled
Allow unsolicited messages from1 *
Windows Firewall: Allow ICMP exceptions Enabled
Allow unsolicited messages from1 *
Fortinet Technologies Inc. Page 24 FortiOS™ Handbook - Managing Devices for FortiOS 5.0

Table 3: Ports scanned in each scan mode
Scan Type Ports scanned
Standard
Scan
TCP: 1-3, 5, 7, 9, 11, 13, 15, 17-25, 27, 29, 31, 33, 35, 37-39, 41-223, 242-246, 256-265, 280-282,
309, 311, 318, 322-325, 344-351, 363, 369-581, 587, 592-593, 598, 600, 606-620, 624, 627, 631,
633-637, 666-674, 700, 704-705, 707, 709-711, 729-731, 740-742, 744, 747-754, 758-765, 767,
769-777, 780-783, 786, 799-801, 860, 873, 886-888, 900-901, 911, 950, 954-955, 990-993,
995-1001, 1008, 1010-1011, 1015, 1023-1100, 1109-1112, 1114, 1123, 1155, 1167, 1170, 1207,
1212, 1214, 1220-1222, 1234-1236, 1241, 1243, 1245, 1248, 1269, 131t3-1314, 1337, 1344-1625,
1636-1774, 1776-1815, 1818-1824, 1901-1909, 1911-1920, 1944-1951, 1973, 1981, 1985-2028,
2030, 2032-2036, 2038, 2040-2049, 2053, 2065, 2067, 2080, 2097, 2100, 2102-2107, 2109, 2111,
2115, 2120, 2140, 2160-2161, 2201-2202, 2213, 2221-2223, 2232-2239, 2241, 2260, 2279-2288,
2297, 2301, 2307, 2334, 2339, 2345, 2381, 2389, 2391, 2393-2394, 2399, 2401, 2433, 2447,
2500-2501, 2532, 2544, 2564-2565, 2583, 2592, 2600-2605, 2626-2627, 2638-2639, 2690, 2700,
2716, 2766, 2784-2789, 2801, 2908-2912, 2953-2954, 2998, 3000-3002, 3006-3007, 3010-3011,
3020, 3047-3049, 3080, 3127-3128, 3141-3145, 3180-3181, 3205, 3232, 3260, 3264, 3267-3269,
3279, 3306, 3322-3325, 3333, 3340, 3351-3352, 3355, 3372, 3389, 3421, 3454-3457, 3689-3690,
3700, 3791, 3900, 3984-3986, 4000-4002, 4008-4009, 4080, 4092, 4100, 4103, 4105, 4107,
4132-4134, 4144, 4242, 4321, 4333, 4343, 4443-4454, 4500-4501, 4567, 4590, 4626, 4651,
4660-4663, 4672, 4899, 4903, 4950, 5000-5005, 5009-5011, 5020-5021, 5031, 5050, 5053, 5080,
5100-5101, 5145, 5150, 5190-5193, 5222, 5236, 5300-5305, 5321, 5400-5402, 5432, 5510,
5520-5521, 5530, 5540, 5550, 5554-5558, 5569, 5599-5601, 5631-5632, 5634, 5678-5679,
5713-5717, 5729, 5742, 5745, 5755, 5757, 5766-5767, 5800-5802, 5900-5902, 5977-5979,
5997-6053, 6080, 6103, 6110-6112, 6123, 6129, 6141-6149, 6253, 6346, 6387, 6389, 6400,
6455-6456, 6499-6500, 6515, 6558, 6588, 6660-6670, 6672-6673, 6699, 6767, 6771, 6776, 6831,
6883, 6912, 6939, 6969-6970, 7000-7021, 7070, 7080, 7099-7100, 7121, 7161, 7174, 7200-7201,
7300-7301, 7306-7308, 7395, 7426-7431, 7491, 7511, 7777-7778, 7781, 7789, 7895, 7938,
7999-8020, 8023, 8032, 8039, 8080-8082, 8090, 8100, 8181, 8192, 8200, 8383, 8403, 8443, 8450,
8484, 8732, 8765, 8886-8894, 8910, 9000-9001, 9005, 9043, 9080, 9090, 9098-9100, 9400, 9443,
9535, 9872-9876, 9878, 9889, 9989-10000, 10005, 10007, 10080-10082, 10101, 10520, 10607,
10666, 11000, 11004, 11223, 12076, 12223, 12345-12346, 12361-12362, 12456, 12468-12469,
12631, 12701, 12753, 13000, 13333, 14237-14238, 15858, 16384, 16660, 16959, 16969, 17007,
17300, 18000, 18181-18186, 18190-18192, 18194, 18209-18210, 18231-18232, 18264, 19541,
20000-20001, 20011, 20034, 20200, 20203, 20331, 21544, 21554, 21845-21849, 22222, 22273,
22289, 22305, 22321, 22555, 22800, 22951, 23456, 23476-23477, 25000-25009, 25252, 25793,
25867, 26000, 26208, 26274, 27000-27009, 27374, 27665, 29369, 29891, 30029, 30100-30102,
30129, 30303, 30999, 31336-31337, 31339, 31554, 31666, 31785, 31787-31788, 32000,
32768-32790, 33333, 33567-33568, 33911, 34324, 37651, 40412, 40421-40423, 42424, 44337,
47557, 47806, 47808, 49400, 50505, 50766, 51102, 51107, 51112, 53001, 54321, 57341, 60008,
61439, 61466, 65000, 65301, 65512
UDP: 7, 9, 13, 17, 19, 21, 37, 53, 67-69, 98, 111, 121, 123, 135, 137-138, 161, 177, 371, 389, 407,
445, 456, 464, 500, 512, 514, 517-518, 520, 555, 635, 666, 858, 1001, 1010-1011, 1015, 1024-1049,
1051-1055, 1170, 1243, 1245, 1434, 1492, 1600, 1604, 1645, 1701, 1807, 1812, 1900, 1978, 1981,
1999, 2001-2002, 2023, 2049, 2115, 2140, 2801, 3024, 3129, 3150, 3283, 3527, 3700, 3801, 4000,
4092, 4156, 4569, 4590, 4781, 5000-5001, 5036, 5060, 5321, 5400-5402, 5503, 5569, 5632, 5742,
6073, 6502, 6670, 6771, 6912, 6969, 7000, 7300-7301, 7306-7308, 7778, 7789, 7938, 9872-9875,
9989, 10067, 10167, 11000, 11223, 12223, 12345-12346, 12361-12362, 15253, 15345, 16969,
20001, 20034, 21544, 22222, 23456, 26274, 27444, 30029, 31335, 31337-31339, 31666, 31785,
31789, 31791-31792, 32771, 33333, 34324, 40412, 40421-40423, 40426, 47262, 50505, 50766,
51100-51101, 51109, 53001, 61466, 65000
Fortinet Technologies Inc. Page 25 FortiOS™ Handbook - Managing Devices for FortiOS 5.0
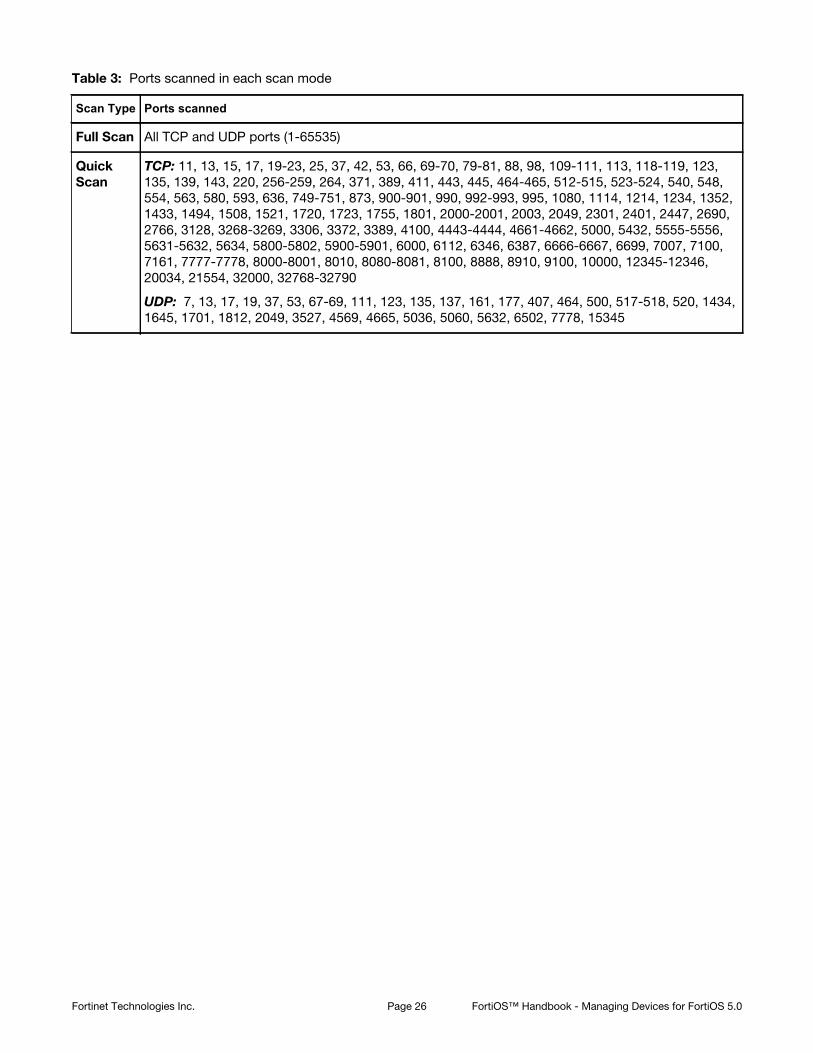
Full Scan All TCP and UDP ports (1-65535)
Quick
Scan
TCP: 11, 13, 15, 17, 19-23, 25, 37, 42, 53, 66, 69-70, 79-81, 88, 98, 109-111, 113, 118-119, 123,
135, 139, 143, 220, 256-259, 264, 371, 389, 411, 443, 445, 464-465, 512-515, 523-524, 540, 548,
554, 563, 580, 593, 636, 749-751, 873, 900-901, 990, 992-993, 995, 1080, 1114, 1214, 1234, 1352,
1433, 1494, 1508, 1521, 1720, 1723, 1755, 1801, 2000-2001, 2003, 2049, 2301, 2401, 2447, 2690,
2766, 3128, 3268-3269, 3306, 3372, 3389, 4100, 4443-4444, 4661-4662, 5000, 5432, 5555-5556,
5631-5632, 5634, 5800-5802, 5900-5901, 6000, 6112, 6346, 6387, 6666-6667, 6699, 7007, 7100,
7161, 7777-7778, 8000-8001, 8010, 8080-8081, 8100, 8888, 8910, 9100, 10000, 12345-12346,
20034, 21554, 32000, 32768-32790
UDP: 7, 13, 17, 19, 37, 53, 67-69, 111, 123, 135, 137, 161, 177, 407, 464, 500, 517-518, 520, 1434,
1645, 1701, 1812, 2049, 3527, 4569, 4665, 5036, 5060, 5632, 6502, 7778, 15345
Table 3: Ports scanned in each scan mode
Scan Type Ports scanned
Fortinet Technologies Inc. Page 26 FortiOS™ Handbook - Managing Devices for FortiOS 5.0

Index
A
adding, configuring definingendpoint profile 15
B
blocking of usersEndpoint Control 14
D
default password 4
E
endpointconfiguring a profile 15
Endpoint Controlblocked users 14monitoring endpoints 19
Endpoint Protectionmodifying download portal 19
Endpoint Protection portalmodifying replacement pages 19
endpointsmonitoring 19
F
firewall policiesand Endpoint Control 17
FortiClientdownload location 14required version 14
FortiGuardAntispam 4Antivirus 4as source of antivirus signatures 14as source of application signatures 14as source of FortiClient installer 14
M
mode, operation 4
O
operation mode 4
P
passwordadministrator 4
V
vulnerability scanconfiguring scans 22viewing results 22
W
warning to install FortiClient 13
Page 27