foss4g2016 geopaparazzi workshop
TRANSCRIPT

NEVER OUT OF DATA IN THE FIELDGeopaparazzi - gvSIG workshop
Foss4g 2016 - Bonn
Andrea Antonello & Silvia Franceschi

PART 1: GEOPAPARAZZI

INTRODUCTIONGeopaparazzi is a tool for digital field mapping. Originally it has beendeveloped for fast qualitative engineering/geologic surveys but it can beused also as a tool for emergency management, general field activitiesand tourism.
Geopaparazzi is available on the . Search forGeopaparazzi on your phone or get it from the online android market.
Note: Geopaparazzi doesn't work on iPhone and Windows Phone.
Android Play Store

INTRODUCTION
The main aim of Geopaparazzi is to have a tool that:
can be always at hand when neededgives the possibility to take georeferenced pictures during the survey,with further possibility to import them into a main GIS applicationis extremely easy to use and intuitive, providing just few importantfunctionalities
INTRODUCTION
The main features available in Geopaparazzi are:
georeferenced notes: text notes, pictures, sketches, forms gps tracks logginga map view for browsing and navigation of the dataeasy export of collected datasimple generation of any type of background map

INSTALLATION1. connect your Android device to internet2. open Play Store3. type geopaparazzi within the Search textbox

INSTALLATION1. connect your Android device to internet2. open Play Store3. type geopaparazzi within the Search textbox4. select to install the first application found
with the right name: geopaparazzi (notgeopaparazzi3)

THE MAIN VIEW

DASHBOARD ICONStake note
map view
import export
toggle gpsloggingproject info

ACTIONBAR ICONS
backgroundtiles sources
more...
gps
settings
create anew project
RED: GPS is not switched on
ORANGE: GPS is on but no fix
was acquired
GREEN: GPS is on, has fix, but
is not logging
BLUE: GPS is logging

TAKE NOTEsimple notes: text,
picture, sketch
possibility to insertGPS or last map
center coordinate complex notes basedon structured forms

PROJECT INFOremove/add new
data
edit and save theproject's metadata

GPS LOGGING
enter a new log name andpossibility to continue
from the last log
logging...
only if gps has fix!!

MAP VIEWlong tap
to clearthe map
from tools

MAP VIEW TOOLStap: add new notelong tap: open notes list
tap: add new bookmarklong tap: open bookmarks list
activate loganalysis tool
activatemeasure tool
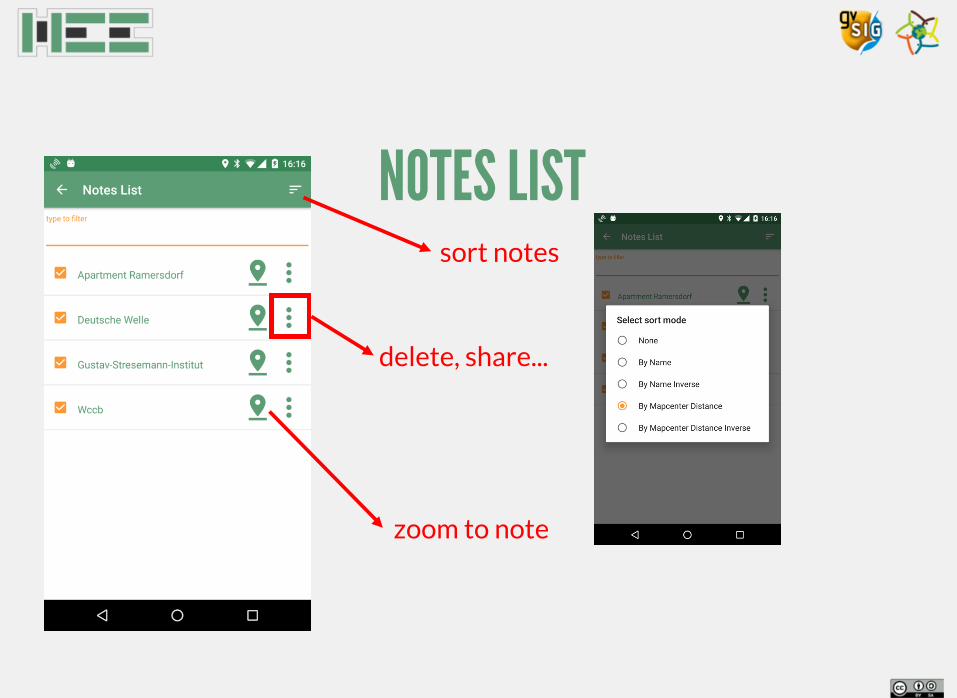
NOTES LIST
zoom to note
sort notes
delete, share...

EDITING TOOLS
tap: enteredit mode
long tap: selecteditable layer

IMPORT browse/import
projects from the net
import csv files that startwith bookmarks_xyz.csv
and contain lines of theform: label,lat,lon,zoom
create a simplespatialite database
with a point, line andpolygon table
voluntary onlineservice that
supplies mapurls

EXPORTonly export thatsupports propercomplex notesrepresentation
export all theimages of the
project into a folder
upload thecurrent project
to the net

SUPPORTED BACKGROUND DATAFrom the select tile sources menu:

MAPSFORGEopen source project under LGPLlicense
.map extension
binary vector format
maps available for download at:http://download.mapsforge.org/maps/

MBTILESopen specifications:
.map extension
image tiles format
can be created in many different ways (ex.jgrasstools, gvSIG, gdal)
https://github.com/mapbox/mbtiles-spec
Mapbox presentation page

MAPURLsimple textfile describing an online/offlineTMS or WMS service
.mapurl extension

MAPURL TMS EXAMPLE
url=http://wms.openstreetmap.de/tms/Aerowest-Bonn/ZZZ/XXX/YYY.pngminzoom=0maxzoom=19center=7.018 50.7type=googleformat=jpgdefaultzoom=13mbtiles=defaulttiles/_aerowest_bonn.mbtilesdescription=OSM 2010 - Copyright Aerowest
the service url containing XXX, YYY, ZZZ aszoomlevel, longitude, latitude placeholders
jpg for imagery
png for most of other maps
this creates an mbtilesdatabase that caches the
downloaded data

MAPURL WMS EXAMPLE
url=http://sdi.provincia.bz.it/geoserver/wms?LAYERS=inspire:OI.ORTHOIMAGECOVERAGE.2011&TRANSPARENT=true&FORMAT=image/png&SERVICE=WMS&VERSION=1.1.1&REQUEST=GetMap&STYLES=&EXCEPTIONS=application/vnd.ogc.se_inimage&SRS=EPSG:4326&BBOX=XXX,YYY,XXX,YYY&WIDTH=256&HEIGHT=256minzoom=11maxzoom=22center=11.42 46.8type=wmsformat=jpgdefaultzoom=17mbtiles=provincia_bz/_wms_ortobz.mbtilesdescription=Aerial imagery 2011 - Province of Bozano
the service url containing XXX, YYY for the boundingboxmin/max longitudes and latitudes and the tiles dimension

EXAMPLES online mapnik offline mapsforge online TMS offline mbtiles

SUPPORTED OVERLAY DATASpatialite databases:

SIMPLE STYLING POSSIBILITIESColors and Sizes
set shapeset stroke widthset fill and stroke color

SIMPLE STYLING POSSIBILITIESLabelling
enable labellingset sizechoose field
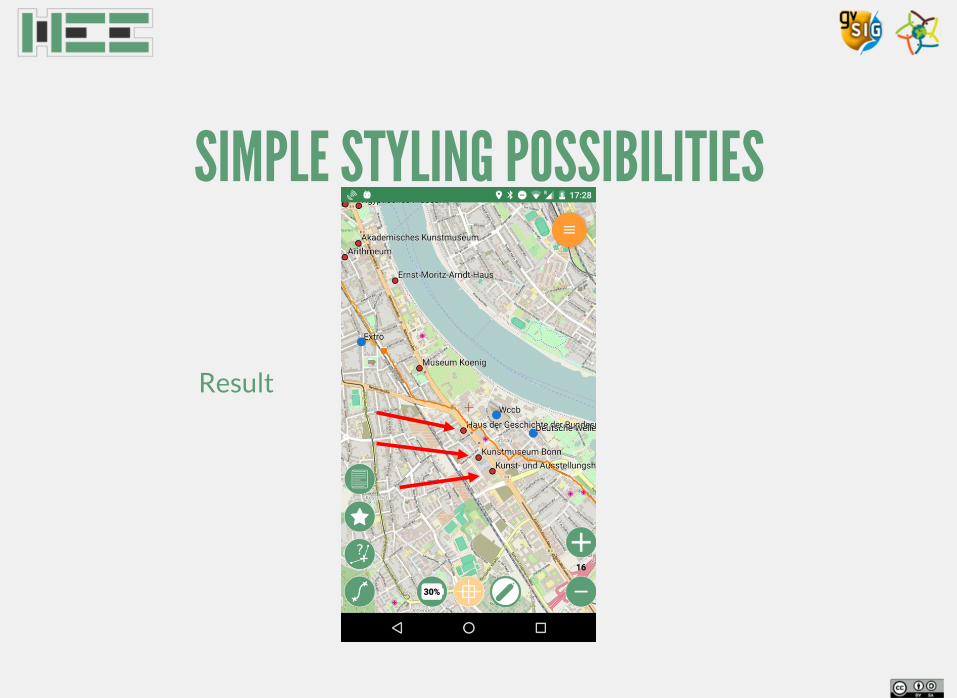
SIMPLE STYLING POSSIBILITIES
Result

PART 2: DATA PREPARATION IN GVSIG

THE WORKSHOP DATASETData folder structure
workshop/├── aerial│ ├── dop10rgb_32367_5619_1_nw.prj│ ├── dop10rgb_32367_5619_1_nw.tif│ ├── dop10rgb_32367_5619_1_nw.wld│ ├── dop10rgb_32367_5620_1_nw.prj│ ├── dop10rgb_32367_5620_1_nw.tif│ └── dop10rgb_32367_5620_1_nw.wld├── aerowest_bonn.mapurl├── foss4g_bonn.mbtiles├── foss4gbonn.sqlite├── shapefiles│ ├── grillplaces.shp│ ├── hospitals.shp│ ├── hotels.shp│ ├── landdistricts.shp│ ├── museums.shp│ ├── parks_gardens.shp│ └── tourist_attractions.shp└── wms_ortobz.mapurl
}}
Files for mbtiles preparation
Files for spatialite databasepreparation (only .shp listed here)
These aerial imagery tifs have beenkindly supplied by the Amt62 of thecity of Bonn for the workshop. Theyare not open data and can't be usedoutside this workshop.

PREPARE AN MBTILES OF AERIAL IMAGESLaunch gvSIG and create a new view. Then enter the properties and set
the right projection. It needs to be the one of the data.
The aerial data of Bonnare in CRS EPSG:25832

PREPARE AN MBTILES OF AERIAL IMAGESDrag the aerial images (*.tif) into the map view.
select "non tiled"when asked

PREPARE AN MBTILES OF AERIAL IMAGESNow open the integrated tiles creator
insert the requested parameters
and push the ok button

PREPARE AN MBTILES OF AERIAL IMAGESBe careful what you wish for!
The supplied dataset covers an area that at zoomlevel 19 counts 1892tiles and it grows exponentially! So careful with the max zoomlevel.

PART 3: DATA PREPARATION IN SPATIALITE

SPATIALITE GUIOpen the spatialite gui and create a new database

SPATIALITE GUIOnce the db is created, select the Load Shapefile button

SPATIALITE GUIImport the shapefiles: example of museums
Important:
the SRIDthe charsetsetting thespatial index

SPATIALITE GUIOn older Spatialite GUI versions:
The Update Layer Stats commandneeds to be executed manually

SPATIALITE GUICheck the imported dataset
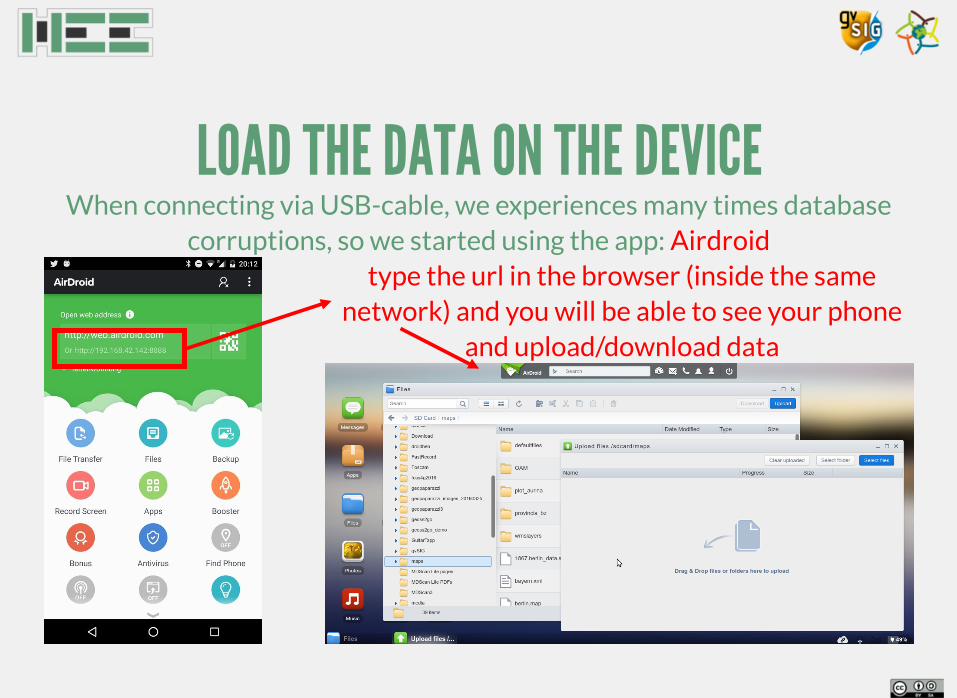
LOAD THE DATA ON THE DEVICEWhen connecting via USB-cable, we experiences many times database
corruptions, so we started using the app: Airdroidtype the url in the browser (inside the same
network) and you will be able to see your phoneand upload/download data

PART 4: DO YOUR SURVEY

PART 5: PROCESS YOUR SURVEY DATA
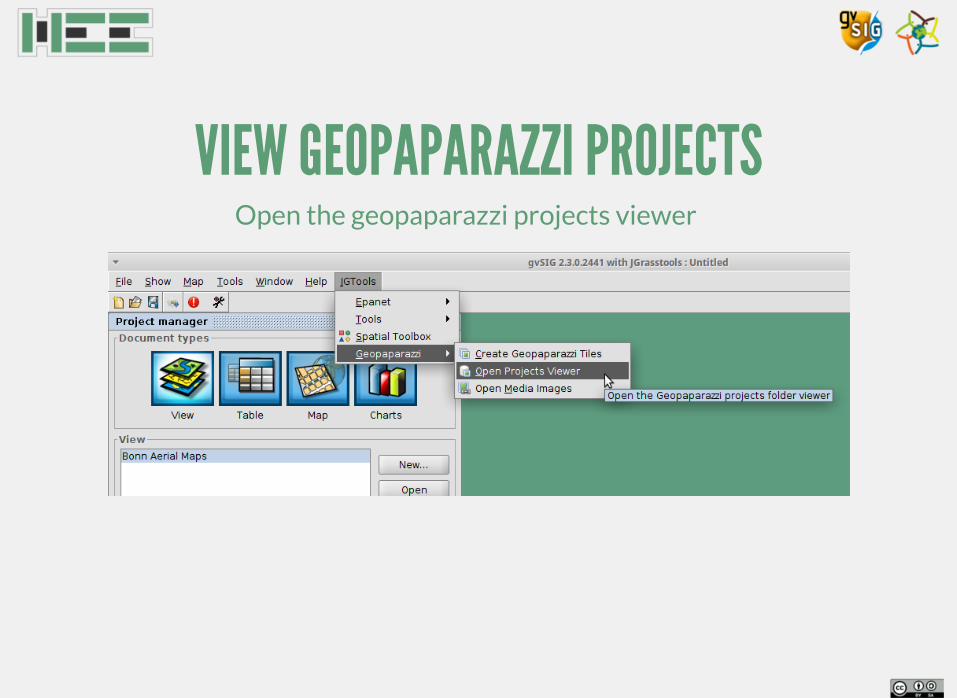
VIEW GEOPAPARAZZI PROJECTSOpen the geopaparazzi projects viewer

VIEW GEOPAPARAZZI PROJECTSThe viewer allows to choose a folder of existing projects

VIEW GEOPAPARAZZI PROJECTSThe user should put all the projects in a a folder and select that. There isalso the possibility to create an empty folder and enter in server mode.
enter in servermode and supply
a network port
browser for theprojects folder

VIEW GEOPAPARAZZI PROJECTSNow we need to configure geopaparazzi to connect to the server.
On the pc find its network address.

VIEW GEOPAPARAZZI PROJECTSIn geopaparazzi set the server's address.
To do so go in Settings->STAGE sync settings-> Server to connect to
the format is:
ipaddress:port
where port is theone set in gvSIG

VIEW GEOPAPARAZZI PROJECTSNow enter the export menu and select S.T.A.G.E.
The upload of the current opened project will start.

VIEW GEOPAPARAZZI PROJECTSOnce the upload has finished, hit the refresh button and the project will
appear in the projects view. To see what it contains, double click on it.

VIEW GEOPAPARAZZI PROJECTSTo load the data of a project, right click on it and push load project.

VIEW GEOPAPARAZZI PROJECTSTo load the data of a project, right click on it and push load project.
click to select and zoom to
right click to open or save image

VIEW GEOPAPARAZZI PROJECTSSelect a log to zoom to it and load its profile view
click to select, zoom and load profile

VIEW GEOPAPARAZZI PROJECTSRight click on the project to edit metadata (they help when searching)

CONVERT A PROJECT TO GIS DATAIn gvSIG do an add layer, it will present you Geopaparazzi as an option
browser for a*.gpap project file

CONVERT A PROJECT TO GIS DATAWhen loading a project, the metadata of the project are checked and a list
of available data is presented.
the layers that will be createdon import are listed here
project metadata
if this is not checked, memory layersare created (not recomended)

CONVERT A PROJECT TO GIS DATAThe new layers of gps logs, notes and media are created containing most
possible information in the attributes table
the shapefiles arecreated in a folder
beside the project file

CONVERT A PROJECT TO GIS DATATo open images from the notes, a small tool is supplied
it enables a selection toolthat selects only notesfrom the media layer
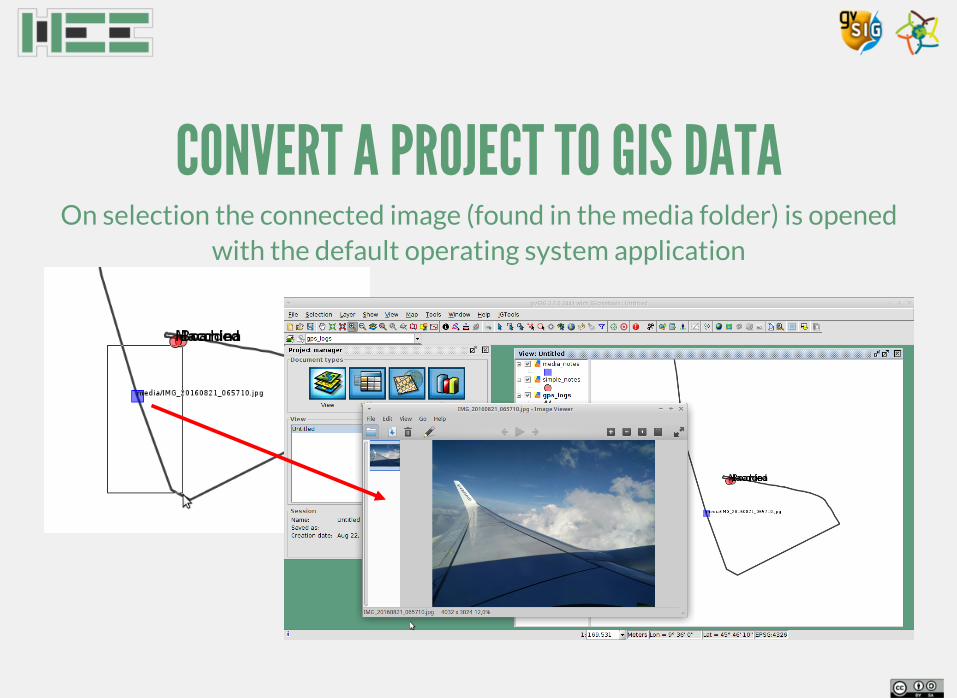
CONVERT A PROJECT TO GIS DATAOn selection the connected image (found in the media folder) is opened
with the default operating system application

PART 6: ORGANIZE SURVEYS WITH GEOSS2GO

WHAT IS GEOSS2GOGeoss2Go is powerful tool for professionals to better organizetheir work. It can also be used to keep data organized incategories, by nation, by project, by whatever necessary.
Together with Geopaparazzi it gives the possibility to standardizethe layout of surveys for teams in a simple and effective way.Installing datasets and survey forms has never been that simple.
This app has been funded by the MYGEOSS call for innovativeapps of the European Commission.

INSTALL AND OPEN GEOSS2GOGeoss2Go can be found and installed from the .
Once it is launched, it presents the following view:
Google Play store

WORKING WITH PROFILES
To create a new profile we can simply pushthe red button on the upper right part ofthe view.
Once pushed, the main profile info dialogwill pop-up. There the user can insert aprofile name and some description aboutthe profile.

WORKING WITH PROFILESOnce ok is pushed, the profileis created. It containsinformation about thecontained datasets and forms.
Delete the profile

WORKING WITH PROFILESStyling the profile can behandy, but will also have animportant impact on its viewin geopaparazzi.

WORKING WITH PROFILESTo activate a profile tap thesettings icon and select theright switch.

WHAT CAN YOU ADD?Basemap types supported Spatialite databases
FormsA project database

HOW DOES IT WORK ON GEOPAPARAZZI?Once a profile is activated in Geoss2Go,inside geopaparazzi that profile is used.To let the user know, geopaparazzi willuse the profile's background for some ofits views.
Tiles sources and spatialite databasesare freezed to the ones defined in activethe Geoss2Go profile.

PART 7: CREATE A SIMPLE FORM

WRITING A FORMGeopaparazzi supports complex notes called form based notes.
To use them, a tags.json file needs to be created and placed insidethe geopaparazzi folder inside the sdcard. In that file a jsonformat description of the wanted tags and forms needs to beplaced.
By default, to help the user to start, a sample tags.json is createdin the Geopaparazzi installation. It contains form samples andexamples to show all supported form widgets.

WRITING A FORM: SECTION=BUTTONEvery form is composed of sections, each of which
creates a button in the add notes view.
[ { "sectionname": "fountain", "sectiondescription": "fountain", "forms": [
] }]

WRITING A FORM: SUBSECTION=TABEach section can contain several sub-forms, that
will create a tab each.
{ "formname": "General data", "formitems": [
]},{ "formname": "Technical data", "formitems": [
]}

WRITING A FORM: FORM ELEMENTSTo add content to the sub-forms, any of the tags described in the
can be used.
For example lets add two textfields to prompt the user for a name andstreet. Also the name should then be the label rendered in the map view.
supported tags section
{ "key": "name", "value": "", "islabel": "true", "type": "string", "mandatory": "yes"},{ "key": "street", "value": "", "type": "string", "mandatory": "no"}

WRITING A FORM: MORE FORM ELEMENTSWhat about adding a combobox?
{ "key": "type", "values": { "items": [ { "item": "" }, { "item": "manual" }, { "item": "electrical" }, { "item": "gravity" } ] }, "value": "manual", "type": "stringcombo", "mandatory": "no"}

WRITING A FORM: MORE FORM ELEMENTSWhat about adding pictures?
{ "formname": "Media", "formitems": [ { "key": "Images", "value": "", "type": "pictures", "mandatory": "no" } ]}
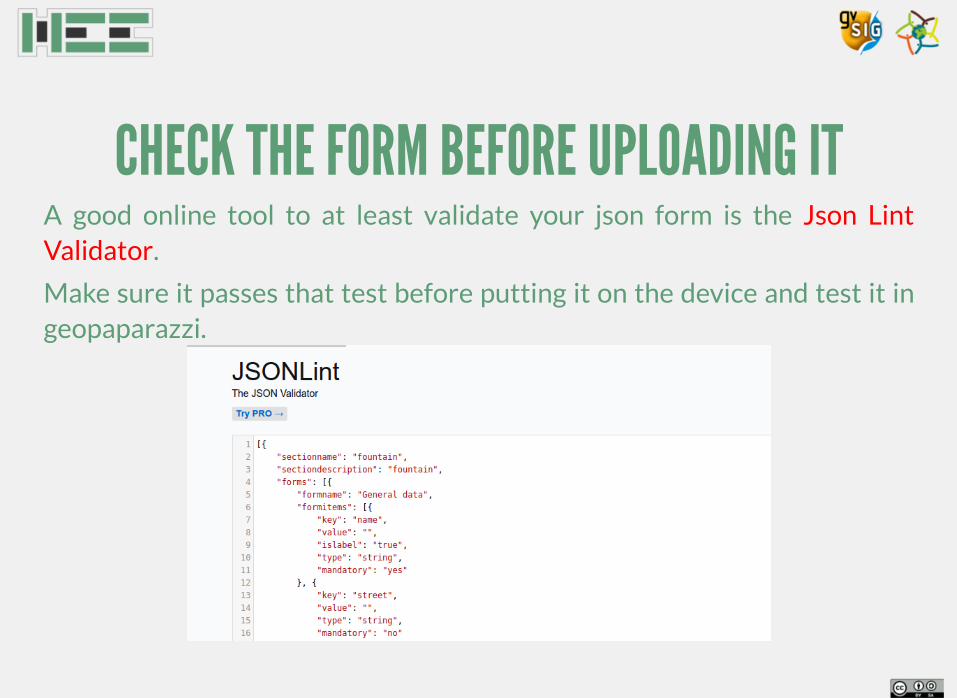
CHECK THE FORM BEFORE UPLOADING ITA good online tool to at least validate your json form is the
.
Make sure it passes that test before putting it on the device and test it ingeopaparazzi.
Json LintValidator