foster care - supervisor guide - information, inc care - supervisor guide ... the assigned...
TRANSCRIPT


2
Foster Care - Supervisor Guide
Contents Information, Inc. Contact Information .......................................................................................................... 2
Overview ....................................................................................................................................................... 2
Add Clients .................................................................................................................................................... 3
Edit Clients .................................................................................................................................................... 5
Review Pending Client Additions and Changes ............................................................................................. 6
Add Payment Request ................................................................................................................................... 9
Edit Payment Requests ............................................................................................................................... 11
Review Payment Requests .......................................................................................................................... 11
Information, Inc. Contact Information For technical questions, please contact:
Michael Bradley
919-545-0246
For all other questions, please contact:
Regi Bradley
919-545-0246
Overview Information, Inc. Foster Care is a web-based system to manage and track foster care payment requests.
The application allows users to manage foster children and their resource family/facility stays and will
automatically calculate boarding payment requests based on the facility stays entered for each child.
Admins generate boarding payment requests for an entire month with the click of a button.
Boarding payment requests are calculated based on the child’s age, facility type and length of
stay, factoring in any child income to be applied towards boarding payments. Users can add
manual payment requests for additional fees such as clothing. After boarding payment requests
are generated, admins review, edit if necessary, and approve all payment requests prior to
submitting them to finance.

3
Once payment requests are submitted, finance will receive an email notification that the payment
request report is ready for review. The system supports multiple finance user roles and provides
admins with the ability to specify separate payment accounts for line item groups.
Add Clients 1. Click on the ‘Clients’ menu item in the left navigation and select ‘Add Client’.
2. Enter the child’s details, including SIS number, first name, last name, and date of birth. Select an
eligibility code from the drop down and specify the child’s gender. The child’s eligibility code and
date of birth will be used to determine the facility rate.

4
3. Select an Assigned Worker for this child. The assigned worker will be able to update the child’s
record. The assigned worker’s supervisor will be responsible for approving client changes.
4. Enter the date the child entered custody.
5. Select the facility or resource family that the child is staying with and enter a date entered. Please
use the actual date that the child entered/exited the facility. The system will automatically calculate
the number of nights spent at the facility based on the dates entered.
After a facility is selected from the drop down, the facility rate will automatically be calculated using
the child’s date of birth and eligibility. The facility rate will be displayed to the right of the facility
drop down.
If the child has a negotiated rate for the selected facility or resource family, click the ‘Use negotiated
rate’ check box and enter the monthly negotiated rate amount.

5
6. Enter the child’s monthly income amounts using the categories provided. Any income entered will
be applied towards the child’s boarding fees.
7. When finished, click ‘Submit’ to create the client.
Edit Clients 1. Click on the ‘Clients’ menu item in the left navigation and select ‘Client List’.
2. To filter the client list, please type the client first name, last name or SIS number into the search box.
To include inactive clients in the results, please check the ‘Include Inactive Clients’ check box in the
top left. Click the green pencil icon to edit the client. Clients may be deleted using the blue trash can
icon.
3. Update the client record. When updating custody information, please select a termination reason.
When terminating a child, the child will automatically be marked as inactive. When a child is marked
as inactive, you will be required to enter a date exited for the child’s current facility stay. You may

6
mark a child as inactive without terminating the child’s record.
4. To view or edit previous facility stays, please click on the corresponding facility stay tab. Please note
that facility stays can only be edited when payment requests have not yet been generated for the
selected facility stay dates.
5. When finished, click ‘Submit’ to update the client.
Review Pending Client Additions and Changes New clients and client changes entered by workers must be approved by a supervisor and/or admin. The
system can optionally be configured to require both supervisor and admin approval for all client
additions and changes. Supervisors and admins are alerted to changes pending approval with the little
bell icon in the top right corner.

7
1. Click on the little bell icon in the top right corner to see a list of changes pending approval.
2. Click on the green arrow next to the client record to review the changes.
3. Alternatively, client additions or changes may be reviewed from the client list. Newly created clients
pending approval are marked with a red ‘+’. Client records with changes pending approval are
marked with a red flag. To review the changes, click the green pencil icon.
4. For newly created records, a note stating ‘This client has not yet been approved’ will be displayed
across the top of the record. Please review the child’s information, make any necessary edits and
select ‘Submit’ to approve the new client. You may reject the new client by clicking the ‘Reject’

8
button. Please note that when newly created client records are rejected, the client will be deleted.
5. For edited client records, a note stating ‘There are pending changes for this client. Please review the
pending changes prior to saving’ will be displayed across the top of the record.
6. Changed values will be displayed in red. The original value may be viewed by hovering over the
changed field.

9
7. Please review the child’s information, make any necessary edits and select ‘Submit’ to approve the
changes. You may reject the changes by clicking the ‘Reject’ button. Please note that when changes
are rejected, the client record will be reverted to its original state.
Add Payment Request Manual payment requests for additional fees may be entered by all user types. Payment requests
entered by workers or supervisors must be reviewed and approved by an admin.
1. Click on the ‘Payment Requests’ menu item in the left navigation and select ‘Add’.
2. Select the payment request month and year.
3. Choose the child’s name from the drop down menu. You may begin typing the child’s name in the
search box provided within the drop down to see a filtered list of children. The child’s SIS ID and

10
eligibility will automatically be displayed after the child is selected.
4. Select the facility to receive the payment.
5. Select a fee type from the drop down menu and enter an amount to be paid. To add additional
payments for this child, please click the ‘add another’ link.
6. Specify any child income amounts that should be applied to this request and enter a comment to
describe the request.
7. When finished, click ‘Submit’ to create the payment request.
11
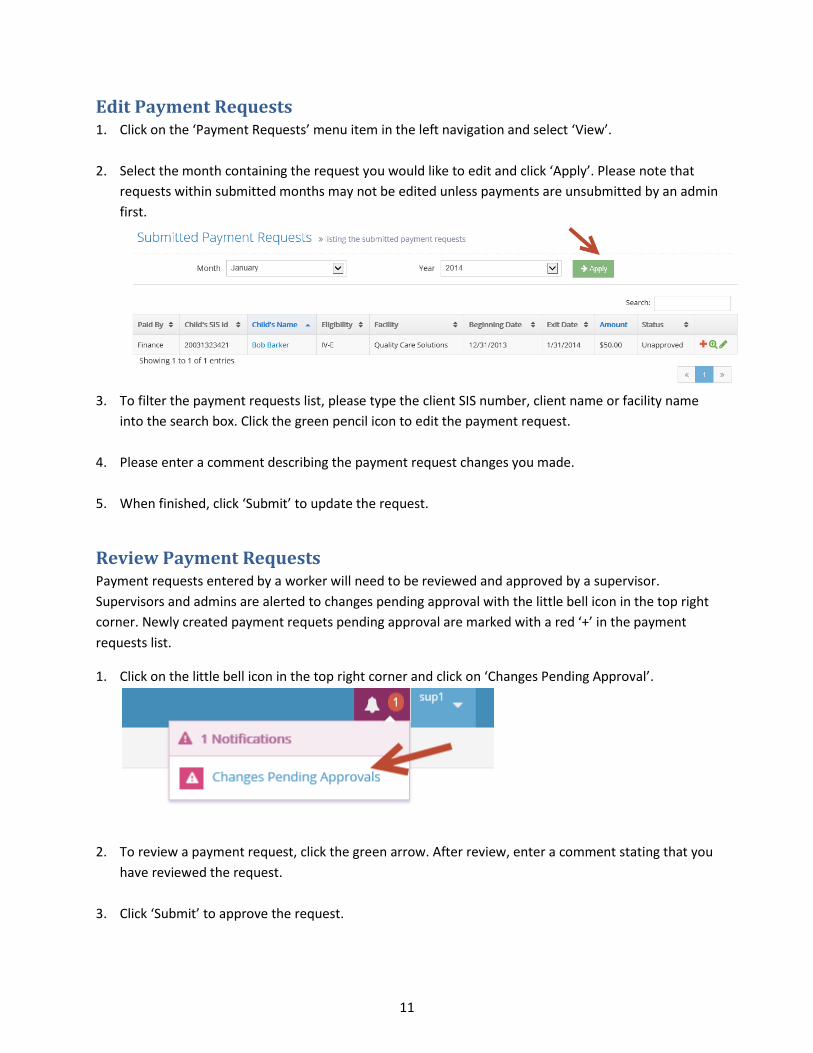
Edit Payment Requests 1. Click on the ‘Payment Requests’ menu item in the left navigation and select ‘View’.
2. Select the month containing the request you would like to edit and click ‘Apply’. Please note that
requests within submitted months may not be edited unless payments are unsubmitted by an admin
first.
3. To filter the payment requests list, please type the client SIS number, client name or facility name
into the search box. Click the green pencil icon to edit the payment request.
4. Please enter a comment describing the payment request changes you made.
5. When finished, click ‘Submit’ to update the request.
Review Payment Requests Payment requests entered by a worker will need to be reviewed and approved by a supervisor.
Supervisors and admins are alerted to changes pending approval with the little bell icon in the top right
corner. Newly created payment requets pending approval are marked with a red ‘+’ in the payment
requests list.
1. Click on the little bell icon in the top right corner and click on ‘Changes Pending Approval’.
2. To review a payment request, click the green arrow. After review, enter a comment stating that you
have reviewed the request.
3. Click ‘Submit’ to approve the request.