fqhc lal annual certification - bureau of primary...
TRANSCRIPT

HRSA Electronic Handbooks
FQHC Look-Alike
Annual Certification Application User Guide for Applicants
Last updated on: October 13, 2011

User Guide For Applicants 2 of 92 FQHC LAL Annual Certification

User Guide For Applicants 3 of 92 FQHC LAL Annual Certification
Contents 11.. INTRODUCTION ............................................................................................................................................. 10
1.1. DOCUMENT PURPOSE AND SCOPE ................................................................................................................. 10 1.2. DOCUMENT ORGANIZATION ............................................................................................................................ 10
22.. BEFORE YOU BEGIN .................................................................................................................................... 11
2.1. REGISTER WITH THE HRSA ELECTRONIC HANDBOOKS ................................................................................ 11
33.. GET STARTED WITH THE HRSA ELECTRONIC HANDBOOKS ............................................................. 12
3.1. LOG IN ............................................................................................................................................................. 12 3.2. SESSION TIME LIMIT ........................................................................................................................................ 12
44.. PORTFOLIO MANAGEMENT ....................................................................................................................... 13
4.1. I AM A FQHC LOOK-ALIKE PROJECT DIRECTOR ............................................................................................ 14 4.2. I WOULD LIKE TO REQUEST ACCESS TO THIS DESIGNATION AS “OTHER USER” ............................................. 16 4.3. CHANGE OF DESIGNATION PROJECT DIRECTOR ............................................................................................ 18
55.. ACCESS THE DESIGNATION ...................................................................................................................... 19
66.. ADMINISTER NEW/EXISTING USERS ........................................................................................................ 21
77.. ACCESS THE APPLICATION ....................................................................................................................... 25
88.. COMPLETE THE APPLICATION FORMS ................................................................................................... 27
8.1. COVER PAGE ................................................................................................................................................... 27 8.1.1 Add or Change the Authorizing Official (AO) ....................................................................................... 28 8.1.2 Request A New Authorizing Official (AO) ............................................................................................. 29 8.1.3 Delete the Authorizing Official ................................................................................................................ 30
8.2. FORM 1A: GENERAL INFORMATION WORKSHEET .......................................................................................... 31 8.3. FORM 2: STAFFING PROFILE ........................................................................................................................... 35 8.4. FORM 3: INCOME ANALYSIS ............................................................................................................................ 38 8.5. FORM 3A: FQHC LOOK-ALIKE BUDGET INFORMATION ................................................................................. 44 8.6. FORM 5A: SERVICES PROVIDED ..................................................................................................................... 45
8.6.1 Form 5A: Required Services .................................................................................................................. 45 8.6.2 Form 5A: Additional Services ................................................................................................................. 46
8.7. FORM 5B: SERVICE SITES .............................................................................................................................. 47 8.7.1 View Site Information ............................................................................................................................... 47 8.7.2 Update Site Information .......................................................................................................................... 48
8.8. FORM 5C: VIEW OTHER ACTIVITIES/LOCATIONS ........................................................................................... 52 8.9. FORM 6A: CURRENT BOARD MEMBER CHARACTERISTICS ............................................................................ 53
8.9.1 To Add a Board Member ......................................................................................................................... 53 8.9.2 Update Board Member Information ....................................................................................................... 55 8.9.3 Delete a Board Member .......................................................................................................................... 56
8.10. FORM 8: HEALTH CENTER AGREEMENTS ....................................................................................................... 57 8.11. FORM 10: ANNUAL EMERGENCY PREPAREDNESS (EP) REPORT ................................................................. 63 8.12. FORM 12: ORGANIZATION CONTACTS ............................................................................................................ 64 8.13. CLINICAL PERFORMANCE MEASURES ............................................................................................................. 66
8.13.1 The Designation Period ...................................................................................................................... 66 8.13.2 Provide Standard Performance Measure Information ................................................................... 66 8.13.3 Add an Additional Performance Measure ........................................................................................ 69 8.13.4 Update a Performance Measure ....................................................................................................... 72 8.13.5 Delete an Additional Performance Measure ................................................................................... 73

User Guide For Applicants 4 of 92 FQHC LAL Annual Certification
8.13.6 View a Performance Measure ........................................................................................................... 73 8.14. FINANCIAL PERFORMANCE MEASURES .......................................................................................................... 74
8.14.1 The Designation Period ...................................................................................................................... 74 8.14.2 Provide Standard Performance Measure Information ................................................................... 74 8.14.3 Add an Additional Performance Measure ........................................................................................ 77 8.14.4 Update a Performance Measure ....................................................................................................... 80 8.14.5 Delete an Additional Performance Measure ................................................................................... 80 8.14.6 View a Performance Measure ........................................................................................................... 81
8.15. APPENDICES .................................................................................................................................................... 82 8.15.1 Attach Documents ............................................................................................................................... 82 8.15.2 Update an Attached Document ......................................................................................................... 85
99.. REVIEW THE APPLICATION ........................................................................................................................ 87
9.1. APPLICATION FORMS STATUS ......................................................................................................................... 87 9.2. VIEW AND PRINT THE APPLICATION ................................................................................................................ 88
1100.. SUBMIT THE APPLICATION ........................................................................................................................ 89
1111.. CUSTOMER SUPPORT INFORMATION ..................................................................................................... 91
11.1. REGISTRATION OR ACCESS/PASSWORD ISSUES............................................................................................ 91 11.2. COMPLETING THE APPLICATION IN THE ELECTRONIC HANDBOOKS ............................................................... 91 11.3. APPLICATION GUIDANCE OR PROGRAMMATIC QUESTIONS ............................................................................ 91
1122.. FREQUENTLY ASKED QUESTIONS ........................................................................................................... 92
12.1. SOFTWARE ...................................................................................................................................................... 92 12.1.1 What are the software requirements for HRSA EHBs? ................................................................. 92 12.1.2 What are the system requirements for using HRSA EHBs on a Macintosh computer? ........... 92 12.1.3 What are the software requirements for FQHC LAL Application Modules? ............................... 92 12.1.4 What document types can I upload? ................................................................................................ 92

User Guide For Applicants 5 of 92 FQHC LAL Annual Certification
Figures
Figure 1: HRSA EHBs Login Screen ................................................................................................................ 12 Figure 2: HRSA EHBs Home Page ................................................................................................................... 12
Figure 3: Home Page Left Side Menu ............................................................................................................... 13
Figure 4: FQHC LAL Home Left Side Menu ..................................................................................................... 13
Figure 5: Add to Portfolio - View Requests ....................................................................................................... 13
Figure 6: Designation Portfolio Registration Page ............................................................................................ 14
Figure 7: Designation Portfolio Registration - Proceed with Portfolio Registraion ............................................ 14 Figure 8: Verify Project Director Identity Page .................................................................................................. 15
Figure 9: Addition Of Designation - Successful Page ....................................................................................... 15
Figure 10: Designation Portfolio Registration - Other User Request ................................................................ 16
Figure 11: Request Access From Project Director ........................................................................................... 16
Figure 12: Request Access From Project Director - Successfully Forwarded .................................................. 17
Figure 13: Add to Portfolio - View Requests - Pending Approval ..................................................................... 17 Figure 14: Left Side Menu - FQHC LAL Home Link ......................................................................................... 19
Figure 15: Left Side Menu - View Portfolio Link ................................................................................................ 19
Figure 16: FQHC Look-Alike Designation ......................................................................................................... 20
Figure 17: FQHC LAL Handbook - Overview Page .......................................................................................... 20
Figure 18: FQHC LAL Handbook - Left Side Menu .......................................................................................... 21
Figure 19: Administer Users Page .................................................................................................................... 22 Figure 20: Users - Update Privileges Page ....................................................................................................... 23
Figure 21: Users - Update Privileges Page - Confirmation ............................................................................... 24
Figure 22: Update Privileges - Information Saved Successfully ....................................................................... 24
Figure 23: Certification/Renewal Page ............................................................................................................. 25
Figure 24: Annual Certification - Status Overview Page ................................................................................... 25 Figure 25: Left Side Menu ................................................................................................................................. 26
Figure 26: Cover Page ...................................................................................................................................... 27
Figure 27: Choose Person to Add Page ........................................................................................................... 28
Figure 28: Contact Information Page ................................................................................................................ 28
Figure 29: Choose Person To Add: Request New AO ..................................................................................... 29
Figure 30: Contact Information: Notify AO Page............................................................................................... 29 Figure 31: Form 1A: General Information Worksheet ....................................................................................... 31
Figure 32: Form 1A: Section 1. Applicant Information ...................................................................................... 32
Figure 33: Form 1A: Section 2. Service Area: 2a. Target Population ............................................................... 32
Figure 34: Form 1A: Section 2b. Service Area Type ........................................................................................ 32
Figure 35: Form 1A: Section 2c. Target Population Information....................................................................... 33
Figure 36: Form 1A: Section 2c. Patients and Visits by Service Type ............................................................. 33

User Guide For Applicants 6 of 92 FQHC LAL Annual Certification
Figure 37: Form 1A: Section 2c. Patients and Visits by Population Type ........................................................ 34
Figure 38: Form 2: Staffing Profile - Administration .......................................................................................... 35
Figure 39: Form 2 - Medical Staff ..................................................................................................................... 36 Figure 40: Form 2 - Dental, Behavioral Health and Enabling Staff ................................................................... 36
Figure 41: Form 2 - Other Staff ......................................................................................................................... 37
Figure 42: Form 2 - Total Salary ....................................................................................................................... 37
Figure 43: Form 3: Income Analysis Form ........................................................................................................ 38
Figure 44: Download Form 3 Instruction Page ................................................................................................. 39
Figure 45: File Download Dialog Box ................................................................................................................ 40 Figure 46: Save As Dialog Box ......................................................................................................................... 40
Figure 47: Form 3: Income Analysis - Downloaded Document Template ........................................................ 41
Figure 48: Form 3: Income Analysis - Attach .................................................................................................... 41
Figure 49: Attach Document Screen - Browse .................................................................................................. 42
Figure 50: Choose File to Upload Dialog Box ................................................................................................... 42
Figure 51: Attach Document Screen - File Selected ......................................................................................... 43 Figure 52: Attached Document(s) ..................................................................................................................... 43
Figure 53: Form 3A: FQHC Look-Alike Budget Information ............................................................................. 44
Figure 54: Form 5A: Services Provided - Required Services ........................................................................... 45
Figure 55: Form 5A: Services Provided - Drop-Down Menu ............................................................................ 46
Figure 56: Form 5A: Additional Services .......................................................................................................... 46
Figure 57: Form 5B: Service Sites Page ........................................................................................................... 47 Figure 58: View Service Sites ........................................................................................................................... 47
Figure 59: Service Sites - Update ..................................................................................................................... 48
Figure 60: Update Site - Service Site Information ............................................................................................ 48
Figure 61: Update Site - Add Organization Information .................................................................................... 49
Figure 62: Update Site - Location Setting ......................................................................................................... 49 Figure 63: Update Site - Contact Information ................................................................................................... 49
Figure 64: Update Site - Change Location ........................................................................................................ 49
Figure 65: Update Site - Add Mailing Address .................................................................................................. 50
Figure 66: Update Site - Add Service Area Zip Codes ..................................................................................... 50
Figure 67: Update Site - Add Service Area Population Type ............................................................................ 51
Figure 68: Update Site - Site Addition Complete .............................................................................................. 51 Figure 69: Form 5C: List of Activities/Locations - View .................................................................................... 52
Figure 70: Activity/Location Summary .............................................................................................................. 52
Figure 71: Form 6A: Current Board Member Characteristics ........................................................................... 53
Figure 72: Form 6A: Add Board Member Information ....................................................................................... 54
Figure 73: Form 6A: Board Members Gender; Ethnicity; Race ........................................................................ 54

User Guide For Applicants 7 of 92 FQHC LAL Annual Certification
Figure 74: Update Link on a Board Member Listing ......................................................................................... 55
Figure 75: Update Board Member Information ................................................................................................. 55
Figure 76: Delete Link on a Board Member Listing .......................................................................................... 56 Figure 77: Confirm Delete Board Member ........................................................................................................ 56
Figure 78: Form 8: Part I - Question 1 .............................................................................................................. 57
Figure 79: Form 8: Part II - Governance Checklist ........................................................................................... 58
Figure 80: Form 8: Part II - Question 2 ............................................................................................................. 58
Figure 81: Form 8: Part II - Question 3 ............................................................................................................. 58
Figure 82: Form 8: Part III: Organization Affiliation ........................................................................................... 59 Figure 83: Form 8: Part III: Add Organization Affiliation ................................................................................... 59
Figure 84: Form 8: Part III: Add Organization Affiliation: Physical Address ..................................................... 59
Figure 85: Form 8: Part III: Add Organization Affiliation: Explain History ......................................................... 60
Figure 86: Form 8: Part III: Add Organization Affiliation: Attach Documentation .............................................. 60
Figure 87: Form 8: Part III: Add Organization Affiliation - Browse .................................................................... 60
Figure 88: Choose File to Upload ..................................................................................................................... 61 Figure 89: Form 8: Part III: Attached Documents ............................................................................................. 61
Figure 90: Form 8: Attachments Uploaded ....................................................................................................... 62
Figure 91: Form 10: Section I - Emergency Preparedness and Management Plan ......................................... 63
Figure 92: Form 10: Section II - Readiness ...................................................................................................... 63
Figure 93: Form 12: Organization Contacts ...................................................................................................... 64
Figure 94: Form 12: Contact Information Data Entry Page .............................................................................. 65 Figure 95: Clinical Performance Measures - Designation Period ..................................................................... 66
Figure 96: Clinical Performance Measures - Standard Measures .................................................................... 66
Figure 97: Update Clinical Performance Measure Information ......................................................................... 67
Figure 98: Update Clinical Performance Measure Information - Baseline Data ............................................... 67
Figure 99: Projected Data Calculation - Sample Calculation ............................................................................ 68 Figure 100: Update Clinical Performance Measure Information - Data Source and Methodology ................... 68
Figure 101: Update Clinical Performance Measure Information - Key Factor and Major Planned Action ....... 68
Figure 102: Progress Towards Goal ................................................................................................................. 69
Figure 103: Update Clinical Performance Measure Information - Comments .................................................. 69
Figure 104: Additional Measures - Add Performance Measure ........................................................................ 69
Figure 105: Add Clinical Performance Measure information - Focus Area ...................................................... 70 Figure 106: Add Clinical Performance Measure information - Performance Measure and Target Goal .......... 70
Figure 107: Add Clinical Performance Measure information - Numerator and Denominator ........................... 70
Figure 108: Add Clinical Performance Measure information - Baseline Data .................................................. 70
Figure 109: Sample Calculation ........................................................................................................................ 71
Figure 110: Add Clinical Performance Measure information - Data Source and Key Factor(s) ....................... 71

User Guide For Applicants 8 of 92 FQHC LAL Annual Certification
Figure 111: Progress Towards Goal ................................................................................................................. 71
Figure 112: Add Clinical Performance Measure information - Comments ....................................................... 72
Figure 113: Clinical Performance Measures - Additional Measures ................................................................. 72 Figure 114: Update Link on a Complete Performance Measure ...................................................................... 72
Figure 115: Clinical Performance Measures - Additional Measures - Delete ................................................... 73
Figure 116: Read-only Display of Clinical Performance Measures .................................................................. 73
Figure 117: Financial Performance Measures - Designation Period ................................................................ 74
Figure 118: Financial Performance Measure - Standard Measures ................................................................. 74
Figure 119: Update Financial Performance Measure Information .................................................................... 75 Figure 120: Update Financial Performance Measure Information - Baseline Data .......................................... 75
Figure 121: Sample Calculation ........................................................................................................................ 76
Figure 122: Update Financial Performance Measure Information - Data Source and Methodology ................ 76
Figure 123: Key Factor and Major Planned Action ........................................................................................... 76
Figure 124: Progress Towards Goal ................................................................................................................. 76
Figure 125: Update Financial Performance Measure Information - Comments ............................................... 77 Figure 126: Additional Measures - Add Performance Measure ........................................................................ 77
Figure 127: Add Financial Performance Measure Information - Focus Area ................................................... 77
Figure 128: Add Financial Performance Measure Information - Performance Measure and Target Goal ....... 78
Figure 129: Add Financial Performance Measure Information - Numerator and Denominator Description ..... 78
Figure 130: Add Financial Performance Measure Information - Baseline Data ............................................... 78
Figure 131: Sample Calculation ........................................................................................................................ 78 Figure 132: Add Financial Performance Measure Information - Data Source and Key Factor(s) .................... 79
Figure 133: Progress Towards Goal ................................................................................................................. 79
Figure 134: Update Financial Performance Measure Information - Comments ............................................... 79
Figure 135: Additional Measures - Added Performance Measure .................................................................... 80
Figure 136: Update Financial Performance Measure ....................................................................................... 80 Figure 137: Delete Financial Performance Measure ........................................................................................ 80
Figure 138: Delete Financial Performance Measure Information - Confirmation ............................................. 81
Figure 139: Read-Only View of Financial Performance Measures ................................................................... 81
Figure 140: Appendices .................................................................................................................................... 82
Figure 141: Appendices Detail - Project Abstract ............................................................................................. 83
Figure 142: Attach Document Page .................................................................................................................. 83 Figure 143: Choose File to Upload Window ..................................................................................................... 84
Figure 144: Attachment Saved Successfully .................................................................................................... 84
Figure 145: Appendices: File Uploaded ............................................................................................................ 85
Figure 146: Appendices: Delete Attachment .................................................................................................... 85
Figure 147: Delete Confirmation Page .............................................................................................................. 85

User Guide For Applicants 9 of 92 FQHC LAL Annual Certification
Figure 148: Appendices: Complete - Save and Continue ................................................................................. 86
Figure 149: Status Overview Page for Application Forms ................................................................................ 87
Figure 150: Application Information Review Page ............................................................................................ 88 Figure 151: Table Of Contents Page Showing Complete Status...................................................................... 89
Figure 152: Submit Certifications and Acceptances Page ................................................................................ 90
Figure 153: General Information Page - Successfully Submitted to HRSA ...................................................... 90
Tables Table 1: Modes of Service Provision ................................................................................................................ 45
User Guide For Applicants 10 of 92 FQHC LAL Annual Certification
11.. In troduc tion
1.1. Document Purpos e and Scope The purpose of this document is to provide detailed instructions to help applicants complete their FQHC LAL applications in HRSA Electronic Handbooks (EHBs).
This document is not meant to replace program guidance documents; applicants are directed to follow program guidance documents for all programmatic questions.
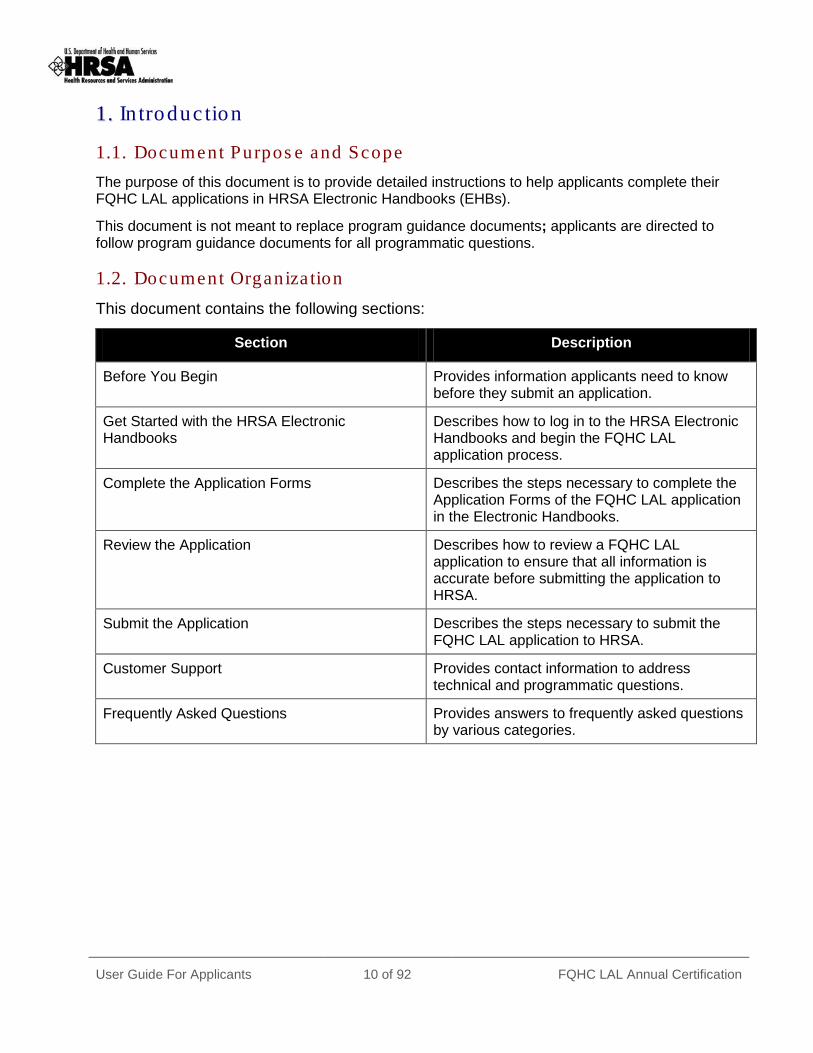
1.2. Document Organiza tion This document contains the following sections:
Section Description
Before You Begin Provides information applicants need to know before they submit an application.
Get Started with the HRSA Electronic Handbooks
Describes how to log in to the HRSA Electronic Handbooks and begin the FQHC LAL application process.
Complete the Application Forms Describes the steps necessary to complete the Application Forms of the FQHC LAL application in the Electronic Handbooks.
Review the Application Describes how to review a FQHC LAL application to ensure that all information is accurate before submitting the application to HRSA.
Submit the Application Describes the steps necessary to submit the FQHC LAL application to HRSA.
Customer Support Provides contact information to address technical and programmatic questions.
Frequently Asked Questions Provides answers to frequently asked questions by various categories.

User Guide For Applicants 11 of 92 FQHC LAL Annual Certification
22.. Before You Beg in
2.1. Regis te r with the HRS A Elec tronic Handbooks The Project Director must register with the HRSA Electronic Handbooks (EHBs) to complete the FQHC LAL application in HRSA EHBs. Registration allows HRSA to collect consistent information from all users, avoid collection of redundant information, and uniquely identify each system user uniquely.
Registration within HRSA EHBs is a two-step process. In the first step, each user from an organization must create individual system accounts. In the second step, the users must associate themselves with the appropriate FQHC Look-Alike organization.
For assistance in registering with HRSA EHBs, call 877-GO4-HRSA (877-464-4772) or 301-998-7373 between 9:00 am to 5:30 pm ET or email [email protected].

User Guide For Applicants 12 of 92 FQHC LAL Annual Certification
33.. Get S ta rted with the HRS A Elec tronic Handbooks
3.1. Log In To log in to the HRSA EHBs,
1. Point your browser to https://grants.hrsa.gov/webexternal/login.asp. 2. Enter your username and password.
Figure 1: HRSA EHBs Login Screen
3. Click Login . The HRSA EHBs Home page (Figure 2) opens.
Figure 2: HRSA EHBs Home Page
3.2. Ses s ion Time Limit When you open a page in the HRSA Electronic Handbooks (EHBs), your session will remain active for 30 minutes after your last activity. Save your work every five minutes to avoid losing information.

User Guide For Applicants 13 of 92 FQHC LAL Annual Certification
44.. Portfo lio Management To view and complete the Annual Certification application, the designation must be registered in your Portfolio.
To add a Designation to your portfolio:
1. From the Left Side menu, click FQHC LAL Home (Figure 3). Figure 3: Home Page Left Side Menu
2. On the Left Side menu, under Options, click View Portfolio. If your designation is not listed in your portfolio, proceed to Step 3.
If your designation is listed on the resulting FQHC Look-Alike Designation page, then go to Section 5: Access the Designation, and proceed with Step 3.
3. On the Left Side menu, under Options, click Add to Portfolio (Figure 4). Figure 4: FQHC LAL Home Left Side Menu
The Add to Portfolio – View Requests page (Figure 5) opens.
Figure 5: Add to Portfolio - View Requests
4. On the Add to Portfolio – View Requests page, click Go.
User Guide For Applicants 14 of 92 FQHC LAL Annual Certification
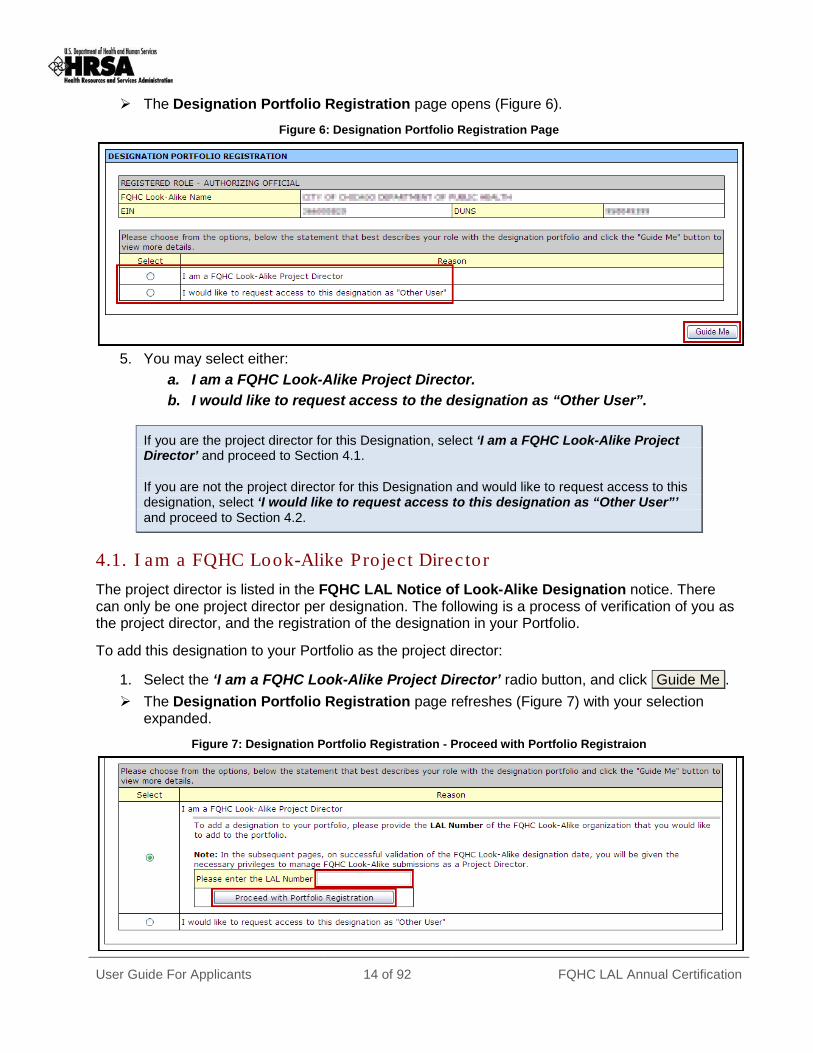
The Designation Portfolio Registration page opens (Figure 6).
Figure 6: Designation Portfolio Registration Page
5. You may select either:
a. I am a FQHC Look-Alike Project Director. b. I would like to request access to the designation as “Other User”.
If you are the project director for this Designation, select ‘I am a FQHC Look-Alike Project Director’ and proceed to Section 4.1.
If you are not the project director for this Designation and would like to request access to this designation, select ‘I would like to request access to this designation as “Other User”’ and proceed to Section 4.2.
4.1. I am a FQHC Look-Alike Projec t Direc tor The project director is listed in the FQHC LAL Notice of Look-Alike Designation notice. There can only be one project director per designation. The following is a process of verification of you as the project director, and the registration of the designation in your Portfolio.
To add this designation to your Portfolio as the project director:
1. Select the ‘I am a FQHC Look-Alike Project Director’ radio button, and click Guide Me . The Designation Portfolio Registration page refreshes (Figure 7) with your selection
expanded.
Figure 7: Designation Portfolio Registration - Proceed with Portfolio Registraion

User Guide For Applicants 15 of 92 FQHC LAL Annual Certification
2. Enter the LAL Number, and click Proceed with Portfolio Registration . The Verify Project Director Identity page (Figure 8) opens.
Figure 8: Verify Project Director Identity Page
The Project Director - Status:
a. If Not Registered – Proceed with the verification process. b. If Registered – This LAL Designation is already registered with your portfolio.
i. Cancel this page and proceed to the next section The Name Validation Status:
c. If Validated – You are listed as the project director for the Designation. d. If Not Validated – The system does not recognize you as the project director.
i. The Enter the Following Information From Notice of Look-Alike Designation section and the Certification section will not show on this page.
ii. Click Cancel to close the window and return to the previous page. 3. In the Enter The Following Information From Notice of Look-Alike Designation section,
enter the notice issue date for this designation. 4. In the Certification section, check the box to certify that you are the project director. 5. Click Continue . The Addition of Designation – Successful page (Figure 9) opens, displaying a message
stating that the addition of the designation was recorded successfully, showing a Status of Registered.
Figure 9: Addition Of Designation - Successful Page
6. To continue to view your portfolio, click Proceed to View Portfolio .

User Guide For Applicants 16 of 92 FQHC LAL Annual Certification
4.2. I would like to reques t acces s to th is des igna tion as “Other Us er” This option allows a member of the organization who is not the Project Director, to request access to the designation and register it within their Portfolio.
To Request Access to this Designation as “Other User” follow these steps:
1. From the Designation Portfolio Registration page (Figure 6), select ‘I would like to request access to this designation as “Other User”.’
2. Click Guide Me . The Designation Portfolio Registration page (Figure 10) refreshes with the selected field
expanded.
Figure 10: Designation Portfolio Registration - Other User Request
3. Read the Note, proceed with the appropriate request and click Request Permission from PD . The Request Access From Project Director page (Figure 11) opens.
Figure 11: Request Access From Project Director

User Guide For Applicants 17 of 92 FQHC LAL Annual Certification
If the project director shows Not Registered your request will not be processed. Click Go Back and try again after the project director has registered this designation.
4. Select the project director by checking the box. 5. Add your comments in the field provided (required). 6. Click Continue to proceed. The Request Access From Project Director page refreshes with a message that your
request has been forwarded to the PD successfully.
Figure 12: Request Access From Project Director - Successfully Forwarded
Proceed to View Portfolio will take you to the list of Designations in your Portfolio, note that this Designation will not be incorporated into your portfolio until the project director approves your request.
7. To add another Designation to your Portfolio, click Proceed to add another Designation . The Add to Portfolio – View Requests page opens listing your request showing a status of
Pending Approval.
Figure 13: Add to Portfolio - View Requests - Pending Approval
8. Click on the View Action History link to track the progress of the pending approval. 9. To add another designation to your portfolio, click Go.

User Guide For Applicants 18 of 92 FQHC LAL Annual Certification
4.3. Change of Des igna tion Projec t Direc tor There may be an instance when an Organization’s Designation project director changes. A notification to HRSA is given and the change is made in the system. Here are the steps necessary to make the change complete:
1. Once the change has been made in the system, HRSA will notify the new project director for the designation.
2. The new project director will need to follow the steps laid out in Section 4: Portfolio and Section 4.1: I am a FQHC Look-Alike Project Director.
On the Verify Project Director Identity page (Figure 8), the Status will show Registered. Ignore that message and continue to add the issue date verification, check the Certification checkbox, and click Continue .
The Addition Of Designation – Successful page (Figure 9) will open displaying the new project director with a Status: Registered.
The former project director will be automatically changed to ‘Other User” status by the system.

User Guide For Applicants 19 of 92 FQHC LAL Annual Certification
55.. Acces s the Des igna tion To access a FQHC LAL Designation it must first be registered with your Portfolio. You must be the project director, or you must have at least edit access privileges granted to you by the project director for the designation. (See Section 6: Administer New/Existing Users)
The following steps describe the process of accessing your FQHC Designation:
1. On the HRSA EHBs Home page (Figure 2), select FQHC LAL Home under HRSA Portal (Figure 14) on the Left Side menu.
Figure 14: Left Side Menu - FQHC LAL Home Link
2. On the Left Side menu of the subsequent page, under Designation Portfolio (Figure 15), select View Portfolio.
Figure 15: Left Side Menu - View Portfolio Link
The FQHC Look-Alike Designation page (Figure 16) opens, listing the Designation.

User Guide For Applicants 20 of 92 FQHC LAL Annual Certification
Figure 16: FQHC Look-Alike Designation
You may have more than one designation listed on this page.
3. To open the desired FQHC Look-Alike Designation, click on the Open Designation Handbook link.
The FQHC LAL Handbook Overview page opens for your Designation (Figure 17).
Figure 17: FQHC LAL Handbook - Overview Page
The Left Side menu contains links to all the activities you, as project director, can perform.
If you are not a project director and you do not see links to activities you need to perform, you may not have been granted access to those activities. (See Section 4.2: I would like to request access to this designation as “Other User” to request access.)
4. To configure user access to this Designation proceed to the next section. 5. To proceed with the Annual Certification Application process, go to Section 7: Access the
Application.

User Guide For Applicants 21 of 92 FQHC LAL Annual Certification
66.. Adminis te r New/Exis ting Us ers Administer New/Existing Users gives the project director, the ability to manage user access to your designation.
Administer New/Existing Users is only available to the project director. For all other users, the New/Existing Users link will not be shown on the Left Side menu.
1. From the FQHC LAL Handbook, in the Left Side menu under Administer, click the New/Existing Users link.
Figure 18: FQHC LAL Handbook - Left Side Menu
The Administer Users page (Figure 19) opens with a prepopulated list of users from your
organization.
2. To search for users in your organization, click Search . To sort the list by New Users or Existing Users, click the appropriate link.
When performing a search from one of the filtered pages (New Users; Existing Users) the search results will be displayed in the All Users view.

User Guide For Applicants 22 of 92 FQHC LAL Annual Certification
Figure 19: Administer Users Page
The Administer Users page categorizes the registered users according to the following three Portfolio Associations:
• None – This is an organization member that has not requested or has not been granted access to the designation. The project director can Grant Access to this user without a formal request by the user.
• New User – This is an organization member that has requested access through the Add to Portfolio process (See Section 4: Portfolio), but has not yet been granted access. The project director can Update Privileges for this user to respond to their access request.
• Existing User – This is an organization member that has been granted access to the designation, and the list of Privileges will also be listed in the Privileges field. The project director can Update Privileges to this user by adding or removing existing privileges.
To Administer User Access to the FQHC LAL Designation for members of your organization:
3. For a member with a New User status, click Go next to Update Privileges drop-down box.
The Users-Update Privileges page opens (Figure 20) displaying the Current Privileges of the user.
For those with the New User status, the Current Privileges will show no current privileges.

User Guide For Applicants 23 of 92 FQHC LAL Annual Certification
Figure 20: Users - Update Privileges Page
4. Click on View Action History to read the comments entered when the user requested this
access.
5. In the Modify Privileges section, check the appropriate checkboxes to grant the user the requested/approved access to the designation.
The Modify Privileges section is organized by View privileges; Edit privileges; and Submit privileges. To grant Edit privileges to a user, they must also have View privilege for that activity. To grant Submit privileges to a user, they must also have View and Edit privileges for that activity.
6. Once the desired privileges have been checked, add any Additional Comments in the Comments field provided. These comments will be added to the standard notification email sent to the user.
To remove privileges for an existing user, uncheck the appropriate checkboxes. To revoke all privileges, uncheck all checkboxes.
7. Click Save and Continue .

User Guide For Applicants 24 of 92 FQHC LAL Annual Certification
A confirmation page (Figure 21) will open showing the selections made and the body of the notification email that will be sent to the user upon confirmation.
Figure 21: Users - Update Privileges Page - Confirmation
8. Review the page and click Confirm .
The Administer Users page will reopen displaying an “Information saved successfully.” message. The updated privileges will be listed for the user (Figure 22).
Figure 22: Update Privileges - Information Saved Successfully

User Guide For Applicants 25 of 92 FQHC LAL Annual Certification
77.. Acces s the Applica tion If the FQHC Look-Alike Designation has been added to your Portfolio, the Annual Certification Application for that Designation can be accessed 150 days prior to the designation period end date.
To access the Annual Certification application:
1. From the FQHC LAL Handbook Overview page (Figure 17), under Submissions, click the Annual Certification/Renewal of Designation link.
The Certification/Renewal page opens (Figure 23).
Figure 23: Certification/Renewal Page
From the Certification/Renewal page you may:
a. View the Annual Certification application. b. Edit the Annual Certification application. c. Submit the Annual Certification application when completed.
2. To begin the Annual Certification Application process, click on the Edit link. The Annual Certification Status Overview page opens (Figure 24).
Figure 24: Annual Certification - Status Overview Page

User Guide For Applicants 26 of 92 FQHC LAL Annual Certification
Figure 25: Left Side Menu
Throughout this document, when you are instructed to “Open Form..,” use the left side menu or click Update on the Annual Certification Status Overview page (Figure 24) for the line item.
Throughout the forms, fields marked with an asterisk (*) are required.
Use the Left Side navigation menu (Figure 25) to access the forms in your FQHC LAL application.
Under Overview:
• Click Status to go to the Status Overview Page for the Entire Application.
Under Review and Submit
• Click Review to go to the Review Page for Entire Application.
• Click Submit to initiate the Submit to HRSA process.

User Guide For Applicants 27 of 92 FQHC LAL Annual Certification
88.. Comple te the Applica tion Forms
8.1. Cover Page The first form to complete is the Cover Page, which displays the pre-populated organization information and provides an opportunity to:
• Edit your EIN
• Add or change the Authorizing Official (AO)
• Request a new person register as the AO
• Update the existing AO information
• Remove an existing AO
To open the cover page:
1. From the Status Overview page (Figure 24), in the Left Side menu (Figure 25), click the Cover Page link.
The Cover Page (Figure 26) will open displaying the pre-populated organization information, and AO contact information.
Figure 26: Cover Page

User Guide For Applicants 28 of 92 FQHC LAL Annual Certification
8.1.1 Add or Change the Authorizing Official (AO) 1. To add or change the AO for this application, click on Add/Change AO .
The Choose Person to Add page opens (Figure 27).
Figure 27: Choose Person to Add Page
2. Select a person from the list, and click Add Selected Person . The Contact Information page opens (Figure 28).
Figure 28: Contact Information Page

User Guide For Applicants 29 of 92 FQHC LAL Annual Certification
3. Complete the information in the form (fields with * are required), and when complete click Save and Continue .
The Cover Page will open, with the “Information saved successfully” message displayed.
8.1.2 Request A New Authorizing Official (AO) If the AO is not listed it will be necessary to request a new AO. To request a person register as the AO:
1. From the Choose Person to Add page (Figure 29), click Request New AO . Figure 29: Choose Person To Add: Request New AO
The Contact Information: Notify AO page (Figure 30) will open.
Figure 30: Contact Information: Notify AO Page
2. Fill in the required information, add any additional comments, and click Continue . The Contact Information: Notify AO Confirmation page opens.
3. Review the information and click Confirm to send this notification to this person with instructions on how to register themselves as the Authorizing Official for your organization.

User Guide For Applicants 30 of 92 FQHC LAL Annual Certification
Your are returned to the Choose Person to Add page, with “The email was sent successfully” message displayed.
When the newly requested AO has been registered successfully, that person will be listed on the Choose Person To Add page. Follow Steps 2-3 in Section 8.1.1 to add them to your organization as the AO.
8.1.3 Delete the Authorizing Official 1. To delete an Authorizing Official click Delete AO on the Cover Page (Figure 26).
A Delete AO Confirmation page will open.
2. Select Confirm Delete to remove the AO from your application. The Cover Page will refresh with the AO removed from the cover page. An error message
will appear stating “The Authorizing Official (AO) is not assigned.” To complete this form, you must assign another AO for your organization, by following Steps 1-3 in Section 8.1.1.
3. When you have completed the Cover Page, click Save and Continue to proceed to the next form.

User Guide For Applicants 31 of 92 FQHC LAL Annual Certification
8.2. Form 1A: Genera l Information Works hee t Form 1A: General Information Worksheet provides a summary of information related to the applicant, service area, patients served, and patient visits.
1. Open Form 1A (Figure 31). Figure 31: Form 1A: General Information Worksheet
User Guide For Applicants 32 of 92 FQHC LAL Annual Certification
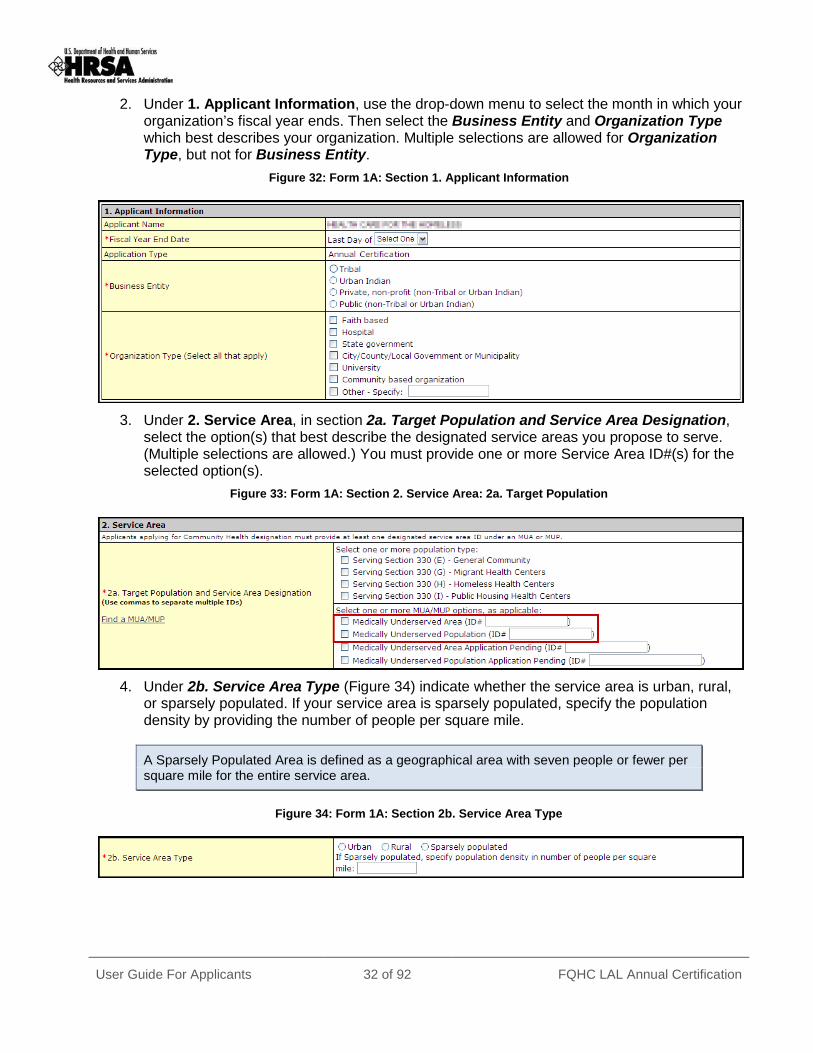
2. Under 1. Applicant Information, use the drop-down menu to select the month in which your organization’s fiscal year ends. Then select the Business Entity and Organization Type which best describes your organization. Multiple selections are allowed for Organization Type, but not for Business Entity.
Figure 32: Form 1A: Section 1. Applicant Information
3. Under 2. Service Area, in section 2a. Target Population and Service Area Designation, select the option(s) that best describe the designated service areas you propose to serve. (Multiple selections are allowed.) You must provide one or more Service Area ID#(s) for the selected option(s).
Figure 33: Form 1A: Section 2. Service Area: 2a. Target Population
4. Under 2b. Service Area Type (Figure 34) indicate whether the service area is urban, rural, or sparsely populated. If your service area is sparsely populated, specify the population density by providing the number of people per square mile.
A Sparsely Populated Area is defined as a geographical area with seven people or fewer per square mile for the entire service area.
Figure 34: Form 1A: Section 2b. Service Area Type

User Guide For Applicants 33 of 92 FQHC LAL Annual Certification
5. Under 2c: Target Population and Provider Information (Figure 35), report the aggregate data for all of the sites included in the FQHC LAL scope. Report the number of provider full-time equivalents (FTE) by staff type.
Figure 35: Form 1A: Section 2c. Target Population Information
Several tables request both current and projected information. “Current” refers to the number of patients and visits for the service area at the time of application. “Projected at Full Capacity” refers to the number of patients and visits you anticipate serving by the end of the FQHC LAL designation period (Up to five years).
6. Under Patients and Visits by Service Type (Figure 36) and Patients and Visits by Population Type (Figure 37), report current numbers of patients and visits. Similarly, provide the corresponding numbers you project at full capacity.
Visits are defined as documented, face-to-face contacts between a patient and a provider, who exercises independent judgment in the provision of services to the individual. To be included as a visit, services rendered must be documented.
Since patients must have at least one documented visit, it is not possible for the number of patients to exceed the number of visits.
Figure 36: Form 1A: Section 2c. Patients and Visits by Service Type

User Guide For Applicants 34 of 92 FQHC LAL Annual Certification
Figure 37: Form 1A: Section 2c. Patients and Visits by Population Type
Fields in this form cannot be left blank. If there is no information, a zero is acceptable.
7. Click Save and Continue (Figure 31) to save your work and proceed to the next form.
User Guide For Applicants 35 of 92 FQHC LAL Annual Certification
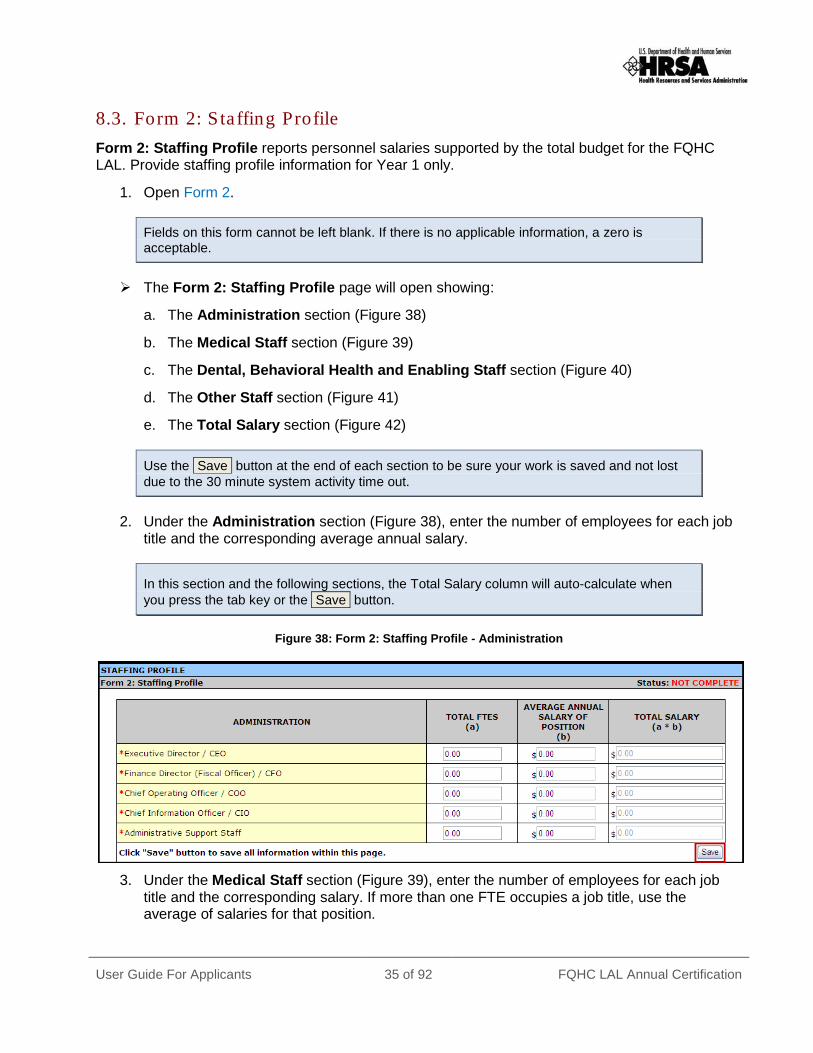
8.3. Form 2: S ta ffing Profile Form 2: Staffing Profile reports personnel salaries supported by the total budget for the FQHC LAL. Provide staffing profile information for Year 1 only.
1. Open Form 2.
Fields on this form cannot be left blank. If there is no applicable information, a zero is acceptable.
The Form 2: Staffing Profile page will open showing:
a. The Administration section (Figure 38)
b. The Medical Staff section (Figure 39)
c. The Dental, Behavioral Health and Enabling Staff section (Figure 40)
d. The Other Staff section (Figure 41)
e. The Total Salary section (Figure 42)
Use the Save button at the end of each section to be sure your work is saved and not lost due to the 30 minute system activity time out.
2. Under the Administration section (Figure 38), enter the number of employees for each job title and the corresponding average annual salary.
In this section and the following sections, the Total Salary column will auto-calculate when you press the tab key or the Save button.
Figure 38: Form 2: Staffing Profile - Administration
3. Under the Medical Staff section (Figure 39), enter the number of employees for each job title and the corresponding salary. If more than one FTE occupies a job title, use the average of salaries for that position.

User Guide For Applicants 36 of 92 FQHC LAL Annual Certification
Figure 39: Form 2 - Medical Staff
4. Under the Dental, Behavioral Health and Enabling Staff section (Figure 40), enter the number of employees for each job title and the corresponding salary. If more than one FTE occupies a job title, use the average of salaries for that position.
Figure 40: Form 2 - Dental, Behavioral Health and Enabling Staff

User Guide For Applicants 37 of 92 FQHC LAL Annual Certification
5. Under the Other Staff section (Figure 41), enter the number of employees for Other Professional Staff and Other Staff then enter the corresponding salary. If more than one FTE occupies a job title, use the average of salaries for that position.
Figure 41: Form 2 - Other Staff
The Salary section (Figure 42) displays the sum of Total Salary for Administration, Medical, Dental, Behavioral Health, Enabling, and Other Staff categories.
Figure 42: Form 2 - Total Salary
6. Click Save and Continue at the bottom of the Form 2: Staffing Profile page to save your work and proceed to the next form.

User Guide For Applicants 38 of 92 FQHC LAL Annual Certification
8.4. Form 3: Income Analys is Form 3: Income Analysis projects program income by source for the upcoming certification period; a one year period.
1. Open Form 3 (Figure 43). Figure 43: Form 3: Income Analysis Form
2. Click the Download link in the Download Template section to download the form. The Download Form 3: Income Analysis Form page (Figure 44) will open in a new
window. This page provides guidance for downloading and saving the Income Analysis form.
Instead of using the Microsoft Word template as described in the following steps, you can export the Income Analysis to Microsoft Excel, as long as you provide all the information in the template.

User Guide For Applicants 39 of 92 FQHC LAL Annual Certification
Figure 44: Download Form 3 Instruction Page
3. Review the instructions, then click Continue . A File Download dialog box (Figure 45) will be displayed.

User Guide For Applicants 40 of 92 FQHC LAL Annual Certification
Figure 45: File Download Dialog Box
4. Click the Save button to save the document to a folder on your computer. The Save As Windows dialog box will be displayed (Figure 46).
Figure 46: Save As Dialog Box
5. Click Save to save the document. A Download Complete window will open.
6. Click Open Folder to open the folder containing the downloaded document. 7. Click Close on the Download Form 3: Income Analysis Form instructions screen. 8. Open the Income Analysis file (Figure 47) from the location where you saved it.

User Guide For Applicants 41 of 92 FQHC LAL Annual Certification
Figure 47: Form 3: Income Analysis - Downloaded Document Template
9. Complete the Income Analysis form. 10. Save the completed document. 11. Return to Form 3: Income Analysis in the HRSA EHBs.
Figure 48: Form 3: Income Analysis - Attach
12. Click Attach in Form 3: Income Analysis section (Figure 48) to upload your completed Income Analysis document.
The Attach Document screen will be displayed (Figure 49).

User Guide For Applicants 42 of 92 FQHC LAL Annual Certification
Figure 49: Attach Document Screen - Browse
13. Click the Browse button. The Choose File to Upload dialog box opens (Figure 50).
Figure 50: Choose File to Upload Dialog Box
14. Navigate to the file you wish to upload and click Open . The file name will now appear in the Document field of the Attach Document screen
(Figure 51).

User Guide For Applicants 43 of 92 FQHC LAL Annual Certification
Figure 51: Attach Document Screen - File Selected
15. On the Attach Document screen (Figure 51), click Attach Document . The attached document will appear in the Attached Document(s) list (Figure 52).
Figure 52: Attached Document(s)
16. Click Finished Attaching . You will be returned to Form 3: Income Analysis. The attached document will be listed
under the Income Analysis Form heading.
To update the uploaded Income Analysis form, you must first make the necessary changes to the downloaded document on your computer. On the Form3: Income Analysis page, click Delete to remove the uploaded document; click Confirm Delete on the subsequent screen. Once the document has been successfully deleted, follow Steps 11-16 above to upload the updated Income Analysis Form from your computer.
17. After you have reviewed your work, click Save and Continue on Form 3: Income Analysis to save your work and proceed to the next form.

User Guide For Applicants 44 of 92 FQHC LAL Annual Certification
8.5. Form 3A: FQHC Look-Alike Budget Information Form 3A: FQHC Look-Alike Budget Information reports budget information for the program, functions and activities for the upcoming certification period’s operation under the FQHC LAL designation.
1. Open Form 3A (Figure 53).
Figure 53: Form 3A: FQHC Look-Alike Budget Information
2. Enter applicable budget information for 1.Expenses and 2.Revenue in the fields provided under the appropriate Program, Function, or Activity:
a. Community Health Centers (CHC-330(e))
b. Migrant Health Centers (MHC-330(g))
c. Health Care for Homeless (HCH-330(h))
d. Public Housing Primary Care (PHPC-330(i))
Do not complete the columns for Migrant Health Center, Health Care for the Homeless, or Public Housing Primary Care unless you have a special population designation.
As you enter amounts in the form the indicated “sum(s)” will be calculated automatically in each section.
3. When complete and you have reviewed your work, click Save and Continue to proceed to the next form.

User Guide For Applicants 45 of 92 FQHC LAL Annual Certification
8.6. Form 5A: Services Provided
8.6.1 Form 5A: Required Services Use this form to view how your organization provides required services. HRSA permits organizations to provide required services directly, by contracting with another provider, or by referral to another provider. These modes of service provision differ according to the service provider and the payment source (Table 1).
Table 1: Modes of Service Provision
Mode of Service Provision Your Organization
Provides the Service Pays for the Service
Direct by applicant Yes Yes
Formal written contract or agreement No Yes
Formal written referral arrangement No No
To view service delivery modes:
1. Open Form 5A (Figure 54). This is a read-only form displaying the list of required services and their corresponding
mode(s) of service provision in your organization’s current scope. To change or update any of these services, you are required to follow the Change In Scope (CIS) application process.
Figure 54: Form 5A: Services Provided - Required Services
2. Click Save and Continue to proceed to the Additional Services section of Form 5A.

User Guide For Applicants 46 of 92 FQHC LAL Annual Certification
8.6.2 Form 5A: Additional Services Use this form to view how your organization provides additional services.
1. To continue to form 5A: Additional Services, select Form 5A: Additional Services from the drop-down menu on Form 5A: Required Services, and click Go (Figure 55).
Figure 55: Form 5A: Services Provided - Drop-Down Menu
Organizations are required to provide behavioral health and substance abuse services, either directly or through formal written referral arrangements/agreements with other providers. These services are listed on the Services Provided - Additional Services page of Form 5A (Figure 56). To change or update any of these services, you are required to follow the Change In Scope (CIS) application process.
Figure 56: Form 5A: Additional Services
2. Click Save and Continue to proceed to Form 5B.

User Guide For Applicants 47 of 92 FQHC LAL Annual Certification
8.7. Form 5B: Service S ites Use this form to view your site information and/or update non-essential attributes of the site in your current scope.
8.7.1 View Site Information 1. Open Form 5B.
Figure 57: Form 5B: Service Sites Page
2. To view your site information click on the View link. A new window will open displaying a read only view of your site information.
Figure 58: View Service Sites
3. To print this information, click Print . 4. To close the window, click Close Window .

User Guide For Applicants 48 of 92 FQHC LAL Annual Certification
8.7.2 Update Site Information Use the Update Site page to revise the site’s information as necessary.
Direct Self Update Attributes and Project Officer (PO) Monitored Self Update attributes can be updated in Form 5B. Essential attributes can be updated only through a Formal CIS.
1. On the Service Sites page (Figure 59), click the Update link. Figure 59: Service Sites - Update
The Update Site page opens (Figure 60).
With the Update Site page open:
2. Update the Service Site Information (Figure 60) Figure 60: Update Site - Service Site Information
a. Click Change Site Name to change the name of the service site. b. Select a location type from the Location Type drop-down menu. c. Enter the number of contract service delivery locations. d. Enter the number of intermittent sites. e. Enter your organization’s web address.
3. Indicate whether your site is operated by your Organization, a Sub-Recipient, or a Contractor.

User Guide For Applicants 49 of 92 FQHC LAL Annual Certification
Use the Save button at the end of each section to be sure your work is saved and not lost due to the 30 minute system activity time out.
4. If your site is operated by a sub-recipient or a contractor, click Add to provide the organization’s information (Figure 61).
Figure 61: Update Site - Add Organization Information
5. Provide information about your location (Figure 62):
Figure 62: Update Site - Location Setting
a. Enter the Medicare Billing Number b. Enter the Medicaid Billing Number c. Enter the Medicaid Pharmacy Billing
6. Revise your site’s phone number, administration phone number and fax number (Figure 63). Figure 63: Update Site - Contact Information
7. Your sites Physical Address cannot be updated (Figure 64). Figure 64: Update Site - Change Location

User Guide For Applicants 50 of 92 FQHC LAL Annual Certification
8. If your organization’s mailing address is not the same as its physical address, please provide the mailing address (Figure 65).
Figure 65: Update Site - Add Mailing Address
9. To modify the zip codes and census tracts where the majority of the site’s patients live or work (Figure 66):
Figure 66: Update Site - Add Service Area Zip Codes
a. Click Add to add a Zip Code to the list. b. Select urban, rural, or sparsely populated from the Choose Population Type drop-down
menu to describe the site’s service area population.

User Guide For Applicants 51 of 92 FQHC LAL Annual Certification
10. Use the drop-down menus and fields under Site Operation Scheduling to indicate when your site offers services (Figure 67):
Figure 67: Update Site - Add Service Area Population Type
a. Select full-time or part-time from the Choose Operational Schedule dropdown menu. b. Select year-round or seasonal from the Choose Calendar Schedule dropdown menu.
11. Provide the total number of hours per week that the site will serve patients 12. Click Add under Months of Operation to identify and modify the months of the year that
the site will operate. 13. Click Save and Continue . The Service Sites page refreshes (Figure 68) with a Status of Complete.
Figure 68: Update Site - Site Addition Complete
14. When all desired sites have been updated, click Save and Continue to proceed to the next form.

User Guide For Applicants 52 of 92 FQHC LAL Annual Certification
8.8. Form 5C: View Other Activities /Loca tions Use this form to view other activities or locations.
This form is a view only form. You still must save it to mark the form as complete. Click Save and Continue (Figure 69) to mark it as complete and proceed to the next form.
To view an activity/location:
1. Open Form 5C (Figure 69). Figure 69: Form 5C: List of Activities/Locations - View
2. Click View to see a summary of the activity (Figure 70). Figure 70: Activity/Location Summary
3. Click Close Window to close the Activity/Location Summary window. 4. Click Save and Continue to proceed to the next form.

User Guide For Applicants 53 of 92 FQHC LAL Annual Certification
8.9. Form 6A: Current Board Member Charac teris tics Form 6A provides information about your organization’s current board members.
8.9.1 To Add a Board Member To add information about board members:
1. Open Form 6A (Figure 71). Figure 71: Form 6A: Current Board Member Characteristics
2. Under Organization Type, select “Yes” or “No” to answer the question, “Is your organization a tribal entity?”
If you answer “Yes”, you are not required to complete the remainder of Form 6A. Form 6A is not required for tribal entity applicants.
Click the Save and Continue button to proceed to Form 6B.
3. If you answered “No” to the tribal entity question, click Add to add board members (Figure 71).
The Add Board Member Information page will open.
4. Complete the Add Board Member Information page (Figure 72).

User Guide For Applicants 54 of 92 FQHC LAL Annual Certification
Figure 72: Form 6A: Add Board Member Information
5. Click Save and Continue to return to the Current Board Members Characteristics page with the new board member added.
Repeat steps 3-5 for each board member in your organization. Please provide information on a minimum of 9 and a maximum of 25 board members.
6. Enter the Board member’s Gender, Ethnicity, and Race in the Number of Board Members fields (Figure 73). You must enter a number in each field; enter zero if applicable.
This section is a summary of the gender, ethnicity, and race of the board members. Enter the total number of board members that match each of the listed criteria.
Figure 73: Form 6A: Board Members Gender; Ethnicity; Race

User Guide For Applicants 55 of 92 FQHC LAL Annual Certification
8.9.2 Update Board Member Information When the addition of a board member is complete, you can update each entry as follows:
1. Select the board member and click Update (Figure 74). Figure 74: Update Link on a Board Member Listing
The Update Board Member Information page will be displayed (Figure 75).
Figure 75: Update Board Member Information
2. Update the board member information as desired and click Save and Continue.

User Guide For Applicants 56 of 92 FQHC LAL Annual Certification
8.9.3 Delete a Board Member To delete a board member from the List of Board Members:
1. Select a board member, and click Delete (Figure 76). Figure 76: Delete Link on a Board Member Listing
The Delete Board Member Information page opens.
Figure 77: Confirm Delete Board Member
2. Click Confirm Delete . The Current Board Member Characteristics page opens with the board member removed
from the list of current board members.
If you Add or Delete a board member, don’t forget to update the Gender, Ethnicity, Race table appropriately.
3. When all board members have been added, modified, and/or deleted, and you have updated the Gender, Ethnicity, and Race table, click Save and Continue (Figure 73) to proceed to the next form.

User Guide For Applicants 57 of 92 FQHC LAL Annual Certification
8.10. Form 8: Hea lth Center Agreements Form 8: Health Center Agreements provides information on agreements between your organization and other providers whereby other organizations provide a substantial number of services, sites, and/or activities in support of your organization or which impact your organization’s board composition, authorities, function or responsibilities.
This form is an optional form that should only be submitted if the FQHC Look-Alike organization has entered into any new agreements since the submission of its last FQHC Look-Alike application. Please only provide agreements with other providers for a substantial number of services, site, and/or activities. Click Save and Continue (Figure 90) to mark it as complete and proceed to the next form. (This form must be saved to mark it as complete)
To identify Health Center Agreements:
1. Open Form 8, and complete: a. Part I (Figure 78) b. Part II, Question 1 (Figure 79) c. Part II, Question 2 (Figure 80) d. Part II, Question 3 (Figure 81) (Optional) e. Part III (Figure 82)
2. In Part I (Figure 78), Question 1, indicate if you have any current or proposed agreements with another organization to carry out a substantial portion of your scope of project.
Figure 78: Form 8: Part I - Question 1
If you answered “Yes” to Question 1, indicate the number of each agreement type in Questions 2a or 2b. If No, proceed to Part II.
3. In Part II, Question 1 (Figure 79), complete the Governance Checklist to determine if any affiliations or agreements limit or compromise the board’s authorities, functions, and/or responsibilities.

User Guide For Applicants 58 of 92 FQHC LAL Annual Certification
Figure 79: Form 8: Part II - Governance Checklist
If you answer “No” to any Governance Checklist item, you must answer “Yes” to Part II, Question 2.
4. In Part II, Question 2 (Figure 80), indicate if you have any current or proposed agreements that affect the composition, authorities, functions, or responsibilities of your organization’s board.
Figure 80: Form 8: Part II - Question 2
If you answer “Yes” to Question 2, specify the number of such agreements in Question 3 and proceed to complete Part III.
Figure 81: Form 8: Part II - Question 3

User Guide For Applicants 59 of 92 FQHC LAL Annual Certification
If you answered Yes to Part I, Question 1 or Part II, Question 2, proceed to Part III.
5. In Part III (Figure 82), provide information about each health center agreement noted in Part I and Part II. Click Add Organization Affiliation .
Figure 82: Form 8: Part III: Organization Affiliation
The Health Center Affiliation Certification/Checklist page opens.
6. In the Add Organization Agreement section:
a. Enter the Organization Name and Organization EIN (Employer Identification Number) for the organization with which you have the agreement (Figure 83).
Figure 83: Form 8: Part III: Add Organization Affiliation
b. Enter the organization’s Physical Location Address (Figure 84).
Figure 84: Form 8: Part III: Add Organization Affiliation: Physical Address
c. Provide the history of each agreement (Figure 85). This may include the purpose of each
agreement and how it has changed over time.

User Guide For Applicants 60 of 92 FQHC LAL Annual Certification
Figure 85: Form 8: Part III: Add Organization Affiliation: Explain History
7. In the Attachments section (Figure 86), click Attach to upload agreements with this organization.
Figure 86: Form 8: Part III: Add Organization Affiliation: Attach Documentation
All agreement/arrangement documents must be uploaded in full.
The Attach Document screen (Figure 87) will be displayed.
Figure 87: Form 8: Part III: Add Organization Affiliation - Browse
8. Click Browse . The Choose File to Upload dialog box will be displayed.

User Guide For Applicants 61 of 92 FQHC LAL Annual Certification
Figure 88: Choose File to Upload
9. Select the desired file. 10. Click Open . The file name will now appear in the Document Name field on the Attach Document
screen.
11. Click Attach Document . The attached document will appear in the Attached Document(s) list (Figure 89).
Figure 89: Form 8: Part III: Attached Documents
12. Click Finished Attaching .
User Guide For Applicants 62 of 92 FQHC LAL Annual Certification
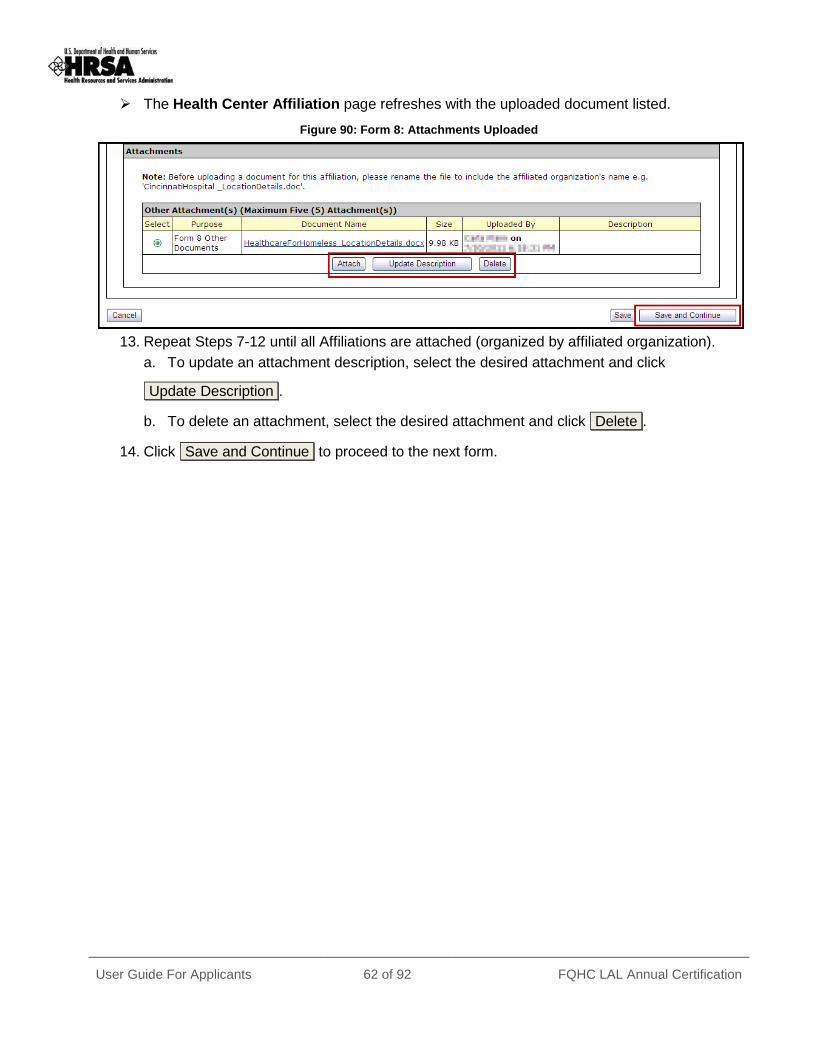
The Health Center Affiliation page refreshes with the uploaded document listed.
Figure 90: Form 8: Attachments Uploaded
13. Repeat Steps 7-12 until all Affiliations are attached (organized by affiliated organization).
a. To update an attachment description, select the desired attachment and click
Update Description .
b. To delete an attachment, select the desired attachment and click Delete .
14. Click Save and Continue to proceed to the next form.

User Guide For Applicants 63 of 92 FQHC LAL Annual Certification
8.11. Form 10: Annual Emergency Prepa rednes s (EP) Report The Annual Emergency Preparedness Report assesses your organization’s overall emergency readiness.
1. Open Form 10, and complete: a. Section I: Emergency Preparedness and Management Plan (Figure 91) b. Section II: Readiness (Figure 92)
2. Complete each section of the form by selecting “Yes” or “No” for each question. Figure 91: Form 10: Section I - Emergency Preparedness and Management Plan
For Section I: Question 1, if you selected “Yes”, you must enter the date the Hazards Vulnerability Assessment was completed.
For Section I: Question 2, if you selected “Yes”, you must enter the date the Emergency Preparedness and Management (EPM) plan was approved by your board.
3. Proceed to complete Section II by selecting “Yes” or “No” for each question. Figure 92: Form 10: Section II - Readiness
4. Click Save and Continue to proceed to the next form.

User Guide For Applicants 64 of 92 FQHC LAL Annual Certification
8.12. Form 12: Organiza tion Contac ts Use Form 12 to provide contact information for the proposed project. Enter Medical Director, Dental Director (Optional), Chief Executive Officer, and Contact Person. The contact person should be the primary communications liaison for any program specific information being submitted as part of this application.
1. Open Form 12 (Figure 93). 2. Click one of the Add… buttons to add or update the information for each type of contact.
For example, click Add Medical Director to add a medical director. Figure 93: Form 12: Organization Contacts
The Contact Information data entry page (Figure 94) will be displayed for the contact you are adding.

User Guide For Applicants 65 of 92 FQHC LAL Annual Certification
Figure 94: Form 12: Contact Information Data Entry Page
3. Complete the Contact Information page. 4. Click Save and Continue to save the Contact Information and return to the Organization
Contacts page. 5. Continue adding contact information for the remaining contact types by following Steps 2-4
above. 6. Click Save and Continue on the Organization Contacts page (Figure 93) after you have
completed the required contact data to save your work and proceed to the next form.

User Guide For Applicants 66 of 92 FQHC LAL Annual Certification
8.13. Clinical Performance Meas ures Use this form to provide information about clinical performance measures. The Clinical Performance Measures form consists of the Designation Period section, the Standard Measures section, and Additional Measures section.
8.13.1 The Designation Period The designation period is the multiyear period (generally a five year period) for which the FQHC LAL has been designated.
1. Open the Clinical Performance Measures form.
2. In the Designation Period section, click the calendar icons to enter the dates in the Start Date and End Date fields.
Figure 95: Clinical Performance Measures - Designation Period
3. Click Save to save the designation period.
The system will synchronize the designation period dates between the Clinical Performance Measures and Financial Performance Measures forms. Changes made to dates in one form will be reflected in the other.
8.13.2 Provide Standard Performance Measure Information Provide the performance measure information as follows:
1. Click the Update link for a Standard Performance Measure (Figure 96). Figure 96: Clinical Performance Measures - Standard Measures

User Guide For Applicants 67 of 92 FQHC LAL Annual Certification
2. The Update Clinical Performance Measure Information page (Figure 97) will be displayed.
For the Standard Measures some fields in the Update Clinical Performance Measure Information screens are pre-populated with data and cannot be changed. Some data option fields are pre-selected and are read only.
Figure 97: Update Clinical Performance Measure Information
3. Enter a Target Goal Description.
Use the Save button at the end of each section to be sure your work is saved and not lost due to the 30 minute system activity time out.
Figure 98: Update Clinical Performance Measure Information - Baseline Data
4. Enter the Baseline Data: Baseline Year, Numerator, and Denominator.
Use the Numerator Description and Denominator Description fields for information on how the Baseline Data fields are calculated.
The baseline auto-calculates and appears in the Calculated Baseline field.
5. In the Projected Data field, enter the data expected when the designation period concludes.

User Guide For Applicants 68 of 92 FQHC LAL Annual Certification
6. Click the Sample Calculation link to see an example of the calculation you need to perform to complete this field.
A new window will open displaying an explanation of and calculation for a “Percentage base Measure Type” and a “Ratio based Measure Type.”
Figure 99: Projected Data Calculation - Sample Calculation
7. Perform the calculation, and enter the solution in the Projected Data field (Figure 98). 8. Enter the Data Source & Methodology (Figure 100).
Figure 100: Update Clinical Performance Measure Information - Data Source and Methodology
9. Enter the Key Contributing and/or Restricting Factor(s) and Major Planned Actions(s) (Figure 101).
Figure 101: Update Clinical Performance Measure Information - Key Factor and Major Planned Action
Key Factor and Major Planned Action #1 is required. Key Factor and Major Planned Action #2 and #3 are optional.
10. Add the required Quantitative and Qualitative Progress Towards Goal information in the fields provided (Figure 102).

User Guide For Applicants 69 of 92 FQHC LAL Annual Certification
Figure 102: Progress Towards Goal
11. Add any necessary or desired comments (Figure 103).
Figure 103: Update Clinical Performance Measure Information - Comments
You are required to provide information in all Performance Measure fields. If a performance measure is not applicable, you must provide an explanation in the Comments field for that measure.
12. Click Save and Continue to return to the Update Clinical Performance Measures page. 13. Repeat Steps 1-12 for each of the Standard Performance Measures.
8.13.3 Add an Additional Performance Measure The Clinical Performance Measures form consists of Standard Performance Measures and Additional Performance Measures.
Although included in the Additional section, Oral Health and Behavioral Health measures are required. They are included in this section of the form so applicants can create measures specific to the types of Oral Health and Behavioral Health services provided.
Any “Additional” measures should be specific to the proposed project
To add an Additional Performance Measure to your application:
1. Click Add Performance Measure , under the Additional Measures section of the form. Figure 104: Additional Measures - Add Performance Measure
The Add Clinical Performance Measure Information page opens (Figure 105).

User Guide For Applicants 70 of 92 FQHC LAL Annual Certification
Figure 105: Add Clinical Performance Measure information - Focus Area
2. Select a focus area type from the drop-down menu.
If your focus area is Oral Health or Behavioral Health, select one or more performance measure categories presented in the Performance Measure Category menu.
3. Enter the Performance Measure description and Target Goal Description. Figure 106: Add Clinical Performance Measure information - Performance Measure and Target Goal
4. Enter the Numerator Description and the Denominator Description. Figure 107: Add Clinical Performance Measure information - Numerator and Denominator
5. Enter the Baseline Data: Baseline Year, Measure Type, Numerator, and Denominator. Figure 108: Add Clinical Performance Measure information - Baseline Data
The baseline auto-calculates and appears in the Calculated Baseline field.
6. In the Projected Data field, enter the data expected when the designation period concludes.
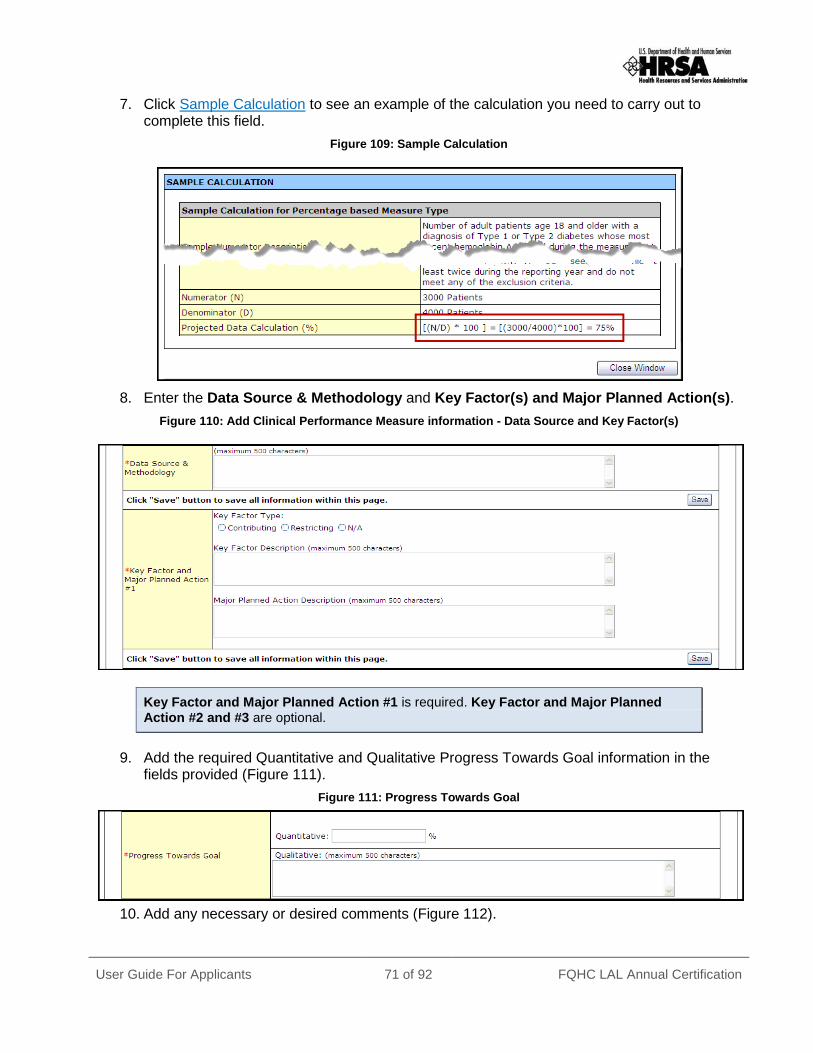
User Guide For Applicants 71 of 92 FQHC LAL Annual Certification
7. Click Sample Calculation to see an example of the calculation you need to carry out to complete this field.
Figure 109: Sample Calculation
8. Enter the Data Source & Methodology and Key Factor(s) and Major Planned Action(s). Figure 110: Add Clinical Performance Measure information - Data Source and Key Factor(s)
Key Factor and Major Planned Action #1 is required. Key Factor and Major Planned Action #2 and #3 are optional.
9. Add the required Quantitative and Qualitative Progress Towards Goal information in the fields provided (Figure 111).
Figure 111: Progress Towards Goal
10. Add any necessary or desired comments (Figure 112).

User Guide For Applicants 72 of 92 FQHC LAL Annual Certification
Figure 112: Add Clinical Performance Measure information - Comments
You are required to provide information in all Performance Measure fields. If a performance measure is not applicable, you must provide an explanation in the Comments field for that measure.
11. Click the Save and Continue button at the bottom of the form. You will be returned to the Clinical Performance Measures form. The added performance
measure will appear in the Additional Measures area of the form.
Figure 113: Clinical Performance Measures - Additional Measures
12. To add another Additional Measure, click Add Performance Measure and follow Steps 2-11.
8.13.4 Update a Performance Measure To update a Performance Measure:
1. Click the Update link (Figure 114). Figure 114: Update Link on a Complete Performance Measure
The Update Clinical Performance Measure Information page will be displayed (Figure 97).
2. Update the performance measure as described in Provide Standard Performance Measure Information (See 8.13.2).

User Guide For Applicants 73 of 92 FQHC LAL Annual Certification
8.13.5 Delete an Additional Performance Measure To delete an Additional Performance Measure:
1. Under the desired Additional Performance Measure, click the Delete link The Delete Clinical Performance Measures Information page opens.
Figure 115: Clinical Performance Measures - Additional Measures - Delete
2. Click Confirm Delete .
8.13.6 View a Performance Measure 1. Under the desired Performance Measure, click the View link to see a read-only display of
the performance measures (Figure 116). Figure 116: Read-only Display of Clinical Performance Measures
2. Click Close Window to return to the Clinical Performance Measures Form. 3. After you have completed work with the Clinical Performance Measures (Figure 113),
click Save and Continue to proceed to the next form.

User Guide For Applicants 74 of 92 FQHC LAL Annual Certification
8.14. Financ ia l Performance Meas ures Use this form to provide information about financial performance measures The Financial Performance Measures form consists of the Designation Period section, the Standard Measures section, and Additional Measures section.
8.14.1 The Designation Period The designation period is the multiyear period (generally a five year period) for which the FQHC LAL has been designated.
1. Open the Financial Performance Measures form.
2. In the Designation Period section, click the calendar icons to enter the dates in the Start Date and End Date fields.
Figure 117: Financial Performance Measures - Designation Period
3. Click Save to save the designation period.
The system will synchronize the designation period dates between the Clinical Performance Measures and Financial Performance Measures forms. Changes made to dates in one form are reflected in the other.
8.14.2 Provide Standard Performance Measure Information Provide the performance measure information as follows:
1. Click the Update link (Figure 118). Figure 118: Financial Performance Measure - Standard Measures
The Update Financial Performance Measure Information page (Figure 119) will be displayed.

User Guide For Applicants 75 of 92 FQHC LAL Annual Certification
For the Standard Measures some fields in the Update Financial Performance Measure Information screens are prepopulated with data and cannot be changed. Some data option fields are pre-selected and are read only.
Figure 119: Update Financial Performance Measure Information
2. Enter the Target Goal Description.
Use the Save button at the end of each section to be sure your work is saved and not lost due to the 30 minute system activity time out.
Figure 120: Update Financial Performance Measure Information - Baseline Data
3. Enter the Baseline Data: Baseline Year, Numerator, and Denominator. Use the Numerator Description and Denominator Description fields for information on how the Baseline Data field is calculated. The baseline auto-calculates and appears in the Calculated Baseline field.
4. In the Projected Data field, enter the data expected when the designation period concludes. 5. Click the Sample Calculation link to see an example of the calculation you need to complete
for this field. A new window will open displaying an explanation of and calculation for a “Percentage Base
Measure Type.”

User Guide For Applicants 76 of 92 FQHC LAL Annual Certification
Figure 121: Sample Calculation
6. Perform the calculation, and enter the solution in the Projected Data field (Figure 120). 7. Enter the Data Source & Methodology (Figure 122).
Figure 122: Update Financial Performance Measure Information - Data Source and Methodology
8. Enter the Key Contributing and/or Restricting Factor(s) and Major Planned Actions(s)
(Figure 123). Figure 123: Key Factor and Major Planned Action
Key Factor and Major Planned Action #1 is required. Key Factor and Major Planned Action #2 and #3 are optional.
9. Add the required Quantitative and Qualitative Progress Towards Goal information in the fields provided (Figure 124).
Figure 124: Progress Towards Goal

User Guide For Applicants 77 of 92 FQHC LAL Annual Certification
10. Add any necessary or desired comments (Figure 125).
Figure 125: Update Financial Performance Measure Information - Comments
You are required to provide information in all Performance Measure fields. If any performance measure listed is not applicable, you must provide an explanation in the corresponding Comments field.
11. Click Save and Continue to return to the Financial Performance Measures page. 12. Repeat Steps 1-11 for each of the standard Performance Measures.
8.14.3 Add an Additional Performance Measure The Financial Performance Measures form consists of Standard Measures and optional Additional Measures.
To add an additional performance measure to your application:
1. Click Add Performance Measure , under the Additional Measures section of the form. Figure 126: Additional Measures - Add Performance Measure
The Add Financial Performance Measure page opens (Figure 127).
Figure 127: Add Financial Performance Measure Information - Focus Area
2. Select a focus area from the drop-down menu. 3. Enter the performance measure.

User Guide For Applicants 78 of 92 FQHC LAL Annual Certification
Figure 128: Add Financial Performance Measure Information - Performance Measure and Target Goal
4. Enter descriptions of the numerator and denominator. Figure 129: Add Financial Performance Measure Information - Numerator and Denominator Description
5. Enter the Baseline Data: Baseline Year, Measure Type, Numerator, and Denominator. Figure 130: Add Financial Performance Measure Information - Baseline Data
The baseline auto-calculates and appears in the Calculated Baseline field.
6. In the Projected Data field, enter the data expected when the designation period concludes. 7. Click Sample Calculation to see an example of the calculation you need to perform to
complete this field. Figure 131: Sample Calculation

User Guide For Applicants 79 of 92 FQHC LAL Annual Certification
8. Enter the Data Source & Methodology and Key Contributing or Restricting Factor(s) and Major Planned Action(s) (Figure 132).
Figure 132: Add Financial Performance Measure Information - Data Source and Key Factor(s)
Key Factor and Major Planned Action #1 is required. Key Factor and Major Planned Action #2 and #3 are optional.
9. Add the required Quantitative and Qualitative Progress Towards Goal information in the fields provided (Figure 133).
Figure 133: Progress Towards Goal
10. Add any necessary or desired comments (Figure 134).
Figure 134: Update Financial Performance Measure Information - Comments
11. Click the Save and Continue button at the bottom of the form. You will be returned to the main Financial Performance Measures form. The new
performance measure will appear in the Additional Measures area of the form.

User Guide For Applicants 80 of 92 FQHC LAL Annual Certification
Figure 135: Additional Measures - Added Performance Measure
12. To add another Additional Measure, click Add Performance Measure and follow Steps 2-11.
8.14.4 Update a Performance Measure To update a Performance Measure:
1. Click the Update link (Figure 114). Figure 136: Update Financial Performance Measure
The Update Financial Performance Measure Information page will be displayed (Figure 96).
2. Update the performance measure as described in Provide Standard Performance Measure Information (See 8.14.2).
8.14.5 Delete an Additional Performance Measure To delete an Additional Performance Measure:
1. Under the desired Additional Performance Measure, click the Delete link. Figure 137: Delete Financial Performance Measure
The Delete Financial Performance Measures Information page opens.

User Guide For Applicants 81 of 92 FQHC LAL Annual Certification
Figure 138: Delete Financial Performance Measure Information - Confirmation
2. Click Confirm Delete .
8.14.6 View a Performance Measure 1. Under the desired Performance Measure, click the View link to see a read-only display of
the performance measure (Figure 139). Figure 139: Read-Only View of Financial Performance Measures
2. Click the Close Window button to return to the updated Financial Performance Measures form.
3. After you have completed working with the Financial Performance Measures, click Save and Continue (Figure 135) to proceed to the next form.

User Guide For Applicants 82 of 92 FQHC LAL Annual Certification
8.15. Appendices
8.15.1 Attach Documents 1. Open Appendices (Figure 140).
Figure 140: Appendices

User Guide For Applicants 83 of 92 FQHC LAL Annual Certification
All of the attachments for the Annual Certification application need only be attached as applicable. If there have been changes since the submission of the last FQHC LAL application then the relevant attachment should be updated and uploaded to the system. For the Project Abstract, Project Narrative, and Attachments 1-6 only one document is permitted. For Attachment 7, a maximum of 5 documents may be uploaded. (Attachments with an asterisk (*) are required)
2. To upload a document to the system, click Attach under the particular attachment type you wish to upload (Figure 141).
Figure 141: Appendices Detail - Project Abstract
The Attach Document page opens (Figure 142)
Figure 142: Attach Document Page
3. To attach the document, click Browse . The Choose File to Upload window opens (Figure 143).

User Guide For Applicants 84 of 92 FQHC LAL Annual Certification
Figure 143: Choose File to Upload Window
4. Select the desired file to upload, and click Open . The Attach Document page refreshes with the selected file path populating the Browse
field.
5. Add a description if desired, and click Attach Document . The Attach Document page refreshes with the Attached Document(s) section populated
with the uploaded document (Figure 144).
Figure 144: Attachment Saved Successfully
6. Click Finished Attaching to complete the uploading process. You are returned to the Appendices page (Figure 145) with the uploaded file shown in the
list.
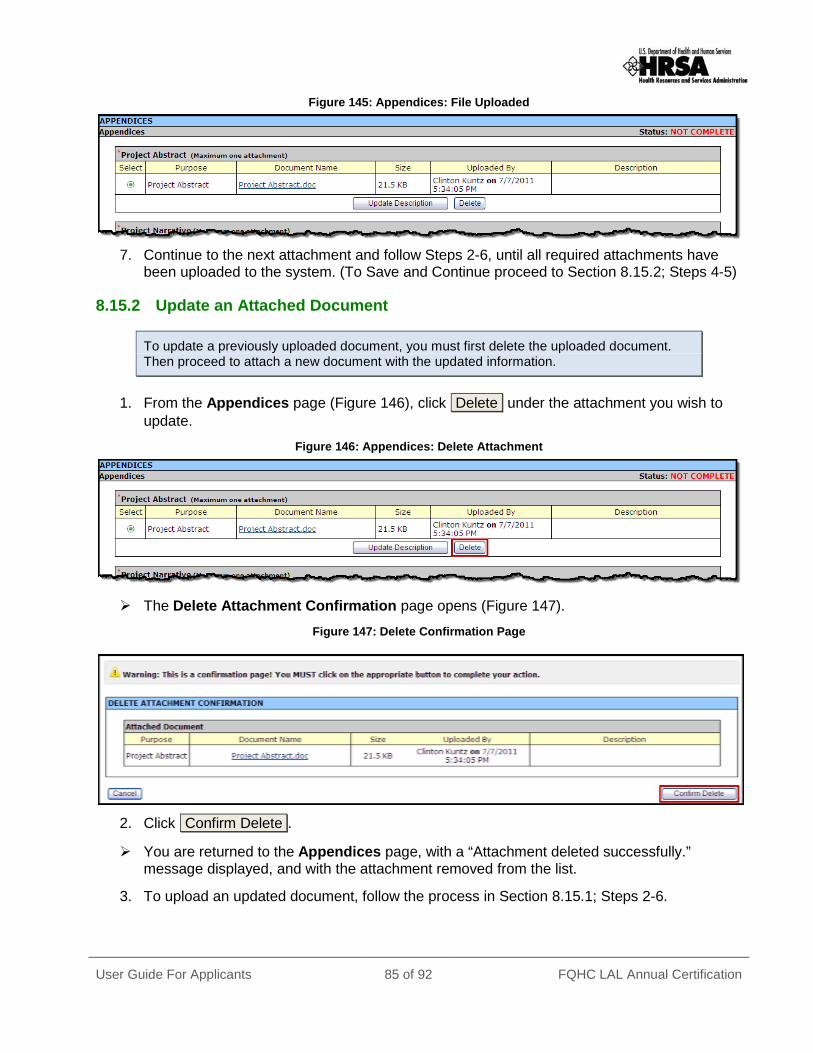
User Guide For Applicants 85 of 92 FQHC LAL Annual Certification
Figure 145: Appendices: File Uploaded
7. Continue to the next attachment and follow Steps 2-6, until all required attachments have
been uploaded to the system. (To Save and Continue proceed to Section 8.15.2; Steps 4-5)
8.15.2 Update an Attached Document
To update a previously uploaded document, you must first delete the uploaded document. Then proceed to attach a new document with the updated information.
1. From the Appendices page (Figure 146), click Delete under the attachment you wish to update.
Figure 146: Appendices: Delete Attachment
The Delete Attachment Confirmation page opens (Figure 147).
Figure 147: Delete Confirmation Page
2. Click Confirm Delete .
You are returned to the Appendices page, with a “Attachment deleted successfully.” message displayed, and with the attachment removed from the list.
3. To upload an updated document, follow the process in Section 8.15.1; Steps 2-6.

User Guide For Applicants 86 of 92 FQHC LAL Annual Certification
4. When you have completed uploading all the required documents, click Save to save your work. If all documents have been uploaded properly the Appendices page will refresh with a success banner and Status: Complete.
Figure 148: Appendices: Complete - Save and Continue
5. Click Save and Continue to proceed to Review the Application.

User Guide For Applicants 87 of 92 FQHC LAL Annual Certification
99.. Re view the Applica tion The status and review pages allow you to check the completion status of all or any part of your application, as well as view or print your application.
9.1. Applica tion Forms Sta tus To view the status of the Application forms from any page, in the Application Process left side menu, under Overview, click Status. The Status Overview page opens (Figure 149). This page shows the completion status of each Application form. All must show a Status of Complete before you can submit your application to HRSA.
Figure 149: Status Overview Page for Application Forms

User Guide For Applicants 88 of 92 FQHC LAL Annual Certification
9.2. View and Prin t the Applica tion To view or print the Application forms, click Review under Review and Submit on the left side menu. The Review page will open showing the Table of Contents (Figure 150).
Figure 150: Application Information Review Page
Use the View links on this page to view and print forms and documents:
1. Click a View link in the Action column to see:
• A form (HTML in the Type column) • An attachment (Document in the Type column) and print it
2. Click: • Print to print the Table of Contents page.
• Print All HTML Forms to print all Application forms (HTML in the Type column)
3. From the Table of Contents drop-down menu, make a selection and click Go to navigate to that form.

User Guide For Applicants 89 of 92 FQHC LAL Annual Certification
1100.. Submit the Applica tion You can submit the application to HRSA once all forms are complete.
To submit an application, you must have the ‘Submit’ privilege. More than one user may be granted the “Submit” privilege. The Project Director (PD) has the Submit to HRSA privilege by default. In addition, other users may be granted the Submit to HRSA privilege by utilizing the New/Existing Users link in the left side menu of the FQHC LAL Handbook for the Designation (See Section 6: Administer New/Existing Users, for more information).
To submit the application:
4. Click Submit under Review and Submit on the left side menu of the Status Overview page, or click Proceed and Submit at the bottom of the Status Overview Page.
The Table Of Contents page opens.
Figure 151: Table Of Contents Page Showing Complete Status
If all forms are complete, a Submit to HRSA button will show at the bottom of the Table of
Contents page.

User Guide For Applicants 90 of 92 FQHC LAL Annual Certification
The Submit Button will show depending on the Application Privileges you have been given: • If you have the Submit Annual Certification/Renewal of Designation privilege, you
will see the Submit to HRSA button. • If you have only the Edit Annual Certification/Renewal of Designation privilege, you
will not see a submit button.
See Section 6: Administer New/Existing Users for more information on user privileges.
6. To submit the application to HRSA, click Submit to HRSA . The Certifications and Acceptances page (Figure 152) opens.
Figure 152: Submit Certifications and Acceptances Page
7. Complete the questions in the Certifications and Acceptance section of the form. 8. Click Submit to HRSA . The General Information page (Figure 153) will be displayed with a “The application was
successfully submitted to HRSA” message displayed.
Figure 153: General Information Page - Successfully Submitted to HRSA

User Guide For Applicants 91 of 92 FQHC LAL Annual Certification
1111.. Cus tomer Support In formation
Use your Application Tracking Number for all correspondence.
11.1. Regis tra tion or Acces s /Pas s word Is s ues For assistance with registering in HRSA EHBs, or access/password related issues please call the HRSA Call Center:
• By Phone: 877-GO4-HRSA (877-464-4772) or 301-998-7373 (between 9:00 am to 5:30 pm ET)
OR
• By Email: [email protected]
Please visit HRSA EHBs for additional online help.
• Go to: https://grants.hrsa.gov/webexternal/home.asp • Click on Help
The Call Center cannot respond to questions that concern application guidance or programmatic issues.
11.2. Comple ting the Applica tion in the Elec tronic Handbooks For assistance with technical issues related to completing your Application within the EHBs, please contact the BPHC Help Desk:
• By Email: [email protected] OR
• By Phone: 301-443-7356 or 877-974-2742 (between 8:30 am to 5:30 pm ET)
The BPHC Help Desk cannot respond to questions that concern application guidance or programmatic issues.
11.3. Applica tion Guidance or Programmatic Ques tions Please refer all application guidance or programmatic questions to the Bureau of Primary Health Care (BPHC) Office of Policy and Program Development (OPPD) at 301-594-4300 or [email protected].

User Guide For Applicants 92 of 92 FQHC LAL Annual Certification
1122.. Frequently As ked Ques tions
12.1. Software
12.1.1 What are the software requirements for HRSA EHBs? HRSA EHBs can be accessed over the Internet using Internet Explorer 6.0 and above and Netscape 4.72 and above. HRSA EHBs are compliant with Section 508.
HRSA EHBs use pop-up screens to allow users to view or work on multiple screens. Ensure that your browser settings allow for pop-ups.
You will need appropriate viewers to view attachments in Microsoft Word and PDF.
12.1.2 What are the system requirements for using HRSA EHBs on a Macintosh computer?
Safari v1.2.4 and above or Netscape v7.2 and above are the recommended Internet browsers for Apple Computers. HRSA EHBs do not work on Internet Explorer for Macintosh.
You will need appropriate viewers to view attachments in Microsoft Word and PDF.
12.1.3 What are the software requirements for FQHC LAL Application Modules? Refer to the software requirements for HRSA EHBs. In addition, you will need Microsoft Word to complete the Appendices sections.
12.1.4 What document types can I upload? The following document types are supported in HRSA EHBs:
• .DOC; .DOCX - Microsoft Word • .RTF - Rich Text Format • .TXT - Text • .WPD - Word Perfect Document • .PDF - Adobe Portable Document Format • .XLS ; .XLSX - Microsoft Excel