franciscan st. francis health rehabilitation services...sect. 7.1 sect. 7.1 franciscan st. francis...
TRANSCRIPT

SECT. 7.1 SECT. 7.1
Franciscan St. Francis Health Rehabilitation ServicesThe more prepared you are for your surgery and recovery, the easier it will be for you and your family or other caregivers after surgery. The effort you put into your rehabilitation can determine how well you recover. We will provide you with the information, guidance and support you need to meet your goals for physical rehabilitation after surgery.
Suggestions for success:• Success starts with a positive attitude and determination.
• �You are the key player in your rehabilitation. We will assist and educate you, but�your effort to rehabilitate your joint is vital.
• Start your exercise program as soon as possible. The stronger you are before surgery, the shorter the time necessary to recover.
• Being familiar with what you are going to do after surgery (exercises, how to get out of bed and other limitations)�will make your rehabilitation in the hospital less stressful.
• We strongly encourage you to review the home safety tips in this book and prepare your living space for your return. Taking these simple steps ahead of time will make your first days at home easier and safer for you and your family.
• If you have questions, call Physical Therapy at (317) 831-9333 (Mooresville) or (317) 705-4640 (Carmel).
WE ARE LOOKING FORWARD TO SEEING YOU REACH YOUR GOALS!

SECT. 7.2
Franciscan St. Francis Health LocationsPHYSICAL THERAPY • OCCUPATIONAL THERAPY • SPEECH PATHOLOGY & AUDIOLOGY • SPECIALTY PROGRAMS
INDIANAPOLIS Physical Therapy, and Sports Medicine Hand and Occupational Therapy, Pediatrics (PT, OT, Speech) 5255 East Stop 11 Road, Suite 301 Indianapolis, IN 46227 (317) 528-5802 (317) 528-5825 Fax
INDIANAPOLIS Specialty Therapy Services, Audiology, Vestibular, Adult Neuro (PT, OT, Speech) 8051 S. Emerson Ave., Suite 100 Indianapolis, IN 46237 (317) 528-8111 (317) 528-8065 Fax
SOUTHPORT Physical Therapy and Sports Medicine, Lymphedema Services (PT, OT) 610 E. Southport Road Suite 101 Indianapolis, IN 46227 (317) 780-5855 (317) 781-1168 Fax
BEECH GROVE Physical Therapy, Hand, and Occupational Therapy 1600 Albany Street Beech Grove, IN 46107 (317) 528-8572 (317) 782-6259 Fax
MOORESVILLE Physical Therapy and Sports Medicine, Aquatic, Vestibular and Lymphedema 1201 Hadley Road Mooresville, IN 46158 (317) 831-9333 (317) 834-5751 Fax
MOORESVILLE Hand and Occupational Therapy (317) 834-9554 (317) 834-4414 Fax
PLAINFIELD Physical Therapy and Sports Medicine, Women’s Health 315 Dan Jones Road Plainfield, IN 46168 (317) 837-4700 (317) 837-4600 Fax
CARMEL Physical Therapy and Sports Medicine 12188-B North Meridian Carmel, IN 46032 (317) 705-4640 (317) 705-4649 Fax

SECT. 7.3 SECT. 7.3
If your joint’s deterioration is limited to one compartment of the knee joint, your surgeon might opt for a partial — instead of a total — knee replacement. The partial knee, or “uni,” is used to delay the need for or prevent a total knee replacement.
A partial knee replacement will involve a smaller implant, less tissue removal and typically a smaller incision than a total knee replacement.
You will have the same pre-operative testing, training and post-operative rehabilitation exercises as a total knee replacement patient. You might, however, expect to leave the hospital the day after your surgery if you can meet your therapy goals:
1. Get in and out of bed with minimal assistance.
2. Walk 80 feet with your walker. You will not have weight restrictions with your new joint.
3. Straighten your knee to less than 10 degrees from straight. Bend your knee to at least 80 degrees in sitting.
4. Go up and down four steps with minimal assistance.
Please refer to the following information in this section to familiarize yourself with all aspects of your preparation, surgery and recovery.
• Do your exercises one to three times a day leading up to your surgery date. After your surgery, you will begin doing these exercises five times a day.
• Start with 10 repetitions of each exercise.
• Do your exercises slowly and maintain control of your movements.
• Make sure that you do not hold your breath while doing these exercises. It is a good general rule to exhale during the difficult portion of the activity.
• If you experience a lot of pain with an exercise, you might be able to modify the exercise rather than eliminate it. For example, if an exercise causes increased pain when you do 10 repetitions, try doing the exercise the next time with five repetitions. Then gradually add more repetitions as you are able.
Knee ReplacementUNICOMPARTMENTAL (PARTIAL) Beginning Your
Exercise Program
/// CAUTION ///Be aware that before surgery there will be limitations to the movement available at your arthritic joint while exercising. This limit is signaled by pain. When you exercise your arthritic knee before your replacement surgery, stay within the limits of your pain tolerance.
Other Franciscan Alliance ResourcesFranciscan VNS Home Care and Therapy Services
Serving 30 counties in Central Indiana. Providing in-home therapy when you are unable to travel.
CENTRAL OFFICE 4701 N. Keystone Avenue Indianapolis, IN 46205 (317) 722-8200 (800) 248-6540 (317) 722-8221 Fax

SECT. 7.4
Getting in or out of bed, up from a chair, and walking with a walker often can be challenging during the early stages of your recovery. The exercises outlined below are designed to improve the strength of the muscles that will perform these tasks after your surgery.
1. Sit in a chair with palms flat on the seat or on the arms of the chair. Lean forward slightly and push up so that your buttocks come up off the chair. Slowly lower yourself back down to the chair.
2. Lie on your bed with your knees bent, feet flat on the bed, and your arms straight at your sides. Lift your head and shoulders off the bed, reaching toward your feet as you tighten your abdominal muscles. Be sure to keep your chin tucked.
If you are unable to perform this maneuver, try a modified version. Lying down with your arms next to your body, push your elbows into the bed, lifting your head and shoulders off the surface.
3. Practice getting in and out of bed by sitting up in bed first. Then bring both legs off the side of the bed. Using your arms behind you, scoot your body out to the edge of the bed.
To get back into bed, scoot your body back by using your arms and legs to push. Bring both legs up into bed. Once you are straight in the bed, return your head and shoulders to your pillow.
Upper Extremity and Trunk Exercises

SECT. 7.5 SECT. 7.5
The following exercises are to be done one to three times a day leading up to your surgery and up to five times a day after your surgery. Perform 10 repetitions of each exercise.
1. Slowly flex your ankles up and down.
2. Tighten your thigh muscles by pushing the back of your knee into the bed. Hold for five seconds, then relax.
3. Tighten your buttock muscles by squeezing them together. Hold for five seconds, then relax.
4. Slowly bend your knee up in bed by sliding your heel towards your buttocks. (Keep your foot on the bed.) Slowly lower your knee back down to the bed.
5. Place a firm roll under your knee. Lift your foot off the bed until your knee is straight. Slowly lower your foot to the bed.
6. Place a firm roll under your ankles. As you did in exercise no. 2, tighten your thigh muscles and push the back of your knee down. Hold for five seconds, then relax.
7. Allow your knee to hang freely and straighten against the simple pull of gravity for five minutes.
Knee Replacement Exercises

SECT. 7.6
8. Bend the knee opposite your surgery knee and place that foot on the bed. Keep your surgery knee straight by tightening your thigh muscle. Lift your leg about 12 inches off of the bed. Slowly lower your leg while keeping your knee straight. (You might need someone to help you with this exercise.)
9. Sit in a chair with both feet on the floor. Slide the foot on your surgery leg back as far as you can. Hold your foot there while sliding your bottom forward to further bend your knee. Hold for 10 seconds.
We expect you to be able to fully extend (straighten) your knee (Fig. 1) and bend your knee to at least 90 degrees (Fig. 2) by one week after surgery.
Fig. 1
Fig. 2
HOW DO YOU GET YOUR KNEE TO MOVE?
• Do your exercises.
• Always work on bending or straightening.
- Sit with knee bent.
- Sit with your knee straight and your heel or lower calf resting on an ottoman or chair. Icing your knee while you do this can help relieve pressure and pain.
• Do not rest or sleep with anything behind your knee. This can make your new joint very painful and can make straightening your knee difficult.
• Limit swelling and pain.
- Take pain medicine as needed.
- Ice the joint. Use the method of cold therapy your team suggests.
- Elevate your leg. Keeping your foot above the level of your heart is most effective.
Knee Range-of-Motion Expectations

SECT. 7.7 SECT. 7.7
Your surgeon will move your knee from straight (0 degrees) to approximately 115 to 120 degrees during surgery. You can rest assured that your knee will bend after surgery. However, your incision pain, swelling and ability to relax can limit your motion immediately after surgery.
For the first seven days after surgery, your knee will likely be sore with any change in position. As you continue to move more frequently, it will be less sore and you will be able to move your joint farther before it becomes uncomfortable. The more you move, the farther you will be able to move the joint.
If you do not move, you cannot have a pain-free knee that moves from straight to fully bent. If you do not move your knee and push yourself to get full motion, you will not get good motion. Your knee can become stiff if you do not work on your exercises. This is not satisfactory to you or anyone on your joint team. You alone have the greatest influence on your functional outcome.
Your discharge instructions will have more suggestions for improving your range of motion.
The first eight weeks and beyond• Follow the instructions given to you by your
joint replacement team.
• Begin scar massage as instructed by your physical therapist. Remember to use sunscreen on your scar if it is exposed to strong sunlight.
• You may begin showering as instructed by your surgeon.
• For the first eight weeks after surgery, when riding in the car on trips greater than an hour and a half, plan to stop, get out of the car and walk about every 45 to 60 minutes.
• Do your exercises for six months. Your therapist may add to your program at your post-surgery visit.
• Your goal over the next six months, as you become stronger and more mobile, is to gradually replace your knee exercises with low-impact exercises such as walking, biking and elliptical machine work-outs.
• Do not use leg weights. Weight-lifting is not as beneficial to your strength and overall joint health as low-impact exercise.
• You might need to continue your pain-control measures. Ice and elevate your leg as long as you feel some benefit.
• You should be able to resume all of your household duties and activities of daily living.
Lifetime precautionsWe encourage you to live a healthy and active life. Exercise should become part of your normal routine. Most people are able to tolerate low-impact activities such as walking, biking, golfing, swimming and cross-country skiing. (See recommendations on page 8.15.)
Avoid high-impact, repetitive activities such as running, high-impact aerobics, jumping, basketball and singles tennis.
Avoid repetitive lifting of 25 pounds or more, such as in assembly line work. Repetitive heavy lifting, every day, all day, can lead to wear and tear on your joint. You may lift heavier weights such as children, luggage or household items occasionally, as long as you feel safe to do so. Try to carry the weight close to your trunk so you have the best mechanical advantage.
STAY ACTIVE! ENJOY YOUR NEW JOINT.
IT IS OUR PLEASURE TO ASSIST YOU IN YOUR RECOVERY.

SECT. 7.8
As discussed in the Planning for Hospital Discharge section of this book, you will likely need some adaptive equipment during your recovery. Talk to your doctor before surgery to see what equipment you might need, and obtain a prescription for those items. Some equipment is optional, and insurance coverage varies, so check with your provider. Your equipment might not be covered.
Walking aidsWalking aids provide stability while you are walking after surgery and provide support for the operated leg. These items include walkers, canes and crutches.
Nearly all patients start out with a walker, although it’s sometimes possible to progress to crutches if you prefer.
It’s best to get your walker before surgery so you can bring it to the hospital with you. Having your equipment at the hospital will help your physical therapist determine if your walking aid fits you properly.
Guidelines for fitting your walking aid:
• Walkers: You should be able to stand comfortably in the center of the walker. With your arms at your side, the walker grips should come to about the level of your wrists.
• Crutches: When you are standing up straight, there should be at least two fingers’ width of space between the top cushion and your armpit. With your arms at your side, the crutch grips should come to about the level of your wrists. Never hang on your crutches.
• Canes: When you are standing with your arms hanging at your side, the handle of the cane should reach the level of your wrist. Canes are used in the hand opposite the affected leg.
Bath seatYou might need a bath seat to help you while showering. This is especially true if you tire easily or cannot tolerate standing long enough for a shower.
Keep in mind that most patients are allowed to stand to shower, but it is NOT permissible to sit in a tub for a bath.
The seat is not necessary for all patients and might not be covered by insurance or Medicare.
Bath seats often can be found in drug stores (Walgreens, CVS, etc.), as well as some large hardware/home improvement stores such as Lowe’s, Home Depot or Menards.
Adaptive Equipment

SECT. 7.9 SECT. 7.9
After surgery, your knee may be both painful and swollen. You will be more comfortable with a pillow between your knees when lying on your side.
While on your back, place a pillow between your legs to keep your knees apart. Turn to your side, keeping the pillow between your knees. Keep the pillow in place as long as you are lying on your side. You might want to have someone help tuck a pillow or two behind your back to help you maintain a side-lying position and for comfort.
Getting out of bedWhile lying down, slide your legs over to the side of the bed. Push up with your elbows and hands until you are sitting, supporting yourself with your hands. Slide your legs out one at a time using your hands to turn your upper body until you are sitting at the edge of the bed.
Getting into bedSit on the edge of the bed. Then slide your legs back onto the bed one at a time. Use your hands to help scoot your hips around until you are in the long sitting position.
Lower yourself gently with the help of your arms.
Turning in Bed after a Knee Replacement
Getting In and Out of Bed after a Knee Replacement

SECT. 7.10
Adjusting your walker for proper use• Standing in the middle of the walker with
your arms hanging comfortably at your side, the handgrip should come to where you bend your wrist, which is approximately hip level. With your shoulders relaxed and your hands resting on the handgrips, you should have about a 20-degree bend at your elbows.
• You should feel comfortable standing at the walker.
• Do not elevate your shoulders to bear weight through your hands.
Standing and sitting with a walker• It will be more difficult for you to stand up
from low chairs. Therefore, you can work on rising from progressively lower surfaces as you gain knee motion and strength.
• A chair with armrests will make it easier for you to stand and sit.
• Do not use chairs with wheels unless the wheels can be locked.
• Do not sit in the bathtub.
• Remember to scoot forward to the edge of the chair or bed and use your hands to push up from the sitting surface to a stand.
• Do not pull up on the walker to stand. The walker may tip backward and cause you to fall.
StandingScoot to the edge of the chair or bed, bending both the non-operative and operative legs underneath you as much as possible.
Push up from the chair with the help of your arms and legs. For a few days after surgery, you might need to rely a little more on the non-operative leg to help you stand.
Reach out and take hold of the walker. Straighten your legs fully as you stand. Take a minute to make sure you feel steady before walking.
Standing following bilateral knee replacements
• Scoot to the edge of the chair or bed, bending your knees as much as possible. The more you bend your knees and slide your feet underneath you, the easier it will be to stand.
• Push up from the chair using your arms and legs. Leaning forward so that your knees are over your toes will help you to stand easier.
• Reach out and take hold of the walker, fully straightening both legs as you stand.
Using Your Walker

SECT. 7.11 SECT. 7.11
Sitting• Using the walker, back up until you feel the chair
or bed behind your legs.
• Keeping both feet underneath you, reach back for the armrests of the chair or the bed, one hand at a time.
• Use your hands to lower yourself to the chair. Work on bending your operated leg as much as possible as you sit.
• Use your arms and legs to help you scoot back into the chair.
Sitting following bilateral knee replacements
• Using the walker, back up to the chair until you feel the chair behind the back of your legs.
• Reach back for the armrests of the chair, one hand at a time.
• Use your arms to slowly lower yourself into the chair, bending your knees slowly and with control as you sit.
• Once seated, use your arms and legs to help you scoot back into the chair.
Walking with a walker• Move the walker forward until the back
two legs of the walker are in line with the front of your toes.
• With all four legs of the walker on the ground, step forward with your operated leg into the middle of the walker. Do not step past the front of the walker.
• Bearing weight as indicated by your doctor (and with some weight through your hands), step forward with your other leg.
• Remember to keep your head up and look forward.
• If you have bilateral knee replacements, it doesn’t necessarily matter which foot you choose to lead with when walking, as long as you remain consistent.
Managing stairs with your walkerLearning to manage the stairs is easier than you might think. Step first with your non-operative leg when going up steps, and step first with your operative leg when going down steps. An easy way to remember? Tell yourself, “the good goes up to heaven, and the bad goes down.”

SECT. 7.12
Going up more than one step• Turn your walker sideways, with the opening
toward you but to one side. Place two legs of the walker on the step you are going to and two legs of the walker on the step or floor on which you are standing.
• Use the top handle of the walker as a portable rail. Further support yourself using the staircase railing, or hold onto someone walking up the stairs with you on your opposite side.
• Step up with the unaffected (stronger) leg first. Then bring up your surgery leg.
• Move the walker up one step, and repeat the process: up with the unaffected (stronger) leg, followed by the surgery leg.
If your steps are not deep enough for the walker legs to be supported when turned to the side, fold your walker and place it in front of you for support when going up the stairs.
Going down more than one step• Turn your walker sideways, with the opening
toward you but to one side. Place two legs of the walker on the step you are going to and two legs of the walker on the step on which you are standing.
• Use the top handle of the walker as a portable rail. Further support yourself using the staircase railing, or hold onto someone walking down the stairs with you on your opposite side.
• Step down with the affected (surgery) leg first. Then bring down your unaffected (stronger) leg.
• Lower your walker one step, and repeat the process: down with the affected (surgery) leg followed by the unaffected (stronger) leg.
If your steps are not deep enough for the walker legs to be supported when turned to the side, fold your walker and place it in front of you for support when going down the stairs. Be very careful to place your foot and walker securely before stepping.

SECT. 7.13 SECT. 7.13
Going up a single step Forward approach
Approaching steps with a standard walker, walk all the way up to the step. Put all four legs of the walker onto the step. Step up with your stronger (unaffected) leg and then step your surgery (affected) leg up.
Backward approach
Approach the single step. Turn around and back up to the step. Step up with your stronger (unaffected) leg, and follow with the surgery (affected) leg. Be sure to have your balance and plenty of room for your feet and walker, then bring the walker onto the step. Turn around and continue walking.
Going down a single stepForward approach
Walk toward the step. Put the front legs of a standard walker to the edge of the step and stand in the center of your walker. Place all four legs of the walker down onto the floor. Step down with the surgery (affected) leg. Then bring the stronger (unaffected) leg down.
Using a shower seat with a walkerYour surgeon will determine when you can begin taking showers after your surgery. At this point, it’s best to have someone who can help you into and out of the shower stall or tub. A shower seat can be an important aid for those who cannot tolerate standing to shower. You should not attempt to sit in a bathtub.
To use a shower seat with your walker, place the shower seat firmly in the tub or shower. Stand with your back toward the bathtub and your walker in front of you. Lower yourself slowly onto the shower seat while reaching back with one hand. Make sure you keep control of your motion and balance. Slowly lift each leg over the side of the tub one at a time.
Slide your buttocks back onto the seat, making sure you are in safe, comfortable sitting position. It is a good idea to have a reacher nearby. It’s also helpful to fit your shower with a handheld shower sprayer prior to your surgery.
To get out of the tub, reverse the process. Place your feet flat on the floor before you attempt to stand up. Use extreme caution and be mindful of wet, slippery floors.
SECT. 7.14
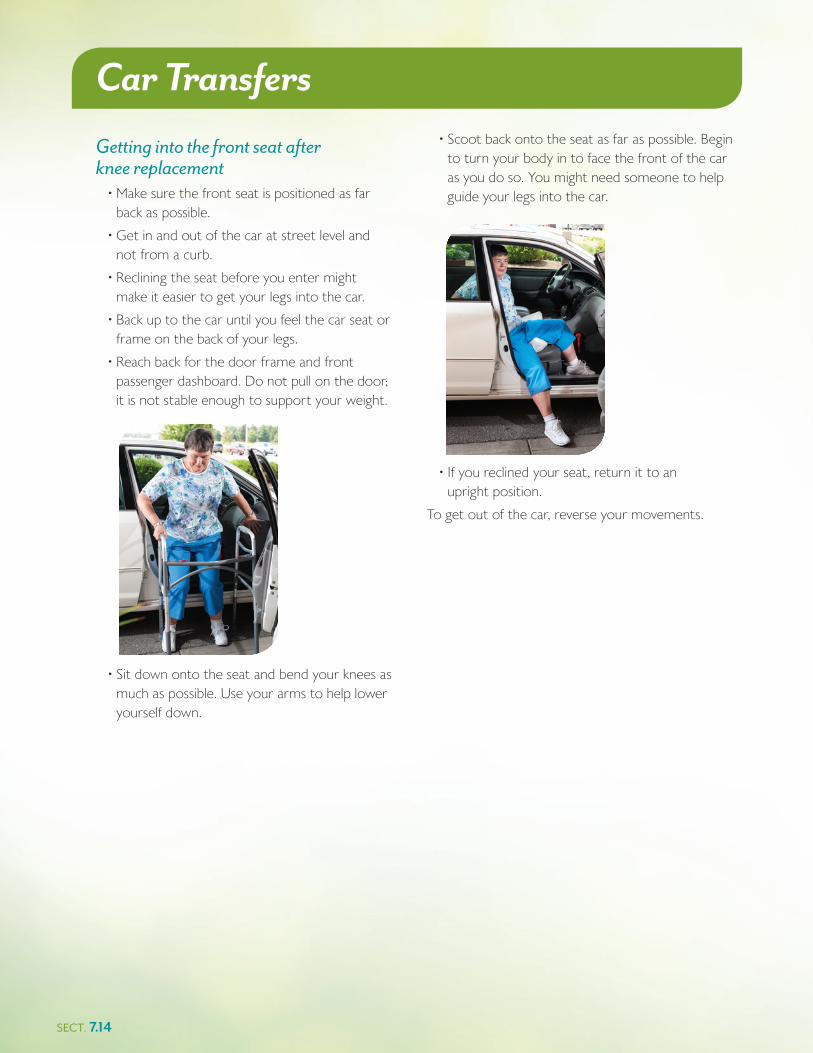
Getting into the front seat after knee replacement
• Make sure the front seat is positioned as far back as possible.
• Get in and out of the car at street level and not from a curb.
• Reclining the seat before you enter might make it easier to get your legs into the car.
• Back up to the car until you feel the car seat or frame on the back of your legs.
• Reach back for the door frame and front passenger dashboard. Do not pull on the door; it is not stable enough to support your weight.
• Sit down onto the seat and bend your knees as much as possible. Use your arms to help lower yourself down.
• Scoot back onto the seat as far as possible. Begin to turn your body in to face the front of the car as you do so. You might need someone to help guide your legs into the car.
• If you reclined your seat, return it to an upright position.
To get out of the car, reverse your movements.
Car Transfers

SECT. 7.15 SECT. 7.15
The American Knee Society makes the following recommendations about activities following knee replacement surgery.
Allowed after knee replacement:• low-impact aerobics • croquet
• stationary bicycling • walking
• bowling • swimming
• golf • shooting
• dancing • shuffleboard
• horseback riding • horseshoes
Allowed after knee replacement if you had experience with these activities prior to your surgery:• road bicycling • speed walking
• canoeing • tennis
• rowing • weight machines
• hiking • ice skating
• cross-country skiing
Not allowed after knee replacement:• racquetball/squash • gymnastics
• rock climbing • lacrosse
• soccer • hockey
• singles tennis • basketball
• volleyball • jogging
• football • handball
Activity Recommendations