freeflow digital publishing solution -...
TRANSCRIPT
Xerox® FreeFlow® Digital PublishingSolutionUser Guide
Version 1.01May 2014702P02772

©2014 Xerox Corporation. All rights reserved. Xerox®, Xerox and Design®, and FreeFlow®
are trademarks of Xerox Corporation in the United States and/or other countries.
Document version 1.0. May 2014
BR7917
Table of Contents1 Introduction................................................................................................1-1
2 The Xerox® FreeFlow® Digital Publisher Order Utility..............2-1Submitting a Job..................................................................................................................2-1
3 Xerox® FreeFlow® Core.........................................................................3-1Editing the FreeFlow Core Workflow............................................................................3-1
Required Nodes.......................................................................................................3-2Recommended Nodes...........................................................................................3-3Other Nodes..............................................................................................................3-6
Managing Job Status.........................................................................................................3-7
4 ePublishing System...................................................................................4-1Previewing the Job...............................................................................................................4-1Publishing the Job................................................................................................................4-3
iXerox® FreeFlow® Digital Publishing SolutionUser Guide

Xerox® FreeFlow® Digital Publishing SolutioniiUser Guide
Table of Contents
1Introduction
Xerox® FreeFlow® Digital Publisher is a solution for use by Print Service Providers toprovide additional communications channels to their end customers – the contentcreators – beyond print. The solution enables the content creators to deliver theirdocuments to a broader audience using today’s mainstream means of communicationsuch as web browsers, apps downloaded from app stores such as iTunes and Googleplay, and links to content sent via today’s choice of social media vehicles like Facebookor Yammer.
FreeFlow® Digital Publisher is an integrated solution of multiple software componentsthat enable automated delivery of published content in both print and electronic formats.The Solution is delivered via Professional Services, thus the software functionality, extentof training, workflow functionality is tailored to the needs of the customer. Phase 1 ofthe integrated solution consists of the following software components:
• FreeFlow® Digital Publisher Order Utility – Facilitates submission of documents intoFreeFlow Core print and ePublishing workflows.
• FreeFlow® Core – For print and electronic prepress operations, including preflight,conversion, imposition, and uploading of an optimized PDF file for ePublishing.
• ePublishing Software Platform – Hosting infrastructure for e-content delivery.
The purpose of this document is to provide general procedures for the most commonoperations that a print provider performs when using this solution. Additional informationon how to use and configure the applications listed above can be found in:
• The FreeFlow® Core online help• The FreeFlow® Core Integration Guide
1-1Xerox® FreeFlow® Digital Publishing SolutionUser Guide

Xerox® FreeFlow® Digital Publishing Solution1-2User Guide
Introduction
2The Xerox® FreeFlow®Digital Publisher OrderUtility
The FreeFlow® Digital Publisher Order Utility is a Web application used to submit jobsfor printing and/or ePublishing. The submission uses the FreeFlow® Core ManifestAutomation from Xerox interface.
The FreeFlow® Digital Publisher Order Utility can submit one or more files at the sametime. The submitted files are combined into a single file in the order that they appearin the Input Files list.
The input files must be compatible with the FreeFlow® Core software. For a list of thevalid file formats, see your FreeFlow® Core documentation.
Submitting a JobTo submit a job:1. Open your browser and enter the URL to the application.2. Select the Add File button.
2-1Xerox® FreeFlow® Digital Publishing SolutionUser Guide
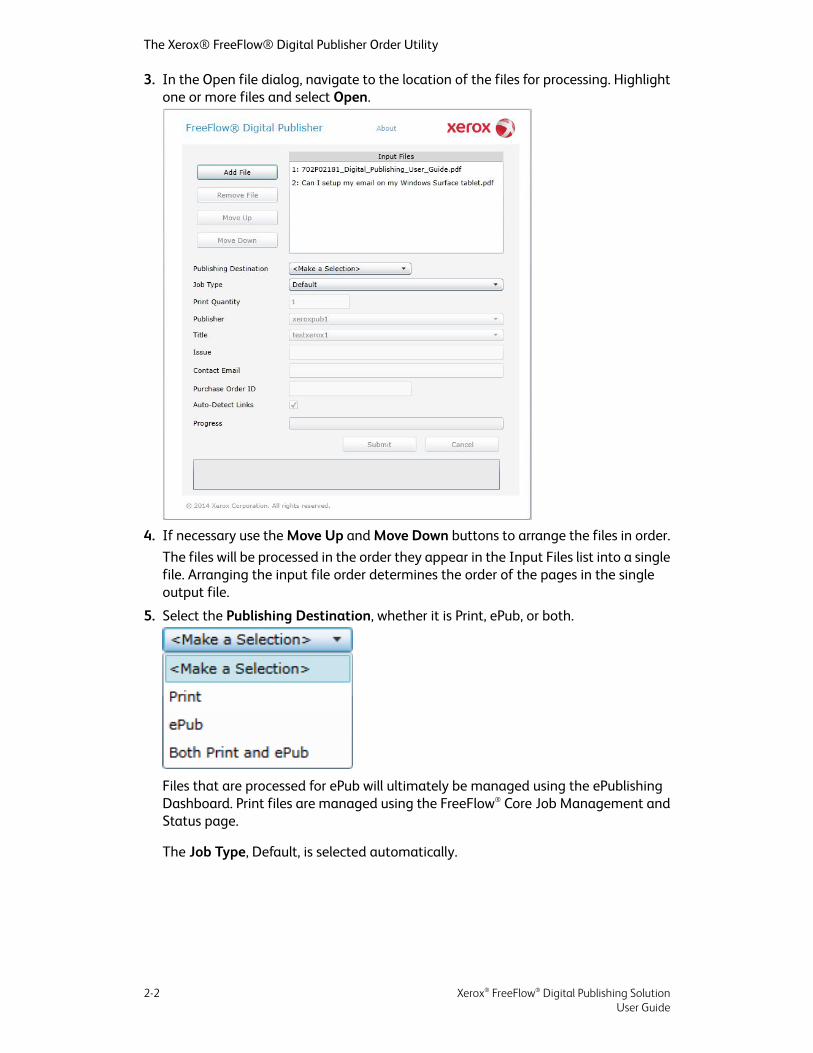
3. In the Open file dialog, navigate to the location of the files for processing. Highlightone or more files and select Open.
4. If necessary use the Move Up and Move Down buttons to arrange the files in order.The files will be processed in the order they appear in the Input Files list into a singlefile. Arranging the input file order determines the order of the pages in the singleoutput file.
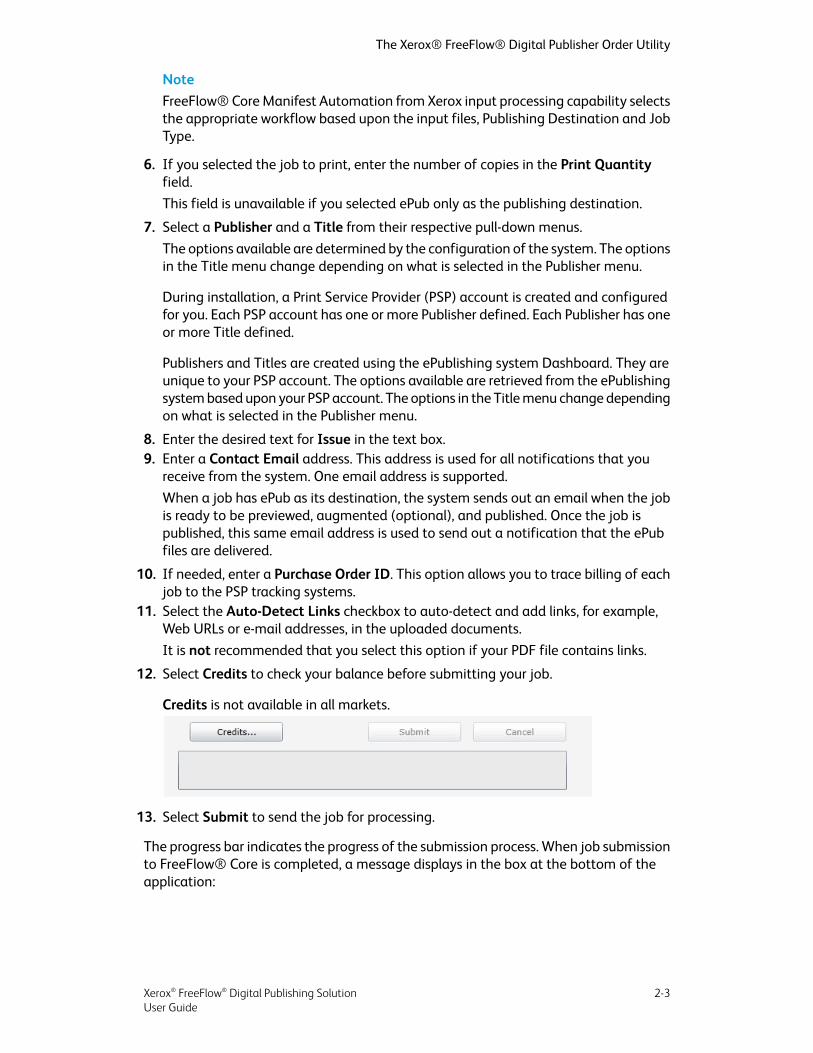
5. Select the Publishing Destination, whether it is Print, ePub, or both.
Files that are processed for ePub will ultimately be managed using the ePublishingDashboard. Print files are managed using the FreeFlow® Core Job Management andStatus page.
The Job Type, Default, is selected automatically.
Xerox® FreeFlow® Digital Publishing Solution2-2User Guide
The Xerox® FreeFlow® Digital Publisher Order Utility
NoteFreeFlow® Core Manifest Automation from Xerox input processing capability selectsthe appropriate workflow based upon the input files, Publishing Destination and JobType.
6. If you selected the job to print, enter the number of copies in the Print Quantityfield.This field is unavailable if you selected ePub only as the publishing destination.
7. Select a Publisher and a Title from their respective pull-down menus.The options available are determined by the configuration of the system. The optionsin the Title menu change depending on what is selected in the Publisher menu.
During installation, a Print Service Provider (PSP) account is created and configuredfor you. Each PSP account has one or more Publisher defined. Each Publisher has oneor more Title defined.
Publishers and Titles are created using the ePublishing system Dashboard. They areunique to your PSP account. The options available are retrieved from the ePublishingsystem based upon your PSP account. The options in the Title menu change dependingon what is selected in the Publisher menu.
8. Enter the desired text for Issue in the text box.9. Enter a Contact Email address. This address is used for all notifications that you
receive from the system. One email address is supported.When a job has ePub as its destination, the system sends out an email when the jobis ready to be previewed, augmented (optional), and published. Once the job ispublished, this same email address is used to send out a notification that the ePubfiles are delivered.
10. If needed, enter a Purchase Order ID. This option allows you to trace billing of eachjob to the PSP tracking systems.
11. Select the Auto-Detect Links checkbox to auto-detect and add links, for example,Web URLs or e-mail addresses, in the uploaded documents.It is not recommended that you select this option if your PDF file contains links.
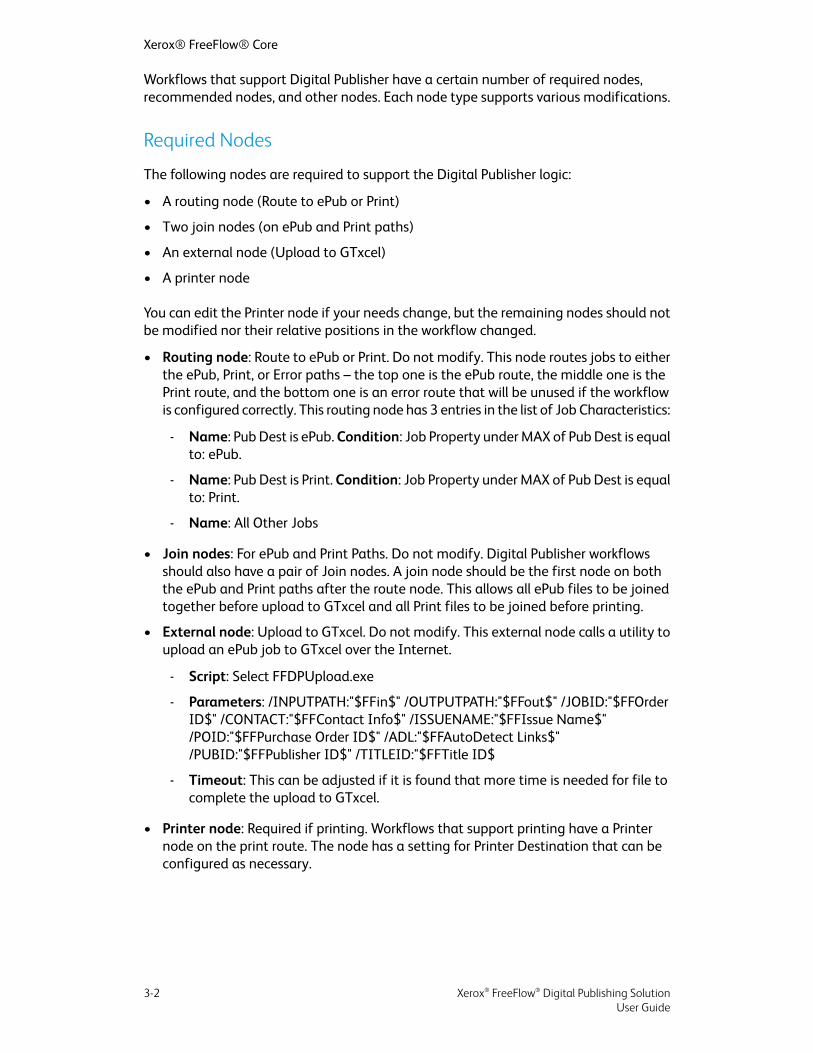
12. Select Credits to check your balance before submitting your job.
Credits is not available in all markets.
13. Select Submit to send the job for processing.
The progress bar indicates the progress of the submission process. When job submissionto FreeFlow® Core is completed, a message displays in the box at the bottom of theapplication:
2-3Xerox® FreeFlow® Digital Publishing SolutionUser Guide
The Xerox® FreeFlow® Digital Publisher Order Utility

Xerox® FreeFlow® Digital Publishing Solution2-4User Guide
The Xerox® FreeFlow® Digital Publisher Order Utility
3Xerox® FreeFlow® Core
The Xerox® FreeFlow® Core is a browser-based solution which intelligently automatesthe processing of print jobs, from file preparation to final production, for a hands-freeworkflow that operates easily, adapts effortlessly, scales quickly and delivers consistentresults. The tool’s modular, configurable and scalable design allows Xerox to offersolutions tailored to specific market segments and customer environments, addressingthe widest array of production print markets – from high-end production environmentsto midmarket enterprises and small to medium-sized business.
As a component of FreeFlow® Digital Publisher, FreeFlow® Core automates the processingof the same input files for ePublishing and integrates with the ePublishing cloud system.
The following FreeFlow® Core interface tabs are used extensively with the Xerox®
FreeFlow® Digital Publishing Solution:
• Job Management and Status: Allows Operators and Administrators to submit andmanage jobs in FreeFlow® Core.
• Workflow Setup: Allows Administrators to manage workflows.• Connections Setup: Allows Administrators to manage hot folders.
If you require more information about Xerox® FreeFlow® Core, see the FreeFlow® Coreuser guide or online help.
Editing the FreeFlow Core WorkflowWhen your FreeFlow Digital Publisher system was installed and configured by Xerox,one or more FreeFlow Core workflows were set up to process jobs submitted to the DigitalPublisher hot folder. If there is only one workflow, it likely has the name Digital Publisher.
You can perform a certain amount of customization to the workflow(s) in order to addressthe needs of the documents that you submit. However, care must be taken not to breakthe logic that is required to support Digital Publisher.
3-1Xerox® FreeFlow® Digital Publishing SolutionUser Guide
Workflows that support Digital Publisher have a certain number of required nodes,recommended nodes, and other nodes. Each node type supports various modifications.
Required Nodes
The following nodes are required to support the Digital Publisher logic:
• A routing node (Route to ePub or Print)
• Two join nodes (on ePub and Print paths)
• An external node (Upload to GTxcel)
• A printer node
You can edit the Printer node if your needs change, but the remaining nodes should notbe modified nor their relative positions in the workflow changed.
• Routing node: Route to ePub or Print. Do not modify. This node routes jobs to eitherthe ePub, Print, or Error paths – the top one is the ePub route, the middle one is thePrint route, and the bottom one is an error route that will be unused if the workflowis configured correctly. This routing node has 3 entries in the list of Job Characteristics:
- Name: Pub Dest is ePub. Condition: Job Property under MAX of Pub Dest is equalto: ePub.
- Name: Pub Dest is Print. Condition: Job Property under MAX of Pub Dest is equalto: Print.
- Name: All Other Jobs
• Join nodes: For ePub and Print Paths. Do not modify. Digital Publisher workflowsshould also have a pair of Join nodes. A join node should be the first node on boththe ePub and Print paths after the route node. This allows all ePub files to be joinedtogether before upload to GTxcel and all Print files to be joined before printing.
• External node: Upload to GTxcel. Do not modify. This external node calls a utility toupload an ePub job to GTxcel over the Internet.
- Script: Select FFDPUpload.exe
- Parameters: /INPUTPATH:"$FFin$" /OUTPUTPATH:"$FFout$" /JOBID:"$FFOrderID$" /CONTACT:"$FFContact Info$" /ISSUENAME:"$FFIssue Name$"/POID:"$FFPurchase Order ID$" /ADL:"$FFAutoDetect Links$"/PUBID:"$FFPublisher ID$" /TITLEID:"$FFTitle ID$
- Timeout: This can be adjusted if it is found that more time is needed for file tocomplete the upload to GTxcel.
• Printer node: Required if printing. Workflows that support printing have a Printernode on the print route. The node has a setting for Printer Destination that can beconfigured as necessary.
Xerox® FreeFlow® Digital Publishing Solution3-2User Guide
Xerox® FreeFlow® Core
Recommended Nodes
The nodes in this section are recommended for most customers. Usage is optional,depending on your needs, including whether or not each node is present and whichspecific settings inside the nodes are chosen. Some or all of these nodes may have beenplaced in your workflow(s) at the time of installation. You can make changes at anytime.
The recommended nodes are located in the workflow on the ePub path – between theJoin node and the Upload to GTxcel external node. For each node, the recommendedsettings are shown.
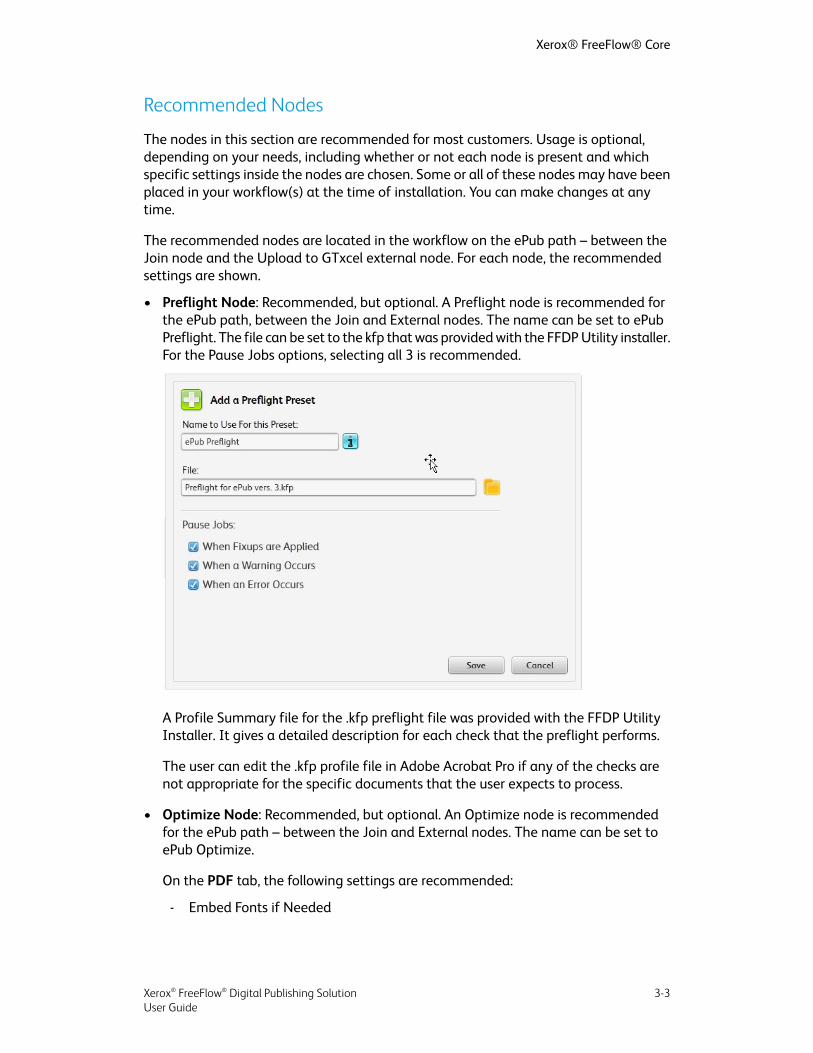
• Preflight Node: Recommended, but optional. A Preflight node is recommended forthe ePub path, between the Join and External nodes. The name can be set to ePubPreflight. The file can be set to the kfp that was provided with the FFDP Utility installer.For the Pause Jobs options, selecting all 3 is recommended.
A Profile Summary file for the .kfp preflight file was provided with the FFDP UtilityInstaller. It gives a detailed description for each check that the preflight performs.
The user can edit the .kfp profile file in Adobe Acrobat Pro if any of the checks arenot appropriate for the specific documents that the user expects to process.
• Optimize Node: Recommended, but optional. An Optimize node is recommendedfor the ePub path – between the Join and External nodes. The name can be set toePub Optimize.
On the PDF tab, the following settings are recommended:
- Embed Fonts if Needed
3-3Xerox® FreeFlow® Digital Publishing SolutionUser Guide
Xerox® FreeFlow® Core
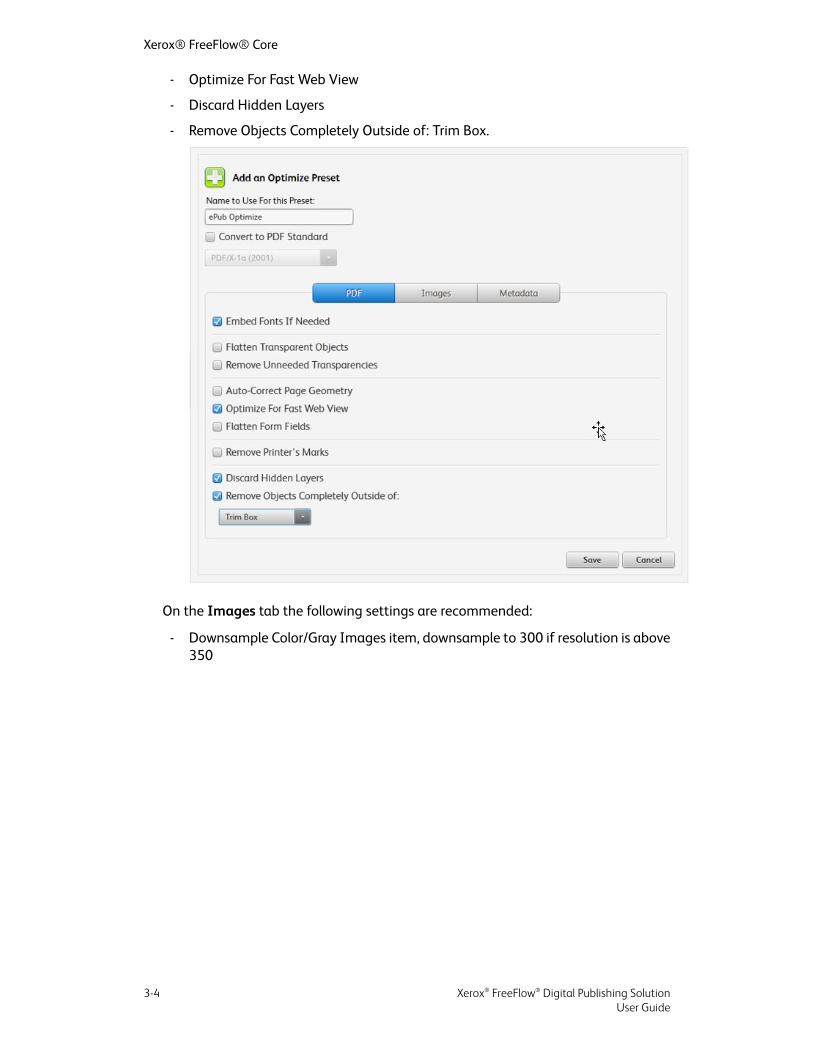
- Optimize For Fast Web View
- Discard Hidden Layers
- Remove Objects Completely Outside of: Trim Box.
On the Images tab the following settings are recommended:
- Downsample Color/Gray Images item, downsample to 300 if resolution is above350
Xerox® FreeFlow® Digital Publishing Solution3-4User Guide
Xerox® FreeFlow® Core
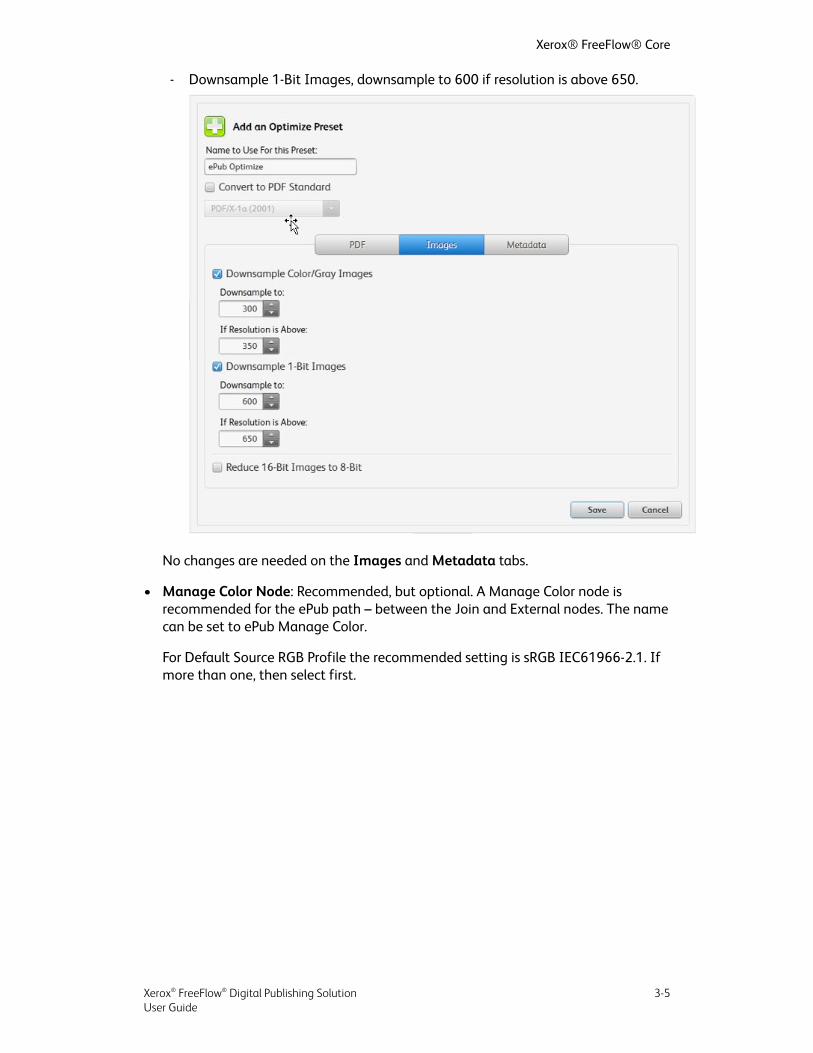
- Downsample 1-Bit Images, downsample to 600 if resolution is above 650.
No changes are needed on the Images and Metadata tabs.
• Manage Color Node: Recommended, but optional. A Manage Color node isrecommended for the ePub path – between the Join and External nodes. The namecan be set to ePub Manage Color.
For Default Source RGB Profile the recommended setting is sRGB IEC61966-2.1. Ifmore than one, then select first.
3-5Xerox® FreeFlow® Digital Publishing SolutionUser Guide
Xerox® FreeFlow® Core
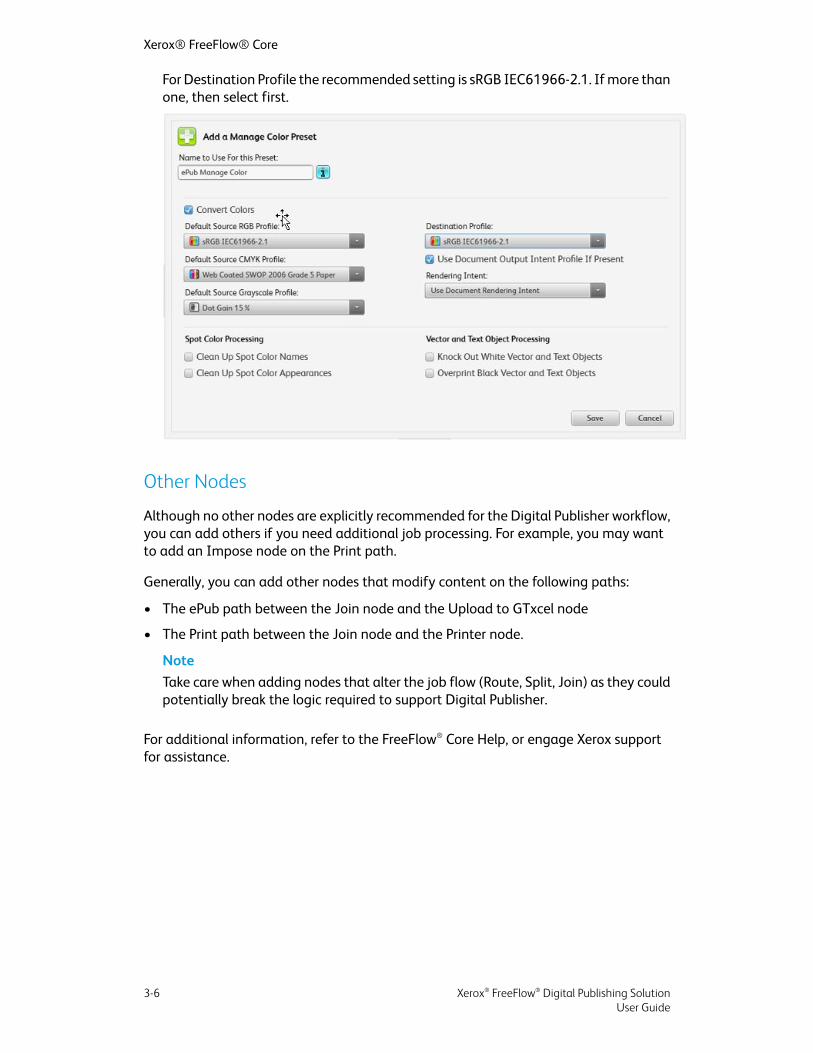
For Destination Profile the recommended setting is sRGB IEC61966-2.1. If more thanone, then select first.
Other Nodes
Although no other nodes are explicitly recommended for the Digital Publisher workflow,you can add others if you need additional job processing. For example, you may wantto add an Impose node on the Print path.
Generally, you can add other nodes that modify content on the following paths:
• The ePub path between the Join node and the Upload to GTxcel node
• The Print path between the Join node and the Printer node.
NoteTake care when adding nodes that alter the job flow (Route, Split, Join) as they couldpotentially break the logic required to support Digital Publisher.
For additional information, refer to the FreeFlow® Core Help, or engage Xerox supportfor assistance.
Xerox® FreeFlow® Digital Publishing Solution3-6User Guide
Xerox® FreeFlow® Core
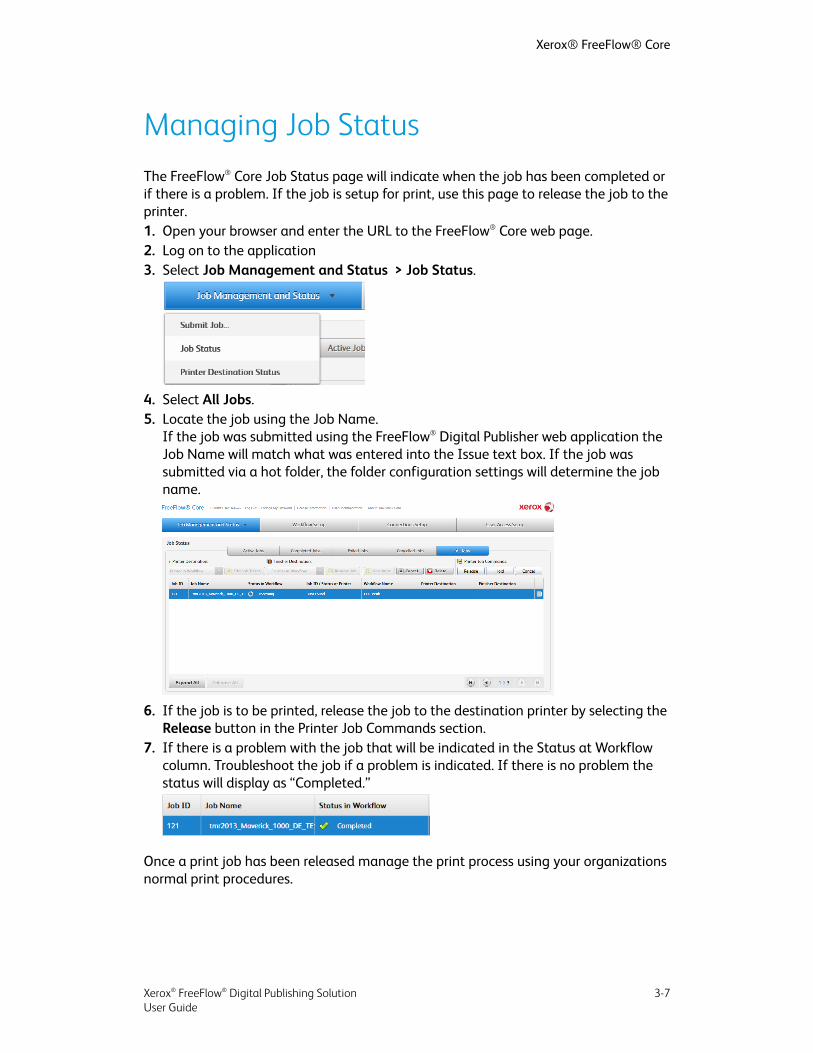
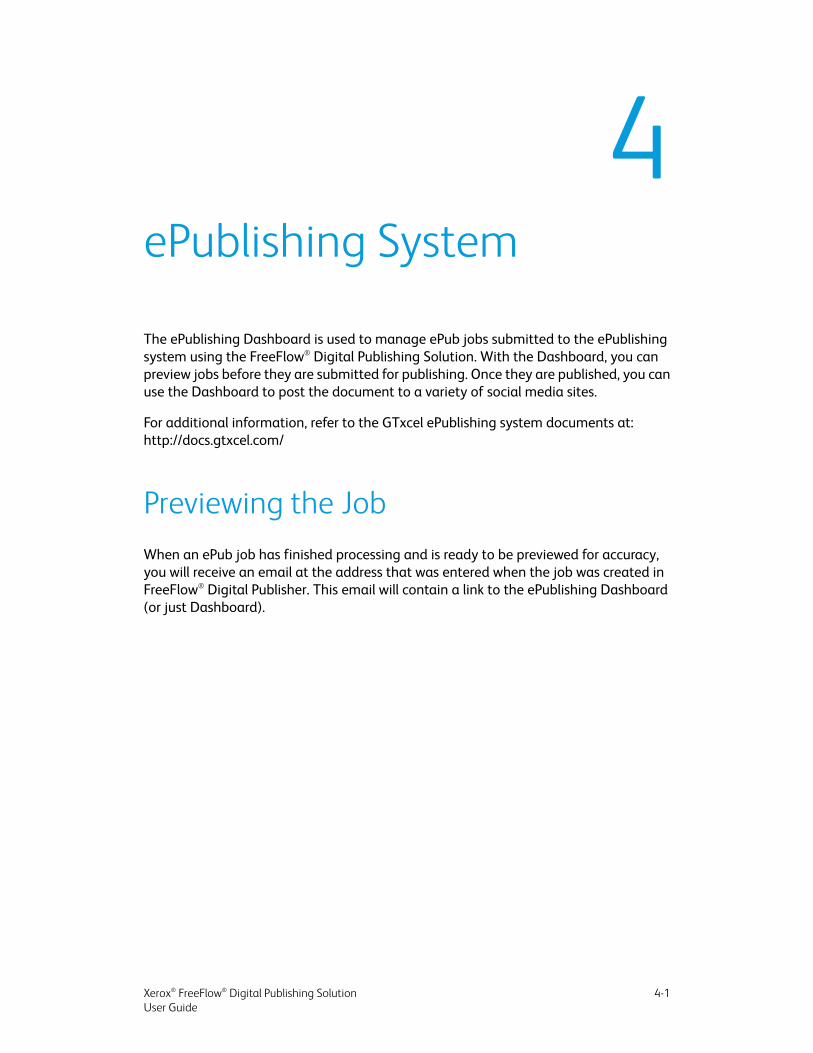
Managing Job StatusThe FreeFlow® Core Job Status page will indicate when the job has been completed orif there is a problem. If the job is setup for print, use this page to release the job to theprinter.1. Open your browser and enter the URL to the FreeFlow® Core web page.2. Log on to the application3. Select Job Management and Status > Job Status.
4. Select All Jobs.5. Locate the job using the Job Name.
If the job was submitted using the FreeFlow® Digital Publisher web application theJob Name will match what was entered into the Issue text box. If the job wassubmitted via a hot folder, the folder configuration settings will determine the jobname.
6. If the job is to be printed, release the job to the destination printer by selecting theRelease button in the Printer Job Commands section.
7. If there is a problem with the job that will be indicated in the Status at Workflowcolumn. Troubleshoot the job if a problem is indicated. If there is no problem thestatus will display as “Completed.”
Once a print job has been released manage the print process using your organizationsnormal print procedures.
3-7Xerox® FreeFlow® Digital Publishing SolutionUser Guide
Xerox® FreeFlow® Core

Xerox® FreeFlow® Digital Publishing Solution3-8User Guide
Xerox® FreeFlow® Core
4ePublishing System
The ePublishing Dashboard is used to manage ePub jobs submitted to the ePublishingsystem using the FreeFlow® Digital Publishing Solution. With the Dashboard, you canpreview jobs before they are submitted for publishing. Once they are published, you canuse the Dashboard to post the document to a variety of social media sites.
For additional information, refer to the GTxcel ePublishing system documents at:http://docs.gtxcel.com/
Previewing the JobWhen an ePub job has finished processing and is ready to be previewed for accuracy,you will receive an email at the address that was entered when the job was created inFreeFlow® Digital Publisher. This email will contain a link to the ePublishing Dashboard(or just Dashboard).
4-1Xerox® FreeFlow® Digital Publishing SolutionUser Guide
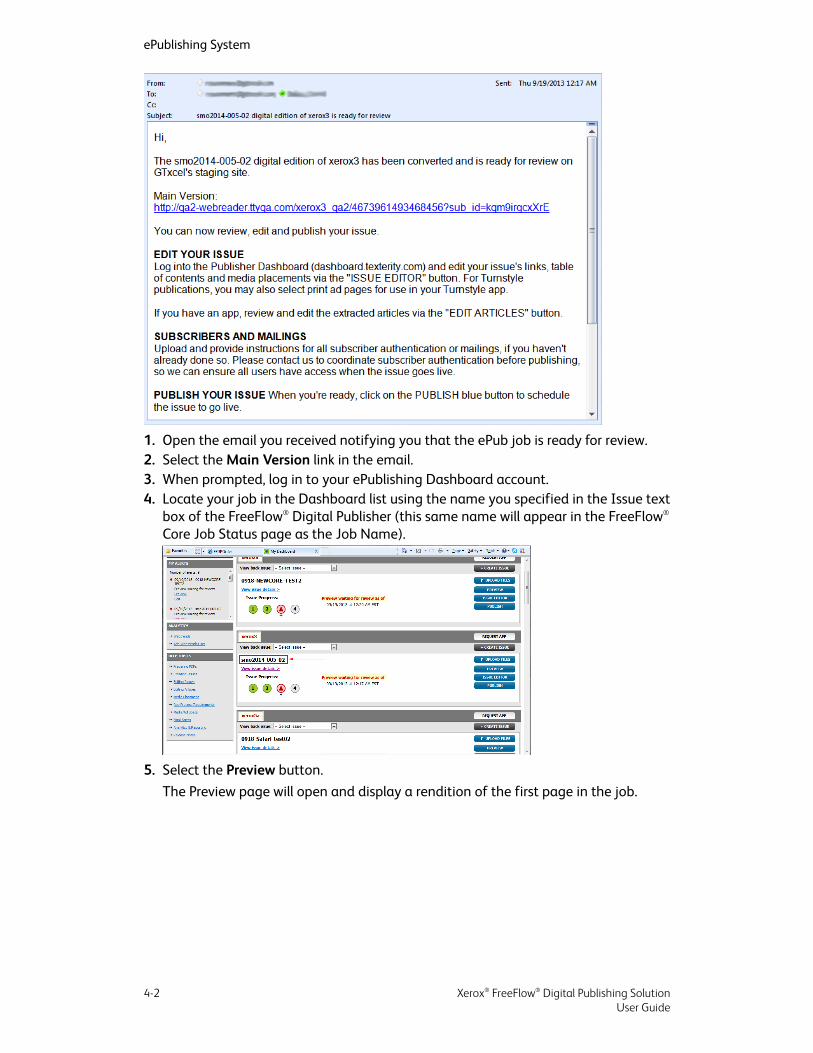
1. Open the email you received notifying you that the ePub job is ready for review.2. Select the Main Version link in the email.3. When prompted, log in to your ePublishing Dashboard account.4. Locate your job in the Dashboard list using the name you specified in the Issue text
box of the FreeFlow® Digital Publisher (this same name will appear in the FreeFlow®
Core Job Status page as the Job Name).
5. Select the Preview button.The Preview page will open and display a rendition of the first page in the job.
Xerox® FreeFlow® Digital Publishing Solution4-2User Guide
ePublishing System

6. Navigate the pages in the job to ensure it has processed properly. If there is an issuewith the job you must troubleshoot or resubmit the job to correct the problem.
If you need to troubleshoot or edit the job refer to the documentation for the ePublishingDashboard.
Publishing the JobWhen an ePub job has finished processing and is ready to be published, you will receivean email at the address that was entered when the job was created in FreeFlow® DigitalPublisher. This email will contain a link to the ePublishing Dashboard (or just Dashboard).
1. Open the email you received notifying you that the ePub job is ready for review.2. Select the Main Version link in the email.3. When prompted, log in to your ePublishing Dashboard account.
4-3Xerox® FreeFlow® Digital Publishing SolutionUser Guide
ePublishing System
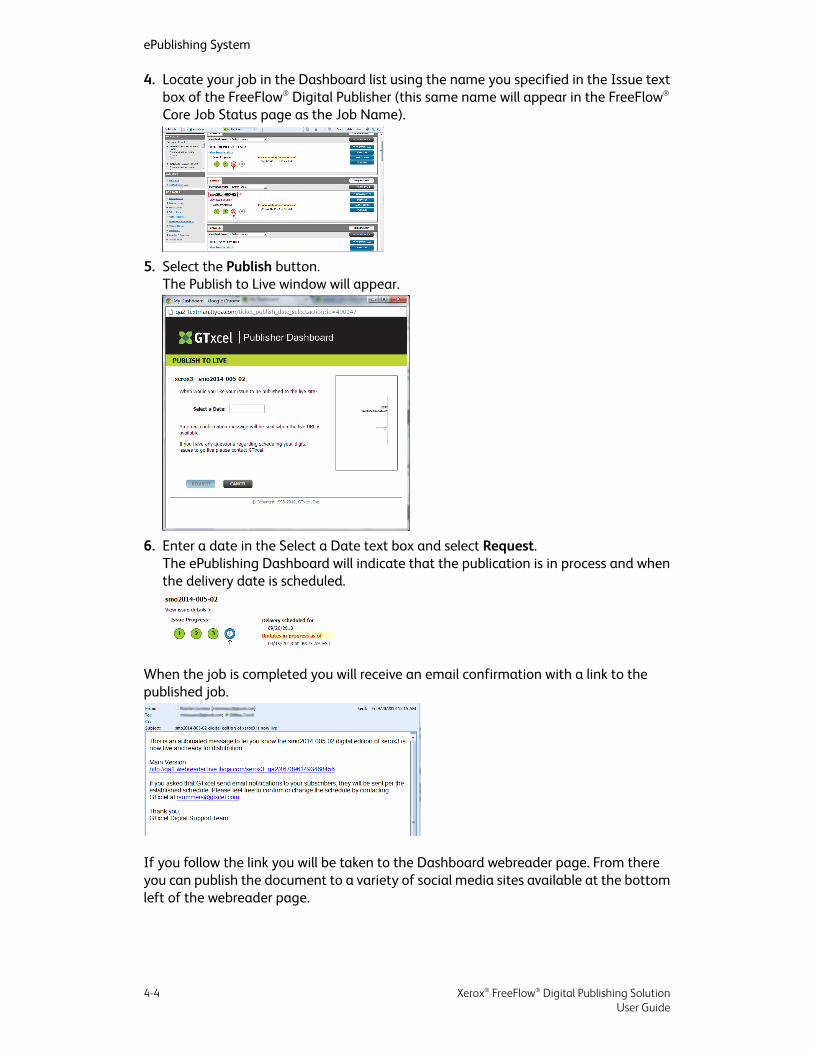
4. Locate your job in the Dashboard list using the name you specified in the Issue textbox of the FreeFlow® Digital Publisher (this same name will appear in the FreeFlow®
Core Job Status page as the Job Name).
5. Select the Publish button.The Publish to Live window will appear.
6. Enter a date in the Select a Date text box and select Request.The ePublishing Dashboard will indicate that the publication is in process and whenthe delivery date is scheduled.
When the job is completed you will receive an email confirmation with a link to thepublished job.
If you follow the link you will be taken to the Dashboard webreader page. From thereyou can publish the document to a variety of social media sites available at the bottomleft of the webreader page.
Xerox® FreeFlow® Digital Publishing Solution4-4User Guide
ePublishing System

4-5Xerox® FreeFlow® Digital Publishing SolutionUser Guide
ePublishing System

Xerox® FreeFlow® Digital Publishing Solution4-6User Guide
ePublishing System