fv400 digital tv receiver with modulator instruction …
TRANSCRIPT

FV400DIGITAL TV RECEIVER
WITH MODULATOR
INSTRUCTION MANUAL
Please read this instruction manual carefully before using your receiver

Table of Contents
Introduction----------------------------------------------------------------------------- 1Safety Information--------------------------------------------------------------------- 2Remote Control-------------------------------------------------------------------------- 3Front and Rear panel illustration--------------------------------------------------- 5Connecting to a Television ----------- ----------------------------------------------- 6Connecting to a Television and Video--------------------------------------------- 7Connecting to a Surround Sound System--------------------------------------- 8Getting Started ------------------------------------------------------------------------ 9
-------------------------------------------------------------------------- 11
Basic Operations---------------------------------------------------------------------- 14
--------------------------------------------------------------------- 17Channel List----------------------------------------------------------------------------- 18 Favourite List--------------------------------------------------------------------------- 19
--------------------------------------------------- 19
------------------------------------------------- 19
Help and Advice------------------------------------------------------------------------- 20
Technical Specifications -------------------------------------------------------------21
Switching on for the first time------------------------------------------------------ 9 Automatic channel scan------------------------------------------------------------ 10 Manual channel scan---------------------------------------------------------------- 10System Setting
A/V Setting---------------------------------------------------------------------------- 11 Antenna Power----------------------------------------------------------------------- 12 First Time Installation--------------------------------------------------------------- 12 System Info---------------------------------------------------------------------------- 12 Change Pin Code--------------------------------------------------------------------- 13 Software Update--------------------------------------------------------------------- 13
Changing Channels----------------------------------------------------------------- 14 Volume Control---------------------------------------------------------------------- 16 Teletext/Subtitle---------------------------------------------------------------------- 16 TV Format------------------------------------------------------------------------------16 Pausing the current picture---------------------------------------------------------16Channel Schedule
Delete a channel---------------------------------------------------------------------- 18Lock/Unlock a channel---------------------------------------------------------------18
Adding channels to favourite list
Remove favourite channels from favourite list---------------------------------- 19
Accessing the favourite channels
Introduction
Thank you for purchasing this product which has been designed and
manufactured to give you many years of trouble-free service.
About This User Guide
This user guide contains all the information you need to know about how to
setup and watch available free view Channels using your set top box.
11
Trade Mark of the DVB Digital Video Broadcasting
Project(1991 to 1996)Digital VideoBroadcasting
Accessories In the Box
Remove your Digital set top box carefully from the box ,and remove the
packaging from each part.
You will find the following items:
Digital set top box with fitted mains plugRemote Control with 2xAAA batteries (not installed)
What is Freeview?
It is the new, free digital service currently providing up to thirty digital channels,
over twenty digital radio stations plus a whole new world of interactive services. It
is broadcast from transmitters and is received via a rooftop aerial.Freeview works
like traditional TV, but because the signals are digital you need a set top box or
interactive digital TV to convert them. This means more channels can be
transmitted with extra features such as interactivity and widescreen pictures.
Instruction Manual

WARNING: To reduce the risk of fire or electric shock, do not expose thisequipment to water or other liquids.
CAUTIONRISK OF ELECTRIC SHOCK
DO NOT OPEN
Safety Information
Position the cables so that they cannot be walked on or pinched by itemsplaced on or against them.Do not use the set top box in humid or damp conditions.Do not allow the set top box to get wet.
Do not place water filled objects such as vases on top of the set top box.Do not expose the set top box to dripping or splashing.
Do not place naked flame sources, such as candles, on the top of the settop box.
Cleaning
ALWAYS unplug the set top box before you clean it.Do not use liquid or aerosol cleaners.Clean the set top box with a soft, damp (not wet) cloth.
Ventilation
The slots and openings on the set top box are for ventilation. Do not coveror block them as it may cause overheating.
NEVER let children push anything into the holes or slots on the case.
Servicing
There are no user serviceable parts in this set top box.
When servicing, refer to qualified service personnel.Consult your dealer if you are ever in doubt about the installation, operationor safety of this unit.
2
Battery Disposal
Please ensure batteries are disposed of safely.
Check with your local authority for disposal regulations.
Safety is Important
To ensure your safety and the safety of others, please ensure you read
the Safety Instructions before you operate this product.
Keep this information in a safe place for future reference. Please read allthe safety information before using the product.Safety Considerations.
Never dispose of batteries in a fire or with other household waste.
OK
DTV/VCR
MUTE
PAUSE
1 2 3
4 5 6
7 8 9 0
TEXT
FAVOURITE
STANDBY
LANGUAGESUBTITLE WIDE
P+
P-
VOL+
RECALL
VOL-
EXITMENU
INFOEPG
Remote Control
33
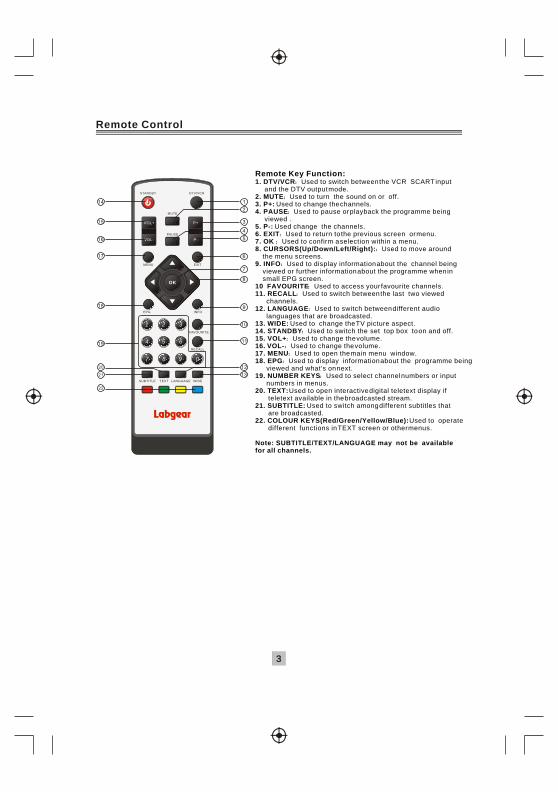
Remote Key Function:1. DTV/VCR Used to switch between the VCR SCART input and the DTV output mode.2. MUTE Used to turn the sound on or off.3. P+: Used to change the channels.4. PAUSE Used to pause or playback the programme being viewed .5. P-: Used change the channels.6. EXIT Used to return to the previous screen or menu.7. OK Used to confirm a selection within a menu.8. CURSORS(Up/Down/Left/Right): Used to move around the menu screens.9. INFO Used to display information about the channel being viewed or further information about the programme when in small EPG screen.10 FAVOURITE Used to access your favourite channels.11. RECALL Used to switch between the last two viewed channels.12. LANGUAGE Used to switch between different audio languages that are broadcasted.13. WIDE: Used to change the TV picture aspect.14. STANDBY Used to switch the set top box to on and off.15. VOL+ Used to change the volume.16. VOL- Used to change the volume.17. MENU Used to open the main menu window.18. EPG Used to display information about the programme being viewed and what's on next.19. NUMBER KEYS Used to select channel numbers or input numbers in menus.20. TEXT: Used to open interactive digital teletext display if teletext available in the broadcasted stream.21. SUBTITLE: Used to switch among different subtitles that are broadcasted.22. COLOUR KEYS(Red/Green/Yellow/Blue): Used to operate different functions in TEXT screen or other menus.
Note: SUBTITLE/TEXT/LANGUAGE may not be available for all channels.

44
Installing the Batteries
Remove the battery cover from the remote control and put 2xAAA size batteries
inside the compartment.
The diagram inside the battery compartment shows the correct way to install the
batteries.
OPEN
OPEN
1.Open the cover 2.Install batteries 3.Close the cover
Using the Remote Control
To use the remote control, point it towards the front of the digital set top box
The remote control has a range of up to 7 metres from the set top box at an angle
of up to 60 degrees.
The remote control will not operate if its path is blocked.
Sunlight or very bright light will decrease the sensitivity of the remote
control.
Made in China
Serial No.:
VCR O O TV SERVICE
100-240V~50/60Hz
Coaxial
DigitalAudio
RISK OF ELECTRIC SHOCKDO NOT OPEN COVER
CAUTIONDIGITAL TERRESTRIAL RECEIVERPOWER SUPPLY: 100-240V~ 50/60HzMAX POWER CONSUMPTION: 10WATTS
FV400
ANT IN RF OUT
RF INTV OUT
5
Front Panel and Rear Panel Illustration
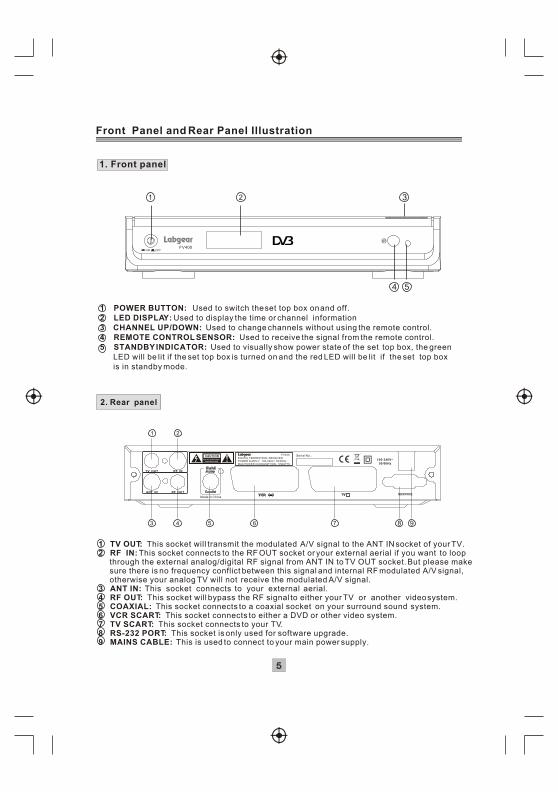
1. Front panel
1 TV OUT: This socket will transmit the modulated A/V signal to the ANT IN socket of your TV.2 RF IN: This socket connects to the RF OUT socket or your external aerial if you want to loop through the external analog/digital RF signal from ANT IN to TV OUT socket. But please make sure there is no frequency conflict between this signal and internal RF modulated A/V signal, otherwise your analog TV will not receive the modulated A/V signal.3 ANT IN: This socket connects to your external aerial.4 RF OUT: This socket will bypass the RF signal to either your TV or another video system.5 COAXIAL: This socket connects to a coaxial socket on your surround sound system.6 VCR SCART: This socket connects to either a DVD or other video system.7 TV SCART: This socket connects to your TV.8 RS-232 PORT: This socket is only used for software upgrade.9 MAINS CABLE: This is used to connect to your main power supply.
1 POWER BUTTON: Used to switch the set top box on and off. 2 LED DISPLAY: Used to display the time or channel information3 CHANNEL UP/DOWN: Used to change channels without using the remote control.4 REMOTE CONTROL SENSOR: Used to receive the signal from the remote control.5 STANDBY INDICATOR: Used to visually show power state of the set top box, the green LED will be lit if the set top box is turned on and the red LED will be lit if the set top box is in standby mode.
3
54

6
Connecting to a Television
TV
Set top box
RF Loop through cable (supplied)
TV
Set top box
OR

77
Connecting to a Television and Video
VCRor Video system
TV
Set top box

Connecting to a Surround Sound System
88
Audio system
Set top box
TV
Getting Started
99
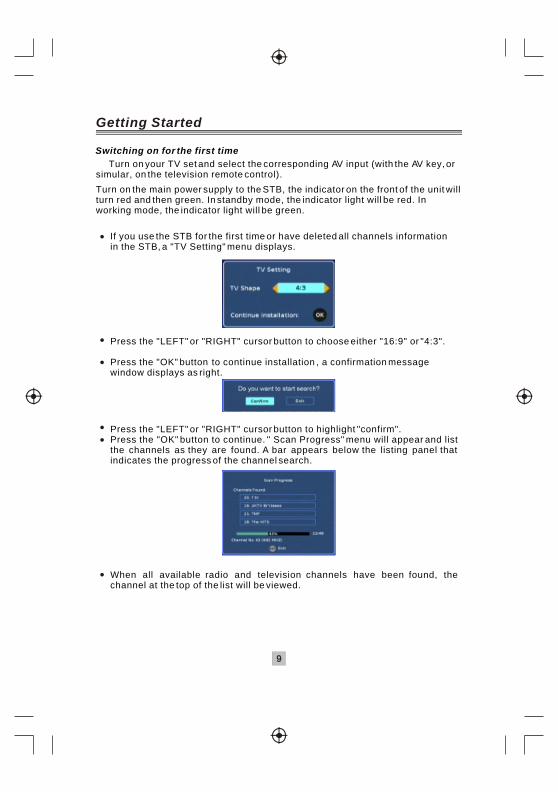
Turn on your TV set and select the corresponding AV input (with the AV key, or simular, on the television remote control).
Turn on the main power supply to the STB, the indicator on the front of the unit will turn red and then green. In standby mode, the indicator light will be red. In working mode, the indicator light will be green.
If you use the STB for the first time or have deleted all channels information in the STB, a "TV Setting" menu displays.
Press the "LEFT" or "RIGHT" cursor button to choose either "16:9" or "4:3".
Press the "OK" button to continue installation , a confirmation message window displays as right.
Press the "LEFT" or "RIGHT" cursor button to highlight "confirm".Press the "OK" button to continue. " Scan Progress" menu will appear and list the channels as they are found. A bar appears below the listing panel that indicates the progress of the channel search.
When all available radio and television channels have been found, the channel at the top of the list will be viewed.
Switching on for the first time

1010
Automatic channel scan 1) Press the "MENU" button to enter the main menu of the STB.
2) Press the "UP" or "DOWN" cursor button to select Channel Search 3) Press the "OK" button to enter the sub-menu. 4) Highlight the "Search Type" and press the "LEFT" or "RIGHT" cursor button
to select " Auto Scan".
5) Press the "OK" button to start searching. 6) Press the "EXIT" button to quit.
Manual channel scan 1) Press the "MENU" button to enter the main menu of STB. 2) Press the "UP " or "DOWN" cursor to select "Channel Search" 3) Press the "OK" Button to enter the sub-menu. 4) Highlight the "Search Type" and press the "LEFT" or "RIGHT" cursor to
select "Manual Scan".
5) Press the "DOWN" cursor to select "Channel No" section, and enter desired Channel Number.
6) Press the "OK" button to start searching. 7) Press the "EXIT"button to quit.
Note: When the search is finished, the first channel of the channel list is displayed you can now watch digital terrestrial televison.

1111
Many aspects of your STB can be set to reflect your circumstances and preference. The System Setting menu is accessed from main menu.
A/V Setting This menu allows the users to set TV shape, Video Output and OSD Transparency. 1). Press the "MENU" button to enter the main menu of the STB, 2). Press the "UP" or "DOWN" cursor to select System Setting, 3). Press the "OK" button to enter the sub-menu, 4). Press the "UP" or "DOWN" button to select "A/V Setting" and Press the
"OK" button to enter its sub-menu.
TV Shape options: 4:3 / 16:9 Video Output options: RGB / CVBS OSD Transparency range: 0~100% RF Modulator Output frequency range: 471.25~855.25MHz(CH21-69) in PAL-I
5). Press the "UP" or "DOWN" button to select the desired item and press the "LEFT" or " RIGHT" button to select desired setting,
6). Press the "MENU" button to return the upper menu or "EXIT" button to quit. Note: Please make sure there is no frequency conflict between the loop
through external RF signal and internal RF modulated A/V signal.See Page 5 for detail.
System Setting

1212
Antenna Power This menu allows users to active the antenna power supply for external active
antenna. 1. Enter the System Setting menu, press the "UP" or "DOWN" cursor to
highlight the Antenna Power menu. 2. Press the "OK" button to enter the Antenna Power menu,
3. Press the "LEFT" or "RIGHT" cursor to to set the status to "ON" or "OFF", 4. Press the "OK" button to save the setting and quit, press the "EXIT" button to
quit without save the setting.
First Time Installation This menu allows the user to delete all existing channels in the STB, and reset
the STB to factory default setting. 1). Enter the System Setting menu, press the "UP" or "DOWN" button to
highlight the "First Time Installation". 2). Press the "OK" button to confirm, a confirmation window appears.
3). Press the "LEFT" or "RIGHT" cursor to highlight "Confirm" icon, press the "OK" button to start first time installation.
4). Or Highlight "Exit" icon, press the "OK" button to cancel the first time installation.
System Info This menu allows users to view the software version and hardware version of
the STB. 1). Enter the System Setting menu, press the "UP" or "DOWN" cursor to
highlight the System Info menu.
2). Press the "OK" button to open up the information box. You can view the software version and hardware version of the STB in this box
1313
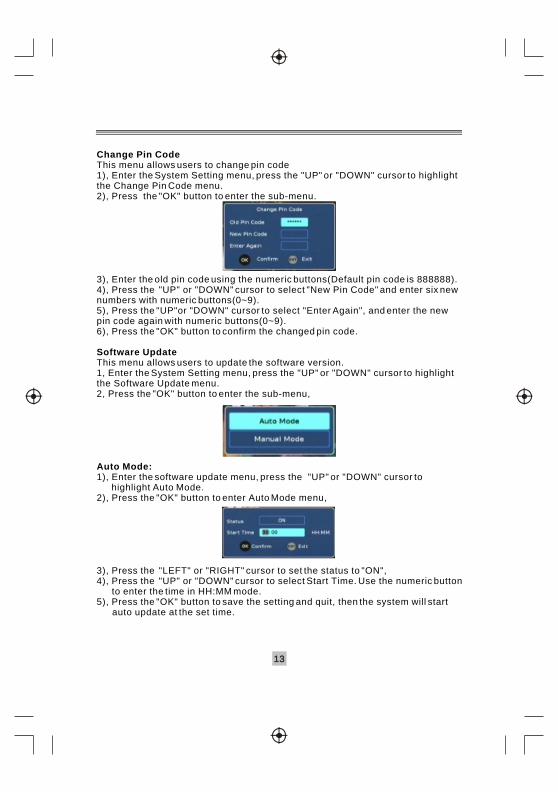
Change Pin CodeThis menu allows users to change pin code1), Enter the System Setting menu, press the "UP" or "DOWN" cursor to highlight the Change Pin Code menu.2), Press the "OK" button to enter the sub-menu.
3), Enter the old pin code using the numeric buttons(Default pin code is 888888).4), Press the "UP" or "DOWN" cursor to select "New Pin Code" and enter six new numbers with numeric buttons(0~9).5), Press the "UP"or "DOWN" cursor to select "Enter Again", and enter the new pin code again with numeric buttons(0~9).6), Press the "OK" button to confirm the changed pin code.
Software UpdateThis menu allows users to update the software version.1, Enter the System Setting menu, press the "UP" or "DOWN" cursor to highlight the Software Update menu.2, Press the "OK" button to enter the sub-menu,
Auto Mode:1), Enter the software update menu, press the "UP" or "DOWN" cursor to
highlight Auto Mode.2), Press the "OK" button to enter Auto Mode menu,
3), Press the "LEFT" or "RIGHT" cursor to set the status to "ON",4), Press the "UP" or "DOWN" cursor to select Start Time. Use the numeric button
to enter the time in HH:MM mode.5), Press the "OK" button to save the setting and quit, then the system will start
auto update at the set time.
1414
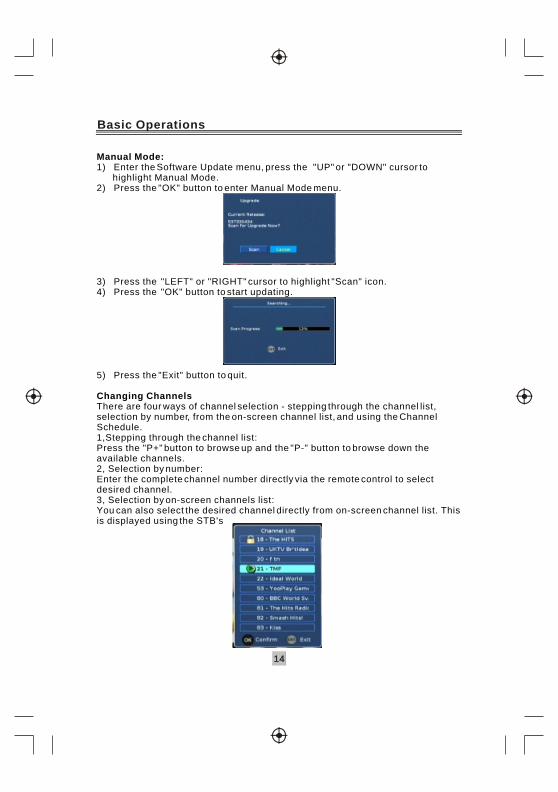
Manual Mode:1) Enter the Software Update menu, press the "UP" or "DOWN" cursor to
highlight Manual Mode.2) Press the "OK" button to enter Manual Mode menu.
3) Press the "LEFT" or "RIGHT" cursor to highlight "Scan" icon.4) Press the "OK" button to start updating.
5) Press the "Exit" button to quit.
Changing ChannelsThere are four ways of channel selection - stepping through the channel list, selection by number, from the on-screen channel list, and using the Channel Schedule.1,Stepping through the channel list:Press the "P+" button to browse up and the "P-" button to browse down the available channels.2, Selection by number:Enter the complete channel number directly via the remote control to select desired channel.3, Selection by on-screen channels list:You can also select the desired channel directly from on-screen channel list. This is displayed using the STB's
Basic Operations

1515
a), Press the "MENU" button to enter main menu of the STB.b), Press the "UP" or "Down" cursor to select "Channel List".c), Press the "OK" button to enter the channel list menu.d), Press the "UP" or "DOWN" cursor to highlight the desired channel.e), Press the "OK" button to preview the selected channel.f), Press the "EXIT" button to quit the channel list and view the channel on full screen.
4, Selection by Channel Schedule:You can also select the desired channel directly from Channel Schedule. This is displayed by pressing the "EPG" button on the remote control. The Channel Schedule provides the users with a brief description of the programme on the currently selected channel and lists the current channels.1),Press the "EPG" button to enter the Channel Schedule .
2),Press the "P+" or "P-" cursor to select the desired channel, the screen switches to the programme on the currently selected channel.3), Press the "EXIT " button to quit the Channel Schedule and view the channel on full screen.
RecallYou can switch to the previously viewed channel by pressing the " RECALL" button.
1616
Volume ControlThe volume level of the STB can be altered with the "VOL +" or "VOL -" button on the remote control.You can silence the sound from the receiver by pressing the "MUTE" button. The sound remains muted until the "MUTE" button is pressed again or until the "VOL+" or "VOL-" button is pressed, or until the receiver is turned off and on again.
TeletextPress the "TEXT" button to Open/Close the interactive digital text.
SubtitlePress the "SUBTITLE" button to switch the programmes subtitle to On/Off.
Displaying programme informationYou can read the current programme information by pressing "INFO" button on the remote control, then the programme information table will automatically remove in 3~5 seconds.
TV FormatYou can change the TV picture aspect by pressing "WIDE" button repeatedly on the remote control.When you set "TV shape" to "4:3" in the System Setting->A/V Setting menu, you can switch the TV format to "FullFrame","Pan&Scan" or "LetterBox". But when you set it to "16:9", you can switch to "Auto", "FullFrame", "VerticalCut" or "PillarBox".
Pausing the current pictureYou can freeze the current picture by pressing the "PAUSE" button on the remote control. Press the button again to switch the current broadcast programme back on to "live". Note: the broadcast between these two pauses will be skipped.

1717
From the channel schedule(EPG,Electronic programme Guide), you can change channels available, check programme information, access one-week programme schedule which details the times and programmes for the next seven days.1, Press the "EPG" button to enter the Channel Schedule.
2, Press the "CH+" or "CH-" button to preview the current programme on the selected channel, and check the current programme information.3, Press the "LEFT"or "RIGHT" cursor to navigate the programme lists for the next seven days.4, Press the "UP "or "DOWN" cursor to highlight the desired programme.5, Press the "OK" button to add a reminder, then reminder icon will appear alongside the selected programme, press the "OK" button again to remove the reminder. When the reminder programme is about to start, a reminder window will appear.6, Press the " EXIT" button to quit the channel schedule.Note: The current broadcast programme cannot be set as a reminder event.
Channel Schedule

1818
The Channel List presents a list of all channels found during the channel search. From the Channel List you can watch and listen to the selected channels, delete them from the list or set a password to access the channel.1), Press the "MENU " button to enter the main menu of the STB.2), Press the "UP" or "DOWN" cursor to highlight the "Channel List"3), Press the "OK" button to enter Channel List menu.
4), Press the "UP" or "DOWN" cursor to highlight a channel.5), Press the "OK" button to preview the selected channel.6), Press the "EXIT" button to quit the channel list menu and view the channel on full screen.
Delete a channel:1),Enter the channel list menu, press the "UP" or "DOWN" cursor to select a channel.2),Press the "Yellow" button to delete the selected channel
Lock/Unlock a channel:1), Enter the channel list menu, press the "UP" or "DOWN" cursor to select your desired channel.2), Press the "Blue" button, you are asked to enter the pin code.
3), Enter the correct pin code using the numeric buttons, press the "OK" button to confirm.(the default pin code is 888888)4),Then a lock symbol displays alongside the selected channel, it shows that the channel has been locked.5), Repeat step 1)2)3) to remove the lock symbol.6), Press the "EXIT" button to quit the channel list.
Channels List

1919
This menu allows the user to store a list of your favourite channels so that you can access them more easily. In this STB, you have five favourite lists to set potentially, each family member can have his own favourite list.
Adding channels to favourite list:1), Press the "MENU" button to enter the main menu of the STB.2), Press the "UP" or "DOWN cursor to select "Favourite List".3), Press the "OK" button to enter the favourite list menu.
4), Press the "Red" button to switch to the desired favourite list.5), Press the "UP" or "DOWN" cursor to highlight the desired channel in the selected favourite list.6), Press the "OK" button to add the selected channel to the favourite list.7), Press the "EXIT" button to quit.
Remove favourite channels from favourite list:1), Press the "MENU" button to enter the main menu of the STB.2), Press the "UP" or "DOWN cursor to select "Favourite List".3), Press the "OK" button to enter the Favourite List menu.4), Press the "Red" button to switch the desired favourite list.5), Press the "UP" or "DOWN" cursor to highlight the favourite channel in the favourite list.6), Press the "OK" button to remove the channel from the favourite list.7), Press the "EXIT" button to quit.
Accessing the favourite channels:1),Press the "FAVOURITE" button to enter the favourite list.2),Press the "Red" button to switch to the desired favourite list.3),Press the "UP" or "DOWN" cursor to select the favourite channel in the selected favourite list.
4),Press the "OK" button to view the favourite channel on full screen.5),Press the "EXIT" button to quit.
Favourite list

2020
Technical Specification
Power Supply
Input Voltage
Power Consumption
100-240V~ 50/60Hz.
Maximum 10W, Standby 5W.
Connection
Main Power Cable
Tuner
RF Modulator
Scart
RS-232
RCA
Fixed Type.
1 Antenna Input/1 RF Output.
1 RF IN/1 TV OUT
1 for VCR/1 for TV
1 for software upgrade
1 COAXIAL SPDIF digital audio output
2121
Decoder
Transmission: stream DVB-T TS
Profile Level: ISO/IEC 13818-2 MPEG-2(MP@ML)
compatibleInput Rate :15Mbps Max.
Video Formats: PAL, 4:3/16:9
Video Output CVBS, RGB
Audio Formats: MPEG Layer I & II 32/44.1/48KHz
If at any time in the future you should need to dispose of this product please note that: Waste electrical products should not be disposed of with household waste. Please recycle where facilities exist. Check with your Local Authority or retailer for recycling advise. (Waste Electrical and Electronic Equipment Directive.)
