g suite enterprise for education - google...
TRANSCRIPT

1
Getting Started With
G Suite Enterprise for Education

2
Advanced controls for adminsSecurity center »
● Security dashboard » ● Security health » ● Investigation tool »
Data regions »
Enterprise-grade communication toolsLivestreaming »Meeting recordings saved to Google Drive »International phone dial-in access »
Table of contents
Enhanced analytics and search capabilitiesAdmin reports in BigQuery » Gmail logs in BigQuery »Cloud Search »

3
Getting started with G Suite Enterprise for Education.
G Suite Enterprise for Education helps you create an innovative learning environment with enterprise-grade tools that are customized for education, including:
● Advanced admin controls● Robust communication tools● Enhanced analytics and search
Watch this video to see how these powerful features can benefit your educational organization. We’ll continue to add capabilities geared toward your specific needs, so stay tuned.
Use this guide to get started with G Suite Enterprise for Education.
Exploring G Suite Enterprise for Education for the first time?
Connect with an expert and learn more here.

4
Advanced controls for adminsG Suite Enterprise for Education gives you more control across your domain with enterprise-grade tools to help
you defend against security threats, analyze security incidents, and protect student and faculty data.
Get started with:
Security center »
Data regions »

5
Security center
The security center gives you more visibility and control over security by providing you with actionable insights about activity within your domain, including phishing and spam emails, external file sharing, and message authentication. It’s also where you can access and adjust basic settings, such as enforcing 2-Step Verification (2SV).
Visit the Security Center to:● Access your security dashboard to view and download reports● Check your security health to ensure you’re following security best practices● Use the investigation tool to dive deeper into security incidents
Advanced controls for admins

6
To open the security center, click Security from the Admin console.
Once in the security center, select the tool that you want to work with. The dashboard is a good place to start so that you can get an overview of key security metrics.
Advanced controls for admins Back to Table of Contents
1 2

7
From the security center, click Dashboard.
You can quickly review all your metrics, then dive deeper into a single dashboard by clicking View report.
Dashboard
The security dashboard gives you a quick overview of important security metrics across your organization, such as spam volume, email authentication, and Drive sharing.
Advanced controls for admins Back to Table of Contents
1 2

8
Advanced controls for admins
Reports
Reports can help you to identify and mitigate potential security risks. For example, you can open a spam filter report to identify which users are receiving spam emails, then work with those users to make sure they have 2SV enabled and understand what phishing emails look like so they are less at risk.
Within a report, you can:● Adjust filters to further classify your dataset● Export to Sheets for reporting and distribution● Launch an investigation to drill down for
actionable insights

9
Security health
Security health helps you understand how your organization's security settings are configured and gives recommendations based on Google best practices.
From the security center, click security health.
Advanced controls for admins
Quickly browse all the available security settings across your Admin console to check whether they correspond with Google recommended best practices.
Back to Table of Contents
1 2

10
Advanced controls for admins
Security health
● A green check mark indicates that a setting is currently following best practices.
● A gray information icon indicates that more information is available to help you update the setting to best practices.

11
Advanced controls for admins
Security health
1. Click a gray information icon to read a quick summary of the recommendation, then click Learn more for a deeper exploration.
2. Click the hyperlinked number of organization units (OUs) in the center column to view security settings for each OU and see how they compare to Google recommended best practices.
3. To adjust a setting, click the name of the setting in the left column. This will take you directly to where you can adjust the setting in the Admin console.
1
2
3

12
Advanced controls for admins
Investigation tool
The investigation tool helps you identify, triage, and take action on security and privacy concerns in your domain.
● See which devices and applications are accessing your data.
● Find and erase malicious emails, mark emails as spam or phishing, or send follow-up emails to users’ inboxes.
● Analyze file sharing, document creation and deletion, user access to documents, and more.
Back to Table of Contents

13
A. In the security center, click investigation tool.● Select a data source. For example “Gmail log events.”● Set conditions for your search, such as date or device type.
Here’s a full list of applicable conditions. ● Click Search.
B. Directly from a report. ● Click the magnifying glass to launch an investigation about
the data in the report. ● Read this Help Center article for details on which reports are
available for use with the investigation tool.
Advanced controls for admins
You can open the Investigation tool in two ways:1
Back to Table of Contents

14
2
From your search results, you can take further action. For example, you can select and delete phishing emails from user inboxes by selecting the top-level checkbox, clicking actions, and highlighting the Delete messages action. See this Help Center article for a list of actions you can take.
3
To check the status of an action, click the white hourglass icon at the top right of the Admin console to open the Long-running task pane. When the action completes, the pane will display granular results of the action.
Advanced controls for admins Back to Table of Contents

15
You can use column-based pivoting to view data about an item or group of items related to a different data source. To view pivot options, click the Options menu that appears when you hover your mouse over a column name or a specific item in the search results.
4
Advanced controls for admins

16
5-7
1
2
3
5. For example, you can open the pivot options for the Recipient column to select Users as the data source. This will use the accounts listed in the Recipient column as the data input for the next query.
6. From here, you can add a parameter from the User account information to see which of these accounts have 2SV disabled.
7. Within the refined search results, you can select one or more accounts on which to perform specific actions, such as suspending the user, resetting their password, or sending them an email with instructions for keeping their inbox more secure.
Advanced controls for admins

17
Data regions
As an administrator, you can choose to store your covered data in a specific geographic location (the United States or Europe) by using a data region policy.
Follow these steps to configure data regions in G Suite Enterprise for Education.
From your Admin console, open the main menu by clicking the main menu icon in the top left of your screen.
Advanced controls for admins
Click the arrow next to Account to open the Options menu, then select Company profile.
Back to Table of Contents
1 2

18
3
On your Company profile page, click Show more.
4
Then click Data regions.
Advanced controls for admins
5
From the left column menu, select the organizational unit you’re storing data for. To apply the setting to everyone, select the top-level organizational unit.
Back to Table of Contents

19
6
On the Data regions card, select the region, United States or Europe, where you would like to store covered data. You can also select No preference.
7
To continue, click Save. Otherwise, click Discard.
Advanced controls for admins
8
(Optional) Repeat steps 4 to 7 for each of your organizational units.
6
7
Back to Table of Contents
For more information about what data is covered by a data region policy, read this Help Center article.

20
Enterprise-grade communication toolsG Suite Enterprise for Education gives you enhanced capabilities for Hangouts Meet. Your users can hold online meetings for up to 250 people, livestream to 100,000 audience members, easily record and save meetings to Drive, and include international dial-in.
This section will walk you through:Livestreaming » Recording a meeting » International phone dial-in access »

21
Hangouts Meet
To use Hangouts Meet enterprise capabilities, and be able to host larger video meetings for up to 250 users, you’ll need to first enable the tool.
To enable Hangouts Meet:From your Admin console, click Apps.
Enterprise-grade communication tools
Then click G Suite.
1 2
Back to Table of Contents

22
3
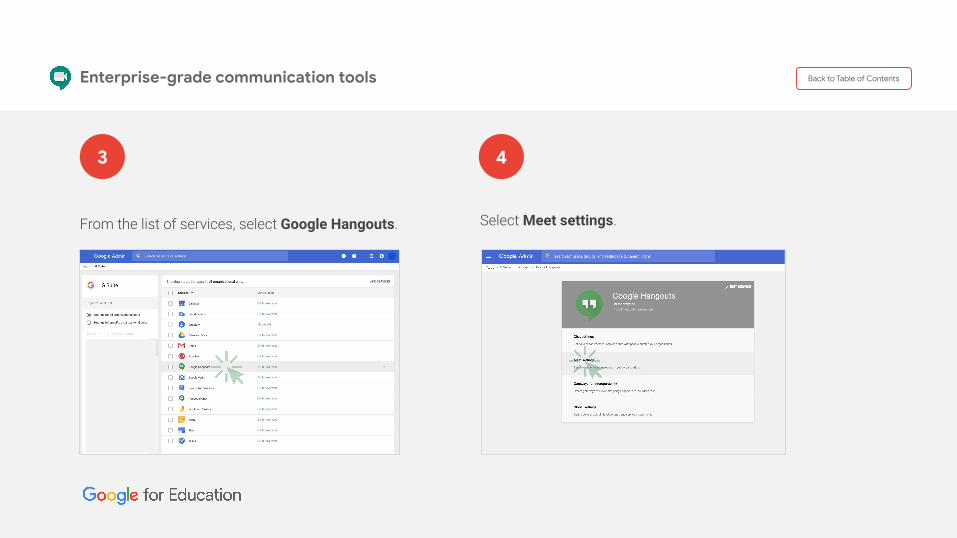
Within the G Suite management interface, select Google Hangouts from the list of services.
4
Select Meet settings.
Enterprise-grade communication tools
5
Check that each feature you’d like to use is turned on.● New meeting experience: ON● Dial-in: ON● Recording: ON● Stream: ON
Back to Table of Contents

23
Livestreaming
The ability to add livestreaming to a meeting is turned on by default. You can restrict access per organizational unit from the Admin console.
To turn livestreaming on or off:Open the Admin console and click Apps.
Enterprise-grade communication tools
Then click G Suite.
1 2
Back to Table of Contents
24
3
From the list of services, select Google Hangouts.
4
Select Meet settings.
Enterprise-grade communication tools Back to Table of Contents

25
5
Hover over Stream, then open the Edit menu .
6
Select the organizational units, or units, that you want to enable livestreaming for, then check the box next to Let people stream their meetings. Then click Save. This setting is turned on by default for everyone in your organization.
Enterprise-grade communication tools
5
Back to Table of Contents
Check out the Help Center for more information on livestreaming video meetings or meeting recordings.

26
Add livestreaming to an event
To create an event with a livestream link, add from a calendar event.
Create an event in Calendar. In the event summary window, click More options to open the event details.
Enterprise-grade communication tools
Under Add conferencing, select Hangouts Meet.
1 2
Back to Table of Contents

27
3
Click Manage details, which will appear on the right when Hangouts Meet is selected.
4
Click Add livestream in the dialog box, which will generate a unique URL.
Enterprise-grade communication tools Back to Table of Contents

28
5-6
5. With the livestream URL, up to 100,000 in- or out-of-domain users can watch the meeting from a browser or mobile device. You can distribute the stream URL in three ways:
● Share the join-meeting info and live URL with all guests in one event. This will allow everyone on the invite to participate in the meeting.
● Create a separate view-only event and paste in the livestream URL. These guests can watch the livestream, but they won’t be able to participate in the meeting.
● Share the livestream URL via email or any other channel of your choice. Viewers can pastethe URL into a browser to view the livestream, but they won’t be able to participate in the meeting.
Guests you invite can share the livestream URL and anyone in your organization can watch the video event.
6. When it’s time for your livestream, join the meeting.
Enterprise-grade communication tools Back to Table of Contents

29
7-9
7. To start your livestream, open the Options menu in the lower right corner, then click Start streaming.
8. When the livestream is on, Live will appear in the top-left corner.
9. To stop livestreaming, re-open the Options menu and click Stop streaming, then click Yes to confirm that you want to stop the stream.
Enterprise-grade communication tools

30
Record a meeting
You can record video meetings for other people to watch later if you are the meeting organizer or in the organizer's domain.
Recordings are saved in the Google Drive of the meeting organizer and in the Calendar event. Also, the meeting organizer gets an email with the recording link.
After you’ve joined the meeting, open the Options menu in the lower right corner, then click Record meeting.
Enterprise-grade communication tools
Wait a moment for the recording to start. Participants are notified when the recording starts or stops.
1 2
Back to Table of Contents
31
3-4
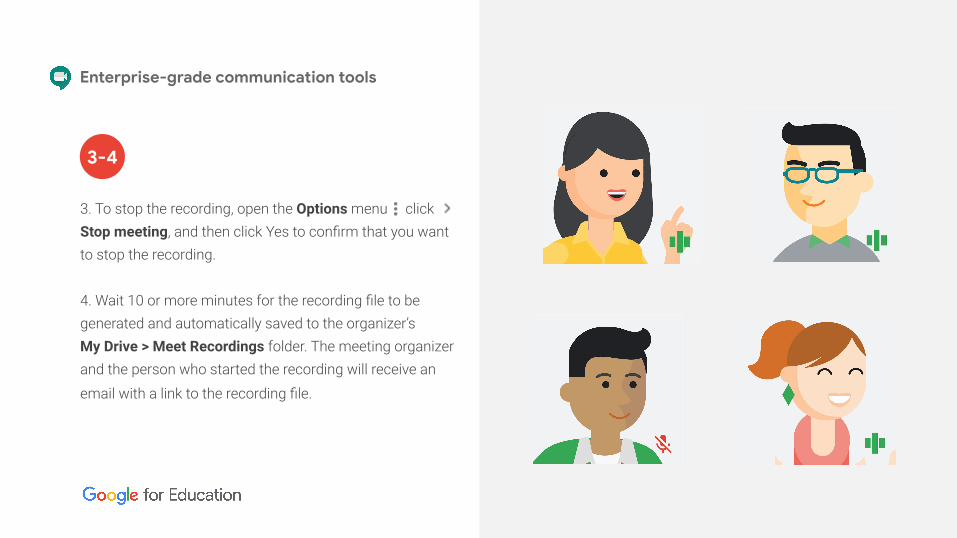
3. To stop the recording, open the Options menu click Stop meeting, and then click Yes to confirm that you want to stop the recording.
4. Wait 10 or more minutes for the recording file to be generated and automatically saved to the organizer’s My Drive > Meet Recordings folder. The meeting organizer and the person who started the recording will receive an email with a link to the recording file.
Enterprise-grade communication tools

32
International phone dial-in access
As a recipient of an event where Hangouts Meet is enabled, international dial-in capability is automatically added with G Suite Enterprise for Education.
To access international dial-in numbers, click More phone numbers in the calendar invite.
Enterprise-grade communication tools
1
Back to Table of Contents
33
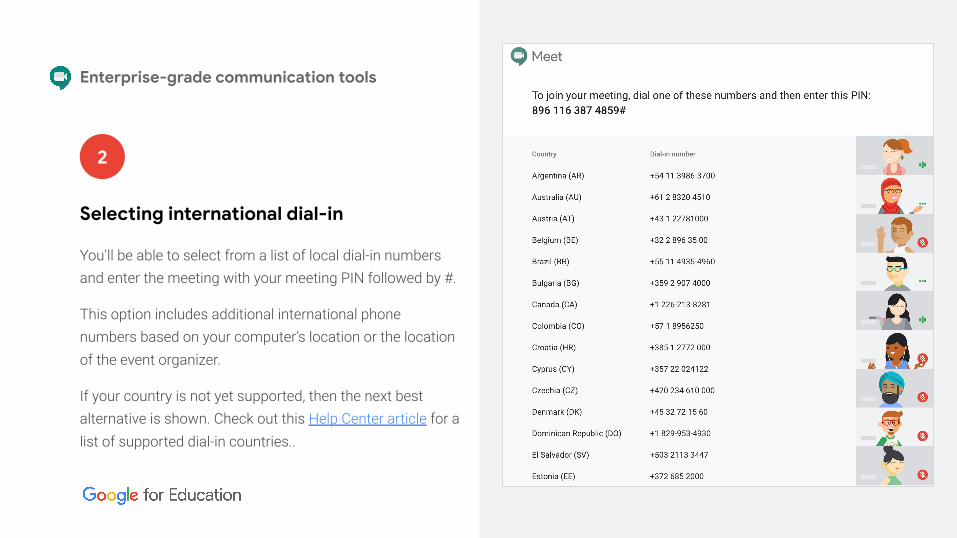
Selecting international dial-in
2
Enterprise-grade communication tools
You’ll be able to select from a list of local dial-in numbers and enter the meeting with your meeting PIN followed by #.
This option includes additional international phone numbers based on your computer’s location or the location of the event organizer.
If your country is not yet supported, then the next best alternative is shown. Check out this Help Center article for a list of supported dial-in countries..

34
Enhanced analytics and search capabilitiesG Suite Enterprise for Education gives you more visibility and control over your data, along with advanced capabilities to locate
information anywhere in your domain through a unified search experience.
You can access all of your audit logs and usage reports and export them for analysis in BigQuery. Within BigQuery, you can analyze
your data on a more granular level, build reports across apps, and incorporate additional visualization capabilities using Google Data
Studio or third-party tools. Read this Help Center article for more details about reporting logs in BigQuery.
Get started with:
Admin reports in BigQuery »
Gmail logs in BigQuery »
Cloud Search »

35
Admin reports in BigQueryGet insight into your G Suite usage by exporting your G Suite reports to BigQuery for further analysis.
Follow these steps to access this feature.
From your Admin console, click Reports.
Enhanced analytics and search capabilities
In the left-hand menu, click BigQuery Export.
1 2
Back to Table of Contents

36
3
Turn on the Export G Suite data to Google BigQuery switch to enable BigQuery logs. The logs will be available within 48 hours after turning on this setting.
4
Under BigQuery project ID, click the down arrow to select the project where you want to store the logs. You need to choose a project with write access. If you don’t see the project, you need to set it up in BigQuery. For details, see the quickstart guide for using the BigQuery web UI.
Enhanced analytics and search capabilities
3
4
Back to Table of Contents
37
5
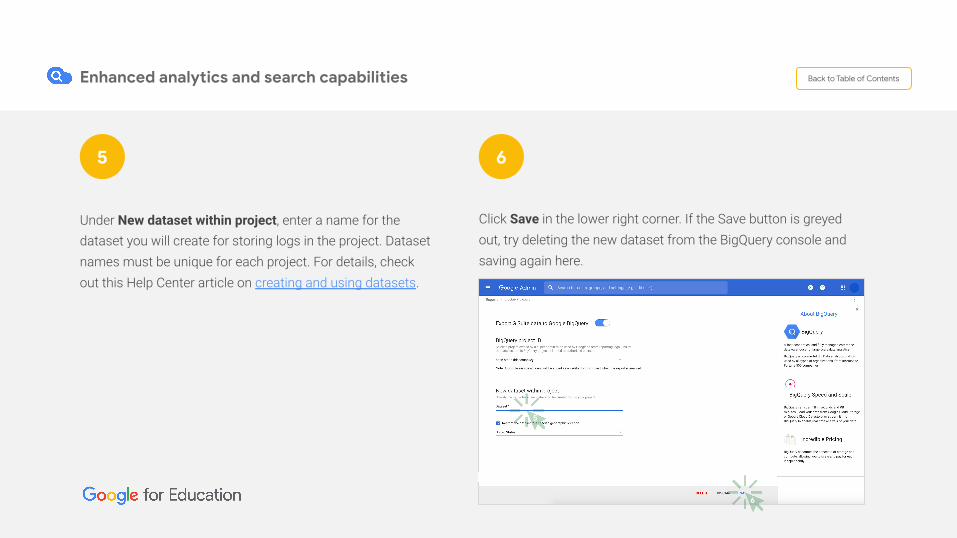
Under New dataset within project, enter a name for the dataset you will create for storing logs in the project. Dataset names must be unique for each project. For details, check out this Help Center article on creating and using datasets.
6
Click Save in the lower right corner. If the Save button is greyed out, try deleting the new dataset from the BigQuery console and saving again here.
Enhanced analytics and search capabilities
5
6
Back to Table of Contents

38
7
The dataset is created the next day when the export is triggered. In addition to project owners, editors, and viewers, the gapps-reports@ system.gserviceaccount.com service account is added as editor. The service account is required to write logs and update the schema.
8
Within BigQuery, you can write queries to analyze your data, or connect your dataset to Data Studio or other third-party tools for further analysis and visualization.
Enhanced analytics and search capabilities
Google BigQuery Google Data Studio
Back to Table of Contents

39
Gmail logs in BigQuery
With G Suite Enterprise for Education, you can search your Gmail logs to analyze and report on your organization’s email. You can perform deep analyses using custom queries, enforce data retention policies, and create custom reports and dashboards using analytics tools, such as Google Data Studio.
From your Admin console, click Apps.
Enhanced analytics and search capabilities
Then click G Suite.
1 2
Back to Table of Contents

40
3
Within the G Suite management interface, select Gmail from the list of services.
4
From the Gmail management interface, select Advanced settings.
Enhanced analytics and search capabilities
5
In the General Settings tab, under the Setup options, hover over Email Logs in BigQuery and click Configure.
Back to Table of Contents

41
6-8
6. In the Add setting window, enter a description under Email Logs in BigQuery.
7. From the drop-down menu under item 1, select the BigQuery project you want to use for Gmail logs. You must select a project with write access.
8. Under item 2, enter a name for the new dataset that will store the Gmail logs.
Enhanced analytics and search capabilities
7
8
6

42
7
8
6
9-11
9. Click Add Setting in the lower right to return to the settings page, then click Save.
10. After adding your setting, go back to your BigQuery project. Your new dataset should appear under the name you designated during step 6.
11. Check out the Help Center for more detailed information on Gmail logs in BigQuery.
Enhanced analytics and search capabilities
9

43
Cloud Search
Cloud Search makes it easy to find information within your organization’s content sources, including G Suite services, such as Drive and Gmail, and third-party data sources. End users can quickly find all the information they need with a unified search experience across your domain, powered by machine intelligence.
To enable Cloud Search:From your Admin console, click Apps.
Enhanced analytics and search capabilities
Then click G Suite.
1 2
Back to Table of Contents

44
3
From the list of services, click anywhere on the Cloud Search row.
4
At the top right of the gray box, click Edit service.
Enhanced analytics and search capabilities Back to Table of Contents

45
5-6
5. To enable Cloud Search for one or more organizational units, you can select from the lower left column a top-level unit, which will include all subunits listed under that unit, or select an individual subunit.
6. Under Service Status, select On, then click Save.
Enhanced analytics and search capabilities
6
your.school.edu5

46
7-8
7. To enable Cloud Search for all organizational units, click All users in this account in the upper left.
8. Under Service Status, select ON for everyone, then click Save.
Enhanced analytics and search capabilities
87
your.school.edu

47
Enhanced analytics and search capabilities
To use Cloud Search
1. On desktop, go to cloudsearch.google.com on any supported browser.
2. Install the mobile app on any supported device.
3. Conduct a search using natural language. Refine your searches with search operators and filters and see targeted suggestions.

48
Enhanced analytics and search capabilities
To use Cloud Search
4. Enable your global Directory so that people in your organization can use Cloud Search to find contact information and employee details for people in it. Read this Help Center article to learn how.
5. Use assist cards to help you stay organized and prepared. Cards show up on your Cloud Search homepage based on recent activity and upcoming events, such as your scheduled meetings in Calendar and the work going on around you. Read this Help Center article to learn more.

49
To get the most out of Cloud Search, we recommend following these additional steps:
1. Turn on Web & App Activity for your users to provide a customized search experience and more relevant suggestions.2. Whitelist the mobile app for your users so that they can install the Cloud Search app on their work devices.3. Set up Cloud Search for third-party repositories, such as Microsoft® SharePoint®. Work with a developer to
use Google APIs to integrate your third-party repositories with Cloud Search.4. Update your user profiles and so that current employee contact info and details show up in search results.5. View usage reports to see how your organization is using Cloud Search, including the number of
search queries from different types of devices and the number of active users for a specific period.6. Support your users with training resources to help them use Cloud Search.
Enhanced analytics and search capabilities Back to Table of Contents

50