g12 hid / t5 ho light fixtures - aquatic lifeaquaticlife.com/media/import/al_g12_hid_manual.pdf ·...
TRANSCRIPT
InstallatIon & MaIntenance GuIdeInstallatIon & MaIntenance GuIde
G12 HId / t5 Ho lIGHt FIxtures
w w w . a q u a t i c l i f e . c o m
Item # Product Description
420055 HID / T5 HO 36IN
420056 HID / T5 HO 48IN
420057 HID / T5 HO 72IN

2
table of contents
safety Instructions .............................................................3 Warnings ........................................................................3 Grounding .......................................................................3
Parts & specifications ........................................................4 Parts Diagram ................................................................4 Product Specifications ......................................................4
Installation ........................................................................5 Packaging .......................................................................5 t5 Ho lamps ..................................................................5 Suspension Hardware.......................................................6 aquarium frame Mounts ..................................................6
timer set-Up & operation .......................................................7 Maintenance ......................................................................9 Housing .........................................................................8 lens Covers ...................................................................8 t5 Ho lamp Replacement ................................................8 HID lamp Replacement .....................................................8
Registration & Warranty ...................................................10
This symbol indicates “Warnings” that are essential in order to protect against injury to people or damage to equipment.
This symbol indicates “notes” that are specific instructions on how to operate, control, adjust or maintain the units.
This symbol indicates “tiPs” that are intended to offer helpful advice for a better user experience.
thank you for purchasing an aquaticLife™ High intensity Discharge (HiD) / t5 Ho Combination Light Fixture for use with your aquarium!
We know you value quality and innovation and will be pleased with this product’s performance.
We encourage you to take a few minutes to become familiar with this manual and note items that apply to your particular model. For additional information, please visit www.aquaticlife.com.
Your purchase includes a coupon on the side of the box. Save Life Rewards™ point coupons from Aquatic Life products and redeem them for free merchandise at www.aquaticlife.com. This is our way of saying thank you for your loyalty
Copyright © Aquatic Life, LLCAll rights reserved. No part of this document may be reproduced, stored in a retrieval system, or transmitted in any form or by any means without the prior written consent of Aquatic Life, LLC.
Aquatic Life, LLCCommerce, CA 90040Toll-Free US only: (888) 548-3480Outside the US: [email protected]
Check us out on...
3
safety InStRuCtIonS
A) READ AND FOLLOW ALL SAFETY INSTRUCTIONS.B) DANGER – To avoid possible electric shock, special care should be taken since water is employed in the use of aquarium equipment.
For each of the following situations, do not attempt repairs by yourself; return the appliance to an authorized service facility for service or discard the appliance: 1) If the appliance falls into the water, DON’T reach for it! First unplug it and then retrieve it. If electrical components of the appliance get
wet, unplug the appliance immediately. (Non-immersible equipment only)2) If the appliance shows any sign of abnormal water leakage, immediately unplug it from the power source. (Immersible equipment only)3) Carefully examine the appliance after installation. It should not be plugged in if there is water on parts not intended to be wet.4) Do not operate any appliance if it has a damaged cord or plug, or if it is malfunctioning or has been dropped or damaged in any man-
ner.5) To avoid the possibility of the appliance plug or receptacle getting wet, position aquarium stand and tank to one side of a wall-mounted
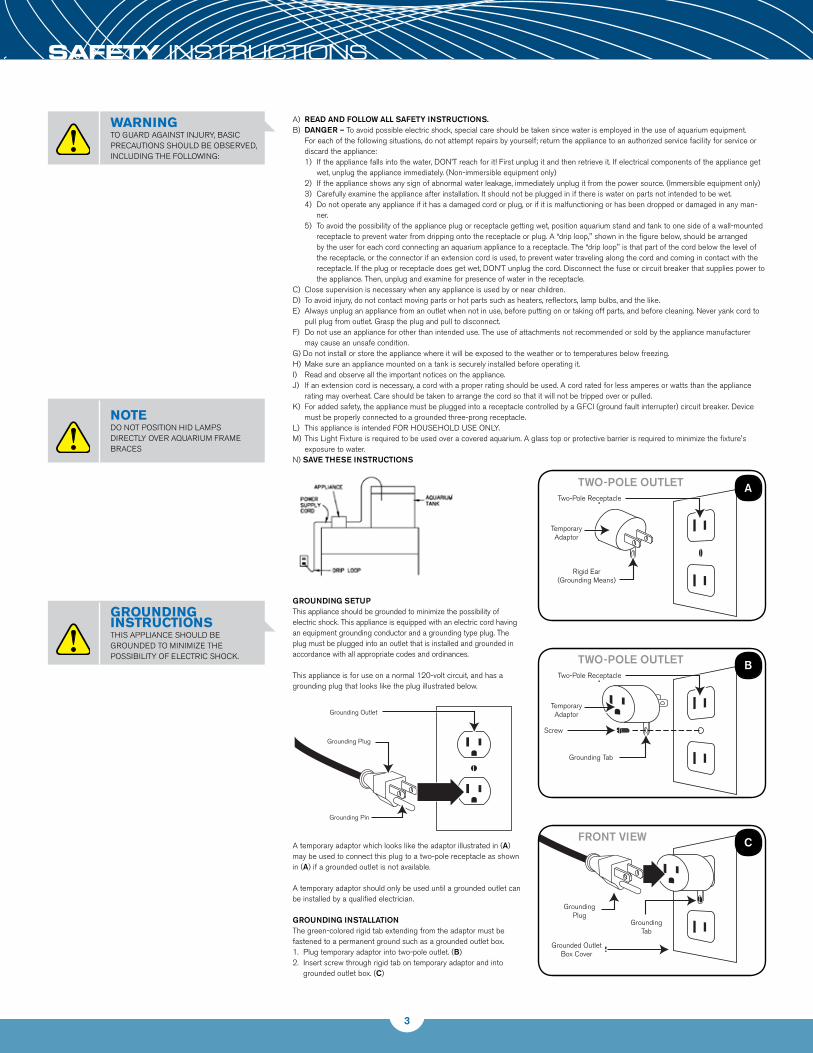
receptacle to prevent water from dripping onto the receptacle or plug. A “drip loop," shown in the figure below, should be arranged by the user for each cord connecting an aquarium appliance to a receptacle. The “drip loop" is that part of the cord below the level of the receptacle, or the connector if an extension cord is used, to prevent water traveling along the cord and coming in contact with the receptacle. If the plug or receptacle does get wet, DON’T unplug the cord. Disconnect the fuse or circuit breaker that supplies power to the appliance. Then, unplug and examine for presence of water in the receptacle.
C) Close supervision is necessary when any appliance is used by or near children.D) To avoid injury, do not contact moving parts or hot parts such as heaters, reflectors, lamp bulbs, and the like.E) Always unplug an appliance from an outlet when not in use, before putting on or taking off parts, and before cleaning. Never yank cord to
pull plug from outlet. Grasp the plug and pull to disconnect.F) Do not use an appliance for other than intended use. The use of attachments not recommended or sold by the appliance manufacturer
may cause an unsafe condition.G) Do not install or store the appliance where it will be exposed to the weather or to temperatures below freezing.H) Make sure an appliance mounted on a tank is securely installed before operating it.I) Read and observe all the important notices on the appliance. J) If an extension cord is necessary, a cord with a proper rating should be used. A cord rated for less amperes or watts than the appliance
rating may overheat. Care should be taken to arrange the cord so that it will not be tripped over or pulled.K) For added safety, the appliance must be plugged into a receptacle controlled by a GFCI (ground fault interrupter) circuit breaker. Device
must be properly connected to a grounded three-prong receptacle.L) This appliance is intended FOR HOUSEHOLD USE ONLY.M) This Light Fixture is required to be used over a covered aquarium. A glass top or protective barrier is required to minimize the fixture's
exposure to water.N) SAVE THESE INSTRUCTIONS
WarningTO GUARD AGAINST INJURY, BASIC pRECAUTIONS SHOULD BE OBSERvED, INCLUDING THE FOLLOwING:
groUnDing instrUCtionsTHIS AppLIANCE SHOULD BE GROUNDED TO MINIMIzE THE pOSSIBILITY OF ELECTRIC SHOCK.
noteDO NOT pOSITION HID LAMpS DIRECTLY OvER AQUARIUM FRAME BRACES
GROUNDING SETUpThis appliance should be grounded to minimize the possibility of electric shock. This appliance is equipped with an electric cord having an equipment grounding conductor and a grounding type plug. The plug must be plugged into an outlet that is installed and grounded in accordance with all appropriate codes and ordinances.
This appliance is for use on a normal 120-volt circuit, and has a grounding plug that looks like the plug illustrated below.
A temporary adaptor which looks like the adaptor illustrated in (A) may be used to connect this plug to a two-pole receptacle as shown in (A) if a grounded outlet is not available.
A temporary adaptor should only be used until a grounded outlet can be installed by a qualified electrician.
GROUNDING INSTALLATIONThe green-colored rigid tab extending from the adaptor must be fastened to a permanent ground such as a grounded outlet box.1. plug temporary adaptor into two-pole outlet. (B)2. Insert screw through rigid tab on temporary adaptor and into grounded outlet box. (C)
Grounded OutletBox Cover
Grounding plug
GroundingTab
FRONT VIEW C
TemporaryAdaptor
Rigid Ear(Grounding Means)
Two-pole Receptacle
TWO-pOLE OUTLET A
TemporaryAdaptor
Grounding Tab
Screw
Two-pole Receptacle
TWO-pOLE OUTLET B
Grounding plug
Grounding Outlet
Grounding pin

4
G12 HID PaRtS / SPeCS
Parts Diagram
model numbers
420055 420056 420057
420/460 Lamp(s): 410041 410043 410041
HID Lamp(s): 3 3 3
LED: 470109
Aquarium Frame mounts: 470064
Suspension Hardware: 470137
Ballast (HID): 470108
Ballast (T5 HO): 470071 470072 470071
Lens Cover: 9000107 9000108 9000109
End plate: 470110
Installation & Maintenance Guide: 3
model numbers
420055 420056 420057
Rated Voltage: 120 Volt AC
Rated Cycle: 60Hz
Power Factor (G12 HID): 0.99 0.99 0.99
Power Factor (T5 HO): 0.55 0.59 0.55
power Cord Length: 3 meters
Dimensions without Frame Mounts: (L x w x H): 91 x 39 x 15.8 cm35.8 x 15.4 x 6.2 in
121 x 39 x 15.8 cm47.6 x 15.4 x 6.2 in
181 x 39 x 15.8 cm71.3 x 15.4 x 6.2 in
Parts List:g12 HiD / t5 Ho Light Fixtures
ProDUCt sPeCiFiCations: g12 HiD / t5 Ho Light Fixtures

5
G12 HID / t5 Ho InStallatIon
tools required for installation:
The Aquatic Life Marine Light Fixture is shipped with the HID lamp(s) NOT installed. The T5 HO lamps will need to have the packaging materials removed prior to operation. place the light fixture upside down on a surface that will not mar or scratch the finish.
PaCkaging
TIp: Use a large towel under the fixture while removing the shipping materials to avoid scratching the fixture.
2) with the four screws removed, pull the End plate from the fixture.
1) Remove the four Allen screws (indicated in the illustration) from the left and right sides of the End plate (Allen wrench Included)
1) phillips #2 Screwdriver 2) Allen wrench (included)
FOUR SCREWS TO REMOVE
NOTE: The Allen wrench supplied with the fixture is conveniently stored in the bag with the CD Manual.
H
H
t5 Ho LamPs
3) Slide the two Acrylic Lens Covers out of the fixture.
NOTE: DO NOT replace the end plates until the Aquarium Frame Mounts have been attached.
Page 8
Page 7
Page 9
3) Acrylic scratches easily and your new fixture includes a plastic film on the Lens Cover to protect it during shipping. peel the protective film off both sides of the Acrylic Lens Cover.
1) Remove the shipping tube from around the T5 HO Lamps. 2) Insert the T5 Lamps into the sockets of the fixture and rotate into place.
H

6
G12 HID / t5 Ho InStallatIon
Detailed instructions are included in the parts box with the Suspension Hardware.
1) Locate a secure structure above the aquarium to suspend the light fixture. The suspension hardware MUST be attached to a structure that can support the weight of the fixture.
2) position the suspension hardware J Hooks (2) above the aquarium and attach to the structure.
3) position the Mounting Bracket over the J Hooks and attach to the support structure with supplied screws.
sUsPension HarDWare
4) Attach the end of the Suspension wire to the Suspension Bracket located on the fixture.
5) Insert Suspension wire through the decorative cap and loop the wire around the J Hook. Secure wire with the supplied wire Fastener. Adjust the length of the wire to adjust the fixture height above the aquarium.
6) Coil any extra Suspension wire into the Decorative Cap and attach the Decorative Cap to the Mounting Bracket.
TIp: Use a string and washer to align the J Hooks in the supports. Hang the string with washer above the aquarium and allow it to rest in the desired location. Then mark and insert the J Hooks.
WARNING: Drywall suspension is not recommended due to the weight of the fixtures.
1) with one outer plastic End plate removed, remove the inner metal End plate by removing the eight screws.
aqUariUm Frame moUnts
2) Slide the Aquarium Frame Mount into the bottom channel of the light fixture.
3) Reattach the inner metal End plate with the eight screws.
4) Reattach the outer plastic End plate. Repeat steps 1 through 5 to the other end of the light fixture to install the second Aquarium Frame Mount.
5) place the fixture over the aquarium and adjust (slide) the Aquarium Frame Mounts so that the base of each Mount is firmly resting on the aquarium frame. Tighten the screws on the underside of the Mounts to secure in place above the aquarium.
HH
H H
WARNING: To install the Aquarium Frame Mounts, the outer plastic End plate is removed and then the inner metal End plate is removed. ONLY REMOvE THE pLASTIC AND METAL END pLATES FROM ONE SIDE OF THE FIXTURE AT A TIME. Removing the End plates from both sides of the fixture at the same time will cause the fixture to separate.
NOTE: Before reattaching the second plastic End plate, slide the Acrylic Lens Covers back into the track over the T5 HO lamps.

7
PoWer
Your Aquatic Life Light Fixture is equipped with a built in Digital Timer and a single power cord. The Timer enables independent control of the three lighting zones in the fixture. Connect the power cord into a grounded outlet (GFCI). The display will illuminate when power is supplied.
timer
The Digital Timer controls three zones in the Light Fixture: wHITE, BLUE, NIGHT. Each of these zones can be programmed to operate at different times throughout the day.
timer set-UP
setting the time
1) press CLOCK on the Control panel until the time begins to flash. press the HR and MIN buttons to scroll to the current time. press CLOCK when current time is set.
2) The clock is equipped with a quick summer time mode that forwards the clock ahead one hour for Daylight Savings Time. press both the HR and MIN at the same time and the clock will advance one hour and display S in the top right corner of the display. To change back to standard time, repeat the step above and the time will revert back one hour. The S on the display will disappear.
Zone Programming: setting the on/off times for the Lamps to operate.
1) Simultaneously press both the “pROG” button and the button of the zone Lamp type that you want to set at the same time (wHITE, BLUE or NIGHT). Three arrows above the zone that is being programmed will begin to flash. START will appear on the display.
2) press the HR and MIN buttons to adjust the START time.
3) press pROG to scroll to the END time. NOTE: For ease of programming, the clock displays a 24 hour format instead of AM or pM.
4) press the HR and MIN buttons to adjust the END time. This is the time the zone will power off.
5) press CLOCK to return to the current time. The current time will automatically display if there is no activity for 60 seconds.
6) Repeat steps 1 through 5 for each Lamp type (zone) that requires a new time of operation.
Pre-Programmed times of operation: For ease of use, the timer is pre-programmed with START and END times. If the timer is in the pre-programmed mode the display will show an R in the right hand corner of the display.
zone 1 wHITE START 9:00 - END 17:00 zone 2 BLUE START 8:00 - END 20:00 zone 3 NIGHT START 20:00- END 6:00
manual override To override the timer during normal operation, press the button of the desired zone. press the button until the display triangle appears above the ON or OFF of the zone selected.
To return to the AUTO mode, press the desired zone button until the display triangle appears above AUTO.
reset BUtton: if the fixture is powered off or unplugged without turning the lamps off manually at the timer, the timer may “lock” and not have any display. To reset the timer to its pre-programmed settings, press the Reset Button in the middle of the Timer panel. A paper clip or similar small object will be needed to press the Reset Button.
NOTE: For ease of programming, the clock displays a 24 hour format instead of AM or pM.
NOTE: when the programmed on/off times are activated, a triangle indicator will appear on the digital display above AUTO. press the button of the Lamp type to toggle between the ON / AUTO / OFF modes.
To view a video demonstration on the Digital Timer go to
www.youtube.com/AquaticLifeLLC
NOTE: REMOvE
pROTECTIvEFILM
DIGItal tIMeR Set-uP

8
q: WHy Do tHe LamPs not tUrn on?
verify the timer control is either in AUTO or ON mode. If the timer is in AUTO mode, make sure the time is programmed correctly
q: WHy Do tHe LamPs tUrn on at tHe Wrong time?
The clock and timer use a 24 hour time format (Military Time). For example, 1:00 pM will show 13:00 on the display. verify that the correct START/END times are set according to the 24 hour format.
q: WHy is tHe timer not resPonsive or Has no DisPLay?
If the light fixture was unplugged or encountered a power loss for an extended period of time, the timer might need to be reset. There is a small reset button on the front of the timer panel. Use the end of an ink pen or paper clip to press the small reset button. This will restore the light fixture to factory settings.
q: WHy Can tHe timer not Be ProgrammeD?
The pROG and zone (wHITE, BLUE, NIGHT) buttons must be pressed at the same time to initiate the programming mode. when in the program mode, three arrows will be displayed pointing to the zone being programmed.
q: WHy Do tHe LamPs FLasH, BUt Do not stay on?
verify the lamps are in the sockets properly and the lamps are not broken or damaged.
neeD assistanCe?
Before contacting aquatic Life, did you
press the reset button on the timer?
Aquatic Life Customer Support
1-888-548-3480 (USA Toll-Free)
1-818-768-6943
Monday – Friday, 8 am to 4 pm (pST)
n Simultaneously press PROG and zone button to initiate programming mode
n Press RESET button to restore to factory presets
n Three arrows above ON, AUTO, OFF in the same zone indicate zone is being programmed
n Clock and Timer use a 24 hour format. (This display is currently showing 4:24 PM)
n Press PROG to cycle through current settings
DIGItal tIMeR fRequently aSkeD queStIonS
9
G12 HID / t5 Ho MaIntenanCe
WARNING: The fixture is not waterproof. Do not spray or submerge the fixture.
WARNING: The fixture is hot during operation and must cool before servicing. Unplug the fixture from power supply and allow cooling for 30 minutes before changing HID lamps.
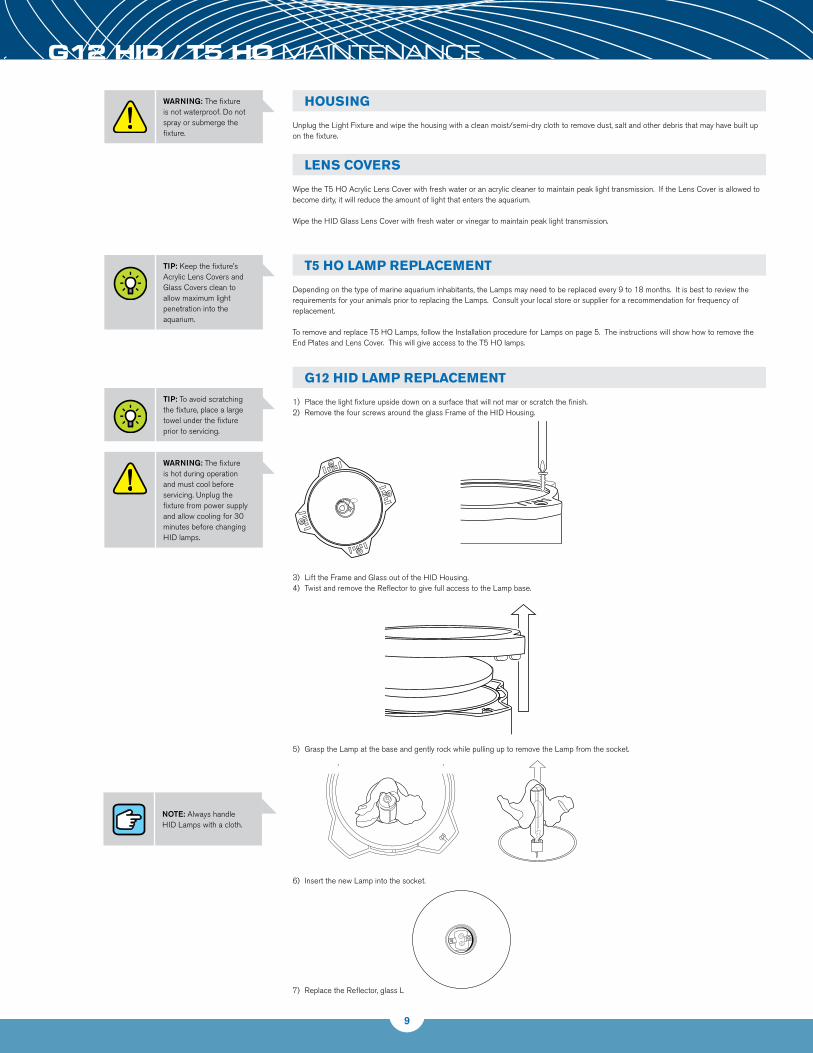
HoUsing
Unplug the Light Fixture and wipe the housing with a clean moist/semi-dry cloth to remove dust, salt and other debris that may have built up on the fixture.
g12 HiD LamP rePLaCement
1) place the light fixture upside down on a surface that will not mar or scratch the finish. 2) Remove the four screws around the glass Frame of the HID Housing.
Lens Covers
wipe the T5 HO Acrylic Lens Cover with fresh water or an acrylic cleaner to maintain peak light transmission. If the Lens Cover is allowed to become dirty, it will reduce the amount of light that enters the aquarium.
wipe the HID Glass Lens Cover with fresh water or vinegar to maintain peak light transmission.
t5 Ho LamP rePLaCement
Depending on the type of marine aquarium inhabitants, the Lamps may need to be replaced every 9 to 18 months. It is best to review the requirements for your animals prior to replacing the Lamps. Consult your local store or supplier for a recommendation for frequency of replacement.
To remove and replace T5 HO Lamps, follow the Installation procedure for Lamps on page 5. The instructions will show how to remove the End plates and Lens Cover. This will give access to the T5 HO lamps.
TIp: Keep the fixture’s Acrylic Lens Covers and Glass Covers clean to allow maximum light penetration into the aquarium.
TIp: To avoid scratching the fixture, place a large towel under the fixture prior to servicing.
H
3) Lift the Frame and Glass out of the HID Housing.4) Twist and remove the Reflector to give full access to the Lamp base.
5) Grasp the Lamp at the base and gently rock while pulling up to remove the Lamp from the socket.
6) Insert the new Lamp into the socket.
7) Replace the Reflector, glass Lens Cover, and Frame.
NOTE: Always handle HID Lamps with a cloth.
O
P
Q
10
ReGIstRatIon & WaRRanty
when you purchase an Aquatic Life product, you will find a warranty Registration Card accompanying the product. please complete this Card and mail it in within 15 days from the date of purchase or register your product online at www.aquaticlife.com. Some Aquatic Life products will include a Serial Number. To validate your warranty, the Serial Number must be included for appropriate products.
product Serial NumbersSerial Numbers DO NOT contain the letters “UL", “CUL", “CSA", “EN" or “CE". These letters refer to a US, Canadian and European Standards for that product. If you need help locating the Serial Number for your product, please visit our website at www.aquaticlife.com or call Aquatic Life at 1-888-548-3480.
Aquatic Life, LLC warrants that this Light Fixture (excluding lamps) shall be free from defective electrical components and leaks or cracks due to defects in materials or workmanship for a period of twelve (12) months from the date of purchase. If a defect is shown, Aquatic Life, LLC will, at Aquatic Life’s sole discretion, either repair or replace the product without charge. No cash refunds will be made. This warranty is provided solely to the original consumer purchaser of the product and may not be transferred or assigned.
This warranty does not apply to damage resulting from accident, misuse, abuse, lack of reasonable care, failure to follow safety and installation instructions, use of the product with non-standard electrical service, or any other defect not resulting from defects in the electrical components of the product or defects in materials or workmanship. This warranty will not be effective unless and until the Aquatic Life product is shown to have been used in accordance with the safety and installation instructions accompanying the product.
THIS CONSTITUTES AQUATIC LIFE’S ENTIRE wARRANTY AND AQUATIC LIFE MAKES NO OTHER wARRANTIES, wHETHER EXpRESS OR IMpLIED, wITH RESpECT TO THE pRODUCT. AQUATIC LIFE, LLC SpECIFICALLY DISCLAIMS ANY AND ALL IMpLIED wARRANTIES, INCLUDING, wITHOUT LIMITATION, wARRANTIES OF MERCHANTABILITY AND FITNESS FOR A pARTICULAR pURpOSE. IF AQUATIC LIFE, LLC CANNOT LAwFULLY DISCLAIM IMpLIED wARRANTIES UNDER THIS LIMITED wARRANTY, ALL SUCH wARRANTIES, INCLUDING wARRANTIES OF MERCHANTABILITY AND FITNESS FOR A pARTICULAR pURpOSE ARE LIMITED IN DURATION TO THE DURATION OF THIS wARRANTY.
AQUATIC LIFE IS NOT RESpONSIBLE FOR DIRECT, SpECIAL, INCIDENTAL OR CONSEQUENTIAL DAMAGES RESULTING FROM ANY BREACH OF wARRANTY OR CONDITION, OR UNDER ANY OTHER LEGAL THEORY. AQUATIC LIFE, LLC EXpRESSLY DISCLAIMS ALL ALLEGED DAMAGES FOR LOSS OF MARINE LIFE, pERSONAL INJURY, AND/OR pROpERTY DAMAGE.
Some states and provinces do not allow the exclusion or limitation of incidental or consequential damages or exclusions or limitations on the duration of implied warranties or conditions, so the above limitations or exclusions may not apply to you. This warranty gives you specific legal rights, and you may also have other rights that vary by state orprovince.
Aquatic Life, LLC shall not have any obligations under this warranty unless the owner notifies Aquatic Life, LLC in writing of any alleged defect(s) within 30 days of discovery of the defect(s). Any notice to Aquatic Life, LLC must be delivered by United States or electronic mail to the following address:U.S. Mail Aquatic Life, LLC 2416 W. Victory Blvd, #136Burbank, CA 91506
Electronic Mail: [email protected]
Aquatic Life, LLC shall be allowed a reasonable period of time to investigate any warranty claim and to perform any testing Aquatic Life, LLC deems necessary to determine the cause of the defect. This warranty shall be interpreted under the laws of the State of California.
registering yoUr ProDUCt(s) WitH aqUatiC LiFe
LimiteD Warranty

11
Aquatic Life, Life Rewards, and“Bringing the ocean to you, wherever you may be.” are trademarks of Aquatic Life LLCCommerce, CA 90040 www.aquaticlife.com
© Copyright Aquatic Life LLC
P/N 9000062 REV 05/11