g2 industrial grade (non agency approved) turbine housing
TRANSCRIPT
920708-05 Rev-10/23/2020
G2 Industrial Grade (Non Agency Approved)
Turbine HousingOwner’s ManualIncludes Aluminum and Stainless Steel Housings, ANSI Flange Fittings, and Tri-Clover® Flange Fittings
SAVE THESE INSTRUCTIONS

2
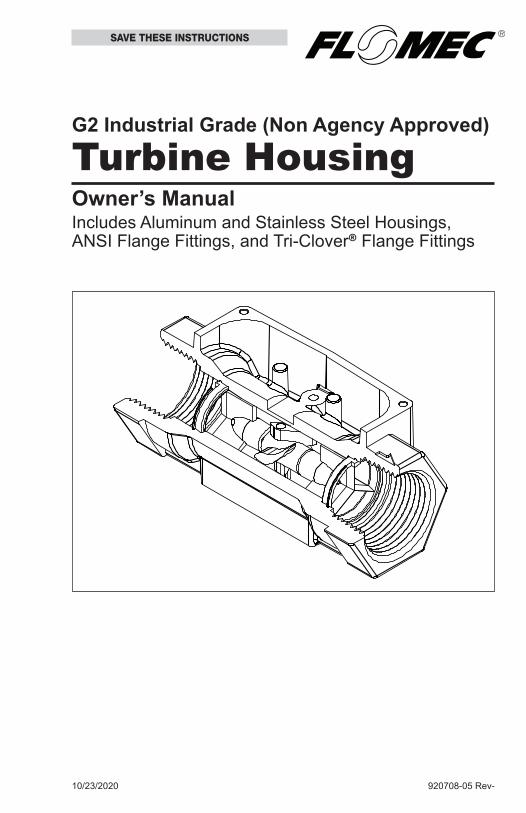
This manual will assist you in install-ing and maintaining your FLOMEC Industrial Grade turbine housing. (See Figure 1) Information on elec-tronics (Q9, QSI, and QSB) are contained in other manuals. Please reference those as necessary.
To the owner…Congratulations on receiving your FLOMEC® Industrial Grade Turbine. We are pleased to provide you with a product designed to give you maxi-mum reliability and efficiency.Our business is the design, manufac-ture, and marketing of liquid handling, agricultural, and recreational prod-ucts. We succeed because we provide customers with innovative, reliable, safe, timely, and competitively-priced products. We pride ourselves in con-ducting our business with integrity and professionalism.We are proud to provide you with a quality product and the support you need to obtain years of safe, depend-able service.
Victor Lukic, PresidentGreat Plains Industries, Inc.
GENERAL INFORMATION
TABLE OF CONTENTSGeneral Information ......................2Installation .....................................4Operation .......................................6Maintenance ..................................6Troubleshooting .............................8Model Number Chart .....................9
Specifications ..............................10Aluminum .................................10Stainless Steel .........................12ANSI Flange Fittings ................14Tri-Clover® Flange Fittings ......16
Illustrated Parts Drawings ...........18Service ........................................21Certifications Table ......................22
For best results, take the time to fully acquaint yourself with all informa-tion about all components of your FLOMEC Electronic Digital Metering System prior to installation and use. If you need assistance, contact the distributor from whom you purchased your turbine.
This symbol is used throughout the manual to call your atten-tion to safety messages.
WARNING Warnings alert you to the poten-tial for personal injury.
CAUTION Cautions cal l your attention to practices or pro-cedures which may damage your equipment.
Notes give information that can im-prove efficiency of operations.
It is your responsibility to make sure that all operators have access to adequate instructions about safe op-erating and maintenance procedures.
Figure 1
TURBINE HOUSING(CUT-AWAY)
ELECTRONICS SOLD SEPARATELY(Q09 COMPUTER ELECTRONICS SHOWN)

3
10. When tightening the turbine, use a wrench only on the wrench flats.
11. For best results, always verify accuracy before use.
Product DescriptionFLOMEC Industrial Meter Turbines are identified by the internal diameter of the inlet and outlet. Model 05 – 1/2 inch Model 07 – 3/4 inch Model 10 – 1 inch Model 15 – 1-1/2 inch Model 20 – 2 inchEach turbine is designed to work with onboard computer electronics and/or with one of several accessory output modules.Liquid flows through the turbine hous-ing causing an internal rotor to spin. As the rotor spins, an electrical signal is generated in the pickup coil. This signal is converted into engineering units (gallons, litres, etc.) on the lo-cal display. Accessory modules can be used to export the signal to other equipment.Upon receipt, examine your meter for visible damage. The turbine is a precision measuring instrument and should be handled as such. Remove the protective plugs and caps for a thorough inspection. If any items are damaged or missing, contact your distributor.Make sure the turbine model meets your specific needs. Refer to the Specifications Section and confirm the following:1. The flowrate is within the limits of
your model.2. The liquid is compatible with the
turbine’s wetted components.3. The system’s pressure does not
exceed the turbine’s maximum pressure rating.
Read Me!For your safety, review the major warnings and cautions below before operating your equipment.
The apparatus enclosure may contain aluminum and is considered to con‑stitute a potential risk of ignition by impact or friction. Care must be taken into account during installation and use to prevent impact or friction.
WARNING
Part of the enclosure is constructed from plastic. To prevent the risk of electrostatic sparking the plastic sur‑face should only be cleaned with a damp cloth.
WARNING
1. Use only fluids that are compatible with the housing material and wetted components of your turbine.
2. This product is not intended for use with flammable liquids.
3. When handling hazardous liquids, always follow the liquid manufacturer’s safety precautions.
4. When working in hazardous environments, always exercise appropriate safety precautions.
5. Always dispose of used cleaning solvents in a safe manner according to the solvent manufacturer’s instructions.
6. During turbine removal, liquid may spill. Follow the liquid manufacturer’s safety precautions for clean up of minor spills.
7. Do not blow compressed air through the turbine.
8. Do not allow liquids to dry inside the turbine.
9. Handle the rotor carefully. Even small scratches or nicks can affect accuracy.

4
Information specific to your particu-lar turbine, including serial number, model number, manufacturing date, and K-factor is etched on the meter. Be prepared to provide this information if you call customer service. SN = Serial Number, a 6-digit num-ber that identifies this particular turbine.MODEL = Model Number begins with a letter indicating the housing material. A for Aluminum H for Stainless Steel High
Pressure S for Stainless SteelTwo digits follow the material code indicating the size. 05 – 1/2 inch 07 – 3/4 inch 10 – 1 inch 15 – 1-1/2 inch 20 – 2 inchThe final letter indicates the type of thread. F for Flange N for NPT I for ISO T for Tri-Clover® FlangeMFG DATE = Manufacturing Date indicating the week and year of manufacture.KF = K‑Factor given in pulses per gallon (PPG).
INSTALLATIONFor your future reference, it might be useful to record this information in the manual in case it becomes unreadable on the turbine.All FLOMEC® turbines are designed to measure flow in only one direction. The direction is indicated by the arrow, cast-molded in the turbine.
Flow altering devices such as elbows, valves, and reducers can affect ac-curacy. See Diagram 2. The following recommended guidelines are given to enhance accuracy and maximize performance. Distances given here are minimum requirements; double them for desired straight pipe lengths.
Diagram 1
FLOW
Upstream from the turbine, allow a minimum straight pipe length at least 10 times the internal diameter of the turbine. For example, with the 1 inch turbine, there should be 10 inches (25.4 cm) of straight pipe immediately upstream. The desired upstream straight pipe length is 20 inches (50.8 cm).Downstream from the turbine, allow a minimum straight pipe length at least 5 times the internal diameter of your turbine. For example, with the 1 inch turbine, there should be 5 inches (12.7 cm) of straight pipe im-mediately downstream. The desired downstream distance is 10 inches (25.4 cm). See Diagram 2.
Diagram 2
FLOW
5X 10X
Minimum Pipe Length

5
A typical back pressure of 5 to 50 PSI (0.34 to 3.4 bar) will prevent cavitation. Create back pressure by installing a control valve on the downstream side of the meter at the proper distance detailed above.Foreign material in the liquid being measured can clog the turbine’s rotor and adversely affect accuracy. If this problem is anticipated or experienced, install screens to filter impurities from incoming liquids.
Models 1/2 in., 3/4 in. and 1 in.: Maximum Particulate Size Inches: 0.005 Microns: 125 Mesh: 120 Standard Sieve: 125 µm Alternative Sieve: No. 120
Models 1‑1/2 in. and 2 in.: Maximum Particulate Size Inches: 0.018 Microns: 500 Mesh: 35 Standard Sieve: 500 µm Alternative Sieve: No. 35To ensure accurate measurement, remove all air from the system be-fore use.Each turbine contains a removable back coverplate. Leave the coverplate installed unless accessory modules specify removal.
Threaded Connections1. To protect against leakage, seal
all threads with an appropriate sealing compound. Make sure the sealing compound does not intrude into the flow path.
2. Make sure the arrow on the outlet is pointed in the direction of the flow.
3. Tighten the turbine onto the fittings. Use a wrench only on wrench flats.
Note: If connecting to new male threads, burrs and curls can adversely effect accuracy. Correct the problem prior to turbine installation.
Verify accuracy after connections are complete. See Operation section.
ANSI Flange ConnectionUse a gasket between the meter flange and mating flange. Determine the material of the gasket based on the operating conditions and type of fluid.Note: Do not over tighten the flange
bolts. This may cause the gasket to be compressed into the flow stream and may decrease the accuracy of the meter. See ANSI flange specification section fro flange installation diagram.
Tri-Clover® Flange Connection1. Make sure the arrow on the outlet
is pointed in the direction of the flow.
2. Insert a gasket between the meter fitting and the mating fitting. Determine the gasket material based on the operating conditions and the type of fluid used.
3. Fasten with the appropriate clamp. Tighten clamp to manufacturer’s specifications.
Verify accuracy after connections are complete. See Operation section.

6
OPERATION
Verify AccuracyBefore use, check the turbine’s ac-curacy and verify calibration.1. Make sure there is no air in the
system.2. Measure an exact known volume
into an accurate container.3. Verify the volume against the
readout or recording equipment.Note: If necessary, use a correction
factor to figure final volume.For best results, accuracy should be verified periodically as part of a routine maintenance schedule.
MAINTENANCE
Remove the Turbine
During turbine removal, liquid may spill. Follow the liquid manufacturer’s safety precautions for clean up of minor spills.
WARNING
1. Drain all liquid from the turbine. Wear protective clothing as necessary.
2. Disconnect both ends of the turbine. For threaded connections loosen both ends of the turbine. using a wrench only on the turbine’s wrench flats.
3. If the turbine is not immediately installed again, cap lines as necessary.
Clean the TurbineDuring use, the turbine should be kept full of liquid to ensure that drying does not occur inside the turbine. If drying or caking should occur, the rotor will stick or drag, affecting accuracy. To determine if the rotor is stuck or drag-ging, gently blow air through the meter and listen for the quiet whir of the rotor.
Never blow compressed air through the meter. It could damage the rotor.
CAUTION
1. Remove the turbine from the system following the directions below.
2. Carefully clean residue off all parts. Remove internal parts as detailed above. Note orientation carefully for correct assembly. Internal parts can be soaked for 10 to 15 minutes in compatible cleaning solutions. Use a soft brush or small probe to carefully remove residue from the rotor.
Follow the liquid manufacturer’s in‑structions for the disposal of contami‑nated cleaning solvents.
WARNING
3. When the rotor turns freely, assemble and install it again following the instructions above.
4. Check accuracy after cleaning. See Diagram 4 for example of bucket test method.
Diagram 3

7
Replace Internal Parts1. Remove the turbine from the
system as detailed above.Note: Carefully notice the orientation
of all internal parts as they are removed, especially the orientation of the rotor to the flow direction arrow. See Diagram 4.
Figure 2
920708-3 MANUALPAGE 7, LEFT
FLOW DIRECTION
ROTORSUPPORT
RETAINING RING
SUPPORT
RETAINING RING
2. Using a small tool such as a screwdriver or awl, gently pry one retaining ring from its groove. Remove the support. If necessary, use needle nose pliers. Little or no force should be required.
3. Carefully remove the rotor.
Handle the rotor carefully. Even small scratches or nicks can affect accuracy.
CAUTION
4. Turn the turbine over and remove the other retaining ring. Remove the other support.
5. Clean, as detailed below, or discard as necessary.
6. Replace one support and retaining ring. Parts should drop easily into place with little or no force.
7. Install the rotor. Make sure the wide end of the rotor’s blades faces the flow direction. See Diagram 5.
Figure 3
920708-3 MANUALPAGE 7, RIGHT
FLOW DIRECTION
FLOW DIRECTION ARROW
WIDE END OF ROTOR BLADE(LEADING EDGE)
8. Turn the turbine over and drop the second support into place. Put the final retaining ring into position.
9. Reinstall the turbine, purge the system of air, and verify accuracy before use.

8
TROUBLESHOOTING
Symptom Probable Cause SolutionMeasurement is not accurate 1. Turbine operated
below minimum rate.Increase flowrate. See Specifications
2. Turbine partially clogged with dried liquid.
Remove turbine. Clean carefully. Make sure rotor spins freely
3. Turbine bearings partially clogged with dried liquid
Remove turbine. Clean carefully. Make sure rotor spins freely
4. Sealant wrapped around rotor
Remove turbine. Clear material from rotor. Make sure rotor spins freely
5. Installed too close to fittings
Install Correctly. See Installation section
6. Improper connections to recording device
Check all electrical connections. Reference appropriate installation instructions
7. Accuracy needs verification
Complete normal accuracy verification procedures. Repeat periodically

9
MODEL NUMBER CHART - THREADED HOUSINGS
Normal Range GPM Water
Normal Range LPM Water
Inlet / Outlet Size NPT
Aluminum Model No.
Stainless Steel Model No.
Stainless Steel High Pressure
Model No.
1 - 10 3.8 - 37.9 1/2 in. A05 S05 H05
2 - 20 7.6 - 75.7 3/4 in. A07 S07 H07
5 - 50 18.9 - 190 1 in. A10 S10 H10
10 - 100 38 - 380 1-1/2 in. A15 S15 H15
20 - 200 76 - 760 2 in. A20 S20 H20
MODEL NUMBER CHART - FLANGED HOUSINGS
Normal Range GPM Water
Normal Range LPM
WaterInlet / Outlet
Size NPTStainless Steel ANSI Flange Model No.
Stainless Steel Tri-Clover Model No.
1 - 10 3.8 - 37.9 1/2 in. -- S05T
2 - 20 7.6 - 75.7 3/4 in. -- S07T
5 - 50 18.9 - 190 1 in. S10F S10T
10 - 100 38 - 380 1-1/2 in. S15F S15T
20 - 200 76 - 760 2 in. S20F S20T

10
SPECIFICATIONS – ALUMINUM
All data on Models 1/2 inch, 3/4 inch, and 1 inch determined with 1 centipoise solvent test fluid at 70° F (21° C). Data on Models 1-1/2 inch and 2 inch is determined with water at 70° F (21° C).
Performance Linear Range for 1/2 in.: 10:1 @ ±2.0% of reading Linear Range for 3/4 in. and 1 in.: 10:1 @ ±1.5% of reading Linear Range for 1-1/2 in. and 2 in.: 10:1 @ ±1.0% of reading Repeatability: ±0.1%Pressure Rating 300 PSIG (21 bar)Wetted Components Housing: Aluminum Journal Bearings: Ceramic (96% Alumina) Shaft: Tungsten Carbide Rotor and Supports: PVDF Retaining Rings: 316 Stainless SteelTemperature Range -40° F to +250° F (-40° C to +121° C) These temperatures apply to operations and storage. They are only for the turbine without computer electronics. Final operational temperature range is determined by computer electronics or accessory modules.
Model Size A05 1/2 in.
A07 3/4 in.
A10 1 in.
A15 1‑1/2 in.
A20 2 in.
Linear Flow Range
Gallons/minute (GPM) 1-10 2-20 5-50 10-100 20-200
Litres/minute (LPM) 3.8-37.9 7.6-75.7 18.9-190 38-380 76-760
Maximum Flow 1
Gallons/minute (GPM) 15 30 75 150 300
Litres/minute (LPM) 56.8 113.6 284 568 1,136
Maximum Pressure Drop
in 10:1 Range
PSIG 8 7.5 5 4 7
bar 0.55 0.52 0.34 0.28 0.48
Frequency Range in Linear Flow Range 42-420 Hz 37-370 Hz 47-470 Hz 36-360 Hz 33-330 Hz
Connections
NPT or ISO Threads Yes Yes Yes Yes Yes
Female Yes Yes Yes Yes Yes
Inlet/Outlet Size 1/2 in. 3/4 in. 1 in. 1-1/2 in. 2 in.
Wrench Size:
Inch 1-1/16 in. 1-5/16 in. 1-5/8 in. 2-3/8 in. 3 in.
Millimeter 27 mm 33 mm 41 mm 60 mm 75 mm
Weight*
Pounds 0.9 lbs. 0.9 lbs. 1.0 lbs. 2.1 lbs. 3.4 lbs.
Kilograms 0.4 kg 0.4 kg 0.5 kg 1.0 kg 1.5 kg
* Computer electronics add 0.2 lbs. (0.1kg) to total weight.1 The meter can operate up to this flowrate without damage. Continuous operation will severely degrade meter life and performance.

11
Dimensions
920708-3 MANUALPAGE 10
1/2", 3/4", 1"STYLE
1-1/2", 2"STYLE
A
B C
B
A
C
Model Size A05 1/2 in.
A07 3/4 in.
A10 1 in.
A15 1‑1/2 in.
2A20 in.
A = Height:
Inches 1.8 in. 2.0 in. 2.2 in. 2.8 in. 3.2 in.
Centimeters 4.6 cm 5.1 cm 5.6 cm 7.1 cm 8.2 cm
B = Width
Inches 2.0 in. 2.0 in. 2.0 in. 2.7 in. 3.3 in.
Centimeters 5.1 cm 5.1 cm 5.1 cm 6.9 cm 8.4 cm
C = Length
Inches 4.2 in. 4.3 in. 4.5 in. 5.3 in. 6.3 in.
Centimeters 10.7 cm 10.9 cm 11.4 cm 13.5 cm 16.0 cm
Computer electronics add 0.7 in. (1.8 cm) to height of turbine

12
SPECIFICATIONS – STAINLESS STEEL (INCLUDE HIGH PRESSURE)
Performance Linear Range for 1/2 in.: 10:1 @ ±2.0% of reading Linear Range for 3/4 in. and 1 in.: 10:1 @ ±1.5% of reading Linear Range for 1-1/2 in. and 2 in.: 10:1 @ ±1.0% of reading Repeatability: ±0.1%Pressure Rating Standard Stainless Steel Meter: 1,500 PSIG (102 bar) **High Pressure Stainless Steel Meter: 3,000 PSIG (207 bar)Wetted Components Housing: 316 Stainless Steel Journal Bearings: Ceramic (96% Alumina) Shaft: Tungsten Carbide Rotor and Supports: PVDF Retaining Rings: 316 Stainless SteelTemperature Range -40° F to +250° F (-40° C to +121° C) These temperatures apply to operations and storage. They are only for the turbine without computer electronics. Final operational temperature range is determined by computer electronics or accessory modules.
All data on Models 1/2 inch, 3/4 inch, and 1 inch determined with 1 centipoise solvent test fluid at 70° F (21° C). Data on Models 1-1/2 inch and 2 inch is determined with water at 70° F (21° C).
Model-SS Standard Model-SS High Pressure
Size
S05 H05** 1/2 in.
S07 H07** 3/4 in.
S10 H10** 1 in.
S15 H15**
1‑1/2 in.
S20 H20** 2 in.
Linear Flow Range
Gallons/minute (GPM) 1-10 2-20 5-50 10-100 20-200
Litres/minute (LPM) 3.8-37.9 7.6-75.7 18.9-190 38-380 76-760
Maximum Flow 1
Gallons/minute (GPM) 15 30 75 150 300
Litres/minute (LPM) 56.8 113.6 284 568 1,136
Maximum Pressure Drop
in 10:1 Range
PSIG 8 6 10 4 7
bar 0.55 0.41 0.69 0.28 0.48
Frequency Range in Linear Flow Range 42-420 Hz 37-370 Hz 47-470 Hz 36-360 Hz 33-330 Hz
Connections
NPT or ISO Threads Yes Yes Yes Yes Yes
Female Yes Yes Yes Yes Yes
Inlet/Outlet Size 1/2 in. 3/4 in. 1 in. 1-1/2 in. 2 in.
Wrench Size:
Inch 1-1/16 in. 1-5/16 in. 1-5/8 in. 2-3/8 in. 3 in.
Millimeter 27 mm 33 mm 41 mm 60 mm 75 mm
Weight*
Pounds 1.0 lbs. 1.2 lbs. 1.7 lbs. 3.3 lbs. 6.1 lbs.
Kilograms 0.5 kg 0.5 kg 0.8 kg 1.5 kg 2.8 kg
* Computer electronics add 0.2 lbs. (0.1kg) to total weight.1 The meter can operate up to this flowrate without damage. Continuous operation will severely degrade meter life and performance.

13
Dimensions
920708-3 MANUALPAGE 12
A
B C
Model-SS Standard Model-SS High Pressure
Size
S05 H05** 1/2 in.
S07 H07** 3/4 in.
S10 H10** 1 in.
S15 H15**
1‑1/2 in.
S20 H20** 2 in.
A = Height:
Inches 1.4 in. 1.6 in. 1.9 in. 2.6 in. 3.1 in.
Centimeters 3.6 cm 4.1 cm 4.8 cm 6.6 cm 7.9 cm
B = Width
Inches 2.0 in. 2.0 in. 2.0 in. 2.7 in. 3.4 in.
Centimeters 5.1 cm 5.1 cm 5.1 cm 6.9 cm 8.6 cm
C = Length
Inches 4.2 in. 4.3 in. 4.5 in. 5.3 in. 6.3 in.
Centimeters 10.7 cm 10.9 cm 11.4 cm 13.5 cm 16.0 cm
Computer electronics add 0.7 in. (1.8 cm) to height of turbine

14
Performance Linear Range for 1 in.: 10:1 @ ±1.5% of reading Linear Range for 1-1/2 in. and 2 in.: 10:1 @ ±1.0% of reading Repeatability: ±0.1%Pressure Rating Flange RuleWetted Components Housing: 316 Stainless Steel Journal Bearings: Ceramic (96% Alumina) Shaft: Tungsten Carbide Rotor and Supports: PVDF Retaining Rings: 316 Stainless SteelTemperature Range -40° F to +250° F (-40° C to +121° C) These temperatures apply to operations and storage. They are only for the turbine without computer electronics. Final operational temperature range is determined by computer electronics or accessory modules.
SPECIFICATIONS – ANSI FLANGE FITTINGS
All data on Models 1 inch determined with 1 centipoise solvent test fluid at 70° F (21° C). Data on Models 1-1/2 inch and 2 inch is determined with water at 70° F (21° C).
Model Size S10F 1 in.
S15F 1‑1/2 in.
S20F 2 in.
Linear Flow Range
Gallons/minute (GPM) 5-50 10-100 20-200
Litres/minute (LPM) 18.9-190 38-380 76-760
Maximum Flow 1
Gallons/minute (GPM) 75 150 300
Litres/minute (LPM) 284 568 1,136
Maximum Pressure Drop
in 10:1 Range
PSIG 10 4 7
bar 0.69 0.28 0.48
Frequency Range in Linear Flow Range 47-470 Hz 36-360 Hz 33-330 Hz
Connections
ANSI 150 lb. Flange Yes Yes Yes
Bolt Size 1/2 in. 1/2 in. 5/8 in.
Weight*
Pounds 5.7 lbs. 10.2 lbs. 16.7 lbs.
Kilograms 2.6 kg 4.6 kg 7.6 kg
* Computer electronics add 0.2 lbs. (0.1kg) to total weight.1 The meter can operate up to this flowrate without damage. Continuous operation will severely degrade meter life and performance.

15
Dimensions
Model Size S10F 1 in.
S15F 1‑1/2 in.
S20F 2 in.
A = Height:
Inches 6.75 in. 8.00 in. 9.50 in.
Centimeters 17.14 cm 20.32 cm 24.13 cm
B = Width
Inches 4.25 in. 5.00 in. 6.00 in.
Centimeters 10.80 cm 12.71 cm 15.24 cm
920708-3 MANUALPAGE 16
A
B

16
SPECIFICATIONS – TRI-CLOVER® FLANGE FITTINGS
All data on Models 1/2 inch, 3/4 inch, and 1 inch determined with 1 centipoise solvent test fluid at 70° F (21° C). Data on Models 1-1/2 inch and 2 inch is determined with water at 70° F (21° C). Size refers to the size of the turbine, not the body ferrule. Refer to dimension chart for detail sizes.
Performance Linear Range for 1/2 in.: 10:1 @ ±2.0% of reading Linear Range for 3/4 in. and 1 in.: 10:1 @ ±1.5% of reading Linear Range for 1-1/2 in. and 2 in.: 10:1 @ ±1.0% of reading Repeatability: ±0.1%Pressure Rating 450 PSIG (31 bar) @ 70° F with Type 1 Buna-N GasketWetted Components Housing: 316 Stainless Steel Journal Bearings: Ceramic (96% Alumina) Shaft: Tungsten Carbide Rotor and Supports: PVDF Retaining Rings: 316 Stainless SteelTemperature Range -40° F to +250° F (-40° C to +121° C) These temperatures apply to operations and storage. They are only for the turbine without computer electronics. Final operational temperature range is determined by computer electronics or accessory modules.
Model Size S05T 1/2 in.
S07T 3/4 in.
S10T 1 in.
S15T 1‑1/2 in.
S20T 2 in.
Linear Flow Range
Gallons/minute (GPM) 1-10 2-20 5-50 10-100 20-200
Litres/minute (LPM) 3.8-37.9 7.6-75.7 18.9-190 38-380 76-760
Maximum Flow 1
Gallons/minute (GPM) 15 30 75 150 300
Litres/minute (LPM) 56.8 113.6 284 568 1,136
Maximum Pressure Drop
in 10:1 Range
PSIG 8 7.5 5 4 4
bar 0.55 0.52 0.34 0.28 0.28
Frequency Range in Linear Flow Range 45-450 Hz 37-370 Hz 45-475 Hz 35-350 Hz 33-330 Hz
Connections
Inlet/Outlet Size 1/2 in. 3/4 in. 1 in. 1-1/2 in. 2 in.
Fitting Clamp Size 3/4 in. 1 in. 1-1/2 in. 2 in. 2-1/2 in.
Weight*
Pounds 1.1 lbs. 1.6 lbs. 2.1 lbs. 3.9 lbs. 5.7 lbs.
Kilograms 0.5 kg 0.7 kg 1.0 kg 1.8 kg 2.6 kg
* Computer electronics add 0.2 lbs. (0.1kg) to total weight.1 The meter can operate up to this flowrate without damage. Continuous operation will severely degrade meter life and performance.

17
Dimensions
Model Size S05T 1/2 in.
S07T 3/4 in.
S10T 1 in.
S15T 1‑1/2 in.
S20T 2 in.
A = Height:
Inches 1.4 in. 2.0 in. 2.0 in. 2.6 in. 3.1 in.
Centimeters 3.6 cm 5.1 cm 5.1 cm 6.6 cm 7.9 cm
B = Width
Inches 2.0 in. 2.0 in. 2.0 in. 2.7 in. 3.4 in.
Centimeters 5.1 cm 5.1 cm 5.1 cm 6.9 cm 8.6 cm
C = Length
Inches 5.0 in. 5.0 in. 5.5 in. 6.5 in. 7.0 in.
Centimeters 12.71 cm 12.71 cm 13.97 cm 16.51 cm 17.78 cm
D = Outside Dia. ‑ Ferrule
Inches .75 in. 1.00 in. 1.50in. 2.00 in. 2.50 in.
Centimeters 1.90 cm 2.54 cm 3.81 cm 5.08 cm 6.35 cm
Fitting / Clamp Size 3/4 in. 1 in. 1-1/2 in. 2 in. 2-1/2 in.
Computer electronics add 0.7 in. (1.8 cm) to height of turbine
920708-3 MANUALPAGE 20
A
CBD

18
ILLUSTRATED INTERNAL PARTS DRAWING
920708-3 MANUALPAGE 21 PARTS LIST
1
2
2
Internal parts shown below are used in all G2 industrial Grade turbine housings covered by this manual (Threaded housing shown).
Item No. Part No. Description No.
Reqd.
1
125500-1“05” 1/2-inch Rotor/Support Replacement Kit (includes rotor assembly, support assembly & retaining rings)
1
125500-2“07” 3/4-inch Rotor/Support Replacement Kit (includes rotor assembly, support assembly & retaining rings)
1
125500-3“10” 1-inch Rotor/Support Replacement Kit (includes rotor assembly, support assembly & retaining rings)
1
125500-4“15” 1-1/2-inch Rotor/Support Replacement Kit (includes rotor assembly, support assembly & retaining rings)
1
125500-5“20” 2-inch Rotor/Support Replacement Kit (includes rotor assembly, support assembly & retaining rings)
1
2
904005-20 904005-20904005-20904005-20904005-20
“05” 1/2-inch Retaining Ring“07” 3/4-inch Retaining Ring“10” 1-inch Retaining Ring“15” 1-1/2-inch Retaining Ring“20” 2-inch Retaining Ring
22222

19
ILLUSTRATED PARTS DRAWING (ANSI FLANGE)
Item No. Part No. Description No.
Reqd.
1
125505-01Flange Gasket Kit - 2 Gaskets(1 in. Neoprene)
1
125504-01Flange Gasket Kit - 2 Gaskets(1 in. FKM)
1
125505-02Flange Gasket Kit - 2 Gaskets(1-1/2 in. Neoprene)
1
125504-02Flange Gasket Kit - 2 Gaskets(1-1/2 in. FKM)
1
125505-03Flange Gasket Kit - 2 Gaskets(2 in. Neoprene)
1
125504-03Flange Gasket Kit - 2 Gaskets(2 in. FKM)
1
920708-3 MANUALPAGE 22, ILL. PTS LIST ANSI FLANGE
1

20
ILLUSTRATED PARTS DRAWING (ANSI FLANGE)
Item No. Part No. Description No.
Reqd.
1
901003-35 Gasket - 3/4 inch Fluoroelastomer 2
901003-36 Gasket - 1 inch Fluoroelastomer 2
901003-37 Gasket - 1-1/2 inch Fluoroelastomer 2
901003-38 Gasket - 2 inch Fluoroelastomer 2
901003-39 Gasket - 2-1/2 inch Fluoroelastomer 2
901003-40 Gasket - 3/4 inch Nitrile 2
901003-41 Gasket - 1 inch Nitrile 2
901003-42 Gasket - 1-1/2 inch Nitrile 2
901003-43 Gasket - 2 inch Nitrile 2
901003-44 Gasket - 2-1/2 inch Nitrile 2
2
906005-49 Clamp - 3/4 inch 2
906005-50 Clamp - 1 inch 2
906005-50 Clamp - 1-1/2 inch 2
906005-51 Clamp - 2 inch 2
906005-52 Clamp - 2-1/2 inch 2
See Illustrated internal Parts Drawing for internal wetted parts.

21
SERVICEFor warranty consideration, parts, or other service information, please con-tact your local distributor. If you need further assistance, call the GPI Cus-tomer Service Department in Wichita, Kansas, during normal business hours.
1‑888‑996‑3837To obtain prompt, efficient service, always be prepared with the following information:1. The model number of your turbine.2. The serial number or manufacturing
date code of your turbine.3. Specific information about part
numbers and descriptions.For warranty work always be prepared with your original sales slip or other evidence of purchase date.
Returning PartsPlease contact the factory before re-turning any parts. It may be possible to diagnose the trouble and identify needed parts in a telephone call. GPI can also inform you of any special handling requirements you will need to follow covering the transportation and handling of equipment which has been used to transfer hazardous or flammable liquids.
Do not return turbines without specific authority from the GPI Customer Service Department. Due to strict regulations gov‑erning transportation, handling, and disposal of hazardous or flammable liquids, GPI will not accept turbines for rework unless they are completely free of liquid residue.
Turbines not flushed before ship‑ment can be refused and returned to the sender.
CAUTION
CAUTION

22
CERTIFICATIONS TABLE
TURBINE BODY ONLY:Aluminum, Brass, Stainless Steel, Stainless Steel ANSI Flange, Stainless Steel Tri-Clover® Flange
(IP65)
TURBINE BODY WITH QSB PULSE-OUT:
(IP65)
TURBINE BODY WITH QSB PULSE-OUT WITH Q09 DISPLAY:
(IP65)
TURBINE BODY WITH QSB PULSE-OUT (OR) QSB PULSE-OUT WITH Q09 DISPLAY, COUPLED WITH ANY QSI COMMUNICATIONS SUITE (VERSION 1, 2, OR 3):
(IP65)
TURBINE BODY WITH MOUNTED INDUSTRIAL GRADE Q9 COMPUTER ELECTRONICS:
FCC PART 15(IP65)

23
NOTES

920708-05 Rev-10/23/2020
Limited Warranty PolicyGreat Plains Industries, Inc. 5252 E. 36th Street North, Wichita, KS USA 67220-3205, hereby provides a limited warranty against defects in material and workmanship on all products manufactured by Great Plains Industries, Inc. This product includes a 1 year warranty. Manufacturer’s sole obligation under the foregoing warranties will be limited to either, at Manufacturer’s option, replacing or repairing defective Goods (subject to limitations hereinafter provided) or refunding the purchase price for such Goods theretofore paid by the Buyer, and Buyer’s exclusive remedy for breach of any such warranties will be enforcement of such obligations of Manufacturer. The warranty shall extend to the purchaser of this product and to any person to whom such product is transferred during the warranty period.The warranty period shall begin on the date of manufacture or on the date of purchase with an original sales receipt. This warranty shall not apply if:
A. the product has been altered or modified outside the warrantor’s duly appointed representative;
B. the product has been subjected to neglect, misuse, abuse or damage or has been installed or operated other than in accordance with the manufacturer’s operating instructions.
To make a claim against this warranty, contact the GPI Customer Service Department at 316-686-7361 or 888-996-3837. Or by mail at:
Great Plains Industries, Inc.5252 E. 36th St. North
Wichita, KS, USA 67220-3205
If you are outside North or South America contact:Great Plains Industries – Australia
1/16 Atkinson Road, Taren Point NSW 2229, Sydney, Australia
The company shall, notify the customer to either send the product, transportation prepaid, to the company at its office in Wichita, Kansas, or to a duly authorized service center. The company shall perform all obligations imposed on it by the terms of this warranty within 60 days of receipt of the defective product.GREAT PLAINS INDUSTRIES, INC., EXCLUDES LIABILITY UNDER THIS WAR-RANTY FOR DIRECT, INDIRECT, INCIDENTAL AND CONSEQUENTIAL DAMAGES INCURRED IN THE USE OR LOSS OF USE OF THE PRODUCT WARRANTED HEREUNDER.The company herewith expressly disclaims any warranty of merchantability or fitness for any particular purpose other than for which it was designed.This warranty gives you specific rights and you may also have other rights which vary from U.S. state to U.S. state.Note: In compliance with MAGNUSON MOSS CONSUMER WARRANTY ACT – Part 702 (governs the resale availability of the warranty terms).
© 2020 Great Plains Industries, Inc., All Rights Reserved.Great Plains Industries, Inc. / 888-996-3837 / FLOMECmeters.com