game flow overview this chapter contains four missions;...
TRANSCRIPT

THE DERELICTTHE ROYAL CITY OF RABANASTRE
UNITSUNITSUNITSUNITSUNITSUNITSUNITSUNITSUNITSUNITSR IT MeleeN -- W -- R --
LV. 1
ALRAUNEUNITSUNITSUNITSUNITSR IT RangedN -- W -- R --
LV. 1
SYLPHUNITSUNITSUNITSUNITSR IT FlyingN -- W -- R --
LV. 1GARCHIMACERA
OBTAINABLE ITEMSOBTAINABLE ITEMSOBTAINABLE ITEMSOBTAINABLE ITEMSClear ItemsNoneOther Items GainedNone
This chapter contains four missions; after clearing each one, you automatically start the next one. This chapter introduces the player to the use of Magick and Abilities, as well as summoning Espers.
STORY MISSION (THE ROYAL CITY OF RABANASTRE)
1-1: Eve of Adventure
IN: Kytes, Filo
OUT: Penelo
STORY MISSION (THE ROYAL CITY OF RABANASTRE)
1-2: The Coveted Derelict
STORY MISSION (THE DERELICT)1-3: The Treasure Is the Key
STORY MISSION (THE DERELICT)1-4: Unwelcome Guests
GAME FLOW OVERVIEW
1
MISSION PREREQUISITE
Clear Mission 0-2.
• Defeat all enemies!• Vaan must survive.• Defeat all enemies!• Defeat all enemies!
OBJECTIVES
LEVEL
2This chapter contains four missions; after clearing
MISSION PREREQUISITE
NIGHT IN RABANASTRE
LEADER UNITDEPLOYMENT
VAAN* KYTES* FILO*
MAX UNITS: 3 (* = Mandatory)
During the escape from the Glabados Ruins, Vaan unfortunately loses his “wings”—his new airship. Shortly after returning to Rabanastre, he spots a huge, ancient craft in the skies above the city. Vaan’s friends Kytes and Filo accompany him as he
seeks to discover the ship’s identity. The expedition leads them into an encounter with some mighty strange creatures at the city entrance.
1-1: Eve of Adventure
UNITS
PART 2:Game Basics
PART 3:The Missions
PART 1:World Guide
PART 4:Data
18
PART 1:World Guide
980-4_03.01 Walk 01.indd 18 11/12/07 8:14:20 AM

This mission illustrates how to create advantageous match-ups in combat by explaining the “Rock, Paper, Scissors” three-way relationship of unit types: Melee is strong versus ranged, ranged is strong versus fl ying, and fl ying is strong versus melee. The mission opens with each leader (Vaan, Kytes, and Filo) standing at the top of a separate staircase near a Rabanastre city gate. One enemy unit appears at the bottom of the stairs below each leader.
New Abilities Available
After completing Mission 1-1, each leader picks up a new skill. Vaan gains Dual Attack, Kytes gets the Firaga spell, and Filo acquires Sonic Wave.
UNITSUNITSR IT FlyingN -- W -- R --
LV. 1GARCHIMACERA
MISSION WALKTHROUGH
LEVEL
2NIGHT IN RABANASTRE
You can group your team and fi ght each enemy separately in a 3-vs-1 battle if you want. But the recommended way is to create three one-on-one battles, pitting each leader against the enemy unit that presents the best match-up: Vaan (melee) versus the Sylph (ranged); Kytes (ranged) versus the Garchimacera (fl ying); and Filo (fl ying) versus the Alraune (melee). After defeating these fi rst three enemies, two more of each type appear at the same locations. Fight each pair with the Leader that provides the best match-up against their type.
Summoning Gates
Ally 0
Neutral 0
Enemy 0
1
2
3
Mission Map: The Royal City of Rabanastre
Sylph
A
1 Enemy Group
Garchimacera
B
2 Enemy Group
Alraune
C
3 Enemy Group
Garchimacera x2(Appear after enemy groups A,B, and C are defeated)
B
5 Enemy Reinforcements
Start Start
Start
Sylph x2(Appear after enemy groups A,B, and C are defeated)
A
4 Enemy Reinforcements
Alraune x2(Appear after enemy groups A,B, and C are defeated)
C
6 Enemy Reinforcements
6
4
5
MAP DATA
PART 3: The Missions
19
Eve of Adventure
1-1
980-4_03.01 Walk 01.indd 19 11/12/07 8:14:54 AM

Vaan, Kytes, and Filo investigate the status of the mysterious airship, now docked at Rabanastre Southgate. Seeing that thieves have infi ltrated the ship, Vaan and crew attempt to sneak inside.
Clear Mission 1-1.
OBJECTIVES
LEVEL
3RABANASTRE SOUTHGATE
UNITSUNITSUNITSUNITSUNITSUNITSOBTAINABLE ITEMS
Clear ItemsNoneOther Items GainedNone
ALRAUNE
R IT MeleeN -- W -- R --
LV. 1 UNITSUNITSUNITSUNITSUNITSUNITSUNITSUNITSSYLPH
R IT RangedN -- W -- R --
LV. 1UNITSUNITSUNITSUNITSUNITSUNITSUNITSUNITSUNITSGARCHIMACERA
R IT FlyingN -- W -- R --
LV. 1UNITSUNITSUNITSUNITSUNITSGIZA RABBIT
R IT RangedN W -- R --
LV. 2
LEADER UNITDEPLOYMENT
VAAN* KYTES* FILO*
MAX UNITS: 3 (* = Mandatory)
• Sneak aboard the derelict airship!• All allies must survive.
1-2: The Coveted Derelict
UNITS
MISSION PREREQUISITE
PART 2:Game Basics
PART 3:The Missions
PART 1:World Guide
PART 4:Data
20
PART 1:World Guide
PART 3: The Missions
980-4_03.01 Walk 01.indd 20 11/12/07 8:15:34 AM

LEVEL
3
UNITSUNITSUNITSGIZA RABBIT
R IT RangedN W -- R --
LV. 2
Unlike 1-1, you will lose this mission if any of your Leaders fall unconscious. This mission describes how to use abilities; it also introduces Gambits and how to set them. After clearing the last mission, Vaan and his friends gained new abilities. As you approach the airship, follow the on-screen instructions on how to employ these new skills to defeat these enemies.
MISSION WALKTHROUGHFirst, have Vaan use his new Dual Attack ability to dispatch one of the pairs of Sylphs. Next, have Kytes blast the four hovering Garchimaceras with his new Firaga area-attack spell. After that, observe the short tutorial on Gambits, then use Filo’s Sonic Wave to KO the two groups of Alraunes. Finally, head for the airship’s entrance.
Get the Bunny Cure
The Giza Rabbits in the lower-left of the map are not enemies; in fact, they will heal any friendly unit who gets close to them.
Summoning Gates
Ally 0
Neutral 0
Enemy 02
3
Mission Map: The Royal City of Rabanastre, Rabanastre Southgate
Garchimacera x4
A
2 Enemy Group
Alraune x3
B
3 Enemy Group
Sylph x2(Appear as you approach this point.)
A
1 Enemy Reinforcements
Start
Alraune x2
C
4 Enemy Group
Giza Rabbit x2
5 Other Units
5
1
4
MAP DATA
PART 3: The Missions
21
1-2The Coveted
Derelict
980-4_03.01 Walk 01.indd 21 11/12/07 8:16:08 AM

Clear Mission 1-2.
• Reach the summoning gate!• Open the summoning gate!• Summon three Espers!• Defeat all enemies!• All allies must survive.
• Reach the summoning gate!
OBJECTIVES
LEVEL
4ABOARD THE DERELICT
UNITSUNITSUNITSUNITSUNITSUNITSUNITSUNITSUNITS
ALRAUNE
R IT MeleeN -- W -- R --
LV. 1 UNITSUNITSUNITSUNITSUNITSUNITSUNITSUNITSSYLPH
R IT RangedN -- W -- R --
LV. 1UNITSUNITSUNITSUNITSUNITSGARCHIMACERA
R IT FlyingN -- W -- R --
LV. 1
LEADER UNITDEPLOYMENT
VAAN* KYTES* FILO*
MAX UNITS: 3 (* = Mandatory)
Summoning Gates
Ally 0
Neutral 0
Enemy 1
1
2
3
Mission Map: Aboard The Derelict
Garchimacera x2
A
1 Enemy Group
Alraune x2
B
2 Enemy Group
Sylph x2
C
3 Enemy Group
OBTAINABLE ITEMSOBTAINABLE ITEMSOBTAINABLE ITEMSClear ItemsNoneOther Items GainedNone
Garchimacera x3(Appear after you summon three Espers)
A
4 Enemy Reinforcements
Sylph x3(Appear after you summon three Espers)
B
5 Enemy Reinforcements
Start
4
5
MAP DATA
Moving through the abandoned Derelict, Vaan, Kytes, and Filo reach a deck where a large stone statue sits in a wall alcove. Another mysterious platform lies before it, then hostile creatures start pouring out of it!
MISSION PREREQUISITE
1-3: The Treasure Is The Key
PART 2:Game Basics
PART 3:The Missions
PART 1:World Guide
PART 4:Data
22
PART 1:World Guide
PART 3: The Missions
980-4_03.01 Walk 01.indd 22 11/12/07 8:16:41 AM
LEVEL
4
UNITSUNITS
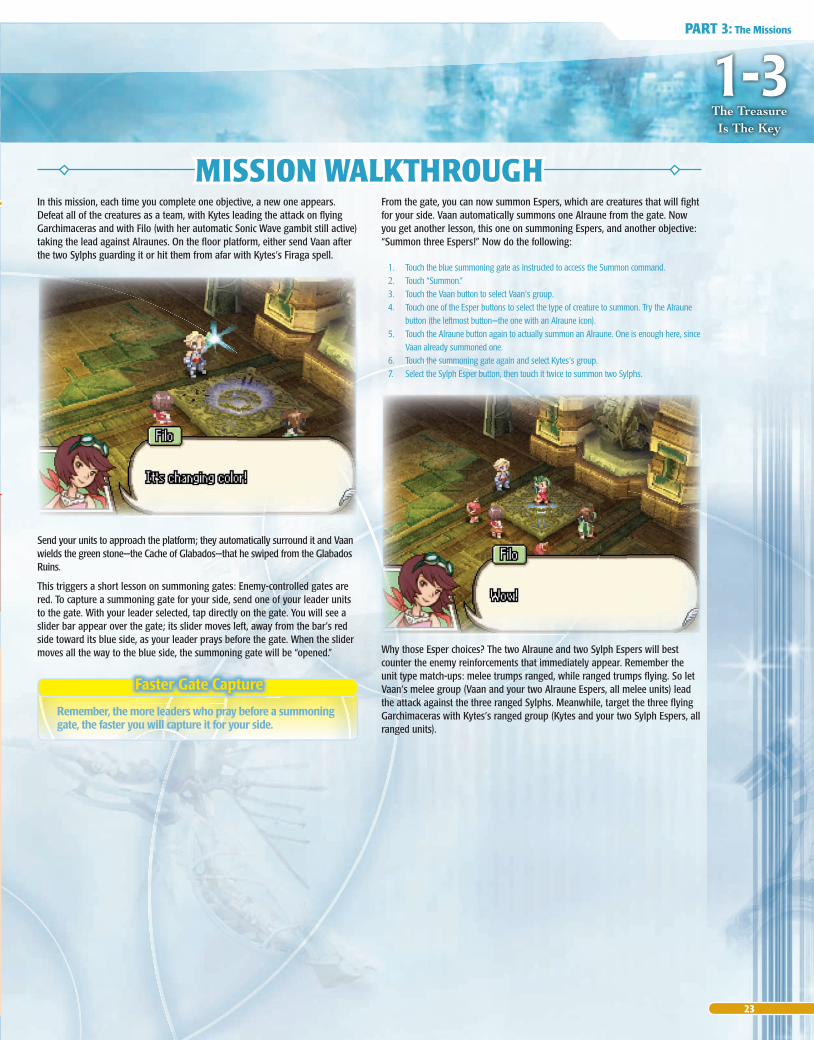
In this mission, each time you complete one objective, a new one appears. Defeat all of the creatures as a team, with Kytes leading the attack on fl ying Garchimaceras and with Filo (with her automatic Sonic Wave gambit still active) taking the lead against Alraunes. On the fl oor platform, either send Vaan after the two Sylphs guarding it or hit them from afar with Kytes’s Firaga spell.
Send your units to approach the platform; they automatically surround it and Vaan wields the green stone—the Cache of Glabados—that he swiped from the Glabados Ruins.
This triggers a short lesson on summoning gates: Enemy-controlled gates are red. To capture a summoning gate for your side, send one of your leader units to the gate. With your leader selected, tap directly on the gate. You will see a slider bar appear over the gate; its slider moves left, away from the bar’s red side toward its blue side, as your leader prays before the gate. When the slider moves all the way to the blue side, the summoning gate will be “opened.”
MISSION WALKTHROUGH
Faster Gate Capture
Remember, the more leaders who pray before a summoning gate, the faster you will capture it for your side.
From the gate, you can now summon Espers, which are creatures that will fi ght for your side. Vaan automatically summons one Alraune from the gate. Now you get another lesson, this one on summoning Espers, and another objective: “Summon three Espers!” Now do the following:
1. Touch the blue summoning gate as instructed to access the Summon command. 2. Touch “Summon.” 3. Touch the Vaan button to select Vaan’s group. 4. Touch one of the Esper buttons to select the type of creature to summon. Try the Alraune
button (the leftmost button—the one with an Alraune icon). 5. Touch the Alraune button again to actually summon an Alraune. One is enough here, since
Vaan already summoned one. 6. Touch the summoning gate again and select Kytes’s group. 7. Select the Sylph Esper button, then touch it twice to summon two Sylphs.
Why those Esper choices? The two Alraune and two Sylph Espers will best counter the enemy reinforcements that immediately appear. Remember the unit type match-ups: melee trumps ranged, while ranged trumps fl ying. So let Vaan’s melee group (Vaan and your two Alraune Espers, all melee units) lead the attack against the three ranged Sylphs. Meanwhile, target the three fl ying Garchimaceras with Kytes’s ranged group (Kytes and your two Sylph Espers, all ranged units).
PART 3: The Missions
23
1-3The Treasure Is The Key
980-4_03.01 Walk 01.indd 23 11/12/07 8:17:20 AM

OBJECTIVES
• Defeat Ba’Gamnan, Bwagi, Rinok, and Gijuk!• Vaan must survive.
Clear Mission 1-3.
LEVEL
5ABOARD THE DERELICT
UNITSUNITSUNITSUNITSUNITSUNITSUNITSUNITSOBTAINABLE ITEMS
Clear ItemsNoneOther Items GainedNone
BA’GAMNAN
R LeaderT MeleeN -- W -- R --
LV. 5 UNITSUNITSUNITSUNITSUNITSUNITSUNITSUNITSUNITSUNITSUNITSUNITSUNITSUNITSBWAGI
R LeaderT MeleeN -- W -- R --
LV. 3UNITSUNITSUNITSUNITSUNITSUNITSUNITSUNITSUNITSUNITSUNITSUNITSUNITSUNITSUNITSGIJUK
R LeaderT RangedN -- W -- R --
LV. 3UNITSUNITSUNITSUNITSUNITSRINOK
R LeaderT MeleeN -- W -- R --
LV. 3
LEADER UNITDEPLOYMENT
VAAN* KYTES* FILO*
MAX UNITS: 3 (* = Mandatory)
Penelo and Tomaj arrive outside the Derelict and fi nd a fallen guard. Meanwhile Vaan, Kytes, and Filo reach the Derelict’s bridge, where the intruders appear. They turn out to be Ba’Gamnan’s gang. (If you played the original Final Fantasy XII, you will remember Ba’Gamnan as the Bangaa bounty hunter.) Vaan and crew retreat to the lower deck, where they must summon Espers to stand against Ba’Gamnan and his tough, hardened thieves.
MISSION PREREQUISITE
1-4: Unwelcome Guests
UNITS
PART 2:Game Basics
PART 3:The Missions
PART 1:World Guide
PART 4:Data
24
PART 1:World Guide
PART 3: The Missions
980-4_03.01 Walk 01.indd 24 11/12/07 8:18:00 AM

LEVEL
5
UNITSUNITSUNITSRINOK
R LeaderT MeleeN -- W -- R --
LV. 3
Once the battle starts, the members of Ba’Gamnan’s Bangaa group approach one at a time, roughly 15 seconds apart. Gijuk is a ranged unit and sets up from the south, but the other three are all melee-type units. Your initial Affi nity is limited, so as the mission starts, summon one fl ying Garchimacera, which is strong against melee units. Next, draw a selection box around all of your allies and fi ght each Bangaa with your entire force as he/she approaches, defeating them one by one. When one Bangaa falls, move to the next target.
MISSION WALKTHROUGH
Set Up by the Gate
Draw enemies closer to the summoning gate so that when you summon new Esper reinforcements, they can get in the fi ght quickly.
Keep calling new Garchimaceras from the summoning gate as your Esper allies fall. Ba’Gamnan comes last, and he’s the toughest. If Vaan is low on health, pull him back behind the others and keep summoning new Espers! When the last foe drops, Bwagi, Rinok, and Gijuk fl ee, leaving their unconscious leader Ba’Gamnan behind. And then the great Derelict awakens…
Summoning Gates
Ally 0
Neutral 0
Enemy 0
1
2
4
3
Mission Map: The Derelict
Gijuk
A
1 Enemy Group
Rinok
B
2 Enemy Group
Bwagi
C
3 Enemy Group
Ba’Gamnan
D
4 Enemy Group
MAP DATA
Start
PART 3: The Missions
25
1-4Unwelcome
Guests
980-4_03.01 Walk 01.indd 25 11/12/07 8:18:38 AM