gamma 100p, 100a gamma gth3 pfa/sfa/xfa gamma - …• auto-darkening filter sa 60 (sfa, 100a) •...
TRANSCRIPT
Operating manual
Operating manual – Brugsanvisning – Gebrauchsanweisung – Manual de instrucciones – Käyttöohje – Manuel d’utilisation – Manuale d’uso – Gebruiksaanwijzing – Bruksanvisning – Instrukcja obsługi – Manual de utilização – Инструкции по эксплуатации – Bruksanvisning – 操作手册
Gamma 100P, 100A
Gamma GTH3 PFA/SFA/XFA
Gamma GTH3 PFA/SFA AIRLINE
1920
680
1908
© Kemppi Oy 2019
1
3
2
1110
14 15
1617
18
1A
1
B
19
SFA / 100A
XFA
LOW BATTERY
14 15
161718
1
19
14 15
161718
1
1
9B
B
1A
2
16
18
17
14
15
Gamma
CR2450
3
3
2
14
4
5
© Kemppi Oy 2019
76
2121
~ 15 mm
9
12
10
8
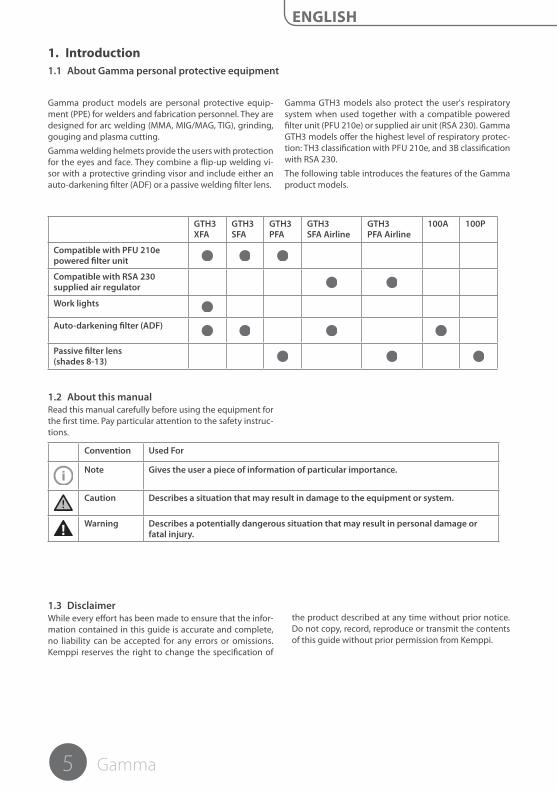
5 Gamma
GTH3 XFA
GTH3 SFA
GTH3 PFA
GTH3 SFA Airline
GTH3 PFA Airline
100A 100P
Compatible with PFU 210epowered filter unit
Compatible with RSA 230supplied air regulator
Work lights
Auto-darkening filter (ADF)
Passive filter lens(shades 8-13)
1.2 About this manualRead this manual carefully before using the equipment for the first time. Pay particular attention to the safety instruc-tions.
Convention Used For
Note Gives the user a piece of information of particular importance.
Caution Describes a situation that may result in damage to the equipment or system.
Warning Describes a potentially dangerous situation that may result in personal damage or fatal injury.
Gamma product models are personal protective equip-ment (PPE) for welders and fabrication personnel. They are designed for arc welding (MMA, MIG/MAG, TIG), grinding, gouging and plasma cutting.
Gamma welding helmets provide the users with protection for the eyes and face. They combine a flip-up welding vi-sor with a protective grinding visor and include either an auto-darkening filter (ADF) or a passive welding filter lens.
1.3 DisclaimerWhile every effort has been made to ensure that the infor-mation contained in this guide is accurate and complete, no liability can be accepted for any errors or omissions. Kemppi reserves the right to change the specification of
Gamma GTH3 models also protect the user's respiratory system when used together with a compatible powered filter unit (PFU 210e) or supplied air unit (RSA 230). Gamma GTH3 models offer the highest level of respiratory protec-tion: TH3 classification with PFU 210e, and 3B classification with RSA 230.
The following table introduces the features of the Gamma product models.
the product described at any time without prior notice. Do not copy, record, reproduce or transmit the contents of this guide without prior permission from Kemppi.
1. Introduction1.1 About Gamma personal protective equipment
ENGLISH
6 © Kemppi Oy 2019
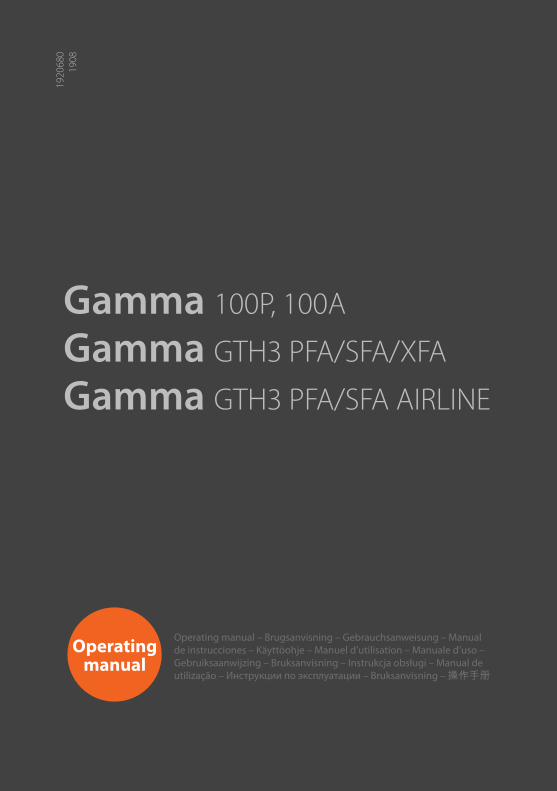
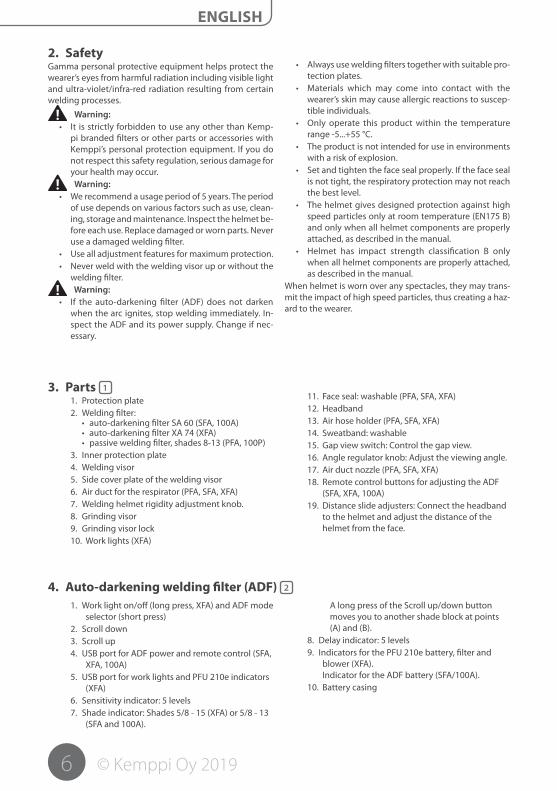
3. Parts 11. Protection plate2. Welding filter:
• auto-darkening filter SA 60 (SFA, 100A) • auto-darkening filter XA 74 (XFA)• passive welding filter, shades 8-13 (PFA, 100P)
3. Inner protection plate4. Welding visor5. Side cover plate of the welding visor6. Air duct for the respirator (PFA, SFA, XFA)7. Welding helmet rigidity adjustment knob.8. Grinding visor9. Grinding visor lock10. Work lights (XFA)
11. Face seal: washable (PFA, SFA, XFA)12. Headband13. Air hose holder (PFA, SFA, XFA)14. Sweatband: washable15. Gap view switch: Control the gap view.16. Angle regulator knob: Adjust the viewing angle.17. Air duct nozzle (PFA, SFA, XFA)18. Remote control buttons for adjusting the ADF
(SFA, XFA, 100A)19. Distance slide adjusters: Connect the headband
to the helmet and adjust the distance of the helmet from the face.
2. SafetyGamma personal protective equipment helps protect the wearer’s eyes from harmful radiation including visible light and ultra-violet/infra-red radiation resulting from certain welding processes.
Warning:• It is strictly forbidden to use any other than Kemp-
pi branded filters or other parts or accessories with Kemppi’s personal protection equipment. If you do not respect this safety regulation, serious damage for your health may occur.Warning:
• We recommend a usage period of 5 years. The period of use depends on various factors such as use, clean-ing, storage and maintenance. Inspect the helmet be-fore each use. Replace damaged or worn parts. Never use a damaged welding filter.
• Use all adjustment features for maximum protection.• Never weld with the welding visor up or without the
welding filter.Warning:
• If the auto-darkening filter (ADF) does not darken when the arc ignites, stop welding immediately. In-spect the ADF and its power supply. Change if nec-essary.
• Always use welding filters together with suitable pro-tection plates.
• Materials which may come into contact with the wearer’s skin may cause allergic reactions to suscep-tible individuals.
• Only operate this product within the temperature range -5...+55 °C.
• The product is not intended for use in environments with a risk of explosion.
• Set and tighten the face seal properly. If the face seal is not tight, the respiratory protection may not reach the best level.
• The helmet gives designed protection against high speed particles only at room temperature (EN175 B) and only when all helmet components are properly attached, as described in the manual.
• Helmet has impact strength classification B only when all helmet components are properly attached, as described in the manual.
When helmet is worn over any spectacles, they may trans-mit the impact of high speed particles, thus creating a haz-ard to the wearer.
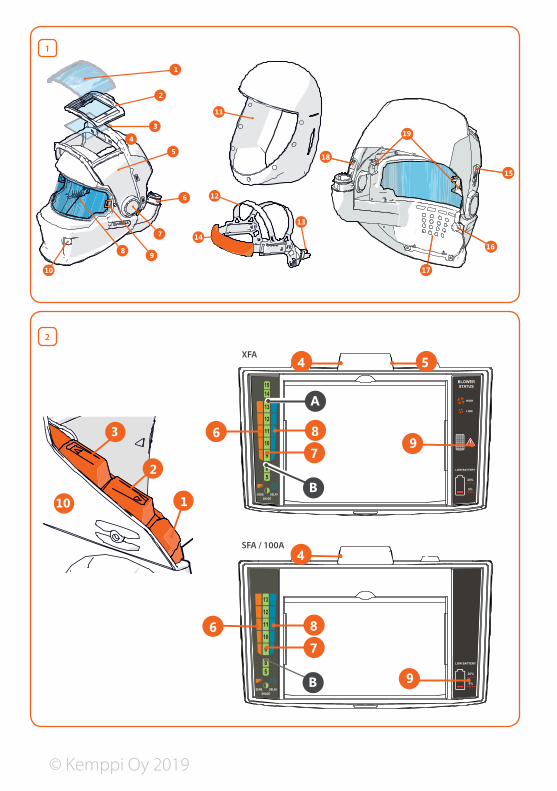
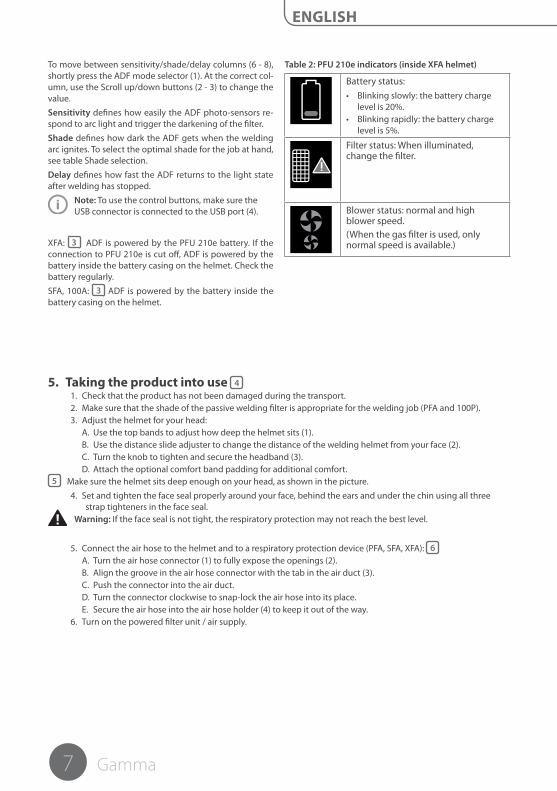
1. Work light on/off (long press, XFA) and ADF mode selector (short press)
2. Scroll down3. Scroll up4. USB port for ADF power and remote control (SFA,
XFA, 100A)5. USB port for work lights and PFU 210e indicators
(XFA)6. Sensitivity indicator: 5 levels7. Shade indicator: Shades 5/8 - 15 (XFA) or 5/8 - 13
(SFA and 100A).
A long press of the Scroll up/down button moves you to another shade block at points (A) and (B).
8. Delay indicator: 5 levels9. Indicators for the PFU 210e battery, filter and
blower (XFA). Indicator for the ADF battery (SFA/100A).
10. Battery casing
4. Auto-darkening welding filter (ADF) 2
ENGLISH
7 Gamma
To move between sensitivity/shade/delay columns (6 - 8), shortly press the ADF mode selector (1). At the correct col-umn, use the Scroll up/down buttons (2 - 3) to change the value.
Sensitivity defines how easily the ADF photo-sensors re-spond to arc light and trigger the darkening of the filter.
Shade defines how dark the ADF gets when the welding arc ignites. To select the optimal shade for the job at hand, see table Shade selection.
Delay defines how fast the ADF returns to the light state after welding has stopped.
Note: To use the control buttons, make sure the USB connector is connected to the USB port (4).
XFA: 3 ADF is powered by the PFU 210e battery. If the connection to PFU 210e is cut off, ADF is powered by the battery inside the battery casing on the helmet. Check the battery regularly.
SFA, 100A: 3 ADF is powered by the battery inside the battery casing on the helmet.
Table 2: PFU 210e indicators (inside XFA helmet)
Battery status:• Blinking slowly: the battery charge
level is 20%.• Blinking rapidly: the battery charge
level is 5%.
Filter status: When illuminated, change the filter.
Blower status: normal and high blower speed.(When the gas filter is used, only normal speed is available.)
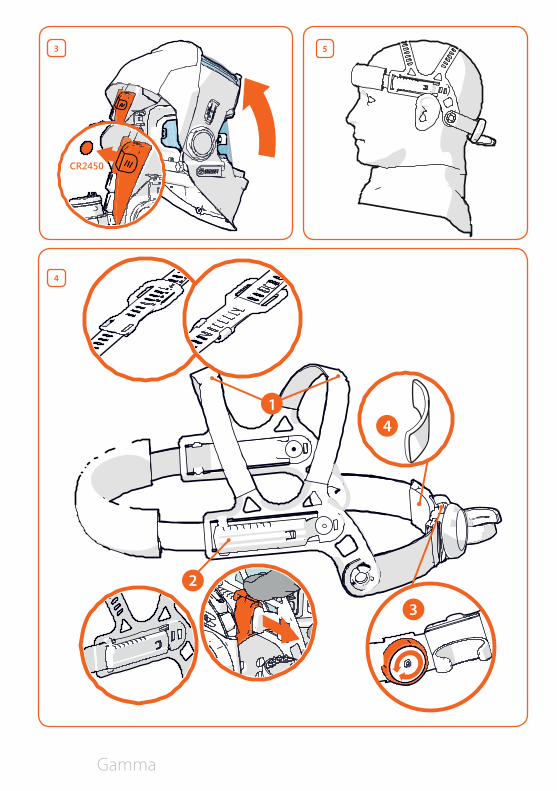
5. Taking the product into use 4 1. Check that the product has not been damaged during the transport.2. Make sure that the shade of the passive welding filter is appropriate for the welding job (PFA and 100P).3. Adjust the helmet for your head:
A. Use the top bands to adjust how deep the helmet sits (1).B. Use the distance slide adjuster to change the distance of the welding helmet from your face (2).C. Turn the knob to tighten and secure the headband (3).D. Attach the optional comfort band padding for additional comfort.
5 Make sure the helmet sits deep enough on your head, as shown in the picture.
4. Set and tighten the face seal properly around your face, behind the ears and under the chin using all three strap tighteners in the face seal.
Warning: If the face seal is not tight, the respiratory protection may not reach the best level.
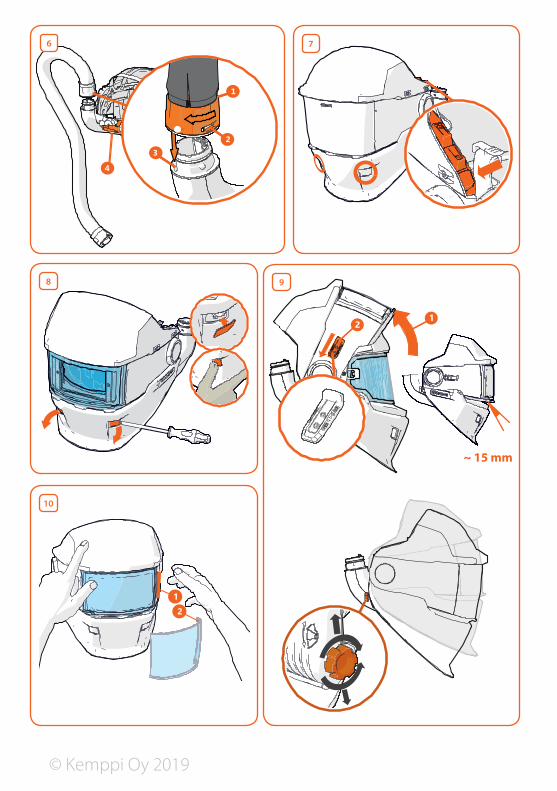
5. Connect the air hose to the helmet and to a respiratory protection device (PFA, SFA, XFA): 6 A. Turn the air hose connector (1) to fully expose the openings (2).B. Align the groove in the air hose connector with the tab in the air duct (3).C. Push the connector into the air duct.D. Turn the connector clockwise to snap-lock the air hose into its place.E. Secure the air hose into the air hose holder (4) to keep it out of the way.
6. Turn on the powered filter unit / air supply.
ENGLISH
8 © Kemppi Oy 2019
6.1 Work lights 7Gamma GTH3 XFA has LED work lights that are powered by the PFU 210e battery. Press and hold the work light remote control button until the light turns on.
Note: Make sure both USB connectors are con-nected.
To replace worn protective lenses on the work lights: 8
1. Remove the worn protective lenses with a screwdriver.
2. Insert the new protective lenses, starting from the outer edge.
Note: Note that the left and right protective lenses are slightly different in shape.
6.2 Gap view 91. Lift the welding visor up.2. Push the gap view adjuster to OPEN position
(towards the visor knob).
6.3 Adjusting the viewing angle 9Turn the viewing angle adjuster to tilt the viewing angle upwards or downwards.
Tip: When adjusting the helmet upwards, support the hel-met with the other hand.
6. Using the helmet features
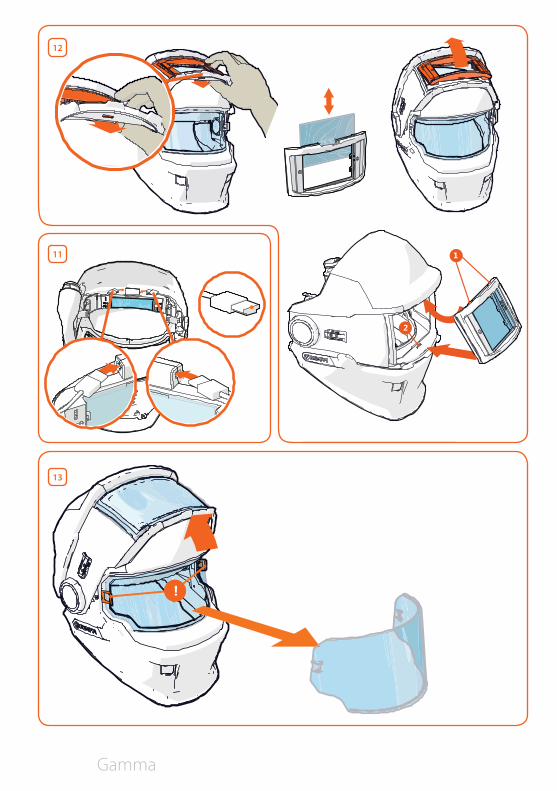
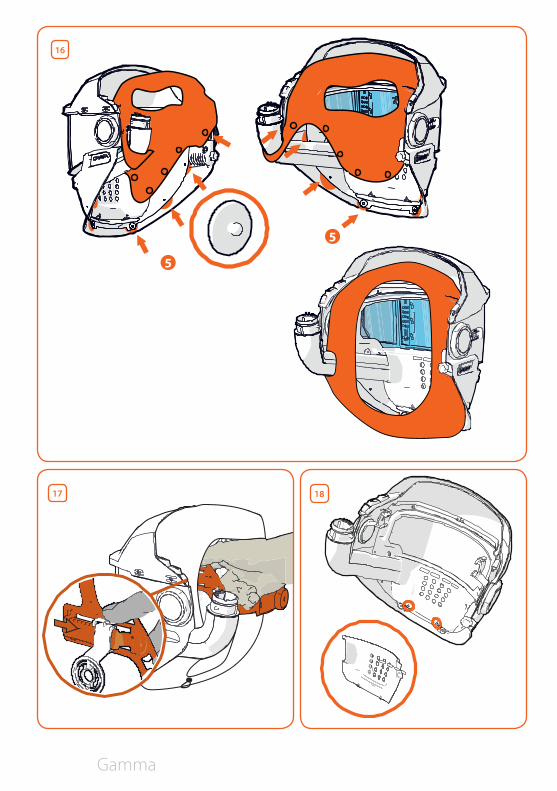
7. Replacing parts
To replace the outer protection plate: 10 1. Use the grooves on the sides to pull the plate out.2. To insert a new plate, push at the corners to
snap-lock the corner grooves into place.
Before removing the welding filter cassette: 11 Before removing the welding filter cassette, detach the USB connector(s): either two (XFA), or one on the left (SFA, 100A).
Note: When inserting the USB connector, the wider side goes up.
Caution: Do not connect the USB connector to any other device.
To replace the welding filter cassette: 12 1. Remove the cassette by pressing the tab behind
the lower edge of the cassette, and then push-ing the cassette forward.
2. Change the passive welding filter inside the cassette if you need a different shade value (PFA, 100P).
3. Insert the cassette by first pushing the upper edge tabs (1) into place, then the lower edge into its groove (2).
To replace the grinding visor: 13 1. Pull the grinding visor locks slightly outwards,
and pull the visor out.2. To insert the visor, align the grooves in the visor
with the visor locks, and snap the visor into its place.
Note: Make sure both sides snap into their place.
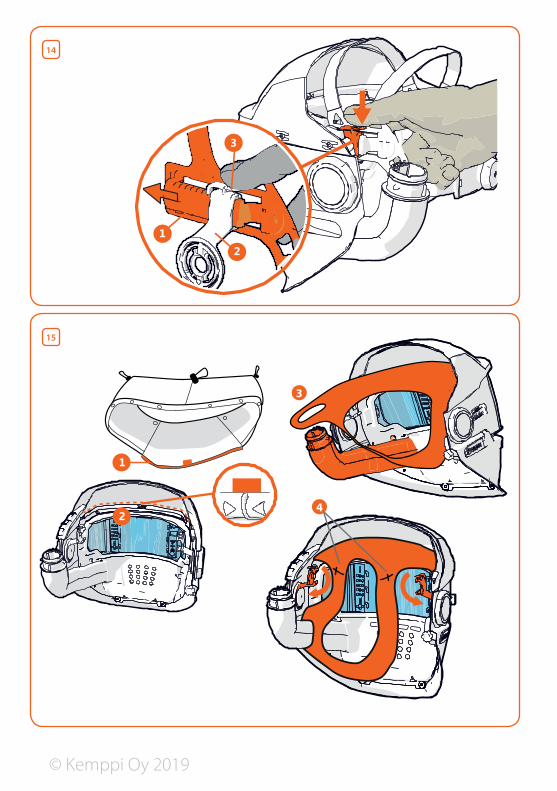
To remove the headband: 14 1. Press and hold down the slide adjuster button (3).2. Push the headband connector (1) forwards, out
of the distance slide adjuster (2).
To replace the face seal: 15-161. Remove the headband.2. Open the face seal snap fasteners (5).3. To remove the face seal, slide the face seal's top
sealing strip (1) out of the groove on the inside of the helmet (2) and remove the face seal.
4. To attach the face seal back, slide the face seal's top sealing strip (1) back into the groove on the inside of the helmet (2). Make sure the face seal is positioned in the middle.
5. Pass the distance slide adjusters and the air duct through the openings in the face seal (3, 4).
6. Secure the face seal in place with the snap fasteners (5).
7. Attach the headband back in place.
To attach the headband: 17 1. Bring the headband connector in front of the
distance slide adjuster.2. Press down the slide adjuster button while
pushing the headband connector through the distance slide adjuster.
3. Slide the headband connector in place so that the slide adjuster pin locks into one of the grooves in the headband connector.
4. Ensure that the welding helmet is at a convenient distance from your face and that both sides are equally positioned.
ENGLISH
9 Gamma
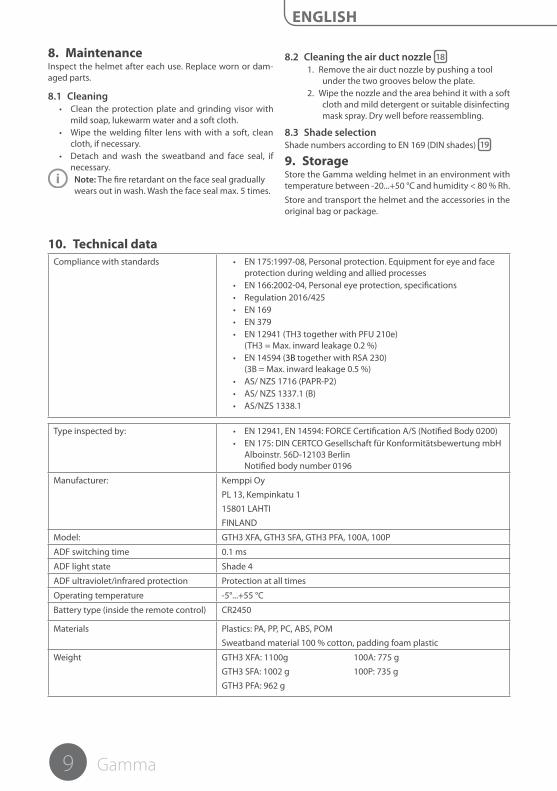
10. Technical dataCompliance with standards • EN 175:1997-08, Personal protection. Equipment for eye and face
protection during welding and allied processes • EN 166:2002-04, Personal eye protection, specifications• Regulation 2016/425• EN 169• EN 379• EN 12941 (TH3 together with PFU 210e)
(TH3 = Max. inward leakage 0.2 %)• EN 14594 (3B together with RSA 230)
(3B = Max. inward leakage 0.5 %)• AS/ NZS 1716 (PAPR-P2)• AS/ NZS 1337.1 (B)• AS/NZS 1338.1
Type inspected by: • EN 12941, EN 14594: FORCE Certification A/S (Notified Body 0200)• EN 175: DIN CERTCO Gesellschaft für Konformitätsbewertung mbH
Alboinstr. 56D-12103 Berlin Notified body number 0196
Manufacturer: Kemppi Oy
PL 13, Kempinkatu 1
15801 LAHTI
FINLAND
Model: GTH3 XFA, GTH3 SFA, GTH3 PFA, 100A, 100P
ADF switching time 0.1 ms
ADF light state Shade 4
ADF ultraviolet/infrared protection Protection at all times
Operating temperature -5°...+55 °C
Battery type (inside the remote control) CR2450
Materials Plastics: PA, PP, PC, ABS, POM
Sweatband material 100 % cotton, padding foam plastic
Weight GTH3 XFA: 1100g 100A: 775 g
GTH3 SFA: 1002 g 100P: 735 g
GTH3 PFA: 962 g
8. MaintenanceInspect the helmet after each use. Replace worn or dam-aged parts.
8.1 Cleaning• Clean the protection plate and grinding visor with
mild soap, lukewarm water and a soft cloth.• Wipe the welding filter lens with with a soft, clean
cloth, if necessary.• Detach and wash the sweatband and face seal, if
necessary.Note: The fire retardant on the face seal gradually wears out in wash. Wash the face seal max. 5 times.
8.2 Cleaning the air duct nozzle 181. Remove the air duct nozzle by pushing a tool
under the two grooves below the plate.2. Wipe the nozzle and the area behind it with a soft
cloth and mild detergent or suitable disinfecting mask spray. Dry well before reassembling.
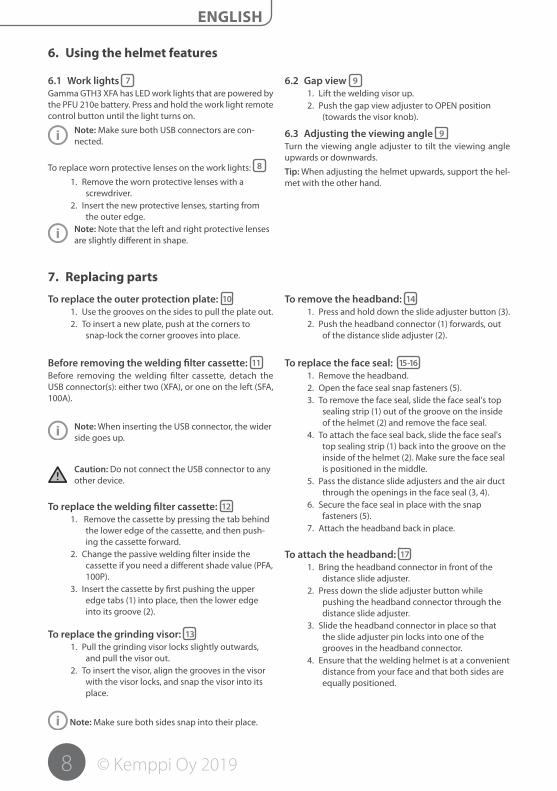
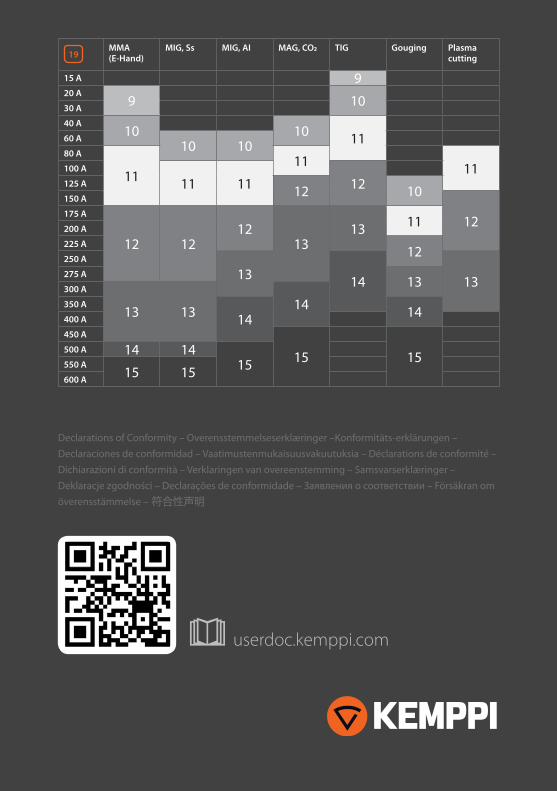
8.3 Shade selectionShade numbers according to EN 169 (DIN shades) 19
9. StorageStore the Gamma welding helmet in an environment with temperature between -20...+50 °C and humidity < 80 % Rh.
Store and transport the helmet and the accessories in the original bag or package.
ENGLISH
10 © Kemppi Oy 2019
Marking explanation of welder’s face shield:
KMP EN 175 B
Symbol Description of the field of useKMP Manufacturer’s mark
EN 175 Number of the standardB Mechanical strength
EN 175 B: Personal protection, Equipment for eye and face protection during welding and allied processes.
Symbol Type of protection Description of the field of useS Increased robustness Mechanical strength-F Low energy impact 45 m/s Mechanical strength-B Medium energy impact 120 m/s Mechanical strength
Ocular marking – EN 166
KMP Identification of the manufacturer1 Optical class (except for cover plates)
B Symbol for mechanical strengthCE CE marking (European Conformity)
11. Ordering codesPart Ordering
code
Face seal SP009794
Outside protection plate 5 pcs SP008034
Welding visor frame assembly SP007996
Visor knob assembly SP008152
Grinding visor 5 pcs SP008040
Passive welding filter, shade 8 W011254
Passive welding filter, shade 9 W011255
Passive welding filter, shade 10 W011256
Passive welding filter, shade 11 W011257
Passive welding filter, shade 12 W011258
Passive welding filter, shade 13 W011259
Welding filter frame SP009755
ADF welding filter SA 60 SP012422
Part Ordering code
ADF welding filter XA 74 SP012421
Remote control SP012097
Inside protection plate, ADF SA 60 SP012425
Inside protection plate, ADF XA 74 SP012424
Side cover plates SP012053
Headband SP009023
Sweatband 2 pcs SP9873018
Comfort band padding SP013231
Work light solid cover plate, 3 pcs SP010526
ENGLISH
Gamma
11
12
1
2
1
2
!
13
© Kemppi Oy 2019
14
15
3
4
Gamma
18
16
5
1
17
5
MMA (E-Hand)
MIG, Ss MIG, AI MAG, CO2 TIG Gouging Plasma cutting
15 A 920 A
9 1030 A
40 A10 10 1160 A
10 1080 A
1111 11100 A
11 11 12125 A12 10150 A
12175 A
12 1212
1313 11200 A
225 A12250 A
13 14 13275 A
13300 A
13 13 14350 A
14 14400 A
450 A
15 15500 A 14 14
15550 A15 15600 A
19
Declarations of Conformity – Overensstemmelseserklæringer –Konformitäts-erklärungen – Declaraciones de conformidad – Vaatimustenmukaisuusvakuutuksia – Déclarations de conformité – Dichiarazioni di conformità – Verklaringen van overeenstemming – Samsvarserklæringer – Deklaracje zgodności – Declarações de conformidade – Заявления о соответствии – Försäkran om överensstämmelse – 符合性声明
userdoc.kemppi.com