ge proficy machine edition profibus/profinetpdb2.turck.de/repo/media/_us/anlagen/g1028.pdf · ge...
TRANSCRIPT

G1028Published 8/28/2013
SART
UP
GU
IDE
GE Proficy Machine Edition Profibus/Profinet
TURCK 3000 Campus Drive Minneapolis, MN 55441 Application Support: 1-800-544-7769 Fax: (763) 553-0708 www.turck.com 1
Table of Contents
Table of Contents ................................................................................................................................................... 1 About This Guide .................................................................................................................................................... 2 Required Parts ........................................................................................................................................................ 3
Hardware .............................................................................................................................................................. 3 Software ................................................................................................................................................................ 3 Target Files ........................................................................................................................................................... 3
Setup ........................................................................................................................................................................ 4 GE Proficy Machine Edition Setup ....................................................................................................................... 4 Setting the rotary dials for Proibus ....................................................................................................................... 7 Setting the dip switches for Proifbus .................................................................................................................... 7 Setting the rotary dials for Profinet ....................................................................................................................... 8
3 Rotary Dials ................................................................................................................................................... 8 2 Rotary Dials ................................................................................................................................................... 8 Dip Switches ..................................................................................................................................................... 8
Setting the Ethernet address via the software ...................................................................................................... 9 Web Configuration ............................................................................................................................................ 9 Pactware ........................................................................................................................................................... 9 IP Addressing ................................................................................................................................................. 10
Installing GSD/GSDML files in the hardware configuration ............................................................................. 12 Adding a device onto Profibus/Profinet network .............................................................................................. 14
Adding a Profibus device onto the network ........................................................................................................ 14 Adding a Profinet device onto the network ......................................................................................................... 16
TURCK Profibus Manuals .................................................................................................................................... 21

TURCK 3000 Campus Drive Minneapolis, MN 55441 Application Support: 1-800-544-7769 Fax: (763) 553-0708 www.turck.com 2
About This Guide
This manual is intended to supplement the GE Proficy Machine Edition documentation. This document will go through a brief introduction on creating a project in the GE Proficy Software and then will focus on installing, configuring, and troubleshooting Turck Profibus / Profinet devices.
TURCK 3000 Campus Drive Minneapolis, MN 55441 Application Support: 1-800-544-7769 Fax: (763) 553-0708 www.turck.com 3
Required Parts
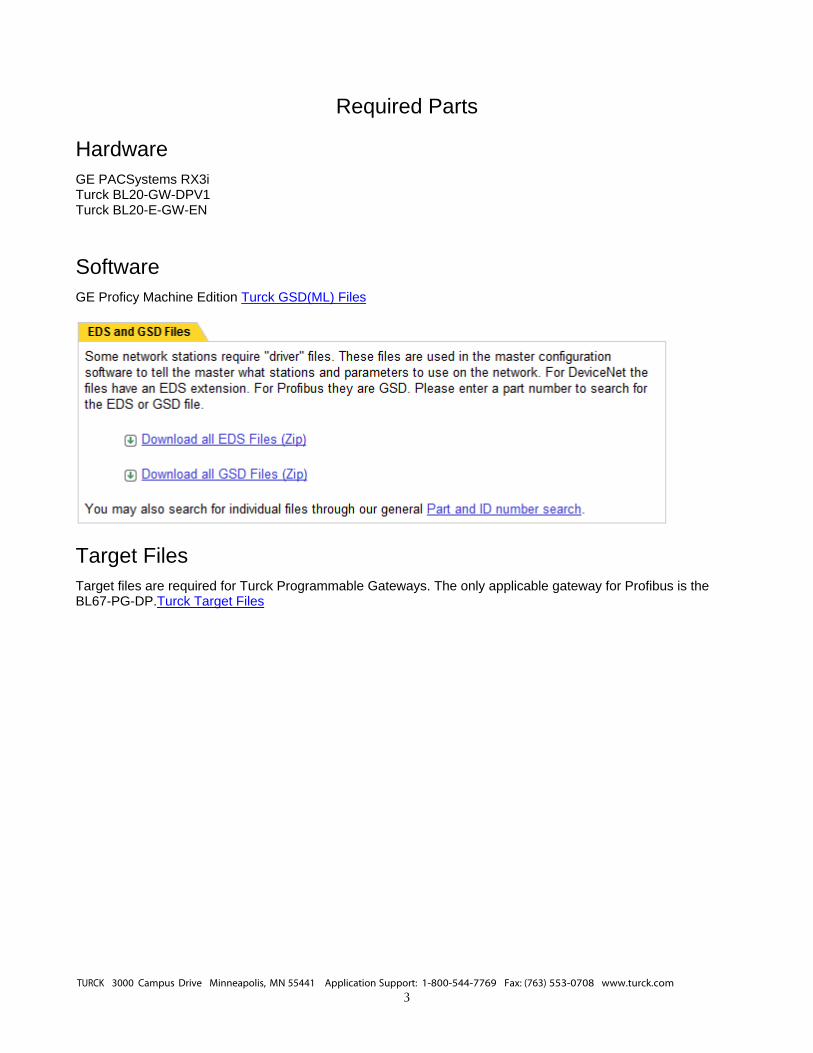
Hardware
GE PACSystems RX3i Turck BL20-GW-DPV1 Turck BL20-E-GW-EN
Software
GE Proficy Machine Edition Turck GSD(ML) Files
Target Files
Target files are required for Turck Programmable Gateways. The only applicable gateway for Profibus is the BL67-PG-DP.Turck Target Files
TURCK 3000 Campus Drive Minneapolis, MN 55441 Application Support: 1-800-544-7769 Fax: (763) 553-0708 www.turck.com 4
Setup
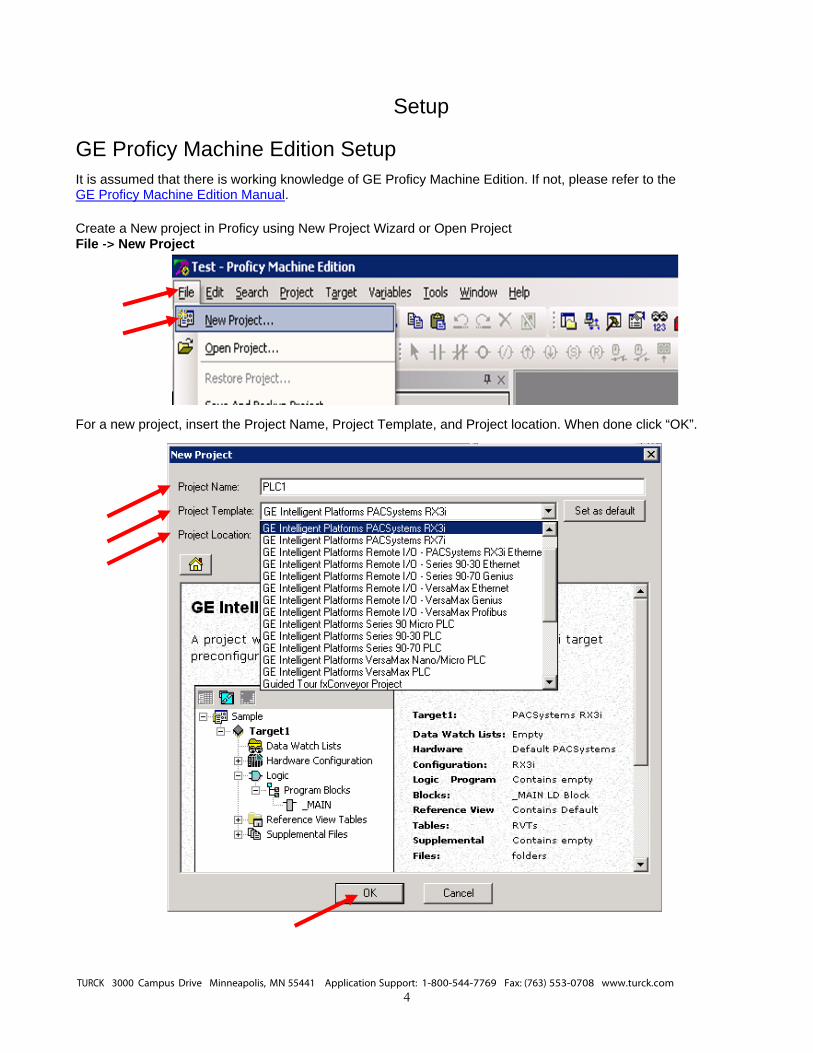
GE Proficy Machine Edition Setup
It is assumed that there is working knowledge of GE Proficy Machine Edition. If not, please refer to the GE Proficy Machine Edition Manual. Create a New project in Proficy using New Project Wizard or Open Project File ‐> New Project For a new project, insert the Project Name, Project Template, and Project location. When done click “OK”.
TURCK 3000 Campus Drive Minneapolis, MN 55441 Application Support: 1-800-544-7769 Fax: (763) 553-0708 www.turck.com 5
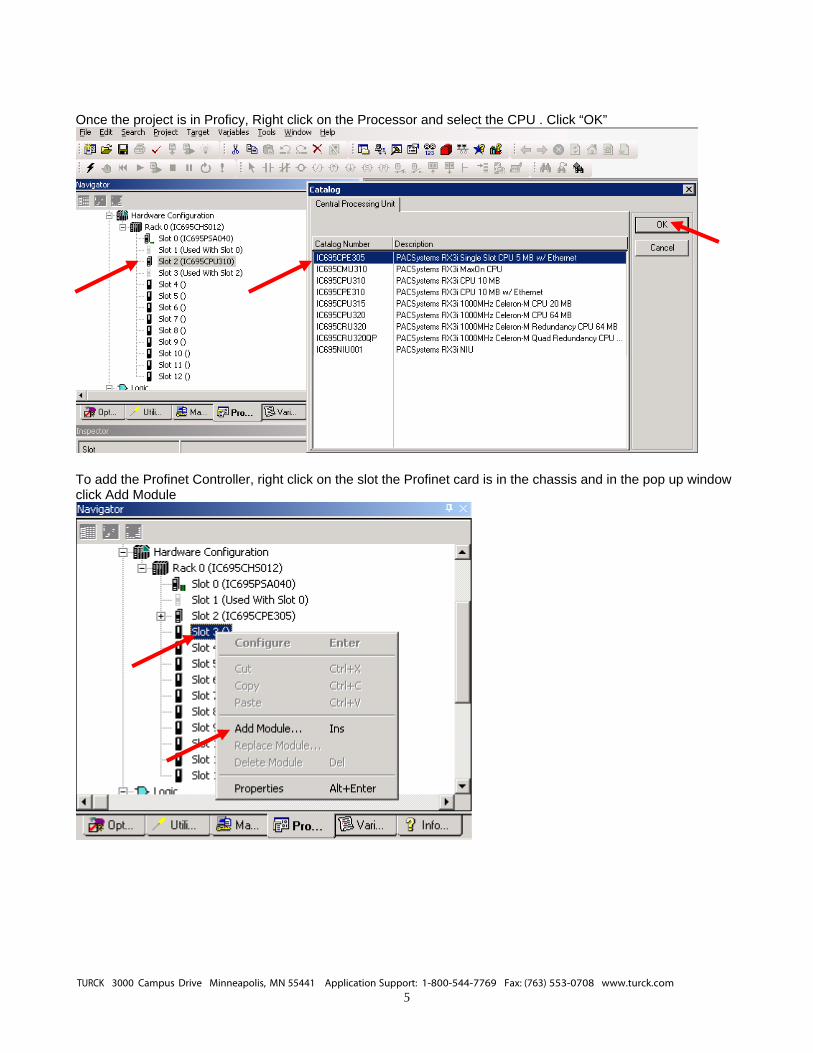
Once the project is in Proficy, Right click on the Processor and select the CPU . Click “OK”
To add the Profinet Controller, right click on the slot the Profinet card is in the chassis and in the pop up window click Add Module

TURCK 3000 Campus Drive Minneapolis, MN 55441 Application Support: 1-800-544-7769 Fax: (763) 553-0708 www.turck.com 6
In the Catalog Window, click on the Bus Controller Tab and select communication master. In our example, the RX3i Profibus Master and RX3i Profinet Controller are used. Click “OK”.
TURCK 3000 Campus Drive Minneapolis, MN 55441 Application Support: 1-800-544-7769 Fax: (763) 553-0708 www.turck.com 7
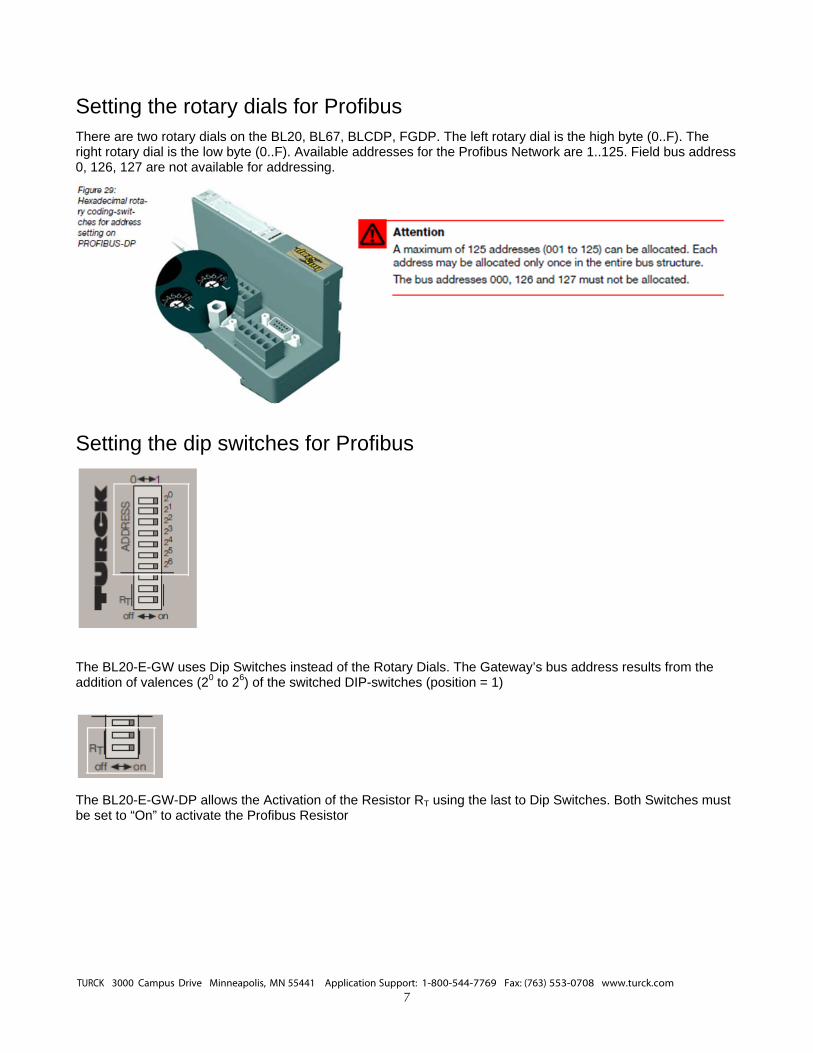
Setting the rotary dials for Profibus
There are two rotary dials on the BL20, BL67, BLCDP, FGDP. The left rotary dial is the high byte (0..F). The right rotary dial is the low byte (0..F). Available addresses for the Profibus Network are 1..125. Field bus address 0, 126, 127 are not available for addressing.
Setting the dip switches for Profibus
The BL20-E-GW uses Dip Switches instead of the Rotary Dials. The Gateway’s bus address results from the addition of valences (20 to 26) of the switched DIP-switches (position = 1)
The BL20-E-GW-DP allows the Activation of the Resistor RT using the last to Dip Switches. Both Switches must be set to “On” to activate the Profibus Resistor

TURCK 3000 Campus Drive Minneapolis, MN 55441 Application Support: 1-800-544-7769 Fax: (763) 553-0708 www.turck.com 8
Setting the rotary dials for Profinet
Depending on the Turck Product being used there are either 2 or 3 rotary dials on the gateway. The dial is used to set the last Octet of the IP address (x.x.x.1-254). The first three octets will be set through the internet explorer or Pactware or the Turck IP Address tool.
3 Rotary Dials 2 Rotary Dials Dip Switches
TURCK 3000 Campus Drive Minneapolis, MN 55441 Application Support: 1-800-544-7769 Fax: (763) 553-0708 www.turck.com 9
Setting the Ethernet address via the software
Web Configuration
To configure the IP Address using the Web Configuration, open Internet Explorer and Type in the IP address of the gateway you are connecting to.
Pactware
Pactware is a useful troubleshooting, simulating and monitoring tool for Turck gateways and I/O attached to the gateway. If Pactware is not installed, click to direct you to the Pactware I/O Assistant Software. Click on the Full to download Pactware to your computer.
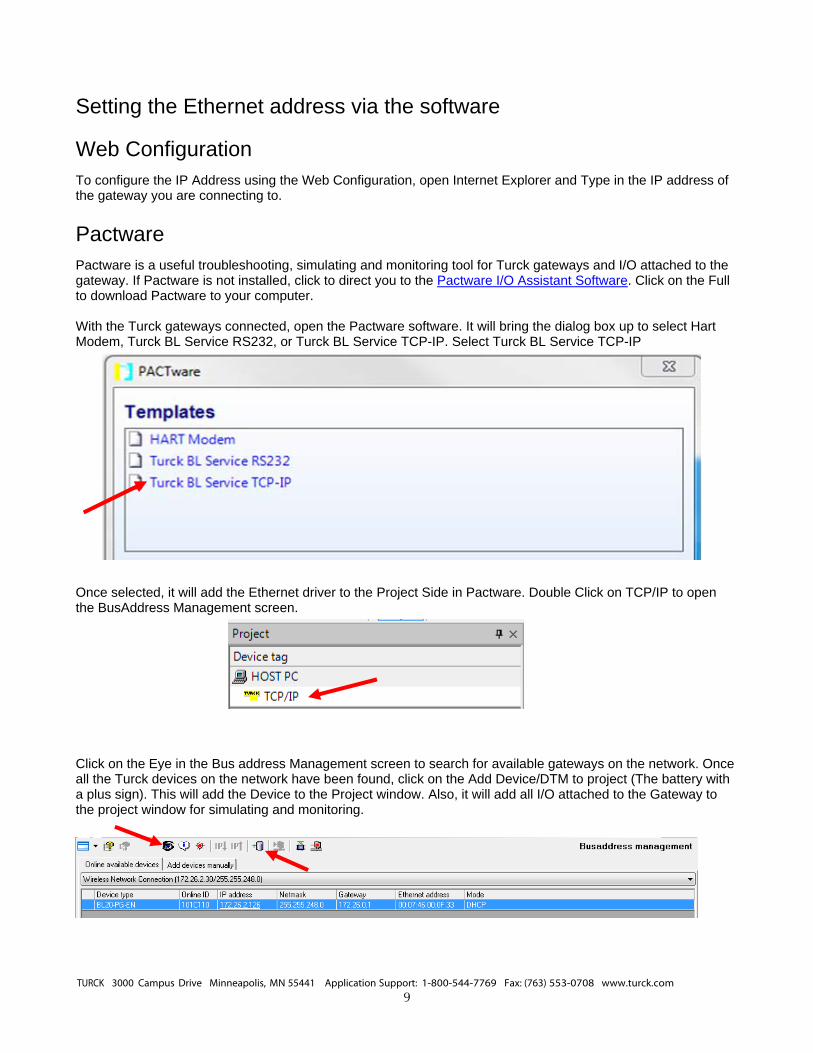
With the Turck gateways connected, open the Pactware software. It will bring the dialog box up to select Hart Modem, Turck BL Service RS232, or Turck BL Service TCP-IP. Select Turck BL Service TCP-IP
Once selected, it will add the Ethernet driver to the Project Side in Pactware. Double Click on TCP/IP to open the BusAddress Management screen.
Click on the Eye in the Bus address Management screen to search for available gateways on the network. Once all the Turck devices on the network have been found, click on the Add Device/DTM to project (The battery with a plus sign). This will add the Device to the Project window. Also, it will add all I/O attached to the Gateway to the project window for simulating and monitoring.
TURCK 3000 Campus Drive Minneapolis, MN 55441 Application Support: 1-800-544-7769 Fax: (763) 553-0708 www.turck.com 10
IP Addressing
In Turck products, the IP addressing can be set by either connecting to the Turck Gateway through Pactware, the IP address tool, or through Internet Explorer or modifying the first three octets of the IP Address. The last octet will be set by the rotary dials or dip switches.
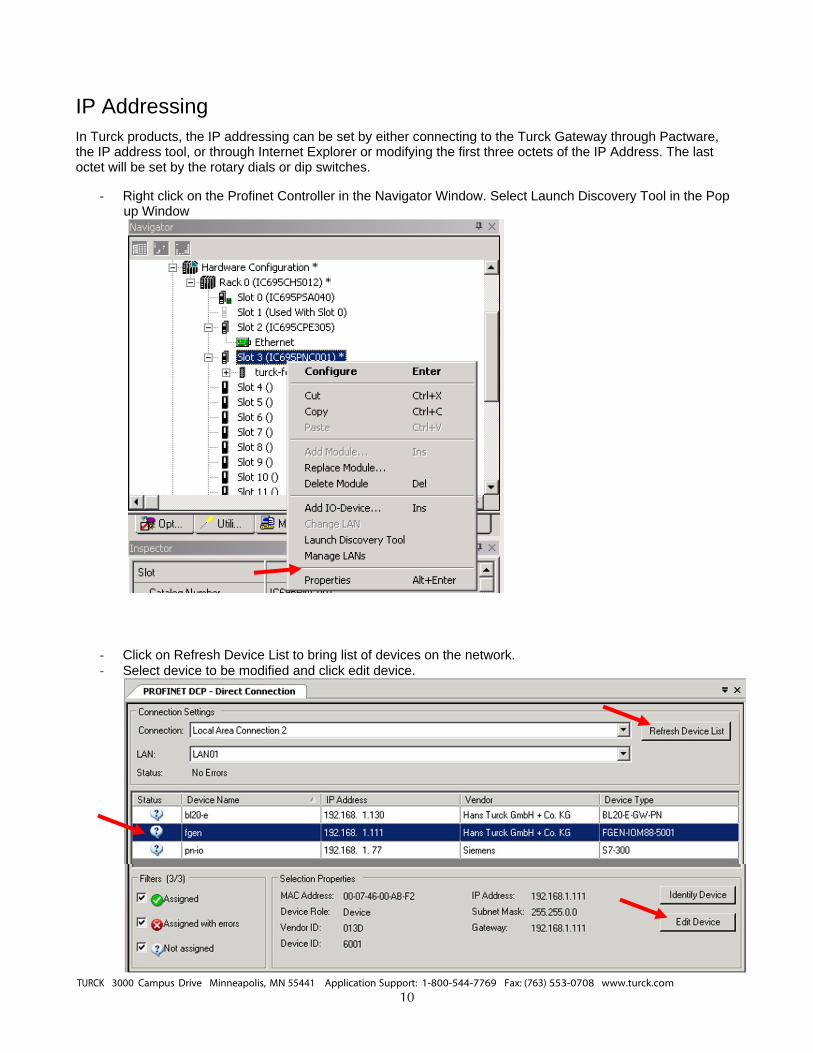
- Right click on the Profinet Controller in the Navigator Window. Select Launch Discovery Tool in the Pop up Window
- Click on Refresh Device List to bring list of devices on the network. - Select device to be modified and click edit device.
TURCK 3000 Campus Drive Minneapolis, MN 55441 Application Support: 1-800-544-7769 Fax: (763) 553-0708 www.turck.com 11
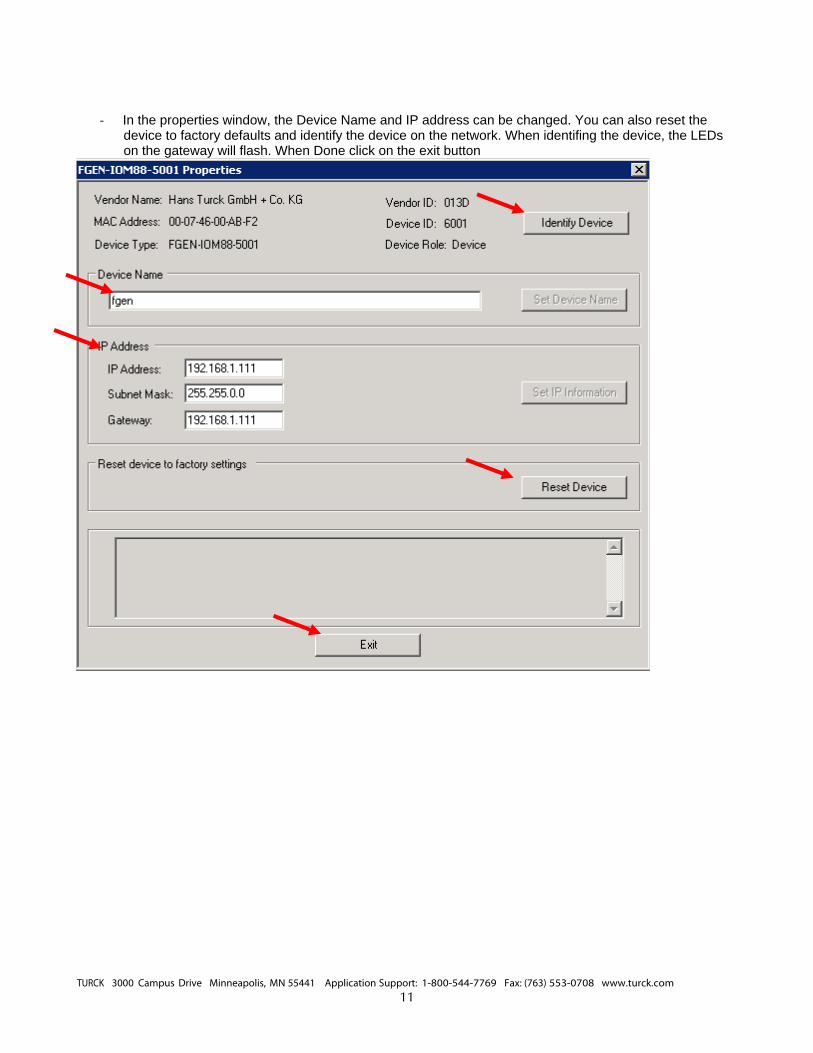
- In the properties window, the Device Name and IP address can be changed. You can also reset the
device to factory defaults and identify the device on the network. When identifing the device, the LEDs on the gateway will flash. When Done click on the exit button
TURCK 3000 Campus Drive Minneapolis, MN 55441 Application Support: 1-800-544-7769 Fax: (763) 553-0708 www.turck.com 12
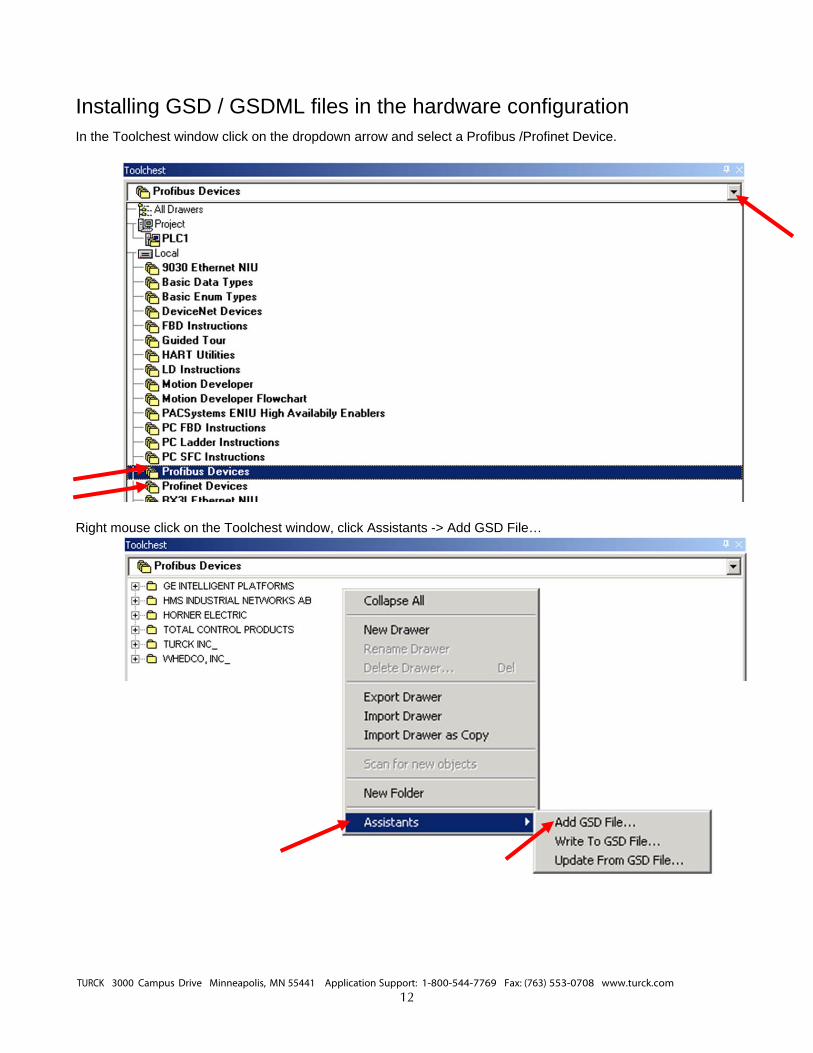
Installing GSD / GSDML files in the hardware configuration
In the Toolchest window click on the dropdown arrow and select a Profibus /Profinet Device.
Right mouse click on the Toolchest window, click Assistants -> Add GSD File…
TURCK 3000 Campus Drive Minneapolis, MN 55441 Application Support: 1-800-544-7769 Fax: (763) 553-0708 www.turck.com 13
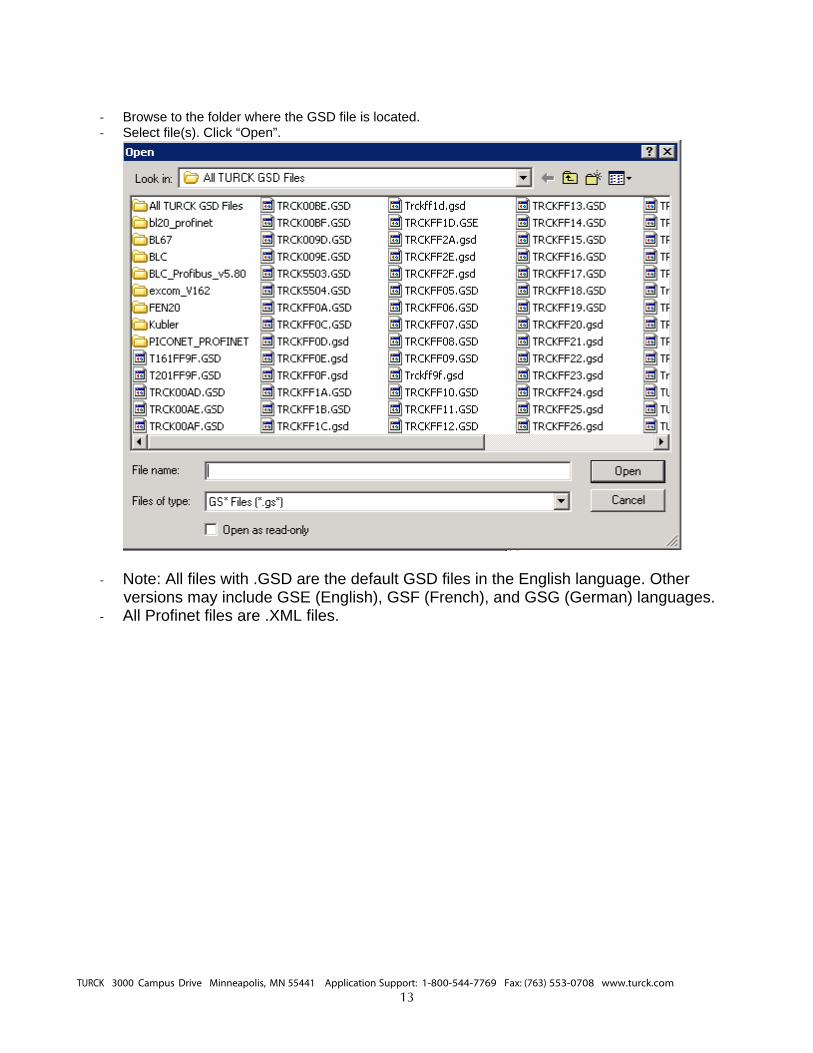
- Browse to the folder where the GSD file is located. - Select file(s). Click “Open”.
- Note: All files with .GSD are the default GSD files in the English language. Other versions may include GSE (English), GSF (French), and GSG (German) languages.
- All Profinet files are .XML files.
TURCK 3000 Campus Drive Minneapolis, MN 55441 Application Support: 1-800-544-7769 Fax: (763) 553-0708 www.turck.com 14
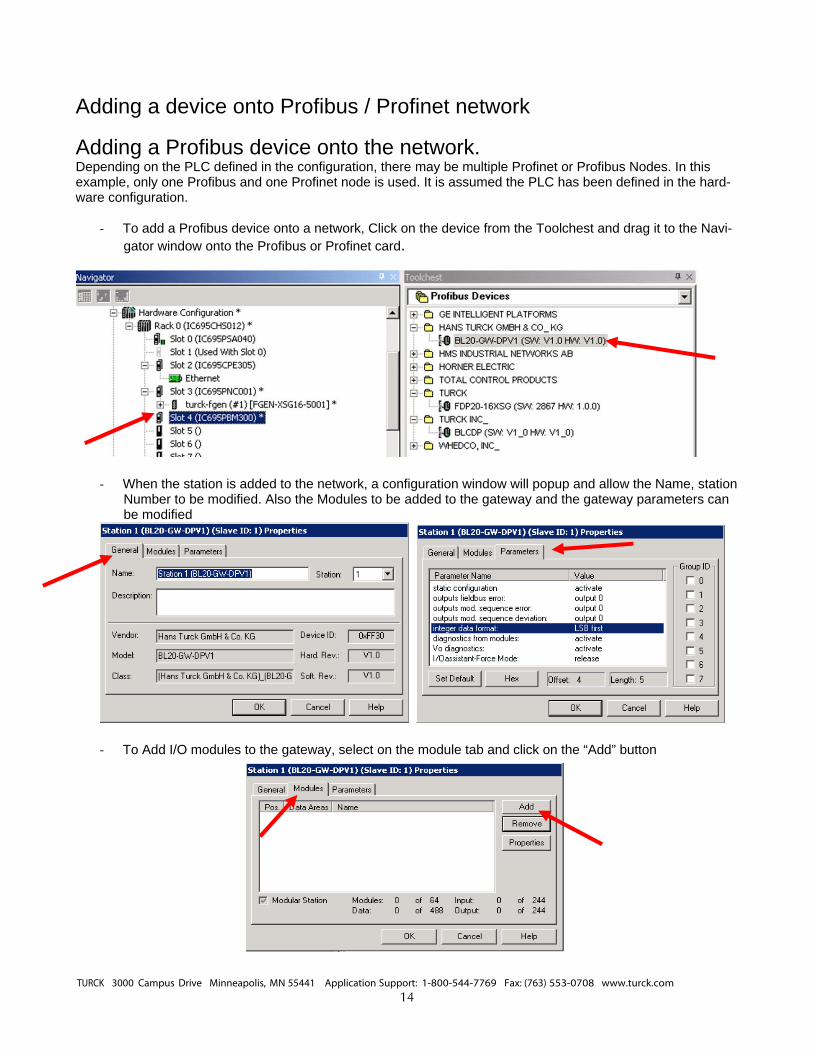
Adding a device onto Profibus / Profinet network
Adding a Profibus device onto the network. Depending on the PLC defined in the configuration, there may be multiple Profinet or Profibus Nodes. In this example, only one Profibus and one Profinet node is used. It is assumed the PLC has been defined in the hard-ware configuration.
- To add a Profibus device onto a network, Click on the device from the Toolchest and drag it to the Navi-gator window onto the Profibus or Profinet card.
- When the station is added to the network, a configuration window will popup and allow the Name, station Number to be modified. Also the Modules to be added to the gateway and the gateway parameters can be modified
- To Add I/O modules to the gateway, select on the module tab and click on the “Add” button
TURCK 3000 Campus Drive Minneapolis, MN 55441 Application Support: 1-800-544-7769 Fax: (763) 553-0708 www.turck.com 15
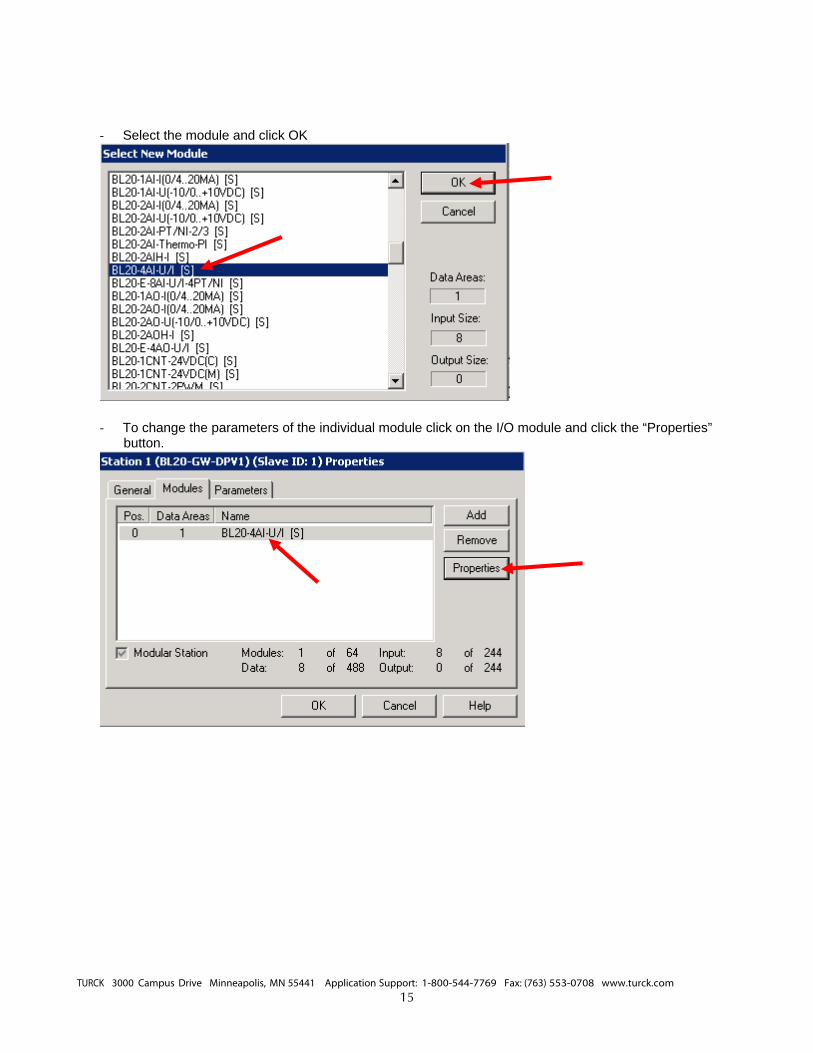
- Select the module and click OK
- To change the parameters of the individual module click on the I/O module and click the “Properties” button.
TURCK 3000 Campus Drive Minneapolis, MN 55441 Application Support: 1-800-544-7769 Fax: (763) 553-0708 www.turck.com 16
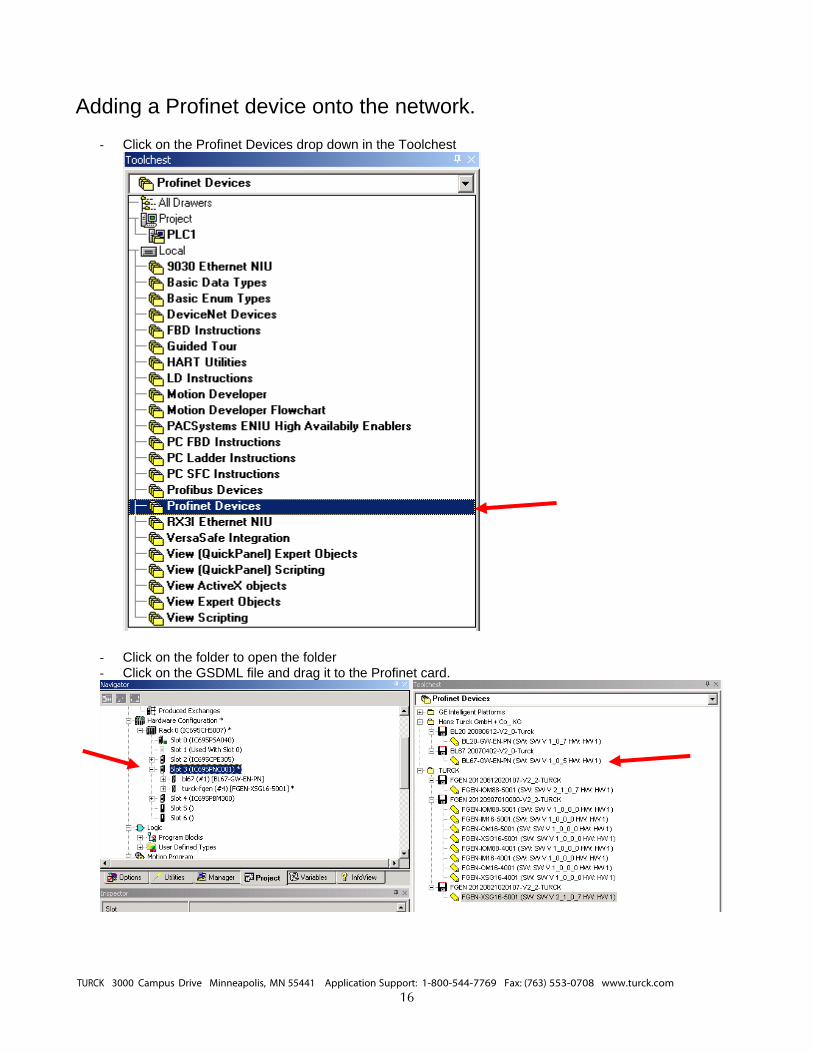
Adding a Profinet device onto the network.
- Click on the Profinet Devices drop down in the Toolchest
- Click on the folder to open the folder - Click on the GSDML file and drag it to the Profinet card.

TURCK 3000 Campus Drive Minneapolis, MN 55441 Application Support: 1-800-544-7769 Fax: (763) 553-0708 www.turck.com 17
- Once it is under the Profinet, click on the gateway and the device name and IP Address will be in the Inspector. This must match the configuration downloaded to the gateway when using the network discovery tool.
- Right mouse click on the device to open the Properites window

TURCK 3000 Campus Drive Minneapolis, MN 55441 Application Support: 1-800-544-7769 Fax: (763) 553-0708 www.turck.com 18
- This will bring up the GW parameters for Profinet.
- Right mouse click on the device to change the Module List
TURCK 3000 Campus Drive Minneapolis, MN 55441 Application Support: 1-800-544-7769 Fax: (763) 553-0708 www.turck.com 19
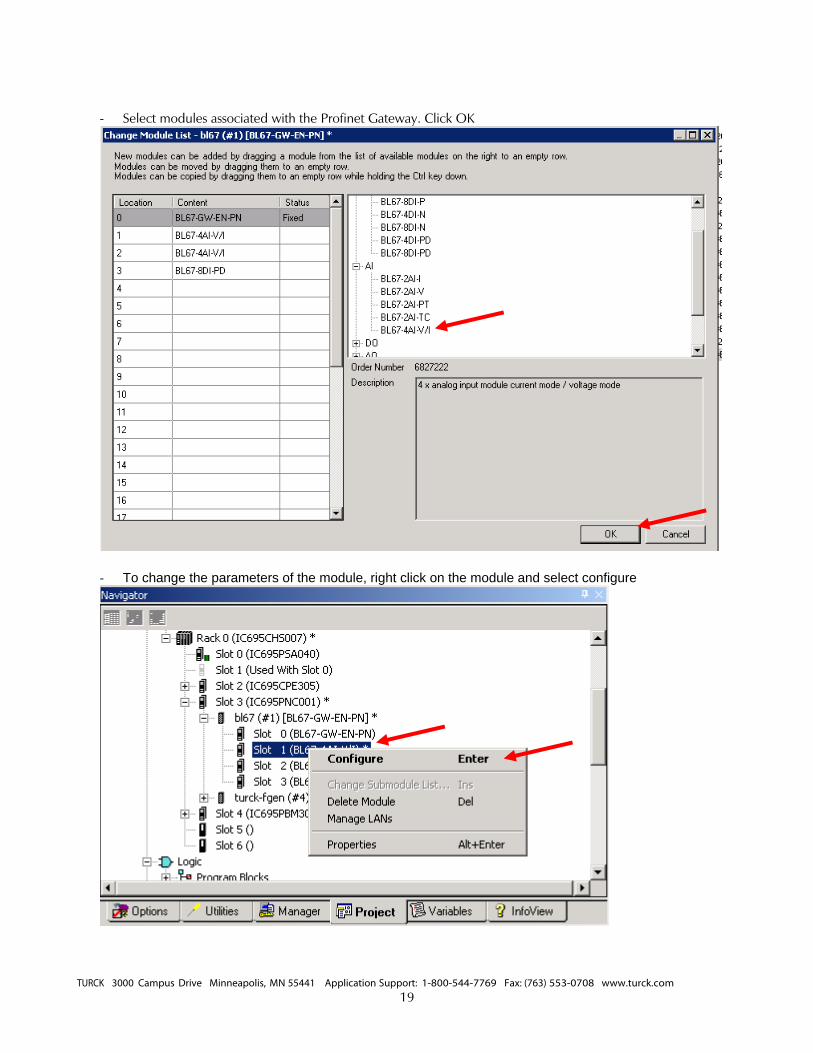
- Select modules associated with the Profinet Gateway. Click OK
- To change the parameters of the module, right click on the module and select configure
TURCK 3000 Campus Drive Minneapolis, MN 55441 Application Support: 1-800-544-7769 Fax: (763) 553-0708 www.turck.com 20
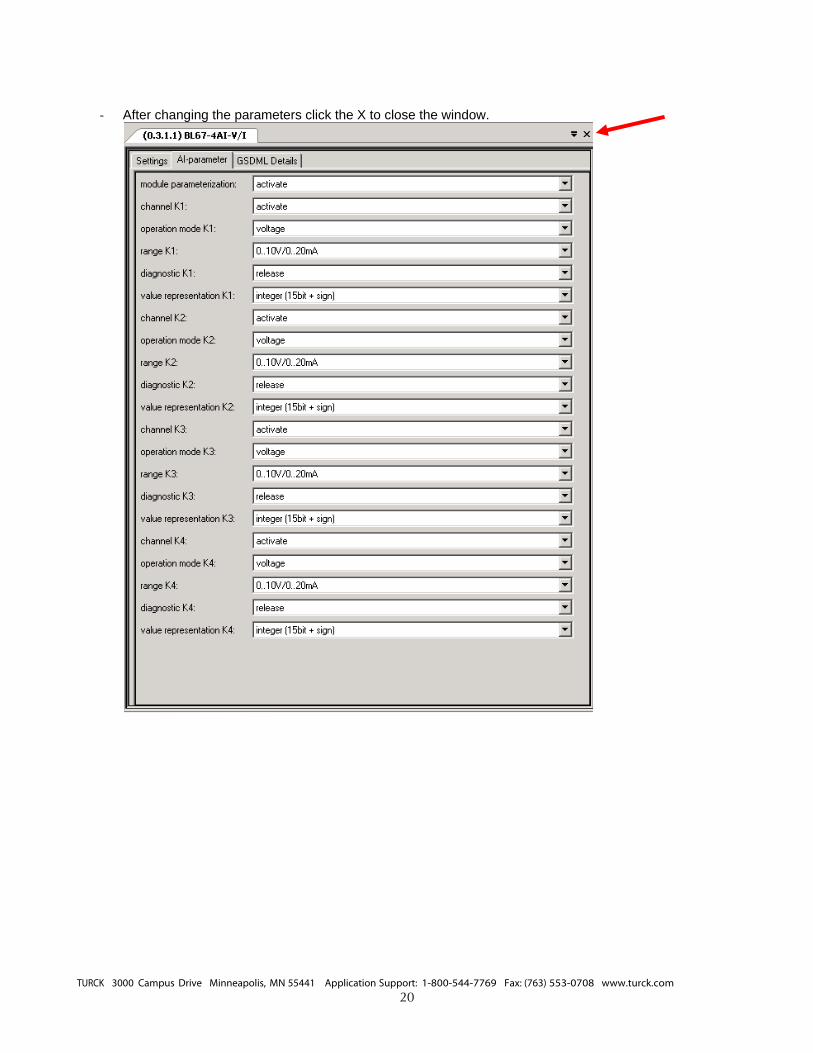
- After changing the parameters click the X to close the window.
TURCK 3000 Campus Drive Minneapolis, MN 55441 Application Support: 1-800-544-7769 Fax: (763) 553-0708 www.turck.com 21
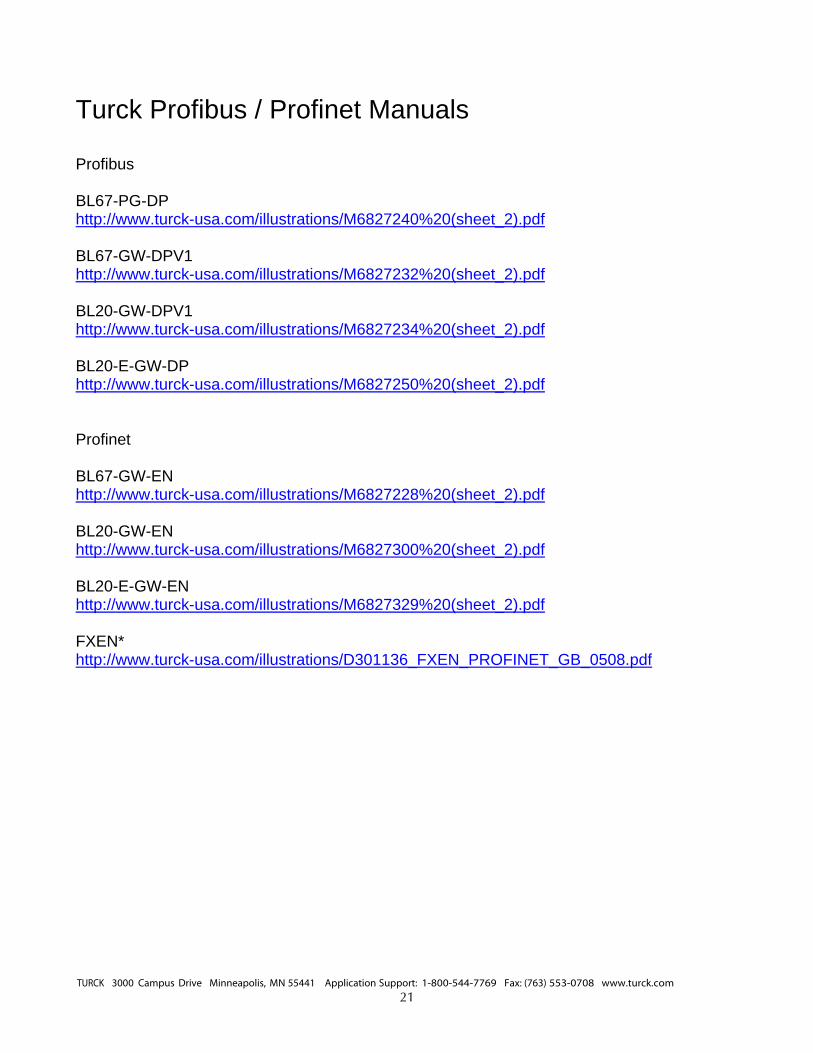
Turck Profibus / Profinet Manuals Profibus BL67-PG-DP http://www.turck-usa.com/illustrations/M6827240%20(sheet_2).pdf BL67-GW-DPV1 http://www.turck-usa.com/illustrations/M6827232%20(sheet_2).pdf BL20-GW-DPV1 http://www.turck-usa.com/illustrations/M6827234%20(sheet_2).pdf BL20-E-GW-DP http://www.turck-usa.com/illustrations/M6827250%20(sheet_2).pdf Profinet BL67-GW-EN http://www.turck-usa.com/illustrations/M6827228%20(sheet_2).pdf BL20-GW-EN http://www.turck-usa.com/illustrations/M6827300%20(sheet_2).pdf BL20-E-GW-EN http://www.turck-usa.com/illustrations/M6827329%20(sheet_2).pdf FXEN* http://www.turck-usa.com/illustrations/D301136_FXEN_PROFINET_GB_0508.pdf