genemapper id analysis - new york city
TRANSCRIPT

FORENSIC BIOLOGY PROTOCOLS FOR FORENSIC STR TYPING
GENEMAPPER ID ANALYSIS
DATE EFFECTIVE
07/11/2016
APPROVED BY
NUCLEAR DNA TECHNICAL LEADER
PAGE
1 OF 21
Controlled versions of Department of Forensic Biology Manuals only exist in the Forensic Biology Qualtrax
software. All printed versions are non-controlled copies. © NYC OFFICE OF CHIEF MEDICAL EXAMINER
Genemapper ID Analysis
A. CREATING A NEW PROJECT
1. Double click on the GeneMapper ID v3.2.1 icon on the analysis station desktop.
2. When prompted, enter your username and password.
3. The program will automatically open a new (blank) project. This main window is called
the “Project Window”.
4. Click on FileAdd Samples to Project…or Ctrl+K. A new window will open, listing
the drives or folders from which to add the samples on the left.
5. Navigate to the proper drive, and choose the folder that contains the run folders or
samples that need to be analyzed. Select the run folder(s) or samples and click on Add to
List.
6. On the bottom right Click Add. The chosen samples will now populate the project.
Adding by Sample File (.fsa file):

FORENSIC BIOLOGY PROTOCOLS FOR FORENSIC STR TYPING
GENEMAPPER ID ANALYSIS
DATE EFFECTIVE
07/11/2016
APPROVED BY
NUCLEAR DNA TECHNICAL LEADER
PAGE
2 OF 21
Controlled versions of Department of Forensic Biology Manuals only exist in the Forensic Biology Qualtrax
software. All printed versions are non-controlled copies. © NYC OFFICE OF CHIEF MEDICAL EXAMINER
Adding by Run Folder:

FORENSIC BIOLOGY PROTOCOLS FOR FORENSIC STR TYPING
GENEMAPPER ID ANALYSIS
DATE EFFECTIVE
07/11/2016
APPROVED BY
NUCLEAR DNA TECHNICAL LEADER
PAGE
3 OF 21
Controlled versions of Department of Forensic Biology Manuals only exist in the Forensic Biology Qualtrax
software. All printed versions are non-controlled copies. © NYC OFFICE OF CHIEF MEDICAL EXAMINER
B. ANALYSIS SETTINGS
1. All defined settings must be used and can be referenced in Appendix D. Analysis Method
Editor and Appendix G. Default Table and Plot Settings.
2. From the “Table Setting” drop-down menu in the toolbar, select “Analysis View”.
Project Window:
3. If the ladders, positive control, and negative control have not yet been designated, do so
now under “Sample Type”.
4. When there is more than one ladder in a project, designate one of the ladders as “Allelic
Ladder” in the Sample Type column. Additional allelic ladders within the project should
be designated as “Sample”. If the allelic ladder analyzes correctly the additional ladders
should be deleted from the project. If the allelic ladder does not analyze correctly,
another allelic ladder in the project or folder may be designated as “Allelic Ladder” and
the failed ladder deleted.
Project Window:
FORENSIC BIOLOGY PROTOCOLS FOR FORENSIC STR TYPING
GENEMAPPER ID ANALYSIS
DATE EFFECTIVE
07/11/2016
APPROVED BY
NUCLEAR DNA TECHNICAL LEADER
PAGE
4 OF 21
Controlled versions of Department of Forensic Biology Manuals only exist in the Forensic Biology Qualtrax
software. All printed versions are non-controlled copies. © NYC OFFICE OF CHIEF MEDICAL EXAMINER
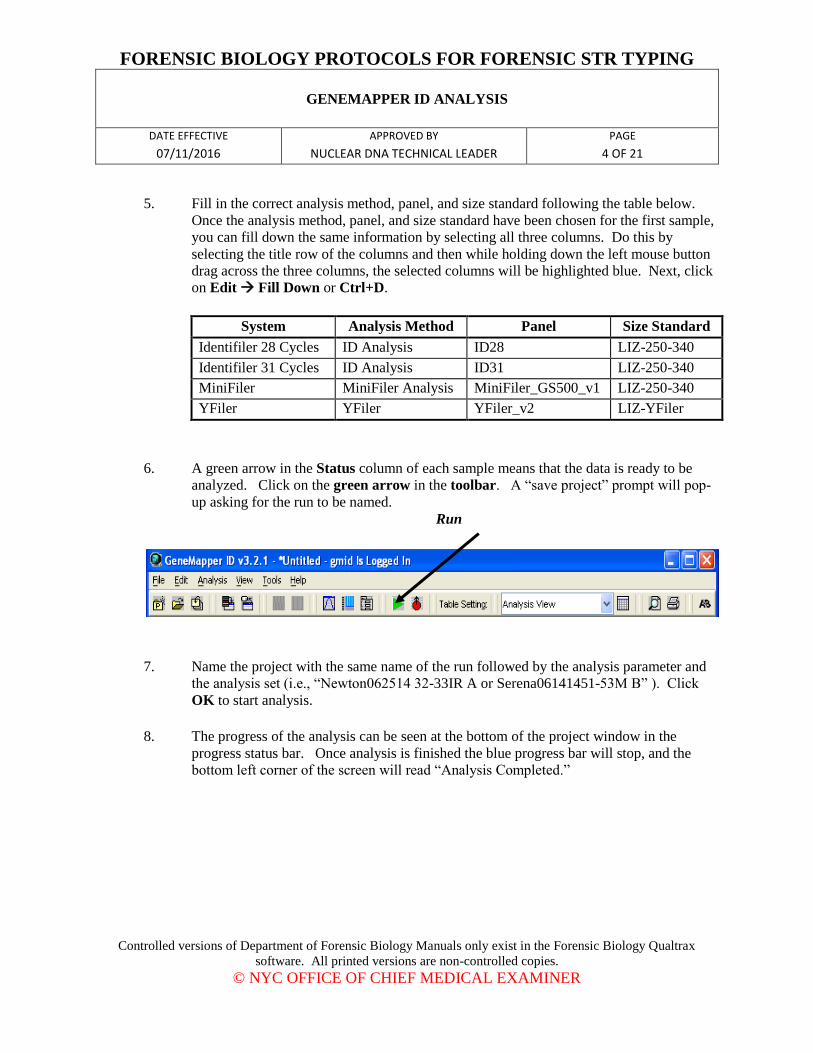
5. Fill in the correct analysis method, panel, and size standard following the table below.
Once the analysis method, panel, and size standard have been chosen for the first sample,
you can fill down the same information by selecting all three columns. Do this by
selecting the title row of the columns and then while holding down the left mouse button
drag across the three columns, the selected columns will be highlighted blue. Next, click
on Edit Fill Down or Ctrl+D.
System Analysis Method Panel Size Standard
Identifiler 28 Cycles ID Analysis ID28 LIZ-250-340
Identifiler 31 Cycles ID Analysis ID31 LIZ-250-340
MiniFiler MiniFiler Analysis MiniFiler_GS500_v1 LIZ-250-340
YFiler YFiler YFiler_v2 LIZ-YFiler
6. A green arrow in the Status column of each sample means that the data is ready to be
analyzed. Click on the green arrow in the toolbar. A “save project” prompt will pop-
up asking for the run to be named.
Run
7. Name the project with the same name of the run followed by the analysis parameter and
the analysis set (i.e., “Newton062514 32-33IR A or Serena06141451-53M B” ). Click
OK to start analysis.
8. The progress of the analysis can be seen at the bottom of the project window in the
progress status bar. Once analysis is finished the blue progress bar will stop, and the
bottom left corner of the screen will read “Analysis Completed.”
FORENSIC BIOLOGY PROTOCOLS FOR FORENSIC STR TYPING
GENEMAPPER ID ANALYSIS
DATE EFFECTIVE
07/11/2016
APPROVED BY
NUCLEAR DNA TECHNICAL LEADER
PAGE
5 OF 21
Controlled versions of Department of Forensic Biology Manuals only exist in the Forensic Biology Qualtrax
software. All printed versions are non-controlled copies. © NYC OFFICE OF CHIEF MEDICAL EXAMINER
C. VIEWING ANALYZED DATA
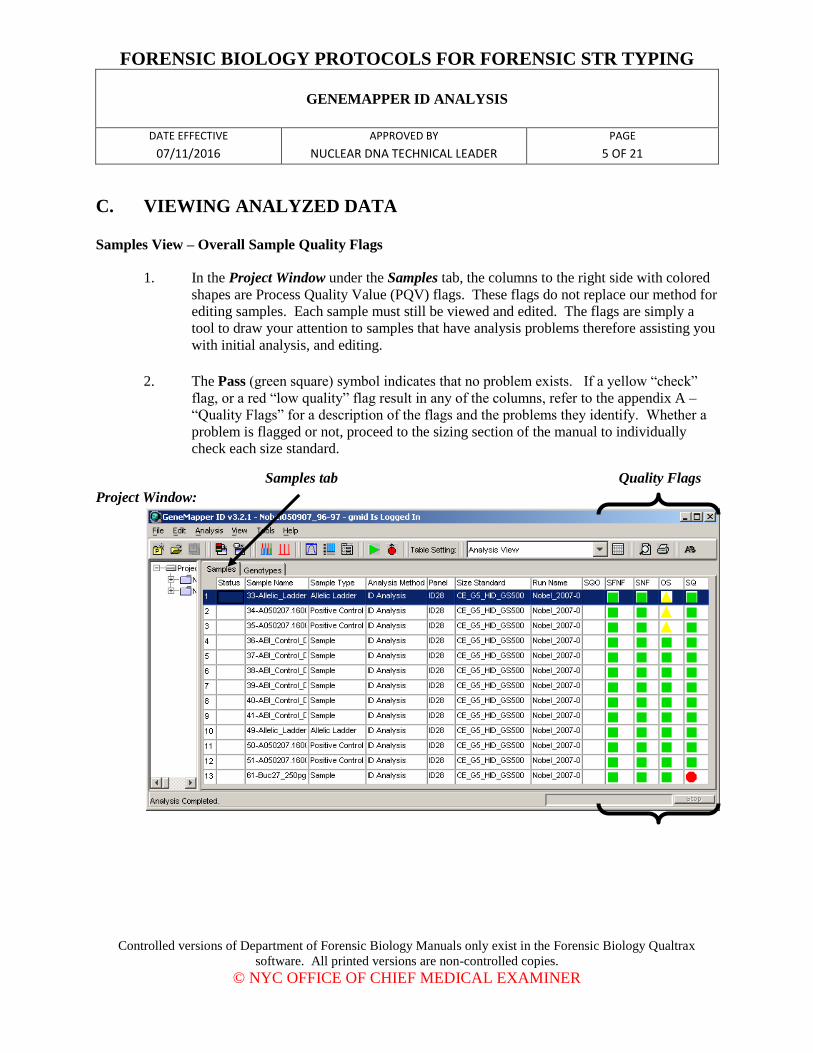
Samples View – Overall Sample Quality Flags
1. In the Project Window under the Samples tab, the columns to the right side with colored
shapes are Process Quality Value (PQV) flags. These flags do not replace our method for
editing samples. Each sample must still be viewed and edited. The flags are simply a
tool to draw your attention to samples that have analysis problems therefore assisting you
with initial analysis, and editing.
2. The Pass (green square) symbol indicates that no problem exists. If a yellow “check”
flag, or a red “low quality” flag result in any of the columns, refer to the appendix A –
“Quality Flags” for a description of the flags and the problems they identify. Whether a
problem is flagged or not, proceed to the sizing section of the manual to individually
check each size standard.
Samples tab Quality Flags
Project Window:
FORENSIC BIOLOGY PROTOCOLS FOR FORENSIC STR TYPING
GENEMAPPER ID ANALYSIS
DATE EFFECTIVE
07/11/2016
APPROVED BY
NUCLEAR DNA TECHNICAL LEADER
PAGE
6 OF 21
Controlled versions of Department of Forensic Biology Manuals only exist in the Forensic Biology Qualtrax
software. All printed versions are non-controlled copies. © NYC OFFICE OF CHIEF MEDICAL EXAMINER
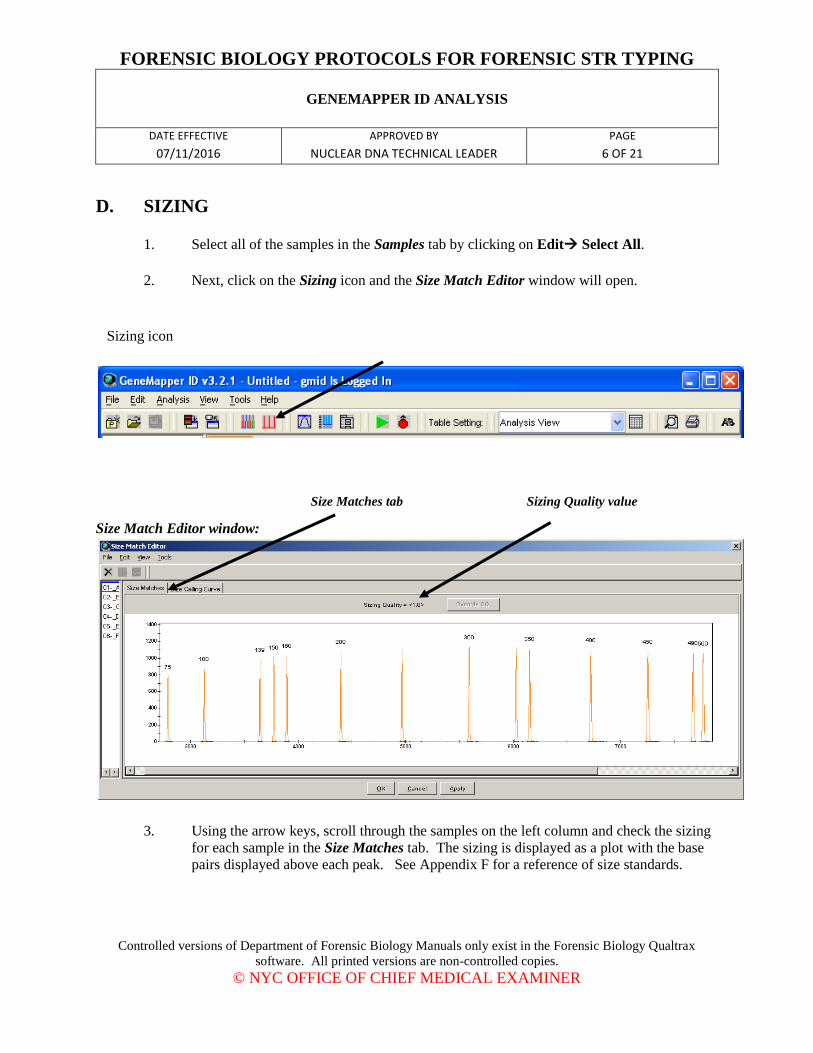
D. SIZING
1. Select all of the samples in the Samples tab by clicking on Edit Select All.
2. Next, click on the Sizing icon and the Size Match Editor window will open.
Sizing icon
Size Matches tab Sizing Quality value
Size Match Editor window:
3. Using the arrow keys, scroll through the samples on the left column and check the sizing
for each sample in the Size Matches tab. The sizing is displayed as a plot with the base
pairs displayed above each peak. See Appendix F for a reference of size standards.

FORENSIC BIOLOGY PROTOCOLS FOR FORENSIC STR TYPING
GENEMAPPER ID ANALYSIS
DATE EFFECTIVE
07/11/2016
APPROVED BY
NUCLEAR DNA TECHNICAL LEADER
PAGE
7 OF 21
Controlled versions of Department of Forensic Biology Manuals only exist in the Forensic Biology Qualtrax
software. All printed versions are non-controlled copies. © NYC OFFICE OF CHIEF MEDICAL EXAMINER
a. Identifiler samples are run with LIZ 500 and should not have the 250 bp or 340
bp size standard labeled. At least the 100bp to 450bp peaks must be present for
proper sizing.
b. MiniFiler samples are run with LIZ 500 and should not have the 250 bp or 340
bp size standard labeled. At least the 75bp to 400bp peaks must be present for
proper sizing.
c. Yfiler™ samples are run with LIZ 500 (LIZ-YFiler) and should not have the 250
bp size standard labeled. At least the 75 – 400 bp peaks must be present for
proper sizing.
4. Red octagon symbol in the SQ column of the project window:
In some cases you may still be able to use this data by redefining the size standard for
that sample. For instructions on how to re-label peaks which have been incorrectly
labeled, see the Appendix E – Troubleshooting section of this manual.
5. While still in the Size Match Editor window document that each sample size standard has
been inspected by selecting Edit “Override All SQ” or Ctrl+Shift+O; Click Apply
and then OK. The Size Match Editor window will then automatically close. A blue “X”
will appear in the sizing quality check box (SQO) for each sample, signaling that the size
standard for each sample has been reviewed.
Project Window:
6. If a green triangle appears in the status column for any of the samples after you applied
the SQO, press the green analyze button in the toolbar to finish the sizing quality
override.

FORENSIC BIOLOGY PROTOCOLS FOR FORENSIC STR TYPING
GENEMAPPER ID ANALYSIS
DATE EFFECTIVE
07/11/2016
APPROVED BY
NUCLEAR DNA TECHNICAL LEADER
PAGE
8 OF 21
Controlled versions of Department of Forensic Biology Manuals only exist in the Forensic Biology Qualtrax
software. All printed versions are non-controlled copies. © NYC OFFICE OF CHIEF MEDICAL EXAMINER
E. PLOT VIEWS
Samples Plot – Reviewing Ladders, Controls, and Samples
1. First, check the ladders and controls in the project using the following steps. If a project
contains more than one allelic ladder, each ladder must be reviewed and pass analysis.
Then repeat the steps for the samples. See Appendix F for a reference of allelic ladders
and positive controls.
2. If there are two positive controls of the same date and time (i.e. high and normal), you
can remove one by selecting it in the Samples tab of the Project Window, then from the
pull down menu select Edit Delete from Project OK.
3. In the Samples tab of the Project Window, select the sample rows you want to view (i.e.
ladders, controls, or samples) then click the plot button to display the plots (Analysis
Display Plots or Ctrl+L). Use the shift key or the ctrl key to select multiple samples.
Plot button Samples tab
Project Window:
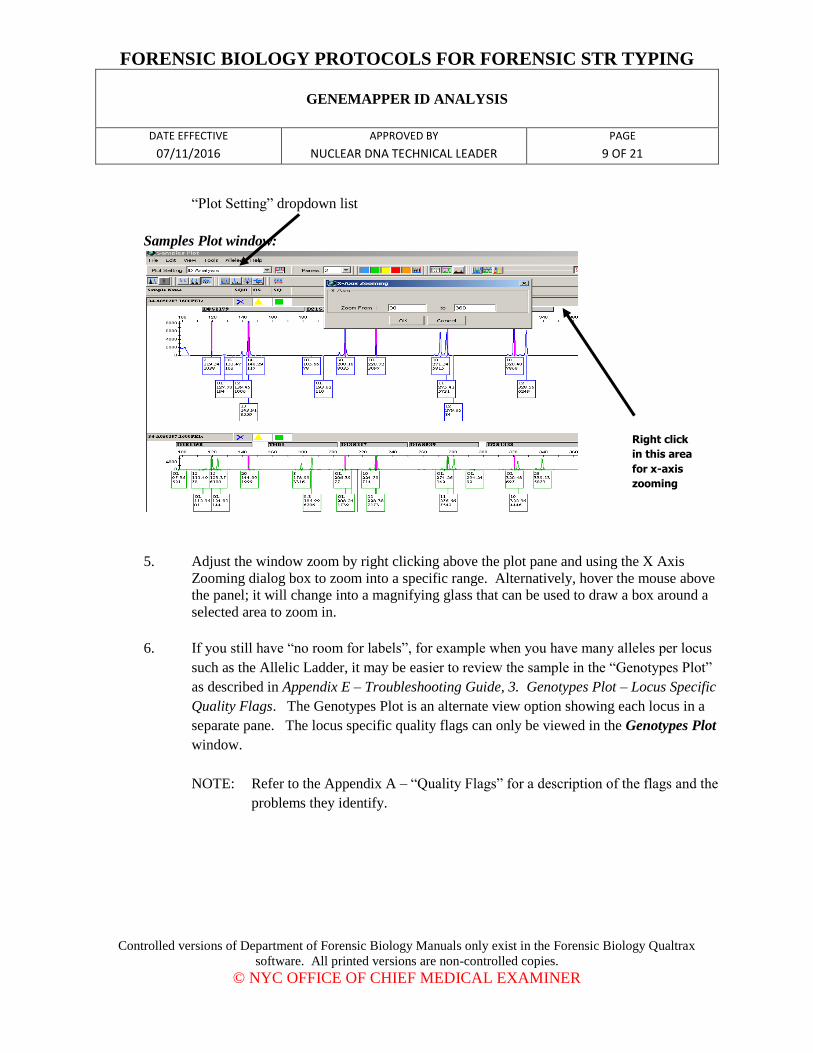
4. In the “Samples Plot” window toolbar there is a Plot Setting dropdown list. For
Identifiler and YFiler, select “Analysis View.” For Minifiler, select “Mini Analysis.”
This will label the peaks with base pairs, RFUs and allele name.
FORENSIC BIOLOGY PROTOCOLS FOR FORENSIC STR TYPING
GENEMAPPER ID ANALYSIS
DATE EFFECTIVE
07/11/2016
APPROVED BY
NUCLEAR DNA TECHNICAL LEADER
PAGE
9 OF 21
Controlled versions of Department of Forensic Biology Manuals only exist in the Forensic Biology Qualtrax
software. All printed versions are non-controlled copies. © NYC OFFICE OF CHIEF MEDICAL EXAMINER
“Plot Setting” dropdown list
Samples Plot window:
5. Adjust the window zoom by right clicking above the plot pane and using the X Axis
Zooming dialog box to zoom into a specific range. Alternatively, hover the mouse above
the panel; it will change into a magnifying glass that can be used to draw a box around a
selected area to zoom in.
6. If you still have “no room for labels”, for example when you have many alleles per locus
such as the Allelic Ladder, it may be easier to review the sample in the “Genotypes Plot”
as described in Appendix E – Troubleshooting Guide, 3. Genotypes Plot – Locus Specific
Quality Flags. The Genotypes Plot is an alternate view option showing each locus in a
separate pane. The locus specific quality flags can only be viewed in the Genotypes Plot
window.
NOTE: Refer to the Appendix A – “Quality Flags” for a description of the flags and the
problems they identify.
Right click
in this area
for x-axis
zooming

FORENSIC BIOLOGY PROTOCOLS FOR FORENSIC STR TYPING
GENEMAPPER ID ANALYSIS
DATE EFFECTIVE
07/11/2016
APPROVED BY
NUCLEAR DNA TECHNICAL LEADER
PAGE
10 OF 21
Controlled versions of Department of Forensic Biology Manuals only exist in the Forensic Biology Qualtrax
software. All printed versions are non-controlled copies. © NYC OFFICE OF CHIEF MEDICAL EXAMINER
F. EDITING
Electronic Editing – First Analysis
1. You can view the sample in the Samples Plot window or the Genotypes Plot window or
minimize back and forth between these views to facilitate analysis. Just ensure that you
are using the correct view settings (“Analysis View” or “Mini Analysis.”)
2. Left click on the allele in question to select it.
3. To edit the allele you must right click on it while it is highlighted and you will see a list
of three choices – Delete Allele(s); Rename Allele; History.
4. Select Rename Allele; another drop down menu will appear listing all of the possible
choices for alleles at that locus including “?” and Custom.
Left click
to select
Right click
to edit
FORENSIC BIOLOGY PROTOCOLS FOR FORENSIC STR TYPING
GENEMAPPER ID ANALYSIS
DATE EFFECTIVE
07/11/2016
APPROVED BY
NUCLEAR DNA TECHNICAL LEADER
PAGE
11 OF 21
Controlled versions of Department of Forensic Biology Manuals only exist in the Forensic Biology Qualtrax
software. All printed versions are non-controlled copies. © NYC OFFICE OF CHIEF MEDICAL EXAMINER
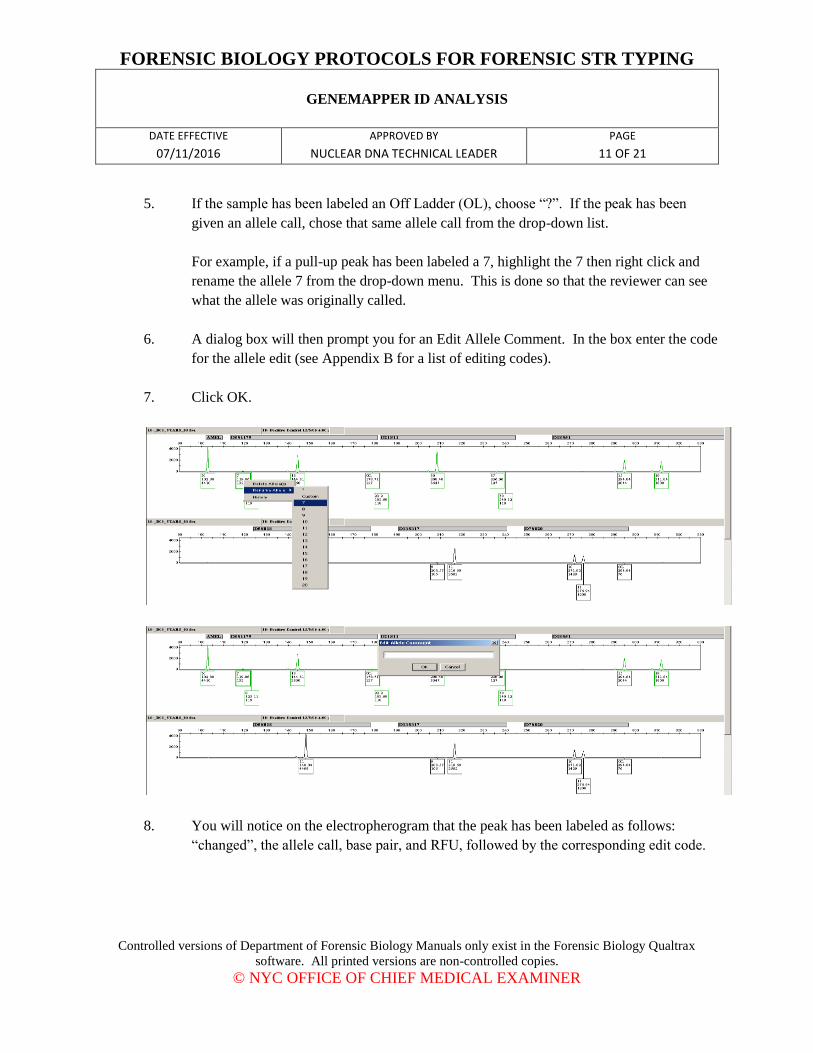
5. If the sample has been labeled an Off Ladder (OL), choose “?”. If the peak has been
given an allele call, chose that same allele call from the drop-down list.
For example, if a pull-up peak has been labeled a 7, highlight the 7 then right click and
rename the allele 7 from the drop-down menu. This is done so that the reviewer can see
what the allele was originally called.
6. A dialog box will then prompt you for an Edit Allele Comment. In the box enter the code
for the allele edit (see Appendix B for a list of editing codes).
7. Click OK.
8. You will notice on the electropherogram that the peak has been labeled as follows:
“changed”, the allele call, base pair, and RFU, followed by the corresponding edit code.
FORENSIC BIOLOGY PROTOCOLS FOR FORENSIC STR TYPING
GENEMAPPER ID ANALYSIS
DATE EFFECTIVE
07/11/2016
APPROVED BY
NUCLEAR DNA TECHNICAL LEADER
PAGE
12 OF 21
Controlled versions of Department of Forensic Biology Manuals only exist in the Forensic Biology Qualtrax
software. All printed versions are non-controlled copies. © NYC OFFICE OF CHIEF MEDICAL EXAMINER
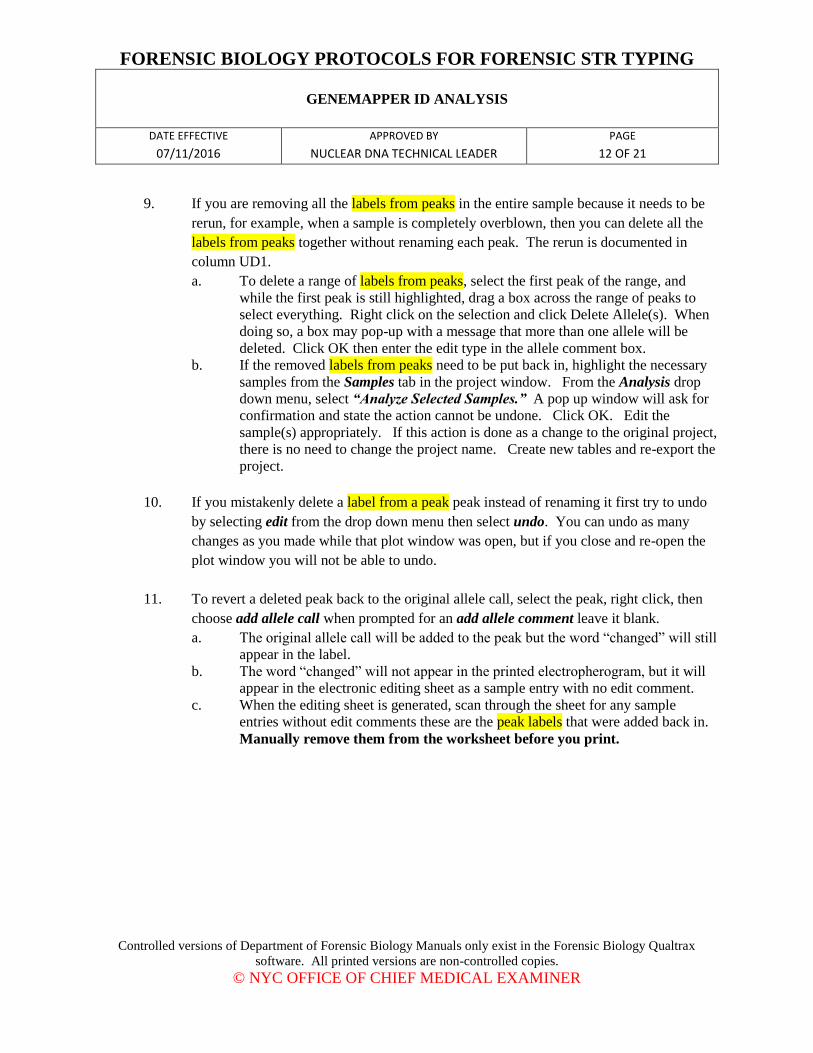
9. If you are removing all the labels from peaks in the entire sample because it needs to be
rerun, for example, when a sample is completely overblown, then you can delete all the
labels from peaks together without renaming each peak. The rerun is documented in
column UD1.
a. To delete a range of labels from peaks, select the first peak of the range, and
while the first peak is still highlighted, drag a box across the range of peaks to
select everything. Right click on the selection and click Delete Allele(s). When
doing so, a box may pop-up with a message that more than one allele will be
deleted. Click OK then enter the edit type in the allele comment box.
b. If the removed labels from peaks need to be put back in, highlight the necessary
samples from the Samples tab in the project window. From the Analysis drop
down menu, select “Analyze Selected Samples.” A pop up window will ask for
confirmation and state the action cannot be undone. Click OK. Edit the
sample(s) appropriately. If this action is done as a change to the original project,
there is no need to change the project name. Create new tables and re-export the
project.
10. If you mistakenly delete a label from a peak peak instead of renaming it first try to undo
by selecting edit from the drop down menu then select undo. You can undo as many
changes as you made while that plot window was open, but if you close and re-open the
plot window you will not be able to undo.
11. To revert a deleted peak back to the original allele call, select the peak, right click, then
choose add allele call when prompted for an add allele comment leave it blank.
a. The original allele call will be added to the peak but the word “changed” will still
appear in the label.
b. The word “changed” will not appear in the printed electropherogram, but it will
appear in the electronic editing sheet as a sample entry with no edit comment.
c. When the editing sheet is generated, scan through the sheet for any sample
entries without edit comments these are the peak labels that were added back in.
Manually remove them from the worksheet before you print.

FORENSIC BIOLOGY PROTOCOLS FOR FORENSIC STR TYPING
GENEMAPPER ID ANALYSIS
DATE EFFECTIVE
07/11/2016
APPROVED BY
NUCLEAR DNA TECHNICAL LEADER
PAGE
13 OF 21
Controlled versions of Department of Forensic Biology Manuals only exist in the Forensic Biology Qualtrax
software. All printed versions are non-controlled copies. © NYC OFFICE OF CHIEF MEDICAL EXAMINER
12. Once editing has been completed you can view the edits in the Genotypes table. This
table contains all of the alleles, sizes, and edits for all of the samples. Up to 15 edits can
be captured per locus.
Genotypes Table
Electronic Rerun Sheet
1. If a sample needs to be rerun, this too is electronically noted. Close the Sample Plots
window and return to the Samples tab in the Project Window.
enter rerun code in UD1
Project Window:
FORENSIC BIOLOGY PROTOCOLS FOR FORENSIC STR TYPING
GENEMAPPER ID ANALYSIS
DATE EFFECTIVE
07/11/2016
APPROVED BY
NUCLEAR DNA TECHNICAL LEADER
PAGE
14 OF 21
Controlled versions of Department of Forensic Biology Manuals only exist in the Forensic Biology Qualtrax
software. All printed versions are non-controlled copies. © NYC OFFICE OF CHIEF MEDICAL EXAMINER
2. Each sample scheduled for rerun must contain a code in column UD1. The first figure of
the code stands for the sample status, the second figure stands for the multiplex system
of the sample, and the third figure stands for the rerun parameter. The following are a
few examples:
a. A sample was overblown and all labels from peaks were removed. It should be
rerun at a 1/10 dilution in Identifiler. Rerun Code: **ID
b. An ID28 sample contained an off-ladder allele and needs to be rerun normal in
Identifiler. Rerun Code: ^I.
c. An ID31 sample has a poor size standard and needs to be rerun at the normal
parameter. Rerun Code: #IN
d. A sample has already been rerun once and the second time still produces an off
ladder allele, therefore it will not be rerun. Rerun code: ^N/A
e. A ID31 sample needs to be rerun at two separate parameters: one rerun at normal
parameter for a range of labels on peaks removed and another to confirm an
off-ladder using rerun high. List both parameters separated by a comma. Rerun
code: *IN, ^IH
3. After entering a code, click outside of the cell for the data to export properly.
4. See the Appendixes B and C for a complete list of edit, system, and rerun codes.
Exporting Data for LIMS
Any case documentation developed outside of the LIMS should be scanned to a PDF document
and attached to the appropriate electronic case record
1. To export this information for use in the LIMS:
a. First, in the Project Window, make sure the table setting drop down menu is set
to “Casework”. In this view you will notice an additional category column
“Specimen Category” this column should be set to “no export” for all the
samples.
b. Then, Go to File Export Combined Table. This table combines the rerun
information from the Samples table and the editing information from the
Genotypes table.
2. Select the appropriate run folder and check the run name contains the initials of the
person analyzing the run.
3. The file must be exported as Text-tab delimited (.txt). Ensure this is selected and click
“Export Combined Table.”
FORENSIC BIOLOGY PROTOCOLS FOR FORENSIC STR TYPING
GENEMAPPER ID ANALYSIS
DATE EFFECTIVE
07/11/2016
APPROVED BY
NUCLEAR DNA TECHNICAL LEADER
PAGE
15 OF 21
Controlled versions of Department of Forensic Biology Manuals only exist in the Forensic Biology Qualtrax
software. All printed versions are non-controlled copies. © NYC OFFICE OF CHIEF MEDICAL EXAMINER
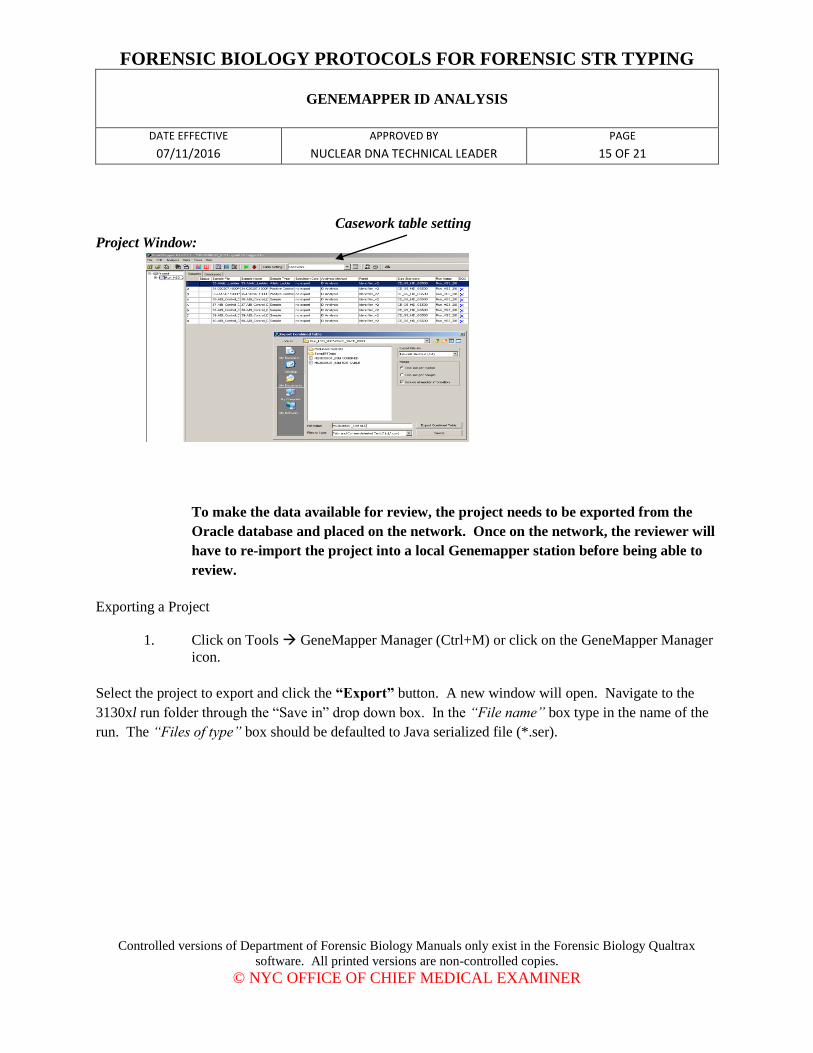
Casework table setting
Project Window:
To make the data available for review, the project needs to be exported from the
Oracle database and placed on the network. Once on the network, the reviewer will
have to re-import the project into a local Genemapper station before being able to
review.
Exporting a Project
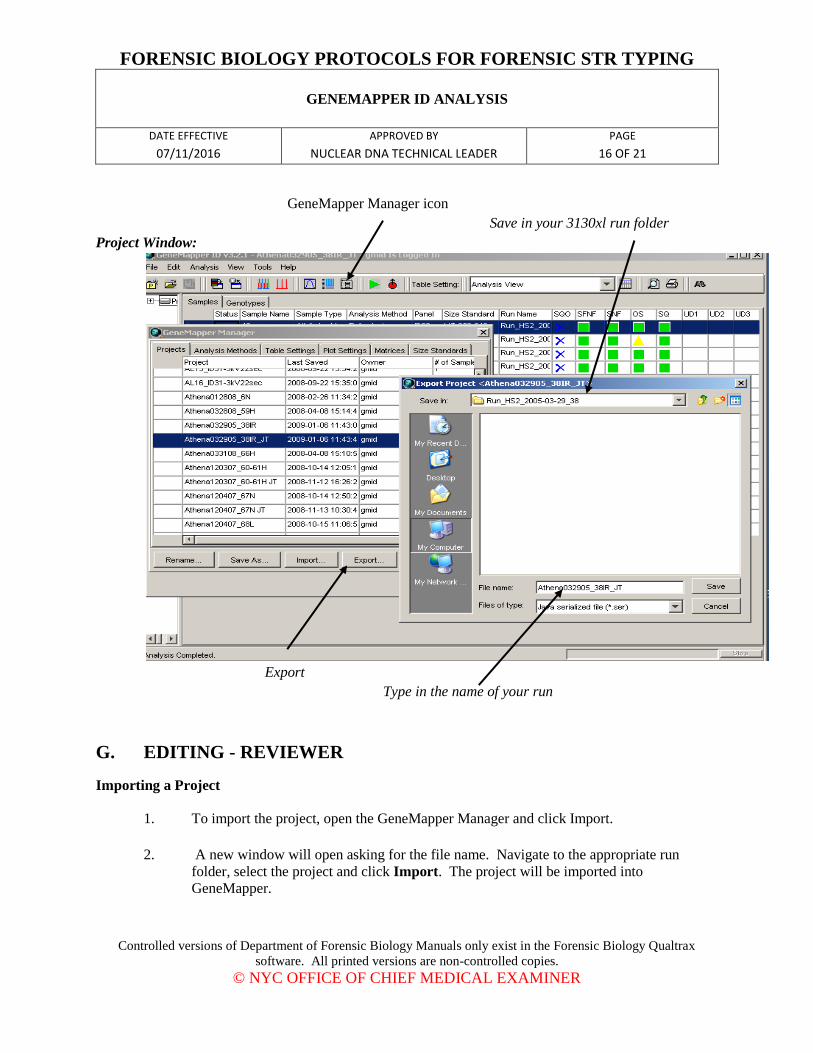
1. Click on Tools GeneMapper Manager (Ctrl+M) or click on the GeneMapper Manager
icon.
Select the project to export and click the “Export” button. A new window will open. Navigate to the
3130xl run folder through the “Save in” drop down box. In the “File name” box type in the name of the
run. The “Files of type” box should be defaulted to Java serialized file (*.ser).
FORENSIC BIOLOGY PROTOCOLS FOR FORENSIC STR TYPING
GENEMAPPER ID ANALYSIS
DATE EFFECTIVE
07/11/2016
APPROVED BY
NUCLEAR DNA TECHNICAL LEADER
PAGE
16 OF 21
Controlled versions of Department of Forensic Biology Manuals only exist in the Forensic Biology Qualtrax
software. All printed versions are non-controlled copies. © NYC OFFICE OF CHIEF MEDICAL EXAMINER
GeneMapper Manager icon
Save in your 3130xl run folder
Project Window:
Export
Type in the name of your run
G. EDITING - REVIEWER
Importing a Project
1. To import the project, open the GeneMapper Manager and click Import.
2. A new window will open asking for the file name. Navigate to the appropriate run
folder, select the project and click Import. The project will be imported into
GeneMapper.

FORENSIC BIOLOGY PROTOCOLS FOR FORENSIC STR TYPING
GENEMAPPER ID ANALYSIS
DATE EFFECTIVE
07/11/2016
APPROVED BY
NUCLEAR DNA TECHNICAL LEADER
PAGE
17 OF 21
Controlled versions of Department of Forensic Biology Manuals only exist in the Forensic Biology Qualtrax
software. All printed versions are non-controlled copies. © NYC OFFICE OF CHIEF MEDICAL EXAMINER
3. To open the project you just imported, click File Open Project (Ctrl + O). Select
your project and click Open.
Electronic Editing - Reviewer
1. The reviewer should check the edits on the editing documentation against the electronic
data.
2. To display the sample plots, highlight all samples and click the “Plot View” button or
click “Analysis à Display Plots”. For more detailed information, refer to Section E “Plot
Views”.
3. The software always keeps the original allele assignments and a list of all the changes
made. If desired, the allele history can be viewed. See “Appendix E – Troubleshooting
Guide, 6. Allele History” for instructions.
4. To change, revert, or add an edit into the documentation, the reviewer should make the
correction in the edit table.
5. In the GMID project, to revert an edited peak back to the original allele call, left click on
the allele to select it, then right click to Rename Allele; another drop down menu will
appear listing all of the possible choices for alleles at that locus. Select the correct allele
assignment to re-label the peak. This change will still be added to the history of that
allele.
NOTE: Peaks can be selected and labels deleted together. For example when a sample
is overblown, and you need to remove labels from many peaks in a range,
simply select the first peak of the range, and while the first peak is still
highlighted, drag a box across the range of peaks to select all. Press the delete
key.
If the reviewing analyst disagrees with the removal of labels from all peaks made during
the first analysis, the reviewer should not complete the review. Have the analyzing
analyst go back to the project and reanalyze the affected sample(s), re-export the data and
create new allele, edit and rerun tables and re-submit for review. The reviewer should
then review the entire project again.
FORENSIC BIOLOGY PROTOCOLS FOR FORENSIC STR TYPING
GENEMAPPER ID ANALYSIS
DATE EFFECTIVE
07/11/2016
APPROVED BY
NUCLEAR DNA TECHNICAL LEADER
PAGE
18 OF 21
Controlled versions of Department of Forensic Biology Manuals only exist in the Forensic Biology Qualtrax
software. All printed versions are non-controlled copies. © NYC OFFICE OF CHIEF MEDICAL EXAMINER
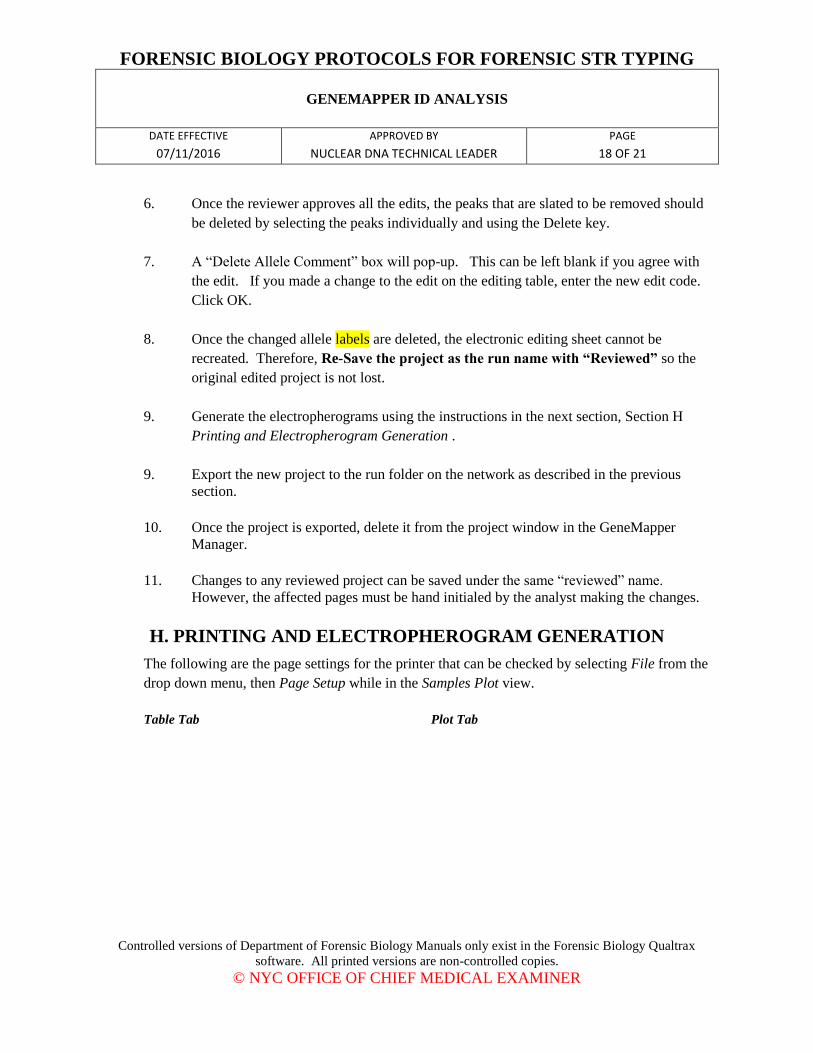
6. Once the reviewer approves all the edits, the peaks that are slated to be removed should
be deleted by selecting the peaks individually and using the Delete key.
7. A “Delete Allele Comment” box will pop-up. This can be left blank if you agree with
the edit. If you made a change to the edit on the editing table, enter the new edit code.
Click OK.
8. Once the changed allele labels are deleted, the electronic editing sheet cannot be
recreated. Therefore, Re-Save the project as the run name with “Reviewed” so the
original edited project is not lost.
9. Generate the electropherograms using the instructions in the next section, Section H
Printing and Electropherogram Generation .
9. Export the new project to the run folder on the network as described in the previous
section.
10. Once the project is exported, delete it from the project window in the GeneMapper
Manager.
11. Changes to any reviewed project can be saved under the same “reviewed” name.
However, the affected pages must be hand initialed by the analyst making the changes.
H. PRINTING AND ELECTROPHEROGRAM GENERATION
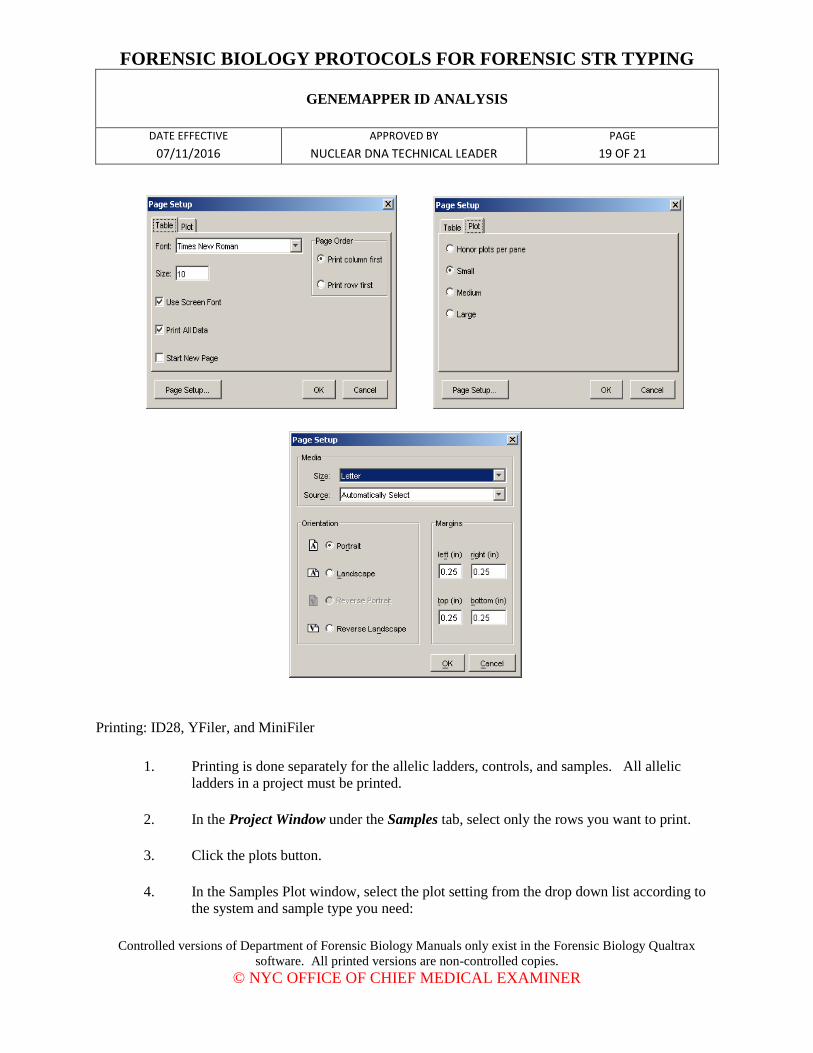
The following are the page settings for the printer that can be checked by selecting File from the
drop down menu, then Page Setup while in the Samples Plot view.
Table Tab Plot Tab
FORENSIC BIOLOGY PROTOCOLS FOR FORENSIC STR TYPING
GENEMAPPER ID ANALYSIS
DATE EFFECTIVE
07/11/2016
APPROVED BY
NUCLEAR DNA TECHNICAL LEADER
PAGE
19 OF 21
Controlled versions of Department of Forensic Biology Manuals only exist in the Forensic Biology Qualtrax
software. All printed versions are non-controlled copies. © NYC OFFICE OF CHIEF MEDICAL EXAMINER
Printing: ID28, YFiler, and MiniFiler
1. Printing is done separately for the allelic ladders, controls, and samples. All allelic
ladders in a project must be printed.
2. In the Project Window under the Samples tab, select only the rows you want to print.
3. Click the plots button.
4. In the Samples Plot window, select the plot setting from the drop down list according to
the system and sample type you need:
FORENSIC BIOLOGY PROTOCOLS FOR FORENSIC STR TYPING
GENEMAPPER ID ANALYSIS
DATE EFFECTIVE
07/11/2016
APPROVED BY
NUCLEAR DNA TECHNICAL LEADER
PAGE
20 OF 21
Controlled versions of Department of Forensic Biology Manuals only exist in the Forensic Biology Qualtrax
software. All printed versions are non-controlled copies. © NYC OFFICE OF CHIEF MEDICAL EXAMINER
Print - ID Allelic Ladder Print - ID Controls Print - ID 28 Samples
Print - YFiler Allelic Ladder Print - YFiler Controls Print - ID 31 PE and
Samples
Print - Mini Allelic Ladder Print - Mini Controls Print – YFiler Samples
Print – ID31 Negative
Controls
Print - Mini Samples
5. Notice that the font size is reduced to accommodate the print setting. This setting will
add the appropriate labels to each peak for printing.
6. Zoom to the appropriate range by using the X-Axis Zooming dialog box to set the plot to
the correct range listed in the table below:
X-Axis Zooming:
Identifiler Zoom from 90 to 370
YFiler Zoom from 90 to 340
MiniFiler Zoom from 68 to 300
7. Select File from the drop down menu, and then print (ctrl+P). Print to PDF format for
LIMS. Save the PDF into the same directory as the analysis project. For the ladder, save
the file as “Ladders”. For the controls, save the file as “Controls”. For the samples, save
the file as the “[sample number]” on the plate. For example, if the sample was run as
sample #23 on the plate, then the PDF will be saved as “23.pdf”.
8. If the peaks appear unusually small against the baseline in the printed electropherogram,
follow the additional instructions in Appendix E - Troubleshooting, 4. Printing, and re-
print the affected pages.
Printing: ID31Positive Control (PE) and Samples
1. For ID31 Allelic Ladders and Negative Controls, use the associated ID print views.
Continue below for printing the Positive Control and Samples.
2. In the Project Window under the Samples tab, select the replicates of one sample and its
corresponding pooled sample (i.e. “trigger_swab_a”, “trigger_swab_b”,
“trigger_swab_c”, and “trigger_swab_abc”).
3. Click the plots button.
FORENSIC BIOLOGY PROTOCOLS FOR FORENSIC STR TYPING
GENEMAPPER ID ANALYSIS
DATE EFFECTIVE
07/11/2016
APPROVED BY
NUCLEAR DNA TECHNICAL LEADER
PAGE
21 OF 21
Controlled versions of Department of Forensic Biology Manuals only exist in the Forensic Biology Qualtrax
software. All printed versions are non-controlled copies. © NYC OFFICE OF CHIEF MEDICAL EXAMINER
4. In the Samples Plot window, select the plot setting from the drop down list titled “Print –
ID31 PE and Samples”.
5. Notice that in the Samples Plot tool bar only the blue dye is selected. This is because one
color will be printed at a time for these sample replicates.
6. Using the X-Axis Zooming dialog box, set the plot to zoom from 90 to 370.
7. Select File from the drop down menu, and then print (ctrl+P). Print to PDF format for
LIMS. Save the PDF into the same directory as the analysis project.
8. If the peaks appear unusually small against the baseline in the printed electropherogram,
follow the additional instructions in Appendix E. Troubleshooting Guide, 4. Printing,
and re-print the affected pages.
9. In the Samples Plot tool bar, unselect the blue dye by clicking it, and select the green dye.
With only the green dye selected repeat steps 6 and 7 for the green dye. Then repeat
steps 6 and 7 for the yellow dye and red dyes individually.
10. After all colors have been printed for one triplicate sample, repeat steps 1 through 7 for
the next sample in the injection until all samples in that run have been printed.