general servie - hot tubs & spas / swim spas / pdc spas · pdf filegeneral servie hot tub...
TRANSCRIPT
Importance on Proper Water Balance
GENERAL SERVICE
Hot tub and swim spa water requires proper care and balancing to avoid a multitude of service problems. Although water care can be simple and procedural, when not taken care of properly, largest contributor to and deterioration occurs when there is not a proper balance of water chemistry.
Not only can the water be inadequate for use, but the equipment, components and thermal cover can be-come damaged and deteriorated beyond repair. Jets, controls and pillows appear faded and deteriorated, pump seals and O-rings, in general, will fail. Metal surfaces become corroded thereby causing most compo-nents inoperable. Thermal covers become faded and generally deteriorate. This type of damage and break-down is NOT covered by warranty.
Encourage your customers to maintain water chemistry avoiding these types of service calls. Ozone is simple and effective, AquaFinesse water treatment system is highly popular with an easy weekly routine. Inspect all hot tubs for this possibility when servicing and inform the customer the importance of proper wa-ter care.
EverPure™ and EverLite™ PDC Spas is an exclusive manufacturer to offer the convenience of an indicator light, EverLite, assuring the proper functioning of ozone; EverPure. Found on the upper side of the cabinet panel near the control pad, this small LED light is lit only during the filtration cycle assuring ozonator operation is properly sanitizing the spa water.
EverLite will not operate with pump activation, ONLY, during the filtration cycle. Also, remember after use, there is a 40 minute delay of filtration, thereby activation of EverPure and EverLite.
The EverPure ozonator has about a 4 year life and is a replaceable component. The first sign of failure is cloudy water or difficulty in balancing water chemistry.
It is recommended to check operation of EverLite weekly.
Plumbing Care
All spas are plumbed with plastic jets, pipes and fittings which are glued together. These plastic parts and their many glue joints are subjected to harsh treatment. Every spa is tested with water to assure there are no leaks when it leaves the factory; however, sometimes spas develop a leak caused by shipping vibration. Over the years, your spa is subjected to many hot-cold cycles and the high pressure generated by the powerful jet pump, which together stresses the pipes and joints. PDC spas are designed to be serviceable with easy-access panels on all 4 sides of the portable spa which allow quick and thorough inspection and repair of the plumbing system. Should a leak occur:
1. Remove side panel to locate leak. Mark the leak with a waterproof marking pen.
2. Turn off all power. Drain spa below leak, allow plastic parts to dry.
3. Replace parts with appropriate fittings and glue.
Periodic Spa Water Draining
After a certain time, the addition of chemicals may not clarify or eliminate odors in the spa. This is
an indication the water needs to be drained and replaced. Generally, depending upon bather load and water
chemistry maintenance, this may need done every 3 months. With the use of ozone and proper water chemistry
maintenance, this may need done less frequently.
1. Reduce set temperature to 59˚F (15˚c).
2. Turn off all power.
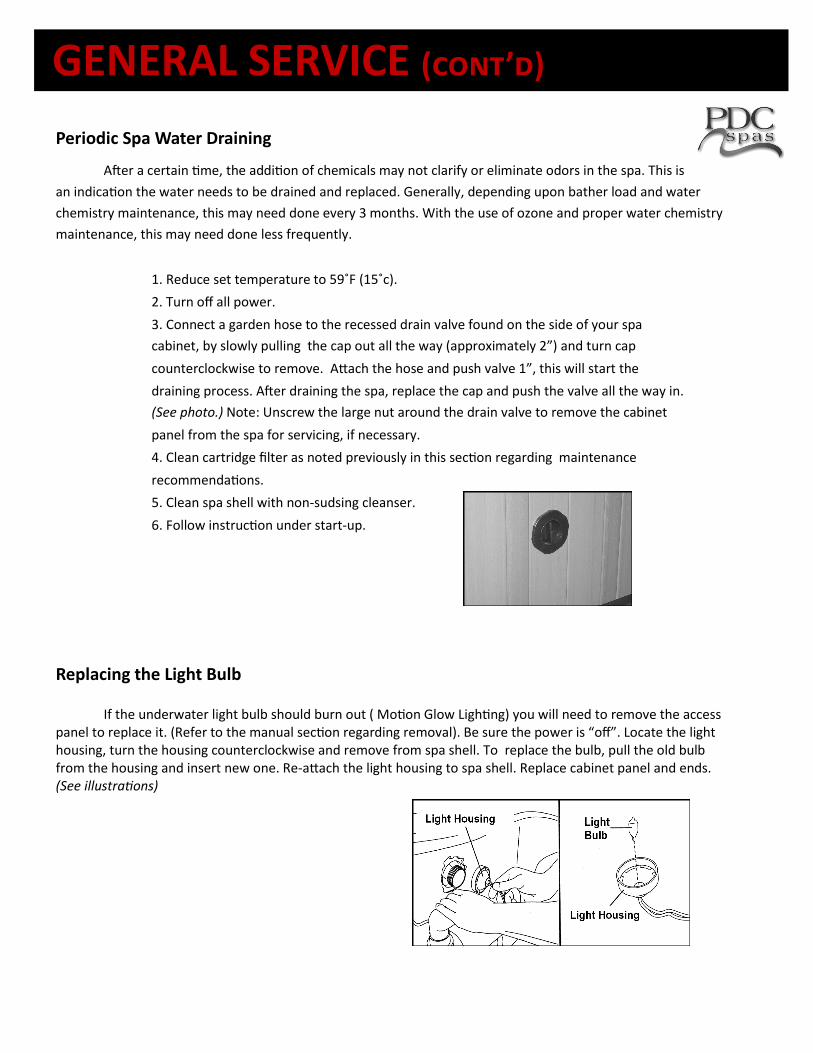
3. Connect a garden hose to the recessed drain valve found on the side of your spa
cabinet, by slowly pulling the cap out all the way (approximately 2”) and turn cap
counterclockwise to remove. Attach the hose and push valve 1”, this will start the
draining process. After draining the spa, replace the cap and push the valve all the way in.
(See photo.) Note: Unscrew the large nut around the drain valve to remove the cabinet
panel from the spa for servicing, if necessary.
4. Clean cartridge filter as noted previously in this section regarding maintenance
recommendations.
5. Clean spa shell with non-sudsing cleanser.
6. Follow instruction under start-up.
Replacing the Light Bulb
If the underwater light bulb should burn out ( Motion Glow Lighting) you will need to remove the access panel to replace it. (Refer to the manual section regarding removal). Be sure the power is “off”. Locate the light housing, turn the housing counterclockwise and remove from spa shell. To replace the bulb, pull the old bulb from the housing and insert new one. Re-attach the light housing to spa shell. Replace cabinet panel and ends. (See illustrations)
GENERAL SERVICE (cont’d)
Cold Weather Use
If your spa is to be used during the winter months in cold climate where the danger of freezing exists, certain precautions should be taken to avoid damage. An increased circulation cycle, and use of a rigid foam cover are suggested.
Cold Weather Shut-Down
Many spa owners find that outdoor wintertime soaking is quite enjoyable, and PDC certainly suggests the use of a spa year-round, although certain situations do require closing the unit for winter months (i.e.,vacation homes). If the spa will not be used for a period of time, perform the following winterizing procedures:
1. Turn heat all the way down and turn off at the breaker.
2. Drain spa of all water.
3. Remove any remaining water with sponge.
4. To remove water from the air channel; the LX Series spas equipped with the Air’assage design, turn power back on. Turn “Bubbler” on for several minutes
to spray out water. Wipe out spa and repeat as necessary. Shut off all electrical
power to unit.
5. Filter should be drained, removed and cleaned. Store in a dry place.
6. Pump, motor and all connecting lines should be drained fully to protect from freezing. Blow air through all connection lines to remove water.
You may wish to use a non-toxic RV type antifreeze to guarantee freeze prevention.
Be sure to read the manufacturer’s instructions and remove all anti-freeze before
the next spa use.
7. Cover the spa with a waterproof rigid cover for protection from snow, ice and wind.
GENERAL SERVICE (cont’d)
SWIM SPA INSTALLATION
Once the swim spa is in its final location perform the following steps to begin the start-up procedure.
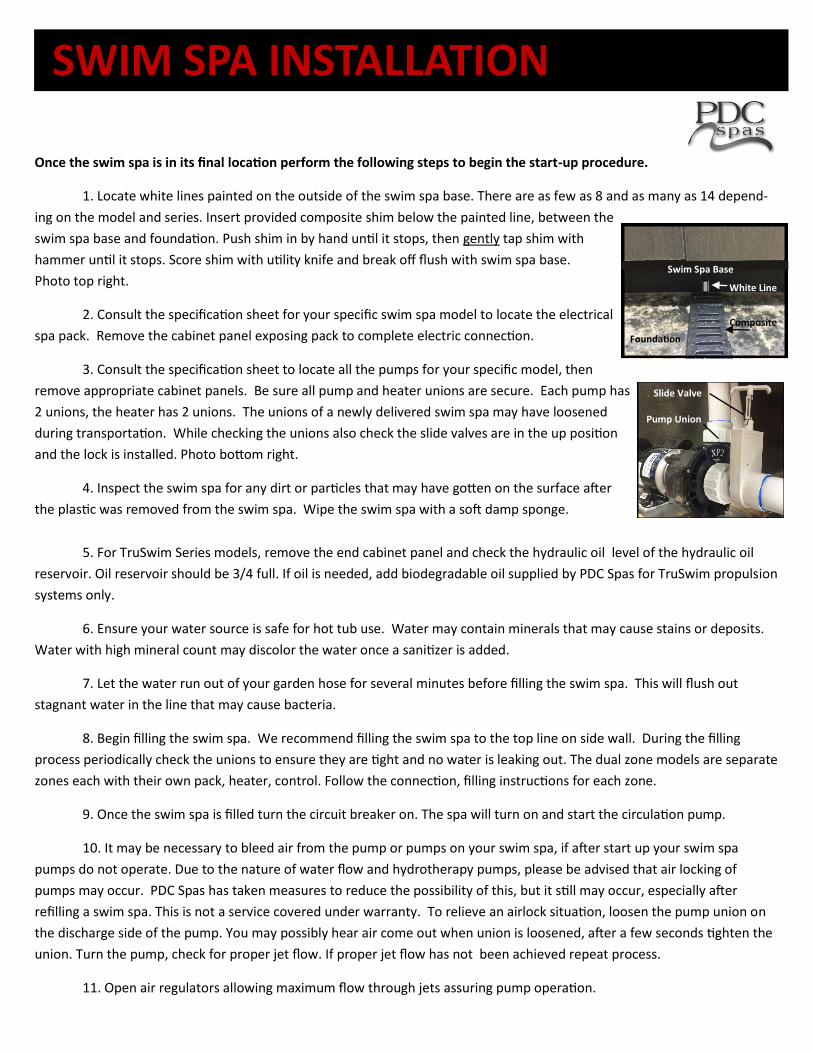
1. Locate white lines painted on the outside of the swim spa base. There are as few as 8 and as many as 14 depend-
ing on the model and series. Insert provided composite shim below the painted line, between the
swim spa base and foundation. Push shim in by hand until it stops, then gently tap shim with
hammer until it stops. Score shim with utility knife and break off flush with swim spa base.
Photo top right.
2. Consult the specification sheet for your specific swim spa model to locate the electrical
spa pack. Remove the cabinet panel exposing pack to complete electric connection.
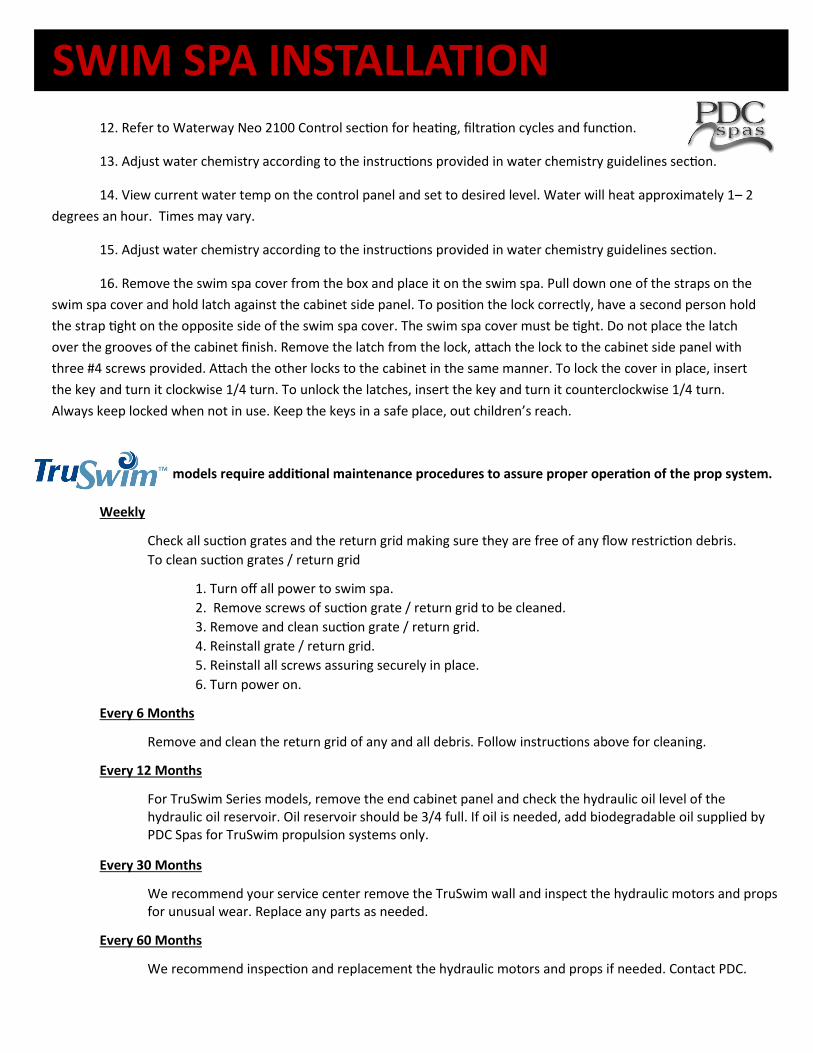
3. Consult the specification sheet to locate all the pumps for your specific model, then
remove appropriate cabinet panels. Be sure all pump and heater unions are secure. Each pump has
2 unions, the heater has 2 unions. The unions of a newly delivered swim spa may have loosened
during transportation. While checking the unions also check the slide valves are in the up position
and the lock is installed. Photo bottom right.
4. Inspect the swim spa for any dirt or particles that may have gotten on the surface after
the plastic was removed from the swim spa. Wipe the swim spa with a soft damp sponge.
5. For TruSwim Series models, remove the end cabinet panel and check the hydraulic oil level of the hydraulic oil
reservoir. Oil reservoir should be 3/4 full. If oil is needed, add biodegradable oil supplied by PDC Spas for TruSwim propulsion
systems only.
6. Ensure your water source is safe for hot tub use. Water may contain minerals that may cause stains or deposits.
Water with high mineral count may discolor the water once a sanitizer is added.
7. Let the water run out of your garden hose for several minutes before filling the swim spa. This will flush out
stagnant water in the line that may cause bacteria.
8. Begin filling the swim spa. We recommend filling the swim spa to the top line on side wall. During the filling
process periodically check the unions to ensure they are tight and no water is leaking out. The dual zone models are separate
zones each with their own pack, heater, control. Follow the connection, filling instructions for each zone.
9. Once the swim spa is filled turn the circuit breaker on. The spa will turn on and start the circulation pump.
10. It may be necessary to bleed air from the pump or pumps on your swim spa, if after start up your swim spa
pumps do not operate. Due to the nature of water flow and hydrotherapy pumps, please be advised that air locking of
pumps may occur. PDC Spas has taken measures to reduce the possibility of this, but it still may occur, especially after
refilling a swim spa. This is not a service covered under warranty. To relieve an airlock situation, loosen the pump union on
the discharge side of the pump. You may possibly hear air come out when union is loosened, after a few seconds tighten the
union. Turn the pump, check for proper jet flow. If proper jet flow has not been achieved repeat process.
11. Open air regulators allowing maximum flow through jets assuring pump operation.
Swim Spa Base
White Line
Composite
Foundation
Slide Valve
Pump Union
SWIM SPA INSTALLATION 12. Refer to Waterway Neo 2100 Control section for heating, filtration cycles and function.
13. Adjust water chemistry according to the instructions provided in water chemistry guidelines section.
14. View current water temp on the control panel and set to desired level. Water will heat approximately 1– 2
degrees an hour. Times may vary.
15. Adjust water chemistry according to the instructions provided in water chemistry guidelines section.
16. Remove the swim spa cover from the box and place it on the swim spa. Pull down one of the straps on the
swim spa cover and hold latch against the cabinet side panel. To position the lock correctly, have a second person hold
the strap tight on the opposite side of the swim spa cover. The swim spa cover must be tight. Do not place the latch
over the grooves of the cabinet finish. Remove the latch from the lock, attach the lock to the cabinet side panel with
three #4 screws provided. Attach the other locks to the cabinet in the same manner. To lock the cover in place, insert
the key and turn it clockwise 1/4 turn. To unlock the latches, insert the key and turn it counterclockwise 1/4 turn.
Always keep locked when not in use. Keep the keys in a safe place, out children’s reach.
models require additional maintenance procedures to assure proper operation of the prop system.
Weekly
Check all suction grates and the return grid making sure they are free of any flow restriction debris.
To clean suction grates / return grid
1. Turn off all power to swim spa.
2. Remove screws of suction grate / return grid to be cleaned.
3. Remove and clean suction grate / return grid.
4. Reinstall grate / return grid.
5. Reinstall all screws assuring securely in place.
6. Turn power on.
Every 6 Months
Remove and clean the return grid of any and all debris. Follow instructions above for cleaning.
Every 12 Months
For TruSwim Series models, remove the end cabinet panel and check the hydraulic oil level of the hydraulic oil reservoir. Oil reservoir should be 3/4 full. If oil is needed, add biodegradable oil supplied by PDC Spas for TruSwim propulsion systems only.
Every 30 Months
We recommend your service center remove the TruSwim wall and inspect the hydraulic motors and props for unusual wear. Replace any parts as needed.
Every 60 Months
We recommend inspection and replacement the hydraulic motors and props if needed. Contact PDC.