general surgery resident robotic curriculum
TRANSCRIPT

1
General Surgery Resident Robotic
Curriculum: Supplementary Materials

Green, et al
2
Curriculum Content Overview Pg 3
Detailed Curriculum:
STAGE I Pg 4
STAGE II Pg 4
STAGE III Pg 4-5
STAGE IV___________________________________Pg 6
**Refreshers**________________________________Pg 7
Session Outlines:
Dry Lab Pg 8
Proficiency Assessment ___ __Pg 10
Wet Lab _______________ _____________Pg 12
Simulator Access Set-Up Pg 13
Simulation Completion Form Pg 14
Case Logs
Bedside Surgeon Pg 15
Console Surgeon Pg 16
Attending Evaluation Pg 17

Green, et al
3
UCSF General Surgery Resident Robotics Curriculum
UCSF Curriculum:
Stage I: (Online modules) à Online Module Certificate Stage II: (Dry Lab) à Docking Proficiency Stage III: (Simulation)à Documentation Stage IV: (Bedside/Console Procedures)à Documentation **Refreshers** Documentation: All documentation should be uploaded to the Robotic Smartsheet. Contact ***** if you cannot find the email sent with the link to access (Contact email address)
The components of documentation collected by the Department of Surgery associated with the Robotic Curriculum include the following:
1. Online module certificate (.pdf) 2. Docking proficiency form (.pdf) 3. Simulation completion sheet (with photographs of scores) 4. Bedside case log form(s)(10 cases total) 5. Console case log form(s) (20 cases total) 6. In depth console assessments (2 faculty) (2 separate docs) 7. Complete case list (to attached to chairman’s letter) 8. Letter from chairman

Green, et al
4
Detailed General Surgery Curriculum: STAGE I: Online E-Modules / Training Videos Goals: be able to describe current robotic systems, list standard equipment, demonstrate ability to troubleshoot, describe benefits of robotics, demonstrate maneuvers to manage complications and errors that may occur. Instructions: www.daVinciSurgeryCommunity.com. Go to “Join the community.” Once you complete the training, please upload your assessment certificate to the Robotic Smart sheet. If you need assistance with access, please email ****** in the Surgery Education Office: (Contact email address)
STAGE II: Dry Lab
• During orientation week (interns) +/- Summer PGY2 year (and new transfers) • 1-2 hour session with surgical attendings in OR • Groups of 3-5 • Yearly • Hands on overview of robot tool functions: docking/instrument exchange/collisions • Didactics on collisions • Completion of docking proficiency form (Qualtrics assessment)
• Docking proficiency form • Trouble-shooting collisions
STAGE III: Simulation Console Exercises There are multiple simulators available for access at the surgical campuses where UCSF residents rotate. Simulators have several exercises to help users become more familiar with the robotic functions. We have identified some specific exercises to illustrate appropriate readiness for the operative environment.
All exercises can be accessed on any simulator. Locations and availability of the simulators vary by campus. Please see below for details:

Green, et al
5
Campus # of Sims
Simulator Location Availability Access
Contact prior to use:
Questions?
PARNASSUS 2 OR 8
S0550
OR8: When OR not in use (+ evenings and weekends)
OR- Badge No
S0550: 24 hours Badge For badge access issues contact Surgery Education Office
MISSION BAY 2 In OR x2 OR: When OR not in use (+ evenings and weekends)
Badge No Contact Info: *****
CPMC
MISSION BERNAL
2 In OR OR: When OR not in use (+ evenings and weekends)
Badge No Charge Nurse (MB) ***-***-**** Charge Nurse (VN) ***-***-****
VAN NESS
2 In OR
KAISER 1 In OR OR: When OR not in use (+ evenings and weekends)
Badge No
Rep Contact
***-***-****
VAMC 1 In OR OR: When OR not in use (+ evenings and weekends)
Badge No
Please see attached form for step-by-by step instructions for accessing the simulators.
Residents are required to achieve a score of 85% on each of the exercises. Some will be easy, but others will take multiple attempts to improve skills and reach 85%. We ask that residents take a screen shot (photo of monitor) with >85% completion of each exercise and document on the attached sheet the date, time and location of completion. Once all the required modules have been completed with a score of 85% or greater, upload the form to the Robotic Smartsheet. If you need assistance with Smartsheet access, please email ******* in the Surgery Education Office: (Contact email address)_
Green, et al
6
Additionally, when you complete a task with a score >85% take a photograph of the robotic screen (illustrating the task name and your score). There is a place on the Smartsheet to upload each of the 6 photographs.
1. Camera targeting 1 2. Peg Board 2 3. Energy switching 1 4. Ring walk 2 5. Thread the rings 6. Suture sponge 2
STAGE IV: Bedside/Console Procedures
Bedside procedures: • Scrubbed, bedside assistant • ROLE: Participate in port placement, inserting trocars, docking the robot, inserting and
exchanging instruments, operate assistant port, trouble shoot collisions • 10 Cases required for UCSF • Document via Case Log and upload to smartsheet
Console procedures:
• Should have completed simulation exercises • Track cases and type/degree of console participation • Identify degree of involvement and types of skills utilized • Document via Case Log and upload to smartsheet
Final Console Evaluation
• After 20 cases have been completed • In depth performance review by two different attending surgeons for 2 separate robotic
cases

Green, et al
7
**REFRESHERS**
Bedside Review
• Monthly (usually during 1st week) • 1-6 residents per group – (residents on service) • Recurring at rotation sites for resident review • Organized with Da Vinci rep
Console Practice There are multiple simulators available for access at the various surgical campuses. Simulators have several exercises to help users become more familiar with the robotic functions. Although we have identified some required exercises for practice, we encourage residents to explore all exercises throughout their training. Maintenance of robotic skills is best achieved with consistent use. We encourage residents to access the consoles for practice during/before rotations where robotic cases are likely to be encountered. All exercises can be accessed on any simulator. Locations and availability of the simulators vary by campus.
QEC Certification: To obtain a QEC certification you must compile the following documents and request a letter of recommendation from the Chair of the department of surgery.
1. Online module certificate 2. Docking proficiency sheet 3. Documentation of simulation completion 4. Bedside assistant cases (10) 5. Console cases (20) 6. Comprehensive attending review (2x)
Simulation Refreshers
Bedside Refreshers
Green, et al
8
DRY LAB SESSION OUTLINE:
Goals: • To improve resident knowledge and procedural competency with the robotic instrument • Participants will be able to recognize unique components of the robotic tool including:
o Port placement o Docking robot o Instrument Insertion and Exchange o Camera functions o Trouble shooting collisions
• Participants will be able to SAFELY and efficiently dock the robot and exchange instruments. Objectives:
• Describe the steps for docking the robot • List 3 key components of port placement • Demonstrate ability to dock robot and exchange instruments • Compare features of internal and external collisions • Recognize different types of collisions and explain how to manage
Activities:
1. Instructors will walk through the key steps, highlighting important features 2. Participants will complete an assessment to demonstrate competency in docking robot and
instrument exchange 3. Instructors will describe features of external and internal collisions 4. Participants will practice managing collisions from console and bedside.
~*~*~*~*~*~*~*~**~*~*~*~*~*~*~*~*~*~*~*~*~*~*~*~*~*~*~*~*~*~*~*~*~*
1) Walk through PORT PLACEMENT
• Size of ports: 8mm for camera, vessel sealer; 12mm for stapler, • Working distance for Xi robot: ~8cm apart • Measurements: to be performed after insufflation and creation of pneumoperitoneum • Port insertion: to second black line imprinted on trocar
BRINGING ROBOT TO BEDSIDE • Lighted green crosshatch marker (+) for guidance to center robot • Grab and move • Clutch to bring arm • Release tab = BEEP

Green, et al
9
ARM STAGES • Insert camera into port & adjust angle • “Target” anatomy • Dock remaining arms
EXTERNAL ADJUSTMENTS ***Avoid Collisions*** • Clearance • Arm spacing and alignment • Burp / Assess for collisions
INSTRUMENTATION ***Avoid Instrumentation Injuries*** • Guided (visualize) tool exchange • Camera exchange • Clean camera / flip scope • Connect cables • LED lights
2) Proficiency Assessment Dock robot, camera and instruments to target anatomy.
Instrument Exchange [ ] Clean camera [ ]

Green, et al
10
Proficiency Form (transcribed into online form)
Theme Skill Completed 1 2 Bringing Robot to Bedside
Green + 5cm from camera port Grab and move feature Clutch to bring arm to port Use release tab to dock. Hear beep
Arm stages Camera angle correct Camera target anatomy Dock remaining arms
External Adjustments Avoid Collisions
Adjust patient clearance Adjust proper spacing and alignment (fist width of elbows)
Burp ports Instrument Exchange Avoid Injuries
Guide tool exchange Guided camera exchange Use clutch at top of arm to move and advance instrument
Scope flip and cleaning Connect cables to energized instruments Identify colored LED light indications.
Green, et al
11
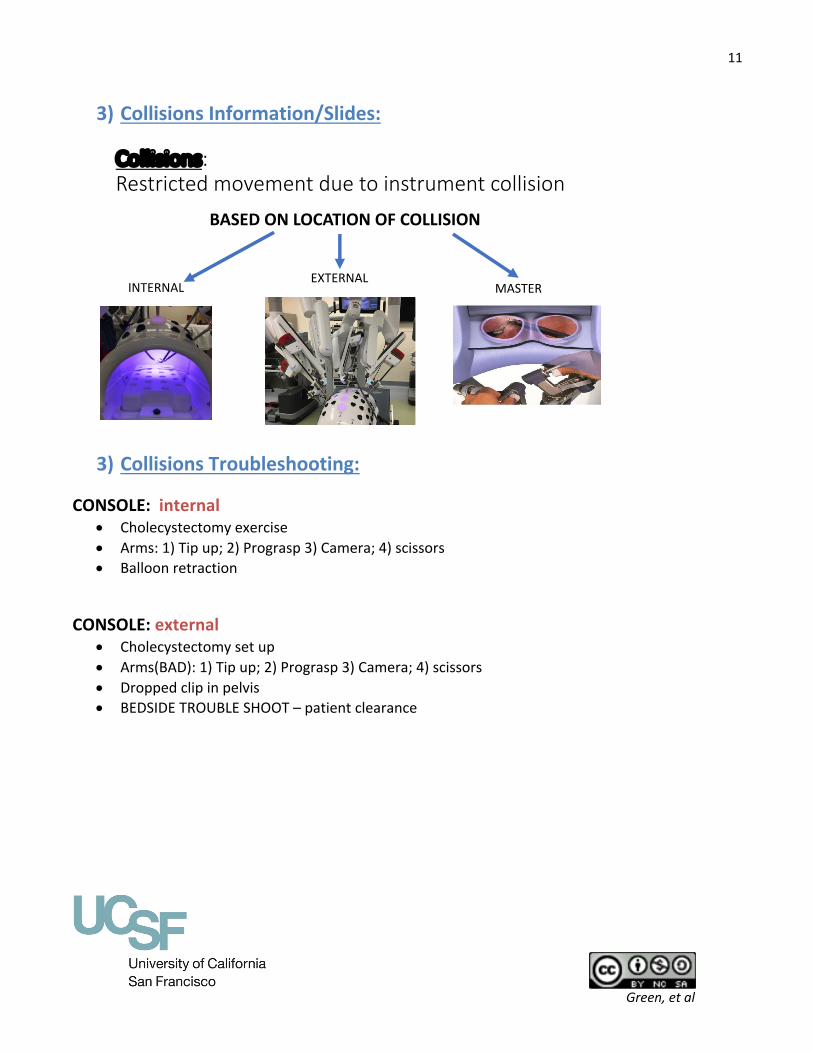
3) Collisions Information/Slides:
3) Collisions Troubleshooting:
CONSOLE: internal • Cholecystectomy exercise • Arms: 1) Tip up; 2) Prograsp 3) Camera; 4) scissors • Balloon retraction
CONSOLE: external
• Cholecystectomy set up • Arms(BAD): 1) Tip up; 2) Prograsp 3) Camera; 4) scissors • Dropped clip in pelvis • BEDSIDE TROUBLE SHOOT – patient clearance
Collisions:Restrictedmovementduetoinstrumentcollision
BASEDONLOCATIONOFCOLLISION
INTERNALEXTERNAL
MASTER

Green, et al
12
WET LAB OUTLINE
The goal of this lab is to provide residents with an opportunity to work with live tissue using robotic technology. The focus will be on applying surgical techniques and concepts in this unique environment. Instructors will be present and provide individual feedback for console surgeons. However, instructors will not be allowed to sit at the console and thus must rely on verbalization of instruction using language, gestures or a combination of both.

Green, et al
13
Simulator Access Instructions:

Green, et al
14
SIMULATION COMPLETION FORM
You are encouraged to explore all the exercises, but the following are required. To meet the requirement you need to achieve a score of 85%. Some will be easy, but others will take multiple attempts to improve your skills and reach 85%. Please record your score, the date you achieved it and the location of the simulator used in the table below. Once all the required modules have been completed with a score of 85% or greater, upload this form to the Robotic Smartsheet. If you need assistance with Smartsheet access, please email ******* in the Surgery Education Office: (Contact email address)_
Module Date Completed Location Score (%) Camera targeting 1
Peg Board 2
Energy switching 1
Ring walk 2
Thread the rings
Suture sponge 2
***Don’t forget to upload a photograph of the robotic screen illustrating the task name and your score for each module listed above.
15
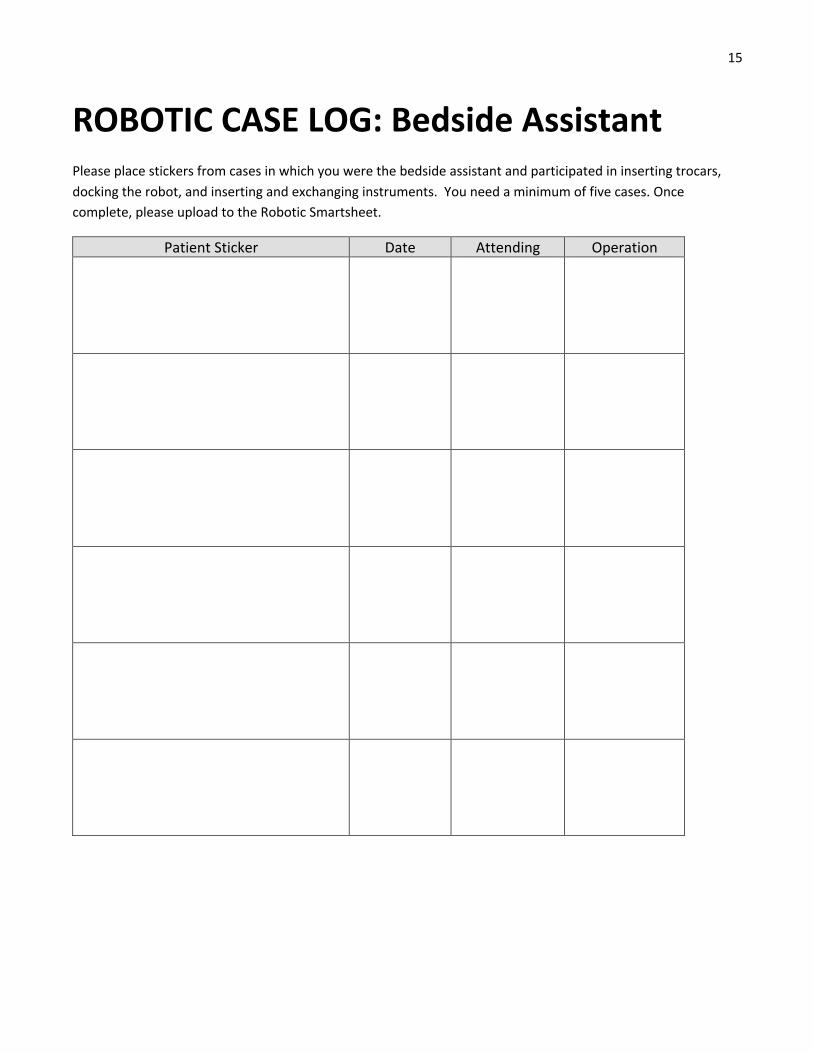
ROBOTIC CASE LOG: Bedside Assistant Please place stickers from cases in which you were the bedside assistant and participated in inserting trocars, docking the robot, and inserting and exchanging instruments. You need a minimum of five cases. Once complete, please upload to the Robotic Smartsheet.
Patient Sticker Date Attending Operation

16
Green, et al
ROBOTIC CASE LOG: Console Surgeon Please place stickers from a minimum of 5 cases in which you were the console surgeon and performed a significant portion of the case. You may copy this page as many times as necessary. Once complete, please upload to the Robotic Smartsheet.
Min/Mod/Max: Refers to the amount of time at the console you were acting as surgeon. (Min = 0-24% of the case as primary surgeon, Mod = 25-50% of the case as primary surgeon, Max = > 50% as primary surgeon)
Skills 1-6: Mark all that apply: 1) Retraction, 2) Tissue Manipulation, 3) Dissection, 4) Suture, 5) Electrocaudery/Staple, 6) other
Patient Sticker Date/ Attending
Operation/ Min/Mod/Max
Skills (1-6)
Jane Doe, MRN 1234567 1/1/17 Sigmoid
colectomy 1 X
2 X
3
Surgeon Min X
Mod Max 4 5 6
1
2 3
Min
Mod Max 4 5 6
1
2 3
Min
Mod Max 4 5 6
1
2 3
Min
Mod Max 4 5 6
1
2 3
Min
Mod Max 4 5 6
1
2 3
Min
Mod Max 4 5 6

17
Green, et al
Attending Evaluation: Console Surgeon This form is for residents in their final year who have already performed 20 cases as console surgeon. The evaluation is to be completed by the attending physician and reviewed with the resident at the completion of the case. Once complete, please upload to the Robotic Smartsheet.
Patient Sticker Resident Date
Operation
Skill Adequate More Practice Recommended
Demonstrates understanding of trocar placement and spacing
Understands principles of docking and is able to dock in a timely fashion
Uses camera appropriately and is able to focus the camera
Demonstrates appropriate clutching and maintains hands in a comfortable workspace
Demonstrates ability to use third arm and switch between instruments
SAFETY: Does not move instruments that are not in view
SAFETY: Recognizes tissue response to assess grip strength and handles tissue appropriately
Demonstrates ability to troubleshoot system and manage collisions
Please comment on areas of strength: Please comment on opportunities for improvement: The resident demonstrates competency on the robotic system. YES NO ____________________________ ______________________________ Attending Name Attending Signature