faculty.bemidjistate.edufaculty.bemidjistate.edu/grichgels/projects/2017 geomet… · web...
TRANSCRIPT
Geometry
Samantha RedepenningMonticello Middle School
Kristie O’BeirneBagley High School
Mandy PulaBagley High School
Grades 7-10

EXECUTIVE SUMMARY:
Unit 1: During this unit, students will be investigating circles. The unit will start with expanding students understanding on key concepts and terms associated with area, perimeter, and circles. Students will practice calculating area and perimeter of rectangles and work on identifying characteristics of a circle such as radius and diameter. Students will take their knowledge and understanding of area, perimeter, and circles to explore the formulas used to calculate area of a circle and circumference of a circle. Finally, students will practice calculating area and circumference of circles in terms of and using 3.14 with a fun matching activity. Unit 2: Students will be investigating side lengths to determine which triangle is acute, obtuse or right. Then students will explore the Pythagorean Theorem using squares to construct a right triangle. Once students understand how the Pythagorean Theorem works, they will then use the theorem to calculate areas and perimeters of polygons by solving for side lengths first. Finally they will use activities to use as practice to help retain the information they have learned. Unit 3: Students will construct their own 30-60-90 and 45-45-90 triangles. They will use their constructions to find the properties of special triangles and how their side lengths are related using the Pythagorean Theorem. Students will then fill in a unit circle using their knowledge of special triangles. At the very end we will wrap it up with a fun monster puzzle. MN STANDARDS:Unit 1:7.3.1.1 Demonstrate an understanding of the proportional relationship between the diameter and circumference of a circle and that the unit rate (constant of proportionality) is . Calculate the circumference and area of circles and sectors of circles to solve problems in various contexts. Unit 2:8.3.1.1 Use the Pythagorean Theorem to solve problems involving right triangles. For example: Determine the perimeter of a right triangle, given the lengths of two of its sides. Another example: Show that a triangle with side lengths 4, 5 and 6 is not a right triangle. 8.3.1.2 Determine the distance between two points on a horizontal or vertical line in a coordinate system. Use the Pythagorean Theorem to find the distance between any two points in a coordinate system. Solve problems involving right triangles using the Pythagorean Theorem and its converse. 8.3.1.3 Informally justify the Pythagorean Theorem by using measurements, diagrams and computer software. Unit 3: 9.3.3.4 Apply the Pythagorean Theorem and its converse to solve problems and logically justify results. 9.3.3.5 Know and apply properties of right triangles, including properties of 45-45-90 and 30-60-90 triangles, to solve problems and logically justify results.
TABLE OF CONTENTS:
Unit 1: Circles pg: 4Day 1: I got this: Perimeter and Area of Rectangles Day 2: What is a Circle, Radius, and Diameter?Day 3: What! I need to calculate the Circumference (Perimeter) of a CIRCLE!Day 4: From Circumference to AREA of a Circle!Day 5: Circles Finale! Pretest and Posttest pg: 13 Unit 2: Triangles and the Pythagorean Theorem pg: 14Day 1: What kind of triangle is it really? Day 2: Deriving the Pythagorean Theorem using squaresDay 3: Areas, Perimeters and Side Lengths...oh my! Day 4: Pythagorean Theorem Word ProblemsDay 5: Pythagorean Theorem Math LibPretest and Posttest pg: 19
Unit 3: Special Triangles pg: 20Day 1: Construct a 30-60-90 and a 45-45-90 TriangleDay 2: Analyze a 45-45-90 TriangleDay 3: Analyze a 30-60-90 TriangleDay 4: Unit CircleDay 5: Monster PuzzlePretest and Post Test pg: 23

UNIT 1 ~ Circles Day 1: I got this: Perimeter and Area of Rectangles
Students will take the first 20 minutes of class to complete the pretest that relates to this unit on Circles.
Launch: How have we learned to calculate perimeter and area of rectangles? Briefly review how to calculate the perimeter and area of rectangles. Provide each student with one centimeter graph paper. Each student will need to construct and cut out three different sized rectangles. Explore: Have students then calculate the perimeter (counting distance around) and area (space inside) the rectangles. They will copy the table below into their notebooks and place their data in the table.
Perimeter Area
Rectangle #1
Rectangle #2
Rectangle #3
Share: Once everyone has collected their data on perimeter and area, students will share with their group members their rectangles and their calculations for perimeter and area. After groups have had time to share and discuss, random students will be asked to come up and share their rectangle and explain how they went about calculating the perimeter and area. At this point, based on content learned in previous grades, I will ask if anyone knows the formulas for area and perimeter. A=lw P=2l+2wShow students how the formulas can be used to come up with the same exact answers as they did using the counting method. Summarize: During this time, students will be asked to do a “quick jot” in their notebook. In their notebook, I will explain that I would like them to write their own definition for area and perimeter. In addition to their own definitions, explain in their own words how they would calculate area and perimeter of a rectangle. Students should leave with the understanding that perimeter of a rectangle can be calculated by counting the distance around and area can be calculated by counting the space inside. They should also understand the same calculations can be found using the formulas.

Day 2: What is a Circle, Radius, and Diameter? Launch: Ms. Red ordered 4 pizzas for her mother’s birthday party last night. The Pizza Guy used a lot of big fancy words like: Circle, Radius, and Diameter. Ms. Red really has no clue what any of these things are! Today you are all going to be experts in helping her figure out what these fancy words mean! Explore: Before we start trying to figure out what a radius and diameter are, can anyone explain the type of shape a pizza is? How is a pizza similar to and/or different than rectangles we talked and explored yesterday? What are other examples of things in our lives that are circular? Great! I am confident that you all have an expert idea of what a circle is! We are now going to dive in and see if you experts can now help me figure out what in the world a radius and diameter are. (I will project the images below).Ms. Red drew pictures of each type of pizza and also recorded what the pizza guy told her about radius and diameter for each pizza. Some pizzas had full cuts from one part of the pizza through the center to the other side of the pizza while some only had cuts to the center. GOAL! With your tablemates, try to answer the following:
1. Can you use the pictures and numbers for diameter and radius that Ms. Red has given to make a prediction about what a radius and diameter of a circle are?
2. Can you determine how the radius and diameter of a circle are related?

Share: Once groups have had some time to discuss, one person from each group will write their groups answers to the above two questions on the board. We will take time as a whole group to share and discuss. Summarize: As a “quick jot” in their notebooks for today, students will summarize our findings from class today and give their own definitions of circle, radius, and diameter.I will remind them that it may be helpful to include our conclusions about how the diameter and radius of a circle are related. Students should leave with the understanding that a radius of a circle is the distance from the center to any point on the circle. Diameter is two times the radius and is a straight line that goes from one side of the circle to the other and goes through the center.
Day 3: What! I need to calculate the Circumference (Perimeter) of a CIRCLE!
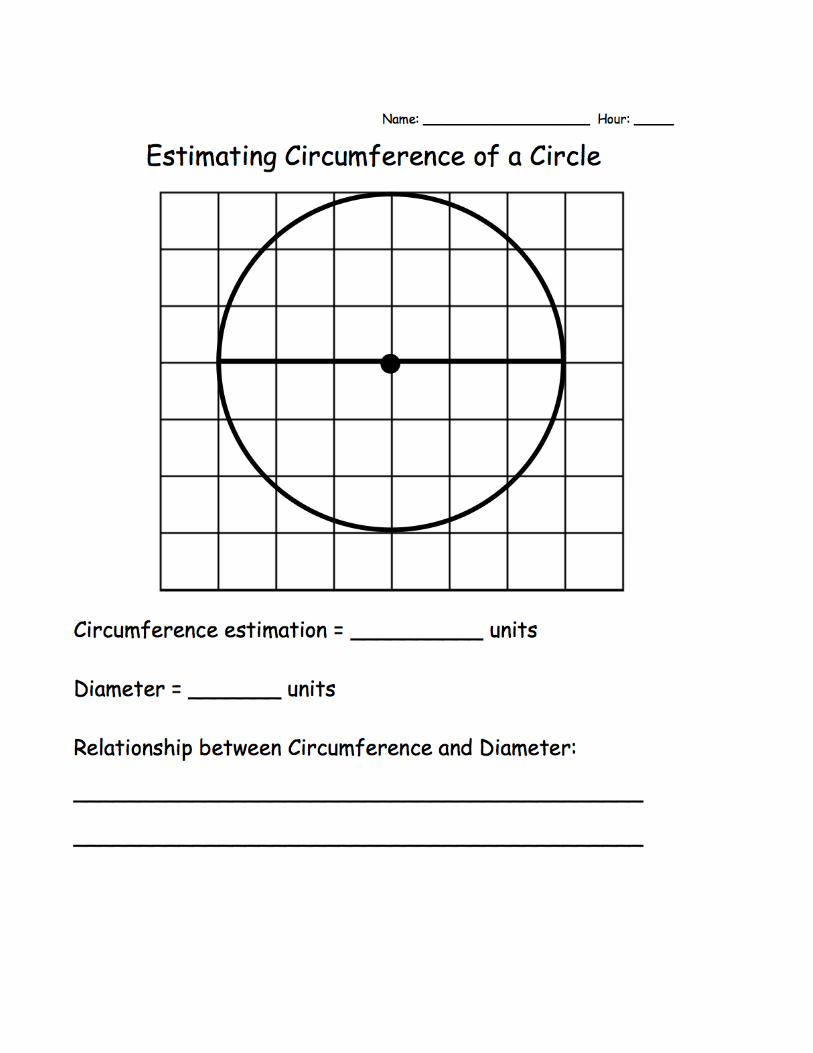
Launch: A few days ago we learned how to find the perimeter and area of rectangles. Can anyone give a real-life example of why it would be important to know the area and perimeter of something rectangular? Yesterday we started exploring circles!! We learned that diameter is two times the length of the radius. Can someone come to the board and draw a picture explaining radius and diameter?Today we are going to use radius, diameter, and an activity to help us figure out a way to calculate circumference of a circle! (during this time I will ask students to write the word Circumference in their notebook. I will then have them watch me as I outline what the circumference of a circle looks like. Before getting into the activity, I will ask them if they can think of another word that we have learned about that it is the same as Circumference. Groups will share)I want them to make sure after circumference in their notebook they write = perimeter = the distance around somethingBefore we begin, can anyone give a real-life example of why it would be important to know the circumference/perimeter of something circular!?! Explore: Handout worksheet to each student (found on page 9). Students will also be given a piece of yarn and a ruler. I will explain to students they have time to explore the following things in their group:
1. Each person needs to estimate the circumference of the circle using the yarn and ruler.
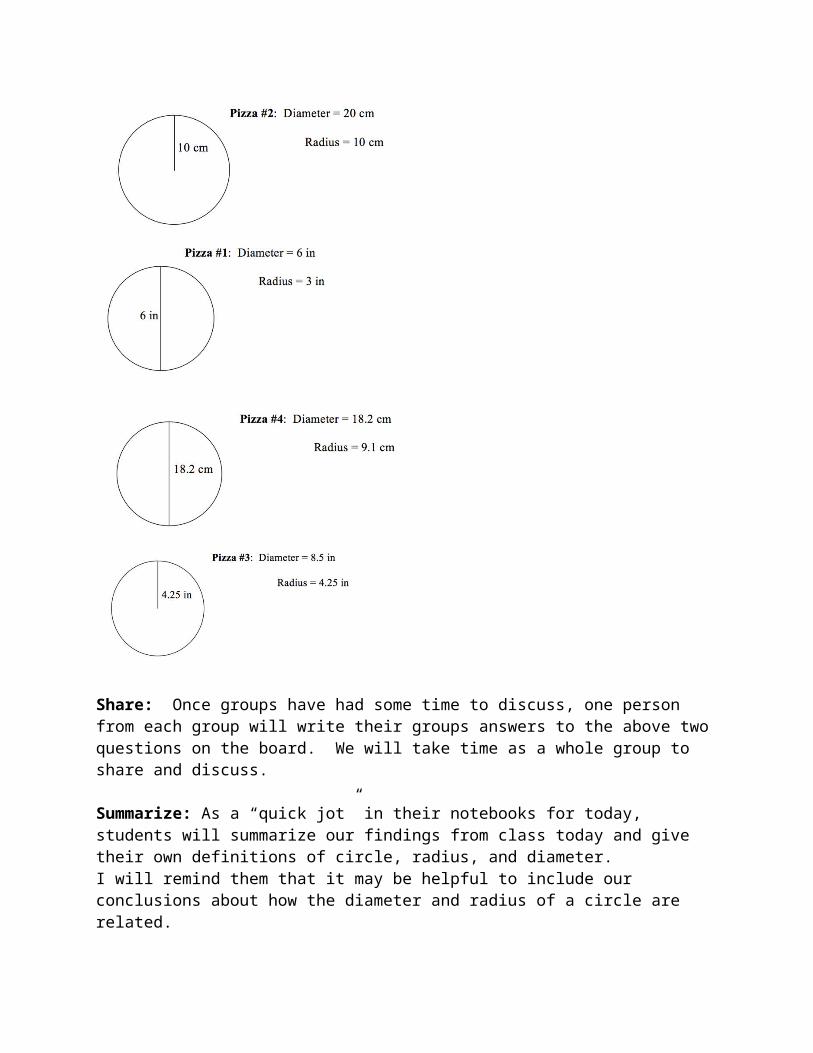
2. Each person needs to calculate the diameter 3. Each group member needs to compare their answers from 1 and 2 and if
someone is way off or numbers don’t match up, try to figure out where mistakes were made
4. See if your group can come up with a relationship between circumference of a circle and it’s diameter! HINT: There IS a relationship… can you figure it out?
Share: Groups will agree on an estimation, diameter, and relationship and write their findings on the board. Once every group has shared their findings on the board, 2-4 students will share how they used the yarn and ruler to estimate the circumference of the circle. We will then discuss as a class the relationship between diameter and circumference. This is how we will derive our circumference formula. For example, the circle they are given has a diameter of 6. If a student gets a circumference estimation of 19, students will be able to come up with that the circumference is a little over 3 times the diameter. The number slightly over three is replaced with Pi is the ratio of the Circumference over the diameter. =Cd**Before this unit we will have talked about . We talked about the symbol is the exact value and that 3.14 is the rounded version. To make things easier, we will stick with using 3.14. I will bring up and show them the circumference formula. C=d is the formula and it works because we learned that the diameter is a little over 3 times the diameter and 3.14 is slightly over 3. Summarize: As a “quick jot” in their notebooks, students will summarize the answers to the following questions: What is another name for circumference? What is the perimeter or circumference of something? What did we learn about the relationship between diameter and circumference of a circle? Why does the formula C=d make sense based on what we learned today?


Day 4: From Circumference to AREA of a Circle!
Launch: The following 4 problems will be drawn on the whiteboard. Students will be asked to copy down the 4 problems and calculate the circumference using the formula we came up with yesterday: C=d. I will remind students to replace with 3.14. **During this time I will be circulating the room and answering questions
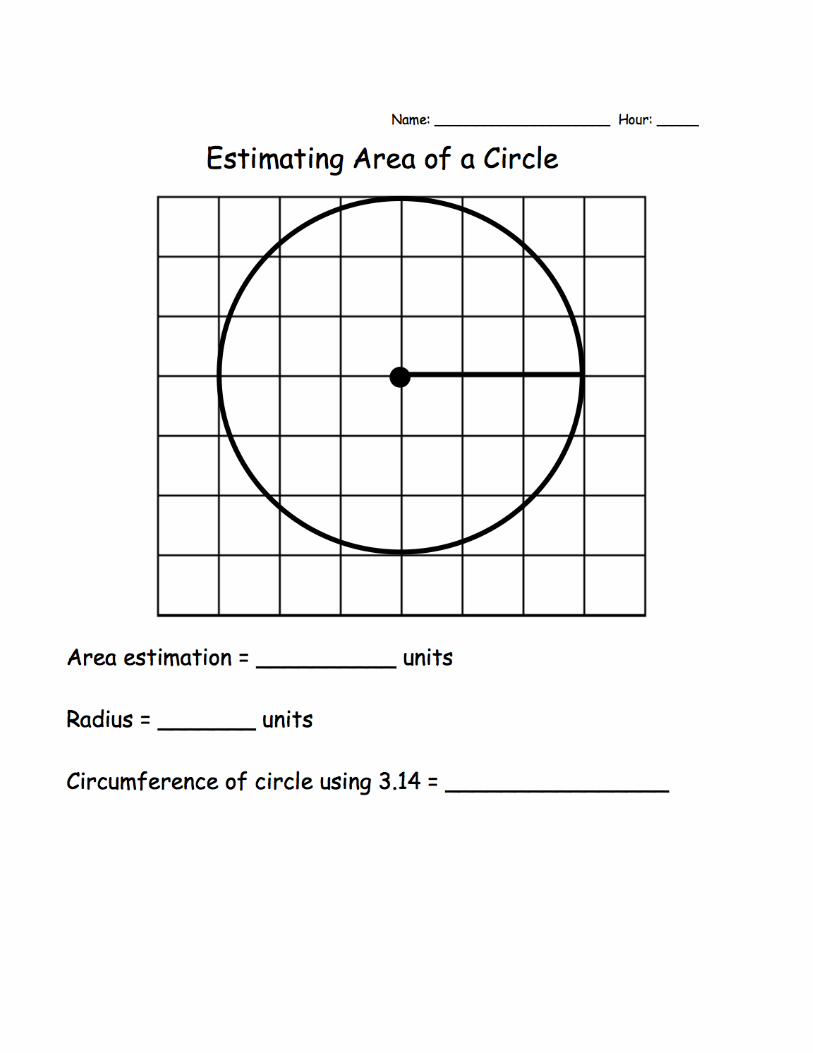
Students will first work through the problems on their own. I will then give them 3 minutes to discuss in their groups. I will remind them that everyone in their group needs to know how to do it. If one person in a group is stuck, help them out. Come back together as a class and pick a different student to come to the board and show how they made the calculation. Clear up any questions from yesterday’s findings and make sure students have the circumference formula written in their notebook. Explore: Transition from finding circumference / perimeter to finding AREA!! Handout worksheet to each student (see page 12). In groups, they will have eight minutes to do the following things in their group:
1. Each person needs to estimate the area of the circle by counting the space inside
2. Each person needs to calculate the radius3. Each person needs to calculate the circumference using 3.14 for 4. Each group member needs to compare their answers from 1, 2, and 3 and if
someone is way off or numbers don’t match up, try to figure out where mistakes were made
Share: Once groups complete the 3 tasks in explore, one group member will record findings on board. As a class we will find the relationship between area and the radius of circle. We will use the circles they used to calculate the area estimations. As an entire class, I will walk them through:
1. Each student needs to cut their circle into 4 equal sections (we are working towards the figure shown below)
a. Show students how they start to look like a parallelogram2. Cut each fourth in half
a. Again, closer to a parallelogram (something we know)3. Cut each piece in half once more
a. Have students place them so they look like a parallelogram i. Area can be found by A=lw
We will conclude as a class:Width = radius Length = 12C=12d=r being half of the circumference.Width Length = rr=r2 Area of a circle formula is: A=r2
Summarize: As a “quick jot” students will summarize the following prompts in their notebooks:What did we learn about the relationship between radius and the area of a circle? Why does the formula A=r2 make sense based on what we learned today?


Day 5: Circles Finale!
Students will take about the last 20 minutes of class to complete the posttest that relates to this unit on Circles.
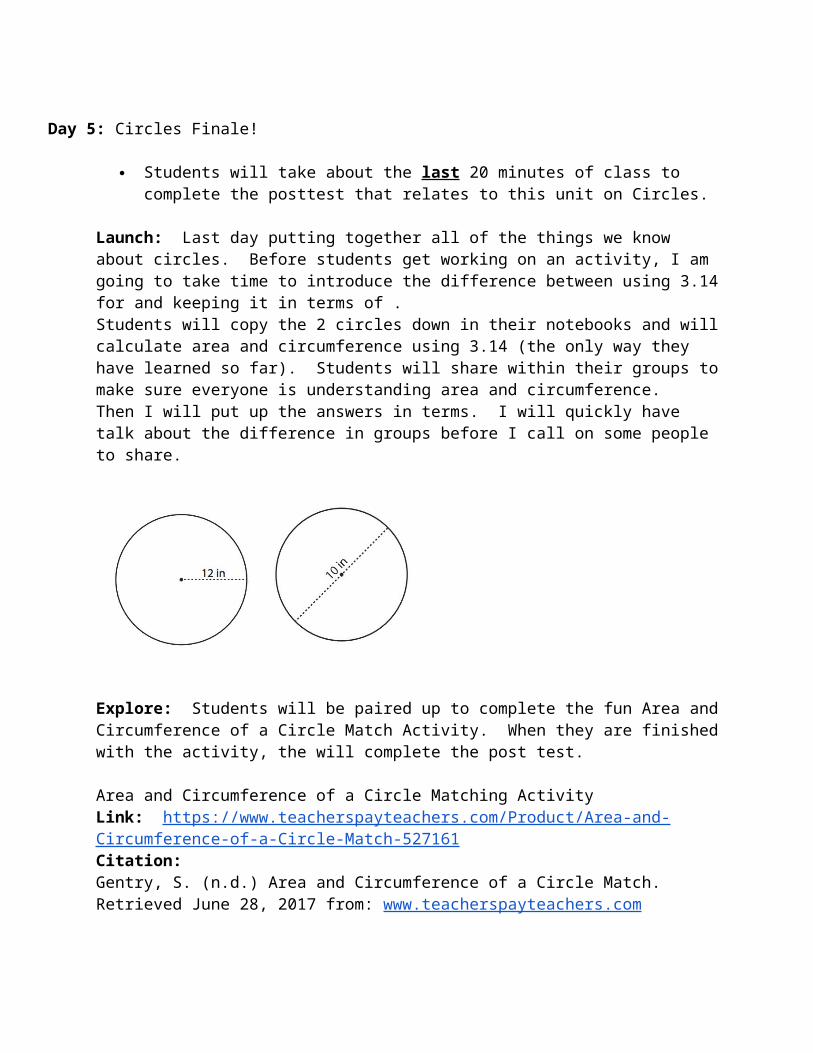
Launch: Last day putting together all of the things we know about circles. Before students get working on an activity, I am going to take time to introduce the difference between using 3.14 for and keeping it in terms of .Students will copy the 2 circles down in their notebooks and will calculate area and circumference using 3.14 (the only way they have learned so far). Students will share within their groups to make sure everyone is understanding area and circumference.Then I will put up the answers in terms. I will quickly have talk about the difference in groups before I call on some people to share.
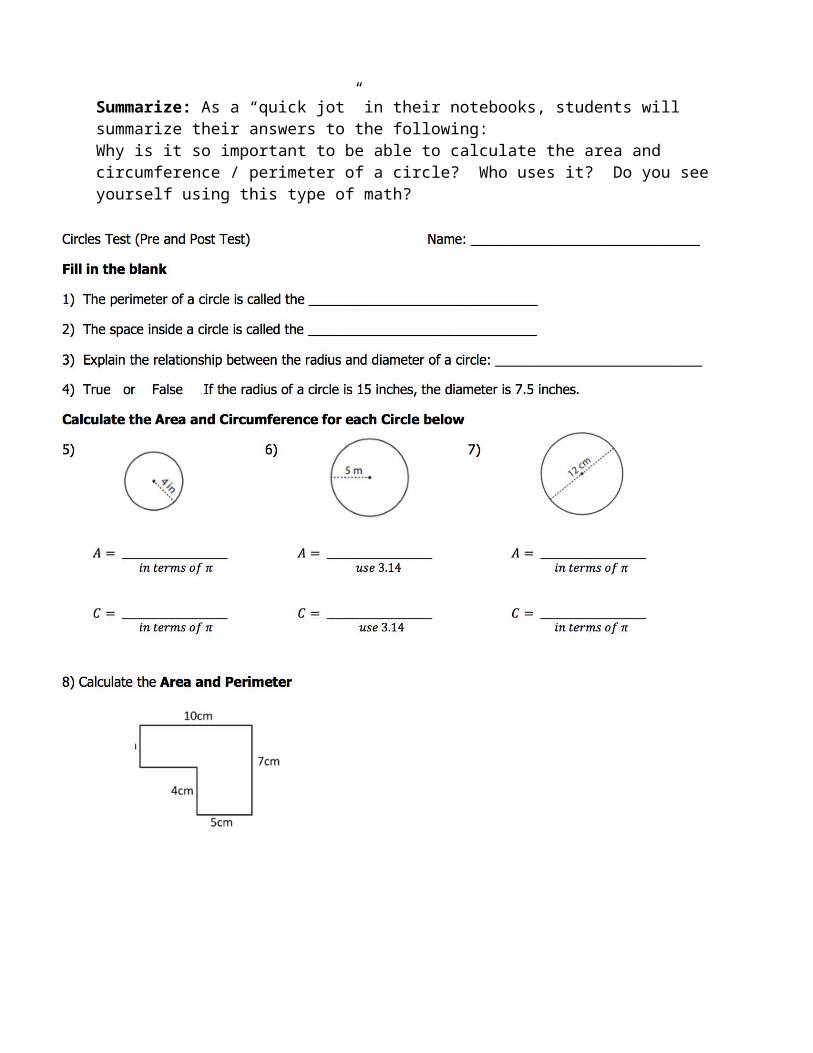
Explore: Students will be paired up to complete the fun Area and Circumference of a Circle Match Activity. When they are finished with the activity, the will complete the post test. Area and Circumference of a Circle Matching Activity Link: https://www.teacherspayteachers.com/Product/Area-and-Circumference-of-a-Circle-Match-527161Citation:Gentry, S. (n.d.) Area and Circumference of a Circle Match. Retrieved June 28, 2017 from: www.teacherspayteachers.com Summarize: As a “quick jot” in their notebooks, students will summarize their answers to the following:Why is it so important to be able to calculate the area and circumference / perimeter of a circle? Who uses it? Do you see yourself using this type of math?

UNIT 2 ~ Triangles and the Pythagorean Theorem
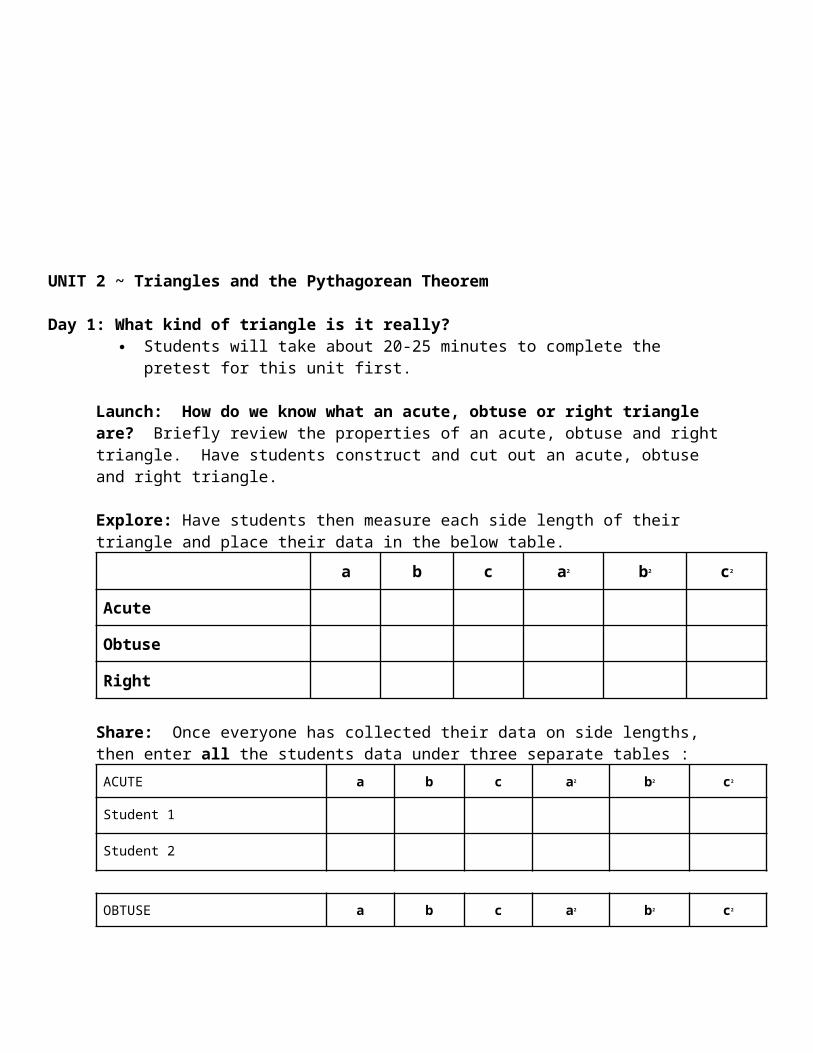
Day 1: What kind of triangle is it really? Students will take about 20-25 minutes to complete the pretest for this unit first.
Launch: How do we know what an acute, obtuse or right triangle are? Briefly review the properties of an acute, obtuse and right triangle. Have students construct and cut out an acute, obtuse and right triangle. Explore: Have students then measure each side length of their triangle and place their data in the below table.
a b c a2 b2 c2
Acute
Obtuse
Right
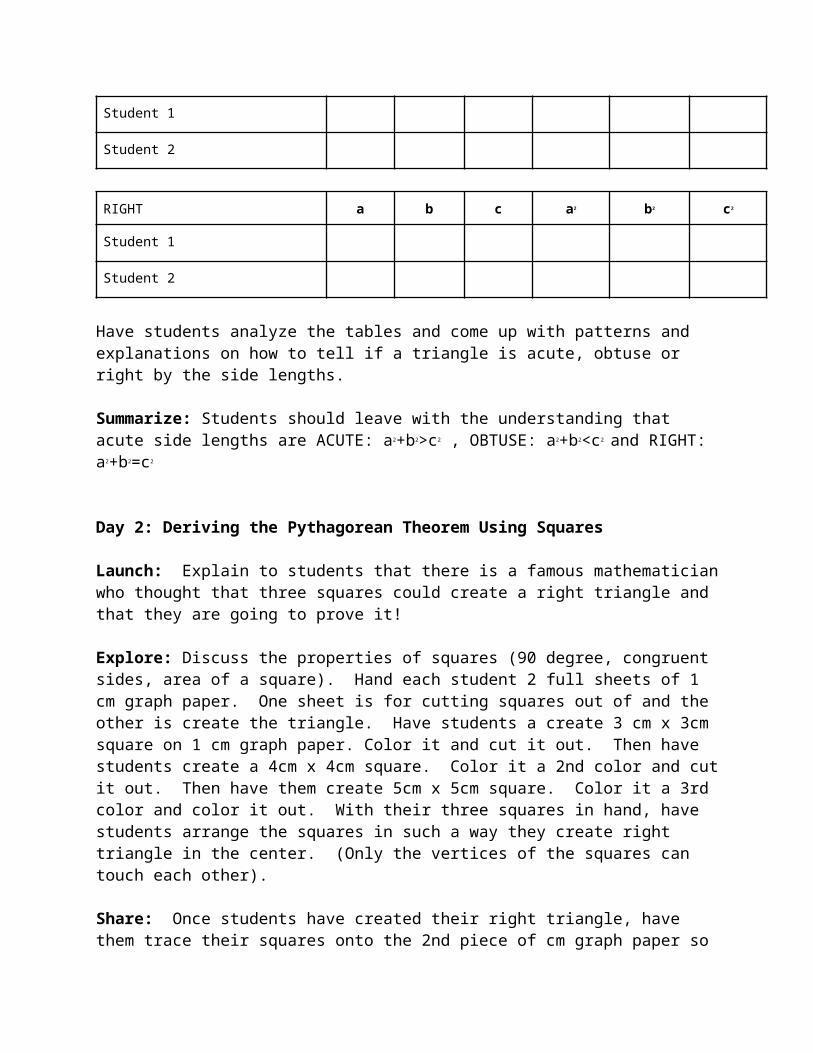
Share: Once everyone has collected their data on side lengths, then enter all the students data under three separate tables :ACUTE a b c a2 b2 c2
Student 1
Student 2
OBTUSE a b c a2 b2 c2
Student 1
Student 2
RIGHT a b c a2 b2 c2
Student 1
Student 2
Have students analyze the tables and come up with patterns and explanations on how to tell if a triangle is acute, obtuse or right by the side lengths. Summarize: Students should leave with the understanding that acute side lengths are ACUTE: a2+b2>c2 , OBTUSE: a2+b2<c2 and RIGHT: a2+b2=c2
Day 2: Deriving the Pythagorean Theorem Using Squares Launch: Explain to students that there is a famous mathematician who thought that three squares could create a right triangle and that they are going to prove it! Explore: Discuss the properties of squares (90 degree, congruent sides, area of a square). Hand each student 2 full sheets of 1 cm graph paper. One sheet is for cutting squares out of and the other is create the triangle. Have students a create 3 cm x 3cm square on 1 cm graph paper. Color it and cut it out. Then have students create a 4cm x 4cm square. Color it a 2nd color and cut it out. Then have them create 5cm x 5cm square. Color it a 3rd color and color it out. With their three squares in hand, have students arrange the squares in such a way they create right triangle in the center. (Only the vertices of the squares can touch each other). Share: Once students have created their right triangle, have them trace their squares onto the 2nd piece of cm graph paper so when they remove the cut out squares, the image is still the same. Have a student from each group tape their work on the boards for everyone to see.
Are these the same? Why? Do they all create a right triangle? Discuss side lengths and squares?
Now discuss how the famous mathematician said that if all three squares can form a right triangle, then when there are two squares added together, their sum with equal the third square.
Have students find this out to be true using scissors to see if two squares can equal a third.
Summarize: Introduce new vocabulary: leg and hypotenuse. Write theorem out as a2+b2=c2 and leg2+leg2=hypotenuse2. Discuss how will we know what the hypotenuse or a leg is? Will this work every time?
Day 3: Areas, Perimeters and Side Lengths...oh my!
Launch: Ask student how to build a fence? What things do we need to know before we can build a fence? Why are these things important? Give students worksheet with different polygons on it. State that they will need to calculate the perimeter and area of each shape to accurately put a fence around it. Explore: Hand out worksheet (see next page) with different shapes on it and have students calculate the area and perimeter. Share: Students will share their answers and explanations to the class on the projector.
Summarize: Why can finding area and perimeter be tricky? How are we going to remember the formulas (pythagorean thm, area of square and triangle, finding perimeter?
Day 4: Pythagorean Theorem Word Problems Launch: Draw a picture of the board of this problem:
Have students work this out and pick a group to explain their answers. Explore: Have students pair up. Hand out the student sheet to each student. Then randomly place task cards all over the classroom for students to complete. Pythagorean Theorem Task Card Activityhttps://www.teacherspayteachers.com/Product/Pythagorean-Theorem-Task-Cards-with-QR-Codes-1790989 Share: Have student display their answers and explanations on the projector. Summarize: What problems were the easiest/hardest? Where there any other ways you could solve these problems?
Day 5: Pythagorean Theorem Math Lib Activity
Students will take about 20 minutes to complete the posttest for the LAST 20 minutes .
Launch: Last day putting all we know about Triangles and Pythagorean Theorem to work. Pythagorean Theorem Math Lib Activityhttps://www.teacherspayteachers.com/Product/Pythagorean-Theorem-Math-Lib-754408 Explore: Students will be paired up again to complete the fun Math Lib Activity. When they are finished with the activity, the will complete the post test. Summarize: Why is the Pythagorean Theorem so important? Who uses it? Do you see yourself using this type of math?
Name: _______________________________Triangles and Pythagorean Theorem (Pre and Post Test)
Find the missing side lengths.
1. 2. 3.
What type of triangle do the side lengths make?4. Side lengths: 7, 13, 9 5. Side lengths: 7, 8, 9 6. Side lengths: 6, 10, 8 Find the perimeter and area of each polygon
7. 8.

Unit 3 ~ Special Triangles Day 1: Construct a 30-60-90 and a 45-45-90 Triangle PretestObjective: Students will construct a 30-60-90 and a 45-45-90 Triangle. Launch: Today we will be constructing some triangles, but not just any triangle these are special triangles. Everyone is going to construct different sized triangles. The first thing I want you to do is construct an equilateral triangle. Here is a hint make your side lengths an integer.Explore: Students will construct their triangles.Instruct: Now in an equilateral triangle what are my angle measures? (The class should respond with 60 degrees). Great label your angles on your triangle. Next take your triangle and fold it in half and then cut it. The angle you folded in half how many degrees would that angle be? (The class should respond with 30 degrees). So I have one 60-degree angle and one 30-degree angle. What would my last angle be? (90 degrees). Make sure you name is on your triangle and let’s save this for tomorrow. Now let’s start a new construction. I want all of you to make a square, and here is a hint you want the lengths of the sides of your square to be an integer.Explore: Students will construct their squares. We will do the same process as we did with the equilateral triangle to construct our 45-45-90 triangle.Share: I want all of you to put your names on your triangles and tape them up somewhere in the room for all of us to see.Summarize: We have just constructed what is called a 30-60-90 and a 45-45-90 triangles. Tomorrow we will begin discussing what makes them so special.
Day 2: Analyze a 45-45-90 Triangle Objective: Students will analyze their 45-45-90 triangle to find the relationship between the side lengths. Launch: Yesterday we constructed some special triangles, but I am a little confused as to why they are so special. So today I am hoping you can help me figure it out. Today we will focus on just the 45-45-90 triangle. In your groups I want you to use the Pythagorean Theorem to figure out the side lengths of your triangles in simplest radical form. Once you know your side lengths come put them up on the board in the chart I have drawn for you.Intro to Special TrianglesExplore: In groups students will find the lengths of their 45-45-90 triangles, and record their answers on the board. Next I will have students look to see if they can find any patterns for the side lengths of a 45-45-90 triangle. Share: Students will share what they found for a pattern for a 45-45-90 triangle.Summarize: Today we found that for a 45-45-90 triangle the hypotenuse is always our leg length times the square root of 2. Tomorrow maybe we can conclude why a 30-60-90 triangle is so special.

Day 3: Analyze a 30-60-90 Triangle Objective: Students will analyze their 30-60-90 triangle to find the relationship between the side lengths.Launch: Yesterday we found that for a 45-45-90 triangle the hypotenuse is always our leg length times the square root of 2. Today I was wondering if we could figure out why they call a 30-60-90 triangle is special. In your groups I want you to use the Pythagorean Theorem to figure out the side lengths of your triangles in simplest radical form. Once you know your side lengths come put them up on the board in the chart I have drawn for you.Intro to Special TrianglesExplore: In groups students will find the lengths of their 30-60-90 triangles, and record their answers on the board. Next I will have students look to see if they can find any patterns for the side lengths of a 30-60-90 triangle. Share: Students will share the pattern they observed with a 30-60-90 triangle.Summarize: So today we found out that for a 30-60-90 triangle our hypotenuse is always 2 times as big as our littlest side, and our other side is always times the square root of 3. Tomorrow we will talk more about why these are important triangles.
Day 4: Unit Circle Objective: Students will use their 30-60-90 and 45-45-90 triangles to fill in a unit circle.Launch: I have this circle and it’s called a unit circle. Supposedly there is some way that your triangles will fit in this unit circle to give coordinates. Someone told me that this only works if your hypotenuse is 1. Can you help me in figuring this out? Put your answers on the board when done.Explore: Students will work in groups to figure out the coordinates of the unit circle and how it relates to their triangles.Share: Students will share their work with the class.Summarize: Today we figured out something pretty cool. This unit circle is a big part of Algebra 2 and Calc.

Day 5: Monster PuzzleObjective: Students will use their knowledge about 30-60-90 and 45-45-90 triangles to complete a monster puzzle. Launch: I have been working on this puzzle for a long time and I just can’t figure it out. I need you to use your expert skills and help me. Explore: In groups students will work on their monster puzzle.Monster PuzzleShare: As a class we will work on filling in the table on the board and explaining what they did to get that answer. Summarize: Now that we know everything there is to know about special triangles we can start exploring more exciting topics that our special triangles might play a part in.

Pretest and Post Test:
For each triangle find the two missing side lengths.
