geostatistics for the environmental...
TRANSCRIPT

GS+ User’s Guide Version 7
GGSS++
G A M
EEnnvv
GGeeooSSttaattiissttiiccss ffoorr tthhee iirroonnmmeennttaall SScciieenncceess
M A D E S I G N S O F T W A R EAccessible Geostatistics for Everyday Science

GS+ ™
GeoStatistics for the Environmental Sciences Version 7
Gamma Design Software, LLC Plainwell, Michigan 49080
800/873-0690 phone 269/685-0910 fax
www.gammadesign.com

Copyright © Copyright 1989-2005 Gamma Design Software, LLC. All Rights Reserved
ISBN number 0-9707410-0-6
Information in this document is subject to change without notice and does not repre-sent a commitment on the part of Gamma Design Software. The software described is provided under a license agreement and may be used or copied only as specified in the agreement. No part of this document may be reproduced in any manner whatsoever without the express written permission of Gamma Design Software.
Gamma Design Software P.O. Box 201 Plainwell, Michigan 49080 U.S.A.
Citation The appropriate citation for this documnent is Gamma Design Software. 2004. GS+: Geostatistics for the Environmental Sciences. Gamma Design Software, Plainwell, Michigan USA.
Trademarks Microsoft and Windows are trademarks or registered trademarks of Microsoft Corpo-ration. Surfer is a registered trademark of Golden Software, Inc. ArcView and Arc/Info are registered trademarks of ESRI, Inc. Other brands and their products are trademarks or registered trademarks of their respective holders and should be noted as such. GS+ is a trademark of Gamma Design Software.
February 2004 October 2004 rev

Table of Contents
i
Table of Contents
Chapter 1 Introduction Overview ..............................................................................................1 System Requirements ..........................................................................2 Installation ............................................................................................2 Updates ................................................................................................2 Licensing and Copy Protection ............................................................3 Single-User License Agreement ..........................................................3 Chapter 2 Getting Started From Data to Maps: How to Proceed...................................................5 General Screen Layout ........................................................................5 Menus...................................................................................................6 User Preferences ...............................................................................13 Graph Settings ...................................................................................17 Printing Graphs ..................................................................................23 Printing Data or Text ..........................................................................24 Using Older-Version GS+ Files...........................................................24 Chapter 3 Working with Data The Data Worksheet Window ............................................................25 Column Assignments .........................................................................28 Covariate Values Warning..................................................................29 Missing Values ...................................................................................29 Data Filter Dialog................................................................................30 Duplicate Values ................................................................................31 Chapter 4 Importing Data from External Files File Import Dialog ...............................................................................33 Importing Text Files............................................................................34 Text Input File Formats GS+ .............................................................................................36 GeoEas.......................................................................................37 ArcView® XYZ.............................................................................38 Surfer® XYZ ................................................................................39 Spreadsheet and Database Input Files..............................................40 Input File Formats (File Import Properties) ........................................41

Table of Contents
ii
Viewing Files (File View Window) ..................................................... 42 Appending Data to an Existing Worksheet (Data Append Dialog).... 42 Chapter 5 Summary Statistics Z Variate Summary............................................................................ 43 Frequency Distributions Frequency Distribution Histograms ........................................... 45 Cumulative Frequency Distribution............................................ 47 Normal Probability Distribution .................................................. 49 X,Y Coordinates Summary................................................................ 51 Coordinate Postings (Quantile Plots) 2-Dimensional Data ................................................................... 52 1-Dimensional Data ................................................................... 54 Defining Posting Intervals.......................................................... 55 Regression Analysis Tab................................................................... 56 Cross-Variate Regression Window............................................ 57 Regression Values..................................................................... 58 Chapter 6 Semivariance Analysis Overview ................................................................................................... 59 The Autocorrelation Window ..................................................................... 60 Define Nonuniform Lag Class Intervals............................................. 64 Variograms Window .......................................................................... 66 Semivariance Values Window........................................................... 67 Isotropic Variogram Models............................................................... 68 The Spherical Isotropic Model ................................................... 71 The Exponential Isotropic Model ............................................... 72 The Linear Isotropic Model ........................................................ 73 The Gaussian Isotropic Model................................................... 74 Anisotropic Variogram Models .......................................................... 75 The Spherical Anisotropic Model............................................... 77 The Exponential Anisotropic Model ........................................... 78 The Linear Anisotropic Model.................................................... 78 The Gaussian Anisotropic Model............................................... 79 Anisotropic Semivariance Surface (2D Variogram Map)................... 80 Cross-Autocorrelation or Cross-Semivariance Analysis ................... 83 Chapter 7 Other Autocorrelation Measures Standardized Variograms.................................................................. 85 Madograms........................................................................................ 86

Table of Contents
iii
Rodograms.........................................................................................87 Drift ....................................................................................................88 Correlograms......................................................................................89 Covariance Analysis...........................................................................90 General Relative Variograms .............................................................91 Pairwise Relative Variograms ............................................................92 Moran’s I Analysis ..............................................................................93 Fractal Analysis ..................................................................................94 Chapter 8 Variance Clouds and h-Scattergrams Overview ............................................................................................95 Variance Clouds .................................................................................95 Variance Cloud Pairs .........................................................................99 h-Scattergrams ................................................................................100 h-Scattergram Pairs ........................................................................104 Chapter 9 Interpolation Basics Overview ..........................................................................................105 The Interpolation Window ................................................................107 Z Estimate Boundaries .....................................................................109 Defining a Uniform Interpolation Grid ..............................................110 Defining a NonUniform Interpolation Grid ........................................112 Polygon Outlines (Interpolation Masks) ...........................................114 Polygon Outline Map .......................................................................116 Cross-Validation Analysis ................................................................117 Cross-Validation Values ..................................................................118 Chapter 10 Conditional Simulation Overview ..........................................................................................119 Secondary Data for Simulations.......................................................121 Number of Simulations .....................................................................122 Chapter 11 Kriging and Cokriging Kriging ..............................................................................................123 Cokriging ..........................................................................................125 Chapter 12 Inverse Distance Weighting Inverse (IDW) and Normal (NDW) Distance Weighting ...................127

Table of Contents
iv
Chapter 13 Interpolation Output File Formats GS+ (.krg) Format ............................................................................ 129 ArcInfo® or ArcView® (.asc) Format............................................... 130 Surfer® (.grd) Format ...................................................................... 131 Chapter 14 Mapping The Mapping Window ..................................................................... 133 Map Contour Intervals .................................................................... 137 3D Maps ......................................................................................... 139 Standard Deviations ............................................................... 140 Rotation ................................................................................... 141 2D Maps ......................................................................................... 142 Standard Deviations ............................................................... 142 Sample Posting ....................................................................... 143 Transects (1d Maps) ....................................................................... 144 Standard Deviation ................................................................. 144 Chapter 15 Bibliography ......................................................................................... 145 Chapter 16 Glossary ................................................................................................. 147 Index ................................................................................................. 155

Chapter 1 Introduction
1
Chapter 1 Introduction GS+ is a GeoStatistical Analysis program that allows you to readily measure and illustrate spatial relationships in geo-referenced data.
GS+ analyzes spatial data for autocorrelation and then uses this information to make optimal, statistically rigorous maps of the area sampled. The maps can be created in GS+ or in other mapping programs or geographic information systems.
When do I need geostatistics? You need geostatistics when you need to make accurate, statistically rigorous maps created from incomplete data – which means whenever you make a map for a prop-erty that cannot be exhaustively sampled. Whether you are mapping oil deposits or plankton distributions, geostatistics allows you greater confidence in the interpolated values for the locations not actually sampled.
Statistics Provided by GS+
GS+ provides spatial autocorrelation analysis:
• Semivariance analysis produces variograms and different types of variogram models, including isotropic and anisotropic variograms;
• Anisotropic variogram maps make it easy to recognize anisotropy; • h-Scattergrams and Variance clouds provide an easy way to recognize data
outliers; and • Many other types of autocorrelation measures, including Moran's I, fractals,
correlograms, covariograms, madograms, rodograms, drift, standardized variograms, and general and pairwise relative variograms.
GS+ provides fast interpolation:
• Block kriging and punctual kriging provide optimal interpolation of a discrete point or an area around a sample point location;
• Conditional simulation provides probability based interpolations and estima-tion error;
• Cokriging provides optimal interpolation when you have only a few samples for the primary variate but lots of samples for an easier-to-measure, related variate; and
• Inverse distance weighting provides simple nearest neighbor interpolation based only on distance to nearby samples.

Chapter 1 Introduction
2
GS+ provides basic parametric statistics:
• Sample means and variance; • Frequency distributions, probability distributions, and skewness and kurtosis
measures for determining departures from normality; and • Quantile plots or coordinate maps show the distribution of sample values
across the spatial domain; • Transformations for returning the data to normality; and • Regression analysis for covariates vs. primary variates.
System Requirements • PC Compatible with Pentium or faster processor • Windows NT4 / 2000 / XP or higher Operating System • A minimum of 40 MB of free hard disk space • A minimum of 64 MB RAM
Installation To install GS+:
1) Insert the CD-ROM or download the installation file to a temporary folder
2) From the Windows Start Button, click Run
3) Type g:\Setup [use your CD-ROM drive letter for g:]
4) The Setup program will prompt you through the installation process. Follow the instructions on the screen. The serial number for your copy of GS+ can be found on the GS+ CD-ROM package.
Updates Maintenance updates are available free of charge to registered users. Update files are available by download only from http://www.gammadesign.com. The current version of GS+ can be checked from the Help menu as described in Chapter 2.

Chapter 1 Introduction
3
Licensing and Copy Protection Copy Protection The standard version of GS+ is not copy-protected. We rely on national and interna-tional copyright law and the integrity of our users to abide by the license agreement printed on the CD or diskette envelope and below. This agreement limits you to installing your serialized copy of GS+ on only one computer unless you have a site license.
Site Licensing If you have reason to install GS+ on more than one computer in the same laboratory, or on a network that allows more than one user at a time to access the program, please contact Gamma Design for information about converting your single-user license to a site or classroom license. It is a violation of your single-user license agreement if the program resides on more than one computer.
Single-User License Agreement Gamma Design Software License Agreement Please read carefully; this is a legal agreement between you (the end user) and Gamma Design Software, LLC (“Gamma Design”). When you break the seal on the software media you signal your agreement to be bound by the terms of this agree-ment, including the Software License and the Limited Warranty. If you do not agree to be bound by the terms of this agreement, do not open the package and return the package together with accompanying written material to Gamma Design at the ad-dress below for a full refund. SINGLE USER Software License
1. Gamma Design retains ownership of the GS+ program enclosed. Gamma Design gives you (the end user) the right to use a single copy of GS+ on a single computer. You may use GS+ on a network or file server ONLY if access is limited to one user at a time and you have the original copy of the documentation and program disks. You do not have the right to install or use GS+ on more than one computer, hard disk drive, or file server at a time.
2. GS+ is owned by Gamma Design and is protected by United States copyright laws and international treaty provisions. GS+ must be treated like any other copyrighted mate-rial although you may either 1) transfer GS+ to a single hard disk drive so long as you keep the original copy for the purpose of backup, or 2) make one copy of GS+ for backup purposes. The written material accompanying GS+ may not be copied.
3. GS+ may not be rented or leased, but may be permanently transferred if you keep no copies of any version of GS+ and the recipient agrees to the terms of this agreement.
4. You may not decompile, disassemble, or reverse-engineer GS+.
5. Gamma Design retains all rights not granted expressly herein. Nothing in this Agree-

Chapter 1 Introduction
4
ment constitutes a waiver of Gamma Design’s rights under any federal or state law.
Limited Warranty 1. Gamma Design warrants that GS+ will conform substantially to the accompanying writ-
ten materials for a period of 1 year from the date of purchase, provided that GS+ is used on computer hardware and with the operating system for which it was designed.
2. Gamma Design disclaims all other warranties, either express or implied, including im-plied warranties of merchantability and fitness for a particular purpose. This applies to both the software itself and accompanying written materials. This limited warranty gives you specific legal rights; you may have others that vary from state to state.
3. Under no circumstances shall Gamma Design be liable for any damages whatsoever arising out of the use of or inability to use GS+, even if Gamma Design has been ad-vised of the possibility of such damages. Such damages include but are not limited to damages for loss of profits or revenue, loss of use of the software, loss of data, the cost of recovering such software or data, the cost of substitute software, or claims by third parties. In no case shall Gamma Design be liable for more than the amount of the license fee, as set forth below. Some states do not allow the exclusion or limita-tion of liability for consequential or incidental damages, so this limitation may not ap-ply to you.
User Remedies 1. Gamma Design’s entire liability and your exclusive remedy shall be, at Gamma De-
sign’s discretion, either (1) refund of the purchase price or (b) replacement of the software that does not meet Gamma Design’s limited warranty. In either case soft-ware must be returned to Gamma Design with a copy of the sales receipt. This war-ranty is void if failure has resulted from accident, abuse, or misapplication. Any re-placement will be warranted for one year.
2. The warranties and remedies set forth above are exclusive and in lieu of all others, oral or written, express or implied. No Gamma Design Software distributor or em-ployee is authorized to make any modification or addition to this warranty.
U.S. Government Restricted Rights GS+ software and documentation are provided with RESTRICTED AND LIMITED RIGHTS. Use, duplication, or disclosure by the Government is subject to restrictions as noted in sub-paragraph (c)(1)(ii) of The Rights in Technical Data and Computer Software clause at 52.227-7013. The manufacturer is Gamma Design Software, P.O. Box 201, Plainwell, MI 49080.
General You must fill out and return the Warranty Registration Card to be eligible for customer support and service. If you have questions about this agreement, write to Gamma Design Software, P.O. Box 201, Plainwell, MI 49080, U.S.A.

Chapter 2 Getting Started
5
Chapter 2 Getting Started
From Data to Maps: How to Proceed To make a map using GS+:
• First, collect samples from known locations. The sample locations do not need to be evenly spaced or even to lie on a grid, you simply need to know their location in a Cartesian (x,y) coordinate system;
• Second, bring the data into the GS+ Data Worksheet; you can enter the data directly into the worksheet or import the data from a text file, spreadsheet, or another source; often the easiest way to import data is to cut-and-paste from the source spreadsheet or text file;
• Third, perform Semivariance Analysis to produce a variogram model of the autocorrelation present in the data;
• Fourth, use Kriging or Conditional Simulation to produce an interpolation file that will contain optimal estimates of values at evenly-spaced intervals over the sample area; and
• Finally, draw a 3D or 2D Map of the property. This map will be an optimal, unbiased representation of the property over the area of interest. You can also produce a confidence map for the estimates, which will allow you to as-sess the statistical error associated with each estimated contour interval.
General Screen Layout The main GS+ window has a command menu at the top and holds each of the indi-vidual analysis windows that are currently open. The main windows are:
• The Data Worksheet Window • The Data Summary Window • The Autocorrelation Window • The Interpolation Window • The Map Window

Chapter 2 Getting Started
6
Main Menu The Main Menu presents access to the windows that provide GS+ analyses. Below the command menus are icons that represent short-cuts to many of these functions.
Commands and toolbar buttons that are shaded out are not selectable. For exam-ple, the print icon is not available when viewing a window without a graphic or work-sheet to print. The six covariate icons for covariate functions are not available unless a covariate has been defined in the Data Worksheet window.
The tool bar is customizable via the Edit menu or by right-clicking on the main menu. You may add or remove shortcut icons for most analyses. It is also movable and reconfigurable; it can be dragged to any spot on the screen with the mouse.
The File Menu The File Menu provides commands for saving and retrieving GS+ parameter files, used to store and retrieve analysis settings, and also commands for printing and setting user preferences.
• New File – Clears existing analysis parameters. • Open File – Allows the user to load an existing parameter file. To open a text
data file, use the Import Command in the Worksheet window. • Save File – Save the existing parameter file. • Save File As…. – Save analysis parameters in a file to be named.

Chapter 2 Getting Started
7
• Print – Prints a spreadsheet or graph. • Printer Setup – Make changes to the print format • Preferences – Set user preferences to be saved from session to session • Exit – Exit GS+
The Edit Menu The Edit menu provides access to the cut-copy-paste-delete editing commands. These commands are available whenever the cursor is in an editable field within a particular window.
• Cut – remove selected material to the clipboard • Copy – copy selected material to the clipboard • Paste – paste the clipboard into the selected area • Delete – delete selected material • Select – Select a worksheet row or column. If the cursor is not in a worksheet
this command will be dimmed. • Toolbar – customize the toolbar to contain a variety of different tool shortcuts

Chapter 2 Getting Started
8
The Data Menu The Data menu provides access to the data worksheet and to summary statistics windows, and provides commands for importing and exporting data files and for ma-nipulating data within the worksheet.
• WorkSheet – display the data worksheet window • Assign Column – assign a variate to a data sheet column • Sort – sort the highlighted column; the sort alternates between ascending
and descending order. If the cursor is not in a worksheet cell the sort com-mand will be dimmed, as it is here.
• Change Decimals – increase or decrease the number of decimal places to show in a particular column; this has no effect on calculations. The cursor must be in an active worksheet window.
• Insert – insert a row or column into the active worksheet • Delete – delete a row or column in the active worksheet • Import Data – import a data file into the active worksheet • Export Data – export the contents of either the active worksheet or the active
data arrays to a text file. The active data arrays are the non-missing data in the ID, X-Coordinate, Y-Coordinate, and Z-data columns of the Data Work-sheet window. If the Z data have been transformed (using a transformation command), the transformed z values will be printed in addition to the original z values in the Data Worksheet.
• Summary Statistics – display basic statistics for the primary variate (Z) and covariate (Z2) if defined.

Chapter 2 Getting Started
9
The Autocorrelation Menu The Autocorrelation menu provides access to one of several types of autocorrela-tion analyses in GS+:
• Variogram
• General Relative Variogram
• Correlogram
• Madogram
• Covariance Analysis
• Moran’s I Analysis
• Drift • Pairwise Relative Variogram
• Fractal Analysis
• Standardized Variogram
For each analysis you may choose to analyze the primary variate Z, the covariate Z2, or the cross-variate Z x Z2, although cross-variate analysis is not available for every autocorrelation measure. If Z or Z2 are undefined the menu command will be dimmed.

Chapter 2 Getting Started
10
Interpolate Menu The Interpolate menu provides access to one of the two types of Interpolation pro-vided by GS+.
• Kriging Analysis – display the Interpolation Window with access to Cokriging, Block kriging, and Point Kriging
• Inverse Distance Weighting (IDW) – display the Interpolation Window with access to Inverse Distance Weighting and Normal Distance Weighting inter-polation methods
• Simulation – display the Interpolation Window with access to Conditional Simulation
The Map Menu The Map menu provides access to GS+ mapping functions.
• 3D Map – display the Mapping window with 3D mapping selected • 2D Map – display the Mapping window with 2D mapping selected • 1d Transect – display the Mapping window with 1D mapping selected; if a 2-
dimensional map file (one having both an x and a y coordinate) is currently selected, the 1D option cannot be selected

Chapter 2 Getting Started
11
Window Menu The Window menu allows you to quickly move to open windows in GS+.
• Cascade – rearrange all open child windows • Data Worksheet – display data worksheet window • Data Summary – display data summary window for the primary or secondary
variate • Autocorrelation Analysis – display autocorrelation windows for the: • Primary Variate (Z) • Secondary Variate (Z2) • Cross Variate (Z x Z2) • Interpolation – display kriging, conditional simulation, and IDW analysis win-
dow • Map – display mapping window
The Help Menu The Help menu provides access to GS+ help functions.
• GS+ Help – display context-sensitive help topic.

Chapter 2 Getting Started
12
• Check for GS+ Update (via Internet) – send an automatic query to Gamma Design's web address to see if the version of GS+ currently running has been updated. If a newer version is available, you will be asked if you would like to connect to the proper web page for an update. For this feature to work, your computer must have access to the internet. Communication is conducted using your browser. You can also check the GS+ update status manually by checking your program’s version (available from the About GS+ screen) against the version displayed at www.gammadesign.com.
• Go to www.gammadesign.com – connect to Gamma Design's home page through your normal internet provider using your default browser.
• Email Gamma Design – send an email message to [email protected] using your default email program. For this feature to work, you must have access to the internet and a default email program installed.
• How to Contact Gamma Design – show how to contact Gamma Design Soft-ware.
• About GS+ – display title and copyright screen, and also display the current GS+ version number.

Chapter 2 Getting Started
13
User Preferences – General Tab The Preferences dialog allows you to set user-default values for some GS+ behav-iors. There are three categories available – General settings (as described here), settings for Data File Import, and settings for Analyses.
Reset The Reset command returns all user-default values on this tab to original default values. To reset all values on all tabs, use the Global Reset command.
Missing Value Indicator Specify the value used by GS+ on output files and when importing data files to indi-cate that a value is missing. Missing values are ignored during data builds and sub-sequent analyses. This value can be overridden by values specified in individual dialog windows.
Show tips Display short explanations of commands and input boxes when mouse hovers over buttons and boxes.
Places Past Decimal For different types of variates, allow GS+ to format values automatically or specify directly the number of places past the decimal to report in windows and printouts. All calculations are performed on double-precision values regardless of the values requested here. These values can be overridden by values on specific dialog win-dows such as the Field Assignment Dialog of the Data Worksheet Window.
Global Reset Sets all user-default values on all tabs to original (GS+ - defined) default values.

Chapter 2 Getting Started
14
Save/Exit Close window and keep preference changes.
User Preferences - Data File Import Tab The Preferences – Data File Import dialog window allows you to set user-default values for importing data files into the GS+ Data Worksheet.
Reset The Reset command returns all user-default values on this tab to original (GS+ - de-fined) default values. To reset all values on all tabs, use the Global Reset com-mand.
Filename Extension Default extension for the data file name specified when importing data files to the Data Worksheet.
Default Fields When importing data files, these values indicate which fields to assign initially to dif-ferent variates. Field (column) assignments can be changed in the Data Worksheet window.
Default Import File Type When importing data files, this file type will be the default type.
Places Past Decimal to Show When importing data files, report this many places past the decimal in the Data Worksheet cells. This value is overridden when specifying places past the decimal in the Field (Column) Assignment Dialog of the Data Worksheet window.
Automatically Rebuild Data Arrays When new data is imported and when columns are reassigned (e.g. when the X-

Chapter 2 Getting Started
15
Coordinate column is reassigned to column 3 from column 2), the internal data array used by GS+ must be rebuilt. This can take some time if the array is big because duplicates must be checked, missing values tested, and autocorrelation boundaries calculated. The alternative to automatic recalculation is to press the Rebuild button on the Data Worksheet Window. Check or uncheck these boxes to turn off auto-matic array rebuilds.
Global Reset Sets all user-default values on all tabs to original default values.
User Preferences – Analyses Tab The Preferences – Analyses dialog window allows you to set user-default values for some analyses.
Reset The Reset command returns all user-default values on this tab only to original (GS+ - defined) default values. To reset all values on all tabs, use the Global Reset command.
Variogram Defaults • Offset start of first lag by ½ interval – with this check box GS+ will (when
automatically defining uniform interval lag classes) shift the first lag class to ½ of its normal separation distance. This can provide better resolved variograms when there are sufficient pairs of points in shorter separation dis-tance classes. The disadvantage is that if there are few pairs of points for the shortest distance classes when the first lag is not offset (a common prob-

Chapter 2 Getting Started
16
lem), there will be even fewer pairs available with the first lag offset. If this is the case, there will be little if any improvement to the variogram.
• Automatically make anisotropic surface map – the Surface Map com-mand on the Semivariance Window will be automatically enacted after variograms are calculated. This will make the exploration of anisotropic rela-tionships more automated but there is a performance penalty as creating a surface map requires further computation.
IDW Interpolation Defaults • Weighting Power (0-100) – this value provides the initial default weighting
power for inverse distance weighting (IDW) interpolation. This value may be overridden from the Interpolate Window; see the Interpolate Window for fur-ther information on this parameter.
• Smoothing Factor (>0) – this value provides the initial default smoothing factor for inverse distance weighting (IDW) interpolation. This value may be overridden from the Interpolate Window; see the Interpolate Window for fur-ther information on this parameter.
• Default to Normal Distance Weighting (NDW) – sets the default IDW inter-polation to Normal Distance Weighting (NDW). This value may be overrid-den from the Interpolate Window; see the Interpolate Window for further in-formation on this parameter.
Interpolation Defaults • Draw map after interpolating – check this box to automatically draw the
map of interpolated values after interpolation. Global Reset Sets all user-default values on all tabs to original (GS+ defined) default values.

Chapter 2 Getting Started
17
Graph Settings – General Tab The Graph Settings Dialog appears when you edit graphs. The dialog will look slightly different depending on whether you are editing a bar graph, an x-y scatter graph (e.g. a variogram), or a 2D or 3D map. In the case of a 3D map, for example, there will be a place for scaling and renaming the Z axis in addition to the X and Y axes. In addition to the General tab, there is also a tab for Axis Scaling, Axis Titles and Labels, and Contour Details (only available for maps).
Graph Colors Tab You may set background colors for three different parts of the graph. Click on the color bar to the right of the component name to bring up a Color Dialog Window that will allow you to change the color of that component; the color of the bar indicates the current color.
Graph Borders Tab You may set border styles for the graph and for the legend (if shown). Width refers to the width of the border and Print allows you to choose to print or not print the bor-der when printing:

Chapter 2 Getting Started
18
Lines Tab On graphs with lines (for example variogram models) you may specify line pattern, width, and color:
Graph Title A title is text that appears at the top center of the graph area. To change the font of the title press Change, which will bring up a Font Dialog Window.
Graph Legend The legend appears on maps and quantile postings to indicate the value ranges for different symbols or colors. Legend text appears at the top of the legend table. To change the font of the legend title and values press Change, which will bring up a Font Dialog Window.
Graph Footnote A footnote is text that appears at the bottom left of the graph area. To change the font of the footnote press Change, which will bring up a Font Dialog Window. To have variogram model parameters printed as a footnote to variogram graphs, place in this field the exact phrase “(model results)” [do not include quotes]. This notation is placed in the field by default whenever a new variogram and model are calculated; you will need to remove it if you do not want variogram model parameters to appear as a graph footnote.
Apply Now Press Apply Now to apply any changes made to the graph and keep the Graph Set-tings dialog window open.
Cancel Press Cancel to exit the Graph Settings Dialog without applying any changes since the last Apply Now command.
Exit Press Exit to close the Graph Settings Dialog window. Any changes made since the last Apply Now command will be applied to the graph.

Chapter 2 Getting Started
19
Graph Settings - Axis Scaling Tab The Axis Scaling tab of the Graph Settings Dialog Window allows you to specify how to scale the graph axes, e.g. how long or short an axis should be, and how the bars and symbols should look.
X Axis Range and Tick Marks The X Axis range can be set to automatic or user-defined (manual). If the range is automatic and the lowest value in the graphed data set is greater than zero, then the axis range is set to a minimum value of zero and a maximum value of 10% greater than the highest value in the data set. If the range is automatic and the lowest value is less than zero, then the axis range minimum is set to 10% less than the lowest value.
The Number of Labels (bar graphs only; not shown above) refers to the number of values placed along the x-axis.
The Number of Ticks (x-y graphs and maps only) refers to the number of ticks along the x-axis. Major ticks are accompanied by labels (values); minor ticks are not la-beled and appear between major ticks.
To set the appearance of the labels (font, precision, etc.) see the Axis Titles, Labels tab.
Y Axis Range and Tick Marks The y-axis range is set identically to the x-axis range. Note that for maps of 1-dimensional transects there is no y-axis; the z-axis represents the vertical dimen-sion.

Chapter 2 Getting Started
20
Z Axis Range and Tick Marks The z-axis range (on maps) is set identically to the X and Y Axes. Note that a z-axis is only present in maps and transects (1-d maps).
Bars For bar graphs you may specify the number of bars to be plotted, their color, and pattern. The Bars section is not shown above.
Symbols For x-y graphs (e.g. variograms) you may specify the type of symbol (open box, closed circle, etc.) as well as the size and color of the symbol. The Symbols section is not shown in the example screen above.
Graph Settings - Axis Titles, Labels Tab The Axis Titles and Labels tab of the Graph Settings Dialog Window allows you to specify the text that accompanies each axis and to format the values that accom-pany the major tick marks.
Axis Format Use these boxes to set the axis titles and how axis values are formatted. Decimals refers to the number of places past the decimal to format axis values (e.g. 3.1415 has 4 places past the decimal); check exponential to format the axis value in scien-tific notation (e.g. 3.14E0). For 3D maps, boxes for the Z-Axis are also provided as shown above; for x-y and bar graphs, there will be no boxes for the Z-Axis. The font for axis titles and values can be reset with one of the Change commands.

Chapter 2 Getting Started
21
Graph Settings - Contour Details Tab The Contour Details Settings tab of the Graph Settings Dialog Window allows you to edit map contour parameters. Some of these settings are identical to those that ap-pear in the Map Window and changing values here will also change values there; for other maps (e.g. Anisotropic Surface Maps) this window is the only place where con-tour details can be set.
Projection
• 3D – displays a 3-dimensional map of the data. The height of the map can be adjusted by changing the 3D Proportion; the perspective can be adjusted with the Rotate (Mouse Action) command of the calling window
• 2D – displays a flat, 2-dimensional map of the data 3D Proportion
• for 3D projections, sets the height-to-width ratio of the map. For tall, skinny maps set this value to 2 or higher. For flatter maps, set to less than 0.5. This setting is not available for 2D projections. This command will not affect the aspect ratio of the map, i.e. the x and y axes will remain proportional to one another
Map Surface • Contour lines – draws lines between contour intervals • Color bands – fills the space between contour lines with different colors; col-
ors can be specified from the Define Contour dialog window by pressing De-fine Contour Levels, below
• Smoothing – apply slight smoothing to the data to improve visualization

Chapter 2 Getting Started
22
• Solid pedestal – for a 3D map fill in the area beneath the surface with a solid color.
• Wireframe – for 3D maps, drapes an x-y grid over the surface • Wireframe Weave – specifies the density of the wireframe grid. A weave of 0
puts a grid line at every data row and column; a weave of 1 skips one row/column, a weave of 2 skips 2, etc.
Contour Levels • Number – the number of contour levels to put on the map • Define – brings up the Map Contour Intervals dialog window that allows you
to set break points for individual intervals and colors for contour bands (see Chapter 12 for a description of the Contour Intervals dialog)
Map Legend • Show legend – displays the contour legend next to the map • Continuous vs. Stepped – display legend as continuous scale with values
next to break points (e.g. between color bands) or display legend as stepped format, with values next to boxed colors
Ceiling • Contour lines – project contour lines above the surface onto the ceiling of the
plot (3D maps only) • Color bands – project color bands onto the ceiling of the plot (3D maps only)
Floor • Contour lines – project contour lines beneath the surface onto the floor of the
plot (3D maps only) • Color bands – project color bands onto the floor of the plot (3D maps only)
Grid Lines • X axis – place a vertical grid line along the back walls of the 3D plot x axis • Y axis – place a vertical grid line along the back wall of the 3D plot y axis • Z axis – place horizontal grid lines along the back walls of 3D plots

Chapter 2 Getting Started
23
Printing Graphs The Graph Print dialog window allows you to specify how you would like graphs printed – to what device or file, where on the page, and how big the image should be:
Destination Choose where to send the image. If Printer is checked, the graph will be sent to the printer specified in the Printer box. If File is checked, the graph will be sent to a file that is specified in a subsequent Select File dialog window. If Clipboard is checked, the graph will be sent to the Windows clipboard, from which it can be transferred to another program via the Edit-Paste command.
Printer and Page Setup Provides access to printer settings as provided by the operating system, including printer selection, orientation, and margins. All printers available to your Windows system are available to GS+. This command is not available unless Printer is the destination specified elsewhere in this dialog window.
Scale Set the scale of the finished graph image as % of full page for the printer specified. The Scale command is not available unless Printer is the selected destination.
Center on page Check this box to have the graphic centered on the output device. Otherwise the graph will be printed to the upper left corner of the margin area specified in the Set-tings command. This box is not available unless Printer is the selected destination.
File Format Use the File Format list box to choose a graphics file format. File format options include a standard Windows Metafile (.wmf) format, an Enhanced Windows Metafile (.emf) format, a standard Bitmap (.bmp) format, a web-ready JPEG format (.jpg), and a web-ready PNG format (.png) . These commands are not available unless File is specified as the destination for the image.

Chapter 2 Getting Started
24
Printing Data or Text The Print dialog window allows you to specify how you would like text data printed.
Destination Choose where to send the image. If Printer is checked, the graph will be sent to the printer specified by Settings. If File is checked, the graph will be sent to a file that is specified in a subsequent Select File dialog window. If Clipboard is checked, the graph will be sent to the Windows clipboard, from which it can be transferred to an-other program via the Edit-Paste command.
Range Choose how much of the data to print. Selection prints only the highlighted portion of spreadsheets, First Page prints only page 1.
Printer and Page Setup Provides access to printer settings as provided by the operating system, including printer selection, orientation, and margins. All printers available to your Windows system are available to GS+. This command is not available unless Printer is the destination specified elsewhere in this dialog window.
Using Older-Version GS+ Files: The Convert FileDialog When loading a parameter (.par) file created with a DOS version of GS+, you will be queried to convert the DOS file to a GS+ Windows file.
Make backup Check this box to make a backup copy of the file before converting. The backup copy will have the same name as the original file except will have the extension .old.

Chapter 3 Working with Data
25
Chapter 3 Working with Data
The Data Worksheet Window The Data Worksheet contains the data for GS+ analyses. Data can be entered manually or can be imported via the Import file command. Entered data can be edited, filtered (or bounded), and can be temporarily or permanently deleted from subsequent analyses. Field assignments (assigning fields or columns to x-coordinate values, y-coordinate values, etc.) are made in the worksheet window by clicking on the second row.
Base Input File The Base Input File is the external file from which worksheet data first were loaded – if none of the data were loaded from an external file then this field will be blank. To import data to the worksheet from an external file, press Import to bring up a File Import Dialog window.
Import File Press Import File to bring up a File Import dialog from which text and binary (e.g. worksheet) files can be imported into the worksheet (see Chapter 4).
Filter Press Filter to bring up a Filter Dialog that allows the data to be constrained to a particular range; data outside of the specified range are treated as temporary miss-ing data, i.e. excluded from subsequent analyses. The filter check box turns filter-

Chapter 3 Working with Data
26
ing on and off.
Print Press Print to print the worksheet.
Copy Press Copy to place the contents of the worksheet onto the Windows clipboard. From the clipboard values can be pasted into other applications.
Rebuild The Rebuild command builds the data arrays on which all statistical analyses are based. This command is enabled whenever data records have been edited. The data arrays must be rebuilt prior to semivariance or other analyses whenever data have been changed. Sometimes this occurs automatically, such as when columns are reassigned. Other times, such as when individual cells are edited, you must re-build the data arrays yourself. When rebuilding is needed, the Rebuild command will become enabled and the color of the font will change to red. During rebuilding the data are checked for duplicate coordinate locations and for a sufficient number of valid records.
Note that rebuilding is only needed when column assignments change or when data within a column assigned to a coordinate or z-variate changes. In the screen above, changing a value within the Al column will not require arrays to be rebuilt because no variates (X, Y, Z, Z2, or ID) are assigned to the Al column.
Clear Press Clear to empty the data worksheet and reset all analysis windows. Has the same effect as the File – New menu command.
Exit Exit closes the Data Worksheet window and brings up the Data Summary window. If the Rebuild command is enabled the data arrays will first be rebuilt.
Data Title / Description Any text information desired can be entered in this field. When importing text files, the “header” records in the file – the records that appear prior to the data records – are automatically read into this box. If specified in the text file import window, these records can also contain variate names that appear as data column titles. The first line of the Data Description becomes the default graph and worksheet title.
Data Records The second row of the data worksheet specifies the Field or Variate Assignments, i.e. which field or column contains the X-Coordinate Data, Y-Coordinate Data, Z-Variate Data, or Sample ID Data. These assignments can be changed by clicking within the top row, which will bring up a Field Assignment Dialog window.
The third row of the data worksheet specifies the user-supplied Field or Variate Names for the various data fields or columns. To enter or edit names, click on the

Chapter 3 Working with Data
27
cell to be edited. When data is imported from a text or external worksheet file, vari-ate names can be read from the header records.
The data area of the worksheet contain data for each variate. To enter or edit data in any given cell, double-click on that cell. To enter a formula rather than a value, begin the cell with an “=” sign.
The data worksheet may contain 2 billion records and up to 64 columns.
To sort the datasheet, click on the topmost row of the column. Sorts will alternate between ascending and descending order. Or use the Sort command in the Dat Menu.
To change the number of decimal places to show for any given column, use the Decrease Decimals or Increase Decimals command in the Data Menu, or click on the respecitive tool icon in the menu bar.
To change column, move the cursor to the top of the column and use the mouse to stretch or contract the column margins.
To temporarily delete a cell from analyses, change it to a Temporary Missing Value with a click of the right mouse button (its color turns red and the font becomes italicized; see the value 0.32 in the diagram above). Another click restores it to the worksheet (its color will return to black and font to normal).
To change a value to a Permanent Missing Value, delete its contents by highlight-ing it and pressing the Delete key (note the empty cells in the figure above).
To insert or delete a row or column in the worksheet use the Edit | Insert command or Delete on the menu bar.

Chapter 3 Working with Data
28
Column Assignments In the Data Worksheet window, you may specify which field or column to associate with the Sample ID, X-Coordinate, Y-Coordinate, the Z variate, or the Z2 variate by clicking on the second cell from the top in any column. This will bring up the Column Assignment dialog:
Column name The name of the column or variate name.
Assign column as • None – make column unassigned. • Sample ID – the specified column contains Sample Number or Sample ID in-
formation. This can be text or numeric data. • X Coordinate – the specified column contains values for the X-Coordinate lo-
cation. If you choose a column that is already assigned, the other variate’s column will switch with the original X Coordinate column.
• Y Coordinate -- the specified column contains values for the Y-Coordinate lo-cation. If you choose a column that is already assigned, the other variate’s column will switch with the original Y Coordinate column.
• Z (Primary Variate) – the specified column contains values for the Z variate. If you choose a column that is already assigned, the other variate’s column will switch with the original Z column.
• Z2 (Covariate) – the specified column contains values for the Covariate. The Covariate is used in cokriging. If you choose a column that is already assigned to another variate, the other variate’s column will switch with the original Z2 column.
Rebuild automatically when reassign Rebuild the internal worksheet when window closes. This is equivalent to pressing the Rebuild button on the Data Worksheet window.

Chapter 3 Working with Data
29
Covariate Values Warning In cokriging there are usually more Z2 covariate values than primary (Z) values. If your column (field) assignments for Z and Z2 result in data arrays with more Z val-ues than Z2 values then you will get the warning notice below.
You may continue the analysis with more Z than Z2 values, but there is no advan-tage to doing so – in cokriging Z values without corresponding Z2 values are treated as missing. Likewise, there is no advantage to cokriging when you have just as many Z2 covariate values as you have Z values.
Missing Values Data in the Worksheet that are marked as Missing are ignored during analyses. Permanent missing values appear as blank cells and temporary missing values ap-pear in red. You can use the right mouse button to make cells temporarily missing and vice versa.
When importing or exporting files special placeholders (values or symbols) can be used to indicate missing values These placeholders are specified by the user in the Preferences window, or during file imports by a value or symbol specified in the File Import Properties window. In GS+, the default missing value indicator is the numeric value -99.0 but this can be changed in the User Preferences window (Chapter 2).
Missing values appear in output files when a value cannot be interpolated because the location appears in an exclusive polygon or because numerical limitations disal-lowed its computation (such as when a variogram model is inappropriately used dur-ing kriging).
Chapter 3 Working with Data
30
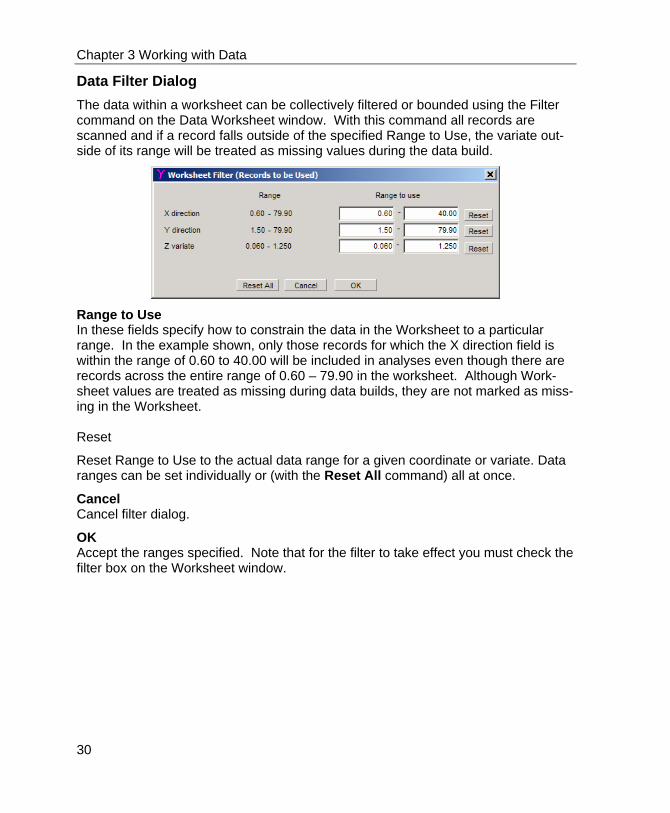
Data Filter Dialog The data within a worksheet can be collectively filtered or bounded using the Filter command on the Data Worksheet window. With this command all records are scanned and if a record falls outside of the specified Range to Use, the variate out-side of its range will be treated as missing values during the data build.
Range to Use In these fields specify how to constrain the data in the Worksheet to a particular range. In the example shown, only those records for which the X direction field is within the range of 0.60 to 40.00 will be included in analyses even though there are records across the entire range of 0.60 – 79.90 in the worksheet. Although Work-sheet values are treated as missing during data builds, they are not marked as miss-ing in the Worksheet. Reset
Reset Range to Use to the actual data range for a given coordinate or variate. Data ranges can be set individually or (with the Reset All command) all at once.
Cancel Cancel filter dialog.
OK Accept the ranges specified. Note that for the filter to take effect you must check the filter box on the Worksheet window.

Chapter 3 Working with Data
31
Duplicate Values When worksheet data are rebuilt into data arrays, GS+ checks each record against every other record to check that no duplicate coordinates are present. If one or more records are found to be duplicates, a warning screen will appear:
Use first value (make other values missing) This option includes the first record encountered (record 1 in the case described) in the analysis and marks other duplicates in the worksheet (records 8, 25, and 26) as temporarily missing values. So long as these values remain marked as missing, on subsequent worksheet rebuilds this Duplicate Query warning will not occur.
Use last value (make other values missing) This option is the same as the first option above except that the last record encoun-tered is used in the analysis (record 26 in the case described) rather than the first.
Use average value (make none missing) This option directs GS+ to use the average of the duplicate records. It does not mark any values in the worksheet missing, which means that the next time the work-sheet is rebuilt this Duplicate Query warning will occur again.
Stop data build and examine worksheet Specifying this option will cause the data build to halt and will display the first dupli-cate record of the data worksheet. Any other duplicates already found during the data build will be reset to non-missing will be returned to their pre-build state.
Also take this action for other duplicates of this build Checking this box causes other duplicates encountered to be treated the same as this set of duplicates. For data sets with many duplicate values, this option saves time by keeping this dialog window from displaying again during the present build.
Cancel Cancel the data build. Any duplicates set to missing values during this build will be reset to nonmissing.
OK Accept the option specified and continue the data build. The data build restarts every time a duplicate is encountered to provide a comprehensive scan.

Chapter 3 Working with Data
32

Chapter 4 Importing Data from External Files
33
Chapter 4 Importing Data from External Files File Import Dialog A number of different file types can be imported into GS+. These include spread-sheets (e.g. Excel formats), databases (e.g. Access, dBase, Paradox, and FoxPro formats), HTML (web) pages, and text files. Files are imported via the Import com-mand within the Data Worksheet Window, which brings up the dialog box below. From this dialog you choose the file and the format (as illustrated in the pull-down list box at the bottom of the menu).
Open Press Open to open the identified file. The window that next appears will depend on the type of file to be opened. A text file will bring up the Import Text File dialog whereas spreadsheet, database, and HTML formats will bring up the Import Spread-sheet dialog.

Chapter 4 Importing Data from External Files
34
Importing Text Files Choosing to import text files from the File Import Dialog brings up the window be-low. The contents of the file are displayed in the large preview area. When the OK button is pressed the contents of the file are read into the GS+ Worksheet according to rules specified by the chosen File Format. These rules define how many rows of header data precede the data rows (2, in the example below), how missing values are identified (with the number –99 in the example below), how column names are separated (with commas, below), and how data fields (columns) are separated from one another within data records (with spaces in this example).
A different dialog window is available for importing spreadsheet, database, and HTML files (described later).
File Format A variety of text file types can be imported into GS+, including formats defined by the user. Each type has its own manner for separating fields within data records, for handling missing values, for allowing header records, and for specifying names of fields (column titles) within the file. Predefined input format types include the follow-ing; examples of files appear in the next section:
GS+ format , in which fields are separated by spaces (free format) or tabs, missing values are indicated with the placeholder -99, the number of header records is automatically detected, and column titles (variate names) appear on the 2nd record separated by commas.
GeoEas format, in which fields are separated with commas, there are no missing value indicators, the number of header records is specified on the 2nd record of the file, and column titles appear as individual records following this second record.

Chapter 4 Importing Data from External Files
35
Surfer® XYZ format, in which fields are separated by spaces (free format), missing values are indicated by blank fields, and the first record in the file is a header record in which column titles (variate names) appear as fields separated by spaces. Note that the Surfer XYZ format also allows fields to be separated by commas, which should be specified separately as de-scribed below. Note that this format is not the same as the Surfer Grid file format that can be used for Krig output files or Map input files.
ArcView® XYZ format, in which fields are separated with commas, missing values are indicated by placeholder commas, there is a single header re-cord, and within the header record variate names are separated by quotes and commas.
Custom, in which any of these format specifications can be changed or cus-tomized as specified in File Import Properties.
Properties The Properties Command brings up a File Import Properties dialog window (de-scribed below) within which you can specify how GS+ should adjust its input parame-ters.
Change Column Assignments The Change command brings up a Field or Column Assignment window from which you can assign variates (e.g. X coordinate) to columns or fields in the data file. Col-umns can be reassigned later from the Data Worksheet window.
OK Press OK to import the specified file’s data into the GS+ Worksheet and close the dialog window. If data already exists in the GS+ Worksheet, you will be asked what to do with it.
Cancel Press Cancel to exit the Import Text File dialog without importing data.

Chapter 4 Importing Data from External Files
36
Text Input File Formats: GS+ Format The standard GS+ input file format is comprised of header records and data records:
Data records are space-delimited or tab-delimited XYZ type data. This means that each data record contains at least 3 fields: an x-coordinate loca-tion, a y-coordinate location, and the value for at least one z variate meas-ured at that x-y location (single-dimension transects will have only x-coordinate and z variate data values). Additional fields can hold a sample ID value and multiple z-variates for a particular x-y location.
Header records precede the data records and contain whatever text infor-mation about the file that the user feels is useful. There can be any number of header records; for this format GS+ determines the number of header re-cords automatically, which means that data records start with the first all-numeric record. The last header record can contain column titles (variate names), separated by commas.
Missing values are denoted by the number -99. Any of these parameters (field delimiters, number of header records, miss-
ing value indicators, etc.) can be changed to a custom format from the Im-port Data File window.
The following listing is the first 11 records of a standard GS+ input file that has fields for sample ID, x-coordinate, y-coordinate, and two z variates. Note the variate names in the second record, and two missing values I nthe last column:
File Demo2d.dat;1994 sample, m east, m north, Pb, Al 1 4.5 11.9 0.42 0.42 2 2.7 29.4 0.6 0.45 3 1.6 32.6 0.6 0.08 4 4.1 44.5 0.43 -99.00 5 0.6 64 0.51 0.14 6 2.4 71.8 0.34 0.32 7 7.8 3.5 0.37 0.12 8 6.7 10.2 0.61 -99.00 9 6.7 16.3 0.46 0.49

Chapter 4 Importing Data from External Files
37
Text Input File Formats: GeoEas Format The standard GeoEas input file format is comprised of header records and data re-cords :
Data records are comma-delimited XYZ type data. This means that each data record contains at least 3 fields: an x-coordinate location, a y-coordinate location, and the value for at least one z variate measured at that x-y location (single-dimension transects will have only x-coordinate and z variate data values). Additional fields can hold a sample ID value and multi-ple z-variates for a particular x-y location.
Header records precede the data records and contain specific information about the data records:
Record 1 contains text of the user's choice, usually a data set title or file name.
Record 2 contains the number of fields (values) in each data record. Record 3 contains the name of the first field. Records 4+ contain the names of the second, third, etc. fields (one
name per record) There are no missing value indicators in the standard GeoEas format Any of these parameters (field delimiters, number of header records, miss-
ing value indicators, etc.) can be changed to a custom format from the Im-port Text File window.
The following listing is the first 11 records of a standard GeoEas input file that has fields for sample ID, x-coordinate, y-coordinate, and one z variate. Note the four variate names in records 3-6:
File for field 55 4 ID X meters y meters Z (mm) 13,-14036,-3097,11 14,-13621,-1266,25 22,-12384,-911,79 23,-121276,978,91 24,-12674,190,14

Chapter 4 Importing Data from External Files
38
Text Input File Formats: ArcView® XYZ Format The ArcView® input file format is comprised of header records and data records :
Data records are comma-delimited XYZ type data. This means that each data record contains at least 3 fields: x-coordinate location, a y-coordinate location, and the value for at least one z variate measured at that x-y loca-tion (single-dimension transects will have only x-coordinate and z variate data values). Additional fields can hold other variates for that location, e.g. sample ID, other measured z-variates. The ArcView XYZ input format is not the same as the ArcInfo Ascii Raster File Format, which is a Kriging out-put format that can be read directly by Arcinfo® or Arcview® GIS software.
A single header record precedes the data records and contains field (vari-ate) names for the data record fields. Names are within quotes and comma-delimited.
Missing values are indicated by blank fields. Any of these parameters (field delimiters, number of header records, miss-
ing value indicators, etc.) can be changed to a custom format from the File Import Properties window.
The following listing is the first 9 records of a standard ArcView® input file that has fields for an x-coordinate, y-coordinate, and one z variate. Note the three variate names in record 1 and the missing values in records 5 and 9:
“X data”,”Y data”,”Z data” 4.5,11.9,0.42 2.7,29.4,0.45 1.6,32.6,0.08 4.1,,0.65 0.6, 64,0.14 2.4, 71.8,0.32 7.8, 3.5,0.12 6.7,10.2, 6.7,16.3, 0.49

Chapter 4 Importing Data from External Files
39
Text Input File Formats: Surfer® XYZ Format The standard Surfer® input file format is comprised of header records and data re-cords :
Data records are space-delimited XYZ type data. This means that each data record contains at least 3 fields: an x-coordinate location, a y-coordinate location, and the value for at least one z variate measured at that x-y location (single-dimension transects will have only x-coordinate and z variate data values). Additional fields can hold other variates for that loca-tion, e.g. sample ID, other measured z-variates.
A single header record precedes the data records and contains field (vari-ate) names or column titles for the data record fields. Names are space-delimited so they must be single words (e.g. "mEast mNorth Nitrate") in or-der that they be properly assigned to their columns. You can allow names to be delimited by commas or other characters by changing this to a Custom Format in the File Import Properties window (e.g. "meters East, meters North, Nitrate (ug/L)" ).
Missing values are indicated by blank fields. For files where there is more than one z-variate per record, a missing value for any field in the record means that the entire record will be treated as missing. (To avoid this prob-lem use comma-delimited data records.)
Any of these parameters (field delimiters, number of header records, miss-ing value indicators, etc.) can be changed to a custom format from the Im-port Text File window. Note that some Surfer® files are comma-delimited rather than space-delimited.
The following listing is the first 9 records of a standard Surfer® input file that has fields for an x-coordinate, a y-coordinate, and one z variate. Note the three variate names in record 1 and the missing values in records 5 and 9:
Xdata Ydata Zdata 4.5 11.9 0.42 2.7 29.4 0.45 1.6 32.6 0.08 4.1 44.5 0.6 64 0.14 2.4 71.8 0.32 7.8 3.5 0.12 6.7 10.2 6.7 16.3 0.49

Chapter 4 Importing Data from External Files
40
Spreadsheet and Database Input Files Choosing to import a spreadsheet, database, or HTML files from the File Import Dia-log brings up a window similar to the one for Excel spreadsheets below. Multiple worksheets or tables within the larger spreadsheet workbook or database are avail-able through a pull-down listbox. The contents of the spreadsheet or data table are displayed in the large preview area. When the OK button is pressed the contents of the file are read into the GS+ Worksheet according to rules specified by the Proper-ties command. A different dialog is used to import text files as described earlier.
Worksheets Available The worksheets or tables within individual spreadsheet or database files are listed here and can be chosen via the pull-down listing.
Properties The Properties Command brings up a File Import Properties dialog window within which you can specify how GS+ should identify missing values. When importing spreadsheets and databases, other file import properties are limited to single pre-defined choices – e.g. spreadsheet columns are used to denote different GS+ Work-sheet fields.
Change Column Assignments The Change command brings up a Field or Column Assignment window from which you can assign variates (e.g. X coordinate) to columns or fields in the data file. Col-umns can be reassigned later from the Data Worksheet window.
OK/Cancel Press OK to import the specified file’s data into the GS+ Worksheet and close the dialog window. If data already exists in the GS+ Worksheet, you will be asked what to do with it. Press Cancel to exit without importing data.

Chapter 4 Importing Data from External Files
41
Input File Formats (File Import Properties) Choosing to import files from the Import Text File or Import Spreadsheet dialogs brings up the File Import Properties window below.
Data Records The Field (Column) Delimiter specifies how individual values within the data records are formatted. For text files values can be comma separated, tab separated, space separated (free format), character separated, or binary data. When spreadsheets are imported, columns are delimited by Table Cells only.
The Missing Value Indicator specifies the value or character within the file that in-dicates that a value is missing and that the record should be ignored during import-ing. A missing value that is imported becomes a blank cell in the GS+ Data Work-sheet. The indicator can be absent, a decimal point, a numeric value, or a character.
Header Records The Number of Header Records indicates whether the first records in the file con-tain header records – descriptive text that should be ignored as the file is read into the Data Worksheet. For text files choose None, Varies, or Fixed Number. Header records will be read into the Data Description field of the Data Worksheet Window. Spreadsheet files are assumed to contain a single header row containing column names.
The Column Title Separator refers to whether column titles (variate names) appear in the second record of the file, and if so, how names are separated from one an-other within the record. For text files choose No Field Names, Same as for Data Re-cords, Quotes, Brackets, Comma, Tab, Space, or Character. When spreadsheets are imported, columns titles appear in different cells of the first spreadsheet r ow
OK/Cancel Press OK to accept the settings shown and return to the Import Text File or Import Spreadsheet dialog. If the settings are different from the standard settings for the format originally defined, the format will change to Custom with the new settings de-fining the new Custom format. Press Cancel to close without importing.

Chapter 4 Importing Data from External Files
42
Viewing Files (File View Window) The file view window is used to display the contents of selected files. It is available from windows in which input and output files are specified. At the top of the window is the file name and size. The contents of the window can be highlighted and copied to the Windows clipboard using the Edit – Copy menu command but cannot be changed. The example below was brought up from the View Output File command in the Interpolation window.
Data Append Dialog When importing data into the Data Worksheet, if the worksheet already contains data then you will asked how to import the new data – whether the imported data should Replace the existing data, be placed in columns to the right of the existing data (Append to Side), or be placed at the bottom of the worksheet (Append to End). Cancel will cancel the import with no changes to the worksheet.

Chapter 5 Summary Statistics
43
Chapter 5 Summary Statistics
Data Summary Window - Z Tab The Data Summary window provides standard descriptive statistics for the variates defined in the Data Worksheet window. Information is provided for both the Z-variate (as below), for the coordinate variates in a separate X,Y Coordinates tab, and when a covariate is being analyzed, for the regression of Z vs. the Covariate Z2 in a separate Regression tab.
For the Z-variate it is also possible to specify a lognormal (base e) or square-root transformation in order to better normalize the variate’s distribution prior to geostatis-tical analysis. If you do transform the variate, you may choose to have GS+ report the interpolated (Kriged) values either in transformed form or backtransformed to the original measurement domain. The backtransformation occurs after all analyses have been performed, and it is not applied to autocorrelation results.
Also from the Data Summary window you can access a full-window frequency distri-bution, a cumulative probability distribution, or a normal probability distribution by clicking on the small frequency distribution image.
Transformation It is often helpful to apply a lognormal or a square root transformation to a Z variate in order to normalize for skewed frequency distributions. It can also be useful to scale data to a range of 0-1 if the values are extremely large. The transformation specified is applied to every Z value in the data set prior to geostatistical analysis;

Chapter 5 Summary Statistics
44
the values in the data worksheet are not transformed. View the effectiveness of the transformation by viewing the Frequency Distribution or a probability distribution and the values for skewness and kurtosis in the data summary.
Offset If your z-variates span the range of <1 to >1 (e.g. 0.3 to 20.1) and you decide to ap-ply a lognormal or square root transform, you should make all values >1 prior to transformation by adding an offset value such as 1 (e.g. ln[z+1]). This is because of the discontinuous nature of the lognormal transformation across the <1 to >1 range.
Backtransformation When a transformation is chosen, after analysis of the transformed data the output data are customarily (but not necessarily) back-transformed to the original data do-main when reported. You may choose among three potential backtransformation choices: None, Standard, or Weighted. The standard backtransformation is simply the converse of the transformation: scaled values are rescaled to the original range, logn-transformed values are raised to the natural exponent e, and squared values are raised to the 0.5 (square root). Offset values are subtracted from the backtrans-formed values. The Weighted backtransformation is a complex backtransformation that more closely approximates true population statistics than simple backtransformations. See Haan (1977) and Krige (1981) for further details. Backtransformations are applied only to final data. These include statistics on the Data Summary screen (mean, standard deviation, etc.), and all kriging results. Indi-vidual semivariance values are not backtransformed prior to display.
Frequency Distribution Click on a frequency distribution image to view an enlarged version of the frequency distribution. From the Frequency Distribution window you will also be able to view a normal or cumulative probability distribution of the data (see below).
Summary Statistics Descriptive statistics appear in the box noted. Note that n refers to the number of active data items currently in the analysis (128 in the screen above); n missing re-fers to the number of worksheet records that were excluded from the analysis be-cause they contained a missing x, y, or z value or because they were excluded from the analysis by the Filter command (4 values, in the example above). If duplicate values were averaged (see the Duplicate Values dialog), then all the duplicates for a given location count as a single record, and the duplicates will not be counted as missing.

Chapter 5 Summary Statistics
45
Frequency Distribution Histogram The Frequency Distribution window contains a bar graph of the frequency distribu-tion for the Z variate. If the data are transformed, two graphs will appear, with the distribution for the transformed data to the right of the distribution for the nontrans-formed data (as below). If the data are not transformed, only the left-hand graph will appear. Data can be transformed in the in the Data Summary window.
The number of frequency classes (bars) can be changed using the Edit Graph command. In addition to a frequency distribution bar graph, you may also choose to view a Cumulative Frequency Distribution or a Normal Probability curve (described below).
List Values Press List Values to bring up a window containing the data used for the frequency distribution.
Edit Graph Press Edit Graph to bring up the Graph Settings Dialog Window, which will allow you to make changes to the graph including changes in the number of distribution classes (bars).
Print Graph Press Print Graph to bring up the Graph Print dialog window.
Plot Type of plot to graph. Choose either Frequency (as displayed above), Cumulative Frequency, or Normal Probability curves (shown later).

Chapter 5 Summary Statistics
46
Frequency Distribution Values The Frequency Listing window provides a listing of the values used to create the frequency distribution graph. The number of classes is set from Frequency Distribu-tion window using the Edit Graph command. This is a read-only worksheet.
Actions You may Print or Copy the contents of the worksheet using the menu commands of the main GS+ window. You may also change the Decimal Places reported by high-lighting a column and pressing the Increase or Decrease Decimals icon (or use the Data | Change Decimals menu command). Clicking on the top of a column will Sort the worksheet based on the column selected in alternating ascending or descend-ing order. You may also change Column Widths by placing the cursor over the line between two columns and dragging to a new location.

Chapter 5 Summary Statistics
47
Cumulative Frequency Distribution The Cumulative Frequency Distribution window contains a graph of the cumulative frequency distribution for the Z variate. If the data are transformed, two graphs will appear, with the distribution for the transformed data to the right of the distribution for the nontransformed data (as below). If the data are not transformed, only the left-hand graph will appear. Transformations are performed in the Data Summary window.
If the data are normally distributed, the curve will describe an S-shape frequency distribution. E.G. in the graph below, transforming the data acts to normalize the distribution.
List Values Press List Values to bring up a window containing a listing of cumulative frequency distribution values.
Edit Graph Press Edit Graph to bring up the Graph Settings Dialog Window, which will allow you to make changes to the graph.
Print Graph Press Print Graph to bring up the Graph Print Dialog Window.
Plot Type of plot to graph. Choose either Frequency, Cumulative Frequency (as dis-played above), or Normal Probability curves (displayed below).

Chapter 5 Summary Statistics
48
Cumulative Frequency Values The Cumulative Frequency Listing window provides a listing of the values used to create the Cumulative Frequency Distribution graph. All values in the data set are ranked by value (ascending order); any given row is the frequency of the value of that row plus all preceding frequencies (expressed as percent); the final cumulative frequency value is 100%. For example, the first value in the table is the lowest value in the data set and has a cumulative frequency of 100 × (1/ n).
Actions You may Print or Copy the contents of the worksheet using the menu commands of the main GS+ window. You may also change the Decimal Places reported by high-lighting a column and pressing the Increase or Decrease Decimals icon (or use the Data | Change Decimals menu command). Clicking on the top of a column will Sort the worksheet based on the column selected in alternating ascending or descend-ing order. You may also change Column Widths by placing the cursor over the line between two columns and dragging to a new location.

Chapter 5 Summary Statistics
49
Normal Probability Distribution The Normal Probability Distribution window contains a normal probability curve for the Z variate. If the data are transformed, two graphs will appear, with the distribu-tion for the transformed data to the right of the distribution for the nontransformed data (as below). If the data are not transformed, only the left-hand graph will ap-pear. Transformations are performed in the Data Summary window.
The normal probability curve is the same as a Cumulative Frequency distribution with the y-axis logn transformed. If the data are normally distributed, the curve will describe a straight line. E.G. in the graph below, transforming the data acts to nor-malize the distribution.
List Values Press List Values to bring up a window containing a listing of normal probability dis-tribution values.
Edit Graph Press Edit Graph to bring up the Graph Settings Dialog Window, which will allow you to make changes to the graph.
Print Graph Press Print Graph to bring up the Graph Print Dialog Window.
Plot Type of plot to graph. Choose either Frequency, Cumulative Frequency, or Normal Probability (as displayed above) curves.

Chapter 5 Summary Statistics
50
Normal Probability Values The Normal Probability Listing window provides a listing of the values used to create the Normal Probability distribution. All values in the data set are ranked by value (ascending order); any given row is the frequency of the value of that row plus all preceding frequencies (expressed as percent lognormally transformed).
Actions You may Print or Copy the contents of the worksheet using the menu commands of the main GS+ window. You may also change the Decimal Places reported by high-lighting a column and pressing the Increase or Decrease Decimals icon (or use the Data | Change Decimals menu command). Clicking on the top of a column will Sort the worksheet based on the column selected in alternating ascending or descend-ing order. You may also change Column Widths by placing the cursor over the line between two columns and dragging to a new location.

Chapter 5 Summary Statistics
51
Data Summary Window - X,Y Coordinates Tab The Data Summary provides simple descriptive statistics for the variates defined in the Data Worksheet window. Information is provided for both the X,Y Coordinates (as below) , for the Z variate in a separate Z-Variate tab (described earlier), and in a Regression tab when a covariate is assigned (described later).
Coordinates Range and Name This is the range over which the x-direction and y-direction data vary, and the name of the variates as defined in the Data Worksheet.
Posting The posting is a map of the location of each x,y coordinate point within the range of X and Y coordinate values. For 1-dimensional transects the posting appears as points along a straight line. Press Expand or click on the map image to bring up a larger Covariate Postings (Quantile Plots) window that provides access to legends and different ways of grouping quanitle data (see below). Data postings of kriged data are also available from the Map window.

Chapter 5 Summary Statistics
52
Coordinate Postings (Quantile Plots) 2d Scattergrams The Coordinate Postingwindow provides a map of sample locations that can be coded to show sample values at that location. Values are grouped into as many as 10 symbol classes, with classes defined using one of three different strategies.
Data may be grouped in one of three distributions:
• Quantiles – in which Z data are placed into groups of equal frequency, i.e. into groups that have the same number of sample values. Quartile distribu-tions are divided into 4 groups, percentiles into 100 groups, etc.
• Intervals – in which Z data are placed into groups based on even intervals of the data range, without regard to how many sample values are placed in each group.
• Custom – in which you can define how groups are formed. Note that this coordinate posting is different from the posting available from the Map Window. The Map Window posting uses data saved with the interpolation file; this posting uses nonmissing data in the current Data Worksheet.
Levels Set the Number of levels (corresponding to different symbols) to any value be-

Chapter 5 Summary Statistics
53
tween 1 and 10. For values of 1, the legend will be suppressed.
Set the Type of level to correspond to how symbols are assigned to locations. Quantiles divide the domain into an equal number of sorted values per level. In the example above (quartiles), there are as many values greater than the median of 0.34 as there are less than 0.34.
Choose Intervals to divide the range into even intervals, e.g. in the example above, in which values range from 0 to 1.25, choosing Intervals would divide the data range of 0 – 1.25 into 4 levels: <0.3125, <0.625,< 0.9375, and <1.25.
Define provides the opportunity to define custom intervals and set symbol size, color, and shape, as described later.
Edit Graph Press Edit Graph to bring up the Graph Settings Dialog Window, which will allow you to make changes to the graph.
Print Graph Press Print Graph to bring up the Graph Print Dialog Window.

Chapter 5 Summary Statistics
54
1d Scattergrams The 1d Coordinate Posting window provides a map of coordinate locations for 1-dimensional data. The location of each data point in the active data set is marked by a symbol corresponding to its relative value. Both the number of levels displayed as well as the range for each level is user-defined. A similar window provides post-ings for 2D data, as described above.
Commands in this window are the same as for 2d Scattergrams, above.

Chapter 5 Summary Statistics
55
Defining Posting Intervals The Define Posting Intervals window allows posting intervals to be custom-defined, and provides the opportunity to set symbol size, color, shapes, and legend names. This window is accessed from the Coordinate Posting window.
Value Range Specify the upper threshold of each value range. Changing a Percentile or Intervals value will change the Type of Level (defined in the Coordinate Posting window) to Custom. The number of values displayed is based on the number of Levels chosen in the Coordinate Posting window.
Symbol
Choose a symbol for the specified interval.
Name
Choose a name to appear in the chart legend.
Color
Choose a color for the specified symbol by clicking on the colored box.
Size
Choose a size for the specified symbol
Legend title Specify the title to appear at the top of the legends. No legend will appear if only 1 interval level is chosen.
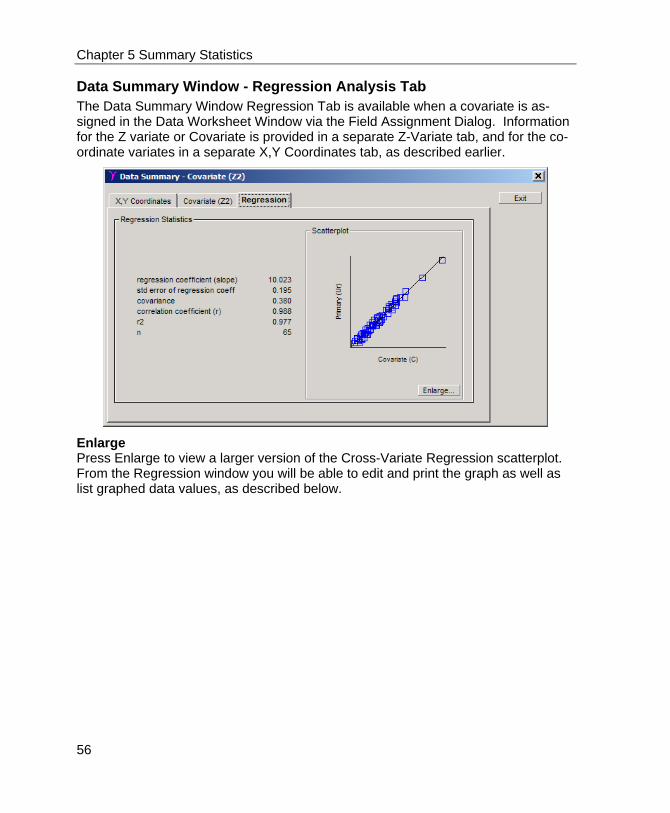
Chapter 5 Summary Statistics
56
Data Summary Window - Regression Analysis Tab The Data Summary Window Regression Tab is available when a covariate is as-signed in the Data Worksheet Window via the Field Assignment Dialog. Information for the Z variate or Covariate is provided in a separate Z-Variate tab, and for the co-ordinate variates in a separate X,Y Coordinates tab, as described earlier.
Enlarge Press Enlarge to view a larger version of the Cross-Variate Regression scatterplot. From the Regression window you will be able to edit and print the graph as well as list graphed data values, as described below.

Chapter 5 Summary Statistics
57
Cross-Variate Regression The best test of whether a covariate is related to the primary variate – a prerequisite for cokriging – is to perform a regression analysis. In GS+ the results of the regres-sion of the primary variate Z vs. the Covariate Z2 is presented in the Data Summary Regression tab. Clicking the Enlarge command in that window brings up the Cross-Variate Regression window:
List Values Press List Values to bring up a window containing a listing of the values used in the regression, as described below.
Edit Graph Press Edit Graph to bring up the Graph Settings Dialog Window, which will allow you to make changes to the graph.
Print Graph Press Print Graph to bring up the Graph Print Dialog Window.

Chapter 5 Summary Statistics
58
Cross-Variate Regression Values The Regression Listing window provides a list of the values used to create the re-gression. Regression statistics appear in the Data Summary Regression tab.
Actions You may Print or Copy the contents of the worksheet using the menu commands of the main GS+ window. You may also change the Decimal Places reported by high-lighting a column and pressing the Increase or Decrease Decimals icon (or use the Data | Change Decimals menu command). Clicking on the top of a column will Sort the worksheet based on the column selected in alternating ascending or descend-ing order. You may also change Column Widths by placing the cursor over the line between two columns and dragging to a new location.

Chapter 6 Semivariance Analysis
59
Chapter 6 Semivariance Analysis - Overview
Semivariance is an autocorrelation statistic defined as
γ(h) = [1 / 2N(h)] Σ [ zi – zi+h ] 2 where γ(h) = Semivariance for interval distance class h; zi = measured sample value at point i; zi+h = measured sample value at point i+h; and N(h) = total number of sample couples for the lag interval h.
Semivariance is evaluated in GS+ by calculating γ(h) for all possible pairs of points in the data set and assigning each pair to an interval class h. For uniform interval classes , GS+ makes interval class assignments for any given pair of points using the following formula:
class = INT(D/DI) + 1 where D = distance separating the pair DI = lag class distance interval INT = Integer function
Where the first lag is offset by ½ interval in order to better resolve values close to the origin, the formula is:
class = INT([D/DI]+0.5) + 1
This option is available by checking a box in the Preferences – Analyses dialog. It can provide better resolved variograms when there are sufficient pairs of points at shorter separation distances. The disadvantage is that if there are few pairs of points for the shortest distance classes when the first lag is not offset (a common problem), there will be even fewer pairs available with the first lag offset. If this is the case, there will be little if any improvement to the variogram.
For individually-specified lag class intervals, pairs of points are assigned to interval

Chapter 6 Semivariance Analysis
60
lag classes based on values in the Define Lag Class Intervals window.
GS+ calculates a semivariance statistic for each interval class; the graph of all h’s vs. all semivariances for each interval class in the analysis constitutes the variogram (more properly called the semivariogram).
For cokriging, semivariance analysis must be performed for the primary variate (Z), for the covariate (Z2), and for the cross variate (Z x Z2) situation.
Autocorrelation Window The Autocorrelation Window is where various options for variogram calculations and the end results appear; see the Semivariance Analysis summary for a definition of semivariance and formulas for lag class distance intervals.
Active Lag Distance The Active Lag Distance specifies the range over which semivariance will be calcu-lated. The minimum distance for this field is the minimum distance between adjacent points in the data set, while the maximum distance is the maximum distance be-tween points. Specifying a value too large or too small will assign respectively the largest or smallest possible values to this distance.
For example, a 1200 m transect will have a maximum lag of 1200 m; specifying an Active Lag of 300 m will limit the variogram to lag intervals less than or equal to 300

Chapter 6 Semivariance Analysis
61
m along the entire 1200 m length of the transect. The default active lag is 80% of the maximum lag. This is not likely to be the most appropriate active lag for your data but rather will provide a starting point. Variograms typically decompose at large lag intervals because of decreasing num-bers of couples per lag class as the maximum lag interval is approached. GS+ allows 1 million lag classes to be specified with up to 1 billion pairs per class.
Lag Class Distance Interval The Lag Class Distance Interval defines how pairs of points will be grouped into lag classes. Each point in a variogram represents the average semivariance for a single lag class, which is a group of pairs separated by a certain Lag Class Distance Inter-val, sometimes called a step size. This interval can either be calculated by GS+, in which case it will be uniformly distributed across the active lag distance, or it can be manually set by the user:
• Use individually-specified points With this option you may use the Define command to bring up a window to Define Lag Class Intervals, i.e. to specify individual break points for the lag intervals (described below).
• Use a uniform interval With this option, the value specified is the size of the interval, applied uni-formly across the active lag distance. E.G. an interval of 2 units with an ac-tive lag distance of 10 units will create 5 lag classes, each 2 units wide. The minimum interval allowed is the smallest distance separating any two sam-ple point locations in the data set. The maximum interval is the greatest dis-tance separating any two sample point locations. The default value is 10% of the active lag or, if 10% of the active lag is smaller than the minimum al-lowed, the minimum allowed. This default may not be appropriate for any given data set; you should try different steps for every set. The number of lag classes (and therefore plotted points) in a variogram is a function of values for the active lag and the active step; a 300 m active lag with a 15 m active step will have ca. 20 lag classes. Note, however, that the lag distance for a given class will be the average distance separating points within the class and not necessarily the midpoint for the class. For a 10-20 m lag class, e.g., the average lag distance may be 12.3 m rather than 15 m if more pairs of points are separated by 10-15 m intervals than by 15-20 m intervals. Changing the distance interval will clear results on the screen from previous analyses calculated with a different step. Results based on the new step

Chapter 6 Semivariance Analysis
62
must be re-generated with Calculate command.
Anisotropic Axis Orientation Anisotropy refers to a direction-dependent trend in the data. Consider data collected from a two-dimensional grid on a mountain slope: elevation will be autocorrelated differently in the upslope-downslope direction than in a cross-slope direction, and thus an isotropic (all-direction) analysis may hide much of the autocorrelation that in fact is present. Anisotropic analysis allows you to see if your data have a directional component that might arise from a variety of unforeseen factors. Anisotropic analy-sis is irrelevant for single-dimension data such as a transect. GS+ evaluates geometric anisotropy, i.e. anisotropy which is expressed as vario-grams with different ranges in different directions. The Principal Anisotropic Axis (the Major Axis of the anisotropic model) is the direction with the longest range, i.e. the direction of major spatial continuity. The best way to evaluate anisotropy is to view the Anisotropic Semivariance Surface (Variogram Map), and use the Azimuth function to define and then set the Principal Anisotropic Axis to the direction aligned with the lowest semivariance values (the direction of maximum spatial continuity, or major axis of the anisotropic variogram model). The map is accessed by pressing the Surface command at the bottom of the Semivariance Analysis window.
Principal Axis (degrees N) The Principal Axis is the direction of maximum spatial continuity, or base axis from which the offset angles for anisotropic analyses are calculated. Offset angles are 0º, 45º, 90º, and 135º clockwise from the base axis; points aligned sufficiently close to one or another of these angles (see Offset Tolerance below) are included in the ani-sotropic analysis for that angle. The axis orientation should correspond to the axis of maximum spatial continuity, i.e. the major anisotropic axis. The default axis is 0º from the north-south (y) axis. Choose the appropriate axis value by using the Surface command to bring up the Anisotropic Variogram Surface window.
Offset Tolerance (degrees) In anisotropic analyses, the Offset Tolerance determines how closely the alignment between any two points needs to be for those points to be included in the analysis for a given offset angle. Two points will be included in the analysis for a given offset angle if the angle between them is within the offset tolerance from the offset angle.

Chapter 6 Semivariance Analysis
63
For example, if the angle between two points is 59.3º and the offset tolerance is 15.0º, the points will be included only in the 45º angle class, which would include all angles between 30º and 60º. The default tolerance is 22.5º.
Variogram Options Show Sample Variance Check this option to show the sample variance for the data as a dashed line on the variogram graphs.
Show Variogram Model Check this option to show a model for the variogram points. If the model has al-ready been defined, either automatically or manually, the variograms will be redrawn with the model now graphed. If a model has not yet been defined, or upon execut-ing the Calculate command, a best-fit model will be calculated and graphed.
To see the model parameters and to change the model, use the Model command at the bottom of the variogram image.
Expand The Expand command brings up a separate variogram window, from which the variogram can be printed or formatted. Variance Cloud Analysis, the ability to view individual semivariance values, and the number of pairs per variogram class interval are also available from these windows.
Model The Model command brings up a Model Dialog window within which you may change the variogram model. The Model command is enabled only when the Show Model Variogram Option is selected.
Surface The Surface command brings up the Anisotropic Variogram Surface Map window. The surface map is useful for visualizing anisotropic autocorrelation when present, as described below.
Calculate The Calculate command causes the semivariogram to be calculated.

Chapter 6 Semivariance Analysis
64
Define Nonuniform Lag Class Intervals Use this dialog window to specify individual lag classes that are not necessarily uni-form. In the cells of the spreadsheet you can specify the upper bound of the dis-tance interval classes desired. Zero is always the lowest bound and the Active Lag Distance is always the upper bound, regardless of values entered in this dialog. In the example below, note that classes are separated first by 2 distance units, then by 4, 18, and 70 units.
Clear Clear the worksheet.
Import Import a text file containing the lag class interval bounds. The default extension for interval files is .int. The format of the file to be imported is numeric-only records fol-lowing a variable number of alphanumeric header records. For example:
line 1: Optional header record 1 line 2: Optional header record 2 line 3: 2.0 line 4: 4.0 line 5: 8.0 line 6: 12.0 line 7: 30.0 line 8: 100.0

Chapter 6 Semivariance Analysis
65
This file describes 8 lag classes: 0 to <2.0, 2.0 to <4.0, 4.0 to <8.0, 8.0 to <12.0, 12.0 to <30.0, 30.0 to <100.0, 100.0 to maximum lag distance. You can adjust the active lag to be any value up to and including the maximum dis-tance separating points in the input file, i.e. the maximum lag distance. Actions You may Print or Copy the contents of the worksheet using the menu commands of the main GS+ window. You may also change the Decimal Places reported by high-lighting a column and pressing the Increase or Decrease Decimals icon (or use the Data | Change Decimals menu command). Clicking on the top of a column will Sort the worksheet based on the column selected in alternating ascending or descend-ing order. You may also change Column Widths by placing the cursor over the line between two columns and dragging to a new location.

Chapter 6 Semivariance Analysis
66
Variograms Window The Variograms window presents a full-window variogram that can be edited and printed. Different tabs hold variograms for the different anisotropic directions. Addi-tionally, the semivariance values that were used to produce the variogram can be listed, and Variance Cloud Analysis can be performed. Variance Clouds provide a means for detecting outlier pairs of points that may be artificially skewing the vario-gram.
You can use the mouse cursor to identify the number of pairs in specific lag classes (reported at the bottom of the window; in the example below, the cursor (not shown) was over the 2nd symbol in the variogram), and to begin variance cloud analysis. Note also that parameters for the variogram model (if present) are presented in a graph footnote. If you do not want parameters to appear as a footnote you must use the Edit Graph command to bring up the Graph Settings dialog and in the Footnote field remove the notation “(model results)”.
List Values Bring up a Semivariance Values Window, including for each lag class the average separation distance for pairs of points in that class, the average semivariance for those points, and the number of pairs of points upon which the average distance and semivariance are based.

Chapter 6 Semivariance Analysis
67
Graph Cloud Create a Variance Cloud window.
Edit Graph Bring up a Graph Settings dialog window for editing the graph.
Print Graph Print the graph via a Graph Print dialog window.
Semivariance Values In this worksheet are listed for each lag class the average separation distance for pairs of points in that class, the average semivariance for those points, and the number of pairs of points upon which the average distance and semivariance are based. This is a read-only worksheet.
Actions You may Print or Copy the contents of the worksheet using the menu commands of the main GS+ window. You may also change the Decimal Places reported by high-lighting a column and pressing the Increase or Decrease Decimals icon (or use the Data | Change Decimals menu command). Clicking on the top of a column will Sort the worksheet based on the column selected in alternating ascending or descend-ing order. You may also change Column Widths by placing the cursor over the line between two columns and dragging to a new location.

Chapter 6 Semivariance Analysis
68
Isotropic Variogram Models GS+ provides five types of isotropic models, each of which can be described based on three parameters:
• Nugget Variance or C0 – the y-intercept of the model • Sill or C0+C – the model asymptote • Range or A – the separation distance over which spatial dependence is ap-
parent. Sometimes this is called the effective range in order to distinguish range (A) from a model’s range parameter (A0). In GS+ the Range (A) is cal-culated from A0 as described in the formulas for the different models, later in this chapter.
0.24
0.19
0.12
0.06
0.000 20 40 60 80
Separation Distance (h)
Sem
ivar
ianc
e
Range (A) = 13.3
Nugget (C0) = 0.04
Sill (C + C0) = 0.21
Generalized Variogram Model
C
C0

Chapter 6 Semivariance Analysis
69
GS+ calculates default values for each parameter of the five models. You may change any of these three model parameters from the Isotropic Variogram Model dialog window:
Variogram Model Type Choose one of four isotropic models (Linear, Spherical, Exponential, and Gaussian). As a model is chosen the variogram graphs will be updated to denote the change.
Model Terms Any of the three model parameters for each model may be changed within the ranges allowed for individual parameters. To change a value either move the slider beneath it or type a new value directly into the text box:
• Nugget Variance or C0 – the y-intercept of the model; the nugget variance can never be greater than the sill.
• Sill or C0+C – the model asymptote; the sill can never be less than the nug-get variance.
• Range (A) – the separation distance over which spatial dependence is ap-parent. This is sometimes called Effective Range in order to distinguish range (A) from a model’s range parameter (A0). The Range A is calculated from A0 as described in the formulas for the different models, below.The range cannot be less than 0.
Statistics – This Fit GS+ provides three statistics to aid the interpretation of model output:
• Residual Sums of Squares – provides an exact measure of how well the model fits the variogram data; the lower the reduced sums of squares, the better the model fits. When GS+ autofits the model, it uses RSS to choose parameters for each of the variogram models by determining a combination

Chapter 6 Semivariance Analysis
70
of parameter values that minimizes RSS for any given model. The Residual SS displayed in the This Fit box is calculated for the currently defined model.
• r2 – provides an indication of how well the model fits the variogram data; this value is not as sensitive or robust as the Residual SS value for best-fit calcu-lations; use RSS to judge the effect of changes in model parameters.
• Proportion C/(C0+C) -- this statistic provides a measure of the proportion of sample variance (C0+C) that is explained by spatially structured variance C. This value will be 1.0 for a variogram with no nugget variance (where the curve passes through the origin); conversely, it will be 0 where there is no spatially dependent variation at the range specified, i.e. where there is a pure nugget effect.
Statistics – AutoFit Statistics for the Autofit model (the model most recently calculated by GS+) apppear in this box. In this way you can compare your changes to model terms against that calculated automatically.
Autofit Automatically refit the model using as starting conditions the parameters in this dia-log window. Model fitting in GS+ is somewhat dependent on starting conditions (as-sumed model parameters prior to iterations). Sometimes you can fit a better model by hand, in which case Refitting will further refine parameters to minimize RSS. To return to the original model parameters you may need to exit this Model definition window and recalculate the variogram.
Print Print a copy of the model window.
Cancel Exit the dialog window without applying changes.
OK Close the dialog window and apply any changes made to individual models.

Chapter 6 Semivariance Analysis
71
Spherical Isotropic Model The spherical isotropic model is a modified quadratic function for which at some dis-tance A0 pairs of points will no longer be autocorrelated and the semivariogram reaches an asymptote. The formula used for this model is: γ(h) = C0 + C [1.5(h / A0) - 0.5(h / A0)3] for h ≤ A0 γ(h) = C0 + C for h > A0
where γ(h) = semivariance for interval distance class h, h = the lag distance interval, C0 = nugget variance ≥ 0, C = structural variance ≥ C0, and A0 = range parameter. In the case of the spherical model, the effective range A = A0.

Chapter 6 Semivariance Analysis
72
Exponential Isotropic Model The exponential isotropic model is similar to the spherical in that it approaches the sill gradually, but different from the spherical in the rate at which the sill is ap-proached and in the fact that the model and the sill never actually converge. The formula used for this model is: γ(h) = C0 + C[1 - exp(-h / A0)] where γ(h) = semivariance for interval distance class h, h = lag interval, C0 = nugget variance ≥ 0, C = structural variance ≥ C0, and A0 = range parameter. In the case of the exponential model, the effective range A = 3A0, which is the distance at which the sill (C + C0) is within 5% of the asymptote (the sill never meets the asymptote in the exponential or gaussian models).

Chapter 6 Semivariance Analysis
73
Linear Isotropic Model The linear isotropic model describes a straight line variogram. Note that there is no sill in this model; the range A0 is defined arbitrarily as noted below. The formula used is:
γ(h) = C0 + [ h(C / A0) ] where γ(h) = semivariance for interval distance class h, h = lag interval, C0 = nugget variance ≥ 0, C = structural variance ≥ C0, and A0 = range parameter. In the case of the linear model, there is no effective range A – spatial auto- correlation occurs across the entire range sampled; in GS+ model windows A is set initially to the separation distance (h) for the last lag class graphed; in the variogram below, this would be 77.4.

Chapter 6 Semivariance Analysis
74
Gaussian Isotropic Model The gaussian or hyperbolic isotropic model is similar to the exponential model but assumes a gradual rise for the y-intercept. The formula used for this model is: γ(h) = C0 + C[1 - exp(-h2 / A0
2)] where γ(h) = semivariance for interval distance class h, h = lag interval, C0 = nugget variance ≥ 0, C = structural variance ≥ C0, and A0 = range parameter. In the case of the gaussian model, the effective range A = 30.5 A0, which is the distance at which the sill (C + C0) is within 5% of the asymptote (the sill never meets the asymptote in the guassian or exponential models).

Chapter 6 Semivariance Analysis
75
Anisotropic Variogram Models GS+ provides four types of anisotropic or direction-dependent geometric models, each of which can be described based on four parameters:
• Nugget Variance or C0 – the y-intercept of the model; this value is the same for all directions.
• Sill or C0+C – the model asymptote; this value is the same for all directions. • Range or A – the separation distance over which spatial dependence is ap-
parent for the direction examined. It is the sum of: • A1 – the range parameter for the major axis of variation φ and
• A2 - the range parameter for the minor axis (φ + 90),
adjusted for the angle between pairs θ as noted in the formulas for indi-vidual models.
Sometimes Range or A is called the effective range in order to distin-guish range from a model’s range parameters (A1 or A2). In GS+ the Mi-nor Ranges and Major Ranges are calculated from A1 and A2, respec-tively, as described in the formulas for the different models later in this chapter.
GS+ calculates default values for each parameter of the five models. You may change any of these four model parameters from the Anisotropic Variogram Model dialog window:
Variogram Model Type Choose one of four isotropic models (Linear, Spherical, Exponential, or Gaussian). As a model is chosen the variogram graphs will be updated to denote the change.

Chapter 6 Semivariance Analysis
76
Model Terms Any of the three parameters for each model may be changed within the ranges al-lowed for individual parameters. To change a value either move the slider beneath it or type a new value directly into the text box:
• Nugget Variance or C0 – the y-intercept of the model; the nugget variance can never be greater than the sill.
• Sill or C0+C – the model asymptote; the sill can never be less than the nug-get variance.
• Range Minor – the separation distance over which spatial dependence is ap-parent. This is sometimes called Effective Range in order to distinguish range from a model’s range parameter (A2). The minor range is calculated from A2 as described in the formulas for the different models, below. The mi-nor range can never be more than the major range.
• Range Major – the separation distance over which spatial dependence is ap-parent. In some texts this is called the Effective Range in order to distinguish range from the model’s major range parameter (A1). The minor range is cal-culated from A1 as described in the formulas for the different models, below. The major range can never be less than the minor range.
Statistics – This Fit GS+ provides three statistics to aid the interpretation of model output:
• Residual Sums of Squares – provides an exact measure of how well the model fits the variogram data; the lower the reduced sums of squares, the better the model fits. When GS+ autofits the model, it uses RSS to choose parameters for each of the variogram models by determining the combination of parameter values that minimizes RSS for any given model. The Residual SS displayed in the This Fit box is calculated for the currently defined model.
• r2 – provides an indication of how well the model fits the variogram data; this value is not as sensitive or robust as the Residual SS value for best-fit calcu-lations; use RSS to judge the effect of changes in model parameters.
• Proportion C/(Co+C) -- this statistic provides a measure of the proportion of sample variance (C0+C) that is explained by spatially structured variance C. This value will be 1.0 for a variogram with no nugget variance (where the curve passes through the origin); conversely, it will be 0 where there is no spatially dependent variation at the range specified, i.e. where there is a pure nugget effect.
Statistics – AutoFit Statistics for the Autofit model (the model most recently calculated by GS+) apppear in this box. In this way you can compare your changes to model terms against that calculated automatically.

Chapter 6 Semivariance Analysis
77
Autofit Automatically refit the model using as starting conditions the parameters in this dia-log window. Model fitting in GS+ is somewhat dependent on starting conditions (as-sumed model parameters prior to iterations). Sometimes you can fit a better model by hand, in which case Refitting will further refine parameters to minimize RSS. To return to the original model parameters you may need to exit this Model definition window and recalculate the variogram.
Print Print a copy of the model window.
Cancel Exit the dialog window without applying changes.
OK Close the dialog window and apply any changes made to individual models.
Spherical Anisotropic Model The spherical anisotropic model is a modified quadratic function in which at some distance A1 along the major axis and A2 along the minor axis, pairs of points are no longer autocorrelated and the variogram reaches an asymptote. The formula used for this model is:
γ(h) = C0 + C[1.5(h / A) - 0.5(h / A)3 ] for h ≤ A γ(h) = C0 + C for h > A where γ(h) = semivariance for interval distance class h, h = lag interval, C0 = nugget variance ≥ 0, C = structural variance ≥ C0, and A = √ {A1
2 [cos2 (θ - φ)] + A22 [sin2 (θ - φ)] }
A1 = range parameter for the major axis (φ). In the case of the spherical model, the range (or effective range) for the major axis = A1. A2 = range parameter for the minor axis (φ + 90). In the case of the spherical model, the range (or effective range) for the minor axis = A2.
φ = angle of maximum variation θ = angle between pairs

Chapter 6 Semivariance Analysis
78
Exponential Anisotropic Model The exponential anisotropic model is similar to the spherical in that it ap-proaches the sill gradually, but different from the spherical in the rate at which the sill is approached and in the fact that the model and the sill never actually converge. The formula used for this model is: γ(h) = C0 + C[1 - exp(-h / A)] where γ(h) = semivariance for interval distance class h, h = lag interval, C0 = nugget variance ≥ 0, C = structural variance ≥ C0, and A = √ {A1
2 [cos2 (θ - φ)] + A22 [sin2 (θ - φ)] }
A1 = range parameter for the major axis (φ). In the case of the exponential model, the range (or effective range) for the major axis = 3A1. A2 = range parameter for the minor axis (φ + 90). In the case of the exponential model, the range (or effective range) for the minor axis = 3A2.
φ = angle of maximum variation θ = angle between pairs
Linear Anisotropic Model The linear anisotropic model describes a straight-line variogram. Note that there is no sill in this model; the ranges for the major and minor axes are defined in terms of the distance interval for the last lag class in the variogram. The formula used is: γ(h) = C0 + h(C / A) where γ(h) = semivariance for interval distance class h, h = lag interval, C0 = nugget variance ≥ 0, C = structural variance ≥ C0, and A = √ {A1
2 [cos2 (θ - φ)] + A22 [sin2 (θ - φ)] }
A1 = range parameter for the major axis (φ). In the case of the linear model, there is no effective major range – spatial autocorrelation occurs across the

Chapter 6 Semivariance Analysis
79
entire range sampled; in GS+ model windows A1 is set initially to the separation distance (h) for the last lag class graphed. A2 = range parameter for the minor axis (φ + 90). In the case of the linear model, there is no effective minor range – spatial autocorrelation occurs across the entire range sampled; in GS+ model windows A2 is set initially to the separation distance (h) for the last lag class graphed. φ = angle of maximum variation θ = angle between pairs
Gaussian Anisotropic Model The gaussian or hyperbola anisotropic model is similar to the exponential model but assumes a gradual rise from the y-intercept. The formula used is: γ(h) = C0 + C[1 - exp(-h2 / A2)] where γ(h) = semivariance for interval distance class h, h = lag interval, C0 = nugget variance ≥ 0, C = structural variance ≥ C0, and A = √ {A1
2 [cos2 (θ - φ)] + A22 [sin2 (θ - φ)] }
A1 = range parameter for the major axis (φ). In the case of the gaussian model, the range (or effective range) for the major axis = 30.5 A1. A2 = range parameter for the minor axis (φ + 90). In the case of the gaussian model, the range (or effective range) for the minor axis = 30.5 A2.
φ = angle of maximum variation θ = angle between pairs

Chapter 6 Semivariance Analysis
80
Anisotropic Semivariance Surface (2D Variogram Map) The Anisotropic Semivariance Surface or Variogram Map provides a visual picture of semivariance in every compass direction. This allows one to more easily find the appropriate principal axis for defining the anisotropic variogram model. A transect in any single direction (e.g. 10 degrees north) is equivalent to the variogram in that di-rection: the surface (z-axis) is semivariance; the x and y axes are separation dis-tances in E-W and N-S directions, respectively. The center of the map corresponds to the origin of the variogram γ(h) = 0 for every direction. See Isaaks and Srivastava (1989; page 150) and Goovaerts (1997; page 98).
Edit Graph Change axis scales and other graph settings via the Graph Settings dialog window.
Print Print the graph to a file, printer, or other device.
3D Change the graph projection to 3D from 2D or to 2D from 3D.

Chapter 6 Semivariance Analysis
81
Azimuth When the check box is marked, a transect on the map surface illustrates the azimuth angle. The angle is specified in the text box (e.g. 330º in the window above), and also displayed graphically in the area under the azimuth angle. The average semivariance for the transect is displayed as A:nnn beneath the Set command. Note that there is no difference between an angle and that angle plus 180º.
Set Make the azimuth angle displayed in this window the Principal Anisotropic Axis in the Semivariance Analysis window. Pressing Set will reset the Principal Anisotropic Axis; for consistency, the angle in the Semivariance Analysis window will display a value between 0º and 180º, so that a value >180º will appear as that value less 180º (e.g. 225º will be reset to 90º in the Semivariance Analysis window). Set will force a Rebuild of the anisotropic variograms (and models, if selected) in the semivariance window. The Principal Anisotropic Axis (the Major Axis of the anisot-ropic model) should be the direction of major spatial continuity (or major axis of the anisotropic variogram model), corresponding to the direction with the longest range. Correspondingly, A should be smaller in the major direction (lower average semi-variance) and largest in the minor (90º-offset) direction.
A The average semivariance for the azimuth transect is displayed as A:nnn beneath the Set command, where nnn is the average semivariance. A should be smaller in the major direction (lower average semivariance) and largest in the minor (90º-offset) direction
Mouse Action • Off – returns the mouse to normal operation. • Rotate – turns the cursor into a rotator cuff when the left mouse button is
pushed, allowing the image to be rotated as desired. This option is available only for 3D map projections.
• Move – allows the graph to be moved within the window by clicking the left mouse button and dragging the cursor.
• Scale – shrinks the graph image with the left mouse button. • Zoom – allows you to zoom in on a particular graph area by using the left
mouse button to define a rectangular zoom area. Within the zoomed area the location of the cursor is noted on the Mouse Location panel.
• Reset – resets the image to the default rotation angle and scale. Mouse Location Provides information on the current location of the cursor when it is on the map sur-face. Units are map units as specified by the axes. Z is semivariance.

Chapter 6 Semivariance Analysis
82
Anisotropic Semivariance Surface (3D Variogram Map) The 3D Anisotropic Semivariance Surface or Variogram Map is a 3D projection of the 2D map. Use the Edit Graph command to change 3D graph formats.
Commands for the 3D map projection are the same as those for the 2D projection, above.

Chapter 6 Semivariance Analysis
83
Cross-Autocorrelation or Cross-Semivariance Analysis The Cross-Autocorrelation Analysis Window is identical to the Autocorrelation Analysis window except that cross-semivariance analysis (Z x Z2) rather than semivariance analysis (Z or Z2) is performed. Cross-semivariance analysis must be performed prior to cokriging. For a description of the commands and options pro-vided in this window please see the description of the Semivariance Analysis Win-dow, above.
Commands in the Cross-Autocorrelation window are the same as in the Autocorrela-tion window, earlier in this chapter.

Chapter 6 Semivariance Analysis
84

Chapter 7 Other Autocorrelation Measures
85
Chapter 7 Other Autocorrelation Measures
Standardized Variograms In standardized variogram analysis the variogram is computed as a proportion of sample variance:
γ(h) = ( [1 / 2N(h)] Σ [ zi – zi+h ] 2 ) / s2 where γ(h) = Semivariance for interval distance class h; zi = measured sample value at point i; zi+h = measured sample value at point i+h; N(h) = total number of sample couples for the lag interval h; and s2 = sample variance for all z’s.
Standardized variograms (both isotropic and anisotropic) appear in the Autocorrela-tion Window, on the Standardized Variogram tab. Pressing the Expand button on this tab brings up the Standardized Variograms window; note the sample variance line at 1.0 along the y-axis:
The List, Edit, Print, Cloud, Scatter, and Exit buttons work here as they do for the Variograms Window.

Chapter 7 Other Autocorrelation Measures
86
Madograms Madograms are similar to traditional variograms (see Semivariance Analysis), ex-cept that the absolute difference between zi and zi+h is used rather than the square of the difference as for traditional semivariance. The formula thus becomes
γΜ(h) = [1 / 2N(h)] Σ | zi – zi+h | where γΜ (h) = semivariance(M) for interval distance class h, zi = measured sample value at point i, zi+h = measured sample value at point i+h, and N(h) = total number of sample couples for the lag interval h.
Madograms (both isotropic and anisotropic) appear in the Autocorrelation Window, on the Madogram tab. Press the Expand button on this tab to brings up the Mado-grams window:
The List, Edit, Print, Cloud, Scatter, and Exit buttons work here as they do for the Variograms Window.

Chapter 7 Other Autocorrelation Measures
87
Rodograms Rodograms are similar to traditional variograms (see Semivariance Analysis), except that the square root of the difference between zi and zi+his calculated rather than the square of the difference. The formula thus becomes
γR(h) = [1 / 2N(h)] Σ [ |( zi – zi+h)| ]0.5 where γR(h) = semivariance(R) for interval distance class h, zi = measured sample value at point i, zi+h = measured sample value at point i+h, and N(h) = total number of sample couples for the lag interval h.
Rodograms (both isotropic and anisotropic) appear in the Autocorrelation Window, on the Rodogram tab. Press the Expand button on this to tab bring up the Rodo-grams window:
The List, Edit, Print, Cloud, Scatter, and Exit buttons work here as they do for the Variograms Window.

Chapter 7 Other Autocorrelation Measures
88
Drift Drift (also called trend) is calculated as
F(h) = [1 / N(h)] Σ [ (zi – zi+h) ] where F(h) = drift for interval distance class h, zi = measured sample value at point i, zi+h = measured sample value at point i+h, and N(h) = total number of sample couples for the lag interval h.
Drift graphs (both isotropic and anisotropic) appear in the Autocorrelation Window, on the Drift tab. Press the Expand button on this tab to bring up the Drift window:
The List, Edit, Print, Cloud, Scatter, and Exit buttons work here as they do for the Variograms Window.

Chapter 7 Other Autocorrelation Measures
89
Correlograms Correlograms are calculated using the formula
ρ(h) = C(h) / (σ-h σ+h)
where ρ(h) = correlation for interval distance class h, σ+h = standard deviation of all head values (zi) for lag h, and σ-h = standard deviation of all tail values (zi+h) for lag h.
Correlograms (both isotropic and anisotropic) appear in the Autocorrelation Window, on the Correlogram tab. Press the Expand button on this tab to bring up the Corre-logram window:
The List, Edit, Print, Cloud, Scatter, and Exit buttons work here as they do for the Variograms Window.

Chapter 7 Other Autocorrelation Measures
90
Covariance Analysis Covariance in GS+ is computed as:
C(h) = [1 / N(h)] Σ zi zi+h – m-h m+h
where C(h) = covariance for interval distance class h, N(h) = total number of sample couples for the lag interval h, zi = measured sample value at point i, zi+h = measured sample value at point i+h, m-h = mean of all head values for lag h, or [1/N(h)] Σ zi, and m+h = mean of all tail values for lag h, or [1/N(h)] Σ zi+h.
Cross-covariance is computed in the same manner but zi and zi+h represent two dif-ferent variates, Z and Z2, respectively.
The covariance graph appears in the Autocorrelation Window, on the Covariance tab. Press the Expand button to bring up the Covariance window:
The List, Edit, Print, Cloud, Scatter, and Exit buttons work here as they do for the Variograms Window.

Chapter 7 Other Autocorrelation Measures
91
General Relative Variograms The general relative variogram is a graph of semivariance standardized by the squared mean of the data used for each distance interval h:
γGR(h) = γ(h) / (m-h + m+h)2 where γGR(h) = general relative semivariance for interval class h, γ(h) = semivariance for interval distance class h, m-h = mean of all head values for lag h, or [1/N(h)] Σ z
i, and m+h = mean of all tail values for lag h, or [1/N(h)] Σ z
i+h.
General relative variograms (both isotropic and anisotropic) appear in the Autocorre-lation Window, on the General Relative Variogram tab. Press the Expand button on this tab to bring up the General Relative Variograms window:
The List, Edit, Print, Cloud, Scatter, and Exit buttons work here as they do for the Variograms Window.

Chapter 7 Other Autocorrelation Measures
92
Pairwise Relative Variograms The pairwise relative variogram is a graph of semivariance normalized by the squared average of tail and head values:
γPR(h) = [1 / 2N(h)] Σ [ (zi – zi+h)2 / [0.5(zi + zi+h)]2 where γPR(h) = pairwise relative semivariance for interval class h, N(h) = total number of sample couples for the lag interval h, zi = measured sample value at point i, and zi+h = measured sample value at point i+h.
Pairwise relative variograms (both isotropic and anisotropic) appear in the Autocor-relation Window, on the Pairwise Relative Variogram tab. Press the Expand button on this tab to bring up the Pairwise Relative Variograms window:
The List, Edit, Print, Cloud, Scatter, and Exit buttons work here as they do for the Variograms Window.

Chapter 7 Other Autocorrelation Measures
93
Moran’s I Analysis The Moran’s I statistic is a conventional measure of autocorrelation, similar in inter-pretation to the Pearson’s Product Moment correlation statistic for independent samples in that both statistics range between -1.0 and 1.0 depending on the degree and direction of correlation. The statistic is defined as:
I(h) = N(h) Σ Σ zi zi+h / Σ zi+h2
where I(h) = autocorrelation for interval distance class h, zi = the measured sample value at point i, and zi+h = the measured sample value at point i+h.
Note that in this analysis all of the weights in the adjacency matrix (Sokal and Oden 1978) are set to 1, i.e. I is weighted by distance (h) between sample points rather than by simple adjacency. Calculating this statistic for a variety of lag distances yields the Moran’s I autocorrelogram.
Moran’s I correlograms (both isotropic and anisotropic) appear in the Autocorrelation Window, on the Moran’s I tab. Press the Expand button on this tab to bring up the Morans’s I window:
The List, Edit, Print, Cloud, Scatter, and Exit buttons work here as they do for the Variograms Window.

Chapter 7 Other Autocorrelation Measures
94
Fractal Analysis The Fractal Analysis window is used to set up the parameters for fractal analysis and then calculate the fractal dimension D for the data set defined in the Data Defini-tion Menu. GS+ calculates the fractal dimension D as a function of the slope of a log-log variogram plot (Burrough 1981, 1986 ):
D = 2 - m / 2 where D = the Hausdorff-Besicovitch statistic, and m = the slope of a log-log variogram
Because D is based on an analysis of semivariance, it is sensitive to the same analysis parameters that affect semivariance analysis.
Fractal variograms (both isotropic and anisotropic) appear in the Autocorrelation Window, on the Fractal tab. Press the Expand button on this tab to bring up the Fractal window:
The List, Edit, Print, Cloud, Scatter, and Exit buttons work here as they do for the Variograms Window.

Chapter 8 Variance Clouds and h-Scattergrams
95
Chapter 8 Variance Clouds and h-Scattergrams Variograms can be sensitive to outlier values in a data set, and sometimes an er-ratic-looking variogram can be traced to a single extreme value that inflates γ(h) whenever they are compared with other values. One way to locate such outliers is to draw a variance cloud for each separation distance interval (or lag class) h; an-other way is to draw an h-Scattergram for each interval.
Variance clouds and h-Scattergrams are measures of pairwise variance in autocor-relation graphs. In a variogram each point on the graph represents the average semivariance for all pairs of points in a particular lag class. h-Scattergrams and variance clouds let you see the individual pairs of points that are used to calcualte the average semivariance for that class.
Variance Clouds The formula to calculate variance for any given pair of points at locations i and j can be reduced to the mean square difference between the points:
Varij = [ zi – zj ]2
where
Varij = variance for pair (i,j), zi = measured sample value at point i, and zj = measured sample value at point j.
Any given pair(i,j) are separated by a specific distance; this distance is plotted along the x axis of the variance cloud graph. All pairs on a specific graph are in the same separation distance (lag) class.
Note that a variance cloud is specific to both direction (isotropic or a specific anisot-ropic direction) and to a particular lag class. In the variogram below, the cursor is on the point representing lag class 7 of the isotropic variogram, which one might sus-pect contains an outlier because it is so different from the other points:

Chapter 8 Variance Clouds and h-Scattergrams
96
Clicking on this variogram point or the Cloud button brings up the variance cloud for lag class 7 below, and it becomes apparent that a number of pairs are very different from the others – placing the cursor over each of the outlying points reveals that all of them contain record 4 as a member of the pair (the cursor below is over the point represented by records 4 and 96 at a separation distance of 52.77):

Chapter 8 Variance Clouds and h-Scattergrams
97
Clicking on this variance cloud point brings up the Sample Details window, which gives us the option to temporarily mask (remove from the active data set) one of the data records for this pair:
Since record 4 is a member of all of these outlier pairs, we can choose to mask re-cord 4, which has a transformed value of 2.639 (if the data were not transformed, this value would match the value in the Data Worksheet). This gives us a much more reasonable variogram:
Re-examination of the variance cloud for lag class 7 (below) reveals that the highest y-axis values are substantially lower than before (0.35 vs. 6.12) and, more impor-tantly, all of the major outlier pairs are gone. This was accomplished by removing a single data record from the analysis:

Chapter 8 Variance Clouds and h-Scattergrams
98
Lag Class The lag class for which the variance cloud is created. The variance for every pair of points in the lag class is plotted against the distance interval separating that pair.
List Values Bring up a listing of Variance Cloud Pairs, including for each pair the variance, sepa-ration distance, and the identity (data record number) of each member of the pair.
Edit Graph Bring up a Graph Settings dialog window for editing the graph.
Print Graph Print the graph via a Graph Print dialog window.
Cloud and Scatter Choose either Variance Cloud or h-Scattergram analysis.

Chapter 8 Variance Clouds and h-Scattergrams
99
Variance Cloud Pairs This read-only window contains a listing of all pairs of points within a specific lag class, including for each pair the variance, separation distance, and the identity (data record number) of each member of the pair. These pairs are graphed in the Variance Cloud window.
Note that in the example below, sorted by variance (with pairs of highest variance listed first), record 4 shows up as a member of 13 high-variance pairs. This confirms record 4 as an outlier, which was determined in the variance cloud graph, above:
Actions You may Print or Copy the contents of the worksheet using the menu commands of the main GS+ window. You may also change the Decimal Places reported by high-lighting a column and pressing the Increase or Decrease Decimals icon (or use the Data | Change Decimals menu command). Clicking on the top of a column will Sort the worksheet based on the column selected in alternating ascending or descend-ing order. You may also change Column Widths by placing the cursor over the line between two columns and dragging to a new location.

Chapter 8 Variance Clouds and h-Scattergrams
100
h-Scattergrams In an h-Scattergram each head value zi is plotted against each tail value zj for a given lag class h. The formula to calculate this difference for any given pair of points at locations i and j is
Dij = zi – zj
where
Dij = difference for pair (i,j), zi = measured sample value at point I, and zj = measured sample value at point j.
Note that an h-Scattergram is specific to both direction (isotropic or a specific anisot-ropic direction) and to a particular lag class. In the variogram below, displayed ear-lier, the cursor is on the point representing lag class 7 of the isotropic variogram-which looks odd:
Clicking on this variogram point or pressing the Scatter button brings up the h-Scattergram for lag class 7 below, and it becomes apparent that a number of pairs are very different from the others. Placing the cursor over each point reveals that all of the points farthest from the 45-degree line contain record 4 as a member of the pair (the cursor below is over the point represented by records 4 and 92 with a sepa-ration distance of 52.28):

Chapter 8 Variance Clouds and h-Scattergrams
101
Clicking on this h-Scattergram point brings up the Sample Details window, which gives us the option to temporarily mask (remove from the active data set) one of the data records for this pair:
Since record 4 is a member of all of these outlier pairs, we choose to mask record 4, which has a transformed value of 2.639 (if the data were not transformed, this value would match the value in the Data Worksheet). This gives us a much more reason-able variogram:

Chapter 8 Variance Clouds and h-Scattergrams
102
Re-examination of the h-scattergram for lag class 7 reveals that the greatest differ-ences between head and tail values of individual pairs are substantially lower than before (0.8 vs. 2.8) and all of the major outlier pairs are gone. This was accom-plished by removing a single data record from the analysis:

Chapter 8 Variance Clouds and h-Scattergrams
103
Lag Class The lag class for which the variance cloud is created. The variance for every pair of points in the lag class is plotted against the distance interval separating that pair.
List Values Bring up a listing of h-Scattergram pairs, including for each pair the variance, sepa-ration distance, and the identity (data record number) of each member of the pair.
Edit Graph Bring up a Graph Settings dialog window for editing the graph.
Print Graph Print the graph via a Graph Print dialog window.
Cloud and Scatter Choose either Variance Cloud or h-Scattergram analysis..

Chapter 8 Variance Clouds and h-Scattergrams
104
h-Scattergram Pairs This read-only window contains a listing of all pairs of points within a specific lag class, including for each pair the difference, separation distance, and the identity (data record number) of each member of the pair. These pairs are graphed in the h-Scattergram window.
Note that in the example below, sorted by difference (with pairs of greatest differ-ence listed first), record 4 shows up as a member of 13 high-variance pairs. This confirms the record as an outlier, as was found in the h-Scattergram above:
Actions You may Print or Copy the contents of the worksheet using the menu commands of the main GS+ window. You may also change the Decimal Places reported by high-lighting a column and pressing the Increase or Decrease Decimals icon (or use the Data | Change Decimals menu command). Clicking on the top of a column will Sort the worksheet based on the column selected in alternating ascending or descend-ing order. You may also change Column Widths by placing the cursor over the line between two columns and dragging to a new location.

Chapter 9 Interpolation Basics
105
Chapter 9 Interpolation Basics Interpolation is the estimation of values in an area for points not actually sampled. There are many different interpolation techniques, ranging from simple linear tech-niques that average the values of nearby sampled points, to more complex tech-niques like kriging that use in the average weights based on distance to nearby sample points and the degree of autocorrelation for those distances.
GS+ provides three broad types of interpolation. All are nearest-neighbor techniques in which values at locations close to the interpolation point are used to estimate the interpolation point value. They differ in the way that nearby locations are weighted and interpolations calculated. The three techniques are:
• Ordinary Kriging, in which interpolation estimates are based on values at neighboring locations plus knowledge about the underlying spatial relation-ships in a data set. Semivariograms provide knowledge about the underlying relationships. The estimated value at a given location is a weighted moving average of best estimates calculated to minimize local area variance.
• Conditional Simulation, in which interpolations are based on a form of sto-chastic simulation in which data values are honored at their locations. This means that local details are not obscured by smoothing as they are in kriging.
• Inverse Distance Weighting (IDW) and Normal Distance Weighting (NDW), in which interpolation estimates are made based on values at nearby locations weighted only by distance from the interpolation location. Neither IDW nor NDW make assumptions about spatial relationships except the ba-sic assumption that nearby points ought to be more closely related than dis-tant points to the value at the interpolate location. IDW applies stronger weights to nearby points than does NDW.
All three techniques are described in greater detail on the following pages.

Chapter 9 Interpolation Basics
106
The Interpolation Window The Interpolation Window provides access to Kriging, Conditional Simulation, and Inverse Distance Weighting techniques for estimating values for points not sampled. Interpolation produces an output file that is used by GS+ for mapping. The output file can also be read by other mapping programs.
Interpolation Range Defines where to place interpolation estimates – in a uniformly spaced grid across a rectangular area or at user-specified locations, in either case with or without masks that can define areas to include or exclude.
• Uniform x-y grid (specified intervals) A grid is defined by a rectangle that has an X-direction length, a Y-direction length, and for each direction, intervals between the grid intersections. Inter-polation locations are at every grid intersection. The default range is defined by the minimum and maximum X-coordinate and Y-coordinate values, and an interval based on a certain number of points in each direction. For 1-dimensional data sets, there is no y direction. The grid can be changed with the Define command, which will display an In-terpolation Grid dialog window.

Chapter 9 Interpolation Basics
107
• Nonuniform x-y grid (specified points) A nonuniform grid is composed solely of interpolation locations specified by the user. Press Define to bring up an Interpolate Worksheet within which lo-cations can be defined or imported from an external text file.
• Include irregular shapes (polygons) Irregular shapes can be interpolated or excluded from being interpolated by defining inclusive or exclusive polygons prior to kriging. Press Define to bring up a Polygon Outlines Worksheet within which to define polygons. See Define Polygon Outlines later in this chapter.
In inclusive polygons, the area within the polygon is interpo-lated.
In exclusive polygons, the area within the polygon is not interpo-lated or mapped.
• Constrain Z estimates The estimated Z values (interpolates) can be constrained to a specific range. For example, if values less than zero are inappropriate you can specify that Z estimates less than zero be reported as zero. Press Define to bring up a worksheet to specify Z Estimate Boundaries, described later in this chapter.
Output File Name Press Select to select an existing or new file to which kriging interpolation estimates will be written. To examine the contents of an existing file press View. Output Format The format with which GS+ will write estimates to the file can be one of several types.
• GS+ Krig format (.krg)– in this format a header area defines the interpolation grid, variate names, and other information about the file needed to initiate mapping later, and the data records include for each X and Y Coordinate lo-cation that is kriged the interpolation or Z-estimate, the standard deviation of the Z-estimate, and the number of neighbors that were used to make the es-timate. See detailed example below.
• Surfer® Grid format (.grd) – in this format a short header area defines infor-mation needed for mapping, and the data is written as a continuous stream of Z-estimates beginning from a specific corner of the interpolation grid. The

Chapter 9 Interpolation Basics
108
standard deviation of the estimate and the number of neighbors used for in-terpolation are NOT included in this format. This format is compatible with Golden Software’s Surfer mapping program. Note that this format is not the same as the Surfer XYZ Input file format. See detailed example below.
• ArcView® Format (.asc) – this is similar to the Surfer format but the header area is formatted differently and the Z-estimates are written in a pattern that begins from a different corner of the interpolation grid. The standard devia-tion of the estimate and the number of neighbors used for interpolation are NOT included in this format. Also for this format, the x and y interpolation in-tervals must be the same (you can set them to be the same from the Interpo-lation Grid dialog window). This format is compatible with ESRI’s ArcInfo® Geographic Information System. See detailed example below.
Search Neighborhood GS+ interpolates values for a specific location using nearest neighbor values weighted by distance and the degree of autocorrelation present for that distance (as defined by the variogram model). Searches are limited to a certain number of near-est neighbors, and can also be restricted to a particular geographic radius. The default value of 16 nearest neighbors is usually sufficient, with no restrictions placed on radius (in Kriging, neighbors outside of the variogram range are weighted identi-cally and, if significant structural dependence is present, weighted minimally). Specifying more than 16 neighbors can slow interpolation substantially.
Interpolation Type – Krig vs. IDW vs. Simulate You may choose to interpolate using either Kriging, Conditional Simulation, or IDW (Inverse Distance Weighting) by choosing one or the other tabs on the right hand side of the window; the options on each tab are described in the next section.
Calculate Perform interpolation analysis. During analysis values are written to the output file in the specified format. You can stop analysis by pressing the <Escape> key.
Cross-Validate Perform cross-validation analysis. In cross-validation analysis each measured point in the spatial domain is individually removed from the domain and its value esti-mated via kriging or IDW as though it were never there. In this way a graph can be constructed of estimated vs. actual values for each sample location in the domain. Cross validation is not available for Conditional Simulation.

Chapter 9 Interpolation Basics
109
Define Z Estimate Boundaries The Z Estimate Boundaries window is used to constrain estimated Z values (interpo-lates) to a specific range. It is accessed from the Interpolation Window.
Range to Use for Estimated Z Enter the lowest permissible value for estimated Z in the lefthand box, and the high-est permissible value in the righthand box. In this example, if the interpolation sys-tem were to estimate a value of -0.45 for a particular point, the value will be reported as 0.
Reset Reset values to the lowest and highest data values, respectively.
Cancel Close window without saving changes.
OK Save changes and close window.

Chapter 9 Interpolation Basics
110
Defining a Uniform Interpolation Grid With the Uniform Interpolation Grid dialog window you may define the region to be kriged or interpolated as well as the intensity at which the interpolation is to take place. This method for specifying interpolate locations is appropriate for interpola-tions at regular intervals across an area; if the interpolations are to be performed at odd locations, use the NonUniform Interpolation Grid. If the outline of the area is a complex polygon you should still use this dialog but then specify the shape of the polygon from the Krig window. Note that for 1-dimensional data sets (e.g. transects or time series) only the X direction is displayed in the dialog window.
Interpolation Range Specify the beginning and ending values for the region to be interpolated. The re-gion may exceed the Data Range, which is noted on the right side of the dialog win-dow. Irregularly-shaped areas within the bounds of the interpolation range may be interpolated by specifying polygon masks from the Krig window.
Important Note: Interpolation will begin at the minimum X and Y values, but may not reach the maximum values if the total distance (e.g. the maximum X value less the minimum X value) is not evenly divisible by the Distance Interval. For example, interpolation of an X Range of 0 – 105 with a Distance Interval of 10 will stop inter-polating at X = 100, prior to exceeding the maximum range of 105.
Data Range This is the range covered by the actual data set; these are read-only values, they cannot be changed by the user from this dialog window.
Distance Interval Specify the distance interval between locations within the interpolation range. A dis-tance interval of 2.0 over a range of 0 to 10.0 means that interpolations will be made at points 0.0, 2.0, 4.0, 6.0, 8.0, and 10.0. Changing the distance interval will change the number of points value.
Number of Points The number of points within the range to be interpolated. For any given range, the

Chapter 9 Interpolation Basics
111
number of points will be the range divided by the distance interval plus 1. For a range of 0 to 10.0 with a distance interval of 2.0, the number of points will be [(10.0 – 0)/2.0] +1 = 6 points at locations 0.0, 2.0, 4.0, 6.0, 8.0, and 10.0.
Optimize The Optimize command sets the number of points to 61 for both the X and Y direc-tions (101 points for a single-dimension transect) and calculates the appropriate Dis-tance Interval. The Interpolation Range is not affected.
Cancel Exit the dialog window without saving changes.
Other Actions You may Print or Copy the contents of the worksheet using the menu commands of the main GS+ window. You may also change the Decimal Places reported by high-lighting a column and pressing the Increase or Decrease Decimals icon (or use the Data | Change Decimals menu command). Clicking on the top of a column will Sort the worksheet based on the column selected in alternating ascending or descend-ing order. You may also change Column Widths by placing the cursor over the line between two columns and dragging to a new location.

Chapter 9 Interpolation Basics
112
Defining a NonUniform Interpolation Grid Specify in this worksheet the locations of individual points to be kriged. This method of specifying interpolate locations is appropriate when locations are not regularly spaced across the interpolation area. If interpolate locations are regularly spaced, regardless of whether the area is rectangular or a complex polygon, it is usually more efficient to use a Uniform Interpolation Grid. Note that with either this NonUni-form Grid or the Uniform Grid polygons can be used to exclude or include specific complex shapes; specify the shape of the polygon from the Krig window (see Define Polygon Outlines later in this chapter).
Block Size For Block Kriging, this is the size of the block around each point that will be kriged. For uniform grids, block size is equal to the interpolation grid size. The local (discre-tization) grid is placed within the box. For Point or Punctual Kriging, block size is irrelevant and is ignored during analysis.
Clear Clears the worksheet.
Import The Import command brings into the worksheet a text file containing interpolate lo-cations. The text file can be formatted in a variety of ways. Header records are ini-tial records containing non-numeric data that are ignored during import. Data re-cords follow header records (if present) and contain a value for the X-Coordinate followed by a value for the Y-Coordinate; additional fields are ignored (as is the Y-

Chapter 9 Interpolation Basics
113
Coordinate field for 1-dimensional analysis).
The file below describes 6 locations to be interpolated:
line 1: Optional header record 1 line 2: Optional header record 2 line 3: 2.0, 34. line 4: 4.0, 36. line 5: 8.0, 19 line 6: 64.0, 34. line 7: 30.0. 35 line 8: 10.0, 12.3
Other Actions You may Print or Copy the contents of the worksheet using the menu commands of the main GS+ window. You may also change the Decimal Places reported by high-lighting a column and pressing the Increase or Decrease Decimals icon (or use the Data | Change Decimals menu command). Clicking on the top of a column will Sort the worksheet based on the column selected in alternating ascending or descend-ing order. You may also change Column Widths by placing the cursor over the line between two columns and dragging to a new location.

Chapter 9 Interpolation Basics
114
Polygon Outlines (Interpolation Masks) Irregular shapes can be interpolated or excluded from interpolation by defining inclu-sive or exclusive polygons prior to interpolating. In this window you can define these polygons by entering coordinates of polygon vertices, that is x-y points that outline the polygon.
Polygons must be closed, thus they must have at least 3 vertices (3 vertices de-scribe a triangle). You may specify as many vertices per polygon as you like (up to several billion), and polygons may be nested within one another as in the example below. However, the vertices for each polygon must define a single, closed polygon, i.e. no segments of the polygon may cross another segment. Also the first and last vertex specified must connect to one another. You can check the shape of the poly-gon while it is being defined with the Map command.
There are two types of polygons, defined by the keyword “Include” and “Exclude”:
• In inclusive polygons, the area within the polygon is interpolated. • In exclusive polygons, the area within the polygon is not interpolated.
The example below defines two polygons: the first is a 6-sided area that is excluded from interpolation, the second defines an inclusive 4-sided area (rectangle) inside the 6-sided area. You can use the Map command to produce a picture of these polygons (see below). The first line in this example (“Polygon”) is unnecessary. The word "Exclude" or "Include" is not optional; each set of polygon vertices must be preceded by either “Exclude” or “Include”:

Chapter 9 Interpolation Basics
115
Clear Clear the worksheet.
Import The Import command brings into the worksheet a text file containing vertex loca-tions. The text file can be formatted in a variety of ways with fields separated by either commas or spaces.
Print Print the worksheet.
Map Produces an outline map of each polygon within the larger interpolation grid area. Exclusive polygons appear in red, inclusive in blue. See the example in the next sec-tion.
Other Actions You may Print or Copy the contents of the worksheet using the menu commands of the main GS+ window. You may also change the Decimal Places reported by high-lighting a column and pressing the Increase or Decrease Decimals icon (or use the Data | Change Decimals menu command). Clicking on the top of a column will Sort the worksheet based on the column selected in alternating ascending or descend-ing order. You may also change Column Widths by placing the cursor over the line between two columns and dragging to a new location.

Chapter 9 Interpolation Basics
116
Polygon Outline Map This window contains an outline map of the polygons used to include and exclude areas from kriging. It is accessed from the Define Polygon Outlines window, which is part of Kriging analysis.
The overall area is the interpolation area specified in the Interpolation window. Poly-gons are defined in the Define Polygon Outlines worksheet. Exclusive polygons ap-pear in red, inclusive in blue.
Edit Graph Make format and text changes to the graph via a Graph Settings dialog window.
Print Graph Print the graph to a printer or file with the Graph Print dialog window.

Chapter 9 Interpolation Basics
117
Cross-Validation Analysis Cross-validation analysis is a means for evaluating effective parameters for kriging and IDW interpolations. In cross-validation analysis each measured point in a spa-tial domain is individually removed from the domain and its value estimated via kriging or IDW as though it were never there. In this way a graph can be con-structed of the estimated vs. actual values for each sample location in the domain. Placing the cursor over a point provides information on the estimate for a specific location as in the example below.
Each point on the graph represents a location in the input data set for which an ac-tual and estimated value are available. Information about individual points is pro-vided at the bottom of the screen; points are displayed by placing the cursor on them; in the case above the cursor was placed about the point representing record 130.
The regression coefficient at the bottom of the graph represents a measure of the goodness of fit for the least-squares model describing the linear regression equa-tion. A perfect 1:1 fit would have a regression coefficient (slope) of 1.00 and the best-fit line (the solid line in the graph above) would coincide with the dotted 45-degree line on the graph. The standard error (SE = 0.105, above) refers to the standard error of the regression coefficient; the r2 value is the proportion of variation explained by the best-fit line (in this case 39.0%; it is the square of the correlation coefficient); and the y-intercept of the best-fit line is also provided. The SE Prediction term is defined as SD x (1 - r2)0.5 , where SD = standard deviation of the actual data (the data graphed on the y-axis).

Chapter 9 Interpolation Basics
118
Cross-Validation Values In cross-validation analysis each measured point in a spatial domain is individually removed from the domain and its value estimated via kriging as though it were never there. Results can be graphed as well as listed in this read-only worksheet table.
Note that Estimated Z values may or may not be backtransformed depending on settings in the Data Summary worksheet. If you have chosen a transformation with-out a backtransformation, then the Estimated Z values will appear very different from Actual Z values regardless of the integrity of the interpolation system.
Table The record number refers to the actual record in the Data Worksheet. For each re-cord successfully kriged the actual Z value is presented in the middle column and the estimated Z value is provided to its right.
Other Actions You may Print or Copy the contents of the worksheet using the menu commands of the main GS+ window. You may also change the Decimal Places reported by high-lighting a column and pressing the Increase or Decrease Decimals icon (or use the Data | Change Decimals menu command). Clicking on the top of a column will Sort the worksheet based on the column selected in alternating ascending or descend-ing order. You may also change Column Widths by placing the cursor over the line between two columns and dragging to a new location.

Chapter 10 Conditional Simulation
119
Chapter 10 Conditional Simulation Conditional simulation is an advanced interpolation technique whereby Z estimates are based on a form of stochastic simulation in which measured data values are honored at their locations. Other interpolation methods, including kriging and IDW, will smooth out local details of spatial variation, especially as interpolated locations become more distant from measured locations. This can be a problem when you are trying to map sharp spatial discontinuities such as contamination hotspots or fault lines. GS+ uses a sequential gaussian simulation method.
The Interpolation Window contains the Simulate tab:
Variogram Model Variogram models for isotropic and anisotropic variograms are chosen with the Model command in the Autocorrelation Analysis window. Here in the Simulate win-dow you can specify whether to use the isotropic or anisotropic model for the variogram used in the kriging system.
Output Two types of output are available with conditional simulation: either a) the estimated Z value and its standard deviation, or b) the probability that the estimated value for that location is greater than some threshold value t.
An individual Z estimate and its standard deviation is the mean and stan-dard deviation of n simulations for a specific location. Thus the number of simulations will affect both of these values.

Chapter 10 Conditional Simulation
120
Probability is the proportion of simulations for a specific location for which the estimated value is greater than t. Thus this value will also be affected by the number of simulations.
Analysis tab • Number of simulations. You may choose any number of simulations >0.
Keep in mind that choosing too few simulations will produce a map that is very rough, although a large number of simulations may require substantial cpu time. See later in this chapter for examples. The defualt number of simu-lations is 1000.
• Use different seed. If this box is checked each simulation will use a different random number seed. This will slow the analysis somewhat and make each simulation unique to a specific run. The default is to use the same random number seed. In either case a different random path is used for each simula-tion.
• Multigrid refinements. Checking this box forces the analysis to follow a stepwise procedure when simulating interpolation nodes. In the first step a coarse grid is used to allow the influence of large-scale variogram structure; in subsequent steps the search neighborhoods are smaller. This avoids the need for extensive conditioning. The default is 3 refinements.
Secondary data tab Collocated secondary data can be used to refine estimations. Collocated means that a secondary data value is available for every grid node to be estimated (not simply for every primary data value, as is the case for regular cokriging).
• Residuals. This is the same as simple kriging with a locally varying mean. Press the Define button to define the residuals to be used.
• External drift. Press the Define button to define the drift values. • Colocated cokriging. Press the Define button to define the covariate val-
ues.

Chapter 10 Conditional Simulation
121
Secondary Data for Simulations Secondary data for conditional simulation are defined in the Simulation Secondary Data window. Secondary data must be available for every grid node to be esti-mated.This window is accessed from the Secondary data tab of the Simulate tab:
Clear Clear existing data from worksheet.
Fill X,Y Fill the X and Y Coordinate columns with calculated values based on the uniform interpolation grid defined in the Interpolation window. If a uniform grid is not defined in the interpolation window this button is not available.
Import Import values from an external text file. Each record of the file must contain a sepa-rate x, y, and secondary data value separated by commas, tabs, or spaces. You can also import data by copying and pasting into the Windows clipboard.
Other Actions You may Print or Copy the contents of the worksheet using the menu commands of the main GS+ window. You may also change the Decimal Places reported by high-lighting a column and pressing the Increase or Decrease Decimals icon (or use the Data | Change Decimals menu command). Clicking on the top of a column will Sort the worksheet based on the column selected in alternating ascending or descend-ing order. You may also change Column Widths by placing the cursor over the line between two columns and dragging to a new location.

Chapter 10 Conditional Simulation
122
Number of Simulations In conditional simulation the number of simulations used to produce estimates of Z can strongly affect the outcome of the interpolation. Presented below are maps of an 80 x 80 m grid interpolated at a density of 0.5 m, with different numbers of simu-lations. Below left is a map of block kriged data; on the right is the same data set interpolated by conditional simulation (n = 1 simulation).
Additional simulations improve clarity; the map below left represents n = 10 simula-tions, below right n = 100 simulations:
And still more simulations resolve further detail. The map below left represents n = 1,000 simulations; below right n = 10,000 simulations:
You may wish to set the number of simulations high enough that additional simula-tions reveal little further resolution.

Chapter 11 Kriging and Cokriging
123
Chapter 11 Kriging and Cokriging Kriging provides a means of interpolating values for points not physically sampled using knowledge about the underlying spatial relationships in a data set to do so. Variograms provide this knowledge. Kriging is based on regionalized variable theory and provides an optimal interpolation estimate for a given coordinate location. GS+
performs ordinary kriging.
The Interpolation Window contains the Krig tab:
Krig Methods Block vs. Point Kriging. You may choose either block or point (punctual) kriging. Your choice should be made on the basis of sampling design and variate character-istics. If samples were taken to represent an area around the actual sample point (e.g. if soil samples from an area around the sampling coordinate were composited before analysis), then block kriging may be more appropriate than punctual. If sam-ples were taken to represent point values then punctual kriging may be more appro-priate. For uniform grids, block size is equal to the interpolation grid size. For non-uniform grids, block size is defined in the
• Local grid. The Discretization or Local grid describes the size of the grid placed around the interpolation point and inside the block when block kriging. The interpolation estimate for that point is based on the mean value of esti-mates for each of the discretization grid points. A single discretization point describes punctual kriging. Larger discretization grids take longer to interpo-late.
• Cokrig. Cokriging provides a means for interpolating values using a secon-dary variate Z2 that covaries with the primary variate Z. The covariate is sampled from the same locations as Z, and also from a number of additional locations. The kriging estimate is based not only on distance to nearby sam-

Chapter 11 Kriging and Cokriging
124
ple locations for Z and the variogram for Z, but also distance to nearby sam-ple locations for Z2, the variogram for Z2, and the cross-variogram for Z x Z2. This can provide a more robust estimate of Z at unsampled locations so long as Z and Z2 covary sufficiently. See below for an example. Before cokriging you must a) define a covariate in the Data Worksheet Field Assignment dialog, b) perform semivariance analysis (including variogram modeling) for the primary variate and the covariate, and c) perform cross-semivariance analysis (including variogram modeling). You will also want to check the degree of correlation between the variate and covariate in the Data Summary – Covariate window.
Variogram Model Type Variogram models for isotropic and anisotropic variograms are chosen with the Model command in the Variogram section of the Autocorrelation Analysis window. Here in the Kriging window you can specify whether to use the isotropic or anisot-ropic model for each of the variograms used in the kriging system. If you are not cokriging then you will be able to specify a model for the primary variate only.

Chapter 11 Kriging and Cokriging
125
Cokriging Cokriging is an interpolation technique that allows one to better estimate map values if the distribution of a secondary variate sampled more intensely than the primary variate is known. If the primary variate is difficult or expensive to measure, then cok-riging can greatly improve interpolation estimates without having to more intensely sample the primary variate.
Consider the following example. After a radioactive spill, plutonium was sampled across an 80 x 80 m area at a sample density indicated by the quartile plot below. Block kriging (following variography) resulted in the adjacent map:
Soil carbon, easier to measure than Uranium, was sampled at the same locations as Uranium and additionally at another 60 locations as noted in the quartile map below left. Regression of carbon against plutonium showed that the variates were highly correlated (right), suggesting that cokriging might improve the map of plutonium.
Using carbon as a covariate to produce a cokriged map of plutonium results in the below-right map, plotted next to the original kriged map. Note the substantial im-provement in the definition of contour (isoline) differences, especially in the upper right quadrant of the map where the uranium was sampled most sparsely:

Chapter 11 Kriging and Cokriging
126
How do you perform cokriging? Prior to cokriging you must a) define a covariate in the Data Worksheet Field Assignment dialog, b) perform semivariance analysis (in-cluding variogram modeling) for both the primary variate Z and the covariate Z2, and c) perform cross-semivariance Z x Z2 analysis (including variogram modeling). You should also check that the covariate is in fact correlated with the primary variate.

Chapter 12 Inverse and Normal Distance Weighting
127
Chapter 12 Inverse (IDW) and Normal (NDW) Distance Weighting Inverse Distance Weighting (IDW) and Normal Distance Weighting (NDW) are inter-polation techniques in which interpolated estimates are made based on values at nearby locations weighted only by distance from the interpolation location. Neither IDW nor NDW make assumptions about spatial relationships except the basic as-sumption that nearby points ought to be more closely related than distant points to the value at the interpolate location. IDW applies stronger weights to nearby points than does NDW. The formula used for Inverse Distance Weighting is:
Zestj = Σ [ zi / (hij + s)p] / Σ [1 / (hij + s)p] where Zestj = estimated value for location j zi = measured sample value at point i, hij = distance between Zestj and zi; s = smoothing factor; and p = weighting power.
The formula used for Normal Distance Weighting is the same as that for IDW except that the denominator [distance plus smoothing factor] rather than [inverse of dis-tance plus smoothing factor]. The weighting power p defines the rate at which weights fall off with hij, the distance between the interpolated and sample locations. A value of 1-5 is typical. The smoothing factor s reduces the likelihood that any one sample value will overly influence an estimated value for a given interpolation location. IDW is an exact in-terpolator, so where an interpolation location j coincides with a sample location i, Zestj = zi and a sharp “peak” or “valley” may result; setting s > 0 reduces this peak-ing effect when it occurs.

Chapter Chapter 12 Inverse and Normal Distance Weighting
128
The Interpolation Window contains the IDW tab:
Inverse vs. Normal Distance Weighting Choose either inverse distance weighting or normal distance weighting. Inverse weighting applies stronger weights to nearby points than does Normal Distance Weighting.
Weighting Power The weighting power defines the rate at which weights fall off with distance between the interpolated and sample locations. A value of 1-5 is typical.
Smoothing Factor The smoothing factor s reduces the likelihood that any one sample value will overly influence an estimated value for a given interpolation location.
Reset Restore default values to the IDW method.

Chapter 13 Interpolation Output File Formats
129
Chapter 13 Interpolation Output File Formats GS+ Format Output Files The GS+ format for Krig (.krg), IDW, and Conditional Simulation output files (which is also the GS+ format for Map input files) contains a number of header records con-taining information about the file, followed by XYZ-style records for each interpolated points. Each data record contains fields for an x-coordinate value, a y-coordinate value (except 1-dimensional transects do not contain a value for the y-coordinate), an estimated z value for that x-y location, an estimation standard deviation for the estimated z-value (except IDW files), and the number of pairs used in the interpola-tion for that x-y location. Missing values are denoted by whatever value is specified in the Preferences window. Note that this format is different from the GS+ Input File format.
The following listing is for the first 6 coordinates for a standard GS+ krig out-put file. A GS+ IDW Output file would look identical except that there would be no field for Estimated Standard Deviation in the data records.
GS+ Output: Block Kriging Interpolation File v7.0 Set: Field 54, Second Tier Dimensions: 2; Interval source: Calculated Interpolation interval (x; y): 1.3333; 1.3333 X-coor: m east range: 0.00 - 80.00 Y-coor: m north range: 0.00 - 80.00 Z-est: Pb range: 0.151 - 0.813 Z-sd: range: 0.0000 - 0.3655 Mean Z-estimate (sd): 0.391 (0.0186) Valid N: 3721; Missing N: 0; Missing Value Indicator: -99 X-Coordinate Y-Coordinate Z-Estimate EstStdDev n 0.00 0.00 0.431 0.3608 16 0.00 1.33 0.458 0.3486 16 0.00 2.67 0.462 0.3329 16 0.00 4.00 0.466 0.3178 16 0.00 5.33 0.470 0.3034 16 0.00 6.67 0.474 0.2900 16

Chapter 13 Interpolation Output File Formats
130
ArcView® and ArcInfo® Format The ArcView® Ascii (.asc) format for Krig output files (which is also the Arc/Info® format for Map input files) contains a number of header records containing informa-tion about the file, followed by a string of z values for each row of the interpolated grid beginning in a particular corner. Unlike GS+ format files, the standard deviation of the estimate and the number of neighbors used for interpolation are NOT included in this format. Also for this format, the x and y interpolation intervals must be the same (you can set them to be the same from the Interpolation Grid dialog window). This format is compatible with ESRI’s ArcInfo Geographic Information System. Data in this format can be imported directly into ESRI’s ArcInfo™ or ArcView™. Note that this format is different from the ArcView XYZ Input File format described earlier, which is an ArcView output format that can be read by GS+.
The following listing is for the first 200 or so coordinates in a standard Arc/Info® or ArcView® format krig output file:
ncols 376 nrows 253 xllcorner -185556.375 yllcorner -127261.5234375 cellsize 1009.975 NODATA_value -999 354 314 309 301 286 264 305 306 285 285 268 314 339 306 266 248 252 240 256 282 277 289 269 285 277 258 256 282 268 246 250 249 245 266 262 287 295 335 325 323 359 369 361 357 394 450 407 409 382 409 394 486 510 502 516 546 531 542 572 579 586 594 522 654 550 615 678 709 616 533 430 576 507 638 778 769 456 432 576 635 778 721 769 869 563 589 640 588 770 833 874 1019 965 933 621 795 1131 1044 899 1072 1112 880 910 1069 1088 1071 965 975 902 800 543 350 330 376 310 384 418 352 263 205 202 200 200 201 200 198 201 201 201 201 201 201 694 695
To convert this file to an ArcGIS™ grid file, use ArcToolbox™, either the light ver-sion that comes with ArvView™ or the full version that comes with ArcInfo™:
a. Open ArcToolbox™
b. Choose the Import to Raster tool
c. Specify the GS+ ouptut file name, the grid type (integer or floating point), the name of the grid output file, and press OK.
d. You may now open the file in ArcMap™.

Chapter 13 Interpolation Output File Formats
131

Chapter 13 Interpolation Output File Formats
132
Surfer® Grid (.GRD) Format The Surfer® Grid (.grd) Krig Output format (or Map Input format) has a short header area that provides information needed for mapping, and the data is then written as a continuous stream of Z-estimates beginning from a specific corner of the interpola-tion grid. The standard deviation of the estimate and the number of neighbors used for interpolation are NOT included in this format. This format is compatible with Golden Software’s Surfer® mapping program. Note that the Surfer® Grid format is different from the Surfer® XYZ format used for input files (see Chapter 4).
The following listing is for the first 100 or so coordinates in a standard Surfer® Grid format file. The first record is a required line of code letters that identifies the file as a Surfer® grid file. Record two contains the number of grid lines along the x axis and y axis, respectively. Record 3 contains the minimum and maximum values of the x-coordinate. Record 4 contains the minimum and maximum values of the y coordinate. Record 5 contains the minimum and maximum values for the z-variate. Records 6+ contain the z values organized in row order. Within each row the y-coordinate is constant, and the grid row 1 corresponds to the lowest y-coordinate value and the last row corresponds to the hightest y-coordinate. Within each row the z-variate values are ordered from low x-coordinate to highest x-coordinate.
DSAA 376 253 -185556.375 194194.225 -127261.523 128262.152 81.000 4469.000 578 746 1097 1251 581 312 229 229 235 278 292 357 490 997 1411 1397 1373 1373 1370 1061 942 1003 1288 1014 785 963 934 797 703 924 1035 1071 1257 1775 1800 1520 1460 1520 1278 1098 915 645 495 450 378 339 342 425 613 1084 1292 1701 1682 1996 2280 2107 1662 1553 1418 1162 1225 1266 1735 1674 1550 1800 2015 2240 2158 2328 2262 2173 2046 1688 1849 1880 2023 2320 2029 2140 2240 2650 2465 2369 2180

Chapter 13 Interpolation Output File Formats
133

Chapter 14 Mapping
134
Chapter 14 Mapping GS+ produces 2D and 3D maps of spatial data following interpolation. The data to be mapped come from kriging or IDW analysis, and are thus contained in interpolation output files. Maps can be displayed in a variety of ways with a variety of different contouring schemes, 3-dimensional maps can be rotated on the fly, and both 2-dimensional and 3-dimensional maps can be zoomed to more closely view a transi-tion or other map feature. Additionally, sample postings (original data locations) can be displayed, and estimation standard errors can be mapped for input files that have been saved in the standard GS+ format.
Map Input File
• Select – allows you to choose the file with the data to be mapped. The de-fault file extension will correspond to the selected file format (e.g. .krg, .blk, and .pun for GS+ format), although a file with any extension can be selected.
• View – view the selected file in the View File window. • Format – specify the format to use to read the input file. Files with a .krg,
.idw, .blk, or .pun extension are assumed to be in GS+ format. The format specified in this field will override any assumed format:

Chapter 14 Mapping
135
GS+ Krig format (.krg) – in this format a header area defines the interpo-lation grid, variate names, and other information about the file needed to initiate mapping later, and the data records include for each X and Y Coordinate location that is kriged the interpolation or Z-estimate, the standard deviation of the Z-estimate, and the number of neighbors that were used to make the estimate. See detailed example in Chapter 11.
Surfer® Grid format (.grd) – in this format a short header area defines information needed for mapping, and the data is written as a continuous stream of Z-estimates beginning from a specific corner of the interpola-tion grid. The standard deviation of the estimate and the number of neighbors used for interpolation are NOT included in this format. This format is compatible with Golden Software’s Surfer mapping program. Note that this format is not the same as the Surfer XYZ Input file format. See detailed example in Chapter 11.
ArcView® Format (.asc) – this is similar to the Surfer format but the header area is formatted differently and the Z-estimates are written in a pattern that begins from a different corner of the interpolation grid. The standard deviation of the estimate and the number of neighbors used for interpolation are NOT included in this format. Also for this format, the x and y interpolation intervals must be the same (you can set them to be the same from the Interpolation Grid dialog window). This format is compatible with ESRI’s Arc-Info Geographic Information System. See detailed example in Chapter 11.
Map Grid • X direction – the range within the file for values in the x (horizontal) direction. • Y direction – the range within the file for values in the y (vertical) direction; for
1-dimensional data sets this field is blank. • Z values – the range of estimated Z values in the input file. • Z SD values – the range of estimation Z standard deviation values in the in-
put file; only when input files are in a GS+ format that contain both Z values and Z standard deviation values will this box be selectable;
• N (N missing) – the number of valid records in the file and (in parentheses) the number of missing values. The default missing value indicator (e.g. -999.) is specified in the Preferences - General dialog; the active missing value indicator for map files is indicated in the Map Contour Intervals window. Missing values are mapped as transparent regions. Exclusive polygons are mapped as missing values, as is any interpolate location for which there is no kriging solution.

Chapter 14 Mapping
136
Variate to Map • Z values – maps the estimated Z values in the file • Z standard deviations – maps the estimation Z standard deviations in the file;
only files in the GS+ format contain both Z values and Z standard deviation values.
• Sample Posting – map only the original sample locations. Requires the presence of a posting file, which has the same name as the input file but a .pos extension. This file is created during interpolation; if it is not present you will not be able to map a sample posting. Coordinate Postings (Quantile Plots) of the active data are viewed through the Data Summary – X,Y Coor-dinates Tab window, described earlier.
Graph Type • 2D – displays a flat, 2-dimensional map of the data • 3D – displays a 3-dimensional map of the data. The height of the map can
be adjusted with the Edit Graph command of the Map window; the perspec-tive can be adjusted with the Rotate command of the Map window.
• 1-d – displays 1-dimensional data (e.g. a geographic transect or a time se-ries) as an x-y graph. This choice is not available for 2-dimensional data.
• Show legend – displays the contour legend next to the map. Surface
• Contour lines – draws lines between contour intervals • Color bands – fills the space between contour lines with different colors; col-
ors can be specified from the Define Contour dialog window by pressing De-fine Contour Levels, below.
• Smoothing – apply slight smoothing to the data to improve visualization. • Solid pedestal – for a 3D map fill in the area beneath the surface with a solid
color. • Wireframe – for 3D maps, drapes an x-y grid over the surface. • Wireframe Weave – specifies the density of the wireframe grid. A weave of 0
puts a grid line at every data row and column; a weave of 1 skips one row/column, a weave of 2 skips 2, etc.

Chapter 14 Mapping
137
Contour Levels • Number – the number of contour levels to put on the map. • Define – brings up the Map Contour Intervals dialog window (described in
greater detail below) that allows you to set break points for individual inter-vals and colors for contour bands.
Map Legend • Show legend – displays the contour legend next to the map. • Continuous vs. Stepped – display legend as continuous scale with values
next to break points (e.g. between color bands) or display legend as stepped format, with values next to boxed colors.
Ceiling • Contour lines – project contour lines above the plot surface (3D maps only). • Color bands – project color bands onto the ceiling of the plot (3D maps only).
Floor • Contour lines – project contour lines under the plot surface (3D maps only). • Color bands – project color bands onto the floor of the plot (3D maps only).
Grid Lines • X axis – place a vertical grid line along the back walls of the 3D plot x axis. • Y axis – place a vertical grid line along the back wall of the 3D plot y axis. • Z axis – place horizontal grid lines along the back walls of 3D plots.
Draw Create the map in a Map Image window.

Chapter 14 Mapping
138
Map Contour Intervals This dialog window allows one to specify the break points and colors for the contour intervals used for mapping. The number of contour intervals is specified in the Map window, where access to this Map Contour Levels window is provided.
Contour Intervals
• Color buttons – change the color of a specified interval by clicking the adja-cent color button.
• Break points – change the break point between adjacent contour intervals by providing a new value in the space provided. Note that the new break point must be greater than the preceding point and less than the one that follows.
• Missing value – specify the missing value indicator for the data file. This value is usually embedded in the input file as part of the header information, and is automatically extracted by GS+. This value overrides the missing value indicator specified in the Preferences – General dialog or the map input file.

Chapter 14 Mapping
139
Intervals • Get – read contour intervals from a text file; the first value of each record of
line of the file is presumed to be a separate interval. • Save – save the existing contour intervals to a text file. • Reset – recalculate intervals based on a uniform distribution (even intervals)
between the lowest and highest value in the file. Color Source
• Standard – specifies a default color pattern of red-orange-yellow….. violet. • Blue – specifies a default color pattern of different shades of blue. • Custom – specifies a custom color pattern defined below. • Red – specifies a default color pattern of different shades of red. • Green – specifies a default color pattern of different shades of green. • Gray – specifies a default color pattern of different shades of gray.
Color Source Custom • Get – get a custom color pattern saved earlier. The initial custom color is the
same as the standard color source, above. • Save – save the existing color pattern as the custom color pattern. • Reset – reset the custom color pattern to the default Standard pattern.
Color Source Dynamic Expands or contracts the color range when there are fewer than 15 intervals speci-fied. For example, if 10 intervals are specified and the Dynamic box is not checked, the colors for the intervals are the same as they would be if 15 intervals were checked. If, on the other hand, the Dynamic box is checked, the colors for the inter-vals are adjusted such that interval 10 becomes the color of the original interval 15. Checking this box provides greater color contrast on maps.
Invert Flips the color range. This allows you to associate the highest interval values with the darkest colors or vice versa.
Cancel Exit the dialog window without saving changes.

Chapter 14 Mapping
140
Map Image - 3D The 3D map image is produced by the Draw command from the Mapping window.
Edit Graph Change axis scales and other graph formats via the Graph Settings dialog window.
Print Graph Print the active graph to a file, printer, or other device.
Mouse Action • Off – returns the mouse to normal operation. • Rotate – turns the cursor into a rotator cuff when the left mouse button is
pushed, allowing the image to be rotated as desired. • Move – allows the graph to be moved within the window by clicking the left
mouse button and dragging the cursor. • Scale – shrinks the graph image with the left mouse button. • Zoom – allows you to zoom in on a graph area by using the left mouse button
to define a rectangular zoom area. Within the zoomed area the location of the cursor is noted on the Mouse Location panel.
• Reset – resets the image to the default rotation angle and scale. Mouse Location The current cursor location when on the map surface. Units are map units.

Chapter 14 Mapping
141
Map Image - 3D Standard Deviations A map of standard deviations can be produced for interpolation files that contain standard deviation values – Krig or Conditional Simulation interpolations that are saved in GS+ format. Use the Draw command from the Mapping window.
Commands in this Window are the same as for earlier graphs.

Chapter 14 Mapping
142
Map Image - 3D Rotation Three-dimensional map images can be rotated to any viewing angle. To rotate, choose Rotate on the Mouse Action panel and hold down the left-mouse button while moving the mouse over the graph. The cursor will be replaced with a 3D box (as below) of the viewing angle. Release the mouse and the map will be drawn:

Chapter 14 Mapping
143
Map Image - 2D The 2D map image is produced when the Graph Type is set to 2D.
Map Image - 2D Standard Deviations A 2D map of standard deviations can be created from the Map Window.

Chapter 14 Mapping
144
Map Image - 2D Sample Posting The 2D sample posting is produced by the Draw command from the Mapping win-dow when the Graph Type within that window is set to 2D and the Posting box is checked. Each “X” symbol in the image below marks an actual sample location as defined by the original X,Y coordinate locations in the Data Worksheet window. Co-ordinate Postings (Quantile Plots) of the active data (which may or may not be the same as the mapped data) are viewed through the Data Summary – X,Y Coordi-nates Tab window, described earlier.
Commands in this Window are the same as for earlier graphs.

Chapter 14 Mapping
145
Transects (1d Maps) The 1D transect image with or without sample postings is produced via the Mapping window when the variate to be mapped has only one (X) dimension:
Transect Image with Standard Deviation A transect with standard deviations can be drawn if interpolation files contain stan-dard deviations – Krig or Conditional Simulation files in GS+ format.
Commands in this Window are the same as for earlier graphs.

Chapter 15 Bibliography
146
Chapter 15 Bibliography The following references may be useful for those seeking further background about geostatistics and its use in the environmental sciences.
• Burrough, P.A. 1981. Fractal dimensions of landscapes and other environ-mental data. Nature 294:240-242.
• Burrough, P.A. 1986. Principles of Geographical Information Systems for Land Resources Assessment. Oxford University Press, Oxford.
• Burgess, T.M. and R. Webster. 1980a. Optimal interpolation and isarithmic mapping of soil properties. I. The semivariogram and punctual kriging. Jour-nal of Soil Science 31:315-331.
• Burgess, T.M. and R. Webster. 1980a. Optimal interpolation and isarithmic mapping of soil properties. II. Block kriging. Journal of Soil Science 31:333-341.
• Cressie, N. 1985. Fitting variogram models by weighted least squares. Mathematical Geology 17: 563-586.
• Cressie, N. A. C. 1991. Statistics for Spatial Data. John Wiley, New York, USA.
• David, M. 1977. Geostatistical Ore Reserve Estimation. Elsevier, Scientific Publishing Co., Amsterdam, The Netherlands.
• Deutsch, C.V. and A.G. Journel 1992. GSLIB Geostatistical Software Library. Oxford University Press, New York.
• Goovaerts, P. 1997. Geostatistics for Natural Resources Evaluation. Oxford University Press, New York.
• Griffith, D.A. 1987. Spatial Autocorrelation: A Primer. Association of Ameri-can Geographers, Washington, D.C. 86 p.
• Haan, C.T. 1977. Statistical Methods in Hydrology. Iowa State University Press, Ames, Iowa.
• Isaaks, E.H. and R.M. Srivastava. 1989. An Introduction to Applied Geosta-tistics. Oxford University Press, NY.
• Journel, A.G. and C.J. Huijbregts. 1978. Mining Geostatistics. Academic Press, New York.
• Krige, D.G. 1966. Two dimensional weighted moving average trend surfaces for ore-evaluation. Journal of the South African Institute of Mining and Metal-lurgy 66:13-38.
• Krige, D.G. 1981. Lognormal-de Wijsian geostatistics for ore evaluation. South African Institute of Mining and Metallurgy Monograph Series. Geosta-

Chapter 15 Bibliography
147
tistics I. South Africa Institute of Mining and Metallurgy, Johannesburg, South Africa.
• Mandelbrot, B.B. 1982. The Fractal Geometry of Nature. W.H. Freeman, London.
• Matheron, G. 1971. The theory of regionalized variables and its applications. Cahiers du Centre de Morphologie Mathematique, Fontainebleau, No. 5.
• Robertson, G.P. 1987. Geostatistics in ecology: interpolating with known variance. Ecology 68:744-748.
• Robertson, G. P., and K. L. Gross. 1994. Assessing the heterogeneity of be-low-ground resources: Quantifying pattern and scale. Pages 237-253 in M. M. Caldwell and R. W. Pearcy, eds. Plant Exploitation of Environmental Het-erogeneity. Academic Press, New York, New York , USA.
• Rossi, R. E., D. J. Mulla, A. G. Journel, and E. H. Franz. 1992. Geostatistical tools for modeling and interpreting ecological spatial dependence. Ecological Monographs 62: 277-314.
• Sokal, R.R. and N.L. Oden. 1978. Spatial autocorrelation in biology. 1. Meth-odology. 2. Some biological implications and four applications of evolution-ary and ecological interest. Biological Journal of the Linnean Society 10:199-228.
• Trangmar, B.B., R.S. Yost and G. Uehara. 1985. Applications of geostatistics to spatial studies of soil properties. Pages 45-94 in N.C. Brady, editor. Ad-vances in Agronomy Volume 38. Academic Press, New York.
• Vieira, S.R., J.L. Hatfield, D.R. Nielsen, and J.W. Biggar. 1983. Geostatistical theory and application to variability of some agronomical properties. Hilgardia 51:1-75.
• Webster, R. 1985. Quantitative spatial analysis of soil in the field. Pages 1-70 in B.A. Stewart, editor. Advances in Soil Science Volume 3. Springer-Verlag, New York.
• Webster, R. and M.A. Oliver. 1990. Statistical Methods in Soil and Land Re-source Survey. Oxford University Press, NY. 316 p.

Chapter 16 Glossary
148
Chapter 16 Glossary A0Range parameter in variogram models. The relationship of A0 to range A (effective range) depends on the model. See specific model definitions for more information.
A1Range parameter for the major axis in anisotropic variogram models. The relation-ship of A1 to major range depends on the model. See specific model definitions for more information.
A2Range parameter for the minor axis in anisotropic variogram models. The relation-ship of A2 to major range depends on the model. See specific model definitions for more information.
Binary Data Record Format Binary data from many spreadsheet and database programs can be imported di-rectly; if the file can be viewed using the View command then it can be imported. Eligible files include Excel and Lotus 1-2-3 worksheets, dBase, Paradox, Access, etc.
A Character as Missing Value Indicator Specify the character to be used as a missing value indicator in the field that will ap-pear when a character value is specified in the list box. The example below pre-sumes that % has been specified the missing value indicator, and thus the third value of this record will be read into the worksheet as a missing value:
13.2, 34.5, % , 0.15
Autocorrelation Autocorrelation is the degree to which a property is related to itself in time or space. For example, in a spatial domain values for samples taken close to one another are more likely to be similar than are samples taken farther apart – autocorrelation is a formal measure of this self-similarity.
Backtransformation When data values are transformed in order to make their distributions more normally distributed, after analysis of the transformed data the output data are customarily (but not necessarily) back-transformed to the original data domain for final reporting. For example, the backtransformation for a ln(z) transform is exp(z-transformed); for a z2 transform the backtransformation is the square root of the transformed value. Offset values (if applied) are subtracted from the backtransformed values.
Binary Data Record Format Binary data from many spreadsheet and database programs can be imported di-

Chapter 16 Glossary
149
rectly. Eligible files include Excel and Lotus 1-2-3 worksheets, dBase, Paradox, Ac-cess, and FoxPro.
Block Kriging Kriging provides a means of interpolating values for points not physically sampled using knowledge about the underlying spatial relationships in a data set to do so. Block kriging provides an estimate for a discrete area around an interpolation point. Punctual or point kriging provides an estimate for a precise point. In environmental work block kriging is usually more appropriate. The block is defined as the rectan-gular area around a point that is not included in an adjacent block.
Brackets as Column Title Separators Column or variate names are separated by brackets, e.g.:
<m east> <m north> <Pb (ug/g)> <pH>
C or Structural Variance C of the variogram model represents spatially-structured variance. Compare to C0 or nugget variance, which is the portion of the variance not spatially structured.
C0 or Nugget Variance C0 or Nugget Variance is the y-intercept of the variogram model. Nugget variance represents variation not spatially dependent over the range examined.
Characters as Column Title Separators Column or variate names are separated by a character specified in the field that ap-pears when this option is selected. For example if "#" were specified as the sepa-rated:
m east # m north # Pb (ug/g) # pH
Character Separated Values Values within data records are separated by a specific character, defined in the field below the list box; e.g. if the character “#” is the delimiter:
13.2 # 34.5 # 35.6 # 0.15
Cokriging An interpolation technique that allows one to use a more intensely sampled covari-ate in the estimation of values for a related variate. If the primary variate is difficult or expensive to measure and it is correlated with a more available covariate, cok-riging can greatly improve interpolation estimates. See Cokriging Analysis for further information.
Commas as Column Title Separators Column or variate names are separated by commas e.g.:
m east, m north, Pb (ug/g), pH

Chapter 16 Glossary
150
Comma Separated Values Values within data records separated by commas:
13.2, 34.5, 35.6, 0.15
Conditional Simulation An advanced interpolation technique whereby Z estimates are based on a form of stochastic simulation in which measured data values are honored at their locations.
Covariate The Covariate is a second Z-variate that covaries with the primary Z-variate. It is used in cokriging.
Data Builds Data in the GS+ Worksheet is read into the actual arrays that get analyzed during Data Builds. Data builds occur whenever a new data set is read into GS+ (via the Import command) or whenever a field assignment or data value is changed and the Rebuild Button (Data Worksheet Window) is pressed. During data builds missing values are ignored and filters and transformations are applied. Most Data Builds are automatic; you’ll need to force a Data Build whenever the Rebuild Button is red (the Data Summary Window will also be empty).
Data Fields A data field is an individual item on the data record. In the GS+ Worksheet, records appear as rows and fields appear as columns. Prior to analysis you must identify an X-coordinate field, a Y-coordinate field (for 2-dimensional analyses), and the field (column) that corresponds to the Z-variate. For cokriging you will also need to as-sign a field to hold the covariate (Z2) values. Field assignments are performed by clicking on the top row of the Worksheet to bring up a Field Assignment dialog win-dow.
Data Records Data Records are records in text files that contain data values. Data records follow header records that contain descriptive information about the file. Data records are imported into the GS+ Worksheet; header records are imported into the Data De-scription portion of the Worksheet Window.
Decimal Point Missing Value Indicator In the record below the third value appears as a decimal point and will be read into the worksheet as a missing value:
13.2, 34.5, . , 0.15
Discretization Grid The discretization grid describes the size of the grid placed around the interpolation point when block kriging. The estimate for the interpolated block is based on the mean value of estimates for each of the discretization grid points. A single discreti-zation point describes punctual kriging. A 2x2 grid averages 4 grid points. Larger

Chapter 16 Glossary
151
discretization grids take longer to interpolate.
Effective Range See Range.
Geo-referenced Data Geo-referenced data are data that have been collected from a specific location, i.e. any data for which there is a spatial x,y coordinate associated with each data value.
Header Records Records at the top of a data file that precede the data records and that contain in-formation about the data records.
Interpolate An interpolate is an estimated value for a location in a domain based on values of nearby measured locations. In GS+ interpolation is performed by kriging or by in-verse distance weighting methods. Maps are based on interpolations at grid points across the domain.
Kriging An interpolation method based on regionalized variable theory that provides an op-timal interpolation estimate for a given coordinate location. GS+ performs ordinary kriging.
Lag Class Distance Interval Each point on a variogram corresponds to the average semivariance for all values in the spatial domain that are separated by a given distance interval h. This interval (also called a lag distance class) is a range whose width is specified by the user in the Semivariance Analysis window. A corresponding definition is also relevant to Moran’s I, Fractal, Cross-Semivariance, and Madogram Analyses.
Missing Value A value not present in a record. A data record can contain fields for coordinates (e.g. X, Y) and for multiple Z variates. If any one of the fields used for an analysis is miss-ing, the record is ignored during analyses, i.e. when the active data set is built. In the GS+ Worksheet a value is considered missing if the cell is blank (a permanent miss-ing value) or if the cell contents appear as red italicized text (a temporarily missing value). Cells can be assigned temporarily missing by right-clicking on them; a sec-ond right-click returns them to non-missing. In Input and Output files missing values are indicated by characters or values (e.g. -99) defined in the Preferences window.
Model Parameters See Variogram Model Parameters.
No Header Records The first record of the file contains numeric records that should be treated as data.

Chapter 16 Glossary
152
Number of Header Records are Fixed An input field beneath the list box appears when this choice is made, and this field specifies the number of records at the top of the file to consider descriptive text when reading the file; the first data record is the next record.
Number of Header Records Varies The number of header records will be assumed to be all records prior to the first all-numeric record. If all records contain an alphanumeric Sample ID field then all re-cords will be assumed to be header records and no data records will be read. In the example below there are 2 header records:
File GMD Test Site <m east> <m north> <Pb> <pH> 34.5 45.6 0.231 5.8 36.7 46.5 0.241 5.9.
Numeric Value as a Missing Value Indicator The indicator value that will appear when a numeric value is specified in the list box. The example below presumes that -99 has been specified the missing value indica-tor and thus the third value of this record will be read into the worksheet as a miss-ing value:
13.2, 34.5, -99.0 , 0.15
Parameter File Files that store analysis parameters and data for a particular data set. GS+ parame-ter files typically have a .par extension.
Polygons Polygons are Irregular shapes that can be interpolated or excluded from interpola-tion during kriging. Polygons are defined by at least 3 vertices (coordinate pairs) that define the polygon outline. Polygons can be as complex as continent outlines or as simple as building outlines.
Posting A Coordinate Posting is a map of coordinate locations. The location of each data point in the active data set can be marked by a symbol corresponding to its relative value.
Punctual Kriging A type of kriging that provides an estimate for a precise point. Block kriging provides an estimate for a discrete area around a specific interpolation point.
Quotes as Column Title Separators Column or variate names are separated by quotes. E.G.:
“m east” “m north” “Pb (ug/g)” “pH”

Chapter 16 Glossary
153
Range The range (also called effective range) is the separation distance over which sample locations are autocorrelated, i.e. over which there is spatial dependence among sample locations. In variogram models the range is calculated from the range pa-rameter A0 (isotropic models) or A1 and A2 (anisotropic models). See model defini-tions for further information.
Same as for Data Records The delimiter for column or variate titles is the same as specified for data records. E.G. if the data records in a file with four data columns are formatted with "#" as a delimiter:
m east # m north # Pb (ug/g) # pH
Sample ID The Sample ID is text or a numeric value that identifies a particular data record. It is optional. To specify a Sample ID column click on the top row of the data worksheet.
Sill or C0+C The Sill of the variogram model (C0 + C) represents spatially-independent variance. Data locations separated by a distance beyond which semivariance does not change — i.e. after the model asymptote or sill — are spatially independent of one another. Theoretically the sill is equivalent to sample variance.
Space Separated (free format) Values Values within data records are separated by spaces, e.g.:
13.2 34.5 35.6 0.15
Spaces as Column Title Separators Column or variate names are separated by spaces; note that this option limits col-umn titles to single words. e.g.:
east north Pb pH
Tab Separated Values Values within data records are separated by tab characters (denoted by “[tab]” in the example below; this format is often called tab-delimited output by spreadsheet pro-grams, e.g.:
13.2 [tab] 34.5 [tab] 35.6 [tab] 0.15
Tabs as Column Title Separators Column or variate names are separated by tab characters, e.g.:
m east [tab] m north [tab] Pb (ug/g) <tab> pH
Transformation A transformation is a formula applied to all Z or Z2 values in a data set, ususally to

Chapter 16 Glossary
154
better normalize its distribution. The success of a transformation can be judged by observing its frequency distribution before and after transformation. Values may be backtransformed prior to reporting results.
Uniform Lag Interval Classes The Lag Class Distance Interval defines how pairs of points will be grouped into lag classes. Each point in a variogram or autocorrelogram represents the average semivariance or Moran’s I for a single lag class, which is a group of pairs separated by a certain Lag Class Distance Interval, sometimes called a step size. This interval can either be calculated by GS+, in which case it will be uniformly distributed across the active lag distance, or it can be manually set by the user
Variogram Model Parameters Model parameters for isotropic variograms include terms for nugget variance (C0), the combined nugget plus structural variance (C0 + C, also called the model sill), and the range parameter A0 or in the case of anisotropic variograms, A (a function of A1 and A2). The range parameter may be different from the effective range, which should be used to compare ranges among models.
What is a valid record A valid record is any record that contains non-missing values for the coordinate loca-tions (both an X-Coordinate value and a Y-Coordinate value for 2-dimensional do-mains) AND a non-missing value for the Z-Variate. Missing values appear as blank cells OR as red colored text; use the right mouse button to turn cells with values into cells with missing values and vice versa.
X,Y-Coordinates X,Y coordinates describe a physical location at which a Z variate is measured. The coordinates are presumed to be in Cartesian space, i.e. with a 0,0 origin that in-creases for x in an easterly direction and decrease in a westerly direction, and for y increase in a northerly direction and decrease in a southerly (note that values can be less than or greater than 0). Thus a value of 10,20 means 10 units east of the origin and 20 units north. In GS+, if a Y-Coordinate Column is not specified the data are assumed to be 1-dimensional, i.e. collected along a transect or through time. To specify (or remove) a Y-Coordinate column, click on the top row of the worksheet. Note also that latitude and longitude are not part of a Cartesian coordinate system because coordinate distances (measured in degrees) represent different physical distances (measured in meters) in different places on the globe. For a rough con-version from latitude and longitude to meters, consider that one second of latitude equals 30.92 meters on the ground; for longitude, calculate the cosine of the latitude then multiply by 30.92.

Chapter 16 Glossary
155
Z-Variate Data (Z) The Z-Variate is the variate being analyzed and mapped, e.g. elevation for a topog-raphic map, pH for a map of soil acidity, chlorophyll content for a map of lake pro-ductivity, population density for a map of rural population growth, etc. A Worksheet can contain many variates but only one can be analyzed at a time, thus only one column can contain the Z-Variate data. A Z-Variate Column must be defined prior to spatial analysis. To specify a column, click on the top row of the worksheet.
Z2 Variate Data (Z2 or Covariate) The Z2 Variate or Covariate is a second Z-variate that covaries with the primary Z-variate. It is used in cokriging.

Chapter 16 Glossary
156
Index 1D transects, 145 2D Maps, 21, 134, 143 3D
Map proportion (height to width ratio), 21
Maps, 21, 134, 140 Standard deviations map, 141
A0, 68, 69, 71, 72, 73, 74, 153 A1, A2, 75, 76, 77, 78, 79, 154 Active lag distance, 60 Adjacency matrix, 93 Anisotropy
Axis orientation, 62, 80, 82 Semivariance surface, 16, 62, 63, 80,
82 Variogram map, 80, 82 Variogram models, 75
Appending data, 42 ArcView®
Input file format, 35 Map input file format, 135 Output file format, 108, 130
Assign field, 28 Autocorrelation
Autocorrelation window, 60 Correlograms, 89 Covariance analysis, 90 definition, 148 Drift, 88 Fractal analysis, 94 General relative variograms, 91 Madograms, 86 Moran's I analysis, 93 Pairwise relative variograms, 92 Rodograms, 87 Semivariance, 59
Standardized variograms, 85 Autocorrelation menu, 9 Axis formats, 20 Azimuth, 81 Backtransformations, 44, 118, 148 Base input file, 25 Bibliography, 146 Binary data record format, 148 Block kriging, 149 Block size, 112 C0, 68, 149 Cartesian (x,y) coordinate system, 5, 154 Ceiling, 22, 137 Character Separated Values, 149 Cokriging, 29, 60, 123, 125 Column, 26
Field assignments, 25, 28 Titles, 36, 149, 152, 153 Widths, 27
Comma separated values, 41 Commas as column title separators, 41 Conditional simulation, 105, 119
Cokriging, 120 External drift, 120 Number of simulations, 122 Residuals, 120 Secondray data, 120, 121
Contour levels, 22, 137, 138 Convert GS+ DOS File, 24 Coordinate postings, 51
1d scattergrams, 54 2d scattergrams, 52 Definition, 152 Map data, 136, 144 Posting intervals, 55
Coordinates Assigning, 28 Cartesian, 154

Index
157
Latitude, Longitude, 154 Correlograms, 89 Covariance analysis, 90 Covariate
Assignment, 28 Definition, 150, 155 Icons, 6 Regression, 56 Values warning, 29
Cross-semivariance analysis, 9, 83, 124 Cross-validation
Analysis, 108, 117 Values, 118
Cross-variate regression, 56, 57, 58 Cross-variograms, 9, 83, 124 Cumulative frequency distribution
Graph, 47 Values, 48
Cumulative probability distribution, 44 Data
Append dialog, 42 Bounding, 30 Builds, 150 Fields, 28, 150 File import, 33, 41 Filter, 25, 30 Input file format, 34, 36 Menu, 8 Records, 26, 36, 37, 38, 39, 41, 112,
150 Summary window, 51, 56
Regression analysis tab, 56 X,Y coordinates tab, 51 Z tab, 43
Title, 26 Worksheet, 25
Database input files, 33, 40 Decimal places, 13, 14, 27 Define posting intervals, 55 Descriptive statistics, 44 Discretization grid, 123, 150 Distance interval, 110
DOS GS+ files, 24 Drift, 88 Duplicate values, 31, 44 Edit menu, 7 Effective range, 68, 69, 76, 154 Email, 12 Excel files, 40 Exclusive polygons, 107, 114, 116 Exponential anisotropic model, 78 Exponential isotropic model, 72 Export data, 8 Field (column)
Assignments, 25, 26, 28 Default assignments, 14 Delimiter, 41 Names, 26
File Extensions, 23, 24, 64, 107, 129, 130,
132, 135, 152 Import command, 25 Import dialog, 33 Import properties, 40, 41 Menu, 6 View window, 42
Filtering data, 25, 30 Floor, 22, 137 Formulas in worksheets, 27 Fractal analysis, 94 Frequency distribution
graph, 44 Graph, 45 Values, 46
Gaussian anisotropic model, 79 Gaussian isotropic model, 74 General relative variograms, 91 GeoEas input file format, 34, 37 Geometric anisotropy, 62 Geo-referenced data, 151 Graph settings
Axis scaling, 19

Index
158
Axis titles & labels, 20 Colors, 17 Contour details, 21 Footnote, 18 General, 17 Legend, 18 Title, 18
Grid lines, 22, 137 GS+ Input file format, 34 GS+ Interpolation Output file format, 129 Header records, 36, 37, 38, 39, 41, 112,
151, 152 Help menu, 11 Histogram bars, 20, 45 h-Scattergrams, 95, 100, 104 IDW, 127
Interpolation defaults, 16 Output files, 129, 130, 132 Smoothing factor, 16, 127, 128 Weighting power, 16, 127, 128
Importing Default file type, 14 Default filename, 14 File import dialog, 33 Import file command, 25 Spreadsheets, 40 Text files, 34
Inclusive polygons, 107, 114, 116 Input file format, 34
ArcView® XYZ format, 38 GeoEas format, 37 GS+ format, 36 Spreadsheet and database formats, 40 Surfer® XYZ format, 39
Insert rows or columns, 27 Installation, 2 Interpolation, 105
Cokriging, 123, 125 Conditional simulation, 105, 119 Interpolate locations, 112 Interpolate menu, 10
Interpolation grid, 106 Interpolation masks. See Polygons Interpolation range, 110 Interpolation type, 108 Interpolation window, 106 Inverse distance weighting, 105, 127 Kriging, 105 Nonuniform grid, 112 Normal distance weighting, 105, 127 Output formats, 107 What is an interpolate?, 151 Z estimate boundaries, 109
Interval class, 59 Inverse distance weighting, 105, 108, 127 Irregular shapes, 107 Isotropic variogram models, 68 Kriging, 105, 123
Block vs. Point, 123 Command, 108 Krig output files, 129, 130, 132 Output file name, 107
Lag class distance interval, 59, 60, 61, 64,
151 Latitude, 154 Legend title, 55 Licensing and copy protection, 3 Linear anisotropic model, 78 Linear isotropic model, 73 Local grid, 123 Longitude, 154 Madograms, 86 Main menu, 6 Major axis, 75, 81 Map
2D image, 143 2d sample postings, 144 3D image, 140 3d rotation, 142 3D standard deviation image, 141 ArcView® input file format, 130

Index
159
ArcView® input file format, 135 Ceiling, 22, 137 Contour levels, 138 Floor, 22, 137 Grid (range), 135 Grid lines, 137 GS+ input file format, 129, 135 Input file format, 129 Input file formats, 134 Legend, 22, 137 Mapping in GS+, 134 Menu, 10 Surface properties, 21 Surfer® input file format, 132, 135
Masks, 107 Minor axis, 75 Missing values
Count, 135 Definition, 151 Missing value indicator, 13, 29, 34, 36,
38, 39, 40, 41, 129, 135, 138 Permanent missing values, 27, 29 Preferences, 13 Temporarily missing values, 29, 31
Model parameters, 69, 76 Model results, 66 Moran’s I analysis, 93 Mouse action, 81, 140 NDW, 16, 127 Nonuniform interpolation grid, 107, 112 Normal distance weighting (NDW), 16,
127 Normal probability distribution, 44
Graph, 49 Values, 50
Nugget variance, 68, 69, 76, 149 Offset tolerance, 62 Ouput file formats, 107 Outliers, 95 Outline map, 116 Output file format
ArcView® format, 130 GS+ format, 129 Surfer® format, 132
Pairwise relative variograms, 92 Parameter files, 6, 152 Polygons
Defined, 152 How to create, 107 Polygon definition window, 114 Polygon map, 116 Polygon vertices, 114
Posting intervals, 55 Postings. See Coordinate postings Preferences
Analyses, 15 Data file import, 14 Decimal places, 13 Draw semivariance surface, 16 General, 13 IDW smoothing factor, 16 IDW vs. NDW, 16 IDW weighting power, 16 Import field assignments, 14 Import file type, 14 Import filename, 14 Missing value indicator, 13 Variogram defaults, 15 Variogram offset, 15
Primary variate, 125 Principal anisotropic axis, 81 Printer setup, 7 Printing graphs, 23 Printing text, 24 Punctual kriging, 152 Quantile plots. See Coordinate postings Quotes as column title separators, 41 Range, 68, 69, 75, 76, 153, 154 Rebuild command, 26 Records. See Data records Regression

Index
160
Coefficient, 117 Regression analysis, 56, 57 Regression coefficient, 70, 76 Regression values, 58
Residual sums of squares, 69, 76 Rodograms, 87 Rotate graph, 140, 142 Sample ID, 28, 153 Sample postings. See Coordinate postings Sample variance, 63 Scaling data, 43 Scattergrams. See Coordinate postings Screen layout, 5 Search neighborhood, 108 Secondary variate (Z2), 125 Semivariance
Overview, 59 Semivariance analysis window, 60 Semivariance offset, 59 Values, 67 Variograms window, 66
Sill, 68, 69, 75, 76, 153 Single-user license agreement, 3 Site licensing, 3 Smoothing factor, 16, 127, 128 Space separated (free format) values, 41 Spaces as column title separators, 41 Spherical anisotropic model, 77 Spherical isotropic model, 71 Spreadsheet input files, 33, 40, 41 Standard deviations map, 141 Standardized variogram, 85 Structural variance, 68, 149, 153 Summary statistics, 43 Surface, 136 Surfer®
Grid output file format, 107 Map input file format, 39, 132, 135 XYZ input file format, 35
Symbols, 20, 55 Tab separated values, 41
Tabs as column title separators, 41 Text files, 33, 34 Tick marks, 19 Tool bar, 6 Transect image, 145 Transformations
Assigning, 43 Backtransformations, 44, 118, 148 Defined, 153 Lognormal, 43 Offset, 44 Scaling 0-1, 43 Square root, 43
Uniform interpolation grid, 106, 110 Uniform lag interval classes, 154 Updates, 2, 12 Variance
Variance cloud analysis, 66 Variance cloud pairs, 99
Variate assignments, 26 Variate names, 26, 36, 149, 152, 153 Variogram
Anisotropic models, 75 Defaults, 15 Isotropic models, 68, 69 Map, 62, 80, 82 Model command, 63 Model parameters, 69, 154 Model type for kriging, 124 Nugget variance, 69, 75, 76 Offset, 15 Options, 63 Range, 69, 75, 76 Sill, 68, 69, 75, 76, 153 Structural variance, 153 Variograms window, 66
Vertices, 114 Warranty, 4 Weighting power, 16, 127, 128 Window menu, 11

Index
161
Worksheet Formulas, 27 Limits, 27 Window, 25
X axis range, 19 X-coordinate
Column assignment, 28 Defintion, 154
Y axis range, 19 Y-coordinate
Column assignment, 28 Defintion, 154
Z (primary variate)
Column assignment, 28 Definition, 155 Z standard deviations, 136
Z axis range, 20 Z Estimate Boundaries, 109 Z2 (covariate)
Cokriging, 123 Column assignment, 28 Definition, 155 Values warning, 29
Zoom, 140