get creative - issue 1
DESCRIPTION
ÂTRANSCRIPT

Get Creative
Once you have completed your kit
it doesn’t have to end there!
projeCtinside1940’s Hollywood style, chandelier earrings
Lean a new teChniqueThe simple 8 Warp Braid Kumihimo technique

www.the-beadshop.co.uk
produCt review2
We have a selection of toggle sets in silver and gold, so you can finish of your kumihimo braids beautifully and professionally.
toGGLe sets
Our selection of Rattail cords have beautifully co-ordinated mix of colours, perfect for all of your kumihimo braid work.
Braid Mix rattaiL
This durable thread works fantastically with Kumihimo braids, macrame and knotting
BeadsMith MetaLLiC thread Weighs down your braid
to create the right ten-sion whilst braiding.
KuMihiMo weiGhts
Zap No-Drip Jewelry Gel is the thickest, and strongest Cyanoacrylate glue available.Recommended for use with Kumihimo
KuMihiMo GLues
These unique slides are an easy way to add a pendant onto your Kumihimo braids.
pendant sLides
Kumihimo braiding disc’s help you create
gorgeous braiding projects quickly and
easily.
KuMihiMo disCs
These bobbins are perfect for your
kumihimo and macrame braiding. Made from
soft plastic, they’re pliable, stackable and
translucent.
KuMihiMo BoBBins
We have a selection of different toggles which
are perfect for using with your Kumihimo braids.
KuMihiMo toGGLes
We have a selection of different clasps which
are perfect for using with your Kumihimo braids.
KuMihiMo CLasps
code:13957 code:13956 code:13958
code:13953code:13954code:13955
code:13955 code:13954 code:13953
www.the-beadshop.co.uk
3
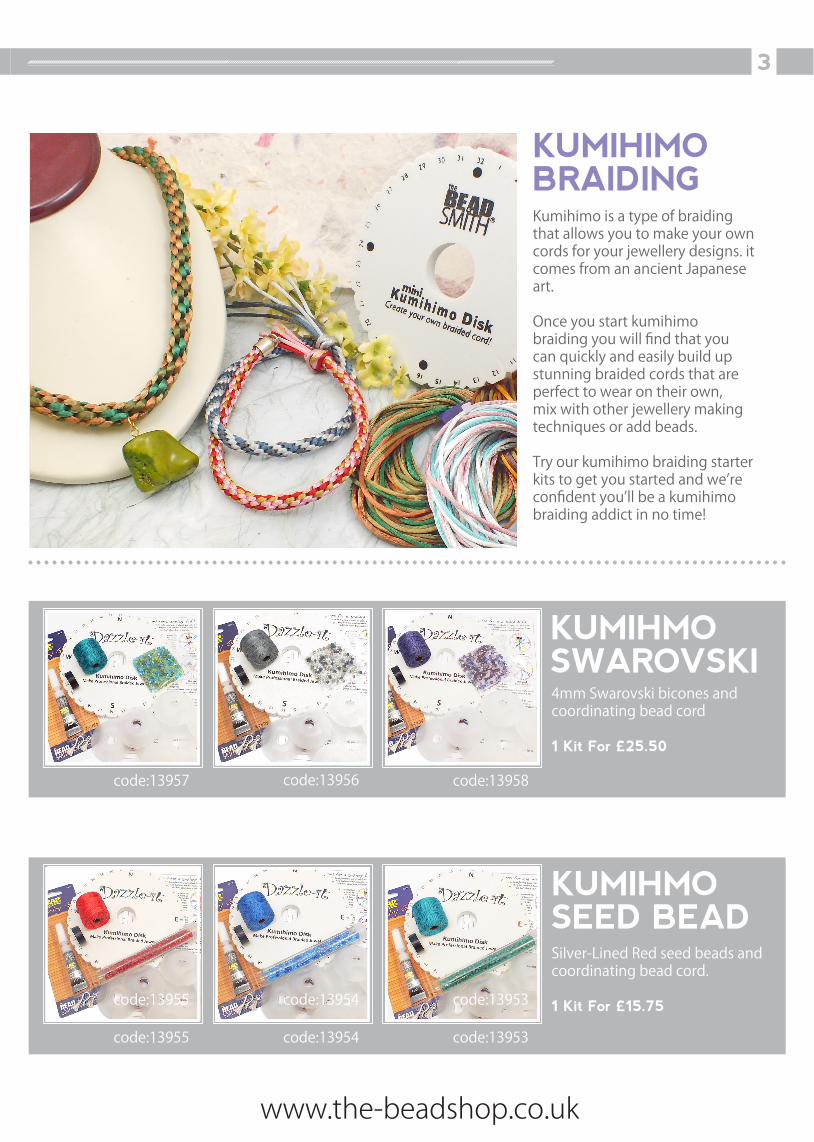
Kumihimo is a type of braiding that allows you to make your own cords for your jewellery designs. it comes from an ancient Japanese art.
Once you start kumihimo braiding you will find that you can quickly and easily build up stunning braided cords that are perfect to wear on their own, mix with other jewellery making techniques or add beads.
Try our kumihimo braiding starter kits to get you started and we’re confident you’ll be a kumihimo braiding addict in no time!
Silver-Lined Red seed beads and coordinating bead cord.
1 Kit For £15.75
KuMihMo seed Bead
4mm Swarovski bicones and coordinating bead cord
1 Kit For £25.50
KuMihMo swarovsKi
KuMihiMo BraidinG
www.the-beadshop.co.uk
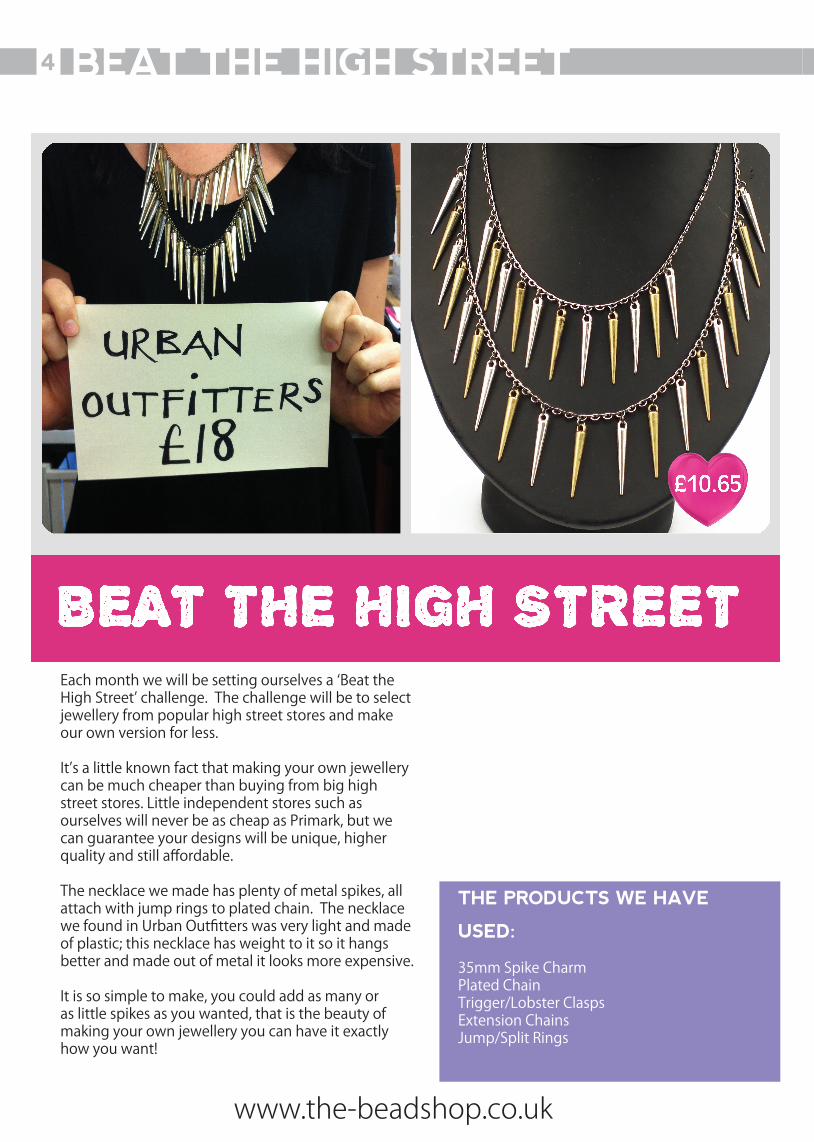
4 Beat the hiGh street
Each month we will be setting ourselves a ‘Beat the High Street’ challenge. The challenge will be to select jewellery from popular high street stores and make our own version for less.
It’s a little known fact that making your own jewellery can be much cheaper than buying from big high street stores. Little independent stores such as ourselves will never be as cheap as Primark, but we can guarantee your designs will be unique, higher quality and still affordable.
The necklace we made has plenty of metal spikes, all attach with jump rings to plated chain. The necklace we found in Urban Outfitters was very light and made of plastic; this necklace has weight to it so it hangs better and made out of metal it looks more expensive.
It is so simple to make, you could add as many or as little spikes as you wanted, that is the beauty of making your own jewellery you can have it exactly how you want!
the produCts we have
used:
35mm Spike CharmPlated ChainTrigger/Lobster ClaspsExtension ChainsJump/Split Rings

www.the-beadshop.co.uk
5jeweLLery teChnique
siMpLe 8 warp Braid KuMihiMo BraidinG teChniqueAll the techniques that follow are based around the Simple 8 Warp Braid technique; the instructions for this are included with all of the round Kumihimo Braiding boards that we stock.
These fabulous little numbers have had all the girls swooning here at Bead shop HQ and none of us can quite believe how simple this kind of effect is to achieve. Just set up you round Kumihimo Board with an 8 Warp Braid using Beadsmith Bead cord in whichever colour compliments the beads you have chosen best. Now thread 25 4mm Swarovski Bicones onto each cord and roll up each length into a Bob-eez No Tangle Bobbin to stop the cords from tangling and the beads from dropping off.
Now weight the centre knot down with something, I personally use my keys, but anything that has a bit of weight will do. This just creates the tension in the braid and makes the weave flow nicely.
Once your board is set up, start off by doing a few turns of the board, using the 8 warp technique (not adding any beads) until you have a braid about 1cm long, this will be used to attach your clasp when your braid is finished.
Next add one bead every time you pass a thread across the board, making sure that the bead you drop is caught under the thread that is running directly across it, like in the picture below
Continue this until all the beads have run out, and then carry on with just the thread, until you have approximately 1cm of braid without beads on.
Now you can add a clasp using the same whipping and finishing technique that is explained in the instructions included with your Kumihimo Board.
We have found that the 6.2mm Kumihimo Clasps work great with these bracelets, also you can use side opening calottes. We’ve found that if you carefully heat the Beadsmith Bead Cord with a lighter, then the ends will all melt together and you can clamp and glue a side opening calotte over this and add your desired clasp.
You can also use the same technique, with other types of beads, including size 6 seed beads and our Czech Faceted Class Range.

www.the-beadshop.co.uk
new produCts6
£1.95code:14361
resin CharMs
£1.75code:14357
£1.75code:14359
40pcode:13705
40pcode:13717
40pcode:14354
40pcode:13706
40pcode:13707
40pcode:13709
40pcode:13708
£1.75code:14360
1
2
1
3
54
7 8
6
2
3
4
5
11
6
10
9
8
7
9
10 11
superLon Bead Cord
www.the-beadshop.co.uk
7
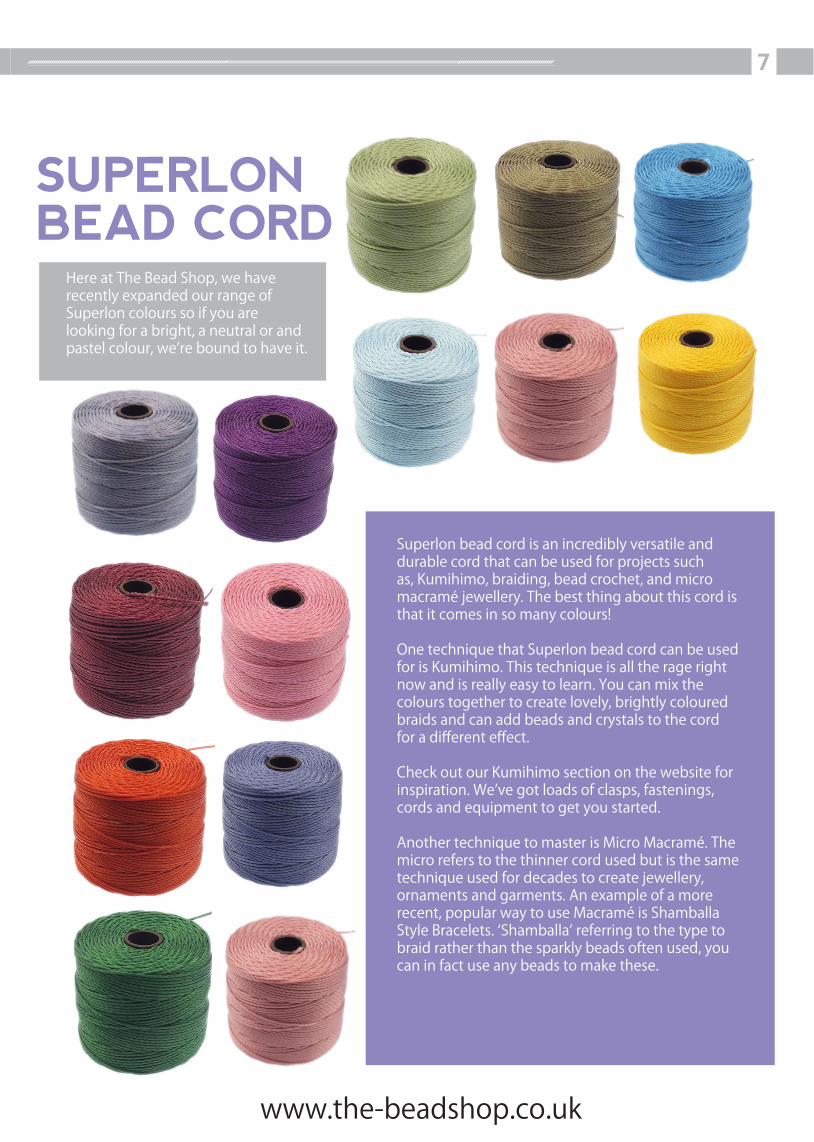
Here at The Bead Shop, we have recently expanded our range of Superlon colours so if you are looking for a bright, a neutral or and pastel colour, we’re bound to have it.
Superlon bead cord is an incredibly versatile and durable cord that can be used for projects such as, Kumihimo, braiding, bead crochet, and micro macramé jewellery. The best thing about this cord is that it comes in so many colours!
One technique that Superlon bead cord can be used for is Kumihimo. This technique is all the rage right now and is really easy to learn. You can mix the colours together to create lovely, brightly coloured braids and can add beads and crystals to the cord for a different effect.
Check out our Kumihimo section on the website for inspiration. We’ve got loads of clasps, fastenings, cords and equipment to get you started.
Another technique to master is Micro Macramé. The micro refers to the thinner cord used but is the same technique used for decades to create jewellery, ornaments and garments. An example of a more recent, popular way to use Macramé is Shamballa Style Bracelets. ‘Shamballa’ referring to the type to braid rather than the sparkly beads often used, you can in fact use any beads to make these.

www.the-beadshop.co.uk
8 jeweLLery projeCt
STEP 1Start by making the main filigree part of your earring. Take one of your filigree’s and using a pencil or something of a similar width, bend your filigree so that it is equally bent in half. The filigree shouldn’t touch at
the sides so don’t squeeze together; there should be a gap of about 5mm. You can perfect the shape with a pair of chain nose pliers.
STEP 2Now take about half a meter of craft wire and start by wrapping the wire around one side of the top hole of the filigree. Do this by threading
about 2 inches through the gap in the filigree and up through the front. Neatly wrap this 2 inch section around and through the same hole several times to secure.
evoKe the GLaMour oF 1940’s hoLLywood with these GorGeous ChandeLier earrinGsJanine is Office Manager at The Beadshop Manchester, and has been designing jewellery both at work and in her spare time for about 3 years. She loves to use Swarovski, mixed metals and loves experimenting with different techniques.
Using Simple wire wrapping and bending techniques, without using specialist tools, Janine shows you how to achieve an elegant and professional glamorous look. The antique brass colours mixed with deep Swarovski Crystals add a slightly gothic edge to these gorgeous creations.
FoLLow step-By-step instruCtions

9
handy tips & adviCe:
When adding your 4mm bicones, remember that there are no definite, evenly spaced holes on the filigree, so you will have to thread through the next available space. It won’t look perfectly even but that is the effect.
4mm Jump rings can be a little fiddly but will create a more subtle look to the piece.
If you are struggling to open and close the small jump rings you could go up a size.
You could buff the metal with a metal reliefing block if you wanted to achieve a more ‘golden’ effect to the metal.
extra projeCts; rinG
Bend the filigree around a ring mandrel and perfect the shape with some chain nose pliers. It may be good to flatten the filigree a little. Add a 9mm Jump ring to the same point as you did on the earrings and attach erinite bicones and siam drops to the jump ring. You can add as many as you like!
produCts used
Vintaj FiligreesVintaj EarwiresSteel Curb ChainsSwarovski Crystal DropsSwarovski Crystal BiconesJump RingsCraft WireHeadpins/Eyepins
STEP 3Add a 4mm siam bicone, thread through the next hole opposite, back up with the middle of the filigree, then add another bicone and thread through the opposite side again. Do this
until you reach the bottom, and add an erinite bicone. Carry on up the other side and secure at the top in the same way. There should be 5 bicones on each side and one erinite.
STEP 4Add your 10mm Bicone to an eye pin and make a simple loop. Add the 9mm Jump Ring through the folded over end of the Filigree, so it sits in the middle. Add the 10mm bicone to the jump ring by opening the eye pin a little and close again neatly.
STEP 5
At the pointed end of the filigree, add about 4 links of chain to each pointed side of the filigree using 4mm jump rings. Add a 5mm Jump ring to the siam drop and add both the ends of chain.
STEP 6Cut two lengths of chain (I’ve used 12 links but if your loops are bigger you may need more, measure against your earring) and using 4mm jump rings, add a length of chain to each side of the filigree. Open the top loop of your eyepin, add on each side of the chain and the ear wire in the middle. Close your eyepin, repeat the process for the other earring.

neCKLaCes1 kit for £12.50
BraCeLets1 kit for £17.50
watCh1 kit for £19.50
code:13923code:13926
code:13927 code:13924code:13925
www.the-beadshop.co.uk
10
These new kits have been inspired by firework displays, taking the shape of firework bursts in a dark winter sky and come in really eye-catching colours.
The bracelets come in a lovely Midnight Black colour-way bracelet, using Vitrail Medium and Jet for a night time sky effect, and we also have the Vintage Rose Bracelet for a really feminine look.
Although most of our kits are suitable for beginners, it may be best to have a small amount of bead weaving experience before trying this kit. The technique is simple once mastered, however, and you can go on to design your own beautiful Firework inspired Jewellery once you have picked up the basics..
Beaded FireworK Burst jeweLLery Kits
jeweLLery MaKinG Kits
11
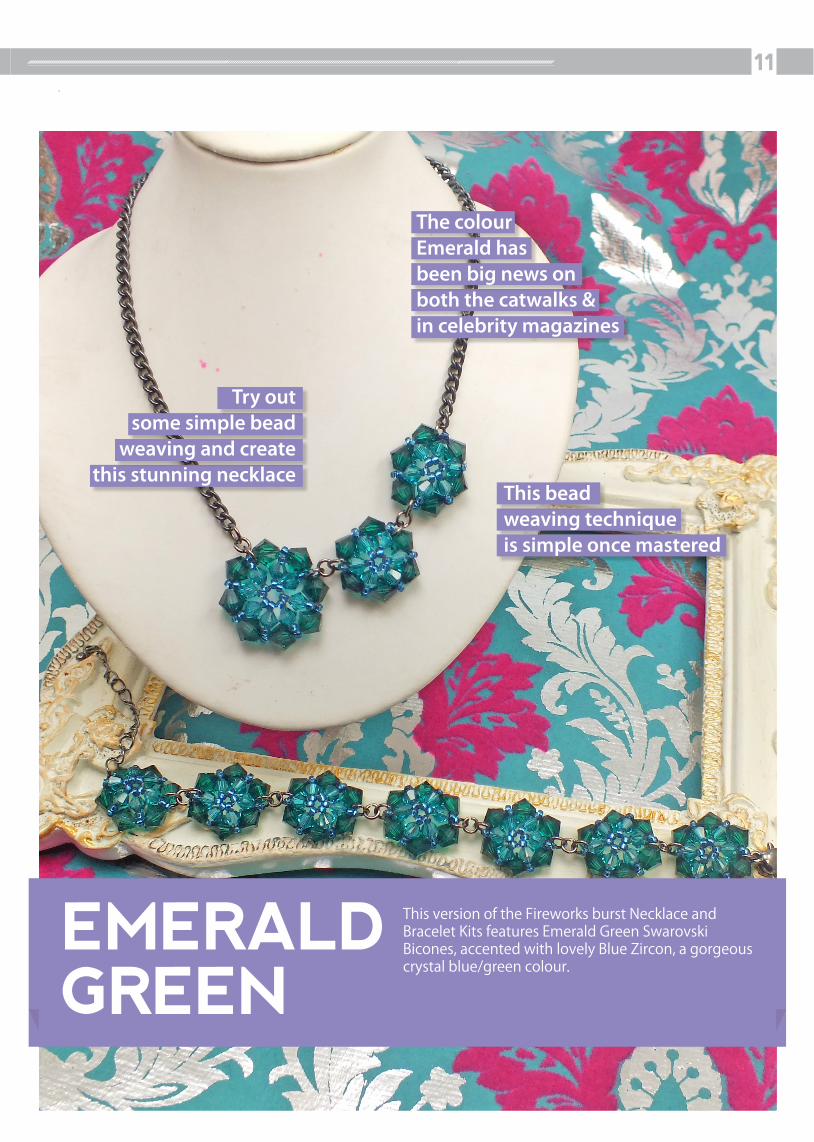
This version of the Fireworks burst Necklace and Bracelet Kits features Emerald Green Swarovski Bicones, accented with lovely Blue Zircon, a gorgeous crystal blue/green colour.
The colour Emerald has been big news on both the catwalks &in celebrity magazines
This beadweaving technique is simple once mastered
eMeraLd Green
Try out some simple bead
weaving and create this stunning necklace

www.the-beadshop.co.uk
12 Guest artist
My naMe is Bo huLLey and i aM a BeadMaKer… Hello to all you lovely jewellery designers and Bead Shop customers, may I introduce myself? At the risk of sounding like an AA meeting, my name is Bo Hulley and I am a beadmaker…
A little while ago I had a lovely message from The Bead Shop asking if I would be interested in writing regularly for the Bead Shop Blog. I was delighted for several reasons, but firstly because unbeknown to Josh, The Bead Shop was where I bought my very first beads and set of tools, maybe six years ago and I have bought many more since then.I don’t buy so many these days, but only because my life took a different direction when I tried my hand at making and selling ceramic beads, so I no longer have much time to make jewellery – I have
to be satisfied with seeing what beautiful and original pieces some incredibly talented designers make with my beads instead.I hope in the coming weeks to be able to chat a little about handmade beads, or art beads as they
are also known and a little of what it is like to be self-employed in this extraordinary online world.
One of my early customers was and fortunately still is, Rebecca Anderson who many of you may know from the wonderful classes she teaches at the Bead Shop. We have become firm ‘cyber friends’ (I hope she agrees!) and last year we met for real at the Big Bead Show in Surrey where I was fortunate enough to take one of her classes. If any of you are thinking of taking a class with her at The Bead Shop Academy, please do, you will not regret it for a second. She is my absolute favourite designer and I own several of her bracelets.
I’m telling you this because I feel I have come full circle. When I made my first stretchy bracelet with blue glass beads I would never have dreamt I would end up making beads and jewellery my full time employment. So it was especially nice to be contacted by Josh who had seen my work online via Rebecca – in the nicest possible way I am right back where I began and very pleased about it too.
To see more artclies from this artists please go online - www.the-beadshop.co.uk/blog

Vestibulum ante ipsum primis 13
www.the-beadshop.co.uk
13
Get Creative!Why not try a new kit. Teach yourself a new technique and experiment with it. Once you have completed your kit it doesn’t have to end there! The possibilities are endless!
I completed our very own ‘Beaded Firework Burst Bracelet kit’ and got a little bit addicted. At first glance I thought the kit would be too hard for me to follow as I prefer to be shown harder techniques such as bead weaving, but as soon as I started reading the easy to follow step by step instructions there was no stopping me!
do you need inspiration?
With this kit you are making a number of individual sections so it doesn’t seem as daunting as weaving a bracelet from start to finish.
I loved these little firework bursts so much I decided to design my own necklace around them, playing around with composition and colour.
Why not check out a new kit today and put your own spin on it!
“Inspired by our Beaded Firework Burst Bracelet kit”
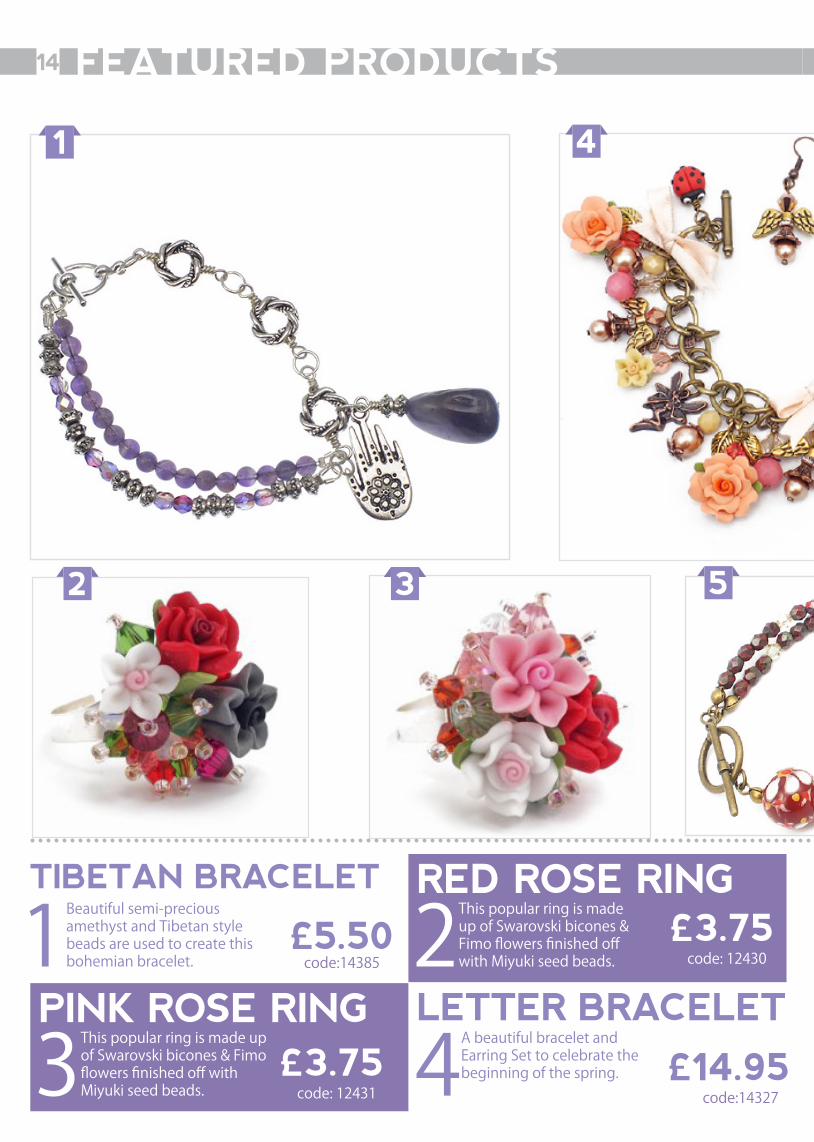
Featured produCts14
1 Beautiful semi-precious amethyst and Tibetan style beads are used to create this bohemian bracelet.
tiBetan BraCeLet
3This popular ring is made up of Swarovski bicones & Fimo flowers finished off with Miyuki seed beads.
pinK rose rinG2This popular ring is made
up of Swarovski bicones & Fimo flowers finished off with Miyuki seed beads.
red rose rinG
4A beautiful bracelet and Earring Set to celebrate the beginning of the spring.
Letter BraCeLet
41
2 53
code:14327£14.95
£5.50code:14385
£3.75code: 12431
£3.75code: 12430

15
5This beautiful Indian bracelet kit was inspired by our beautiful Indian Hand-Painted beads.
indian BraCeLet
6This pretty brooch is made up of Swarovski bicones & Fimo flowers finished off with Miyuki seed beads.
your produCt7A Shamballa Bracelet
incorporates cute little skull beads and beautiful fimo flowers.
sKuLL BraCeLet
8Bring an old handbag to life with this little bag charm made using the very cute hand painted glass hearts.
anGeL BaG CharM
6
8
7
£4.95code:14462
£5.00code:14195
£6.95code: 14468
£3.95code:14535code:14327
£14.95

w@the_beadshop theBeadshop.Manchester academy.the-beadshop.co.uk
The classes are taught by two in-house tutors, as well as award winning external tutor Rebecca Anderson, who took third place in the Seed Bead: Jewellery category in the British Bead Awards last year.
• Jewellery Classes starting from only £20!• We offer refreshments and lunch for our day workshops
academy.the-beadshop.co.uk
Love Craft is a exciting new craft website brought to you by The Bead Shop, and here we carry an amazing range of craft materials & accessories to help to you be as creative as possible.
www.love-craft.co.uk
p@LoveCraftuK LoveCraftuK lovecraftuk
Getting to know us...When you come and visit our shop you will discover a colourful Aladdin’s cave of beads, which is based in the popular off-beat Affleck’s Palace shopping centre, in the heart of the Northern Quarter.
• As a company we have been proudly trading for 20 years and have built the business up over time.
• We pride ourselves on our wide range of stock and the quality of the beads and findings.
• You will find that our prices are very competitive and the shop and website have everything you need to get you started in jewellery making.