getting started - pastperfect museum software · 44 pastperfect museum software user’s guide...
TRANSCRIPT

3GETTING STARTED
This chapter will walk you through the basic steps to set up PastPerfect for your organization. Before you begin this task, PastPerfect must be installed on your computer. See Chapter 1 - Installation and Upgrade for details on installation.
These are the steps recommended when using PastPerfect for the first time.
1. Read this manual.
2. Experiment with the evaluation software.
3. Set up the Main Menu.
4. Enter name and address information for your organization.
5. Enter system parameters.
6. Enter workstation settings.
7. Set up security.
8. Set up custom fields.
9. Set up mapping software.
10. Customize Query fields.
11. Customize Report Maker.
12. Set up spell checking.
13. Create authority files and drop-down menus.
14. Set up your function keys.
15. Customize the Browse screens.
16. Define a backup routine.
39

If you purchased any of the optional features, they must be installed.
1. Install MultiMedia Upgrade.
2. Install Network Upgrade.
3. Install Barcode Printing and Inventory Manager Upgrades.
After completing the above steps, you are ready to start entering data. This is the recommended order to enter data.
1. Convert existing data.
2. Enter your donors as contacts.
3. Enter your accession records.
4. Catalog your objects, photos, archives, and library items.
5. Create records for your incoming and outgoing loans.
6. Create records for your current exhibits.
7. Set up your contacts, members, and campaigns.
Information about setting up and using multimedia, barcode printing, contacts, members, and campaigns will be covered in later chapters. So if you are ready, let’s get going.
USING PASTPERFECT FOR THE FIRST TIME
STEP 1: READ THIS MANUALSince you are reading this, you are off to a good start. Admittedly, this guide is not as exciting as a mystery novel, and some of it may be downright boring. However, we highly recommend that you start by reading it cover to cover. Don’t be too concerned with trying to remember everything, just browse through it to get a general idea of what the program can do. After you start using PastPerfect you can then use the manual as a reference.
STEP 2: EXPERIMENT WITH THE EVALUATION SOFTWAREIf you have an evaluation copy of PastPerfect installed on your computer, you may leave it there for a few months. If you do not have the evaluation version, you can download it for free from our website www.museumsoftware.com. Since
40 PastPerfect Museum Software User’s Guide

the evaluation program is already loaded with fictitious data, it can be quite helpful as a training tool. If you are nervous about trying new functions, try them first in the evaluation version. Add-on upgrades are installed in this ver-sion, so you can experiment with them prior to purchasing or using them. Also take a look at the catalog screens for some ideas on how items are described.
STEP 3: SET UP THE MAIN MENUYou may want to change the look of the PastPerfect Main Menu. To do this from the PastPerfect Main Menu, click on the Setup button at the top left of the screen to open the Setup drop-down menu and then click Main Menu to open the Setup Main Menu screen.
Name on Main Menu - Enter your organization’s name as you want it to appear on the PastPerfect Main Menu. This setting will display on all worksta-tions.
Main Menu Image Options - There are three options for the large image dis-play on the main menu: “Default Image” which displays a single static image, “Default Slide Show” which displays a slide show of all images stored in the Menu Images folder, or “Catalog Record Images” which displays a slide show of your selected catalog record images.
Getting Started 41
Figure 3-1Setup Main Menu

Default Slide Show - PastPerfect comes with about 70 images pre-loaded into the MenuImages folder. You can add to or replace these images by copying JPG image files into that folder, which is usually located at “c:\pp5\MenuImages”. If PastPerfect is installed on a network, each workstation can have its own set of images.
Catalog Record Images - If you purchased the optional MultiMedia Upgrade and have attached digital images to records in PastPerfect, you can have these images appear as a slide show on the Main Menu. To select the images to dis-play, on the Setup Main Menu screen, select this option under Image Group, then click the Select Catalog Images button.
On the next screen, shown in Figure 3-2, you may view the images currently in the slide show by clicking the radio button next to Selected Images. To view just the images not in the slide show, click the radio button next to Unselected Images. To view all images, click the radio button next to Both. If you are view-ing Both, you may also choose the catalog from which to include images. Use
42 PastPerfect Museum Software User’s Guide
Figure 3-2 Catalog Record Images Selection screen

the scroll bar on the right to display more images. To select an image to be included, click on it so the background turns yellow. To de-select an image with a yellow background, click on it so the background turns white. To start over, click Remove All Catalog Record Images from Slide Show. To view your selec-tions before saving them, click the radio button next to Selected Images. Then click Close.
TIP Another way to select and remove images from the slide show is from the catalog records themselves. If you are attaching a great new image and you know you want it to be on the slide show, you can select the image immediately after you attach it. To do this, go to the catalog record where the image is attached. Click the Image Management button, then make sure you are view-ing the image you want. Click the Save As button under Output. To select this image to be included on the slide show, click Add this Image to the Main Menu Slide Show. To remove the image, click Remove from Main Menu Slide Show.
If using one of the slide show options, you must select the interval between image changes. This can be from 1 to 99 seconds. Clicking Exit will load the new show.
Main Menu Banner Color - Click on the desired color to use as a background for your organization’s name on the PastPerfect Main Menu.
Main Menu Background Color - Click on the desired color to use as a back-ground for the Main Menu.
Pull Down Setup and Utilities Menus with Mouseover - If you click on the Setup or Utilities buttons, drop-down menus will appear. You can choose to have these menus automatically appear when you move your mouse over the word Setup or Utilities by checking this box. Otherwise you must click on the Setup or Utilities button to make the drop-down menus appear.
Choosing Images for Catalog Buttons
You may use your own catalog record images for the icons on the Objects, Photos, Archives, and Library buttons, if you have purchased the MultiMedia Upgrade. To use an image that you have attached to a catalog record as the image on one of the buttons, first go to the record where you have attached the
Getting Started 43

image. Click the Image Management button, then make sure you are viewing the image you want. Click the Save as button under Output.
In the section for Use Image on Main Menu Button, click the radio button next to the catalog to you want to assign the image, then click Save as Image for Selected Main Menu Button. You will be notified that the image was created for the button. To set the image on the button back to the default image, click Reset Selected Button to Default Image. Click Exit to save your changes.
STEP 4: ENTER NAME & ADDRESS INFORMATIONBefore you begin entering catalog records, some basic information needs to be entered, such as your organization’s name and address. You may have already entered this when you installed the software, but in case it was entered incorrectly or needs to be changed, this can be done on the Name & Address screen.
From the PastPerfect Main Menu, click on the Setup button to open the Setup drop-down menu and then click the Name & Address button to open the screen to Setup Your Organization’s Name & Address on Printed Forms.
In the top field, seen in Figure 3-4, enter your organization’s name as you want it to be displayed at the top of printed Accession forms. In the second field enter the name and address, as well as your phone number, to be printed on the Deed of Gift form.
In the third and fourth fields, enter your organization’s name, then the name, address and phone number for the Temporary Custody forms. In the last two fields enter the name, address and phone number as you want it to be printed on the Loan forms.
44 PastPerfect Museum Software User’s Guide
Figure 3-3Image Management Save Image screen
Choose the button, then click to save the image as the Main Menu button image.

Please note these fields can also be changed by modifying the default data on the Setup Collections screen.
STEP 5: ENTER SYSTEM PARAMETERSPastPerfect has settings that affect the entire program. If the program is net-worked, these settings are the same on all workstations. You may want to change these settings to make the program work best for your organization. To change these system parameters, click the Setup button on the Main Menu, then click System Parameters to see the screen shown in Figure 3-5. Changes made on this screen are saved when you exit the screen.
Country Settings - Select either USA or UK. For users of PastPerfect in the UK, we provide a different format for telephone numbers and addresses. Also for the UK, the Deed of Gift is called Transfer of Title and currency is displayed in pounds. Spelling of words such as “greyscale” and “colour” is modified.
Date Style - PastPerfect supports a variety of date formats, including ANSI (2009.04.28), American (04/28/2009), British (28/04/2009), German (28.04.2009), Italian (28-04-2009), Japan (2009/04/28), or USA (04-28-2009). Since dates are stored as Julian dates, changing the date style will reformat the display and printing of all new and previously entered dates.
Getting Started 45
Figure 3-4 Name & Address Setup screen

Object ID Sort by - Set your Object ID and Accession Number fields to be sorted either numerically or alphabetically. This will adjust the sorting when you choose the Sort by fields of Object ID or Accession Number on your records. If you use letters at the beginning or in the middle of your Object IDs and Acces-sion Numbers, choose alphabetic sorting. If sorting numerically and your organi-zation uses multi-part numbers, you must enter the character that separates the parts in the Object ID Separator field.
Accession & Sites Screens - Most Accession and Site records include only a small number of catalog records. However, in some cases, such as archaeological collections, there may be thousands of catalog records associated with a single accession or site. In this case you can speed the opening of the Accession screen and Sites screen by limiting the number of catalog records that display. The default setting of 999 is advisable.
Catalog Record Date Display - Placing a check mark here forces entries in the Date field on catalog records to the Year/Month/Day format. Otherwise the field may hold any format of date, such as “1920 ca”. We recommend choosing your date format, either Year/Month/Day or text, before beginning data entry.
46 PastPerfect Museum Software User’s Guide
Figure 3-5 Setup System Wide Parameters screen

Catalog Research - Query - Placing a check mark in this box saves a query in the Query History list even if no results were found. You may see when the query was run and who ran it. This does not make the query available to be retrieved.
Art & Architecture Thesaurus (AAT) Website - By default the URL for the Getty Art & Architecture Thesaurus website is entered. The AAT is a structured vocabulary containing approximately 131,000 terms and other information about art concepts. Terms in AAT may be used to describe art, architecture, decorative arts, material culture, and archival materials. The coverage of the AAT ranges from antiquity to the present. On the Add New Catalog Record screen in the Objects, Photos, Archives and Library catalogs is an AAT Online button that will take you to the website for assistance in naming collection items. To be able to access this website, your computer must be connected to the Internet.
Union List of Artist Names (ULAN) Website - By default the URL for the Getty Union List of Artist Names is entered. The ULAN is a structured vocabu-lary that contains approximately 290,000 names and other information about artists. On the bottom of each PastPerfect Artist/Author/Creator/Photographer authority file detail screen is a Search ULAN Online button that will take you to the website for obtaining information about artists. To be able to access this website, your computer must be connected to the Internet.
Library of Congress Online Catalog Website - By default the URL for the Library of Congress Online Catalog is entered. If your computer is connected to the Internet, a Library of Congress Online Catalog button in the Actions sec-tion of the Sidebar on the Library catalog screen will take you to this website to search their database of publications.
Unlock Upgrade Options - This button can be used to install any of the optional features: MultiMedia Upgrade, Network Upgrade, Barcode Printing, Inventory Manager, Virtual Exhibit, and PastPerfect-Online.
STEP 6: ENTER WORKSTATION SETTINGSIf PastPerfect is installed on a stand alone computer, then the settings on this screen, seen in Figure 3-6, apply for your PastPerfect program on that com-puter. If PastPerfect is being used on a network, these settings can be different for each computer where PastPerfect is installed. The settings will apply for all
Getting Started 47

PastPerfect users who use the same computer. Changes made on this screen are saved when you exit the screen.
Hard Drive Backup Folder - By default this is set to c:\pp5\backup\. This is the location on your hard drive where data backup files will be placed when you select Hard Drive Backup from the Backup & Reindex section of the Main Menu. We recommend that you use the default setting, even if this computer is a workstation on the network. It is best to have the backups saved locally rather than on the file server where the data already exists. This system creates multiple backups, with each workstation making a compressed copy of the data on the server and storing it on the local hard drive.
Removable Drive - This is the drive where data backup files will be placed when you select Removable Backup from the Backup & Reindex section of the Main Menu. It is the drive letter of your flash drive, external hard drive, or zip drive. You can find this letter by plugging in your drive, then opening your Computer screen. The drive should be listed as a Removable Disk or Device.
CD or DVD Drive - This is the drive where data and image backup files will be placed when you select CD/DVD Backup from the Backup & Reindex section of the Main Menu. Select the drive letter for your computer’s CD or DVD drive that has writing capabilities. You can find this letter by opening your Computer screen. The drive should be listed as a CD or DVD Drive.
48 PastPerfect Museum Software User’s Guide
Figure 3-6 Setup Workstation Settings screen

Computer has a CD or DVD Burner - Place a check in this box if your com-puter has CD or DVD writing capabilities, to allow PastPerfect to make backups to a CD or DVD. If you do not check this box, the option for CD/DVD Backup on the Main Menu will be restricted.
Right Click Function - When in Add or Edit Mode, right clicking your mouse can have different functions. If set to Authority File, when you right click on a field with an authority file, it will open that file. If set to Text Editing, when you right click on a field it will open the Edit | Copy and Paste menu. A setting of Both will open authority files when selecting authority controlled fields and open the Edit | Copy and Paste menu when selecting non-authority controlled fields.
Printer Selection Prompt - Three options are available. Generally you will want to use the Standard option which will open the familiar pre-print window where you can select the printer, properties, and number of copies to print. The second choice of Network Prompt may be required on some networks that only allow you to print to the default Windows printer. With this option you can select the default Windows printer before printing. The third option for No Prompt may be convenient if you want to skip the pre-print window.
Output Reports to PDF, Word, HTML, etc. - With this box checked, any time you click the Print button in PastPerfect you will see another dialog box that allows you to choose the output for what you are printing. The options are PDF, MS-Word, HTML, and plain text in addition to sending the report to your printer. By default this setting is checked. If you do not wish to have multiple output options when printing reports, please uncheck the box.
Save Report Maker Output to - When using the above function to output reports to PDF, Word, HTML, or plain text, you can specify the location where the files are saved in this field. This also applies to reports exported to Excel, and those created with Report Maker where you have selected to have the out-put sent to a dBase, Excel, or ASCII file rather than the printer. The default loca-tion is the c:\pp5Reports folder.
Screen Field Font - Select the font name, font size, and font style for the data you enter into fields. This setting will apply to the main screens in PastPerfect. Please note that using larger font types or a font size greater than 10pt may cause some data fields to truncate the display of information.
Getting Started 49

Run Full Screen - Checking this box will allow PastPerfect to run without hav-ing the outer file window behind the program. You will not have the ability to minimize or maximize PastPerfect when this is turned on. You must close and re-open PastPerfect for this function to take effect.
Offset Value - Works in conjunction with Run Full Screen, to shift the PastPerfect screen up on your monitor with a higher number, or down with a number lower than the default of 1.5. Most users do not need to adjust this off-set. You must close and re-open PastPerfect for this function to take effect.
Mouse Over Command Changes Screen View - Checking this box allows you to move your mouse over any of the Screen View buttons on catalog records and see the fields in that Screen View. If this box is not checked, you must click the Screen View button to see the fields in that view.
Highlight Queried Text - When you run a query or field search, PastPerfect can highlight the specified text in the queried field to make it easier to find. Uncheck this box if you do not want the text highlighted.
Ask Before Saving Catalog Location Changes - Check this box to have PastPerfect prompt you before saving a location change in the Location History file. If the box is not checked, location changes will automatically be saved in the Location History.
Skip File Test Before Reindex - Turns off the automatic File Test before run-ning a Reindex. We recommend that you leave this unchecked unless perform-ing the File Test is problematic on your computer or network.
DLL Registration - This button allows you to manually register files that may not have been registered during installation. It should only be used under instruction from the PastPerfect support team.
STEP 7: SET UP SECURITYWith PastPerfect, security is optional. If you desire, you can activate security to restrict unauthorized persons from the PastPerfect program or various screens and features. You decide which screens a user can access and whether or not they have the option to add, edit, print, and delete records or to view values, storage locations, and other sensitive information. This is done by setting up groups with restrictions for various features. Then assign each user to a particu-
50 PastPerfect Museum Software User’s Guide
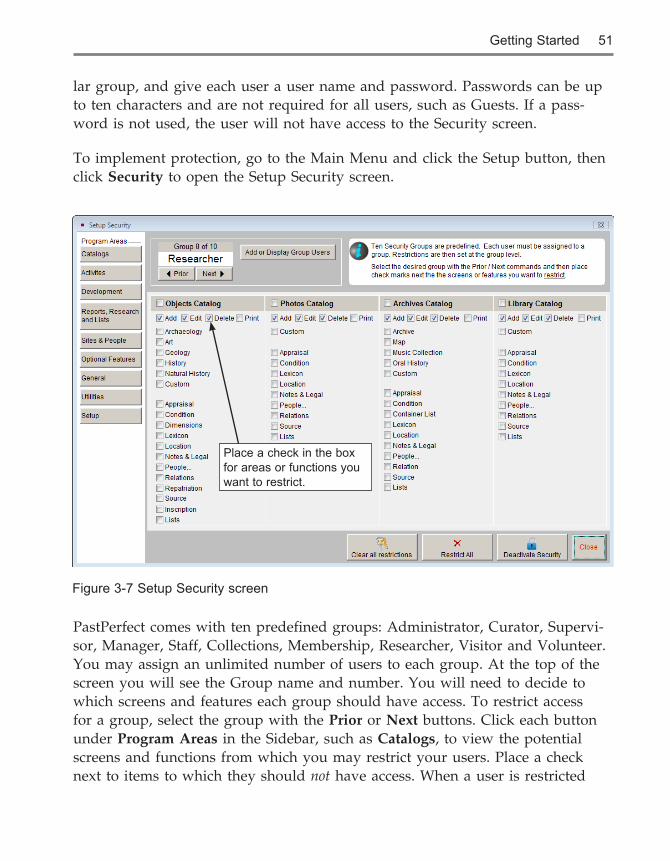
lar group, and give each user a user name and password. Passwords can be up to ten characters and are not required for all users, such as Guests. If a pass-word is not used, the user will not have access to the Security screen.
To implement protection, go to the Main Menu and click the Setup button, then click Security to open the Setup Security screen.
PastPerfect comes with ten predefined groups: Administrator, Curator, Supervi-sor, Manager, Staff, Collections, Membership, Researcher, Visitor and Volunteer. You may assign an unlimited number of users to each group. At the top of the screen you will see the Group name and number. You will need to decide to which screens and features each group should have access. To restrict access for a group, select the group with the Prior or Next buttons. Click each button under Program Areas in the Sidebar, such as Catalogs, to view the potential screens and functions from which you may restrict your users. Place a check next to items to which they should not have access. When a user is restricted
Getting Started 51
Figure 3-7 Setup Security screen
Place a check in the box for areas or functions you want to restrict.
from accessing an area or function, the button or function will turn gray. If you want to clear all the check marks from the screen, click the Clear All Restric-tions button at the bottom. If you want to check all the boxes on the screen, click the Restrict All button at the bottom. Be sure to go through all the pro-gram areas when choosing your restrictions.
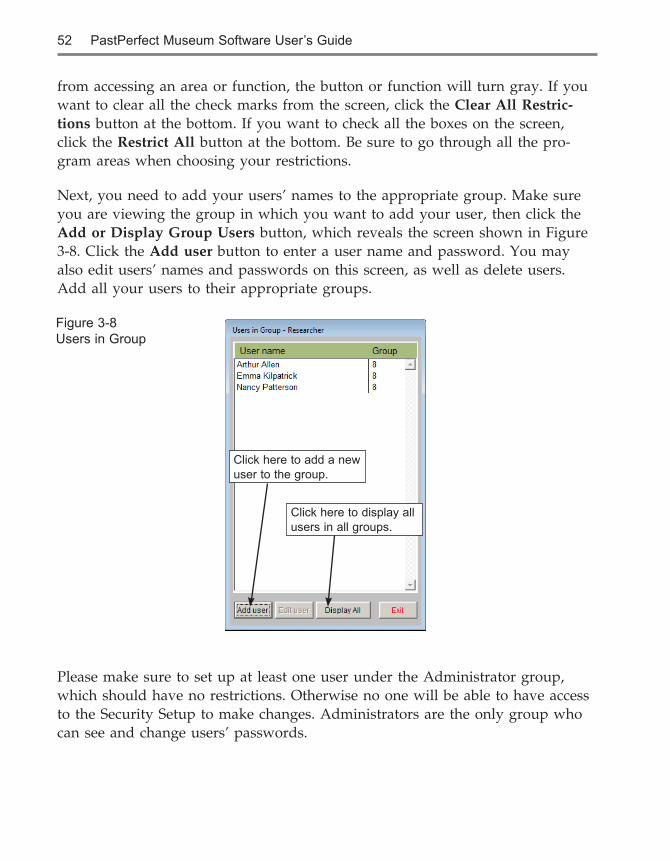
Next, you need to add your users’ names to the appropriate group. Make sure you are viewing the group in which you want to add your user, then click the Add or Display Group Users button, which reveals the screen shown in Figure 3-8. Click the Add user button to enter a user name and password. You may also edit users’ names and passwords on this screen, as well as delete users. Add all your users to their appropriate groups.
Please make sure to set up at least one user under the Administrator group, which should have no restrictions. Otherwise no one will be able to have access to the Security Setup to make changes. Administrators are the only group who can see and change users’ passwords.
52 PastPerfect Museum Software User’s Guide
Figure 3-8Users in Group
Click here to add a new user to the group.
Click here to display all users in all groups.

NOTE When security is activated, the function key settings that we mentioned earlier can be different for each user. Also, the default data screens covered in Chapter 6 - The Objects Catalog and later chapters can be different for each user.
The final step is to click the Activate Security button at the bottom of the screen. Once the button is clicked, it will change to Deactivate Security, which lets you know that security is currently activated. Exit PastPerfect and re-open the program. Now, when starting the program, each user will be asked to pick his or her name from the user list and enter his or her password.
STEP 8: SET UP CUSTOM FIELDSEven though PastPerfect comes with hundreds of data fields for describing your collection and tracking your contacts, there may be some information that your institution wants to record that doesn’t fit in existing fields. The custom fields give you the ability to add the fields you need.
To define your own custom screen names and field names, click the Setup but-ton on the Main Menu, then click the Custom Fields button on the drop-down menu, which will reveal the screen shown in Figure 3-9.
Objects, Photos, Archives, and Library Custom Screens and Fields
For each of the four catalogs - Objects, Photos, Archives, and Library - you may rename the Custom Screen View, so the Custom button on the Sidebar and the Custom view selection display your new name rather than the term “Custom.” Enter this name in the Title field. There are also 22 additional fields that you can rename. These custom fields can be different for each catalog, but they are the same for all the records within each catalog. These fields are located in the Custom Screen View of each catalog.
Select the appropriate catalog button on the left and enter the field names as they will display on the screen and reports.
For Objects, Photos, Archives, and Library, you can create ten character fields that will hold up to 75 characters (custom fields 1–10). Custom fields 11 and 12 will hold 20 characters. Custom field 13 is for entry of integers only up to
Getting Started 53

999999999999, while custom fields 14 and 15 will accommodate numbers with two decimal places up to 999999999.99. Custom fields 16 and 17 will accommo-date numbers with three decimal places up to 99999999.999. Custom fields 18-20 are for dates and Custom fields 21 and 22 allow unlimited data entry.
Custom field 1 is a unique field, as it can be used for sorting records and it will appear on the Find screen to allow instant searches based on its content. Custom fields 1–10, 21 and 22 can have authority files assigned to them to help with consistent data entry. On the Setup Custom Fields screen for Photos, Archives, and Library you can fill the field names with those of the Objects catalog by clicking the Fill Field Names from Objects button under Action. You may also choose to share the custom fields’ authority files with those of the Objects cata-log by checking the Shared box. Similar to other fields with authority files, you may select whether you want the terms verified for these fields when data entry is being done.
54 PastPerfect Museum Software User’s Guide
Figure 3-9 Setup Photos Catalog Custom Fields screen

Catalog Record Locations
The names of the Building, Room, Shelf, Wall, Drawer, Cabinet, and Container fields may be changed on the Location subscreens. For example, if you do not have a “Container” but you do have a “Box,” you can change the name of the “Container” field to “Box.” Enter the names of the location fields in the space to the right of the Location. PastPerfect assumes the Main Location is the most general, the Location 1 is more specific, and so on. These changes will apply to all records in Objects, Photos, Archives, and Library, and for both the Home Locations and the Temporary Locations. You will see these names on the Find, Query, Catalog List and Report Maker screens with the word “Home” or “Temp” in front of the name.
Sites and Localities
The Sites and Localities screen has 11 custom fields. You may rename the Cus-tom Screen View, so the Custom button on the Sidebar and the Custom view selection display your new name rather than the term “Custom.” Enter this name in the Title field. Fields 1-5 are character fields for up to 100 characters. Fields 6 and 7 are numeric fields for numbers with three decimal places up to 99999999.999. Fields 8 and 9 are dates. Fields 10 and 11 are unlimited memo fields. Enter your own names for these fields as desired.
People Biographies
The People Biographies screen also has 11 custom fields. You may rename the Custom Screen View, so the Custom button on the Sidebar and the Custom view selection display your new name rather than the term “Custom.” Enter this name in the Title field. Fields 1-5 are character fields that hold up to 100 charac-ters. Fields 6 and 7 are numeric fields for numbers with three decimal places up to 99999999.999. Fields 8 and 9 are dates. Fields 10 and 11 are unlimited memo fields. Enter your own names for these fields as desired.
Contacts
The Contacts tab allows you to label the 13 custom fields on the Contacts screen. Fields 1-3 will accommodate entries of up to 75 characters. Custom field 1 is a unique field, as it can be used for sorting records and it will appear on the Find screen to allow instant searches based on its content. Field 4 is for dates and fields 5 and 6 are for numbers of the format 9999999.99. Fields 7-9 are numeric
Getting Started 55

fields for numbers of the format 999999999.99. Fields 10-13 are character fields that will hold up to 75 characters. Fields 1-3 and 10-13 may also have authority files set up for them. Enter your own field names in the boxes provided.
In addition to renaming the custom fields in Contacts, you may also rename the A List and the B List, which are Fixed Lists. Type in the new names here. You will see the name change when viewing a Contact record’s Contact Lists section, and when viewing the Fixed Lists in Contacts Lists .
Temporary Custody
Temporary Custody has 6 custom fields. Fields 1 and 2 hold up to 75 characters, Field 3 is a date field, Fields 4 and 5 are for numbers of the format 9999999.99 and Field 6 is an unlimited text field. Type in the names as you want them to appear on the Temporary Custody screen.
STEP 9: SET UP MAPPING SOFTWAREIf you have mapping software installed on your computer, such as Microsoft Streets & Trips, Microsoft MapPoint, or Google Earth Pro, you can create maps based on data in PastPerfect. PastPerfect Mapping allows you to create map data files that can be imported into your mapping software. You can create maps showing the sites where your artifacts were found, as well as map locations of your donors and members. This can be a helpful development tool, allowing you to see where you need to target your mailings to solicit memberships and donations.
To set up PastPerfect to work with your mapping software, click the Setup but-ton on the Main Menu, then click Mapping. You will see the screen in Figure 3-10.
In the field labeled Enter Path and .exe File Name to Launch Mapping Pro-gram, use the button with the three dots to navigate to the file that opens your mapping program. Examples of where this file may be are listed on the screen for your reference, although your mapping software may be installed in a dif-ferent location. If you are using PastPerfect on a network, the mapping software must be installed on each workstation. The path to the executable file will be on your local hard drive. You may check to see if the path is correct by clicking the
56 PastPerfect Museum Software User’s Guide

Test Launch Mapping Program button. If it is correct, your mapping program will open.
You may choose to see the import help screen when you open your mapping program through PastPerfect by clicking the check box next to Show import help screen when launching mapping program.
STEP 10: SET UP QUERY FIELDSYou have the choice to include all fields when running queries in PastPerfect, or to use only selected fields. If you choose to use selected fields, you may make your selections by going to Setup on the Main Menu and clicking Query Fields. You will see the screen shown in Figure 3-11.
The column on the left lists the tables on which you can run queries. Click the radio button next to the catalog table for which you want to change the query fields. Then in the middle column, Available Fields, are the fields that you may include in the query that are not already included. On the right is the Fields to Include in Query column, which lists the fields already set to be included on the Query screen. If you choose to include a field, it will be available for you to use when doing a query or using the Field Search under Find. Since the Accession catalog does not have a Query function, the Accession fields that you choose here will appear in the Field Search Search this field drop-down menu when using Find in the Accession catalog. You may want to restrict users from search-ing some fields, such as sensitive location or value information. Or if there are
Getting Started 57
Figure 3-10 Setup Mapping screen

custom fields you do not use, you may want to remove them to simplify the list of fields.
To add a field from the Available Fields column to the Fields to Include in Query column, double click on the field. You will see it appear on the list on the right. To remove a field from the Fields to Include in Query column, double click on it. You will see it appear in the Available Fields column.
To remove all the fields from the list of Fields to Include in Query, click the Clear All Fields From Selected Table button under Actions on the left. To add all fields to the list of Fields to Include in Query, click the Add All Fields from Selected Table button under Actions on the left.
Change Query Results Field List - This Setup Query Fields screen also gives you the option to change the fields that appear in your Query Results list for each catalog. Click the Change Query Results Field List button to see the screen shown in Figure 3-12. The Query Results are displayed when running a query in any catalog, in Catalog Lists, Contact Lists, and all Research options. To change
58 PastPerfect Museum Software User’s Guide
Figure 3-11 Setup Query Fields screen
Double click on a field to add it to the list of Fields to Include in Query.
Click here to choose the fields you see on your Query Results screen.

the fields, click the radio button next to the desired table at the top of the screen, then click the button at the bottom for Change Query Results Field List. This option is available for all tables except Accession.
The first two fields, Catalog and Object ID for collection tables or ID# and Name & Title for Contacts, may not be changed. You may include up to fourteen fields or have as few as two. The column header caption is automatically entered when you select a field from the Field Name drop-down menu. The fields will appear in the grid in the order that they are listed on this Search Results Fields screen.
If you wish to change fields that have already been assigned, please first clear the field using the red “X” button. Then use the drop-down menu to select the new field to include.
The All Catalog table settings will be used for the query results list when per-forming a search under All 4 Catalogs. The settings will also be used for Cata-log Lists where the records on the list come from two or more catalogs. For example, a list with both Object and Photo records would use the All Catalog query results field list. If a list has records from just one catalog, then the query results field list for that particular catalog will be used; similarly, if you perform a query within a catalog, the query results field list for that catalog will be used.
Getting Started 59
Figure 3-12Search Results Fields screen

STEP 11: SET UP REPORT MAKER FIELDSYou have the option to use all fields or just selected fields when creating Report Maker reports. If you would like to select the fields to make available when cre-ating Report Maker reports, click on Setup on the Main Menu, then click Report Maker Fields. You will see the screen shown below.
The column on the left, Tables, lists all the data tables from which you can cre-ate Report Maker reports. To select fields, first click the radio button next to the desired table. In the middle column, Available Fields, are listed the fields that are not yet included in Report Maker that you may choose. On the right is the Fields to Include in Report Maker column. This column lists the fields that are currently set to be included in Report Maker.
To add a field from the Available Fields column to the Fields to Include in Report Maker column, double click on the field. It will appear in the list on the right. To remove a field from the Fields to Include in Report Maker column, double click on it. It will appear in the Available Fields column.
60 PastPerfect Museum Software User’s Guide
Figure 3-13 Setup Report Maker Fields screen
Double click on a field to add it to the list of Fields to Include in Report Maker.

Getting Started 61
To remove all the fields from the list of Fields to Include in Report Maker, click the Clear All Fields from Selected Table button at the bottom of the screen. To add all fields to the list of Fields to Include in Report Maker, click the Add All Fields from Selected Table button at the bottom.
STEP 12: SET UP SPELL CHECKINGPastPerfect comes with a preloaded dictionary that can be used to spell check your data entry. To spell check a record, simply click on the Spell button at the top of the screen. You can customize spell check to check only certain fields.
To open the Setup Spell Check screen, seen in Figure 3-14, go to the Main Menu and click on Setup, then click on Spell Check from the drop-down menu. The screen has 12 data tables listed on the left under Tables, one for each screen that has a Spell Check button.
First click the radio button next to the table for which you want to change the spell check fields. In the middle column, Available Fields, you will see the names of all the fields in that catalog. On the right is the Fields to Include in Spell
Figure 3-14Setup Spell Check
Click here to add words to the dictionary.

62 PastPerfect Museum Software User’s Guide
Check column. This column lists the fields that are currently selected to be spell checked.
To add a field from the Available Fields column to the Fields to Include in Spell Check column, double click on the field. It will be added to the list on the right. To remove a field from the Fields to Include in Spell Check column, double click on it. It will appear in the Available Fields column.
To remove all the fields from the list of Fields to Include in Spell Check, click the Clear All Fields from Selected Table button under Actions on the left. To add all fields to the list of Fields to Include in Spell Check, click the Spell Check All Fields from Selected Table button under Actions on the left.
You may also add or delete words from the dictionary. Click the Dictionary Management button to view the screen to edit the dictionary. To improve the speed of spell checking, the dictionary is divided into three sections: Short Words (1–8 letters), Medium Words (9–12 letters), and Long Words (over 12 letters). To add a new word, click on the Add Word button. The new word will automatically be placed in the correct dictionary section. To delete a word from the dictionary, click on the word so it is highlighted, then click the Delete Selected Word button.
Words can also be added to the dictionary during the spell check process. If a word is encountered that is not in the dictionary, you will be given the option to add the word.
STEP 13: CREATE AUTHORITY FILES AND DROP-DOWN MENUSPastPerfect uses authority files to help standardize and speed up data input. Authority files are available whenever you are adding or editing records. They are also available in Research mode. Terms that you will use repeatedly should be entered into your authority files before you begin doing your data entry. To open the Setup Authority File screen, go to the Main Menu and click on Setup, then click Authority Files.
Each screen where you may use authority files is listed on the left. Common Screens refers to screens that share the same authority files. To choose a screen, click the radio button to the left of the Screen Name. The authority files for that screen are listed in two columns, standard Authority Files and Combo Box Drop-Down Menu

Getting Started 63
Options. Authority files are lists that appear on separate screens when accessing the file, and Combo Box Drop-Down Menus are lists that appear when you click a downward pointing arrow on the right side of the field.
To open an authority file, select the authority file or drop-down menu you wish to edit and click Next>. This will open the Authority File screen, where you can view and edit the terms in the authority file. Some authority files come pre-loaded. For example, the Subjects authority file comes with the Library of Congress Thesaurus for Graphic Materials I: Subject Terms (LCTGM I). For most authority files, however, you will need to make entries that are specific to your organization. You can always make additions to the files during the cataloging process, but for consistent data entry it is best to create the files before you start cataloging.
This screen allows you to add, edit, delete, add more information, or alphabet-ize entries for the file. To make a new entry, click on the plus sign button, type in the term, and press the Enter key on the keyboard. To edit existing entries, click the Edit button, which is the icon of a hand writing on paper. You will see a spreadsheet-type screen, where you may click on a term and edit the text.
Figure 3-15 Setup Authority Files screen

64 PastPerfect Museum Software User’s Guide
Click the X in the upper right corner or press Esc on your keyboard to close the screen and save your changes. To delete a term, click on the term to highlight it, then click the red X button at the top to delete it.
Some authority files, such as the Collection authority file, have a file folder button at the top of the screen. If you select a term and then click the file folder icon, you may view and enter detailed information about the term.
The Combo Box Drop-Down Menus also give you the option to arrange the terms on the list alphabetically. Click the A/Z Sort button at the top of the screen to list them alphabetically.
Standard authority files can be flagged for verification, which means entries in their associated fields can be restricted to allow only terms listed in the authority file when you have Security activated in PastPerfect. Place a check in the Verify column in you would like this field to be verified before allowing users to save changes to data in the field. If you would like to change the type of verification - Restriction or Notification - you may do so by clicking on Security on the Setup drop-down menu.
Figure 3-16 Collection authority file
Click here to enter more information about a collection.

Getting Started 65
After editing an authority file, click the Close button to save the changes. Click the Exit button on the Setup Authority File screen to return to the Main Menu.
To use the authority files during data entry (in Add or Edit Mode), place the cursor in a field with an authority file. A reminder, usually on the top of the screen, will appear as a book icon with the letter “a” in front of it.
Press the F7 function key on the top row of your keyboard or right click with your mouse. A window will open displaying the authority file terms for that field. From here you may add to the list, edit the list, or select a term to put in your catalog record by double clicking on the selected term.
Combo box drop-down menu authority files are designated by a downward pointing arrow at the right end of the field. To use a drop-down menu authority file in Add or Edit Mode, click the arrow to reveal the drop-down menu. Click on the term you want to enter in the field. Drop-down menu fields will only accept entries that are on the drop-down list.
STEP 14: SET UP YOUR FUNCTION KEYSThe function keys on the top row of your keyboard, F1–F12, provide single-key input of common words or phrases. The Setup Function Key screen, seen in Figure 3-18, is accessed from the PastPerfect Main Menu by clicking Setup, then clicking Function Keys. This will open the screen shown in Figure 3-18 where you can set up the function keys. The keys F3–F6 and F9–F12 can be redefined as often as you like. The F1 key is used to access help, F2 is reserved as the Save key, F7 is reserved for accessing authority files, and F8 is set as today’s date, entered as [Date]. To set up the other keys, enter text, up to 128 characters, to the right of the key. Each user can have his or her own function key assign-ments when users have been set up through Security.
Figure 3-17 Received as Drop-down Menu

66 PastPerfect Museum Software User’s Guide
STEP 15: CUSTOMIZE THE BROWSE SCREENSWhen you press the Browse button on any of the screens, the data fields will appear in columns in a tabular format. By going to the Main Menu and click-ing on Setup, then Browse, you can select which fields display and change the order of the columns.
Figure 3-18 Setup Function Keys screen
Figure 3-19Setup Browse Fields screen
Double click on a field to add it to the list of Fields to Include in Browse.

Getting Started 67
The Setup Browse Field screen, seen in Figure 3-19, has 10 tables listed on the left under Tables, one for each screen that has a browse function. First click the radio button next to the table for which you want to change the browse screen. In the middle column, Available Fields, you will see the names of all the fields in that catalog. On the right is the Fields to Include in Browse column. This column lists the fields that are currently selected to appear on the Browse screen. The order in which they are listed is the order they will appear on the Browse screen.
To add a field from the Available Fields column to the Fields to Include in Browse column, double click on the field name. It will be added to the bottom of the list on the right. You may change the order of these fields by clicking on the square to the left of the field and dragging it up or down in the list. To remove a field from the Fields to Include in Browse column, double click on it. It will appear in the Available Fields column.
To remove all the fields from the list of Fields to Include in Browse, click the Clear List button under Actions on the left. To add all fields to the list of Fields to Include in Browse, click the Browse All Fields button under Actions on the left.
By default, when you are in Browse you cannot edit or delete data. We recom-mend that you leave it this way; however, to accommodate times when you want to make changes in Browse, you can temporarily activate editing and/or deleting capability by selecting the desired option at the bottom of the screen. No Edit & No Delete is the default setting. Edit Only will allow you to edit records in Browse but not delete them. Delete Only will allow you to mark records for deletion in Browse, but you cannot edit records. Edit & Delete will allow you to both edit records and mark them for deletion in Browse.
Because there is no verification when editing in Browse, you are always restricted from changing Object ID and Accession numbers.
STEP 16: DEFINE A BACKUP ROUTINEThis is the most important step of all. You will spend many hours of your valu-able time entering data into PastPerfect. Unfortunately, computer problems occur. Hopefully, it will not affect your data, but it might – and you certainly don’t want to start over.

68 PastPerfect Museum Software User’s Guide
We highly recommend that you back up your PastPerfect data every day. We have included a backup function in the program that makes it very easy to cre-ate a backup. The function only takes a few minutes and may someday save you hundreds or thousands of hours.
From the Main Menu, you can back up the PastPerfect data to either your hard drive, CD or DVD, or a removable drive such as a flash drive, external hard drive, or Zip disk. The hard drive backup of data is great for quick recoveries and we recommend that you use it on a daily basis.
If you are using PastPerfect on a network, we suggest making a backup on each workstation where data entry is done every day. For network users, making a backup to your hard drive makes a compressed copy of all the current data on the server and stores it on your local hard drive; thus it gives you multiple cop-ies of your data on different computers. It is best to make hard drive backups at each workstation.
Figure 3-21Hard Drive Backup screen
Figure 3-20 Backup func-tions on Main Menu
Click here to back up data to your hard drive.
Click here to back up data, images, and multimedia files to CD or DVD.
Click here to back up data, images, and multimedia files to a flash drive or external drive.

Getting Started 69
If you are a PastPerfect user on a stand alone computer and your hard drive fails, your hard drive backup will be of no use. Other unfortunate disasters can also destroy your hard drive, like theft, floods, and fires.
To ensure the safety of your valuable data, whether on a network or stand alone computer, it is essential to back up data, images, and multimedia files at least once a week onto a CD, DVD, flash drive or external drive and store it some-where safe, away from the museum.
If you choose to back up to CD or DVD, the most reliable option is to use a writable CD (CD-R) or writable DVD (DVD+/-R) instead of a re-writable CD (CD-RW) or DVD (DVD+/-RW). By placing just one backup on a CD or DVD and using a new CD or DVD for each backup, you create an archive of back-ups. Should you need to restore data from an older backup, you have those files saved. This archive of backups should be stored in an offsite location. For this reason, we recommend doing your weekly external backups to a CD or DVD, rather than a flash drive or other external drives.
NOTE All letters are backed up when you back up Multimedia files. They are not included in the data backup.
Because backing up your data, images and multimedia files is such an important function, we give you a Data Backup Reminder when exiting PastPerfect. If it has been longer than one week since a backup of your data, images, and multimedia files was made to the hard drive, or removable drive or CD/DVD (across all net-worked computers, if networked), you will see the screen above in Figure 3-22.
Figure 3-22 Data Backup Reminder screen

70 PastPerfect Museum Software User’s Guide
You will see the various backup types listed, and the dates of the last backups (looking at all networked computers, if networked). You have the option to back up to the hard drive, CD/DVD, or a removable drive from this screen, so that you can make the necessary backup before you close the program.
INSTALLING OPTIONAL FEATURES
1. INSTALL MULTIMEDIA UPGRADEThe MultiMedia Upgrade may be purchased for an additional cost. This upgrade allows you to attach images and multimedia links to your records. You will receive a CD that you can use to activate this feature. To start, click the Setup button on the Main Menu, then click the MultiMedia button to open the Setup MultiMedia Options screen.
Click the Install MultiMedia Upgrade button at the bottom of the screen and follow the instructions on the screen. You will be asked to insert the MultiMedia Upgrade CD to complete the process. For detailed instructions on setting up and using the multimedia features, please read Chapter 26 - Multimedia. Figure 3-23Setup MultiMedia screen
Click here to install the MultiMedia Upgrade.

Getting Started 71
2. INSTALL NETWORK UPGRADEA Network Upgrade may be purchased for an additional cost. The Network Upgrade gives you the licensing to install PastPerfect on multiple networked computers that share the same dataset. You will receive a CD that you can use to activate this feature. To start, click the Setup button on the Main Menu, then click the Network button. The Setup Network screen will appear.
Click the Install Network Upgrade button and follow the instructions on the screen. You will be asked to insert the Network Upgrade CD to complete the process. With network operation activated, multiple computers will be able to share the same common data, image, and multimedia files. For instructions on installing PastPerfect on networked computers, please read Chapter 1 - Installation and Upgrade.
3. INSTALL BARCODE PRINTING AND INVENTORY MANAGER UPGRADESThe Barcode Printing and Inventory Manager options may be purchased for an additional cost, to allow you to print barcode labels for your collection items and perform inventory control tasks. You will receive CDs that you can use to activate these features. To start, on the Main Menu click the Setup button, then the System Parameters button.
Click the Unlock Upgrade Options button and follow the instructions on the screen. You will be asked to insert the Barcode Printing or Inventory Manager Upgrade CD to complete the process. For more information on using these fea-tures, please read Chapter 27 - Barcode Printing and Chapter 30 - Inventory Manager.
Figure 3-24Setup Network screen
Click here to install the Network Upgrade.

72 PastPerfect Museum Software User’s Guide
ENTERING YOUR DATA
Now that PastPerfect is configured for your organization, it is time to start entering your data. This is the recommended procedure:
1. CONVERT EXISTING DATAIf your data is already in a computer, it can probably be converted into PastPerfect. There is no need to reenter this data. You may be able to convert the data yourself, or we can convert the data for you. We charge very reasonable rates for conversion services and can give you a free quote before we start the work.
Some of the data formats that we have converted include: Access, ARGUS, ASCII, dBase, DonorPerfect, Excel, FileMaker Pro, FoxPro, GiftMaker Pro, Heri-tage Sentinel, Inmagic DB/TextWorks, iO, MARC, MCMS, Mimsy, Minaret, Paradigm, Paradox, Q&A, Raiser’s Edge, Re:discovery, SNAP! for Windows, Superbase, and Winnebago Spectrum.
For more information about our conversion services, please visit our website at www.museumsoftware.com and click on Services | Data Conversion.
2. ENTER YOUR DONORS AS CONTACTSWe recommend that you start your data entry with the names and addresses of your frequent collections donors. This information should be entered into the Contacts file. The Contacts file can act as the Source field’s authority file for accessions. When you add an accession record you can select the donor from the Contacts file, instead of typing the donor’s name. If there are additional donors for the accession, you may access their information from Contacts when you enter their names in the accession record. For more information on entering data in the Contacts file, please consult Chapter 20 - Contacts.
3. ENTER YOUR ACCESSION RECORDSThe PastPerfect Accession file contains information about the acquisition of an item or items by your organization, including the source’s name and address. Each record represents a single donation, which is defined as one or more items donated at the same time by the same donor. Each catalog record in Objects, Photos, Archives, or Library can be associated with one accession record.

Getting Started 73
Multiple catalog records may be associated with a single accession record. This relation frees you from having to enter the acquisition information on each and every catalog record. It is entered just once in the Accession screen. For details on entering your accession records, see Chapter 5 - The Accession Process.
4. CATALOG YOUR OBJECTS, PHOTOS, ARCHIVES, AND LIBRARY ITEMSFinally, it is time to start the process of entering your catalog records. PastPerfect has four separate catalogs that provide specific descriptive fields for items in your collection. Chapters 6–9 provide step-by-step instructions for entering your records.
5. CREATE RECORDS FOR INCOMING AND OUTGOING LOANSIf you have items in your collection that were loaned to you from other organiza-tions or individuals, you can set up incoming loans to record information about the loans. Read Chapter 11 - Incoming Loans for details. For items that you have lent to other institutions, we provide a file for outgoing loan information. Please read Chapter 12 - Outgoing Loans for details.
6. CREATE RECORDS FOR YOUR CURRENT EXHIBITSPastPerfect provides a special section for tracking exhibits. One record can be created for each active exhibit. When cataloged items are listed on an exhibit, a special flag is placed on the catalog record. PastPerfect will also help you print item exhibit labels and keep a history file of past exhibits. Please see Chapter 13 - Exhibits.
7. SET UP YOUR CONTACTS, MEMBERS, AND CAMPAIGNSPastPerfect will also help you with development. The Contacts section allows you to create mailing lists and produce labels, letters and emails to solicit dona-tions and members. Fundraising campaigns can be defined and pledges moni-tored. Members can be entered along with their dues amounts and paid dates. Volunteer availability, preferences and hours can also be tracked. Before enter-ing names and addresses you should define your membership types, funds for donations, in-kind gift types, as well as volunteer projects in the Main Menu | Setup | Contacts section. This is also where you will compose your mail merge

74 PastPerfect Museum Software User’s Guide
letters, define your organization’s fiscal year and set up emails. Details on set-ting this up are in Chapters 20-24.