getting started using filezilla ftp client 3.0 with the ... for setup of...getting started using...
TRANSCRIPT

Getting Started using Filezilla FTP Client 3.0 with the SCO mainframe The SCO suggests using the latest Filezilla FTP Client for a graphical FTP client interface that provides a secure connection to the SCO mainframe. Filezilla FTP client is freeware, and supports Explicit TLS 1.0 connections and enables Extended Passive mode by default. It provides a low featured, but reliable method to transfer files securely with the SCO mainframe.The latest Filezilla version is 3.5.3.
Setting up your “Site” in Filezilla:
Click the Site Manager icon located on the top left corner of the window.
When Site Manager opens (it will default to the General Tab). Click the “New Site” button in the left bottom corner.
An icon named New Site will appear. Rename to the name you want, and then enter the following for connections to the SCO Mainframe:
Host: ftp.sco.idaho.gov
Protocol: FTP – File Transfer Protocol
Encryption: Require explicit FTP over TLS
Logon Type: Ask for password
User: Your mainframe username
Note: that the password is greyed out. You will not enter a password at this window.
Your window should look similar to the one on the left, except your site name should be different and your user name should be entered next to User:
Next click on the Advanced tab
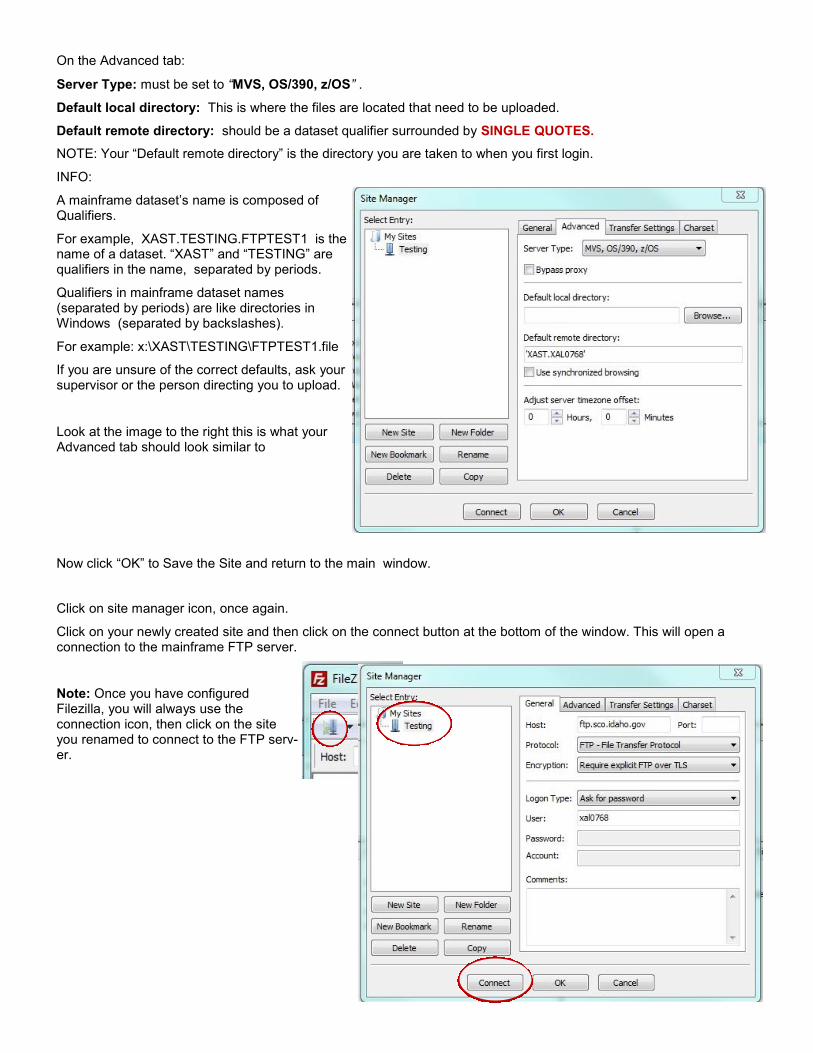
On the Advanced tab:
Server Type: must be set to “MVS, OS/390, z/OS” .
Default local directory: This is where the files are located that need to be uploaded.
Default remote directory: should be a dataset qualifier surrounded by SINGLE QUOTES.
NOTE: Your “Default remote directory” is the directory you are taken to when you first login.
INFO:
A mainframe dataset’s name is composed of Qualifiers.
For example, XAST.TESTING.FTPTEST1 is the name of a dataset. “XAST” and “TESTING” are qualifiers in the name, separated by periods.
Qualifiers in mainframe dataset names (separated by periods) are like directories in Windows (separated by backslashes).
For example: x:\XAST\TESTING\FTPTEST1.file
If you are unsure of the correct defaults, ask your supervisor or the person directing you to upload.
Look at the image to the right this is what your Advanced tab should look similar to
Now click “OK” to Save the Site and return to the main window.
Click on site manager icon, once again.
Click on your newly created site and then click on the connect button at the bottom of the window. This will open a connection to the mainframe FTP server.
Note: Once you have configured Filezilla, you will always use the connection icon, then click on the site you renamed to connect to the FTP serv-er.
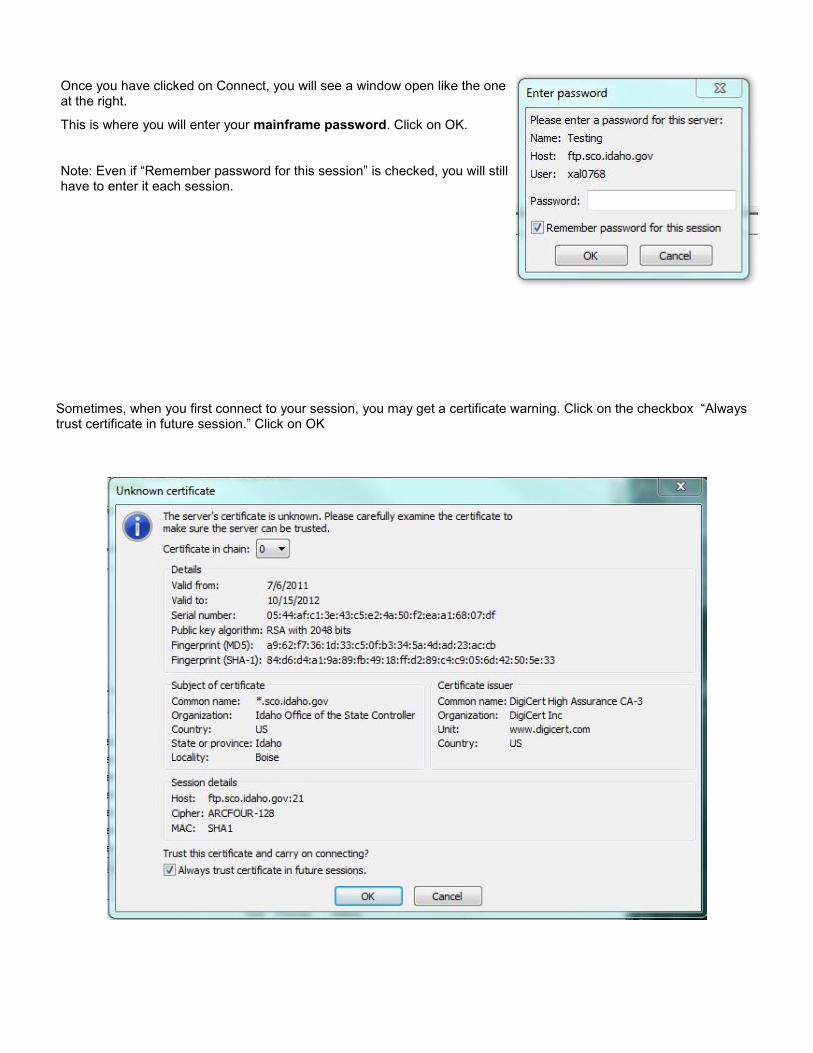
Once you have clicked on Connect, you will see a window open like the one at the right.
This is where you will enter your mainframe password. Click on OK.
Note: Even if “Remember password for this session” is checked, you will still have to enter it each session.
Sometimes, when you first connect to your session, you may get a certificate warning. Click on the checkbox “Always trust certificate in future session.” Click on OK

Once your connection is made your window should look similar to the image below. Local folders and files are on the left side of the window, and the remote datasets are on the right side of the window.
Each dataset qualifier is treated like a directory in Filezilla. Once connected, you can actively change your local directory or remote directory.
To change datasets or directories either click on the directory or type it into the address bar over the top of the icons.
If your “Remote Site:” bar is grayed-out, this means your default remote directory must be changed to a qualifier that already exists on the mainframe.
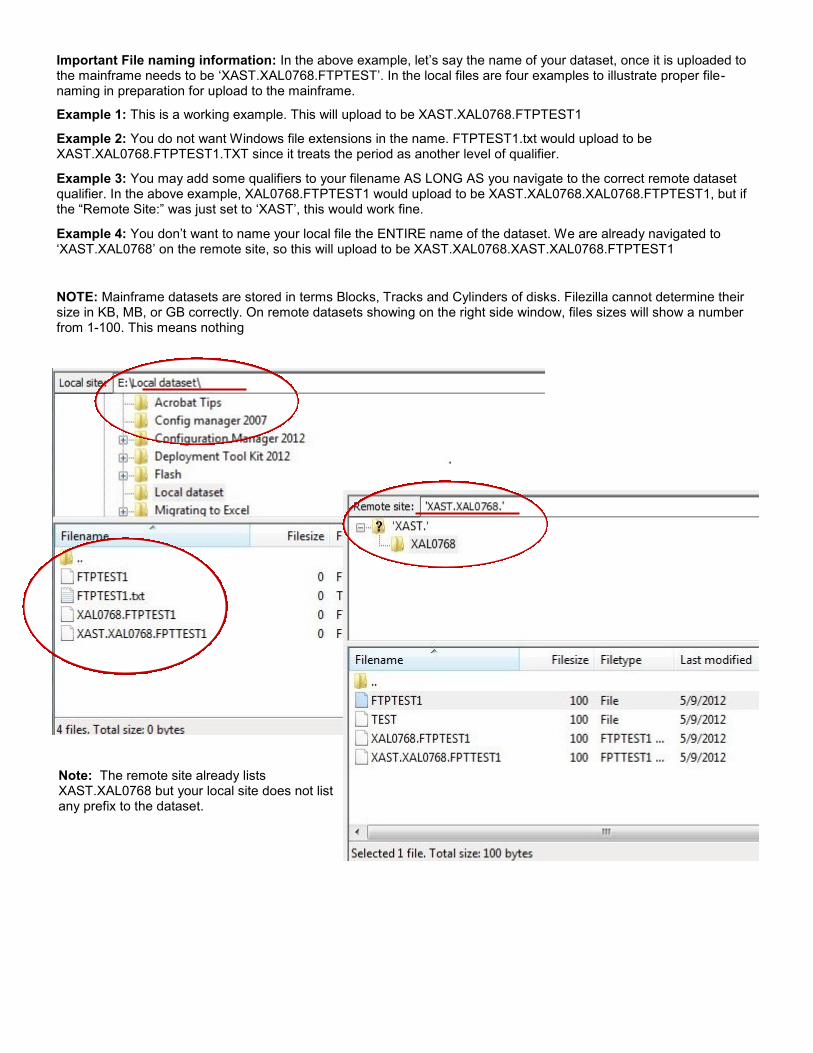
Important File naming information: In the above example, let’s say the name of your dataset, once it is uploaded to the mainframe needs to be ‘XAST.XAL0768.FTPTEST’. In the local files are four examples to illustrate proper file-naming in preparation for upload to the mainframe.
Example 1: This is a working example. This will upload to be XAST.XAL0768.FTPTEST1
Example 2: You do not want Windows file extensions in the name. FTPTEST1.txt would upload to be XAST.XAL0768.FTPTEST1.TXT since it treats the period as another level of qualifier.
Example 3: You may add some qualifiers to your filename AS LONG AS you navigate to the correct remote dataset qualifier. In the above example, XAL0768.FTPTEST1 would upload to be XAST.XAL0768.XAL0768.FTPTEST1, but if the “Remote Site:” was just set to ‘XAST’, this would work fine.
Example 4: You don’t want to name your local file the ENTIRE name of the dataset. We are already navigated to ‘XAST.XAL0768’ on the remote site, so this will upload to be XAST.XAL0768.XAST.XAL0768.FTPTEST1
NOTE: Mainframe datasets are stored in terms Blocks, Tracks and Cylinders of disks. Filezilla cannot determine their size in KB, MB, or GB correctly. On remote datasets showing on the right side window, files sizes will show a number from 1-100. This means nothing
Note: The remote site already lists XAST.XAL0768 but your local site does not list any prefix to the dataset.
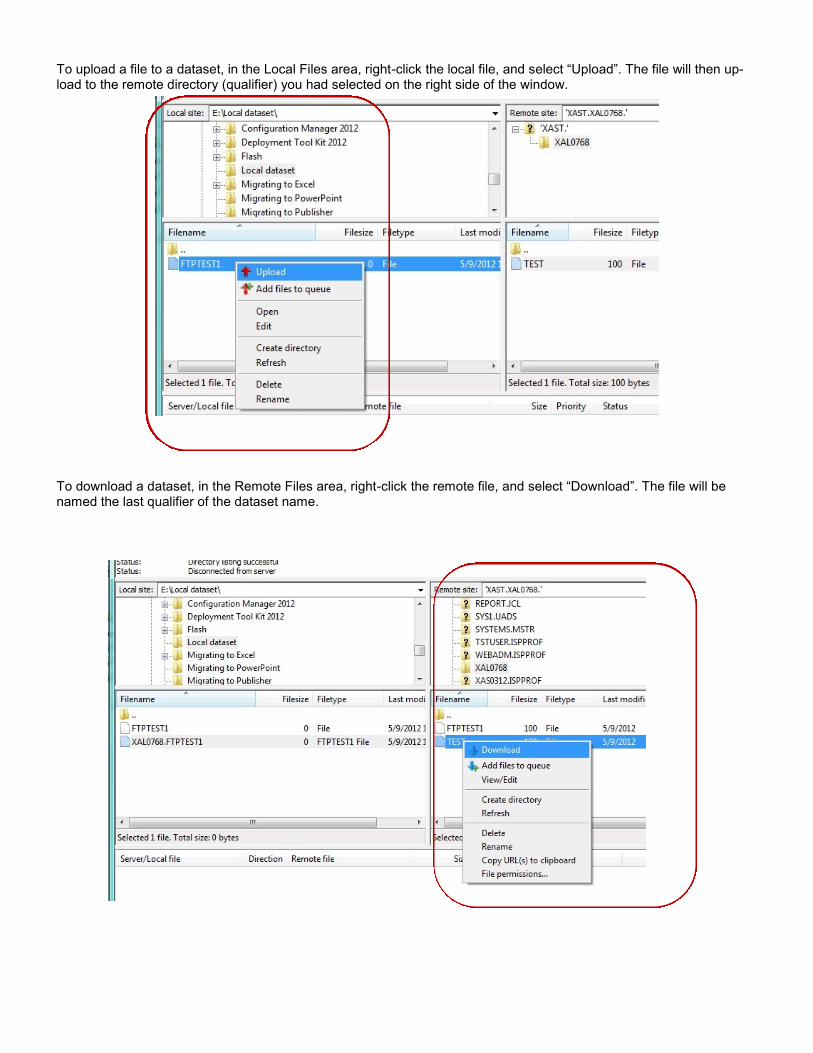
To upload a file to a dataset, in the Local Files area, right-click the local file, and select “Upload”. The file will then up-load to the remote directory (qualifier) you had selected on the right side of the window.
To download a dataset, in the Remote Files area, right-click the remote file, and select “Download”. The file will be named the last qualifier of the dataset name.

When you are ready to close, there are two ways you can do this.
Click on the Server dropdown on the main toolbar and click on disconnect. This will disconnect you from your session.
Click on the disconnect server icon on the toolbar.