getting the best from your onedrive - welearn365 home … · getting the best from your onedrive...
TRANSCRIPT

Getting the best from your OneDrive Context As part of WeLearn365 every user gets a personal storage area known as OneDrive for Business. This is fully integrated within the Office365 environment and provides 25Gb of cloud storage space for each user. This space can be used to store most types of file, to share files with others and to create Word, PowerPoint, Excel and OneNote documents online without the need for any locally installed software. Why use OneDrive
• It is cloud based and can be accessed in school, at home or anywhere you have a secure internet connection
• Any data (files or documents) that you upload are held in secure Microsoft Data Centres based in the EU – this is not the case with many similar cloud storage providers
• It provides a significant amount of ‘free’ storage – much more than many other popular cloud storage providers
• You can create and save a range of documents and resources directly in your browser using the familiar Microsoft Online apps and on a range of devices including iPads
• You can share files and collaborate with other WeLearn365 users • You can synch your files to keep a local copy on your PC, iPad or other device
Drag and Drop Uploading documents and files has always been a bit long-winded in SharePoint. Finally true drag and drop is now available across a range of the most popular browsers. It really is just a case of dragging a file from your computer and dropping it into the documents area of your OneDrive – see below:
The file will upload and appear in the OneDrive Documents area (see below).
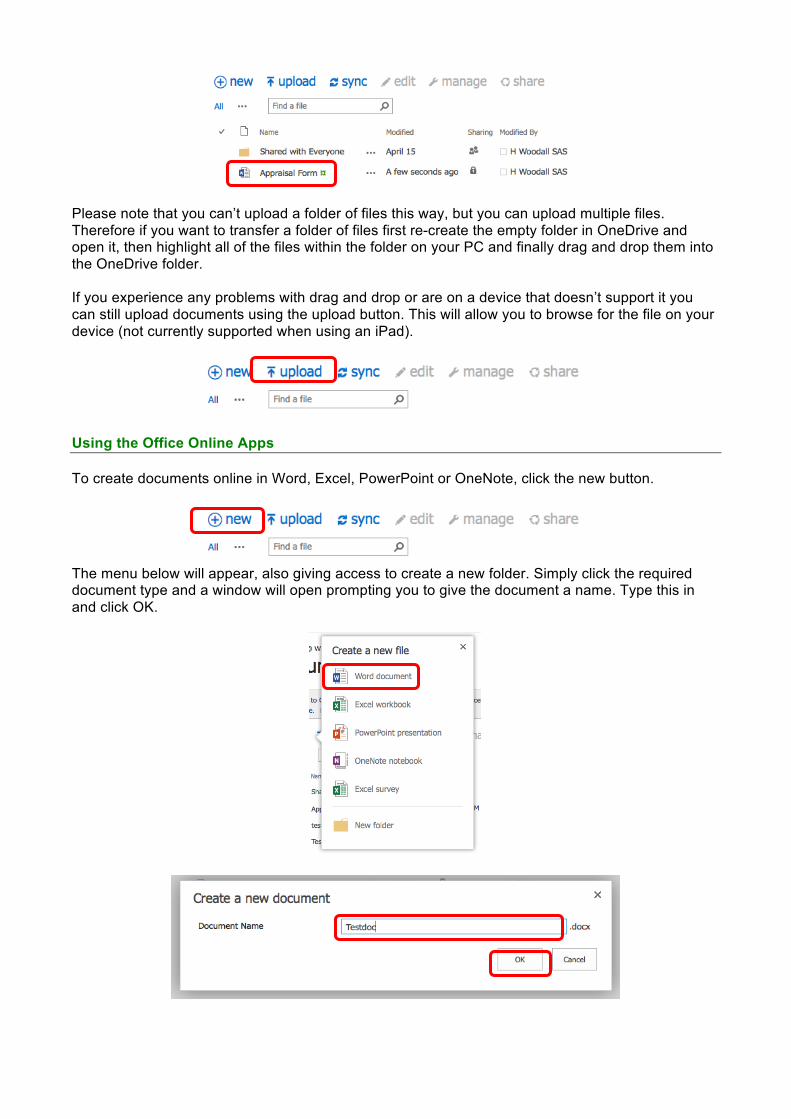
Please note that you can’t upload a folder of files this way, but you can upload multiple files. Therefore if you want to transfer a folder of files first re-create the empty folder in OneDrive and open it, then highlight all of the files within the folder on your PC and finally drag and drop them into the OneDrive folder. If you experience any problems with drag and drop or are on a device that doesn’t support it you can still upload documents using the upload button. This will allow you to browse for the file on your device (not currently supported when using an iPad).
Using the Office Online Apps To create documents online in Word, Excel, PowerPoint or OneNote, click the new button.
The menu below will appear, also giving access to create a new folder. Simply click the required document type and a window will open prompting you to give the document a name. Type this in and click OK.

An application window will open allowing you to create the new document.
As you work on the document it will auto-save using the name you gave it above. To leave the editing window and go back to OneDrive, click your name on the top blue bar.
This will show your OneDrive window with the newly created file.
To view the document just click on the name once. This will load it in read mode. To edit the document further click the EDIT DOCUMENT/WORKBOOK/PRESENTATION and then Edit in Word/Excel/PowerPoint Online.

Sharing Documents with others It is easy to share documents with other WeLearn365 users. This can be just for others to view or indeed for them to collaborate on and add to. To share a document firstly open it in edit mode (see above) and then click on the Share button
A window will pop up where you can type the name of the user you want to share it with. As you type the system will be searched for a match with suggestions displayed in a list. When the correct user appears in the list, click on their name to confirm them. They will then appear underlined in the text box. This can be repeated to add further users.
By default any users you add will have rights to edit your document. If you want them just to be able to view, change the drop-down from Can edit to Can view. Then click on Share.
The document will close and you will be taken back to the main OneDrive screen. You will notice that your document now has the sharing icon next to it (see below).
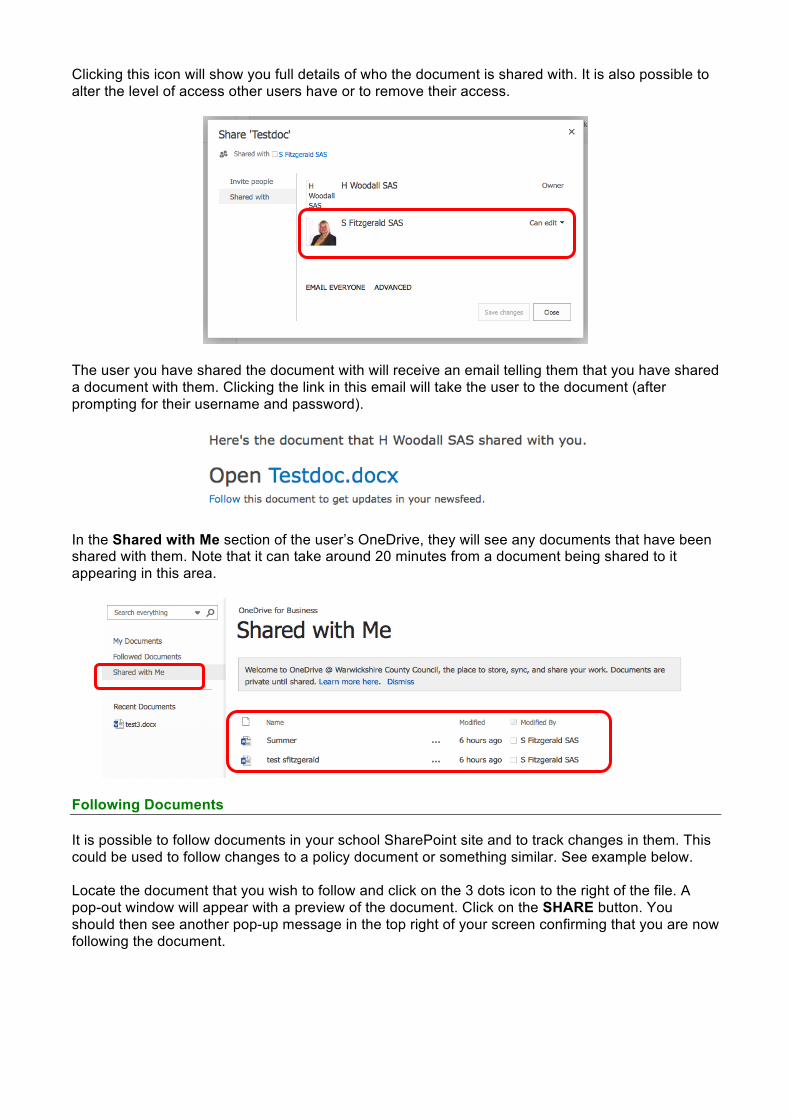
Clicking this icon will show you full details of who the document is shared with. It is also possible to alter the level of access other users have or to remove their access.
The user you have shared the document with will receive an email telling them that you have shared a document with them. Clicking the link in this email will take the user to the document (after prompting for their username and password).
In the Shared with Me section of the user’s OneDrive, they will see any documents that have been shared with them. Note that it can take around 20 minutes from a document being shared to it appearing in this area.
Following Documents It is possible to follow documents in your school SharePoint site and to track changes in them. This could be used to follow changes to a policy document or something similar. See example below. Locate the document that you wish to follow and click on the 3 dots icon to the right of the file. A pop-out window will appear with a preview of the document. Click on the SHARE button. You should then see another pop-up message in the top right of your screen confirming that you are now following the document.

Once a document is being followed it will appear in the Followed Documents section of a user’s OneDrive.
Synching your OneDrive OneDrive has a facility to sync with a PC or and Apple iOS device (iPhone, iPad, etc.). This means that everything in your OneDrive is available directly on your device and can be backed up there. It also means that you can potentially copy files from your device straight into OneDrive. To use sync on a PC you will need to download a small application from the web and for iOS devices you need to download the free app (OneDrive for Business). To setup sync, click on the sync button in OneDrive.
The following pop-up window will appear. If you haven’t synched previously, click on Get the OneDrive for Business app that’s right for me.
You will be taken to a Microsoft web page where you have a number of options depending on the device you are using. Select the app that best suits your device and then follow the installation instructions.
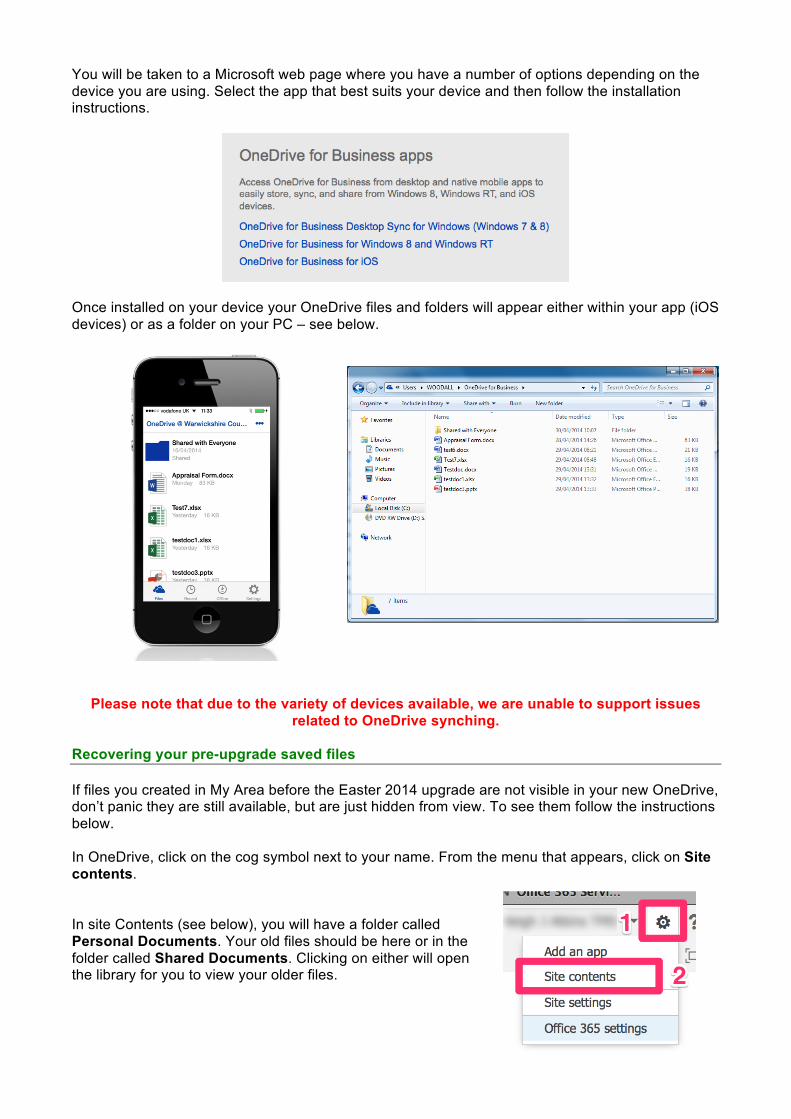
Once installed on your device your OneDrive files and folders will appear either within your app (iOS devices) or as a folder on your PC – see below.
Please note that due to the variety of devices available, we are unable to support issues related to OneDrive synching.
Recovering your pre-upgrade saved files If files you created in My Area before the Easter 2014 upgrade are not visible in your new OneDrive, don’t panic they are still available, but are just hidden from view. To see them follow the instructions below. In OneDrive, click on the cog symbol next to your name. From the menu that appears, click on Site contents. In site Contents (see below), you will have a folder called Personal Documents. Your old files should be here or in the folder called Shared Documents. Clicking on either will open the library for you to view your older files.
