gift bag class - stamping with kris · gift bag class by kris mcintosh ... take 50cm of real red...
TRANSCRIPT

Gift Bag Class by Kris McIntosh www.stampingwithkris.com Page 1
Gift Bag Class
During this class we will complete a Genie Bag, Corner Bookmark, Gift Card Holder and a Birthday Card. The
instructions for most of these items can be found in many places on the internet, these are merely my
versions of them.
Instructions For Flower
You will need to make four flowers to complete all the projects in this class.
Step 1
For each flower stamp the For You Flower onto Whisper White card stock, once using Tempting Turquoise ink
and twice using Pacific Point ink. You only need one full flower and one centre of the Pacific Point flowers.
Step 1

Gift Bag Class by Kris McIntosh www.stampingwithkris.com Page 2
Step 2
Punch out one Pacific Point flower using the Fancy Flower Punch. Punch the central part of the Tempting
Turquoise flower using the 5 Petal Punch. Punch the centre of the remaining Pacific Point Flower using the ½”
Circle Punch.
Step 2
Step 3
Punch Old Olive cardstock using the 5 Petal Flower Punch. Cut into the centre of the flower and then cut out
two sets of two petals and one single petal.
Step 3
Step 4
Attach the Tempting Turquoise 5 Petal Flower over the top of the Pacific Point Fancy Flower, making sure to
stagger the petals. Attach the ½” Pacific Point flower centre on top of the Tempting Turquoise flower. Attach
one set of two petals from the Old Olive 5 Petal Flower behind the flower.
Step 4
Instructions for Gift Bag (Genie Bag)

Gift Bag Class by Kris McIntosh www.stampingwithkris.com Page 3
Step 1
For this bag I am using a C5 Envelope (165 x 230mm).
Step 1
Step 2
Cut off the flap to make the envelope 8” long. Score on each long side and across the bottom at 1”. Do not
score across the part of the envelope that is “open”. Score diagonally across the corners.
Step 2
Step 3
Fold along the score lines and then open the envelope to make a bag shape.
Step 3
Step 4
You will create little triangles on the bottom of the bag.

Gift Bag Class by Kris McIntosh www.stampingwithkris.com Page 4
Step 4
Step 5
Flatten the envelope and put to one side. Cut two pieces of Whisper White card stock 4-3/4” x 8-1/4”. Lay
one on top of the other, matching all the sides and using the Wide Oval Punch, punch through both layers.
Step 5
Step 6
Cut two pieces of Whisper White card stock 4” x 5-1/4”. Emboss both pieces on the bottom two-thirds using
the Finial Press Embossing Folder. Stamp greeting in the top right hand corner of one piece using Pacific Point
card stock.
Step 6
Step 7
Wrap each piece of embossed Whisper White card stock using Real Red 5/8” Satin Ribbon and attach one to
each piece of Whisper White card stock created in step 5.

Gift Bag Class by Kris McIntosh www.stampingwithkris.com Page 5
Step 7
Step 8
Apply adhesive to one side of the scored envelope inside the score lines and along the top. Attach the
stamped piece to the envelope, making sure that it is a little outside the score lines.
Step 8
Step 9
Apply adhesive to the other side of the envelope inside the score lines and attach the other piece of card
stock, making sure that it is aligned with the piece on the other side.

Gift Bag Class by Kris McIntosh www.stampingwithkris.com Page 6
Step 9
Step 10
Push open the envelope to create the bag and apply adhesive to the triangle. Fold triangle underneath the
bag and placing one hand inside bag make sure that it is well secured.
Step 10
Step 11
Attach flower to the front of the bag using dimensionals.
Step 11
Instructions for Corner Bookmark

Gift Bag Class by Kris McIntosh www.stampingwithkris.com Page 7
Step 1
Cut Whisper White card stock 4” x 41/4”. Using your Diagonal Scoring Plate on the Simply Scored Scoring
Tool, place the card stock with the 4” edge along the top. Score at 2”. Turn the card stock over so that the 4”
edge is still along the top and score again at 2”. Punch along the other 4” edge using the Eyelet Border Punch.
Step 1
Step 2
Cut Whisper White card stock 2 ¾” x 2 ¾” and cut in half diagonally.
Step 2
Step 3
Fold the 4” x 4 ¼” card stock on the score lines so that both triangles are on the same side.
Step 3
Step 4
Attach one of the triangles created in Step 2 over the top of the folded card stock to create a pocket.

Gift Bag Class by Kris McIntosh www.stampingwithkris.com Page 8
Step 4
Step 5
Take 50cm of Real Red 5/8” Satin Ribbon and fold to find the centre. Add a Mini Glue dot to the ribbon on the
centre mark and one more Mini Glue Dot on either side about 5cm from the centre. Attach the ribbon to the
bookmark on the side where the pocket is and then tie the ribbon in a knot on the front. Trim the ends of the
ribbon.
Step 5
Step 6
Attach your flower to the front.
Step 6
Step 7
Here is a photo of the bookmark on the corner of a book.

Gift Bag Class by Kris McIntosh www.stampingwithkris.com Page 9
Instructions for Gift Card Holder
Step 1
Cut Whisper White card stock 3-1/2” x 10-1/2”. Score along the 10-1/2” side at 3” and 7”. Use the 1” Circle
Punch to cut a half circle from the middle of the 3” section.
Step 1
Step 2
On the opposite end measure in 1-1/4” from each side and make a pencil mark.
Step 2
Step 3
Line up the Word Window Punch with the pencil mark and cut away the side sections.
Step 3

Gift Bag Class by Kris McIntosh www.stampingwithkris.com Page 10
Step 4
Use your scissors to cut away the rounded section.
Step 4
Step 5
Fold the score lines and make a pencil mark either side of the notch created in steps 3 and 4.
Step 5
Step 6
Open up the card stock and pierce the cardstock where you made the pencil marks.
Step 7
Step 7
Cut a slit between the pierced holes. You could simply add Velcro dots or small magnets instead of creating
the slit.
Step 7
Gift Bag Class by Kris McIntosh www.stampingwithkris.com Page 11
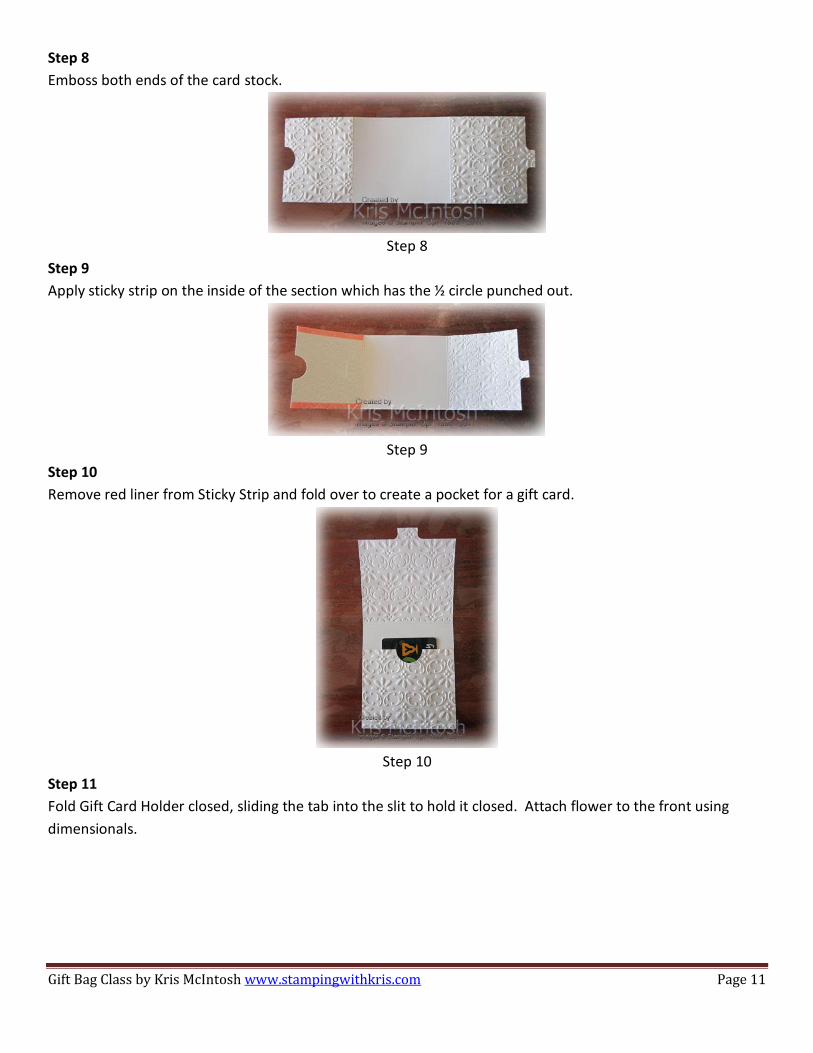
Step 8
Emboss both ends of the card stock.
Step 8
Step 9
Apply sticky strip on the inside of the section which has the ½ circle punched out.
Step 9
Step 10
Remove red liner from Sticky Strip and fold over to create a pocket for a gift card.
Step 10
Step 11
Fold Gift Card Holder closed, sliding the tab into the slit to hold it closed. Attach flower to the front using
dimensionals.

Gift Bag Class by Kris McIntosh www.stampingwithkris.com Page 12
Step 11
Instructions to make Card
Step 1
Cut Whisper White card stock 13.3cm x 9cm and emboss the bottom two-thirds using the Finial Press
Embossing Folder. Stamp the greeting in the top right hand corner using Pacific Point ink.
Step 1
Step 2
Wrap the embossed Whisper White card stock with Real Red 5/8” Satin Ribbon and tie a knot. Attach to
scored and folded Whisper White card. Attach flower using dimensionals.

Gift Bag Class by Kris McIntosh www.stampingwithkris.com Page 13
Step 2
To Finish Gift
Insert the book mark, gift card holder and the card into the Genie Bag. Tie a piece of Real Red 5/8” Satin
Ribbon through the handles to hold bag closed.
I hope that you enjoyed making this little gift set and that you will be able to use the instructions over and
over again. I have made Genie Bags using many different sized envelopes and varying the width of the score
lines. You could also use the brown paper lunch bags that you can buy at the supermarket.
Kris Kristine McIntosh Independent Stampin' Up! Demonstrator Brisbane, Australia 0429668535 [email protected] Blog: www.stampingwithkris.com Web: www.krismcintosh.stampinup.net Challenges: www.sunnychallenges.blogspot.com Facebook: http://www.facebook.com/pages/Stamping-With-Kris/187579114586591