gigabyte server management …download.gigabyte.asia/filelist/manual/server_manual_gsm...gigabyte...
TRANSCRIPT
Gigabyte Server Management
Installation and Configuration GuideRev. 1.0

Copyright© 2016 GIGA-BYTE TECHNOLOGY CO., LTD. All rights reserved.The trademarks mentioned in this manual are legally registered to their respective owners.
DisclaimerInformation in this manual is protected by copyright laws and is the property of GIGABYTE. Changes to the specifications and features in this manual may be made by GIGABYTE without prior notice. No part of this manual may be reproduced, copied, translated, transmitted, or published in any form or by any means without GIGABYTE's prior written permission.
Documentation ClassificationsIn order to assist in the use of this product, GIGABYTE provides the following types of documentations: For detailed product information, carefully read the User's Guide.
For more information, visit our website at:
http://b2b.gigabyte.com
Active GIGABYTE distributors and resellers: Access a comprehensive source of sales, marketing & technical materials at:
http://reseller.b2b.gigabyte.comPlease contact your sales representative to register.
https://www.facebook.com/gigabyteserver
- 3 -
Table of Contents
Chapter 1 Getting Started ...............................................................................................51-1 Using Your Gigabyte Server Management ....................................................... 51-2 Hardware Requirement .................................................................................... 51-3 Software Requirement ..................................................................................... 5
1-3-1 Prerequisites on remote management server ..........................................................51-4 Installing Gigabyte Server Management (Windows) ........................................ 6
1-4-1 Installation Procedure ...............................................................................................61-5 Installing Gigabyte Server Management (Linux) ............................................ 10
1-5-1 Tomcat Installation Procedure ................................................................................101-5-2 PostgreSQL Installation Procedure ........................................................................101-5-3 Restore dbGSMv0XX.backup .................................................................................111-5-4 pgadminIII Installation Procedure (Optional) ..........................................................131-5-5 Login Gigabyte Server Management ......................................................................14
Chapter 2 Gigabyte Server Management .....................................................................152-1 Overview ........................................................................................................ 152-2 Enter Gigabyte Server Management ............................................................. 16
2-2-1 System Manager ....................................................................................................182-2-1-1 Information ..............................................................................................................192-2-1-2 Monitoring ...............................................................................................................202-2-1-3 Remote Access .......................................................................................................212-2-1-4 NetworkConfiguraiton ............................................................................................262-2-1-5 Event Log ...............................................................................................................272-2-1-6 Alert Management ..................................................................................................282-2-1-7 Updates ..................................................................................................................302-2-2 Group Manager ......................................................................................................322-2-3 Alert ........................................................................................................................342-2-4 Account ...................................................................................................................352-2-5 Preference ..............................................................................................................362-2-5-1 IP Range .................................................................................................................372-2-5-2 Event Log ...............................................................................................................382-2-5-3 Alert Management ..................................................................................................392-2-5-4 Database ................................................................................................................422-2-5-5 Properties ...............................................................................................................432-2-5-6 Update ....................................................................................................................442-2-6 Help ........................................................................................................................45
Chapter 3 Appendix ......................................................................................................463-1 Event Log List ................................................................................................ 46

- 4 -

- 5 - Gigabyte Server Management
1-1 Using Your Gigabyte Server ManagementGigabyte Server management has a user-friendly Graphics User Interface (GUI) called the Gigabyte Server management GUI. It is designed to be easy to use. It has a low learning curve because it uses a standard Internet browser. You can expect to be up and running in less than fiveminutes.ThischapterallowsyoutobecomefamiliarwiththeGigabyteServermanagementGUI’s various functions. Each function is described in detail.
1-2 Hardware RequirementBefore using Gigabyte Server Management , please check your system for the following required configurationrequirements:
• SystemProcessor:2GHzandabove• SystemMemory:Minimum4GBRAM• FreeDiskSpace:1000GBatleast• Nodeservers:255maximum
1-3 Software Requirement1-3-1 Prerequisites on remote management serverSupported Browsers:• Internet Explorer 9 or later• Google Chrome 39.0.2171.65 m or later• MozillaFirefox33.1.1
Operating System:• Windows 2008 & 2012 R2• Redhat/CentOS 6.3 or later
Chapter 1 Getting Started

Gigabyte Server Management - 6 -
1-4 Installing Gigabyte Server Management (Windows)1-4-1 Installation Procedure1. UnzipthefileandrunGSM_Setup.exe.2. Then,aseriesofinstallationwizardsappear.3. Click Next.
4. Click Install to start the nstallation.
- 7 - Gigabyte Server Management
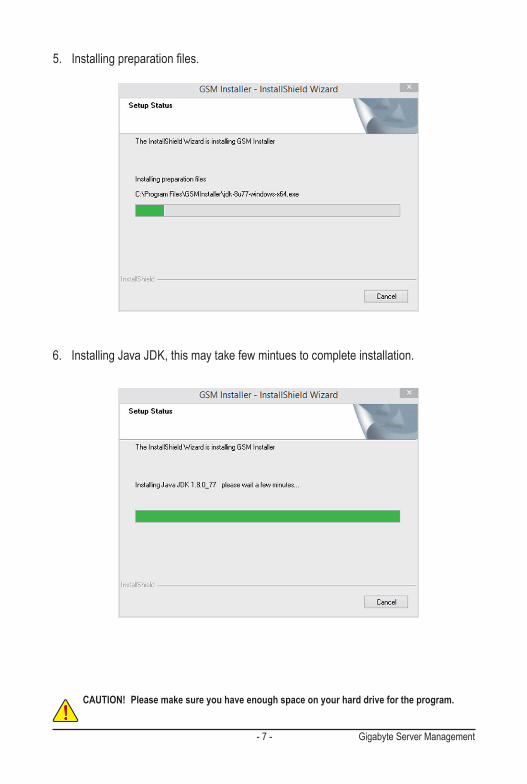
5. Installingpreparationfiles.
CAUTION! Please make sure you have enough space on your hard drive for the program.
6. Installing Java JDK, this may take few mintues to complete installation.
Gigabyte Server Management - 8 -
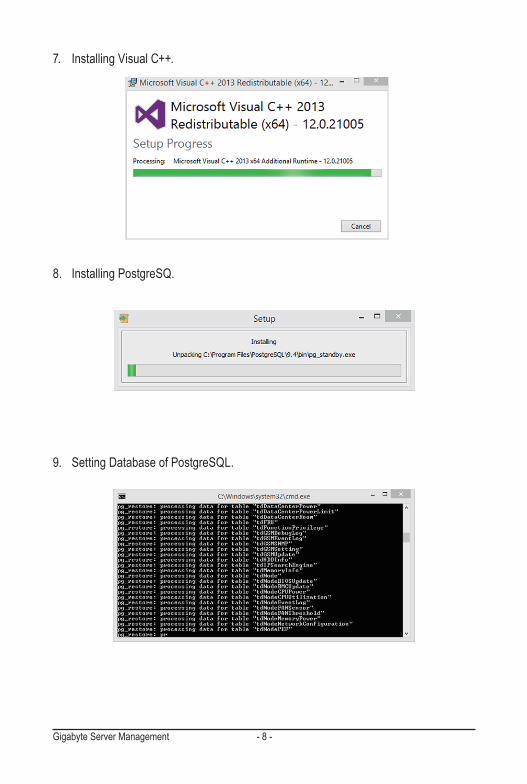
7. Installing Visual C++.
8. Installing PostgreSQ.
9. Setting Database of PostgreSQL.
- 9 - Gigabyte Server Management
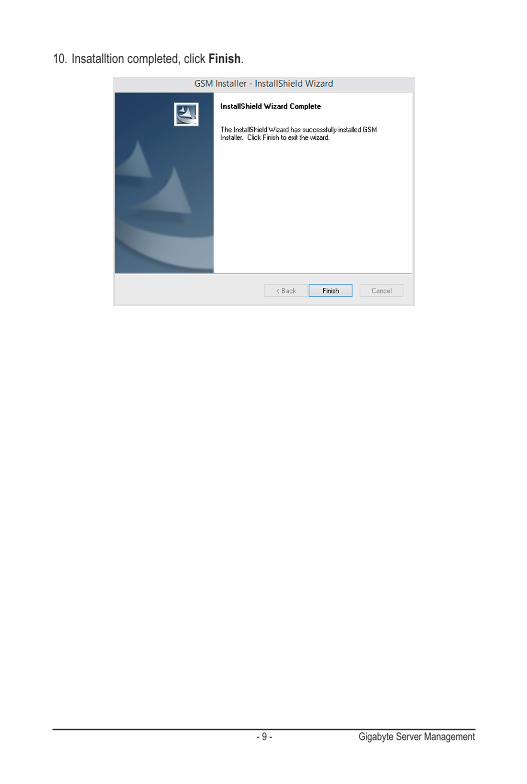
10. Insatalltion completed, click Finish.
Gigabyte Server Management - 10 -
1-5 Installing Gigabyte Server Management (Linux)1-5-1 Tomcat Installation Procedure
1-5-2 PostgreSQL Installation Procedure
1. Unzipapache-tomcat-7.0.47.tar.gz tar-zxvfapache-tomcat-7.0.47.tar.gz
2. Move apache-tomcat-7.0.47 to /root/tomcat7 mv apache-tomcat-7.0.47 /root/tomcat7
3. Move GSM.war to /root/tomcat7/webapps mv GSM.war /root/tomcat7/webapps
4. Execute startup.sh cd /root/tomcat7/bin ./startup.sh
[Ubuntu]1. Install default-jre apt-get install default-jre2. Install PostgreSQL apt-get install postgresql postgresql-contrib3. Openuppostgresql.conffileinyourfavoriteeditor vi /etc/postgresql/9.3/main/postgresql.conf4. Alterthelisten_addressesasbelow: listen_addresses = '*'
[Cent OS/RedHat]1. Remove the old PostgreSQL package. yum remove postgresql*
2. Locateandedityourdistributions.repofile,located: [CentOS] vi /etc/yum.repos.d/CentOS-Base.repo ([base] and [updates] sections) [Red Hat] vi /etc/yum/pluginconf.d/rhnplugin.conf ([main] section)
3. Tothesection(s)identifiedabove,youneedtoappendaline: exclude=postgresql*
- 11 - Gigabyte Server Management
4. DownloadPGDGRPMfile [CentOS] curl -O http://yum.postgresql.org/9.3/redhat/rhel-6-x86_64/pgdg-centos93-9.3-1.noarch.rpm [Red Hat] curl -O http://yum.postgresql.org/9.3/redhat/rhel-6-x86_64/pgdg-redhat93-9.3-1.noarch.rpm
5. InstallPGDGRPMfile [CentOS] rpm -ivh pgdg-centos93-9.3-1.noarch.rpm [Red Hat] rpm -ivh pgdg-redhat93-9.3-1.noarch.rpm6. Install PostgreSQL yum install postgresql93-server7. Initialize service postgresql-9.3 initdb8. Startup chkconfigpostgresql-9.3on
1-5-3 Restore dbGSMv0XX.backup1. Modifypg_hba.conffile[Ubuntu] vi /etc/postgresql/9.3/main/pg_hba.conf
[CentOS / Red Hat] vi /var/lib/pgsql/9.3/data/pg_hba.conf
2. Edit
TYPE DATABASE USER ADDRESS METHODLocal all all→postgres peer→trusthost all all→postgres 127.0.0.1/32 indent→trusthost all all→postgres ::1/128 indent→trust
:wqtosaveeditedfile.
3. Start service[Ubuntu] service postgresql restart
Gigabyte Server Management - 12 -
[CentOS / Red Hat] service postgresql-9.3 start
4. Create database createdb -U postgres dbGSM
5. Restore dbGSMv0XX.backup to database pg_restore -h 127.0.0.1 -p 5432 -U postgres -d dbGSM -v " dbGSMv0XX.backup"
- 13 - Gigabyte Server Management
1-5-4 pgadminIII Installation Procedure (Optional)[CentOS]1. Install pgadmin3 yum install pgadmin3_93
2. Execute pgadmin3 pgadmin3 &
3. File -> Add server
[Redhat]1. Get wxBase curl -O http://yum.postgresql.org/9.2/redhat/rhel-6.5-x86_64/wxBase-2.8.12-1.el6.x86_64.rpm
2. Install wxBase rpm -ivh wxBase-2.8.12-1.el6.x86_64.rpm
3. Get wxGTK curl -O http://yum.postgresql.org/9.2/redhat/rhel-6.5-x86_64/wxGTK-2.8.12-1.el6.x86_64.rpm
4. Install wxGTK rpm -ivh wxGTK-2.8.12-1.el6.x86_64.rpm
5. Get PgAdmin3 curl -O http://yum.postgresql.org/9.3/redhat/rhel-6.5-x86_64/pgadmin3_93-1.18.1-2.rhel6.x86_64. rpm
6. Install PgAdmin3 rpm -ivh pgadmin3_93-1.18.1-2.rhel6.x86_64.rpm
7. Execute pgadmin3 pgadmin3 &
8. File -> Add server

Gigabyte Server Management - 14 -
1-5-5 Login Gigabyte Server Management1. Open a browser and enter URL http://localhost:8080/GSM/
2. Enter Database User Name postgres
• This utility supported CentOS 6.3 or later version.• PostgreSQL must be execute in root authority.• In Fedora 19, you have to install package in the following: Locateandedityourdistributions.repofile,located: vi /etc/yum.repos.d/fedora.repo and /etc/yum.repos.d/fedora-updates.repo ([fedora] sections)
InstallPGDGRPMfile: curl -O http://yum.postgresql.org/9.3/redhat/rhel-6-x86_64/pgdg-centos93-9.3-1.noarch. rpm
Initialize: /usr/pgsql-9.3/postgresql93-setup initdb
- 15 - Gigabyte Server Management
2-1 Overview
Chapter 2 Gigabyte Server Management
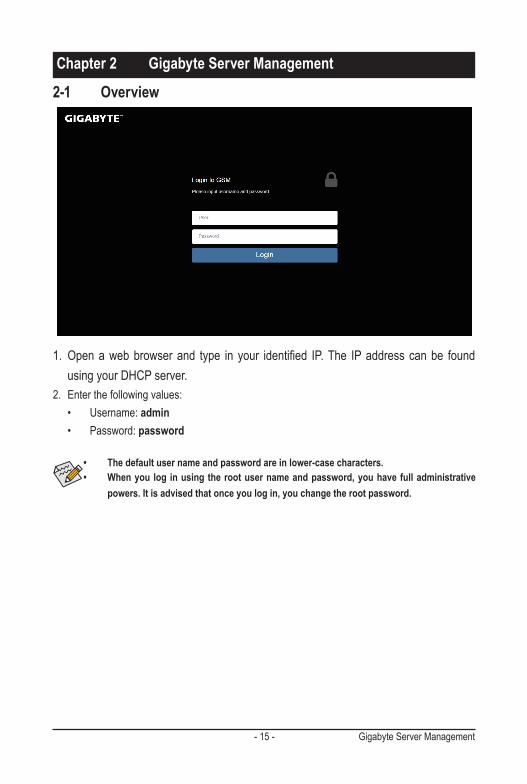
1. Openawebbrowserand type in your identified IP.The IPaddress canbe foundusing your DHCP server.
2. Enterthefollowingvalues:• Username:admin• Password:password
• The default user name and password are in lower-case characters.• When you log in using the root user name and password, you have full administrative
powers. It is advised that once you log in, you change the root password.
Gigabyte Server Management - 16 -
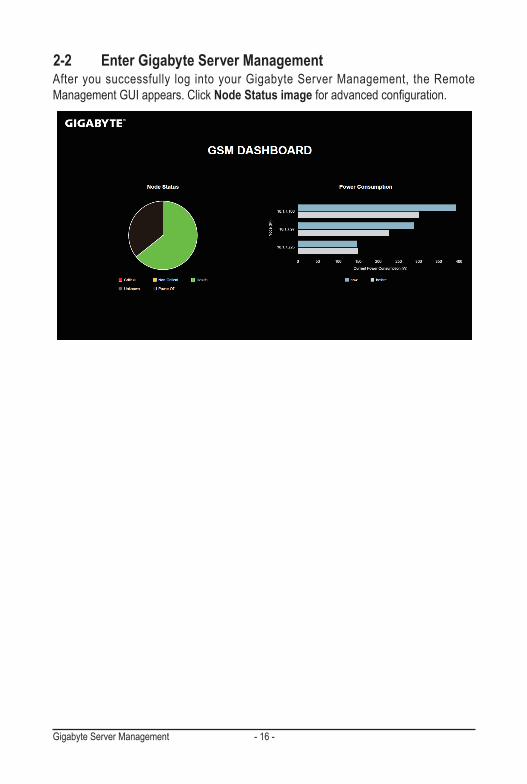
2-2 Enter Gigabyte Server Management After you successfully log into your Gigabyte Server Management, the Remote Management GUI appears. Click Node Status imageforadvancedconfiguration.
- 17 - Gigabyte Server Management
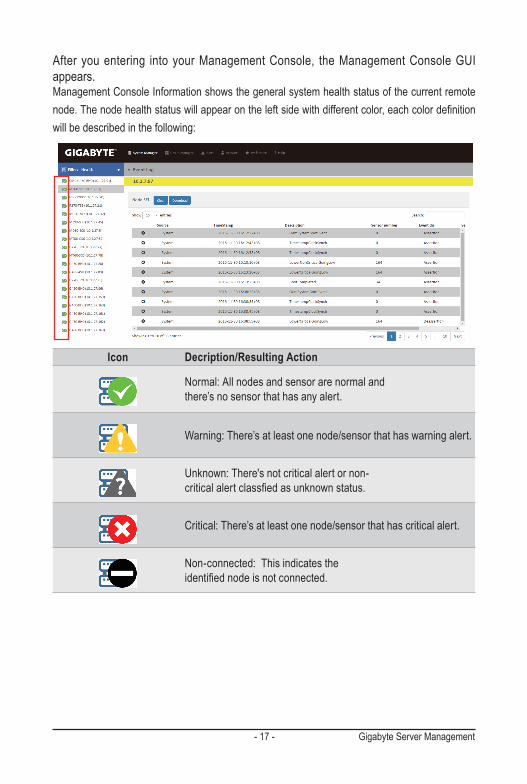
After you entering into your Management Console, the Management Console GUI appears.Management Console Information shows the general system health status of the current remote node.Thenodehealthstatuswillappearontheleftsidewithdifferentcolor,eachcolordefinitionwillbedescribedinthefollowing:
Icon Decription/Resulting Action
Normal:Allnodesandsensorarenormalandthere’s no sensor that has any alert.
Warning:There’satleastonenode/sensorthathaswarningalert.
Unknown:There'snotcriticalalertornon-criticalalertclassfiedasunknownstatus.
Critical:There’satleastonenode/sensorthathascriticalalert.
Non-connected:Thisindicatestheidentifiednodeisnotconnected.
Gigabyte Server Management - 18 -
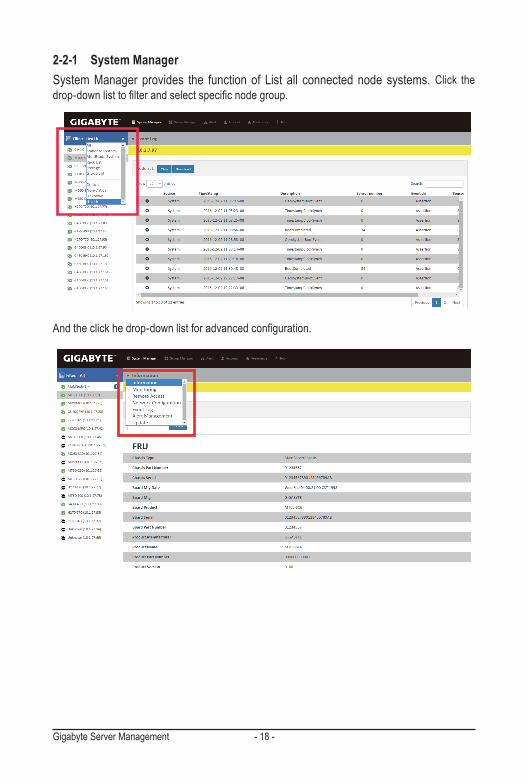
2-2-1 System ManagerSystem Manager provides the function of List all connected node systems. Click the drop-downlisttofilterandselectspecificnodegroup.
Andtheclickhedrop-downlistforadvancedconfiguration.
- 19 - Gigabyte Server Management
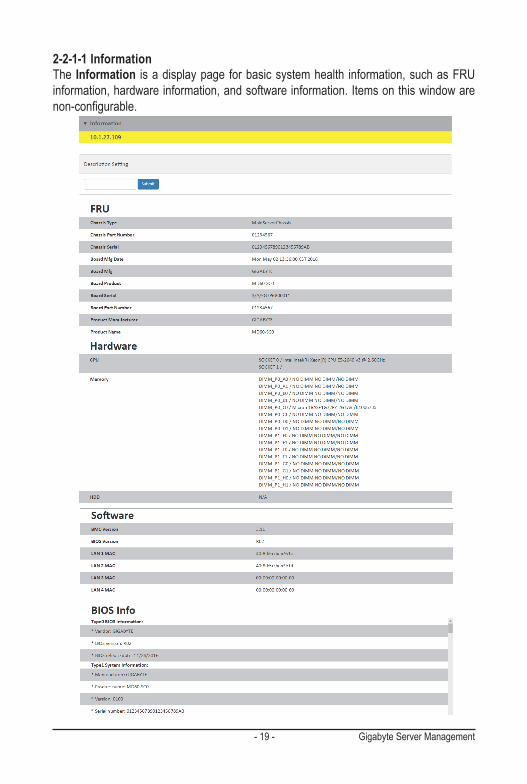
2-2-1-1 InformationThe Information is a display page for basic system health information, such as FRU information, hardware information, and software information. Items on this window are non-configurable.
Gigabyte Server Management - 20 -
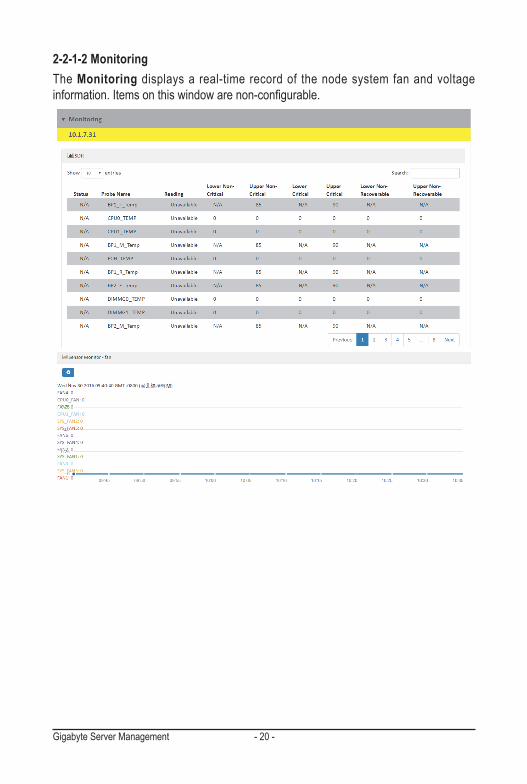
2-2-1-2 MonitoringThe Monitoring displays a real-time record of the node system fan and voltage information.Itemsonthiswindowarenon-configurable.
- 21 - Gigabyte Server Management
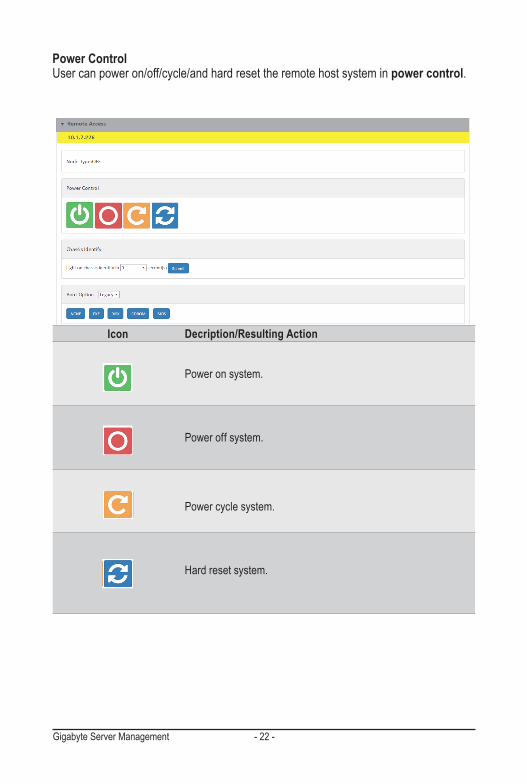
2-2-1-3 Remote AccessThe Remote Accessprovidesthefollowingremotefunctions:• PowerControlConfiguration• Chassis Identify• Boot Option • Launch iKVM• Reboot BMC• Restore BIOS default settings• Mount/Unmount Virtual Media• NetworkTimeProtocolConfiguration• BMCAccountConfiguration
Gigabyte Server Management - 22 -
Icon Decription/Resulting Action
Power on system.
Power off system.
Power cycle system.
Hard reset system.
Power ControlUser can power on/off/cycle/and hard reset the remote host system in power control.
- 23 - Gigabyte Server Management
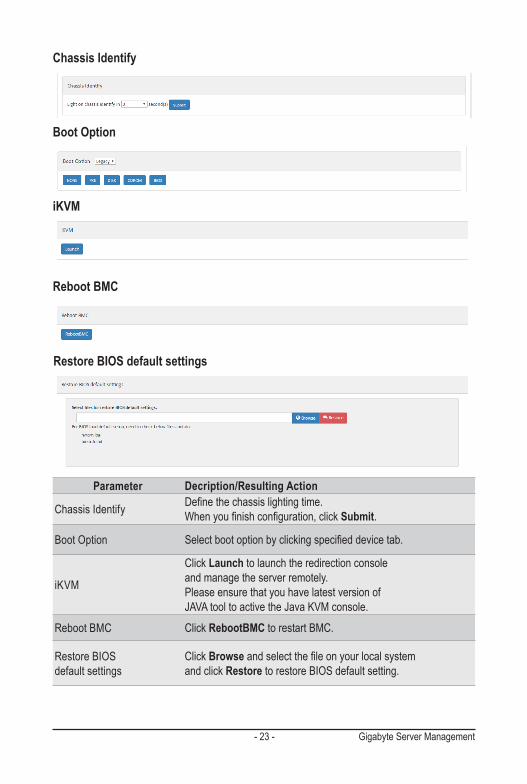
Chassis Identify
Boot Option
iKVM
Reboot BMC
Restore BIOS default settings
Parameter Decription/Resulting Action
Chassis Identify Definethechassislightingtime.Whenyoufinishconfiguration,clickSubmit.
Boot Option Selectbootoptionbyclickingspecifieddevicetab.
iKVM
Click Launch to launch the redirection console and manage the server remotely.Please ensure that you have latest version of JAVA tool to active the Java KVM console.
Reboot BMC Click RebootBMC to restart BMC.
Restore BIOS default settings
Click Browseandselectthefileonyourlocalsystemand click Restore to restore BIOS default setting.
Gigabyte Server Management - 24 -
Virtual MediaUser can mount an ISO Image via Virtual Media function page.Follow the instructions below to mount or unmount an ISO image.1. To mount an ISO image, select the ISO image and click Mount.2. To unmount an ISO image, select the ISO image and click Unmount.
Network Time ProtocolNetwork Time Protocol provides Network configuration.User can view and modify the network settings on this screen. Select the Operation Mode from the drop-down list.
NOTE! Virtual Media does not support Windows operating system.
Parameter Decription/Resulting Action
Dedicate Mode RequestanimmediateclocksynchronizationwiththeNTPserver;request will be sent when click the Sync Time Now button.
Daemon Mode
Runs NTP daemon which sends a NTP request at approximately 5 minuteintervals. Multiple NTP servers may be specifiedtoprovideredundancy.
- 25 - Gigabyte Server Management
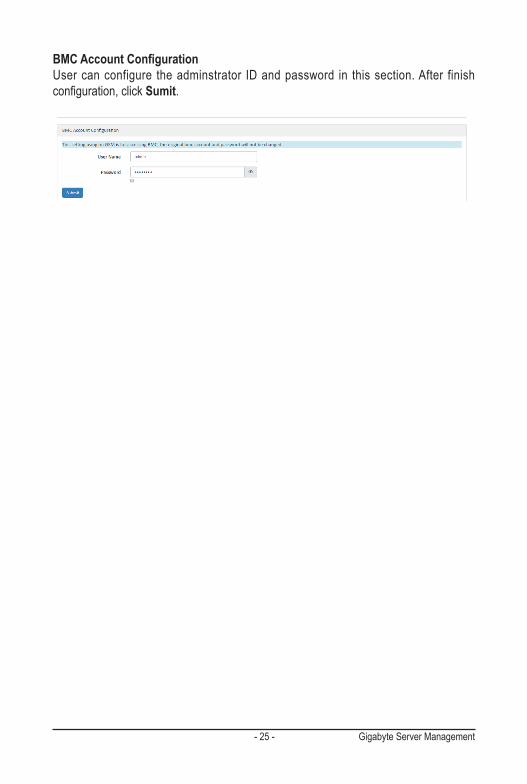
BMCAccountConfigurationUser can configure the adminstrator ID and password in this section. After finish configuration,clickSumit.
Gigabyte Server Management - 26 -
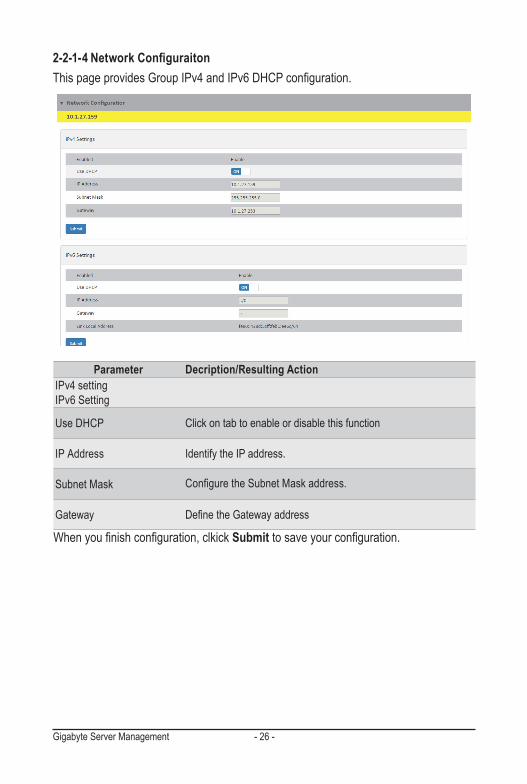
2-2-1-4NetworkConfiguraitonThis page provides GroupIPv4andIPv6DHCPconfiguration.
Parameter Decription/Resulting ActionIPv4 settingIPv6 Setting
Use DHCP Click on tab to enable or disable this function
IP Address Identify the IP address.
Subnet Mask ConfiguretheSubnetMaskaddress.
Gateway DefinetheGatewayaddress
Whenyoufinishconfiguration,clkickSubmittosaveyourconfiguration.
- 27 - Gigabyte Server Management
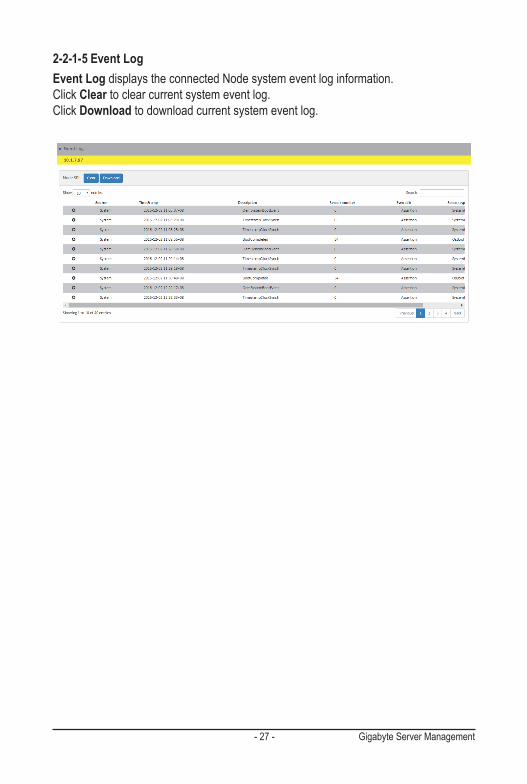
2-2-1-5 Event LogEvent Log displays the connected Node system event log information. Click Clear to clear current system event log.Click Download to download current system event log.
Gigabyte Server Management - 28 -
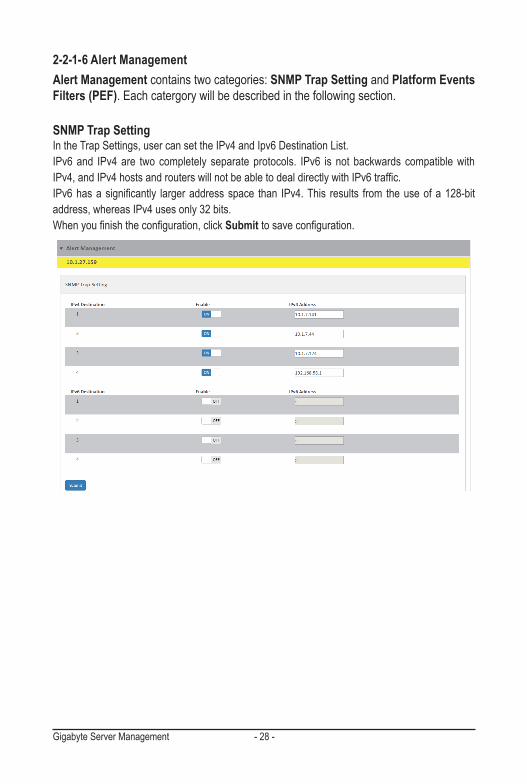
2-2-1-6 Alert ManagementAlert Management containstwocategories:SNMP Trap Setting and Platform Events Filters (PEF). Each catergory will be described in the following section.
SNMP Trap Setting In the Trap Settings, user can set the IPv4 and Ipv6 Destination List.IPv6 and IPv4 are two completely separate protocols. IPv6 is not backwards compatible with IPv4,andIPv4hostsandrouterswillnotbeabletodealdirectlywithIPv6traffic.IPv6hasasignificantly largeraddressspace than IPv4.This results from theuseofa128-bitaddress, whereas IPv4 uses only 32 bits.Whenyoufinishtheconfiguration,clickSubmittosaveconfiguration.
- 29 - Gigabyte Server Management
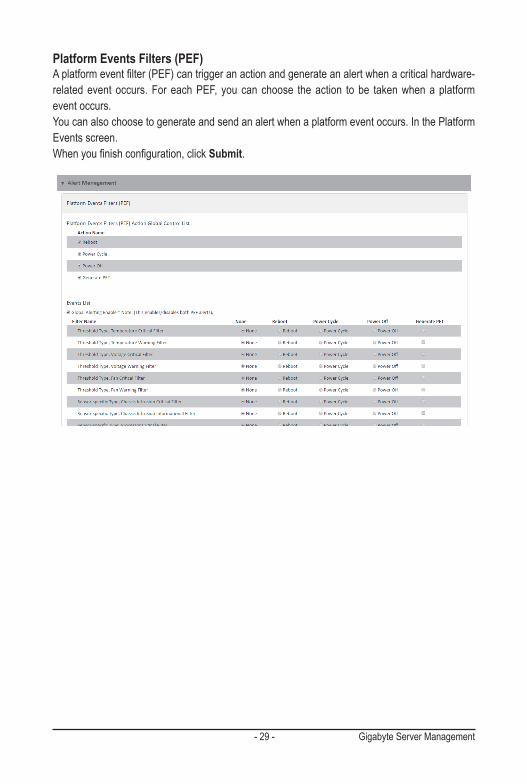
Platform Events Filters (PEF)Aplatformeventfilter(PEF)cantriggeranactionandgenerateanalertwhenacriticalhardware-related event occurs. For each PEF, you can choose the action to be taken when a platform event occurs.You can also choose to generate and send an alert when a platform event occurs. In the Platform Events screen.Whenyoufinishconfiguration,clickSubmit.
Gigabyte Server Management - 30 -
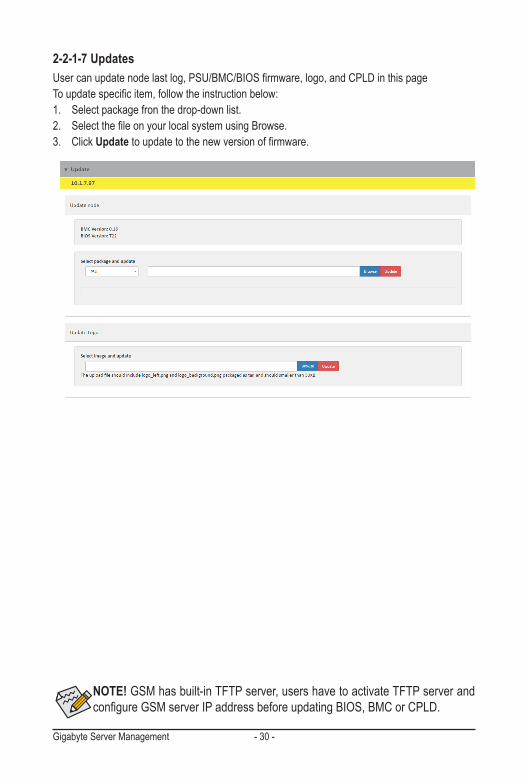
2-2-1-7 UpdatesUsercanupdatenodelastlog,PSU/BMC/BIOSfirmware,logo,andCPLDinthispageToupdatespecificitem,followtheinstructionbelow:1. Select package fron the drop-down list.2. SelectthefileonyourlocalsystemusingBrowse.3. Click Updatetoupdatetothenewversionoffirmware.
NOTE! GSM has built-in TFTP server, users have to activate TFTP server and configureGSMserverIPaddressbeforeupdatingBIOS,BMCorCPLD.
- 31 - Gigabyte Server Management
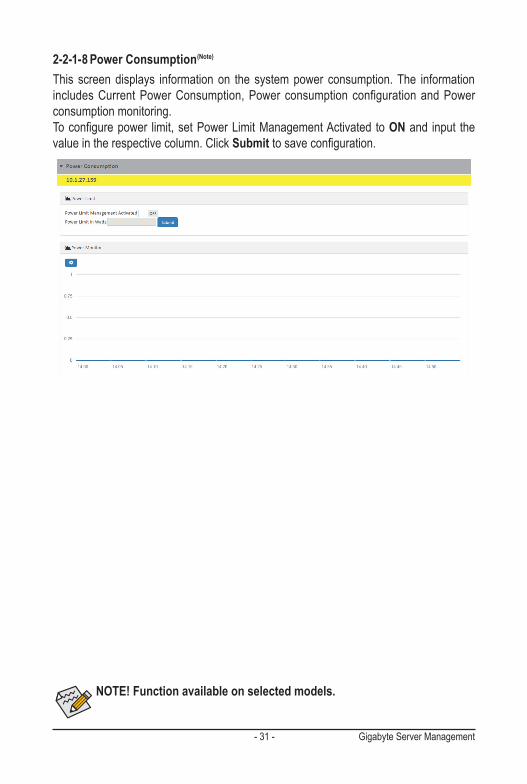
2-2-1-8 Power Consumption(Note)
This screen displays information on the system power consumption. The information includes Current Power Consumption, Power consumption configuration and Power consumption monitoring.Toconfigurepower limit,setPowerLimitManagementActivated toON and input the value in the respective column. Click Submittosaveconfiguration.
NOTE! Function available on selected models.
Gigabyte Server Management - 32 -
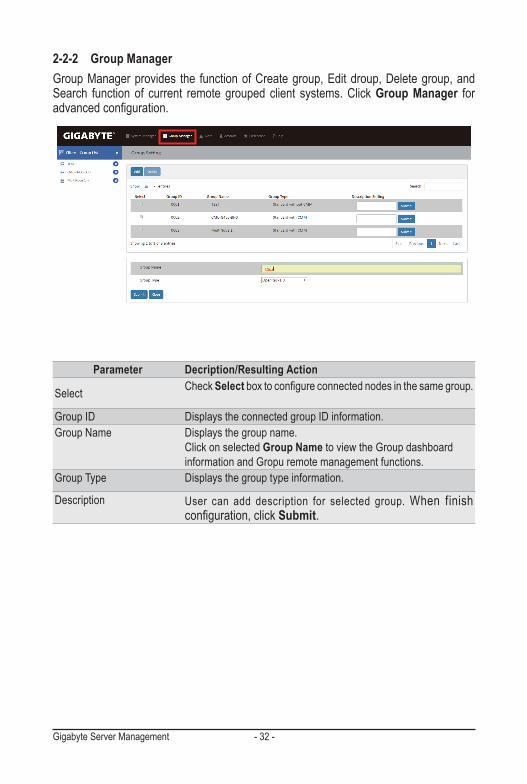
2-2-2 Group ManagerGroup Manager provides the function of Create group, Edit droup, Delete group, and Search function of current remote grouped client systems. Click Group Manager for advancedconfiguration.
Parameter Decription/Resulting Action
Select Check Selectboxtoconfigureconnectednodesinthesamegroup.
Group ID Displays the connected group ID information. Group Name Displays the group name.
Click on selected Group Name to view the Group dashboard information and Gropu remote management functions.
Group Type Displays the group type information.
Description User can add description for selected group. When finish configuration,clickSubmit.
- 33 - Gigabyte Server Management
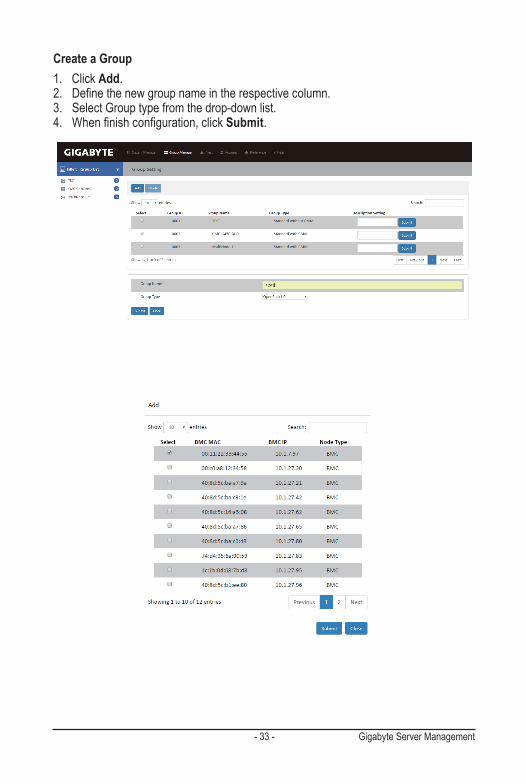
Create a Group1. Click Add.2. Definethenewgroupnameintherespectivecolumn.3. Select Group type from the drop-down list.4. Whenfinishconfiguration,clickSubmit.
Gigabyte Server Management - 34 -
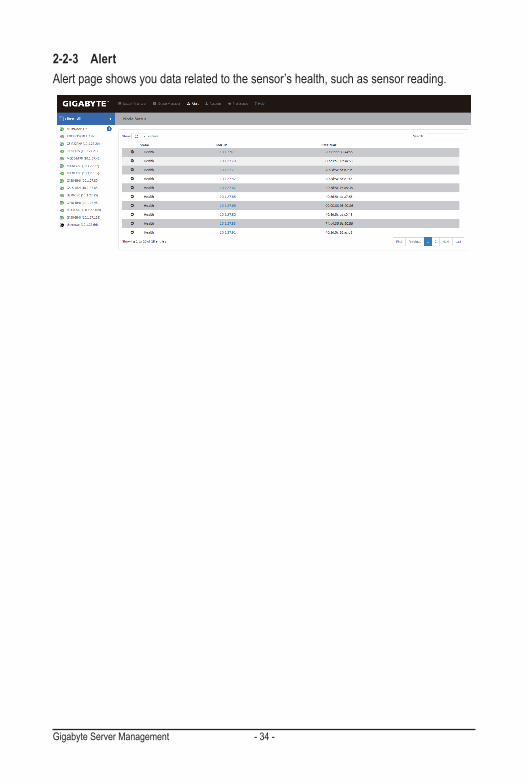
2-2-3 AlertAlert page shows you data related to the sensor’s health, such as sensor reading.
- 35 - Gigabyte Server Management
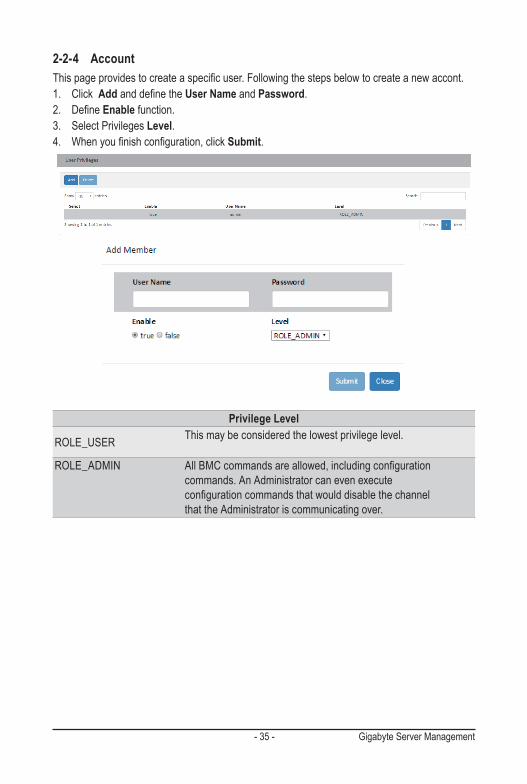
2-2-4 AccountThispageprovidestocreateaspecificuser.Followingthestepsbelowtocreateanewaccont.1. Click AddanddefinetheUser Name and Password.2. DefineEnable function.3. Select Privileges Level. 4. Whenyoufinishconfiguration,clickSubmit.
Privilege Level
ROLE_USER This may be considered the lowest privilege level.
ROLE_ADMIN AllBMCcommandsareallowed,includingconfigurationcommands. An Administrator can even execute configurationcommandsthatwoulddisablethechannelthat the Administrator is communicating over.
Gigabyte Server Management - 36 -
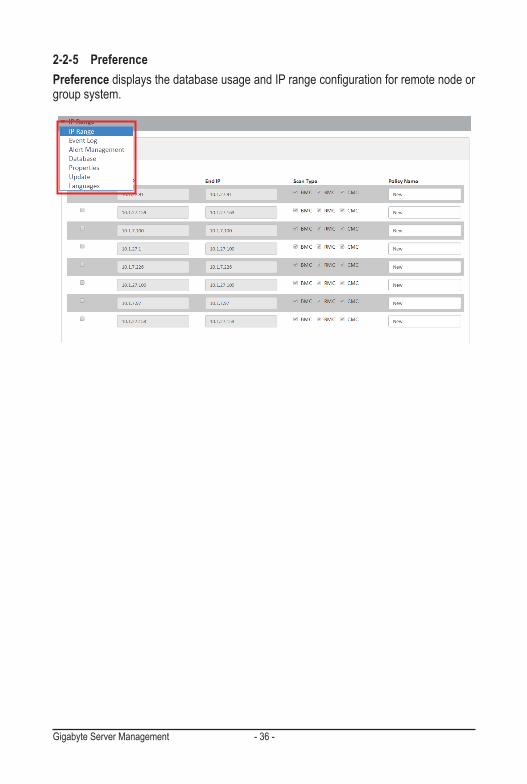
2-2-5 PreferencePreferencedisplaysthedatabaseusageandIPrangeconfigurationforremotenodeorgroup system.
- 37 - Gigabyte Server Management
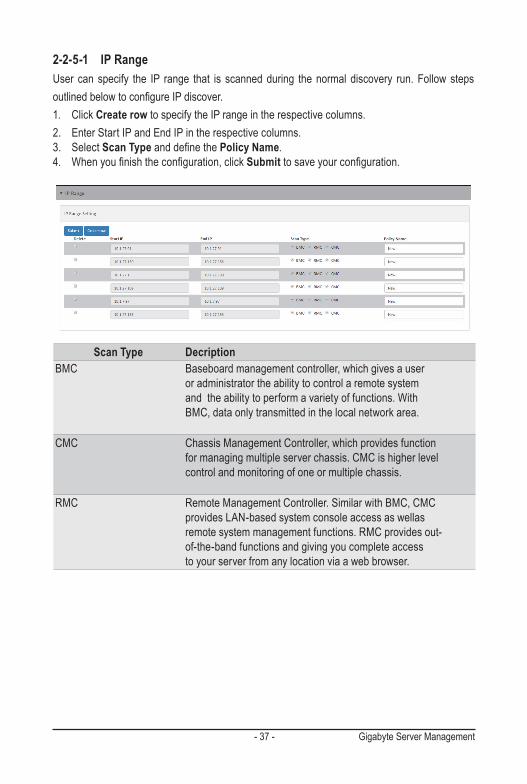
2-2-5-1 IP RangeUser can specify the IP range that is scanned during the normal discovery run. Follow steps outlinedbelowtoconfigureIPdiscover.1. Click Create row to specify the IP range in the respective columns.2. Enter Start IP and End IP in the respective columns.3. Select Scan Type anddefinethe Policy Name.4. Whenyoufinishtheconfiguration,clickSubmittosaveyourconfiguration.
Scan Type DecriptionBMC Baseboard management controller, which gives a user
or administrator the ability to control a remote system and the ability to perform a variety of functions. With BMC, data only transmitted in the local network area.
CMC Chassis Management Controller, which provides function for managing multiple server chassis. CMC is higher level control and monitoring of one or multiple chassis.
RMC Remote Management Controller. Similar with BMC, CMC provides LAN-based system console access as wellas remote system management functions. RMC provides out-of-the-band functions and giving you complete access to your server from any location via a web browser.
Gigabyte Server Management - 38 -
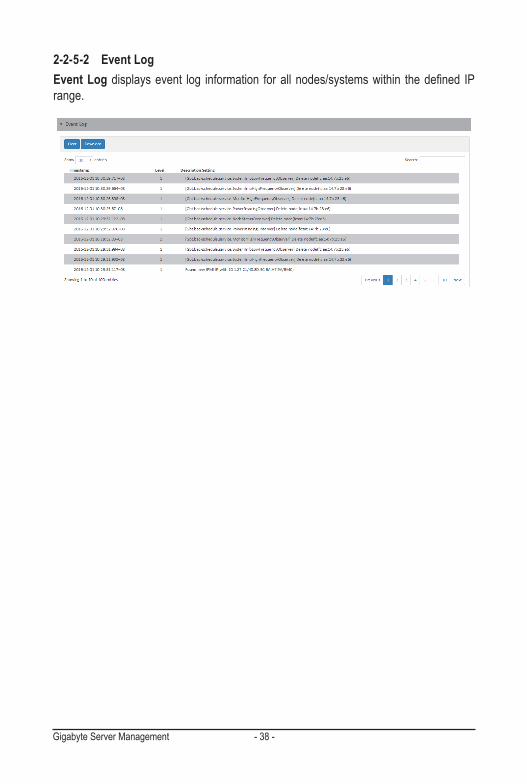
2-2-5-2 Event LogEvent Log displaysevent log information forallnodes/systemswithin thedefined IPrange.

- 39 - Gigabyte Server Management
2-2-5-3 Alert ManagementAlert Management the following configuration:GSM SNMP Setting and IPv4 Destination configuration,SMPT Serverconfiguration,andSend Mailconfiurationforallnodes/systemswithinthedefinedIPrange.
GSM SNMPGSM SNMP trap configuration includes SNMP setting and SNMP destination configuration.
Parameter Decription/Resulting ActionAlerting Enable Determine whether the trap is sent by connected node.Host address Displays the host address information.Alerting Level Determine the alerting level from the drop-down list.
Please refer to Section 3-1 Event Log for description of alerting level.
Gigabyte Server Management - 40 -
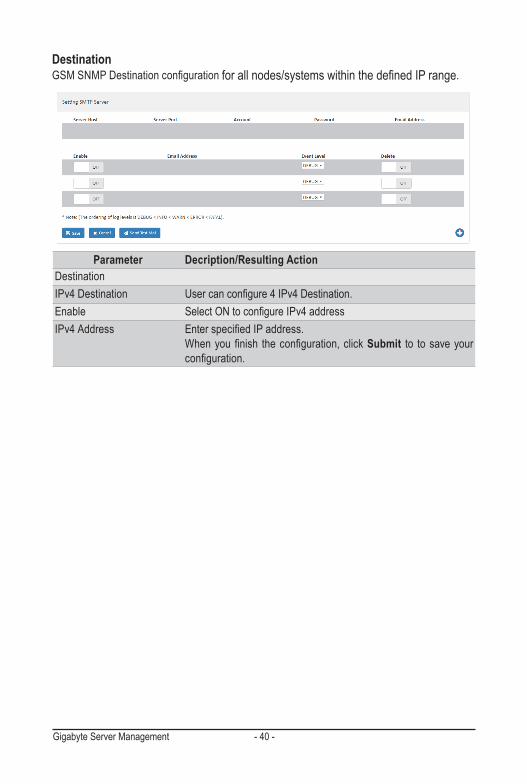
DestinationGSMSNMPDestinationconfigurationforallnodes/systemswithinthedefinedIPrange.
Parameter Decription/Resulting ActionDestinationIPv4 Destination Usercanconfigure4IPv4Destination.Enable SelectONtoconfigureIPv4 addressIPv4 Address EnterspecifiedIPaddress.
Whenyoufinish theconfiguration,clickSubmit to to save your configuration.
- 41 - Gigabyte Server Management
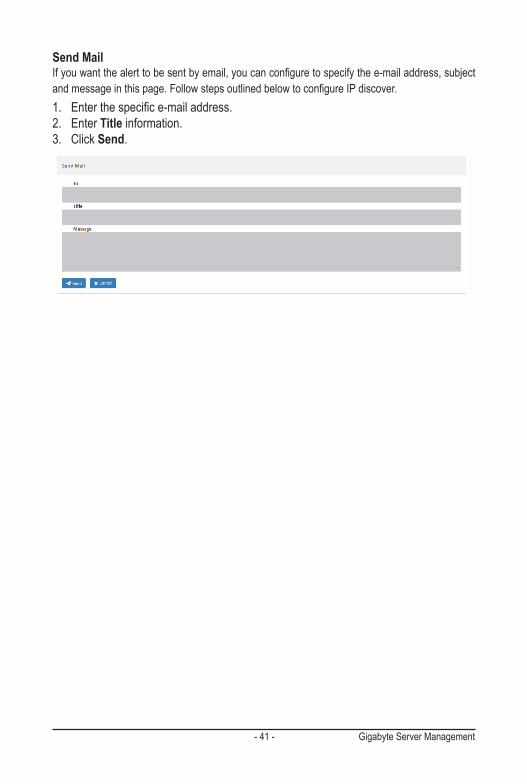
Send MailIfyouwantthealerttobesentbyemail,youcanconfiguretospecifythee-mailaddress,subjectand message in this page. FollowstepsoutlinedbelowtoconfigureIPdiscover.1. Enterthespecifice-mailaddress.2. Enter Title information.3. Click Send.
Gigabyte Server Management - 42 -
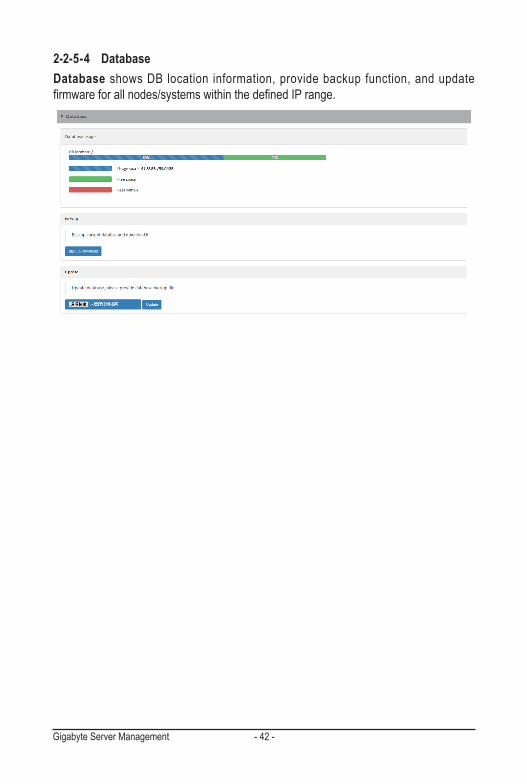
2-2-5-4 DatabaseDatabase shows DB location information, provide backup function, and update firmwareforallnodes/systemswithinthedefinedIPrange.
- 43 - Gigabyte Server Management
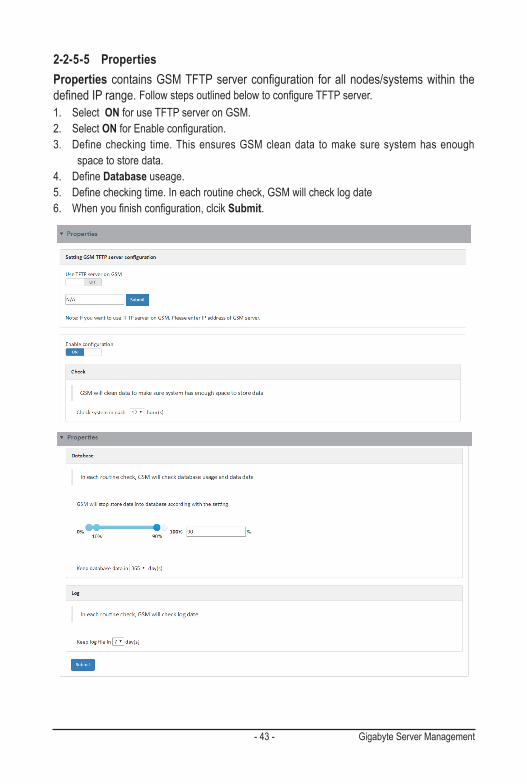
2-2-5-5 PropertiesProperties containsGSMTFTPserverconfiguration forallnodes/systemswithin thedefinedIPrange.FollowstepsoutlinedbelowtoconfigureTFTP server.1. Select ON for use TFTP server on GSM.2. Select ONforEnableconfiguration.3. Define checking time. This ensures GSM clean data to make sure system has enough
space to store data.4. DefineDatabase useage.5. Definecheckingtime.Ineachroutinecheck,GSMwillchecklogdate6. Whenyoufinishconfiguration,clcikSubmit.

Gigabyte Server Management - 44 -
2-2-5-6 UpdateUser can update GSM firmware and reset system to default setting for all nodes/systemswithinthedefinedIPrangeinthispage.Toupdate,selectthefileonyourlocalsystemusingBrowse.1. Click Updatetoupdatetothenewversionoffirmware.2. To reset system to the factory default, click Reset.
2-2-5-7 LanguageUser can select the preference language in this page.
- 45 - Gigabyte Server Management
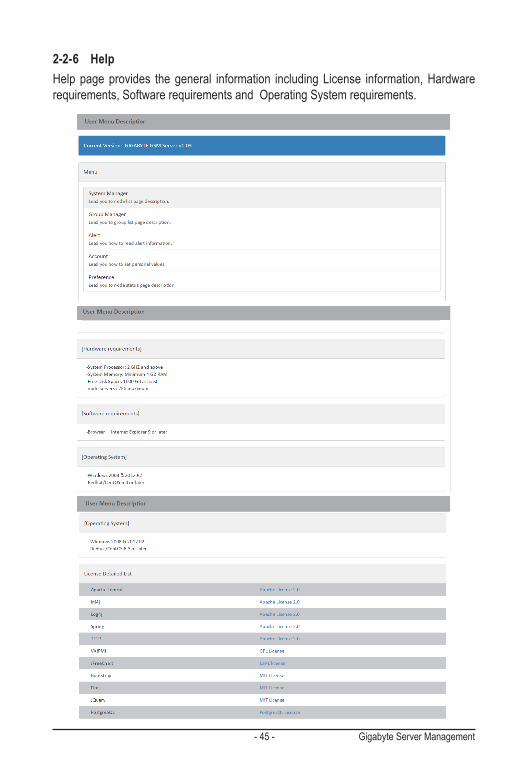
2-2-6 HelpHelp page provides the general information including License information, Hardware requirements, Software requirements and Operating System requirements.
Appendix - 46 -
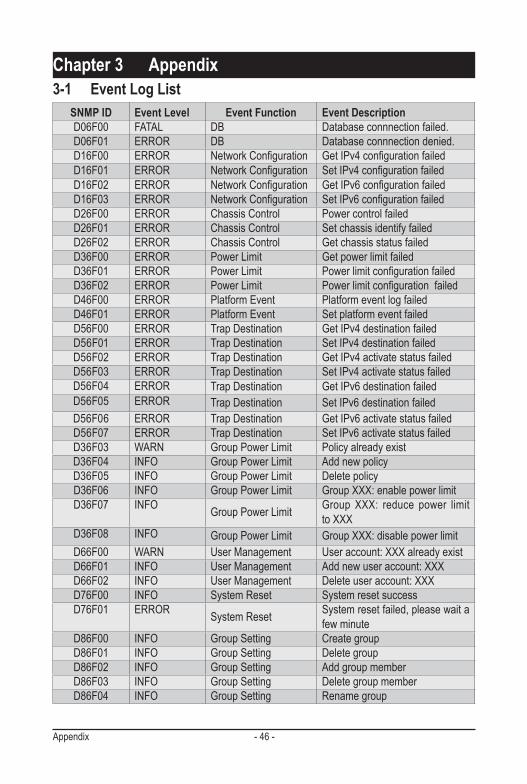
Chapter 3 Appendix3-1 Event Log List
SNMP ID Event Level Event Function Event DescriptionD06F00 FATAL DB Database connnection failed.D06F01 ERROR DB Database connnection denied.D16F00 ERROR NetworkConfiguration GetIPv4configurationfailedD16F01 ERROR NetworkConfiguration SetIPv4configurationfailedD16F02 ERROR NetworkConfiguration GetIPv6configurationfailedD16F03 ERROR NetworkConfiguration SetIPv6configurationfailedD26F00 ERROR Chassis Control Power control failedD26F01 ERROR Chassis Control Set chassis identify failedD26F02 ERROR Chassis Control Get chassis status failedD36F00 ERROR Power Limit Get power limit failedD36F01 ERROR Power Limit PowerlimitconfigurationfailedD36F02 ERROR Power Limit PowerlimitconfigurationfailedD46F00 ERROR Platform Event Platform event log failedD46F01 ERROR Platform Event Set platform event failedD56F00 ERROR Trap Destination Get IPv4 destination failedD56F01 ERROR Trap Destination Set IPv4 destination failedD56F02 ERROR Trap Destination Get IPv4 activate status failedD56F03 ERROR Trap Destination Set IPv4 activate status failedD56F04 ERROR Trap Destination Get IPv6 destination failedD56F05 ERROR Trap Destination Set IPv6 destination failedD56F06 ERROR Trap Destination Get IPv6 activate status failedD56F07 ERROR Trap Destination Set IPv6 activate status failedD36F03 WARN Group Power Limit Policy already existD36F04 INFO Group Power Limit Add new policyD36F05 INFO Group Power Limit Delete policyD36F06 INFO Group Power Limit GroupXXX:enablepowerlimitD36F07 INFO Group Power Limit Group XXX: reduce power limit
to XXXD36F08 INFO Group Power Limit GroupXXX:disablepowerlimitD66F00 WARN User Management Useraccount:XXXalreadyexistD66F01 INFO User Management Addnewuseraccount:XXXD66F02 INFO User Management Deleteuseraccount:XXXD76F00 INFO System Reset System reset successD76F01 ERROR System Reset System reset failed, please wait a
few minuteD86F00 INFO Group Setting Create groupD86F01 INFO Group Setting Delete groupD86F02 INFO Group Setting Add group memberD86F03 INFO Group Setting Delete group memberD86F04 INFO Group Setting Rename group
- 47 - Appendix
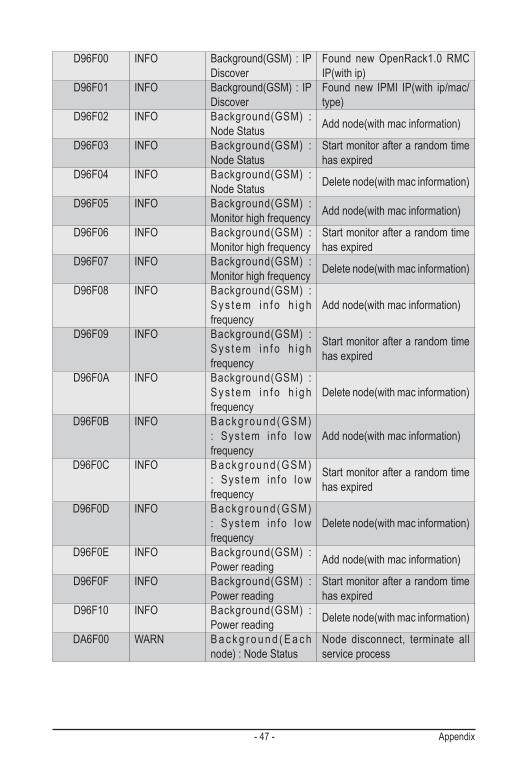
D96F00 INFO Background(GSM) : IPDiscover
Found new OpenRack1.0 RMC IP(with ip)
D96F01 INFO Background(GSM) : IPDiscover
Found new IPMI IP(with ip/mac/type)
D96F02 INFO Background(GSM) :Node Status Add node(with mac information)
D96F03 INFO Background(GSM) :Node Status
Start monitor after a random time has expired
D96F04 INFO Background(GSM) :Node Status Delete node(with mac information)
D96F05 INFO Background(GSM) :Monitor high frequency Add node(with mac information)
D96F06 INFO Background(GSM) :Monitor high frequency
Start monitor after a random time has expired
D96F07 INFO Background(GSM) :Monitor high frequency Delete node(with mac information)
D96F08 INFO Background(GSM) :S y s t e m i n f o h i g h frequency
Add node(with mac information)
D96F09 INFO Background(GSM) :S y s t e m i n f o h i g h frequency
Start monitor after a random time has expired
D96F0A INFO Background(GSM) :S y s t e m i n f o h i g h frequency
Delete node(with mac information)
D96F0B INFO B a c k g r o u n d ( G S M ) : Sys tem in fo lowfrequency
Add node(with mac information)
D96F0C INFO B a c k g r o u n d ( G S M ) : Sys tem in fo lowfrequency
Start monitor after a random time has expired
D96F0D INFO B a c k g r o u n d ( G S M ) : Sys tem in fo lowfrequency
Delete node(with mac information)
D96F0E INFO Background(GSM) :Power reading Add node(with mac information)
D96F0F INFO Background(GSM) :Power reading
Start monitor after a random time has expired
D96F10 INFO Background(GSM) :Power reading Delete node(with mac information)
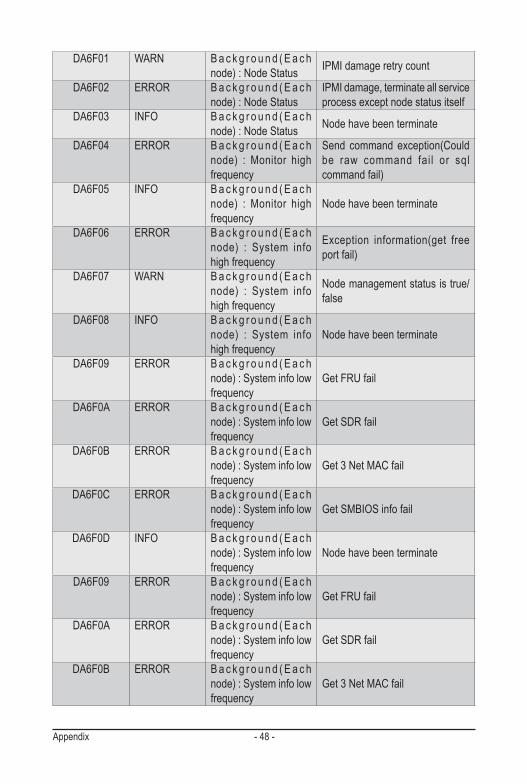
DA6F00 WARN B a c k g r o u n d ( E a c h node):NodeStatus
Node disconnect, terminate all service process
Appendix - 48 -
DA6F01 WARN B a c k g r o u n d ( E a c h node):NodeStatus IPMI damage retry count
DA6F02 ERROR B a c k g r o u n d ( E a c h node):NodeStatus
IPMI damage, terminate all service process except node status itself
DA6F03 INFO B a c k g r o u n d ( E a c h node):NodeStatus Node have been terminate
DA6F04 ERROR B a c k g r o u n d ( E a c h node) : Monitor highfrequency
Send command exception(Could be raw command fai l or sql command fail)
DA6F05 INFO B a c k g r o u n d ( E a c h node) : Monitor highfrequency
Node have been terminate
DA6F06 ERROR B a c k g r o u n d ( E a c h node) : System infohigh frequency
Exception information(get free port fail)
DA6F07 WARN B a c k g r o u n d ( E a c h node) : System infohigh frequency
Node management status is true/false
DA6F08 INFO B a c k g r o u n d ( E a c h node) : System infohigh frequency
Node have been terminate
DA6F09 ERROR B a c k g r o u n d ( E a c h node):Systeminfolowfrequency
Get FRU fail
DA6F0A ERROR B a c k g r o u n d ( E a c h node):Systeminfolowfrequency
Get SDR fail
DA6F0B ERROR B a c k g r o u n d ( E a c h node):Systeminfolowfrequency
Get 3 Net MAC fail
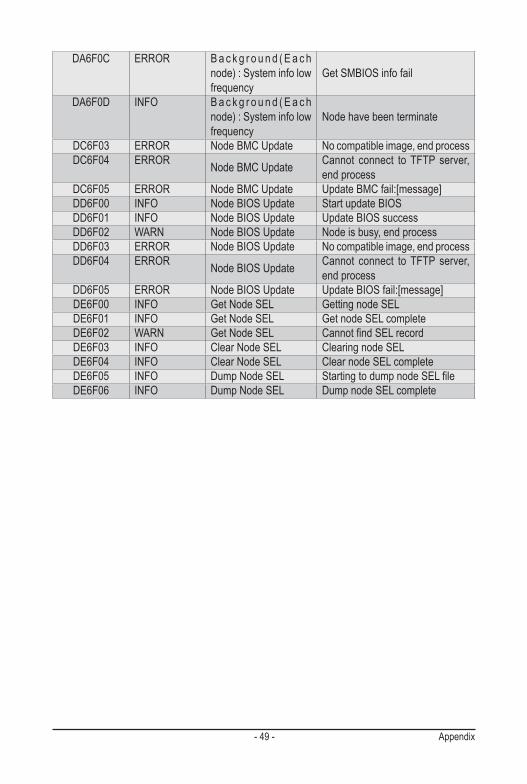
DA6F0C ERROR B a c k g r o u n d ( E a c h node):Systeminfolowfrequency
Get SMBIOS info fail
DA6F0D INFO B a c k g r o u n d ( E a c h node):Systeminfolowfrequency
Node have been terminate
DA6F09 ERROR B a c k g r o u n d ( E a c h node):Systeminfolowfrequency
Get FRU fail
DA6F0A ERROR B a c k g r o u n d ( E a c h node):Systeminfolowfrequency
Get SDR fail
DA6F0B ERROR B a c k g r o u n d ( E a c h node):Systeminfolowfrequency
Get 3 Net MAC fail
- 49 - Appendix
DA6F0C ERROR B a c k g r o u n d ( E a c h node):Systeminfolowfrequency
Get SMBIOS info fail
DA6F0D INFO B a c k g r o u n d ( E a c h node):Systeminfolowfrequency
Node have been terminate
DC6F03 ERROR Node BMC Update No compatible image, end processDC6F04 ERROR Node BMC Update Cannot connect to TFTP server,
end processDC6F05 ERROR Node BMC Update UpdateBMCfail:[message]DD6F00 INFO Node BIOS Update Start update BIOSDD6F01 INFO Node BIOS Update Update BIOS successDD6F02 WARN Node BIOS Update Node is busy, end processDD6F03 ERROR Node BIOS Update No compatible image, end processDD6F04 ERROR Node BIOS Update Cannot connect to TFTP server,
end processDD6F05 ERROR Node BIOS Update UpdateBIOSfail:[message]DE6F00 INFO Get Node SEL Getting node SELDE6F01 INFO Get Node SEL Get node SEL completeDE6F02 WARN Get Node SEL CannotfindSELrecordDE6F03 INFO Clear Node SEL Clearing node SELDE6F04 INFO Clear Node SEL Clear node SEL completeDE6F05 INFO Dump Node SEL StartingtodumpnodeSELfileDE6F06 INFO Dump Node SEL Dump node SEL complete